Transcripts
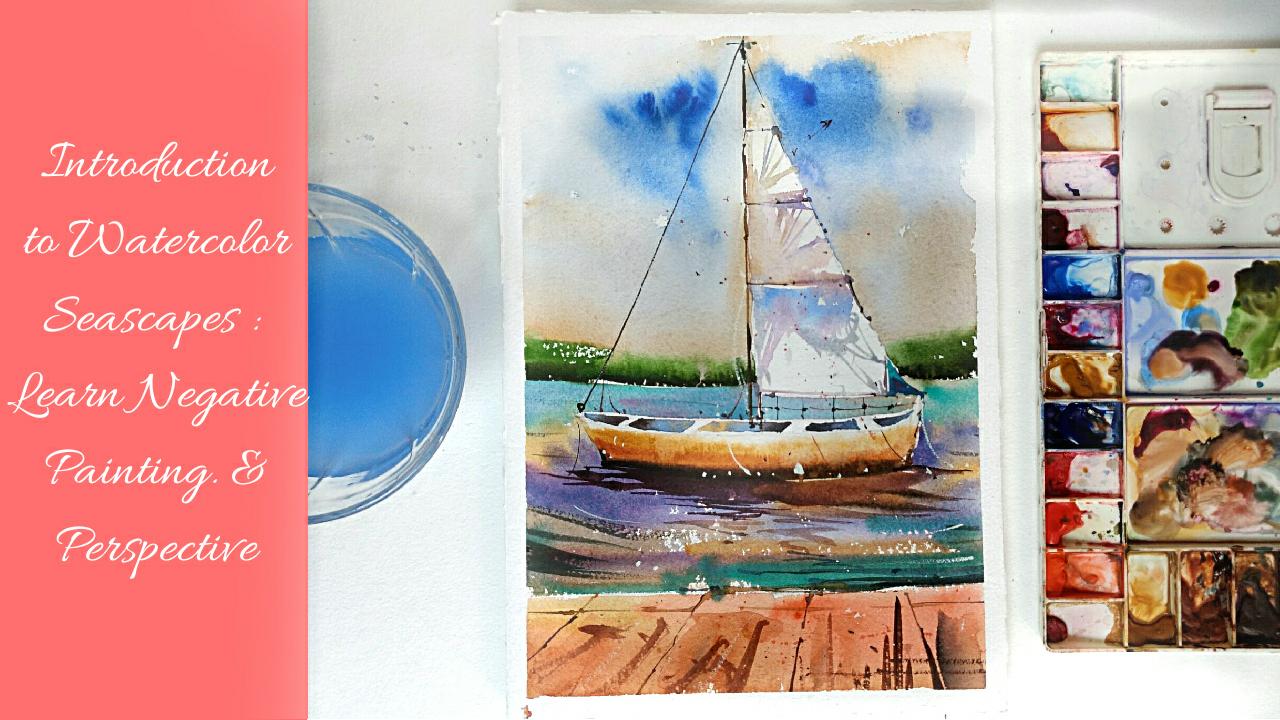
1. Introduction: Welcome to my class. Introduction to watercolor Seascapes, Lund Negative painting and perspective. I am shred akashic, a watercolor artist, and my goal is to teach you all the basic techniques of watercolor so that you can develop your own style over the time in this class will mainly focus upon one point perspective and how it can basically change our paintings. I will also take you through one demonstration off prospective studies. Then I'll teach you that what is negative painting and how we can use it and finally will be integrating everything into a sea ski.
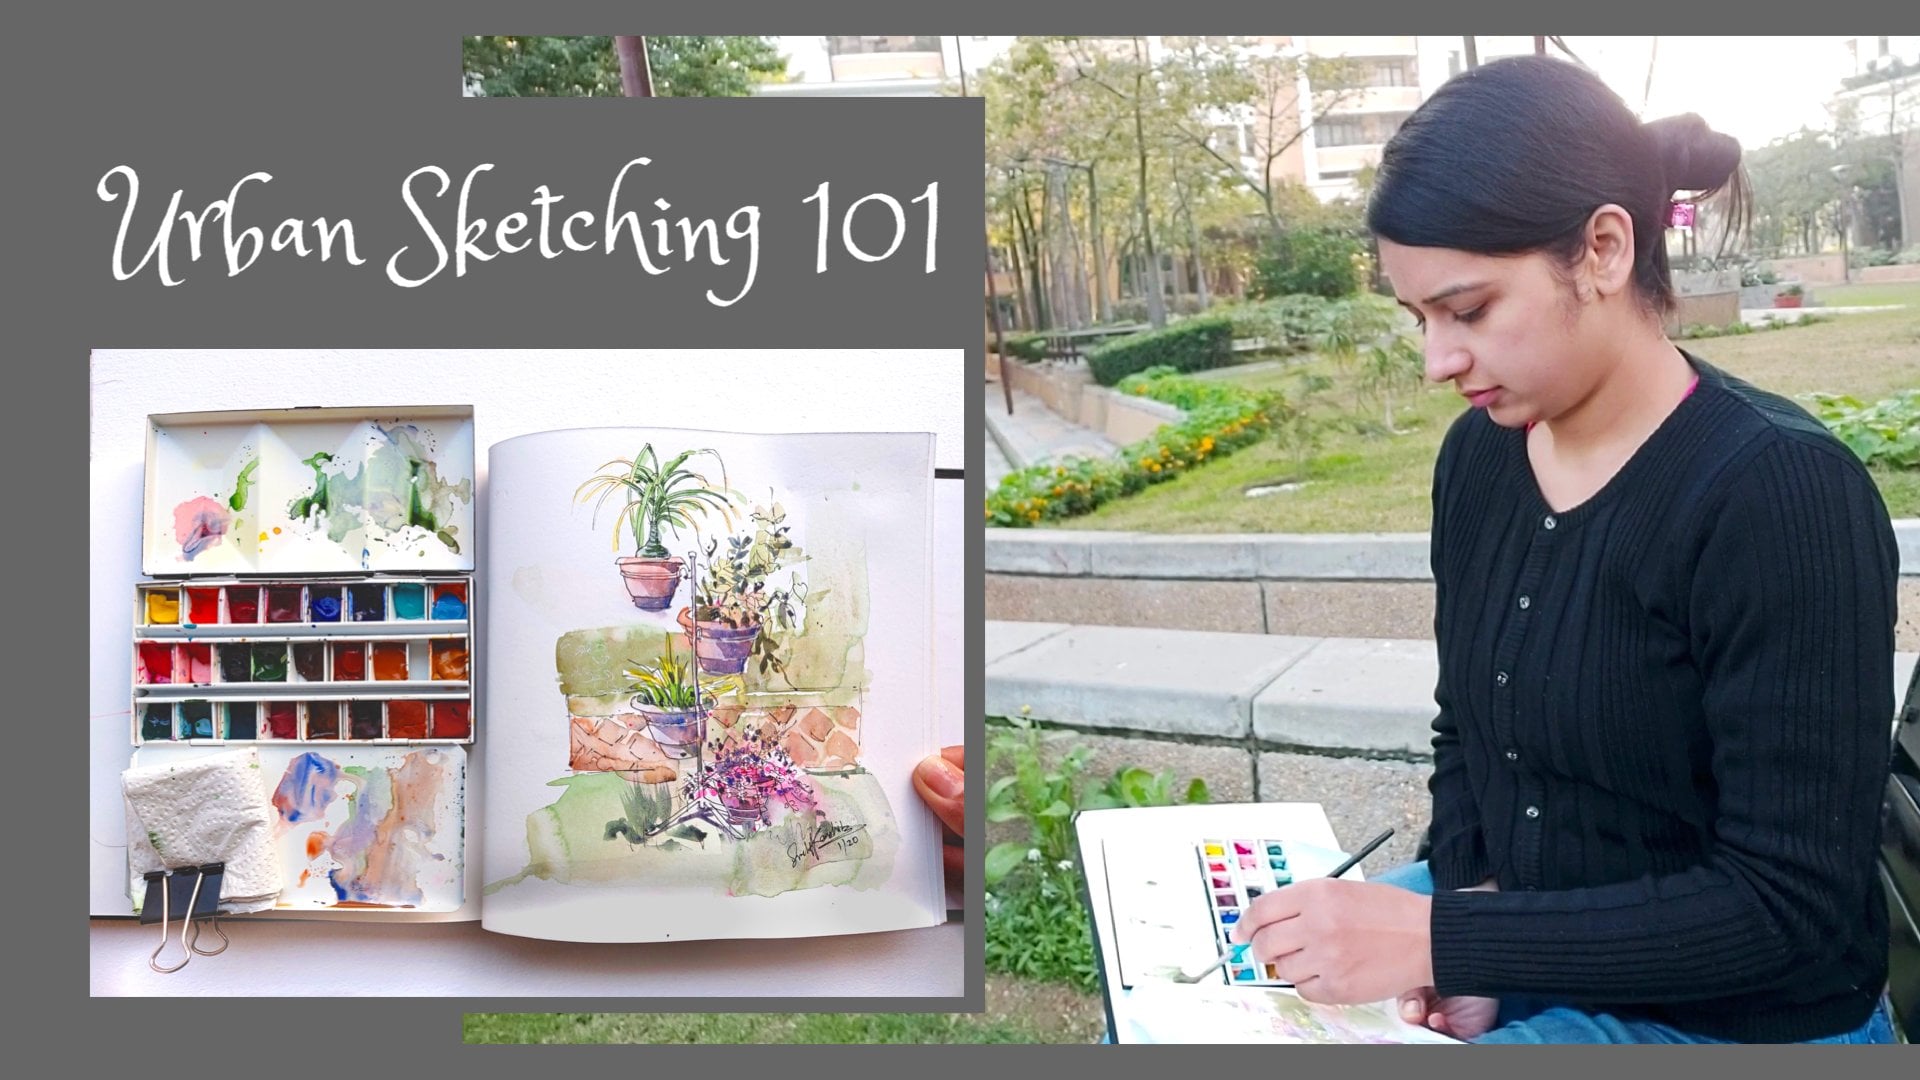
2. Material Required: Let's talk about the materials required. We need a pencil for sketching on a few pressures. I generally recommend a rigger brush and a more brush number 10 or 12 and a small number eight squirrel brush. I will also let you know about how I used the other brushes. I use a masking tape to treat this office. I'm walking on on to mount the paper. A water container on the paper. I am using his Children part 4 40 gs. Um, rough. This is my watercolor palette. And this time I'll be using hall bind lavender, which I didn't use in previous videos on This is Chinese right or tight Aidan White. Here I'm marking all the colors I'm using in this tutorial. You can just know them down and next move onto the next spot.
3. Introducing Two New Techniques : to make this beautiful boat. We need toe have basic knowledge of perspective and negative painting. And these are the two new techniques will be discussing. I'm using one point perspective in this painting and notice how the four grand lines converges at this point called Vanishing Point, and I will be giving you the demonstration through this simple watercolor walk, moving forward all the monsters, negative painting and how we're going to use it. Inventing the boat here is an example how negative painting helped us. So first, let's talk about perspective.
4. Perspective : One Point: This is the horizontal line and I'm taking a random point Vanishing point. You see that all the converging lines in our painting will meet at this point, and this is basically called one point perspective. But guys, we're not going into the details. We are going to learn only what is needed to execute this painting. To fully understand the perspective, we need an entire different class, which I may do in the future. I'm making a field on all these converging lines are meeting and at the vanishing point. And if there are two emission point, yes, that's possible. On it is called to foreign perspective, and sometimes there are three vanishing points, which is called three point perspective. But here we are only walking on one. But now horizontal line. What is horrid online? This is place where the sky seems to meet the distinct plane. Andi, even if you're not able to locate horizontal line in a scene, it's still there, hidden behind buildings, objects of people. But how does it helps us by using horizontal line and vanishing point, we can project realistic looking perspective lines with stickers directly into the painting . Imagine that you are standing in a clear field or plain. Will you be easily able to see the horizontal line? Yes, and it would be at your eye level. And what if you're standing on the top off buildings? Will you be able to see the hardest line? Then the answer is yes. Andi, If there no obstructions in front off you Andi, if we can say like horizonte is always other eye level on, there are some exceptions, but in most off the cases are for now. You can consider that it is always other eye level. This is how artworks, the colors that I have used here in the sky, have used Goebbels blue and then yellow car in the fields. Also, I'm using your local for the road. I have used a mix of ultra marine blue and burnt sienna on the green. Here I'm using its permanent sap green. Notice how all of my strokes I'm trying to make them look like converging at that vanishing point. It brings a bigger sense off now I will let it dry in every painting that I make. I try my best to accentuate the perspective. Lines and effects. Here are some gems that I'm going to share video that will help you further in building up the perspective effects in your painting. So the first thing is that the foreground is mostly warmer than the distant sky in mountains. In the painting off board, I'll be using the warm, orangish and yellow car color in the foreground and green and blue in the distance. The second thing is tonal value. The tonal value off the foreground is generally darker than the distant sky. Next trick is to use more wet in wet effects in the background and keep crisp edges in the foreground. And the last thing that I generally used or do is that I put more details in the foreground and lesser in the background. Now it takes time in a photo. Understand that where we can apply these rules on where we can change it? Herum doing the details, using the thick consistency off darker value being Andi using a rigger brush Andi, when I put these take consistency off, being with a fast and swift brush motion, thes dry fix comes out and they look really appealing in the foreground. Notice how the bushes are the polls are decreasing in size is the goes towards the vanishing point. This is done. If you bond, you cannot move bars or human figures to it. Just practice it on. Have fun. Here is a snippet off how I'm going to use one point perspective in the sketching, but I should do you again when we'll do the final sketching. - In the end, I just want to say that always trying to find excuses to Adam perspective.
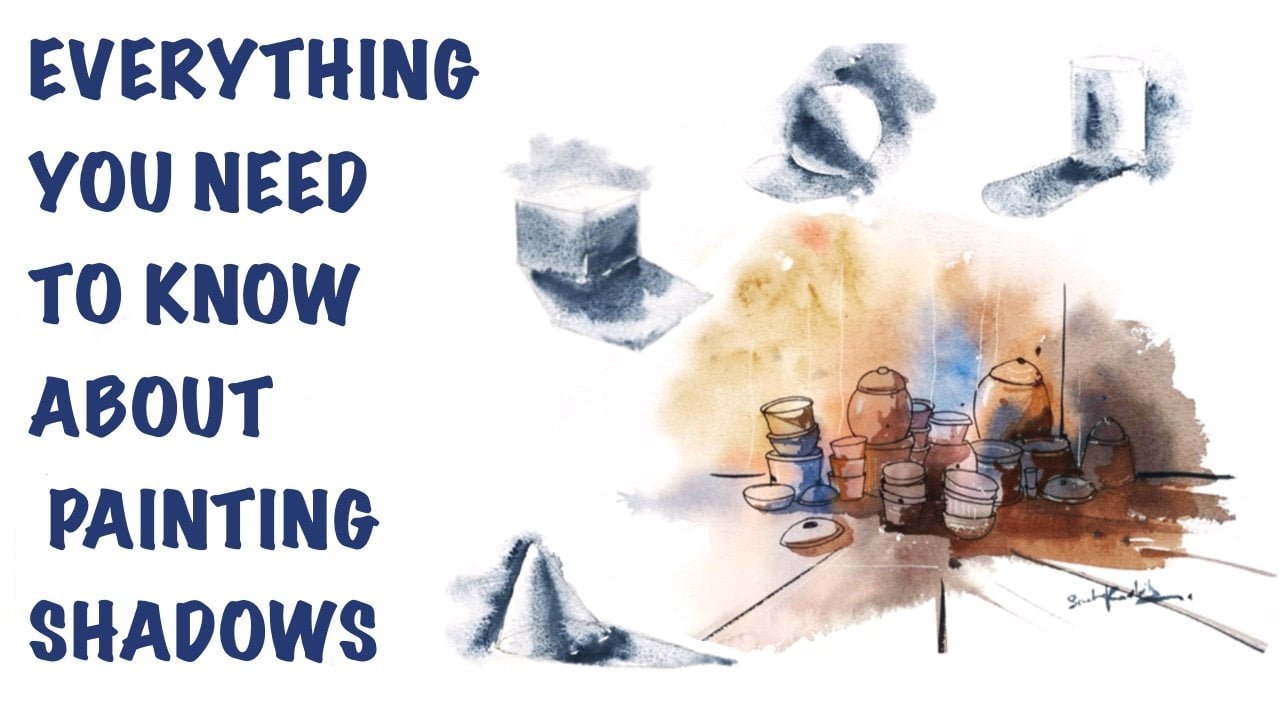
5. Negative Painting : Okay, so this is the most interesting technique, and you can find many adaptations toe this technique to really simplify negative painting. We paint around an object to define its shape, and you can find many variations off this technique. Some other Spain's object from close to distance, gradually revealing their shapes and adding depth for me, I have created my own style. I do the negative painting around half off the circle, and I applied darkest, own off satellite genuine to create maximum contrast of values. Then I joined the background to the circle, wearing the tone in softening edges, and then added, Take consistency off so delight genuine to create shadows. This looks so divine. At this point, the lost and found edges are just godly, and now I'm going to use the consistency of sort of like, genuine and make a mark for shadow. If you want to know more about how I control the pinto water ratio, you can also check out my last last, which was master watercolor technique learned toe paint, light and shadows. So isn't it easy and quick you can capture many urban's getting subject using this technique just being the background defined the main object and join the shadows to the background. Watercolor is all about simplifying. This is an example of how we're going to use this technique in a painting, and here will paint this part to bring out the shape off the planks. This is also a variation off negative painting.
6. Sketching Shapes : Applying Perspective : it's time to do with sketching. So I am going to make a heart is in line first at the Elvis, too. On notice how the upper part off the paper is larger than the lower part. As usual, I'm only going toe sketch The major shapes this is the mast on soon will be attaching a sale to it. Guys, I strongly advise you do not use the scale for these lines. Unfortunately, s any sketching work? Try not to use gills, go free hand and make mistakes. Still, no sketching part was relatively easy. Andi. Now we re putting a vanishing point on making the full ground using one point perspective. See how all the lines coming from the finishing point varies in anger. And I tried my best to simplify this sketch. Andi, I hope it helped you. And this is the part Will be painting to bring out the shape off the blanks.
7. Basic Color Mixes: Since we're going to paint a Seascape, I'll use more blues and violet. The first makes is off Global Deal on permanent rules Fact is, thes mixes Andi get a visual feedback. So when you actually start painting you below what to mix, the next makes is off. Go by blue permanent roles and cobalt deal. It will give us a violet, and I'll create variation off the's in the sea. I'll also add yellow occur at some point for variation off bomb and cool of the next Makes is off raw sienna and ultra marine blue. As you already know that raw Sienna doesn't gives green when we mix it with the blue, so it's really helpful for the sky part. Next mix is done using viral orange Bon Sienna bunt number and also using a mix of bond number and ultra marine blue. We'll be using this gradation to paint the boat. Okay, now, Father Doc in the foreground, I'll be using a mix off your Loker viral orange and burnt Sienna. I'll be using cobalt blue what remix of Cobalt Blue, along with a mix of burnt sienna and ultra marine blue in the upper part off the board to bring out the shape off the planks. No. Remember that this office I'm walking on the stilted and that's why the wash is falling down. She's so go ahead and practice all this mixes so that you're ready for the final project.
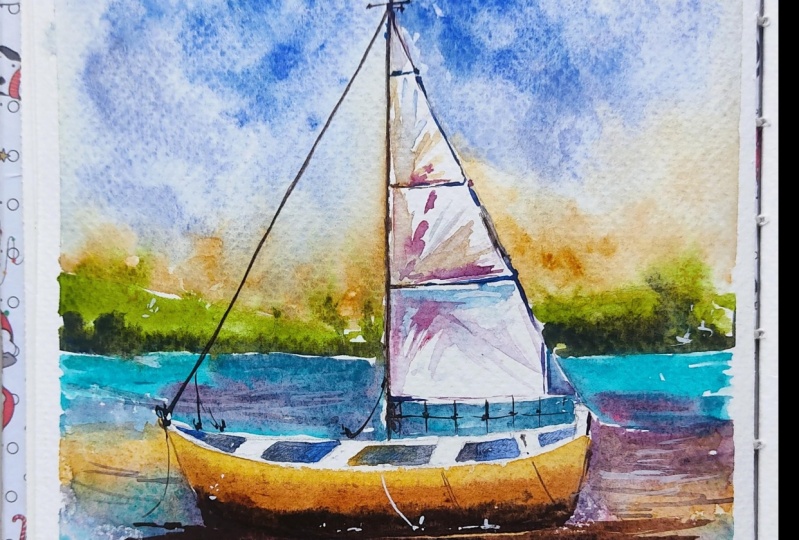
8. Final Project : 1st Wash + Executing Negative Painting: so the fun begins. I'm going to put first layer is going to be a continuous wash. And remember not to paint inside the sailing boat and loading up my mop brush with raw sienna and a hint of cerulean blue. I'm going to put it in the sky, see how I have painted inside the sea. It just happened on. Instead of correcting it, I will use it to my benefit. I applied nearly, ah, heavy or a thick consistency of ultra marine blue, and I'm going to spread it on the paper. See the condemnation of clouds from the left part off the boat to the right part. Now I will be adding a bit off lavender. You don't need toe. Add lavender. You can use any other violate or whatever being too you want to experiment with. I just wanted to experiment with lavender in this painting's why. Just give it a try. Now I am a blank, raw sienna here. I'm applying a more ticker consistency offer all sienna. Basically, I'm alternating the warm and cool Hughes and also varying the tonal values. The video is not sped up, and I'm painting quickly, so the edge after Bush doesn't dries up. If it drives, the painting is spoiled, and we want an effortless looking continent wash with no hard edges if you want, then you can pick up the excess water accumulated at the edge of the wash. Here I'm using. Take consistency off permanent sap green on with quick motion. It's bringing out the dry brush effects. There, you can see pointed white portions are left. She's These are our distant mountain, Andi. I've painted them in cool colors. Imagine the background sky and the distant really are still wet on here. I'm taking a mix of cobalt blue with a hint off permanent rules and making the sea. Guys do not paint inside the boat or the mass or sale. Here I added a bit off raw sienna. She's now I'm adding random strokes off your local toe break that continue t off the same paint. I used a mix of cobalt in cobalt blue and permanent rose to makes this violet guys, for these sparkles in the water, you need thick consistency off your Loker Andi, to supply the pain in a quick motion. Also, you need a rough or cold press paper for these sparkles to come out not coming to the foreground. As I told you in basic color mixes, I'm using your loca. I will also be using Barrel orange in Bonn. Sienna. It's nearly done. And now I'm going to soften this area. Our first wash is done on notice how my entire washes still red and we painted the board using the negative painting.
9. Final Project : Painting Sail: the first year has dried up completely and using a Princeton long round velvet touch brush number 10 you can also use a rigger brush. I'm going to make the same. I'll be bringing out changes in the hues and tonal values quickly on the main colors I'll be using here are raw sienna, Yellow car and the Violet, which has been mixed using cobalt blue and permanent Rosa Coble feel and permanent rules. And for the consistency off the paint, I'm here going to use a mainly them watery consistency off the paint. This is take consistency of Taco Bell flu, along with the permanent rules. - I'm just making these strokes with variation in the hues. This is a mix of cobalt blue and permanent rules, and that the points I'll be using your local okay, she's imagine we're painting the hard cloth material off the sale. Andi, it will give pictures like this only that's all. And now let's being the boat. You don't need to wait for this sale to dry. You can just directly who want to paint the boat
10. Final Project : Painting Boat & Reflection: in this class. I'm going to paint the board and the reflection first extractor doing the negative painting painting inside the board to bring out the shapes off the plans here I'm using, Ah, watery consistency of the cobalt blue and a mix off ultramarine blue with born sienna just similar toe the steps we took in the basic color mixes. We're going to do the same thing and being the entire idea. She's here. Check it out the same thing from the other angle. I'm starting putting the year loca and then cobalt blue and ending up with the mix off ultra marine blue and burnt sienna, which makes Greece see how the shape off the blanks have started to come out. And it looks so beautiful. I'm using a silver velvet brush. Number eight. You can use any other brush with a good point using the same brush. I'm applying water because of this. We will not get any hard edges, and the margin off the paint will take place very effortlessly. She's This is a very take consistency off your local. Imagine the Washes vet, and now I'm using Take consistency of Burnt Sienna and this is take consistency off bond number. And this is a mix off ultra marine, blue, burnt sienna and burnt number. We're going to paint the reflection in combination, but before that I'm sprinkling some water droplets on this part, so it will create some watery effects which will look good on the boat. Observe carefully the brush strokes. I'm applying here from thing to take. It's basically a mix off your local along with the violet. We made guys very the brushstrokes we need thin and thick line on zigzag motions like this will help us - notice the direction off the brush strokes here. It brings a feeling off the waves, that is all. And now we can move on to make the details.
11. Final Project : Details!: Let's take a moment and see how the painting has come out. We painted one section at a time and using the perspective lines in the foreground and the negative painting. This looks really pleasing. Whenever I say Didn't I'm surely going to pick up my rigger brush and using the consistency of the pained, I'll make the details. So let's start the details here. I'm mixing the consistency of ultra marine blue burnt sienna burnt number to make agree on . I'll be painting the ropes in the boot guys. If your sky or the background, it's much more darker than you can also use white water color paint to make this room. Try it out. It will really add to the dimension you can also use or put a reference image if another boat near you and add details. According to that reference image here, I'm painting the must. - If you ask how I decide to put the details which things to add and what to do, move it all comes from observation and trial and error. With practice, you'll be able to do the same and make your own decisions. Making these random ropes is really interesting thing to do. You can keep on adding a lot off robes, and still it will look really interesting, making some hard edged strokes in the foreground. And all these lines are converging towards the vanishing point. These are some random fences which are near or around the dock area. He splatters are being done using viral orange on the my studio Excuse white water color paint, either a Chinese fighter, titanium, right? And using a rigger brush we're going to mix. Father did eight, adding some splatters here and there, and some darks and ropes in the darkest part Off the water on board reflection and some lines in the foreground also don't make a lot of strokes in the water with this white paint. It will really take off all your attention to that part, and here I'm going to add some boats on. The painting is finished
12. Conclusion: In the end, all I want to say is that enjoy the process just like these techniques, thinking it was so fun to integrate negative painting in the basics of perspective in the Sea Escape. If you have seen my previous classes, then you must be family with how to make a country this washed and level it being water issues. Basics are seen for all the subjects. If you face the D stick, knees and art books were really interesting, and you like them when you can also follow me and check out my world on my instagram handle at watercolor dot consultant. If this class will helpful to you, please consider putting other views. Are you finished painting? Let me know that what else you would like to learn in the future classes, and then we can vote for me. Also, experiment and show me your variation off this painting by playing the Hughes colors and tones. See you again. Happy painting
 Sweta Kaushik, Watercolor Artist & Urban Sketcher