Transcripts
1. Introduction : hello to you all. Here I am again to simplify one more subject for you. This time I'll be talking about shadows. I'm sure the akashic, a political artist, and you can connect with me at mines. The handle at watercolor dot consultant. I'm known to create beautiful light in shadow effects in my painting. And if you are a bigger and have no idea from where to start learning about shadows, this is the class for you. This class can be taken by all the artists, irrespective off what medium they use. I'll start with the most basic shape that is fear and tell you what a shadow and it's part . Then we'll talk about the direction off light source and its effects on shadow. I have also included two final projects on one bonus class to make it more fun. In this bonus class, I'll be showing you a new technique to do line in wash illustration, which I have discovered over the time. Over the time, I have outlined three steps off observation and three reminders using which you will always create perfect shadows. I have been using these streaks personally and have summarized them for you in a new way. By the end of the class, you'll be able to create, and many played shadows on your own, so let's start the class and happy painting.
2. Materials Required: for final Project one. I have listed the materials required. You can pause the video and know them down for final project to these are the materials you would be requiring. And here are the materials required for the bonus listen.
3. What is Shadow ?: what is shadow shadows formed when an object up Turks light. But why do need shadows in your painting? They actually helps you in creating really looking believable paintings. The moment you had shadow toe any painting, more depth is created on the final question is how to create those technically colored shadows. So guys, after a lot off brainstorming, I have outlined these three observations. But you have to make why making a subject. The 1st 1 is the direction off light if light shadows statically above the subject or at any angle. Sometimes there could be more than one light source, and it's definitely going to affect the shadows. The second point is the shape of the object you are mending. Shadow is generally off the steam shape. Andi. You can basically modify. If it's not clear in the reference picture the thirties. This our face on which it's falling on the variation in the shadow can be seen. Let's talk about the reminders, which you have to keep in mind when you pick up your brush. The 1st 1 is the tonal value of shadow. Yes, Shadows has tonal variation, and you have to capture them correctly. The next one is the edges of shadows, which can be sharp or blood. And the last is the use off complementary color in the shadows. If it's too much for you to grasp, work on one step at a time and focused on observing only one step till it becomes habitual , and then we went to the next one.
4. Shadow has Parts ?: Let's learn the part of shadows on the most basic shape that is fair. Sphere is easy to draw, have a full range of value and it's easy to locate the different part of shadows on it. You don't need to learn these parts. It will give you an overview off signs of shadow. Also, you will get to learn the tonal value of shadow. I made the study in procreate and I I will be now labeling and explaining each part she's. This is our source of light and this is the shadow formed by eight. So the direction off the light is coming from the top right corner. The shape of the object is fear. On the surface on which the shadow is falling is basically a flat surface where we can clearly see the shadow is in the shape off oval Onda forced part. Time marking is the highlight. It is the reflection off the light source, and this has the lightest tonal value in our subject. Highlight is directly facing the light source. Now, the next part we are going talk about it's a center light on. This is the part facing towards the light source but it's tonal. Value is a bit darker than the highlight. So in some cases or object, you might not be able to see any off these parts. For example, in some objects or reference images, you might not be able to see the highlight or center light or any other part we're going to talk about. So now, moving on to the third part. This is the mid to, as you can see, that the tonal, really off Mick tone lies in between the centre light and the doctor part. So the next part is the core shadow. Gore shadows that darkest stone on the object, so there are no light trees on the core shadow, and that is the reason it is the doc, a shadow on the object. If, in case you don't know the tonal value is, the lightness or darkness often object. Now the next part I'm showing you is the reflected light. It is the light bouncing from the surface, the nearby surface Andi. In any object to beamed general use, you'll see they're just around the core shadow or near the darkest part will be seeing this part. The reflected light mark and really glows the surrounding year. Guys, this is gosh addled. This is formed when our object or subject is basically stopping the light rays to reach to the ground. And when we generally see shadows, it is car shadows we're talking about. And now this box is the occlusion. Shadow occlusion Shadow is the part off cash out only, and this is where sphere touches the ground and there is nearly no light. It is the darkest value in God's shadow area. Now, guys, I don't want you to memories each and everybody. Just knowing that these parts exist will help you in making realistic painting when you directly pain from a reference or even to life painting. I also want you to observe your surrounding and try to locate these parts on different shapes. Now you know that you have to create highlight are the reflected shadow or the occlusion shadow, which we generally usedto miss in the next class, we're going to find and compare these parts off shadows in other shapes, like cube gone and slender cheese
5. Final Project 1 - Painting shadows in basic shapes: This is final Project one, and in this project we're going to make four basic shapes. First, we're going to sketch them on. Then we'll fill it with water colors on. The motive behind our practice is going to be to learn tonal value and shading and to create the accurate shadows. Notice the shape off the shadow here, so a sphere shadow is basically over. It's not a complete, accurate circular shadow, and now I am going to make a cube. In this exercise, we're not focusing on the direction off the shadow, but merely on the tonal value off the shadow on the structure. Our basic object. I need you guys to focus on a cubes shadow the most because it's the most trickiest one. Let's consider that the light is falling from the top left corner, so shadow will be in there towards the right corner. A cubes shadow. Basically, it has three edges. That's why it's a bit difficult to make, so you have to figure it out that how you have to put these edges and there are some condition in which you can see only to which is also making a slender is relatively easy. You won't mess it up, Andi. I can see the same thing about Shadow. Consider that the light is falling from top right corner. And I'm making this over at the base to give me a better idea. How toe The longer the shadow further So see how they're originating, like as a vengeance and number. Want to go on? The base of the cone is again similar to that of cylinder. It's made up of off an over shape. If you're thinking that how practicing thes shapes will help you then I want to tell you that nearly all the complex subjects around you is a combination of these basic shapes only . Okay, so in this one light is falling from the top left corner and see how it is originating from the edges off the oval we have made at the base. Let's filled watercolors. The paper here I'm using is ah, watercolor paper. 100% gotten rough. On it is 4 40 GSM. You can use any other watercolor paper. My brush is silver velvet brush number eight Again. You can use any other synthetics, coral or stable hairbrush, preferably around number eight or 10 on the paint. I'm using his sort of light genuine from Daniel Smith. Okay, so I prefer to use for the legend knowing for tonal studies because it has a full range of values. You can you also use any other paint, which is Doc in Hue, so that you can finally water it down. Andi, bring out all the values that are needed for these tonal studies. So the light is hitting this fear from the top right corner. And I use a dark valued wash in the background so as to bring our father the lighter part of the sphere, the highlighted part off the sphere. You don't need to do that. And it's not accessory. But that's my style. Andi, it really brings out that impressionistic effects. Furthermore, I have joined the I have nearly done this study in rhetoric application on Still, I'm trying toe locate all the values. You can do it in your style, or you can do the same as I am doing Now. You know that you have to make the darkest part the occlusion shadow in the cash shadow area and you have toe leave space for the highlight. And you have to make that gold shadow, which is the darkest shadow in the sphere. And just knowing these things will actually help you in locating the correct values. In your reference. Pictures are from your life painting, and finally, it will help you in creating more realistic paintings. Let's move on to make you. Andi will be locating the same parts of the shadows in Cuba and see how it books here. So it's going to be a new thing for you guys again. I'm betting the background, and I'll put take consistency of total like genuine so as to bring out that start on trust Off light and shadow. I'm picking up a bit of water that entered the top part of the cube, so the top part off the cube is relatively lighter value on. We can say that it's the center light part where the light is indirectly hitting and the rest to surfaces are relatively darker valued, and we can say that they're the metal or the cold shadow areas here in putting that tickets consistency off, sort of genuine. On this is the core shadow off the object that is the darkest shadow off the object Now I'm painting the shadow and I'm using middle tone cause literal. I'll be adding the darkest really of sort of light genuine to create the occlusion shadow. And I've already told you that vision shadow is the part where the cube touches the ground and there is nearly no light at that point. I hope you're able to relate the previous class with this one now moving on to making cylinder. I mean, I start with the background, work on the highlight in the centre light area one towards the mid term, and I am the co shadow at some later point because it gives me a better idea that how Doc Oh, my study should go because watercolor dries, I'll be a little bit lighter then what you apply. So I'm going to repeat the same things which we have done in Sphere and Cube. I'm going to look it all the shadow parts. So guys from here onwards, I'm going to speed up the video a little bit. Let's finish both off these studies and discuss about it here. It's done. I hope you grab the concept. Let's move on and learn how the direction off the source of light effects the angle of the shadows
6. Final Project 2 - shadows in 360 degree view: next step is to study the direction off the light and the effect on the shadow. Consider this as a light source, and around this I'm going to make eight fears, and we'll be starting that how the shadow will be affected in every situation. To learn the concept of shadow and light, we should know how the changes in direction of flight is going to affect the angle and length of shadows. Light can fall from top sideways at any angle from front or behind, or they could come from more than one angle. In a single scenario, The best idea to practice it is take any simple object from your surrounding and using the flashlight notice in other how. The change in the direction off the light source is going to bring out the changes in the shadow. Most interesting thing used to see how what happens in case if the light is falling from the back side or from the front side here, I'm adding water colors. I'm not doing any tonal value study. I'm just showing you where is the light source and where is the center light your the highlight area and where the shadows will form. You can do the same thing. Andi. It's really an easy X. Society can use other shapes also, other than the basic shapes we're going to discuss about here. Light source in this fear is from the back side, and in these cases we are notable to see much of the light except at the borders in the direction off The light source for this fear is from the front side on the shadow baby in the back side. So we're not able to see any shadow in the topples here, only a little bit in the bottom line. Let's study the direction off light and the angle of shadow in a cube again. The source off light is at the centre, and I'm goingto make eight Q and every angle. We will show you the major possibilities, since it's the same situation altogether as we learned in Spear, so the angle of the shadow would be seen. But the shape off the shadow is going to be different. She's I am sketching over the shadows and see how the shadow has three edges that's in this condition again. Good to have three edges because the one edge is facing towards the life source. Often you're not ability, the shadow of that, and we definitely see other three edges. There are some cases in rich. These conditions can change, and you only able to see two wedges off in the shadows, and you have. You should really experiment and find out those conditions also, but they're easier to make. So I'm focusing on the one which is a bit trickier, and that is the reason I highly recommend you to use a flashlight and a simple cube and find out how it brings out the changes. I feel like the most of the things around us are cube or Cuba bridge in shape. So that is the reason Cube is a very important shape to learn on, to know how the shadows box in acute again. I am not doing any tonal study. I'm just covering the sunlight area and the shadow part, the pains. I'm using its global do and sort of genuine, and the brushes silver well, brush number eight. The surface off the cube on which I am not painting is being directly hit by the light, - and it's done, and let's move on to the next shape. Next shape is the lender. The situation is seem. I'm making the source off light in the center and they'll be eight cylinders at every angle . And then I'll be making the shadows informed at every angle. The colors I'm going to use our viral orange and cobalt blue on the brush shall be using is again the silver relevant brush number eight. I'm going to use that brush for all the studies in this class and the plant here. I'm using issue Knuble, I black waterproof. See how the shadows are broader in the outer edge. If you find it difficult to make Charlotte Dennis Lender just making overlooked the base, it will really start out things for you at the vice. Just using the edge off the cylinder, just extreme the lines of the shadows. Here I am going to sped up the process a little bit. - Uh , - she's we're nearly done. I'm sure that you're enjoying this fully. And let's move on to the next and last ship that is gone. The pains I'm using isco by feel and so delay genuine. The source of the light is a dissenter, and I'm going to make eight cones around it, two at the sides, one at the top and one at the bottom and rest. Four are going to be in the middle. You must have noticed that the angle off shadows is same in all the four studies, because it mainly depends upon the light source. The only change you can see is in the shape of the shadows. I'm using the sides of the corns trickster in the shadows. Cheese. Let's to watercolors again. Don't take it as a hard and fast rule to use tonal values to use the correct tonal values in this class project, we just have to paint the shadows and the highlight will come out on its own. I'm going to sped up the video here, but only marginally. You wouldn't be able to see a big change. So if you want to paint at your own rhythm and slowly you can do that also, it's nearly done. I just want to see. Don't try to paint the exact value in this class project and enjoying the process. You can use any color you want only focus on the direction on the shape of the shadow. You can do this exercise using other interesting shapes around you. Just leave the highlight on paint. Everything is I can't wait to see the illustrations you do using these techniques. Our next class is a bonus class, and you'll be surprised how am going to make terra cotta parts in a new, unique style?
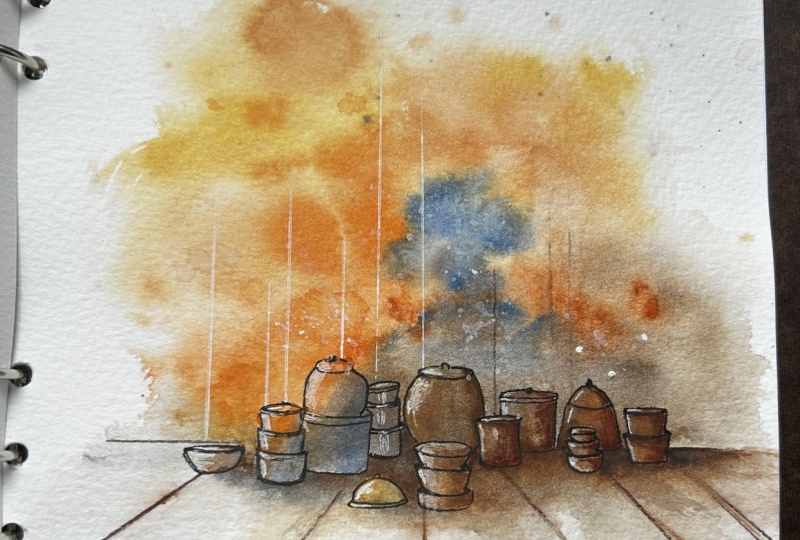
7. Bonus Lesson - Terracota Pots: welcome to the bonus lesson. We will be painting terra cotta parts in an entirely new style which have developed over the time we will begin by applying a loose first layer. I am applying border using Escada number 14 more brush and I recommend you to use 100 person Corton watercolor paper. Minimum 300 g s. Um, I am splattering yellow occur in the wet in red. Bush and Rossi NL's Also I developed this style, keeping in mind too highly simplified line in wash illustration. Now I'm adding viral orange to the already wet wash. I'm using a masking tape. Tell the surface I'm walking on so that the beads of the water can come flowing downwards. It also helps in mixing the watercolor in a natural way. Here I applied born sienna and this is ultra marine blue. I'm betting the surface here and this is a mix off ultra marine blue and burnt sienna. So the light is hitting from the left. A dio, there's five me. Have you stock of a new towards the right as it is going to be in a shadow again. I have used a doctor version off burnt Sienna and ultra marine blue. And these are some perspective lines I'm making finished this step in a single goal and then let it try in Second step will start illustrating using, Ah, you nibble I pen, which is a waterproof pen. You can also use any other waterproof pen. She's. I will make bold marks for the parts, and in this style I'm keeping the lines pretty thick. I have a trick to make lesser mistakes in the pendulum. Start from the park's captain the front and then eventually being the part of the back. In this trip, you will not be making many mistakes. Go slow on, turn your paper if required. If you make a wrong man, develop it into some elements of painting. You can add different shapes off part and even our Baltic sharing the back now enjoy the process on do the same as I am doing. She's We're nearly done with the pen work. Just keep in mind not to make those perfect shapes draw, lose and have fun. And now I'll be using a white gel pin to create some highlights. Light is hitting from the left side off the bending so I'll create some highlights towards the left and some other parts. I am going to create some picture using the white shell pin, - that's all. You can create some more watercolor horizontal lines and add some other things you want to , and now we're moving on to the next part that is creating shadows. Shadows is the third in the last part in a bonus class, and I'm using your Loker Burnt Sienna, cobalt blue and a mix off burn CNN Ultra Marine blue for the grace. Since the source off the light is towards the left, I'm making the shadows on the right, so you have to take care to make shadows on the object and also just below them on the ground. Reports at the bag are incomplete. Dark. I have switched to a smaller brush. It is silver well with brush number eight. You can also use any other brush but smaller in size because we started in a force later, we started with Escada number 14 more brush. It was a background and we needed to paint big. But here we are painting shadows, which are much smaller in size, so we're going to use a smaller brush for that. Now I am painting the shadow off this lid on the shadow part is nearly done on here. I'm making these perspective lines, making more texture and effect using this wide gel pin. It also brings out a larger contrast in values. And as villas in shapes and we're done, I hope you find this style relatively easy and quick to finish. The style gives you more control, and you don't have to paint within the lines.
8. Final thoughts: let's reflect on what we have learned till now. So focus on the light source angle on the shape of shadow and tonal value. Pain small studies life as it will give you a much better idea off how shadows works. Also keep in mind the three observations and reminders which you have to do by Lou Paint from alive or a reference picture. I wanted to discuss with you many more topics on shadow, but then I might make an entire new class for that as an intermediate level class. I hope you all found this class insightful to check out my walks. You confined your insta at watercolor dark Consultant, I will personally reply toe all your class project and give you feedback. So make sure to upload your project here. Also considered leaving a class review as it will help me in reaching two more students. Do let me know your ideas for the next class. Until then, happy painting and see you again
 Sweta Kaushik, Watercolor Artist & Urban Sketcher