Transcripts
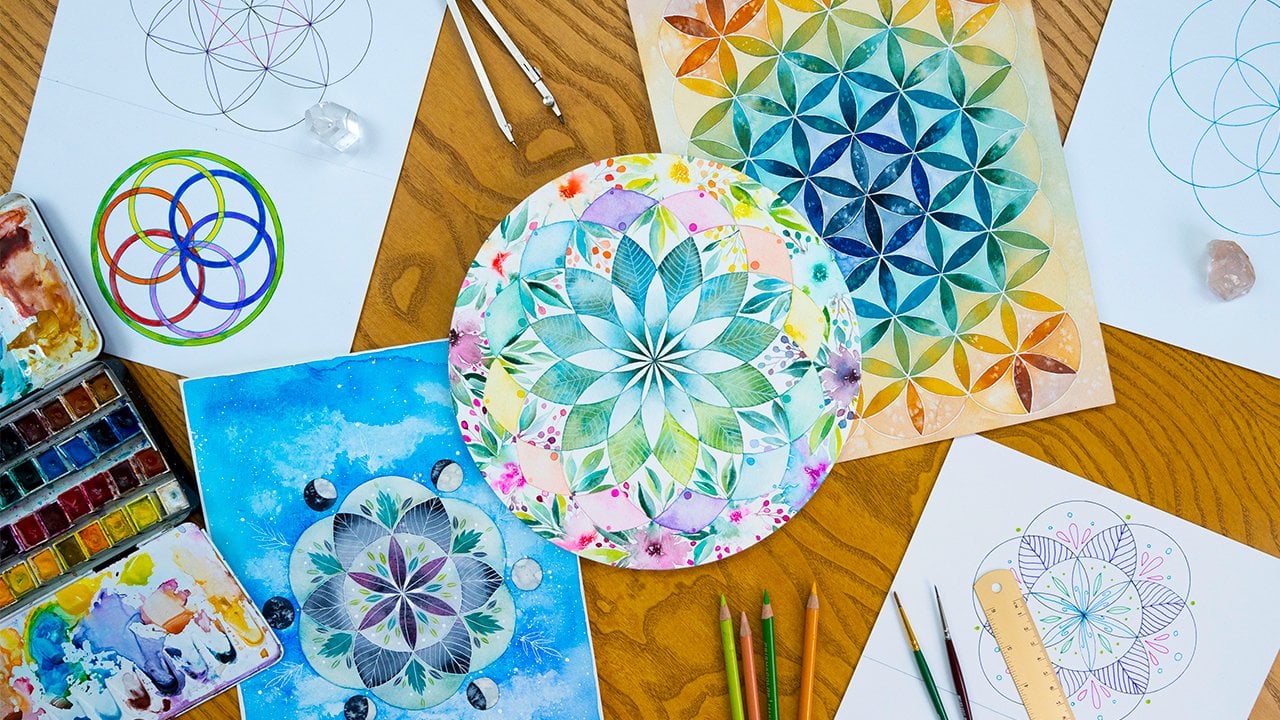
1. Introduction to Sacred Geometry: The study and creation of Sacred Geometry is an
inner voyage of discovery. The more you work with geometry, the more it transforms
your consciousness. As artists, we experience a beautiful combination
of achieving mathematical perfection
in each shape while expanding our
creative abilities. Sacred Geometry has
been celebrated and studied throughout the ages by many cultures all
around the world. It is also a structural
part of our nature. While the study of this
topic can range from mathematics to physics
and even spirituality, this course will focus on a
simple approach for artists. We will begin with a
brief introduction, followed by a list of supplies, tips for using your
geometry tools, and step-by-step
instructions to drawing your first Sacred
Geometry formation, the Vesica Piscis. We will then dive deeper
into exploring this shape, its meaning, and variations. Your final project will be to take on your creative mission by creating an illustration using the medium of your choice. My name is Ana Victoria, I'm a watercolor
artist, teacher, and author of the
Modern Maker series. Which includes my
most recent title, Creative Drawing: Symbols
and Sacred Geometry. Find a relaxing spot, prepare your art supplies
and open your mind to a meditative
artistic experience.
2. What Sacred Geometry sacred? (Keynote): Hello and welcome to
introduction to Sacred Geometry. I'm so happy to be able to share a little bit about
this topic with you. Before we actually start
diving into our drawing, I think that it's worth to share a little visual slideshow of what Sacred
Geometry actually is and a little bit of
my perspective on it. The way that I like to describe Sacred Geometry
is the art of truth. The study and creation
of Sacred Geometry is an inner voyage of discovery. The more you work with geometry, the more it transforms
your consciousness. It really does that. I know that it
sounds like a lot, but I promise that I will
keep it super simple. I always like to
start off by saying, I have gotten a question before. Hey, Anna, does Sacred
Geometry belong to one specific culture or
era, or even religion? The answer is no. Although Sacred Geometry is
celebrated by many cultures, it is more like nature. Nature doesn't belong to us instead we are all part of it. I always like to share
this beautiful image of these flowers with underlying
Sacred Geometry grids. It's from a beautiful
book called Flower Sacred Geometry
Patterns in Nature. When I started to
study Sacred Geometry, I was completely overwhelmed. It's not an understatement. I couldn't even
understand where to begin and that is the reason why I wrote my
Sacred Geometry book and why I'm teaching this
class because I really think that it's an artistic practice that is so valuable for artists and I want to share with you in a way that makes it easy. Easy for you to actually draw these shapes for
yourself and experience this beautiful inner
transformation that I just mentioned. When I started to learn about Sacred Geometry as
I mentioned before, I started to see all
these different topics come up and I quickly
understood that Sacred Geometry can be found in a variety of topics
and interpretations. Some of these are
ancient civilizations, psychology, philosophy, all forms of art throughout
the ages, music, architecture, mysticism,
symbolism, math, the Big Bang theory, human
conception, anatomy, astronomy, chemistry,
alchemy, etc. It truly is this huge topic and I want to share just
a couple of visuals so that you can see what
I'm talking about here. Hear some different
interpretations of Sacred Geometry in
all over the world, Scotland, Israel, China, Turkey, Egypt, Germany, France. But let's not get
ahead of ourselves. I want you to just
close your eyes for one moment and think
of a circle and think of all the different
places that you have found a circle around
you in nature. Look up to the sky. Do you see the moon or
do you see the sun? Your eye, how about your eye. How about a square? Can you think of
different places that you see a square in nature? It's not that easy. That is because a
square is more of a man-made object whereas the circle is the most
common shape in nature. It's a little bit of
symbolism for you. The square actually
does represent the building blocks of human civilization and society and in art it does have this
really cool symbolic nature. But the circle is the most
common shape in nature and it really
represents infinity. It's this magical shape
and it's actually like the place where Sacred
Geometry starts. Again, think of all
these different shapes, a bubble at a sun, the moon, all planets represents
the number one, a single-cell, the
source of creation. It does have a boundary though and it's represented
by a circumference which is going to be very
important in our drawings and three words that I love to
use to describe a circle is perfection, wholeness,
and completion. That is this beautiful sense of satisfaction within the circle. I'm going to go over the
names of all of the shapes in Sacred Geometry
just to start to get you familiar with the shapes and what they look like and in our drawing process we're actually going
to do a Vesica Piscis which is this middle
shape that you see here. I'll explain how to draw
them and what it means and the whole system
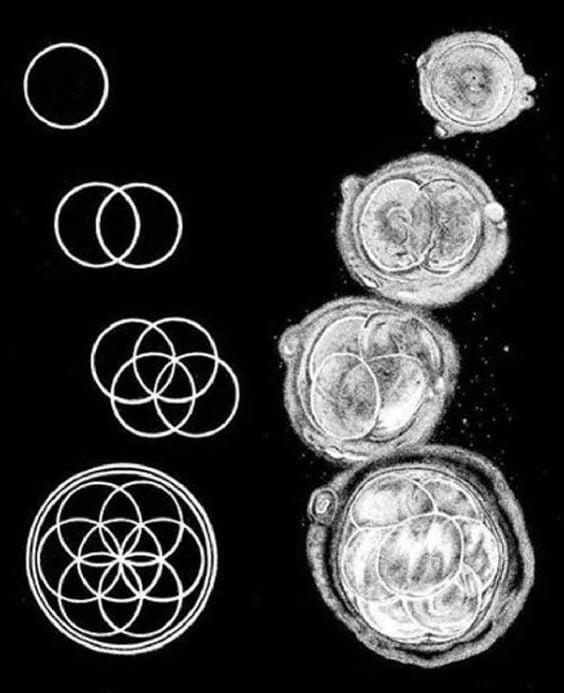
behind these drawings. Sacred Geometry begins
with a circle, as I said, and then we continue
to intersect these circles so
the middle point of your second circle will be set on the circumference
of your first circle and that is how it
continues to grow and grow. It's like a geometric
grid set in motion so there are a lot of
movement in Sacred Geometry. We start off with a circle and then we have
the Vesica Piscis where the circle
duplicates itself and it is like it
becomes aware of itself and a point is born as well. Then in the Seed of Life, which is this third shape, this is actually
the building block for the entire Sacred
Geometry grid. The Seed of Life is this
beautiful petal shape that you can see here and many
intersections are born. It is created where the second
circle starts to replicate itself around the
middle circle over and over again until we
close the shape. Then we have the Flower of Life. This is probably the
most recognizable shape in Sacred Geometry, maybe if you've
taken a yoga class or if you bought some
meditation mat or something, you might see this symbol there. Then these are more complex
shapes that are built from the Flower of Life
including the Egg of Life, the Tree of Life or Merkava, the Fruit of Life and all
these shapes as they grow there's like more complex shapes that are born from them. This is called the
Metatron's Cube. This is a really interesting
shape because we start to integrate straight lines
and in Sacred Geometry, it is said that straight
lines symbolize this masculine energy and the circles representing
feminine energy, so there's a lot of
symbolism around balance and platonic solids are also born from the
Metatron's cube. If you see this again, like within these lines, all of these other
elements are born and they are all encoded
within Metatron's Cube. Platonic solids, they have
three characteristics that are specific only
to platonic solids, which is that all of its
faces are the same size. All of its edges are
the same length and all points fit perfectly
inside a sphere. Talking a little bit more
about symbolism here, each one of these shapes
represents a different element, which is really fun. If you are into a
creative practice that you might want to integrate
this into your artwork. It's a really cool way to have a little bit more
of depth into your art. Fire, earth, air, spirit, water all these correspond to a
different platonic solid. Then finally, I always
like to integrate the Vortex or the Torus
in Sacred Geometry. It is part of the
system as well. Now that you've seen what
the shapes have looked like, here are some examples
of different places that we can find Sacred
Geometry throughout the edges and all
different places. We have these rosette
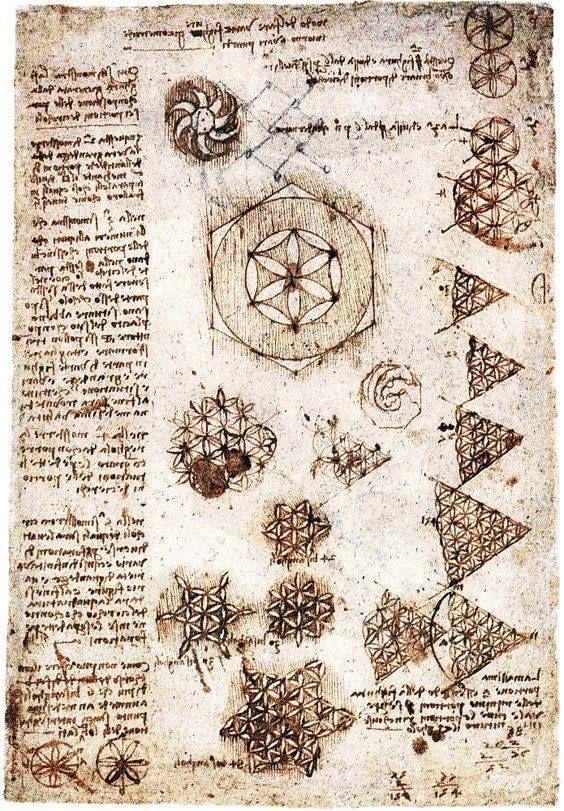
patterns in Israel. We have some sketches
by Leonardo da Vinci, and thankfully we have a
bunch of different visuals. He was pretty obsessed
with the Flower of Life. I found this photo of these really cool coins
in ancient Greece. You will begin to see, remember how I said, Sacred
Geometry nests and grows. These shapes where you
start to discover shapes within the shape and
then you can expand and also create larger
systems and grids. Once you start to actually draw, you'll get a better
grip on this. But I wanted to share
this bottom one, which I think is
really beautiful and it's the seven
interlocking circles that could also be
used as a template for more geometric patterns like underlying grid
and Islamic art. Which is just, I'm
fascinated with it. It's beautiful. You can see how
we start off here with a more simple shape and then you start to connect
the intersections with lines and you can get these
really cool grids, which are beautiful painting
subject matters as well. Here's a little bit more about da Vinci's art to your left. If you google Leonardo da
Vinci Sacred Geometry, you will have hours and hours of stuff to read and
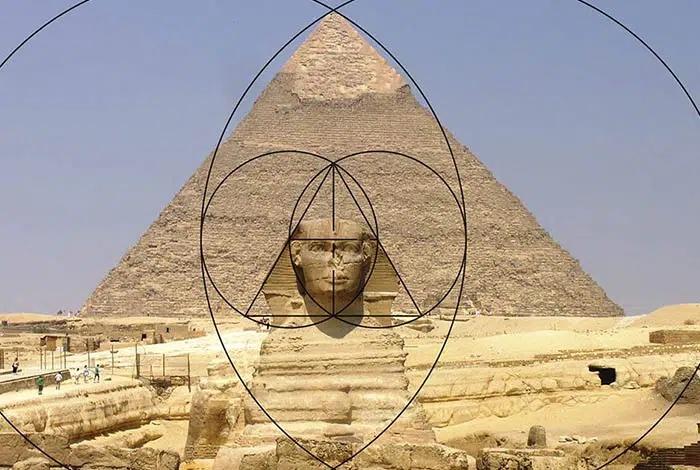
images to look out. It's quite fascinating. Sacred Geometry,
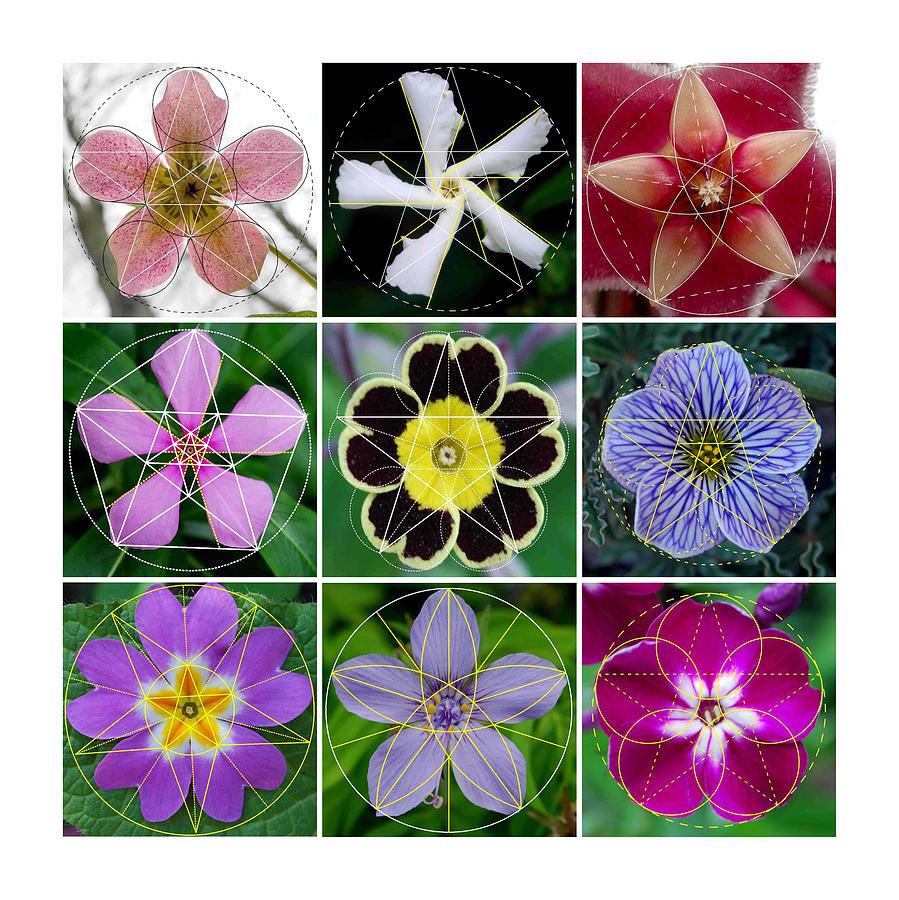
formations in biology. This image here is
by Stephen Bowers and it's called sacred
pattern of life. That's on the top-right. I really like sharing
this because remember how I mentioned biology
and Sacred Geometry. Then to the bottom right
we have honeycomb. Which is a Sacred
Geometry grid as well. It's a series of
hexagrams, hexagons. These are called
divine creator's. I love this. They create the perfect
grid with six sides. One of the things that
I'm fascinated about is how psychologists have
embraced the mandalas. FYI mandalas are also born
from Sacred Geometry, so Sacred Geometry is like the predecessor of all of this. You can call them magic circles. He really studied this and
has books and essays on it. He really noticed how drawing
these symbols created a really calming effect
on his patients. That's just a little
nugget there. If you want to research more on Jung and the magic circle, it's super fascinating topic. When we study Sacred Geometry, we begin to understand our
place in the universe. As I said, we are
part of this circle. Everything that
gives us life and everything around us is made
out of Sacred Geometry, including the macro cosmos
and a micro cosmos. It really is no wonder that Sacred Geometry is so
attractive to us as humans. At least, I was
mysteriously really drawn to this topic before
I even knew what everything meant and what
the symbols represented. It really is because
Sacred Geometry is an intrinsic part of our
inner and outer world. When we begin to study
Sacred Geometry, and it becomes
more apparent that these symbols are part of absolutely everything
that makes us. Now that you've seen
it, you can't unsee it. You'll start to just notice that everywhere it's something
really cool that happens. I've heard from students that it's had the
same effect on them. Maybe before you start drawing or if you wanted to start
drawing right away, that's fine. But I really do want
to encourage you to upload a little
bit of homework, a little bit of research
on their discussion board. This is especially
so that we can share with the rest of the
students in the class. If you have any books or if
you do any online research, or if you have been to temple where you've seen
these shapes like, I would love to see photos of that anything interesting that you've found
on the Internet, some really helpful keywords
to use our Flower of Life, Merkava, Tree of Life,
the Vortex, Torus, Vesica Piscis, Seed of life. I would love to see
what you find online. It's a really cool
conversation starter as well. I'm here to continue the conversation in
the discussion board. I know that I really
like closed over a huge chunk of information. But as I said, I'm trying to keep it as
simple as possible and have this experience be
about the art creation. I really liked this quote here, "Mighty is geometry, joined
with art irresistible." Let's go straight
into our drawing and I'll see you in
the next lesson.
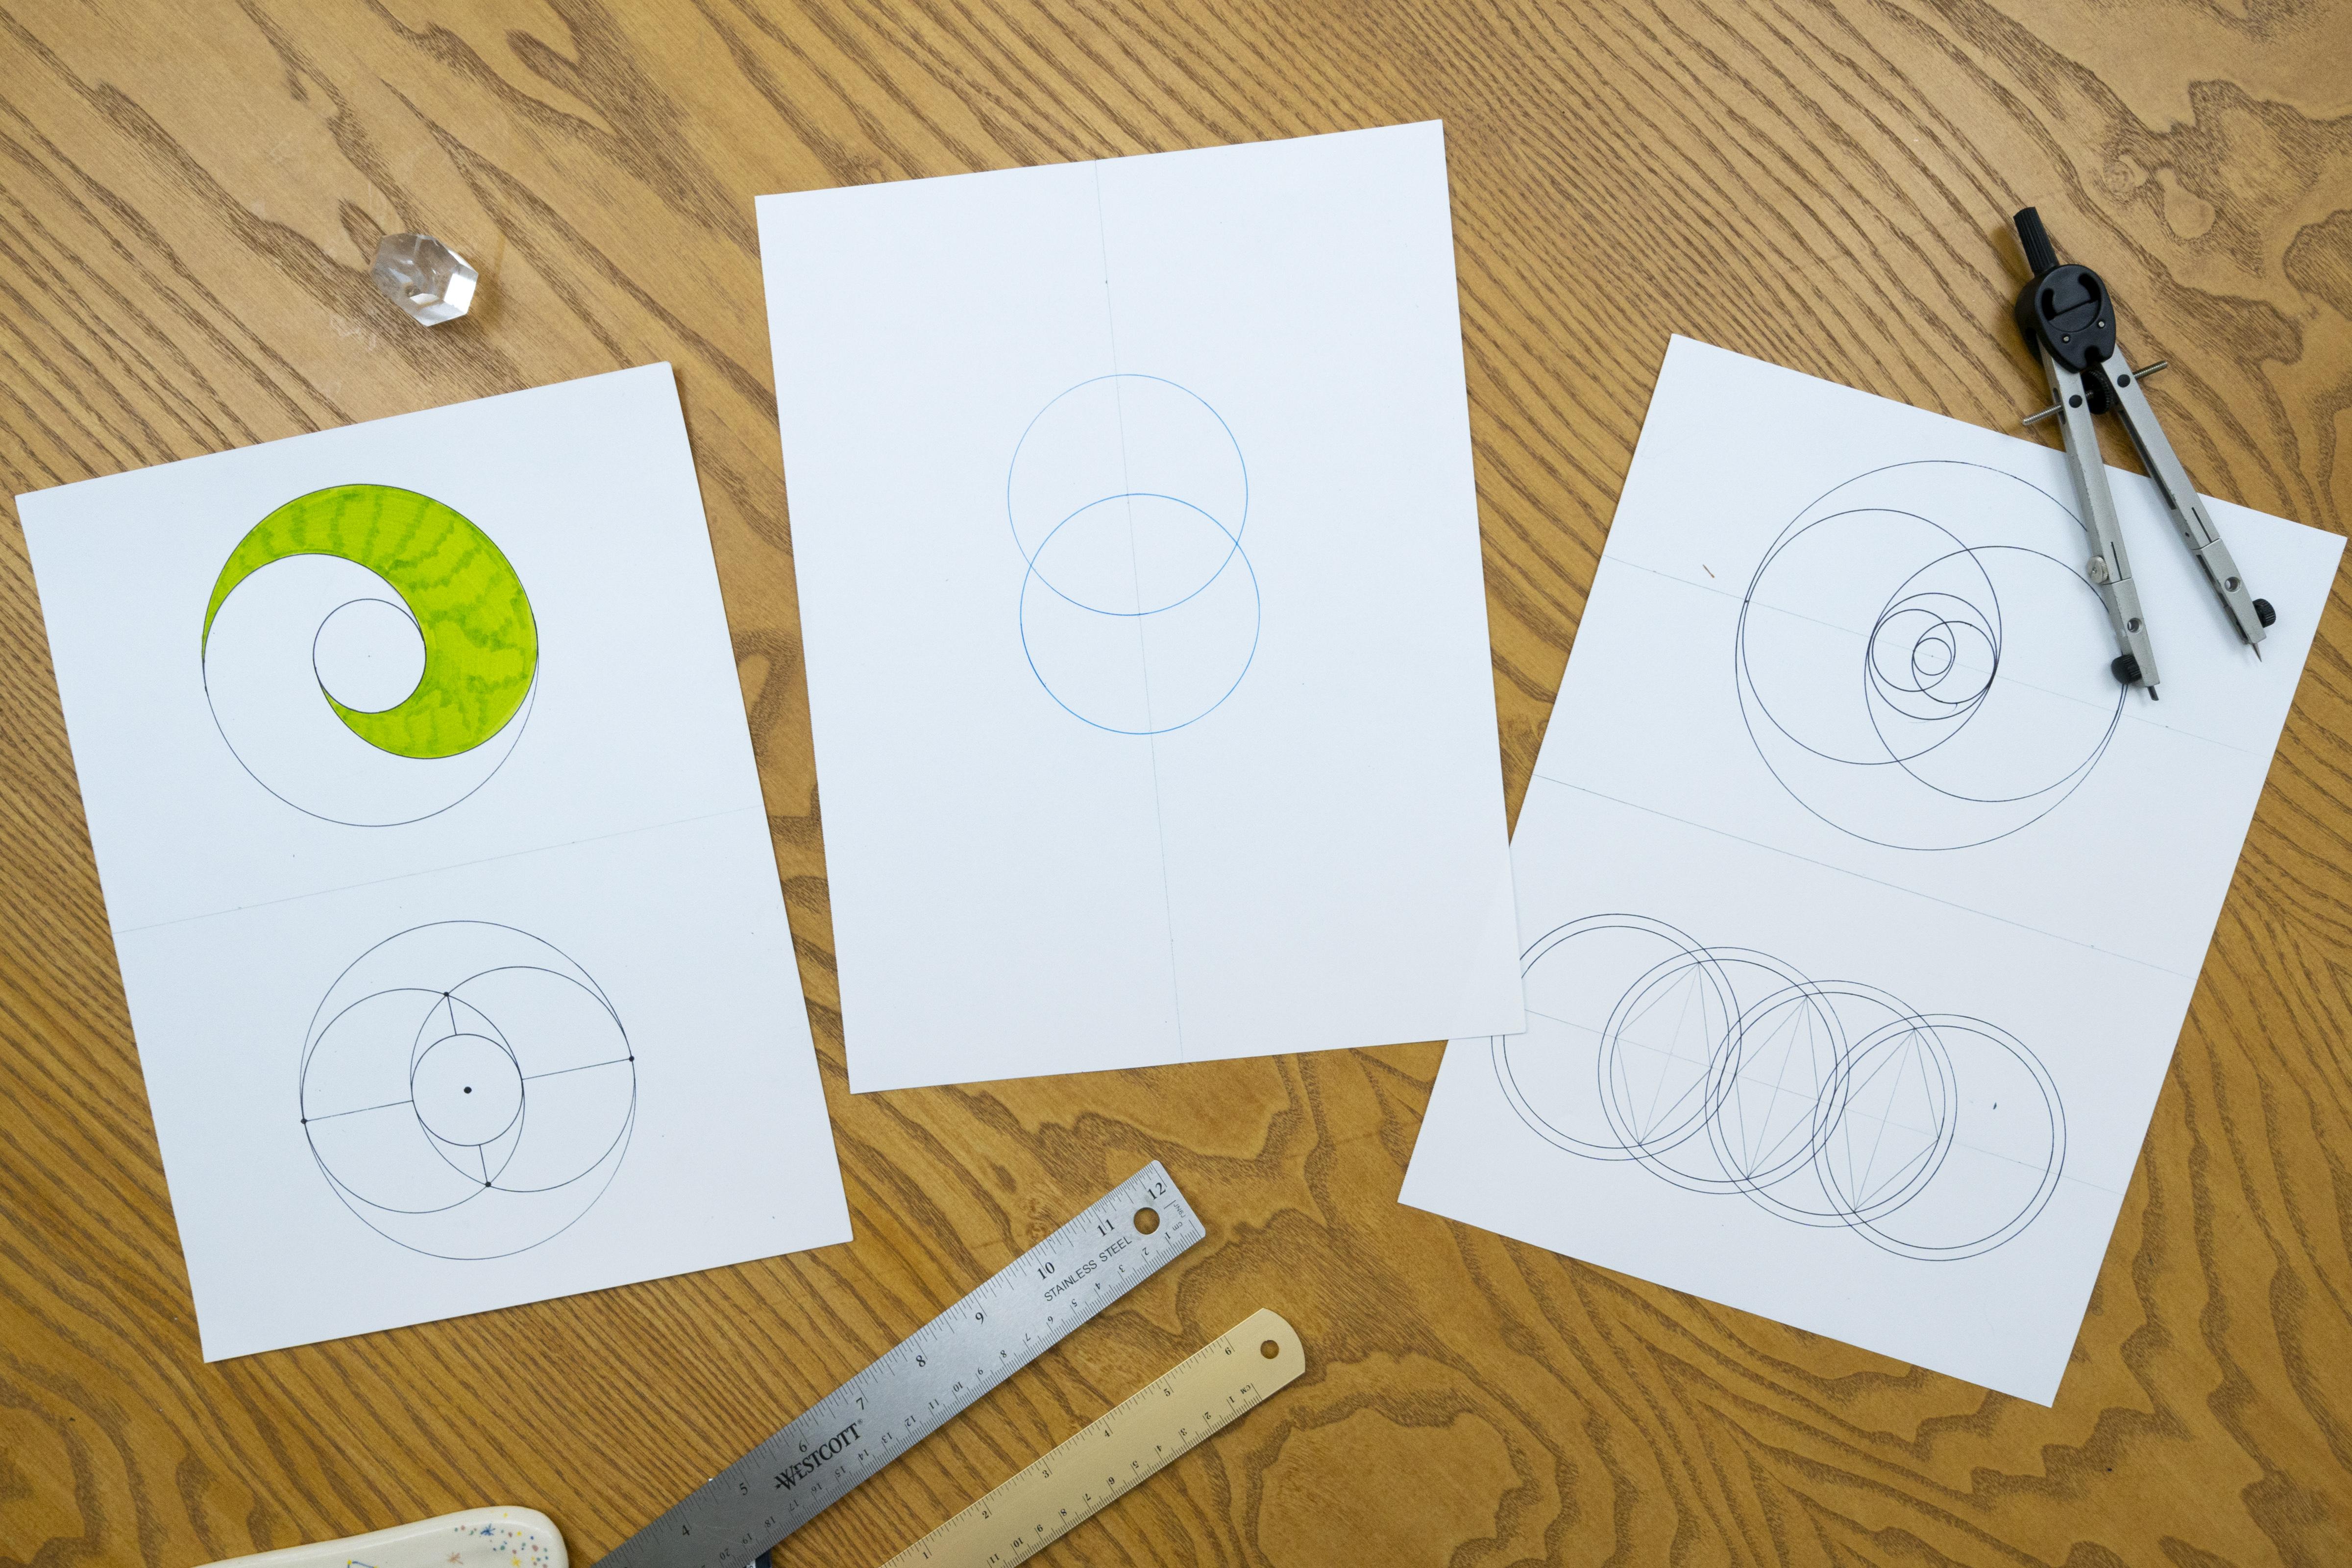
3. Geometry Tools: The Number one tool that you are going to have to use
no matter what is a compass. There's different
types of compasses, and maybe that you haven't used this since you were in school. For example, I've taught
geometry in-person quite a bit and some people almost have forgotten
to use these tools. You are probably familiar
with them but anyways, I'm just going to go over just different aspects and a few quick tips on
how to use these. Here are three different
types of compasses. They all have the
same characteristic, which is that they have
a lead point in them, which means that they
have some pencil. There's also all
different ranges of professional,
school grade, etc. If this is your first time, you can maybe just
do a quick search on Amazon or your local
craft store or something. These are very easy to find
if you don't have a compass. Your compass has two
arms, like this. It has two arms like this. Some of them will have
a little screw in the middle and these are
actually just open like that. It has two arms and
one of them has a needle point and
then the other has your little pencil here, which is the lead point. Then the most important
thing is that you're always going
to want to use your compass holding it from the base and not from
one of the arms. Because if by
mistake you open up, this aperture changes
a little bit, your whole design
is going to be off. Just being very
careful, very mindful. This is why geometry is also such a meditative
drawing practice. You just have to pay very close attention as you're
making all these shapes. A quick tip is to make sure that this needle here is super
secure in your paper. I'm going to just dig that in here and I'm very sure that
it's not moving around. I would rather you not worry about having these markings than doing it too soft and having your entire design be messed up. What you're going to
do is you're going to really dig in there, make sure it's secure and you have a certain
aperture here. See how easy that is. It didn't move around
or shift or anything, holding it always
from this base. As you can tell, probably from this, especially
from above, you really won't be able to see these pencil drawings too well because it's a little bit light and we have a lot of light
going on here on the paper. When I would be doing
my geometric drawings, I would usually be using this
especially because we have a lot of grid work and
guidelines and stuff, and then we go in
and erase and stuff. Then I just wanted to
share this one with you. I like this compass too because it's almost like one of
those mechanical pencils here where you can release
the point like that. This gives you a
lot of precision. Again, just like all art work, it's about your
personal preference. You can play around and discover what you like to use most. As I said, for class purposes, it's going to be a little
bit tough for me to always be using a
pencil like this. I'll use it sometimes, especially when we're
going to need to erase. There's another type of
compass like this one here, which allows you to use
your own drawing tool, and it has a little screw here which will secure
that into place. For example, most of the
time you might see me using a pen like this, which you will be able to
see a lot better on screen. Again, this is mostly for
demonstrating purposes. In my personal
experience, these are a little bit harder to use. I don't know if you
make a little mistake it'll go out of balance. Again, you have
an aperture here. Make sure that the needle
is really in there, and then only holding it
from the top, you go around. Sometimes your circle
gets a little too big and it's even
nice to be able to flip your paper around like that where you don't
have to move too much. That's another little trick
on using your compass. If you have this
type of compass, you can also even use your
own personal drawing tool, your pencil in there. You can also just do this, which can be useful too, because maybe you really like a certain type of pencil
and you can use that. Just always making sure that
the screw is pretty tight. You really never want
this to be wobbly. Then another quick
tip is, for example, let's say you want to be drawing some geometry on black paper. This is nothing special, it's just a regular
white colored pencil. This is from Prismacolor again. You can also do this, and let's say you're drawing on black paper or even craft paper, any colored paper, you can also use this as your
drawing tool so that you can actually see what
you're doing here. See how that's a fun
little trick right there. Just make sure that it's always
pretty sharp because you are going to need a lot of precision when working
with geometry. Another quick tip for your geometry tools is basically
how to use your ruler. These are the three go-tools
that I always have handy. This would be my basic
ruler that I use. Sometimes I like to
have this little one here because it's really
easy to move around, especially if I have
shorter distances. You guys have probably
learned this at school, but I'm just going to make
sure that you know this. Whenever you use your
ruler just make sure, let's say right now I'm
doing a half point here, make sure that you
have it set in place and then you
apply pressure with your left hand or the hand that you're
not using to draw with. Apply pressure. Make sure that's really in place and then just draw pretty soft, like that. Just a super easy tip there. One more thing about
compasses is that, obviously there's different
uses for your compass. One, the most obvious
is that it's going to measure the radius
of your circle. The radius of your circle is the center to the edge
of the circumference. But sometimes it'll also be useful when drawing
to measure distances. Here I have the aperture
that's two inches, and let's say that I want to measure two inches
from here to here. It's also handy like that. You can use your compass
just to measure distances. We'll get into all this later, but I just wanted to share these super basic tips on how
to use your geometry tools. Again, number one thing is make sure that this needle is
very secure in your paper. If it moves around, it's going
to be hard for you to go back to your original drawing. You have your tip very
secure in here and then always grabbing from this part and never from one of the arms. If you were to use
one of the arms, you could tilt it, you can mess up the
aperture like that. Those are the basic tips and now let's actually
start drawing.
4. Art Supplies: To draw Sacred Geometry or just geometry in general, you don't really need that much. For this class,
I'm going to share some technical tools that
we're going to use and then I also share with you some just like
variations or fun things that you can do to actually
make art with your geometry. We're going to
start out just with some plain white paper. I like to use drawing paper, especially when I'm sketching or just like trying to figure out all these shapes through my personal process or
just through exploration. This is just some white paper and it's actually
Canson drawing paper. There's so many brands, all different kinds of
paper that you can use, but I like this because it's
pretty thick, it's heavy. You can use it for
colored pencils, you can use it for sketching. You can even use
like some markers. This is kind of like
what I'm going to be using to demonstrate how to draw the different
shapes with you. I also have a couple
of different papers that you can use for drawing. You can use mixed media
paper, something like this. This is a lot bigger. I usually like to work in
12 by 9 inches in general. This one's just a
little bit bigger. It's all about personal
preference really, but just to show you some
different types of paper. FYI do not use watercolors
on mixed media or drawing paper
pretty much ever. This is not meant to handle
that amount of water. It's more for drawing,
for sketching, maybe even gouache
colored pencils. Definitely not
watercolor though. These are the two types of
paper I like for drawing and I'll show you in a bit
some different kinds of paper that you can actually use when you're making your artwork. But for now what I really
want to dive deep into is your geometry supplies. Just going to open this up to have a white background here and basically there's
only two things that you're going to need
to draw Sacred Geometry. One is a compass, and one is a ruler
or straight edge. There are definitely
different types of compasses. I'll demonstrate
in the next video how to use these and
the differences, but I just took some out so that you can see
what they look like. As I said, you need a straight
edge for straight lines. Even if you don't have a ruler, some people even use the
backside of a notebook or something like
that or a card, but I think it's really useful
to have the proper tools, especially because geometry
is so much about accuracy. Then you don't need this, but if you have a square like
this instead of a ruler, this is totally fine as well. There's different
types of campuses. Some of them have a lead
point like these here, which have a little like
a pencil on the bottom and then some of them, you can exchange
different drawing tools, like this one here. Right now I'm using a pen. Maybe you can use
different colored pencils, and that's basically
your choice. Again, we'll dive deeper
into it as we move along. Basically, I mean, all you really need
is a piece of paper, a compass, and some
sort of straight edge. That's all you need to learn
how to draw these shapes. It's a lot simpler
than it might seem, and now I'm just going to
share some extras with you. Just pretty much
like drawing tools, designed tools, painting tools. These are the ones
that I like to use. Don't feel like you need to have all of this to take this class, but it'll be fun once
you really start getting into embellishing your art or playing around with
the geometric shapes. Usually when I would
be drawing geometry, I would be using a pencil, but especially for
demonstration purposes, I'm going to be using, sometimes I'll use maybe
some markers to shade in different areas or
these different pens. These are little
fine liner pens. It doesn't have to be
this brand or anything, but it'll be really helpful
so that you can actually see what I'm doing as
I'm drawing the shapes. Just a couple of fun tips
for your actual tracing and drawing the
geometric shapes. As we move along, you'll see
when I start to use these. Then as I mentioned before, so this class is kind of divided into a little bit of a
theory technical drawing, and then you're free to
use any medium you want. If you are feeling like you want to paint
with watercolor, if you've taken
more of my classes, that probably means that you've already dive deep
into watercolor and actually your final project is going to be totally free, like you can use any
medium that you prefer. I have a little different
mediums to share with you here. You can use colored pencils. I really like
Prismacolor Premier. I've definitely tried out
different brands too, but it's all about
personal preference. I really like these. You need a really nice sharpener and you're also going
to need a pencil. You'll need this throughout just like the entire
geometric process. A brand that I really like
is Blackwing Palomino. These pencils are amazing. You don't have to use this, but I know that you guys
sometimes like to know about what I'm using and
personal preference and stuff so I really
liked this pencil. I have these colored
pencils here. These are really
fun for sketching. You can use these on
your mixed media paper, on your drawing paper. You can also use watercolors. For example, I have
this watercolor paper. You guys have seen me use this before in different classes. Again, this Canson XL
line is really good, especially for practice stuff. It doesn't have
much texture even though it is a cold press paper. As you can see, it's
actually not that textured, which in my personal
experience is a little bit better
for Sacred Geometry or geometry in general, because there's so much
precision involved. A little bit of a
flatter surface will help you with that, and you can even use
colored pencils with this. No problem at all. Then we have some
fun things here. You can also draw
on black paper. I really like to do this
with in-person students. I have two different
black papers that I use. One is a drawing paper, and one is actually a
black watercolor paper, which is super special. This brand here is Stonehenge
Aqua Coldpress Black, and they actually just released a new line of
Hotpress paper too. I haven't tried it, but
I'll get my hands on that. Tell you about it on
social media or something. This kind of paper is
really cool because it has the same composition as white watercolor
paper would have. You wouldn't want to paint transparent watercolor
paints here, but it's really fun with
metallic paints or even if you find some like
pastel watercolors or just like remedies like that. It's really fun. You can even use
colored pencils on here or gouache or something. It's just a bit of a thicker
paper and it's just fun. Again, this is all optional. I'm just sharing different tips for embellishing your
Sacred Geometry. This again, back to Canson. Canson is like my go-to
for basic everyday paper because they have a huge line. It's pretty inexpensive
and it's really nice, especially if you're
practicing and working out stuff and then going
to scan maybe. For example, this paper here is really good for like
colored pencils. I just had a little
like quote I drew here. Just to share with you that you can use colored
pencils for this. Definitely do not paint on this. It's drawing paper, so it won't handle
the amount of water that we use in
watercolor, for example. Pretty important to
always check out what each paper is for. Again, you definitely do
not need all of this. I'm just sharing personal
preferences, some fun tips. Maybe if you want
to try this out, you can definitely do that. These are different
types of paper as we have our colored pencils, we have our geometry tools, and then just a
quick share here, you can also use, for example, these are little
metallic watercolors. You guys know I like
hydrocolor a bunch, and my collection
just keeps growing, which is really fun. For example, these are
metallic watercolors, and there's all kinds of like shimmers and color shifting
stuff, it's really fun. If you're into it,
you can use these to embellish
watercolor paintings, or even painting like the geometric shapes directly on your black watercolor paper, for example, that
looks super cool. Then as always, I just
have my go-to watercolors. This is my Sennelier pan set. These are also like my
everyday watercolors and as you've probably taken
more of my classes before, you might know that I
like to mix in some, maybe I'll have some
liquid watercolor paints in here or even tubes, so I like to mix and match. But this is what it looks like. This is what my set would
look like on a daily basis. Then obviously you're going
to need your brushes, your water, same as always. If you haven't taken a
watercolor class with me, this is definitely
not the course that you should be
starting out with. Go back and watch the
foundational watercolor classes and then we always
just need an eraser, there's going to be a lot of
guidelines and stuff like that that will be
having to erase. I really like
Faber-Castell erasers for this kind of stuff. This is pretty much what you're going to
need for this class. Again, all of this stuff like the actual art
supplies are optional and totally up to you. Whatever medium that
you enjoy painting with or drawing with,
you can use that. What this class is going
to really focus on is the geometry tools
and the drawing. So it's a bit more
of a technical class and then at the end you'll
be exploring on your own. That's it for this lesson. In the next lesson, I'm just going to give you some basic tips to actually use your compass and your ruler.
5. Vesica Piscis: Drawing instructions : The Vesica Piscis is the true starting point
of Sacred Geometry. This may seem like a
very simple drawing, but it's really important
and it's really what gets the entire Sacred Geometry
grid into motion. What's really going to
happen here is that our circle is going
to duplicate itself and that moment when we have that original source
duplicating itself, we start to gain movement lines. There's tons of interpretation that can go along with this. For now, I'm going to stick
with the technical aspect and I'm going to teach you how to draw your very
first Vesica Piscis. The first thing
that I like to do whenever I draw any
geometric shape is actually have a
little bit of symmetry in order within my drawings. Again, you don't necessarily
have to do this, but it's just a little
tip that I like to use when drawing these shapes. What I'm going to do
is I'm just going to measure the half
point of my paper. I'm just going to move
this down a little, I'll go back to the
center in a bit. There's a lot of precision
that goes into this, I have to get pretty
close to the paper. I see that this paper
is nine inches wide, so I'm just going to do
a little marking here, 4.5 and do that
again at the bottom. It's just to make sure
that we're dividing our paper in half with
just a straight line and this case I am using pencil because I'm actually even
going to erase this later on. I'm actually going to
even do very soft. Remember this is just a guide. It's not part of the drawing is just a guide to help me have a straight geometric shape here. Now that we have the
half point here, this line that divides
in the middle. We're going to grab
our compass and again, I'm using a pen here so that you can see more
clearly on camera. I would usually be using
a pencil with this. For filming purposes, I will try to make this
as visible as possible. Again, I'm just going to
adjust this a little bit here and make sure this
is really tight, and then right at this moment, it doesn't matter what
aperture you have, just make sure that you
don't move it from now on. I'm going to keep it
at this distance here. It's big enough so
that you can see what I'm doing and
right now what you're going to do is
grab your needlepoint and place that slightly higher
than the middle of your page. It's exactly on my line
here and you're going to remember to make sure that
needle is really secure in here and then continue
to draw your circle. Again, sometimes I
like to flip the paper around to help my hand move
more seamlessly like that. You have your very
first circle here. This is a perfect
circle and the circle, as you saw in the
beginning video where I did those
slideshow for you with a bit of a
symbolism and stuff. The circle represents
so many things and once we duplicate
this circle, an intersection is born and this intersection has
so much meaning to it and it's also the starting point of the entire Sacred
Geometry system. It's a big deal even
though it seems quite simple but Sacred Geometry is actually pretty simple, just as nature is. But when we begin to observe, learn how spaces nest and grow within each other is when it becomes really powerful. Now for your actual
Vesica Piscis moment, make sure your needlepoint is exactly on the circumference
of your circle, and right now what I'm using is this guide that I have here, this pencil guide is
actually helping me to have a centered drawing. That's all it is. You don't even need to use it for instruction purposes,
that's what I'm doing. You will notice that a
good way to make sure that you haven't shifted
any of your aperture here is that you're drawing
tool should be exactly right at
the middle point of where you began drawing
your first circle. Going around here. I like to flip my
paper a bit to help me out and make a
really perfect circle. It all depends on what
you feel comfortable using your hands and that's it. This is a Vesica Piscis. This is your very first
shape in Sacred Geometry. It seems very simple, but once you start learning
how the entire system works, you'll see how powerful it is and how important this
simple shape is here and also there's tons and
tons of interpretations and different uses for this
specific drawing here. A few that come
to mind right now is how you get the
first almond shape, which is this one in here. It's also the base
for the human eye and basically, it's embedded. You're embedding the
instructions for the rest of the Sacred
Geometry system. There are many
different metaphors. Also for this simple shape here, it's the symbol of
the divine feminine, it represents the
womb of a universe. The shape you see here. It's also a shape
for the human eye, which I'll demonstrate how
to draw in the next video, and you'll find it in
different religious symbolism. You can even see, find the
little fish here with the, if you were to cut out
just this part here. It's also called the mandala
in religious symbolism. It also represents
a crescent moon. If you flip it like this and
if you cut out this area, you will have a
perfect moon as well. It's also famously known to be how the shape of a
lens is formed, etc. As you begin to dive deep
into Sacred Geometry, you'll begin to learn all of these different symbols
and also numbers and there's a lot that you
can dive deep into this. My purpose for you
in this class is to make Sacred Geometry
really simple and help you on
your creative path and just open your eyes to a little bit of
everything that you can have happen with
these simple shapes. That's it. This is how you draw
your Vesica Piscis. Go ahead and do this. I've had a bit of a
practice with it, I've seen students maybe
have a little bit of trouble making it very precise, or I think you'll be fine though it's a very simple shape. Go ahead and draw your
first Vesica Piscis, and I'll see you
in the next video for creative interpretation.
6. Variations: Explore within the shape: The Vesica Piscis
is pretty much at the center of all other
shapes in the universe. The more you explore
sacred geometry, the more you will
find this to be true. As I said before, this is the first step in a
series of overlapping circles that initiates this
expansive form, it's basically a drawing system. So the really interesting part
about sacred geometry and what makes it sacred
for us artists is, all the exploration and variations that you
can find within these pretty much simple
shapes from the beginning. So your creative
mission is going to be to begin to play and
explore within these shapes. I'm going to get you started by demonstrating just a few of the things that you can do
with this simple shape. But my real goal, like the real purpose
here is for you to take on this
creative mission, and make it your own. Really just begin to
expand your mind, begin to use the
tools and begin to discover different shapes
within the shapes. So I'm just going to
get you started with this exploration, all
these variations. Remember that sacred
geometry nests and expands. So it'll be really
fun for you to start to just using
again, same tools. It's your straight
edge and your compass and see all the different
variations that you can find. So the very first one that
I'm going to teach you. I have some Vesica
Piscis that I already drew out here just to get us
going in this exploration. The first thing that
you're going to notice is that this looks pretty
much like a human eye. But we're missing a
circle in the middle. So what you're going
to do is actually, I have this middle line here, this guide that I drew initially to indicate the half of my page, and then I'm going
to grab this ruler. Remember I told you that
sometimes like too use this smaller ruler because it's really easy to move around, especially when I'm
drawing shorter lines. So you're going to measure from this intersection
to this intersection. Be very careful about
this in geometry, every single millimeter, it has to be very precise. So I'm just going to draw
a line here in the middle. This actually gives us the perfect center for another circle that we're
going to draw here. So we're going to shorten
the aperture of our compass. So we're going to place
this point in here, super firm, and then
I'm going to grab, I'm going to move my
drawing tool all the way so that it's exactly
at this point here. If you would flip it around, it would be exactly
at this point here. So what we're going
to do now is draw another circle within
the almond shape of our Vesica Piscis. This here is how you trace
that perfect human eye shape. So there's a bunch of different fun things that you can do here. You could also go ahead and draw even a smaller circle
here for a pupil, you could maybe draw two rims on this side and it could
be like a tiger eye. There's all fun things
that you can do. You can even expand
your compass, so go back to that
center point here. Then you can open
up your compass again and make sure that it's
exactly at this point here, at the outer edge of one of
your larger circumferences. So we go ahead here and
start drawing around. Again, notice how
I really like use my paper movement
here to help me out. This is another level
to the Vesica Piscis. It's part of what I was saying before about nesting
and growing. All you really need to do is explore within these shapes. So something else
that you can do here, I'm just playing
around right now. This is part of the exploration, is to know you can have fun
with this and say, "Well, maybe it would be
interesting if I traced from here to here and maybe use
this line here too." You can just have fun, explore, and you're starting to create some really interesting
shapes for drawing actually. I don't know, I'm just
playing around now. Maybe you can draw dots at
some of your intersection. This is all just really
artistic exploration. So it's about you having
fun, expanding your mind, really, letting the shapes
tell you what to do next. Once you see more
complex drawings, artwork, you'll notice
that it all starts out from this point and then it just expands and grows from here. That's one example. Another example is, it's actually pretty similar. We're going to do the
same steps again, where we find our center
point and we're going to actually trace that
same exact eye in the middle with
a circle around it. But I'll show you something
else that you can find within the shape. So again, I'm just going to
grab my drawing tool here, which I'm using this black
pen to demonstrate for you. Right now, what I'm
actually going to do is, you'll understand why
I'm doing this in a bit. I'm going to use a
pencil right now. Because all these pencil
markings at this moment, you will see how we will
just take some of this into consideration and then erase other lines for this
specific shape. So again, just repeating this. I have that human eye, needle in the same
point just opening up. I have my circle. Doing an outer circle now. So at this point they
look pretty similar. But what happens if I start
to select certain lines that I want to be
using and instead of using the entire drawing system. So the first area that
I'm going to select is the entire outer
circumference. Just making sure that
I'm precise here. Drawing this outer circle. Now what I'm going
to do, this is where it gets really interesting, is I am going to just choose a certain area
to highlight here. Just so you don't get lost, what I want to do is select this area of my circle, and I'll draw it nicely. So see how it's just half
the circumference here, and then have a
circumference down here. It'll all make sense once you
actually trace these lines. So you go back to the
original circumference here. This is the middle point of this circle here and then
you close the aperture, so it's exactly the same
as the original circle. What I'm going to do is only trace this side here,
and then I'm going to go. It's almost like an
S form, you can see. Then I'm going to go here. You can see it's
half a circle here, half a circle here. Then I'm going to
close the shape by closing the aperture again. The inner circle, the eye, to be very mindful of
what I'm doing here. It's going to connect
like this, and like this. We've created this
really fun spiral shape. What you want to
do in these cases, you see that I have this
pencil outline here. Even in this case this
one is totally dry now. Pens obviously take less time to dry than watercolor would, but you still have to be
a little bit careful. You don't want to
smudge your pen. So then you go ahead
and just erase all your guides and it'll give you a really clean drawing. Just having this
really simple shape is so inspiring and
you start to think of everything that you can do
when using watercolors or colored pencils or metallic
paints or even textures. Remember that this class, I'm not necessarily teaching
your painting techniques, it's more about the drawings. So if you want inspiration for, let's say like the mosaic class, go and take that or
watercolor textures, I have just really more than
a dozen watercolor classes too where you can
find inspiration on different ways to fill
out your drawings. Then again, it's
really up to you. The medium is your choice, it's all about your mission as an artist, your
creative exploration. So I'm just carefully
erasing here, I don't really want to
smudge drawing that I did. So we've created this really
cool spiral shape here. If you wanted just
to demonstrate the duality of the nature here, I'm just going to
grab a quick marker. Just to show you these two opposite sides what
they look like. As you can see, this would
be a really fun shape, for example, if
you're into shading, I can imagine it right now. It just starts to get your
imagination going and I might start to think maybe
some shading in here like a fun
gradient on each side, intersecting with
one or the other. It just starts to really get you going and all of these shapes, that's what they're meant for. It's meant to expand
your creative mind. The cool thing about
sacred geometry and I really talked a lot
about this in my book, Creative Drawing: Symbols
and Sacred Geometry is how you're always using
both sides of your brain. On one side you have this
very analytical and precise and you need to get
the measurements right and you're
going for perfection, for symmetry all this, and then on the other hand, your creative brain is
always on fire here. You're always using it because what makes sacred
geometry special for artists is this exploration mode
that you start to go into when you have your
perfection as a base, and then you just start
to play and explore. It's a great way
to just dive deep into any kinds of supplies that you want
to try out, all that. The shapes are pretty simple, but they're super powerful and there's so much meaning
behind each of these shapes. I'm going to go
ahead and show you a couple more different
variations to get you going. But what I want you to upload in your class project is a few of the variations
that you made, and it's also going to
be fun for you to see what different students
have come up with, and it'll maybe spark
ideas and you can create this really cool library
of Vesica Piscis. I don't want to spoil
it too much for you because I'll
show you a couple of more different things that
you can do with this. But in the end it's really about you playing around and you discovering and maybe
adding more lines, erasing more lines,
connecting different dots. Let's continue with this, I'm just going to find
my other drawings that I created here as a base. Another really fun thing
that you can do is actually duplicate
the Vesica Piscis. For example, here I
have the basic shape, but what happens
if I just continue drawing the Vesica Piscis
towards the bottom. What we're going to
do is almost like a quadruple version of this. Here I am going to
continue where I left off. Again, placing that needle
point in there really firmly and drawing a second
Vesica Piscis right here. That's already a different
shape in itself. Just for fun, I'm going to
make it one step further here. Once you have a different
shape like this, this could be the shape in
itself and I can already start to see different fun things
that I could make here. One thing that I
like to do is add some inner or outer rims. What I'm going to do is actually just take the exact
same center points that I was using before and just open up the aperture
just a little bit here. You can be very precise with
this and start measuring and making it be a very
specific measurement. Here, pretty much all that
I did was just create an outer rim for each
one of these circles, and you just go back
to the center point of each circle and it starts to create this really cool
intersecting shape. They can almost be like rings, if you decided to let say, erase one of these sides and you can make it like
they're interlocking. You can just play
around and have all kinds of fun
experiments with this. Another thing that
you can start to do is let's say that you
would like to begin, you can create diamond shapes
within each one of these. I'm going to go ahead and trace from the intersection of
each of the almond shapes. I'm going to create
a line like that, and again here, and again here. What you can do is maybe start connecting dots
here so that you can have this interesting
diamond shape within each one
of these circles. It's all about really getting
your imagination going, observing, playing
around with the shapes, see how you can connect the intersections
in different ways. All these designs again, has this really cool
mystical feel to it, but that's because within
all of these shapes, there's so much meaning
embedded into all of them. Even that looks pretty
cool, just like that. You could also go ahead and close the diamond
shaped like this, so you'll have three
diamond shapes within your quadrupled
Vesica Piscis. It's all about getting
that precision right and just being mindful
of your tools. Here's another example of what
a simple Vesica Piscis you can do if you just start playing around
with your compass, with your straight edge,
connecting lines, etc. You could go on forever here. You can even continue doing rims and make this very
expansive thing, or you can go inward. Remember the phrase
that I really like is geometry just like nature, it grows in nests. It becomes very interesting
when you start to just play around
with all of this and just see where it takes you. Here, for example, another way that it
can grow is I have a smaller Vesica Piscis here and what I'm going to do is start by creating a circle around the smaller
Vesica Piscis. Here I just had a
small Vesica Piscis, I created a circle around it. Then what you can do is actually place your
needle at the edge of the circumference here
and open it up to this larger circle and we're going to work our
way around this here. Then we're going to do the
same thing on the other side. We're placing our
needle on this edge of the circumference and
you'll see that it'll meet our smaller circle, and we actually just created
another Vesica Piscis within the circle
that we already had. You could do this forever and ever and ever and have it expand and expand and expand almost
like a fractal image, where within each shape is the different shape over
and over and over again. We can even continue
to go on here. My page won't be long enough
for us to go on forever, but just a quick little example of where this can take us. If I had a larger
piece of paper, I could go ahead and once again open up
the aperture all the way here and create another
circle and it can be this very cool, expensive thing. What we can do though is take it one step inward and create
a smaller circle here. Going back into the center point and adjusting the aperture, have a little baby
circle in here. You can continue. Again, the phrase is always like
how it nests and grows. All these shapes fit within each other and they can also
expand out of each other. These are just a few
examples of what you can do with this simple
Vesica Piscis shape. Go ahead and explore
it for yourself. I find it helpful
to actually maybe draw out for in the beginning
and just have that ready, that way you can start
to expand and grow and just see what comes out
of all of these shapes. This is going to be part
of your class project. What I want you to do
is to actually upload a few different variations
of different shapes that you found within the Vesica Piscis. First it's going
to be just using an outline like this and then later on you can start to actually explore
your creative mission, which is actually adding art, more art, art supplies, drawing, painting, etc, into the shape.
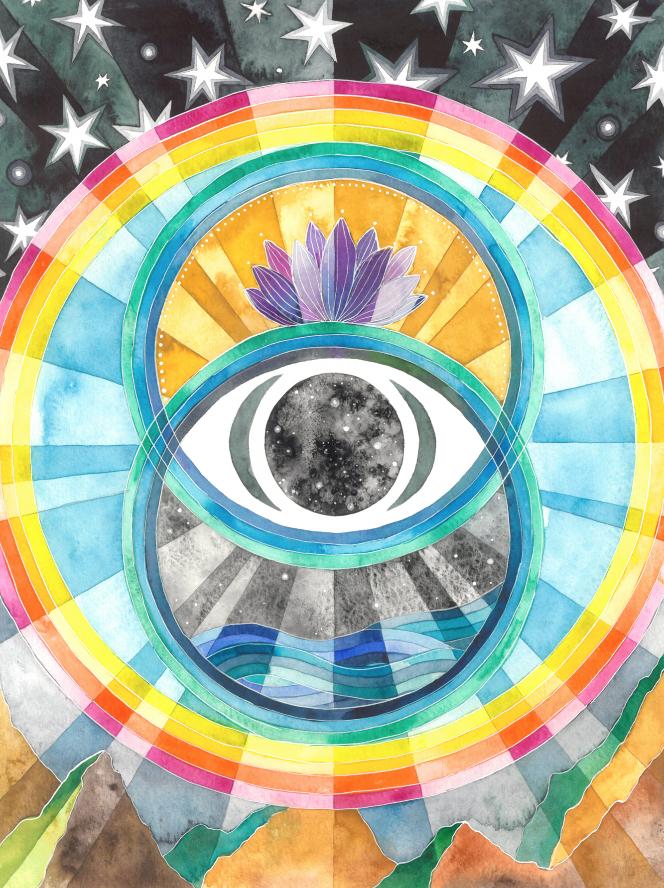
7. Final Project: Your creative mission: Now that you know how to
draw a Vesica Piscis shape and also you've begun to explore all the different
interpretations and meanings and also you begin to
discover different ways that you can play
around with this shape, your final project and
what would I really want you to upload to this class is basically your personal
creative mission and that is to explore
within the Vesica Piscis and create a work of art
that is completely yours, all your own, feel
free to play around. This is one of the very
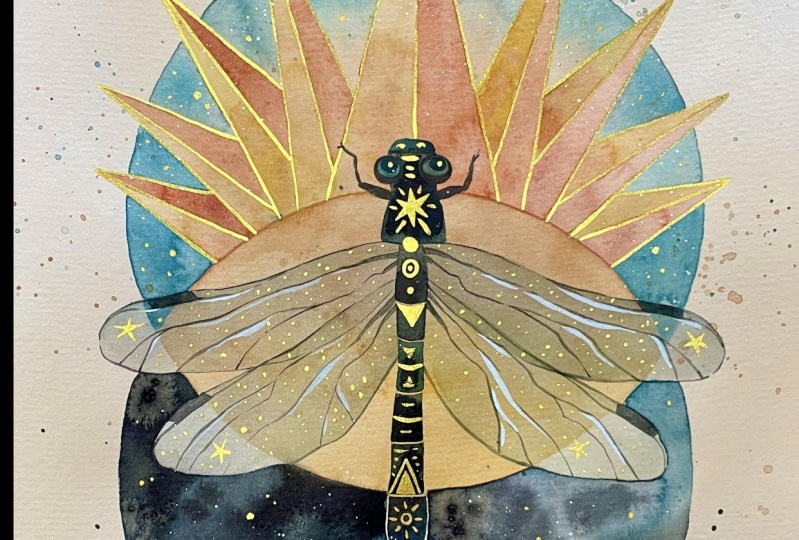
first paintings that got me started on my creative
geometry journey. I really wanted to
share it with you today and just talk it out
a little bit more and then I'll show you
another example that I did. So you can see all the
different ways that you can actually make art
using Sacred Geometry. In this case, this class specifically you're going to
be creating a Vesica Piscis. What you'll see is in general, the shape is pretty simple. The Vesica Piscis, remember the rims
that I showed you in the little exploration exercise, and I have also some
organic drawing in here, which is the lotus flower. I played around
with some moon that I also used with my compass. Then I have a little bit
of free-hand drawing here, which I have these mountains. I have some stars
that I traced here. There's a lot of play with
different transparencies. For example, you
can see this with this ocher paint here
or the starlight here. It's all about different
transparencies that you can use with
watercolor opacity. All of that is in my
very beginner course, modern watercolor techniques, which it's all just
different ways to use these simple
watercolor techniques. I really wanted to
share this with you. This is one of the
very first pieces that got me really set on this entire Sacred
Geometry journey. I have a really fun place
in my heart written. I really wanted to
share it with you because what I want you to do is I don't need you to try to paint something
in my style necessarily. But I wanted to show
you me and myself as an artist what
I have discovered. I actually drew this
specifically for this class to share with you just
different ways that you can actually make Sacred
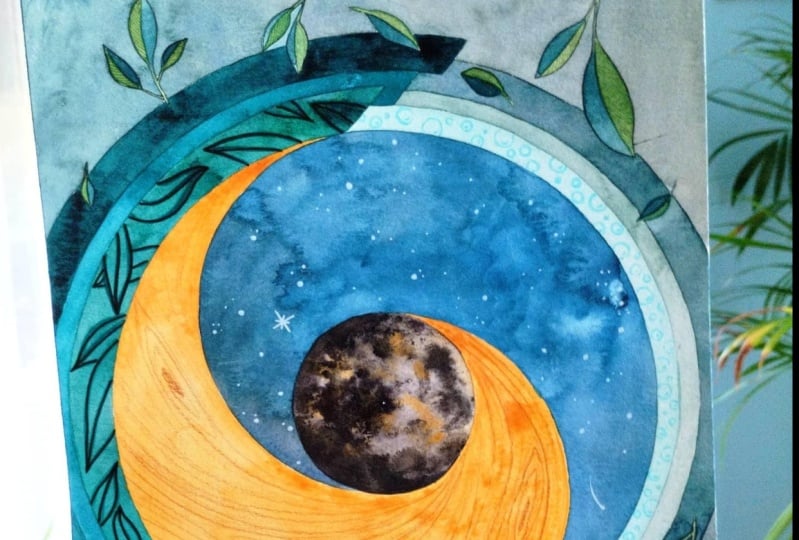
Geometry pieces yourself. This is also Vesica
Piscis based. It's actually similar to one of the last demonstration
that I showed you when we were playing
around with variations with our Vesica Piscis. What I did here was basically
just grow and expand and trace more circles
around the Vesica Piscis. I didn't use
watercolor with this. For Sacred Geometry, it's actually really fun to sketch out on black
paper for me. That's one of the things that
I've had a lot of fun with my in-person students
with is also there is this
mysterious field to it. This is the black
paper that I shared with you in the supplies video. It's just drawing paper. It's Canson XL. You can see here. It's not like any super
special pencils or anything. It's just Prismacolor
Premier pencils. They work really well over
black paper like this. This has absolutely
no water in it. It's only drawing. It's just some very simple
little gradients and stuff, but you just have to invest a
little bit of time into it. This took me a few
days to finish. I just drew over and over
again the gradients, played around with my
color palette, etc. This is another very magical
and mystical approach to Sacred Geometry using
the Vesica Piscis. I wanted to show you two
different versions of this and ways that it's inspired me. What I really want
from you is for you to upload to the class project different drawings that
you've found derived through the Vesica Piscis with as simple exploration process and then your final project, which is going to be your
creative interpretations. Using whatever medium you
like, you can use gouache, you can use watercolors, you can use colored pencils. It's really up to you. You can even use ink, really whatever the
point is here for you to actually play around
with color, with shape, with forms, and come up with something
unique of your own and really have fun
in this process which is so transformative. I explained a little bit
about how you're working with both side of your brains
with all this precision. The really cool
thing about drawing Sacred Geometry is that
there's so much beauty in it because perfection equals truth and
truth equals beauty. That's what makes
it so powerful. By drawing these shapes, you are working with mathematics and there's all kind of things behind it that you
might not realize that you're doing in the moment. But as you continue to draw
these shapes over and over, you'll begin to notice just how transformational
the entire process is. I'm really excited to
see what you make here. Your final project
is going to be to create your creative
interpretation. This is your creative mission. Whatever supplies, medium that you want to
use is totally free. Whatever it is that is
calling you, use that. The important thing
here is that you use the Vesica Piscis as your base
and then expand upon that. Sacred Geometry is
truly transformational. You are using all
parts of your brain that you may not even
realize that you're doing. Then once you start with
your creative mission, you'll see how all these
creative side starts to flourish and
you'll be really, truly inspired to
create some magical, fantastic art based on this. Upload your exploration phase, which is where you start
to play around with the actual Vesica
Piscis shape just as an exercise with
just a pen or a pencil. Then also upload a
work of art that you create using
the Vesica Piscis. Whatever you want to use,
you can use colored pencil, you can use gouache, you can use watercolor, acrylics, you can
use even pastel, just maybe even graphite pencil. Whatever it is that
you want to use as your creative
medium, use that. Just make sure that you
really have fun exploring. Don't be afraid of the shape. Don't be afraid to play
around with your compass, with your straight edge. Have fun with this, and I really can't wait
to see what you make. I'll be waiting for you
in the project gallery. Any questions that
you might have, feel free to post them
into the discussion board. Also make sure to
pick up my book, creative drawing symbols
and Sacred Geometry, where we dive really
deep into all this, and I have some fun
little tutorials over there for you as well. For now you have all the
tools that you need to create some fantastic
Sacred Geometry art. This is going to get you started on a really
beautiful path of creating these
special, special drawing. Thank you so much for
taking this class and I can't wait to
see what you make.
8. BONUS: Symbols, Construction of Regular Pentagon by A. Durer: I'm going to demonstrate a little bonus video here, which is really cool because we're going to
dive a little bit deeper into symbolism and how
pretty much every shape can be derived from
the vesica pisces. You'll see how powerful
this shape is. I talked about circles in my intro video when you guys started out
taking this course. We talked a lot about circle, the meaning behind the circle, why it's so important
and powerful. Now we're going to dive a little bit deeper into different
symbols and what they mean. I'm going to show you this
through the vesica pisces. I actually learned this little
sequence from Alex Grey, who you might know is
an amazing artist, and his wife Alison Grey. They are both super into sacred geometry as
most artists are. A lot of the art that
you see out there has sacred geometry grids
in the background, like even as a guide. The more you explore
your memorial, you'll begin to see how it's really embedded into everything. I'm going to start with
this little demonstration here to show you
how we're deriving different shapes
that you'll see in everyday life maybe
in nature as well, in symbolism, and how they can all come from this
simple shape here. We have a simple vesica
pisces here traced out. The first thing that
I'm going to do is this vesica pisces allows me to trace a vertical line here, just by meeting the two intersections. Just throwing that
out there. Again, you've seen this before where we'll be able to draw another circle again
with that eye shape. What you are going to do is
be very mindful here and find the exact center and
trace another circle. As you can see here, it's off by just a
slight millimeter. We're going to try to
make it work anyways, but I'm human too
like we will all be making some mistakes when
we're tracing our shapes. Just try to keep it as
precise as possible. Because if you don't, it might throw your
entire grid off. Just a little comment
about that here. What I'm going to
do is actually, I'll use another pen
here so I don't have to keep lifting it up from here. Now what we're going
to do is actually trace our first shape that we can find within
the vesica pisces. The first shape that we'll
find is actually our triangle. All we have to do is trace
this middle point here, which is the center
of our circle, and find this intersection
up here and this way, we will have traced
a perfect triangle. Now triangles have a lot of meaning and
symbolism to them. One of the interpretations that is most popular is
how the base of the triangle is your mind and then the way that the
angles dive up like that is almost like it's
your mind looking up towards the heavens and
this symbolizes the spirit. Many times you will
see the triangle being used to symbolize the
spirit of the human. You can go super deep
into this and start talking about the Number
3 numerology, etc. But my focus in
general when I teach sacred geometry is to
keep it pretty simple, pretty art-based, and then you can begin to look for different
interpretations yourself. These are just some very simple, interesting facts that come up when searching symbolism
related to geometry. Another interesting
shape that we can derive from here is
actually the square. The square you will see that, I might even use
another color pen to make this easier
for you to see. To find a square within
the vesicle pisces, all you have to do
is go to the edge, it's the intersection
of your cross point and this inner circle that
we did with the eyes helping us out to find
those exact points. Again, trying to be
pretty precise here. Remember to always
hold your ruler firmly for your straight edge. Again, some people
don't even use a ruler. I've even seen people
trace geometry with some oracle card
or something like that. You just need a straight
edge because we haven't really been using measurements
if you've noticed. It's more about having
that straight line. The square is a really
interesting shape because as I shared in the
intro presentation that we did for this class, we talked a lot about
the circle and how you can find it in nature
over and over again. It's the most present shape that's found in the
entirety of nature. But the square, on
the other hand, it rarely appears in nature
as I did some research. I think it's just in a couple of spots and true
nature, for example, it can be found in the eye of a lobster like the
shape traced out, but not much after that. What it really represents is the building
blocks of humanity. It exists more in
the material world, not much in the nature
or spiritual world. It represents humans
in some sort. It represents our existence. It's evidence of humans existing because it's meant to
represent building blocks. If you see that's how we construct buildings
and bricks and stuff. It represents
civilization, matter, and body in some form. The squares are
really interesting subject and then it
turns into a diamond. It's like this endless grid
that can lock into each other and then you can create a smaller square
within the square. It's a really interesting
shape actually, and it represents building
blocks pretty much. After the square, what we're going to do now is, we're going to find our trinity, which can be represented if we expand our vesica pisces
into a third circle here. What I'm going to do is grab this compass
and I'm going to find the original aperture that I used for these two circles. Then at the intersection here, where the vesica
pisces meets here, we're going to trace
a third circle. I'm going to flip
the paper around. This is just the way that I
feel comfortable tracing. You don't have to flip your paper around every
time but I like to. Now we have the trinity and
from this trinity shape, you'll be able to
find there's a lot of interesting
interpretations here. You can even draw a trinity naught from
this triple shape here. It represents mind, body, spirit, they're all
part of this shape. Then what's interesting
here is in my next class, I want to release
when after this, where we start to dive deeper into the seed of
life, for example, which is the next shape derived from sacred geometry
under vesica pisces. It starts to set this
formation in motion. Sacred geometry is in
constant movement. It starts growing
and growing and growing from
interlocking circles. This trinity here sets that into motion and also
what can be derived from this shape here
is actually a hexagon. If we take the same
aperture here, and the hexagram actually, which is the six-sided star. What we're doing here is just we used the same aperture that we had from this circle, this intersection here,
to this point here, and on the other side as well. Here's what we get a hexagon, which is really interesting. A hexagon is a six-sided shape which is super powerful because it's present in one of my favorite
forms of nature, which is the honeycomb. Bees are regarded very highly in the sacred geometry
world because they actually create this perfect structure using sacred geometry
specifically, the hexagon, which is the six-sided shape that's
born through this trinity. I'm just connecting
these intersections. This is the hexagon which is
born from this trinity here. Again there's this expression that's used that it's
nature's divine designer. Again, it's very
present in the Bs and all hexagons are really cool because they fit perfectly within each other so it
creates this perfect grid. Once you have your
hexagon shape from this, you can derive the
hexagram which is actually the six-pointed
star and you will have seen this shape many times especially the Star of David is actually where
this shape comes from. What you do is here all
you have to do is trace these points here and we will have two perfect triangles, one will be shaping
upward and one will be shaping downward and there's also some
symbolism to this because usually this upward pointing
star represents the heavens, the feminine shape
in general and then this downward pointing star represents the earth,
the masculine. Through these geometric shapes
you'll begin to discover all pretty simple
symbolism that doesn't necessarily have a connection to any specific
culture but they're just more shapes that are based in nature and
general interpretation. If you even would flip
this around you would find the Star of David here. Obviously, all of this symbolism you can start to investigate
within cultures, within religions, what the symbolism is
it's really beautiful. But what's interesting
here in general about sacred geometry is that all these symbols are
very simple, very basic, very logical and it's no wonder that all cultures have
adopted them and use them in their personal
cultural symbolism. Now what we can do
is actually derive the pentagon and pentagram
through this very same shape. What you're going to do here
is we're actually going to find these points here. I'm just going to circle
them so that you can see where I'm making
these connections. This intersection here, this intersection here, and then this
intersection up here, which is the third circle
with the dividing line. What you're going to do is actually follow this angle here, so with your straight
edge place it at this point and then intersect
it with this point and you're going to make a
marking on this side here same with the other side then we'll have
the shape here and this will be the base of your
pentagram or your pentagon. We're going to trace
these lines here. Now what we're going to
do is actually open up our compass to the original
size of our circle here I'll just grab this one
here so open up the radius just exactly
to this point here. This is one of those occasions where I told you that
your compass will also indicate distance and
then you're going to place your needle exactly at the
intersection of this line, you're going to make a
little marking here, the line with the circumference and do the same on
the other side. This gives us a middle point
here and that's where we will trace our pentagon. Again, the pentagon which is the five-sided shape and
this is also born through the Trinity because we have these three circles
and we connected these two intersections
so basically we did have an arrow here and this point here is
what was really important. Obviously from the pentagon
we get the pentagram, which is the five-point star. All you have to do
is connect just here so these points here will give
us the five pointed star. One of my favorite
interpretations of the pentagram is actually is that it represents
the human body. This point up here
represents our head, our torso and then
the two sides, these two sides are our limbs, our arms and then the bottom one are our legs extremities. Again, if you go into for example paganism or
start researching there you will also find tons of different interpretations
that have to do with the pentagram. You might find that
each point of the star represents a different
element, etc. What I'm teaching
you here is I'm trying to keep it as
simple as possible especially for artists so
that you can start to explore this entire creative journey
for yourself but again, I mean, this is the
tip of the iceberg. Once you start diving
deep into this also within the
pentagram you will also find the divine proportion
which is also known as the golden ratio, etc. There's a lot to look into
this and I thought that this little bonus
geometric demonstration might be helpful for you
to see how in reality, yes, the more you explore
the vesicle Pisces the more you will see that pretty
much every single shape is derived from the
vesicle Pisces. You can continue the
grid and then find all different connections
within all of these shapes, you will be able to explore
this a lot more in my book, Creative Drawing and
Symbols in Sacred Geometry. I dive a little bit
deeper into this. Here what I really
want to see from you is your creative mission, your artistic interpretation, so make sure to post whatever exploration
that you've found within your vesicle Pisces
and then your creative project
which is going to be an artistic version of
the vesicle Pisces. I can't wait to see what
you guys come up with. Creating sacred
geometry can be very simple but it's a
very powerful tool. It's extremely meditative and it really does transform
you from the inside out. I'm happy to be able
to begin sharing this entire beautiful journey with you and I can't wait
to see what you make.
 Ana Victoria Calderón, Artist