Transcripts
1. Introduction to this course : Introductions and object
orientated approach with Arduino and ESPs. Hello and welcome to
this online course. I'm out because it knows I'm a senior developer in
the lab environment, but also in embedded systems. In this online course,
I'm following along in practical approach that we are building together some projects. First of all, we go through
the theory at a minimum, but we're also implementing
in the first chapter, the first classes
and printing out some code on the serial monitor. On the next example, we are controlling LEDs at the runtime at different
kinds of states. And this is one of
the main advantages with the object orientated
approach that we can edit and also adjust
here a lot of things with different
components in real-time. What I mean with different
states at the same time. We're also dealing
with other components, for example, infrared sensors. So when we have ten
or more sensors, how can we evaluate them? We initiate that. You're doing this with
an array, for example. And I will show you how
we can control them and evaluate them in an
easy and convenient way. In the Arduino
environment when we are developing in embedded systems
with microcontrollers. Than we are also have to deal
with limited use in books. And this is one of our
next two examples. We are creating an headlamp. This headlamp has only one push. This push button. We are controlling three
different kinds of light voice. The first one is a shortcut because the button,
it will turn on. The second one. We're pressing
the button for 1 second, second, LET goes on. If you push the button and hold it down for longer
than two seconds, the first LED will fit
on our last example. We make the classic
game rock paper scissor with several motors and recreating the game logic by our self in an
object oriented way. When you are interested in bringing your
own source code to the next level to write and code cleaner and also in a
more structured way. Do not hesitate and wait
any longer and gets this class and code with me
in the object oriented way. I'm looking forward to welcome
you in this online course.
2. Practical experience vs. theory: Before we start with
the programming part, I would like to focus
on one major topic. That means practical
experience versus the theory. I'm aware and I'm sure
that a lot of you have many years of experience in coding and also in the
development of programs. But here in this setting, I would like to be a little
bit more open-minded. That means that you, of course, have your own
approach to some things. And maybe you're
asking yourself, why do you make this
too complicated? There's surely an other
way how we can implement such smaller codes parts, for example, this is okay. This is completely okay. You can adapt to
all my versions to your approach and also
implemented individually for you. There are always some
discussion going on when it comes to
programming languages, when it comes to implementing
source coded data. And don't take too serious, be open-minded, and adapt
it to you on approach.
3. Prerequisites for this course : Prerequisites. What can I assume that
you bring along to this online course that I've collected here
four major points. I would like to be
here very transparent. What you can expect it undoes online course and
what is not covered. The first will be, of course, you should bring along some
basic programming knowledge. That means you should know about the different kinds
of data types. You should know what is an
if it's at the fundamental, basic knowledge of programming because this is not
really covered here. Of course, I explained what I do in all decoding and
then the source code, but there is no deeper
knowledge behind it. The second part is also that I'm covering all the
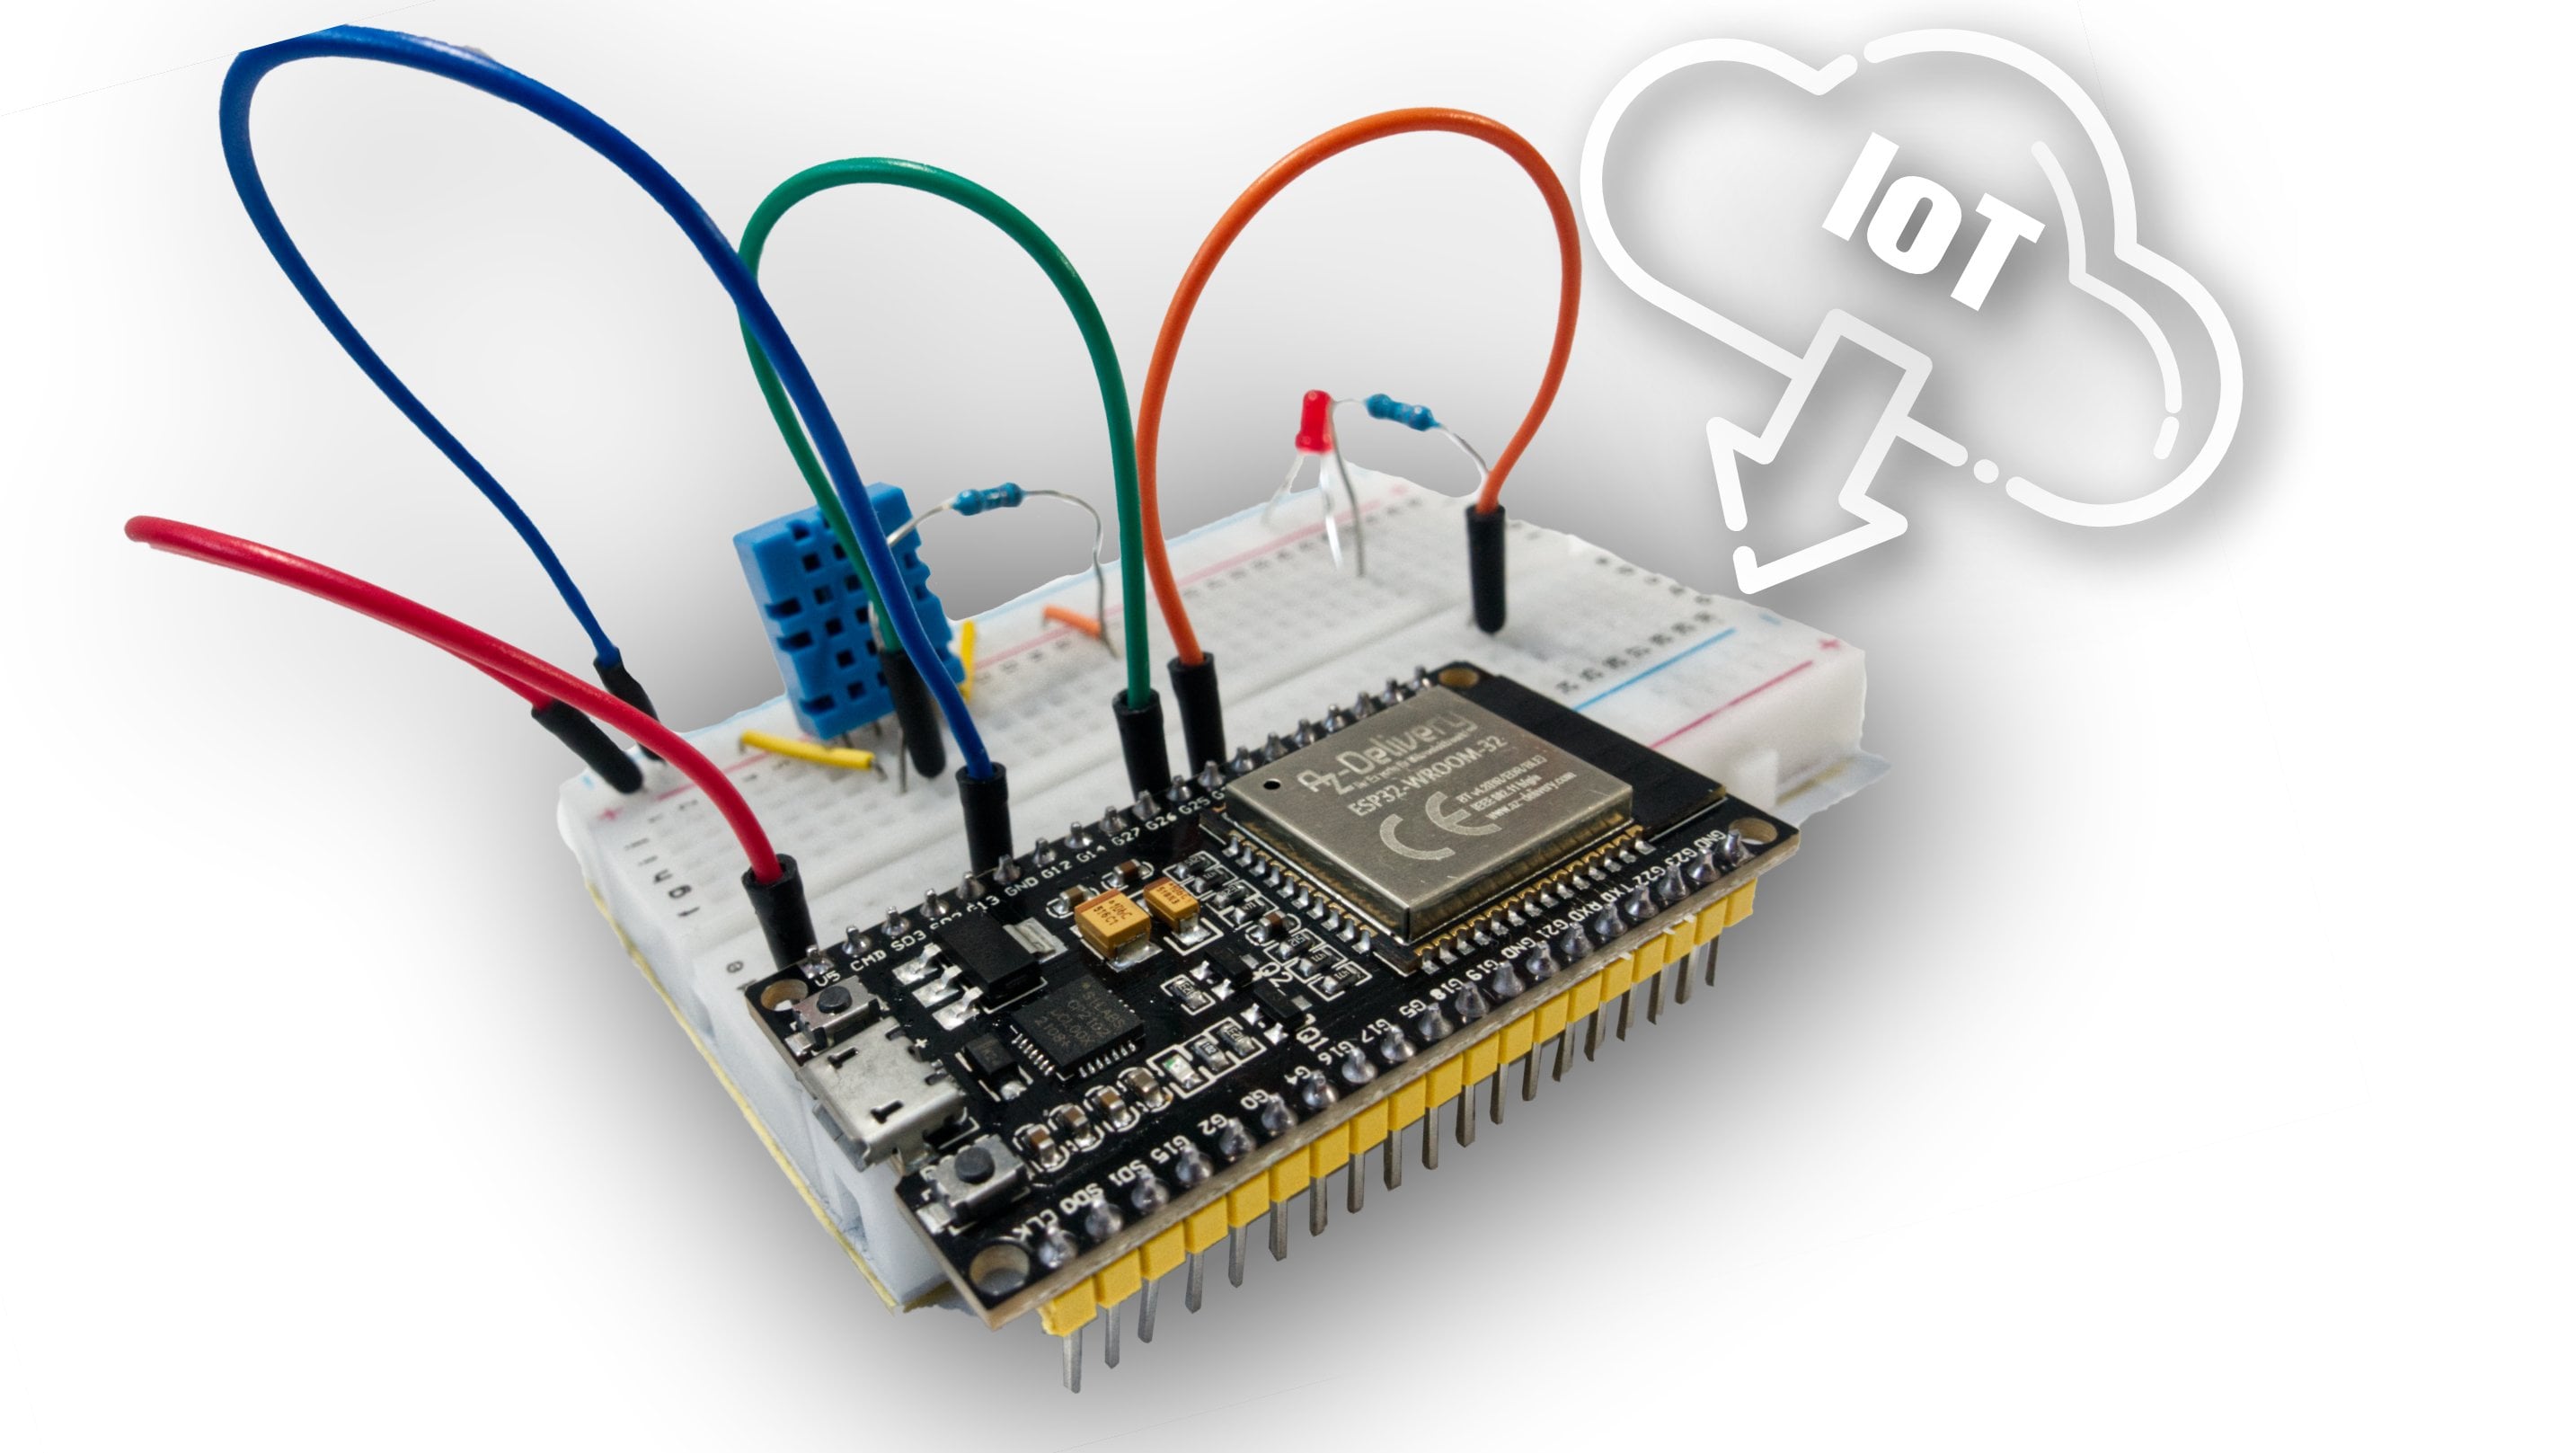
wiring diagrams, etc, on the ESP 32. Of course, all of these
objects are indebted. Source code is applicable
for the Arduino environment. Nevertheless, if you use an
outer unit, normal n, nano, etc, It's always
the same concept, the same source code. But just be aware, I'm using the ESP 3200 because it has some
Wi-Fi connection. It's very cheap and you can use it for Internet
of Things devices. But It's also applicable for
the Arduino environment. I'm using Visual Studio Code with the blood for
male blocking. And it's a little
bit different to the original union EDI, but you can use it. It's, doesn't matter because
source code is C plus plus and it works in nearly
every programming, programming, which one to use. I showed you also
how you can use my source code and implemented
in the Arduino EDI. The last, I think also one of the major point is you
should be interested in an object oriented programming because the very
first beginning it looks for you like a
little bit more on the source code,
more lines of code. But when you go
through the examples like here is the
LEDs that he can see the major advantages when we are coding with object oriented way because we are
more flexible, we can adapt to
certain situations and we can make really, really cool programs
with different kinds of components in an
easy and fast way. And this is why I bring this point along because at the very first
beginning, we writing, it looks like that we
are writing more code, but it's more practical, more feasible, more adaptable.
4. Disclaimer: A few thoughts about
the disclaimer. I tried to be as careful as possible when it
comes to kinematics. And the source
goes to be precise and look it over and over again. But I'm not free
from any errors. That means maybe
I made a mistake on Bahrain parts and you
bring everything together. And then USP do for example, an auto competence will
get damaged or even worse, it could be burnt down. Because often when you're wiring together the
components in a forest way, then they got
really, really hot. And it also could be could be occurred
at it's burned stone. It's also could happen if you grow up into
an open circuit. There is a danger of life. He could be ensured
in several ways. Always be active on the Byron
pod and the coding part. B also very, very reflective when it comes to different kinds
of components. For example, I haven't USP 32, which has a little slightly
different pinouts. Maybe your ESP started E2F. So when we are connecting
the virus together, always check the GPIOs, the death penalty data. Be aware what we are doing an implemented and adapted
to your own versions. I can't guarantee you that everything I show you
will work on your system because there are too
many different components and approaches here outside. But in my previous videos shown, it's very simple to follow or be aware of the risks and then
we have a good outcome.
5. ESP32 Pinout: A few words to the
topic of the peanut. As you might know,
a GPO or stands for general purpose
input and output. That means we can use, for example here the GPIO
number 27 as an input. So we have here in pure
sensor detects motions. And when motion is detected, we can send and signal
here to pin 27. But in an other example
was to I-SPY study tool. We can also use the pin GPO, pin 27 as an output. That means it will
fire up an LED, for example, that the LED
will be fleshed or blinked. Therefore, we should
also know that there is an pinout and GPO P naught, and it depends on which company, manufacturer and do you use? I use it from AC delivery. And as you can see here, this is the pinout for ESPs
32 from a set delivery. And it's a little bit different
than other manufacturers. For example, here I have
no ground connection. That means always
check your p-naught. Nevertheless, if it's
an ESP certitude, they are not always the same. Check the GPO will reference
the pinout reference so that you can be sure that this pin will be I'm
afforded need to what you need. For example, here I have
here no ground pin or the pin 3534 are
just input only. Nsc is some other 32s which have also 3232
only as input declared. We have young used
for internal flash, never recommend for other
use, the yellow ones. So be aware of the
different kinds. We have also used
some touch pins. We have also some AD, AD and DCM converter so that we can transfer
signals that data. This is also always
needed when it comes to when it comes to wiring parts of the TB
aware different GPOs, different kind of ESPs have
different GPIOs and pinouts. And then we can
hopefully have and good wiring schematic and
can also implement it in.
6. VS Code vs Arduino IDE: Why should you change the Arduino EDA to
Visual Studio Code? And there's a simpler answer
that you don't have to. I would like to show you
here just my opinion, how you, what is the workflow? Why? I think Visual Studio Code is a little bit more
convenient when it comes to decoding
daily routine. On the left side, I viewed
it out in your ED50, Python 2 on under, I'd said it's Visual
Studio coordinates. You can see it's very
similar in visual overlay, but it's in the core and the compiler was in
a speeding curve. And when we compile it, there are a lot of differences. I feel very first example which we are dealing here
in this online course, it's making here the LEDs with objects are in dated and I will show
you 1 first thing. For example, if I click here on compiling and click on the
left side on compiler, can see that the literature, the code needs 1.7 seconds.
I haven't clicked it right. Once again, adding new EDA. It takes twice as long, maybe third as long. And this is not so much necessarily when we have not really implemented
third-party libraries, but when we do later on, her fear 678 external libraries, then you really recognize
and significant difference in compiling speeds from roundabout 20 seconds through
over a minute in the RNA. And this is really annoying
when you're just making short mistaken spelling mistake. And also the speed when we
are caught is different. For example, I create
the object red to within constructor and we're
passing the value would do. Then we're jumping
into the setup just to show you the difference. Then I'm typing here reds
two points and I see all the function which way which I implemented in the class
which we are dealing later on. For example, I click
on flesh brackets and then I see I have
to enter an integer. Same example here,
the same workflow, but a little bit different. Red two points. Nothing happens. I'll wait. And I hope something will
open with control and space. The Arduino it is loading there. All the necessary
functions. Now I have it. I would like to set the flesh and T pasted
me in integer delay, okay, is already selected so I can override it
with 500 for example. And it's done. Not really fast, I would say. But of course you can do
it at one more example. So when we have year opened the object wisdom
function that we could hit the Control key
and the left mouse. And then it should jump
to the class itself. Here. Very easy tag here. And here It's haven't loaded. Don't know if I'm clumsy or
it hasn't loaded already. I didn't notice it. Control. I don't know. It should work, but not as fast as in Visual Studio
Code. Now, it has done. As you can see,
Sandberg flow little bit different in
under booking speeds. Also on their visual
story, courtesan, my opinion and
really great bearer do I have to skip warp
that here's my workspace. Blood from Indian, really
great dependency manager. There you have to
say, for example, I would like to update
the analogWrite. I wanted to have two
version 1.2 and all above. When there is a new version art, I get to the update. Right away. I could set the framework at the upload part and
also the monitor port. That is, when I'm
uploading the code, it will be opened stores
at a certain monitor on the same port data platform. Any also should detect
automatically report. But here I set it
up because often I have more than two Arduinos
connected to my PC. So I would like to have
it hard-coded here. Also because I'm using a lot of space and little
FS Management. And therefore also in
their platform i o, we can build the file
system image and also upload files from the fund research to
the code, to our ESPs. And this is necessary
when we want to interact. For example, the ESP 32 can have half and
a web server on it. When we are building a website, then we can put in to calibrate something
or to put in some, some, some values, for example, how should it flesh of laid
down for our other examples? And without a new EDA, we have to install
third-party components. It's a little bit, yeah, not, not intuitive and easy to use. Visual Studio Code.
There is a lot of the things integrated. And also once more, the speed is really,
really other dimension. Just a few insight
views when you want to switch to
Visual Studio Code. There are lots of
good YouTube videos out where you can make
your first examples. I will describe and show how I set up the projects
here on this course. But I'm not going to deep inside the whole mechanics
of Visual Studio Code. Justin first claims the dedicated so that
you get an overview.
7. Source Code from VS Code in Arduino IDE: In this video, we cover how
we can transfer the codes, the source code from
the Visual Studio Code to the Arduino union EDA. Definitely have an example. This is the LED example
from our first jump down and assuming we are
already done with it. And you want to now to
transfer these kind of codes. On the left side is the
Arduino IDE version 2. And on the right side
after Visual Studio Code with the platform blogging. And as you can see,
they look very similar, but they are in the core and the compiler
a little bit different. And also the visual Studio Code is a lot faster when
it comes to combining. So here you can see
the structure of the project and you can see
there are a few more photos, these two IF edit, but since the other photos
are always in the Oresteia, same when you're
creating a new project. Two are from Visual Studio Code. So what is interesting for us is the source folder and we have three Sui major files is
LEDs dot CPP and LEDs dot H. These are the class
and the class is also 100% compatible
with the Arduino IDE. And then you see main dot CPP. And its main CPP him
is our main file, and this is our inner file, which you can see here. So far as in short introduction. And now we're jumping
into an explorer and jumping right
into these folder. Here's my project. Once again, the different kinds of projects, I click on LEDs, as you can see, the same
structure as before. Click on source. Now I copy the files
into a folder. Let's assume it's called
0.1 so that we can now copy it, paste it here. And so we can have a sub folder. And now we renamed the main.cpp. Right-click on it, changed
the name to run dot. Get rid of the CPP. And yes, now we've changed here. The extension now into
our media copy, the path. Go to them. File Open. Go to the folder which
we just created, and we open the file
which we renamed. New instance will be opened, switching to the left. And what I would like to
show you now is that this is why I picked this example because they have different
kinds of compilers. Let's compile in
Visual Studio Code. This exactly code. And also here I've said
that needs to be 32. Is it an older libraries
are loaded here. If there is an third-party
library included, you can download it from
the library or manager, but in this case we
don't need anymore. And then we go here
to compile it. And as you can see here, the Visual Studio Code
successfully compile the code. But here the Arduino IDE is a little bit more strict
on, and you can see you, the error message is
called array must be initialized with brace
enclose initializer. And this is, I haven't done
it in the Visual Studio code. So therefore, we just
have to uncomment these lines and
have to, of course, we will be dealing with the
content in there later on, but we have to initialize all
the objects, for example. So once again, recompile it. And as you can see now, takes a little bit longer
than the Visual Studio Code. It's always also
have combined it. Now, you can upload the sketch to USBE
certainly do, for example, and you have the same code With created refurbish
to the court, but adapted it to
the Arduino EDA. Once more. This is a little, there, a little differences
in the compiling, but in general, 99%
would be implemented. You can implement it to
your already in edi, which is comes from
Visual Studio Codes. And once more, just give it a try and to
use Visual Studio Code. It's much, much faster
in the compiling. And also, I think it's a
little bit more convenient to code because there's a lot of good key features instead
of Visual Studio Code, which you can use it in your
daily programming life.
8. Online Simulator: When you are, during
your coding process, is often the case that you want to test some logical parts, just a few lines of
code so that you don't have to compile the
whole code again and again. Therefore, some
online simulators are really handy because then you just grab Dakota
pasted in contested. What can we.com? Similar IT projects in your
browser is in my opinion, really aren't good way
and good simulate done. Because here you have, can use the ESP certainty
to click on it. And then you have here
the online simulator. And the good thing
here is that you can also add some, some, some components, some
electrical part, but as well as
external libraries. And also you can paste in here your classifiers
so you can test your, your whole project
within simulator. So first example, I
will create here, LED, connected to an order
with, for example, 25 to GPIO on the
ketotic goes to ground. Then the LED pin is 25. This is the same pinMode. Them, pinMode. Led pin. Wrong. Output. In the loop. We are making a delay. No, it's not the best way, but it's just for
testing purpose. Then we'll click on assimilate. And the good thing here is also when we starting
to see it begin, we also should see here the console, the
serum communication. And as you can see him, We
can hear you perfectly. Test also components and how we can control
the components and also our code if we have
an clean code or not. Walkway.com, good simulator
for testing your code.
9. Enum: The following next chapters, we are making a little
bit more complex codes and source code and
staff what we also want to check which states we
are currently dealing with. For example, when we
are developing and game, then we wanted to know, are we are waiting
for user input, are we are finished playing or are currently playing, are
calculating something. And often this will
be done with flex. So for example, you
could define or declare, in this case, some pool
variable, for example, state waiting is
false or ballroom. Start. Gaming is true. Then in the loop, you
can check it with an IF. And regarding the states, you could calculate something, oh, wait, for user input data. In my opinion, there is an
other more convenient way when it comes to checking
states in C plus plus. And therefore I am
really using often enum. Enum is, in a few ways. I think the better
way to choose. Not. It reflects because
with the enums, you have one variable. In this case a status. About three states are combined. So it gives you a good overview how many
states you have defined in your program you
could address it was state is a model for example. And you also can print it
out, print line state. But now you don't get here and a string because this
is only the variable name, that means we are getting
here 0 because it's 0 index when we are
setting to pause, then we're getting and one, that means the compiler chooses the right datatype in the enum, because you also could declare
here some other things. But I don't give them value, only setting the state. And this is what I
think it makes it really convenient
in the programming. Let's take an example little bit more to see what I mean here. First of all, I said
the state of normal and we're printing
out the state. Then at the very first stop, I would like to define the
function prototype because it's really find later on It's
AND function check button. So we're simulating
something like our program waits for an Pattern click and then we are
changing the states. Freest millions because
I would like to change after two seconds to
stay there automatically. And therefore I implemented the Blink without delay logic. I'm sure everyone has
already dealed with it. And if not so on just Google
Blink without delaying. Therefore, we're sitting
here in the middle years. And after two seconds, I would like to change the
state into status fatigue, for example, we just
finished the check button. The very end. For example, I make
the state's normal. So let's see. We're starting the program Debra Thompson to
setup the setup Cs. We are changing the state
to start as normal. I would say that the spouse to spouse her we're printing
out the first state, then we're jumping
into Check button. The state will be changed
to start as normal. After two seconds to state will be changed to status fabrics. So we have here three
different states. And now we want to also visualize it in printed
out the different states. So therefore, I would recommend
cities and switch case. Switch case. We want to check the state. We're not dealing
here with a string. So therefore we could use here, the case starts as normal. We are just writing
here the variable name, and then we are writing here. Let's go for example. Then second case started
as pass or break. Throbbing in. Now it's break time. The last one is it's finished. My case, it's college starts to static and then
we can doping in. We are finished.
Bit more review. And then we could just check it. If you have right or not. What does the problem? We often delay here. Delete is good. We're at T of 500s and
this one too much. Once again. So what
do we have here? I click on pause it at
the very first beginning, it will be printed out a one because the state is unpause. Sera index. Then we
jumping into Check button, check button changes to
start this normal, normal. And afterwards, yeah, we're
finished with the setup. And then in the loop, this is not the fact
that we're jumping, in, which case, and now
it will be printed out. Let's go because they've
thought this isn't a mile. After two seconds,
the status will be changed because here on
the blink without delay, logic jumps in and we setting the state
to status fatigue. And so the status, oh, we are finished
where we print it out. This is just a small case, a quick case that
you can see how we can change the state, or we could also check
the state in an project. And as you can see him
gives you a good overview. Which different
states do we have and also how could we change it?
10. Struct: I also used on a
regular basis structs. Structs are really
a convenient way where you can summarize different kinds of variables which different
kind of datatypes. Also I would call it and
smaller lightweight class. So how is, how can we use a strategy C plus plus
in Arduino environment? For example, we can
type in a struct, then we give them
structure name, for example, person down and we can define some variables. I haven't string,
name an integer age. Boolean is the
personal quota or not. And just for example, if reasons long account
balance in dollar cents. And it's always a good
practice when you're dealing with account
balances, money, etc. Don't calculated with floats
because it's always the eye. It could be tricky when
we are calculating with floats regarding the decimal
place or it's not easy. And therefore, I would also recommend that we are
calculating with, for example, a sense and then we visualize it in
normal dollars. But here we are dealing
with dollar, with structs. For example. Now we could see
it person, heavy, but this brackets
semicolon the name of it. For example, y comma, the age 25 command, is encoded through comma. And then we can sit on their account balance,
for example, purpose. Afterwards, we also could change their different
kinds of variables. Therefore, I type in
heavy bird point, and now I could address the variable inside,
for example, a name. My new name. Also about point,
quarter is false. I'm printing out here. Anybody by name and if
I'm not misspelled, something should print out my new name because we have overwritten it from Harry boats. And as you can see him, now we have discussed how we
could define a struct, how we could initialize it, and also how we could change in sudden
strikes some things.
11. Basic setting of an empty project: In this video, I would
like to show you my basic settings and how we can create a blank new project
in Visual Studio Code. First of all, if the workspace and I click
on the platform, I own menu, click on open, and then it will show me what is my core platform
or et cetera. What I would like
to focus with you is I've gone into platforms. And here the installment, you see my expressive
version is 3.5. And of course, when you
show, watch this video, maybe in one or two years later, of course, will be
another version. And this could also happens
that some of my code snippets won't work out-of-the-box
because you made some changes. Therefore, it's necessary
that you always keep in mind that you have to adapt certain type of codes when it comes to updates
from the platform. Just that you know,
when you got them compiling error to see
where it could happen. Also, we discussed in a
previous video, state boards, I'm using the AEC delivery
board, deaf kids C4. And here you can also
browse through your boards. And when you have normal ESP 32, then I think you also could take this one or you can
search for an ESP 32. You find a different kind of frameworks and
also manufacturer. Now we go on to the projects
and I would let out on Home, click on New Project. And for example, I typing
in, OOP. In Toronto. I'm selecting the boards. Ac delivery. I'm using the ID or
the inner framework, and I'm choosing
here my location. And that's all what
we need to do them, I click on Finish and my
project will be created. And I've left side here
on the working space. You can see here now
my 51, my project. And the first thing what we are doing is here on the platform. We're open here the general
settings of the project. And I would recommend you to
make the following changes. We were adding hidden
monitor speed, for example, to 1152 sera, sera framework and the
upload and monitor port. The monitor port
or the port from your device you can get
from the platform you all, you're connecting your device
and click here on devices. So connecting, click on refresh. And as you can see here, this is my port three is the reason why I'm edited
here and the platform. I also add here and
third-party library. It's called analogWrite. Nevertheless, if we use it, but here then this is
one of my basic things. I always implement. The library manager from blood from IO is very, very good. So you can click your
libraries and for example, Adafruit, Neil pixel, just
for training purpose. You can click on it. And here you can
see the examples, how you could address it in the source code and
also the installation. For example, if you
would always have the updated version
on specific version, you just copy out
here this line, go through the lab
Deborah tendencies, and then you can include it
in your program as normal. And these goods to go, to start with it. Safe. On the left side,
we have here now our menu we're going
to explore on, and this is all project
and then a source. We have one made sure file. And I will also
work from India to put in front of everything
in the first place. Justin header of
your credentials, your maybe your
license, et cetera. Repeated intro on
an actual date. And then you're good to go. It also comes very handy
when you're typing in here your platform versions. So that also persons
from outside? No. What was your basic settings and how you developed
with which circumstances? This is just a few
settings which I make when I'm starting
a new project.
12. Structure of a class & data encapsulation: Let's start with the basics
of the class structure and also with data encapsulation
and motor practical guy. So I would like to start here
by opening the main CPP. And what I suggest to do is here we writing everything in one file just for
training purpose. And the first thing when we are declaring classes is
we're typing in class. Then the name of the class, curly brackets open,
curly bracket closed. And at the end, it has
to be an semicolon. And this is the basic structure
of the class that limit. One class element is also
that we are defining here whether their function or the variable is visible
to the outside or not. And this could, this is, um, can we do with the identifier public
and also with private? So everything which comes
after the private is just, for example, here we have
a string called name, and these elements are only visible and accessible
inside the class. In this next example, we can have your last name. And of course,
inside the class and inside all the functions which
we are defining later on, we have excess of this variable names
and also the content of the variable when we are using here
some public things. And of course I could also
type in a string filename. Then we have x's on these variables also
outside of this class, and outside of this class means outside of this structure. When we instantiate
the object later on, then it's not possible to access your things
which are in private. We are only have
access on things which we are defining
in the public area. This is that we are always be aware of that
kind of mechanism. And because this is
data encapsulation, that means we are only
showing data into the public, which is accessible
from outside the class. And this gives us also in
security feature because we can add here some very
confidential things, but also it's that you're not unconsciously
changing here some data. So therefore, it's not
only on data security, it's also in security issue when we are using here
private and public. And the public, for example, we could use your string getName and could see here
return a name. And as you can see, the function itself is public from outside. And this function can give us back here some
private variables. This is what we will
learn later on, getters and setters
so that we can use your public functions to
get private elements. There are also other identify which I
would like to discuss with you and it's
called protected. Protected isn't way which
we are using later on in when we are
inherited some classes. So that means in
the protected area, we can the variables here,
for example, string, my second name is
only visible in the student class as
private, handles as private. But later on, when you give someone the library and
the library is inherited, then the protected
acts as some public. This means that you core class will be
handled as private, everything which
isn't protected. But later on, it's when
someone inherited, it is used as public. And this is a good thing
when you are developing. And library, which later
on will be distributed to other developers so they can make their own
thing out of it. But you would like to have
protected you own class. This is what protected means and it could be
come very, very handy. So we talked a little bit about the different kinds
of private and public and protected
identify us, but later on we will see it a little bit more in
practice when we initiate the objects and also program more functional to fit just in short introduction, this is how we set up a
class with class the name, column brackets, and the
semicolon at the end. And with private and public, this is the more usual
way how we program it. We're defining our
functions and variables.
13. Instance and constructor: Let us now focus on what is an instance and what
isn't constructor. So first of all, the Arduino edge, we are
putting in front of everything. And then also in the setup time, I would recommend type
in 0 begin because afterwards we are maybe
don't think about it. So then we're ready to go. So we have finished now the
first step of our class. So this is our
blueprints so far. And now we want to set up in the real coding world our class. Therefore, we
initiate an object. And this could be done
with the class name, then variable name of the
object in my case, idiom, then students, bracket, open bracket
closed and semicolon. And there we go. We have initiated our first
object with the name Eddie. Then I'm jumping here
inside the setup. And by typing in 80, I have access to all the
public members from my class. And as you can see,
I can't access the name or the last name
because this is in private. So I can use this one, the function which
I defined here, and f x is over the function
to my private members. This is an inconvenient way, how we can program and how could we access here all the elements. Then as a second example, we can initiate here
and the second object, and it's called Julia. And as you can see also here, Julia dots get name. We can access here also the
same thing from Trulia, but we don't have any
data storage so far. So it would be the next
step to fill in here some, some strings so that
you get to know also hear the names of our objects. And of course we could say
he would set all my data. And I could say
string, name one, last for string, and
so on and so on. And I could invoke this
function afterwards, but this is not the
way I want to do it. Because for the first setup, there is an construct like
it's called constructor. This constructor takes us our first inputs when we
are initiates the object. How could we define
a constructor by simply adding the name from
the class to the public. So there is no return value. In this case it's called
student and insert. We could say string,
firstName for example. And then as we did here, we can say the
names are private. Member will be a,
gets the firstName. So this is now our constructor. The constructor will be invoked when we initiate the object. And the object is here initiated and as you can see
now we have an error because this one needs
now an input parameter. Therefore, I could
say locals and Julia. So just to see, this is a different kind of does is just the declaration of the name and this is
the input parameter. Now, we want to get the name. This is, this is an
return, a value. So we have to cover it here in serial print line, print line. And we could also get in
front serial print line. My first class. Then connect here. Use pm, so T2 on
to your project. To see here on the right object is the right project
is here selected. We click on check and
built the project, and then we're
going to upload it. So and also the serum monitor
would start right away. And we should get now
three lines of output and our serial monitor first-class than the name Marco's
should be displayed. And also here, the Trulia
should be displayed. Looks so good. So far, so good. Yeah, my first-class
markers and Trulia. So we have now discussed
what is an instance often from class and also
what isn't constructor.
14. Overloading constructor: It's also often the
case that there isn't a requirement that we not
only need one constructor, it would be really handy when we have a second or third one, which gives us more opportunity to have more input
values, for example. This is also what we
can implement so we can overload the constructor are also function in this
is called polymorphism. And how could we do that? We just typing in the constructor
name and defining here. And second, it has
the same name, but other input values. For example, pinwheel
your string. Firstname. For example, we can say here,
name is firstName. And here we could also do something with the pinwheel you. But this is just for
training purpose. Scrolling down a little bit
and would like to show you, I can now enter an integer. And as you can
see, both objects, both constructor will work
because this one will invoke the first one is the
compiler also checks out, okay, there's only one pyramid, dark one string pyramid
that I will take this one. And the second one has two input parliament that
our first one is an integer. The compiler will
take the second one. This isn't convenient way. How could the depth our program? Because often it's
the case that we need more input values
at the same time. But I would like to make
here another example. So for example, we could
take your string firstName, string, lastName, last name. And it's called lot. That last name is last. So going down, now, of course I get an error
because we only have constructed with two
input parameters. And now, as you can see, we have here one initiated
object with one constructor, and this is the
overloaded constructor. String, lastName,
return, last name. So this is our private
member and we can access the private member with our public function,
get last name. And we're changing here
getName to get lastName. And we are compiling it and
uploading it to our USBE 32. And when everything works well, we have three lines
in our ceremony done. My first-class, the firstName of Eddie enters only the
last name of Julia. So let's see what our
program will print out. Finished, upload it. Then
we're open the ceremony done. My first-class, and it's called
markers as we have here. And we are only
printing out the sake of the LastName from
Julie and Julia. As you can see, this is what overloading constructor or
function channel remains, and also how we can use it in
our object orientated way.
15. Exercise example Interaction of header and CPP files: In this video, we're going to explore the object
oriented way a little bit more and covering all the Arduino environment
aspects from the, from the object orientated way. And therefore, I would
suggest that we delete the class and all the objects which were defined
in the main CPP. Because we want now to define
your headers and CPP files. And this is the standard way to program and code in an
object oriented way. But first of all, get rid of all the
things which we are defined and declared
here in the main CPP file. Nevertheless, if you
are under ED or in the Visual Studio Code
now in the main folder, in my case, it's
the source folder. We created two new files, and it's called person dot
h for the header file. And also new file
with person dot cpp. If you're not just on the right top corner where you can create a new file
on the file explorer. And you can also edit
here the extension. And one of the first steps I would suggests right-click
on person dot h, split to the right until
we have the two fires. In the environment or in a
C Plus Plus environment, it's very common that we haven't had a file
in the header file. There is my class definition and the private and public members and the function prototypes. A function prototype is
just the declaration of the return parameter and the name of the function.
Just an overview. On in the CPP file. There is the whole logic inside the whole
performing parts. In the main CPP, we are defining the object and work
who is the object. But first step first, I would like to start
with the header file. In the header file,
we could now define our class as we did before
in the main CPP file. Therefore, we are
making here in class, person, curly brackets,
open semicolon. And as we did before, could see private integer
age in Detroit for name. Them were from public, an empty constructor
for example. And then we have function, it's called print all. And as you can see, no curly brackets,
just a semicolon. And this is the
function prototype. Since the compiler there will
be on function print all in but with the name print all
and no return parliament. And the function itself will be declared a little
bit later on. But we're not finished yet. Because we need here also the include arduino dot h so
that we have excess of all. There are the parameters
from, you know, environment. I'll show you one
small because if I'm taking it a string
as an phoneme, I will get an error because the C Plus Plus don't know
unsparing only chars. Therefore, we including here
dot h and the error is gone. One thing what we
also need to know is your data includes guards, name Include Guard is, we could say if n
define and some name, I would suggest that
you call it the same as the file just with an underlying define
person's age. And if so, what what was it? What is the Include
Guard not doing? They include guards
shows the compiler. There is some file
called person dot h. And if here is some code already included,
don't include it. And if we should include it, there isn't any person dot
h defined, then include it. So we need to include
the person dot h. Of course in domain dot cpp
file include personal dot h. So this is the first time I am including year the whole court. But I also have included in
the CPP or in a person's CPP includes person dot
h. And as you can see, I have included it two times. And this will also, the compiler will use
it and say two times, but we still include guards. It, it will only used one
time at the very first time. Maybe here it will be included. And then at this point, the compiler maybe sees a hard, there is a definition of person, age already existing
and he would skip it. And this will be more faster code and
also in cleaner course. So this is include guards and urea of the
class definition. And this is so far our
finished header file. We stir function parameters and their declaration
of the variables. But what this was the logic. So in the person dot cpp, we can define your white
print, or for example, Sarah print line H. And we can see that we have here an error
because h is not defined. Why is it so this
is just a function. There is no reference
that we are want to act with the class
of the person. Therefore, we have to
adhere the class name. It's called Person double
points, double point. And now we have excess of all
the members of the class. And as you can see,
the error is gone. And now we have also were
acting inside the class. This is the reason
why we have also here the access to
the private members. And this is it. So far, we have implemented
our first-class in the Arduino environment
in a way with the header and the cpp file.
16. Getter: In this video now, we want to discuss the getters and setters and what we can do now every time when we want to
access private members, use a functional public function
which has access to our, our public or private members. For example, when we'd want to change, burned the lifecycle, some variables, or
also when we want to get some of the
private members. But before we start, we want to add some
more private variables so that we can use
it in our examples. For example, an integer
height just for turning Barber's String
lastName, string sex. And also String address
for later purposes. String SIP country, code, and a string country. So far so good. And as a function later
on we want to use print person, print
person details. And of course, we
shouldn't print something out directly
from the class. We should go through
a return value. And afterwards in
the main program, we should print something
out for debug purpose. But here it's just
a training purpose. And I would say
this would be okay. We now have no object. We want to assign some
objects via constructor. Therefore, we are
adding here some inputs string underline so
that I don't mix up the normal private members
and the input borrow mentors, I would say for name, comma string, underlying
lastName, string. Now, what else do we need? Yes, height, I would
say integer height. That looks good. I copy the whole
constructor. Okay? The whole constructor switch to the person's CPP, paste it in. Afterwards, I delete the semicolon curly
brackets open and close. And now, as you can see, we have an error because
we want, we want, or we should have to identify here the class name
double-blind, double point. And now we have access
to all our members. Sign for name. This is my private variable, will be passed our inputs. But for the score, for name, then last name, last name, just use the auto complete, sex and sex one end where
the height is height. So let's see any errors. Yes, something
misspelled, for example, what's what do you
don't like here? Aha, aha, aha, no underscore. So what we're doing here, we passing the input parameters
to our private variables. And this will be invoked
when we initiate an object. So switching to our main CPP, now we want to add
some new objects. Therefore, we are
writing person, that's the class name
and variable name for the object is called AT person. And inside the Person constructor we have
to fill in for name, last name, sex, and height. So Eddie, LastName,
phone and molecules. Eddie, for example. Male, 180 centimeters. Of course, we could also change the name of height
in centimeters. It would be a little bit
more clear and clean accord with the second person. It's the pot person. It's called, but no gender. And it's only 25
centimeters higher. Unserved person. We have Julia Julia, female. And we have to hide 175 female her and said,
right, Yeah, female. So now we have initiated
three objects. And now you can see also the main advantages of
the object oriented way, because if you would do
this in a normal way, you have declared
here 1234 variables. Of course we have
also here divert, declared here for virus, but for the second person. Needed as well for variables eight in
summary, then also here, now we have 12 different kinds of variables when you want to deal in the code with
these kind of information. The main advantage in the object orientated ways that we
have here, our blueprint. And we assign these
informations to our blueprint. And in the background,
they will deal with holder memory management and
all with the declaration. It's at this, we've just made them blueprint
and use it over and over again as many
times as we have memory and CPU usage
to, for us to use. So now we just initialized it. But we also had some
print person details. This function I would like
to invoke null, therefore, Abby points, and as you can see, I have two options
because we only have here two public functions. The constructor only
will be invoked automatically when we
are creating the object. Therefore, I'm using
the person details, no input parameters. And we are good to go. But the same thing
brings details. And as well as Julia wants
to print out here some data. One thing I missed
going back to person, um, because we don't declared any of these
functions so far. Therefore, what
person, Double point, double bonds, print
person details. Now we want to use this
serial print f function. Print F function is
very convenient. We can use here and string. And then after the comma comes to variable
names, for example, I would like to use here the full name and I
can mix your texts. For example, name. And this is a placeholder. Was answering this placeholder. The very able for name will
be automatically put in here. The placeholder. Now also can add here
inside the string. And second variable,
for example, LastName, as also in string. And here, the second
variable will be used here for the
second placeholder. And as you can see, I only, I also can use
your uncertain variable. It's not really rocket science. But what do we do
now when we are mixing your strings
and integers? Also, this is no problem for us. We can use here and d for
integer, add some placeholder. One minor information to you. My compiler and the
Visual Studio code will automatically convert
the string to a char. And as we know in the Arduino, there's something I can string, but in a C plus, plus, there is no string,
there only chars. And therefore, some
compilers need also here on Come converted
conversation to an char. I don't need it, but if you
are in 3D, for example, gives you here compiling error just adds to the strings here, see underlying
underscore string STR. And then everything
should be fine. So now we also implemented a prime
print props and details. Let's see if we're right. I'm going to write
project as you can see here.
Here's the warning. You should change
your I-System string, but it's uncharged, expected. But it's implicit conversation. It's in my case,
everything rent. Well. So Success. Show me the serial monitor. Restart. We have everything in one line
and we could change this. Well, As we're just at the end of the text
and line break, so that we have here
a little bit more on better outcome than connecting. Just stay tuned. We are near the result. Now I have to print
the boot button. It's strange behavior. Sometimes I have to flush it through the boot
button, sometimes not. Once again, new line restarted. Here we have molecules, lastName 86 m, height
100, eighties. And as you can see, these are the information from
our constructor. And also here, and also here. Congratulations, you
implemented here constructor and you also implemented yet and
getter function.
17. Setter: But what if we want to change current lifespan of life-cycle of our program,
some informations. And still we don't have access to our members here
because as you can see, I can't access here
to, for example, for name is new name. When I tried to compile this, I will get an error
because this is some private member is private. So what can I do now? I can use here also some
public functions to access it. So let me see what
we can do now. For example, we are
defining here and white set last name. And we're a string
underscore lastName. And also white set H, integer h. Looks good so far. Then we're switching
back to our person dot h naught person
that H plus is CPP. And now we are
defining here white, void, set, age, integer age. And we could see edge
is underscore H. We could do that also with what? Set last name will take an input parliament
the string lastName. And we setting in the lastName
is underscore lastName. What is the problem? Once again, we have to assign it loose person, double-blind,
double points. And now we have the
right reference. We're going back to main CPP. And now I could say,
for example, 80. I would say what set
h one up to 55 years. And we could say Julia set
lastName, maybe she wedding. And then we see here. So let me see what is here. Strings certain age. What's the problem here? Within these contexts? Let's try it out. If there is some error. Nope, looks good to me. Then we uploaded it once again. And let me see if we have here some change restarted
from clear line break. What I've changed so far
is that Julia has a new, um, lastname, but
we haven't assigned here the H. So person's CPP. I would like to print
out you're also the h. Then we go here, H at this point, for example, it's an integer 123 h. And what I would
like to stress out here a little bit more
why we do this with the setter and getter is that not only to fetch the data
from our private members, it also have and good way that we can hear at some
logic before we enter it. For example, we could say
if age greater than 100, we said that the h
is 299, for example, regarding the database
limitation or whatever else. We assign the variable
to our private members. Once again, we uploaded. And as you can see, this is also a good way how
we can see QRA and also keep the higher-quality level to
our whole programming and data management flush to use PM. Now, once again, we have here changed at the
current life plan, 155, we set the age, whereas my bot, and in the setup we are
added some logic and it's got here the 99 Julia
lastName MANOVA. We're assigned to your
horror at the first place. And then the seconds
in the setup, we added the last
name to malware. This is the principle of setters and getters in the
object oriented programming.
18. Inheritance : Also one of the main
concept is that we can inherit class from
another class. That means we have blueprint,
some general records. And then we can use
all this function, all these variables
in our class. So when you google and research a little bit
about object oriented way, one of the main
examples is always in general and generally heater. And this vehicle is one class. And then you can inherit and use all the functions and
adapted to and sports car to an SUV and two
cars, cars, Cars, etc. So that you get the big picture. It's in general code. And then you could also specify other classes with
some individual codes. But also this is my
case that what we are using a lot is it
gives us an API. It's called an interface
where we can use in class for our own purpose and
adapted to our own purpose. So how could we do
that in our example? Here we have our
objects, our project, and we're creating
here some new files because now we want to add
to the person and customer. And this could we do with
new file customer that H and new file customer dot cpp. I'm switching the customer
that h to the right. And now we can declare here all the things
which we did before. First, we are starting
with the class, class customer semicolon. Then we need here on the
Arduino as with before. And we need to include guards because I'll show you later on. That's necessary. But how can we do now? They inherited for the class
person to the customer. Therefore, one double
point public person. Now we've got an error because person is not included here. Include person dot
h. And now we have successfully inherited the
person to the customer class. And as you can see here, we have one include person that H to include
person dot h, The third one. And this is why it's necessary that we have to include
guards that were not include o again and
again, the whole code. So in this customer class, we could also define
his own private things. For example, integer customer
ID, integer, sales, public, for example, customer
ID, integer, number. And also what is really necessary when we
inherit something, we need to use the constructor
from our base class. And how can we do that? We go on to customer and we say using personal
double bond person, that means we inherited and we use the same constructor
in our inherited class. Perfect. So far, so good. What we do now is we're
switching back to customer CPP. Include customer dot h, include arduino dot h. And we can set your white
customer double bond, double bond, set customer
idea, integer number. And you could say
customer ID is number. So far, nothing, especially
what we don't see here, but what we have x's in
our customer CBP is older. Or what we can use is all the function which
we already had here. That means we can set the age, we can set last name, but also we can
print the details. So we take a closer look
to the main CPP file. Under Julia, I would say we create a new object
and it's called customer because this is our new inherited class
robot and it's an customer. S we declared here, we ops. We are using the
same constructor. That means we have here
a robot or a friend use a needle and he is one. The five. Hi. Take a closer look
at why is it broken? Because we haven't got
included that customer dot h. And now we should get here
on customer, customer. Now, Now it's compiling. So we have initiated here and new object,
it's called Robert. And we inherited also
the constructor. Now, I would like to hear Robert print person details and upload it once
again to our ESPN. And in the meanwhile,
I would like to stress out once more that we don't have here declared the print person details. This will be
automatically used from the person dot h because we are inherited
all the functions. So in when everything
goes right, we also should get you all the information
from our robot. That's opening ceremony done. We see Robert last name casinos, age, sex, and height, 195. And we're successfully
inherited a complete class, adapted it, and also use the function
from our base class. And of course we
can use here our own functional
accept customer ID. So we can set also here robot set customer
the dysfunction is only available in the, in the customer class. And therefore I could
say, for example, 255. And it will work
as we did before. So the concept is we're using a base class
and inherited to a new class and use all
the functions which is publicly accessible
to our new class. This is what
inherited is and why we use it on a regular basis
into object oriented way.
19. Inherited function overloaded: What if, when we want
to use the print personal details also
in our customer class, because in the person for you, it makes total sense that
we print out the age, sex, and height, but
not as a customer view. And therefore we can overload
an oval right there, print person detail in
our inherited class, and this is what we do now. So therefore, we go into the customer
that edge and we say, we want to add in a sales number and get rid
of the age, sex, and type. Therefore, our helper
function would call set, summarize sales. And we're defining integer sales with an underlying
and white print. All sales. How do we call that
print all print. Costume person. It's called print
personal details. Yes, this is what we
want to overwrite now. So it's now re-declaring
the customer that H, we can jump to the customer CPP. The first thing will be customer double-blind,
double-blind some cells. And we have integer sales. And we're seeing the sales, this is the private variable, is on those sales. But not is we're
adding here a plus, so it will be summarized them in the main CPP
we could use here. For example, Robert, some sales. 1505200. I would like to add
here 150 again. So we have three
hundred five fifty, five hundred and
fifty in a summary. And this should be printed out into the print person details
and print person details. We have already
declared in the person, but we want to get rid
of the age, sex, etc. Therefore, we are defining
here once again this function. So be over loaded,
print person details. And I jumping back to
person CPP and copy all the things which we
did here, paste it in. And I would like to
get rid of this one. And this sales. Sales. Is this an integer? Okay? So what can we see? Now? We see that we
have an error in for name and last name,
what is called? It's called. We can't access the name
because it's not declared. The x's is not prohibited. Why is that? So let's take a look into the customer dot h. We have not declared here for name or last name
because it's inherited. We're not we're not meeting. There's no need to redeclare it. Then let's take a
look in person dot h. This is private, and as we know, all private is just
accessible from person, from an object, from
the person dot h. But we are now in a customer. So we inherited, but
we have no access. What can we do as we did in the very first
beginning of discourse? We know three members of a class and we could
change this to protect it. What's protected now? Protected means that it is
private in the person class, but it's public to all
inherited classes. And as you can see,
now we have no error. This really a good
way because someone, maybe it would like to save this whole data encapsulation
for its own class. But isn't developer for
open-source projects and says, okay, you can use all my things. But please inherited
and edited in your way. And with the protected state. Now we have adopted and overloaded the print
details function. Once again, let's
upload all the things, jumping back to main CPP. And now what changed is Eddie bought and
truly should print it out all the details from the class from of
course, the person. We should summarize here, the sales and printed out the new sales
function, new line. And as you can see, Robert has successfully just For name, last name, and the sales
which are summarized here. This is a main concept that you can overload inherited function. Be aware of the protected
and public members. And we also could add here
some our own functions, but also we could overload it. And I think this is really
handy when it comes to public and open
source development. So we have a lot of, a lot of potential
where we can use it. So print person details.
20. Recap Introduction OOP: If you followed me along all at the steps of this
practical exercises, I can congratulate you
because you have learned now the basic concepts of the
object orientated approach, what we need here in this online course for
the Arduino environment. These are really
the core basics. I would like to
make a short recap so that we can summarize
all the learnings so far. First of all, we took a
closer look on the syntax, how we could define a class, how we can write a class, and also what is
data encapsulation? That means with the public
and private members, but also was to protect it. Once. Afterwards we
initiated an object. We did in the main file. And also we are
using constructor. So a first input parameters
could use and sets our private members in
the initiation process. Then we talked about
the getter and setter. So how we could use public function to
access private members, and also how we could change datas from the lifecycle
lifespan during our coding. And afterwards, we also took a closer look
on the inheritance and how we could inherit
classes in two other classes. How we could use the class, the inherited class function. How could we overload function, which we are inherited
main concept. And afterwards we also try to hear the different kinds of data encapsulation,
for example, with the protected
ones so that we have x's in the inherited class, but not in the base class. This was to find the basics. And now we're jumping
right into our exercises.
21. Wiring and series resistance calculation: Let's start with
the wiring part. We have on the right
side, the ESP 32. The first thing what
we do is we are connecting the ground
to the breadboard. And now we have here an LED. And this LED has two collectors. The first one is there an
order is the plus side, and it's also there, the lateral connection pin. And then we have the cartilage. It's the minus part. And as you can see,
we have here and the resistor before we
connect the LEDs. And this is necessary
because we have too limited the basic current for the LED. And how can we do that? There are lots of
different websites where you can calculate it because it's necessary for each different color
which you implement. You have to choose
on proper resistor. And this is calculated with
an Arduino Uno with fivefold. Be aware we are using here in
this example and use be 32. And it used to be 32
has an output voltage, voltage on the GPA or from
roundabout, 3.3 volts. Therefore, we have to
adapt here the values so that we get the proper
resistor at the proper ohms. So for example, let's
go a little bit down. This is the whole calculation. So we have to see the overall
voltage is in our case, 3.3 volts minus the
voltage on the LED, because we want to have just a certain amount of
voltage on the LED so that the proper basic current
of the LED is on the LED. And this is why we have to
make it here and calculation. So let's jump right into it. For example. We want to calculate for
the red LED that resistor. Therefore, we are saying
the main voltage is 3.3 volts minus 1.6 words for
the LED and the rest of it, the 1.7 voltage have to or
must fall up for the resistor. Then when the 1.7 volts
follow-up of the resistor, the LED only gets 1.6 volts
and also 0.02 amperes. And this is what we need. So we're not finished with now is our calculation because we just only have here the voltage which fold
up on the resistor. Then we have 1.7 volts divided
two basic or main current. This is 0.02 and pass. And as a result, we're getting, let's
take a closer look. 58 ohms. So as you can see, there's a little difference. But in the main contexts, I would suggest that you use, for example, also
the tune of 20 ohms. It can't damaged or shouldn't
damage due to LEDs. But it won't bright, or is, it's so bright because it
can't get the full voltage. But in my case, I also used, I think 220 or 110
ohms for all of them. Just for training purpose, it's easier to use when you are in a
productive environment. I recommend that you really calculate the exactly resistor exactly ohms because it's also concerning the durability or the lifespan of the LED
and the components. So now we are knowing
about the resistor. Let's check how we can
wire everything together. On your opinion, how do you
check if it's an output pin? And then you connect
the output pin from the ESP 32 to the resistor, the resistor to the unordered
list, the longer part. And then you connect the
second part of the cathode to the minus or ground
parts. And that's it. Take as much or as
many LEDs as you want. I have here 3691215 LEDs. So it's, it's shows
you a little bit more what we can do with the
object oriented approach. And when you only have
two or three LEDs, it's not so much. It's okay. And, but you see the main advantages when you're adding five or more
LEDs to your project.
22. Control the LED with an object: Let us now add some
functionality to our program. First of all, right-click
on lids dot h and splits to write
so that we have on the right side
the header file. And we are opening on the
left side to delete dot CPP. And because they are, we want to add the
functionality. First of all, include the LED is dot h so that we have access
to our class elements. As the next point
I would recommend to includes the arduino dot h so that we have all access of the Arduino
environment here. First of all, I would like
to define the constructor. The constructor is
as the main method which will be
invoked when we are creating the object later
on in the main dot cpp. So the constructor has here and input parameter and
it's called integer pin. So we are LEDs, LEDs how the class
name is called. And then we are calling
the constructor. It's the same name
as the class name. Then we have an
input parliament. It's called Pin, curly
brackets open, close. So we have here
our functionality. What do we are doing now
with the constructor? The constructor takes the
pin number, the GPO arm. And so we save the pin number into the private variable pin, LED, pin, it there, pin. And then it's saved
into the class. And later on, we can
turn it off, turn it on. And this was different
kinds of objects. And the second part, I would recommend
we are accessing or defining the pinMode
with Pinellia deer. And it's an output because
we have LEDs and we want this week bonds
rewards on the GPIO. So the pinMode could
also be invoked outside the setup function because
later on I opened them in. We can here create an object, for example, lids, white one, and then
the curly brackets, the constructor will be
invoked and white one, the first one is at GPO 12th, in my case, closing brackets. And now we have created
our first object. It's called white one
from the class LEDs with the constructor
12th integer. And so we have here the sets, the private variable pin LED, and we have set the pin mode. Once again, why we
can access here, the private variable, because we are dealing
here inside the class. We can't access a pin
LED with this very real, this is not possible. So on. Now, we want to add
the functionality. For example, we could go on, turn on curly
brackets on and off. And so we could say
digital pin LED high. And we're getting here an arrow whilst
it's own because we defining here AND
function in lids dot CPP. But it's not our turn
on from the class. Therefore, we need to identify are in front of the function. It's the class name,
double-blind, double point. And now dependability is
recognized and we can set on turn on the LED
as an x function. We would turn it off. It is turned off. Digital rights, pin LED and low. I got an extra error. Why is that so because turn off his ear and input parameter. And this is also for
training purpose. Why is it so analog of bull, analog of poor log of and
as we mentioned before, don't mix analog and digital
white and therefore, I pass here and
bool variable that we can check if
analogue of his true. Then we have to turn off
the LED with analog. Right on the lower
right pin LED 0. Else we could use
digital rights. So the next, the next error arises here because analogWrite is
not defined. Why is that? So because I haven't
included it, we have to include
another right dot h. And now we're fear
and simple logic. With the turn off function, we pass in here
and true or false. If it is true, then we shuts down the
LED with amiloride. As with the digitalWrite, the analogWrite we
are using later on for fading on or four. Say detectors so that we can set the light in different
kinds of aspects. So slightly timid or
faded on and not just flesh it with the full
amount of brightness. This is the reason why I'm here. Going a little detour to
show you on how we could also pass you some
input parameters, etc. So now we have here the
functionality within constructor. We have turned on function
and the turn off function. And now I would like to implement
it in our main project. So here, the white one
is already defined. Now I can go here by
typing in white dot. And here you can see
all the functions which are defined
in the header file. But you only have already
added some logic to turn on. And in the loop we
are making here and delay just for training
purpose for five seconds. And then we can say white one, turn off, brackets on. And here we've got
the suggestion. Please give us here
in bull variable. And I can recognize, aha, what is it bool analog of? When you describe
your very rich, very well, then you
don't have to think about what have I meant here? Analog of is false because
we haven't digital right on. And this should work
for the first example. So then I would suggest we
are clicking on the tabletop. I connected my
breadboard with my PC. This is an old sketch
which is running. Then I flesh it. First of all, I check
it with the compiler. If I have something
misspelled is not. It looks goods uploads the whole sketch and clicking the button to
flush the whole thing. Now it's uploading and then
it should only success. I have the false program. I have to switch to LEDs
for the English part, once again, upload
the right project. You see here you can change
the project directory. And because I have open here, a lot of different
options for our projects. Connecting, once again, putting. And now only the first LED, the white one should be fleshed, should be turned
on, as you can see, after five seconds, it
should turn off very well. So now you maybe would say, Okay, it makes sense, but it's a lot of more codes
to write than I'm used to. I have I could also
define it here. That's right, But hold on. Now we can go on and say, for example, two more LEDs. For example, green one red, one year the proper pins. You could say green one turn on, red one turned on,
that's worked. And then also here after delay, we're saying the green one and the red one
should turn off. Right-click Format
document uploads. And then I'm sorry, LED should turn on and
after five seconds, it should turn off. Booting once again. And as you can see here, it looks like that
some LEDs are on. Let's consider three
LEDs and after five seconds, which go off. Perfect, our sketch works, but it looks like
that they are on, but this is because I have some spotlights and
this is the reflection of it. So it's turned off. Once again. Restart the ESPN. As you can see, the three LEDs, which we are declared here going on and after
that, it's turned off. This is one easy way. I would like to
visualize you how the object oriented way has a lot of advantages because
here we have one pattern. With this pattern,
we can address many, as many LEDs as we want. And when we would like to change something
in the turn-off part, we just have to do it in here and all the
LEDs are affected. In the next video, we would like to add some more functions so that
you can see that we also can use different kinds of
functions for the LEDs.
23. Headerfile: I feel a fresh new project
in Visual Studio Code. And you can follow me along also with the
other intermediate, just create a new project. Then I've included in the main file analog
rights library we needed because we want to use a PBM GPIOs so that we can set the output voltage into different kinds of slots
so that we can fade, for example, our LEDs. Be aware when we are
using external libraries. Also GoTo platform. And make the reference for
the library dependency here. Also when you are with the EDA, then you can use here
on the left side, the library manager and
includes the analog, right? I'm not sure if it's included
already in the core from the ASPE 30 to just give it a
test when you're compiling, then you should get
success or an error. Then you have to add
the library. So on. Then as an exponent, we are going to the
source directory and creating two new files. We are starting with
the header file, and it's called LED's dot h. And in the same
way we are adding then CPP file lids dot CPP. Okay? We're starting with
Declaration or defining the things in the
LEDs in the header file. The header files
gives a good overview of what variables do we use and what functions
we are implementing later on in the LEDs dot CPP, my approaches we are, I'm using the finished project and paste everything in
riches in the header file. Because then you've
got them good overview what we are developing now. This is where I think
awesome good advantage in, in programming. When you are exchanged with
some other programmers, encoders detector, deletes data, gives a good overview
of the project. So first of all, we're making the Include Guards. If N def LED is harm is my approach it's called is
the same as the as the file. Then define lids at the end. And if it's a small reminder, the Include Guard helps
us that the code is just once implemented
from the compiler. So when we are using a
lot of includes from the LEDs punk star,
the program checks. Are you already implemented? When not implemented? If yes, then they aren't implemented. Once again, I also would recommend you jump
to the main file and make the include LEDs dot h so that we are prepared for
the programming parts. When we are including
the header file, the CPP file will also
automatically included. Jumping back to LEDs dot h. And now we are starting
with declaring our class. Curly brackets open,
curly brackets closed and a
semicolon at the end. So far, so good. Then we are typing in
private and public. And now we could just start
with the declaration. One thing is missing
and we have to include that arduino
dot h. Why is that so, so that we have access to all the other function
from their environment. So we're starting with
the private variables, so pin LED and then
we have brightness. Then we have an
integer Fade Amount. And we have year and
bool crusade modes. Then I've added here
five unsigned lungs. And I'm sure you already know the Blink without
delaying functionality. And of course, I only
had to implement one, I think one previous release, but I want to be sure and save. So I implemented five of them because later on we
have different kind of control mechanism for the early days and so
we are in a safe way. Okay? The public part, we have here a lot of function which we
will implement it later on. I'm just pasting
it in right-click and we can say Format document. We're using a constructor turn
on and turn off function. And the turn off
function also has an input parliament and pool analog of because
we shouldn't mix. This is just a reminder. Don't mix analog
and digital, right? It's the same LED that
won't really work. Just decide if you'd turn
it on with digitalWrite. Also turn it offers
digital right, and it's the same
as analog, right? Therefore, we have one
function and we check, are you turned on with
analog of or not? So we can check this fade
down with milliseconds. We have a target
function, f function. We are using our turn off
after a delay function. We will say it's the LEDs
and also we haven't set to pulsate mode so that we
can set it in the loop. And that's all lets you can see. Here. It just gives us
a really good overview what function we will
implement it later on. So far so good. And in the next video,
we are starting by defining our first
functions in the late, it's dot cpp file.
24. Toggle LED: In this video now we wants
to add and function, which turns on or off our LED. And this was instead
where we don't know, is it on or off? So it should be
automatic, automatically. Identify if it's on or not. So the target function, we are here in the LEDs dot
CPP and I type in white. It is toggle
brackets on and off. So now we are writing
your digital right pin LED n-tier for
example, Hi or low. But now I want to have
the status from the LED. I want you to know it.
Therefore, we could say digital, pin it there. And the pin LED reference us or gives us back if the
GPA or it's on or not. So if the LED is
blinking and R is on, and we're writing digital
read pin LED here. We're cutting back on higher. So it delivers us, for example, high or low. But I would like now to
have the opposite of it. Therefore, I could make
an exclamation mark. And this will be
invert my signals. So if I getting here back and higher with two
exclamation mark, it will be in low. And this is extremely
handy because now we can add the digital
read and inverted. So if we're getting an high, so the LED is on, we're getting here the
high part V inverted it. So we getting and low and the digital right
turns off the LED. On the other hand, if it is low, the digital reads gives us
back and low. We inverted it. And so we haven't high. Very convenient function. And so we can jump
back here to the LEDs, see the main part. And now we're getting
rid of the delay because delays are always bad
when you are coding. For example, when
we according with MQTT transfer on transmitting
or we stepper motors, there is a need in
the loop function. That's, the functions are
always have connection. And if we are here
working with delays, the connection has
troubled to keep on. And therefore, the program
won't work very good. Or in the case it
won't work either way. Therefore, it's
necessarily get rid of the, of the delays. And now we are wanting
to implement here AND function which turns on or off our LEDs every two seconds. Therefore, we are using the
Blink without delay logic. And I'm sure you already
heard dysfunction, but I explained it
here once more. So we're needing here the current lifespan
of the of the program. So the lifecycle here
is in milliseconds. Previous Millis
isn't defined here. So we're going up to the
upper part and defining an unsigned long because the
previous millions could be a really large number as we're
talking in milliseconds. So it's recommend you to use
and long and not an integer. So how is this logic work
in just a few terms. For example, we have
here 1 second lifespan. If the code 1 second
Are thousand, one thousand milliseconds with your 1000s previous Millis is 01 minus 0 is 1000. Thousand is not greater
than two thousand, two thousand n,
for example, ten. Then we have 2010 is
greater than 2000s. And this logic, this
if condition is true and the code here
will be invoked, then one thing is missing. We're setting back the
previous village to the current Millis because in
the next step, for example, 2050 minus 2010, because this was the last time
the if condition was true, then we have the new condition
is not greater than 2000s. But for example,
if 1 second later, 3,050 minus 2010 is not
greater than 2000s. But for example, in
the next two seconds, for thousands, 50 minus 2010
is greater than 2 thousand. It's true. And the previous Millis will
be set to 44,050 and so on. And so we have an easy logic
for every two seconds. But we want to toggle our
LEDs. How can we do that? For example, writing white one, toddler, red one toggled on. And what was it? It
was the red, green. You can see a simple
logic where we can turn on and turn
off here the LEDs. And of course in the
toggle function, I'm not checking if it's an
analog or digital, right? It is also for training
purpose to visualize you what is possible with
input parameters, etc. But here, just toggle LEDs, switching the project
to the right project. Then let's see if
we have fearsome misspelled something
or if the compiler gives us a green sign, yes. Then upload the whole program. Depending on the tabletop
cam, where are we? There we go. And as you can see, the program is uploading. Nothing is. We are already uploaded it
and are each two seconds, the LEDs will turn
on and turn off. So you might ask yourself, Okay, cool thing, but I could also manage this with some
function outside here. For example, white toggle
and then invoke it. And for white, red and
green, That's true. But later on when you're using different kinds of previous
Millis, for example, with different lifespans
and life cycles, then you get the full potential of the object oriented way. This is just an first easiest
step that you can see what is possible and how flexible is the
object oriented way.
25. Turn LED off after x seconds: In this video now,
we want to add the turn after delay functions. So the three LEDs toggle here. Since we have started the USP. So detune, that's okay. And now we want to add three more LEDs to
the sketch entities. Three LED should turn off after a specific,
specific delay number. And this is what we
want to implement now. Therefore, we jump into
the LED elites dot cpp. I copy the whole function from
the header file is so that we have here they're exactly
declaration copying. Let's double bond, double bonds, curly brackets open and close. And so we have here the function that
turns off after delay. It has two input power
meters, ten milliseconds, so that we can
choose each entity, how long it should be turned on, and also if it's turned
on with analog of or not. So therefore, we
have to implement also the Blink without
delay principle or a logic, but a little bit different. Now, first of all, we want to have the current
Millis, nothing new here. But if condition we have now
here, something changed. We take the current
Millis and the previous Millis,
I'll shorten up. It's here defined
in the private. We can use it you
also in English. For example, turn off. And now we say that
different than the current Millis minus
the previous Millis turn off is less than
the milliseconds, which we passing to
the input parameter. And also something new is
here because we don't want to reset the previous
minister and off. So as we did before, we said This millions
turnoff is current minutes, but we don't reset previous
Middle-Eastern off. Why? Because we only want once that this logic will be executed. So, but we want the
else part of it. And in the else
part, we say turn off the LED with analog of. So turn off is the function which is
referred here in our, in our LED class. And the turn off takes a true or false and set up the pin LED, which we defined before. And that's it. That's it. What we have here in
included in the logic. Let's go to the main CPP file. And now I would like to
add here some more LEDs. Therefore, I LED is blue, one is on my GPO, 16. Then I have LED is red, one is on 15. Already have that. I want a yellow one is on 19, and I want to have white
tool is on GPIO 14. Then I turn on the LED
lights to turn on. Blue one turned on. And the yellow one turn on. Of course, I could also turn
it on here in this part, this is, it depends on what
you would like to implement. And also, I like to keep my
code as general as possible. And it's called turn off after delay when we changed the name. So it's more obviously turned
on and off after a delay. Then you could also
add here, for example, that you don't need to turn
it on with an separate line. Then you also can call the turn on or off after
delay, for example. But I would like to
have it more general. So I just turn it on. Then this part is the toggle on and off,
which we did before. And now I can say white to turn off after
delay open bracket. Now I see two parameters,
the integer milliseconds. I wants to turn off the
first one after two seconds, and it's not with analog. Look right? Oops. Then I have the blue one
and I have answered one. It's called yellow one. The blue one should turn
off after four seconds, ends the yellow one
after ten seconds. So we have here two or more simultaneously processes
going on where FEA, the blinking and the
toggling each two seconds. And also the white
to the blue one and the yellow one should turn
off after a specific time. Let's see what the
compiler says. If you have some
spilling area somewhere, it looks good so far. Then here we have the blinking
sketch just going on. Then we're clicking on uploads. Clicking the button so
that it can be flushed. Nth Now button. Let me flesh it now. Led to bluer turn off
after two seconds. After four seconds. After ten seconds. Yes. And this re ones in the
loop, which we have here, toggle until infinity
is infinity loop. So once again, we are
restarting the program. The white is, the Y2 is after two seconds of the blue
one after four seconds, and the LED will be yellow
one after ten seconds. And you see the parallel process with the toggle is going on. And I think this is just a good example that
you can see how the object oriented way supports
you when it comes to different kinds of
processes at the same time. That really at the same time. But you can see there is no difference, a
visual difference. So if you implemented this kind of logic in a
normal way with the factory, then you had to define here three different previous
Millis because you need different kinds of logic. Blink without delays,
because here we have two seconds,
four in ten seconds. And as you can see, you have
to write three functions with nearly the same logic
but not the same variables. And this is not good when we reproduce code for
the same thing. It's never a good idea
because now I have one pattern here that I could change it as
I would like it. And as you can see,
just with one line, we can activate and
invoke that function. So here we have the first example of our
object oriented way.
26. Fading: Now we want to
implement and fading. Fading. Fading means
that we turn on the LED step-by-step in small values so that we can turn
it off more smoothly. And therefore, I'm
going to the lids dot CPP and we are implementing
fade on function. I copied this one.
Then o typing in whites leads double-blind,
double-blind, paste it. I have here the function. In this function,
we are implementing our Blink without delay logic. Therefore, I have here
the current Millis. And now we are entering the
same as we did in the loop. That means we have
your current Millis, we are accessing the
previous real-estate on. You see, this is a
different kind of variable we're getting are
passing over the function, the Middle East in seconds. That means that for example, every or each two seconds, three seconds at it, this
logic will be invoked. And in this function, now, we can set up the previous
millisecond on is the current Millis
so that we are entering the condition
again and again. Now we say if brightness is, is 25, so less than 255, then we could
increase their value. And that could be doing,
for example, first, we are printing out the
level of brightness. And then we see
another look, right? We're seeing the pin LED and we have depth,
brightness value. The brightness is set to two serum at the
beginning, right? And then afterwards
we increase the value of brightness by
the fade Amount. And fatal wound is also in private variable
which we have here. And it's inquiry is set to five. That means each
row or each loop. We increase the
brightness by five. So the LED should increase the brightness
level step-by-step. So far so good. Right-click Format document. And we have implemented
our feet on function here. Analogwrite could also
have assert, assert value. For example, the maximum
value of this depends on which library to you use, but it should also work
with two parameters. Then I'm going back
to the main loop. And I have to initialize
it to more objects. I would say that we are
collecting. Let me see. I'm taking the LED screen
two is on the pin, green to 25, and we are
adding the blue tool. And it's on the GPIO 17. Then at the end of the loop, we're leaving
everything as before. So we have here our
three toggles, hour, three LEDs which turn off
after the past seconds. And now we are seeing
green to fade on, for example, to one
that's in milliseconds. And we have blue to fade
on 600 milliseconds. So far, so good, safe. Let's see what the
compiler says. If we misspelled
something or not. Then we are switching on
the camera. Looks good. Then we uploading the sketch and flushing is sturdy to them. Now, all the processes
should be invoked. Yes, and as you can see, these two functions here we have the green one
and the blue one. The blue one increases
600 milliseconds, five steps, the green one
is a little bit faster. V3 are toggling and the others
are already turned off. So once again, I will start the serial monitor because we pasted something
in a ceremony, time comes through here. And now, as you can see, I have two messages, was not really clear. I should have added here also
the PIN value for example. But you can see here one
LED is at 80 and the other is at 255, already
finished fading. And here we have
only the blue one. As you can see, each
600 milliseconds, it's increased by five. And I say it once again. Here you can see the
full potential of the object oriented way because here we
have the tumbling. We have to turning off function ends, the
fading function. And all within one program, parallel processes,
simultaneous processes. And as you can see, we're fear and
really good overview of what we're doing here. There's not really
much coordinates. Because you can see if
Aidan, what is fed down, we can jump back and see
here the logic of a fade on. This is one main
advantages besides these parallel processes
that we can see here, the code is very
clean and very clear. And also for some third parties, could be, I would say, work into the logic little bit faster because it has
some good structure.
27. Pulsate: Now we want to add an other parallel function and it's called the
pulsate function. We would like to turn on the LED slightly and smoothly and
then also smoothly turn off. And I've called it pulsate, so we copy it to our
lids dot cpp, white. Let's double bond double points. And we're adding
yet the function. And now we could start
with the codes by itself. And as we did before, we use here the Blink
without delay logic. Same time as every time. We say here, if current Millis. So the lifespan,
the lifecycle of the codes minus the previous
middle is proceeds. Have, we have defined
it here, we'll say it. And then we say curly
brackets on off. The first thing what we do, we are passing the
previous millis to the current Millis
so that each circle, the if condition
will be checked. Then next step we say brightness
plus equals fade Amount. And fade amount is set to
five as we did before in the fate on S and X point, we have to add if brightness equals 0 or
brightness equals to two, 55. Why do we need it? We need a logic which adds us the design or design from the, from the radio,
from feed amount. Because if we are at
brightness levels serum, the fade amount should have
the sign plus so that we add each circle, 51015, etcetera. If we reached the level of 255, the fade amount should
change the sign to minus. So we are counting down
to 255250 iterator. And therefore, in
this simple logic, we can change the sign
of it, fade amount. This minus fade amount. Because if we are decreasing the value and
we are getting to 0 minus, equals minus is plus, and it goes up. If we've reached the top to fade amount will be a minus sign. And we're going down simple
logic, but effective. And as the last one, we have to add
another log right? Pin LED. And we're seeing the
brightness level. That's all what we need to do. So jumping back
to the main part, we initiate hear some new
variables, some new objects. And I would suggest to
add the yellow tube. It's on my pin 21
and read to write. I don't know if it's the
right pin to a form. And at the very
end of our sketch. So all these three processes
like the toggling, like to turn off and to fading. We keep it in the sketch. And now we say red to pulsate. Ten for example, and very fast. And yellow to say it. By 50 a little bit longer. Just check if we have some
arrows turning on the cam. And as you can see, this is the sample
sketch from before. I'm clicking Upload. Then we're fleshing,
once again, use PM. And the uploads should begin. Up. Then try to focus the camera. So now, as you can see
here, where is my feeding? W2 is pulsating
very, very slowly. And here we have the
yellow one is also sitting and not the
blue one does only feeding on this
one is proceeding. And of course the, the red one is very
fast pulsating. So for processes, different kinds of
processes are going on. And as you can see, I think seven or eight LEDs have different kinds
of functionality. Once again, we're turning on and turning off this reality. These, we have fading
on and we have the totalling enter pulsating
all at the same time. I think this is done by really
just a few lines of codes. And as you can see, it's really, really good overview and
has a good structure.
28. Instantiate objects in array: This video, I would like
to show you once more the potential of the
object oriented way. Therefore, I would like to create an area
and then this area, we store all the
objects so that we can iterate it and can play
a little bit around. Therefore, I created and const
int variable because it's, I have here 15 LEDs. And when we change afterwards here something
in a breadboard, I only need here ones and change should have everything adapted. So we are creating
now a new array. List is the class name, this is the array name I call. It. All leads for example. And we need to say how
big should the area. It's cool, It's has 15 slots. Then we make here some
curly brackets, semicolon. And inside the curly brackets, we could say, let's 12th. This is the same
as we did before. So just have a look. We initiated the object
white in this form, we say, let's just
the class name, this is the object name,
this is the constructor. But we also could do
something like that. It's the same procedure, it's the same object. We're creating an object. And we initiated with lids this, the class name and
the constructor. And this method we will
use here inside the eye all LEDs because here the name, we're don't have a name. We only store the
object in the array. So let's see how
we could do that. I have prepared,
already prepared it means we are having
our first object, second object, third, etc. So in order, like I have
it here on the breadboard. And so we can afterwards do some loose something like
I'm chasing lie detector. Can see 15 objects
are stored here. And this is what we have
to do because one at one time we have to initiate
it with the pin number. So that's mandatory. All all lids has 15
objects. So far. We don't need something in the setup because
it's already made in the class that we have
from pinMode, it's better. Now, I would like to
fade on every year. Are each of the LEDs
at the same time. Therefore, I made
AND function here. Let's call it fade in and
then make your for loop. And this is the auto suggestion. They can say integer. And for leads num, that means 0 to less than 15. So we have to afford, it will be iterated. And then we can
say, for example, or dates, or it's
called alleles. Now we call it all leads. Leads. Then we iterate through the
first, the second, etc. Then we can make a point. And we can say fade
on 150 milliseconds. This is the same
as we did before. For example, if we have
here the yellow to object, then we could also say yellow
to point, fade on 150. And we could say yellow, one fate on blah, blah, blah. This is the same
procedure as we did here, because all objects
are stored in our, in our array and we can access
it when we are iterating. So here is the object
and then we can access it with the class. So far so good. Then we have to call the
function in our loop. Let's see what the
compiler says. If everything is
right, it looks good. Connecting the USP
it certainly to monitor her computer
monitor monitor, upload it, then switching
the camera, flashing it. Now, every on it was
the force up J project. Once again, upload it was the setup for us in
the wrong directory. So now it's the right. Projects should be compiled. Let's see. There we go. Everyone of them are, each of the LEDs will
slightly fade on, once again, a restarted. And as you can see it,
It's simultaneously. But in fact it's not
really simultaneously. It's a little bit
delayed each LED, but this is what we
want and now it's easy for us to make another function. For example, we want to
proceed, it proceeds all. And then we are changing
here, not the fades. It's called proceeds within 20. And in the loop, we are calling
proceed all uncommented. This you can see uncommented
all of the things before, because we want to just
use the array function. Present. Once again,
uploads the whole sketch. Fleshed, use pm. And now the older LEDs should
go on and off smoothly. Perfect. As you can see, we have Kavya
and very convenient way where we can control many, many of the LEDs. For example, we can make
hundreds and thousands of LEDs control only with four
or five lines of code. And this is what I think what
we are also using later on. This is what's so powerful because Mr. object oriented way, we have here way to control a lot of components
at the same time. And this is in a very easy way.
29. LED chasing effect: Let us add here a one
more function and it's easy to implement and we want to make an LED
chasing function. That means the early days should go on from the
left to the right. And if it reached the top, then the LED should
turn off from left to right and then
starting all over again. So for example,
we call it Jason. In this function,
we are starting by turning on all the LEDs. So we are using here on for-loop and we're
seeing here not pulsate. We're seeing torn on. And we are using
embed the layer, but it's just for training
purpose so that we are seeing, okay, There is your underlay
and it has a nicer effect. In then we want to
turn off all the LEDs. So in the same function you're
using and second floor, because this is first iterated. And here's the second loop. In the second loop,
we are already have this function and it's
called turn after delay. We need to input parameters. The first is the turn off delay. We're seeing 50 milliseconds
and is it an analog of No? That's the reason
why we say false. For example, we
have here in delay. And now we could say here, let me see him. That's it. Just compile, it. Looks good. One thing I've missed, I
have to invoke the function, of course in the loop. Chasing, uploads
the whole thing. Let's see what it looks like. So normally it should
start from left to right. If I have entered all
the pins correctly, according to the order
here, the breadboards? Yes. From left to right, it goes on and if
it reached the top, then it will go out smoothly. And as you can see here, we have a lot of possibilities where we
can control, turn off, turn on the LEDs in and really, really convenient way
with this area and the area is the old or
older objects stores. So have fun with coding in an object oriented way
and also with arrays.
30. Wiring: And vibrating part for this
project is very, very simple. We have our ESP 32 and here are the HV 210 infrared sensors
as much as you need. So in my craft project, I have a lemon of the sensors. And in this exercise example here for this
course, I have five. And it is recommended
that you use here and voltage converter so that you can plug in
your external parcels, for example, 12 volts. And this voltage converter converts the voltage
to five volts, and this five volts
goes to the breadboard. And so you can power up
here your sensors, the ESP. So the dual should also
connected then to be five. But I skip this line
because I'm powering with the USB because we are programming it and we
want a 0 monotone. So I don't want you
on root function. This is the reason
why I skipped here. If five volt pin. Then on the right side, we have here our LCD and LED
should simulate the mortar. And we're connecting here to the cartilage from
the elite to ground. Then from the unordered
list, the larger pins, we go to the resistor and
then to the pin number 13. The pattern will be
connected to ground. And on the other side,
we are connecting into, without any resistor
onto GPR 12th because we are using here the input pull-up
resistor from the ESP 32. So let's take a closer look
and how I implemented it. You can see this
is my setup. Here. We have the LED and the push
button and the five sensors. One of them will
be the motorcade. And as you can see your
small potentiometer, it could occur that these sensors will
interfere the others. Then you have to put it
connected with some, some virus trends
as I have it here. And then it should
be works fine. So in my case it works properly. I connected it with some
wires here on the breadboard, that means the ground and the VCC and the output pins are connected if
it's the virus here. So that's all what we need.
31. Create Project and Class: We are starting with
an fresh new project I've created already one
included here in this era begin. And my texts so far, then I would like to
open the platform, any end here we are, copy and paste from the
previous projects one. So the money is money. Those speeds upload ports. And I'm including, as always, the analogWrite so
that we have it here. Save, close it. Once again, open domain CPP. And now what we want to do is we want to implement a class which identifies which of these sensors will be triggered. And therefore, we are starting with creating
our, our classes. But before that you see how I implemented
the whole virion parts. So I used to be 32 on
the breadboard plus and grounds to the breadboard so that each of them
has a power supply. And the left pin of each of them are connected to one of
the GPIOs from the ESP 32, and that's it so far, the whole modern logic will be implemented
later on because now we only want to focus on, I'm the object oriented way, how we can access here
the infrared sensors sub. Then we're starting by
creating two new files. Right-click on source, new file. And we're calling
it IR our sensor or a dot h new file
or sin dot cpp M. Right-click, split through
right, close this one. So we have our
scheme from before, and I would like to start
with the header file. First of all, class, the sensor, curly brackets, semicolon,
then private, public. Then we need here a
day, includes Arduino. And we knew we also need
an Include Guard if N def sensor underline age
and we have year-end, define the very end. And if so, you may ask yourself why I'm typing in this whole
thing again and again. It's been good. I would say exercise also
for you that you know, these are the
requirements for class. And when you do it
again and again, then you also could copy and paste on template, for example. But at the very first beginning, I like to do it
this step-by-step. So you can also see veiled
references it's at. So then we're skipping to the CPP file and
we are including here the sensor dot h and as
well as the Arduino. Then in the main CPP, include ERs and self.age. So all the references
are made so far. And now we can go on with the definition of
the class by itself. And I would like to fill in the whole header
file so that you get a good overview what we are needing and what
we're implementing. So these are, the
central pin will be the GPO status tensor that we recognize if
there isn't changed. Also the previous state, we're needing data to identify which your
sensor is triggered. Intellect the punk, or
we can call it points. Because we wanted to also
say that for example, the middle one gives
us five points, ten points, 20 points, a game. Count iterations, ERs, and are triggered, is
motor triggered. Later on to that, we
also can have fun and logic for starting and
ending the mortar. Then we can implement
the constructor. So we are taking
here the Earth-Sun, so it's the GPI open. And also we are saying we
want to have the points. For example, I named this
a little bit different than this point so that we have here unclear I'm distinction. Then we need here one more,
three more functions. Right-click, Format,
document, check, ER, trigger. And this will be implemented
in the loop so that we know which one of the ER
census is triggered. And calibrating stoke laugh, It's called for
example, calibration. This is unnecessary
that we iterated and also save us some,
some inflammation. This is only for debug purpose and then gouged out
those motor gate gets down to smooth gait
and a new version of it. So we overwrite this function. This will be neat. I
notice I get this. This is, will be needed for controlling the motor
turning off and on again. So, so far, the header
file is finished. The CPP file is set up the main CPP file as
the reference and name. The next video, we can start
with the logical part.
32. Address IR sensor individually: Let's start with the
source code and logic. So we starting with defining the constructor class name
IR sensor or a double bond, double bond I, ours and so on. And we have integer
GPIO pin and integer underscore points,
curly brackets. And inside we are X, says sensor, pin is GPO or pin. Then we say points is on the
points and we have here and pinMode debts sensor
pin is an input because we want the ER value and
we haven't started those. I would start sensor is one. This is needed in
the next function. So this is the first,
the first initiation. We're switching to
the main CPP file. And now we could address the five objects to
our five senses. And how could we do that, our sense or is our ER
sense or is the class name. Then I would say our
sensor one is ER, sense. The first is to pin. My first pin is
14 and I assigned points tend to its 2345. The second sentence or so for the sorts and the second
sensor isn't a pin seven. Twenty-seven, twenty
six, twenty five. And we have the last one at r0. Then we give them the
points for 2050 hundredths. And the last one gets 0 points
because this will later on our motorcade Watergate to identify Should we
start the motor or not. Okay, So far, so good. Now we could also implement here on function, for
example, checkpoints. Checkpoints is on
the checkpoints. In this function we could
address that objects. For example, you
are central one. And here we could say check
trigger, Check trigger. Is it a motorcade? Nope. Why do I implement the motorcade
also in this function? Because I would like to have
uncheck trigger functions. So which of my sensors will be triggered in
the whole project? Now if one motorcade, so I say the rest of them. I'm force sensor 2345. This is a really convenient
way and not very good way. But first of all, I will show you how you
can do this in the, in the little detour. And afterwards we are
making here an array son, switching back to ERs. And so because we want now to implement the check
trigger function. So check trigger
function isn't white. Er, it's not unworthy, is an integer ERS sensor or a double bond double check
ER or trigger motorcades. And now we are implementing nearly the same as we did
with the balanced the button. And now you would ask yourself, why should I make can be
bones function for an ER, sensible choice and
analog read statement. And why I'm doing that
is I want to have your function which just starts by going
back to the sensor. So first of all, it will be in the normal way
when I'm triggered. The sensor like this one, it will deliver
triggered, triggered, triggered, triggered,
triggered, not triggered. And I want to have such thing that it's triggered
in the logic, but now it returns
me the points. This is what I will like to
have in my, in my project. So nothing happens and
when the marble goes away, then need to resent
me their points and just only one time and
not to five or six times. And therefore, we could use really the same approach
as we did before. So we're saying previous
state is start to censor and status sensor is digital
read sensor pin. So we're reading the sensor and we're passing it
to the previous state. And now we're saying if
previous state is higher and start doors sensor is low, that means its target, then we have E errors, sends or triggered, is not true, is Millis because
we want to measure the time as debouncing. Then else, if else
if we could see if the previous state is now low and the status sensor
is, what do you think? Then we have here the
logic where we can identify now how long the
years and so has triggered. And I would like to say here, if millions minus ER sends
a pretty good sense, are triggered under
ten milliseconds. Nothing should
happen if and else. I could say here, should
something happened. And I could say, if motor gates, this is the input parameter. If this will be triggered, then I could say 0 print. Altogether. We are implementing
this later on, but I would like to cover
it here because it has an input parameter and their
song should all raise, triggered when the motor
is also triggered. And nevertheless, if it's
a motor good or not, I would like to print
out the sensor pin. So far, so good. This is what our
main logic to nose. So if uncensored is detected, like I'm covering it here, then the Millis will
be passed to a sensor, and afterwards it will be
printed out the sensor pin. So let's see what
the compiler says. And I'm connecting
the whole thing. And uploaded. Sudden we're turning
on the camera. Here are my sensors
and now I'm covering the first one and
now I'm leaving the first one and
I deleting point, I'm getting returned
the sensor pin also at the second one. The third one, the fourth one needed a little bit go
down. And the fifth one. And also here, it
gives us an very, very clean results
from each of the pins. And this is what I want. I want a marble which will pass through the LEDs and give
me back the sense of pain. Or later on, they're referenced points which
were declared here. This is the first thing which
we implemented now have a clear and simple result.
33. Objects in Array: So far we tested our logic for now our main program
and it works very well. But it's not very good. Code it because we have
five separate lines and each line we need to identify if our ER sensor is
triggered, they are formed. We adapt now our source code to a more object oriented
way so that we can use also hear some
areas. How could we do that? We say our sensor, the class name, and then
I call it our array. Here is the placeholder. How many areas do we need? Curly brackets open and
close. Before we do that? Uncommon for them because the
last one will be my motor get this sensor which indicates
us molto start or not. So and also here we unconvinced
the hall to check points. So our IR sensor array should meet here and
const int for example, num, ER, sends or sensors is 44. For sensors, which
gives us the points. One identifies us if
the motor starts. So I sit here, the num num ER sensors and they're convenient way
is here that I later on can now change the numbers for accordingly 7810 and all the loops which
are not heat flux. A hold of for loops
which comes later on. We'll be adapted automatically. So it's called year
sensor, that sensor on. Here, we have now an other curly brackets
for each object. 40 is the pin, ten is there. I'm doing a points. Then the second object,
pin 2720 points, certain object 2650, photo object 25100 points.
The motor gate. We'll leave it
there because this should be an a separate way. Then check points we
need and follow-up. So for for tablet. So that we get here
the auto-completion. I'm using here an
integer and two for the count and setting
here the number IRR centers. So it iterates through 01234. Then, yeah, I would
say our array, then identify which
object points. And I could say check trigger. And it's false because
you are just once the points and one sensor
should be addressed manually. And this is the
modal gates because the more target is separate,
watergate is true. Yes. This is all what
we need to change. So uploaded once
again, no compiling. Eran turn on the camera around. I've added extra LED, which is also implemented
in the violin part, but we come to it
later on, so on. Ceremony Dan should be the
same result as before, but with some change,
everything works well. So we adopted now the whole program in a
more convenient way, in a more straightforward way. So when we have to
change something, it's very, very simple. And as I mentioned
in my project, I've added here 11 sensors and think about if you
have to change something, and I'm not really
flexible enough. And it was this construction. We can adapt our code
in a more easy way.
34. Simulate Motor on off: In this video now we would
like to simulate the motor. The motor is here, the LED, and use
the push button. We can start the mortar. And then if the marble
goes up, up, up, up on the top of our Galton
board, there's the motorcade. This is the center. And when the marble hits or passes
by these ERs and so on, then the motor will
turned off and this functionality we
would like to implement. Now, therefore, we have
to go to the main CPP. And we declaring here
two more variables. Here. Integer LED is an integer. Button is, so let's take a look. My button is on the pin 12th
and D is on a CERT team. Then in the setup, we need to pin modes. Pin mode button is
an input pull-up, and pinMode LED is an output. Either loop function. We want to check if
the button is clicked. Therefore, we say if. And how can we do that
with digital reads button? And it has to be low because I have connected the
button wants to the low, to the ground and once
one pin to the GPIO. And therefore, I would say if digital read button is lower than something
should happen. And in this case,
digitalWrite LED high. So we will turn on the motor, and here we turn on the LED. So then the next part will be when the
motorcade is triggered, our sensor on the end, it should turn off. Therefore, we switch it
back to ER sensor so that we have access to our variable. We have to say
external integer LED. And so we say the program. Please look outside
of this program. This variable have to be identified on the
external is because x term is defined
outside of this file. So the motorcade is here. If motorcades once, then
we can say if this is triggered digitalWrite
LED and it's low. Let's check the compiler. And Lester, ESPN. The camp. Are we on? Once again to the serial
monitor is already open. Sun now we're
connecting flushing. So let's see what is going on. The normal points
should work as before. And when I'm switching now, are turning up, push the button. And this is the motorcade. And motorcade will be
triggered to an M. Relieve it. Yes. Nice. And the points will
work as before. So now in our case, we pushed the button and
this is what I also didn't. The first concept, the
model will be starved. Model, model, model brings the marble up to the
top. There's a sensor. Sensor will be triggered
so the motor get off that. Not too much. Too many marbles get
to the top at once. And then the marble
takes the way down some of the,
so we turned off. Then it triggers one
of the sensors and this gives us now
the sensor later on, the points which
will be delivered.
35. Evaluation of the IR sensors: In this video now, I
would like to implement, implement the
calibration method. Because when you think
of the whole project, I would like to see how often each sensor will be triggered
and which points are. I'm getting back. Because as you can see here, we have here and return value, but we didn't implement
it here any returns, and this has to be implemented. So first of all, I would like to check if we have
assigned the points. Points are assigned. And now I would like to
call here at this stage. Nevertheless, if it's
a motorcade or not, the calibration method, the calibration
method could be It's a wide sense our double bond
double point calibration. In this function, I only
want to get back and texts because I'm only
interested in pin points. And how often do I use it? And therefore, I have
and member variables, private member
called in durations. And we iterate this one. And now I can see
serial print f. And I want to have
three variables. The first one could be sensor, and it's called the sensor pin. Then I could add a
second value as well. And it's the points. Also an integer format. And the points are the points. And as a last one, we can also add here the
iterations, durations. And it's also an integer, and it's called
count iterations. We're getting back each time
and sensor is triggered. This line sensor pin
points, iteration. Looks good. A little bit more. Brackets would say
in this format. And the ending I'm
making once line break. And that looks good so far. So then we're choosing the right project,
upload the whole thing. And now we should get
here some feedback in our serum monitor when the
compiler sees no error. But I think it
looks good so far. Then we're uploading
the whole sketch. Open the ceremony dam. And as before, we could start
here, the motor engine, and we see here the motor
sensor pin 0.30 points, iteration one, iteration 234, and the divergers beginning
we have here ten points. We have here second, 20 points, 50 points, 100 points. And the different
iterations would be iterating. Very, very good. This is what I want. And now you can imagine, you could make this in
an automatic process. There. Marvelous go up, goes down. It will be collecting the
points and the iterations. And then you can
also summarize here, normal distribution when
everything went well. But this is not what I want in the
productive environment. This is just for calibration. We can turn this off. And also here the central pain. I don't want, I want to get back only the
points what I want. And therefore we could
say, for example, here, define a new variable. It's called integer output. And we return it at the
very end so that we can sure that there
is something. Get back here. We could say output is
0 points, for example. Now you have to imagine when you have few some other logic, for example, you can
add some bonus points, some bonus levers, etc. It's always a good
idea to put this in an outer variable and
don't put just the points. Then we're going back
to the main CPP because here the return
value goes nowhere. Therefore, I would
implement here also on D2L within new variable, it's called gotten points. And we see here gives me this
points in this very room. And if Galton points
greater than 0, because 0 is our motor gate, then centimeter the
points via MQTT, for example, or send it
via server side events. Server-side events were also
dealing in this online class in rock paper scissor exercise. So we could also start there mortar via websites on the ESP, or we can handle their points and sending
back to our website. But here we also could, yeah, we consider a print
just for debug purpose. Points D. And we're getting back
here deck got some points because this isn't good
approach when we are dealing here inside the main. And when we're getting
back from our whole class, just the points and
the whole logic will be implemented
in the main part. So it once again, we
are uploading our file. And let's see what
the compiler says. Normally spilling That's
always a good sign. Then uploading the whole
thing once again and now the ceremony there should be a little
bit more clearer. I've I've missed the line break. So 11010202050, One 100. And the motor gates as well. The motorcade should be
outside of the for loop, and then it's within
goods sold so far we've implemented now also on the
points and the motorcade.
36. Craft Project Overview: So let's see the
finished project. First of all, the
marble lift will be powered by such a
small motor neuron. And the motor is
attached to the bottom. So when I'm pressing
here my button, it's connected via
MQTT, marble lift one. And here is the motorcade
which triggered off the motor. So once again, once again, motor will go on and go on until the motorcade
will be triggered. Afterwards, the
marble will go down. And according to the sensor which will be triggered
and getting back the points to my node red Burma MQTT
broker is also connected. Now, longer lived,
and it's finished.
37. Recap OOP IRSensors: Congratulations you at the
end of this video chapter. And I hope you had
as much fun as I had to make the source code for
this object orientated way. So let's use, here are a few seconds to recap all the learnings
what we had here. First of all, we created your different
objects so that we can check if some of the infrared sensors
will be triggered. Then afterwards we created
an area so that it's more inconvenient way
that we could control the year census and also the object oriented
way it comes here. One time shows us the advantages we are created
and calibration function. And this calibration function delivers us the sense of pin, the count of the integrations, enter points and
thinking about it. How could you easily develop
this with some function? It won't be so easy
because you need it here. Different kinds of
iterations, variables, and how to control the
different kinds of sensors. In a way, it won't be so easy. It would be achievable, but not so convenient as
an object oriented way. We make one blueprint
for one case. And afterwards each object can use this blueprint and this is where I think it's so valuable when it
comes to source code. Whenever you have different
kinds of sensors, many of them, multiple of them, then use your object,
write your own class. It will be faster and much more flexible, so much for the recap. And now we are going to the next exercise and
to the next video.
38. Wiring: Then virion part of this
project is very, very simple. So we have here and USB 32. We have two LEDs, two resistors, and
one push button. The push button will
be connected to the bread board from
ground to the push button. And the other side, we are connecting here, the push button to
the GPIO2 and 13. In my case, we're also
connecting ground from the ESP, so T2 to the breadboard. So that will have the
same potential to LEDs. And as I mentioned in the
first practical exercise, it depends on the
color of the LED, which resistant to unit. And it also depends if you
use an Arduino or and ESP 32. The ESP 32 supports here 3.3 volts and there are the enol can deliver
five words from GPIO. And regarding this, you have
to calculate the resistance. Just take a closer
look on one of the first videos
of the LED class. There. I mentioned it a little
bit more in detail. Here my case was the ESP 32, I just use and 100 ohm resistor for both of them because it's
just in training purpose. So I connected the ground
to the cathode of the LED. This is the, the tiny pin and then the lava pin we are
connecting to their resistor. And from the resistor to the GPIO number 25
to the red one. Green one, which is displayed
here with some blue one. I connected with,
same as the red one. So connecting the
grounds to the cathode, then the longer pin that
goes through the resistor and from the resist on
to the GPIO number 12th. And that's it for this example, the rest will be program are
coded in the source code.
39. Add Class Button: Let's start with a
fresh new project. I feel included the headlamp
and in the main cpp, I just edit it here
and Sarah begin. That is all what I did so far. Now, what I would like to do is to set up the whole
class construct. Therefore, we click right
on source new file. And we say Here, button dot h, and we are calling new file, button point CPP,
right-click combatant, that edge splits to the right. Then we see explorer
should go away. And now we have here
our development IDE. And I would like to start with
defining the button dot h. First of all, the class,
it's called button. Curly brackets open,
close, semicolon. Then the next one is
to include guards. If N def button edge, then we could say define button H and the very
ending with hearing. And if I include
god is finished. Then what is the
third, the serpent? It's every time the same thing. We should include
the Arduino head up. So on. The header file is, so this state finished. Then we jumping to
the button dot cpp, I would suggest that
we are adding here. The first thing includes
button that edge. And we are including
the Arduino. So far, so good. And what we also need
here will be there. I'm look right dot h. So h would we need later on for the LEDs so that
we can feed it with PBM, their font, going to own the explorer clicking
on platform in Him. We have to add here the external
library and look right. And I also would
suggest that we hear adding the monitor port from my, in my case, it's
the column three. We have set the speed
to 115200 or in a framework and the
expressive platform and according to you use PIM
also setting up the port. Save close to blood from. And we have here everything which we need for
the button cpp. Then I also would suggest that we jumping
into the main CPP and make the reference include DOD edge so that we have here all the files referenced
in our three files. Then as a next step, recruits define the
whole header file. That means we could say here
it's an brought tech debt and as a short reminder and protected acts here in the
class button dot HHS, private. When we inherit later
on the whole class, then it will be as
public, public member. So protected in charge, button, pin, integers, dates, and integer result we are needing later on
and on the public, we have here the constructor, which is taking us and pin. We're having start
function and we have Jack button with
return parameter as an integer right-click
Format document. And we have also formatted
our button dot h. I'm jumping to the button CPP. And I'm want, I want to
implement you the constructor. Therefore, I say button, that's called the class
then double point, double points, button
in the drop-in, curly brackets open, closed, and it's button pin. This is our protected member, is the pin which we are passing
through the constructor. Then we are going
to the main CPP. And then the main CPP, or we
are making here an object. We initiate an object
button, button edit there. And in my case, the button
is placed in a GPO certain, in, in this example, we're just passing the value to our class and we're not
setting up the pinMode. This is a different kind of approach I would
like to show you. Of course, you could also
make the pinMode as well. But so far so good. We're set it up yet, our class, our main button, CPP
and the main CPP. Now we're ready to go
to quote the rest.
40. Debounce button with millis: In this video now, we want to be balanced the
button and also prepare the code so that we are in the next
step can use l, can identify how long
we pressed the button. But before we could do that, we have to set up
here our button, and therefore button CPP M, we are declaring
another function. It's called whites, button, double point, double
point, start. Here we're setting
in the pin modes. It's the button pin. And I am using here
and inputs pull up so that we have good signal. And I think in the
Arduino environment, you also have to input pull-up. And otherwise you use
only the input's value. And also I'm sitting here at
the state variable at high. We're coming later on. Why we do that. So switching
back to the main CPP file, in the setup part, we are seeing here that we
are using the button up, There's button we
haven't got initiated, but the object with button, button LED, this is our object now which
we are initiated. And now we can say
button, LED point start. And now we have
the pinMode ready. So the next step will be that we make here the check button. And once again, I
change this to white because afterwards we
are using the integer, the return parameter, but in the first step we don't need it. So we're saying what button, double bond, double
bond, Check button. And this Check button will
invoked in each loop. So we switched to the
main CPP and say button, LED and check button. So I would suggest that we are just writing
now a few lines of code. And afterwards we uploaded
to the ESP and we go, once again, go through
the whole code. First of all, we are
defining a variable. The variable will be integer. Previous state is state, and the state is digital. Pin, button, pin, button, pin. So what you're doing here, we are looping through
this function. Each loop, the last state from the button will be safety
and the previous state, and the actual state will
be saved here in the state. Why do we do that? The reason is we can now identify when someone
pressed the button. And this is very easy. We can say if previous
state is higher, state is low because I'm using here the input pull-up and I am connected the
button to the ground. My state low means when
I'm pushing the button, high, is it when it's, I'm giving us no signal? This is the reason why I'm
giving you stay design. That means at the
very first beginning, we're not pressing
the button and be initiated with the high signal. Inside this fungus are
in this if condition. We are making remeshing
here at a time. Therefore, I need one more
or two more variables. So I'm seeing here an
unsigned long button, clicked milliseconds and unsigned long button
down milliseconds. What is unsigned? Unsigned is when we're
declaring variable, we have minus part
and then plus part. Each, each thing
is the same size. But when we are seeing unsigned, we just want the plus side and we are taking
all the values are all the memory space and only
assign it to the plus side. So we have doubled the size
only and the plus side, this is what it means
with unsigned long. Because we are the milliseconds. Current lifespan couldn't
be a minus part. This is the reason
why we use it. So with this buttonClicked
milliseconds, we can now assign button. Click. Milliseconds is Millis
what you're doing now? When someone press the button, the milliseconds,
current milliseconds will be assigned here
to the buttonClicked. And why do we do that? Because now we can go
on and can say else-if, if the previous state is
and I think you know what, It comes, low, end
state is high. Then we released the button. Because when I'm
pressing the button, the loop is going on. So I'm pressing the button
and the button clicked milliseconds seconds will be assigned to their
current life span out to the milliseconds. And afterwards, if
I'm releasing it, now I can do something with the different was the Millis editor button
clicked milliseconds. So, but here is, here comes the logic part. But one thing is you're
missing one currency because we are not discussed already what is
debouncing a button? The balancing means when
we're pressing a button, there's some mechanical
things going on. This mechanical function
isn't not very precise when it comes to milliseconds because the button called close
in one milliseconds, the strong or the
current circuit. And this is why we
got mixed signals. So this process needs a few
seconds, a few milliseconds, and the arena can recognize
these milliseconds and gives us a signal on, off, on, off. And this will occur
also in our sketch. That means we've
got the viewer will get a few more signals
than we are used to. Making your practical
showcase serial print line. And we're seeing here
buttonClicked milliseconds. So normally we should
pressing the button, nothing should printed
out at the 0 button. And when I'm releasing it, then we are getting, I think so more than one result. And this is the reason of the
bouncing from the button. So let's upload the
sketch to our ESP. Then turning off the camera. And you can see here
the 0 monitors on, just deleting the old ones. And now I'm hold the
button and release it. And you can see you will get
here a few lines of code and this is bouncing off
the, off the button. Means it can't close it
fast enough to get an, a really clear signal. So what we can do now, we have measured when
we clicked the button. And this could be useful for us because now we can
go on and can say, if for example, we list the current I'm lifecycle minus
buttonClicked milliseconds. So this is when we are
pressed the button under 50 milliseconds because this is what we are not interesting. Here is the bounds area, nothing to do just
for training purpose. Then we say, else. If the signal is over
50 milliseconds, then we only should get here one straight line
uploaded once again. And then we are discussing
the whole code. Once again, code is uploaded. Then I'm restarted. Click on the button
and release it. So the long click always, most of the time will work. But if I'm clicking
short, short clip, then also you can see here
it's D balanced because I only get a one straight line of it and this is what we want. No, no bouncing of the
button, just click. And now we have really precise signal and we're getting good
result out of it. So once again, what
have we done until here with meteor and
previous states? And then state, the
state will give us a signal from the button, and the previous state will
save the status from before. Then we're sitting here
with the first if, if the previous state is high and that means
nothing is pushed, and now it is pushed. Please save me in
the milliseconds into the variable
buttonClicked milliseconds. And I'm holding down the button and the loop goes on and
goes on and goes on. Now I'm releasing the button. Now in the next loop we are here because the previous
state is now low. And the state is high. High means I
released the button. The difference between the Millis ends, the buttonClicked. If it's short or less
than 50 milliseconds, then do nothing else. Please give me some
logic here in this part. In the next videos,
we can define here if it's greater than 5200. So this is the area where we can define the different
kind of click pressures. And so we have two things. In one logic, we are
deep bounced the button and also can identify how
long someone pressed.
41. Detect duration of clicks: And now we want to identify
two different kind of how long we press the button. And this will be very, very easy now for us because now we're just adding an else if. And we are seeing here, milli is minus buttonClicked. So the whole thing is greater than 50 and I need a
little bit more space. All the things up here should be less than 200 milliseconds. So that means if it's
greater than or less than, then something happens. So it's uninsured. Click then all the thing. Recopy it. Else-if button greater than 200 and less
than 900 milliseconds, for example, is an onClick. So here's the debouncing
area. Nothing will happen. And after the milliseconds from 50 to 200 or short
clip should be identified and afterwards
and long click. So uploading the whole
thing once again, and let's take a closer look. If you can identify now the
different kinds of clicks. Sketches up. Then I'm clicking on
short, short, short, short, long, long, long, short. And as you can see, a
normal no bouncing. Everything is deep
bonds regarding clear, clear clicks, only
one line at a click, and this is what we want. Nice. So as you can see, a simpler we have with
one logic and D pounds. And we could identify
different kinds here of how long we press the button. So it's on your creativity if you want to add
more function, but I think two or
three should be enough. Because otherwise
it will be hard to identify how long our
three seconds it, but it's depends on your project and now
your field can feel, feel free to make your own patent lengths and identify the different
kinds of measurements.
42. Clean Interface : This video now we want to keep the class a little
bit more general and chiller means that we
are getting rid of some specific things because later on we will
in other project, for example, if we want to use the patent CPP and button dot h, our class, also in the project. And there is no need for a
specific implementations, so we need the whole room. The whole logical
part should be in the main CPP and not
in the pattern CPP. So I show you what I mean. We are changing to the Checkout button and
return value into an integer. Also in the buttons, the BPM we're
changing here under return value to an integer. And what we do now is we are
defining here three states. So for example, the
return value theorem. There is nothing to do. Nothing to do. If we're getting a return one, it's in short click and
otherwise it's long click. Therefore, we have
already variable, which is called result. And I would suggest
that we are making here result of 0 means we
have nothing to do. Whereas he could the result 0. Put, inserts the first thing because I is also nothing to do. And also in the debouncing
error, nothing to do. At the very end, we return the result and the short click. We uncomment the serial print. We just say result is one. And in the else-if
is result is two. This is my flex
and I returned to flex and I have every case here. There isn't a result assigned, so it should be
returned in each loop. And 0 or one or two. This is what I mean was
generated in the next project. You could use it and
also can identify the different kinds
of states after results and do something
in the main part. And this is what we do now, switching to the main part. And now this function will
deliver us and return value. And this returned
value will be catched, for example, in and switch case. So we say switch and
we say case one, brake case to
bubble point break. So this is the main
structural funds, which case? Right-click Format document
and inserts the case one, we could say serial, print, line, fraud click from main CPP. And in case two, we should have
here n long click. Then uploads once
again to our USBE 32. This is what I mean with
keep it general because now the whole pattern CPP is
gives us a return value. And nevertheless, what
we are doing now, we're catching here the
return values into something and this is a good way how we
keep them clean interface. Then turn on the camera and
open the ceremony time. And now we should
see the same result. Short clip, short click,
onclick, onclick likely. Same result. Cleaner interface. And now we can use our own library in
other projects as well.
43. Control LEDs: Now it's time that we also can control our LEDs
with the button. And therefore, we
defining two variables. We can say it's LED read. I have the GPO 25, and LED green is on
GPO 12th. In my case. In the setup, we have
to make an pinMode. Pinmode LED red is outputs. Copy paste. Led green is also an outputs. So we already prepared and
now we can control our LEDs. That's also an easy one. You could say here, and
digital rights LED. But a short clip, I used, gray one is high. And we could now say
work with flags, for example, if it's on, then we're setting it to low. Is it often we set into higher? But I'm sure you already
watched the LED class and also on previous example and exercise in
this online course. And there we are toggled an LED. So digital rights, for example, we could use here, LET green, and here in the
high or low part, we are saying digital
reads LED green. And what I'm doing now
is I'm setting here. If the pin is the LED is on, then I getting here
back and high, but I don't want an high because then I
want to toggle it. And therefore I am
invert the signal. And I see when I'm
getting at higher, it's inverted too low. If the LED is turned off, I get in here and low and question mark, exclamation mark. We are setting the low to high. So this is all
what we need here. With toggle the LED, the 0 print, I keep it, keep because then I can see what we're getting in the loop. And if you read, so, this should be fine.
Right? Project. Then uploads the whole thing. And now with some short click, we should see or should turn on. The green LED is on long click, the red LED should be turned on. So turning on the serial, monitor them and
clicking the shot. Clicking long. And what
we can do now is missing shortcuts and click
short and long. And as you can see, both of them will work at the same time
because we are just controlling the GPIOs
with the Pin button. And this is what I
think it makes so powerful because
now as you can see, we have just a several
lines of code. The whole general logic
is in the button. And now we have here a good example what we can do with one button
and several states.
44. ButtonHeadlamp inherits from Button: At this stage at a project, we have now, I would say finished our
general pattern class. Of course, you can add
some more points to it. What you use on a regular
basis so that you can use this class and you individually
projects again and again. This is why we do this
object orientated way. But it could also occur
now that we have, now and circumstances and requirements that we
have adept our class, this adoption is not
useful when we are implemented in the
general base class, in our case, the button class. Therefore, we're
creating a new class. What we will do now, it's called the button
headlamp rifle. That means the base is the base class is
our button dot h. We inherited and then we can
adapt some code snippets. And this is on more useful way, on more clean way because the individual parts are
in a separate class. The base class is in a general way or we kept
it in a gentle way. So this is what we do now. We are creating a new class. Right-click on source,
We clicking on New File and we can say
button had a lamp dot CPP. And also right-click New File, button, lamp dot h. And we're beginning
with standard io.h with the header file. And now I think this
is nothing new to you. We could say class
button headlamp. And now we want to derive it
from the other base class. One double-blind public button, curly brackets open,
close, semi-colon. That this will work
in the right way. We have to include now
that pattern dot h. And as you can see,
the third time that we include the header
file from the button. And this is why we need some
include guards as well. But before they
include guards come, we are here and write that H. And now the Include
Guard F and deaf button had lamb underlying age. And then we have
year-end if fine. And at the very end
we're seeing here. And if that looks in a
way that I would say, that's good so far. Splits to the right. Close this one. Now we're jumping into
the headland dot cpp. Therefore, we have to include the head lamp dot h and we have to include
the arduino dot h. I would suggest that
we also do is here, so that we have our
environment also in the class. And now we could define
here the first thing. For example, we could
say in the header file, public double point, next, using a button double
bond, double bond pattern. So what is this? We are using the constructor from the base class
button button. Let's open it once again. And as you can see, this
is our main constructor, which we are invoked
in the main file here. And this will be used now in also our dev related
class button headlamp. And we're making here
and second function, it's called White check fate. This we could also create
here in our button, in our CPP file. And I think you
also know this one. Button, headlamp, doubled
point, double point, check fate comes
from my fancy codes. So far so good. One tiny adaption we have
to do in our main file. Because now we don't want to use the button class
anymore because it's, they're related in
our button headlamp. Therefore, we change here. Button had headlamp. We can use the name as the same. And we can also see
here the constructor, but why do we get an error? We have to change
the header file. And this is headlamp. And now everything
should work as before. Just give it a check. And I think then
we are good to go. Next. Let's check yes,
in the next video. Now we will implement
the function to them. Check fade, and also I'm broke a little bit
more with the class.
45. Function Keep button pressed: Now we want to add some function here in our data related class. And we want to see if the button is pressed longer
than x seconds, for example. The good thing is now
that we have excess of all the things in our base
class, like for example, the variables and also
all the things which are invoked in our
main CPP in the loop, we are checking here, button lit, check button. That means that here
in the check button. I'm around here and a check
button I checking year the digital read already and it won't be saved
into the state. And I have x is also in the dairy related
class of the state. So therefore, I can check
here if state is low, that means is the buttonPressed and
also Millis minus button. Milliseconds. Greater than 2000s. I mean, two seconds, 2
thousand milliseconds. Then I would like
to print out on serial print line pressed
longer than two seconds, and I am inherited. So let's see. That
looks good so far. And we're have to implement the check faith
also in our main CPP. Main CPP, or it's already there. So it means button, that's the object dot jag fate. And now the function will
be invoked in each loop, we're getting the necessary
states and also the button clicked from the base
class we're getting here because the
buttonClicked milliseconds. And also here, we're seeing that here are the
variables are assigned and we use them in our dairy
rated class to check if the button is pressed
longer than two seconds. So therefore, we
are uploading now the sketch to see if we
have the old functions, the short and the long click. And now with additional in our specific class
where we program here in very detail in
the pattern headlamp. So Kimara, ceremony done. And not short click,
Launch, click. Holding down the button
after two seconds. Here you can see I'm pressed
longer than two seconds, 12. Here we go. Once again that we
can see that one too. And I'm breast lump
it into seconds. Yes. There we go on. And in the next video, we are implementing
the fading component.
46. Add function Fade: So now we want to
implement the logic. That's when we're pressing
and holding down the button, the LED should be increased. And normally we do
that with a for loop, the fall of being
incremented and variable, and we're passing
the increments level to an analog write for example. And so it should be automatically
increased each loop. But this is not how it's
supposed to be because we want, not an automatically way. We want to hold down the key. And when we release
it, the brightness a increasing should be stopped. And therefore we have to make a slightly different
approach here. So we have here also some requirements and challenges
which we should conquer. So at the very first thing, I would say analog right? Led green. And we could say, for
example, to turn it on. This is one step what
we want to implement. We want to increment
it from 0 to 255, for example, this is the
maximum brightness level. The first challenge will be, we're not getting the
proper LED or our variable. Of course we could
say just a PIN value. But the GPO is,
it could be done. But what I would like to show
you is we can also access your variables
outside of this file, which I'm going back to
main CPP and can see here our, um, two variables. And what if, when we put them above the include statement? Because here is it include. The compiler goes from
top to the bottom and maybe he can
access them. There. Led green jumping back to pattern headlamp just to
see the firm writing. Is that right? Written, Yes, but I can see it's not defined. So next approach, we could copy the LEDs statements
inside the headlamp, but then we have a
double declaration. That's also not what we want. But we could say here, external compile
now knows, okay, somewhere outside this file, the LED read into
LED green should be defined and I access it. And as you can see
now, this will work. Next step is how could we increase the level
of the analog, write the brightness level. And therefore, I would like to use here and static integer, it's called count for example. And we increase it in each loop, the value of the variable, so we can add the
count variable. And as far as we are in the
loop, gently break domain. So you can see here we are here. The function is invoked
into the main loop. And this will increase
our level in each loop. But what if when we come
to two hundred fifty, two hundred fifty
five to 70 years, this is not a good way because
then we have an overflow. Therefore, we are reset
our count variable when it reaches
greater than 255. And then we can say count is 0, so we are resetting
the whole thing. And we can also say analogWrite
serum, so we turn it off. And for a proper visualization, we are taking a
bet on beds delay. But then this just for training purpose and also that
we can see here and more. The effect I also would like to implement in short delay of 20 milliseconds so that it's
not just hitting the 255, it goes a little bit slower
up to our desired value. Okay, So far so good. What do we need else? I think this is everything. Static, okay? Static means it will be
set in the very first, when we invoke it, it the very first time, it will be defined here. Then it has, now the value one at the value
of one Next loop. This won't be invoked
anymore because it's just invoke the
default row first time. Now this account
has the value 1234. This is a very convenient
way to work with just inside this scope from the white button,
headland check fate. And we don't have to declare in a global
way static int count. So let's see if we have
compiling error and flesh. Our ESP. Looks good, but we
are not flushing it. Because we would like to add
some more serial print line. And I would like to post a count variable so that we see what is going on here. And for the reading gift, the contrary, more space here, right-click
Format document. So far so good. So now jumping back to the
main file because we have to adapt your also
something because Here we are working
with digital rights. But the fading will
be implemented with analogWrite and mixing,
analog and digital, right? It's never a good idea. So I would suggest
we also adapted a function so that
we can also fade, but also click turn off and
on the green LED again. Therefore, we have
to implement also on little function
with and flag. So in the main file we are
setting here in the case one writes LED green
is for example, Sarah. And we want to turn
it on with 255. And we could say here, we need N static polar. Is it on or is it off? And if one, then we could say, we are turning it off. And we say is on. This LED on when it
is on returning off. So is LED on is false
for the next one. Else. When it is false, then we turn it on
simple as it is 255. And it's true. And I also want to have this serial print that you can
see what we're doing here. Short clip from main CPP,
right-click Format document. Once again, what
we're doing here, we're fear and static pool. It's, the very first
beginning will be defined as false when the click is coming. Because this is our
Check button function which delivers also one. When we get in here, one back, The first step
is, we turned it on. Led is true. In a next click, LED. Led on is true. Then we will turn it off
and so on and so on. And this is a convenient
way how we work with flex. So once again, we
check it and then we are able to upload our file. Here we have our main file. Click on it, it's insured, click at some short click. Then when I'm can also hold it along a bit and clicking on longer
than two seconds, it will increase the fading. I'm clicking on the shoulder, click, clicking once again. And I can see there
is a double message because I've
implemented two times. This is the reason
why it's doubled. But nevertheless, now when
I'm starting to fading again, it should be started by 141, holding down two seconds. And as you can see, now, it will be continuous by 141, I click once again. It's on full brightness. Once again, it's off. Clicking under two seconds. This one is on. Short, one, short. Then IN keeping breasts so
that we cycled once room till 2552 seconds delay, and it's gone, and it's gone. Very good. This is what we want so far. That means our full function is implemented on and
off perfectly. And in the next video, I have some additional
tasks for you.
47. Additional task implement LED class: Now I have a special
task for you. We would like to
implement the LED class, which we are created in also in this online course and
implemented in this project. And it would be nice when we, for example, in the short click, we setting up the
pulse function. So one-click is posing on and
another click pulsate off. And in the long click, I would like to turn
on the red LED. And after, for example, five seconds, the
LED should go off. This could be a good
case, for example, for some garage
door for example. So when we want to open it, the sign or the LED will flesh. So that means caution. There is the door is opening
and when we are leaving, we click once again
the door and the light will go off or to be turned
off after six seconds. So this could be done
with the LED class, but we have to adapt here the main CPP file,
this will be the task. There are many different kinds of approaches and solutions. In the next video,
we can summarize how you approach was and
how I implemented it.
48. Possible solution: So let's start with
the implementation or one possible solution by adding the two LED
to our workspace. So just drag and drop the
class files from the LED, which were created in
the previous classes. And one of the first
steps were being include it is dot h. And then in the next
step we could say to implement or
initiate the object. So let's type this in
uppercase. Let read this. You can see there's a
difference here with 25 and we have LED green with 12th. So also for
visualization purpose, you can see we are keeping
here the variables because the variables will be used
with the fading function. And that function is too
short and the long click, we are using the object. So we can use objects
and the variables or the GPIO pins both at the same time. But of course in and
goods architecture, you only would use
one kind of approach. But I would like to show you that both of them are possible. So going a little bit
down to our main file, the file explorer,
we're closing, and there we go. So in the main file, we now can hear adepts, this one because we
are down to want to add here this function. We want to implement the
poor state function. And you'll make, and remember, we can say LED green
dots, crusade. And we need and time, for example, 20 milliseconds. But this function should
be invoked in each loop. And here we are only checking
if the button is pressed, so that will not work. Therefore, we have to work
with some flags so that we can also access to function outside
this switch construction. And therefore, as I did before, I would like to use this one. So as I said, static
integer count is 0. What do I do with them? If count modulo two is
Sarah, for example, I would say proceed on false. And proceed on is
not defined yet. So I'm going up a little bit
and say pulsate on is false. So the very first beginning, I set it to false. Then going a little bit dark. Else, for example,
puts it on, is true. And we could also say here, say true and LED, green dot turn off. And it's true, of course
true because we have used analog off and on for the fading effect
at the proceeds. That's the reason why
reducing here turn off true, but I miss mixed tear up. This should be true and
this should be false. What have I implemented here? This variable will be assigned
at the very first loop. Then modeller always divide, gives us the rest
from the division. So divided by two has not rest. And this is true, so it will be go on. Then one divided by two. There is some
registers now, null, which is the division, and therefore it
jumps to the else. So each time I'm pressing
here, they're button. I have to also to increase
the value of the variable. This is just an assured
function where we can toggle. And I would say in Fleck. So clicking once to flag, it will be turned of true. Second time, it will
be turned to false. And now outside the
host switch structure, I could say if proceeds, if the flag puts it on its true, then I would like to say it because proceed
is then in each, in each loop through and also this function
will be invoked. And so the LED could
turn on and off. This is what we want to test now because we have
made a lot of changes. And so we can be sure
that these changes are. Properly set up, so therefore,
turn off the camera. Now let's see. If we click once. They pulsate function
will be turned on because here at the very first
column 0 variable, that variable as
one and the loop, the if statement
is always true and the preset function
can work properly. Once again, I click on off. So the static count variable
will be hold on One, One modal or two is not 0 and
so it comes turns off and deposit on will be turned
or to false one again. And I can click,
click, click, click, keeping the two seconds
and I can fade it. Fading. And to fade is going on. Clicking one time again. And the proceeding, we work. But this is not the
whole function. The second part was that
we wanted to implement yum and turn on and
turn off automatically. Therefore, we could
say LED red, turn on. And we make this with digital
rights. This is okay. And you may know, we have fear and
function in LET CPP, and it's called turn
off after delay. But here we have to adapt a little bit because
in this function, I'm, let me see where it is. So we are in this function will only work once at the time. Therefore, we have to
say Previous middle is turn off, is Millis. Then it will work
in a proper way. Each time it will be invoked. Turn back to main CPP. And also this function should be accessible outside
the switch construction. And therefore we say LED
rat turned off after delay, for example, 5 thousand force, or let's say 2500 and false because we are
using LED digital, right? Once again, we are
uploading the whole sketch. So now we can see we can
turn off the proceed. Of course, we can also
turn on, turn off delay. Once again, do an on and off. And also the fading should work properly as we seen before. Once click again and
it will be pulsating. This is what we were
created to fulfill tasks. And now we're at the
end of this project and have successfully
implemented a class. They're related to class
and also implemented another class to use it
in our main project.
49. Wiring: Let's start with the overview of the hardware and
the bearing part. As you can see, it's
very, very easy. With ESP 325 LEDs. The LED is connected to the
ground, to a breadboard. And on the anode
and the plus side, we have one resistor. And then we're going to the
GPI or from the ESP 32, in my case, five LEDs and I'm starting to cheaper or sink. It's 19, will show me in 1918. Then we have GPL 51615 on the upper side of a for several models
as canine and G9 team. And you can also can
only use three of them. For example, plus and minus, we are connecting
to the breadboard. And each of the cells
has some data pin. And we're connecting the data
pin to GPIO on for example, 14, twenty seven, twenty
six, twenty five. When you in developing mode, I would recommend
to skip the V5 part to the breadboard because the
USP is powered via the USP. And you don't want to have two different kinds of choices. But it's important
that you connect the ground to the
breadboard because grounds, the potential
should be the same. Afterwards when you
go want to have the whole game upside are
not connected to your PC. Then of course, you need to connection so that the
ESPs also powered. But I'm powering
the cell walls with an external USB afterwards with an external power
source connector. And I want to, I'm
connected with them. 12th world power adapter differ here and
voltage regulator, which is set up to five volt with this potentiometer
within digital meter, I can measure here to five world when I'm scrolling down or up. Then I'm connecting plus, minus to the breadboard. And now I have five
volts on the breadboard. The service will be supplied. We are an external power source. This is all the things
which were needing. The LEDs have one resistor, as we discussed before
in the LED class, and connected to the minus
parts of the breadboard. As you can see, very,
very basic things. It's more on the software side. And now we can go on
to the source code.
50. Creating class files: We are starting in
this project by creating a new project file. I've already did that
in the platform. Any data we're adding
here our basic templates, for example, the monitor speed upload ports,
monitor port. And I'm always include
the analogWrite library. Save this one. And also in the main CPP, rewriting the 0 begin. And it's called rock paper scissor and maybe have
some fourth variant. I'm taking the well, and this is how I call
now my classifies. It's an acronym, It's RPS. We, WE New File, R dot h. So then also creating here
and CPP File and New File, CPP than to the right. And we're starting
with the header file. The header file has always
the same structure. So it's called class because then we are
making in semicolon. The next part will be
including the arduino dot h. And they include guards,
include guards I, f and f r p w underlying h i. Then it's called define RP SW. And at the very
end we're seeing, and if it looks good so far, then we're switching
to the CPP file and including here the
Arduino today edge. And we're also
including the RPS W, H. I copy this one, switching two main CPP. And also I'm including
here header file. So we have now set up the basic program and also
created the class files.
51. Headerfile: Now we want to define all the things which comes
into the header file. Although when we're not
needing it right now, I would like to give you an
overview of what we need. So first of all, I'm euro. My class is gone
verse the class, class LPS W, and privates. In the private section,
we haven't string. It's called solution. And we have here and
two-dimensional array. So in the solution file, we have now four rows and these furrows should be
initialized with curly brackets. And we're putting
here in default. The first entry is for example, scissors, stone, paper. Then I have in each row, 43 entries means comma after stone. So I can say now, the very first entry of each of the lines
will be checked if i, o will be chosen by me. So that means if I
choose scissors, then the next entry comes paper, because scissors beats paper. But nothing else. Stone and when I'm
choosing stones, stone will be scissors,
beats scissors, paper will be stone and was speeding scissors and
this donor. So what rules? Because the world's
citizens don't syncs. The paper will
float on the water. And the paper will
cover the stone. Stone will crushes scissors. Scissors will cut paper. These are the rules
in the basic format. Of course, you can
adapt TO many, many variations for e-commerce, for example, with monkey, etc, then you can add more rows. And my game logic is now what we are
implementing later on. I choose the first one, for example, paper
I iterated through. And paper can beat
stone and worse. And then I see the
bottom stone or wealth, then I win because I
have chosen paper. If the bot has not
stone and not wells, then I've lost because I
only can win with paper. And this is the
game logic so far. The first one is what I choose, and then I see what is
in the second part. And then I can say, if I have one or not, then we're going on
with the struct. Struct for example, scores. And in this structure, I will put in n string
match and an integer score. We will use this later. And it will also have
here on previous score. Right-click Format document. Then public double point. Here, we are defining
an enum states won't. Why do we do that in public? Because we want to use the
states in the main CPP. We want to check if we are
now at playing States, if we are waiting
for user input, for example a website, or we are at the end and then their results
should be printed out. Then I'm also say string
chosen input for example. And I'm typing in an
array and then we have scissors, stone, paper. Well, and of course we could
also use here and get down. But I would like
to keep it simple. I'm, I'm, I'm have chosen input. And afterwards we can fill in here and random
number, and it's done. Then I'm scores, score three. So what is course scores is now our struct and
we initiate this. And now we have here an
array of three scores. These three scores
we are setting up, for example. So one. And the score is 0. And then, okay, then
I don't use it, its core, I would
say game score, one. Copy. Then the second
one we can say lost. And the surgeon should be, for example, a tight
drawn as he liked it. Eyes tight. So far, so good. As you can see. The first one is the string, the second one is the integer. This is an array, and at the very end we
need here semicolon. Then the next thing
will be white. All LEDs off. White. Led on. Or we could say turn all LEDs. Here we see a camel case, white. Check, gameplay and check use. When two input parameters, string use a string, but wide reset game. This is all what we
need for this project. And now we have
already implemented all the header things which we are needed
in the game logic.
52. First game mode: In this video now we start with defining our
first game algorithm. And therefore we switching
to the RP as w dot cpp, we're declaring wide p.sit, W double bond, double bond, Check, use a wind. This will be our main
function which will check us our game lost
or draw section. So it's user string. And this function will be
invoked in our main.cpp, every passing here, our
selection and the bot selection. Then we can say if the input from the user
is equal to the bot, then it's what we designed. It's in tight silver print. One. Else. We could say. Then, now the logic, what we have defined
just before it comes now into the
game, that means four. We say here integer equals 0, integer less than forum, because our solution area
has the parameter form. And now we are seeing here if solutions, this is solutions. I define this with S because there are
solutions plural arm, year 0. This is user. So when I'm choosing scissors, then it will iterate through and will check if the first four, if the first element is here, scissors, when it is, then it goes on. Then we say, if solutions E, but not the first one, the second one is
bought or solutions. We need a little bit more space. One to this spot, then what is done? We have one. Else. We have lost. This can we print out? Then we check once again
what we have done here. And we could say euro lost. So once again, the logic we iterating through
the game to, through the solutions.
Here we are. Then, for example, if
I'm choosing paper, the first area, we'll not. The first if will not pass
because the solution serum, serum is scissors, 10 is stone to 0 is
paper, then bigger. Checking the next solution. If the bot has here, stone, this one, all the buttons wells, then I have one elseif lost. And that's the easy
algorithm for our gameplay. So let's try it out. We are going to add
our main file and TR, we initiate our new object. And the object is the class
name is RPS w and I would say game is RP as we w, but not with such w2 name. And then inside the
setup I could see game point check user when. And I will say for x first
example, paper, paper. And the bot will have stone. Then I have one because
paper will cover stone. So let's try it out. Just check here the compiler. Then in the meanwhile, I connect my USB into the
computer, uploading it. Then we'll see if we're right. So restart. And as you can see with one, because paper we'll
cover here this dome. Then next example, when
we're losing, for example, we taking scissors and the bot will take
Welles once again, upload the whole thing. And now the scissors shoot
lost against the welds. So let's see in the
background here minus several motors because at the start they are
taking the position on, so lost its true. And the last game, what we would like
to check if we have paper and also paper than the whole game should stop with serial print tight
because the input is the same and lasting
should be checked. Let's see if this
function will be right. Then we have set up successfully our game algorithms so far. Yes. Are we good? So in the next part, we will cover a little
bit more in detail. The algorithm.
53. Game mode in loop: Now let's use the object
a little bit more. And therefore we want to get
rid of the 0 print here. And we want to use the
game's core game score. But I would like to use it with lowercase at the beginning. So game score. And now we want
to have an index. For example, we
have your tight is this second index 01 seconds. And now with some point, It's a chest me already. We have to identify
here score or match. And I would like
to have to score. And now plus equals one because we want
to have an addition. To add here to
summarize the function, sum with one, same,
same but different. We have here to index 0
and we're in the last, we have the index one. Little bit more object
orientated because now we score, are we safe this course
in our game score? So let's see, switch to the main CPP to get the
full potential here. What we have. Now, we want to go here into
the loop and we're making here and bads delayed just for training purpose
because afterwards we're getting rid of them. Okay? So once now, print out the details so we can
use a serial print f. And really convenient way how we could add text and variables. So for example, we could
say one, lost and tight. And what we can do now is we can set up here with a comma, the first variable, the second, third very room, making a line
break so that we have here a little bit more of
Merrill model space. And now how could we
access now the game score with RPS W on potent game score. Not whisking. Game is our
object name, game, games colon. And then we could say, we want to have
the 1 first index, dot score, class name, then public member
name, and the index. So this is what we are using
also for the last one, but was the first index. And the last is
the second index, but no comma at the end. Double comma, also. The placeholder for that will be the and also the last one. Looks very good. For the
very first few print f, it has to be not print. And now let's check if
we have within right. And it looks good, but we want to hear a
little bit more flexible, a little bit more random. So therefore, I would say
will make your user input is I'm user inputs. We want to access
our chosen inputs. So we are saying here again, dots chosen, chosen input. And I could say,
for example, two. And it will be giving me back, or 10, or 1012 will
be printed out back. I want to print also this
line art user input at, at the end of the string here, I also want to add a line break. So slash n for line break. But here, there is no
random function inside. So therefore, I would suggest
we're typing in random. And it will takes
two things to start, starting point and
the last point. But the last number
should be exclusive. So we have still 123
are what we need. Therefore, we have a random
function which gives us, should we also include
here user input? And this random function puts in assistance don't
paper or on wealth. And to paper for the, for the bot will be set fixed so that we can check it afterwards. Then connect the USB
to your computer. Can hear my stepper motors in the background because
it's already connected, then you will see if
we are right or not. So restart and well, Scott lost against paper. So where are we? Mean here? Paper stone was
once again, I have to restart. Stone, stone, stone, people
lost stone, paper, lost. Lost. Paper. Paper is tides. Stone lasts, stone lost. Scissors, one against pipe bomb. I'm lost against paper
because paper are floating. Stone against pay. Was, and as you can
see it, once again, we're starting all over again so that I can see it says a one, paper, one against paper. Our paper should be tired. Css, stone lost wealth one. Yeah, so it works. You can see the game score
will be saved in the object. And we have here a little
bit more flexible way. And also we implemented here
and random function so that it's a little bit
more spicy in there. First, in the first field.
54. Create a website: It's time to create the website. Therefore, we are going to our source folder,
right-click on it. New folder and I'm creating
here and data folder, it has to be the name
data so that we can later on upload the whole
phase to our system. Then I copy and paste here
the files from the platform. Because we are needing here
the jQuery, for example, enter style CSS, and
right-click on it new file, and we're creating
an index HTML. Now I am copy and paste
a little bit because it's more general things to do. But we're going
through each line. The first thing we're being, we're starting with HTML. Then we often had a year. Here. We could say, for example,
rock, paper, scissors. Worse. Here are a few things that we
can also open the website. For mobile devices. We've referenced a
style and Jake row data which were
included right before. Then we are starting with
the body part, body. And we can close the
HTML. Inside the body. We are pasting here the headline could be
the same as the title. Then we have here
and class content. So we're closing it. Inside this content. Main website will be visualized and we have
here and other diff. So we need all the divs so that everything is
aligned very well. You can follow this
along in the style.css. You can see what the
class boxes will do. Then the next one, so that we really have everything aligned
TO. It's awesome div. And inside the box, no shadow. I have here and
select the Select. I would say, we make
safe all the things. Then we're going to into
our project folder. So this is all rock paper
scissor folder source data. Double-click on the index HTML. And where is it? Here it is. Here's the website so far. Rock paper, scissors, game. And here I have my selection. And then I will scissors, stone, paper, wealth. And also the id should
named as the same. Scissors, stone paper. Worse. Okay, refresh the page. Now we have new things. So far so good. The next thing will
be, for example, we could say line
break, line break. That we have a little bit
more space here close to the deaths after the boxes. Let me see. After the boxes, we fill in here a new notebook
shed on and it's called, for example, submit entry. And this is necessary that we have here an
onclick function. I come to it later
on, game or play. So this is a patent. What have we done now? We've made and buttons. So when we choose afterwards
here and selection, then we can invoke
here AND function, which we pass the
data to our ESP 32. So that looks, looks very good. After the main def,
after the content, I will add on hertz and
underline underline sprays. And I'm adding here a new div and it's called
def statistic for example. Then this statistic
we're posting here, the results class statistic have to be the name because it's defined in the style CSS, so I can change the name here. Otherwise I have to change
it also the CSS files. And here I haven't table. This table will be filled afterwards with the
server-side event. The table has had somebody
with lines and rows. And the idea is, for example, this course
that I could check change. And these aren't
Duran's result in H3. Once again, refresh,
and this is now our perfectly responded
website so far, so good. At the very end, I would
suggest that we also include your JavaScript
not in a new file. I would say it's good enough when we're all putting
here in one script. Then we say function,
how is it called? It's called Submit get. In this function, we will
pass data to our ESP 32. So, so far we've
created a website. Then in the next step, we will
discuss how we can put up a WiFi connection and how we can get up to data to our ESP 32.
55. Access website via ESP32 Webserver: Now it's time that the USB 32, we'll connect it to our
wireframe and that we can also access the website
from or to the GSP 32. First of all, little mistake in the video before
we have to take the data out of it in
the main hierarchy, in the main folder
area than the sources, data and source on
the same hierarchy that's necessary
for later purpose. So in our source, I will copy here
my credentials in. So you can follow me along
with right-click new file. Your credentials, for example, Craig dentures dot h. And we can say
here, for example, it's constant char
life and see SSID. And we could say the password
is const char not 2442. That's it. That's what we need
to identify and define it. I delete this one because
I already have it here. In the main cpp. I include it includes dentures
dot h as the next one. We could say that we
need here a little bit more of the external libraries. Therefore, I include
the following ones. You may ask yourself, where can you get them? You can get them on platform. I don't open libraries. And I don't know if
we did this before, but here you can
choose, for example, ESP itself on and you
get to hear the name, for example, from
Kevin Harrington. And you start example
installation. And you'll get to hear
the library name. Can copy it. And as I
have here, paste it. That's all what we
have to do now. Save it and change to the main CPP TO before or
after the arduino dot h. We including now all the
libraries which we need, that's the y fit and H. Why haven't we made and reference
and a blood from any? That's the reason because
to y feed at H isn't the core of the ESP 30 to the core means that there is referenced the libraries
is a built-in libraries, I would say and all others. We have to include it in
this way as we did before. For example, also the TCP
which were needed and the ESP arsenics web server for the communication
to the web server. Spits is also included in the core and spits
is depreciated. That means in the next releases them may not
be supported anymore. Instead, there's
little EFS used. Why I'm using spoofs, because I'm using here the
black foam USB 32 version, 3.5, the blood film version, and I need it for other reasons. But later, when you want
to change two little EFS, there are just a
few minor changes and everything
works the same way. I show you afterwards
how you can do that. Then we need to hear
this servo dot h. That's all the libraries
which we need so far. Then our chest that we are making changes to
the Explorer source, new file, my wife, V dot h. Now we are
connecting or say here, all the necessary
functions which we need. For example, they connect to access points that we've
got a Wi-Fi connection. Here we can say
connects to Wi-Fi. Wi-fi between SSID and password. And this is from the
credentials dot h, Our main global variables. Then this is on
standard procedure. You can just copy and pasted
right-click Format document. Here you get the
Wi-Fi connection. If it's in a while loop, each second it will
be printed out and point and it's successful. We can print out here
and local IP address. If it's more than 20 loops, then it will break out
of the while loop. Because then often
it so that there is something with the
router for example. Then also I would suggest that you include here
the processor function. It will be needed for the web. So for example, if we would like to turn off and on lights, etc. So that when we are
transferring and get parameter, we don't use it in this case, but you should implement
it because it's required. Also create the object later on. What do we need for the
server-side events? And we also create here the web server object
was to port 80. And then also we should include
here the arduino dot h. And also this serial
errors should be gone. So far, so good, a lot
of copy of pastes. This is some general things. We're switching back to main
CPP on to the setup part. Because now what we want to do is we want to start Smith's. There's also a
standard procedure. Could also copy and paste it. Then we invoke our function, or we call our function
connects to access point which we already defined. But as you can see where
if you're an error, because we are not included
it yet includes my wife dot h. The next point we have to add here sum functions
for the web server. So I just post in all the things and then we
go through it line by line. This one is called Server on. Server on, when we are
accessing the website, it will pass from
our file system, the index.html
side from Smith's. Next one. We have here our CSS file. A CSS file will be provided from Smith's website and
also the Chaco, it's text JavaScript,
and it will be provided through spirits
with this filename. Filename. So as you can see, start the middle index. And this is necessary
because we are storing the data into the file
system from spills. And this is how we can
access it automatically from the program style CSS and
also the index or tomorrow. So far, so good. And what we also need this
here on server begin. One side note, if you want to change to little f s later on, just change the include
statement S begin. And here was this
respects you change two little EFS and
everything should work fine. As with spirits. After the silver begin. We're adding nothing so far. And I also would
recommend we comment out the loop because
we want to trust to check if we have stable Wi-Fi connection and
if we can access the website, therefore, we are making
here and first compiling, check if everything is right, and then we are uploading this catch at the
very first place. So let's see if
everything looks fine. Yes. Then uploading the sketch, as we can see, the
file will be uploaded. Now, if the upload
is successful in, we're switching to the
serum monotone because now we should see if gas, if it's connecting or not. Yes, and we have
unstable function, but we can't access now our our website because we
haven't uploaded it so far. So we're close to 0. Mana is necessary because
otherwise we block the way. So now we have a
different approach. If you aren't Arduino EDM, I would recommend you
random not to terrorists. Search for instance, ESP
32 file system upload on. Because it's
completely different. You have done unit here on
third party application, which is provided to
you in the article. But it's not come with the
Arduino IDE to point O. So I also, I have
experienced with the old media and with this
specific uploaded works very, very good with the
new Arduino IDE. I can't see anything
because I don't use it. So just go step-by-step
through this whole process, upload your data files, and then you can follow me
along with the other steps. With the Visual Studio Code. It's more convenient. We switching to the platform IO, go to our deaf kit. First of all, we could
clean all, for example, or we say Build
file system image. Once again, it's necessary that all the serum
monitors are closed. Otherwise we would block it. Then we could say
Upload File System. And now all the data will be uploaded through to
the ESP 30 tune. It's not finished yet. Wait until here the successful
message will appear in the serial monitor on shift
data verified, leaving. That looks very good. Now we can turn on the serial monitor so
that it's connecting, once again, connecting to WiFi
am typing in the actress. Once again. In my case, I often have to report it so that connection could
be established. Once again, now, it's
successfully established. And when I'm typing in
the IP address into them, into my webs, into my browser on the website
should be opened. And that's it for the
first I'm approach, we will have successfully
created and Wi-Fi connection edit the specific
data to the USB 32, and we have access to our
website on the ESP 32. Much, very, very good approach. Much are we have
done everything. And then the next step
we are implementing the game algorithm
to their website.
56. Transfer data from website to ESP32: Now we want to establish
the communication between the ESPN
and the website. So our goal in this video, we'll be then when we are choosing here some
of our options. Weekly complaint that this value will be passed to our ESP 32. First of all, we have the
opening of our index HTML, and it is in our data folder. And at the very end, after opening once again, it's the very end we have
here an empty function, submit gets this Submit get will invoked when we are
clicking on this button. This button will
transfer or will access to the function which should deliver us some
of the chosen option. So this is the ID SSP Oswald. And we are accessing this idea and we should get
back one of this option. So how can we do that? I'm a jQuery fan because
it's for me easier to use. But you can also use your standard JavaScript
language as well. So I would say far
user input is. Now we're accessing the idea. And the idea is with the
hashtag, SSP be Oswald. It's called dot well, for the wealthier and
American lowercase. In case if we have
fearsome other characters, then I printed on the console lock user inputs for later for debugging propose. And now the task will be
that we also transfer this value to the ESP and that can we do
with them GET request, what isn't GET request? For example, my website. And if I have here, for example, on a website named it's called
arduino dot PHP. And then indicating with
some question mark, the variable name is William. And this isn't, um, yeah, and way how we can communicate through the USB with
the GET variables. That means that I
can later on gets here this variable name
and fetch the data. And this is what we're doing
here with this approach. Therefore, I'm
also using jQuery. So I'm using here, you are our function
up that was not right. That was not supposed to be. It's should code,
function and data. There we go. And that's the structure of it. And here is nothing. Here is nothing to
do for us because we only want to send
the data anomaly. The USB can send data back to the website and
we can do here something. But we are using
an other approach because this is not just
in synchrony process, but we want an asynchronous
process because later on the ESPN should make the whole game and afterwards
should send back the data. This is just for sending in
real time data to our ESPN. But the URL should be defined. And I would say get variable
name is called SSP BM. And I'm seeing equal, and we're sitting in the
variable name is user input. So the GET parameter should look like
something like this, is, for example, Stein
or stolen in this case. And lay down, we're fetching this variable name and
getting back the user inputs. So we're saving in the data. And I would recommend
that we are uploading now just to the website so that we can see if we
have here some arrows. Then we're going to bled from
Iowa, upload file image. And stop. I see here I have missed here. I of course I have
to put in here to get so once again, upload it. Opened a ceremony done. So I'm already connected than I'm opening the
website once again, refresh it, right-click
somewhere here. Then you can go on to inspect. We are clicking on cancel. And now when we
are choosing here something and click on plane, we're getting here the id. That's what we want. Perfect. So what we have
done so far is we are getting by clicking
on the play button, this value of the ID, not the contents, the ID. This idea should be the
same as we defined in the, oh, where do we have
it in the header file? Because then we can match it. So this is a stone paper
wealth should be have the same ID as here, defined. Then we can go on later on
in check use of in could put in the values into this function and have our whole game logic. So, but we're not
finished yet because we have to put here in the main CPP and function which will
also capture the get. And I've already
declared it here. So we make here an
individual function and we want to get here, they're answering could
be web server request because this construction
has everything what we need. First of all, we're going a
little bit up to the top of our file and we are creating
here some variables. First of all, I would like to make a global
variable user input. And we're defining here
and function prototype. What is the function prototype? Because I would
like to make here the check patterns function, but not above the setup when I'm declaring uncommented to show you what I'm what
I mean by that. Just copy it. I go to the end of the file. I would like to have
here the function because it gives me
a better overview. But here you can see him. The check pounds could have been compiling error
because we need to define at the very first place the function so that the compiler goes from
the top to the bottom, knows, okay, the function
will be defined, has no logic, goes, goes down, down, and
here comes to logic. This is what a prototype
does, therefore, uncommented so that the
compiler knows the function. And now we're going right to
the button and now they're, the details comes in
as an input parliament that we're using this request which we are getting
from the web server. And now we could say, if the requests, and
this is a pointer, so we are accessing
with the error. And here are all the
implemented function which are there. And there shouldn't be any
function with Hesse param, not wheezing S, S PBM, or what do we call
it? We call it. Let me see. Spb for example. However you want to
call it main CPP. I want to capture this. And if there is such parameter, then I say user inputs, which we are declared in
a general global scope. Then we say request
that has parameter. Now we get parents
get param, SSP, PM. And we're saying, well, you're very good so far. Now, I would like
to print it out 0, print user input, so that
we can check if our right, let's see what the
compiler says. Closing all the
opened Hello things. And when the compiler
gives us a green light, we uploading the sketch, the website is already uploaded. Then we can see if we haven't established and
communication ceremonies is open or reloading
the website. And now I want to have to stone. Stone is here. I wanted to paper. Okay, I have missed
a line break. Scissors. Scissors again was very good. And here we have a successfully establish
the communication between the website and passing us
the value to the ESP 32.
57. Game mode on two games won: Now we are coming to
the secret sauce of our game because we
wanted to change the game mode so that we can automatically detect if we are waiting for an input, if we are on bleeding or if the game is at the nth
and we played to one. So that means I need two wins or two losses that we are
finishing the game. And therefore, our states
comes here into the game. And first of all, we have to think what
is the first state? The first state will be, we are waiting for user inputs
after the USP 32 started. Then after we are setting here and use
input via the website, then we are changing
to playing the game. When you're playing the game, there has to be in
the background. Check if we are at the end or we are playing
again against the bot. Because if someone, if I have one or the BOD
test two times one, then we are at the end. We are resetting everything in publishing the results
to the console, or we are waiting for the input. This is what we are
wanting to implement now. Then, first of all, let's go to the setup part. And in the setup, we have to declare here, we want to wait. So the first statement
of our states, therefore, we are going
to the end of the setup. Then we are typing in our Cloud object name of
triclinium is called game. Game dot. State equals game dot. Wait for user input. Here we got an error because
here we have our states, but the states are
not initialized. And of course, it's not unusual way that we are initializing things
in the header file, but I only want one
object of the states. I don't want to have many different kinds of
objects, just one state. And this the reason
why we can initiate it here into the header file, and then we can use
it and access it. So now we can hear in the loop, ask our object, our game object, in which state we
are currently are. And then we can here, focusing on the
eraser for example. So what can we do now? Switch game dot state. And in the switch case we are, I'm asking the next case. So the case game,
playing double point, break case game, wait for
user input data points. And we have UK's game
and without any break. And so far we have identified the different kinds of
states inside and break. Jump back here. There has to be upper f. Now, it should be good. Yes. So lay down, we're checking here the content
for the switch case, but we are currently
at the state. It's the setup. We are waiting for user input. So now someone is entering at the website on inputs and we're
getting the input here, deleting the serial
print and be changing the state to playing. Therefore, game dot
States is game playing. Now that we have changed the
state in the next loop here, the function will be jumped
into the case game playing. And now we can think
what is the next step? Now we have to use
our main function. It's called Game check, use of when user inputs. This is our global variable
from Czech params. And here I want to have the
inputs inside the loop, but outside the switch, I would define here string pot. And the pot gets here. Game dot chosen inputs. Here, this is our desired RAM. It has four entries and we
want with an random number, x is here, one of them. And as we discussed before, this is a private thing. That's the reason
why we add it here. The chosen input as
public chosen input. Then we are making
in random number, for example, random through four and S we discussed
also earlier. This first number is include inclusive and this is
exclusive. So we need here. 0 to three, that's the reason
why we have to enter you. And for our number, round number we are
identifying as well. Because we needed also
later under this number. And we can set here in the
URL field random number. Okay, So far so good. Now the user input comes
from the website will be checked here from
the Czech patterns. And we got here on random
inputs. So far, so good. What do we need? Now? We just checked the states. Let us see game check user when we're just
storing this course, but we don't change here any
states and keep it general. That means we have to hear
me Can second function and check gameplay. Gameplay. We haven't got defined
yet, so therefore, we're switching to our file. I'll press W and we're
saying what RPS, WOW, point, check gameplay. And here, under
Czech game blame, we have to think about
what should happen. So someone enters
something and teapot. And it's now we have for
here in states where someone has won or lost. And now we should identify, is the game at the end or should we wait
for another input? Because for example, if I have scissors and I'm the stone, the bot has won the first
time. Now we have to wait. But what we are to draw, what when we only
have one-to-one. Therefore, we checking
now if our games column, so if the game score dots, we have to access here
to score the game score. First entry dot score. That's the, that's what we want, is greater than tool. Or if the game score with the first one score greater than two, then someone has lost
or someone has one. Because the first one is I have 12 times or the
bot has 12 times. So even do after events, then the game is finished. Then we can say here, the state is when no, wow, nobody has one. Then the state is, wait for user inputs. And we are here
inside the class. So that's the reason
why we don't need an object name and we can
identify it with an equal sign. So far so good. And this check gameplay will be invoked and each loop
when we are playing. And for this reason,
I would like to add some silver prints so that
we have an nicer output. Results. Serial print. We can say one. Then we seeing lost. And we could say tides. And we are typing in
the game score, not 0. Score. Lost this one. And schemes CO2 is tied, so we get at the whole thing. And as the last one, serial print line, Okey-dokey, looks good so far. Then we have to go back to our main loop because
we're not finished yet. Because now we
checked again blame. So it's wetter waiting for
an input or it's the end. But what he said to the nth, going a little bit
down, we have here a one more function which
we have to implement. So we could say game
dot reset game. And let me see a little bit. So reset game, switching
back to our class file, white RP SW, recent game. And what should happen here? It's very easy because I don't want to delete the object on initiated or new one because
maybe you would do at here some rounds counting, etc. So I only want to delete or
overwrite sticking school. Therefore, I am
using a for loop. So integer count to three. And Tia, I say game score. I, score is equal 0. And now I'm overwriting
this course at the end and changing the state to
wait for user inputs. Now I think we have managed all states in a general way
because he in the loop, we can then access the
several models, for example, but not implementing something
in the main core class. And also here we are
waiting for user input, nothing to do here. But also here I
would suggest for training purpose and
also for validation. I would like to
print out here then the inputs, so serial print. And here we are. I'm giving him the bottom, but I'm switching here, not the pot at the first. I would like to have
here the user inputs, because then it's the same
order like here, user input. Then we've got the pot as the last sign
we're making here, print line and
semicolon at the end. Don't forget the semicolon. Let's check if we have
here some arrows. Do we get the green
light from our compiler? And then we are
uploading the sketch to their USP 32.
Yes, it looks good. Then uploads. So the program is
flashed and we're connected to the Wi-Fi and once again reload the website ends. Now, I would like
to choose stone. Stone is my input, paper is the bot, so I lost. That's true. Stone again, stone paper. Okay. Once again, I would like to have paper, paper against Scissors. I lost than wealth was. Again sister, I win because
scissors are drawn. Then once again, Wells was
paper and paper floats. I lost again. New game. We'll start at the next time. Scissors. Scissors was just
not my lucky day. Stolen scissors. One, once again, the stone
and stone paper, I lost. One more game. I would like to have fear
and tight paper scissors. I lost purposes as I lost. As you can see, here, we got paper, paper tight. That's what I wanted to check. So the gameplay, I would
say, works very well. And in the next video,
we're going to show our try to make the rest of it.
58. Sending Server Side Events: Now we want to send back
to results from the ESP to the website so that
we'd later on can also visualize the
results there. Therefore, we can use here
the server side events and the seller side events are
pretty much prepared for us. We just have to copy
paste things in. And this is from
expressive itself. They gave us the code snippets
and you can fill it in. Therefore, we are
opening the index HTML and outside the
Submit get function, we are declaring here. And if window event source, inside, we are copy and paste the first function,
right-click Format document. So an EventListener,
it will be opened. And then we got here
also on message when it is disconnected and the
ESP lost connection. Also the message, the first
one will be implemented here. But now you're our source. Our events can come. Before we do that,
we are switching back to our main CPP file. And we, let's see, go to the state. And we have to initialize
here the server side events. The server has begun here, but now handle the
web server events. And how could we do that? It's also here on fixed
pattern copy and paste here and also for expressive
self event on connected. Then we got in here an
idea when we're reconnect, and this is the first match. The message was,
which will be sent here within Halo and
server at handles. So this is the basic script, which handles are the events. But what is our job? Our job is to send the
results to the website. Therefore, we could go here under the gameplay, for example, and sending results to website. And this is what we
can do now, events, punk send events is our object
which we are created here. Let me see here. Should be on a wi
fi, I think here. This is this event,
event source. And now in the loop going down, sent you, we have
to send a string, for example. And string. Just copy and paste
the first one. Some string because this is only an integer
converted into a string. And then two uncharged
because this is what we need. Then I'm also giving the second value and it's
called, for example one. And we are also
posting here Millis. So here we have to
add not reduced, and it's called the game. And how to record
the game score. Dot game score, 0 and dot score. Now we have two points. Next line, we want
to have the lost. And the third one
will be the tight. Okay. Let's finish up. First of all, uploads
the websites. No, we're not finished
on the website. We just have the basic events, but now we have to
capture our events. Therefore, I also have
prepared here something. Let's go through it. Sourced addEventListener,
and it's called 11. We then divide here onto
the main cpp, this one. So this one will be
initialized here at one. And then we are printing
out the values on the console just for
the first purpose. Then copy paste two times
because we have lost and tight. Last one. Now, Save and Upload file so that we have a new
updated the website. Once again, what's the problem? Yeah. Now it's works because the
serial monitor was open. And afterwards also
upload this catch. Usp has connection. Then we are making Reese
refresh inspect console, whereas the council
little bit bigger. Here we are. And as you can see, we get here the messages. So when we're refreshing, use P is connecting you also
to the server side events. So why are not showing here? Then I'm sending scissors. And here the result on
the 0 input is the same, but we also get to
hear the feedback. So one lost tight. Once again, I would
choose PayPal with 110. Then we cutting
here was I got 111. These are the last 31. Very good. This is from the console log
in the website so that we can see what we entered
scissors to 11. Once when I'm pressing the next, the next option, then the game
will start all over again. And as you can see, we got here also this server side events. Perfectly. We're sending values
to the ESP header and game playing
Glenn motors and then sending back the
values to our websites. And in the next step, but we could make it a little bit more. I'm pretty this JavaScript
and also with CSS.
59. Prettify events: At this state of this project, we can successfully get server-side events
on the website, but it's just in the console. And now we want to pretty
up at the whole thing. Therefore, we are going
back to our main CPP and the events are cutting out the events from the main
game-playing to the end. And before we reset the game, we are sending here
the events just once after the game play. Then we're saving
here the main CPP and switching to our index HTML, because here we have
to add a little bit. First of all, we are looking
here at this structure. We have here a statistics. And it's called results is the class name of archaea
have to call it the kidneys. And because it's a class name. And we want to add
here in some rows. And a table is from a
structure with an rho. Rho is and t are tech. And we have also some columns, and the columns are
identified with td. I want to have your
four columns. One row. The first column is
the round number. Then how many, how
often I have one, lost and tight, etc. Therefore, we are using jQuery. First of all, I would like
to have here and variable, and it's called TR
counter because I want to know how many hours, how many rows I am adding. We'll see why we are
using needing them. First of all, we have to declare
for not only the rounds, I want to have one lost. This is the header
and also tight. Okay? Now we can go
down to our events. And now we have to think. We want to add here at the 1. First of all, we have to
create the n starting from a new row and then the
columns comment and the end, we have the structure
of the ending of the column and the
row once again, first of all, the row starts, then we have four columns and then we have
to finish there. Row. Therefore, once again, going down to our one event. So first of all, var row is, we're starting with
some TR event, and then it comes our column. And this will be sent now via
che chromium to our table. And the table is called. It's a class that we're using
a point, mr for example. And we're using the
append because we want to add afterwards
each line afterwards. We are parsing the
row value room, but we're not finished here. What is our TR? I would like to identify
with special ID and the idea is the t, our counter. So first of all, just
a normal quotes, then double-quotes so
that I can add here the very room and insights. The T D I would like to
have also. Plus, plus. Okay? I'm not right here
because here comes the row number
plus, plus counter. So this is the same. The id is just the identifier for
us, for the programming. And here I would
like to have this. Here stands 123, etc. But I also add here and class. It's small numbers and you
can see it in this style CSS. So far so good. Then we're overwriting our row variable and we're sending
also this one to the TR, which we are created here. Therefore, hashtag
plus t, our counter. So we are wanting
now to access the id of the new created a
line dot append a row. Inside the row. We are creating a new column. And this is also with unclass smaller
numbers and insights. This one we can add here
e data. What is data? Data is what we are printed
out in the console, which we are passed
through the ESPN. And that's all what we need. I think then I would
copy this one. The console log we are overrides and I'm adding here and
var in front of the row. And also here, the last one, but we are not finished. The last thing because we
have to close the line. Close to light. We're open it here at the very
first beginning, but we want to close it now. Therefore, I say the ID
from the TR counter, which we initialized before. Dot append, and a closing
tag for the line. At the end, I have to increase our counter
for the next line. That should be everything. I think so far. Then I would suggest we are uploading the
website and the sketch. And let's see what
the compiler says. Usp has connected than we are restarting or
refreshing the website. As we can see, our four
rows or columns are here. Now I'm sending scissors. I've lost one time, second scissor, and I've
lost already the game, as you can see here. I'm lost. Then once again, lost onetime, tight,
onetime, one. So we only have one row because
we are still in the game. And now we have one. And so we have here,
then next line. So one minor error. We have to initialize our
counter with one and not 0. But here, another game with stone then lost
onetime, lost to time. Next row. Lost one the first time. Tight, tight. Second time, lost one time than now I changed
to paper and I won. So the game or the fourth game, 12 times, lost onetime
tight two times. So we've successfully
implemented here the server-side
events and also have good result page where we can visualize
how our results are.
60. Implement LED Class: One of our last task will be now to implement the LED class. Therefore, I go into
the main folder of the previous course
chapter on which the, which we have defined the LEDs. And there we go. We copy and paste it to our
source folder and open it up. Here you can see what
we have here defined. Then I would suggest we
are opening here the RPS, w is TPP and including here in the new LEDs dot h.
And as an exponent, I would say that we
check the header file because in the header
file I already implemented at the
very first beginning. All LEDs off and
turn all LEDs on. I wouldn't say terminology. It's a little bit false name. It should be display
LEDs for example. So then here we go, Wide, all LEDs off. And it's worth our BSW and
MSW topic point-to-point. This lids. So what is wrong with that one? Sorry, no, it's okay. So now we have to think, how could we implement
here an LED function, which is, which will be
invoked on every game-play. And therefore, it's
relatively easy because we call the function
after each check player. Because after each check lay, there has to be unchanged
in the discourse. And then we also want to display here the
change of the score. Display LED's. And here we make a simpler
function where we can see if the game score for winning for 0 dot score is equal to one. Then first LED on LLC
if game score one. So that means that we have lost. Dotcom is one is to my fault. I'm the one because I have two
LEDs on winning and losing then to LEDs are on the
same thing with debits. So if we are losing, then first LED on and
also here the second one. So we haven't initiated
any new objects. The class name is lids. Then for example,
it lit, yellow, one is lit, and
it's in the pin 55. We have five LEDs. Let red LED read do, and we have blue one. We have two pins. I am having the second
yellow unpin 18, the first red one on 17, on 16, on 19. And now we can turn it on. So we say late, yellow, one turn on. If we have the game score 12, then I would like to have here
the yellow one to turn on. Games caught off. I would like to have the LED
red one turn on the LED 12. If game score to
score equals to one, then the big one, LED blue or turn on. When we're wants to. Not again please. Oh wow, we should reset all the
LEDs to LED is off. This is a simple one. We're just calling each of
the LEDs and turn them off. And how could we do
that with turn off? And SEM might remember, we have here an analog. We checking if we
turned on the LEDs, which analogWrite
always digital, what we turned it on
with digital, right? That's the reason why we
pass in here and false. Then afterwards, I
go to Reset game and call all LED is off. That should be
everything what we needed for our
displaying the LED. So let's see what
the compiler says. So on the ESP is flashed, turning on the camera
so that we can see here our whole Bahrain. And just the reports that my router let my ESP connects to the wife
team. Now we're ready. So now I can choose here,
for example, stone. And the red LED goes on
because I have lost. Then once again, I
have lost two times n, it will vanish immediately. This is the reason why, because we haven't tier
under its main CPP. When we are resetting
here everything in the loop we could define
here and short delay. For example, delay
three seconds. It's okay this we using
here and delayed because the game when it's finished
shouldn't do anything. So for example, you could update here the sketch once again. But I'm keeping it here, just testing here the LEDs. Now we have tight, so the blue LED also works. Then on second one, I've lost once again. I've 111, lost too tight,
and we're finished. John, also, our LEDs works
very well in a fast way. We implemented here
such classes and you could access here
different kinds of functions when
you would like to. And this gives us now
a good overview of the potential of the
object orientated way.
61. Create and publish your own library: So when we have created
our own classes, maybe you'll also want
to share and provide you class with others. This could be done with
some finished Library. In this video, I would
like to show you how we could set up from a class on library and how
you could share it and implemented arduino, EDA. And Stefan. I'm here on my Windows machine. I'm in the folder documents,
Arduino and libraries. This is the standard folder, and it's also for
the Arduino IDE to 0 and also for the later
versions suitable. In this in this
folder structure, I'm creating a new
folder and I'm calling it pixel LEDs for example. And in this folder now, I am copy and paste. Here. Let me see where I am. Form our finished
sketch from the LEDs. Let me see LEDs source. I'm coping here. All defies insights. This main folder
and the main cpp, I'm adding it, the name
to or for example, chasing LEDs are not cpp. I'm changing to ignore
because we want to add the library into
the Arduino EDM. Then we're creating an folder for the examples that have
to be called the examples. And then we'll drag
and drop this file inside this folder we
made on subfolder. It should be the same
name as the file. For example. In this file, in this folder, I'm opening the inode data and we have to adapt,
hear something. First of all, we have to add here some nodes
which license, etc. What is this library for? What is this example for? The first thing what
we're doing is here, we're changing the quotes
to this science because now we haven't
finished library in the libraries have to
be included with this. The greater and less than sign. That's all what we have to do. Then we'll tidy up a
little bit our code. Maybe we add in here
some, some comments. Just get rid of all
these examples. Let chasing. And we could say here, for example, the examples. Save it. And that's good for us so far. Let's jump back to the folder. Here are my CPP and LEDs dot h. That's what I want to have here. Nothing more what I want to add. But one single thing
should be done. And this is under
library dot properties. Let's open it. Here. You can define your
name, for example, or the name of the class
should be the same name as the photon diversion or
the outdoor maintain. A few posts are
things which category and also what dependencies
are in your class. This gives you a good overview. There are a lot
more things to do. For example, keywords
that will be found with the
library manager, etc. But I would like to keep it
here very simple so that you can see what we want to do here. The outer EDA takes my
machine always a little time. So now we're going to sketch, include library, going down
to Contributed Libraries. And there should be
here depicts Lady lids. Perfect. Then I'm saying, yeah, because now after a full
access after class, Let's my LED is lids. For example, I'm using
here the bar five copy. This one might leak is
to, for example, 18. Then I'm turning on
my leads to turn on. And in the loop I say
my LED crusades, 20th. My LED to. Then is there a completely
suggestion? Let me see. If it works also on
Yeah, there we go. I would like to have
turned off after delay. We have two milliseconds. I would like to turn off the
second LED and five seconds. And it's on false because we
don't have an analog, right? Very good. Now I want to upload this one. I have used your nodes 23 and let's upload
the whole thing. There we go, switching on
the camera, restarted again. So we have here
the LED pulsating. This one should go off after
five seconds. Very good. And we have successfully
implemented our own library in
the Arduino IDE. Now we can access it in a very convenient
way and you could share your library to others. But we're not finished yet. We also have here
some file example. Then we go down. And there should be also the
example between included. There we go, because
Lydia chasing LEDs. Let's open that one. Here. We should have the
example from before with all of our files and with
the example, perfect. And this gifts also other developers and
good inside view, what they can do
with your library. So let's see where are, where we are here
under libraries. So you could also go on this
holy folder and to sip it, to an SIP file. And then you can share it, for example, on GitHub it's at, or you can send them to develop on this developer
can go to Sketch, Include Library
at a SIP library, and then the whole library will be installed to the media. This is also a convenient
way for others to implement your whole setting, for example, for library. And that's it so far. That's how you can create an, a simple way your own library and can provide it to others.
62. Summary of the Learnings: We are now at the end
of this online course and I would like to
take a few minutes to summarize all the learnings which we are made in
this online course. So first of all,
we are discussed a little bit about the basics. What is an enum,
what is instruct? What are the different
kinds of IDEs? What we have the Arduino IDE, Visual Studio Code,
this platform ion. How we can use the
code from the Arduino to the visuals code
and visa versa. Then we made on
short introduction to the object orientated basics. We are discussed
about how we can set up an empty project. What is the main class? What is the construct? What is an constructor
and the initiation of an object that we can also
overload constructors, constructors the main functions, the first function when we
initiate a project object. And we can have provided several different
kinds of constructors. Then we also discussed about basic functions as
getter and setter. So with public function, we can access private members. That's the data encapsulation. And we also talked about
inheritance so that it's easy for us to edit
and public library. Then we started with the
first individual LED class. Means we had a lot of LEDs
and at the same runtime or the same life cycle we
could control here on different kind of LEDs
at the same time. This is only possible in
the object oriented way. If you would do that in a
function oriented where you needed a lot more barriers
that this is possible. We are toggled to LEDs we made and delay
after eight seconds. We have faded in pulsate it. And also we are access
it with an array. So that is four as possible
to control and call many, many LEDs at the same time. One off the next project
we're with the Galton board. We had a lot of different kinds of sensors also included
in this project. And it was easy for us to
create an array and initiate, control it, initialize
the ER sensors. And this gives us also an
opportunity to work fast and flexible with different
kinds of inputs from sensors. One main project was
also the headlamp. Because of the reduction of our inputs controls
with only one button. It was the challenge to have implemented three different
kinds of light models. So we said one short breaths, we implemented on, just
turn it on and off. The first LED. When we pushed a button
for roundabout 1 second. Then the second LET
goes on or off. And when we are keeping pressed the button
for light into tech, we are feeding on the first LET all sweet Lite models where accessible via one
button at the same time. This isn't really practical. Example because
often we only have one input but need
more than one mody. And this is what real-life
example could be. Last project we implemented the rock paper scissor
game, recreated and again, Modi in the object oriented
way we are calling here and webserver made
communication from the web server to the
web server with the ESP. And also you could see in
this example how easy it is to control several
cells with an array. And this gives you a
once more an opportunity to interact this Smith's
electrical components, mechanical components
in an easy way. So we focused on the hardware
side, on the software side. And I hope I can show you the full potential of
the object oriented it.
 Markus Edenhauser, Bringing IT and People togehter