Transcripts
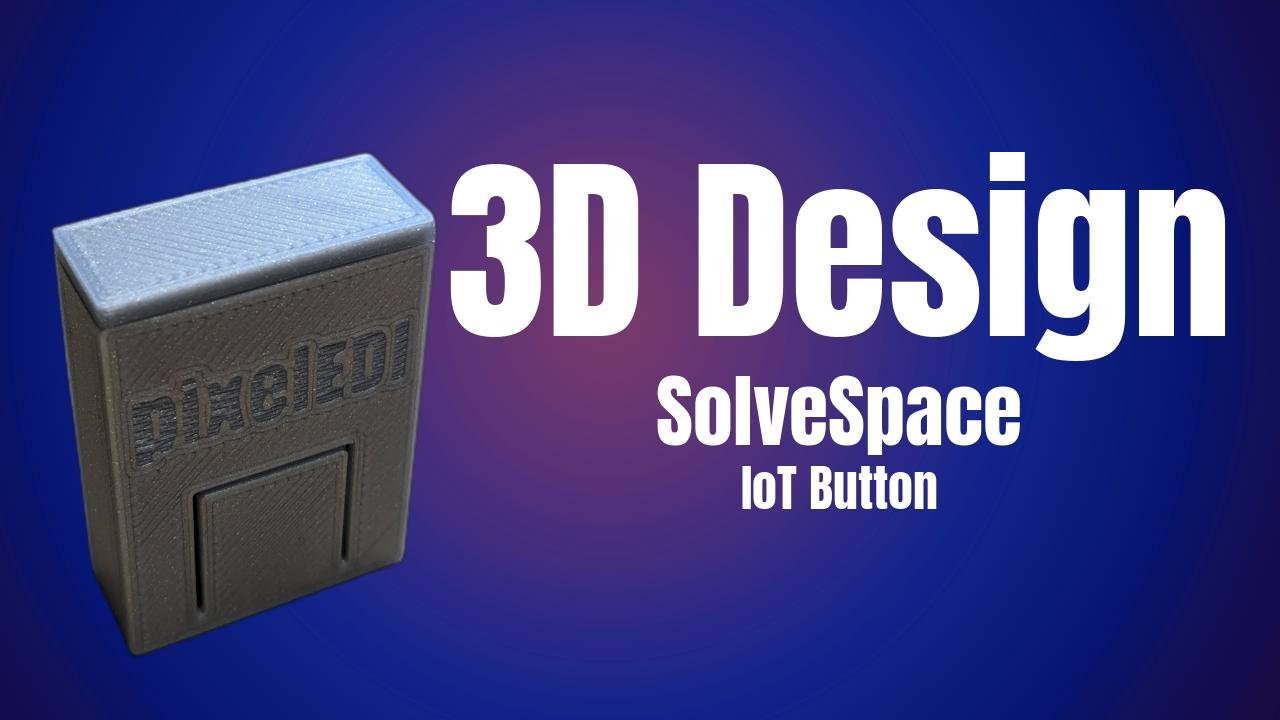
1. 1 Intro: Hello and welcome to the
Soul Space Tutorial. Now we are creating this thing and this will help
you to keep your desk clean because now we can put on here our coffee
cup or glass of water. And the best part is
we don't need here such expensive CD
software for remodeling. We're using an open
source software. And with a few
minutes of designing, we can easily build
such a thing.
2. Download SolveSpace : Let's start in this series
by downloading the program. So Space looks at the
very first glimpse, a little bit old
schooloostalgic, but don't judge the book
according to its cover. Hold on a little bit and go on the journey in the open
source environment with me, Solspace is a paramedic
two D three DCD system, which is really awesome here. On download Sospace.com
the download we have the version for
Windows, Linux and Mac. Under Windows, it's really easy. Just download the
file and it's an X. Just run it and that's it, no installation is required. Then you can copy in save space somewhere
where you want to, um, copy it and on your disk
and so that you can find it later on and can just started here for higher performance, but I don't think
you have needed. There is also some open
MPs included for OS. There is file which you
also can directly use it. Then the Linux you
can use when you are using Debian distribution,
the Snap store, or in my case with Linux Mint, you can use the flat
Tap Packet Manager and can get here
the newest version. Okay, I really recommend to take a closer look here
under the tutorius which when you are
completely new to it gives you good and rough
overview of what is. So space are capable. Also an short glimpse into the chain log can discover what they are
planning to do with this app. And as you can see, we have
here the last update, 2022. But it's okay because it's
just simple CID mechanism. As you can see in
the next steps. The simplicity of the program
makes it white, so cool. And of course it's open source. You don't need active
Internet connection when during your CD
sketching, et cetera. This is what I really
like. Good license to use it commercially
and open source. That means everything is on UPC and not distributed
during cloud service.
3. First surface: So let's start by
creating here in circle with for example, hitting on the keyboard. Or no mania on the left. And we need a property
browser, you can see on. Then we have show
property browser. Then we click on the
origin left click. Then one click on the outer
curve D for the dimension. And I'm adding here 100. The unit is here in millimeter. And then we have here
a nice measurement for adding here some
glasses, et cetera. And this will be fit
for most of the cases. Then we're making
three D object, so that means we can extrude and we are selecting here
the middle line B again, for example, we're
adding here one, 1 millimeter is enough
from the space. I would say you could add here other millimeter
if you would like. But I think 1 millimeter
is really good to go. This is our first tlicon home, our first menu entry here, our first layer,
we can switch back here and jump in right away. If we want to edit here the
diameter for example to 80 enter and jumping back
here in the history. Then of course it
will be adapted. I'm jumping back because
I would like to have here 100 going back to trout. Click on trout. Then we are
changing here the color, for example here
some fancy colors. I'm changing here the opacity so that we can see later on. Also here some things which
is below that first surface.
4. Make a hexagon: Now we want to adhere
the hexagon pattern, but not the pattern itself. We are starting just by
creating one hexagon, and in the next step, we're
creating the pattern. You can see when we hover
the mouse over the surface, it will be here in the yellow. I'm deactivating this feature because I always
get blinked away. Then selecting the upper point here on the surface and
move with the middle mouse. The surface right in the top view can create
new link or new work plan. And now we have the top view. With this top view, we're
creating here a new circle by hitting on the keyboard and
selecting the outer line D, and it has a dimension from six. This is now whole line selecting the circle,
hitting with this. It is now in
construction line as you can see because
it's now green. What we do now is
selecting the line tool. If you're hovering the circle, it will be changed to yellow. As you can see, I'm making it in line and
as you can see now it's attached to the
outer line of the circle. I'm creating here rough
sketch from an hexagon, but always connected here
to this outer 0.1 2345. And the last one is six. It's not perfectly
shaped hexagon because it's really simple here in so space we have
to create our own. But that's not really
the magic behind it. First of all, we're setting to restrict it to horizontal by hitting or selecting
only this line and hitting H on the keyboard. Then we're selecting
two lines and clicking, or it's this one,
constraints equal lengths. Now the second one, the third, one third
with the fourth one. And the Ford with the fifth, and fifth with the sixth. Now we have a perfect
angled hexagon, selecting one side and
hitting D. You can see here reference
reference means we have not the ability to
change the diameter or something like that because
it's now fixed inside. Because we have it aligned on the circle and also aligned
by each of the same side. You can see here the
degree of freedom. If we have here
degree of freedom, we could change here something. And always before
making the next step, we have to take a close
look here if everything is OK. Now I'm talking a little bit out and we
have Meteor, our hexagon.
5. Hexagon Pattern: And now it's really easy for
us to make this pattern. So therefore, we are
in this active layer. We are clicking here on this
new group step repeating. You can see the layer is changed because we
have created a new layer. Then we are selecting two
sided and selecting one of the middle points,
the first hexagon. And hitting V, that
means we was not the right hitting H because
we want horizontal align it, clicking here on this last layer and change the times
two, for example, seven. Then we can grab here one of these outer lines,
bringing a little bit in. But I'm not really
satisfied here. I'm hitting 99,
looks much better. Now we can make here fixed dimension by selecting two of the points, hitting D. This is not a really
good dimension. Let's go with 99 looking good. But now we have here some
space that means hitting 11. But then I have to jump back. Delete this one now, hitting 11, that's what
I want to have here. Selecting the middle
0.9, there we go. And now the next step, We repeat this step because
this is our finished layer. And when we're
hitting, and again this will be
reproduced two sided. Then I'm taking the outer side because then we can say
here, vertical aligned. Now we go for what
do you say 11. 11 looking good so far. Now we have here our
perfect pattern. What we can do now
is click on X Trout. And now it's in the four side. We have to click
here on difference I would suggest to grab
one of the points. Then we activate the
surface because what we do is we stick to
the undersurface, the bottom of the surface
when we're adding in. Later on then also
this difference will be go through.
I'm jumping back. And what really necessary is
that we click once again in this translation and we say suppress degree of
freedom calculation. Because afterwards soul
space will be really slow. Suppress clicking on home. When this is too much points, we can also click here on
height also the last one. Then we have only here
the finished example.
6. Outside Boarder: The next step is to adding here this little border and therefore I'm try to grab this point on the bottom
point from the origin. Then top few new group and we're making a
construction line with, with the line we're
hitting the border. That means we have
here the radius. It should be horizontal aligned. Hitting for construction line. This should be on the
bottom side perfectly. Now next one hitting
for example, also this bottom point. But now we are grabbing with the middle mass
button, the side. Few new group. Now we are making rough sketch from for example, like this. I'm going back,
I'm starting here. Left mouse with next side and now right click with the mouse so that we
finished our line. Then arc tool and we are
setting here such thing on this side is vertical
with. This is horizontal. Now we click these
two sides with L and also these two sides with L that is restricted on this side. I would like to have
here 1.5 in the width. And the height could
be, for example, three. And now we could select this point and this
point and say O. It's restricted to this site. As you can see, what
we do now is we are creating now this surface in circle so that we
have our border. Therefore, selecting the inner
side and the middle point. But be aware, we have
to grab at this point. By selecting these two points, we can create this outer line by creating and clicking
on this kind. Here we have some sriggly lines. Doesn't matter, wick, con, force nerves as
you can see here. We can add here an other
color that is a little bit more that you can see here
We have a nice rounding, yeah, such an easy tool. And as you can see, we made a fast pattern. And also the outside will be
done really, really quickly.
7. Add Text to Layer: Yeah, if you would
like to have here such an text as I have. It's also very easy
in so space we are selecting the top point, new group, Then select the text we are creating
here some texts. Then selecting those two
points horizontal aligned. By selecting the text,
we can change it here. In the property
process, for example, you can type in your name, it will be perfectly in the
width, also selecting it. I would like to change
it, for example, here. Then I could change the
dimension a little bit. You can edit it here as
you would like to have. Now what I did is I
created an object, then I did it in the other side, that is here on this side. Then point to surface. This is now here on the surface, so that it won't be
here any hexagons, but it's not finished yet. Because now I can't change here the color because
it's in the same height. Therefore, once again, I'm clicking here
on the top surface. Then new group. Then we are selecting the text. We can copy it by control C, for example, selecting
the middle point. Right click, Paste Transformed. And you could say
this point fast. Use this point and
Paste Transformed. Now I have it once again
here on the same side. Then once again click
here on Routes. But now we click on Difference. We don't the whole deep. We just say for example, 1.4 It's a little bit
down on the surface. And this is the perfectly
size so that you then can change the color in your slicer, for example. That's it. Now you can hit your export
triangle mesh, for example. Maybe there are some arrows,
but it doesn't matter. Then you can import it in your slicer and
can print it out.
8. 2 Color option in Prusa Slicer: In a brusher slicer, you can adhere, for
example, the STL file. Normally the slicer
says to you, okay, when you go to slice here, maybe this is
something like color. I would like to add the
automatically changing the color. If it's too much, then just use here this sidebar for example. This one is okay, but
this one hitting, um, the Delete button. Also here hitting
the Delete button and here hitting
the Delete button. I only have two colors
when I'm printing that here you can see it
like this is the main part, and afterwards we have
the second color. This is how I made this
little project in Sol space.
 Markus Edenhauser, Bringing IT and People togehter