Transcripts
1. Introduction: Hi, I'm Emily Armstrong. I'm an artist and an art
teacher from New Zealand. If you want to start drawing
portraits in this class, is a good place to begin. It's a simple introduction to finding the proportions
of the face. I'll introduce you to two
different methods for drawing the layout or the structure
of the face and the Eat. First, I'll take
you through how to find the proportions
of the face. Debt is looking straight ahead. And then I'll take you
through a more complex 3D he'd technique based on the luminous method which
you might have heard of. And you can use this
to experiment with drawing faces from
different angles. Before we draw each
method together, I'll show you It's simple
techniques for drawing basic head shapes like
eggs in 3D circles. They are not as
easy as they sound. This class is suitable for complete beginners or
for people who are interested in learning more about the proportions
of the face. It's not a full
portrait drawing class and we won't be
drawing the features of the face and detail. However, you can check out
my other Skillshare classes if you are interested in taking your portrait drawing practice further,
Let's get started.
2. Materials: You're going to need
for this class as a pencil and some drawing paper. I'd recommend regular HBP
and so or maybe it to HP. And so if you want
to work over top of your drawings later
after the class, you will also need an
eraser and if you prefer, you could use a roll
of straight lines. However, I think it's good practice to try and
draw these free hand. You could also use a tablet in digital software like
Procreate to take this class.
3. Exercise: Drawing An Egghead: For a warm-up for this
exercise we're going to be practicing just drawing
some simple shapes. The heat is shaped a
little bit like an egg. And if you've ever
tried to draw an egg, sometimes it's tricky to
get it even on both sides. Or it might be too pointy or you might end up with more
of an oval shape. This exercise is going to help simplify that process for you. Start by drawing some
simple ellipses. We're working from the elbow so that the hand isn't resting, stuck down on the page, but it's moving with the pencil. You will see that you might not get it right the first time. But as you go over that ellipse, hopefully you can get a rhythm going and get something that's
a little bit more round. Next we're going to
draw ellipses again, but this time we're
going to draw them with a little bit more control. So start off with a loose one. Start to sketch around that each evening it out as you go. If you see somewhere where
it's a little bit uneven, use those short light marks
to round it out a little bit. And we're gonna try that again. So to start off with
something nice and loose, and then you have
something to edit. What aiming for
something that has the same width, in
the same height. Keep your lines nice and light. Mine are a little bit dark. I'm using a pencil just so
you can see what I'm doing, but I'd keep them as
light as you can. Use maybe a to H pencil. Go through and check that your circles are
in fact circles. Then if you wanted to,
you could even go around those with a more solid line, especially if you're using very light lines to start with. Now that you've found the
right path of the circle. If you think of the circle is
the main part of the skull, the round part of your head. What we can then do is
add on the lower part of the heat or the face and that's going to
be the jaw shape. Find the halfway point of the circle and then
draw a straight line. This is the central axis of the face and the
chin is going to be the same length is one of
these halves of the circle. Then we can draw the drawer
with two lines or two angles. Go through that again. Scene two line seem to excess. Find the halfway
point of the circle. Add on half of the circle link. And it's going to be where
the chin is and you can make the chin is wide or as
narrow as you like. And then two angles to create the jaw shape joins up with
the circle on either side. Now that you have an idea of
how to draw a basic shape with that round circle of the scale and in this
jaw shape edit on, we're going to do those
again, but quite quickly. Draw a circle. Add
an a center line. Mark where the chin is gonna go. And remember the chin is
going to be the same. Distance away from the circle
is half of the circle. Effectively, we've
got 123 equal parts and then add in the jaw shape. Then if you wanted to, you can
round it all off until you have that shaped heat. See if you can work
quite quickly. Sketching a new circle
in the center line, finding the point of the chin, then rounding everything
off if you want to try a few different versions. So this is quite a narrow chin
and this has a wider chin.
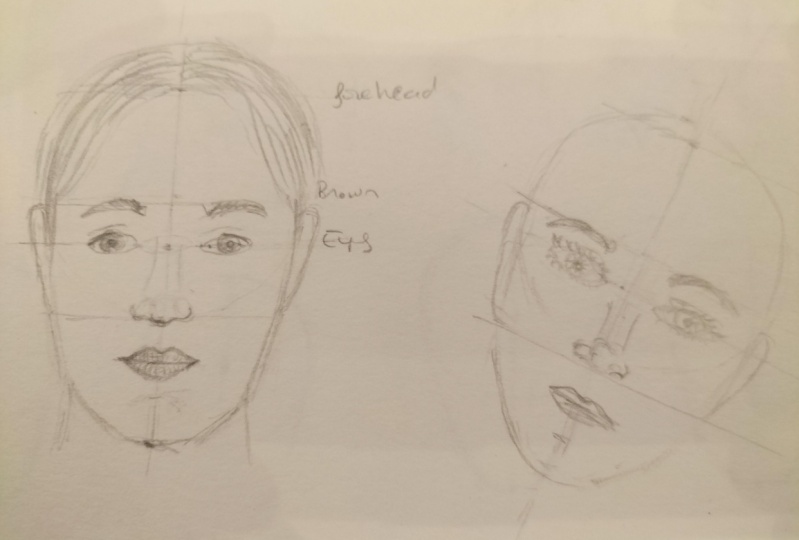
4. Intro To The Central Axis Method: Let's take a look at the
central excess technique first, I call it the central access technique because we start with the vertical line and the horizontal line of
the face to form across. Watch the overview, but
don't worry if you don't get it straight away because
right after the overview, we'll draw a layout
together so you can become more familiar
with the technique. And then after that,
I'll take you through a worksheet to practice
applying this layout. Two different phases
and viewpoints. This technique for finding
the layout of the face is based on the central
axis of the face. Let us the vertical axis
and the horizontal axis. And it's most useful
when you're drawing a subject that is
looking straight ahead. But maybe the head is tilted to one side or tilted
to the other side. The vertical axis is the line
that goes straight through the middle of the head from
the skull down to the chin. The horizontal axis
is the line that goes across the face
through the eyes. This cross-section,
the eyes are usually halfway between the top and
the bottom of the head. Just for fun, go ahead and
tip this on your own face. Now, notice that
the vertical axis and the horizontal axis
are perpendicular. They're at right
angles to each other. Once the central axis
are established, the phases in divided
up into thirds. The first step is to find
the eyebrow line above the eyes and then divide the space between the eyebrows
and the chin in half. This will give us the
placement of the nose. We then add an extra space
above the eyebrows that is the same distance as the other two to create three-thirds. This top space identifies the
placement of the hairline. The bottom third
between the nose and the chin can be divided
into thirds. Again. This gives us the placement
of the center line of the lips and the racist of the chin underneath
the lower lip. Note how the ears fit within the middle
third of the face.
5. Using The Central Axis Method: We'll start by
placing markers on the page for the top and
the bottom of the head. You can make the heat as
big or small as you like, but I'd suggest making it
about the size of your hand. Then draw an egg shape
to represent the head. You can use that circle
and draw method that we did in the previous
exercise, if you like. The circle will take
up about two-thirds of the space between the top
and the bottom of the head. When you're done, you can erase any of your messy sketch lines, including the circle line, so that it doesn't
get in our way. Now add a vertical line down
the center of the face. You're welcome to use a ruler, but I think it's really
good practice to try and sketch these lines freehand. It helps to make a mark at
the top and the bottom first, so you have two
points to join up. Use short, light overlapping
lines to lightly sketch the center line
and change it as you go. If it's not straight. Then find the halfway point and add a horizontal
center line. You can use your pencil
as a measuring tool to check where the
halfway point is. This horizontal line is
where the eyes will be. If you wanted to, you could sketch in the shape of the eyes. Now, just as a guide, keep an eye length space
between the two eyes. We can use symbols
for this exercise, so don't worry about
it being realistic. Once we've got an idea
of where the eyes are, we can add in a
horizontal line above the eyes about where
the eyebrows would set. This is the brow line. Once we have this line, we can then use it
to break the face down into equal thirds. We have the eyeline and
then the brow line. We don't really need the line
anymore except to notice that the eyes are halfway between the top and the
bottom of the head. Here's, this can be
useful sometimes as well. Make a mark halfway between
the brow line and the chin. This is where the nose will go. You can use part of
your pencil to check that both sections
of the same length. Then take that same
length and add another third above
the brow line. This gives us the
position of the hairline. We should now have
three even spaces between the hairline, the nose and the chin. Go ahead and lightly sketch
in a general nose shape. Then create an
imaginary hairline. Here could be coming down
the sides of the face. Perhaps you can
see a widow's peak and then bring the hair
around the top of the head. The mark that we made for
the top of the head before is representative of the skull. But if you think about it and maybe even touch your own head, the here usually comes a little bit above the top of the skull. I'm just adding a few symbols here to represent the eyebrows, the iris, and the pupil. We've gotten this bottom third between the nose and the chin. This third can now be
divided up into foods again. For the sake of this exercise, we'll try and keep them equal. Pays to keep in mind that everybody's face is
different in quite often these foods in the lower part of the
face and not even. The first third gives us the
center line of the mouth. Then the next MAC gives us the races or the
tempo of the chin. What you'll often find is the
space between the chin and the center line of
the lips is a little bit less than the
other two-thirds. But it's different
on every person. We are creating a generic
guide that we can compare two photographs
of people and check whether it is accurate or you might find a
bit the lower third of the face is greater than the
upper third of the face. Perhaps I have quite
a big forehead. So the upper third is
greater than the other two. But this guide gives us
something to check against. The ears will usually fit into the center
third of the face. But that all depends on
how big the Pearson's ESR, usually the bottom
of the ear will line up with the
bottom of the nose. And you could check
this on your own face. Now if you like, all of the details I've added
in here are just symbols. But if you wanted
to, you could go ahead and play around a
little bit more with this. Adding in those straight
angles for the eyes, three for the top lid to, for the bottom lid. Just have a little
bit of fun with it. It's a little bit like one
of those police sketches. You can change the
eyes or the nose and the mouth to create whatever
kind of character you like. When you followed along with this first drawing and you've got something that's complete. Now HIPAA go at drawing
the same thing, but imagine the person's
head is tilted to one side. This means that the x's are, the face are going
to be on an angle. For this drawing, start with the vertical center line that determines the angle that
the head is going to be on. And sometimes this is the most useful thing to start with. Make a map for the top and
the bottom of the head. And then find the halfway
point for the horizontal axis. Remember this is a line
that goes through the eyes. I'll speed this version
up a little bit, see if you can remember
the steps to finding the cross-section of the face
in the foods of the face. Most important thing to
note here is that the vertical and the horizontal
axis perpendicular, even though the head
is tilted to the side, they are always at right angles. Remember once you've
found the eyebrow line, you're going to find
the halfway point between the eyebrow
line and the chin. That gives you the
placement of the nose. Then you're going to
take another segment, the same height is that space between the
eyebrows and the nose, in the nose and the chin. And you can edit
to the space above the eyebrows creates
the hairline. The final measurement
to make is to divide the lower third up into thirds, again, giving us
the center line of the lips and the
basis of the chin. It will be a good idea
to repeat this process until you get really
used to the formula. If you do anymore than remember, this is for a heated there
is facing straight ahead, but it could be
tilted to one side, so you could try
different angles. The pros of using
this method are, it's simple to use based on the central axis in
the foods of the face. It's good for drawing. Subjects are looking
directly heat, and it can be used for
different viewpoints as well. The cons, it doesn't really account for the 3D
form of the face. To avoid the face looking flat, the planes of the
face needs to be shown clearly through
your shading.
6. Exercise: Drawing A Sphere Head: I've got another
quick exercise here for you in this
one is to help you get an idea of how to draw
the head is a 3D shape. Before we move on to
the next method of finding the layout of
the face, the 3D HD. We're going to start
off just trying to draw a sphere or a circle is a
three-dimensional shape. Start off by drawing
a loose circle. Remember put something
down first and then you can edit that. Rounded off. Take out any corners or bumps. Do a few of those just
to warm up again. We've got four
two-dimensional circles here. They have a height and width. What we want to create
is something that feels three-dimensional on this
two-dimensional surface. So we're going to think
about the contour of the surface of a sphere. And we'll start
with a center line, starting in the center at
the top and the bottom, but we're going to curve
it around the sphere. Then we can also
do the same with a horizontal axis as well, starting at the center. Curving it around the sphere. You can choose the
degree of that curve. It could be very shallow
like this one here, or could be a little bit
deeper like this one. We'll do one here
that's quite deep. So I'm finding the center 0.1. And then following
that curve around, imagining I'm going
over the front or the front side of the circle and then
do another one here. Try a few different
variations each time. Start at the center. Imagine this as a
ball and your cubing. A piece of string around it. You can go up, you can go down. You chose, but
you're trying to get that sensation that it's
curving all the way around. You should have four spheres now they feel more like
they have three-dimensions, the rounded, you can pick
them up and put them in your hand rather than just
a flat circle or a whole. What we drew here is we drew a vertical axis curving
around the sphere, and we drew a horizontal axis
curving around the sphere. You saw that you could
change the degree of those where those
curves occurred, whether they were quite deep or quite shallow
like this one here. Now, each of these
x's is going to represent something when
we come to draw the face. And we've got this one here, which is the vertical axis, and usually start with that one. This vertical axis. This is going to determine
the tune of the head. The twist of the heat. I'll show you what
I mean in a moment. And then there's this horizontal
axis here and this is going to determine
the brow line, the eyebrow line, and also
the tilt of the head. So the tilt forward
or backwards. We've got this one
here which determines whether the head is
turning from side to side. And then we've got this one here which determines
whether the head is tilting backwards
or forwards. And this is how this works. You might have already
seen this before. You might get where this is going just from looking at it. If this is the skull, we've got s2 line
always draw the vertical 1 first I
find more useful. And then we've got
the horizontal one. This is the eyebrow line. So we can just imagine
there's some eyebrows there, draw them in, even draw an eye
underneath if you want to. You can see you get the
sense that if this was a persons here to get there
we're looking downwards. Whereas if we do one with
the opposite vertical, but we'll do the horizontal
axis tilting upwards. Put the eyebrows
along that line. And you get the sense that that person is looking upwards. You can even add a little
nose in here if you want to. When we come to do the
Loomis head exercise, we're gonna be adding
the jaw on as well. But just to get
used to this idea of the three-dimensional sphere, have a go at drawing four
different faces like this. You can make them
silly if you want to do whatever you want. It's really important
to try and get used to this idea of the
three-dimensions. Because I think this
is why some people struggle with this
particular method. For Loomis method is you do
have to have an understanding first of how to draw something that
looks three-dimensional. If you haven't done that before, then if you put some of these
curves and the wrong place, they're not going
from the center or they're kind of wonky V and you'll end up with something that
doesn't look correct. Try some really
extreme ones as well. So this one's looking
quite far out, this one's looking
quite far down. You could do one
that's really tuned to the side and really
tilted upwards. Actually, this one
doesn't look like it's tilted so far up and you can
see what I did wrong there. I didn't make the
horizontal access code from the center of the sphere. That's say, listen
and what not to do. It was rushing heat
a little bit here. I'm tilting it right
up, but I'm coming back to the center of the
circle here on the side. In this example, the
Pearson's heat is tuned slightly to the side on
a three-quarter angle, but the eyeline is
fairly straight ahead. You don't see much
of a curve here. They were looking straight
at you then really all you'd see is you'd
see pretty much this. You might see a slight
curve where the eyes, because you're not getting
any perspective from either side or from the
top and from the bottom. This particular three-dimensional
hidden method is most useful when you're
dealing with a face, is looking to the side or
looking up or looking down. Otherwise, we just use your standard central
access method that we did in the
previous lesson.
7. Intro To The 3D Head Method: This method is based on
the luminous method, which is named after
Andrew Loomis. He's an American illustrator
who published a number of influential capstone and illustration box
around the 1940s. This method is based on
the scale as a sphere. It's a little more complicated
than the previous method because we're now
dealing with a 3D view. However, it does use the
same foods at the base. So as you go along, you'll see that there's
some crossover. Give it a go. And even if
you prefer the other method, you may find aspects of this 3D head method come
in handy in the future. The 3D head layout method, the scholar is seen as a sphere. It's a three-dimensional shape. We can draw it as a circle, but we recognize that any
lines that we add to this, I'm going to curve
around this circle. Vertical axis will show which direction the
head is facing. The horizontal axis
will show whether the head is tilted
forward or backwards. In other words, whether the
face is looking down or up. If you put your hands up on
either side of your own face, at your temples, you feel that the sides of the
face are quite flat. We account for these side planes by cutting off the
side of the sphere. Because this plane is now flat, the line that wraps
around the sphere will also flatten and we can add a cross-section
to the side plane to find the line of the
here and the position of the nose extend a line
around the sphere from the top and bottom
of the side plane. The 3D scale is now complete. From here we can add the jaw to find the
base of the chin, add another vertical
section the same size as the two
existing sections. There are now three even third set show the
position of the hairline, the eyebrows and the
nose and the chin, the sides of the
face and the jaw. The contour of the
cheekbone can be added by extending a curve from the center
of the side plane to the corner of the chin. Erase the unnecessary
lines to leave the essential structure
of the 3D head.
8. Using The 3D Head Method: Instead of taking you
through drawing one 3D heat, I'm going to lead you
through drawing each of the steps of the process. So by the end of the exercise, you have eight small Diagrams, each one showing a progressive
step of the method. Through this repetition, I hope you'll gain a
good understanding of the process to follow and be able to remember it more easily. Let's have a go at drawing out the basic layout of the 3D HD, which is based on
the Loomis method. I'm going to talk you through
it and what we're going to actually do is
draw each step. So we're going to be working
through the process, repeating each step
several times. I'll show you what I mean. We start by drawing
a basic circle. Keep it nice and light. This is the first step
in drawing the 3D HD. We're gonna move on
to the second step. We're going to draw
the first step again and then
we're gonna add on the second step and we're
going to go all the way through until we get
to the final step. Drawing another circle. We draw the second one. We're trying to keep it
about the same size. So we're learning how
to control our pencil and repeat the same actions. A little bit out.
It doesn't matter. Now we're going to add
in a vertical axis. And I'm thinking of this person is having turned the head
slightly to the side. We're getting like a
three-quarter view. If the person was
looking straight ahead, we'd have central access
directly through the center. But because they're looking
slightly to the side, we're going to curve that
vertical axis around the bowl. Let's step two. Let's
move to steep three. We're going to have
to repeat what we've done and stick to. I think this is a really good
way to help you remember what the steps are by
repeating it several times. Because the Loomis
method is very dependent on getting things
in the right place. It's important to
remember what goes where. It's also a reason why sometimes it's not appropriate
to use this method because it is quite static. Not a lot of room for changing things around
and still having it work. Found the same to the circle
at the top and the bottom. And then I'm gonna
wrap the string around the ball trying to give
the same angle as I did. And then step two. This time I'm gonna add the
horizontal axis. Remember this is where
the eyebrow line is. This horizontal axis curves
around the ball as well. Is going to determine
whether a person is looking up, looking down, if they're looking up, that excess is going
to curve upwards. If they're looking down, it's
going to curve downwards. We're going to do someone who's
looking over to the side, but they're looking
straight ahead. The direction that
the head is turned, start at the center and
wherever slight curve just to keep that 3D effect. So there might be looking
downwards just very slightly. We're going to repeat
the same thing again. Drawing the circle, adding the vertical axis. The horizontal axis. This time what we're going to do is we're going to imagine that we are cutting off the
side of the circle, slicing through it on each side. And if you put your hands
up to your face now, you'll feel that the sides
of your face are quite flat. We have this rounded
part of the skull, but either side is actually quite a flat
plane or flat area. So we can draw in an
oval shape here is if we have cut off the side of
that sphere where that ball, it should follow the same curve is seen to access
so it's parallel. Going to rub out a few of
my excess lines there. So you've got Step 1234. We're going to move
on to the next step. Put this down here. We're going to have to
repeat what I did in steep for starting with a circle. Hopefully each time you do this, it's feeling a little
bit more comfortable. And it becomes a little
bit more natural. Don't worry if you've
got messy lines, you'll see my lines
are very messy. This is always just the
beginning of portrait sketch. The lines that you're
drawing here actually disappear once you've
got everything else in My to center lines
and I'm drawing a knit slice off area left over when there to show that we've cut off that
side of the ball. If we've cut off this side, I'm also going to show
that the other side has cutoff in sometimes this is neglected in other videos
on the Loomis heat, but the theory here
isn't completely round. It's going to match
this one here. All I've done is just
typing it off a little bit. So it's not quite so round. Sometimes it'll be more
extreme than other times. You should get this feeling of a ball that is two
sides cut-off it. What we can also do
in this one here, we can add an axis, a vertical axis to that
side plane of the head. This is step five. I'm gonna go into steep six. See if you can remember what needs to be
done in what order. It doesn't matter
if you draw them, draw the different
steps out of order. But it can help to remember, it helped to make
it a more natural process if you do them in
the same order each time. Let me move on to cut off the other side of the
ball just a little bit in excess of the side plane. And this is also going to
show the tilt of the heat. So if, if this curve, the eyebrows camera right down low and around here
in the vertical axis, which is always perpendicular
to the horizontal axis, would be like this. Sort of showing how the
heat is tilted forward or if it's the other way and the eyebrow line
came up and over, the vertical axis would
come through here. So it would be
tilting backwards. Don't worry if you
get a bit lost with these sorts of things, it does become a
little bit easier and more familiar the more
you practice this. What we're gonna do
here in step six is we're going to look at this horizontal axis here and we're gonna draw
another one along the top so that it meets the top of the
oval of the side plane. And then we're going to
draw one at the bottom. It should be parallel with
this center line here. So here's the same
slight curve to it. We're gonna move
on to step seven. Remember the process
during the circle. Center axis shows the
tune of the heat, the vertical center axis. Are they turning to the left
or they tuning to the right? Horizontal axis shows
the two to the heat, whether it's tilting
forwards, backwards. Remember the curve
of this oval here, the side plane needs to follow the curve of
the center line there. And then we've got
this slightly cut off. But on the opposite side, we're going to mirror the
curve of this horizontal. Seem to x's. And draw another one up here
that joins to the top of the oval side plane
and one at the bottom. This line here, if you remember from the previous exercise, we were drawing 3D spheres. This is the line of the
brow, the eyebrows. They are going to
occur along that line. This here is right
between the eyebrows. If it helps, you could
put a little cross there. If you have a look
here and here, you should have two
spaces that are pretty much the same
minus slightly out. And I think it might
just be that my curve at the bottom needs to be
just a little bit more. One that joins up
with this oval here. We've got one space, we've got another space
which is about the same. Then we're going to add
on a third space which is the same length
as these two spaces. One, it's going to be
the same length as this. The same length as this. We can make a little mark
here. We've got that mark. We can make another
mark here and then another one down here. That's going to be a chin. Go through that process again. Steve, we're getting near. We've only got a couple
more steps to go. When you put this over here. It should be cut in half
by that center line. Because this person isn't
looking up or looking down, pretty much looking straight. A heat and net
direction to the side. This should be cut in half
by that line as well. Actually, I forgot to put
the center axis in here. If you think about it,
this side plane is flat. It's like the flat
side of the head. So you can actually edit
that a little bit as well. Rather than it
being a curve here, It's gonna be a straight line. You see on this one I've
got to even spaces here. Something was not
quite right here. I think maybe my circle
is not round enough. Was a little bit squat. If you remember, this is a
space between the eyebrows. We've got skip here and
then this gap here. And then from here, from the center of the eyebrows, we're going to go straight down. We're going to find the chin. It's going to be the same. Distance from this line is
the sign is from that line. Effectively we've got
three thirds again, kind of like in our
other method 123. This one is the chin. We can add in the jaw line now, going to come up
to this line here. The jaw line on the other side. This line here we already
know is the eyebrow line. So if you want to, you
could put in some eyebrows. There may be even some eyes. Just drawing little silly ones. They don't need to be realistic. This Mac here, this is
the line that matches, meets up with the
bottom of the oval, that is the nose and it's
the base of the nose. If you think about
people's noses, sometimes they are much bigger. They can be quite long, narrow, they can be wide. This is sort of the
base of the nose where your nose joins your face. And then the nose is going
to come out from here. You can see it might be a person that has an overhanging nose. That Mac there is always
the very base of the nose with a nose goes in
and meet the face. You can feel it
on your own face. This is a chin. What we do here is the same as we did with
our other method. We divide it into thirds. We've got the mouth. Then hit tempo of
the chin there. This third here is the
hairline. The top of the skull. Here is going to come down
to this point usually again, depends on whether they have a receding hairline or bangs. But this third here
forms the forehead. Let's go ahead and
just put in some here. Here is going to go
up above the skull. The ear is going to go this
quarter of the side over.
9. Using The 3D Head Method Pt 2: We're gonna do one
more down here. And this is going
to complete it. This just one more step
we're going to add in. We can draw the face and a little bit more
detail if you want to. So I'm going to draw this
one a little bit bigger. If you are going to add in
some more detail to the face, then keep it nice and
light at this stage. Okay, so we've got our circle, we're going to add in the
vertical axis curving around the ball because this person is looking off slightly to the
side in a three-quarter view. Horizontal axis. We're doing this in
quite a generic way if you really thought about it, the center point of the sphere might be a little bit
higher because it's, it's around the other
side of the ball. So there could be a
bit more of a curve here that we're trying to keep things simple
at this stage. What next we need to
add in side plane? This is an oval at the moment because we can still see part
of the front of the face. But if this person
turn directly to the side, this cutoff area, if you imagine a
ball that's head, the side cutoff
would be a circle. If the face was turned
more towards us, it would be a
narrower oval because we can't see as much of
the side of the face. So we're up to step four. We're going to add in the cutoff part of the
opposite side of the face. It's not a totally vital
step at this stage, you might find that it works
to having it as a circle. But when you come to
draw the full face, you might end up with a
little bit jutting out. And we're going to draw in
the axis of the side plane. Then we're going to add
in how forehead line, which joins up with the top of the oval of the side plane. And we're going to add in our nose line which joins
up with the bottom. We should have two spaces that
are pretty much the same. I think mine's a
little bit out again. We've got forehead,
we've got eyebrow. We've got nose, is going to be here and we're going to
draw a line straight down. So remember not to move
it all the way around. Sometimes it's a bit of a curve
to the front of the face, but it's fairly, fairly flat. If you put your hand up against
the front of your face, excluding your nose like to
either side of your nose, you'll feel that
it's quite flat. Remember the distance between the nose and the chin is the same as the distance between
the nose and the eyebrows. Maybe a little bit lower
you can add and the jaw. And the type of joy you have, whether it's going to
change person to person. If you wanted to, make
it quite angular. You could, or you
could make it softer. That might depend on
with your drawing a male or a female as well. Also going to draw the
other side of the face. A little bit of a bump here, which might be with
the cheek bonus coming down and then coming inwards. And we've got the nose, we could put in a line for
where the mouth is going to be in with a dimple of
the chin is going to be, remember the ear goes
in this bottom quarter. The side plane.
There's one more thing we're going to add
in net is a line that curves from the center of the oval of the side plane, curves down and meets the chin. And it just helps
to define more of the side plane of the face
and the area of the jaw. And it usually
also meets up with the cheekbone might
be as well in here. Once you have this, you
can go ahead and add in some of the details
of the face here. Maybe the neck if you want to. Before I do that, I'm
just going to rub out some of these lines
a little bit so that you'll be able to see
what it looks like when I go over top
with the details. And I'm not drawing from a
photograph for anything. I'm just making
it up in my head. So it's not going to
be super realistic, but just so you can see
how the proportions fit. And you have a go as well. And could draw another one next to it if you want a
bit more practice. We're now drawing the nose. I'm just using a
circle for the ball of the nose and then an oval
for the side of nodes, the side of the nose,
that wing of the nose. For the eyes. I'm thinking about two or three straight lines on the top and then
two on the bottom. This one here will be hidden
a little bit by the nose. And it might be a
continuous line that comes down
from the eyebrow. Those are all things that
will come with practice. It's a really useful
technique to know about. And especially if
you're having trouble with getting the head to look like it's
three-dimensional. This can really help you suss out where's the side plane of the face and which
direction are they facing? Are they tilted up
or tilted down? And I tend to use a mixture of the first
method that we did, the central access method. In this method, the
luminous method. If you have probably
underused this when I need to check something or I need to figure something out and I'll just be
thinking about this method. I won't actually be applying it and drawing and all these lines. But it helps you to identify the side
plane or other areas. The tilt of the
face in the head. The thing this is
going to be a male. I could make it a female. Maybe soften off the door a
little bit in the nick here. And then I can add in some here. So remember this
is the hairline, but the here will come
up above the skull. And I mean, it depends
on what kind of here cut the HIV as to how
high up it will come. It will come up a little bit, at least if they
have here that is. And it's going to come
down here towards the ear. She looks a little
bit, little bit angry. Then this part here is
gonna be usually with a cheap bonus. There. I've got a little bit too
much of a chin on the side. It's making it look masculine. So you can play around
with those things as well. It's kinda fun to come
up with urine faces. You put a cheekbone
on the side as well.
10. Next Steps: If you enjoyed this class, you might like to
take my other classes on drawing realistic eyes, drawing realistic
noses, and drawing realistic mouth's to take your portrait drawing
to the next level. Thanks so much for joining
me and happy drawing.
11. Bonus: About The Planes Of The Face: What is a plane? A plane is simply a surface that faces
a particular direction. For example, if you
think of a cube, It has a top surface or plane, a bottom plane, two side planes, a back plane and front plane. In its most simple form, the face has four planes, front plane, two side planes, and a bottom plane. Why do we need to be aware
of the planes of the face? As light hits a surface, it reflects back off it. And that results in
a light tonal value. A plane on a three
D form that is not facing the light
source will not be lit. It will be a darker tonal value. The position of the light
source will determine how much light will reach
the different planes. For example, if the light source is coming from the right, say from a window, then the right side of the
face will be fully lit. The front of the face
may receive some light, and the left side of the
face will be in shadow. We need to be aware
of the planes of the face so that
we can more easily identify which surfaces are light and which
surfaces are dark, so that we can get a
realistic sense of form. In its most simple form, the face has four planes, the front plane,
two side planes, and then a bottom plane
underneath the chin. When we bring in the other
features of the face, the number of planes
is going to increase. We have the four
planes of the nose. Then it's going to become even more complex when we add in the planes of the lips and
the planes around the eyes. As light hits the surface, it reflects back off it. And that results in a
lighter tonal value. In this simple representation, the light source is
coming from above. You can see underneath the
eyes and some parts of the lips underneath the nose and underneath the chin
are all in shadow. The position of the light
source will determine how much light will reach the different planes and
how light or dark they are. For example, if the light source is coming from the right, say from a window,
the right side of the face will be fully lit. The front of the face
may receive some light, and the left side of the
face will be in shadow, and vice versa, if the light is coming from the
opposite direction. Now, this representation is
actually quite simplified, and if you look at
a face carefully, you'll see that
there are a large number of different planes. When you consider
the surfaces of the eyes and nose and
mouth, the cheek bones, the forehead, the chin, and each individual plane will be facing a
different angle. No matter how small the
difference in drawing terms, each of these planes will most likely have a different
tone or value. However, don't get
overwhelmed just yet. We can simplify matters by focusing on where the light
source is coming from. Have a look at this
face and see if you can figure out where the
light is coming from. Look for the parts of
the face that are the lightest and look for the
parts that are the darkest. Are those planes that
are the lightest? Are they upward facing surfaces or downward
facing surfaces? This photograph is
not high contrast, so it can be difficult
to see but have a go. Where do you think the
light is coming from? If we exaggerate the contrast, then it's much easier to see that the light is
hitting the cheekbones. And so it's coming
from up above. And also the right side of the face is a
little bit lighter, so we can assume that the
light source is coming from above and slightly to
the person's right.
 Emily Armstrong, The Pencil Room Online