Transcripts
1. Intro: Have you ever seen the beautiful and elegant writing
on wedding cards in white envelopes and wondered
how and who wrote them. Do you want to create something visually beautiful
and aesthetic? Then my friends, you
are at the right place. Calligraphy is a nod of
beautiful writing and it can turn a simple text into
a stunning piece of art. My name is Leica. I'm a calligrapher and
an engraving artists. What started as a hobby has now turned into a
full-time profession. Calligraphy is not
just limited to paper, but can be used on many
different surfaces. Apart from writing invites
for luxury brands like Cartier and blogging for fashion
designers and cooperate. I have also conducted
offline and online classes for
almost a decade. I am here to share my
skills and knowledge in copper plate
calligraphy with you all. This class is intended
for a beginner as well as for those who have
prior knowledge of the script. So what are you waiting for? Let's dip up and running
and get started.
2. Getting started: The most important thing
to use for practice, or the copper plate
guide sheets. Before we get on actually
writing something, we need to know later height. And sometimes the x-height is the distance between the
baseline and the header. This is the height of a lowercase letter that does not have an ascender
and descender, e.g. a, e, u, w, etcetera. The top two spaces
above the x-height, or the first ascender and the second ascender
spaces, respectively. Letter T and P start from
the first ascender space. While the letters
having ascending loop start from the
second ascender space. Copper plate is written with
a slant angle of 55 degrees. And in most cases the letters
will be written so that the shaded stroke is at
the 55 degree angle. There are some exceptions, but we will look at those when we come to the letter
forms themselves. The two spaces
below the x-height, or the first descender space, and the second descender space. Letter P and letter F has the descender that goes on till the first
descender space. On the descending loops go on till the second
descender space. Baseline is the line on which the base of the body of
a letter we'll set e.g. the bottom of an a, you, ie, W. It is the line
you would write along. The idea of writing with
a flexible nib is to achieve shaded downstrokes
and hairline upstrokes. And it is this which gives copper plate
elegance and beauty. When the pressure is
applied to the nib, the tines of the nib will open
and give a shaded stroke. When the pressure is
released at times will close and the nib will
produce a fine hairline.
3. Fundamental Strokes Lowercase Letters: From the PDFs provided, pick out the sheet of
fundamental strokes to form lowercase letters. Dip the pen and ink till
the vent of the nib. And let's try the first stroke. This is a thin and
light stroke that is created by lifting
the nib of the pen off the paper while moving
upward from left to right. The upstroke is used to
create the thin hair lines. Second is the oval
stroke that is used to create oval shapes
and copper plate calligraphy. The oval is created by
starting with a light hand, putting a slightly heavier
pressure in the middle. And Lisa pressure
before turning and going up with a hairline
stroke to join. The third stroke
is the undertone. You start from the header
with a heavy pressure on the nib till two-third
of the x-height and then release the
pressure before touching the baseline and continue
to go up as a hairline. You can always go back and touch up to make the square tops. The fourth stroke
is an overtone. Start from the baseline
with the hair line. And as soon as you
turn from the header, start putting a heavy
pressure till the baseline, desalting in R-squared bottom. The fifth stroke is
called a compound curve. And it is a combination of an
overtone and an undertone. Make sure to keep the headlines
bad little to each other. Starting from the baseline with a hairline going
till the header, then coming down
with pressure and releasing the pressure just before touching the baseline
and going up in a headline. The sixth stroke is
the ascending loop. Oops. It's normal to make mistakes. Let's make again, keep the loop. Headlines curb gracefully. Start from the header in a hairline half of the
second ascender space, and then turn left with the
same hairline and gradually increase the pressure as you proceed downward
till the baseline. Seven stroke is the
descending loop. We start from the header with
a thick downward stroke and start releasing
the pressure from the top of second
descender space. And then curving upward
in the form of LWE, finishing before the baseline and exert with a
hairline stroke. Just keep in mind that you
have to keep the pressure uniform mile coming down till
the second descender space. The eight stroke
is a downstroke. This is a vertical
stroke that is created by applying pressure
on the nib of the pen. While moving downward. The downward stroke
is the backbone of copper plate as it is used to create most of the
letters in this script. I like to practice this drove along with an entry stroke as it makes it easier for me to make the down-stroke when my
pen is already in motion. See you in the next lesson with the first group of
lowercase letters.
4. Group 1 Lowercase Letter: Let's begin with the first
letter, that is letter 0. It simply starts
with a headline. And then we just
add the oval to it. Just a headline and the
overlay is added to it. The next letter in this
group is letter C, which is made with
an entry stroke. Then start as if we are making a know by leaving it halfway, ending with an exit
hairline stroke. This exit stroke will become the entry stroke for
the next letter. Then just below the header, we put a dot and bring a small stroke from the header to that dot to make
it let us see. For letter E we make a hairline stroke and
add the letter C to it. And then bring a small loop down from the header
to make an E. Not exactly at sea, but the second stroke
of C. For letter a, we make a hairline entry stroke, then add an oval to it. And then starting from the
header we make an underturn, and that's our letter a. So we can see letter a is a
combination of three strokes. That is the entry hairline, the oval, and the undertone. For making the letter d, we make a headline that
is the entry stroke, and add an oval to it. And then add a long
undertones starting from the first ascender
space to the baseline. Let's do it again. Entry stroke plus an
oval plus underturn. Letter G is a combination
of three strokes. An entry stroke that is
a headline and no one, and a descending loop. Let's do it again. Entry stroke plus the overall. Lastly descending loop. This is how we make the letter G. Now we come to letter Q. First we make a headline, then add the oval, and then add the reverse
descending loop. What do you mean by
reverse descending loop? The reverse descending loop will be moving up towards the right and not left like in
the descending loop. Let's do it one more time. Hairline entry stroke plus t over one plus the
reverse descending loop. And here's our letter Q. The last letter in this
group is letter S. Make an entry stroke. Then start from the header
and make an inverted C, and end with a
hairline exit stroke. Let's do a quick recap
of all the letters now.
5. Group 2 Lowercase Letters: Now we come on to the second
group of lowercase letters. The EU is made in three strokes. Make a headline upstroke
starting from the baseline, and then make to
undertones parallel to each other, squaring the top. Let's make two more use. To make letter w,
make an entry stroke, add an undertone, and
another under turn. And make sure that
the gap between the 200 turns should be equal. So W has an entry stroke. And to undertones all on
the 55 degrees slant angle. Add a dot on the exit stroke
to make a hook in the end. The J consist of two
separate strokes, the dot, the first stroke
is the leading stroke. Move the pen to the waistline and make a complete
descender stroke. Be sure to pause before
you start the drums true, so that the nib opens and the top of the stroke
is squared off. To make letter K start with an entry stroke and make
the ascending loop. Add the third stroke that touches the ascender in
the middle of x-height. The stroke is quite
unique and is used in only letter K will break it down in the
recap for you to see. Letter L is made with
an entry stroke, adding an ascending loop, coming down with a heavy
pressure and releasing the pressure just before the baseline and exit
with a hairline stroke. In other words, it's a long
undertone with a loop. Letter T is a combination of three strokes and entry stroke, underturn and a crossbar. The undertone starts from the first ascender space
and ends at the baseline. Make sure to have square tops. Make a crossbar just in the same line that we
will put the dot of I-N-G. Letter F is the only letter that has both
an ascender and descender. F starts like an edge with a headline leading stroke,
and ascending glue. And a heavy downstroke going all the way till the second
descender space. The cross stroke of f is made without
pressing on the nail. Let's do a quick recap
of all the letters now.
6. Group 3 Lowercase Letters: Now comes the group
three letters. Letter V is a compound
curve with a hook. The hook is similar
to the 0 form, but it is much smaller. It is formed by moving the pen in a counterclockwise motion, pressing very briefly on the
nib during the downstroke. Letter X has two strokes. First we make a compound curve and then add a sliding
curve from right to left with a light hand crossing the text
drop in the middle. Letter R is made in two strokes. First row is the overturn. The second stroke
intersects the waistline, and then exit form of hook
like in the letter B. Let's make some more. Letter M is made up
of three strokes. An overtone plus, and
then a compound curve. Make sure to have
squared bottoms. Let's make some more. Letter N is made up of an
overtone and compound curve. An overtone and a
compound curve. And that's the letter. And let's do a quick recap of all the letters now.
7. Group 4 Lowercase Letters: Now we come on to the last
group of lowercase letters. Let's start with B. A. B is made up
of three strokes, a hairline stroke, an
ascending loop, and the hook. The first two strokes
and B is like an L. Plus the hook with an
exit stroke is added to it. And we have letter B. Letter h is made up
of three strokes. Entry, hairline,
stroke, ascending loop, and a compound curve. Headline, and ascending loop, and a compound curve. And we have the letter h. The letter Y is made up of two strokes. First is the compound curve, and then a descending
loop is added to it. A compound curve and
a descending loop. And you have your y. Start the letter with the hairline Coming
up to the waistline, around to the right
and downward, allowing the nib to open
on the down-stroke. When you reach the baseline
swing the stroke to the left, make us bond rather
flat loop that rest on the baseline and curved
downward to make the descender. Letter P consists
of an entry stroke, a downstroke, and
a compound curve. Starting with the
hairline entry stroke. Downstroke, and then
add a compound curve. Let's do a quick recap
of all the letters now.
8. Fundamental Strokes Uppercase Letters: Now let's start with the fundamental strokes
for the uppercase letters. The first row is the
12th downstroke. Starting slightly to the right
of 55 degree angles land, begin the stroke with a small
downward curve to the left, followed by a downstroke
along the slant line. Just before the baseline, make another small cup. And the finishing stroke
with a comma dot, the next stroke is the oven. This drug is almost identical
to the lowercase 01. It just a little wider and
takes up to three lines. Space. Stroke is the almost
vertical stroke. This drug is not made
on the 55 degrees land, but it is made closer
to the vertical. For the sake of clarity, we can call it the
vertical stroke. Even though it is not exactly
on the 90 degree line. The fourth stroke is the
spider entry stroke. The spiral entry stroke has
the same shape as the spider. Next is the loop stroke. This is similar to the
spiral entry stroke. This stroke and the
spiral entry stroke are made on the 55
degree angles land. The next stroke is
the compound curve, just as we did it
for the lowercase. The next two strokes are the
horizontal entry strokes. The first one begins at the ascender line with
the curve to the left, down to the right, and then back up to
the ascender line. The second one is similar to
the crossbar of miniscule F. Both these strokes are
done with a light hand. Therefore, it is a hairline.
9. Uppercase Letters: Group 1: For letter T, we make
us where downstroke on 55 degree angles land and add the spiral entry stroke and elongate it to the
right curving up. Let it f is same as letter
T. The only difference is horizontal headline
that crosses the baseline. Curving up with a
loop at the end. For letters make us
very downstroke and add the first horizontal
entry stroke to it. Letter L starts
with a downstroke, making a rather
flat loop on left and move to the right
with the hairline stroke. The horizontal
entry stroke to it. Let her eye is
made into strokes. Start with the swelled
downstroke with a comma dot. Put your pen just
above the downstroke on the right and start
with a curved stroke to the left and then
swing out to write crossing the downstroke
slightly above the waistline. Letter J, start with
the downstroke, which continues all the way to the second descender space
to make a descending loop. The second stroke
is just same as I. Letter B is made
up of two strokes. Start with the basic
downstroke with a comma dot. The second strokes
traps with a spiral, curves up to the ascender line, crosses the
downstroke and swings up to the right to form two curves on the right
side of the downstroke. These two curves
are separated by a small loop position slightly above the
center of the space. Letter P starts with a
straight downstroke, ending with a comma dot. Then the second
stroke is made with a Spider-Man crossing the
down-stroke curve to the right, down and around to the left. Let it out is made with a P. And the final stroke is
same as the lower part of K. I make letter D in one stroke. First stroke, ending in the flattened loop
along the baseline, curving up to the ascender
line and around to the right. Then crossing the downstroke, making a spiral in
the end to the left. Let it always made into strokes. Start to make an oval. And when you cross the baselines tight start going
left back down. Complete the oval
by joining with a curved light stroke down
from the starting point. Q is an 0 with an entry
horizontal stroke in the end. Let us see is a
combination of oval form and an anticlockwise
spiral stroke and an entry horizontal stroke. Letter G. We make us see from the
ascender line to the header. And then simply add the swelled downstroke from
there to the baseline. Like the B, the letter E has two large coal separated
by a small loop. The loop is located above the
center of the letter space. The lower curve is therefore
larger than the upper curve. It also extends
further to the left. And letter X, the first
row is the reverse c, and the second stroke is a C with a very light hand headline.
10. Uppercase Letters Group 2: Let her read starting
with the compound curve, adding your swelled
downstroke to it. At the baseline, swing
around to the left and up, making a loop that crosses the downstroke to
the ascender line. And finish stroke is like the lowercase l. The two downstrokes are parallel to each other. Letter V is made with a
compound curve and then adding a sweater downstroke and make a headline upstroke all the
way to the ascender line. Moving to the right. That blue is a compound curve. And two V's put together for letters that make a compound curve and a
splendid downstroke. The baseline. Make a flattened loop. And then curving towards the right with a
heavy downstroke, then the descender line and turning up from
there in a hairline. That ACh is made with
a compound curve and the downstroke ending with a comma dot and end
the final stroke, like in the lowercase letter, you make a spiral
entry stroke and continuing it on the
main slant downstroke, turning up in a hair line
and adding a long undertone starting from just below the ascender line
to the baseline. For y, the first row is
just like the first row. Cough, you just happened size
of u and the second stroke, it's a sweater downstroke.
11. Uppercase letters Group 3: It starts with a
hairline upstroke, curving to the right in
the end on ascender line. And from there, make an
undertone till the baseline and add a closed curve crossing both the hairline
and the downstroke. Starts with a hairline upstroke, a downstroke, then again
a headline upstroke, and finished with a
long undertone as a letter N starts with an upstroke on
the main slammed. The middle stroke is a
vertical swear it's true, and ends in a hairline. Again on the mainland going towards the right as it
reaches the ascender line.
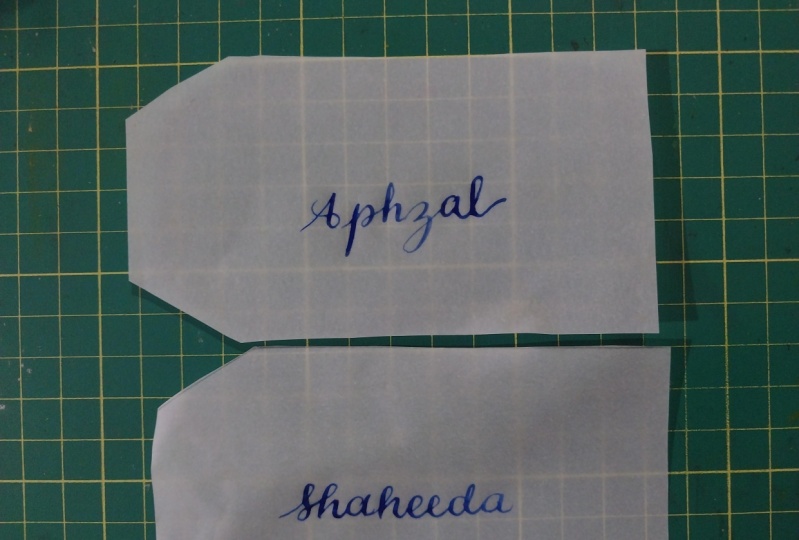
12. Class Project: Materials for our class project
or the choice of a paper. It could be card, stock, watercolor paper,
or vellum paper. Then comes the ruler,
scissors, pencils, kneadable eraser, gold paint
pen and vaccine is optional. I am using a card
stock paper for today's class project that works well for copper
plate calligraphy. You can also use a
watercolor paper or vellum paper for this
follow along class. We begin by choosing a size for a name tags or place cards. As per our requirement, I have chosen the size of sports centimeter by
ten centimeter here. And now we cut the
shape we want. You can keep it rectangular, which is a standard shape, or cut it in the shape
as I have done here. After cutting, we make
guidelines across the center of each name tag or place card
with a ruler and pencil. And then lightly sketch
the name or texts that you want to write on
each tag. What guard? Dpo pointed nib into
the ink and begin writing the name or text
using copper plates script. Remember to use a light
touch on the upstrokes and a heavier touch on
the down-strokes to create thick and thin strokes. That is a characteristic
of copper plate. Script has learned in
the previous lessons. And keeping in mind the
fundamental strokes, you must have built
a muscle memory. By now. You would know when the pen will barely touch the
paper for hair lines, that is the upward strokes. And when to put a
little pressure to have the thick
downward strokes. Copper plate calendar fee is a beautiful and elegant
style we all know, but we should also
know that it requires patience, practice,
and perseverance. Master the script. There is no right or wrong
way of adding embellishments. What seems good to
you is the best one. You may choose to make, same as mine or be creative. Sky is the limit. Allow the ink to dry completely
before using any eraser. To erase the pencil lines. Once the ink is dry, you can add a touch of
elegance to your name tags by using a gold paint
pen to add borders, or you may use a ribbon. Also. You're beautiful name tags or plays cards are now
ready to be used. Place them on a table
or attach them to give, to add a personal touch. See you in the next lesson.
13. Final Thoughts: Thanks for being in the class. I hope you had a great time. I recommend you to post your projects in the
project gallery. Looking forward to seeing
your beautiful works.
 Sulekha Duggal, calligrapher