Transcripts
1. Class Introduction: Hi, my name is Asia and I am an illustrator who is absolutely in love with Cube studio pain. I created this course mostly for a very specific type of illustrator. So if this sounds like, you know, this course is for you, if you're the type of illustrator that spans hours and hours, looking at reference or stock photos. You know, searching for the perfect pose that you can use for your OC. Or if you're the type of illustrator that spends so much time in front of the mirror trying to get the perfect pose, trying to get the angle right, just so you have something to base your drawings off of. Or even if you're the type of illustrator that finds it difficult to find a willing model to pose for you, then this is the course for you. This is not a 3D modelling course. I will how ever teach you how to use 3D models to your advantage? So the beauty of this course is that all of these assets are already included into IP studio pain. I will just teach you how to clean up the workspace, use the panel's use the tools as well as suppose all of these free models so that you can have your very own customizable mannequin so much so that you can actually change their body shape, changed their high, you know, you can even defy gravity you. Something that you can't do with dolls and wooden mannequins. I'm also going to teach you how to articulate hands, fingers, and stuff. Because I know that hands are also like a really difficult subject. Most illustrators find difficulty in looking for perfect reference photos for, especially if you only have your two hands and you kinda want different size hands are. And with that, I've included a lot of exercises this time around. So I'm also including a workbook that you can download. Each step of the workbook or each part of the workbook corresponds to a lesson in the video list. So please feel free to have a look at the video list. Asked me for any questions and I really hope that you can share your progress with me or with others. And I hope you enjoyed this class.
2. Preparing Your Workspace and Knowing Your Tools: So either look at your file or start a new document by clicking on paint on the upper left. You'll see that I have my draft or sketch layer already in the document. And the first thing I want to do is make sure that we're all looking at the same workspace. To do this, click on Window Workspace and reset to default. Then click yes, we're resetting everything to the default. That we have, the same workspace in our screens. And so that I can guide you without the customizations I've done to my own panels. Next thing you want to do is access the materials folder. You can do this by going to window material and choosing the subfolder. Or if you look at your right side, you will see that there are small icons of different folders. To close this panel. Or you have to do is click on the arrows again. And then to open it, just do the same. So from here you can either choose a folder or search for downloadable from the CSV website. Let's choose the body type from the existing folders. Just choose the 3D female drawing figure. And then what you're gonna do is you're going to click and drag that onto the canvas. So to be able to manipulate the model, you have two different tools you can choose from. You have the Move tool as well as the object tool. And the Move tool moves the model around the canvas without changing the perspective or the size of the model itself. You can do this by accessing the Move tool with the shortcut key on your keyboard. Another tool you can use is the object tool, which is under the operation tool. And this allows you to move and manipulate different parts of your model. So let's close that window again. And then you'll see that there are different layers on the right here. Make sure that you are selecting the correct layer when you're trying to manipulate your model. So again, just to summarize case to move it around the canvas. And the operation tool is to move individual parts of the model. You'll see that you're using the operation tool correctly if you are able to highlight its different parts. And if you're not able to do that, make sure you're also checking that you are selecting the correct layer.
3. Preparing Your Panels: The first thing you want to do is make sure that you can see your model properly. So if the art board or canvas is to zoomed in, you can easily use the navigational subchannel. You can actually manipulate it using the hand tool and you can see that you can pan around the canvas like so. You can use the plus and minus buttons on the side here. And that will also do the same zoom in, zoom out effect. You also have a 100% zoom. So that'll show you the art work in a 100% resolution. So let's zoom out a little bit and make sure that it's a comfortable view for us to be able to move all the parts properly. I like to work in an uncluttered workspace. So I'm going to close some of these panels. So once I'm happy, now I have the screen real estate to expand and shrink and move around the panels that I do need. I'm really not worried about losing myself panels because I know that I can always access them again from workspace reset to default or window, and then choosing the window or of the panel that I actually need. So there should be no fear in losing access to certain panels if you accidentally closed a panel that we need for the rest of this class, just remember that you can always reset to default if you end up closing something, for example, like the brush panel or the brush tool, all you have to do is go to Window, look for that same tool and it will reappear. The next thing you're going to do is expand and give yourself some space so you can see the actual tool properties. And you'll see that I am expanding this panel here. A good trick that I use that I end up doing a lot and combine the panels just so I have like more space and the rest of the panels disappear. You'll see that. To move them, I just wait for the red highlight to appear and then I expand. So there you have it.
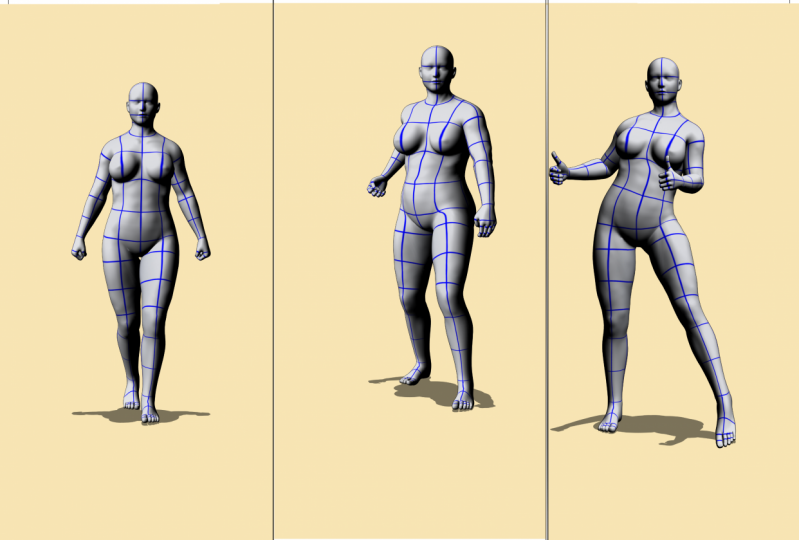
4. Customizing a Body Shape: So you'll see here the tool property panel, which appears when you're trying to customize the model to change the body shape, all you have to do is expand that menu. Take note of these two important buttons. The first one is initial body shape, and this is pretty much a reset button in case you're not happy with your model. You'll see that when you press it and the model gets ungrounded and all you have to do is just click the ground button again on the toolbar. And then to find that again, just click on the object tool and then scale as you would normally. From here you'll see options to customize the overall body shape. And you have these sliders that go up, down, left, and right, and can also go diagonally. And it allows you a really dynamic range of body shapes to use for your model. I would pause this video at this moment so that you can experiment with the different ranges here. You can also use the numbers on the bottom to kind of play around and find the perfect body shape for your drawing. From here you'll see that you're actually able to also reach this by not only clicking on the appropriate buttons on the left, but you can even click on the model itself. So if you want to edit the head, Click on the head part of the panel. And it acts in the same way as the earlier part. You'll also see that you're able to change and customize the neck. But for parts like this that are a bit smaller, I would suggest that you use the navigator panel to zoom in on what you're working on so that you can really be more precise with what you're trying to do and how you're customizing your model. Some models won't allow you to customize all parts. Like for example, you can customize the torso, but not really the shoulders. But that's fine. You can even just like change the Seder For now, let's try and explore what we can do with the rest of the body parts. You'll see that you can lengthen the torso. You can even lengthen the arms. You can shorten the arms. You can make an thicker or thinner when it comes to the hands, I would prefer to teach you how to customize the hands in the next video versus now, because it's actually a pretty versatile part of the model. You'll see here that if you aren't able to get the exact like sizes that you want by dragging the siders. Remember that you can always use the number box on the bottom. You can also keep the proportions on so that as you're increasing length, that also increases in width. So that's really useful if you want to keep like a kind of semi realistic believable model to use as reference for your drawing. So once you're happy, remember to save this and to do that, just click on this button, not the left one. Click on this and register the body type as material. So rename it first. And then to organize it, all you have to do is click on this little sub folder here, categorize it into the 3D sub folder or create a new one for your custom models or because somebody types and then click OK. Once you're happy, doing that will allow you to reuse that body type over and over again, no matter what pose or modal you end up using. Saving the body type as material is always a safe way to kind of keep a record of what you've been doing before you reset anything back to its initial body shape. Once that's done, you will be able to access the body type the same way you access any kind of material in the same way you access the model that we're using now. So just click on the folder that you saved it to. And all you have to do is click and drag it. And then you'll see that you're able to apply the same measurements that you made earlier. And here I'm just applying a bunch of different body types that I've created earlier so that you can see what I mean. I like having different kinds of body types that represent the different characters that I used for my illustrations. That way I have them handy and I don't have to recreate everything from scratch. This really just speeds up my workflow and I'm drawing.
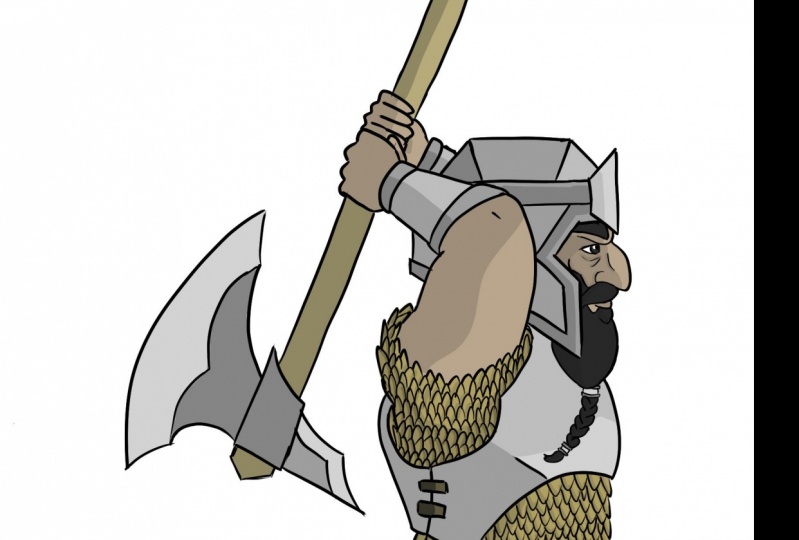
5. Exercise 1: Recreate a Body Shape: To access the first exercise in the workbook, go to the classes homepage, scroll down to the projects and resources tab, and then click on the PDF link. This is where you'll find all of the materials that I am going to be providing for the entirety of this class. Choose two of these three stock photos to recreate and clip studio pain. You do not need to recreate the post that they are doing just yet, but you do need to have a look at the body proportions that each photo has. The musculature, the amount of fat in the body parts, as well as the height and proportion of the head. Tried to recreate that as best as you can. It doesn't have to be a one-to-one re-creation to help you get started, I recreated one of these poses and pasted the model below. Once you've recreated these models in clip studio pane, you'll need to either screenshot them or save these photos as PNG or JPEG, and then paste them inside these boxes.
6. Posing Arms & Legs: Change the camera angle to match your sketch. Specify camera angle preset, and find the preset that matches your sketch. The closest. We have a few ways to move the limbs. The first one would be clicking and dragging, which is pretty much like a free movement. And it allows you to just drag the liens or whatever part you, you choose, while also affecting the rest of the parts that are attached to it. As you can see. Another way to move the different parts is to access the movement arcs. And these are represented by these different colors representing different directions that you can move these isolated parts. This allows you to choose a part and move it independently of the rest of the body. The exception would be as if you choose something like the shoulder here. Obviously the forearm is also going to move because I chose something that was in-between the torso and the forearm. You can't have the forearm staying in the same position if you're already moving the joint that connects it to the main body. Another thing to note here is some hearts have these cones. These columns represent the limited range of motion that is allowed for the part that you've chosen. So depending on the direction that you're rotating or spinning different parts, the cone also changes, or the cone also shows you the maximum amount of movement that is allowed for the part that you chose. A good example would be when you look at the movements of the head, it's also limited to the way you, the neck is positioned. So you'll see that obviously, it can't go anymore forward than that and can't go anymore backwards than that. Which is really good because you're trying to reference realistic anatomy. There will also be instances where you're going to have difficulty moving some parts. So my suggestion would be just change the camera angle as you see fit so that you can adjust it comfortably. You'll also notice that some parts have limited movements or only one colored arc. That means you can only move that part in one direction. This is really important to note also, if you're getting frustrated and wondering why you can't move it as freely as the other part is you have to consider the joint that it's attached to. So before you can actually move a forearm or the wrist or the fingers, you have to consider the elbow angle, the rotation of the elbow, the spin of the elbow, and even maybe their shoulders. So you'll notice in my sketch, the body has a little bit of a twist in it. Now to achieve this, just at the pelvis to match the pelvis, the pelvises direction in my sketch. And the second is, I move the ribcage the opposite direction of the pelvis. This will give us the twist we're looking for and a more dynamic pose that will enhance our illustration. Now let's move on to adjusting the different limbs. You'll see that it's very similar to adjusting the arms and the elbows. But you'll also see that the dark green cone representing the range of motion is slightly different when adjusting the model. Think about how the limbs are articulated. You'll start to notice some silhouettes you may not have considered before. Notice the curves on this leg. I originally thought that there were only two curves, but using this reference model, I realized that there were three. You can see that with the hip, the thigh, and the calf. You'll also notice the difference between the idea I have of how the backlit should look vs how it actually looks with an anatomically correct model. Again, if you're having trouble adjusting certain parts, remember that you can always change the camera angle to better adjust them. A benefit of having a model versus a photo reference or yourself in front of the mirror is the freedom it gives you the study all the moving parts in different angles and perspectives.
7. Posing Hands & Feet: So let's try and customize the hands. What you need to do is zoom in on the part that you want to customize. You will see that if you don't do that, you'll end up clicking on the bigger parts are the bigger joints. So to avoid that, just zoom in on the part that you need to customize first. So in this case, let's zoom in onto the hands. Click the appropriate part until it's highlighted, and then you'll see the arcs appear again. Zoom in even more. And then you'll be able to see that you can even manipulate the risk rotation, the risk flexion, as well as the different digits. And from here you'll also be able to see that you can manipulate each digit by its individual knuckle. You can edit both or just one to be able to customize it in any pose that you need. For example, here you can even move the fingers and you'll see the limitations by which you can wiggle each individual finger. Another trick I can show you is if you can't decide on what to do with the hands, you can go back to your Materials folder, look for the pose subfolder, and then look for the hand pose, some folder which is here. And then all you have to do is do the same as you would be applying a post on other 3D model. Just look for a hand pose that you need. For example, a face and open palm grabbing something, et cetera. And once you've chosen, all you have to do is click on it, drag it to the part that you want to apply the post to and voila. So now that you have that, let's zoom out and then let's apply that to the other hand, you can apply the same bows or another one. It's up to you. And you still have the flexibility to customize that one post into something else that you need. In this case, I want to still change the rotation of the fist. I want to close the thumb a little bit more. And that's it. Next thing I wanna do is if I'm done with the poses, I just want to close this panel again just to keep my workspace clean and less cluttered. So now I'm moving on to the feet. And I'm just going to speed this up a little bit because the principle is the same. For now. I did not use any poses, but I will manipulate the feed those same way I manipulated the hands. So make sure you zoom in so you're not clicking on the wrong thing by accident. Check which joints you can actually customize. In this case, I think you can customize all of the knuckles of the toes and the ankle itself. And then there you have it. A 3D model that you can use to refine your very rough concept sketch. Now if you want to check the integrity of all of the parts that you've just moved. Don't forget to use the different camera angles that we learned in one of my earlier videos. And just move it around. Keep manipulating your model until it's perfect and the way you want it, for example, right now, I can see that some of the angles are kind of off, so I'm just gonna start adjusting them manually. Once I'm happy with that, I'm also going to start adjusting the bigger parts of the model or the model over all by using the these little pins over here. So you'll see that these fixed bowls are actually also moveable. You can move the model itself up and down the canvas, as I mentioned before. You can also move it left to right, funded forward and backward, whatever you need. If you need to scale your model, just make sure to highlight the outer ring with a little tiny arrows. And then you can actually scale it up or down depending on the size your sketches. You can also start manipulating the other fixed points. And you'll see that since the rest of the parts of the model are also fixed, the only thing that's going to be moving is the pin that you've selected as the rest of it's body parts are still stuck to the other bins. And this is a really fun way to just goof off, but also it helps to see also the movement of the body and what its limitations are. Like. For example, if you're happy with where the hands are and where the feet are, or if you've already placed your modelling in your head, you already have it in a certain position or certain position on the ground, then you can actually modify, let's say the neck or the chest or whatever else you need without having to redo everything else all over again. So before you finish up with your model, make sure to check everything else by using the different camera angles. Adjust any pins that you need to adjust. And that's it.
8. Exercise 2: Recreating Poses: For this next activity, choose two of the models that you recreated from the last exercise. Then tried to copy the poses of these rough sketches here. You don't have to recreate them absolutely 100% accurately, but please try to apply everything you've learned in the previous videos. If you have any questions on how to move certain limbs, feel free to post in the discussion tab.
9. Saving Your Pose and Re-using It for Other Models: To be able to reuse the posts that you so lovingly created, you will have to register the full body pose as material. Make sure that you rename it something identifiable. Makes sure that you click on the proper sub folder under pose and full body or entire body. And then you'll be able to reuse it on any other body type that you want to. Here's a good example. This body is actually a different body type than the one that we've been using in the previous videos. So here I've opened the previous model that we've been using and I'm going to apply the body type that we just saved. You have to make sure you are selecting the right layer. Otherwise, when you drag a pose onto a body without selecting the right layer, it will just add another model onto the canvas. So to avoid this, select the layer of the model that you're trying to apply the post to and then drag from there. You can proceed as normal with changing the camera angle presets and everything else you need to do. Let's try to apply the same post, so different body type. So I'm going to drag this model onto the canvas. You'll see that it's also drawn differently than the first model that I have. So you'll see that there's a new layer. And this can be repeated as many times as you want on as many different models as your computer can handle. So for example, look at this masculine type of model. I do everything I do like normal resizing, repositioning. And then I just do the same click drag. And it's applied.
10. Lighting Your References and Using Them!: To add depth to your reference studies, it might be useful to also learn about lighting. So to access the lighting settings, just click on the wrench on the toolbar below. And then click light source. You can also access this with a subtour property panel on the left. Once you click expand, you can actually just drag your cursor around the sphere. And it will allow you to change the light source as well as where the shadow show up. Not only will you be able to change the direction of the lighting, you will also be able to change the harshness of the lighting so you can actually influence the mood of your reference image. Apply that to whatever illustration you're creating. From here you'll see me save my reference model a few times to get a few good angles and poses. And then I'm going to upload that into my reference window. Just navigate to the right side of your screen and then click on this tab. Then you'll be able to open some view. If this is not here, remember that you can go to Window some view from here, click on the folder icon to load all of the images that you've just saved. Having the same model in the same pose with different lighting references helps you create a more interesting picture.
11. Exercise 3: Hand and Lighting Practice: This next exercise is a little bit easier. What you'll do is take a photo of your hand in a pose that you find challenging or in a pose that your character would normally do. I'm doing the fingers crossed example here. Then next thing you do is you have to recreate this again and tip studio band and then save it as oppose. Don't forget how to save poses by looking at the applying poses video. Once that's finished, use your new reference, tried to experiment with lighting.
12. Extra: Using the Camera and Cube: This is just an additional video to teach you how to manipulate the model as well as the camera angles using the toolbar. And what I want you to pay attention to here is that all of these little light blue buttons correspond to the different colored handles that you can see above the model here. This allows you to tilt the camera and change the camera angle at a fixed point with your model staying in the same position. This allows you to pan the camera up and down the screen. So you'll see that the model is still in the same position. This allows you to zoom in and out. This allows you to move the object itself. I either model itself. Think of this tool as more of a free rotate so you can rotate your model freely while this other one allows your model to rotate on a fixed point. This allows you to spin the model left and right, similar to the horizontal axis that you see when you click on the model. And this one allows you to move the model on the perspective plane without changing the model for its position. An essential thing to notice here is if you want to move the camera and just look at the light blue buttons with the camera icon on them. And if you want to move the object itself, just use the buttons that have the cube in them with a different arrows. And that gives you an idea of how to use the tool.
13. Exercise 4: Putting Everything Together: For this fourth exercise, choose a model from exercise too that you like the best. This is how we're going to start practicing drawing, crop reframed the model that you want, changed the lighting, make it dramatic, make it soft, it's up to you. And then start using it as a reference. Once you're done with your sketch or your illustration pasted here, don't forget to upload them to the projects page.
14. Final Project: For the last exercise, it's time to work on your own custom model, sketch out a rough character idea or a rough character posts that you have particular difficulty in recreating from memory. And then follow the steps that we did here in this class and create a body type, pose it, and then paste the screenshot on the box below. Once that's done, changed the lighting, changes the framing and user new reference and complete the drawing.
 Asia Noble, Pro Doodler