Transcripts
1. Introduction: Have you ever wanted to
create three characters, but didn't really
know where to start? Well, then, this
course is for you. Welcome to this introduction to character modeling in
Blender for beginners. In the following lessons, I'll guide you step
by step to model your first three D
character using Blender. My name is Monica, and
I'll be your instructor. I'm a professional
three D artist with more than ten years of
experience working with Blender. During my career, I've
worked on TV productions and commercials in the VFX
and animation industry, and I'm currently working for
animated feature films as a CG modeler for one of the biggest animation
studios in the US. This course is aimed for beginners who are
starting to explore the world of three D. We will be using blender
as the main tool, which is a great program that
is free and open source, so it's easily accessible for anyone wanting
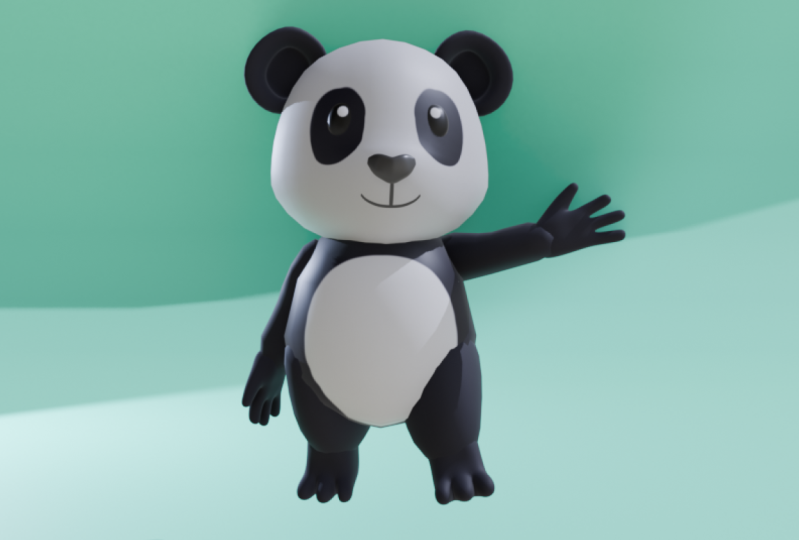
to learn thread. In this case, we will be
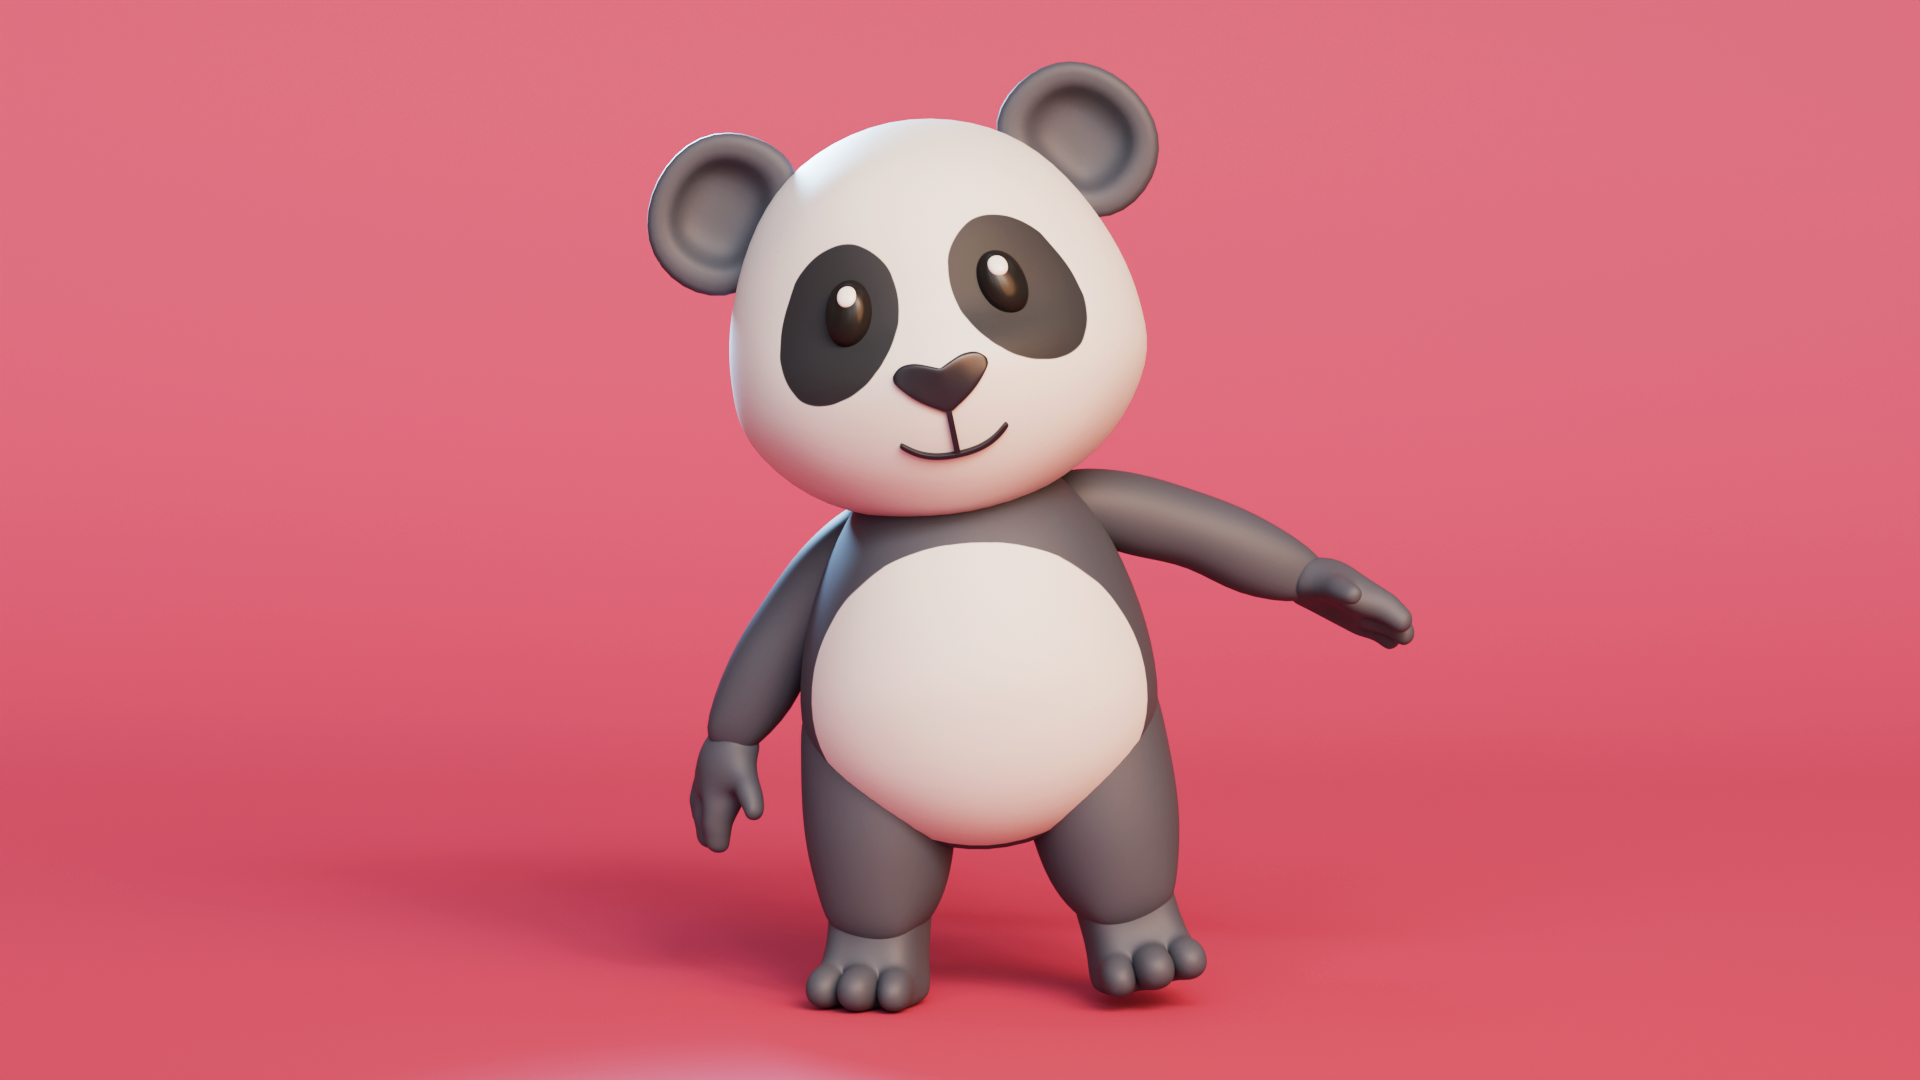
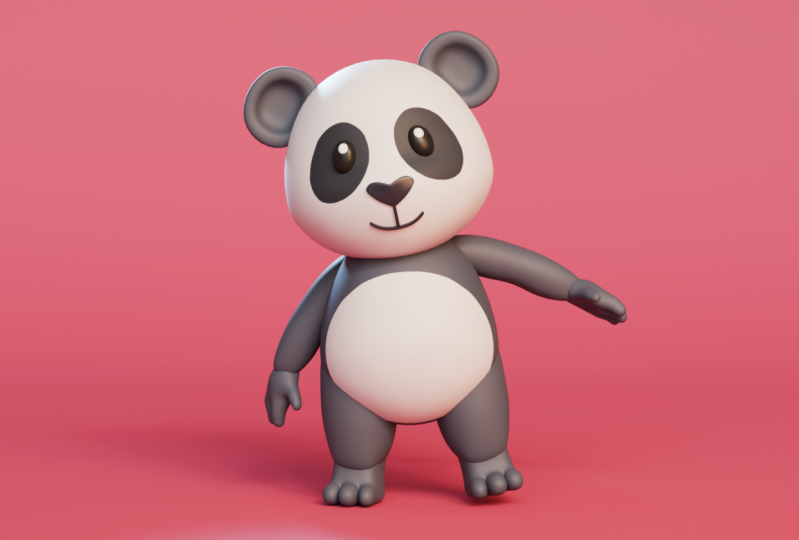
creating a cute panda bear. Here, I will guide you through the whole process of making each part of the body
using simple shapes. I'll teach you different
modeling methods, and I'll give you some
of my personal tips that can help you model
more efficiently. You will also learn how
to use certain modifiers, how to pose your character
without the need of a rig, how to create textures
and materials, and how to render a final
image so that at the end, you can share your work
under the project section, and we can all appreciate
your beautiful work. If you are a complete
beginner with blender, and this is your first
time using the program, I recommend you see two of my previous courses where I
teach everything you need to learn in order
to be prepared to start creating your first
three D characters. There, I show you all the
intricacies of the software, like how to move
around the interface with all the different
shortcuts and tools, as well as the most important concepts of three D modeling. So feel free to check
them out as well. I hope you follow me
along on this project, and I really look forward to seeing your final panda bears. Without further ado,
let's get started.
2. Reference Images: Before we start
modeling our Panda, it's important to have a
visual guide that can give us a guideline of the proportions and shapes of our character, and that way we know
what our goal is. In this lesson, we'll
set up a reference image inside Blender to make the modeling process
a little bit easier. Usually for box modeling, it's helpful to have front and side views of our character, and you can either find
reference images online, or you can create a simple
sketch of your own characters. But for this course,
specifically, I'll be using this
reference image, which you can find in the course resources and that
will be provided to you. Okay, so now in Blender, we are going to add
a reference images. First, we're going to clear our scene with the objects
that we have currently. So to do that, I'm going
to select everything by pressing A and then delete it by pressing X and then just deleting
the selected objects. You can also delete them by
just pressing the delete key. Okay, so now that we
have a clear scene, we can import our
reference images. It is important
that you do them on your orthographic views because we have a front and side
view that are orthographic, it's important that
our reference images are like that in our scene. If we import them in
just a perspective view, we're probably not
going to get it right, and we wanted to
have it perfectly aligned with the
front and side view. So to do that first,
we're going to go into our front view by pressing
one on our numpad. Remember that to check what
view you have currently, you can also check the top
left part of your screen, and you will see that it
says front orthographic, so you know that that's the view that you have in
this very moment. So from here, we are going to add our first reference image. So we're going to press
Shift A to bring in the ad menu and go under
image and select reference. Here we're going to select
the image that I gave you wherever you saved it. So I'm going to go here and just select it and say
Add empty image. And now we have it
here on our viewport. So it is important that especially the front view of our Panda is perfectly aligned in the
middle of our scene. And as you can see,
it is not currently, it's a little way to the left. Side. So we want
it fully centered. To do that, there
are different ways. You can just select the move gizmo here on the
left and move it to the right. That's perfectly okay.
You can also do it with shortcuts by
pressing G for moving, X for locking the X axis, and then just simply dragging
your mouse to do that. But there's a third option
and it is going under the image properties on your right on your
properties menu. And down here, there's
the image properties, and we can do an
offset on the X axis. Whichever method you
choose is completely fine. But what it's
important that is that it's completely aligned in the middle and it's
kind of hard to tell without seeing the grid. So for us to be able to see the grid underneath the image, we have to select
the opacity button right here. We're
going to check that. And as you can see,
as soon as I do that, I'm able to see the grid
on top of my image. That is very important
because then we're going to align it perfectly
in the middle. I'm using the nose as the reference to have
it perfectly centered. You can also bring
the opacity down. Sometimes you have
better visibility like that with
your actual model. You can do that up to you. I like to have a little
bit of opacity in there. So great. Now we have our
front image settled. It's always good to
rename your references. So I'm going to call
this front reference. And just in general, all
your objects in your scene, they should be renamed so you have your scene very organized. So now we have our
front reference, and we got to put
our side reference. But as you can see,
it is the same image. I can use the same
image because it has the side view in it. So what we're going to do is
that we're going to go into our right view by pressing
three on our numpad, and this is our side view. And what we're going to
do is that we're going to duplicate our image right now. I'm going to press
Shift D to duplicate. Now I can drag it.
If I drag my mouse, I see that I have a new object, but I want it in the same
spot as it was originally. So to do that, I'm just
going to press right click and that's going
to keep it right where it was originally located. And so now we're
going to rotate it, so we need to rotate it by pressing R. Then we're
going to log the axis, which in this case,
is the Z axis. I press, and now
we're going to rotate it 90 degrees because I only need to rotate
it to the side. But you will see that
now my panda bear, you can see here is
facing to the back. This side of the
screen is the front, and this is the back,
and we don't want that. So I'm actually going
to rotate it again. By 180 degrees. That way, my Panda
is looking forward. And now from here again, I'm going to do an offset so that I have it
somewhere in the middle. It doesn't have to be perfect since this side view
is not symmetrical, but somewhere that's
kind of centered for us. Great. So now that we have that, we're going to rename it
as well. I reference. And when I go back
into perspective view, you will see that I
have kind of like this X from the top view. You can either keep it like that if you like
working like this. I know a lot of
people prefer it, where we're going to have
our model in the center, and you have kind of like
the reference right there. I personally don't have to
have it don't like to have it just in the middle
because I feel like it can get very crowded. So what I like to do
is that I actually push the images back. So this one I'm going
to push to the side, and then this one
I'm going to push to the back just a little bit. So that I can actually have more space in the
center, which I prefer. So now that we have that, we're basically ready to
start modeling our Panda, but one thing that we
need to do is to lock the reference images
because here, I have the possibility of selecting them when I'm modeling,
and we don't want that. We want it to be locked
so that we don't have any risk of
moving our reference. So to do that, we're
going to first rename the collection as references. Reference images, maybe.
Sorry about that. And now we don't want to
be able to select them. So to do that, we're going to go under this filter
on your top right, and we're going to select
the restriction toggle with this arrow so that this means that we are going to be able to toggle the selection on and off. And now we have
that option here. We're simply going
to toggle it off, and that means that now we won't be able to
select it by error. Now with the reference
images in place, we are ready to start
modeling our Panda. I'll see you in the next video.
3. Saving: All right, so now that we have a reference images in place, we could start modeling
our panda bear, but before we do so, we're actually going to
save our file first. It is important that we save our progress so that we
don't lose any work, and this is a perfect moment
to do so because we really haven't started doing any
of our modeling work. So we're going to go under file and we're going to hit
that save option or saves. You can also press
Control S or Command S, and we're going to select the location that works for you, and we're going to rename it. So in this case, I'm
just going to call this Panda underscore 01. And the reason why I
have underscore 01, it's because with this, it can create increment savings automatically without me having to go and rename it manually. So this is a great way to do it. I'm just going to save
that blender file. And you will see it here. Now, I can show you where
the increment button is. If you go under file, and you save incremental, that's actually going to
increase that number to 02, 03, and so on and so on. That way you have
versions of your work and you're not saving under the
same file all the time. I highly recommend you do this because if for
whatever reason, your file gets corrupted or
something happens to it, it will always have the
previous version as backup, and it is important to do that to always have
versions of your work so that you don't
lose your work for any reason that might happen. So yeah, now you save
your file and we can continue with our
modeling lessons.
4. Head part 1: All right, so now we
are ready to start modeling our Byer,
but before we do so, let's create a new collection
so that we keep all of our new elements into that collection instead of
the reference images one. So we're going to go
under our outliner, right click and then
select New collection, and we're going to
rename it mesh. This is where we're
going to keep all of our meshes. You can rename it. You can organize it
however you want. But for now, let's just keep
it as simple as possible. So now under this collection, I'm going to start adding
all of my objects. And first, we're going to start with the head of the Panda. So first, I'm going to
go to the front view. And as you can see, the
head is pretty round, so I could easily
start with a sphere, and let's see what
would happen with that. If I add Shift A and
select the mesh, and I select an UV sphere, which is just a
normal sphere shape. You will see that it is what
we would possibly need. But I want you to see how the topology is and why this
could be an issue for us. As you can see, there's
these verdicts at the top and at the bottom that's
connecting a lot of phases, and this is not ideal for
This is not good topology. This is not ideal
for our character. Usually for characters, we have very specific needs
of our topology, and this is not a good way
to start just because of those points that might give us some errors,
give us some issues. It's not terrible to use sphere, but I do have another method
that I actually prefer, and it's not starting
with a sphere. I'm going to get rid
of this actually. I'm going to add a cube instead. Now you might be wondering how are we going to go
from a cube that's very sharp and has
all these angles into a more spherical shape? Well, there is a very
easy way to do so, and it's by going under
the properties window. On your right, you're going
to go under the modifiers. And we're going to select and search for a modifier that's called subdivision surface.
We're going to select that. And as you can see,
now my cube has become more it will have
a more spherical shape, and this is exactly
what we need. We needed to become rounder and rounder by just adding
the subdivision surface. Now, this is still very sharp and it has many angles still. So I want to actually increase the amount of subdivisions 1-2, and now we'll have
a rounder shape with more faces to work with. Now, if we compare
it to the sphere that we had previously,
it's not perfect. It's not as smooth as the
one that we had seen before. This is exactly what
we need because we have less geometry to work with, less faces, less vertices, which will allow us to
shape everything better, and then we can increase
adding more resolution to it, adding more
subdivisions to it so that it becomes smoother
and looks more of a sphere. So now from here, I'm
actually going to apply that modifier and so that the subdivisions become
part of the actual mesh. But as you can see, this
is still kind of squared, it's not perfectly round, and we want to have that
perfectly round sphere. So under Edit mode, make sure to hit that tap
key to go into Edit mode. There is an option that I
really like that is at the top, there is this mesh menu. And if you go under transform, there is an option
that says two sphere. And what this will do is that it will convert
all of my vertices and bring them into position so that they become
a perfect sphere. So I'm going to select that and just going to drag my mouse. And as you can see,
it's very subtle. But if I drag my mouse, you can see how it's becoming
a perfect rounded sphere. I'm going to just click on it, and now I have that very
perfect sphere that we need to start with working that we need to
start working with. Alright, so we are ready to actually start
shaping the head, but we're going to do that in the next lesson. So
I'll see you there.
5. Head part 2: Okay, so now we can actually
start shaping the head. First, we're going
to rename it so make sure that everything
is super organized. So this will be our head object. And now from here, we can
start shaping our forms. So we're going to go under
Edit mode by pressing Tab. Make sure to always do your topology modifications
on Edit mode. And here we're going to scale it down and just
kind of move it into position by pressing G and moving it up and just
scaling it up a little more. You know, we're
just trying to get that initial alignment with the design, with the reference. And I'm going to go
into the side and check that it's actually kind
of in a similar position. We're still not shaping, just aligning it to our reference. And from here, we
can actually start moving the vertices so that we can create the
shape that we need. Now, my best friend for shaping general forms is our wonderful tool that's
proportional editing. It is this button up here, or you can also just press O and you will be
activating proportional editing. The cool thing about
it is that even if we just select a single vertex, it is going to affect
a range around it. So that range is defined by that radius that
you see that you can increase or decrease the size by scrolling up
or down on your mouse. And that way, you can
manipulate, like, a big bunch of space and, like, the vertices that are around your selection and create
more organic shapes. This will make us avoid having very sharp angles
that are not too pretty. Actually, as you can see,
I'm only moving one side, and since this character
is symmetrical, I want to have
symmetry activated. So I'm going to right click to just kind of reset the position. And on your top right, you will see kind of like a butterfly icon and
then X YC next to it. We're going to
select the X option, which means that it will mirror whatever we
do on one side, is going to do the same
on the other side. And since our sphere
right now is symmetrical, it will not be a problem. So now with that in mind, I can actually start shaping it. As you can see, and it's
going to affect both sides. So let's start very simple shaping the border on
the front side and kind of make it match with the reference design and
just kind of, like, move it. Now, it might be too much
for certain positions, so we're just going to decrease the range and move it
to wherever we need. I'm going to decrease it
again and just to move it. We're not only needing to
shape it on our front view, but we also need to shape
it on our side view. We're going to also do that. I'm going to select
these vertice and just move it up and this
will move to the back. And just like that, we are shaping our head,
something like that. It doesn't have to be
completely accurate because we still have
very low topology, which is great for
creating general shapes. But when you want more detail, you definitely want
more topology. Right now, we're keeping
it simple for now, keeping the shape very basic. Now I also want to
move the front. Maybe I also want to move. I'm going to shift
select the vertex that's next to it and also
move that down. Same for this front. Just going to move
it maybe increase the proportional editing and then decrease it and
move it forward. Same for these guys. Going to try to get it as
close as possible for now. And let's do this again
here and here, shaping. But as you can see,
we still would need more polygons than this to
have a more accurate shape. So what we're going to do is
that we're going to actually create the modifier again,
the subdivision modifier. But this time we
won't be applying it. So I'm just going to search
for it and select it. And again, I want two
levels of subdivision. And as you can see,
it reduced volume, and that's because it's
creating more subdivisions, smoothing it out, so we need to reshape it again a little
bit with more accuracy. The good thing about
it, though is that we still have the same amount
of polygons to manipulate, but it's giving us
a smoother shape, and that's actually
exactly what we need, with a few vertices to
get the perfect shape. We just moving some of them. I'm just manipulating that. Now, you also want to make
sure that we're keeping it round because we don't want
any sharp angles anywhere. So I'm just going
to bring this down and let me bring
this down as well. You know, just kind of
getting into position. Great. So now I'm actually
going to see it from the top, and I want to keep it very, very, like, round in the back. So I will start
shaping it again. But this time, I actually want
to see what's underneath. So to do that, we're
also going to toggle the X ray by pressing Alt C, or you can go up here and
it's like the double squares. It's a suggle X ray. And if I select that
or just say Alt Z, we are going to be able
to see what's underneath. And I will be able to select all the vertices
that are maybe not visible from the
front because now I'm watching them from
the X ray view. So now I can also
start shaping that a little better so that
it's very round. Now let's go to the
side view and make sure that also the
volume looks right. So I'm going to select
those two and just start shaping shaping is key
in these early processes. With very few vertices, is the idea that you can get
the ideal shape with very few moving very few vertices. So I'm just going to maybe
move this a little too. You want to keep the
volume very precise. So I'm just going
to keep on shaping that select these two
shape those and just, you know, get a better better closer to the volume that
we want in our reference. So I'm just going to keep
moving some vertices here and there until we have a very
close shape of what we want. I'm actually going to bring
this down a little like that. As you can see, though, if I try moving these
vertices to the front, I won't get the
sharpness of the nose that it's showing here,
that angled nose. It's looking pretty
good overall, but I still want to have
that sharpness there. So what we need is to
add more topology. And to do so, we can press Control R to insert edge loops
in different face loops. So as you can see wherever
I place my mouse, it's going to add
that yellow line, which means this is where you would be creating
that new edge loop. In this case, I want
it on this face loop. So I'm going to
just click there, and once you click, you can drag it up or down depending on
where you need it. If you want it fully in the
middle, fully centered, you can just right
click and it will immediately snap to the
center of all of the faces. That's actually what
we need right now. So I just snapped
it to the center, and I'm going to
select these vertices, and I'm going to start sharpening that nose
a little bit more. Now, it's not super
sharp either, but I might select this
too and just bring them down to create a more
sharper nose over there. So it just takes some patience
to shape it in a nice way. I'm actually going to
move this as well so that the volumes are
pretty good overall. I'm going to bring this down, maybe move that vertex
down to the back a little. And these two, I'm going to move them to the front a little. You know, just start shaping. Now, it's also good to not only view everything from
the side and front view, but also we want to see how it's looking in the
perspective view. Maybe I'm noticing
that it's very, like it's not as round, so I might want to
shape that a little better by selecting
these vertices and just kind of like creating a rounder shape around the back. So it's good to
always check both, yes, the orthographic views, but also our perspective views to make sure that everything is looking pretty smooth and
not too sharp or anything. And that's only possible by checking your object
from different views, kind of, like, going around and seeing what's
working, whatnot. So we can also see it
let's see from here. Now, something that I'm noticing is that maybe these faces, this one right here is very big, and these ones are not, and it's because we added that edge loop. I like keeping everything
very, like, proportional. So maybe we can start moving
these vertices up a little and kind of like
doing an average of the position so that it's not
super sharp in that middle. In that middle section,
and we can have more evenly spaced
faces. That makes sense. So we can just drag it, keep shaping until we have something that
looks good for us. I'm just going to keep
shaping this a little, making sure to get those
cheeks. Okay, let's see. That looks pretty good. And let's check it
from the front. I'm going to toggle
X ray to compare. Can be a little hard
with the opacity. But you can kind of see
that we're pretty close. Maybe this might be a little
too much for the cheek, so I'm just going to bring it in and do the same
here and just, you know, you get an idea of what you should be
moving and whatnot. Now, I can get pretty
detailed here, but I don't want to make
this video too long. So just keep in mind and
always checking the volume, making sure and you can keep, shaping it on your own, kind of getting an idea of how it looks at the
bottom as well. You just make sure that everything looks
very round and nice. And then you can go out of Edit mode back to object
mode by pressing Tab again, and to make it look smoother, we can just right click and say, shade smooth so
that we don't have our faces showing,
and it's ready. We have our head
perfectly shaped. You can obviously
move more vertices to make it perfectly
round and soft, but I think it looks
pretty good for now. So now that we have
our head ready, we can start working on
other parts of the body. I'll see you in the next lesson.
6. Torso: All right, now that we
have the head ready, we're going to continue
with the torso of the bear. To do that, we're going to do exactly the same process
as we did with the head. We're going to start with a cube and convert
it into a sphere. It's the same exact process since it's a very round shape, it's going to be pretty similar. So we're going to start
by adding a new cube, and I'm going to
scale this down in edit mode and bring it down, put it in position, and then I'm going to rename it. Well, actually, first, yeah, let's rename this to torso. And something that I
like to do when having multiple objects in my scene is that I don't like to
keep the same material. Both of them currently
have the gray color, and I like knowing all the
different objects that I have, which ones are
separated and whatnot. And there's a very
fun way to see or visualize the
different objects. And it's like up here where
you see the four spheres. The one that's
selected right now is basically just saying that
we have our solid mode on. The first one is iframe. Third one is the material, which we don't have
any at the moment. And then the last
one is the render, which it can get pretty slow. We're going to stick
to the solid mode. But then there's an arrow
next to the spheres, and here we can change how we're viewing our objects
in the viewport, there's one really cool
option that's under color. You can change it to random. And what this would
do is that it will assign a random color for each different object in your scene. I'm going
to click on that. As you can see, mine have
converted into purple and pink. Now it might be
different for you. Maybe not, maybe it
has different colors. But basically, now I know that I have two different objects, two different
measures on my scene, and I like working, that's why I can differentiate them better. Now with this in mind, we're going to continue
with the process. So just like we
did with the head, we're going to add a
subdivision modifier, which is right at the top. We're going to increase
the subdivisions to two. And then from here, we are going to shape it
a little further. Just make sure that
it's the right size, we're going to go
into the right view. Maybe we can scale it in
the Y position a little. Just a little bit and
then move it to the back. We need to shape this
a little better, but we have an idea
of where things are. We're going to apply
that subdivision, that initial subdivision, and now we have more
vertices to work with. Now we can actually start
shaping our things. I'm going to start on
the side view this time. And I'm going to make sure
that our symmetry is selected. Right now it's not because
it's a new object. So going to make sure that
that one is selected because we're still working in the
front view symmetrically. So just make sure you
have that activated. And then from here, we can
start shaping the body. It's actually going to
start on the side view, just selecting and moving
our vertices around. So just make sure
that you need to have a higher range for your
proportional editing, can do so. Now it's hard to
see with the head. So you can either just
toggle the X ray mode, which I really like
doing to bring it up. It doesn't matter if it
crosses with the head. That's completely
fine. Because they are two separate objects, so it doesn't
really matter much. Now we're going to
move these up here, you know, keep shaping
them accordingly. Let's see if we can move
the belly in position. Actually going to select these three now and just move them up. Let's do the same for this
and the back as well. Again, just shaping
general forms until we get what we like. Just shaping shaping and remember that we are
also going to add the subdivision surface again
to have a smoother shape. So we might need to increase
the volume of this, but first let's just add
that modifier again. This time we won't
be applying it. Let's just do it twice. That is very smooth. And then we have an idea of
how much we need to move. Move our vertices. I'm just going to
move this down. Again, I really like
toggling on and off the X ray view to know
where I'm doing my things. So let's just keep
shaping it until we get it pretty accurate to our design, something like that. Seems good. Now let's
go into the side view, and let's keep shaping that. So, let's just do
that to the front. This one's over here. Let's see a little more,
a little more shaping. This might look a little weird. It is because of how
low it is on the front. If you see at the right, it is actually being
covered by the leg. I do feel though, it might be a
little way too low. So we can just strick it and not follow exactly our design. Sometimes you got to do that. If it's looking
weird in three D, then you just make
your own decisions, and maybe you're
not following super strictly the the design. So it's really, you have to be kind of mindful of
what looks good and what doesn't to make sure that our design
looks pretty good. So let's just keep shaping that. And then, again, as I mentioned, it's always good to
look at your thing on a on the perspective view, just because you cannot just
follow your orthographics, and then you have very weird angles and you
don't want that. So now what I'm going to do
is I'm actually going to hide the total the
visibility of the head. So you can do it either by clicking that I on the outliner, or you can just press H to hide. Um, and then I'm
going to look at it from the top view. It
looks pretty good. Now, I didn't do the convert to sphere for this object.
You can do it or not. It's really not as important here because as you
can see the design, the corners would be covered by the head
and the legs anyways. So it's not super relevant, but you can always do
it anyways, up to you. Let's just make sure
that it is round. It looks like a sphere,
it looks great. Yeah, I like how
this is looking. Now let's just look from the
sides, just turn around. Maybe this is looking
a little weird. So I'm just going to make
sure that the back side is a little rounder and
that we get a nice. Again, we can always trick and change the design a
little bit so that it looks nicer in three D. I'm going to push these
two to the back a little with smaller proportional editing,
something like that. Same with this. Let's
see this one too. You want a nice belly
in there. Nice. Once we are ready
with the shaping, we can bring the
head back and again, go back to object mode and just say shade smooth so that
it's perfectly smooth. That's it. That's the torso, very simple torso for our bayer. I'll see you in the next lesson.
7. Legs: In this lesson, we will
be working with the legs. So to do them, we are
going to start very similarly as we did with
the body and the head. But this is going
to be a little bit different just because
we have two of them. So instead of having a
single object in the middle, we're going to have two
different objects side to side. So to do so, first, we're going to add a
new cube as always. I'm going to rename
it. Just as legs. Usually, when you rename mesh, you can change colors when you have the random
option activated. So don't worry about
that. But then here, it's very important that we keep the pivot of our object in
the center of the grid. What I mean by that is
when you see this object, you will see there's this orange.in the center
of the object. That is our pivot. So if I move it around, if I move my object
around in object mode, you will see that the pivot changes. It's going
to come with it. It's going to stay in the
middle of our object. But we don't want that. We
want to keep it in the center. So in order to keep it there, we are going to move and grab and just align our
object in edit mode. It is very important
that you do so. You can scale it here and then just move it and drag
it where you need it. Now, another thing I will say
is that you can drag it in object mode as long as
you keep the orange.in the center of the grid
looking it side to side. So what I mean by
that is that if I drag this down, I'm
in object mode. I press C, I'm going to only drag it in the Z axis
so I can bring it down, and that's also going
to be okay because my pivot is remaining in
the center of the grid. Doesn't have to be the
center of the world, it has to be the center of
the grid from the front view. So then from here, we can go into edit mode, scale it down, and just move it, and you can see that the pivot remains in the
center of the grid, which is exactly what
we need to be able to duplicate this object and
mirror it to the other side. So first, we're going to
scale this down and just kind of very quickly do a
little bit of shaping. So I'm just going
to move this here, maybe move it up. Remember that we're
going to be also adding subdivisions to this, so we might need it to be a little thicker
than the actual leg. You're just going to keep
it like that for now. And now we're going to
apply both modifiers. So first, we're
going to start with the subdivision
modifier as always. We're just going to
have that for now and increase the levels
for two as usual. But we're also going to
add the modifier called mirror and that's going to duplicate my object and
flip it to the other side. As long as the pivot
remains in the center, it's going to work
perfect for us. If I were to have the
pivot somewhere else, the mirror is going to happen wherever that pivot point is. So that's very important
to always keep it centered when you're doing the mirror the mirror
axis, the mirror modifier. It's not important
to keep the symmetry on because as long as we have the mirror modifier activated, we won't really need
to have symmetry on. Then here, we're going to
just shape it a little extra. Just do some of
that shaping work. I'm just going to move it. Then as you can see here, it's hard to reach that leg up to where it connects
with the body. So we could just apply the subdivision
and move the vertices, but I always prefer working
with less vertices when creating the basic
overall shape. So to be able to fill that gap, we can actually create and add a new edge loop and we're
going to just click on it, and then we're going
to bring it up. So when I create more
topology and more geometry, that's going to
sharpen our objects, especially when we have
the subdivision on. So I'm just going to drag it up, and as you can see, that's filling in the gap and
making it sharper. So then I can go back
and just shape it a little more with
that in mind now. So I can just make sure
that it looks pretty good. Now I'm going to go
into the side view. Going to shape it a little more. Making sure that everything looks good from
the side as well. So let's just make sure
that it all looks good. I always stuggle back and
forth with the X ray mode. Okay, this is pretty
good for now. Let's see from the front, make sure that maybe
that's too much. So we're just going
to change that. But now I feel like
we do need to apply that subdivision modifier to
shape it a little better. So let's go ahead and do that. With object mode, let's
just apply the subdivision, and now we can modify
those vertices again, shape them a little more to make them look closer
to the reference. Let's see from the side. Now I can move this back. But before I keep on
working with this, I'm actually going to
apply the subdivision or not apply at the
subdivision modifier again. Again, twice with with
two subdivision levels. And the idea is that now we
might have a reduced volume, so now we can more accurately
work on the shape. But as you can see, I can only manipulate the
vertices on one side. What if I also want to
manipulate it on the other side? Well, there is an option
on a mirror modifier. Which is a triangle
that's facing down. If we click on it,
then we will be able to modify from both sides. No matter where I click, if I click on the left or
I click on the right, I will be able to modify
it on either side, which is very helpful
to have it activated. And then from here,
we're just going to keep shaping
it a little more. Making sure that it
all looks very good. And then from the sides. I actually want this
to be more of an arch, so we can move some
of those vertices, just a little more to have them to have more
of an arch shape. So let's just select
some of these and, you know, start adding
more of that arch shape on the leg and then just
keep shaping the rest of it. Maybe this part I will bring down a little extra you know, just kind of shape it
until it looks very nice. And then, as always, you remember to not only make sure that it looks good
on the front and the side, but also on our three review. If I spin around and you see something
looking kind of weird, this is the time to modify it. So we can always actually
going to disable proportional editing
and just move that verdict to
make it more round, you know, just different
things here and there to make it look more
accurate to our design. Cool. So there's something here that I actually
don't like too much, so let's make it more round. Just like that. Great.
Now, one last thing that I want to mention
is that as you can see, the legs are kind of like
facing upwards a little bit, and that's going to become
very important when we create our feet so that we can have a smoother transition
from the leg to the feet. So what we are going to
do now is that we're going to select all of our
vertices in edit mode. This is very important. It
has to be in edit mode. And then from there
in edit mode, we are going to rotate it in the Z axis so that
it faces outward, just a little bit,
something like that. And then with that in mind, now we're going
to shape a little more to make it
match our reference. So let's just work on that. Now this is going to
become a little harder to select to know which
vertices to select. But since we're using
proportional editing, the bigger you use it, the better because you're moving all vertices
proportionally. And when we worked on
it facing to the front, we knew that the
shape was very good. So now it's just
selecting a few vertices and making sure that it follows the reference
pretty good. So let's just do that
for a little longer. Until we have a nice shape. So I think this is
looking pretty good. Now, as you can see the
arch changed a little bit. So let's just work on that
a little more to make sure that everything
looks accurate. We're going to do this move
it so that the arch is good. Maybe this is a little extreme. As you can see the vertex is like all the way up
there. That's not good. So we're going to
make our best to make sure that it stays pretty average to the other
faces as well. So it's just a lot of
going back and forth, seeing what works
and what doesn't. And let's see it
again until we reach that arch shape nicely
again, something like that. I think that's pretty good. And let's just move it here. Just some more shaping.
That looks great. So now let's it from the front and that
looks pretty good. So then we just go
back to object mode, shade smooth to make it look
very nice, and that's it. That's our legs. I'll see
you in the next lesson.
8. Arms: Okay, so now we will continue
by working with the arms. To do the arms is going to be similar to how
we did the legs, but we're going to need
to add a few extra steps. First, as always, we're going to start with a cube, so
I'm going to add that. And instead of working
everything in edit mode, I'm actually going to work
this time in object mode, and I'm going to do all
my transformations there. So first, I'm going
to scale it down. I'm actually going to move it
to position in object mode. I know I said that this
could affect our mirror, which we will be king in the end because our
pivot is moved as well. But I'm going to show
you different ways that we can make it work so that we can do
the mirroring normally. So now that we've moved it, I'm actually going to
scale it down more. But now here I'm actually
going to rotate it. I'm going to just
press R and rotate it so that it aligns with
the angle of the arm. Now here I'm actually going to scale it down a little more, place it kind of in the middle. And now here, now you
might be wondering, Okay, I need to scale it so
that it's longer, right? Now, if I try to do it now, I'm going to scale
it in the X axis, which is what I would need. You will see that
it's going to scale very weird and we don't want it. We only want it to be longer, but we don't want
it to be bigger. So what we need to know
what we need to do now, is that we need to scale it, aligning the transformation
to the object. As you can see now, we don't have gizmus
in the scene. We can bring them up. So
we're needing to scale it. So I'm going to go into my
left side of the viewpoard and I'm going to
select the scale tool so that I can actually
see what's happening. And you can see here that the axes are aligning with
the world, with my viewpoint. And now we don't want it. We don't want to
scale it like that. We want it to be scaled
aligned with the object. Since we rotated it, we can change the Gizmo to
be aligned with that object. And to do so, we can go up
here to where says Global. And there's a drop down menu
that we're going to click on and you will see
that it says local. That's the option that we
need. There are others. I'm not going to go
to dip into those. The option that we need
to select now local, and that's going to
change how the Gizmo is aligned to that object,
particular object. Now here, we can actually
scale it in the X axis, and it's going to
elongate how we want it in the object X axis, not the world X axis. That's very important to know. I'm going to scale it
somehow like that, I can go back and
select the move tool, and I can drag it. So there we go. And
now, as always, we're going to add our
subdivision surface model fire so we can see how
this will look. Now here, I'm going to
go now into Edit mode, and I want to add a loop cut right in the middle because that's more or less
where my elbow will be. And I also want to add
another loop cut that's kind of close to the shoulder because we want it
to be less round. So those are the two things
we're going to be adding, and now we can shape it
here before we apply the subdivision for
two different reasons. So let's go into Xray mode and we can select those
and just kind of try shaping them can
be a little hard, but let's just try our best to make it closer
to our reference. So let's just do that.
And then with the elbow, it's going to be
important. Bring it down. And then somewhere here. Let's do that. Okay,
that seems good enough. It's now that we have that we can look at the side
and see how that's aligning. As you can see, it's not
really aligning much, and that's because the reference is having the arm to the back. We can align it to
that reference. And I think the
easiest way to do it is by going on our top view. And here I want to rotate it. So I'm actually going
to bring my rotation Gizmo by selecting
it on the left, and I'm going to rotate it so that the int is
farther to the back. And now let's see
it from the side, and I'm going to move it, rotate it a little more
so that it aligns better. But as you can see, it's not very close to where
the arm actually is. The ankle is pretty close,
but the location is not. So now I'm going to
select my moving Gizmo. I'm not going to use this because that would be
bringing it more inside. Remember that this is rotated, so that's not exactly
what we need. We actually want to move it
back in the global axis, how we had it before, so that it's aligned
to the viewpoard. Now here I can actually
drag it to the back. Cool. Now that we have that, let's go back. That's better. And now here we can
apply our subdivision. So I'm going to apply that, and now we can shape it
a little better. So I'm going to select
those vertices, make sure that I have
proportional editing on, and I'm going to try to align it better loops
to our reference. So this loop code is more or
less going to be our elbow. I'm going to try to shape it. And let's go back, see
how that's looking. That's looking pretty good.
Let's see, like that. And now this we can
move them like that. Actually slit all these and
just that's pretty close. Let's see these over here. We can make them
closer to the wrist. Cool. That's good enough. And now on the side
view, let's see. That's not aligning too well, so let's align it
a little better. Again, I'm going to do
proportional editing, so it's closer to our
reference. So let's do that. Shaping as much as we can. There we go. That's pretty good. Let's just try moving this in. Okay, that seems to be
good. Now, let's see it. That's good enough
for the amount of topology that we have now. Now let's add another
subdivision surface modifier. See now we need to do some more shaping that
always happens. I'm going to increase
it to two this time. And from here, let's
do some more shaping. It's all about the shaping. Maybe we should have had that
before shaping it as much, but, you know, you can
always go back and shape. Whoops. I don't want to hide it. I just want to grab it.
Okay. So let's move it down. Do something like that. More aligned to a reference. Okay, our wrist is going
to be a little funny. Okay, there we go.
And then these ones I'm going to actually bring in. And then I'm going
to select all of them and bring them closer. Alright, that seems pretty good. Now, on the side, I actually want to make it a little nicer here on like the curve that's
happening there. It's kind of weird.
So I'm actually gonna help shape that
a little better. It's a little hard to know, but you just move it like
that. That seems pretty good. Okay. So one last thing that we can do is we're
actually going to select going to
change the mode from vertex to edges up here
on the left top corner. I'm going to click Alt click
to select the whole loop. And actually, even
though in a reference, we don't see it as much, I want to bend it a little. So what I'm going to do is I'm going to move it with
proportional editing, bend it a little to the back. That's where our elbow is. And then at the front, I'm actually going to
move it up a little. So it's bending a little better. And then we can just shape a
little extra. There we go. I think that's pretty
good. Pretty good overall. Great. So now that
we have our arm, we need to duplicate
it and mirror. So the way that I taught you before was just adding
the mirror modifier. But as you can see now, it's actually not working. It did create a new version, but it's on top of the same one, and that's because
we moved our mirror. Now, sorry, we moved our
pivot and that's not going to work for our mirror our pivot needs to stay in the center. So what we can do
now, as you can see, in the middle of our world,
the middle of the grid, we have this icon that's like, you know, the circle
with some lines. That's called the cursor. And the cursor is a
very useful tool. We're not going to get
too much deep in it, but basically we want to align
our pivot to that cursor. If you don't have the
cursor in the middle, there's a way to change it. If you want to move it, if you
just do Shift click Shift, right click on your world, you are going to be able to
move it wherever you want to. And maybe you did
that by mistake and your cursor is not in the
middle of your world. So to align it first, we are going to hit shifts, and that's going to
bring this menu. The option that I
want you to select is cursor to world origin. That's going to snap your cursor into the
center of the world. So I'm going to select that and that's going
to bring it back. And now with our
objects selected, we are going to go at the top, there's this option
called Object. We're going to select that, and now we are going
to select set origin, and we're going to
bring the origin to the three D cursor. That means that
it's going to snap our pivot to that
center of the world, which is what we need to
now at the mirror modifier. Oh, and what happened? Now it is mirror
to the other side, but it's way up. That's
not what we need. The reason why it's because
our object is also rotated, and it's accounting for that rotation because
it's mirroring locally. We don't want that, so I'm going to get rid of that mirror. And now what we need to do is
apply our transformations. This is very
important. To do so, we're going to go
under object, apply. You can also do so
by saying option A. And now we're going
to hit rotation. That's the transformation
that we need to basically apply and freeze so that it has no
rotation at all. So once we click that and
now I add modifier again, now it's where it's
supposed to be. I know it's a few
more extra steps. If you don't want to
do that and just do everything in edit mode,
that's completely fine. But this is another way that you can mirror your objects even if your pivot is
not fully centered. Now from here, I'm just
going to go Object mode, right click Shade Smooth, and we have our arms. Remember to rename it. That's very important.
Oops, arms. And there we have them. So we have our arms ready. Make sure to keep
saving your work. Don't forget to do that, and I'll see you in
the next lesson.
9. Ears: So now that we have the
arms and legs ready, we're actually not
going to continue with the hens or feet just yet. Instead, we are going to
be working on the ears. So to work on the ears, we as always, are going
to start with a cube. So let's add that to our scene. We're going to bring it up
and scale it down some. Oh. Now, we're actually going to go into edit mode,
and from here, we are going to
move it so that we keep the pivot in the center. And now from here, we're going
to scale it a little more, and now we are going to
rotate it so that one of the faces is actually
attaching to the head. So we are going to rotate it, something like that, going
to make it a little bigger. Then I'm going to go
into the side view, and I'm going to make sure
that it's more center, and I'm going to also
scale it in the Y axis. Now, I'm not going
to go entirely down to where the reference
is just because we are going to be adding
a subdivision modifier. So let's actually do that now. I'm going to add a modifier
subdivision surface, and now you see that we have
more of a spherical shape. So one thing that you might
notice with the reference, and I'm actually
going to move over here is that the front is fairly flat
compared to the back. And so if you check
our object currently, and I'm actually
going to increase the subdivisions
just for you to see. It's very round in both sides. We don't want that. We
only wanted rounder on the back in the
front, we want it flat. So there's a cool
method that we can use to make this sharper. But first, let's actually
shape this a little more. I'm just going to go
and move some vertices. It doesn't have to
be perfect yet, but you get an idea of
the shape of the ear. I'm just going to do
something like that. And then on the sides, I think it's pretty
good on the side, and I'm going to show you how we can make the front sharper. So to do that, we are
actually going to select. Instead of using vertices, we're going to select edges. So make sure to select
the edge option. And now from here, we're going to select the
edges that are at the front. Just the edges that
are at the front, and you will see
the face getting highlighted. And
that's why we need. So now, there is this tool
that is actually super useful and it's a great thing to use when you
need sharper edges, which is called the Kris tool. You will find it up here in this menu when
you're in edge mode. That's very important
that you have selected the edges, and
you're in edit mode. And so you're going
to go under Edge and then there's this option
called Edge Cris. You can also access
it by pressing Shift E. So let's
just select that. And now nothing happens, but you need to start
dragging your mouse. So I'm going to start
dragging my mouse. I'm dragging it up so that it starts getting
some influence. And as you can
see, it is getting sharper at the top,
at the front, sorry. Now I click once
I'm happy with it, but if for whatever
reason you clicked before and you're not too
happy with the result, you will see immediately
after you click, there is this menu
at the bottom called Edge res and we're
just going to open it. And here you can
change that factor. So if you want to
make it completely one or you don't
want it as much, this is where you're going
to be able to change it. So I'm going to
bring it to where I had it somewhere around here. And now we have that front
that's way sharper and the back still remains
soft and very round. So now that we're here, I will actually
apply my modefier with just one level
of subdivision. So I'm going to apply
it, and now you will see that I have
all the topology. I have these phases
selected now. I'm actually going to go
under the select mode face. And now, even though
we might be kind of ready for the shape of the ear, the reference doesn't
have much more. I do want to have kind
of like a hole in the middle to make it look like it has some depth,
like a normal ear would. So what we're going
to do is that with these four phases selected, we're going to press
I to make an inset. So with eye and dragging, I can make an inset. I'm going to do it somewhere. Maybe there. I don't want
to make it too thick. So let's just keep it there. Once I'm happy with
it, I just click. And now I'm still with
those faces selected, I'm going to extrude back
so that I create the whole. And here I'm actually
going to scale it down without proportional
editing because I just want to scale those
faces that I have selected. Cool. So now we have this base shape of what
the ear would look like, but it's still very blocky, so now we're going to add another subdivision
surface modifier and this time with two
levels of subdivision. Now here we can actually
go back and shape with the vertices shape
that ear a little better. So I'm just going to
move it like that. Move this to the side, and just try to get it as close as possible to the reference. Here we go. A few more, and something like that, that would be very
close to our reference. Yeah, that looks pretty cool. Now, one thing that I
do not like currently, is that this edge came with the same creas
that I had on the border. And you can notice that
because the line in Eme looks like thicker,
looks more dark. So you can tell that it
has some creas in it. And actually, we can't
see it currently, but if I activate this option on the
subdivision modifier, the triangle facing down. You will see that now
that kind of makes the topology attached to the actual subdivision
that we're looking at, so that we can see
all of the edges. And now you can see that those
edges are also very black, meaning that they
have a crease on. So I want to modify the
factor of those crises. So I'm going to go back
to selecting edges. I'm going to select by
clicking with ATClick. I'm going to be able to
select the whole order. I'm going to press
Shift E for decreases, and I'm going to reduce it. So I'm going to move
it down to the left. I think you just have
to move it some. Now, if you're not too sure
how much influence it has, you will always get that
menu when you click. And here actually, since
we're removing some crease, it's actually going to
go in the negative side. Negative, with a negative value. And here you can see how much you want it
to be influencing. So I want it a little
but not as much. So something like that. And then for the ones
that are inside, I'm going to select all of them, and I actually want none, no res whatsoever here. So I'm just going
to press Shift E again and completely reduce it so that it's no
longer there. Cool. Now I have the ear. Now we can shape
it a little more. I feel like maybe the side, now we can compare
it to the reference. And there are some things
that we can work on for sure. So let's actually select some of those vertices and
move them back. So I'm going to select
everything, move it back. As you can see, this crease
might be too strong. But first, I'm going to
make sure to select this, maybe move it back a little to have more of that
shape at the end. And let's see what
we can do about it. So I'm going to maybe
remove Let's see. Yeah, let's do
again some Shift E and reduce that
amount of the crease. Let's see it from the side. Yeah, I think that works a
little better. Let's see. Something like that, and
I'm just going to grab everything and move it back. It's not going to be perfect, but something that's
close to the reference. Okay, let's see how
this is looking. I think it looks pretty nice. The reference is
not perfect either, but you can get an idea of
how everything is looking by just going around the
object and seeing it in three D. I really
like how this looks. One last thing I would
like to do is just maybe push these
vertex to the back, like the single one
that's in the middle. I'm going to push it a little just to make it even rounder. But I think overall,
this looks pretty neat. So now we're just
going to go into object mode, shade smooth, and we can now apply
a mirror modifier, and we should have our
ear on the other side. Cool. We've got the ears. Now, maybe I want to increase
the thickness actually. Let's just select this loop and I'm going to scale it down, and that would allow
me to have a smaller. You can always shape it as well if you want it a little rounder. I think that might
be a good idea. Something like
that. Okay, great. I like that a lot. So let's keep it like
that. We have the ears. Don't forget to rename it. Ears. There we go. So ears are done. So I'll see you in
the next lesson.
10. Feet: In this video, we are going to start working with the feet. So to do the feet, we are
going to start with a cube, and we're going to drag it down close to where
the feet are. You're going to scale it down. And now in edit mode, I'm going to move
it to the side. Great. So now here, let's actually locate
it a little better. I'm going to go
into the side view. And yeah, I think
this is a good spot. I maybe I'm going to move it to the back a little bit
because with this cube, I'm not really accounting
for the toes just yet. We will be adding those later. So I think this is just going to be the base
of our food for now. And so now we need to
add some loop cuts. Let's start by adding it looked at where the toes
are going to stick out, kind of like where
the base of them are. Now, this reference is not too good because it has a little bit of
perspective with the toes. The toes should be
relatively very aligned. So that's where I'm just
going to bring them out from a single line. And this is going
to be where my toes are. This is a good size. And now I'm going to
add a new loop cut close to the top just to give
it some sharpness there. We can also change that and
just add some Cris weights. But remember that another way of sharpening an object is by
adding more geometry to it. So the closer it is, the sharper
the edge is going to be. So now that we have that, let's go and add new loop
cuts in the front view. I'm going to actually
get rid of this, and I'm going to add
not just one loop code, but I'm actually
going to add two because we need to split it in three parts because we're
going to have three toes. So with Control R, instead of clicking right away, you're going to scroll up once so that you
add one loop code. Now you're going
to click, and then you're going to
right click so that we center it and it's completely even for
the three squares. It's evenly spaced.
Great. So now from here, let's select the three phases that are where my toes
are going to come out. So instead of just
pressing E and extruding, we actually need to do it a little differently because
if I just do that, they're going to
extrude together as a block, and we
don't want that. We want to separate them. So to do that, we
are going to go under phase in our menu phase. And then instead of
selecting extrude phases, we're going to go with
extrude individual phases. And that will allow
us to separate them. So I'm going to go
somewhere somewhere there. This is very blocky,
but that's enough. That's what we're
going to be needing. So as you can see
now, it looks as if they're together, but
they actually are not. If we go and add a subdivision surface modifier to see how this is looking, you will notice that
they're actually separated and they're not
just a complete block. So this is basically
what we want to do. Now on the front view, I'm going to separate
them a little extra. So I'm just going to grab this one and move
it to the left, grab the other one and
move it to the right. And now I do want
to scale them in the X axis because I want them to touch each
other at the base. So let's just select
this one and scale in X. And also, I want to
make them like rounder. So let's just do that
for all of them. And as you can see,
now they're touching a little more at the base, and that's what
we're looking for. Great. Now we are going to rotate those ones so that they're looking
sideways a little more. So let's just select that
rotate in the C axis, and I'm going to rotate
them a little bit. I do the same with
the other one, rotate in the C axis
to the other side. And now for this
one, I actually want to bring it forward,
a little more. G, and Y, bring it forward, and maybe skill it up a little because that toe tends to be bigger and I'm
going to bring it up. Cool. That looks
pretty good to me. And another thing we need to
do now is that we need to shape the heel a little better because it's
not as flat at the bottom. So let's se like these vertices that
are right at the heel, and now I'm going to move them to get it more similar to a reference,
something like that. Cool. So this is a very
basic basic food, but it's going to
help us to make it better with adding
more subdivision. For now, we can just apply the subdivision
at a single level. So let's just apply it, and now we have the
topology with us. Cool. So now I
actually want to make the toes a little more pointy, so I'm going to bring them
forward just a tiny bit. And I'm going to add a modifier. With two subdivision levels, and that's looking pretty nice way smoother
than what we had. And yeah, it's
looking pretty good. Now maybe for the toes, we might want to make
them wider at the middle. So what we can do is
add more loop cuts. I'm going to show with this one, I'm going to add a new loop cut like that. Let's see it again. That way I'm
sharpening the base, and I'm going to bring
it kind of close to it. And now with this one,
I'm actually going to select the edges with alt. So I select the whole loop
and I'm going to scale it so that they're
a little chubbier, and I'm actually
going to bring it. Oops. In the C axis, I'm
going to bring it up. I should be doing this in
the orthographic view. Yeah, that's looking
pretty good. And we're going to repeat the
process for the other two. So let's add a loop cut
to the one in the middle. Select the other loop cut, and we're just going
to make it bigger, and we're going to bring it now the other toe at the loop
cut somewhere at the base, select the other one,
scale it and bring it up. Yeah, now they're a
little more round. Now you can always make
them touch a little more within each other like selecting this edge right here. We can actually move it and
the other one so they're overlapping and we should
do the same Oops, I can. It's kind of hard to select it. So let's actually add our on cage option so that I'm
able to select it better. I'm gonna move it,
and I'm going to select the other one
and move it as well. So they're touching, and
that seems better to me. Great. So one last
thing we need to do is that remember how we tilted our legs so they were
looking out a little bit. We want to do the
same thing with our toes and the feet overall. So we're going to in
edit mode, with A, we're going to select
the whole thing and we're going to rotate it in the C axis so that
they're facing outwards, and now we're going to
just move it so that it's more accurate with the leg. And now we need to shape
it a little so that the connection with the
leg feels more natural. So let's actually select the vertices and just start shaping that with
proportional editing on. So I'm going to just move
this in, actually. Let's see. Maybe I'm going to
select that vertex in the middle and with some proportional editing,
just bring it back. And then these ones I'm
actually going to bring in something like that. Yeah, I think
that's pretty good. And then we're going
to do the same process for the sides. Just kind of shape it more
naturally with the leg. And then here at the front,
let's see what we want to do. Yeah, we probably want to
also select the middle point and just bring it forward so that it's coming more
natural from the leg. And then we can always make it seem a
little more natural. A lot of detail. We
can just select all of these and scale them
kind of like that. And yeah, we might want to do
the same with all of these. I want to scale them a little. So it's a little more
rounds at the bottom. Yeah. I think that
looks pretty good. Let's see from the sides. Maybe I do want to make
this a little less sharp. As you can see here,
it is pretty squared. So we can actually, there's a pretty good method that you just select the edges. So let's say we select these edges and we
can slide them so that they don't
change the shape, the overall shape of the object, but we're just sliding them. So we're just going
to press Control E to get our edge menu. And then we're just
going to say edge slide, and then we're going
to move it forward. And we're going to
repeat that process. Select all of these. Control E, edge slide. So that they're
not super squared. Let's do the same thing here. Oops, not that Control
E. Edge slide, and the same for this. So let's like those edge slide, and that makes it
a little rounder. Yeah, I like that much better. Cool. So the food
is basically done. We can just shade
smooth and let's add our mirror modifier so that we have the
other food as well. Now, here you can always go and maybe rotate it
a little bit extra. Make that and then move it
a little more. There we go. We've got some toes. Now, I also would like
to shape the legs a little just because if you
look at the reference, they would come much lower. So we can do that, maybe select these
edges and bring them forward with a little bit
more proportional editing, something like that,
and then yeah. So that we get more
of that curve. And let's actually see here
how we can also for the food. I'm selecting those, and I'm going to bring
them in a little. Cool. Actually. Yeah, now let's
leave it like that. Okay. That seems better. We can always change
these vertices, bring them down without
proportional editing this time, and just shape it more. This one as well. So
they're not as high up. And instead, they're
a little closer and flattened to what they
are supposed to be. We can just shape a little more. Okay, I think we're done. So always remember to rename. They're going to be the
feet. And there you have it. All right. In the next video, we will be working on
the hands. See you then.
11. Hands: In this lesson, we are going
to work with the hens. So to do the hens, we are going to do similarly
to how we did the arms, where we're going to add
a cube. So let's do that. And I'm going to scale it down and I'm actually
going to move it to the side on optic mode,
not on edit mode. And here, actually we
could place it down here. I actually want to just
keep it to the side, and I'm going to not follow the reference too well
just because making hands, it's a more tedious process and we want to make
sure that everything aligns pretty good and then we're going
to do the rotation so that the hind aligns
with that reference. So we're just going to
work on the side for now. And the first thing is
that we're going to make this more flat on the axis. We're going to start with
the base of the hind, so we can kind of see
compared to the reference, if this is a good size, I think something
like that could work. Maybe something like this. Cool. So we've got a flat cube. And now we are going
to add some loop cuts. So let's go into Edit mode, and we are going to make. First, let's go to the side, and we're going to
create two loop cuts. Remember to do Control R and
scroll up to create two. These are going to be
our three fingers. So if I just right click, it's going to stick
right to the middle. Let's go to the front view, and we're actually going to do a similar process of
dividing in three. But this time I'm not
going to be using the double loop cut because I want to change the
position of each one. I start with one, and I'm going to bring
it kind of close to the to the base. So
somewhere there. And then let's do the
same one over here. And the reason why I want
that is because I want to do this for the thumb. I actually think that
might be too much. So let's try again
somewhere there. This is going to be
the base for my thumb. Cool. So now we have some divisions. It's
looking pretty good. And now we can add our
thumb and fingers. So to do so, we are going
to go into Edit mode, select the face mode. And now here we can
do our extrusion. So for the thumb, I'm just
going to select that pace, press E, and extrude out. We can always change
that because we don't know exactly
the size of it. And before we extrude
our other fingers, I actually want to
select the middle face, and I want to push it a little to I'm actually going to
go into the top view. I want to bring it forward. So I'm going to press GX, and I want to do a tiny
curve, not too much. It's just a slide push forward so that I get
this kind of nice curve. And from there, we can
select the three faces. Go to phase, extrude
individual faces. You can also bring this
menu by pressing Control F, and you will have
it closer to you. Say, extrude individual faces, and we're going to extrude them forward.
Something like that. Now, let's add a subdivision
surface modifier to see how this is looking. And this is the
start of our hand. It looks very funny right now, but we need to make sure to change the proportions
of everything. So we can actually push
them a little more. Since they are not
all facing forward, we can change our Gizmo
to be instead of local, we're going to use
the normal option, and that would allow
us to push it. However, that face is
kind of facing towards. So now if I move it, it's not going to move it on the like this would not move
directly with the grid, but it would move individually, and we can do the same
for each one of them. So let's do that,
something like that. Cool. Move them
forward. A little more. This would be the
biggest finger. Cool. So now let's focus
on the thumb a little bit. The thumb, it's not
sticking fully to the side. So I actually would
like to rotate this. So I'm going to press R and because we want
to Woops sorry, R and Y because we
have the normal gizmo, and we're just going
to push it like that, and we want to make kind of facing to the
side a little bit. Something like that could
work. And now let's focus on shaping it
a little more round. And for this one, I
actually want to create a loop cut that sticks close
to the base of the thumb. Okay, that works for now. We could actually select that
and also select the shifts, we're going to
select these edges. Oops, and I actually want
to make them smaller. 'cause the thumb was kind of thick and we don't want that. So this would allow us to
make it a little better. And now I actually want
to bring them down. Cool. That seems good
enough for our thumb. It might be too long because
we have the panda has, like, chubby hints, so you might want to shorten
that a little bit. Right. Now let's
focus on the fingers. So we want to scale them. I'm going to go back to
the global position, so the axes are more aligned to what
we've been working with. So I'm going to
scale them down in the Z axis to make them rounder. A little more. And
actually for fingers, I feel like the
base is too long. So I'm going to select the
loop cuts that are like the loops that are around
the base of the fingers. So let's do that. And we're going to push
them to the back a little. Yeah, that seems good to me. And we might want to push
the fingers as well. So let's do one by one with
local, the normal Gizmo. Let's see W one. I'm going to push
them in. So that they are a little
chubbier. There we go. And now we are going to increase the amount of
flip cuts on each finger. I'm going to increase that
to two so that it is a little more sharp and I'm just going to keep
them in the middle. Let's do the same thing
for each one of them. Oops. I'm going to add two
and keep them in the middle. Yeah, that's looking
pretty good. So now, one thing that I would like to do is to make
them a little chubbier. So it's actually do that. It's kind of hard
to know exactly. Which one would make it better. But let's just wry the
ones at the base closer to the base and make them just a little bit thicker.
Not too much. Co, this is looking like
the base of our hand. Now, what I want to
do is I want to make the base of the hand
a little smaller. So I'm just going to move
with the global orientation. I'm going to bring this inside. I might use proportional
editing this time a little bit like that, and I'm going to do the
same for the other side. Okay. Now I will select the phase that's up
here and I'm going to move it up with some proportional
editing. There we go. And I'm going to do the
same for the bottom one. I'm going to bring it up.
Cool. This is a good base. So now let's just apply this
subdivision at one level. I'm just going to hit
Apply and I'm going to add a new subdivision
surface modifier with double subdivision so that we see how smooth
everything's looking. And I think it's
looking pretty good. So one thing that we
can do now is that we can kind of do some of the if I select one
of these loops, I can kind of create a
knuckle by just moving it up. And I'm getting kind of like that arch in each one of
them. So let's do the same. For these ones, just
move them up a little. Move them up again. One thing, I think I
have it on currently. But if you feel like
when you're using proportional editing
and your range is too big and it's moving, let's say, in this moment, you see that it's also
moving the topology of the middle finger. So there's an option if you go under proportional editing. There's this curve next to it. Or you're going to
select that arrow, and then there's this option
called connected Only. What that would do is
that it would only affect whatever's connected
to your selection. So as you can see, the middle
finger is no longer moving. That can be useful sometimes. So good to know
that that is there. So now I'm going to
just bring this up a little more, just a little. Same for the bottom
ones, these two. I'm going to bring them up. And something that I want to do now is select the whole loop, and I want to make it. Actually, let's do the next one. I'm going to make it thinner. And the same for the
one that's next to it. Just to give it a
little more shape. I think that's a
good thing to do. So let's try doing this
again for the other fingers. I'm just going to move this up, check the bottom and
move it up as well. And let's do the same
process for the other two. So I'm going to select the one loop next to
it and scale it down. Actually, if I do it without
proportional editing, it could be a good idea
to make it thinner, just like that one,
that one loop, and then we're going to do
the same for the other loop. Cool. It's very subtle, but you can see now we have
kind of that knuckle shape. Lastly, the next finger, so let's bring these two up. Same for the bottom ones. Let's bring those two up. And now let's select
what's next to it and just kill it
down a little bit. And same for the other
one. Just scale it down. And there we have some knuckles. Cool. Now one thing
I'd like to do is to select now back to the
normal orientation. I want to select the verdict
that's in the middle and just push it
forward a little bit to make it a
little more pointy. I'm just going to do
that. There we go. Then for the thumb,
we might do the same. Oh, it's actually
already like that. It's a little pushed forward. So the thumb looks pretty good. We can do the same idea with the knuckle by just selecting
that and bringing it up. Back to the global orientation, bring it up, and I'm just going to thin the base
one, the base loop. Going to make it
thinner. Let's see if we make this one thinner. Yeah, we can make this one
a little thinner as well. Great. We got a hint. Now the reason why I'm not
following the reference too much is because the hint
reference is not the best. It seems to be a
little chubbier. We can try and play
with that as well. So if we move, let's say, we move these edges with
proportional editing on, if we move them to the side, and increase that proportional
editing, that's not good. Let's try making it bigger. There we go. Yeah, that
seems pretty nice. I'm going to do the
same for these. Just push it to the
side lit a little more. And we're not going to focus too much on getting a
super accurate int. Hens are actually one
of the hardest things to model if you didn't know. But yeah, now I'm going
to grab the tips, the faces that are at
the tip of the fingers. I might do the same
for the thumb. Oops. And I want to push them down with like a little
proportional editing. Now, if I just select these guys and I can rotate it a little
bit and push them down. So kind of like they're
facing down more, and I'm going to do the
same for the thumb. So just let's select the tip, and let's rotate it like that. Cool. So we can try making them chober or
just keep them like this. Sometimes it doesn't
look too good, so, oops, I don't want that. Let's see if I'm trying to
select all of the actually, let's just start, sorry,
finger by finger. If I try making this jobber so that they're
touching each other, that might look too weird. So let's try maybe making
the base jobber only. And since we have
connected only, I think it might work. Et's do the same here. Yeah, we've got some
chubbier hands there. Hob fingers. And we can do the same for the
thumb. Just make it. Actually, this one here, make it a little chubbier. Cool. We've got a nice hand. So now that's done. I actually want to
push one of these higher up you can see
that in the reference. Yeah, that's good. And let's do same
for the bottom one. Kind of having a palm
of the hand over there. So now that that's done, let's actually
place this where it needs to be. But I rotate it. And now let's go to the
side view and bring it close to it. Let's see. So maybe the hand is too thin, compared to the size of the arm. So we can now go to Local and maybe make it
a little thicker. Maybe a little just
a little longer. I'm going to rotate it a
little extra, just like that. Now let's focus on
the connection. So it is aligning
pretty well overall, as you can see here, but this
is looking kind of weird. So let's just try to match
it as close as possible. Let's see, I'm going to select
a face and make it maybe a little a little
closer to the base. And now I can also
change our arm by selecting maybe if we just
like the middle vertex and we bring it close to the hint. Let's see. Yeah,
something like that. I think that's good enough. Let's see, maybe bring it
down a little forward. Yeah, I like how that
connection looks pretty good. So now, remember to
do the mirroring, but because we um
move the hands to be kind of on the side on object mode
and not in edit mode. Remember that the
pivot is next to the right where the object is
and we need to change that. Let's remember the
steps to do that. We are first going to
apply our rotation. So let's do object. Oh, well, first origin to three decursor we can do
that. Just move that. Then we're going to
go under object, apply the rotation so
that it's facing normal. And now we can add the mirror modifier and we have the hand
on the other side. Great. Now you can shape
this a little more if you want to to make it a little closer
to the reference, if you want the
nds to be chobber. I do like how they look though. The reference is not the best, and I do like how
these nds turned out, so I'm just going to leave
it like that for now. And remember to always
rename your object. Hence there we go. So that's it for the ints.
12. Eyes: Alright, so now we
are going to move on and start working
with the eyes. But before we do so, I wanted to show you that
in the last video, I forgot to do our shade smooth for the hands as we usually
do for all of our objects. So make sure to do that. And I also wanted to
show you that I ended up moving the face that's
right in the middle. Right here, I ended up
moving it a little closer to the reference with
proportional editing to make it look chubbier
as it is in the reference. So if you want to do
that, go ahead and push that a little up just to make it look
a little more round. But if you don't just
keep it like we had it in the last video,
completely up to you. So let's move on
now into the eyes. So for the eyes, as always, we're going to
start with a cube, and we're going to turn
this cube into a ball. Let's just scale it down,
move it forward and move it up to place it near the
spot where the eyes are, can scale it down a little more, and let's add that
subdivision surface modifier so that we can convert
it into a sphere. And now from here, let's
actually start shaping it. So instead of going back
and forth with X ray mode, I'm actually going to
hide the head first. So just select the head and press H so that we can
see a little better what we're doing with our e. I'm
going to go into Edit mode, and oops, I'm going to
move it into position. I'm going to keep the size of it closer to the
height of the eye. Let's see. Yeah, that
seems pretty good. I can see down here, it's a little hard to see, but you can tell that's close
to the height that we want. Now here, let's actually shape it more so it's
closer to how we have it. Let's do some skiing in the
X axis to make it thinner. And let's go now
into the side view, and we're also going to
scale it here in the Y axis. I'm going to move
this into position, but we might need to change
this later depending on how it is sticking
to the head, which we might need to change. So let's just keep it like that. It seems pretty good
overall size wise. But now I actually want to add a loop cut to make the
back a little flatter. So it doesn't look as front. And even though that's
going to be sticking in the head and we won't
be able to see it, you can tell that it changes
how the front is as well. So that's why I want
it to be closer, kind of, like, reading that loop cut closer to the back so that we get that
sharpness in the back. Alright, so now from here, we can just apply
that subdivision. Add a new subdivision
surface modifier with double levels, and now let's bring that head back to see how it is attaching. As you can see, it is clearly
sticking in too much. So we're going to
go into Edit mode, select everything with A, and we're going to
bring it forward somewhere we can
see it. All right. So let's do, that
seems like it's good. Now, we probably need to rotate it because
as you can see, the sides are sticking out, like the outer side is sticking out too much
compared to the inner side. So we might need to rotate it. So let's do that by
rotating in the Y axis. Now if you compare
it to the reference, it's actually also we're going to need to rotate it
in the X axis a little bit. Like that. And then from here, actually, let's do
that one more time so that it aligns
a little better. Again, in the Y axis, make sure that you're using the normal gizmo so
that it's rotating pretty aligned to our e because otherwise you would be aligning it to the viewpoard
and we don't want that. And now let's see
how it is looking. Yeah, it's very close
to what we wanted. We might want to move
it down a little more. And then one last
thing that I want to do is I want to rotate it in the C axis so that it's tilted a little bit,
like our reference. Now, we might want to
stick it in a little more. And that looks
pretty good to me. Yeah, we can keep
the eye like that. Cool. So now again, make
sure to shade smooth. And now let's add
that mirror modifier so that we have the
other eye as well. Cool. I feel like it's
sticking out too much. I'm going to actually
move it in a little more. Yeah, that's a little better. Cool. So make sure to rename it. I'm going to name it eyes. And one thing that I do
want to add right now, as you can see,
there's kind of like this highlight on his eyes. I want to make that
a physical object to make it really noticeable. If we try doing that
with lighting later, it's probably going to not
look exactly the same. And I do think that looks
very nice in our reference. So let's go ahead and add another cube that's
pretty small. Let's push it forward. Make it smaller, make it a sphere with subdivision surface. Let's do it twice. This time. We can actually apply this
and we can go under mesh, transform to sphere, to
make it a complete sphere, and drag that mouse. Now let's keep it very small, and now let's move
it into position. So let's just move
it somewhere there. Oops, I moved it in object mode. Make sure to move
it in edit mode. I'm going to move back
into global orientation, and I'm going to scale
it in the X axis, and I'm going to make it more
flat, something like that. Now let's just push it back
and let's try to align it. To our e. So we're going
to need tops right here. Let's do so, push it forward. Yeah, that seems pretty good. It's going to stick
out a little bit, and that's fine.
This just rotate it. Now let's add another
subdivision surface. That's doubled and this
just smooth it out. We might want to make
it a little bigger. I'm going to push it in compare it to the reference,
that seems okay. And now, it's actually rotate
it like that a little bit. So now let's add that
mirror modifier again. And this I'm going to call highlights, and
there we have it. So those are the eyes. They look pretty
nice. I'm actually going to move them out so
they're more centered. That works pretty good. Cool.
So we've got the eyes done. Now in the next video, we are going to continue
with the rest of the features of the
face. I'll see you then.
13. Nose: Okay, so now in this video, we are going to
work with the nose. And to do so, we're actually
not starting from a cube, but instead we're going
to be adding a plane. So let's just do that. Open the menu and
search for a plane. Now, I do want to move
to the side view, and I want to bring it forward. I'm going to scale it down, and I actually want
to rotate it in the X axis because I want
it to face to the front. So let's do that
by pressing R X, and then 90, because I
want it facing forward. Alright, so now from here, I'm going to scale it
down, bring it up. And actually, I'm going to
hide the face so we can see better what we're doing with the nose instead of just going back and forth
with the Xray mode. So I'm just going to
hide it by pressing H. And this looks kind of funny, but let's just
focus on the nose. I'm actually going to
go into Xray mode, and you will see that
it's shaped as a heart. So let's actually scale it down I'm going to go
back into Xray mode. Then I'm going to kind of
locate it in the middle. Somewhere there, we can
scale it in the C axis so that the height is
close to what we need, and let's just keep
it like that for now. So now what I want you to do
is to apply the rotation. This is going to
become very important. So let's just go under object, apply rotation in that way where our axes are
aligned with the world. All right, so now we can go
and create in edit mode, our first loop cut that is going to be right in the middle. So with Control R, we are just going to place it right in the middle by pressing clicking with the
right click so that it stays right at the center. And now I'm actually going
to go into the phase mode. I'm going to select the face on the left of our screen and
I'm going to delete it. I'm going to select faces, and I will only be working
with half of the nose. Now, before we do anything else, I want you to add a mirror modifier,
we're going to do that. That way, we're going
to have both sides. But it's very important
that you do at this stage is to
select clipping. What clipping does
is I'm going to show you if I go
back into Edit mode, and I'm going to select
the vertice in the center. If I try, you don't
have to do this. I'm just going to show you
if you move it to the side, they can separate.
And we don't want. We don't want that. We
want it to stay right in the middle and that
they're always connected. So by activating clipping, if I try moving it, it's never going to move
the vertices in the middle. They're always going
to stick together, and that's what we
want for this case. All right, so now
that we have that, I'm going to select
these verdicts. I'm actually going to disable proportional editing
for a moment. I'm just going to follow
the shape of the heart. So we definitely
need more loop cuts. I'm going to create a few. Let's say, actually,
let's go back. Let's create Yeah, I
think, let's do five. Let's do five. Loop cuts I
think they should be enough, and we're just going to
place them in the middle. So now we're going to
select one by one, I forgot to activate this. Okay. So let's move it up. By the way, if your menu
was hidden like mine was, you just have to press T
to bring it on and off. So that's important to know. Okay, let's just shape this following the
shape of the heart. So I'm just going to
go vertex by vertex. I'm not really worrying
about adding more topology. Just with the vertices
that we have, we can create the shape. So I'm just following
the reference right now. Let's do that almost there. Then these are the
weirdest ones. We're just going to do
something like that. I'm actually going
to bring them a little in something like that. Now, I do want to add a new loop cut that's
close to here, and then another one
close to the other edge. And with these two in
the middle, I'm sorry, I'm going to scale
them in the C axis, and I'm going to push them
forward a little bit so that shape is a little
more rounded. Cool. We've got our heart shaped, as you can see there. It is a little
funny on the edges, but you don't have to worry
because we're going to be adding a subdivision
surface later on. Now that we have this,
I actually want to apply that mirror modifier. I'm just going to apply it. Make sure that you're
in object mode. And now we are going to try to project this heart shape
onto the volume of the head. So let's bring back the
head by pressing TH. We can bring everything
that was hitting back. And I'm going to
select on the nose. And as you can see, this is really far away. And what I'm going to do
now is I'm going to add a modifier that's called
a shrink wrap modifier. You can find it like that. Shrink wrap modifier. And what this modifier
will do is that it will project the nose into
the volume of the head. So the first thing I want
you to do is to select the target where we want
to project this nose. So under the menu of the
shrink wrap modifier, there's a target option and then there's this speaker
that we can select, and we're just going to select
the object of the head. So we're just going
to click on there. And as you can see,
something happened, and it's not working very good because we need to
change the Snap mode. Sorry, the wrap method. So right now it is at the
nearest surface point. We don't want that. We want
to change it as project. So by doing so, we're
back to where it was. But what we're going to
do is that we can move it back and try to bring
it close to the face. As long as soon as I that, you will see the magic
where it kind of, like, starts wrapping around the
head. Do you see that? It's super convenient. I really love the streak. So now that we have
that, as you can see, it is kind of like
sticking inside the head. Now, there are a couple
of things that we can do. We can do an offset and just bring it forward
a little bit, which could work, but I actually want to
keep it in place. And what I'm going to
do is that I'm going to apply this modifier, the shrink wrap modifier. So I'm just going to apply it, and I'm going to
go into Edit mode. And I'm going to select
all of my faces. By pressing A and I'm going
to extrude them forward. I'm creating volume
into the nose. Something like that would be nice and there we have our nose. Now we can add the subdivision surface modifier at this point. So that it's a little softer. We're going to create more
levels of subdivision, see how everything is looking, and I actually wanted to be a
little sharper on the back. So let's go under Edit mode, create a new loop code
and bring it to the back. Kind of like that. I think
that looks pretty good. Now, we can always modify
it a little further. So I'm going to select
these faces right here and I'm going to do
the same for these two because remember
that actually, we could just do our symmetry up here
next to the butterfly. So we do the same
thing on both ends. So let's see if
that's going to work. I'm going to select these two, and I'm going to move
them out to make them a little round that did
not work. I wonder why. Okay, let's just select
both on both sides, and now I'm going to just do a scale in the X axis so
that I'm pushing them, and I'm creating a softer end. Then we could also add more subdivisions at the middle because we're losing that
sharpness over here. So we could either
create more loop codes or we could try
creating a crease. Let's try that and
see if it works. So if I just select that edge, and then I'm going to go under edge edge crease and bring
it up. Did something. It's not let's see, the percentages at one and
it's not doing too much. Oh, I forgot we had
another loop cut. So let's just select this triangle to see the topology on the
subdivision surface. And now let's try it
again by selecting both. So let's go under edge, edge, crease, just push it. Yeah, I think that could do it. It's a little pinchy, but that works good. And now we can just go on
object mode, shades mode, and we have a nose that's perfectly projected
onto the head. So let's remember to rename this as nose, and there we have it. We have the nose of panda. Perfect. So in the next video, we are going to work
around the mouth, which are just these lines
that are underneath the nose, and we're going to do a
pretty similar process. I'll see you then.
14. Smile: All right, so now we're
going to focus on the mouth and the smile. So let's just do the same
process as we did for the nose. We're going to
start with a plane. Oop, not a cube. Let's start with a
plane. There we go. And now we're going
to move it forward, scale it down, rotate
it in the X axis, just like we did with the nose. I'm going to bring it up.
And now let's scale it down. Now again, remember to
apply the rotation. And now we're going
to hide the face so we can see better
what we're doing. Now for the stick going
down the nose to the smile, it should be fairly easy. We're just going to
scale it in the X axis. Now I do want to scale it in the C axis so that
it's overlapping with the nose a little bit and so that it's also touching
the bottom of the smile. And now what we need to do here, it's that we actually need, I'm going to explain something. I'm going to add let's
bring back the face, and let's add the
shringwrap modifier. I want to show you something. If I select the target as the
head and I select project. Now let's just
select the object, and if I push it, yes, it's going to actually
project on the head, but as you can see, it's not really following the
curve of the head. Now we can leave
it like that, but it's not really
following that curve. The reason why is because we
don't have enough geometry. Let me get rid of that modifier. I'm going to bring
it forward, and we actually need to
add some loop cuts. Let's just add maybe five
loop cuts would be fine. So let's just keep
those in the middle. So we need more geometry that allows the object to
bend along the curve. Now, if I add that string
wrap modifier again, selecting the head, doing a
project as the rap method, and I'm going to project
it back to the head. Now, that's much
better, as you can see, it's actually
following the curve, and it works much better. Now we can apply that modifier. Now I'm going to select
all of the faces. You can also just select A, and we're going to go into the side and we can extrude it. So let's just press E
and extrude it forward. I'm going to go a
little further than the nose just because we don't want it to
look that squared. We actually want to add a
subdivision surface modifier. Now, that will
make it look very, very thin and it's not really
what we're looking for. So let's just add
some loop cuts. Maybe we can add one
close to the border, one close to the border, and then we can
add two over here, and that looks a little better. Now we can actually add
a few more subdivisions, and we can select these
edges right here. So let's do this one,
this one, and this one, and we can try making it overlap a little
better with the nose. Something like that
should work fine. Yeah, I like how that looks. Great. Don't forget to shade smooth and now we can
continue with the smile. For the smile, let's
repeat the process. Let's just add a new plane. I'm going to go
into the side view. Going to push it
forward, scale it down, rotate it in the X axis
90 degrees, press Enter. I'm going to move it up. I'm going to scale it down
and let's apply the rotation. Now let's hide the face,
the head, I'm sorry. Going to hide it, and now
we can focus on the smile. So to do that, I'm
actually going to scale it kind of like for the
width of the whole smile. So let's just scale it in the X axis until it's touching
the ends of the smile, and now we can scale
it in the C axis so that it aligns with the
thickness of the smile. Something like that might work. I'm actually going to place
it right where that smile is. And, no, actually, let's
do something different. Let's move it up to where the
corners of the smile are, and we can try
something very cool. So let's just go into edit mode. I'm going to add a
bunch of loop cuts. Now, make sure to have a
loop cut in the middle. So, if I add one more, you will see that there's
no loop cut in the middle. You want a loop cut there, so I'm going to actually
add a couple more. I think that's pretty good. And I'm just going to
it's actually 11 cuts. Going to just press Enter so that they're
completely centered. I'm only going to
select the edge in the middle and I'm going to activate
proportional editing, but I'm going to change the
mode from smooth to sphere. And let's see how this works. Now, if I try moving
this down and I can change the
radius of tolerance, you will see that it's
actually creating an arc and that saves
us a lot of time. So this is pretty good.
Now we can always go and disabling
proportional editing. I'm actually going to enable symmetry by pressing the
next to the butterfly. And we can just make it
a little more detailed. But this gave us really a
heads up, a head start, sorry. We can just push the vertex a little bit to make it more aligned
with the shape. But overall, we already
have a nice looking arch. Let's just move that like that. Perfect. So now we can
repeat the process. I'm going to bring
the head back. I'm going to select that smile. Let's add a shrink
wrap modifier. Let's select the target. Let's change the wrap
method to project. And now we can push it back. And it's projected. Now, we don't have to push
it too much over there. It looks good. That looks great. Now, let's apply that
Shrinkwrap modifier. Let's select all of our faces
and extrude them forward. Let's do something like that. Now from here, actually, let's extrude it again. I'm going to make sure
that it's a little past the line in the middle because now we want to add a
subdivision surface modifier. And again, we can add more subdivisions and add
more topology to make it. Not as a tube. So we can just do a few
cuts here and there, to the side, and then I think
that looks much better. Now, we can always push
it to the back so that it aligns a little better with
the stick in the middle. But I think that
looks pretty good. Don't forget to shade smooth. Now, if you want this
as a single object, there's a way to do so. Up to you if you want
to do it or not, but I just want to teach
you that there's an option. If we select both the stick and the smile and press Control J, that will be joining the
objects into a single mesh. So as you can see now, this is a single object. Now, if I go into Edit
mode and you want to, for whatever reason, bring
them apart, separate them. You can just select an
element of one of the shapes. Let's say I select
an edge of here, if I press L, I
will be selecting, actually, it's where
my mouse is located. I will be selecting
that part of the mesh, can do the same process here. I will be selecting
with L by pressing L, I can select the mesh, and I could, for example, if I want to
separate them again, you can press B and then you
can separate by selection. That way you will be separating
again into two objects. Now, I won't do that because
I actually want them together and just
keep them as one. So now we are going
to rename it. This is going to be our
smile, and there we have it. We have our beautiful smile. Now, there's a single object that is missing,
a single element, and that's going to be the
little round tail of our bear. So that will be the last
thing that we need to do to finish our model.
I'll see you then.
15. Tail: Okay, so in this video, we are going to finish our model by working and doing the tail. So to do the tail is
going to be very simple. It's actually going
to be simpler than anything else we've done because it's just
almost like a ball. So remember how we've worked so far by creating spheres
with our cubes. We're going to do
the same thing. We're just going to add a
cube and scale it down. Now we're going to
put it in place. Something like that, we will
need to shape it a little, but it's not going
to be too much. Now let's add a subdivision
surface modifier with two levels of subdivision. See that looks pretty good. I'm actually going to make
it closer to our reference. That looks pretty
good. Maybe I'm going to scale it a little. Now I can apply
this subdivision. And remember that we
can go under Edit mode, select all of our vertices
and go under mesh transform, and we want to convert it into a perfect sphere
by dragging out. There we go. We've converted the shape into a perfect sphere, and now we can just go ahead and with proportional editing on, we can just grab each vertex and shape it a little
closer to a reference. There's not really
much we need to do. Let's see if I can just
select this. Let's. Let's just select this and bring the proportional editing
down. Something like that. Let's see from the with
the X ray mode activated, I can move this in. Let's actually increase
that proportional editing. And just bring it in. To select these
vertices right here and kind of follow the shape
over there. Let's see. Now this is maybe too much, so let's make it
a little smaller. Actually select all
of these and make it closer to the
reference. There we go. I think that looks pretty good. So let's see not from the sides. I like how it looks. Just nice and round. So now from here, actually, if I go back into the reference, I feel like this should
be in a little more. That looks better. Cool. So now let's add a subdivision
surface modifier, again, it double
subdivisions and just shade smooth and
we've got our little tail. That looks pretty
nice, actually. We might just need one level of subdivision to
make it look good. Now, I might want you bring these vertex out
just a little bit. Make it a little more pointy. Yeah, that seems
a little better. So there we go.
We have our tail. Remember to rename it. This is going to be our
tail, and we're done. So we have our model
ready and finished. But this course is not over
yet because we are going to apply materials and texture this guy so that it actually
looks like a panda bear. So now that our model is ready, we can continue with our look def and just adding
materials and textures. I'll see you in the next videos.
16. Materials: All right. So now that
our model is finished, we can continue and we can do some materials to give some
color to the panda bear. So to do so, we are
going to start. I'm actually going to
start with the legs. I can start with any part
that's completely black. So either the legs or the arms or the hinds, it
doesn't really matter. And I'm going to
create a material. So to do so, let's go to
our menu on the right, and the material tap is going to be the one with a red circle. It says material, we're
just going to click on it, and as you can see, it doesn't
have a material currently. So we're going to change
that and we're going to create a new material. Now, we're going to rename this. I'd like to say, have a prefix to know
that this is a material. I'm just going to name
it mat underscore, and this is going to be the
main black color of the body. So let's just call
it maybe body. It's just very normal
for everything else. We know that's just the main
color of the whole body. And now, we want to change this color to somewhere
more on the darker side. As you can see, it's not
really changing on my scene. Now you might be
wondering, maybe it's because of the mode that we had where we had
random materials, random colors, actually. If I change it to material, it's still not showing up. And the reason why
it's because to be able to see materials, we have to go under
the look deaf or Vuporshading, um method. Basically, we're going to go here and we're going to select that you will see that now
I am able to see the color. I do want to change the
color a little bit. I'm going to go back
into the base color. I'm going to click on the
bar that has the color, and I actually want to bring
it up a little lighter. Somewhere 0.085 could
be something good. I actually want to change
the hue a little bit. Because I don't want it
to be completely gray. I do want to add a tint of blue, so I'm just going to
move my color picker on the wheel and just
select a blue color. Something like that
would be nice, maybe a little there,
something like that. Now that we have
created that material, we can select all of the
other parts that are completely black and assign that material that
we just created. Let's do that very quickly.
I'm going to select the feet, and I'm going to just click on this like this dropdown menu
next to the new button, and then you will see the list of all the materials
that you have created. So I'm just going to
select the MT body and assign it to it, and I'm going to do
the same for the arms. For the hands and for the ears. Now, I'm not going to do
anything for the head or the belly just yet because we are going to
add some textures to that, we cannot use the same material since we want to add
some that has textures. So we're going to
hold on for a second, and then for the
eyes and the nose, we're going to do
something different. But for now, let's actually change how this
material is looking. Right now, we just a
change the color of it, the base color of it. But we can also change if
we want it to be metallic. In this case, we don't really
want it to be metallic, so we can just keep it at zero. There are different
properties that you can change to change how the material looks with
different lighting. So I don't want it
to be metallic. I do want to change
the roughness, though. Roughness is basically
how shiny an object is. So if it's zero rough, that means it's completely shiny, and you can see it there. I almost looks like plastic. And if I bring it up to one, it means it's completely mat. So there's no
reflections whatsoever. It's very, very mad. Now, we want somewhere
in the middle. I'm actually not going
to keep it at 0.5. I'm going to keep it a
little more mat than shiny. So something like 0.6, I think would be good
for what we want. Because we want some
reflection on it, and then we don't have to worry about anything
else for this material. We're just going
to keep it simple. Now, let's add the
material for the eyes. I'm going to select
the eyes and I'm going to create a new material. This time, I'm going
to call it eyes. And this time, I
actually want to select I don't like using
complete black colors, but something very close
to black could be okay. Something like a value
of 0.0 15 would be good. I actually want to
make them very rough. Sorry, not rough at all. So I'm going to
bring the roughness down to make them
a little shinier. And that looks pretty good, maybe a little less, maybe 0.35. Yeah, I think that
looks a little better. And we can do the same for
the little highlights. So for the highlights,
we actually need to add a new material. So we're going to name
it matt highlights, and we can keep it up
at just a white color. Now the reason why I didn't
leave it as it was because it's good to have materials
on every single object. So even though we're
not changing the color, it's important to add
the material to it, and we can also bring that
roughness down a little bit. Cool. We've got the eyes. Now, let's focus on the nose. Let's create a new material. The reason why even though
the color might be the same, the reason why I create
a new material is because the roughness
properties are going to be different and so we also want to make the nose a little shinier than the body, and that's why it's important
to do a new material. Let's rename this one, mate and then this is
going to be let's say nose and we want to
also make it a little dark, maybe a little more gray, maybe we can change the hue
as well to be closer to blue. Something like that, and then
we want it to be shinier. Something like that
would be nice. Maybe the eye should
be even shinier. Let's see. Now, there's
something that we can do with the eyes and it's that
we can change the IOR, which is the index
of refraction. Now, I won't get into details of what this does,
but basically, if we lower it down,
something like that, the reflection won't be as hard. I think that looks
a little better. And the nose, we can
keep it at maybe 0.35 as we had the eyes. Yeah, I think that
looks pretty good. Now for the smile, we're going to select the
same material as the nose. Let's just go into that
drop down list and select MD nose we're missing one
object, the little tail. We're going to select the
body material as well. Actually going to change
the hue of the base color. I think it's blue, so maybe something closer to the white middle would be nice. I think that's a little better. Cool. So we're still needing
to do the head and the body, but for those, we are going
to be creating textures, and we are going to do that in the next video. So
I'll see you then.
17. UVs: Alright, so now we
are ready to start working with creating some
textures for our panda bear, for the belly and the head. There are some steps
that we need to follow in order to be able to start
painting the textures, and one of the most
important steps is that we need to add UVs to our mesh. Now you might be
wondering what UVs are, and I'm not going
to get too deep into this topic because
it's very major and important and way too much for me to try to explain
it in a single video. But I'm going to try my best to explain what they are
and why we need them. So basically UVs. I'm actually going to go into a different
setup right here, and I'm going to go into
the UV editing window. So you can see more clearly
what we are doing here. So as you can see, I have a
three D model on my right, which is the panda bear. And then I have a
grid on my left side. So basically, when we
add UVs to an object, what we're doing is that we're
having our three D object, and we're unwrapping it into a two D flat surface so
that we're able to add images or textures and project them into our three D model
in three D dimensions. So basically what we're
doing is just we're splitting our three D
object and making it flat. So it's just a TD image. Um and that's what
basically the U Vs are. Now, we call them UVs because
it's the U and the V axis. We don't call them the X and the Z axis as we would
do here on a three D viewport just because we want
to make the difference that UVs are not in three D at all. So basically, UVs
are just because it's the U versus the V axis, and yeah, we're just projecting a flat surface
onto our three D model. Now, to do so, we are going to go
under Edit mode. And we are going to select all
of our pass by pressing A. Now, as you can see this model, because we started from a cube, I already has some UVs, and we could probably
work with this. But maybe there's
a case where you don't have any UVs
on your model, and that can happen
a lot of time. So there's a method that
you can do to create some UVs and we're
actually going to do that for this case. So now that we've
selected everything, we're going to press U. And we're going to get
a UV mapping menu. Here we're going
to go under wrap. There are different methods
that we can unwrap a model. But here we're just going to use the most simple and automatic
one that you can use, which is called the
Smart UV Project. I'm not going to go into
details how this works, but basically this will do the work for us in a
very simple manner. So we're just going to
hit Smart UV project. Something that I do want
you to do is to change the island margin to be
something like 0.05 maybe. This is not
completely necessary, but this is going to allow us
to have some space between RUVs and I will show
you once I click wrap. So now that we have that, we're just going
to hit and wrap, and you will see that now I
have six different pieces that have been unwrapped
into our UV space, right? So the spacing that I was
talking about is just between each of these
kind of UV islands. There is a 0.05 space
in between them, and so they're not
that close together. This can be very relevant
with more complex objects. But for now, we don't really care much about
it. This is good. This is all we need to do. Now, for the head, we're going to do
the same process. We're going to select all
of our pass by pressing A, and now I'm going to head U and I'm going to select
Smart UV project. We're going to do the
same island margin and just hit wrap. Now I have all these
different islands spread out on the UV side. So that's all that we're
going to do in this video. Just explain how UVs
work, why they're needed. We basically wouldn't
be able to create a texture or to a, just simply put a texture
on a mesh that doesn't have UVs because we need a
way to tell blender. Like, Hey, this is the two
D map of my three D object, and this is what you're
going to project onto our three D mesh. So that's all. Now
in the next video, we're actually going to start painting some textures,
so I'll see you then.
18. Textures: Torso: Alright. So now that
we have our UVs ready, we can start painting
some textures. For this video in particular, if you happen to have a
graphics tablet on hand, that'd be really nice for
this part of our lessons. If you don't have
one, don't worry. We can work with a mouse
with no issue at all. But if you happen to
have a graphics tablet, please feel free to use it now because when we're
painting textures, is a more artistic process and you might get more accurate results
with a graphics tablet. But if you just have
a mouse, don't worry. We can just use that, and you will have
similar results. Do not worry about that. But now that we have our UVs, we can actually start
doing our textures. Now, the first step for
that is that we need a material where that
texture is going to exist. So we need to add a new material just like we
did with the other parts, and I'm going to name it Mt. This is going to be our torso, and we just need
to keep it as is. We're not going to change
anything just yet. But basically, this is we're creating a space
where that texture is going to be attached. So now what I want you to do is select any other body part
that has the material body, and we're going to
copy that color just because we
want it to match. Like, the base color of
our torso is going to be the same and we want it
to be exactly the same. So we're going to go and
click on base Color, and we're going to
copy that hex code. So let's just copy
that and keep it on our clipboard so that we can use it as our
base color as well. So now that we have a material, we can create and start
painting textures. To do so we're going
to change from our UV editing view to
our texture paint option. You will see we have
our UVs on the left, and then on the right,
the object that I have selected is the
torso and it looks pink. So the reason why it looks pink is not because
it's the base color. We haven't really added any
base colors. It's white. But this represents that we have no textures currently
in this element. There's no texture, and that's
what the pink represents. So we need to create that space where we can start
painting the texture. To do so, we are going to go up here where it
says texture slots, and here we are going to see
that it has no textures. So we need to add one by
pressing this plus button, and here we're going to select
a base color, um, texture. There are other options that we are not
going to get into. We just need to change
the color of our panda. So let's just choose
a base color texture, and then we can leave
the name as it is. We're going to change the size of our image to 2048 by 2048, just to make it a little bigger. Now, this might change if
you're working for games, you might need smaller textures to make it more optimized. If you're working in VFX, you might want higher textures because you really want
that detail in there. But I think two k for
now works for us. We're going to disable
the Alpha option. Now, this is just if you had transparency
on your texture, which we really don't
at this moment. So we don't need it. If you leave it on,
it shouldn't matter, but I just want you to understand
what it does and why we don't need it because we're just going to
have solid colors. And now we're going
to leave it blank. And here under color is
where you're going to paste that hex code that you saved
from the other body parts. And let's just select that, so that's going to
be our base color. When that's ready, we're
going to click on Add. And as you can see, we will have the color on our viewport. On the left side, it's
a little zoomed in, and that's just because we
created a bigger texture. But as you zoom out,
you will see that those UVs with the
texture placed on. And now you will
see if I go under my L dev view that
they all match. The color is pretty
much the same. So now we are ready to
actually start doing the painting of that like
white circle in the middle. So because we need some
reference to know where it goes, we're going to go
on our front view. Now we are going to
select the color. I don't want to go
full white here, but I'm going to go
somewhere a little below that full white,
somewhere there. Now, you can change the
brush if you want to. One by default is paint hard and that works perfect
for what we need. We can just keep that one, and this is when you're
going to start painting. As you can see, you can
start painting on the model. Now you can also
paint on the UV side. But since we didn't do our UVs personalized
or customized, these are simply automatic
with a Smart UV project, we don't really know where all the parts belong
in our model. So I don't recommend
you painting on top of the UV map this time. You're going to paint on
the three D model surface. Now, it's really hard to see, so I'm going to press Old C
to go under the X ray mode, and I can actually have a guide. I'm going to show you
what happens when I start doing that, you will see that it
is not the smoothest. Now, there is a reason for that, and that even though
I have a tablet, if you were doing
it with your mouse, it's really hard to get
it, like, super accurate. And there's a trick that we can use to make it a little better. And if you go under
your right menu, there's this option
called stroke. And here you can change the stroke to a
stabilized stroke, which basically means that you're going to have a
delay on your brush, so that way it's going to be a little more accurate and
you will see what I mean. Now I have this factor in
radio, you can change that. But basically, now if I try, I'm going to show you
without the X ray mode. But as you can see, it's
like a much smoother line. Let me just go back and you can see how there's like a line
coming from the brush. That basically means you
have a stabilized stroke. So let's go back to that
reference and start painting sort of close to
what we would like to have. Let's see how that's
looking. Yeah, that's looking kind of good. Let's continue to the bottom. Something like that.
You have an idea of where you want things. Now let's go and start filling
in the gaps of the things. Now this is where it becomes
troublesome as you can see, this is not the most accurate. Before I start being more
detail on the edges, let's go ahead and
just finish painting. I'm going to disable
the stabilize stroke from it
just so that I can paint everything that's inside.
I'm just going to paint. Now there's a bucket option, but I do enjoy the process of painting just
artistically. We go. So we have a full
belly that's white. Now we have these issues over here and over here that
I would like to address. Now, I don't want to
make the circle bigger. So instead, what I'm going to do is that I'm going
to choose I'm going to change the color back
to the original base. So to do so, you can
just press Shift X and just kind of drag or place your courser on the color that you want and
just release Shift X. And with that, you
should be able to have the color that
you've just picked. I'm going to go back to the
stabilized stroke thing and I'm going to try my best to keep it a little more detailed in certain areas. Let's go here and
start doing that. Now let's go here and
do a similar thing. Et's go back,
something like that. And then something that
you might not notice here, I'm actually going to
reduce the size on the sides by a little
bit, something like that. Cool. Now, what you might see is that we're not being able
to see where the legs are. So I'm going to go back
from texture paint up here. I'm going to change it into
object mode for a second, and I'm going to hide the legs. Just so that I can see how we're not fully
doing it right. So let's go back to
that paint option, texture paint, and we
are going to continue so that it is looking a
little more accurate. So let's do that. Now, as
you can see, by default, we have symmetry on, and that's exactly what
we need right now. So we're going to
leave it as is. But here you can go ahead
and just kind of like, make it a little a
little more detailed. Let's go on the bottom,
something like that. Cool. That's the belly. That's all that we needed. We can bring the legs back. And, yeah, that's it. Now, if you go under the
Look Dev menu or Viewport, you will see that it's matching and it's
looking pretty nice. Now, before we finish this, it's very important that
you save your image. Because right now
we're just working locally on this file, but this information that we just painted is not anywhere. So what we need to do
is that as you can see, it says image, and
it has an asterix. So what we need to do is
that we need to save it. So let's save our image. Doing so, you might get just, like, your folder where
you might want to save it. So I'm going to go under. Let's see. Going to
save it pretty quickly. Textures. Let's name this Toro I'm going to
keep it as a PNG. I really like PNG is working for this and we're just
going to save as image. Make sure that it's a path that you recognize that you know
where you're saving it, so you don't get
lost in it later. We're just going to save
the image, and that's it. We are ready to continue. So in the next video, we are going to do the
texture for the head. I'll see you then.
19. Textures: Head: All right. Now that we've created the texture for the tor, we are going to do a very
similar process for the head. To do so, first, we again need to save some important information
because the head has to be the same color as the circle that
we did on the belly. So to do that, again, we are going with
the color picker. You can select the color
that we just assigned. Make sure that it's not any line or anything of the color that
you're choosing, it has to be the white one. And now we would have it here. On our color picker, so we can select the color
and just copy the hex code. So let's just copy that.
And now that we're there, we need to paint the head. Now you might be
wondering how do I go back to selecting the head? Because currently
you're just you cannot click except
for just paint. So to do that, we're just going to go up here
under texture paint, and we're going to change
it to object mode. Once you do that,
you can just select the head and go back
into texture paint. And as you can see, we're having a very similar process of the head being pink because it doesn't
currently have a texture. So before we do that, we actually need to create
a material for the head. So let's create new
material for the head. And now that we
have the material, I'm going to go back under the properties like
the first step, the properties of the brush. We don't lose that now
under texture slot, we are going to create a
new slot. Let's do that. We're going to
create a base color. Same process is going
to be 2048 by 2048. We're going to
disable the Alpha, and then here under color, we are going to
paste that hex code, and we're just going to say. So there we go. We have the
base color of the head. So let's go now under the let's go on our front view
and we can start painting. So now we need to choose
the inverse color, right? So to do that again, shift. X, you can just
select your color. Now, as you can see,
this is not the best because it's changing depending on where I place it
on the three review. The most accurate way to do it is to do it on your UV map. As you can see right now, we have the MD head base color. Let's change it for a second to the torso base color so we
can do our color picking. We shift X just here and now we can go back to
that head base color. That way we can see
what we're painting. So now here, let's just try. I'm going to see if I have
the stabilized stroke I two. So let's see how that's looking. It's looking pretty
good. Overall, yeah. See, I was a little worried that it was
a different color, but that's just simply
the lighting that we have on the three D view. So
don't worry about that. And now with this in mind, let's go ahead and say old C to be able to
see our X ray mode. Now, you might want
a smaller brush for this to change the
size of our brush, you just press F, and you can make it bigger or
make it smaller. So we're going to
make it a little smaller, just a little bit. And then we are going to
try and follow that line. As much as you can, try to
do it as best as possible. Let's just do that.
Something like that. Let's see how
that's looking. Yeah, that's looking
pretty good. So now I'm going to
change the stab stroke. I'm going to increase
my brush size, and I'm just going to paint
the insides of the shape. So let's do that. And now let's go back
to that stabilized stroke, reduce the size. And then we can go in and just start making
it a little better. Let's see. So let's just do our best to
keep it very straight. Let's see here. Let's just
move around, right here. Let's see how to make it better. It's a little tricky. That's looking good. Let's just finish a
little more here. Okay, that looks
better. There we go. Now, let's compare
it to a reference. That's looking pretty similar. Maybe here, it's a
little more square, so we can always go back and choose the other
color and go back and just remove some of
that extra extra hoops. Let's see. I'm going to go back and just do it a little
closer so it's more defined. There we go. Great. So now, if we look into our look deaf, it's
looking pretty nice. Now it looks more
like a reference. Now, I might want to
change the shape a little more just because it's very squared and I'm not loving it. Without reference, it's kind
of hard to really know. So here we can just spend a little more time
reducing the size, making it look more appealing in three D because with that
references not always so easy. I'm just going to do that. Let's see here a
little more rounded. Then on the sides, we're
going to do a similar thing. Just a little less
big. There we go. Okay, that's good
enough for this. Again, remember to save your
image, super important. So I'm going to save it as head. I already had a head image, but I'm just going
to save over it, and there we go. We've saved our image. And now we have the
That's pretty cool. It looks very nice. We have the eyes of our Panda. There's something that I still feel kind of weird about and it's like he's looking
kind of weird up here. So I might want to round
that a little more, but I don't want to make
this video super long, so just go ahead
and start refining the shape so that we are ready for the next video.
I'll see you then.
20. Parenting: Alright, so our
textures are done. I currently move into the layout view just because I don't need
to texture anymore. I need the UES or
anything like that. But there's something
that we still need to do before we move on. And that we got
to make sure that the materials align with
the other properties. Now, the color is
not the same because the head and the
body have textures. But the finish of the material should
be exactly the same. Meaning that the other
property that we had changed was the roughness for the arms and the ears
and all of that. So we're going to
copy that value of the roughness that we chose, and we're going to
apply the same value for the head and the torso. Let's go under the
roughness of the head, and we're just going
to copy that value, and we're going to do
the same for the torso. So now we know that the roughness of everything
is exactly the same, and we don't have anything
like any discrepancies there. So now we are going
to move on into our basic like base
shading, solid shading. Just because we don't need
to see color right now, it's not relevant to what we're going to do
next, which is posing. So in order to pose, we need to understand a very important topic
that is parenting. So usually, when you're
posing a character, you would need a rig
to be able to move it. Now, a rig is basically
like a skeleton inside your models
that have bones in it, and those bones allow
you to move your object. Now, that's a very complex topic that we won't be
covering in this course. But the basic foundation for rigging is something
called parenting, and that's something that
we will be using today. So for parenting, what it
means is the following. So if I grab the head
and I try moving it, you will see that the
head moves without the ears or without the eyes
or the nose, it's separated. It's completely individual, and that's how all of our
objects are currently, and that's not what we want, because if we move the head, we would like the
ears to come with it, just as it would
do in real life. So how do we do that? Basically, there's
this option where we can parent an object
to another object. So if I want the ears
to move with the head, I would need to
pair in the ears to that head so that the ears
would become the children, just like the name suggests. Ears will become the children, the head would
become the parent. Let's try that. To do that, we're just going to
select the ears. We're going to select the head, and we're going to
press Control P or Command P to parent. Then we have this menu that comes up and there
are plenty of options. We're just going to keep it
simple with the first one. We're just going to
pair into objects. I'm going to select that. Now if I select my head
and I try moving it, you will see that the
ears are coming with it, and that's exactly
what we needed. We needed to select the head, and if we move it, that
the ears come with it. Now we're going to repeat
that exact same process for the rest of the face. So before we jump into that, we are also going to parent
the highlights of the eyes, but we're not going to
parent them to the head. We're going to parent
them to the eyes first. And the reason why is
because if I move my eye for whatever reason or I scale it or do any
transformation on them, I do want the highlight
to be affected as well. So basically, the highlights would become
children of the eye, which would make them grandchildren of the
parent. That makes sense. So we're going to do that.
Let's repeat the process. We're going to select the
highlights, select the eyes. I'm going to press
Command P or Control P, and I'm going to set to parent. Great. So something that
you might be noticing already is that if you
go under the list, you will see that the
eye highlights and the ears are no
longer on my list. Now, why is that?
Basically because since they are now children
of another object, you will find them
under that object. So if I open like I expand
the eyes with the arrow, you will see that
the eye highlights there are underneath the eyes. And if I do the
same for the head, you will see the head now
contains the ears object. So basically,
that's just to keep everything organized and there's a hierarchy that we can understand to know
what's parented to what. So let's do now
the same process. We're going to select the Is. We're going to select the head. And now instead of
pressing Control P, I'm actually going to press Shift R. So what Shift
R does is basically a really cool command
that allows you to repeat the last,
thing that you did. So right now, we've
been parenting, and instead of going every time Control P and selecting objects, and that's, like,
a more extense, um kind of like process
you do the thing. I can just press Shift
R because that's just going to repeat
the last action. So now let's do the
same for the nose. I'm going to select the
nose, select the head, Shift R, select the smile, select the head, shift R. And now if I move the head, you will notice that
everything is coming with it, and that's exactly
what we needed to do. So we are going to continue
parenting in the next video, but that's going to
be a little different because as you can see, these arms are a single object and we want to separate them. So we're going to learn
that in the next lesson.
21. Pivots: Alright, so now that we've parented everything on the head, we're going to continue doing so for the arms and the legs. But as I said in
the last lesson, you will see that now
they are a single mesh. Like the arms are a single one and the hands are
a single object. And just like that,
the legs and the feet are just single objects,
and we don't want that. So what we want to do
instead is separate them. To do so, first, we need to
apply our mirror modifiers. I'm going to go with the arms, and I'm going to apply
the mirror modifier. Now, we know we can
do this because we're not going to modify
the topology anymore. That's going to stay as it is. So now we can do that safely. And what I want to
do now is I'm going to go under Edit Mode. I'm going to select
one verdex and just kind of keep my mouse
hovering over one of the arms. And I'm going to press L. Now, L is for selecting just like whatever's attached to
that area to that verdix. As you can see, the other
vertices are not attached to the ones on the right,
like, by anything. So that selects
whatever is connected. We're going to press P. P is going to allow us to
separate the selection. So now if I press
B, as you will see, and I go out of Edit mode, you will see that now I
have two different arms. Now, I'm going to want to rename them because
I want to make sure that they that I
know which one is which. So the initial arms, I'm going to rename as
arms underscored RT, meaning it's the right arm. Now, it's the left
side of our screen, but it's his right arm,
if that makes sense. So that's why we're
going to call it that, and then we're
going to call this. Arm, F for left, we
can actually just do. Actually, let's
just keep it short. L and R for left and right. I think that's simpler. So we're going to do the same process for
everything else. For the hands, let's just
apply the mirror modifier, go under Edit mode, select one of the
vertices, hover the mouse, press L. It's
important to press L. Now P two separate by selection. And we're going to go out
of Edit mode with tab, and now we have two
different objects. So now I'm going to
select one of them, hands, and this is going
to be just hind R, and the other one is
going to be and L C, almost theirs, and
now we're going to do the same for the legs. We're going to apply
the mirror modifier. Going to go on edit mode, select the aisle of polygons, press B, separate by selection, go out of Edit mode, and we're going to
rename them as well. So these are going to
be our right left. And this one's going
to be our left leg. Cool. Lastly, we're
going to do the feet. Let's apply that
mirror modifier, go on Edit mode, select one of them,
separate by selection, go out of Edit mode
and then renamed. This is going to be
the foot on the right, and this one's going to
be the foot on the left. Cool. So now that we've
separated all of those objects, now I could have
done the same thing for the ears, technically, but I'm not planning on changing how each one
moves individually. So that's why it
didn't really matter. Everything else, it
will be very relevant. Now that we've had that, we can start parenting. I'm going to select the left
hand with the left arm, and I'm going to hit Control
P, parent to object. Now if I rotate this, you will see that arm the
hand comes with the arm. We're going to
repeat the process. Remember that by doing shift R, we should be doing
exactly the same, and it's always good to test. So now I'm going to select the right foot with
the right leg, shift R, same idea
for the other. So now let's just check that's, that's doing a good job. And now we want to parent
everything to the body. That's super important. So
I'm going to select the face, the head, and I'm going
to parent it to the body. I'm going to select the leg
and parented to the body, parent this to the
body, last one. Now, technically, if I move
the body, it didn't do it. Let's go back and
see what's going on. Control P, said
parent the object, and let's do that again. Maybe I had changed the command so it wasn't doing
the parenting. Let's go again, head to torso. There we go, and we're missing the tail. That's
super important. As you can see now on my list, I should only have
the torso there. Now if I open that, you will see all of our
other objects in there, and if I open the arm, you will see the head and
so on and so on. It's just keeping a hierarchy. So now if I move the body, now it's bringing
everything with it. That's exactly what
we needed to do. Now there's another thing
that we need to change, and that is the pivots
where things are moving. So right now, if I
try rotating the leg, which is a very
natural movement, it's doing it in a very weird
way that we don't like. We would like to
change that pivot, same for the head, same for the eyes, for everything else. We want to change that pivot. So what we're going
to do is we're going to start with
the head, actually. We would like the pivot to be
somewhere closer to I mean, he doesn't really have an neg, but if you have an egg, I would put it more
close to that base. So to change the pivot, first, we can change the origin of the cursor where
everything is. And then from there, we can
snap the pivot to the cursor. So to change the cursor, I'm going to press N to bring this menu here on the right of my Viewboard I'm going to go
under actually under two. Wait, no. Under view is where
I want to see the thing. Under view, there's an option to change the three D cursor. Remember that to change
the three D cursor, you can just like,
press shift right and you would move somewhere. But you can also do
it more precisely. So I'm going to bring
it back to the center of the world. That's
where it was. And I actually want to
bring it up on the axis. So let's try doing that.
That's maybe too much. So let's try 0.1. Let's do a little
more, maybe 0.15. Oh, maybe that's not too much. Let's do something like that. 0.12 seems like a good spot. And now I'm going to select see how my pivot still in
the center of the world. So what I'm going to do is I'm going to select the object. I'm going to go under object, set origin, and
then I'm going to set the origin to
three d cursor. So now it snaps to
that three d cursor. And now, if I rotate the head, it would do it from
that middle point. Now, we are going
to do something similar with legs and the arms. Let's start with the arms. I'm going to move my cursor
down just a little bit, Let's do maybe like maybe
something that's not enough. Let's do, something like that, -0.01 seems like a
good Well, actually, we can just keep it
at zero this time for the arms because that's kind
of like a good middle point. But now I'm going to
move it to the side because that's where
I want the rotation happening for the arm. So let's move that location
on the x axis this time, maybe somewhere around 0.3. Maybe I would like
that a little higher. So let's try 0.03, maybe 05, maybe would be better. And let's move this something like that. Yeah, I
think that's good. Now that the pivot is there, we want to select
the arm and again, set the origin to
three recursor. Great. So now we want to repeat the process
for the other arm, so we're going to keep
it right where it is. And the only thing
that we're going to change is that
we're going to add a minus before the location
since this is symmetrical, it should stay under the same, it should be the same location,
but on the other side. And now we're going to
repeat the process of setting the origin
to three D cursor. We're almost there. Let's Let's do, let's
do the legs first. So we're going to center
our three D cursor first. So just keep it at zero. And I'm going to bring it down. Let's say, Somewhere there
is actually pretty good. Do it a little less. Yeah,
zero -0.55 seems good. Now I'm going to move it
on the X axis, maybe 0.25. Let's see how that looks,
maybe a little more. Now, this is a lot
of, like, testing values and seeing what
works and what doesn't. I think that's a good point
where a hip joint would be. So let's just select that, and we're going to set origin
to 380 cursor. There we go. Now we're going to
repeat the process, change the X location with a minus and now
we're going to snap. I forgot to watch
on the side view. That's important, but I think
that's a good spot anyways. Now let's do object set
origin, 23 dcursor. Cool. Now let's do the hands. Let's move the location
in the X axis. Now let's bring it up, maybe a little more. A little extra 25. There we go. I think
that's a good spot. And now let's see on the side. We would need to move it
back. So let's move it. Oh, other side. Okay,
so it needs to be positive and a little more. That's too much. Maybe 0.2. Yeah, 0.2 is a good
spot for the hint. And now we can select the hint and set origin
to three D cursor. Now we're going to do the
same for the other hint. Our pivot should sorry, our cursor should be just in
the positive location in X, and the rest should
remain the same. So now let's just
apply the origin to three D cursor. There we go. And then lastly,
we have the feet. So let's actually bring in
it's really hard. Let's see. Maybe 0.2 would be maybe a
little a little farther, 0.25. Maybe a little more. 0.3. Yeah, I like 0.3. Now I'm going to
actually center this. Sorry, not on the C. The Y one, I want to center it, and
I want to bring it down. See it from the side. 1.2 -1.2. That's maybe too much. 0.05. Yeah, -1.05, and then we might want to bring it to
the back a little bit. Let's do it for 0.05. Yeah, that's good.
That is great. So now we just select
the right, sorry, the left foot and we
set origin 23 recursor. Lastly, we're going to change the location in the
negative space in X, and we're going to do the
same origin to three dcursor. Now, I could do the
same for the tail. Let's actually do that. I'm not planning on
moving the tail, but just to be safe, I'm going to place this in
the center in the X axis. Now I'm going to go
into the side view. Actually, now that I'm here
since I'm in the side view, I'm just going to place
it and it should remain. No, I did not. Let's
just bring it to the center of the
world in the X axis, and that did a good job. You could have done that
with the other ones, but it works. I worked. Let's just keep it that
way and now let's select that object and set
origin 23d cursor. Great. Lastly, we are going to test that everything
is working as we want it. So if I rotate it,
that's working good. If I rotate the leg, that's working good as
well. That seems good. This seems good. This seems
good. Let's do the hands. Yeah, that seems to be moving fine and same for
the food. Okay. Great. One last thing though, is we should change
the pivot of the body. It should be somewhere
close in the hips. So now that we have
it around the tail, we can just move it to the
center of the world and see. Not in C. That was that
was not what I wanted. Okay, let's just move it back because I don't
think there's a way. Let's just keep it
somewhere there. Just do something
there, and it's Y. It needs to be centered in Y. So that seems good. Maybe I'll move it
back a little bit. 0.1. Okay, let's keep it there. I'm going to select the
body and just set origin to three dcursor and that way. Now, this will look
funny with the legs, especially if I rotate it. So if you want to do
some posing like that, we might need to rotate this as well just so that he
has some support. But we're not doing any
complex rigging here. So there we go. We have
our parenting ready. So now we can move on
and pose our character. So I'll see you in
the next lesson.
22. Posing: All right, so now that we have all our parenting done and all the pivots are
in the right place, we can continue and
post these characters. The first thing I want to do
is I actually want to hide the reference images because we don't really need
them right now. We don't want the
reference to distract us from just creating
a different pose. So now that we have him here, let's go on the front
view and then see, I'm just going to do a very subtle pose to
make it different. You can go a little
more extreme. But since we don't
really have a rig, we kind of have a
constraint of how much we can do with our pose. But what I want to do is
something very simple and cute. I'm going to just rotate the head to the
side a little bit. I'm going to rotate
this arm down. Maybe I'm going to
rotate the hint as well. Now I'm going to
change this, and I'm going to change
it actually to local, and I'm going to just move
the head hind like that. And now let's grab
this arm and let's rotate it so that it's
maybe not too much. Just lift it a little bit. We can rotate the hint as well. So, that's too much. Got to be kind of subtle
with it. Just like that. And then let's see how it's
looking from the side. That's important to
always check how things are looking
from the side. So I'm just going to just
rotate that a little more. Cool. Now I can rotate. Actually, I'm going to rotate
the whole body like that. But since it looks like
he's losing balance, I can let's see, just
something like that. I'm going to move the leg
back here so that there's a little bit more
balance on his weight. We can maybe move
this a little bit to the other side and then
just lift the leg a little. And that's just a
very simple pose, but as you can see, this allows us to have
something different. Now, something that I
want to do with this arm, it's because this is not
attached to the body. It looks like it's coming
from a weird spot. So I'm actually going
to change where it is located so that it comes more
from that place instead. Okay, I think that's it. Like, it's very simple,
a very simple pose. You can do something
different if you want to. I think that this is good
enough for this project. You can do something
different pose, be creative. But yeah, this is just how you pose your character
without a rig. It's very simple, very useful. So yeah, now that we
have an actual pose, we can go ahead
and render it out. So for rendering,
we might need to do some lighting, some camera work, maybe a background,
and we can finally have a final image. So that's it for this video. I'll see you in the next one.
23. Camera: Okay, so basically we are
done with our character, but we would like to be
able to show our work. And to do that, we need
to render an image. So to do so, the first thing we need to do is to add a camera. So let's go ahead
and do that with Shift A and just add a camera. Now, you're probably
going to have this menu on the bottom left, and I want to just keep
everything very centered. So let's just do
that. Actually, I would need to rotate
that to maybe zero. Yeah. So basically we just
want it facing the pair. So let's just move
it to the pack. And now to be able to
know what we're seeing, we are going to press
zero on a NAT numPaD and then you are going to see whatever your camera
is seeing currently. So one thing that before we start moving this around
that I want to do is I want to change the
focal length of the camera. For characters, I usually
like to go more like a almost with a tell lens. So what I want to do is change that focal length
a little higher. I'm going to go with
maybe 85 millimeters. That's going to make it
look like it's closer, even though the camera
is in the same position, and it's going to flatten
our object a little bit. Now, I want you to look
what if I change it to 25, and I come closer to the camera. Like if I want it to be
in the same position, it's going to look
like very distorted, and that's why I don't
love it as much. I'm going to keep it at 85 and I'm going to just
move it to the back. And just go into the camera. So something that we can do now, it's kind of like position the camera from the camera
view with a very cool option. You can select that
option by going under view and then go
under navigation, and you're going to see at the
end there are two options, fly navigation or
walk navigation. I honestly don't really know much of what's the difference. I think one is faster
than the other, maybe. I might be wrong, but I usually just select walk navigation. And then if you move your mouse, you're going to see that
I'm rotating around. And if you've ever
played video games, to move this more accurately, you're going to use
different keys. So I'm going to
explain that to you. If you press S, you're going to go farther. If you press W, you're
going to go closer. If you press Q, you're
going to go down. If you press E, you're
going to go up, and if you press A,
you're going to go left, and if you press D,
you're going to go right. This is a very cool
thing because you can help with moving
your mouse around, you're going to be
able to locate it. But then also, you're
going to be able to change the position with your keys. So basically the tilt is
managed by your mouse, and then the location of it
is managed by your keys. So I'm going to
move it somewhere that it's fully centered. And I think that's pretty good. So basically, now that I
have that camera ready, I want to add a floor to the floor and background
to the player. So to do that, I'm
going to just add a plane. So let's do that. I'm going to go
on my front view, and I'm going to place it right where the right foot is
kind of like touching. So I'm going to place
it right there, and then I'm going
to scale it up. That might be a bit too much, but just scale it
up enough so that the camera is fully covered. Whatever the camera
seeing is fully covered. And then what I like doing
is going on Edit mode, select the edge on the back, and I'm going to extrude
it in the C axis way up. Now, I'm going to select that edge that's
right on the corner, and I'm going to
bevel it by pressing Control B and just raging
my mouth my mouse, and then just with scrolling up, you can add more
subdivisions to the bevel. And I don't like to
go too exaggerated, but something like
that would be good. And I'm going to make sure
that it's shade smooth. Now let's go under our
camera, and that's perfect. We don't really need
any more than that. Now, we are going to add a
material for the background. So let's show that New and we're going to emit
material background. Perfect. I'm going
to keep it white for now because we haven't
really done any lighting. But as you can see, this
lighting that you see now is just like what
blender has by default. But as you can see now,
we have, like, a floor. You could change this to
whatever color you want. Now we can see this better
when we have our real lights, but I would like to go with like a fun color or something. So we can play with that around. But basically, that's what
we need to set it up now. We do need to add some lights, and I'm going to add a
few things to be able to render these out so that
it looks really nice. I'll see you in the next video.
24. Lighting: A Alright, so now
that we have this, we are going to add some
lighting into this so that we have more
control over it. So what we're going to do now is that we actually want to select scene world and scene lights
under our viewport shading. Now, what this is going to do, currently, we don't
have any lights. We don't have any environment
texture or anything. So it just shows up really weird. But we're
going to change that. So the first thing I want
to do is I want to add an texture environment image so that we get some lighting
from the environment. Now, the way to do that
is that we're going to go underworld and we are going
to select what we said color, we're going to click
on that yellow dot, and we're going to go and
select Environment texture. Once we do that, everything's going to turn pink
because we need a texture to be able to
have some lighting of it. So here we're going to open. There's a texture
that you should have an HDRI that I gave
you on the resources. So you should open that. I have it on my downloads here
is the Brown Photo Studio. These are free HDRIs
you can find online. And yeah, basically
what it does is that it brings the lighting for us. As you can see, we have a
shadow, we have everything. But I would maybe like seeing different angles
of the lighting. So to do that, we can go. I'm going to open this window down here and I'm going to change I don't want
to see the timeline. I want to see the
Shader editors. I'm going to click on
the Shader Editor. And here, right now you have just a color for the object
that we have selected. But I actually want to change
here where it says object, I'm going to change
that into world because I want to change
the world settings. Now, here you will see that
we have a world arc output, we have the background node, and then we have our image. But to be able to
rotate this image, which I actually want
to show you something. Let me see if I
disable the world. You will see the
picture right there. Basically, that's what's
lighting our world. So now from here, we can add two nodes. So let's add a texture
coordinate node, and let's add a mapping node. So we're going to
need these two nodes to be able to rotate
the world around us. And here we're going to connect the generated output into
the first vector input, and then we're going to
change and not change. We're just going to
connect the vector output into the vector
input of our HDRI. Now with that, we
are going to be able to rotate in the C axis, the world around, and
we will be able to see how the character
is being lit. As you can see, the
shadows are changing. Now, if I bring back that plane so that we don't get
distracted by the image, you'll see if I rotate this, we're going to have different lighting for different things. So we can choose
something that we like. I honestly feel
like the beginning, let's just maybe move
it a little bit. Something like that, I
think that's pretty good. I will like to change the
color of the background, I feel like it's too bright. Let's try and change it
to something softer. Maybe in the purple and
then bring it down. Yeah, something more like
that or maybe we can try an orange. I don't know. You can be playful with this, choose the color that you feel like works better and
you like the most. Give me some pink.
I like the pink. Okay. You can keep it like that. One thing that we can do
here is I actually want to go on Edit mode, select this edge, and I
want to bring it more higher because I feel like it
was doing something weird. I might actually bring it forward a little
bit, just a little bit. Okay, now, that seems okay. I might need to
change the roughness instead because I
feel like it's being very like I want
it to be more mad. Let's do something
like that instead. Okay. Great. So now
that we have that, we can add a few more lights. We won't be doing too much, but something that I want you
to take a look right now it if you have a decent
machine that can render uh, without killing your computer, I know not all of us can have access to great
computers and whatnot, but right now we are using
IV as our render engine, which is a real time renderer, which means it's
going to be cheaper, it's going to be easier
and faster to render, but also the quality of our
renders might not be the best compared to our second render
engine, which is cycles. I'm not going to talk about
workbench, but cycles. Now, cycles is a tracing um, renderer, which creates
much more accurate renders. If I go under the render tab, you would see now that
it takes much longer. It's much noisier,
and there's more that you need to
work with cycles. Now, I do suggest that if
you feel like you have a strong enough computer to support this that you make the most of it because
it's really cool. I feel like cycles has a lot of power that you can work with. But if you don't and you don't want your computer
to explode, that's fine. You can always just
change it back to EV. You might be thinking like, Oh, cycles doesn't look as good. And the reason is that
I haven't brought my samples to the highest that it can be on the Viewboard. You can make them
a little higher so that it's not as noisy and
then you can play with that. But for now, let's just work
with IV since it's faster. And the reason why
I mentioned that is because the lighting is
going to look different. So if you have the power
to work with cycles, make sure to add lights
and start comparing them in cycles so that you know exactly
what you're doing. But for now let's
just focus on IV. Let's add a few more lights. I I feel like the lighting
overall looks very good. There's just one light that
I would like to add and it's a spotlight that I'm
actually going to move to the back and I want to
rotate it in the X axis. Let's see. Here we
go. There we go. The reason why I want to
add this light is because I want to have a little
bit of a rim light which is the light that we get on the silhouette and make
things look a lot better. Let's do something like that. Let's rotate it in let's
do the world Oops. I don't want to go
under modeling. Global orientation. I'm going to move it into C
axis, something like that. And let's see how
that's reacting. Et's go under the
light. We might want to bring the power up to
something close to 5,000. See how we start seeing that light on the edge and giving me that silhouette
that looks very good. We can change the radius or
just make it more small, change the size of the cone. There are plenty of things
that we can do, but honestly, I just wanted to
be close enough so that it's close to our panda. Going to rotate it in the
C axis a little bit more. See how that looks. Maybe I'm going to move it to let's see. This is a lot of placing and seeing what's
working, whatnot. See something like
that would be nice. Having that rim light on our side and kind of the
side of the face as well. And then we can change
the color of the light. I don't want it to
be completely white, so maybe something more
warm would be nice. Or maybe even something cooler. Yeah, I also like
in the blue tones. All right, that's
it. That's basically it. We have our lights. Because our HDRI has a
lot of lighting in it, I don't want to saturate it and just kind of make it explode
and look very white. I feel like this is decent. If you want to add
a few more lights, you can you can also change the strength of the environment. So if I want it less, it affects less, but it's still there and then just add
a few other lights. That's also doable. So just see what works for
you, what you like. This is complete
personal preference. I think I might want to add. Few more lights maybe
to play with it, but it's completely up to you. You get the idea, add some lights here and there
to make it look appealing. And yeah, that's basically
it for the lighting. In the next video, I'm going to show you how to render and how to export the image.
I'll see you then.
25. Render: Alright, so we have our
lighting setup ready. I ended up adding
just another light, which is this one right there. Kind of like to give it a
little more brightness to it. But yeah, you can
add as many lights as you want,
completely up to you. But we're going to keep
it like that for now. And I'm going to show you
how to render something out. So first, we're going to
need to know if you're rendering with IV or if
you're rendering with cycles. That's super important
because it's going to be a little bit
different for each. If you're rendering with IV, there is a cool option. Right now we are on
the render view, but this is not the
actual final render. As you can see, we have
different samples for each. So right now our
viewport has 16 samples. If we render it out,
it's going to be 64. So it's quite a bit
of a difference. The samples are
basically saying how much the computer is calculating
the light, basically. So the higher the number, the more it's going to calculate each ray and each
light and all of that. So you don't worry if this is not going to
be the final quality, but it's good that
you test it out. One thing that I
think it's fun for IV is that IV has a
ray tracing option, which might consume a
little bit more of time, but I'm going to show
you if I activate. Oh, it actually looks a
little better than it did, it's the lights
are not as bright and it seems more natural. So if you are rendering with IV, just select tracing and I feel like that's going
to be great for you. Now, if you are
rendering in cycles, you can see it takes
much more time. Again, the viewpoard sampling is different than the render. So right now we're
having as you can see, right on the top left, we see the samples. Right now it's 36 out of 1024, which is what we said that's going to be the Mc samples in the viewpoard and you see how much it's
taking to fully Oh, wait, it completed the render. Okay, so that didn't
take too much. But for the renderer, you have a 40 96
maximum samples, and the noise tresshold
is much lower. So that means that the quality of the image is
going to be much, much better, but also it
can take much longer. So be mindful of that. I wouldn't mess too much with these numbers because
it might be too much. You might kill your computer
or you might never end. So just be mindful of that, but those are basically
the differences of each. Now with that in mind, we now need to set a output. So underneath where
there's a printer. We're going to see how much
we want the resolution to be. Right now, it's just a
ten eDyP resolution. So basically it's
20 1920 by 1080. Change. When we're
testing renders, it's usually nice to just
bring this percentage down, so it's going to
keep the same ratio, but it's just going to be 50% less big so that we can
test things like that. I sometimes even do 10% or
20% to see faster results, but also see how the quality
of it is going to look. Right now I feel very confident
I'm just going to keep it at a 100% of that resolution. We don't care about frame rate because we're not
doing animation. And then we need
to set an output. Here it says output. We're going to select a
folder where you want those let me see here where you want the
image to be exported. I'm just going to do here. I'm going to just do
a Panda. Let's see. Yeah, I'm just going
to call it Panda. Wait actually. Let's just
create a new folder, I'm going to call it output. I'm going to select
that and I'm just going to call it Panda except. Cool. And then I'm going
to change the file format. Oh, actually, it's
PNG that works great. I want a PNG for now, and I'm going to keep
everything as is. So yeah, that's basically
all you need to do. Once you have your setup done, I will suggest you go back
to your solid mode to start your render so
that you don't kill your computer and have
two renders at once, the viewboard and the real one. You definitely don't want that. But now that we're here,
you just going to go up here on the render tab, and then you have the
option of render image. You can also access that
with F 12 on your keyboard. Yeah, it's going to
start rendering. It's going to probably
take a little bit, might not take that
much, but we'll see. I'm going to keep
rendering this, and I'll show you the
result in the next video.
26. Final Image: Great. After rendering,
this is our final result. Now, it is important to save the image somewhere
in your file. So let's do that by
going under image, and then we're
going to hit Save. And here you can change the location where you're doing it, but I'm just going to
keep it here and we can name it panda render or
whatever you want to name this. It's going to be a PNG since that's the format
that we had chosen. And we can just simply
say save as image. So you have it saved. Um, great. So now that we have
our image done, I always try to keep my scenes organized and that's
something that we haven't done for
the past videos. So we're going to
make sure that all of our objects in the scene
are in the right spot. So one thing is that
I'm going to rename the plane to be background
so we know what it is. So this is going to
be our background. And now we want to move
the things that are not a mesh in a different
collection. So let's create a new
collection called Extras. And now we can move
the camera and the two lights into
that collection. So now we have reference
images in a collection, the meshes in a
different collection, and then all the other objects
in a different collection. You have everything organized. So, yeah, that's basically it. We have our final
render of the Panda. I'm very proud of you
for getting up to this point and
finishing your project. This is super cool. This is just a great way to
creating simple characters. Hopefully, maybe now you can start creating
characters of your own. But, yeah, I would also
love to see all your work, everything that you've
done during these lessons. So please feel free
to share your images of your Pandas under the project section so we can all see it with
the community. Maybe we can get some
feedback and whatnot. So, yeah, I really hope you learned a lot
during these lessons, and thank you for watching.
 Monica Trochez-Hayes, CG Artist