Transcripts
1. Introductionto Abstract Collage: Hi, I'm Amy Wynn and I'm
really happy to have you here in my Historic Mill
studio in Rhode Island. Today we're going
to explore collage, collage as a catalyst
for abstraction. I love making collages. I feel like working
with collage is a way to experiment things side by side that you might
not normally play side by side and really work
with color variations, work with your imagination. Artists have done this
for quite a long time. Modern artists,
contemporary artists, artists like Hannah Hook, an early Surrealist artist
like Kurt Schwitters, who worked a little bit after her in the timeline
of art history. But these artists
used photographs. In this case, the Surrealist
used photographs and bits of paper and drawing and painting combined to create images
that were more dreamlike. Kurt Schwitters used remnants of everyday life ticket stubs. We're going to be actually
exploring what you might just be able to use in terms of what you find around
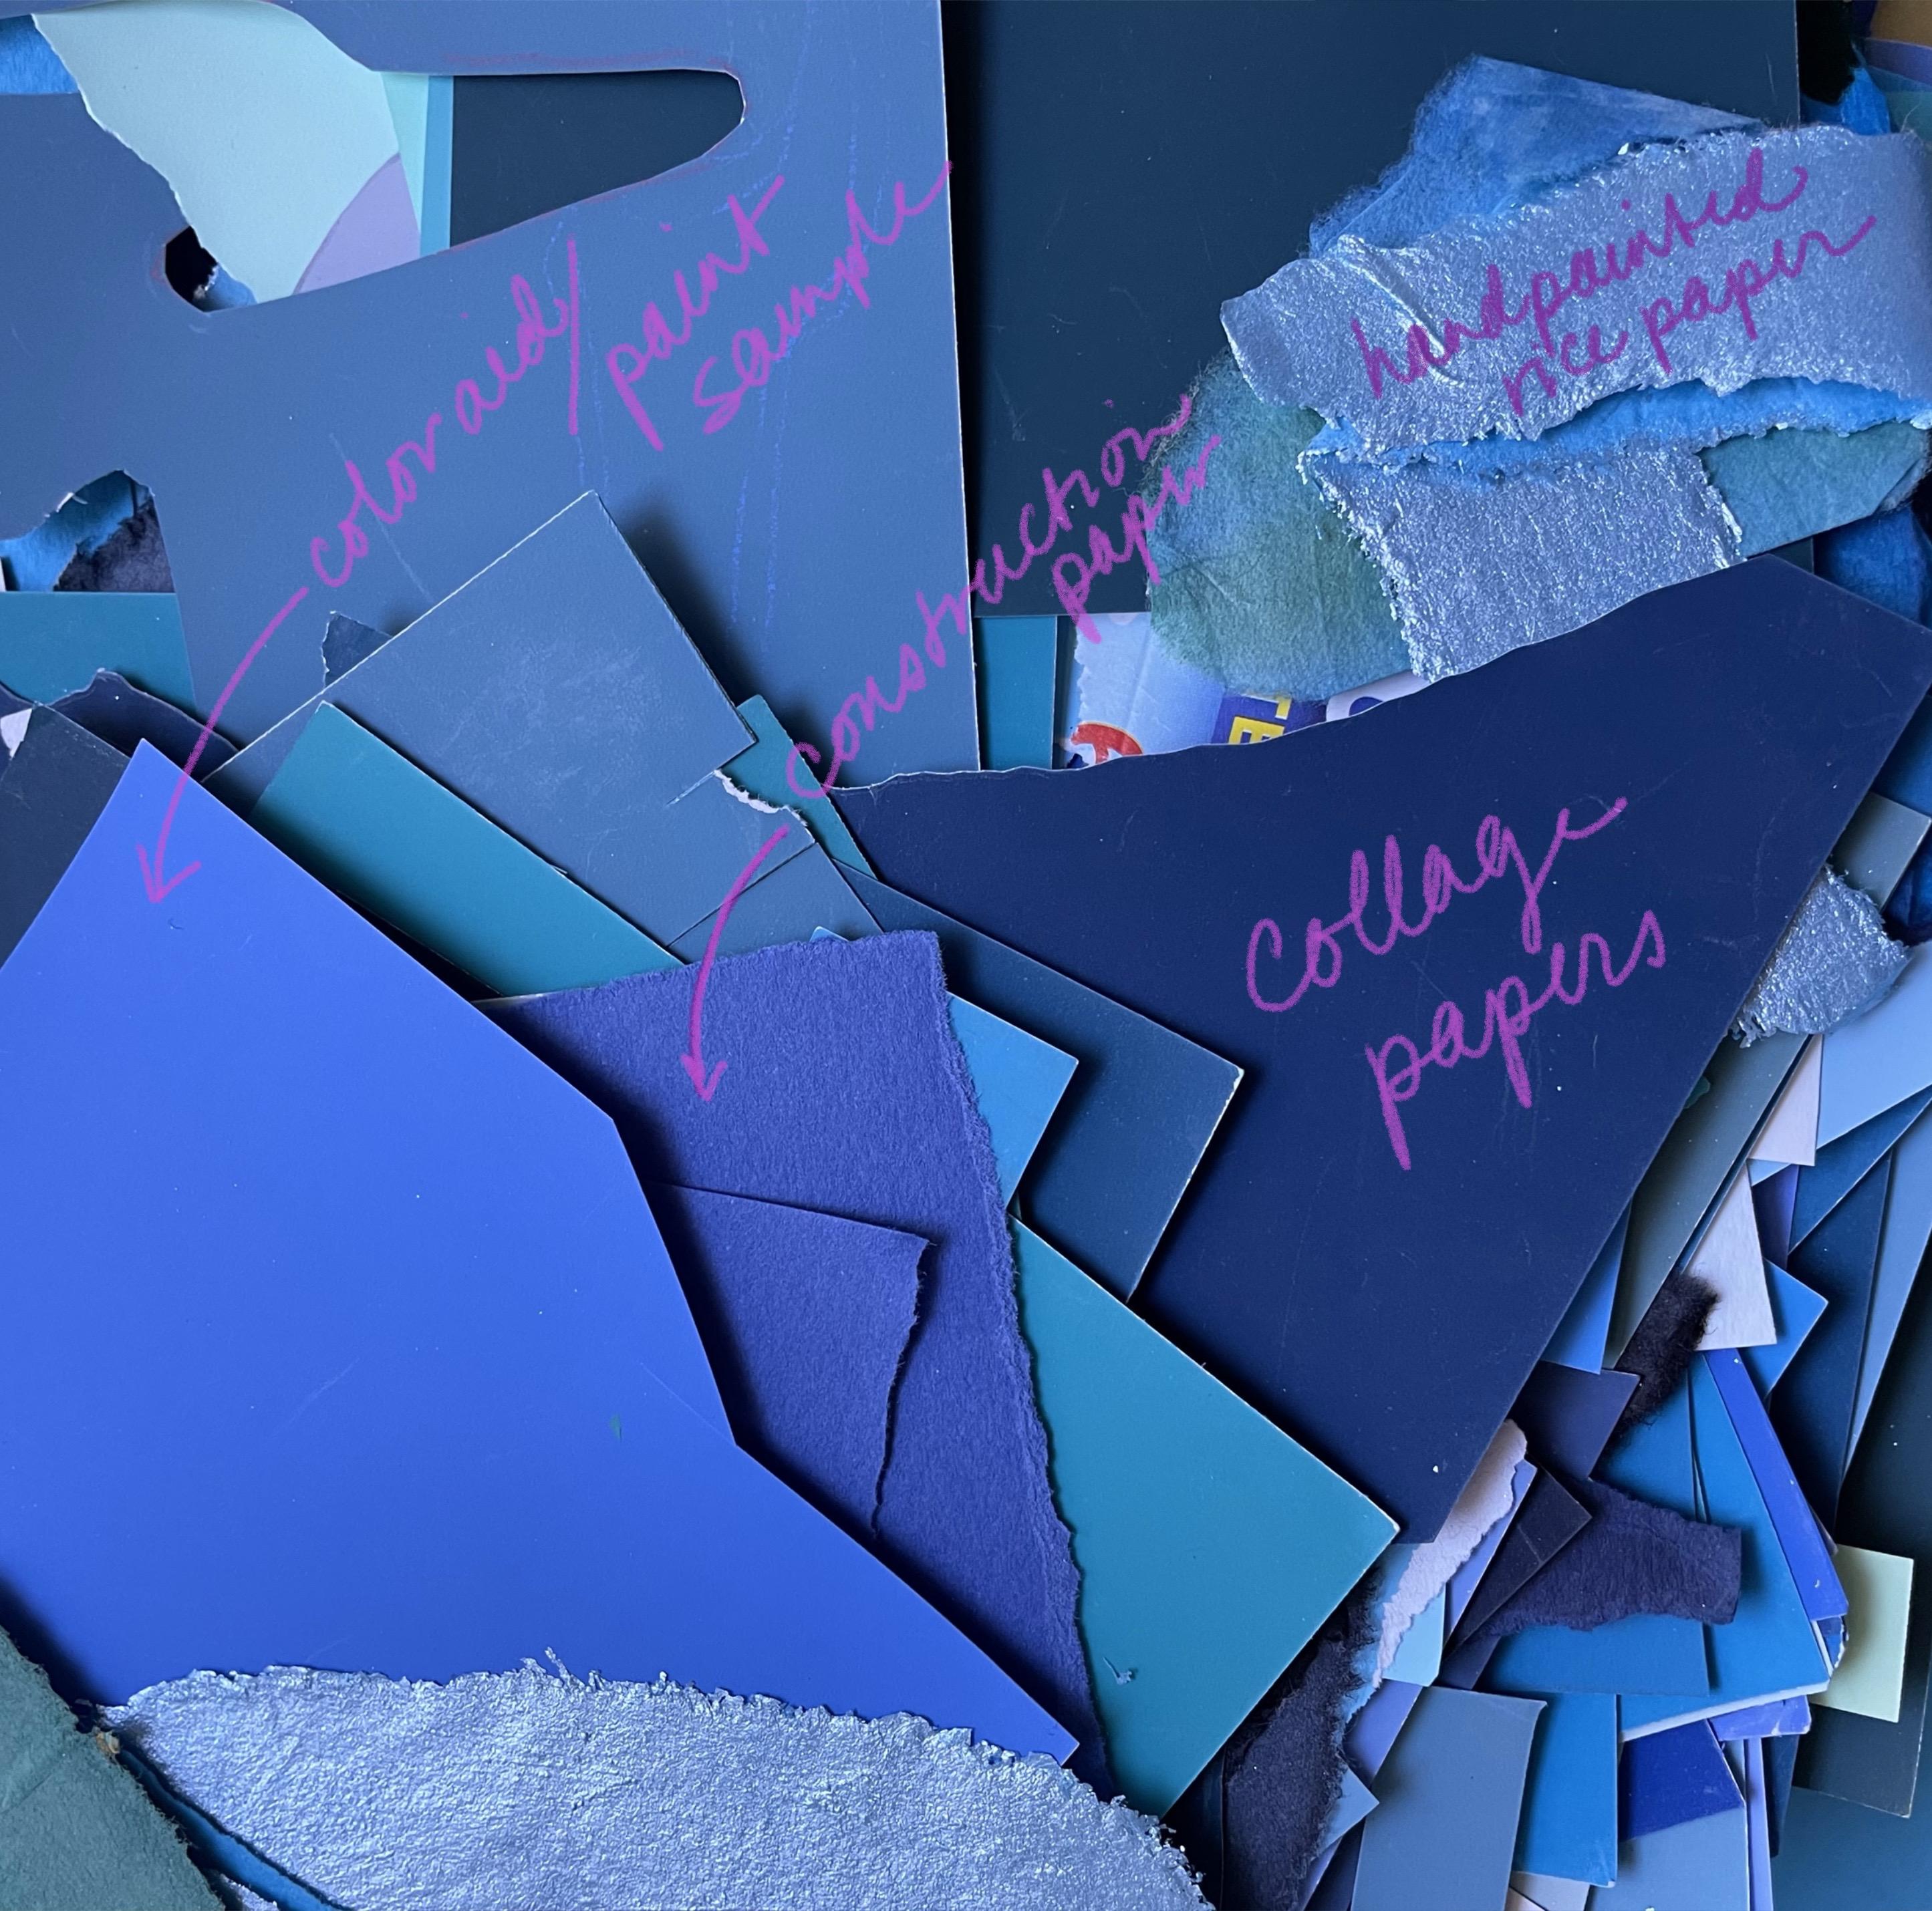
your household. For collage, we'll be
talking about materials. This is actually
one of my collages. And we'll talk about hard
edge versus soft edge, torn paper versus cut paper, Working with simplification,
which is a huge, huge benefit of
working with collage. We'll also be looking at
the beautiful possibilities of using the remnants of process inherent
to cutting paper. You cut out a shape and
they'll be leftover shapes. And I save everything. I save all the leftover
shapes because I feel like those leftover shapes are
opportunities for abstraction. We'll talk about
arranging and rearranging leftover shapes and play with that in terms
of color schemes, amping color, working with
monochrome flipping value. It's all super playful and I think that you'll
find as we go through the different activities
and exercises that it will really spark new possibilities
in image making. In addition, we'll talk a little bit about your aesthetic. You know, like
what inspires you. Some collages are done with more biomorphic or
organic shapes. We'll be working with
a really fun exercise with this rhododendron here. And other collages
have harder edges, they might have more of an
industrial kind of feel. And we'll be working
with a fun game called Cubo Mania
where we're going to be cutting up an image and regrouping it and
reorienting it with itself. So collage gives
the opportunity to orient and reorient
to layer to flip, to play with color schemes. It's a really fabulous way
to edge into abstraction. And it's also, if you remember when you were a
kid and maybe you made collages when you were in kindergarten or second
grade or whatever it was, and you tore paper and you cut paper and you glued it down. This tactile experience is a
really connective process. I'm excited to show
you the sorts of things that I work with in
the studio, around collage, using remnants of papers, working with different
color schemes and really experimenting. I hope that what I show you will spark your inspiration
to try it for yourself.
2. Collage Materialsand Techniques: I find collage materials to be so exciting because
quite honestly, you can use pretty much
anything to make a collage. So I want to show you some of the things that I really
enjoy working with. And then I invite you to start collecting things
like magazines. You know, you might be leaving
through a magazine and see this incredible green color and you could just tear
it out and put it in your collage pile to
use at a later date. I like to use U. Sometimes I like
to use envelopes. You know, I collect envelopes, especially if they have
beautiful colors inside. You never really
know what's going to be inside when
you open it up, and they often have a lot of really beautiful
patterns on them. I also sometimes use like stickers that
come off of a package. Some of these other papers, here are things I'm
about to show you, ways that you can maybe
prepare handmade, hand colored papers for collage. But also some other store
bought options for collage. Once you start collecting
things to make collages with, you'll just start to amass a collage palette
where you'll have multiple colors and
you'll be able to pull things really quickly and
have a lot to work with. All right, so I
want to talk about papers first because often
collage is done with paper. Collage can also be
done with fabric, with wood, cardboard,
all sorts of things. But basically, paper is a
very common collage material. So typically you'll have a substrate which would be just a backing to
glue things onto. This just happens to be
a basic piece of paper. And then in terms of
different types of papers, you know there's your
basic construction paper, which there are many colors you can buy and you can even just use like kids
construction paper. And construction paper
can obviously be cut. You can make some beautiful
shapes by cutting. And this is true of all these papers I'm
going to show you. Scissors are just one way to
work with creating shapes. Another way,
especially if you have maybe more precise shapes or
small shapes that you need, is to use some kind of blade. And obviously you want to
be careful doing that. Often I'll put some kind
of backing behind it, whether it's a piece
of heavy cardboard or a cutting mat like this. Let's say you want to create
a shape through cutting and you want to be really careful
to keep your hand out of the way, right? So using a blade to cut, using scissors to cut. And then the possibility also, which I often do, of
tearing the paper. Tearing the paper without any sort of cutting tool at all, creates a very
different sort of edge. And you can see that here in some of these softer
edged papers. These were all torn,
but this edge was cut. So there are many possibilities. And you might think, well,
that's a subtle thing. You know how you're actually
going to cut your paper, but it actually creates
a real variety in terms of just the look and the
feel of the collage. I want to show you also just hard edge soft edge
store bought paper. Handmade paper. The paper was actually handmade, not by me, but it
was hand colored. It was hand painted. I'm going to show you
that in a minute. I love the organic possibilities of painting your own paper. I also love the possibilities of the saturated flat quality of papers like this
paper like this, you could buy in the art store, but you could also go to like
a home improvement store or a paint store and take a look at the swatches they have on
display and collect from there. A little bit here and there. And what's interesting
as opposed to when you tear construction paper
and get the soft edge, if you tear a paper like this, what happens is, and you can
see it against the pink, is that because it's
painted on one side, when you tear it
in a certain way, it'll give you a white edge. And it will give
you a colored edge. That also creates some
beautiful variety in terms of collage, tearing, cutting. Store bought pigmented papers. And then the possibility
of hand painted paper, I think I really build my collage palette around these ideas, around
these effects. I'd like to show you
how I hand paint paper. And this is a piece of
sort of porous paper. It's like a rice paper
or a mulberry paper. Any kind of paper that's
sort of fibrous and absorbent I feel is a great one for this
sort of possibility. So I'm going to tear
it and sometimes I'll just tear some
random shapes, not really knowing in terms of just preparing
papers for collage. I'll tear some random shapes, I'll put it down on
some kind of backing, you know, just for the
paint purpose of painting. Sometimes I'll use
diluted water color. But oftentimes just because I love the intensity
of the pigment, I'll use an in a colored ink. So I'm going to try that now. And you'll see, I think that this was
painted in this way, right, like torn and painted. And you'll see how that the ink kind comes
out to the edges. So I'm just going
to take a brush, I'm going to dip it in to
this really beautiful blue. I'm going to go ahead
and just paint the sin, and you can see how it
absorbs out to the edge. If you use enough ink,
it's really beautiful. You can see as the dark ink starts to absorb into the paper. You could see that
like deckled edge. I just think it's so beautiful. And then I would let
it dry like I did to this one and it would take a bit and then just pull it off. And there you have your
piece to work with. Sometimes if I'm really
going to get into a collage jag in the studio and I have some ideas in mind
in terms of color. I'll tear a whole bunch of this rice paper and just do
a whole range of colors. Let them dry, and then
I'm set up to work. So that's a possibility
you'll find your own way. Hand painted, store bought. And then ultimately the thing that's very important
is, you know, yeah, I have all these
beautiful papers, but how do I attach
them to the substrate? How do I attach them to
the collage surface? And there are many
glues out there. There are many things
you could possibly use. So one thing would
be a glue stick, and I would recommend
getting a glustic that advertises itself as
a pretty powerful one, as opposed to the
restickable kind where you can take things
off and put things down. I'm going, I'm sure that many
of you have used gluestics, but I'm going to show
you how I would do it. I'm going to take the glutic, just put it onto the
back of this piece of paper and then just
flip the paper over. Decide where I want it to be
and then just glue it down. And hold it for a second
so it adheres in the end. Once you glue a lot
of papers down, let's say you've
completed your collage. Sometimes I'll take a piece of wax paper and put it
over the collage. And then put a heavy
book on top for a little while just so
it really sticks down, but that's not going anywhere
that's nice and secure. Then you always want to remember to put the cap back on
the glue stick again. I know that sounds really
basic, but I can't. You get into the
heat of the making and then you come back
later and you say, oh shoot my glues all dried up glue stick is one way to go. Another way to go
is liquid glue. And liquid glue, again is
totally a possibility. A lot of you have probably
this lying around the house. You can put the liquid
glue on your piece, and sometimes also you
could put it in a jar. You might want to use a
brush to spread it out, especially if it's in a jar. Then you can flip it
and maybe ask yourself, oh, that looks nice on
top of this other one. Give it a little bit of a rub on the back and
work in that way. Those are two possibilities. Another possibility, which
I'm going to show you later, is the hot glue gun. This really works well. We're going to do one
collage that uses a lot of heavier cardboard. Hot glue gun is a
really great way to really get those
pieces to stick down. I'm going to show you
that in a later lesson. So all of these materials, some of them might just be household items that
you have lying around. A good glue is really important. If you like the look of
these hand painted papers, I invite you to try that out. It's very satisfying. And then you can really dictate the colors that
you're working with. But again, a basic construction paper,
something like this, in various colors is a great starting point,
cutting, ripping. And there's nothing like the
feeling of like pressing down a piece of beautifully
colored paper and really feeling it
attached to the surface and start building these
beautiful images out of collage.
3. Collagefor Simplification: So simplification is not simple. Simplification is
sometimes, I think, one of the hardest
things to do when we're working with an image that
has a fair amount of detail. And we ask ourselves,
what can we let go? How can we let it go? What we're going to work
with in this lesson is using collage as a way
to simplify an image. In the simplification
of the image will actually create
something much more abstract. They'll be an essence of
the original image there, but it's really a way to let go of the things that we
might think are important. It's very hard for a lot of people to do that,
including myself. So collage is an incredible
teacher for simplification. If you give yourself some rules, I have this image here. I took this photograph on the beach out in
Provincetown on Cape Cod. And I love the way the boats
are situated on the beach. And I thought, you know, that might make a pretty
interesting collage. So I took the image and I
made a drawing from it, like a simplified
drawing already. In the process of working
from a photo to a drawing, I've started to simplify, but I knew this was going
towards the collage. I knew that I wasn't
so interested in cutting out every
blade of grass. I wanted it to be a little
more simple and graphic. So what I did is I took a
piece of tracing vellum, which is a transparent
or translucent paper, and I laid it over the image. And I actually said, Amy, you just get five
shapes. That's it. And it's a challenge, right, Because there's so many shapes
actually going on here. So I took a pen and I just said, all right, I just
get five shapes. So I made one shape, the boats, I made the
other shape, the beach. Another shape is the grass, another shape is the sky, and the fifth shape is the
buildings in the distance. So I did that. And this in and of itself is quite an abstraction if you're knowing that it
started here, right? So I don't really
need the photograph anymore and I don't really
need the drawing anymore. And what I ultimately made
from this is this collage. The colors aren't exactly what the colors were in
the original image. I just chose colors
that I felt were sort of suitable or look
good together. And I want to take you
through the steps of how I got from here to here, just so that you can potentially
try this for yourself. Now I know I mentioned that you could cut
paper or tear paper. This is a hard edged collage. This is a collage,
as you'll see, that I cut with an
exacto blade and I glued it down and it's
quite hard edged. You could take this
idea and take paper, and you could rip shapes like if I was working with ripping
this central shape here, as opposed to the
precision of scissors. I could take this feeling of the central shape and just start to tear the paper, keeping the remnant shapes, because those are
often so beautiful. I love just the feeling of
the paper as I tear it. Actually, I love, yeah, You know, a shape like this
versus a shape like that. A different feeling. It's got
the gesture of that shape. But if you like this
kind of chunky, organic kind of quality, you could certainly
try this with tearing. That's a possibility. But I'm going to
take you through the cut paper version because there's some things that I think will be helpful
for you to know about. All right. What I also have here is a piece of what they
call transfer paper. Transfer paper is pigmented on one side and the other
side is not pigmented. I use this, it's a short cut. It's basically a short cut. What I can do with it because I have I consider this a map, because I have my map. I can the transfer paper I'm
naming this fifth shape. I'm going to do this
very light color for it. I can take this paper, I can lay it with
the pigment side down on top of the light
paper that I've chosen. Then I can take a
very hard edged pen, like a ballpoint pen, pen
that has like a metal tip. Often I'll tape down the edges. If I'm doing something a
little bit more involved, double check that the
pigment side is down, then I can go in and just. Trace around the shape. You've already done the work to create these shapes, right? You've already done
the work through the tracing process and
through the difficult process of simplifying to actually
create these shapes. The effort to try to
redraw them all over again just seems like for
me like a waste of time. I did that and it transferred
down onto my page, just like that, because
this shape is little. I'm going to use my blade. I'm going to come
in and I've got a cutting surface
down beneath it. I'm going to do one thing with these is you want
to make sure that they're this is a little bar that you can turn to make sure the blade
is tight in there. And I'm going to come
down one side here. Sometimes I'll turn
the paper to make it easier to cut in a
different direction. You want to just be
steady and slow. There's no rush here. It's actually, I really
enjoy cutting shapes out. It's a very meditative process. Again, I find cutting towards myself a little easier than cutting sideways
or cutting away. You'll find what's
easiest for you, but I definitely recommend
making it as safe as possible. You never want to have your
hand behind the blade. You always want to have
your hand in a safe place. All right, let's
see how this goes. I think, yeah, I
can pop this out. There's my shape, right? And now let's talk a little bit about assembling the collage. So this shape is
this shape here. Just sort of redoing it for you. And you know what,
Also, I really love, I love this remnant. We'll talk more about this,
but you know, don't say, oh, well this paper is
ruined now because, you know, it's left
over from this. This is the stuff that
later on in this course, we'll be using these
remnants of process to make even more abstract
things. So keep that. So I have to put down
for this version, you know, a surface that I'm
going to glue things on. Then I'm going to start
to place my pieces. I did a little pre
cutting of these pieces, but you can see as I'm
laying them on each other, they are looking interesting. Even over here. I transferred these and I cut them
in just the same way. It's like a puzzle and
a beautiful puzzle. A puzzle that you've pretty
much planned and figured out, but you never really
know until the end what, what it's really
going to look like. I've got this piece here, I'm going to flip it
this way. There we go. So I've got these pieces
now, and you know, I have to make a choice about how I want to
put them together. So one thing that a lot of
people do with collage is, you know, these
aren't perfectly cut. You know, they're going
to fit the best they can. So some people really snug them in and put them right
up to the edge. It almost doesn't matter like what color the paper
is beneath it. That's definitely one option. Put this guy in here, you know? That's one option. But another option, which I also think is kind
of interesting, and again, we'll talk
a little bit more about this when we talk
about color variation. But another option is to actually give them like
a little wiggle room, like a little breathing
room that can also be sort of beautiful
depending on what's underneath. Just giving them a
little space in between creating a little bit of a gap can also be
quite wonderful. Then it would be
the process again, of gluing things
down, which we saw. But I'll just do it with
this piece to remind you, sometimes I don't like putting the glue on top of the piece. I'm about to glue down with the collage directly
underneath it. Because then if you
get glue off the side, it's going to get
on the collage. So you can do a
number of things. One thing you could do is just take a piece of scrap paper, it's kind of your glue surface. And you can then have
that beneath it. Put your glue down and I'm
going to try to get it out, especially to these pointy bits. I'm going to try to get it out as far as I can to the edge, so that when I glue it down, those don't curl up on me. Then you can move your
glue paper aside, Then just lay in
your first piece. These other ones are movable because they're not glued yet. But I like to start in the middle and
spread out to the edge. Start in the middle,
spread out to the edge all the way around. Yeah, that's pretty
nice, very satisfying. Just even feeling the
paper is very satisfying. That's my first
piece glued down, and then the other
pieces would follow suit in just exactly
the same way. Ultimately, you
end up with this. It is very simplified version
of the mother image here. And I think that this
possibility of simplification, the possibility of using a map, and again, this mapping process, is incredibly helpful in terms of even the fact that you can't see completely through
the tracing paper. You know, you don't have to make a drawing if
drawings, not your jam. You don't really have to even make the transitional drawing. You could just lay some trace paper on top
of a photograph, right? And trace it. The trace paper obscures a lot of the detail. I can't really see
all of the blades of grass and just choose five
shapes they might be, that means you're going
to have to let go of some of the in
betweens, right? But those five shapes
can lead you to what I consider a beautiful simplified
version of the subject, which is in itself abstract. I suggest looking through
your photographs or maybe going out and photographing things
with collage in mind. Over time, you'll start to
see things in a new way. You'll see the potential of
your world in a new way. Bring it back, get some paper, maybe try to find
some transfer paper. You can even get carbon paper at a copy store and
play a little bit with transfer varying maybe the color schemes
and backgrounds. But try working with this
discipline of simplification, because simplification
can be very beautiful and it's one
of the gifts of collage.
4. New Color Horizonswith Collage: Collage is a great way to
explore new color horizons. So I think many of
us, including myself, we get sort of in a loop
with the colors we like. And we start to maybe lean
on habit a little bit. I'm just speaking for
myself and I think that collage because there's this opportunity to
constantly change it up. There's an opportunity
to constantly try new things side by side without making a big
commitment to it. I think collage is
like an incredible way to expand the colors that
you might choose to use. So I use it a lot for that. I do a lot of different color
schemes based on one image, actually in an effort
to create variety. But also in an
effort to ask myself what's the strongest
way that this image, this abstract image,
might manifest based on the shapes and the colors and the
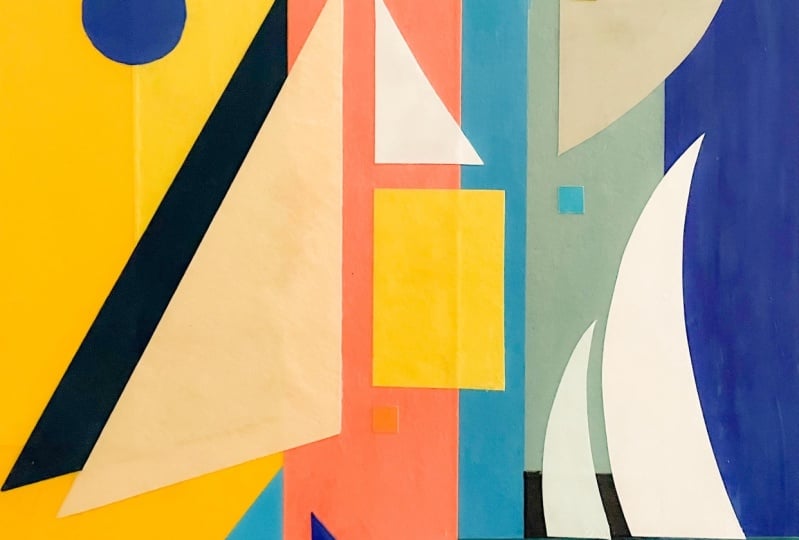
dance that they do. This is the collage that we
made in the previous lesson. It has rather subdued colors. These were colors that
I chose because I like them. We put it together. It's not really hooked to
the reality of the scene, but it has naturalism to it. What might be interesting
is what if I tried to investigate flipping
the value of the colors? The value of a color is its
darkness or its lightness. A color that has a
very light value. And here's just a filtered
version of this collage. A color that might
have a very light value would be
something like that. A color that would have a very dark value would be
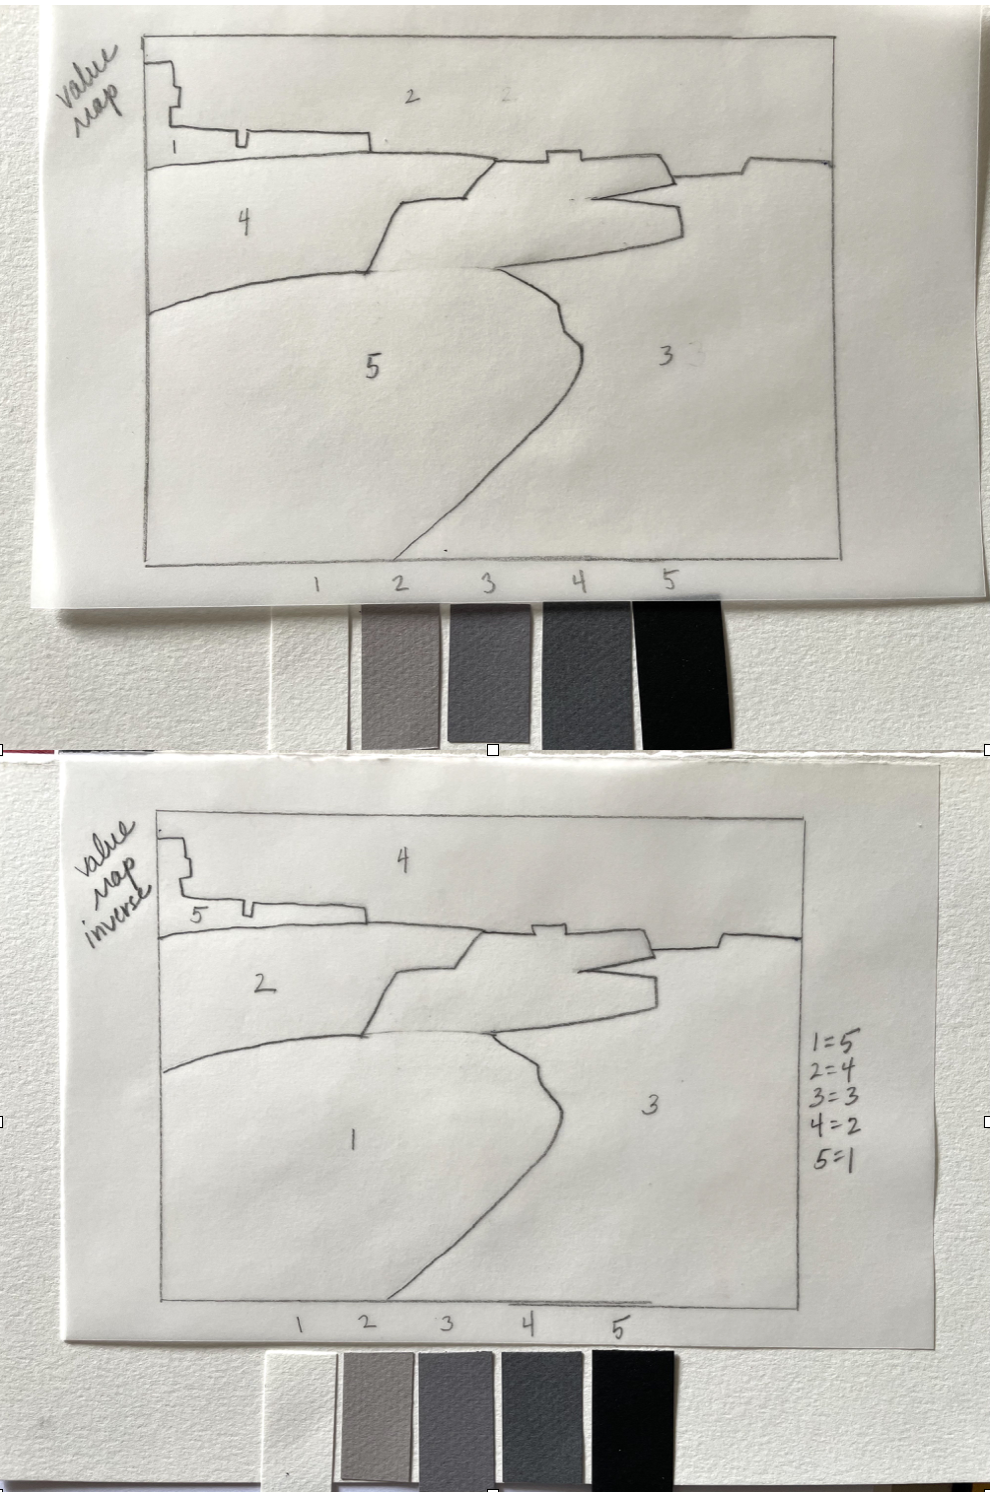
something like that. What I did is
actually made a new, I'm into mapping, I made a new, actually made two
maps of the image. One map of the
image really based on what was happening in the
true value range for this. Took the black and
white, dark shape, dark shape, light shape, light shape, definitely a
little more extreme, right? I made a map using the shapes and I named them
a color. I named them. I'm right here. This
is the color range. We did use the pink, the green, the dark brown, the beige, and the light brown. Now I'm using a range of
still just five colors, white to black with
three midtones. What I did was I
used the same map. These little color swatches
here are an effort to show that number five
is my darkest dark, Number one is my lightest light, three is my midtone, four is my mid dark, and two is my mid light. Again, simplification, like
really dialing it down. If I was looking at the
photograph of this, there'd be a lot more
variables, right? But I'm working
from the collage. I made this black and white
version. I really like it. I think it's you might not enjoy maybe black
and white images, but there's a possibility to it. There's a lot of artists who use shades of gray
and black and white. So then I thought like, what if I flipped it? Like what if I took this idea
and I flipped the values? So I made another map. And in this map you'll see
the difference. Look at that. So in this case, my one is lightest light
five is darkest dark. I basically flipped it darkest
dark as lightest light, lightest lights, darkest dark. The midtone stays the same. These flip and these flip. And it's just in an
effort to show you that in just working
with five colors, you can do things like this. You can do things
like flipping values. This is a very
different image, right? It's a very different image
because it's the inverse, working with things
like inverses, working with things that show different kinds
of gradations. And again, I really do feel
like having a map to go by is a very useful thing because when you
start with the map, you can do your planning. And then once you have the
plan down, then you can play. So this is just one way to play, one way to play with collage in a very subdued
color range, right? In a monochrome that might
be appealing to you. So the monochrome might
be appealing to you. This sort of color range of these subtle colors
might be appealing to you, but you might be somebody
who loves like fluorescence. Or you might be somebody
who really has like a high key color scheme that those are the things
that you like or things that maybe you don't
like sometimes. Actually trying color schemes that are not familiar to you, that you've never used before
that make you maybe feel a little uncomfortable
can be really fun. So we've done the monochrome, we've done the neutrals. And I pulled some colors that
I consider quite bright. And these colors
actually are ultimately going to be creating
the same collage. The same collage of the boat that we have
been working with. But it's going to have a very
different feeling, right? This versus that very
different feeling. So I pulled colors
that are very, I mean, I wouldn't say they're garish, but they're like really zingy. And I'm curious to see the effect of this as these
colors come together. So this is my muse, this is my model over here. Let's just see what these color shapes do
in reference to that. We've got the black, we've got these colors, we're going to transition here. I've arranged them here. I've pre cut them because it takes a little
while to cut them, and we've gone through how to
cut shapes and all of that. So let's start to
play a little bit with these colors, these
color arrangements. So this is that, ooh, that's actually
kind of interesting too, if we just substitute, right, like just
substituting a color. Look at how much that changes the feeling of that collage. But I'm actually interested in making something
totally brand new. So I've chosen this very
bright orange for the beach. I've chosen this yellow for
the middle section here. I've chosen this hot
red for the grass. I've chosen this very
extreme blue for the sky and this purple for the distant buildings already. It's like a very
different image, right? I'm actually really,
in this case, really enjoying having
these fissures, having these gaps
between the shapes, because in choosing a
much darker background, in choosing black, it
amplifies the color. It makes the color
more dramatic. And I think that
that's something to consider as you're working. Like it doesn't
always have to be a white ground or it doesn't always have to
be a realistic ground. It doesn't have to
be a neutral ground. I highly recommend
that you play with different backgrounds
and also that you play with different distances. Like maybe you want just
a tiny little fissure. Maybe you want
something broader. What really enhances the image? What makes it most interesting, depending on what
you're trying to say. So this says something very
different, right, than this. These both say something very different than
this one right here. All of these images
born of the same muse, born of the same
picture of boats. Depending on the color scheme and depending on how you nuance the relationship
between the shapes and the background can give you
a totally different image. So this is sort of a
testament to how collage and just the piecing of shapes can create an incredible
amount of variety. And also like a gateway
to experimentation. And giving you the
opportunity to maybe push through some hesitation around trying something new.
Because guess what? If you decide, you know what, I don't really like
that base shape, Well, this isn't glued down
yet. I can replace. I can change, I can put, ultimately I can sub things out and move them around
in any way that I want, based on just what
I'm inspired to do. So it's very, very playful,
it's very, very fun. And I highly recommend that
you get a range of colors, even colors that maybe really
aren't your preference, and play with how
they work together. It's all relative, and it's really like this beautiful
puzzle to work through.
5. Collageas Catalyst: So this pile of
scraps right here, I think this is
absolutely gorgeous. And this is what you
might over time start to accumulate when you start really getting into
making collage, You know in this pile there's
like rounded cut shapes, there's torn shapes, there's little echoes of organic shapes. There's all these
different shapes. I've got actually
piles like this. I have a yellow pile,
I have a red pile, I have a blue pile of
green pile of brown pile. I've actually organized
all my scraps into piles. Kind of consider it
my collage palette. And I keep these in
this way so I can easily access pieces that
I might be able to use. And it's just an incredible Mm. Testament to the
beautiful evidence. Like this is evidence
of my practice, this is the evidence
what's left over. More and more, I've become
interested in like what's left over in terms of collage and how we can
use those leftovers, those remnants to further
improvise and further create variations and be even a stronger catalyst
for abstraction. So I highly recommend
that you keep things, even if it's like the
tiniest little snippet of red paper, you
never know where. You might just be able
to glue that down and make a collage go
from good to great. So I want to show you an example of just my process on one
thing that I worked on. I had a model in the studio
and I made some drawings. And I ended up
actually, you know, actually collaging the
drawings together based on a series of xeroxes I made. First thing I did was you
had the model in the studio. And then I made a collage of the drawings
where I moved the birds up, I moved the skull
to the other side, made a fractured
version of the model. And then I took those shapes and I started to transfer them onto
a series of colors. As I did that, I actually
took photographs. I found that document even though this
wasn't the end game. Documenting the process like oh, I really like how these
basic blue shapes look against that sort of
light yellow or oh, what happens when I take
the silhouette that I removed of the figure and add it in again
on a stagger, right? So if I just tossed that
in the trash because it wasn't like part of
what I wanted to use, I wouldn't have had the
opportunity to play in this way. So I played around
a bit with shapes. I played around a little bit with working with assembling. This is a collage, just an
image of the collage I made, assembling them and sort of staggering the chair,
staggering the shadow. And I found this very appealing. And ultimately in and of itself, collage in and of itself
is absolutely, you know, this could be my
finished product, but it actually
inspired me to create an oil painting based
on that collage. I had this collage in mind when I ultimately
created this image. So collage can be a
catalyst for variation, but it also can be a catalyst
for other media, right? Other materials. So
paper to oil paint. So that might be something where collage could inspire you. The variations of collage could inspire you in other media, and I totally invite you
to experiment with that. If you aren't typically
a collage artist, maybe you're an oil painter, how could collage influence
other things that you do? All right, so let's dial
it back a little bit. I want to talk about possibilities
of these variations. We just made a
bunch of collages. We made collages that
were monochrome, right? We made collages that
were rather subtle color. And we also made collages that were very brightly colored. I put out here, not the pieces that we used
to make the actual collage, but actually the leftovers, The leftover pieces that we. The remnants of our process. I want to show you how you might play with
this a little bit. If you just said,
I want to see how these monochromatic
pieces dance together. You could start to lay them down in different ways already. You can see that this is really nothing like
what we started with. You can lay them down
in different ways, maybe play a little
bit with things poking through little windows that
you might have created. Or you can say, oh,
you know, maybe I like it this way a little bit more. Or maybe I want to put this black piece behind the gray piece, and
behind that piece. You can see that
with the remnants, you can actually create
very beautiful shapes. I keep the remnants. Let's take a look at
what happens when we play with the very
colorful remnants. Again, just a different feeling. Yeah, that's so you can play with like
complimentary colors laying on top of each other
or coming underneath. Right. So it's this dance and
suddenly I pulled this, oh I, you know, like this
little yellow bit, as I pulled this to the
left, just sort of emerged. And I really love that,
I really love that. And this blue on top
of the red starts to vibrate because these colors have a simultaneous
contrast to each other. When they're put up
against each other, they create a vibration
because they're complimentary. So this has a very
different feeling than the black and white. And then ultimately,
we can also play with our, you know, pieces. We come back to where we
started and play with different variations of
our original collage. Why not? The next step is, you know, maybe you hit something you like in terms of the
arrangement of the remnants. You know, maybe you glue it
down and you say that's it. But sometimes I don't
glue them down. Sometimes I just keep
making variations. And what I do in
keeping on making the variations is I'll come to a certain point and I'll say, oh, you know, I really
love this section. And I'll take photographs, cameo photographs
of those sections. I'll take photographs,
I'll zoom in, I'll take a shot of
one orientation. I'll take a shot of
another shot of another. I'll just keep the collage is like an image
generator. Like an engine. Once you glue things down, of course that is what
most collages end up as. But once you glue things down, then you no longer have
the engine running, right, Like you no longer
have the variations possible. So sometimes if I'm really
enjoying a series of shapes, I'll just keep moving them
around and take photographs. And then from those photographs
I can make drawings, I can make paintings. I can use them for
different things. And I can even start to mix in, you know, like other colors, like, you know, I have
a lot of colors now. I actually have a ton of remnants from my
process with you. Remember we started
with one image, We just started with
that innocent picture of the boats on the beach, and now we have an
incredible number of things to play with based on what was left behind
currently in the studio. I have one image that
I've been working on, a larger, more complex
collage I wanted to show you. I really love going to natural history
museums and sketching. This is a photograph
I took up in Montreal at the Natural
History Museum up there. I'm really interested in
this combination of um, organic, like animal
shapes and architecture. So I just took this one image and I thought what
would happen if I used these image shapes and transferred them and
created a collage? So what I wanted to show you is where I'm at with it right now and it's not glued down, so I'm going to be careful here, but I just borne
from this one image, I transferred the shape
of the animal and the architecture to create this collage which has just 12, just about four or
five colors to it. But what I've done is
I've repeated images, I've used the positive
and the negative. I've flipped things. And I haven't glued it down. Because one, I like the possibility of
maybe taking photographs from it and working on a series based on
different arrangements. But also, I'm just
curious about, you know, what if I moved
this down here and had these gray shapes
overlap the white? Or what if I took this big shape and moved it
a little bit lower, right? What if this shape
came down and sort of overlapped or came
underneath that shape? So you can also, and I'm not going to do
this right now because I'm kind of enjoying
where this is at, but you can also
just take shapes and do a throw down, right? Like I could take
these shapes or I could take some of
these remnant shapes. And rather than arranging, just throw them down in a bunch of times and just
see where they land. Because then actually it becomes a situation where it's
not up to you and it's super playful and you just
get what you get and you don't get upset and document
it and keep moving. So this playful possibility
for variations, variations on a theme, variations on color schemes, variations based on the
beautiful evidence, the remnants of what
was left behind, I think is a fascinating and
really beautiful opportunity to create new images and explore collage as a
catalyst for abstraction.
6. Collage Remnantsof Consumption: So I was teaching a collage
class a couple of years ago. And I had this idea
because we were, you know, working with regular
papers, hand patent papers. I had this idea to diversify the papers that
we were putting down. I gave the class the assignment and you
might want to try this, that for an entire week. They didn't throw
away any wrappers, any boxes or anything that their food came in that they might have normally
recycled or thrown away. I said, I'd like you to
keep it all in a bag. Keep it all in a bag, and
then bring it to class. And they did it and kept
their Jolly Rancher wrappers. And they kept their tea boxes. And they kept their, you know, the little containers
for their tea bags. And they came to class
the following week and I had them spread
out on the floor. And each of them just like laid out all their trash
on the floor. And I said, all right, this is what you're going to
use for your next collage. All of these remnants
of your consumption. And we all have remnants
of consumption, right? I mean, it's actually kind of
a problem in terms of just, you know, the amount, maybe perhaps that
the Earth consumes. But I thought, why
not twist that and make something
beautiful out of it? So it got me thinking, actually, of my own practice, and I thought, well, that would be kind
of neat to try. So I took a sketch book
and I was actually in Italy and I took all of the packaging like stickers and packaging off of all the
food that I was eating. And I didn't really
think about making art. In fact, it's
probably good not to even just think like
I'm making art. I just really thought about
collecting, towards making. And I took these stickers and I just stuck
them in the book. I didn't do anything
on top of them yet, I just stuck them
in there every day I'd collect something and
just stick it in the book. Then I came back home and the book sat around
studio for a while. And then I said, you know what? What if I took these stickers
that I stuck in the book, did a month long practice where I actually
took a remnant of something I consumed
here back in the states every
day for a month, glued that on top of
the Italian remnant, and then did a little drawing
painting on top of it. For an entire month, I filled this sketchbook which was occupied with
these Italian remnants, I put an American
remnant on top, and then I drew and
painted on top of that. And it really became such a
fun playground using shapes and colors that I would
never have thought to use before that was exciting. And I filled this whole book and I really love the
fact that it's just like chunky and full of all
of these wonderful collages. And then I started to think, you know what are
some other things that just happened to arrive? I started to collect envelopes. We all get mail. You
may have noticed, or maybe you didn't
notice, that the inside of business envelopes are
actually really cool. There are blue ones, there are gray ones. Look at this, it's almost
like a snake skin pattern. There are ones that
look like confetti. There are ones, let's
check this one out, that are a little more
geometric and have windows. I started to get like a little bit obsessed with
just envelopes. And I have a huge collection
of envelopes now, and they all have
different interiors. So this was collecting
the remnants of like things that we open that we normally would
recycle or throw away. I thought, how could I use
that as collage material? I started to take
the envelopes apart, like peel them apart carefully. At first, I started to glue them together and play
with the patterns, play with the stamps, play with the
interaction of shapes. And then I started to run them
through my sewing machine. I started to sew lines onto
them and bring them together, which is a little
more experimental. But sewing can
actually be connected to drawing because you're
making lines with string. I started to paint on
top of these collages, I started to work with
different colored threads. I actually also
started to be quite interested in how the
back looked as well. This possibility
of working with, again, remnants, things
you have around the house. Remnants of consumption is really an exciting possibility. Then I started to play with
like a little scraps of cardboard and started to work with sewing them
together as well. I liked that look,
but I felt like I wanted something almost
more sculptural, something a little bit heartier, My next little obsession. And I do think that
creativity, an inspiration, can sometimes involve like needing to kind of latch onto
an idea and play it out. So what I started
to do is, you know, we flatten boxes for recycling. We flatten boxes all the time. And with so many boxes
arriving in the mail, I thought, well, what is the
shape of a flattened box? So I'm just going to
flatten this out. This is, I started to get like, so curiosity is also for
me, really important. I started to think
like, wait a minute, like what is the shape of this box when it's
flattened out? So I started to take like my tea boxes when they
were empty and boxes that would have arrived
from other shipments and start to flatten them because each one
is a different shape. And each one I
just I don't know, I just thought it was really
interesting and beautiful, that it was like a
surprise each time that the flattened box was a possible shape that
I could work with. So you guessed it. I started collecting
flattened boxes. I have a huge box of them, but I've chosen
some recent shapes that I've collected that
I've flattened out, that I thought might be fun
to put together as a collage. Now notice I'm not really
using the colored side. I'm actually, I'm going
to make some space here. I'm actually quite interested in the variations of the
colors of the cardboard. And I'm also interested
in these circles, in this case, how these circles
might interact together. I started to work in this way, but I realized that my regular glue stick and my
regular elmers glue is just not going to cut it
because these boxes are bendy and they're harder and they're a little
tougher to glue down. So I got a hot glue gun and I'm going to
show you how I start a collage based on remnants of consumption having to do with these flattened boxes that
I've been working with. So again, it's just
another possibility if you like this idea to collect things from home and use them everyday
things as material. So this is a little
mini hot glue gun. It has a little glue stick in it and I've plugged
it in to warm it up. You want to be careful
because it is hot. If you decide if you
have a hot glue gun, great know how to use it. If you don't have a hot glue gun and
you're curious about it, you want to avoid
touching the tip of it because it's very hot
and you'd get burned. But the beauty of it is
that rather than gluing something down with
like a liquid glue and you have to sit there and
hold it and you know, these sorts of things would
invariably curl up on you. The beauty of a hot glue gun
is like it's one and done. You put it down, you lay it, and it just sticks. So I
want to show you that. So one thing I think
about is like, all right, I've got
these two shapes. There's a, now there's a
conversation between the shapes. All right, well, what do I want that conversation to be like? Do I want it to lay
over a white section? Do I want it to lay
over another circle? Do I want it to lay on the side? I like how this is lining up with that
and that these edges are spilling off the edge here. I'm feeling that that
might be the position. I'm going to go
ahead and I'm going to just squeeze the glue gun. Lay some hot glue on
the back of this piece. Hot glue can be a
little stringy. Then I'm going to put the
glue gun on the side. It takes a couple of
minutes to set up, so you have a moment
really to work with it. Then I'm going to go ahead
and just press this down. You can feel the warmth
coming through the cardboard. Just give it a moment to set, then you can see how
quickly it attaches itself. That's one shape that
I'm interested in. I also really love this. It looks like eyes,
like glasses. Let's try to see where
that might end up. I'm thinking got a lot of
circles going on down here. Maybe if it comes up a little higher up
into this area also. Do we let things overlap off to the side like
where that's going? I'm once again going to just
put a little glue on here. You don't need a ton. I love the hack lo gun. I'm just gonna let that
just set right in there. Yeah. And then ultimately I
want to do one more shape. I like this gray cardboard against the warmth of
the brown cardboard. So let's just do,
oh, I have a choice. White or gray. Gray would create a little more
variety. White. We've already got a white shape. Again, you're asking yourself, you know, what might
create variety? What might look good
in conjunction? Because, you know,
collage like a lot of visual making is all
about relationships. It's all about what might look good in conjunction
with something else. I'm thinking this one
wants to go here. So it's a little bit of a felt sense of where things might go. Again, you can arrange
things in advance. I'm doing it a little
more free form right now, a little bit more playfully, but this possibility of
working with remnants. I have a few more here, you could keep adding them. Sometimes I'll put something underneath to show through
if there's circular shapes. But this possibility of working with remnants of consumption, things that you might not
normally think to investigate. Open a box, flatten it
out, what's the shape, what's the color, Maybe take
a look inside your bills. Once you get over the
shock of what's in there, like take a look at
the envelope like, wow, that is a bonus. Maybe I could use
that for something. If you are into sewing
or into drawing, you can make collages that
come together with glue, but you can also make collages that come together
with sewing of things that you
collect Over time, you might consider
creating a book, creating a situation that has layers of
remnants of things. Over time, it really almost becomes like a
diary of your life. And when you're using things from your life,
from everyday life, I actually think that it starts to bring a
little bit more of a sense of human connection
and meaning to the work. So you might just want to
try it on a certain week, like just collect things
and lay them out and play a little bit with how they might come
together as a collage. I think you'll find it to be a very playful process and
also you'll be able to tap into pretty much a never ending supply of materials
for your collage work. So give it a try and explore how consumption can
be an inspiration.
7. Biomorphic Collage Expansio: So there's a lot of different
subject matter for collage. I mean, collage actually doesn't really even need
a subject matter. You could just make
collages as we've seen out of old boxes or rip paper. But sometimes you see collages that work with more
organic shapes. I like to call them sort
of biomorphic collages, where you might like for here. For instance, I actually
very precisely cut out a photograph that I took in
Mexico of a pomegranate tree. If I flip it here, I think it's really beautiful
and ultimately could possibly be a collage element which is based on a
biological or organic shape. Sometimes I also work with
collages that are based on industrial shapes and we'll be working with that a little
later in the course. This collage has buildings, it's a very different
look than this one. This one here also has my daughter Celeste surrounded
by flowers like this. Using photography is also a biomorphic collage
possibility. What I want to work with in this course is the
possibility of using an image that in this case actually a photograph of
a rhododendron flower. And use that as a springboard for where
collage might meet drawing, where one image born from collage could morph
into something else. That's another possible, almost surrealistic or thing that
you might want to try, where collage might
meet drawing. That is also an
incredible gateway for making images that
aren't up to you, that push you beyond your habit. In order to do that, we'll
need a few supplies. We are going to be, I actually think in this
case just working with a glue stick is nice because we're just
going to be gluing down some super simple shapes. You want to have a mother image, I call it a mother image. You want to have
maybe a photograph, that botanical or that
is something more natural versus something
hard edged just for this particular activity.
It can be a color. It could also be done
in black and white. But I like color. I think color might
be fun to try. Then you'll need
some kind of glue. You'll need a backing. You'll need something
to put the image on a little ruler perhaps, And then a Sharpie
and a range of colored pencils that doesn't
have to match perfectly, but it might parallel
with the image. Really simple materials and really simple process actually. I'm going to put them aside and put them in a place
where I can reach them. Then I'm going to
take this image, I'm going to shop for areas of the image that
I think are beautiful. Sometimes I call this
window shopping. I'm going to see if I might
actually be able to use this little view finder here to help me find some sweet spots. I'm going to put this down on a section that I find beautiful. Then I'm going to go ahead
and I'm going to take a Sharpie and I'm
just going to find five sections of this image that I think maybe I
might want to work with. They don't have to
be all rectangular. They don't have to be a square. But I'm going to encourage
you to go ahead and shop for just five sections of
whatever image you chose. They could even be long, skinny sections, if that's
of inspiration to you. And then one more, kind of enjoying this very
pale green down here. You can see that you can also choose with your
camera zooming in. Zooming out. But you can
see that by choosing sections like this with a
view finder of some kind, it makes it a little
easier to choose. Now I'm going to go ahead
and cut these sections out. I'm going to save the remnants, not that we're necessarily going to use it for this project, but remember, I save
everything, right? You know that about me by now. I'm going to put the remnants on the side maybe for future use. I'm just cutting out
these five parts. I'm going to lay them wherever because we're liberating
them from the image. We're saying, oh well these
were little juicy bits, little sweet spots that
I particularly enjoyed. But in the end where they
end up for this practice, we'll see they might be upside down from the
original orientation. I suppose that you
could even cut shapes off of your mother image
that aren't rectangular. You could use circles, you could use different things. All right. This is my remnant. I'm going to put it on the side. Here are my shapes. I'm going to take a moment. I don't want to think too much. The intellectual mind often gets in the way
of creative flow. You might just throw them down, actually, I think that
might be what I do. I might just throw them
down any which way. You can see that I'm
wanting to arrange. But randomness is actually
can be a really good thing. Now that I have a general
sense of where I want them, I'm going to take my glue stick and just go ahead
and glue them rather quickly. I'm leaving a gap. I'm leaving a little
space in between, and you'll see why in a minute. And then this last
big square, why not? All right. It's a collage. It's a collage of
remnants of shapes. Now we're going to
take it and morph it, evolve it, use the collage as a catalyst for something
even more abstract. The first thing I
often like to do in this situation is to create some boundary container for the image because there's a
lot of space around this. Sometimes when you
create a little bit of a container for the image, you can, you know, in it in a little bit. So I'm just going to create a little container
for the image by, you could use a ruler for this, but I'm just going
to eyeball it here. I'm going to bring
a boundary in. It might be like
just off a square, Like a little bit rectangular. As soon as I do this, these shapes start talking to this line instead
of that edge. So what I've done is
I've sort of amped up the energy between the shapes and the edge of the composition, which to me, just makes it more exciting than
having all this like, nebulous space around it. All right, so that's
a first step. Now, what do I mean by
evolving the image? You've got these
rectangles down there. It used to be a flower, but now it doesn't really
look like a flower anymore. What I'm talking
about now is taking clues from these images. Clues may be leading off the shapes and extending
them into the white space. I'll show you what
I mean by that. One of the first
things that hits me is the line of
the flower here. I'm not really drawing
on the photograph, but I'm coming off
the photograph and following that
curve to the edge. I can also come
off the photograph here and follow that
curve to the edge. I'm linking it up to the edge
based on color and shape. This curve can also
hook to the edge. This line, two can come even further down and
hook to the edge. This here, there's the
line coming off this one. And this seems to be
curving in this direction. I'm making these shapes, these intersecting
shapes coming off of. And based on some of
the shapes that I have here in my
remnants from my image, again, I'm not
working super slowly. I am working quickly so
that I can come in and, you know, just let it have a little bit more
fluidity and flow. I don't know what it's going
to end up looking like. And that is actually
fine with me because for me that's really like the
beauty of abstraction. And the beauty of
collage is like making peace with
not knowing, right? Like making peace with
like not securing an outcome with just like letting it be what
it needs to be. So I'm going to
continue list running a few more lines off
of here and then I want to kind of slip
into doing some color. All right? Do I do like how
that's starting to look? There's maybe just a little bit. It's super fun to make
these extensions too. So you can see
there starts to be a rhythm filling the space. This is where it's sort of
fun to work in some color. So I chose some colors that more or less go with
what's happening here. You could also do
this with paint. You could do it with
like an opaque paint. But I'm choosing
colored pencils because that's a quick and easy way to start creating this
morph in this extension, this pale yellow green. This color is not going
to match perfectly, but it'll give you the idea, pale yellow green coming
off of this region here. And I'm just going to go ahead and just color in this shape. And I'm going to look for a few more of these green shapes. The yellow green shapes, there's a petal coming off of here. What starts to happen as
I start to fill these in a little bit is that these
lines become shapes, right? What used to be a
line is now a shape. And that shape is inspired by what's been going
on in the collage. I'm ready for some pink. There's a lot of pink in this. So here's an area of pink, well that color match
is pretty good. This sort of shapy work can be super inspiring and can
really generate ideas, generate ideas for
other projects. Like, you know,
sometimes this in and of itself can be the
piece you end up with. But sometimes what can happen is that you work
on a collage like this, I call this like a
biomorphic expansion, right? You work on a biomorphic
expansion like this. And for me, as I'm working, I start to actually
generate ideas. And it's almost subconscious, just by the almost relaxing
act of coloring in shapes, I start to think, oh, you know, this would be a
really interesting painting or, you know what, if I worked in this way with
another subject matter, this is really very dimensional. Now that I'm putting
in these dark greens, you could see how the pinks
are really starting to pop. So I'll just do a few
more little shapes here and then I think
you get the idea. I really love working
with organic shapes. I like working with shapes, shifting the green here to
be a little bit brighter. I like working with shapes that have some flow and some pop. That's my wheel house. This biomorphic expansion
project is really like, perfect for a lot of the
things I like to work with. I recommend you the next step here would be to
continue coloring out the shapes to continue
working with these spaces. I think that you can
subtle color variations, but I think that the clue
from this photograph, and I encourage you to go and take photographs
with this in mind. The color cues from this photograph and the
shapes that come off of it. They're not something that I would have just thought to do. Like if I sat down
without the photograph, I wouldn't have ever really come up with
something like this. So the idea of having these little juicy bits of the photograph as a springboard, as an inspiration, as a spark, really allows you to then jump into something
a little different. Jump into something that might not be your habit in
terms of working. So I encourage you to try this biomorphic collage,
expanding an image. You might even have a bunch of photographs that you
might just want to print out and cut up and
glue down and draw off of. But I think that over time, remembering to put a little
container around it, really allowing these shapes to flow and then choosing some beautiful colors
to fill it in, I think that you'll
find that that'll be a really wonderful way
to generate new work.
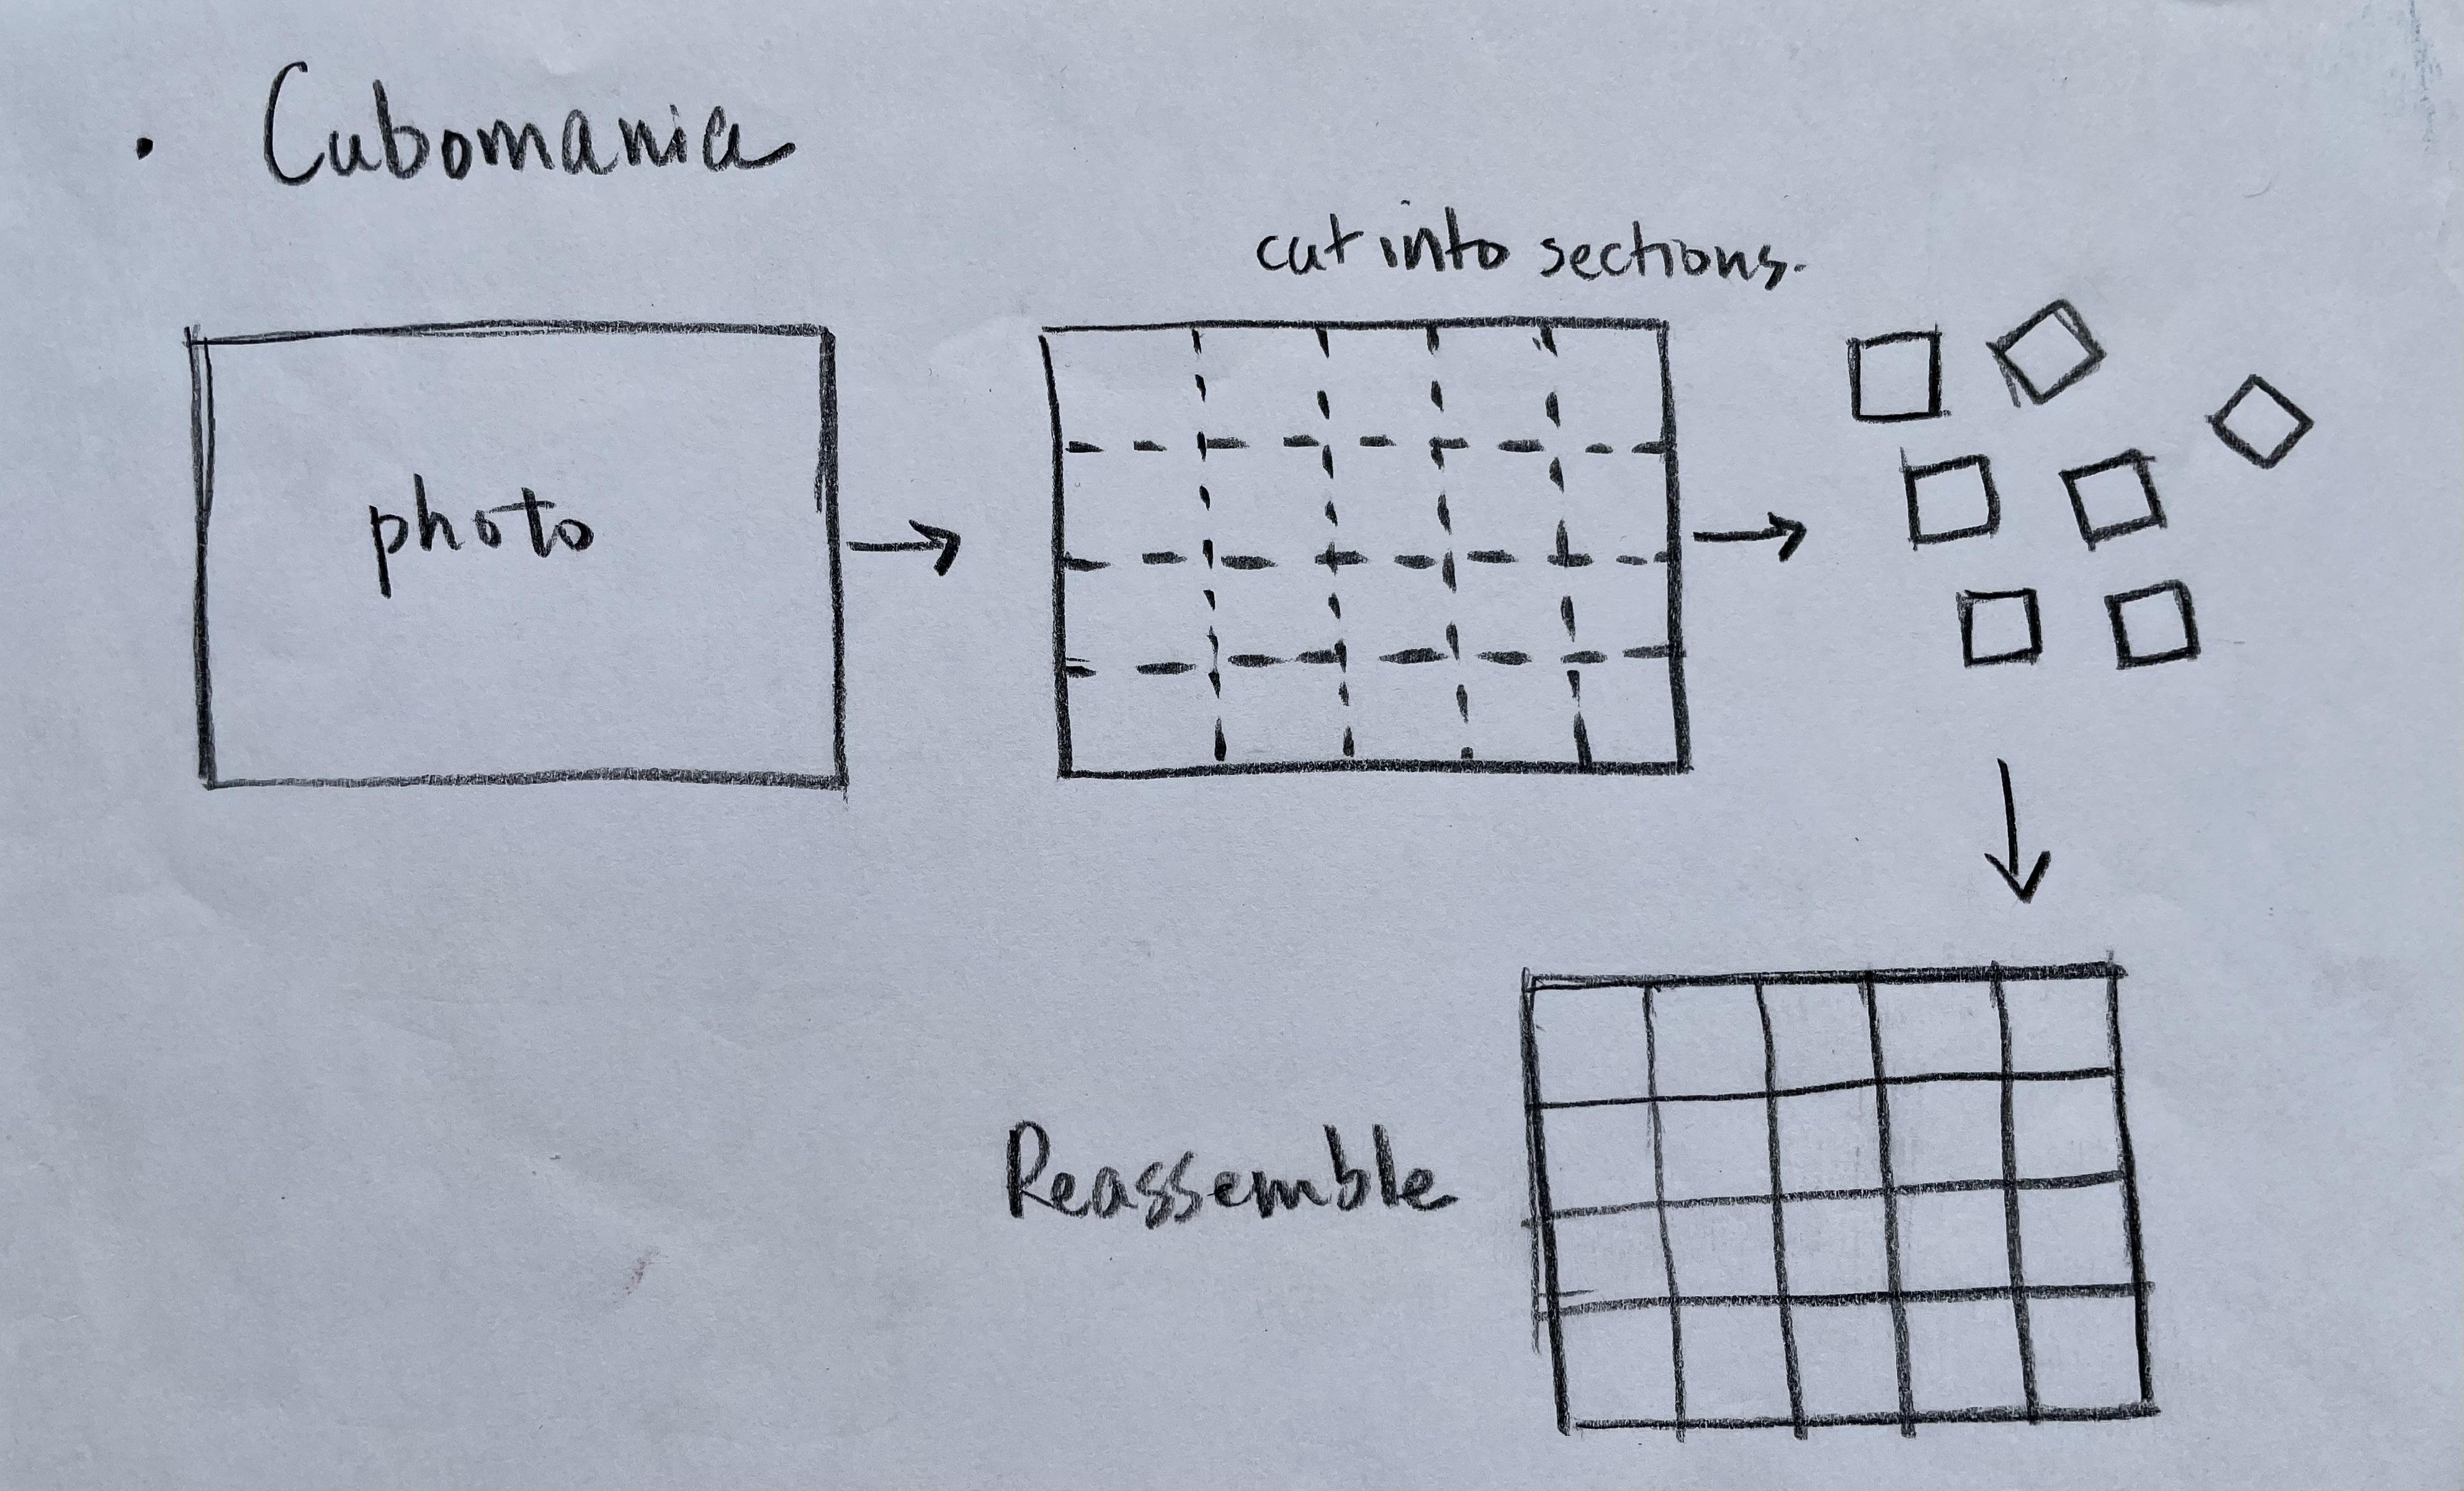
8. Deconstruct Reconstruct: I'd like to play
a game with you. I'd like to play a game
called Cubo Mania. And cubomania is something I like to play when I'm trying
to generate new images. In particular, when I'm
looking at images that have more of an industrial
kind of quality to them. Even though I tend
to have a preference for working with more organic
shapes and organic images, which I can show you here in this drawing of
a tree that I made. I took this drawing
of a tree which is very fluid and very organic. I took it and I
actually blew it up, and I made a tracing out of it. And I took that tracing and I'm going to show
you how to do this. And I cut it up in multiple ways and
placed it with itself. And when I placed
it with itself, and we're going to go
through this step by step, I was actually ultimately able to make an image like this, which is a real
abstraction from the tree. It still has like the feeling of treeness to it a little bit, but I transferred that tracing, I painted it in. And it was just a
really nice way to move from something
slightly organic and realistic to something more abstract through
this idea of using a grid or using cube shapes
to assemble something new. So I want to show
you that first. I want to show you
sort of looser ways I've used industrial images. You know, sometimes I'll go
out and I'll take, you know, five or six photographs of an industrial area here in Rhode Island where
my mill building is. There's a lot of old mills that are being torn
down or derelict. And so I'll go and take photographs, multiple
photographs, and actually make
collages out of those photographs that are
a little more free form, and that might be something
that you would enjoy. But what I want to show you is how you might use
industrial shapes, industrial images
to make something that might even have more abstraction or more
variation through cubomania. First I'm going to show you the process and then
we're going to do it together so you can see how I might work with it. All right. I really need
basically a Sharpie, a dark pencil, some scissors, a ruler and some glue. Also an image, a little
bit of tracing paper, which you'll see in a moment. It's really simple in terms
of materials to do this. This image here is going
to be the example image. And then I'm going to do another image for the whole process. But this is a photograph
I took in India. It has some organic shapes, but it's also got some hard
lines and industrial shapes. I took that image, actually took a smaller version. I cut it. I took a
section and cut it up. And I made a bunch of little
squares out of that image. Here are my little squares. I cut it up into sections. I took those squares. I just made a whole bunch of
different versions of it. Like different possibilities. That might be a possibility. I took a photograph, I could make another
possibility by like a puzzle, shifting these pieces around. Took a photograph, another
one took a photograph. This is a way, this image here, the realistic image,
could become, again, an image generator. An abstract image generator. Something that was born
from something hard edged. Something where
you're actually using a hard edged technique to relate it to itself in different ways
and create new forms. So you could make collages in this way and say,
this is my outcome. I really like this
idea of cubominiaI. You might arrive at a certain
configuration and say, that's my collage, I'm
going to glue it down. Or you could just keep these
pieces, which I actually do. I never really glued them down. Keep these pieces as a way to continue to experiment
and create images. Because if you do that, there's a possibility
of actually of the making tracings of the images which could
potentially turn into drawings and then those could potentially
turn into paintings. So there's a possibility
of as you look ahead, of using some of these images in new ways and perhaps
having this practice of just assembling
shapes again and again feed other media that you
might be interested in. That's some potential. That's sort of the process. But I want to hands on show you how I might approach this. So I'm going to put
the example aside. I'm going to show
you this photograph. I took this picture last
summer out on Cape Cod, looking down into
a fishing boat. I love the fishing
boats because they have really beautiful colors
and really strong shapes. So I took this picture
and then with my Sharpie, I went in with a ruler and just sort of partitioned
it off into nine squares. This is easier using squares. These are not like
perfect squares, but if your image is a
square to start with, it'll make it a little easier to associate it with itself again. So what I'm going to do is I'm going to cut out these squares. I'm going to actually put my
original image up here so we can sort of see how playful this can be and
see what we end up with. So I'm going to cut
out the boundary because the white area really
isn't going to serve me, so I'm going to cut that
off using a Sharpie, depending on the image. You know you want to use
a pen when you divide it up into shapes
to play cubo mania, you want to use a
pen that's going to show up so you sort of
know where to cut it. All right, and put these aside. Then you can start to cut out
your nine squares at first. I'm actually going to cut them
out and sort of leave them in the order in the
arrangement of the original. Just so we can see before and
after as I cut them apart. Actually, what I also find interesting is that
each one of these, you could divide each one
of these again into shapes. Or each one of these
little abstract sections of this image could be in and
of itself an inspiration. There's a lot going on in
just this little square, but we're going to work
with the whole thing. So right now this is a
cut up version of that. The pieces are laid more or less in the order that
they are in the picture. But now it's time
to play the game. Now it's time to play cubomania. We can start to place and shift things in a way
that feel good to us. You don't have to
know a ton about. We don't have to get all
like intellectual about composition to know that
when we move a shape, right? When we move a shape and place it down in relationship
to another shape, that there is a conversation. Like I just moved this
blue net up to this side. So suddenly I feel like
there's almost like a sense of motion,
like arcing through. And if I take this sort of
wood beam and put it here, there's an echo happening. That's quite interesting to me. I'm just playing, I'm
playing this game. I'm moving things around. I'm seeing where, you know, maybe by creating
a new arrangement, this might become a
possible abstract image that I find appealing. I like this arrangement
at this point. I certainly could glue it down. That definitely could be
something I could do. But as we saw in the last image, if I don't glue it down, it might be interesting
to work in a way that has some variety. Ultimately to change it and
make some variety out of it, I'm just going to quickly
transfer this onto this paper and reveal
my trace paper. The trace paper is
really the next step. If you decide that you want to create multiple
images out of this, I'm going to just
put these up on the opaque paper and just arrange them just
a little bit more. Great. And then I'm going to
put this trace paper on top. You can see that these are
not lining up perfectly. I'm not super
concerned about that. You want to keep the
grid as much as you can, but if they end up being a
little bit off, that's okay. We are working with
abstraction after all. You could glue them down.
But I'm going to work with this a little bit more
free form at this point. You can start to, so I'm going to actually create a little
boundary around this. Just so that when I
lift the trace paper, I know like where the
edge of my image is, then the trace paper obscures
the image a little bit. It makes it a little
harder to see. I'm going to go in and I'm not going to actually draw the divisions between
the pictures. I'm just going to pull
out some major players, some major shapes that I
find interesting here. I'm not also yet
really thinking too much about how these things
might hook up together. Even though when I
laid the images down, I did make a note of like Mm, that shape could lead into that. But for now, I just want to work with the things that
seem to be dominant. The shapes that seem to be dominant through
the trace paper. Because I'm not working
with every single detail. This actually, I feel like the trace paper is a little
bit of a gift because it's really not allowing me to
obsess about detail so much. You can be as
painstaking, accurate, or detailed, or careful
as you want with this. I enjoy that sometimes, but sometimes I also
just enjoy working a little bit more rapidly and just picking out
really key shapes. Because sometimes
when you go too slow, you end up getting
a little caught in thinking and
arranging and planning. There's something
about just letting it be fluid that can often, at least for me,
be a way to work with things in a slightly
more abstract, quicker way. I just have a few
more to fill in here. I know we're all waiting
for the big reveal. And also as shapes
turn in space, this is already so
abstract in my eyes. I have a sense that, yeah, it's an industrial image, but I don't almost know anymore. Like if you're just
looking at this and didn't know where
this was coming from, you might not know like, oh, that's the deck of
a fishing boat. Like, it becomes a little
bit more ambiguous. It comes a little
bit more universal. That's also interesting to
me in terms of image making. The way that abstraction can make an image
feel a little more, a little more universal and then sometimes more
accessible to people. Okay, basic shapes outlined. I'm going to take my
grid and move it aside. Then I have these
wonderful lines and shapes happening here. What I would like
to do, I do have a little hint of where
the grid comes in. I have a little hint of
where the divisions are. The next thing I like to do
is I'd like to start to just use what I'm feeling to
connect some of these shapes. This is an industrial image. I'm actually interested
here in possibly keeping the shapes pretty rectilinear or in the last one
we worked with, we used a lot of curved shapes. And I'm wondering
here what it might be like to work with
straight lines. Because working
with straight lines is what drives this image. And working with
straight lines is what ultimately is going to
give the character, I think that it was born from. So I'm just going to
extend some of the lines. Close up some of these
shapes a little bit. Bring it out maybe
all the way to the edge. And you see that. You see why this boundary also is actually
helpful because, you know, it terminates
like these lines terminate at the
boundary here we go. And just a couple more
straight edges here. Yeah, I'm like in
where this is going, again, I had no idea. I could not predict what this particular
game of Cubo Mania, and I do play this
game quite a lot. I couldn't really predict where
this would ultimately go. But it is a wonderful
way to make one, an abstract collage which could keep on configuring itself, but two maybe end up with a
industrial style drawing. You could add color,
you could make multiples of these based on
multiple configurations. As we saw, it can be a
really satisfying for me, it really heightens my curiosity about the possibilities
of photography, the possibilities of collage, the possibilities
of an image really being an engine that can
keep working for you, collage is an amazing
catalyst for that.
9. Outro: So in this course, we have explored collage in
a lot of different ways. We looked at historical
examples of collage. We looked at how to hand
paint your own papers. The difference between papers, the difference between
cutting versus ripping. How you can create
variety and excitement by exploring an expanded
color palette in terms of the colors
you might choose. And we also explored
the possibilities of working with
remnants of process, working with things
that were left behind. Working with things
that were left over, this is really, I think, an incredible thing
to be aware of. Just notice that
rather than throwing something away that actually
could be repurposed Also. In that same vein, this idea of using
consumption as inspiration like what
is in my recycling bin, you know what is coming
through the mail slot? You know, what are things in my everyday life that I could repurpose to make
collage out of. So I think collage is an incredible avenue
for being playful, for being curious, for
really changing things up. And creating
variations that will keep you inspired
for a lifetime.
 Any Wynne