Transcripts
1. Introduction: Hi there. My name is Hendrien and I'm a 3D Potter from Pretoria, South Africa. I create art using a Clay 3D printer and what I really enjoy most is watching the
print take form. It is absolutely
fascinating to watch, especially if you have designed yourself from start to finish. My mission is to
help people think differently about
the collaboration of pottery as a traditional art and also technology such as 3D clay
printing and 3D design. I want to make it more accessible for
people to understand and learn the skills that are needed to become a 3D Maker. They are so many possibilities when it comes to
3D clay printing. Perhaps you are an artist or creative looking for a different
way to express yourself. Perhaps you are a
business owner or an entrepreneur looking at
a new venture to pursue, or move into, you may be
a hobbyist and just looking for something new to craft and explore and to push
your boundaries. Now the best part of
creating is creating something from start to finish. If you are taking this class, you have an interest and
desire to learn more about the process of
3D clay printing, what it may involve, and what areas you may need to focus on if you'd like
to start on your own. I will help you by giving
you a little bit of background on what
3D clay printing is, the process of printing. And also what is
needed to get started. As this is an
introductory class, you won't need to have any prior knowledge with regards to 3D clay printing and what it
involves . For your project, you'll be doing a little bit of research with regards
to what are some of the benefits of 3D clay printing and how do they relate to you? We're also going to be asking
ourselves the question of, why do you want to
start 3D clay printing? The reason we're doing this
is because I have seen so many people give up before they've reached the
end of the process. They feel that the learning
curve may be too steep. They buy all the equipment and a few months later they
have to sell everything. That is why we
want to go through everything step-by-step
so that we can understand the process and know where to begin and where
we will be ending. And that is why we are
asking the question why? Well, if you're ready, let's get to class.
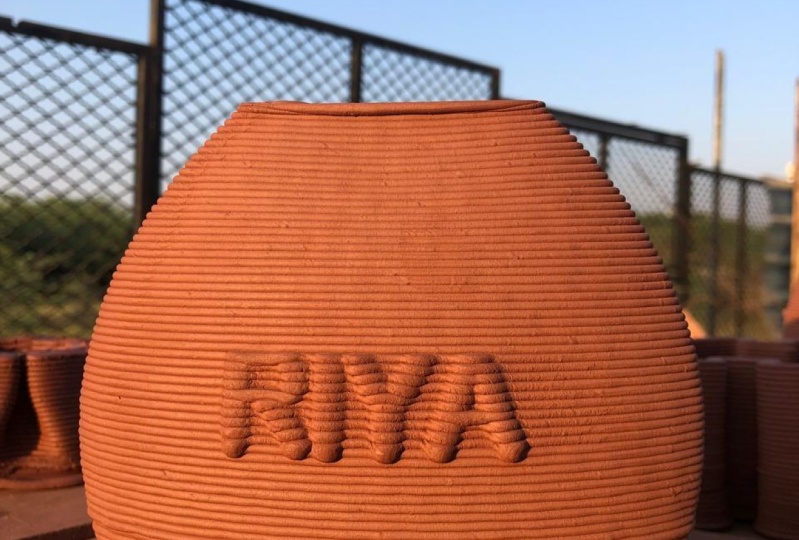
2. What is 3D Clay Printing?: Simply put, 3D clay printing is an additive technique
that involves building up your clay material
in layers by using a 3D printer that has been modified to print your
3D design with clay. The process by which
the printer prints is called the coiling method. Now pottery coiling is one of the oldest pottery
techniques that there is. This is whereby you
take a clay coil and build up your pot
layer by layer. And isn't it interesting with all this new technology
and innovation, we've gone back to the tried and tested method of coiling. Now there are many different
types of 3D printers. What makes the clay
printer different? Well, one of the biggest
differences is that you don't need a mechanism to
heat up your material, to melt it in order
for it to print. Clay is a type of
fine-grained natural material that can easily be shaped
and molded when wet. So you don't need
to heat it at all. And all you have to
do is add water. Another part of your
printer that doesn't have to be heated
is your bed plate. This is the part where you're
printing your 3D design. Once your item has been printed, it needs to be left to dry evenly. With clay, if
it dries unevenly. For example, if there was a
heated bed plate underneath and the bottom dried a
lot faster than the top. This could actually
lead to cracking. 3D clay printing allows
for quite a lot of experimentation
and innovation. You are able to print exceptionally detailed
forms which you may not necessarily be
able to create by hand. And this in itself
is very exciting. Next, we're going to
be looking at some of the skills and insights
that you will need.
3. 3D Design: One of the first skills that you will need to conquer is how to 3D design using
a CAD software. Now CAD is short for
Computer Assisted Design. The CAD software
is there to help you draw and create
your designs. You don't have to have expert drawing skills or have
an eye for art and form. If you learn the
basics of the program, you'll be able to build on that. Think of it as a very
advanced sketch tool. It is there to help you and
to make your life a lot easier while you're creating
your design in a 3D space. I personally use
Autodesk Fusion 360. I find that it's a lot easier to navigate along with being
one of the best there is. A big bonus is that it's free for hobbyists
and for students. You will, however,
have to go and see which program will work for you because we all
have different needs.
4. Pottery: Making pottery is a beautiful
and creative process. Clay, however, can have
a mind of its own. I often tell people when they're starting out to maybe watch some tutorials or maybe
join a pottery class so you can get a little
bit more insight into the process. Now there are quite a few
different types of clay, some of which include
Stoneware clay, Terracotta clay, porcelain. Bearing in mind that you can fire them at
different temperatures. So it's a good idea
to know your clays. A really good tip is to remember
that Clay has a memory. Once it's been
fired in the kiln, it will come out and show
you what it's remembered. For example, if you've
accidentally bumped it, you may have perhaps
overworked the clay or maybe you just touched
it in the wrong place. This may lead to
warping or cracking. So it's really good to
understand and know what the pottery process is
and what you need to do. Some of the basics are
How to work with clay. How clay reacts to
the environment, for example, whilst
it's drying. And also what are the
decorating and firing processes? A really good idea in
the beginning is not to purchase all the materials
and the equipment, for example, the kiln that
you think you may need. Rather see if there's
a pottery studio nearby or someone
else who has some of the materials that you
can use so that you can test and see
what you want to do. Because with decorating there are so many different
avenues that you can explore and until you
find what works for you, you don't want to spend so much money and you also want to save on
your electricity bill. Next, let's move onto what the process is of
3D clay printing.
5. Creating a 3D Design: Once you have selected which 3D design program you'd like to use to create
your 3D prints. There are some factors that
you need to consider. The first one is - How big is the buld plate of your printer? For example, at the bottom, I can print a width
of 20 centimeters and my printer height
can be 40 centimeters. This is something I need
to bear in mind when I'm creating my print
in the software. Another big consideration is to remember that you're
working with clay. The shape that you create
must be able to hold itself up because clay does
not dry immediately. It dries over time. So either you need to put in supports when you're
creating the print. Or your print needs to flow at such an angle that the clay will be able to support itself. This is one of the most
important things to remember. Here is the design that
I've created for printing. With the angles, everything should be able to
hold the shape. The full understanding of how far you could possibly
push the boundaries of your prints will only come from designing and testing over time. Once you have finished creating your 3D design and saving it, you will be exporting
it as an STL file. I'll be explaining what this
means in the next section.
6. Prepping your Design for Printing: The next step in the process
is taking your STL file, which is a 3D drawing file, and importing that into
a slicing software. Now I know there's a lot of lingo floating around right now, but let's have a look at
what a slicing software is. The slicing software translates
the 3D drawing file, the STL, into a language that a 3D printer can understand
in order to print. This language is
also called Gcode. Without Gcode, your printer
would be unable to print. I am sure that there are quite a few pros out there that can write their own Gcode. I, however, am not one of them. I use Simplify3D for
my slicing software. Unfortunately, it is not free. I do find however, that this software
works a lot better with my Delta Wasp printer
that I have purchased. So in Simplify3D, I'm going to import my design. I may just scale it
down just a little. Next, I want to look at some
settings for the print. Now I know there's a lot
of information here, but don't get disheartened. I just want you to
take note of some of the things you need to think
about before you print. Firstly, we need to look at the nozzle diameter and I'll be using a three millimeter nozzle. Next, let's look at the layer height. I wanted a 1.5 millimeter layer. There we go. Next I'm going to
look at Additions. Skirt outlines I
want two. A skirt is simply just a layer of
clay that the printer will print around your
print. That is just to test your clay consistency and to see that everything
is running smoothly. I usually do at least two skirts and approximately five
centimeters away from my print. That's perfect. Next, I just want
to go to speed. AT the moment it's set to 50
millimeters per second. I think I'm going to bring
that down to 30, Okay. Now here I'm just gonna
say Prepare print. Once it's done slicing
or preparing the print, it's pretty much creating the paths for the 3D
printer to follow. These paths are instructions
for geometry, for the print. There are the two skirts
that I've created. Now I can see, if I look
here at the colors, my print should be good because
it's going quite slowly. So I can actually adjust the speed when I'm
printing and push the speed up a little because
it's nowhere near the red. That's good. I'm just going
to save this to my SD card. And we're pretty
much ready to print.
7. Printing: There are quite a few different 3D printers that you can buy. You're even able to
build your own if you use the open source information
available on the web. Now when I started out, I did not possess the technical
ability to build my own. So I bought one. The one that I purchased was a Delta Wasp 2040 clay printer. Let's dive into how the
printing process works. Firstly, you need to
prep your clay to make sure that it's
the right consistency. If it's too dry it won't print because it won't be able to
move through the piping. And if it's to wet, it will just end up
a sticky mess and it won't be able to print
and hold its shape. So it's about finding the
right balance for you, which can only come
from time and testing. The printer uses compressed air to push the clay through the
pipes and the extruder. So you will need to
have an air compressor. Once I've prepped my clay, put it in the container and
attached it to my printer. I can now put my air compressor on and let the air pressure
start to build in the tank. Your clay will then start
moving through the pipe as the air starts to push the clay
down into the extruder. Now I'll be inserting my
SD card where I saved my file and making sure my
printer settings are correct. I also need to set where my printer is going
to start printing. So I'm quickly going to
set that. In the resources I've called this Z Max because that's what it's
called in my printer. Z equals height. Once everything is ready, go to your file and press Print. Now it's good practice to constantly monitor
and check your print. You never know when
something can go wrong. Sometimes there may be an
air bubble and this could be quite catastrophic when
it comes to your prints. I've had one that shot straight
through a print before. Testing your 3D clay prints is, a very important
part of the process. It can also be the
most daunting part. What I started doing
was to write down my settings each time
I created a print. And this really helped
me to see where I was going wrong and what
I needed to change. I have included a sheet in the resources for you in
order to show you what are some of the essential
things you need to look out for and what you should be
recording from the start. And hopefully this
makes it a lot easier for you when
you're starting out.
8. The Pottery Process: Once your print has
finished printing, you need to leave
it to dry evenly. Some potters prefer to put
plastic over the print. Others just leave it to
dry in a cool, dry place. So see what works best for you with regards to the print
that you are creating. Once it is dry, you can choose what
decorating techniques you would like to use. Some of these include
carving and sculpting, painting with underglazes, painting with stains
like oxides, glazing. And they are many, many more, but these are some
of the most popular. But there are so many different techniques
that you can use. A really good
suggestion would be to create 3D mini testers. Test you're underglaze
paints, test your stains, your oxides, your glazes, see what process
works best for you. That is why it's also a
really good idea to join a pottery studio or
use someone else's materials and to experiment
a little because in the beginning you might not necessarily know
what your style is. A really good tip when it comes to glazing your pottery is to make sure that your
item is not wet. If, for example,
you've made a mistake, dipped it in the glaze
and realized it looks wrong and you want to
wipe it off, that's fine. Leave it to dry and then
dip it in the glaze again, if you dip a part that is wet, the glaze may not stick to it and it may not come
out as nicely, which means the color
might not be as bright.
9. Information Breakdown: Once you have absorbed
all of that information, Let's quickly break the
process down step-by-step. Let's look at the
software that we need. You need a 3D design
CAD software. For example, I use
Autodesk Fusion 360, and you also need a
slicing software. As mentioned before, the one
that I use is Simplify3D. Next, the pottery process. You need to know how
to work with clay. What the right consistency is for the clay and the printer. Lastly, you need to know
how to decorate your print along with firing in the kiln
for the different stages. Next is equipment. You will obviously need
a 3D clay printer. As mentioned, I'm using a
Delta Wasp 2040 clay printer. You'll also need
an air compressor. Mine is quite small. But depending on the
size of your printer, you may need a bigger one. Now I know that seems like
quite a lot of information. But start with the basics
and build up from there. Don't go out and buy
all of the equipment. Remember, this is a
long-term investment. So whether you want to
start with the pottery first or with the 3D design, at the end of the day, you have a long-term
goal in mind.
10. Project: For your project, I'm going to ask you to do a little
bit of research on the internet and find out what are some
of the benefits of 3D printing and also how
do they relate to you? For example, when I started out, I was only a potter. I had absolutely no
technical ability at all. I however, sustained
a chest injury whilst working on
my pottery wheel. And I was exploring different
avenues of creating my art. And that is how I
found 3D clay printing. In that way, it helped me to
create the things I'd like to make that I can't necessarily make on a
pottery wheel anymore. Another big benefit
for me is that clay is a material that I can
reuse and recycle, so it's a lot more
cost-effective. The next question I
want you to answer is, why do you want to
start 3D printing? For me itt was out of necessity. I had a pottery business, but I couldn't create pottery. And 3D clay printing helped
solve that problem. You need to figure
out the why for you. Because once the learning curve starts getting a
little bit steeper, you need to answer that
question for yourself. So you can motivate
yourself to push through. Is it because you'd like to explore different
creative avenues? You'd like to
experiment and just try something new or like me, you'd like to start a business? Once you've answered these
questions for yourself, you're welcome to
share them with the class in the project folder. Now how you choose to
do this is up to you. You can either create
a post or take a photo of your brainstorm
on a piece of paper. It's completely up to you. If you have already started
on your journey and created some pottery works or
created some 3D designs. You are welcome to take some photos and share
them with the class. In the discussion section, I'd love to see
some of your work.
11. Final Thoughts: 3D clay printing is still very much a niche and a
lot of people are scared to start
because they feel that the learning curve
can be quite steep. Yes, I'm not going
to lie to you. There is a lot that you need to learn if you're
starting from scratch. But I promise you
persistence pays off. If you put in the work, you will reap the
rewards in the end. Good luck on your journey. If you would like to
learn how to 3D design, you are welcome to
go have a look at my Beginner's Guide to
3D Design in Fusion 360. It really helps you with regards to navigating the workspace and what are the fundamentals
that you need to know to work within
the software? I really look forward to some of your feedback with
regards to the class. Or if you have any questions, please drop them in the
discussion section. Thank you so much for
joining me today. I hope I've helped you get a better understanding about what 3D clay printing is all about. And I hope to leave
you with one feeling. And that would be
the feeling of being inspired to go out there
and try something new. Thank you so much.
 Hendrien Horn, 3D Potter