Transcripts
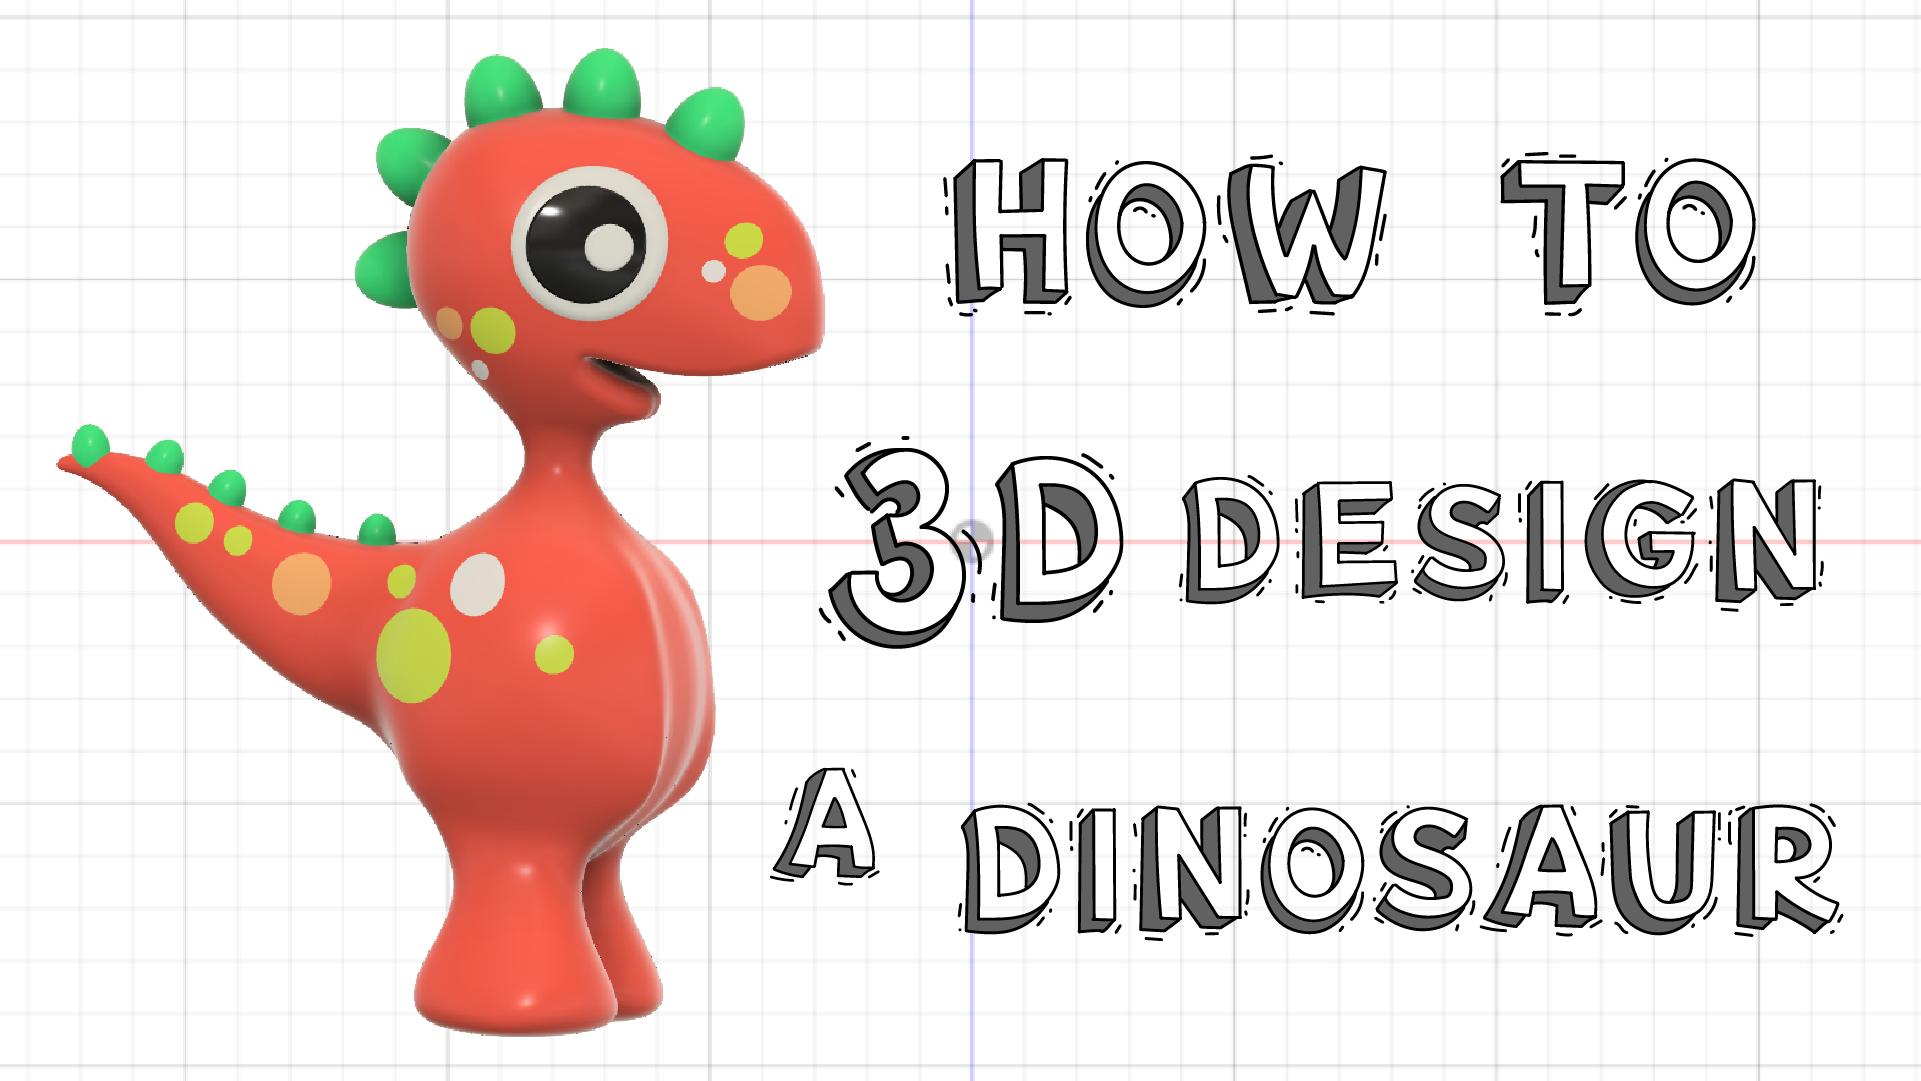
1. Introducton: Hi there and welcome to this beginner's class on how to 3D Design a Dinosaur in Autodesk Fusion 360. As a beginner, you'll be learning how to work with surfaces, which will help you quite a lot when it comes to creating more complicated 3D models. We'll be learning how to create a form and shaping the surface of the form using a large variety of 3D modelling tools. Working with surfaces can seem a little bit daunting when you first start out. But I will be there giving you some helpful tips and tricks to bring you a few steps closer to understanding how to create a model from start to finish. You will have the opportunity to experiment with the shape of your model, giving you the creative freedom to explore quite a few of the tools as you progress on this journey to becoming a 3D Maker. Hi, my nameis Hendrien Horn, and I'm a 3D Designer and Ceramic artist from South Africa. When I started to teach myself 3D design, I fast-track my learning curve by creating character models. In this way, I started to learn a lot faster about how far I could possibly push the surfaces and shapes within the 3D software. It also helped that doing this made it a lot more fun and I really enjoyed creating characters from scratch. Being a 3D Designer opens the doors for absolutely anyone to become a 3D product designer, animator, and inventor. And you don't need a degree in tech or design to do it. All that you will need for this class is a computer, a mouse, and of course, the Fusion 360 software installed on your computer. If this is your first class, I would suggest rather go have a look at my Beginner's Guide to 3D design. There I go over the layout of the software and talk you through how to use the mouse with regards to orbiting and moving your model around. These are the essential basics that you will need to understand in order to complete this class, because I won't be going over that today. Well, thank you so much for joining. Myname's, Hendrien, and welcome to this class.
2. Project: We will start by 3D modelling the outer shell of our dinosaur. Now the shape is a little bit more complex and all this means is that we'll be taking a little bit more time with regards to shaping our model and ensuring the surfaces of the model are correct so we can turn it into a solid body. We will model the dinosaur in different sections, including the head, feet and tail, making it a lot easier to design. Once the outer shell of the dinosaur is finished, we will convert it into a solid body. And here we'll just make some final changes to our character model. When you are happy with the overall look and shape of your model, we will be moving to adding some appearance. And this is the part that I really enjoyed the most because by adding some color and materials, your object and model really does start coming to life. Lastly, we'll be saving our model and I'll show you how to capture an image of your model within the software. This will also allow you to share your image with the rest of the class in the discussion section. Please don't be shy guys. I really look forward to seeing all of your projects. Well if you're ready. Let's get to class.
3. 3D Model Body: Let's start by Creating a Form. Here on the top - on this icon, click on the purple one, Create form. Now you see all the icons here at the top of changed. Now the first form we will be creating is a Quadball. So you can click on the icon. The plane will be working on is this ZX plane. Click on the plane. If it doesn't flatten out here on the right on your view cube, click on the front and it flattens out. Let's click on the origin. And it's created our Quadball. Yours might not necessarily look like mine. If you don't have any lines displayed here. Go down here to display settings, visual style, and select shaded with visible edges because yours might be on shaded. Let's change it back because in order for you to work properly with the surfaces, you need to be able to see the edges. Because we're making the body, I'll be making this a little bit bigger. I'm going to change this to 100 millimeters. Now it doesn't really matter which unit of measurement you're working in right now, as long as you stick to the same numbers, Span faces, Let's make that 4, symmetry. Let's select mirror and we're going to tick length symmetry. Make sure it's on new body and say, Okay. Now before we move on to creating the head, I first need to start creating the neck here. We're going to be leaving the sculpting process for later once we have our basic shape. So for now we need to concentrate on creating a hole here for the neck. So here on the top right on my View cube Let's look at him from the top. And because I have it on length symmetry, if I select this face, I'm going to hold in Shift and select the one below, Let's right-click and say delete. And there it's automatically created a hole within our form. Now you can see this is just a surface because it's very thin here, so it's not a solid body. And this is pretty much just the shell. Now I'd like to change this so that this opening is a little bit more round. The one way to do it is to go to modify and click on Edit form, but I won't be doing that. I prefer to use the shortcut - right-click and edit form is to the right. I can click on that. And now this box will appear. Make sure that yours looks like mine. And here on the selection filter make sure it's on All. This just means that you can edit the vertices, lines and edges, and the faces all at the same time. For example, I can edit the face. Move that around, just Control Z that orthe vertices, move that up and down and do that again or the edges. So this just makes it a lot easier. I'm going to click on this vertex. here. Make sure you don't click on the one on the inside. Make sure it's the one on the outside. And I'm going to move it up. about five millimeters. Do the same for the bottom and the side. As you can see, because I did it on the right, it automatically did it on the left because of the length symmetry. I'm going to go Okay. And that's about right. And now we can move on to creating the next body for the head.
4. 3D Model Head: Now we can move down and we will be creating another quadball So let's click on quadball and we need to select the center plane, the ZX plane. Now if we move upwards on this line, we can click anywhere on this line because you can always move it later. And there is created a quadball for us. I'm going to leave it at 80 millimeters, span faces is 4 and mirror is length symmetry, and new body. And I'm going to say, okay, Now like we did before, I also want to create a hole here at the bottom. So I'll go to the left here. And put the first body off that we created and look at this quadball from the bottom. Like we did before. Click on the one face - hold in Shift, Click on the other, right-click and say Delete. Let's round this out again, a little. right-click Edit Form. And setting this at four instead of five. There we go. Let's put our other body on. Now we want the neck a little bit thinner because this looks quite thick. If you would like to move the shape up and down, the shortcut to do this is to hover left of your form. Left-click and drag a box over it. And as you can see, it's selected the entire thing. You can right-click and say Edit Form. And in this way you can move it up and down. Now yours doesn't have to look exactly like mine, but I'm going to have it a round about there. You can always move it again later and say, OK, click outside of the form Now let's look at shaping the neck and bringing the circle in. Like before we're going to say right-click Edit Form, I'm going to double-click and it selects the entire line. You can switch your second body off if you want. And let's just bring this in just a little bit by using this little icon here with the three triangles around it. It doesn't have to be exact. We can always change it later. And I'm going to do the same for the top one, Double-click it, selected the entire line and bring it in just a bit. Next, I want to start creating faces that we will connect to the one above by welding it. So I'm going to double-click on this bottom part, and this is where the sculpting starts to get exciting. You're going to press Alt on your keyboard, click on this arrow and drag up. You can release Alt and there, you've created new surfaces. Now you can drag this up or down, but we're going to try and get three surfaces in here. So we're going to hold an Alt again. Click on the arrow, release Alt, and drag up and one more time. Now make sure when you've dragged up that these do not intersect. The reason is if any of these vertices and lines intersect this Shell won't be converted into a solid body when we click on the Finish Form button later. And it's very important that these vertices do not intersect. So take it down just a little so that there's a nice gap in-between. I'm going to say, okay, and the reason why we have the same amount of span faces on both of these objects is because when we weld the vertices, we need to have the same amount on the forms. So there's that one's opposite. There is another two and there and there. So you need the same amount of vertices and faces in order for it to work well, Let's, weld, these two together. We will go to Modify - Weld Vertices. Click on the top one and the bottom. And it's automatically welded it for you. Now it's turned it into a geometric shape. This just means that something is going wrong and that the shape is not an enclosed form. Which means if you were to click on Finish Form, you wouldn't be able to do it. So it's just instructing you to go and fix the vertices so we need to connect all of them. This may happen to you where there are two, where you can almost maybe not even see the one in the center. So just be careful and make sure you select them. There we go. And now we can see the form is no longer geometric. You can say, Okay.
5. 3D Model Feet: Now before we start sculpting the body, Let's move to making the feet at the bottom. So like before, let's look at it from the bottom. And we'll be selecting these two faces holding in Shift, right-click and say delete. Like before, we'll right-click edit form. And let's just round this out just a little bit. You can see I'm only using the arrow, not using the square or the rotate for now. But here I'm going to click on the line, and now I'm going to use this rotate icon here. Maybe bring this in just a little more. Now we're going to look at it from the front. And we're going to double-click so that it selects the entire circle. And like before, let's create some new surface faces hold in Alt. And now you can actually use this little square in the middle, release Alt and drag down. And again, hold in Alt. Now this looks quite funny. This little toggle here is what you can use to move the lines. For example, let's double-click on this line and bring it out just a bit. Double-click here. And let's rotate this. Actually, I want to bring this leg in. And I'll just click on the one on the back so that it's both faces. I just just want to level this out just a little bit. Now be careful when you're doing the feet, make sure that they do not overlap like this because these vertices are intersecting, which means you can't finish your form. For now I'm going to leave this basic shape. We will be going back and moving everything around a little bit later. Now we need to fill these holes up so that this is enclosed. So we'll go, okay. Now double-click on this line so that you ensure it's selected. Let's go to modify - Fill hole. And there it's closed the hole for us. Now there's different options here that you can use. I prefer Fill Star, mainly because it's flat at the bottom and there aren't that many faces because I prefer the foot to be flat at the bottom. But you are welcome to use any other one if you'd like. It's not really going to change the shape that much. This is just my personal preference. Let's say OKay. And I'm just going to leave it like that. And now we can move on to the tail.
6. 3D Model Tail: Let's look at it from the back. I'd like to create a hole here for the tail. Like before hold in Shift, select them, right-click, Delete. And let's make this a little bit more round. Right-click - Edit Form. And I'm going to double-click on it and just bring that in just a little bit. Let's look at him from the right. Right-click - Edit Form again. Now let's model this tail. Hold an Alt. Now when you get to the tip of the tail, we will be closing this hole by using the Fill hole option. Please do not close it by intersecting the vertices. So when you're done, say Okay, We'll go to Modify - Fill hole. Select the Fill Star. I'm happy with that. And say, okay. And the basic shape of the dinosaur is coming into form. I'm just going to do a little bit of work here on the tail. I don't want this edge to be so sharp. So I'm just going to edit it and bring it up a bit. For now, I'm just going to leave it like this. And next we can move on to sculpting the entire body. So I'm going to say, Okay.
7. Streamline 3D Model: Let's start with the shape of his head and zoom in and right-click Edit Form. Be careful when selecting lines in the beginning. Maybe start working with faces, and holding in Shift and selecting a few and dragging them out. If we look at them from the front, you can already see the changes that that one move has made. Now I enjoy sculpting the face. You don't have to add too many features for now, but just ensure that these vertices do not intersect. I think I'm just going to bring the neck in a little. If you'd like to move the entire face like we did before, click on the left-hand side of the shape and drag a box over it. And you can move it. But I'm not going to. I'll just say control Z (undo), I just wanted to bring the tops of these legs out just a little bit. And here at the back. Just so that gives it a little bit of definition. So when you're making your final adjustments, you don't have to be too critical of yourself. Just enjoy creating your surfaces and exploring what you can do with the shape because it doesn't have to look exactly like mine. I think he's almost there. I want a really nice curve here on the top of his head. So I'm just going to double-check this here, and with his neck maybe bring this in just a little more. And once you're happy with your overall shape, you can say Okay.
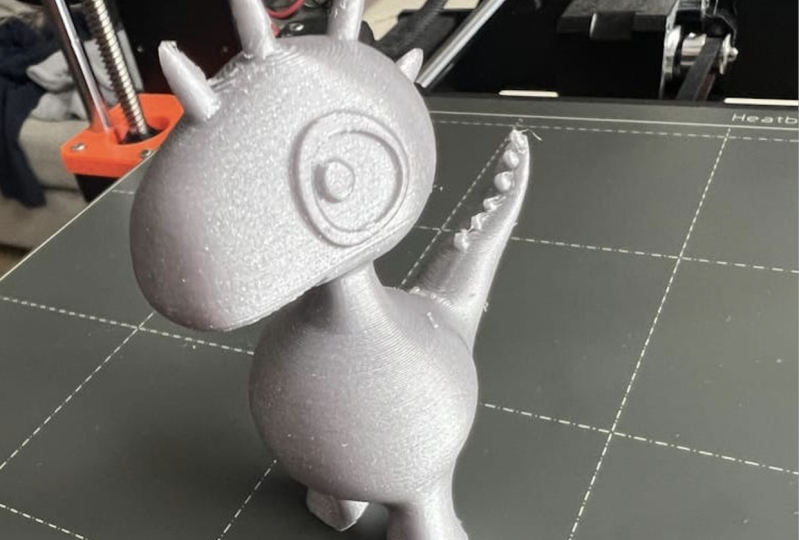
8. Finishing Form: And now we need to click on the Finish Form button. But I'd just like to show you what happens if something goes wrong. I'm going to exaggerate it now. But if for example, I may have intersected vertices. Let's go. Okay. And if I click on the Finish Form button, it's going to pop up this error and tell me the model has failed to convert. And here on the right, another pop-up box will appear telling me what the problem is. So T splines surfaces are self-intersecting. Instead of saying continue, click on Return, we're going to say Close. And unlike my shape, yours might be minor. Which means if you've got up here to Utilities and say repair body, It's asking you the T-spline body. Just click on the entire body and click on auto repair. Now, by just doing that, it may automatically just repair your problem. But with what I did, I know, it wouldn't have done that. So I'm just going to say, okay, and I'm just gonna say Control Z (Undo). Now let's click on Finish Form and see if it worked. And there I can see that my form has converted. And also here at the top, all of the icons have changed. Now if you did do the auto repair and you tried to click on Finish Form and it didn't want to Auto repair it for you. That just means that you're going to have to go and look where your problem lies and fix it by hand. And the software won't do it for you automatically. I'm actually looking at his feet here and I'd like to make a quick change here as I'm looking at him. So I'm going to go here on my history timeline, right-click and say Edit. I'm back to where I can edit my form. So right-click edit form. And I just want to bring this foot out just a little bit. Give it more definition. And that's what's great is you can always go back in your history timeline and make changes. Finish Form. And there we go.
9. Sketching Body: Now we need to create the sketches to add some of the features. I'm going to look at him from the left. Let's go to Create, create sketch. We'll be working on this middle plane, the ZY I'm going to hit P on my keyboard for project, make sure on Selection filter you've selected bodies. Let's select the body and say, Okay, and this purple line has appeared. On the left-hand side on our bodies. Let's turn the body off and now we can see the basic outline of our shape. Now let's start with the eye. I'll hit C on my keyboard for center diameter circle. Let's make this 40 millimeters and say Enter, Let's move it around. I'm happy with it there. I'm going to hit C on my keyboard again, let's do an inner circle like this, 30 and say enter. And if I zoom in, Let's create another one here just for another highlight. 12. Next we will be using the Fit point spline tool to create a mouth here, which we will be using to extrude and cut through the shape later. So we'll go up here to Fit point spline. Now click on the outside of your shape, three anchor points on the inside, one on the outside, and click to make sure that you've got an enclosed shape. Now press Escape on your keyboard. And now we can move these anchor points around. You'll see these lines here are actually intersecting. So if you click on it, we can use these anchor points just to straighten them out. And just create the shape that you'd like to cut out a little bit later. I'm happy with that. Next, let's concentrate on creating the Horns. I want at least five to six horns here. So I'll be using the Ellipse tool to create the first horn So we'll go to create - ellipse. You're going to click on this line. Now note that with the horns, this will be the one that we will move and create more going to the left. So I want my last horn to be there. I'm going to click on the line, release, check the angle. Click, drag out, make it 20. And enter. Now I'll press L on my keyboard for line. Let's do a line through the center of this ellipse. Now I know that these lines are intersecting at the moment. And to clean up our sketch little, we can actually get rid of that. We only really need to rotate this part of the body and a little bit that's going inside here on the face. So I'm going to press L on my keyboard again for line. Click on the one side, and click on the other. I'm going to press Escape. And now let's trim these bottom lines away. I'm going to hit T on my keyboard for Trim. And you'll see your highlights in pink, pink, or purple. And you can trim those lines away. Not forgetting this line we've created here. This is just to help clean up our sketch a little, because intersecting lines can just cause problems later on when you're modeling. Now let's do the same for the tip of the tail. Let's go to create - ellipse. Last one on the tail, I'd like it approximately here. Click Release. Let's make it 14 by 10. And like we did for the other ellipse, Let's press L on our keyboard for line and put a line through the center. Now we don't need to cut anything away here because it's not intersecting with any lines. So we can leave it like that for now. The last little features I want to add to the body, are just some circles here so that we can add a few dots on his body when we're doing the appearance. So I'll hit C on my keyboard for center diameter circle, and let's create some circles. Now let's copy the shape and move it along the side of his head. Click on all the lines holding in Shift, right-click and say Move or Copy. At the bottom here we going to say Create Copy. And let's move it that way. I'm only going to be using the arrows and the rotate function. Let's say Okay and let's do a few more. Once you're happy with the top of the head, let's move to the tail. Click on all the lines holding in Shift, right-click and say move and copy. If it hasn't copied the line here, just press L on your keyboard for line and do another one quickly. We'll put our body on. There we can see everything. Let's say Finish Sketch. And now we can start modelling all the features.
10. Adding Features: Let's start by creating all of these horns. We will be revolving the shapes around. So for now we can switch our body. off. Let's say Create, revolve, the profile. We must select the one side of the horn. The axis is the middle line. Make sure it's on new body 360 degrees and say, Okay, and there is the first horn. Put our sketches back on and we don't have to go Create Revolve again. A shortcut is to right-click and say repeat revolve. Let's do the same for all of them. Let's move to the ones on the tail. If there are lines intersecting, I'm just going to go to my sketch here at the bottom right-click and say Edit Sketch. And let's quickly draw a line here. L on my keyboard for line, T on my keyboard for trim. Trim these lines away. That's better. It's a finished sketch and the history timeline has popped back to the front. So let's go to Create, Revolve. Now put our body on. That's looking a lot more like a dinosaur. Let's quickly extrude his mouth. Will press E on our keyboard for extrude, the shape we want to extrude is the shape that we've created. Here instead of one direction, let's make it symmetric. And here on new body we're going to say cut. If we turn him, here you can cut open the part for his mouth and say, okay. Next, let's move on to his eyes. We will also be using the extrude tool. For now I'm just going to put my main body off. Let's press E on our keyboard for extrude. The profile we want to extrude is this outer part of the eye, the direction. We'll keep it on one side for now, the distance. The distance is to Object. It's going to ask you which object? Let's put this main body on and we'll select this object. Here on extend- Make sure it's adjacent, and there you can see it's cut it. Now be careful we don't want it to cut. We actually want to create a new body. Another thing is we want to extrude it to the shape of the face so that it can pop out, but that it has a little bit of an angle. If we look. So I'm just going to say Cancel and do that again. And here on offset is where we will make our change and make sure your operation is on new body. As soon as I press 2 it popped the eye out. So if this is 0, it's on the side of the face. But if I say 2, it popped it out. So I'm going to say Okay, now I'm going to do the same for the other two. Press E on my keyboard. For Extrude, I'll be selecting the middle one. The distance is toobject. Let's change the offset to 3, So it pops up a little more. Let's do the final inner circle. E on your keyboard, make sure to select the right profile. Note that I didn't select the eye here, I actually selected the main body. If you select the eye here when you're choosing your object, it may not necessarily work. Let's make it 4. Say, okay, now let's put our sketches off here for now. Just so we can see what's going on. I just want to smooth these lines out a little. And for that we'll need to use the Fillet tool. so I will, press F on my keyboard for fillet. Click on the outer line and just bring it in. You'll see if you overextend it, it will turn up in red. And if you push it too far, you'll actually create a hole in the middle. And we don't want that. We actually just want it to be smoothed out just a little. Say, Okay, I'll right-click and say repeat Fillet. I can already see before we carry on with the fillets, we've got a problem here, and that is a problem that we need to take care of, but we'll look at that a little bit later. Right-click, Repeat, Fillet. Repeat fillet again. I quite like that. I'll say, okay, now we just need to mirror it to the other side. Well for that we will go to create, mirror, instead of faces. Let's change it to bodies, the objects are these three bodies. one..two..three. The mirror plane is the center plane, the Z plane. Once I've clicked it, it's automatically mirrored it to the right-hand side. Okay, and there we go. So this problem here usually has to do with the sketch. So I'm quickly going to go back to the sketch here at the bottom right-click and say Edit Sketch. And say Finish Sketch. And there we go. It's gone. I just want to round out his mouth a little using the fillet tool. So we'll press F on our keyboard again. Let's bring it in just a little. Okay. And the last thing we need to do is just to split our body with those sketches that we've created with the same center diameter circles. So we'll put our sketch back on and we'll say Modify - split body. The body we want to split is this main body. The splitting tools are all of those circles. Now you can put your main body off and go and select all of them. Now you'll see they're splitting the body. Because if you turn it, it's showing up in red, which means it's cutting. So if I put my body back on and say, Okay, that's created all of those lines here on the left, I'm just going to bring my body's in by clicking on the arrow. Put my sketches off bring that in. And there he is.
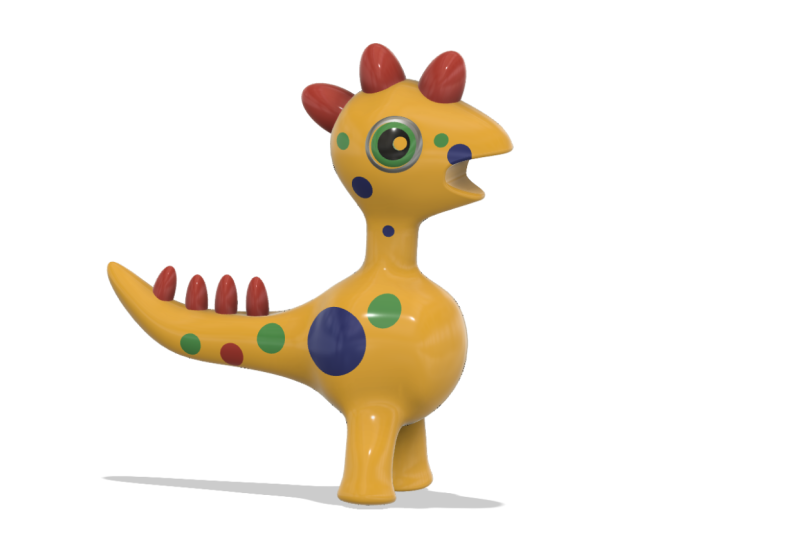
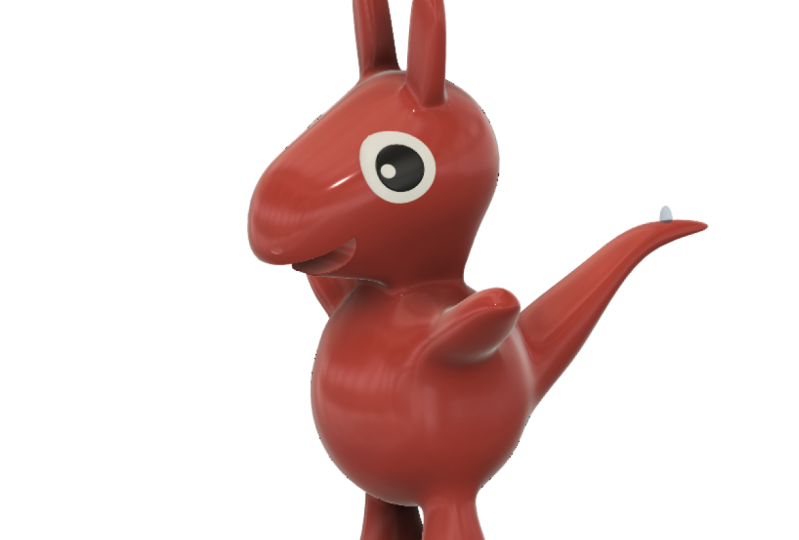
11. Save and Capture Image: Now let's save him. We'll go up here to File - Save. And let's call him Dinosaur. My location. Let's go here and select my Skillshare Classes folder. If you don't have a project folder yet, go down hand, create a new project folder. And then all of your folders that you have in there will obviously pop up. here. So we'll say Save. Next. Let's capture an image so we can share it on the group. Now pick a nice angle. I think I'm going to do that. And let's go to File - Capture image. Now here on the image size, I usually go a little bit bigger, mainly because if you use one of the smaller ones, you make cut off parts of his body without even realizing it. So rather go a little bit bigger, you can always crop it later. Make sure that transparent background is de-selected. Because if you have a transparent background and you capture an image, the background may show up in black, which means you may lose some definition with regards to your picture. Or if you've added some features to him on the size that are a bit darker, you might not be able to see it. So rather keep your background white. And then we say, Okay, it's going to ask us the name again. And I'm just gonna say dinosaur, save it as a PNG. And here at the bottom I'm just going to say save to my computer and to my downloads folder and say save. And there we go. We've captured an image, You're welcome to do different angles as well. You don't necessarily just have to upload one photo if you'd like to do different angles, you are more than welcome to.
12. Adding appearance: Lastly, we can finally move on to changing his appearance. So we'll go to modify appearance. And here at the bottom we've got all the different materials we can use. I'm going to be concentrating on the paint folder and on the glossy colors. So let's start with his eyes. Let's make this part black. I'm going to click, drag and drop. Let's turn part of his eye black. I actually want the whole eye black. So I'm just going to do that again. I can actually going to click on it. Drag the color, click, drag and drop. Let's just say remove. And you can see it's changed the entire color, Now I'd like these parts to be white. So let's click on this one. Make sure I've selected the entire body. Drop it in, and same for the bottom one. Now be careful when you're working with these different faces because I may be selecting this part, but that means I might be changing all of the colors. So if you'd like, you can also just click on the faces. Now, if for example, I'd like to change this part to another color, but in my library I only have these two colors at the moment. And if I drag and drop another color, right-click on it and say Edit. And here I can edit the color. I can also change the roughness and the reflectiveness of it. And say done. Now I've changed the properties of this color by changing the roughness, which means it won't be the same as the black. So if, for example, I want to go back and maybe change the black to have the same properties as this red. There is an easy way to do this. You right-click on the red, say duplicate, and a new color will appear. We're going to right-click on it and say edit. And you'll see the roughness that I changed earlier is exactly the same as the original red. We'll just drag the color down to black and say Done, and there is our new black. So I can click on this part, drag and drop. And now they have the same properties. Now if for example, you're not using a color, for example, this red, you can right-click on it and say unassign and delete. And it takes the color away. I'm assuming you'll be experimenting quite a bit. So this area may get overpopulated with colors. So if there's a color that you're not necessarily using, you can just unassign and delete it. Now you don't necessarily have to work with the plain colors. You're welcome to experiment with all the different types of materials, like wood, metal, glass. Depending on your preference, have fun with it. I'll see you on the other side. If at any point in time you want to see what it looks like without all the lines we can go here to display settings visual style, and change it back to shaded. Once you're happy, let's just say done. He's looking kinda good.
13. Finishing up: Thank you so much for joining me. I really hope that you enjoyed creating your dinosaur. And as you are now fast tracking your journey to becoming a 3D maker. You are welcome to let me know if you have any ideas for 3D models I could possibly make in the future. If you would like to post your dinosaur on Instagram, you welcome to tag me. My handle is @hendrienhorn. I am so excited to see all of your 3D dinosaurs. Please don't be shy guys. Please share your creativeness with the world. I know as an artist myself, it can sometimes seem like a daunting experience, but I promise you it's completely worth it. So please don't be shy. If you find yourself in a little bit of a bind or you need just a little bit of help, you are welcome to let me know. I would also love to hear your feedback with regards to the class and how you guys are progressing with your other 3D model designs. Thank you so much for joining me and I'll see you guys next time. Bye.
 Hendrien Horn, 3D Potter