Transcripts
1. Introduction: Hello everybody, It's
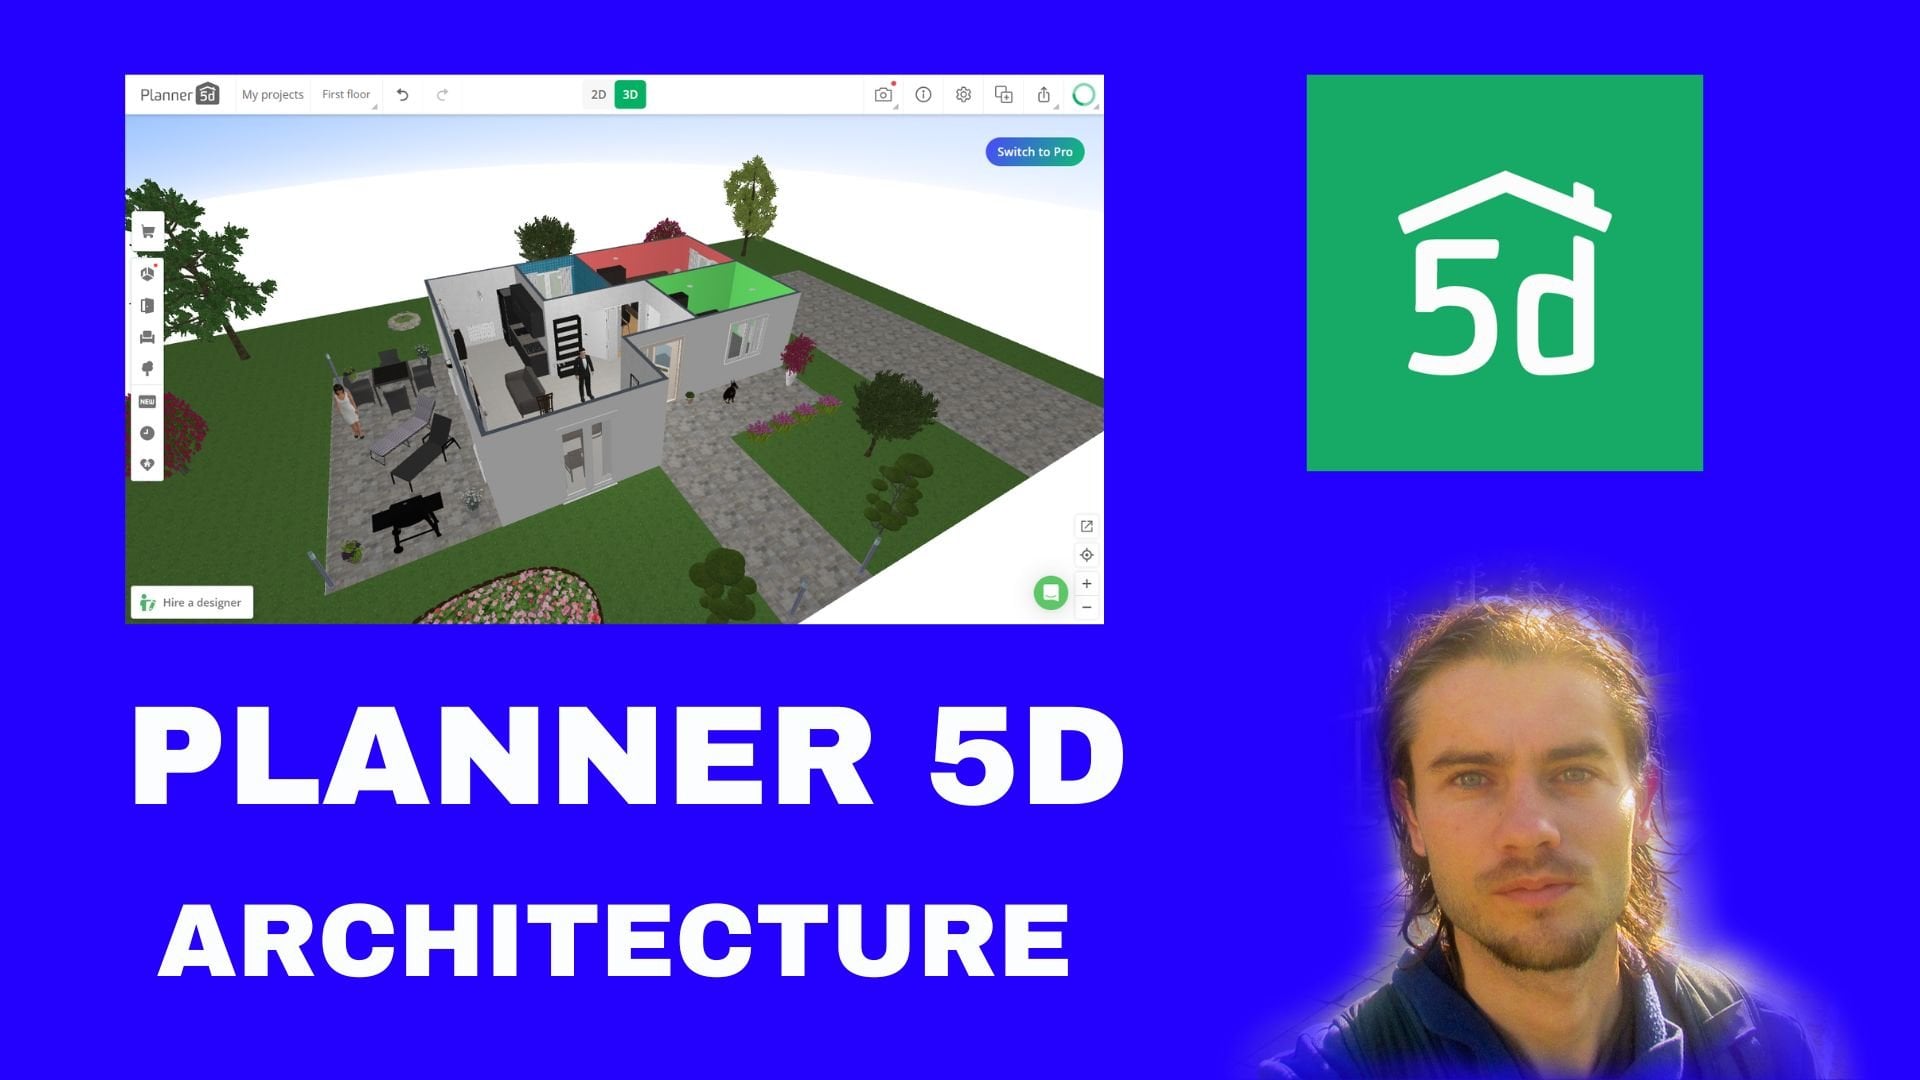
neat class and welcome to this curse floor planner or Zoo complete Charles
Flood planner. What is this? It is a software
that allows you to create a 2D plane and obtain a
3D rendering in 3D time. So extremely important,
you can walk in 2D and you can mix in 3D
directly in wait time. The software is specialized
for interior design, but it is a possible also to
expand on exterior design. Software allows to
optimize all in terms of design thanks to
the click and drop system. And so different preset size. In dead, it is
quick to add doors, to add windows or
event furnitures, thanks to the big library, change to the 3D view is very
poor food with a real time render of the plane
into de Tres, we can move around the
rooms to see its layout. It is then possible to expand
the views from planner refers to total
tidy free version. This version gives access
to all the design features. On the other end, you will
have to buy credit if you want to export your project
with high-quality format. Or if you want to work
on several levels. Who is this software for? This software can be for
individuals who want to create a rendering of
their future apartment, or simply design a new room. This software is
for entrepreneurs who want to practice,
for interior designers, who want to make tools and
to create different type of presentation and rendering for customers in 2D plane
view and 3D view. This software also can be for real estate agency who
want an economic tools to give ideas to clients and create
renderings of project. Now, what you will learn in this training curves,
in this training, you will learn how to use online tool for
planners step-by-step, you will be able to
efficiently create your room. Gradual. I will use directly the
design of any apartment. Use of the dashboard,
navigation management, master of the values design tools to
create your 2D plane. Navigating with a 3D view, you will see how to
perfectly correct words, create rooms, set
room parameters at furnitures, color and texture. You will also see how to create a presentation page or manage the camera and export your work. At the end, a complete
project of with the creation of a
truce will allows you to see also features seen in cross flow planner,
the complete curves.
2. Start with software: Let's start with frog planner. So first things to do if
you want to use this tool, it is online so you don't you don't have to download anything. You can walk directly. It is online tools and you just need to have a
Wi-Fi connection. So we are going to go on this website, so
flop planner.com. And let's just take a glance. And what is the difference about the pricing important
at the beginning when you start something and
proton to know is what, what is the goal
of this software? So you can just take a
glance about the first page. It be possible to
plan your space with a 2D view and a 3D view. So this is why it is
extremely useful. You will be able to
export your work and to have crit image in just minutes. And you will be able to
upgrade your project to have more element
mock possibility. And for this you will
be able to buy credit. So first things to do forward. Who is using flop planner? Personally, I think it's definitely great
for personal use. Or if someone wants to work as an interior designer
or something like this. I think for these two girls, it is the best to use
for your planner. So first the personal use
when you are rearranging, moving into a new house or
planning or innovation, having a floodplain
can be Great ed. It makes communication about your ID Asia and more efficient. So yes, for personal use, if someone wants to
create design of say, next, I was a designer
of Zen next apartment. It can be amazing to use
these type of tools. It can be also great
for interior design. If someone wants to work
as interior designer, when you are an interior
designer or STDs, you want to focus on the design and not
on the technology. For Planner app you to make
great 2D and 3D visualization fast and for a fraction
of the cost of traditional 3D CAD software. This is a reality. If you create interior design. If you cross credit
hours design, room design using a CAD software or real
3D modelling software. It can be extremely long. First, it will be so
much more difficult. Second, it will be
extremely long. And you won't have a library of furniture or these
type of things. This is why it is a great tool. Because for interior designer, you can hurt them lot of time. You have a big library with real furniture and this
is why it is amazing for someone who will
be able to work for interior design and the
price will be good. Great. Also. It's also possible for
real estate agency. Maybe for real estate
and chances I will use a different
type of software, but it is a possibility. And then you have
more options like furniture retails are
again for education. Let's take your
glands about pricing. We're going to work on
first individual pricing. And for $0, something
interesting, It's for $0. You can have access to all the functionalities for editor functionalities for free. You can design all your
interior of for free, you have the full library, also an export
images in 2D and 3D. 2d and 3D. It will be
just in low definition, but it is possible. And this is totally free. You have unlimited project. And after, if you
take a subscription, just five dollar payments, you need to understand
that insides of $5 you have for credit included where it is I'm
proton because far Exploitation we
work with credits. So $5 a month. And thanks to that,
fossa features, you can just unlock exporting
images with time luck, and you can also put
favorite items list. This is just a little
difference about digital, but for the rest,
nothing special. Change too much. You have four-credit
useful if you want to export in HD, you walk. And after in the pro,
totally pro versions, these $29 but you have
30 credit inside. So T credit, insight and moral value of
also custom templates, home type sets, and create
your own room styles. Next is, I think
definitely it's more for professional interior
designers that we can use this one after. For the rest, we can just
stay basic and clues and just buy credit if we need
for exploitation. And you don't have to forget
that with a free version, you can only work
with one lever if you want to work with
a second levels. You will have to buy credit e.g. now if I just come back, so it says for individual, after you have also
company pricing, it is little different. I'm not going to enter
too much in details. So difference is every
time we really are bad to credit here we have
60 credit here, 2.225 credit included, and
here 800 credits included. After you have projectile evils, project livers, what is this? It is if you want to, inside your project,
correct to say gone levels or a cell divides. And in this case, in this case, this project is
limited to one floor. When design images
you can export from this project are
in SD quality only. With the free version. It
will be this one floor for one design and image
is exploiting in SD. You ever saw floor
planner watermark, don't forget this is a floor
plan or watermark here. So this is why if
it just for you, for a future project
can be enough just to have totally free
version. But if e.g. this for interior design work, when interior design work, yes, it can be useful to
maybe add more leverage, or it can be useful
also to export in HD. This is a reason for
which we can buy credit by your credit now of your subscription
and get credit every month. If I just continue, you have the credit system. So take your lens so
bad the credit system, you will find the price. Our credit system
standout project level one floor plan now a
fully functional in free. But to unlock better export
option, as, as explained, multiple floors or specific publish options
you need credit. This credit can be
used to upgrade project to your project level. Each upgrade cost a
certain number of credits. This is a onetime
fee per project. Once you have
upgraded the project, it will stay upgraded
for river credit can be purchased with our
wizard or subscription. When you have a subscription, you have credit inside, but you can just
buy credit without any subscription and get credit. You can find the
price five credit, $5, 9910 credits, $9.99, 30 credit, $29.19,
5.100 credit, $89.95. Just like this. And you
can find here's a price. So SD when you export
it this free to credit 3D expert in HD resolution
multiple for proofs, advanced options as 3D
export in HD resolution is dysphagia credit suite
dx brought in for K resolution ten credit project. Say it is for one project after, if you use e.g. ten credit for one project, you can export anything
that you want. Multiple images
is not a problem. It just for one project
and you have also a K for 20 credit pair project,
just like this. So this is how you can
start with proper. Now, just understand
the difference, what is free and
what you will be able to add if you paid e.g. credit or if you
take a subscription. After just sign up for
free, you go here, sign-up and after will
enter into the dashboard.
3. Edit project: It did design transform, design transform or your design, it is possible when you
click on this area, this is a design is
sitting so you can add it here, all your designs. The first things
that you can see is the separation of your design in different pattern depending
of the rooms that you choose are so short phase
that you have created e.g. electric shares is
my living room. Automatically. I'm
going to zoom on my living room or recenter
on the living room. If I click here on this bedroom or this
bedrooms are here, I can re-center exactly on the path I created are so different surfaces
for the garden. So if I click on one
of these directly, I can recenter also on this one. Each time you can see zoo number of meter,
square of area. If I click on my living room, I can see directly sweep, print suite meter square. Here is he's a bedrooms and
each time you have dementia, we just have one design. This is my first design. The things that
you can do it ADD, ADD THE just design a name. Inside. It is my main project and inside I can
change the design. I can just make design e.g. or frost flow host design. It depends on what I want to do. A step holds design first. So this is my design named after you have the
design history. You can find the
different savings and you can restore if you want
to add a specific step. So every scene is is it safe? So this is why I
can restore and I can come back in a previous, produce, produce a view. I can come back and currents. You can also transform
your design. Transform your design. It is cranial rotation. Normally you start with
the right position, but if after you
need to change for different reason for our
expectation can be useful, you can apply a
specific value, e.g. I. Can tell minuss 90
degrees or 90 degrees. You can also flip
after vertically, or you can flip horizontally. Your design JT is just apply and you can come back on this area
interests form design. If I just go here, you can
also change the pivot, but it's not extremely useful. You can just drag and move
here and click on Apply. Let's come back on
Transform design. And let's apply your rotation. If I want to be like
at the beginning, I need to turn 90 degrees. I can go on back or a player. You can find also a summary of all your items
in your design. Items design here
at the beginning. So colognes awards and I
will choose the materials on my words and on my Fraass. I ever saw summary with all four nutrients that
are used in this design. You can also download
the project list with a list of all the
projects that you have. If I drag and move, I can add another
element just like this, but it's not extremely
useful finally, but just to show you, you can also drag and move one of the elements that you
have already in your design. And last point, it is, so light see teams. And here's, here's a listing
of all the different lights. We can change the intensity. And if you want to do
is activate too light for our render at any
moment you can do is activate two
lines and you can change the color of the light. So it sees the different
things that you can do. It is just to edit all the element of your own
design at the same time.
4. Create project: Let's explain how to
create a new project. So to create new project, when you are in your
main dashboard, you just need to click
on Preuss crack project. After you can enter the
names that you won't, they just keep project here. If it is for our
special location, specific location, you have the options to
enter the country, to enter the state zip codes, CT, any things that you want, and you can add some more
information as possible. Hey, it's not the case. I'm just going to
start a project. After to start the project
you will have three options. The first option is to
create an empty plant. So second option is
to upload an image. So it means to have a sketch
to use to create e.g. your world and your home and
to use the room without, let's just first with
the basic things. It is empty plane. What will use mass transit time. And thanks to that, you can
just start from scratch. So it means we will be able to draw whom and to
draw world's first. So I can use drove cars. Go left-click, can create e.g. a. War on this area. And O'Dell war and O'Dell
world just here and close. After I will have
x0 options to make some modification if I
need just like that. And you don't have
too much precision, I will show you after how
you can have specific value. And then I can use true rooms. And I can go left-click, create a room here, drove home again, left-click Coronado whom and I
could continue lysis. So this is just
stamped from scratch. So now let us come back. The other possibility if
I click on craft project, that project again, start. It is directly to
upload the image. So we arrive on this part
and you can choose a file. First ceilings of phase that
you want, choose a file. And I selected this image. And the image will arrive
on the backgrounds. So if you have a sketch, you want to reuse
a sketch even if you have a plain in
color or you can just import the image
directly inside here. So it's okay for that. So now the image
appears on this area. The first things to do is I will show you a little
bit more in details after you have the settings
and we'll be able, e.g. to work with the
transparency of the image. By default, we will work with 50 per cent if we want to turn. It's possible also to tell the
most important since we'll be to set to set scale
of floodplain image. So it means she, I don't have dimension, just an example, but normally you will
know your dimension. And if you know the dimension from one point to another point, you can use this one. Again, set scale. I need to select a frost print. Oops, let's do this again. I'm going to come back
on Background Settings. And click here and you select
the first point like this, print your acidic the
second point like this sprint and need to enter or length in
centimeters. And e.g. here, I will have we'll
have a 1,000 centimeter. So it means ten meter. And I can just validate. And thanks to that, my
plane now is scale. And why it is useful. Because if I click on back, I'll draw awards from
this point to this point. Take your glands. We have 10 m, so it correspond perfectly. So this is why the first things
to do will be it will be M proton to just
set the right size. And after we'd be able
to draw your walls or to draw your
rooms at any moment, who will be able to click here background sittings
and remove image. The last possibility,
if I just come back. So the last possibility
to create a project is to act directly
like template. And I can create two
new project again. Start that change
from room result. And directly you have a specific room and you can
change the type of room. If e.g. I. Select
this type of whom, I can create some rotational. Also apply Miro
horizontally or vertically. This is the first thing that
you need to understand. After directly, this
is a main door. You can change the
location of the menu. You can click on this one. You can also click
on this window. You can drag and move on the
direction that you want. After if I click on Next, I can also work with
different dimension. You can find the color
corresponding to the arrow, e.g. this is a blue color, so we see the first
dimension eight. And if it's too small,
I can increase. Let's take e.g. 600
centimeter, just like that. Here dimension I have
on the green line. So it means this 1500
centimeter dimension. See, it is this 1470 mentor and you have also the
end-all dementia. So just need to be
careful about color. I've taught when you're in
dimension, you click on Next. And whether you can start
with an empty room like this. And you click Start. Whether you can directly define a style. First glands are left. Select what type of
form it will be. Can be your bedroom. Because depending of
what you choose here, you will have
different furniture us inside acidic bedrooms. And now you apply e.g.
just type black hair gray. I will have bad. I will add maybe a sofa. I will. Maybe your carpet.
Yes, as you can see, it is designed for a bedroom, but now if I change and I decided maybe it can
be or living room, just need to be careful
if it is a living room, It's about the size. But if you create something
just swim meter by three meter or two meter by two meter and you want
to have a living room. He's going to define any sink because it
is too small here. It's okay, I can
define e.g. or DRE. And I can wait and automatically I ever designed
automatically or you have a design and
you can try with the possibility blue,
black, and y's. If I just come
back on the first, E is going to change and you can repeat the process
if you don't like, you can directly
try more options. You have also contemporary
just laces, printed y's. So you can select the
model that you want. I've taught 260 models. You click on Start and directly
you have a model of whom. Very great. If you
just create one room, it can be a bedroom
interior design. It can be even roomy
interior design. And you don't have a
lot of ID directly. You can use this element, so you can stand directly from
a template just like that. But after we can make
some adjustments so we can move the window, you can move if you want. Also the door. You also differ on
telling man you can change the position, can just drag and
move like this. Can drag and move it like this. We will see after
that we will be able to go on the 3D view, go inside. And after with a left-click,
I can take a glance. I can also change the position
of a different element. If you don't have a lot of ID, it can be great to
first 200 time, but also to generate
possibilities. I'm going to come back
just at the beginning.
5. Start with dashboard: Let's see the dashboard. So first after to
create your account, you will arrive on
this dashboard. This is the main dashboard. And for this part, you can find information about your account on the
top right corner. And you can find also information about
your account here. If you need to buy credit, you can directly by
credit here you can also manage your subscription if
you have a subscription. Here is the summary
of John and off project exploitation and credit. She I just created
a different account just to show you how it works. I've just created the base
of four different project to have something on my dashboard and to
show you how it works. So first, in the middle, you have the listing
of your project. You can create a new project
here we will see that just after and after you have a
listing of different project. If you want to edit
one of this project, you can just click on this one. And after you will have different options
here, edit an upgrade. You can view e.g. different exportation. If you have, I don't
have exportation, you cannot solve
you project inside. So it means if I click
on View project, I can have a listing of all the furniture that
I used in my design. Take again sees a
design of her house. And inside I put all these different projects and I have a listing
in this area. Here it just to show
options and you have more. He got e.g. View Design. You can duplicate your design. If you click on View Design, you can just have a general view and you
can open if you want. You can also duplicate
the design or delete your design
with these two parts. If I just come back later, before I can come back here, listing of my project, you can also click on Project
and directly you have z listing just here with
exactly the same elements. If you want to open a project, you can just double-click
or you can just click on Open here. If e.g. I. Open this project, just click on this area. I can enter inside my editor. Just like this. If I want to
come back on my dashboard, it is pretty simple. Just click on this icon
on the top left corner. Just like that, and I
can come back here. You can also apply some filter
on these are real debt, debt updated that
created an Nim. If you want to rename a project, e.g. this is my project. I want to rename from
project number one. I can click on this one. And just Egypt and upgrades. And now I have this
element indeed details. And I'm going to change
for project number one, you can find information
about the project keywords. So for free, this is SD. You can export in SD, and you have all
this possibility. If you want to upgrade, you can have exploitation with better quality if
you buy credit. Here you can also
enter name of country, state, city street address, e.g. it is a project for
a specific area. You can directly enter more,
hey, it's not the case. I'm just going to
click on Update. Can click on this project also. Are great and just change for
project number to upgrade. Let's click on this one. Edge it and upgrade
project number, sweet. Update Project. And I can click on this one also and directly edit an upgrade. And project number four. That makes this
so you can rename your project after if I
continue a little bit, you have this element,
this is tailbone. I don t have state board. I will show you how
you can create a stable you can create this
Thai Baht from scratch, but you can also
directly credit to state but from a specific room, what you just eyeball
this table, it is a page. And on this page you can make, you can add a different element. You can make your design,
you can add text, you can add images, you can add color. And the aim is to
create a page with representation of rooms that you are going to credit. So e.g. in this room, you can
put image of furniture, you can put a tighter. You can put the colors
that you have inside the room and you make your presentation,
presentation page. After if I just continue,
it is exploitation. When we extract elements, they will appears on this area. Here it is little different
the Joseph reports. So this is a frostings
to understand. Now after to do
this work library to start with new project. And don't forget, don't forget also here
and you can go on pricing super broad
partners for explore. And you can just come
back on that website. And after Alex, I will explain how to create
a new project.
6. Master navigation: Let's start with the Edit mode. Let's see first the dashboard of this edit mode and
at the same time, zoo navigation, how you
will be able to navigate. So about the dashboard first. You have different
categorize on the left. So here it is. You can work with your design. So main things that you need to have in your design,
main information. When you click here, you can
edit anything that you want. Crato, room, cracked
walls, cracks, show faces, a position,
doors and more. When you click on this area, you will be able to
add more information. Here. You can add furnitures
with a huge library, amazingly where it is very huge. Read a lot of options. Here. You will be able to put and drag colors on the walls or on floss. Here it is a sin, but it is not collapse, it is materials. And here you will see you on different exploitation image. When you go on the top, you can find the flow. It is a first floor. If you upgrade, you can
create a second floor. Our mock flow if you need. It is an undo panels. So undo and redo
action automatically your project will be saved
because it is online tools. This is the name
of your project. To export an image, we will go on the
top right corner. When you arrive on this area, will be able to change different view to edit
this parameter and two, well 2D to 3D. So it means if e.g. I. Chose true room, I can
go left-click here. Just draw any homelessness
and some little too big. But just to show you, we will be able to
activate the 3D view. And directly we
enter in this mode and will be able to edit
the camera at any moment. We can come back, come back and we
read on the 2D view. So you can mix 2D, 3D. It's very, very easy, very fast. If you will need to
change the unit, you can change the
unit on this area. We will work in the
kerosene matter personally, I walk every time,
I mean metals. But you have also the
possibility to change, to walk in, fit. Here you can mature distance if you need and you can
add more information. You can log e.g.
your furniture's. You can also look live births and lines
and low construction. Sometimes it is useful or
you will click on something and it can move
with that you need. So let's just press Escape
about your navigation. Navigation first, you
can extend your view. If you want to have
everything into center, you can extend or
reduce this banners. If you need to zoom,
you can click Plus. You can zoom in and
you can click menus. You can zoom out. If you want to
re-center your view, you just click on this. Reits extremely useful. It is the same for the 3D view. Some time you will have
some silly, little strange. And if you want to recenter, just click on this
area and it's perfect. If I've come back to my 2D view, I've taught to do this work. If you want to move
in your space, you just go left-click,
left-click. You can move on your space. Left-click, left-click,
left-click. And you can use also
your scroll wheel. You can zoom in, zoom out. So normally with just left-click
and the scroll wheel, you can do everything
that you want. Your dragon moves
the scroll wheel, zoom in, you zoom
out and left-click. You can drag and move like this. You can also click on the
scroll wheel. It will be same. You will be able to move. When you walk in the 3D
view like this, it is sand. You can zoom in, zoom
out with our center. And if e.g. you change the camera
for Icon work. So because we have two options, we have the alkaline waxed
fruit and we have also, this is a general view. If I'm using this one and I can turn with
left-click, left-click. I can turn inside the
room just like this. And if I want to advance, if I want to work, I just need to click on
my arrows on my keyboard. Just click on the arrow keys. With the arrows keys, you can just come
back, you can advance. You can turn like this. So e.g. I go in this corner
with my arrow keys. Now, want to turn my view. I go left-click and I
turn left-click and item. I want to go in this corner, I'm going to use my
arrow keys, work, grown these corners and then left-click and I can
turn on this direction. Just like this. It does come back
on the 2D view. You will add parameters to it. Here it is a general settings. I will explain this just after. And for the rest,
everything is okay.
7. Edit parameters: It did parameters of
your sin to Egypt, parameters of your scene. You can go directly on this, on this part and you
have this element. And thanks to that, you
can have general settings. So it is something
important to know. First, I created this design
with this house and garden, and you can just change
the display froze display is black and
white, just like that. So it is like a sketch. You just have like a sketch
of your design options. Just here is color. So it is like a sketch, but sketch with color. And the last option, this is what we use the most. It is with everything, with all the materials. I can zoom little bit. After you have parameter of the scenes and general sittings. You have agreed, I would say if you don't want to use a grid, you can just remove your grid. I can advice user must have
the time to keep your grid, but sometime you
can remove that. You have also the symbol. It's time. You can
activate your symbol or activate you
have I2 resolution. I think the best things to do
it's to keep a resolution. You can work with
the blueprint mode. You have also show camera. So each time if you, if I just zoom literally
beat just here, I can activate and
just show cameras. And you have a camera here. I have a camera right here. I have a note here,
I have another here. You can find these type of camera and you can
also drag and move the camera and add a little view on the top
right corner, just here. So when you click here, you apply show camera. You can find your camera. And if I click on
one of these camera, I can see the view on
the top right corner. And I can change also the view of this camera, just like that. And I can turn this camera, I can turn on this direction. And I can change little bit. Sometime it's lethal along
with the connection. Yes. Now it's okay. After if I just continue, I'm going to do is
activate camera. You have also emerged smoothing. I can advise you to keep
this one and you can hide all above the number
of centimeter. And the phase operator, I can reduce this. And I can only see in every sink more than
on the first floor. So it means on zero centimeter. And sometime it is useful if you have differently versus if
you have differently volts, you can hide all above. And you can put a
number of centimeter. Now if I just continue, you have furniture
and stricture. You can decide to show furniture
all not just like this. You can also have your
furniture color or not. And you have show item,
outlines, stricture color. It just a different
type of display. Here it is about zeolite. Show shadows or show light. Just like this. If I
just click on this area, you have a light here, I have a light here. You can find little bit
difference as you can see. If you continue, you have
also the text sitting. You can find lab birds with
different type of dimension. You have a source here. I have different options. It was my room here, it was the best
room and I can do is activate show levels. After I ever saw dimension, you can show the dimension
line or you can do is activate all the
dimension with this one. So if I just go
also on my 3D view, I can go and this area. And first, I can
keep on this view. And click here to
center my main view. And this is a cell after
you have different options, but it's not exactly
the same options. One more time you have
Shortcuts section, and you can click here. And you can create a kit with a number of
centimeter if e.g. I. Drag and move
on this direction, zoom little bit,
critique carrot, and you can enter the
number of centimeter. It is useful by default, you have the height of the wall, so it means 280 centimeter. And you can just go add
zero centimeter and see all your room inside
your design just like this. And you can, thanks to
that, removes the words. I can reach pay rate, my worst, just moving truck
and moves the sprint. You have also shows
a camera frame. Here, show girls. You have the doors here. If I want to show, I can click on these activate. You have also cutaway
walls. If you are e.g. outside, you are in the garden. You can see inside your room depending on your
view, just like this. And you can reach pay rate if you this activate
Quetta would worse show floor below
just about here. I'm not just one flow, but if you have to flow, it is possible to use show
floor below JT show ceilings. So by default you have this one. If I go inside, you can see the selling at any moment you can do
is activate this one. And you can just see
the scanning like this. And the last things
is show Shadow. You can find the shadow here. If I adjust, one of
the best things to do, I can zoom out and you can
see the different shadow. I can click here. These
activate, reactivate. These activate, reactivate. And here it is much smoother. I can advise you to keep every time image
image smoothing. So this is how you can edit the parameter which is useful. Don't forget also that you have a lightened scenery
on this area. And thanks to
lightened scenario, you can use it for examples
of bedrooms exists. You can put different
types of backgrounds for the sky at different
moments of the day. So you can select what you want. If I select this one, I can go during the night. But one of the best things
to do if you select this one is to change the
environment like e.g. this one. E.g. this one. Sometimes so this one. But yes, I'm willing to sit in this one and this is the same. Don't use daylight. Just use night. If you click on this one, you need to choose
the best environment depending on if you choose daylight or if you
choose a night. If I choose daylight, maybe I can choose this one. Maybe I can choose this one. I can choose this one. And if I select night, I can change and maybe
I can select this one. Again. This one. Here you have indoor or outdoor. It depends where you
are located. If e.g. you are here, you
can stay on indoor. And if you are outside, you can say stay on outdoor. So let's come back
during the daylight. They just click
here. Yes, that's it at any moment you can
also click to dress, come back at the basic
of variant meant.
8. Draw room: Let's explain how to
create rooms, drew rooms. So to create rooms, we can use this
feature, draw rooms. And directly we have the thickness of the words
and directly wherever. So the wall eight
and race from flow. So we will keep this
parameter first. If you just want to crash
the design of one room, you can for sure just draw words and you can
create forwards. You can then tell the
dimensions that you want. I can tap four and then I
can go in this direction. I can tap sweep, come back on this direction
with four and combat here. And I created just a room. But you can also directly use these features and sometime
you can her own time. So let's just come back
with history panels first. And let's apply drew rooms. If I want to do the same thing, it means for midterm by 3-meter, I can go left-click from the center point and I can enter my two
value on this area. So you just start with one left-click and you can
enter the first value, four, and you can tap coma
and the second value, sweet. And thanks to that
accurately the room directly with foamy
term by three meter. And you can learn a lot of time. I can advise you to
create worlds from the main paths and after
to create whom inside. Let's take an example. Let's first create
a base of hours. I can use draw world's first
and position my first point. Let's zoom little bit and position of first
element at ten. So I can apply ten after I
can go in this direction. And let's grab
something with eight. And I can present,
I can come back on this direction with ten also. And I can close the
path with eight meter. So this will be the
base of my house. And for the base of this, I have ten midterm
by eight meter. Now if I want to
craft room inside, the best things
to do will be to, you can draw walls. But I think draw rooms
will be the best. I can use drones here and
work with sickness, or eight. And I can go left-click. Let's start e.g. from this
coronal point, left-click. And I can then tell
us what to value. Don't forget that you
can use negative value. So here I need to add
phrase on Pearl menus. I need to add menus
for by n fall. So I can tap mean is four, then comma and I can tap four. And I created my first room. And let's create
two second room, draw rooms again, I can start
from this corner of print. And if you don't want
to enter a value, you can also directly snap to this world and accuracy
the second room. But now I don't have room here. So this is why it's not
extremely convenient. I need to do this again. I think I didn't start
from the right print. Yes, just like this
and now it's work. So you have this platform and
they have this second whom. If I want to crop to
room on this area, I can use true rooms again. And left-click from this corner. And I would like to add
sweet by two midterm, so I can enter my first
value minuss sweet. And I can enter my
second value, true. And I can press Enter. And I created another
room with precision. This is why my advice
it first to create two walls on this
exterior element. And then inside, inside. You can just use through hoops. And after it's pretty simple, we have the first rule. We have another rooms, we have a no doubt rooms again
and another older homes. And I will explain afterwards
that we can change the name and we will be
able to edit each rooms. If you want to make
adjustment and no problems. You can just click on
one of these words. As you can see, the
length is four meter. If I want to change
the position, left-click, left-click, and you have different
type of value. Don't hesitate to zoom
to have more precision. Here. I want to start
from this point. Dragon move, lead maybe
a space for window. I can extend with just 1 m, maybe a little bit more, 1 m, 20, and take your glands. So this is why
this tool is very, very great if we want to
create interior design, because everything is made to have grid are
going to need to improve quality and to match
a fast interior design. You can also create homes for
outside, but don't forget, if you create rooms, I would say you will have
every time a wall eight, I can reduce this one. If I type e.g. just ten, I can obtain that if I redo it, It's not possible to create some sing less than
ten centimeter. So even if I create two
rooms here, true rooms, ten centimeter, and I
can snap to this area. The size will be different, but I will have worse. I can take your plans and I have small-world ten
centimeter on this area. And you can see the
different homes here. So let's come back on Tuesday. And we have seen
these two features to draw walls and draw rooms. And thanks to that,
it is great to be able after to place the door
and to place a Windows.
9. Draw wall: Let's explain how
to create worlds. Joe, words. To create worse, we can use
directly these features. You can mix, draw words, Andrew rooms to create
your interiors. I think drill wells is
better if you want to crash the men walls,
outdoor words. And if you want to
create the inside, I think it's better
to use drove rooms, but after we can mix
together also two features. Let's click on Joe
world's first. And if you apply settings, you will find sickness of the
world and the world eight. By default, we will keep that. But sometime if I want to have a different world for
outside the main worlds, I can maybe a detailed sickness. And inside some
time I can reduce. Also. The word eight is
280 centimeter. If we work with just one flow, we will stay at zero after all. So m is just to go left-click. So most of the time we need to start from one of
these points here. And you can enter in dimension
on this area. Left-click. And as you can see, I can draw my first word. And if I want ten meter width, I can stop at ten, or I can just tap ten here
and just press Enter. And now I created my first word. If I want to stop, just press Escape and I
can finish just like this. The more precision you, you will, you will have, the more precision
if you zoom in, if I click Control words and I want to continue and
I zoom directly, I can snap here, but if you don't zoom sometime,
as you can see, it will be difficult to snap, so don't hesitate to zoom
here and left-click. I can cry to know downwards, but it's possible
to continue here. E.g. I can, I can work with six, so I can tap six. Just need to be careful to stay the most of the
time perpendicular. You have a guide like here, I have a blue guide, like what? I work horizontally. And I can come back
with a value of six. So I can type six
and press Enter. And each time I
can continue like this here I want to have to, I can take two and up, press Enter, and I can come
back on this direction. And here if you want to close, when you arrive on this area, you can find a guide like what? I'm perpendicular. And I can click with
four meter and I can come back here,
snap and left-click. And we can work with precision. If you take a glance,
a budget dimension, why we have this dimension for the simple reason that
we have sickness. So this is why we have e.g. here, five meter 85. And here we are two
midterm because each time we have
sickness of the war. So now if what's happen? If you crowd to award and you want to
create a world inside, to create a room
inside it is possible. I think it's not the
best, but it is possible. You can just position your
first sprint like here, and left-click and you
can draw a new worlds. I can grow worse horizontally. I want Sui meter. I can stop at Suite
just like this. I can enter a sweep and
now I can come back. You can find a guide and
you can walk horizontally. And I can go left
leg directly here. And I created
another adult world. Something very great is if you create a world directly here, exactly on the same place,
nothing will happen. Nothing will happen because
you have already awards. And I can continue,
draw walls, e.g. I. Can start here, come back on this direction and go on this
area and go on this area. And I created an
adult worse after. If you want to edit towards, you go left-click on the wards and you have different options. You can delete two words. You can create texture of words, drill wells from
here, or split words. If you want to move the words, just stay left-click and I can drag and move
on to direction. I have all the
information that I need. A budget dimension, I would
like to have set two meter. I can drag and move at
two meter if I want to create a new wall
starting from this part, and I don't use Joe Watts, I just go left-click here. And directly, I can start a world drove off from
here and take a glance. I can create two new words
directly from this part. You can also divide words. So if I just click here, I can use split. And automatically I split my words where I
apply my prints. So e.g. if I click on
this part, I use split. Now, as you can see, a split exactly where I put
my left-click and after, if I want to create
something like a corner, it is possible. The last possibility is
to create, took care of. If I click on this one, I can click on Curves and you can drag and
move on new direction. But about the curve
you won't have, you won't have a
lot of precision, I think because it's difficult
to have a specific value. But you can create two curves. So this is how you
can create worse. And at any moment you
can drag and move walls on a direction or
on another direction. You can also take your point
and make some adjustment. If you want to remove a world's click here
and delete that. If you delete it, if the
opacity is not close, automatically, you want
to have in your rooms. And I can just go on
this area and this area, dress, clothes, clothes,
these different words. I'm going to show you
also some seeing more. I can click here, Close, click here, Close,
click here, close, just click here and delete, delete, delete and delete. So now if you want
to edit towards, I can go left-click
on this area and you have the word
finishing, will finish. And thanks to that,
you have a color. You can change the
color and I can apply phrase on policy, sweat
color, Double-click. And if I use my 3D view here, as you can see, I think
it's not the best amongst the top I
can go on this area. It's not close, so this is
why it's not extremely good. I'm going to remove
this world first. Draw walls again. And left-click here. The first element,
second element. So the element, four element. So now it is closed. If I use
my 3D view, as you can see, we can have this type
of isometric view, or we can also go inside. If I click on one of these, e.g. this one, you can
have the seating. So one more time you can change this parameter and you
observe world finish. And then so as, as explained, you
can change Socolow. I can select this
color just like this. And if I just come
back on this war, I have noticed this red color apply on the side number one, and you can select the
size that you want. So this is a side1, side2. You can also select e.g. color, but you can also select any things that you want so it can be
on own materials. But I will show you in
detail stressed after. Let us come back on this wall. So now you have Qur'an side
wine and cooler on side two. If I come back to
my 3D view and e.g. I. Go in this direction, you can find the curl, but definitely the best
things to do will be dragged and move on the
different worlds color, it's not extremely convenient
to add cologne directly, directly from these panels.
10. Draw surface: Let's explain how
to draw Shah phase. So to draw surface, we can use these features. Why it is interesting
to draw shift phase because if you take a
gland so bad the sittings, by default, we will
be able to just add a surface with any worse. So this is why it can be
useful to create your face. By default, you have a
sickness zero centimeter, but it is possible to
increase the thickness. And if I just come back here, this is a materials that you
would have at the beginning. So to create a shocked
face truss credit for Sprint exactly like a room. And you can extend
on a direction. You can enter a value
for the first segment. I can take ten, and I can go in this direction, and you can create another
segment, can be six. And if I come back
on this direction, I can apply ten again and
try to have something perpendicular sometime it's not easy to have some
sin perpendicular. If you don't sue after if you press Escape or you
can click on your face. The Zoom link, and you can
make some adjustments. So here e.g. I. Can make an adjustment to have some scene perpendicular
just exist. After when you click
on the shore face, you can duplicate, you
can flip vertical. Flip horizontally also. Maybe are not perfectly
perpendicular, but yes, I think it's
going to be okay. And if you click here, you can create two
curve, just laziness. So this is why
sometime it is useful because you can also
draw a shocked face with multiple line dress stasis. So you can create multiple line if you want to close the path, you can just press Escape
and you can finish. After you can add multiple
curves like this. You can dragon moves a print
and at the same time you can drag and move old
saws intermediate print to create shelf. Just exits. So e.g. I. Can come
back and z's are rare. Track and moves this print. Drag and move. This
brain dragon moves the sprint and you can create
something with a curve. As you can see. It is useful to your shop face smile when you will work
with the gown done. Because into account when we
sometime we are not going to use a worlds and we don't
want to create two room. So this is where
it can be useful. If I create a base, just throw wars and cracked a first-world
on this direction. And I can zoom first. Let's just apply ten again. Validate. Here. Let
just apply eight. Can go in this direction. Eight, then I can go
on this direction. I need to zoom out and just apply ten and just come
back here with eight. So now I can press
Escape, I can zoom, I think so position
is not perfect. I can just come back,
Extend little bit. And maybe I can remove
this wall thing. It was not the best. I can grow a new
downwards starting from this print and just
snapping here. And if I drag and
move this print, yes, trust legs that I've
taught to do this work. If I want to create
a garden or wrong, I can use draws your face and
create multiple rectangle. So e.g. I. Can start from this. Brain glands are left. And maybe I can apply
your value like five. So I can take five. Yes, you can type
five sometime it's difficult to be perfectly
horizontally or vertically. But after we can indeed set, if I just want
sweet on this area, can type sweet, I can come
back on this direction. You have a guide horizontally. If I want 20, I can tap 20 and I can go on this
direction just like this. One more time. I can apply sweet walk vertically this time. And I can press escape and accurately this
type of your face. If I want to have the
same thing on the front, again, click on my
shelf face duplicate, and I can drag and move
this your face and position on the other
side, just like this. So we have the short phase. We can follow this guy, but maybe we'll make
adjustments after. And I can just go
on this direction. And I can continue, I
can use draws your face. I can start from, you can zoom a little bit. You can start from this print. And you can arrive
to this point. Just stays out after
we'll make an adjustment. I can arrive here. I need to do this again, it was not perfect. Let's stop the sprint. The sprint. This point. Sometime it is not
extremely convenient. I can start maybe from
a different point. Yes. Now it's better
and I can just snap here and press Escape. So I created this show face. Now I can make some adjustments
to snap on Z-score. Now, just like that, I know it is nice. Again, repeat the process on
the left. Draws your face. I can snap to this print. Go on this direction, snap here. But when you walk like that
with this type of triangle, you need to stop on this area. So this is why it's
not extremely good. So I need to repeat the process may be stuck to this point. Let's do something different. Go in this area, this area, and now
it's going to work. I can press Escape, zoom little bit Texas kroner, and just snap here. I think to crowdsource
garden is not, it's not extremely convenient. In these tools in the software. Definitely, it's amazing for interior design,
for outdoor design. It's not perfect, perfect. Not everything is perfect. And that's it. So I
created my gallery and here on this face. And if I select one
of these tools, peak and drag any materials. Again, select materials. If I continue. First, you can change or categorize for
outdoor materials. If I just continue, I can drag and move to grace. Just here. Just here. Just here. And let's repeat the process
yet dress here, perfect. It is also useful if you
want to create to pass. You can use these tools. So you come back here
and draw your face, e.g. you have a duct here. You can just create
some seem like like just to pass in front
on your garden. And you can create
something like this. You press escape. And it is Sam, you can apply. The materials are materials if I want to make something
here, it is possible. Just like that. This is how you
can draw surface. And so most of the time
we will use for outdoor.
11. Edit room type: Let's see how to AD
the type of Zoom room, 22 type of the room. We can go here and
set Arun type. It would be useful for
different reasons. So the first things to do, Let's create a basic, basic thing, farm,
house, suggest. Credit to war. Start form is the sprint. Finger can zoom little bit. Let's directly type something. I'm going to tap
ten and validate. I can go in this
direction, just step six. And validate, go
in this direction, just step ten again, stay horizontally and I can
just come back here with six. I've taught to do this work. Let's create the first room. Rooms. And I can go left-click
on this area. I can just create
two room menus for. So first I can tape
menus for coma, sweet. Just like this. And I can do exactly the same thing on
the, on this direction. Draw rooms, left-click and
I can snap on this area. And I can click
again on drew rooms, arrive around here and
create something lazy. Maybe I can click on
this one, and that's it. So I would like to have a place
for the living room here. I would like to have a
place for a bathroom here, a place for first term, a second room maybe
I can complete also withdrew room
for a small kitchen. It would be a radio
small kitchen, but it's going to be okay. Maybe I can drag and move
little bit on this direction. Just like this. I want to
set directly the room style. Click here in formation, same set, room style. And you'll have two options, whether you can drag and move or you can click on
one of Zoom, e.g. if I click here
directly on this room, automatically I have
information about the sides. So it means a meter squared. And when I click
on Run type here, I can find categorize type. And I can drag and
move living inside, just like this living room, and I can just come back. It can be useful also because after I can
go and sittings, not unseating that we'll be
able to have a light bulb and just type out can change the
blending of the room type. I can also click on directly set type and drag and
move at my convenience. So it means I can drag and
move bedrooms on this area. Drag and move
bedrooms here also. Let search bus home, drag and move
bathroom and kitchen, drag and move kitchen. And thanks to that, you
can ask sing directly, Arun type into your plane. I've taught a few, create
more things like erase. I can just come back, select, Draw shocked face. I can start from this point, go directly to this sprint. And I can extend. Oops, it's not pretty good. Let's click on Draw.
See your face again. Start to this print. I can walk like for here, can work like because I have this sickness
little bit more. And I can click here, I can press Escape. Let's make a little
adjustment here. And after to do this work, I can click on this
face sittings here. It's not possible to
directly of what they want. So I can just come back on
Information Center type. You have more option. It can be outdoors, it can be a downturn. So if I want to put
calendar and I can put gamma and beta can put also, it can be a path shoe. It can be also a balcony. So after up to you to
choose what you want. Maybe I can put a little garden and put down there
and just inside. Just as these this
type of information, if you go on this area, you can find here text and you can show the elaborates on this activates, should I bells? If you need to scale, It's also possible if you
want to increase the size, you over to the letter
spacing just on this area. Ariella bell outlines
also is possible. I'm going to increase
a little bit, maybe put in 200
per cent trust legs that can also show dimension, interior dimension if you need. Just like this, shows
the different levels. I've taught to do this
work everything is okay. We just assessing the wound
type inside each rooms. And if I click on one of these room for
examples or leaving, it is I'm proton because now
I can use a magic layout. You can use magic
layer would only, only when you are seeing her own type and magically
out. What is this? I will explain little
After you can, depending on the route type, you can directly
observe chronic shows. He will propose you models
of interior design, e.g. here, living room. I can select the style
that I want, the inside, maybe something with contrast magic layer
would automatically, I'm going to have
different type of furnitures inside,
just like this. And it is a contrast. I can select my 3D view,
residual position. And I have just an example
about the furniture. And this is why it is
extremity and proton to select what type of whom it is. Because if you change e.g. bedroom, you will add
something with a bed, you will have something
with a wardrobe, maybe a table for the bed, all these type of things. So it depends just about
what type of whom it is. And I just come back yes. At this lever.
12. Add informations: Let's explain how to
add more information. So to add more information
when you go directly here. So first thing is
that you can do each to place libraries. So we have seen how to
use how to set room type. Now you can place also libel and here it just
more information so you can just create
something like place. I don't know, maybe
you can take place of life and I can increase
the font size. And I can position shows here. Pace of life, dress like this. And here we will be
able to add e.g. different type of furniture like a table I can complete
with place to libel. T raise for summer, e.g. I. Can increase the font size if you want to change
the font family. It is also possible you can
change the font family here. And you can also plug in bold, anything that you want. And after I can go
left-click and drag and move on this direction,
Erase for summer. Heat is a bedroom. Bedroom. I can apply directly placed labor for kids. After two place for kids. I can drag and move e.g. on this area. You can
then click on this one. And it just changed
with a value of 30. I can just come back, place libel again for parents. And let's increase with a
value of 30 and sees the same, I can just drag and move
and position this here. You can add more
information with place, place, place, labor after you have also the font
color or sometime you can change CATs in red. You have a background
color so you can make multiple things and
you have full transparency. And if you want to create a frame with a
rectangle on the back, ruined cities also possible. Just like that. Sometime it can be useful. You can apply your wife's colo, they could blend so but this
one and you can change. It can also be useful. You can just drag and
move an element and you can create something
like project. If I just click here
project arrows and increase the size and
position this here. That's it. I've talked to those, this one. You can also position symbols. These symbols can be interesting
if I just come back, if you want to see
where it is or not, you can just drag and move and
position on your drawings. You have also different
types of numbers. If I want to add something
neutral species, thing like this type of bubbles, it is also possible. I can then click on the bubbles skin and I can
increase just like this. And I can position
after y-naught terms of bedrooms keep
projectiles inside. You can do a lot of things. Place, labor's place
symbols, sorry. And yogurt sauce is
different the information. So it's not extremely
useful for Hull House, but for someone will design
the interior of a building, industrial building, a
professional building. Maybe it can be useful to add this type of symbol,
like security symbols. You can also draw lines it
just to add more information. You can have different style you still exist
today that you want. And you can just create a line. Sometime he found
two separate liter. This part with two-part
can just create a line. Just to give some information. You can also change the
sickness if you need decrease, increase, you can change
the tie. So size. Just like this. If I just come back here, you have also draw dimension. So by default we have
this type of dementia. You can go in this area. You can add dimension line, and you can also show interior
dimension if you need. But don't forget
you have generated dimension line on this area. So it is exactly the same. And you can create
your own dementia. You select the first frame. You silly, too sick
and print hate is like to have my
interior dimension. But you can do this on the
form may be 2-dimension. If you need NADPH
for every sink. I can also add
dimension Y naught from a corner point to
another corner point. It can be also a dimension here. I don't have dimension with the terrorists or with a garden. So I can click on this sprint, click on this sprint, and I will have a new
dimension, as you can see. And if I just go click
here and left-click here, just something you can just use and
possession eventually, you can change the
size with centimeter. So this is a type of
things that you can do. Just add more information
to your design. If you want to complete, it is possible with these panels adding extra information
into your design.
13. Place doors: Place door. Let's explain how we
can place though. We have this features. The first things to do. Let's create a base for hours. I can use draw walls,
cracked my base. I can see this first print. Let's zoom little bit. And I can enter a value
of ten, validate. I can then go on this direction. Let's apply a value
of six, validate. Ledgers, come back on
this direction with a value of 10.6 here. I can zoom a little bit first, I can draw a room. I'm not going to enter
a specific value, just crowd to first whom
like around this area. Click on Draw room again, credit to save on room, like around stress here, just let treated space. Yes, I think it's enough
space on this area. Maybe I can read
you a little bit. And let's draw another room. Click here and credit to another
room and this direction. Yes, perfect. I can
press Escape. So e.g. I. Will have parameter
space for living room here. This will be my first room, my second room, and this
will be the best form. If I want to place though, I go to search these
features, play storms. And you have a library, library with a lot
of possibilities. And Shane just basic
indoor, outdoor. Me I would like to create
a front door first. So you have this
front door you can also set exist type
of front door. This door says though, when you are in the
dark categorize, you can also find
directly windows, though, like this one, you have slamming doors. So it will be on this categorize that you will find windows down. Here. Let's sit exist
though as Amanda, just go, left-click,
drag and move. And why it is extremely
useful because you just need to snap to a word. You just need to step
to a wall and e.g. I. Can position just here. You have different information. If I want to get to space of 1 m with my rightward,
I can stop here. After. If you want, you need to invert the direction
you click on the door, and you have different options. I can invert vertically and
I can flip it horizontally. And I'm going to flip vertical
you again two positions opening on this direction. Just like that. If I want
to position in the doors, I click on Play Store again. I said eggs or doors or Taiwan. Let's click on the frozen
basic standard doll and left-click and
position inside the wall, inside to the right position, you just need to see your value depending of
where you want to place. Don't hesitate to zoom to
have more precision found to lead 0.0, 0.50 meter. I can add 0.50 m
here on this area. And I can invert. So I click on my door,
flip horizontally, and I can flip vertically to the opening
on this direction. If I want to position
the same dot here, you can repeat the process, but some seeing more usefully just to duplicate,
click on this though. Duplicate. And now I can position
my daughter's here. And this is same left-click. Flip vertically,
not free, but yes, flip vertically and
flip horizontally at the same time.
Click on the door. Duplicate and positions
or don't dress here. I can zoom a little
bit and inverts, so pH here, flip first
horizontally and vertically. No, I don't need. Now let's take a
glance in the 3D view. We can find the position
on the different dose. It is nice. Maybe I can check my parameter show cut section, no camera from the shy. Just go here. I think so I'm seeing is
getaway cutaway walls. They have cutaway
world's shoulders. Yeah, I think something is wrong because if I click on my walls, I can go, I can click on
this wall stress here. And just go and just sitting. Yes, I think I read
you in my world. So this is why I
have this render. It is not really good at not going to do every single again. But I need to come back with
280 and probably to apply on all the words and see
sometime or problems because. I need to change all the
worlds on this direction. If I just come back
on my first design, here you have transform design, but you don't have
the possibility to edit all the worlds
at the same time. So I need to click on
each words, sittings 280. Yeah, it's a parameter or saved. So this is why I need
to repeat this process. So I need to change on my walls because the final example, I changed from ten centimeter. And after I didn't come back
at the beginning with 280. And this is why you now it
was again ten centimeter. So I need to change all
my worlds and sittings. 200, 208 centimeter.
Normally it's okay. I can check in my 3D view,
just activate receipt. And yes, Now it's
definitely better. So if we go just insane, we can find the different doors. You can click here, go inside, and you can find the
remainder trust on this area. I can move little bit with
my arrow keys and you can find these classical dose if you want to
change your colon. So darn, it is possible,
just come back. You click on one of these door and you can
change your friend colossal dark color and so does sweet
old and you have a sittings, you click on the Settings, you can change to white
and aid by default, we have 98 centimeter wide
and 220 centimeter eight. You can sell it internal door, or you can select from those
sometime can be useful just to activate what
type of dough it will be. If I just come back and I wanted really to
change the color, I can change the frame color. Just activate here. And if I want to make some
Sinclair little different, I can apply like this brown
color and just validate. Oops, let's do this again. Yes, it's brown color. Here, you have the dark color. And if I just click here it is. And you have also, you
can also reach out to recuperate to color with
your color picker tools. And you can click
here and recuperate the same color if I want to
have everything in Brian. And I can click also
here, apply to all. If you click on apply to all, it will be applied
on all the doors inside your house also
does inside your iris. If I click now on one of
these door, take your glands. It is exactly the same. But I think I didn't apply
to frost color on Also das. So the first apply to and dose. We also dress kit here. I'm going to change it. So maybe some materials. Let's make something
with a brand cola, but maybe a little darker. If I just click here. Let just to stick this one, let us come back. Yes, just on this area. Here apply to if I click outside and click again
on this door frame color, dark colors, and
sees a dose we URL, but things these have
to be validated. Yes, now it's okay. So
if I click on my door, you can find your frame color or dark color and AudioSuite odds. If I just click here, you can find some
these two color. If I just click here,
these two color, if I just click Join
us is due dark cola. Little differences. The dose
We all you can apply only on one door and each time you can change the
packaging of your door. If now I sit in my 3D view, just click here, go inside. You can find now
is a difference. We have this brown
color on each door, inside, even the first
door, just cases. So it is useful you
don't have to apply a different color on
all separate doors. You can just do play on one
door and Zen on all the doors inside your inside
your home. But if e.g. I. Came back and I want it to have just my main DOE in y's, I can come back, just activate
twice. Just like this. After I can teach outside, click on dark color wise
also and take a glance. Now, I didn't apply to all. So if I click on
this dough wise, wise, sweetie,
click on this View. And now it came back in wise, but only this door will be in y's and the rest
will be in brand. So just a little difference
to understand when you want to edit materials of your dog.
14. Place windows: Let's explain how
to add windows. So to add windows, we can reuse the same examples
that we use for the door. So thanks to that, we
have our structure. So we have positions, awards, we have positioned the door
and now I would like Windows. Just click here and
you can activate drew, place windows like this. You have a list of
different wisdom. Windows as, as explained, if you want to have windows Duo, you need to come back and to search insights or
categorize doors. And if I just
continue here, e.g. this type of doors, I have this type
of slamming doors, and I have also this
type of tomorrow. So maybe I can select this line sliding doors after you
have multiple options, you have also the
small, big dose, just like this, can maybe
position wines here. And you can have different
type of dementia. So as you sit in the
windows that you want and you just drag
and move on this area. After, if I click here, I assume little bit you can find the direction of opening. It is a sliding doors. I can invert the direction. You can find the arrow on
dislocation just exact. You can so infra, but here it's good to
have opening inside. If I select this window, I have nothing special to do because it is a
very simple window. So now if I take a
glance on the 3D view, I can reuse icon works fruit. And if I turn it around, you can find this window. Just like this. If now I go into the bathroom, I can find this type of
window, very vesicle window. And as you can see
it is a window starting from the
beginning of the lever. I'm going to remove
this window because I don't want to really
to position that. Let's go left-click. Let's make some
little adjustments. Center this element,
just like this. After select Place windows. Now is this is all the windows and you can find
your different of alleviation level
from forms of law. One of the basic is
a two pane window. I can go left-click position
one on this first rule. If I zoom a little bit, you can find the dimension. If I want to center, I will position with on the left 100 T2 and on the
right 100 cell T2. Just like this. Take a glance. You can drag and move
132.100 zero t2. Just like that. After you ever saw
the type of models, if you want small window, you have the standard window. You have also this type of
standard window, glass wall. Classic window. You have also the small window. Let's just go left-click
in the bus room, Let's position just
a small window. If I want to center,
I can just take a glance about the
value one more time. I can zoom and I
can position with undulate 0.55 and
on the right 0.54. Now to duplicate a window, click on this and duplicate,
and thanks to that, I can position and order
on this area just exists. After I can click
on this window. Duplicate also position in
order on this area exists. And maybe I can position
in order here also. So click on this window, duplicate and a sigma bond
directly addressed here. Let's go on. The 3D view works. So as you can see, we
are inside the bathroom. This is a very small window
so that you can apply. If I just go in this room, you can find the basic
window dressed like this. If you click on the window
inside the 3D view, it's not possible
to do anything. It will be only
for the furniture, but not further doughnut fossil
window, not fossil water. And it just come back
on this direction. Let's turn around with
left-click outside. You can find also a
render outside exists. And turn just here. And it works exactly like sudo. So if you want to edit
the color of the frame, you click on one of these window and your frame color
or dark color door, sweet, old one more time. We can apply frame cooler
and darker lot tools. All the window at the same
time can click on frame. Let's work more times. C leak, like a brand color. Here. Let's select this color. And I can click on Apply
all if I want to apply on all the windows at the
same time, dark color. And I can click here, use these tools and drag and
move on this direction to recuperate the same color and sees a dose we
all we can share, but it is something little
specific, pseudo sweet. So in this example, let's
just come back quiz. No, CME spatial can
come back with white. Let's click again
on this window. I think that this one
is not very dated sometime it's not
validated, is easily. I can click again, select this one applied to all. Yes, normally no, it's okay if I just send
them a taker glands. So by just sitting
you have the wider eight and erase from
flow of your windows. So it means if I
wanted to create a specific window on this base, I want to make some sink bigger. I can apply 270 white. If I click on one of
these window, this one. And I can select here, we have just the frame color. It is in brown sittings. And you can find
the race from flow. And we have 70 centimeter. And if we go directly on this window setting and we have raised from floor
to hundred centimeter. So maybe for this window I'm
going to change little bit, put 160 centimeter and
increasingly tells a wide with like 60 and increasingly tells
you ate with 60 also. When you find these
similar items, it just that you can replace
your window or you can replace your door with another window or
with an adult dog. You just need to activate
to update and just to change things too that
you can keep the position, but you can change
the appearance. If I select my 3D view. Work through. As you can see, the
frame is in brown. Now, translate this. So we have every sing
with a brown color. Just like this.
15. Add furnitures part 1: Add the furniture's let's explain how to add
the furniture. When we go answer left, we can find these features
and you can find furniture, those in different categories. You can also choose by brands. So the first thing to do, we'll take an example just
of room, whom design. And I can click here, just activate one of
these tools, rooms. And just go left-click on this point and create your
rooms with two value. I can zoom a little bit. They just create something
with six and coma six, I can tap 66, press Enter. And I created the
rooms 36 meter square. So the first things to do when you want to search
for furnitures, you need to select
the right categorize. Something extremely useful with this software extremity
and theorists thing is you have a
lot of categories. So if you seek e.g. living room, you
can find furniture. Inside living room furniture
you can select e.g. sofa. Inside you can
see leaked may be large sofa and inside you
have again different list. And the first thing that you need to do
when you are here, you can come back. So categorize, he sees a subcategory, subcategory
men categorized. So we can come back at
any moment to sofa, at any moment to
living room furniture, and at any moment to Object. Unlock doing to show
you also categorized, but just to show you
the principle of work. If Fy wants, I'm seeing in
architecture for decoration, I have this type of options. I can come back on object. If I want furniture from
bathroom, I can click here. I would categorize
that Taiwan can be, can be best swim furniture
and I have a lot of options. You can also apply
some filters. Here. Maybe it can be for just
two small apartment. It can be a room, but at the same time,
the living room. So the first thing
is I can select bedroom furniture and I would like to have a bed
so I can click on beds. After I have multiple options, I can select some scene
model may be a double bed. And I can apply a
filter by color. So it means if I want every
time the same type of color, a lot of furniture in y's, I can click on Weiss. If I want a lot of
furniture in Brooklyn, I can click on brand. If I want something
more in dark, brown color and gray, I can click on gray. And I just select what I
want and just draw again. Move on the left, e.g. I have this one. I can go left-click and I can drag and
move inside the room. After I can position
where I want, you can snap
directly to the war. And maybe I can
position this here. And let's continue
be fluctuated. The furniture's again, come back directly bedroom furniture. And I need to have a bedroom storage so I can
click on bedrooms storage. I can keep this
field tell by kudos. If you want some
sinful brand, e.g. you want to design this
room with the same brand, you click on brand and you see the eggs are brands that
you won't like frozen part. So profound. Furniture line, suit or
Clavius, I can click here. And they have all the furniture. See all the furniture
from this brand. After I can search something. And thanks to that, you
can make the design with furnitures of
the same brand. Let us come back to categorize. Lead. Just come back to bedrooms from each girl's bedroom
storage, bedroom wardrobes. I can apply the
same filter, e.g. of color, and I can
select one of these. It can be y naught, z swan, I have this one. Maybe I can still exists one, drag and move and position
along the wall, maybe here. Maybe we forgot to use this. I can come back to
my place though, and I can position it though. Maybe you're around
this area and invert. And I can position or a window, this window maybe
I can prediction a Windows or window just here. Let's come back on furniture,
bedroom furniture. I would like to have
a chest of drawers. I can click on this one. Select Same Fill Color. And y naught to y naught to six. This one, I can go left-click and position this element here. And I could continue
with bedroom furniture. I want to have a bedside table. I can click on bedside
table, isolate models set. I want like e.g. this one left-click and I can
position just near my bed. Just like that. And
you can drag and move. If I want to have the sofa, I need to change the
category so I can come back on object directly. It will be in living
room furniture. And I can see sofa directly. They have different
type of option. I can see the two color. One more time. Maybe
I can drag and move this sofa and position this one. Yes, on this area. Just like this in front of this can move really tells
a window move literal. So I can continue. You can also tap
some similar if I come back on object
and I want e.g. a. Tv furniture, I can just take TV and I will have directly, I will be inside
living room furniture. And I have the different models. And I can select one of these. Maybe I can try this one and
position just on this word. And you have a lot
of more categorize. They just come back on object. Here. You need to remove TV. If you want to add some sync directly in February to need
to have a subscription. If you don't have
a subscription, nothing will happen if
you click on February. If I need something for a desk, I want to have a desk I won't find directly on this element. And I can continue and
silica ten AF, e.g. schools. But it's the
best things to do. It's to select object of fees. And you have this cup
organiser of his furniture. Let's click on this one
and you have computer, desk and desk can
just click on desk. Keep This filter by color if I want to keep
the same style. And just Tillich, one of these
might not select this one. Maybe I don't like to merge
this one, I can continue. Yes, maybe I can try this one. This is a big desk and
I can just click here, remove, position
this element here. And if I click on my furniture, I will show you after
I can edit this one. If I need a chair, I come back on home
office furniture and you have off his chair, e.g. and you have this
default option. Let's try again. Move this one. Position, this here. I think I need to
create a rotation. Yes, just like this. If I want to position
decoration element, it's a super simple. I can go on object and you
can find here accessories. So I can click on Accessories. And they have lot of categorize. It is unbelievable. I want to mural, I
can click on New select like bathroom
living or mural. I can apply leaving or
mural and proceedings, the first one and maybe I
can position this one here. I can come back to
accessorize, categorize. And if you want e.g. something on the wall, you can find directly this type of element
and terroristic. I can just see this one left-click and
position this here. You have also a lot of
decoration element. I can select just decorative
accessories like this. When you add a
decorative accessories, if you put this directly on
a furniture automatically, it will be on the right leavers. Let's take an example. I can select this
one left-click. And if I want to pool, why not on this area
automatically he will be directly
on this furniture. Just like that. And I could continue or you have more options I can select. Maybe yeah, maybe I can see leak
to one of this again. I just want to show you that
you have a lot of option. It is unbelievable. So number of elements
that you can do. If I drag and move
this one again, I can trust here if I position, it will be on the floor, but if I go here, it will be directly on
this, on this furniture. So this is a first things to do. You add the elementary
acidic your object, you sit eggs are
categorized that you want and you just drag and move.
16. Add furnitures part 2: Let's continue with furniture. Furniture. So after to see how you can
drag and move the furniture, you can indeed some
of these furnitures directly on your 2D view
and after on your 3D view. To resize an element, it depends of the frontier. Some furniture are resizable, order or not resizable. If I select my bed, I can click on this one first. You have different options. So it means you can craft rotation with this type of
tools you can find out. So this tool just here, here it's small when you
work with a 3D view. You can also invert
just like this. And you can just
click on push down. But here, if you
want to put e.g. I. Can click on
this one and I can try to put this on the ground, but sheds, not going
to work properly. But sometime you have some Singh and it is not underground
and you can drag, you can click here to
push this onto the floor. And now as you can see, this on the floor like this. And if I come back
here now it will come back on this area. If I just click on my bed again, you can duplicate
your elements here. And as you can see,
you can duplicate. And when you click on this one, you can also delete. If you want to resize
and you can find scale and show you
won't have precision, but you can just scale
at your convenience. You can click on the different vendors and you can scale your
element at your, at your coffee nails,
but you won't have a lot of precision. There.
Just come back. After. If you click on your furniture, your guns are left and
you can find sittings. We sittings, you can
resize your element, not every scene, but some
are possible. So e.g. this one, it is possible. If I want to decrease
the white of my bed, I can apply 160 centimetre. If I want to decrease the eight, I can apply 207 centimeter. You ever saw race from flow
and you have also rotation. Here we will check in the 3D
view. You have a new hall. When I click on this one, I can select Settings. And here as you can see, it's not possible to
re-size this element. We don't have the options. It depends of the element. We have erased from
floor at zero. And maybe I will
be able to change the risk from flow
depending on the size. And I will have to
seize a 3D view. And I could continue
I have this. So phi, if I click on
this one sittings here, it is possible to change
the length and the white. I want to have a
cephalic, larger. I can increase with 260 length. It's okay. Maybe I want 100 and
rest from floor. I can keep this one if you want to change the
custom labels. You can until a storm labours. Hey Josh, when to D, but you don't need to
merge to select this one. And this is how you
can edit your element. You can drag and move, you
can snap, you can eat, eat, when you click on your element directly
on this area. So now if we work
on the 3D view, let's enter in the 3D view
re-center review first. Let's take a glance.
I'm going to enter inside dressed like that. And as you can see, we have
first the problem with bed. We have a risk from floor. So I can come back
on my 2D view. Click on the bed. I
don't know why it is little strange sittings. And you have raised
from floss 61. I can tap zero, press Enter, come back. And if I select my 3D
view recenter again, maybe I can go inside. Yes and no. If I use my arrow keys, yes, it's better you can find you can just find the
bed on the floor. And you can also take your
glands so bad this element, it's directly on the floor. I don't like too much. I can just click on this one. And you have different options. So first you can drag and
move in this direction. You can also drag and
move in this direction. You can create rotation so
you can work on your 3D view. But be careful if you drag and move these because
after it's extremely difficult to come back
at the right position. So I prefer to use
this undo panels. So be careful, but you can use this one just if
you want to create some mortician like
90 degrees and to keep more
precision, I can e.g. so click on this arrow and
drag and move along the walls. If I want to raise from flow. With a value just x's. Here I have another
element. This is a frame. I can change the
position or here, or I can use this one. You can position, place your element directly
from the 2D view, but also from the 3D view. I think I would advise you to
walk with a 2D view first. Tried to wrap the
rise position and just make adjustments
on the 3D view. 3d view can be
interesting to check and make adjustment if
I zoom a little bit, maybe here it's Antares
team to make adjustments. So I can click on this one. You need to find
these cross-sell just on this area and I can just
make a little adjustment. And this type of adjustment,
it's not possible. On the 2D view, you won't
have the same precision. And here I can drag and
move, and drag and move. I can turn. This sees my desk is
definitely a big desk. Ccs my chair and as you can see, I can change with
position. Also. See is my TV furniture
one more time. I can click on this one and I can change with position also. You can also change
the seats in e.g. my desk is too big. I can click on
this one sittings. And she's a factory
executive desk. He's not possibility
this element to resize. If I want to ask
something smaller, I need to change. And if I select this Waldrop, I can go and sit in this one. It is possible. So directly
I can increase with age. You can see the
difference in real-time. Let's apply by B12 and plenty. And I can increase
the wide, like 160. And after I can pull my, our tools to try to have
the right position. And when you click here or at any moment
you can, if you want, you can open short-selling
cutaway worse. Lecture. I'm going to keep
these different parameter and come back to my 2D view. So this is how you can
add an image, e.g. you wanted to add something
forward bias whom? If I click on Draw rooms, I think I have too much Miho. If I click on Draw
room, I can go. Left-click here thread e.g. in element. This is a new rooms. Maybe I can delete this one. I need to wait a little bit. I think it just
sometimes rerender. You need to wait a little bit. If I sit in my 3D view. Yes, now it's okay. Just not a debt. So here it will be
removed for badly soon. And I can position a door
British and a dot here. And just come back on furniture syllabus
room one more time. You have multiple options. If I select bus from
furniture you have correctly all in one element, all in once alien men, e.g. I. Can select this
one and position, just hear the other. So bigger things. Maybe I can make
something little bigger and just select
something like that. They affect. I've taught I can come back on best
room you ever saw some furnitures,
accessories, best scenes. Yeah, that's for
sure. Where else you can find show wears
on this area. If I want to put a show
where I can select e.g. this one, put my show where on this direction and ends our teeth after you
can add more elements, if I select my 3D view, walks through the
door for my bedroom. I can go inside and you can have really very nice furniture. Directly supposition is nice, but if you want to make some little adjustments,
you can click here, change literature position also with erased from
flaw or settings, you have erased
formed flower here. After I depends
on the furniture. I can also increase 20. And in this example I can change also the parameter of this size. This is the same
for my show where I can change the
position if really I need any fragrance sittings? Yes, I can change all
sorts of lanes are wide and eight just exits.
17. Add lights: Let's explain how to add light. So to add light, we
can find this in the furnitures and we have
directly this categorize. So the first thing
that I'm going to do is to draw a room. I can click on True rooms. Left-click on this area, can zoom little bit and create a first whom with
directly a value of six. And coma can tap
a value of five. So this is my first room. After to this room, I'm just going to add
little furniture. And just before place a door, I can position the doorway, not just on the front like this. And I can position a window
also directly on the front, click on this door and
invert. So direction. After, Let's add very
few furniture fast. I can click on
furniture, chairs. Let's just took ply
bedroom furniture hours. And I can click on this element. I have this frustrating mount, drag and move a
bed. You have e.g. a. Demand drag and
move just here. And I could continue, I
have more element, may be. Yeah, maybe I can add another one like
this one just here. So if I wanted to add a
light how to do this, you need to go directly
into the right category. And you can sit exist,
categorize directly here. And you have directly
electrical, electric things. And you have
electric toothbrush. See is this he's already
found but you have general appearance or
it's not electric kettle. I was talking about electrical. It is lighting. Lighting. And inside lighting. You have different options. One more time you
can select to brand, or you can come back
in, categorize. If I select categorize,
this is festive. Any mandatory is
lethal particle. It dressed about declaration. This is for garden. And you're seeing that
we'll use the most is indoor lighting
and ruminating. Ruminating can have
something specific for bathroom dressed like this. Very useful, this
type of element. If I just come back on
living room lighting, you can find
different elemental. So if I go an indoor lighting, you have already this
type of element. First, I would like to add
a small on this table, just the table lighting. I can click on this
one, bedside lamp. And maybe I can drag
and move a small, chose this one just here. After to do this work, you have also desk
and desk lamp also, if you have a desk,
can be useful. Let just at the
desk first object. I can directly tech desk, it will be faster maybe. And accessories or fees? Yes. I have this one. Yes. Let's position this
Desk directly on this area. I can come back on object. Lighting. Select
indoor lighting. And say 19 for lighting, table lighting or you have
desk and desk lamp like this. And I can why not slick this one left-click and
position on my desk. After if I want to
add a light on doors, I can come back on
indoor lighting. And you have ceiling late
teens. For late teens. If I acidic silly
things like this, It's not exactly what I want. For lighting. You can have
also big light like this. I can just drag and
move one of these with decoration. Or it can be. It can be. It can be. Yes, it can be this one. And I can position may
be on this around. I can come back on
lighting, indoor lighting. You have also up lighter light
fittings and accessories? Yes. I don't have a lot of
choice because I add desk. So this is why I didn't
have a lot of choice. I can now come back and
it will work properly. So the first thing
that I'm going to do if you position something on just directly on the ceiling, Let's try this one. I'm going to try an order just to show you how to edit it. And left-click, I
can try this one. I can come back on
indoor lighting. You have a source with the ceiling with these
different options. So spot, I can try to
show you this one. Sitting flashlight,
sitting down lighter, you have all these different
type of spots I can apply. I can apply interest once here. And you can also position
element on the war, war lighting and
picture lightings. I can just go inside this categorize and drag
and move once here. So I have a different element. Now, the first thing
is that I'm going to do if you want to get, once you click on the light. And this is like a furniture
you're going sitting, you can change the
line weight eight depending of the ileum and
not taught every sink. If I want to increase, I can put 25 25 waste
from fraud directly. It is on my bedside table. If I select e.g. just this one, I can go and
see things one more time. I can change the lens of white. And eight, if I
click on this one, just here, see teams. As you can see IRS Form flow and it's not possible
to edit tomorrow. Though. It can create
some rotation. You can invert, duplicate. And if I just click on
this one, see teams. This is the same. It's not possible to change
race from flow. Now let's activate the
3D view re-center. And I can go inside. Fin gets better and I
can take your glands. So this is why when you
have something like this in some element, it is possible to reduce the
size of this, of this belt. And thanks to that, you can add some seem a
little different. Thank you, Glenn. So but here it's not possible to change the size of the cable. And it's only available if you have something
with heights ceiling. If you don't have a ceiling, it is not possible to use this. Wipe. The best things to do
because I can't edit small. I just need to remove this one. Just takes out. If I continually turbid
here we have a spot. As you can see. I can change the position with my
element on the floor. I can go and see things here. I can change the length and y, if I want to increase, I can increase like 25, 26. By default, we snapped directly to the
ceiling, so it's okay. I don't need to edit tomorrow. I can come back on this area. You can find this element
directly on the wall. Same I can drag and move. I can change the
position settings and I just have a
rest from flow. It is not possible to aged. So this is a type of things
that you need to do. If I come back on 19
again, indoor lighting, light fittings and accessories, you able to just access
stories that you can apply. These not lighting, it
is dressed accessories. If I just come back at floor
lighting, not correlating, just selling lighting, you have a totally
different type of options. Maybe I can try different ones. Have different spot,
can try this one. Selling Don lifestyle,
habits such unduly. If I select one of these, I would like to dress to show you which ones that you can. Just click on this element. Sittings sheets that possible One more time to
edit this one more. Share. It's not possible. You have a lot of elements. It's not possible to aged mouse. If I click on this one, I can drag and move
left-click sittings. As you can see, you just
add race form flow. So it is a standard element
and you can do more. I can maybe try this one. Left-click again. Sittings and address
table is from flow. In most of the alien manager
just have raised from flow. If I select this one again, left-click sittings and you just have raised from,
from inferior demands. It is possible to edit HTML, but not on this one. If you extend to the garden, It will be a subversive
or to apply lighting your scene in Gander enlighten
you will have long term, you will have outside, you have also security lighting. A lot of different things. Don't forget when you
use your 3D view, I can directly go inside. You have this different
type of light. You can change your lightened
scenario if you need. I can apply this one. I can apply dark dress legs out. And you will see their
own variant meant. And I can change dress here. She's indoor, outdoor. I can keep indoor. I can also change little
B2 type of environment. Now is this thing
that I'm going to do, it should just
come back on back. And you got the beginning
on your first design. You can find just
the item design. So here you have the item design and you can find a list
of all your element. You ever choose a
light see Teams, and you can find the
different lights that you position in your design. And if you want to do
is activate too light, you can detect the vector
light just like this. So let's eating. You can
distract you at once. If you have an element activity, you can just change the intensity of the
light, just like that. You can change the
color of the light. You can put this in yellow
if you need Chris here. And that's it. Each time you can fit here, light settings and you can
change some parameters. If I go directly on this area. You have also the
small panel light and you have sure lights here. We didn't see a light, shall you can now activate. We see so light but not what will be the
interference of the light. And sheets possible
to use Show light. Just like that.
18. Place structurals: Add structural replaced, stricture either with
these features here, you have different
elemental lot of elements, specific elements
that you can add. So e.g. if you need to add
stairs, you cannot stairs. If you want to find some sink like crew who
fit is possible. You have also balcony. You can find a fireplace. You have only this
type of options. If I just come back
here, draw room. Let's take an example. I can go left-click
on this area. Let's step some sink
like six by six. Just make your room like this. So I've dealt to make my room. I can maybe draw a
second element inside. Just click Control, left-click. Draw rooms. Left-click on this
area and create another room here.
Play structure. And so you have a
lot of options. If you need to add the stairs, you can just click
on these tools and you can go left-click or you can click on one of these. And you can position the
stairs on a specific location. It can go at this area
after I can turn on if I want 90 degrees or
I can turn ways. Depending of z location, I can position that
angle play structure and if I want to
add a fireplace, I can go left leg position. Why not a fireplace here? You have also more so
more option if you want to add a pillar inside it is also possible
this type of pillar. And I can position why not here? You can even create a balcony. And you can go left-click,
drag and move. And you can also position or
balcony on a specific area. Just like that. You can e.g. snap here. If you go outside,
you will observe war, but you can drag and move. So balcony go inside this
type of type of war. If I select my 3D view, now, just activate this one. I can go inside just here. One more time or
you have my walls. I need to change the
side of my words. Just I'm going to
remove this one. Going to remove
this one, this one, and just click on
this area sittings. I will have to create two
new project to come back exactly with all my words
with the same size. Because here it's not
extremely convenient. And let's just come
back with 280. I have two words on this area. Let's apply 200.280 and to entry date TO
get so normally it is okay if I check my 3D view. Yes. Now it's working properly. When you have
something like this, you just need to add a window. If I just come back
from this balcony, I can change the
position of the balcony. But the most important
things is to have a window. So I can place,
use place though. And I can select
one of these door, this one, sliding door, slamming door on this area. And I can use my balcony. If I click onto by Connie, as you can see, you can turn. You have different option. You can also invert. And you have this small option. It is a scale options. And thanks to that,
you can extend on this direction, like this. I can extend on this
direction here. So let's extend. It'll be tomorrow.
Laughter. I can drag and move position my
balcony on this area. Just like that. And if I just click
on my 3D view, now I can zoom and you can
find the balcony here. So this is why it can be useful. You need to add the
windows and the balcony. I can also increase the size
and different direction. I can click here scale and extend on this direction,
just like that. Click on my 3D view. And you can see, so
balcony dress here. If I just come back inside, you have different element, this type of element, if it's possible to move. So I can take e.g. this element and I
can drag and move. I can create to a
rotation 90 degrees. With all these type of element, it is like furniture. You can click on this one
and you can change e.g. here it's not really good, but I can create two rotation. Again, position in
another area, element. And Sam, if I just
click on the fireplace, I can drag and move
along these words. If I go little outside, it is a same for balcony. Can click on the balcony and
I can create rotation or I can just move around
just like this. So this is a type
of things that you can do if you want to add, I'm going to remove
this one removes this one removes these
different element. After you have more options, I'm not going to
explain everything. Just go and play structural. And you can try
different options. You just a little bit
more specific scenes, type of fireplace
that you can use. You can also apply clay swirl
sometime it can be useful. You have also conservatory roof. If you want to create
two green hours outside, you can create worlds. And you can add like
a conservatory roof. And I can position this
one maybe on this area. After I can click here, I can crack to rotation
just like this. Or maybe on zero the
other direction. Yes, dress here. After I can click
on this one scale. I can scale on this direction. You can also, every
time when you have an element settings and you
have the lanes away to eight. And sharing this example, I want to have swings. Read, maybe swim
return would be great. And white, 600, maybe
a little bit more, 620, just like that. After I can go left-click, drag and move in this direction, I can zoom to snap here. And if I sitting my 3D view, you can find some glaze
a roof on this area. So the position is not really
good for the simple reason, I need to go and see things and you observe race flock flow. And I will have to enter
280 centimeter like this. Now if I drag and move, I can also snap. Sometimes the precision
is not extremely good. Left-click. And duplicate can
go on this area. Flip. Not on this direction. Maybe credit to rotation. Yes, it's better. And position this element here. If I come back in my 3D view, you can find this type of hoof. And after I can
change with position, I can drag and move if I need. So I can use a different view. Click on the top,
click on this one, and I can change the posterior
position in the 3D view. So this is an example
about what you can do. If I just click
here, I can delete. If I just click down at can delete if I sit exist
fireplace it is same. You can go and see
things and you can change the land so wide. So eight raised from flow. And you can also
create two rotation. I'm not going to enter
more in details. It depends of the projects
that you have to craft, and depending on the project, you can try different things. So just to add SH waves
that you can use exists. And if I select my 3D view, zoom little bit, you have this big archway.
As you can see.
19. Background settings: Let's explain the
background settings. Background settings, you
can find this feature here. When, if you credit
just empty project. After, if you need, you can choose a
file and you choose a fight as a reference phase. So it means as a sketch, as the image reference. You can directly when
you start a project, as, as explained before, directly
apply a reference image. So directly you can start from an image what you can do
this after if you want, you just need to
click here you see the background settings and
it will be exactly the same. Chooser. Fine, Let's work. I'm going to click on this area and I have this image so I
can click on this image. Just like this. Yes, now it's okay. So after to download the image, the first thing that you need to understand it is a sittings. Here's your abs, a background
settings either invisible. So at any moment you can, you can hide the
visibility of your image. You can see front or
you can see back, just exit Activate
formed back shades. Not, definitely not useful. You can receive
credit to rotation. So it means if you want to work directly on this direction, you can turn 90 degrees or I can just come back with a zero. So last point is transparency. So we work with 50 per cent, but I can redo it
sets 100 per cent and I won't see any
sink or zero per cent, and I will see more of my image. So by default it is 50
per cent are generally, it is the best type of things that you can do
after the sale on sings, it is to use set scale
of floor plan image. So you need to define to
print here on this sketch. I don't have the
right dimension. So I'm going to set my own dimension from one
point to another point. E.g. here I have an element
may be four meter six. Maybe I can tell that from
this point to this point, I have 12 meter. But if you create your
own sketch or you have your own sketch with also
dementia, it's pretty simple. If you have a dimension from this point to this
point, light 12th, e.g. you click Set scale
of flood plain image. You select a first point. So this corner is acidic, the second parenthesis corner. And you said the dimension, I select this corner
to this corner. But you can see like e.g. furniture or you can just
see leaked a window. If you have X2 size of the window and it's
going to work also. So if it is 20 meter, it will be 1,200 centimeter. And I can just validate. So now I scale my
scan my plane and I can use my different features
to modiolus this house. So first I can draw walls and because the size of
my worlds and need maybe to go in more inside. And maybe I can start more
forms this print just here, and create my words. And I need to arrive at 12th. And now it's well,
because if I stop at 12, it is exactly the same
size as you can see. No, I can go in this
direction and I can just follow my plane here. And I can go and z direction. Oops. It's not the best
because now I can move. I need to press Escape first and click on
Draw walls again. And I can snap to my words and just go
on to left just here. And just go on this direction. And I can snap. I position my main words after I could
continue just rewards. I can also use draw. It depends on what
you want to do, but you can also use draw rooms. I can start credit to room e.g. here. I can create another room, e.g. here, draw rooms. You have this one,
but here, e.g. it's better probably
to just add words. I can come back through wars and create one
world's dress here. Can press escape to
save on the walls. And its direction
is the direction. Hey, I do this little fast, but you can take for sure mouth time to
have more precision. So important thing is to
show you the principle of work when you use
a reference image. Here also, we have a
size for our dough, but because I will position
the diodes better to close so I can click on Draw
walls and just close here. And draw walls and
just close here also. Yes, it's better. And maybe I will have a door
here so I can use draw walls also and just
close on this area. And after you can add window, you can add as many
things that you want. If I position door, I can position may be Amanda. Where is the main doors here? It is little difficult. Maybe one of the main
deck can be on this area, maybe on this area. Maybe I can position
my main door here. And just click on center
environment. Just like that. Select place though, basic door. And I can drag and move just
on this different area. So once here, take your glands. My dough is maybe I think
it works perfectly, properly, but really
it's little too big. In my example, I will
read you just a little bit with 90. Yes, perfect. And I need to draw
wall or so from this point to this point, I positioned just opening
in the right direction. And I can duplicate position,
another truss here. And Shen Xue opening
duplicate position and not just here. And duplicate again. And position anode here. Duplicate again once here. And I can invert,
duplicate again, rocky ones here and more. You can repeat this
process for the window. So I'm not going to enter
too much in details, but the aim is just to
understand the principle. If you select 3D, activate here, I can find my first type
of render from this house. Dressed like this with
all the different dose and all my words. If I just come back at two, at the end when you
finish your work, can come back onto
background sittings. And at any moment, whether you can read you
to transparency, to 100%, put 100 per cent to see better surrender all the things
that you can do it just to remove your
image at the end. It is also a possibility. Image. Click here. Yes, delete.
20. Add colors: Let's explain how to add colors. To add Carlos, we can
find these features. So the first thing
that I'm going to do, it's just to use and draw rooms. I can select one of these
and I can go left-click, just create a room
with a two value. It's not very important to
budget value dressed crowd to room around 5-10 m. And after all, they just
add directly adores. And I can position this door, e.g. on this area. I can click on this door and just invert position and just let add a basic
window place window. And I can drag and move this
window around this area. So now I created this room. Maybe I can read a little
bit on this direction, register, little bit on this
direction, just like that. If I want to change
color inside the room. So things that you need to do, it, you have different options. So first possibility
is to click on peak and drum any color and to
your words and sort phase. And you can select
any things like that. So e.g. if I say leak, so I'm seeing a range
of color like orange. I can click on this one. And if I go left-click, when you arrive on the world's, you can position outside the
words are inside the words. In this example, I
will position inside. Here. If I want to repeat
the operation, I can go left click and I can
position inside this world, you can find a coat
color on this area. If you use a profession, you can also add a
color in February it Let's continue
with right-click and just click here and position this element here and
right-click dress click here and position
this intimate here inside my position
color inside my room. So now let's check if
everything is okay. I can use my 3D view. I can just recent first. And as you can see, yes, inside we have this red color
on the wall, just laziness. So now if I create e.g. a. Second room, I can
go in this area, they dress comeback draw rooms. And I can snap here, just let's create
something smaller. And it is exactly the same. I can drag and move
color inside first, I can add the door place though, position or don't trust
inside or on this area. And I can come back and
select colors, track Carlos. And because here e.g. it is a room here, it can be your best room. I'm going to seek
something more in blue, so acidic to a range of color. You have also different options
about the color with e.g. pure and original little green. And you have different type of categorize that you can
choose for your color. Because if you sit it Deluxe, you have a lot of options. If you want something
more bicycle, you can why not see leaked On, made by n, you have less
options and you can sneak one. I'm going to select e.g. this one stretches and left-click
drag inside, like this. Left-click drag inside,
left-click drag inside, and left-click
drag inside or so. So yes, definitely, everything looks okay if I drag
and move on this area, if I click on this wall, now, you can find side one
and side number two. From this panel, I can
also edit my texture. So side1, side2, if I
click on the sidewalk, you can find this codon. If you click on this site too, you can find this color. And each time you can
see the wall finish. If I click on Finish, I can e.g. remove the color or choose a different color if I
need from this panel. So if I want to make
something different, It's also possible, don't forget that you have
a blockage here. If you want to
recuperate to color, you can use this color
code and reuse after. You can also just remove
Socolow just like that. So this is how you can
work with the color. Here you will finish
again, spicy scent. And I can find the
color code just here. If I just come back on
and I click on this one. So now I have the sidewalk. I don't have anything. Now, this is a side too. And you can also, when you click on front of you, you can have a view with Carlos. And you can have a
view with materials. If I drag and move any color inside or I can just
click on the color. Sometime it is interesting
to use this panel because you can find
surrender in real-time. And it is also
interesting when you use materials or your
download materials. So this is how you
can, you can work. Don't forget that. When you click e.g. on just to, just to room, you can find the room
type and you have some materials on the floor. By default, I have this color. I can also change the
color on this floor. I can remove the color first. Now I come back and gray, and I can go and choose
different color, and I can select a different
color for this flow. You can apply color on the wall, but you can also apply color
on floor any further floss. And most of the time we
will use the material.
21. Add materials: Let's explain how
to add materials. To add material to first
things that I'm going to do. Each to create a room. I'm going to use true rooms and just create two
room basic rooms. I can enter to value if I need. Let's step e.g. just step six. And coma can tip five. In this example. Let's do this again. Six. I'm going to
redraw it manually. It's going to be better because here makes some
sync not perfect. So I'm going to reduce to six. And here we can
validate to six or so. Yes, just like that. And after five I can
read routes little bit. And yes, Five. And drag and move
in this direction. So it's okay for that. I can, why not try
to signal in room one more time in this
type of example, I can create two sigma and room. I can apply for this
room may be four. And coma I can apply
just to like this. Let's add those plays door so I can position the first dog here one more times and
just invert direction. Let's come back on,
place those again. And position when doors
around this area. After place windows and
position one window dress here. Now let's see how
to add material. To add materials, you
have different options. The first option is
just to click here. You can drag any materials if you go and callosities same, you just need to go on
the right materials and it is exactly
the same thing. After you have different
categories of materials. And you can drag and
move the materials on your face or just on the side on the wall depending of
what they want to do. E.g. I want to change the
material on this floor. I can select what they want. It can be OneNote tile or it can be it can be wood.
If I acidic e.g. first word like this, I have different options and
I select what I want, e.g. this one left-click and
I can drag and move on this your face exists. If I want to make
something different, you have multiple
options like e.g. this one, you can try
multiple options. If I want to have tiles, I can click on this one. And why not to select this
type of can continue. Maybe this type and drag
and move inside just here. It is also possible to
work with the world. Let's take an example. I have this tide, I
want to position this directly on my bathroom
or on my small room. I can drag and move n
exactly like color. You just need to drag
and move inside. And you drag and move
inside just like this, and drag and move inside
on four different sides. And so you have
multiple options. Again, come back, I
can find all so why not wallpapers for the world's, you can see all
the possibilities if I am theories team by, maybe, Let's try this
type of wallpaper. I can go left-click and
drag and move inside. Left-click, drag
and move inside, left-click, drag and move inside and left-click
drag and move inside. Just like that. If I select my 3D view, let's take a glance about
surrender. Recenter. So perfect. We can see the
wallpaper on the floor. We can see the tiles
directly on this element and apply different materials
on these two rooms. Now let's come back
to the 2D view. When you click on
one of the world's, you can find your
site one and site to. So here in this example, I have on this side, so it means this side. I have this wallpaper. And I just need to
check some sync. I think it's okay. I
can click on this one. And if I click on this
one, yes, it's okay. So now I can click
on this one, e.g. and you can find the
side1 front view. And you can go and materials. We can find a material
on this view. If you want to input
your own materials, you click on Upload. Upload you select Choose File. And I can select my own
materials on my computer, e.g. acidity, this texture. You need to wait a
little bit because this needs to be downloaded first. I need to wait a little bit. And after it will
appear on this area. You have old saws
or columns and you have also the
material if you want to apply different
materials, e.g. if I see leaked
again while papers, and I can click on this one
or I can click on this one each time you can find
the materials such reuse. So sometime it's little
longer buds or render, I can come back on Upload
and take a glance. I have this one and I can double-click to positions
is on this area. It's definitely too long. I'm going to wait a little bit. And click on this wall again. Select my side number one, or I can go directly
on the front view. Take a glance. It was these patterns. So now I'm going to
double-click here and I have my image texture on this one and try acidic feel
you have different options. You can apply free
and you can change. You can also apply no
stretch if you need. You can apply fields. Most of the time
we will use field, but you have also content
tile horizontally. If you click on terrorism tally, you can scale on the wide and
you can scale on the age. You can do the same vertically. And you can do the
same with style bus. And each time you can scale
on the two direction. If I just value that
these materials. So now I have this one here. I just select my
3D view re-center. And just to show you, I
have this time materials. Now on this one. It's not extremely
interesting in this example, but it was addressed to
show you how you can add the materials and you can continue with this outside also. Let's take an example. I can continue on
with my 2D view. Directly. I can go
here, draw your face. And I can start, why not from this
sprint to sprint? And I can draw your
face on this area. I can press Escape. I can draw a nodal surface, e.g. this part to this
part until here. And I can just come back
and just press Escape. Yes, just like that. Now you have this your
face and this face. I can use different
type of materials. I can come back and change. May have outdoor materials, e.g. in outdoor materials,
if I just continue, I want to have grace. I have these options
I can drag and move. You have also
dromedary of grace. You want to try different
this one, again, this one. But I can also use
something like sandstone. Here. I think it's
more for words, it's not extremely good, but For I can see leaked if I just come back at
the beginning for outside, you can also use this
small rocks on this area. You can create paths. For outside. You have all this possibility for outside. It is the same. If you want to add any scenes outside you can
see leaked again. Why not Stern? And if you
want to add break e.g. on your world outside,
it is possible. Let's select two
models of bricks. Maybe I can try. Maybe I can just, maybe I can try this one, or maybe I can try this one and just go left-click outside. Left-click outside on
all the different sides. Outside, outside, outside, again,
outside and outside. Now if I take your glands to
my 3D view, can recenter. You can find some
materials for outside, just like this first. And also on the floor you can
find the different element. But I think I can change
my parameters first. You can click here. And
getaway cutaway words. I'm going to remove this one. And now you can
find this material, this brick materials
on the outdoor walls. Just like that. You can make a lot of sin. It or strangest is not view on the 3D view because
I have this one. And here you have this one. So it's either
strange why it's not totally on the 3D view
here on this area. Consider this one
just here and go out. And just like that. So interesting and theorists
tend to use these materials. You have a lot of options. I can come back to my 2D view. You can work on flows. You can work on indoor words, you can work on outdoor words, and you can mix
colors and materials.
22. Magic layout: Let's explain the magic layouts. Magic lay out what is this? It is to let the software
to choose a layout, to choose the furniture, and to choose a style and
directly to decorate the room. So the first things to do, Let's just draw a rooms and
left-click on this point. I can add two value. Let's just apply six by six. Just like, just like this, after he will decorate
depending on the position of your window or the
position of your door. So first things to do, place a door, its position
or door on this area. And just let's position basic window directly
on this area. Wonder when, when do I can
click on this one and invert? After? If you want to apply
some magic layout first you need to define
the type of whom, because if you click
here, you don't see. So magic layout because you
didn't define your own types. So first click on the womb
type and define what you want. Because if you choose a
living room, he will add. So far, he will add table, he will add decoration. If you select kitchen, he will add sings for kitchens. If you seal it, bedroom, he will add a bed. He will add one robe or
these type of things. So first, what you want, we have six meter by six meter. Maybe I can try or living room. So I can try leaving first. And after to define leaving, if I go left click, you
can find magic layout. Click on this one. You need to sit in those
times that you want. It can be addressed Cyrillic
first, classic style. And after you click
on magic layout, here we calculated
z dimension and creative classic style for
your home or rest painting. Maybe it's a door, a window, and different type of things. Personally, I don't
like to match, but you have the osteon. You can add any moment. Click again on magic
layout or restyle. And you will have something
a little different. So if you are not
satisfied, you can change. But after all, you can
eat, eat by yourself. Let transvestite classic,
let's apply e.g. linux style magic layouts. And that's it. Now you
have this type of element. It's early turnstile,
a change for our nodal modelling brightness. If you want to have a
modern style magic layout. So that's it. So fries on
parity than terrorists. And after you can
enter in your 3D view re-center position
first, just like this. And if I zoom a little bit, you can find the disposition
of the sphere onto them. And personally I like to
style, I think it's good. And after if you
want to just e.g. if I don't like this one, I can click and I
can just delete. If I want to change the
position of this one, I can click and I can
change the position. So after you let the software, if you don't have a lot of IgE, you don t know how to start. You can just let the software to create something for you. And after you can add
them or furniture, or you can remove furnitures, or you can edit furnitures
at your convenience. So if I want to move the frame, I can move the frame. If I don't like this light, I can delete this slide. Just press delete. And I could continue like this if I want to change
the color of the wall, it is also possible
I can come back on Tuesday and isolate
one of these, like peak and dragging
materials color. And I would like
something more in red. I can drag and move here. Drag and move here, drag and move here, and then drag and move here. And if I come back to
my 3D view, Waltz, who know I have this typed, but I just change the
color of the word. So this is why some magic layout can be extremely interesting. Here we define, we define
directly or living room. So tomatoes square, but maybe
it can be also a big room. If I just come back. Yes, I'm going to come
back to this step. So we have living, I need
to change the type of whom. So first I click on this
room, change the type. And this time I can
see leak two bedrooms, salty meter square our
bedrooms to tell big, but it's going to work
for white I want to do and go on back magic layout. And now he will create an
entirely off all the trims. Again, Silesia Stein
one more time. Why not to try with the same
style, modern brightness, but this time for our bedrooms, it will be a big bedrooms. This is why we are a
lot of space here. But take your glands are
like this type of style. I can change, maybe I can try for industrial magically out. You can try your
luck to have seen depending of what
you want to do, your own brand magically out. Just like this, because
it is centimeter squared. We don't have a
lot of furniture. Those things are
womb is little big. So this is why we
have a little space. And after this is some
e phi f too much plane. I don't like this one. I can just press Delete if I want to position that
can change the position. If I want to add furniture, I can also add furniture. I can go on directly bedroom furniture and I can drag and move new
furniture if I need. I can come back to my 3D view. We have a very nice decoration. Again. We can easy to
different parameter. So this is why magically I
would can be interesting. You can also use this one
when you start your design, you start to room directly
at the beginning. You can directly have a template like a
template like this.
23. Add camera: Let's explain the camera, how we can work with x2 camera. So first, things to do we
need to work in the 3D view. So let's go into the 3D view. And as you can see, I have this example here with this creation
of this project. The first things that you
need to understand is by default you can have
different type of camera. I added different
camera in this example. But first, this is my camera. You can find the
listing of camera here. By default, you have exactly
two camera when you start. So this is why I'm going to
select my camera on number six and just delete this camera. Then I'm going to continue select my Cameo random but five, and delete this
camera just here. Select my camera number
four and just deleted. So this camera, like this and acidic macadamia
random Burp Suite and delete this camera. So now I can come back with two camera or you
have one camera here and a second camera here. So beginning, you
have two options. The first option is this one. So it is just a
general overview. And the second
option is this one. It is a view from,
from human being. So whether you choose once, whether you can choose this one. If you chose the first, sometime maybe we'd have like a widescreen and you won't see
anything when it's a case, you just click here. And thanks to that,
you will be able to update the view rephrase on
Purdue OWL on this area. And you have something
like 60 total wrong. You just click here and you
can come back on the top you with the right size. This is a camera
random bell one. With this camera, you can drag and move on this direction. You can also change
the field of view. So this is a two
things that you can use after I can click on
my camera and number two, but if I use my camera random
breath to automatically, I change for this type of view, that change for
this type of view. So now what is anti-racist? To add more cameras and the rest is from the exploitation. When you export an
image like this, you can see secure rent and go, but you can also set
it directly camera up. So this is why you can add multiple camera and why
it can be interesting. So it's like augments. I'm going to use this one. So this view and on my
camera on number one, silly. Not on the camera
number ones are Camera number one is directly. I can stay like this. And I'm going to use my
camera and number two and select to view of the
leaving group like this one. After the next step to
other camera, click close. Let's add a new camera. And with my my arrow
on my keyboard, I can just drag and move on to this direction or
this direction. And I'm going to go on
my first room and I can change the view. Acidic e.g. this view, and then just
click on Update camera. So thanks to that, you
can save this view. After Let's add a new camera. It will be my camera
and number four, and I can move with my arrows on my keyboard
and select e.g. is this view that can be
read just to save this view. Let's continue. I'm going
to go on the bus room. So I can click here, this is the best room and I
can obtain this type of view. Maybe I can go in this area, left-click and turn around. And I can sit exist view. After to sit exist view. I can click plus, oops, I'm on the camera and number
four, it's not truly good. I need to come back, select e.g. this one, then create
two new camera. The camera random dot five. And now I can take a view of
my bathroom like this view. And I can click Update camera and create two new camera again. Bruce Cameron, number six. With a camera number six, I can click to view
of the garden. I can grow its side like this. And maybe I can set it to
a view of the theorists. Yes, perfect. And I can
click on Update camera. So now I have
exactly six camera. If I dress go at the beginning. This is my camera
random belt one, with the view on the top left. I have different views
from from human beings. So I can click here and I
can have my first view. I can add my second view, myself view my view and my view. Just like this. Each
time if you want, you can drag and move
on this direction. You can also turn at
your convenience. And you just need to
update the camera. Just like this.
Why it is useful? Because now if I export my image and not answer
to D view on the 2D view, it's not important,
but on the 3D view, you can find Camera
number 123456. And each time I can
have the right view, depending of the camera,
is I take shoes. So this is why it is
useful to create camera. But you can also just
export the current angle. So it means your
acidic two angles, then you move, you
expect an odor angles. And it is also a possibility. Don't forget that if e.g. I. Select, I go inside. I can just go on this area. You have different options. So if you click
here, you can e.g. remove the selling and just act directly
this type of view. You can also use cutaway words. It means if you have, if you are outside like this in the garden, you can find, you can see inside the house because you
use scatter away words. I've taught your convenience. You have different options. You can also show the
shadows or you can remove the shadow depending of
the results that you want.
24. Export work: Let's explain how
to export walk. We have this creation, this project, and I
can use my 3D view. So thanks to that, I have different
type of options. And one of the first
things to do if you want to export your work, you can define camera, as I've explained previously, but something also
that you can do if I just come back
in my 2D view. So this is a 3D view
to the view you can directly click on Export
Image expert in age. So after that, you have
export resolution. So by default you will answer is D. If you just use
the free version, you will have only the
possibility to expert in S D. So it means 960
pixels by 540 pixels. If you buy credit or you
take a subscription, you will be able
to export in HD, or you will be able
to explore in for K. And also
alternatively in PDF. First, you can find the 2D view. So it means this is this view of my project and I
can export in JPEG, I can export in PNG. You will just keep on
your JPEG file and this one free SD
export floor planner because you use the Free Russia. If you don't want this one, you need to have a
subscription to take credit, orientation, landscape
or portrait. In this example, the best things to do
is to use a landscape. But if e.g. Garden is located in a
different position of your arm, your atlas, you can export
in portrait or landscape. It's definitely better
after you observe ratio A4 for 30.69. And we're going to keep this ratio in this
example after he, it's not possible to edit
this one in the free version. And I can just export
the image in the. So now if I want to
explore different view for 3D, one more time, it is exactly the same as D with a free version or HD 4k8k, you have also the possibility
to create a 3D tool if you buy a credit. So you select 3D, you set your environment. So first you can
go on this area. You define the environment
with light and scenarios. So as, as I explained, you can choose all
environments that you won't. They just keep this
simple environment, this one or maybe this one. After to define
zone, very unmanned. You can create camera. So you click here and every time you can create a new camera. And from this camera you
can update view. So e.g. this is a view of my
camera number one. Just here with the
camera random bell one. I'm going to just
use this basic view, but maybe I can change
and I can use e.g. this view with my
camera number one, just isometric view like this. And I can drag and move it around this direction if I need. I can also change the
shadow with this print, depending of the
moment of the day. After I've tells
that I can define a media can just change liter my isometric view
and just drag and move. And yes, Tom legs is perfect. So this is a view of my
camera on and bellwether. To save the view, just
take a dead camera. Don't forget to
have that camera. After this is my camera
random brush tool. We have a view of
the living room. Perfect. And I can just sit, stay laces. Now this is my view of my
camera, random brush, sweet. And I have a view
of my first rule. I can sit exist view of
that camera Camera number. For this type of view, I need to come back
on my first yes. Okay. So can you run number four? I have this virus
is not what I want. So I can change, I can just
click here, go inside, and select the view of why not just Sigmund room
that can Mira Lexis. And yes, that can be
rather silly exists view. And now this is my
camera Number 45. I have a view of my bathroom, and this is a cameo
random verse six. And I have a view
of the theorists. Maybe I can move little outside, perfect on this direction. And I can apply a debt camera. So now I have exactly
six different views. Can be right to camera three, camera for Camera Raw
F5 and camera six. What's up burn. If I
click on Export Image, I can silica what you want
just directly on this area. By default, you have
the current hunger. You can also just use
current anger. E.g. I. Select Camera random bell
one and I sit exist view, x-bar teammates current angle. Then I can repeat the process. I go for a zone just on
this area, just like this. And I can click on
Export to match current angle and this angle and you can repeat the process, but you can also just
use your camera views. So e.g. I. Come back to this
view just a bit. Camera export image
and I can use camera number one,
exists and export. Then I repeat the process can be random birth to I can export. Then I will do with
ischemia random births. We export camera
number file expert, camera number five, export, camera number six, export. And you can repeat the process with all the cameras
yet you want. If you want to select
a specific view, you are e.g. top view. You can work with
the bug view here because I have a garden automatically or we
only see so garden, so I think it's not the best. But if e.g. you create the
design of only one room, maybe it can be interesting
to silage bags. You noticed you suit twist few, anything that you
want, just like that. And that's it. So this is how you
can export to work. In protons, you have 2D with
JPEG or PNG and then 3D. And you can export in JPEG. So current angle, if
you want to export in better quality just by credit. After we will be
able to do this.
25. Create styleboards part 1: Let's explain how to
create to style board. So first, when you are on
your main dashboard, here, you have the possibility
to directly go and on Steinberg and you can create a new state
board from this page. So when Moses type
bird is to create a presentation page of
a room or for design. And if I click on this one, now, I can directly go on this area. But you can also create two state bar not from
scratch using e.g. directly room. This is a title I can change. I can make e.g. style bone, style ball and apply room. You can select a
background color, background color that you
want. For your style box. You can also click here, and I've access to these panels and if I want
something more in red, I can apply something
marine rate. If I want something
more in blue, I can apply more blue color. After to put her backgrounds, you have a font settings. So each time if you add text, you can select the font
size and you can see the font weight and
also the font settings. So font-family, if I
just continue here, you have object and if e.g. and make some sing
for a bedroom, I can click on bedroom furniture and I can just drag and move. This is why it's
sometimes can be useful also to have the 2D
view and I can take a bed and positions are
bad just on this area. And after I can just scale. And as I explained, the aim is to create
your presentation. So you can also hide the project name I can phrase
on PER make something here. After in this room may be, I can add more elements like a bedroom
storage. It can be. Or if I just come back hip
can be dressing, table, chest of drawers and interests
come back on the 3D view. Let's just drag and move
this element on this area. If I click on this element that can either project name also, I can use Miro If I need. And you can never add a
drop shadow on this area. And I can extend
and position e.g. this element just here. Let's continue. I can use bedroom
furniture sales and select to why not
to tracing table. You have different options. Let's put this one and just
drag and move on this area. I can click here, apply Miro hydro project
name and position, skeletal bit and positions
is on this area. I think I'm going to change the location so we can add furniture exists for
presenting your place. And you can be most things
can be also decoration. It can be a curtains. If I just in the category
type something like curtains. I can have these
different options and I can see why not select this one. And left-click, drag
and move my curtain. And I can click here. I can also create
rotation if I need, I'm going to hide the project
name and position, e.g. this element here, you
have more options. We can drag any color into
your worlds and sort phase. So e.g. if I select this one and
just drag and move here, it can be just a
colo, project name. I can put color room walls
like this, cold room walls. I can add a drop
shadow if I need. And just put this on this area. And I can use a materials and drag and move phrase on
this one, left-click. And on this materials, I can change the project name and materials room, floor. And thanks to that,
you can create a presentation after it depends how you want to
walk with your page. It can be, you can
put this one here, you can put this one here. I can put this one on this
area as this one on this area. Again, resold your
skin just like this material, color room. And position this element
to tell you on the left. This one may be just here. If I just continue here. So pseudocysts materials,
choline materials, you can also add some text. I can just put title, room design like this. And after. So m is two, you have the front color, you have this one, and
you can drag and move on this area with this element. And then you can click on your texts and you can
edit at your convenience, I can center or left-click. I can change the font
family if I neither. Let's see, leak some sync your
affinity to as great tool. And I can apply bold. Increase my font size. I can change the letter spacing. I can change the font
color if I need. And I can position
title, room design. And I can add more things. I can add text. I can take e.g. modern
style dragon move, position this here. And if I click on this area, let's increase literally be
the style, modern style. I can continue. Let's make something
like Bora for color. So let me just to show you
how you can create a page of terrazzo content is
not extremely and protons, it can increase. For a full color. Let's put this one. And let's continue
with the last element. I can click on Text. Amazing decoration, and
let's increase little bit. Drag and move in this direction and put this on this area. And I can come back. You can drag any color into world since your face
we see the same. You can also add a
picture if you want. So multiple symbol. So if I want to add like your hair out on this,
alright is possible. I can add also arrow
tighter, room design. Put this one here. Maybe I can click on the
arrow and dressed crowd to scale and click on this one, increase position, this
element around this area. I can click on this one,
Increase little bit. Let's continue. I can come back and these are real object and you can have
multiple access service. Let's click on this one. It can be frame, it can be cushion. Let's add e.g. just this
element towards the leg. It is a frame. I can
click on this one. I took project and
put this one here. I can click on AFT for address comeback
accessories, mirror. And let's put this one
directly on this area. And same each time I
can create a selection and just either project name
and position this here. And I can continue. Let's select object. Living room, furniture
has an app chair. Let's select this one and
drag and move on this area. Here. I can position
poorer folklore here, increase this element and
the phi Solexa symbol, you can change the color. I can click on this one. You have a gradual so it means
you can apply to Carlos. I'm seeing Lexus,
I can click here. Change the color also. Why not to put this one in y's and I can click
on this area, put this one in ways. Again. I think the color
will be better. I can apply red and
I can click here, I'll play one red curve. And that's it. We have created a model of patch
of presentation. And I've taught to
do this work if you click on Export Image, you can also expand
the image in SD. If you buy credit, you have more options. Then the square root
to create two page representing a room of
representing e.g. gestural design. Just show how style
is things like this and you can drag and move here we start from scratch, but we can also directly start from existing, existing design. And I can come back here. Now, you have Zs style
board room on this area.
26. Create styleboards part 2: It is also possible to create two styles border
directly from a room. So when you are inside
your design, e.g. I. Have this design
and I have this room. And I can directly
from this room, crowd to style board. And automatically he will
put directly on the page. So different elements. And after we can change
the organization, we can just
reorganize this page. So first let's go left-click,
click on this room. And if I click on this
one and I go on the left, this is my bedroom. And you can find style
border, style border. And when I click here on now, I can enter again in the
same time of panels. And automatically you will
define a model of page. So this is a general settings. You can directly apply
shop project name or not. I'm just going to come back here because something is not
extremely convenient. And letters come back or
neutron from front plane. And I'm going to show
you another example. I can click on this
one, style bone. Take your glands here. I don't have the
element directly. I'm going to show
you another example. It's better because here
I use this just before. If I click on this one and
just click on style bond, yes, now it's going
to work properly. And Decker glands automatically. I have also elements that
are inside this bus home. I can add all the project name. First, just laziness, or keeps a project name at
your convenience. And after I can just
reorganize as I want. So first, if I go in this area, I can select a background color, so it can be gray, blue, red. We can also make
something really darker. We can walk in black, Finn in black, it's
not already good. Again, a Socratic
model of page in y's. Here you have the font settings. You can change the font
size for all the elements. Also takes that you
have on this area. And you have all sorts of
font-weight like this. But I'm going to hide
show project name. So the aim is to reorganize. So e.g. I. Can position this one
here, this one here. Maybe I can increase
leak terms of project. And this area. Maybe I
can increase this one also and put just here. I can add the ones
curtains here. I know the current
turns on this area. This is just what I will, but some materials
on the wall and sees what you have on the current season
material on the ground. Or maybe I can put
these two element on this area, can increase. Put e.g. this one here, this one on this area. Let's make something
a little smaller. And this is a show where you can mix with something more
bigger and something smaller. And I can just, I think credit to offset and
put a title on this area. Click on text. Project bathroom, drag and
move on this direction. I can put bold, change the font color. Let's apply exactly
the black color. Increase the size. I need to click here first. Let's increase the size
with this type of value. I can also center and bold and I can put project-based room on the top left corner,
just like that. And maybe I can put this one, increase the size
in some either. And 10 m square. For furnished like this. Drag and move and
position on this era, ten meter square foot furnish. One more time. I can add more text. Down style track and move. Dress here. And yeah, that's it. So this is a type of
things that you can do for another models of page. I wanted just to show you
that the two possibilities, the first possibility
you can create, you can create this type of
style bought from scratch. So you just go in
the main panels or you can directly
click on the room. I can just come back here. Come back on this area
are not come back on this armor and
written to flop plane. You can click on
one of these room. And after to click
on one of this room, you will have options
to create a bond. If he had just a straight face. If I click on this, your
face, not receiver, but each time when you
click on your room, you will have stayed bond. Now if I just come back
on my main dashboard, I can have a listing of
my style bone just here. So as you can see, I created
different project first. I don't have the previews. A preview porosity
will arrive soon. And zc is my project, this one. Opening editor,
State Board quality. And one more time you can
delete or you can add credit if you want to
export with better quality. And I can come back
in opening editor. And I will be able
to edit again.
27. Project create walls: In this training we're
agreeing to Crato hours. So at those step-by-step,
and thanks to that, we will see different features and how to process step-by-step. So the first thing
is to do each to create a worse and
to draw rooms. I'm going to use Joe worlds
and crunchy base of my house. First I can see the seating. Keep this parameter
and credit just first-world on this direction. So I can create my first-world and just enter a value of ten. Lexis after I can go in this direction and
a value of six, and then come back on this
direction, just daisies. And a value of r, value of six or so. Then we can continue in this direction with
a value of to, continue on this direction with a value of four and
then come back here. So this is my base of my hours. So now inside we are going
to create a different rooms. So I can use these tools, True rooms and first
things to do each to create the first rooms on this corner and net
aerospace on this area. And because of that here I have, I'm going to enter a value
of minors just minuss, minuss, far by sweep, sweep. So I can tap minors
for coma and menus. Sweet dress stasis,
and I can press Enter. And it will be my first form. I'm going to create
a single room. I can use true rooms. Start from this
print, like this. And I'm going to extend
little bit on this direction. So if I zoom in here, we can just extend liter. I can first create my
rooms on this area, then takes the swirl and drag
and move on this direction. And I need to let little space, you have 1 m here. Let's let little bit more. And I can let just 1
m, ten, just laziness. I feel I'm going to
change a little bit. Just check directly on
this area just in front. And the next step is to
create an audio element. I think it's too much. So let's make a
little adjustment. Dragon move here on
this direction we can drag and move
just a little bit. I'm going to come back at sweep. Sweep 0.8 will be perfect. Yes, just like that. I'm going to try
and move towards this wall and just
lead to retail space 1 m. Just for T on this area. Yes. Just like that. And
let's create a bus whom? Rooms. Left-click on this area. And I can crunch your bathroom. But Badger value, I can
tap minuss 2.2, 0.85. I can just drag and move. I can zoom and when
I arrive at minus2, I can validate trust status. So it's okay for
that after I need to enter X2 type of room. So first I can click
on this one type. And it will be so living room. After I can click on
this one, horn type. And this one will be, so bedroom, a small bedroom. I can click on this
one, home type. And it will be
about the bedroom. You can find sizes
liter difference. So I have this
110.7 meter square. Then I have this one
starting 0.6 m squared. And this would be the best whom, whom type bus for me, it will be deterred small, but it's going to be enough. Maybe it's definitely
a little too smart. I can extend a little bit
with 220, just like that. Now if I click on my bathroom, I have 5.3 0.3 metre square. Yes. I think it will be minimum to make
something correct. And this will be
the living room. Salty, salty, sweet point, sweet meter, square.
Just like this. I can check my 3D view. First things to do. Click
here to residual position. So it will be a small
hours vesicles with living room or bedroom and
a bedroom little bigger. And here's the best form.
28. Project add doors: Let's continue. So step-by-step, we are going to add the doors. The doors. So I need to position my
vendors are on this area. And I need to position also
to place my sweet inside dos. First things to do. Plays those. And I have different
type of options. I think I'm going to drag and
move directly on the front so I can go left-click and position this
door on the front. After I can invert the
direction click here involved. And I can position in
the center of this one. So I can left-click. I can drag and move. I need to see the value on
both term not on the top. And when I arrive at 0.61, it means I'm okay about
position of this door. Now, let's continue. Place those. Let's say
just so basic doors. So it means a standout dog here, left-click and position
this one around this area. I can zoom little bit change. So opening and z-direction
and invert and just let little space here on the
top I can zoom little bit, dress lightly. Third space. Not to merge. We can
arrive on this area and I can see my Odell
dimension. I have 2.02. And when are you arrive
at one print 70. Just like this, I can stop. Let's duplicate this door. Duplicate first and
position on this direction. I need to invert. So click here. Invert, invert
also, vertically like that. And let's put this
in the center. When it is more like this, you don't have a lot of dementia and it is
little difficult. So in, in this, in this case, we need to zoom maximum and to try to have
the best procedure. And I can position in the
center of this small words. And let's duplicate
again. Click here. Duplicate and positions is
though or so on this area. In this area I'm going to
position on the right. So here e.g. you need to
see this dimension here. And we can drag and
move, drag and move, drag and move until to
obtain a value of one. I think one will be great. Maybe I will create
a little offset, may be a little bit more, 1.05. Click here and invert this. So after two, does this work? Let's apply the 3D view receipt. And I can zoom a little
bit on my tours inside. So it will be the main doors is a small window en
suite, different doors. So at this moment we
can say if I go inside, I can find my world. But if you want to
change a parameter, you can also use getaway walls. You can also use shoulders. Let's keep this one. And you have a social settings. I can remove that,
but I fear I'm going to keep show ceilings. Let's come back
onto the 2D view.
29. Project add windows: And let's add a Windows. I've taught two position and
to place different doors, we can place windows. So click here first and B for
two position basic Windows. Let's position door windows. So I can click on Place dose. And if I just continue, we have this option
sliding door. This is not the only models. We have an adult models
of sliding door here, but the size is not the same. And I'm going to
click on this one. After I can drag and move here. And this is a big slide windows, I can zoom a little bit. Let's position in the center, so I need to see my dimension. And when I arrive on this
dimension on the bottom, when you arrive at one prints your sweet 1.0 for
i means the center. Just like that. After I can duplicate,
duplicate position here. And let's crack to offset
on this direction. Let's go to offset of 1
m, which is dimension. And duplicate again,
click here, duplicate. And let's position offset
also from the top meter. So I can go here and
credit to offset exactly 1 m on the
top-left corner, just on this area. So now let's continue. I need also to add a window
just on this bedroom, on this war lead
change place windows and said exists
simple window is, is a two pane window. Drag and move on this area, same I need to center, so I need to see my dimension, indoor dimension or
outdoor dimension. And just follow my daughter. And I can until value
of 1.25 or one print. Yes. One one-to-five can
zoom little bit first. Yes, dress like that. Let's duplicate this window. Click here, duplicate the shot first off on one of these words. And let's position
this one on this area. Then I can zoom and position
in the middle. Also. The best things to do is to
take the indel reference, few tags, the outdoor reference. It won't be perfect to
position in the middle because here it is in
the middle of this word. So this is why it's not good. You need to take the indoor
reference indoor dimension. And let's position zero, print a T1, their effect. And let's duplicate
this window again. Duplicate and position
in the bathroom. I can see my indoor reference, but outdoor is going
to walk also here. No problem. 0.52. I think I
will originate this window. It's a little too big
for the bathroom. I can click on this one Settings and we have
a white for this window. Let just widgets,
widgets, widgets, and just create a
smaller window with a value of 80 centimeter. And now I can sinter or again, just like this, It's okay for us that are
buds are opening. Here's a sliding opening
is on this area. I think it will be okay. Here it is same. It will be okay. And it will be okay by just
setting on this big window, Let's keep this
different parameter. And I can just check
with my 3D view. Just click here. After
we can enter inside. And just check that
everything looks okay. If I just come back
on my 2D NCLEX, this window, I can go
directly on Settings. I think I don't like
to merge the eight. Maybe I can change the
84120120 dressed like this. And I can increase here, raise from flocked to 100. And thanks to that,
I can read you a little bit this window. And let's see on the
3D view, click here. And I need to enter
in my bathroom. So dressed on this area
and turn my camera? Yes. I think definitely it's
little bit like this. Yeah.
30. Project add furnitures living room: We're going to add furnitures
on the living room. So first, let's add
furnitures on this area. So it seems that
I'm going to do, It's to click on furniture, categorize and let search
living room first. I can click on
sulfides going to be the first element
that I will select, or you have different options. Here I'm going to select
different type of color. Let's take e.g. disease type of let's take why not this type of so far we have
assumed this type. Let's take this one first. I can position around this area. Let's go to rotation on this direction and
position this here. After I can come back
on leaving furniture, we have different type
of table I can use. Maybe you set table. I can consult table, coffee table, training table. And I need to find
something maybe with directly with we sit so I can
come back also an object. And you have also
dining room furniture, table and chair sets in space. And I can continue. I'm going to click and stay with this type of code ought
to have a modern style. Just click on this one
and position z so wrong. Yet this area, it
will be perfect. After I can come back. Object. And we have a dining room, living room furniture again. I'm chair. Maybe I can position
also armchair. But this is not
exactly that I want to do living room storage
yet cities better. So I can click on the room
storage, apply these filters. And I can put e.g. maybe I can put this element
dress here like that. After I can continue,
I have something for TV, it will be perfect. I can drag and move this
element like around this area. And I can continue. Maybe I can put something
like not this one. Sidebar storage board,
media storage, furniture. Maybe I can take this one. Yes, it will be great. Not here, but on this
area it will be perfect. I can continue little bit. Let's add, if I just
come back here, object. Let's add a plant. I can
click select a plant. Take e.g. I. Can take a phrase on
this one and position a small plane may be
on a limb and maybe I can position on this
area in the corona. Yes, I think it is enough. Now, let's walk
little with here. It will be the kitchen. So I can change object kitchen. And I have multiple options. Kitchen appliance,
kitchen storage. Let's work with basic units. It would be the best. If I drag and move this one, they could glance,
it is too big. So let's just come
back. Maybe I can find some sync, little smaller. And in the same type of style. It is this type of color
or maybe I can do is activate dressed
for the kitchen. Maybe drag and move this one. Yes, I think it will be perfect. Yes. Let's work with this one. I can come back on kitchen and I can type
something like fridge. And you have different models. Let's drag and move this
fridge on this corner. I can click here and
create a rotation. Just like that. Maybe I can add a little furniture so I can
come back and kitchen again, remove fridge, small
kitchen storage. Maybe it can be
interesting if I can find some scene like this or if I just come
back before baking. Yes, this one. I can e.g. dragon moves this one and
I think it's too big. Let us come back and
maybe I can try this one. Yes, perfect. I can position this here and drag and move
on z direction. Perfect. Even if I don't like too much. Yes, I'm going to use this one. It's better. So I
can click here. And I think I have some
trouble with this one. I can just come back to us here. Yes, things are element. It just about the connection. I can come back and
drag and move this one. Just on this area. Crato rotation and yes, perfect. After if we want to decorate, we can use kitchen again and we have the Fairmont two options. We can add e.g. we can add something like
this on top, dress here. And I can zoom a little bit. Maybe I will be able to
edit that in the 3D view. Coffee and coffee and tea. I'm not going to enter
too much in details where m is just to understand
how it works. After for this type of scene, you can just take any
things that you want and you can put an add
some decoration. So m is just to add furniture. And if I just come
back on object, categorize it, step
dressed smart table. And we have different
type of small table. Maybe I can add
something like this. But I think the size is big. It's eight. Yes, I think it's big eight. Are going to stay like that. Their aim is not to add
too much declaration just a little bit. I can use my 3D view. Let's go inside just like that. And I can move this direction. Take this one. And I can drag and move later on this RER drag and move
it around this area. If I want to move this curve, I can also move the curve. So we can just go inside. And if you need to move
your different furniture, yours, it is totally possible. Take a gland, so bad. Kitchen, I think it looks nice,
little too big. I need to come back
on my 2D view. Click on these elements settings and just change
the weight thing, it's little too big. You can just read, use 270. Perfect. I can come
back to my 3D view. And yes, it will be great.
31. Project add furnitures first bedroom: Let's continue. We're going to work with the first bedrooms. So it means this bedroom. So I can come back directly
in my furnitures categorize. And here we can change
for bedroom furniture. I think I'm going to
keep the same type of style and just click
on this color. And we have different
type of bedroom maybe I can keep cheek
take one of these, this one and
left-click position. This position, this
bed on this area. After to do this work, I can come back
bedroom furniture and select a
different categorize. I have wardrobes, beds, drawers. Maybe I can see leaked
first one, robes. And select one of these, maybe this one, left-click. And I need to position on array. I think in this area
it would be great. I can then come back on my bedroom furniture
again. I can change. I ever saw some
bedrooms storage. Maybe I can apply
a bedside table first and I have
different models. One more time. I can see leak. Why not? Why not
see it exists one. And just go left-click on this area and
position this here. I can drag and
move liter my bed. Let's continue.
Bedroom furniture. There's also a chest of drawers. It can be useful for clauses. Need to try something
with interesting, again about your style. Maybe it's a first can be great. And I can go left-click
on this area. I think definitely
it's not really be if I just click on
this one, sittings. So ln, white nose
or length is 48 cm, so I think it will be perfect. I need to check with my 3D
view what will be rendered. So this is my front door. I need to enter inside and I can turn exists on this area and
definitely it is great. Yes. Just like that. I need to check. I have little space
is not too much, but I think it's
difficult to make differently if I just
come back on this area. Yes, I can put this
element just here. I've talked to do this swap. I would like, maybe
it's not the best. I'm going to remove this one and just add the desk
so I can come back. Bedroom furniture. Object. And you
have office here. I can e.g. just see leaked
to this one first just here. This cop organiser. If I just come back on
office amorphous materials and you can find directly
desk or computer desk. If I just click on desk
AL different models. Let us click on this model is perfect and I can drag
and move on this area. Put the chair to rotation and drag and move
here, drag and move here. Maybe I can just
make a small phone each year on this area. I can come back on. Object. Select one more time. Bedroom furniture,
neutrinos, chest of drawers. I'm not sure that I'm going to find exactly what they want. Maybe if I drag and move this one thing,
it will be great. I can just click here acidic my sittings and
rigid Zealand to 40. And I can read you too wide. Just make something smaller. We just 60.120 and put
this on this area. I think it's enough just to four for this one,
we don't need a lot. Maybe I can just add your
laptop object search. I can just type
directly laptop and put one of these on the top
like like for his own PR. Maybe I can put maybe I can put this one
just on the top. Dress here. And decoration. I can come back on categorize. Remove laptop, and we have
different type of accessories. Let's put e.g. I. Can put a mirror. You
have this first Miro, maybe I can put them in a royal directly on. These are real. After. If I have
different decor, decorative accessories,
maybe I can select ones. Like maybe I can select this
one and put this directly. Maybe I can put
this directly here. Let's see the 3D
view works through. So I can click on this element. I can drag and move on this
direction, this direction. And just telling
the wrong about. So my Miro can catch here. Oops, not rotation. It's not really good. If you want to move some time, It's not extremely convenient. I think the mural, it's better
to work on the 2D view. I can just check that
everything is okay. I need to turn the laptop. E.g. I. Can use this one just
here. It's better. And I can click on this trust pool little
bit on this direction. And maybe I can put a little bit this one on this direction. It's okay.
32. Project add furnitures second bedroom: Let's continue. We're going to add furnitures
in the second bedroom. So Francis, I can use again this categorize and
bedroom furniture. So first I can continue
to activate this one. It is great. And I can
just add one of these bed, not take maybe I
can change the bed. Not exactly the same. Maybe this one or this one
I can continue little bit. Or maybe this one can be great. I can position this here. I've taught to do this
one drug and move little bit on the right, select also a bedside table
and a different models. I can try these models,
left-click and position. I think just here. Can move little bit, bed on the right and keep
this one along this one. I can come back.
I would like also to add a bedroom. What row? Then maybe I can
change the models and make something
smaller like e.g. this second models, it is
a same but in smaller. Why not to position on this
on this area just like this. Come back and sit. We have also bedroom. What room? Are maybe bedroom,
storage again. And try to find some single small maybe
something like this one can be great and I can
position in this corner, it will be perfect. I want to add a desk also. Lets come back. Object. Select office. One more time. I can use one of these, one of these Cherry
of different shell. Maybe I can reuse a different maybe I can use this coffees chair
positions is here. All. I'm going to change my mind. Just select an order
on Tesco fees. Yes. Perfect. Like this one. Even if it's a little bit, maybe I can add a little desk. Maybe I can see it
exists one, this one. You have the same also. Use just something
simple like this one. And drag and move on this area. It is definitely big. I don't like to merge. Let's do a change of fees. Computer desk, desk. Let's click directly
on computer desk. You have a basic desk, I think it will be enough. I can click on this one
settings and decrease the wide. Let's just apply. Maybe 80 centimetre. I think AT is little smaller. Let's increase with 100. And I can drag and move
on this direction. I can pull this one just here. Cs1 dress on this area. I think the position on the
element is not really good. Maybe I can change
this element here, position this element here, and just create two rotation. Let's come back on
Office categorized. Think this chair is little big. I'm going to select an adoption
but something smaller. Like maybe this one
will be enough. Credit to rotation. Yes, perfect. One more time. Let's add little decoration,
object, accessories. Let's click on art. And maybe I can add
a painting like this one and position of being
painting on this around. And I can select, I can solve some
singing accessories. Just stepped directly book. I don't have a lot of
options about book. It's a little strange. Maybe if I come back, object. Take a glance. I
have only this one. This one, this one. Accessories again. Storage, fashion. Let's hit play again.
Maybe a declaration, declarative, and
even accessories or just decorative accessories. Yeah, I can see it exists one. Just take an element
of decoration. Maybe I can put this
directly on the desk. These little weak, I
can click on this one. Settings. In some
element like this, it's not possible to resize, not of everything, but in so many mandates not
possible to resize. And in this case sometime
it can be little problems. I cannot do little plant. So you have, maybe I can add this one is definitely
a little big, but I can reduce problem if I go and see things
not done this one. So definitely you
have a lot of option. It can be a big cylinder vase. Metallica can also put this one just maybe on this
area on the floor. So it's okay for that again, just select my 3D
view word stroke and we're in the first room, we need to move in
the second room. So first, I can move with my arrow keys
and take a glance. It looks nice. So we have
directly this element. If I want to change the
position it's possible. I can then turn
around and so left, we have this element,
we have this vase. I can also maybe
positions of ways directly here and come
back on my 2D view. Dressed positions of vase, come back on the 3D
view, works row. And I can come back with this
vase directly on this area. Perfect. Let's
turn this element. I have another
declaration in demand. The chair and this
furniture also. I don't apply too much
furniture for a simple reason. It can be extremely long. And the most important things is to understand the principle. Me personally, I prefer to start with the
worlds and adores, add Windows after AD domain
element of furnitures. And after I'd finished. And it can be like curtains, it can be a light. And we will finish
with the garden.
33. Project add furnitures bathroom: Let's continue. We are going
to work with the bathroom. So it is not a big room, so we need to be careful a
bunch of different elements. So first, let's sit
exists categorize. And we need to go and
buy scream categorize. After we have bathroom
furnitures, bathroom cabinet. By swim lessons, we have
different type of scene. I think we can use
this one, e.g. or we can directly use
the bathroom cabinet. And thanks to that, we have multiple things
at the same time. I can keep this one. And maybe I can
apply one of these. It's not too big. I can select something like that
and position this here. After two. This is why I can come back on bathroom and select to
bathroom furniture. You have also multiple
options here. And let's select, I can select this one and drag and move
on this direction. Let's zoom, drag
and move this here, and drag and move this here. I can come back, I need to add toilets. So click on toilets One more time or you have
multiple options. And only this one, it is not exactly what you want. And toiletries. You ever saw bath tub. You don't have too much options. And maybe if I saw
something on bathroom, I can just tape directly,
something like this. But yes, maybe I have this one. Dress here, 12-lead. So you have this one also, but it is directly
with the furniture. I just seems that I'm
going to do it's directly at something different because
it's not working properly. And it can come back on bathroom and not select furniture. We have best seen bathtub. I can type directly
show where dress here. And yes, we don't have too much, too much element about the best whom it is little strange. I can remove this one. I need to check that every
scene on the right category, bedroom, bathroom. Yes, it is nice about bathroom. I ever saw E here
if I want to have maybe something more like a show where I don't
have too much seeing, maybe I can add a little
intimate and just here first, just for the decoration. I can start something
about bias term. I'll show where yes,
I have shown here, but I just love the show
where it is not a lot. And as you can see,
it is extremely big. So I'm not going to put this
one and just come back on bathroom, select bus, TRB. Maybe I can try once. Yes, I think will be perfect. I can go directly on this area and need
to stick my 3D view. I can click here first. And let's zoom a little bit. Again. Just go inside
the whole thing. I don't have a lot
of a place and take a gland so bad z
location of this element, location is definitely
not really good. And I need to change my position just here and put
this on the floor. I can use seating first
and erase from flow. I can come back at zero to as little strange wide
eight rotation and yes, dress like this. After to resist swatch, I can drag and move
on to this direction. And come back to my 2D view. Here, it will be israeli
meant in the world. So it's okay, no problem. Maybe I can create to upset, but I think definitely
it's better to put the best woman this area. If I invert e.g. I. Turn and they could blend
so bad the 3D view works for element is here. So definitely it's
not really good. So this is why I
need to turn yes. Dressed like that. I've done all those
things that we can do. Also, if I don't want
to try this one, I can maybe come back on
bathroom and just see leak. Yes, First I can put
maybe on element just on this area after I can
come back on bathroom, show well and show where
accessories this trench, we don't have a lot of
things about show well, but I can also use this sugar. Click on this one. And if I go on settings,
I can redo it. So lot Zealand ends away. So maybe I can create
two very small Showell with like eight centimeter, 80 centimeter and that can
reduce with 80 centimeter. And if I drag and move, I
can position this one on this calomel is that I can
position this one here. Just come back on bathroom and acidic denote the furniture. Yeah, you have this one, maybe
it's not bad or this one. And left-click
position this here. Maybe I can put a glaze also. So I can come back and position. Maybe these glazes
little too big, sleek to y naught this one
and position this here. So glass is too big. I need to change settings.
It's not possible. So maybe I can drag
and move first this element and say gone
dragon moves these glaze. If you don't have too
much precision like this because it's not on
the different kroner. You need to go on the 3D view
and I can click on what X4. And yes, the affinity, it is a big place, but
I think it's nice. You can just pull it
on this direction. And on this direction. Here we have this one may be I can drag and move on
this direction also. Yeah. Definitely. We can just
keep a glaze on this area. It will be totally enough. Let's come back on Tuesday. City exists one remove and
only keep these men intimate. And it's okay. So we have finished to
add the main furniture. Furniture on all the
different performance.
34. Project add curtains: Let's continue. We're going to add cartons. So to add curtains on
the different windows, we need to go in
this categorize. And we have also
access, so Rhys, so we can find curtains,
curtains, accessories. So when I click here, I have different
different models. And it depends about
what you want to do. You can also directly select
one of these element. You have keratin pearls here. You have also directly
a complete curtains. If you go on this area. The things that I'm
going to do, it. You can make every scene, but you can also just put some little element
for your curtains. So let's take an example. I'm going to show you two type of two types of possibility. So the first possibility will be to just add a
curtain using e.g. this one. Or if I just
continue using e.g. this one, and I can
just go left-click. Left-click. I can have this type of element, as you can see. And I think it's
not extremely good. I'm going also to yes, so I can take one of
these tracks here. Sometimes you need to wait. I'm going at the same
time, use accessories. Let us come back on curtains and also
curtains, Paltz and roads. And I have different
options. Just here. I can use a transpose
lie, e.g. this one. And I can drag and move on
this direction and pull this one just on this area. Can drag and move
maybe about the size. It's perfect for
this type of window. And let's duplicate
this element. So click here, duplicate and position of trust on
this area with this window. As you can see, I need to move this element and
move this element. Or I can drag and
move this element. Maybe I can reduce a little bit. F and f here will be on the top, but can read this little beads
are sitting with a wide, Let's radius with a value of 50 and positions is on the top. After I can drag and move liter
this element. So perfect. I can take this one
again and duplicate. And I can drag and move
on this direction. Drag and move on this
direction position. Yes, Josie's here. Click. And maybe on
this area as a window, a difference, if
I go and sitting, I can just change the white. 100 centimeter. So now let's add curtain. So you cannot two type of
a cotangent can just put zero turns or you can
use trap a railroad. I'd captains after, if
I just come back here, I can see leak first. There's just something like Z's left-click and put this one. I think it's
definitely very big. If I go and see things, I can change the wide dress. Let's redo the wide with 60. I can keep this
eight and I can read you'd literally be
to a torso with 20. And I can put this
one on this area. After I can duplicate
position this element here. I just need to check
something on my 3D view. Recenter the view. And I can zoom a
little bit on this IR. Just need to check what is
the best, the best position. So I think this one is best. Yes, I think this
one is the best. So if I come back
to my 2D view and need to respect this direction. So this is why I need to click here and create a rotation. Just like this. Maybe I can. Flip little bit. Yes, I'm this direction,
it is perfect. I can position
these two elements. Now, let's duplicate. Click here, duplicate again. And position of first element on this area can crack to rotation. And just flip. Yes, dress like that. That can duplicate again. Position and other here. I can flip dressed on
this area, it's perfect. And I can duplicate again. Drag and move. Flip, invert,
and duplicate again. Drag and move on this
area and just flip. So this is a first type of
things that you can do. After just a single
type of things is you can see two different
type of chart turns something very bicycle can continuously leak
to one of these. Let's take e.g. this one. I can see this one or maybe
I can select this one. So dressed, let's
select something. Yes, in y's this one. And I can drag and
move on this area. The aim is to
reduce IF2 options. I'm going to go and
see things and rigid the wide budget value dress, let's reduce with
40 and position once directly on this area. Just like that, can zoom little bit and yes,
it will be perfect. After I can duplicate,
click here. Duplicate. And position this one just here. Yes, you can just
snap on this corner. And I can repeat this
type of process. But first I need to
select my 3D view. I can enter on this direction. Turn axes. As you can see, it's not bad, but one of the problems
that they have is position. So I need to take
this one and drag and move on this area. First. After I need to change the size
of this element. So if I add this element, I need to go see teens. And I need to change the eight. So I can change
the eight up until two upturn this type of render. I can go here. Change my view. Yes, Perfect. I need to drag and
move and change or eight again, like this. And when you obtain the type of friend
dose that you want, I can select e.g. this one here. And I can just press Delete. Now I can take this
element and I can duplicate and
position this here. This thing that I'm
going to do first each to go on this area. Um, I can just go on like
2D view, it's better. I can check this one sittings and I have erased
from flow of 220. I can repeat this process here. First. Sittings, race from flow 220 effect. And I can also
click on this one. Sittings and rest from row 220. It is very important
to do this work. It's not going to match
properly. So 220. Now I can position right, my different curtains
so I can zoom, I can snap this one just
directly on this area. I have the right dimension now. And I can just duplicate. I can also click if
I want on this one. Sittings, I got
erased from floss 65. And if I just click on this area seating
65 or so. So perfect. Now I can just duplicate this element and drag and
move on this direction. And I can position this
one on this kroner, can just create a
small rotation. Maybe, maybe a rotation on this direction position
this here. I need to check. Let's click here, invert. And I can repeat the
process, duplicate. It's not extremely easy
to position clock turns. You have different ways. This is one way that
I can show you, but you can try
something different. I can click here, flip
and duplicate again. Each time you need
to drag and move. And position also,
turns on this area. Click on this one.
Crowd to rotation. Not done this direction, yes, and this direction, it's better. And just snap here and click
on this one. Duplicate. And positions is here. I can just flip dressed like
this. So this is two-way. If just for the style, you can just position
on each shortens. But you can also position
this element here. I'm not going to do on all the window because it
can be definitely longer. But I wanted to
show you two type of process with two
different cartons. So now I can use my 3D view. So first things to do, I can go in works row and
let's go into the bathroom. You can obtain this type of render maybe in the bathroom I can read you'd
literally be this one. Yes, I think I can reduce it. There'll be this one
because it is a bathroom. So race from floor, I can increase with
probably AT and I can change the ate is
maybe 100 for tea 88148. And even here I think
I can reduce with me, I can make some adjustment. 90.188. I can click here settings 178. And just AT. So this is why it's useful
also to work some time with this type of view 90. So perfect. So now
you have this view. I can go in this room. And yes, it looks nice. I can turn go and
this area looks nice. Maybe I could drag and move. It'll be tons, right? I can go in this area also. And here it is a
same type of glands. We have the keratin, it's little too big. So definitely I need to
change the settings again. And so age is
definitely a little b, so I can reduce and makes
them think like 240. And maybe I can erase like
6240 are dressed for 240, 200 soft t and four. And I can repeat the
process settings. So as I explained, it's
little long to crack curtains that I want to show you the principle of
four bits can be long. You can add an
element here just to position the characters. 204.
35. Project add lights: We are going to add a light. So it is also possible
to add light. I'm going to zoom little bit and click directly on categorize. And here we can come
back with object and we can go and
select lighting. I have multiple option phase Steve and novelty lie
gather and lighting, indoor lighting room lighting. The things that I'm
going to do first is to just come back on indoor line team
and just position a small table lighting on
this area so I can use table. Zoom little bit. I need to select
something not too big. So I can just check maybe, maybe this one or maybe I
can find something smaller. Let's just try this one. Yeah, I think it will be great. I can just use my 3D view. And I can select this light and drag and
move on this direction, and drag and move
on this direction. This is the first
slides I type position. After to do this work. I have also uses bedside clump. You have multiple option. I decided to put this one, but you have also other
options if I sell it under 18, you have selling ninth
floor lighting lighting, ablating acidic
ceiling light tip. I can have passed whom? Sending Don line stare,
setting flashlight. I have all these
type of options. I'm going first just to
go and bathroom lighting, position something
it's pretty simple. Bathroom and civic,
just something basic like can be this one or this one more day on glass bathroom or this one. I'm going just to
position this one and in the middle of my bathroom
like around this area. After Let's walk them
all with living room. So if I come back, you have
ceiling D9 enter covered, so chandelier and
pound on flight track. Or these different options? Maybe I can position I can maybe I can
position the channel. Yeah, maybe I will
add that after. I can just delete one of these. Put just on the
top of the table. After this is a pendant light
truck and spotlighting, let's apply a spot e.g. on this area with for a month. Just like that. I can continue with this one. And maybe I can try another one. Just here. If I go in zoo bedroom. You have also just basic selling D9 TO and I can position e.g. multiple in the room. You have also, maybe I can use one of these
and position e.g. once here and positioned e.g. once here and fall
on each rooms. Just like that. And I can go on this bedrooms. And dragging moves the
same type of phlegm. Just like that. I've
taught to do this work. Let's take a glance
on the 3D view. One of the best things to do. You can see your
element just like that. So best things to do it to
use a wax hook with you. I think I have this rule.
Maybe I can redo it 1 m 60. You can find this
spot just here. If I want to change
little bit location, I can change the location. As you can see, the CEJ, it's not extremely useful because I'm directly
on the wall. It's better to change
on the 2D view. If I click on this one, I can also have
access to sittings. And if I want to
increase vice on per land and increase the
wine, it is possible. Let's make some
seem like 30, 30. I ever saw eight. And I can increase also
in this direction. But you will lose liters. The ratio after depends. I'm going to keep the basic
things are just terms here. I have this element. If I go and see things
in this example, it's possible to change e.g. length eight and whites. So if I click on length, I can, as you can see, I can click on land. And I can change like that. But I think it's definitely
not extremely good. I'm going to come back. Your raise from flow. We just need to keep this one. And it's not possible to
change the size on the top. If I just go out, router can click on this one. I think it's located.
It's not really good. I can go and see things
raise from flow and it's, it's better if we have a roof
in a different position, but it's too much so I
need to remove this one. Can remove this one, just come back, select 2D. Maybe I can try,
you know, del one. If I sit exists one, I can click on my 3D view first. And we have this element. And if I go on settings, first, I need to
click on this one. And if I go and see things, as you can see, it is
also rest from floor. And it's definitely not, not good in this example again, because it is to the size
of the roof is position, is too low, so it's not possible to position this
type of element. I think in this example, I will come back
dressed on lighting, indoor lighting,
lighting and weld size. You can also position elements
on the wards if you need. Or I can come back
on indoor lighting. Maybe put directly
the sense that this, I can click on this one, duplicate and Boise shine
directly on this area. Now, let's come back
on the 3D view. I can go inside, go inside this room, e.g. and I can take your
glands on roof. Let's set it to work
so it's better. So as you can see, it's nice. And yes, you can see the
different spots here. If I go dressed on z's
whom it is the same, you can find different spot. So it is perfect. And if I go in the bathroom, I can see this
pattern also perfect. Let's come back
onto the 2D view. Justice element. Normally at position
two elements, I think undo action. Hey, sometimes this one anymore. I can duplicate first. Just laces.
36. Project edit materials floor: Let's add a materials
on the floor. So to add materials
on the floor, we need to click on this one and we can change color for materials
are directly, we can pick, can
drag any materials. I'm going first to zoom IN. Different type of
categorize can be e.g. tiles and deepening
of what I want to do. Maybe I can position titles
just on your living room. And I will do something with wooden materials
on the bathroom. If phi city exists, one drag and move, I can position on my living
room and I think it's nice. I think I can put this
one also in the bathroom. So left-click, drag and move. And inside the best school on
the floor. Just like that. After, if I click directly
on one of my room, you can find the
wound tap living and directly we can find
these materials. If I click on the Materials
I can remove or I can use my material teachings
are replaced. The materials. If I use material sitting, I think I don't need to
do this here. If e.g. the size of the tile is too big, I can I could reduce, make something like
50 per cent if I want to reach the size
here to keep the ratio, I can tape 50 or so. And thanks to that, I will have size for this style, smaller. So it depends about
what you want to do after I can create
to offset also, to see where I'm going to start. If you want to have a
really small things, you can until 20 per cent and I can enter 20 per cent
also, just like that. Let us come back with 100%. I'm going to click here. Yes, like this. I think it's nice with
big element here. Now, the second type of materials will be for the
two different bedrooms. I can come back on materials
change style for a wood. And I have this type
of PVC, PVC element. I can continue, maybe I can
see exists one or this one. Maybe this one also. Let just left-click, drag and move inside my first bedrooms. I can do the same left-click and drag and move inside
these bedroom or so. Perfect. I apply these two
type of materials. Now it is same if I want, I can click on one of this
room and materials options. I can remove some materials. Choose a different materials
if I want to replace. And material sittings one
more time, I can scale. So if I want something smaller, it is exactly same. I can tap 50 per cent. I can take 50 per cent and I will add something
definitely smaller. I can also make
something bigger. If I take 200% or if
I take 200 per cent. Just like disease,
or in this example, 100% was great or so. So this is why I'm going to
come back with this element. And this element. If I just come back to my
design M first design, we can find the leaving perfect. We can find this element
perfect, this element. And this element.
37. Project edit materials walls: Let's add a materials onwards. So to add a materials on words, I can select the materials
that I want and then drag and move directly
on the different words. You just need to be careful to put this on the right position. So it means inside
the door and not outside or inside the wall
and not outside the word. First, I can select
materials here. I have different options. Just change for, let's start with the best form
because the bathroom, it will be little different. And I would like to
tie materials so I can click on the
materials change. And I guess it's
different options. If I just continue, I would like to make some
similar like this type of tiles or this one can be
very interesting or so, so Entrez go left-click
and drag and move. And I need to put
this inside the war. Drag and move. Here
you have this. Well, I need to
select circle inside. Select here the sacral
inside and just drag and move just on this area in
Silesia separately inside. Let's just check
the render 3D view. And I need to go inside
directly my bathroom. And I check, I think it's
nice. For robust form. It is definitely well
decoration and it's perfect. So let us come back
outside with this 2D view. Now it's the next step is to
change and use wallpaper. Can use different type of
wallpaper for the bedrooms, so two different color. So first things to do, Let's put a specific
color of wallpaper, e.g. on this bedrooms. And I would like to apply this orange and go
inside, track and move. Drag and move when you are here, don't forget that you
have also this part. So if you just drag
and move only here, you will forget
this small element. So don't forget to arrive
also on this small element. Now let's put another
wallpaper or may be on. Yes, I'm just sick on bedrooms. And I can use this one, so cream and left-click, I can zoom and go inside and dress he also. So it looks nice. Let's
check with the 3D view. I can use walk-through, go inside my first row. This one thing, it's okay. And I can go on my
second room, go inside. And yes, I think can be okay. I've taught you have
multiple option. You can try different scenes. I'm not going to show you really meant it depends about what you, what you want to
position. Just like this. And after maybe four
maybe fossil living room, I can just add a paint so I
can just set it to color. Something very basic. Like maybe like not shallow, not read, but something
little like this, you know. And I can try maybe
this one, this one. Maybe I can try. Maybe I can try this one. And this is the same. You need to check that you
won't forget anything. So I can position
first on this side. Same left-click on this side. So don't forget you need
to position once here, you need to position
again on this area. Zoom literally be to have
access to the two circles. Left-click also here
on this circle. Oops, let's come back
and left-click again. This one, and left-click again. This one. And left-click again. This one about cell wall
outside we will just keep. So why scholar? I'm not going to put I
think something specific even if you have different
type of odor materials. But it's more for, it's not too much for
the world's wealth, some elements, but
it's small to create. If you create to pass
in is things like this, you can use this
type of materials. Or if you create a world outside or outdoor words can be totally fair and you
can use this one brachii, different type of bricks. But fossil world outside
we will just keep. So why Scala? Just
check that we have positioned materials and
color on all the words. I can go inside
civic work through. Here, it looks nice. I can just turn around and checking. Everything is okay. Everything is okay. We have position, color on and materials on all the
different words. So it's okay. So after same at any moment
you can click on one of these words and
you can find side1, side2, n. On one of this side, we will add some
materials that we choose.
38. Project render interior: I've taught us
that we can create exploitation of
this type of work. So sensor camera. And after to set the Camila, we can make different
type of use and create exportation
of this part. So it means of the interior. So as you can see step-by-step, we have seen how you can add
words or outdoors at Windows gradual different rooms at furnitures are all the
different homes step-by-step. How you can add cure tense, how you can add light, and also how you can add
different types of materials. First things to do, you can find the different
render or we seize. And thanks to that, you
have a sketch render. You can have a morph
sketch render with Carlos. And we have this type of view. After you can also
edit this display, if you need Show
grid show symbol, you can do is activate symbol. If you select e.g. this one you can also do
is activate at any moment. So labels if you need, you can also this activates the dimension I've done depending
of what you want to do, you can do is activate
some element. I've taught to do this walk. I can go directly in my 3D view. So in my 3D views, MY will be to set the camera. So by default, I have the
camera random belt one. And this can be random but
to the camera random but one is rigidly rally view for the
camera around number one, just click on this View, it will be perfect. I can re-center. Perfect. And that camera after, Let's make a view on e.g. the different room first, maybe I can just create
two camera view for. I can see my camera
random birth to hit speak outside can
be random but two. And if I select this area, maybe I can make like isometric
view. Just like this. Yes, just here. And if I select on this area you have chador cutter width swirls. If I don't apply
cattle wild swirls, I won't find inside. But yeah, I think it's I think it's good
because I just want to walk with the intaglio at this step so I can
apply why not? To waste words that Camille? So now let's create
a new camera. I can click Plus can
Mira, number of sweet. And let's go into first room. I can change for work
school and just credit to view of this room after you
can create multiple view. But in my example, we are just going to
create one view pair home. So first I can see it exists view and update can be around. Maybe I can change literally
beat so direction, yes, dressed like
this, that camera. After I can I have the ceiling. If you just click here at any moment you can do
is activate selling. But I think definitely
it's great. The other so shadow and I
think definitely it's greater. So to use a shadow and
we can drag and move depending of where
will be positioned. So light, just like this. Now, let's create a
new camera so that this camera click Plus
crowds that can be random. But for with ischemia
and number four, I can select a view
like first form. Just like this. I
can move inside. And I can see it exists view. I think it's nice that camera to save this view and then click
to create a new camera. This is known as academy random, but five, and I can select
the signal in the room. I can zoom little. I would tend not to have
this type of UT will be create that camera
to save this view. And then I can select
another camera. Click Plus can be
random brush six. And let's make a view
dressed of the bedrooms so I can go inside the bathroom,
fresco left-click. Maybe I can turn
on this direction. And that's it. I can just create this type of view just like that. And that camera. So now what you have
exactly six view. If I just click on this one, this is my view from the camera. Random bell one. Q follows
the camera random brush, tool, number of sweet inside. Number four, number
five, and number six. At any moment, if we if I
just come back like yours, can be around maybe number
or sweet with this, you can also change the
light and scenario. If we need, we can go during
the Nigerians are light. And if we need, we can also change here. So Environment,
address click keeps. This type of environment. Can go on back. Siliceous my first camera, you will be able to
expand the image so x bar t match to the first. Here we just keep as D. If you want to export
in HD for k of p, d, f, you just take credit and you will
be able to do this. And to DSLR JPEG, PNG JPEG. And I export my image, can take a little time, so I'm not going to do this now. I will do this
after orientation. Let's select landscape, select other thing we
can keep this ratio. You can also apply flown them
if you want or scale bow. If I. So here I
have the dimension, but if you want to
remove the dimension, it also possible if
I select my 3D view, now you have the cure and tango, I can change with
my camera 1234. And each time you
see league e.g. the camera one,
you export image, then you're way to cities or
camera to UX, bottom edge, saying cameras where you
export image can be off for your exports image can be
around five and cameras six. And you repeat every
time it's a process. Again, I ever saw the
film type of view like the form you'll
notice few end mall.
39. Project create garden: Let's continue with the garden. So we're going to credit
the base of the garden. And for this we
will use Sha phase. So extremely important. If you use e.g. Joe words, you will
have everything on the same levels and at the
same time you will have world. So here we are just going
to create soft phase. So click on this
tool draws your face and their aim is to create a
different type of rectangle. I can zoom little bit creative first rectangle
and z direction. I can credit to offset dress
here I can enter a value, I can maybe zoom little outside. And I can tell
first value at six. And validate media, we will make some adjustment probably after. So here I can apply a
value of four validate. And I can go in this direction, just make yes, I'm
seeing like this. And after I can come back on this area and it's whom
little bit. Dress here. So after I can press Escape, I can make some adjustment. I can drag and move
this value six, but on the other direction
here can drag and move it, zoom little bit, fake. It's not extremely smart, extremely easy to make, to use perfectly shore face. If we want to make something
with big precision. I can zoom on this area
and this is the same. I can make some adjustment
just like this here. And I can make an
adjustment here. You have the same size on
this area, in this area. So I think it's nice. Yes, let's keep this. Maybe I can increase little bit, put four, maybe 4.23. Most important thing
is just to show you is a base and try to work. Yes, just like that. I've taught to do this work. Let's click again
on draws your face. We will create the terrorists
complete theorists on all this area. But we will do this after
first things to do, Let's continue withdraw rooms. And I can click on this one. Drops your face. I can
click on this one. Just snap here. Santa can arrive or wrong this area and just
come back here. After I can press Escape, I need to click on this element
and make some adjustment. The same I can click on this. Any men make some adjustment to have element perpendicular. Stress daisies. I can use again, draws your face and I can
click here, snap here. It's not the best. It's this again. Click on this path, click on this part. Drag and move on z direction. And try again. Move dress here. And I can press escape. Need to make some adjustment. Like this. I'm in, I'm
walking horizontally, so it's OK. And click
on draws your face, I can draw and no
dose your face forms this part to this part. Try again, move
in this direction and drag and move
in this direction. I can press Escape. Click on this your face
and make some adjustment. Yes. Trust legs out and cut my last shot
face on this area. So draws your face. I can still exist sprint. Then I can sit exist print, and I can drag and move
on this direction. Let's make some adjustment
after you can press Escape, click on this one. Yes, Perfect. Maybe
I'm going to extend little bit on this area to have some seem
a little bigger. Yes, Perfect. I've
taught to do this work. I can apply your material, just let supply
dress material on. All of these are rare. Materials, select
Odell materials. You can continue a little bit. And we can see the eggs
is Grace materials. But I need to position this on all the different self phase. Just exact 3D view and
just check outside. Perfect.
40. Project create terrace: Let's create terrorists. We are going to
create a pay raise. And for this, I need to draw your face first on this area. Draws, draws your face so I
can click truce your face. But one of the problems after I will have
to make adjustment, but first, I can click
on draws your face. And I can go left-click
on this area. I can go left-click here, and then I can go in
the other direction. It's not extremely convenient. I'm going to do this again, left-click on this area. I think I can walk with a
value of sweet like that. Then I can go in this direction. And when I arrived there
on here can come back with a value of sweet and
just press Escape. I need to make some
adjustment. Just like that. And on this area, I think it's nice, yes, just here to work
horizontally and vertically. One of the problem if I don't
want to have problems and need to click on another
surface. So e.g. you have this surface, I need
to make some modification. What type of modification
I need to do? I need to create an
audio element here, make some adjustment
just like that. And I can drag and move
on this direction. And on this area, I need to draw no,
they're soft phase. And click here. Click here. I can snap to the sprint, snap to this point to create another rectangle and
just press Escape. Let's apply materials. Click here materials. So first, let's select
against a grace material. So this one on this
small rectangle. And for my theorize, I can select a different
type of materials. Flow regular concrete tiles. I think it will be interesting
for what they want to do. Maybe I can select something
a little different. Yes, this one will be
great for my Erase. I've told it to just add
a little furnitures. I can go and foreign trios. And you have exterior garden and outdoor
exterior ON ganglion and outdoor garden furniture or gallon accessory
garden decoration. The acidic furniture, or a
golden table and chef sets. Let's select this one first. And position like this one first, just here. After all, they just come back ON ganglion furniture sales. I can also have table furniture, Schiavo, gallon done so far. Maybe I can add a sofa outside, like fries on pearl. Maybe this one,
left-click position, one. So far on this area. Maybe here. Perfect. Let's come
back on garden out. So counter and accessories. If we want to do an element down then decoration. So sometime we have
some trouble like this. So it extremely convenient we
need to repeat the process. Gather node DO. I'm not going
to add a lot of things. Maybe have low, oh, here it is. Again, the same option. Maybe I can add this one
just here. On this area. I can click Create to rotation on this direction and
position dress here. I can also add plant
if I select object. Directly I can apply plant. You have some options. Why not to put these
tropical plant? Yes, perfect. I can, I go No doubt. I think this one is little too big if I go and see things. Yes, it's perfect because
I can originates the wide. So let's redo the wide first. And let's reduce
the length or so. Maybe I can put 100 here, 100 and I can read you
ate it, just put 200. And thanks to that, I
can drag and move on this corner and use my table. I can put this element just here and put the
table dress here. So it's okay, I can
take a glance 3D view. Just here. As you can see, we have openings. Is this worth? I can change the
parameters and you have cutaway words and you can do is activate
cutaway, it's worse. And yes, I think it's nice. Maybe I'm just going
to invert the plant. So it means this plant will be here and this one will be here. If I select this one,
you have sittings. I can also change
so wide and land. Let's read you a
little bit, 130, 120. And position displayed
on this corner. Yes, perfect 3D view. So it's not possible to make something extremely
advance about the garden, but it's great if you
want to craft erase. It is great if you
want to create pasture or these type of things. I can use words row, go outside and see surrender. You can also drag and move on this area to change position.
41. Project add elements garden: Let's continue. We
are going to add the element structure element on this garden structure
element and this garden. So first things to do I would
like to craft to pass here. Hence is a reason for which I can use draws your face again. And using draws your
face and need to go to Create big pass from
this part to this part. And I can go left-click here. And arrived here 220. I think it's nice. I can arrive verticality
and snap to this point. Then I can continue to
hundred 20, perfect. And I can press Escape
to finish this element. The next step will be also
to create another path here. And I can select one more time, draws your face and
start from this point. I can go to this point,
grant this direction. And I think I need to
apply two meter and yes, Just come back here, swim at 80. I can press Escape. So thanks to that, I can
create something like this. So now I need to
make some adjustment with this, with this grace. Or if I add material to material will be mixed and it's
definitely not good. So this is why I
need to click here. And I need to, oops, not dragging
moves, this one. Let's dress. Come
back. I need to. Yes. Now it's a bit tough. So
I need to click here, take this print and drag
and move in this direction, and take this point, drag
and move on this direction. Perfect. Now I need to try
and move on this direction. Snap here and drag and move in this
direction and snap here. Perfect. I know I
have just this one. This one, and I will
have this sweater, so it is perfect. I can change the materials. Let's put the same materials and here I can click on this one. Materials or I can
just to come back, if I click on Materials, callosities here is
definitely not really good. So I need to come
back on this one. Materials. And it is outdoor materials. Can continue. And let's select
it was sent stone. And I can put this one here. And put this one here also. I'm going to continue
because here I would like to put some sing for, I would like to put some
sin directly for cow. Let's come back directly
on trust your phase, cross your face
and let's click on this area and credit
again a short phase, this one to this one. Oops, it's not good. Let's do this again. Across your face. Click here. We can just snap to this point. And then I can create
some seeing with 4.50, around 4.50 maybe I
can increase little bit just like that. And I can just press Escape. Maybe I can extend
a little bit on the right. Yes. Just exits. I've talked to this work. I
need to make adjustment on this element and
take this print. Try again, move in
this direction, and takes the sprint drag and move on this direction also. Next step is to come back on my materials and drunk and
moves the same material again. So it means this one. Perfect. Let's apply
little decoration. Again shot. So I'm seeing in my categorize trust
church, plant. I just want some
seemingly small, I think this one will
be great, like e.g. this one will be perfect. And I can position once here. If I click on this one, see things that can change
your length and the wide, Let's decrease little bit. For t. And the buds or lender can decrease
little bit with 40. So thanks to that,
I can position one on the left of the entrance. And I can duplicate and position an order on the
right of Zen trends. Just like this. If I
just come back to plant, maybe I can make some
simple little bigger. Like Swan. It's this perfect.
I'm going to put this plant and put
this one just here. I can go into the sittings, maybe eight is little
beak we can reduce, can reduce with a value of 200. Here I can redo tool. So let's put 140. And here let's put 170
and put this one e.g. here on this area. And maybe I can add
a last element. You can also remove plant and
directly you can tap three. You will have also
interesting options. Maybe I can put two bamboo
tree just on this area. I think it will be nice. And if I click on this one
sittings one more time, let's work with lanes 70. Let's walk with
wide 78 may be 160. And put this one just here. Perfect. I can select my 3D view. I have a little trivial
or budget position. Why is this element
are not on flow? I can make some adjustment. So acidic Tuesday again, if I click on this one
sittings, race flow, this trench, let's put zero. And click on this one. Sittings race flow, It's okay. Click on this one
sittings race flow zero. Sometime it's little strange, can have this type of friend
or I can click on this one. Be correct to rotation. Yeah. I think it's
a bit like this.
42. Project add trees garden: And let's add the trees on the garden so we can
add more elements in London and frostings
to do it, to add trees. I can select again, furnitures and things are best
things to do because yes, you can find planes here. You have different options, but sometime you won't find
anything that you want. So I can advise you to come back here and
directly tape tree. And thanks to that,
you can have real tree-like your cherry
tree, maple tree. You have this type of options. So let's select this one, e.g. and put a big tree on this area. After I will change. I will change later, after maybe the size
I can put ones here. Let us continue. So this is why I'm going
to tell you that it's not perfectly
convenient for outdoor. For a simple reason, you don't have to match
things in the library. You have sings,
but not too much. Somehow mapper tree, maybe
I can put ones just here. Let's continue. Maybe I can put an order again
on top-left corner. Maybe this one. Yes. So I can position this
tree on this area first, I can click on this one setting something extremely
important on the tree. It is great because
definitely you can change the size at
your convenience. So let's make something
with 200 centimeter. But the way I'm going to
put 200 centimeter or so. Yes, 200 centimeter. And a bunch of eight, Let's increase literally beat next 200. Maybe I can increase
the wide weighs 220. Positions this
tree on this area. Now I have this one around to position that can position here, but as you can see,
it's literally beak. I need to change the seating. Maybe I can work with
some sink like 300. Maybe I can work lives when
we're 20, Just like that. But to eight finger can keep 400 and position this
on discount now. And I can continue city
exists one sittings. Let's put e.g. this dimension. This dimension. I can read it again. Yes, dress Lexus. I've talked to do this walk. I can select my last tree, so it means this one
and this is same. You can also scale. If you want, you
can directly click here and you can
scale your sweat, your convenience when you have something like a treat
is not a problem. You can also use this one and you can just
scale like this. It is also a possibility. If you want to have
more precision, you're going sit-ins.
And you can change. So different elements here. But it's not possible
to change the ate. So if you want to
change the edge, you need to change the
eight on this area. So it's okay for that. After if I continue
a little bit, maybe I have more plant. It is more decoration. You have more decoration, sings. It's not really planned for. I would say, maybe I can
put this one on this array. I will be more
decoration perfect. If I just come back
to the category, I can delete tree categorize. And you can find also garage
and storage architecture. Plant. A garden and storage is not exactly
that they won't address. Come back on garden and outdoor. So this is a garden furniture. But if I came back,
I can also have a garden stricture like this
can be decoration element. So why not to put to
play out e.g. this one? And I can put this
one on this area. I've taught you as our
true density curve. So gazebo way not to select
too light cure. One of these I ever
found stricture. Kronos access a story. We can also add a small cool, I think it's the swimming pool is little big, but
I can read you. Click on this one sittings
and we have lengthened wine. I think I can make
something just sway and dread and a bad zoo wide apply, sweet Android also.
It's perfect. I can drag and move this on this direction while
we're on this area. And why not position smart
swimming pool just here. So we are not going
to detail too much. I'll definitely this software so best is for interior design. So to create room, to create your house anterior single sought to
extend with terrace, balcony, all these
type of things. After to enter too much
in detail in garden, it's better to use a different type of
software, in my opinion. First, let's see
the 3D view again. But it's great to just have a view of different
type of declaration. I think I need to
just change position. I have this element and
Crato rotation 90 degrees. I can put on this direction. If phi cities are sitting, I ever saw length and wide. I think it's big.
So let's re-do it. Let's put 240 and
above the wide, Let's read your torso. And let's put 228. It's either too much, Let's put 280 exits.
43. Project render exterior: I've taught to do this, we have finished
and last step is to create different
expectation parameters. A digital environment with
zeros and also a garden. So first things to do
as, as explained before, you can take your planes
with the sketch view, sometimes theorists
thing, and you can just export the image with
this type of render. So it is useful because
you can have different, different, different type
of use with this one. After you can click on
this one, if you want, you can export your
image in G beggars. And the final view,
just like this. After that, Let's environment. So here if you go and
export image again, as, as explained, you will have also information that you need. E.g. I don't want the dimension. If I don't want all
these dimension, I can remove this dimension. And now if I click
on Export Image, As you can see, I won't
see any dimension. Know if I want to
have more dimension, I do the opposite process. Should dimension lines show
interior dimension line. And something interesting, you
can also add on dimension. So it means you
have show labours. Also, you can show
syllables are so if you need and you can add
horizontal levels, you can also show
short dimension line. If I just click on
this area here, you can find draw dementia. And if I click on
Draw dimension, it is also possible e.g. to snap to this sprint
and snap to this sprint. And thanks to that, you
can add so lined up so I can snap to this sprint and I can
snap to this print. I can add also more
dimension, e.g. this one, oops, I can
use draw dimension. And I can zoom little. Beta can snap just here. If any share it's not
extremely convenient. Maybe I can snap to this one. Why not snap to this one to
show that we have six meter, I can snap to this
one, to this one. And you can show a lot of
dimension like this also. It's more useful outside
because outside by default, we don't have all the dimension. Just like that. So this is also something
important to note. If I just come back to the view. So now I can select 3D. And we have put different
type of camera. The things that kids do. It's two things that I can do is directly to add
a camera raw form, a view from the terrorists and a view from general Camden. So this is my camera,
random bell one. Fossil cameo random bell one. Maybe we can just come
back with the camera. And number one, maybe we can just come back with getaways. And if I turn the axes, click here generally view, maybe I can have
this type of view. Let's remove this one. Maybe we can have
this type of view are really are general
view like this one. This will be forthcoming
random bell one. So after we have the camera too and we have
the academy or as sweet inside cameo rough for
camera five, cameras six. And now let's create
a new camera crews. And I want to create a view from the terrace so I can zoom
literally beat here. Works who go outside and
just click on this area. And I think definitely it can be a great view from
the terrorists. And update the camera to save. Let's create another
view of home garden. So create a new camera again. And I can move in this
direction. Dress here. Maybe I can create to view
dressed in front when we enter in the house. So it means it can be something definitely
this view can be nice. And update camera I will
obtain this view also. Don't forget, you can change the light at the
moment of the day, you just drag and
move this print. And less things to understand is also
the lights and airy. So if you want to
change environment, you can change, you
click on this one. The best things to do is to
activate night like this. Let us come back resist view. And with this view. So it's okay for that. We have finished. We can just
come back to the 3D view. So it was a great project to aim of this project
was to show you how you can use flow
step-by-step to crowds, a design of a house. So first things to do,
It's to crowdsource. Seconds seems to do. It's too crowded room. After you can give a different information
about the type of room, then you add your PLAs. So doors, you place the windows and you have
all your base structure. I've talked to have all
these based structure. You can step-by-step at
furniture to each rooms. So you select living rooms
and bathrooms and bedrooms. And it can be a kitchen, and you add your
different furnitures and decoration elements. I think it's the best
things to do is to respect the step that I used
in this example. After you can add complimentary
element like chalk, tens of decoration element, you can add light, also an afterthought
to do this work, if you need, you can
extend to the garden. It depends on your project. You can extend
with the pressure, you can extend it
with the terrorists. You can extend also
is a complete garden. Even if I was a complete garden, you won't have a
lot of possibility. And you can make really
amazing project. And then you will export
your image and to d first and then switch will you sell it so different camera
views that you have. And you can craft exploitation.
 Nicolas Forgue, Welcome awesome students !