Transcripts
1. Introduction: Art gave my words wings in a way. I decided to use what I could do and make something out of that, that helps to bring activism in front of people who might not have engaged with it otherwise. Hi, my name is Danielle Coke and I am an illustrator and advocate from Atlanta, Georgia, and I use art to help tell stories and make complex ideas a little bit more digestible and easier to understand. What motivated me to first start sharing this art from the beginning was simply witnessing injustices in the world. I want to be able to create something that not only is positive and hopeful but also informative, educational, and approachable. For today's project, we'll start with how to identify and choose an issue that matters to you, and then we'll conduct research, and then we'll take that information and translate it to a visual piece of art and prepare that piece of art to be posted and shared with everyone. Over time, this art has impacted me in so many different ways. Without even realizing it, it became a way for me to process through a lot of difficult emotions that I was facing by having to research and dive into a lot of these hard topics that I was illustrating. The impact that it has on other people impacts me as well, because I'll share it and somebody will say, I've been looking for the words to say what you just communicated with this piece. Or I was able to have a conversation with my family that I've meaning to have for a really long time about race, so thank you. I'll be drawing on my iPad, but you can use any medium of art that makes sense for you, and together, we'll create a piece of art that is impactful and helps to illustrate or educate about any topic that is important to you. I'm so happy you're here. Let's get started.
2. Speaking Through Art: Welcome. I'm so happy that you're here and joining me on this adventure. I say adventure because honestly, my life leading up into this point has very much felt like that. In January of this year, I'm sitting with my iPad and really thinking through all the different ways that I could create new pieces of art. Martin Luther King Jr. Day was right around the corner and so I decided maybe I could make a piece of art that speaks to his legacy a little bit. I sat with my iPad and thought, in what ways do I feel like his legacy has been altered over time or what truths can I pinpoint that may go overlooked? I took those ideas and sat and create an illustration that spoke to that and I shared it on Instagram for all 700 of my followers who are my friends and family. Before long, people were sharing it. That was very odd to me because I have never experienced anyone sharing any of my work before then. As people begin to share and say, I love his perspective or I never considered it this way, I saw an opportunity and thought, maybe I can speak more to harder issues and people would be more willing and open to listen and interact with it if it's pretty. I took it as a challenge and for the whole month of February, Black History Month of 2020, I decided to create art speaking to all sorts of different topics as it related to racial injustice, equity, diversity, and just so many different topics that I came into contact with a lot as a black woman in America. Before long, I was joined by more and more people who wanted to learn, who enjoyed the art, and who were excited about the prospect of engaging with this content in a new light. After February, we started to witness the tragic deaths of George Floyd, Ahmaud Arbery, Breonna Taylor, and racial injustice in America especially took center stage. When that happened, I saw both an opportunity to continue the conversation, but also a moment of grief and sadness at the state that we were in and wondering how these two things could move and operate together from an art and activism perspective. One day I sat with these thoughts, these ideas and decided to illustrate a piece commemorating Ahmaud Arbery and what we learned from that tragedy. That piece was the very first piece to go viral. Ever since then, I continued to create and have that delicate balance between art and activism. It brought me to a place today where I'm able to continuously share art like this with so many different people, not only in America but in the world. It's been an absolute beautiful journey and a huge learning experience. The idea of taking these hard, tough topics and then trying to make them pretty and shareable is a conflict that I struggled with for awhile because while I did want to speak to these topics, I never wanted to downplay the severity of them or make it seem as though I'm making light out of something very heavy. But one thing that I decided to embrace was the power in the strategy of using aesthetics to take these important issues that needed to get in front of more people and use that as a tool to make the art spread even further and wider. It wasn't ever about saying, "This is really hard, let me make it cute." But it was more of saying, "This is really hard. I can make a piece of art that helps to make it easier to understand and then using aesthetics, using color, using themes and imagery, I can make it more approachable for people to digest and interact with the work." It was more of a tactic to help more people see this information and get it in front of them. Often, art and activism are pitted against each other. People say, activism is meant to inspire action and art is meant to invoke emotion, and those are just two polar opposite things. But when the two come together and you have what's called artivism, a term that I've learned about even recently, you have a super powerful tool because you're able to use the power of art that invokes that emotion and the power of activism which moves people to action, and putting those two together really mobilizes people in a different and a new way. In a way like I said that allows you to reach way more people than you probably ever thought you could. I really believe in the power of our artivism and I'm excited that we can tap into that today. Today, I'll be creating an illustrated infographic that talks all about the Freedom Riders. The Freedom Riders were a group of activists from 1961 who took it upon themselves to make these dangerous journeys on buses for the sole purpose of wanting to integrate interstate travel and honestly, integrate everything forever. On these journeys, they drove through cities and encountered dangerous mobs and they encountered violence and vicious attacks. But the hope in it is that they made it all the way through and were able to successfully bring the government to take action in benefit and support of integration. For my illustration, I'm going to basically be demonstrating and illustrating this timeline from when they started through all the cities they went to up until the ending where they were able to successfully meet their goal. Now I choose this topic because I was really inspired by the Freedom Rider group in general. They were basically a group of young people who saw that they, although they weren't super trained in all things related to social justice and activism or any of those things, saw that they had a role and a part to play in the larger story of pursuing racial justice in America. I find a lot of inspiration in the story because it reminds me and hopefully it reminds you that you don't have to be perfect at the topics that you're passionate about, you don't have to have all the right ideas or say all the right things, just know that you have a part to play and you can do your part to pursue justice in any form. I think this is going to be a great project as we go along through this timeline and we examine ways that we can pull out super important key topics and make them more easy to understand, but also illustrate the journey and how the hard work lead to reconciliation in that way. Even if you're not exactly sure what issue or topic you want to create art about, that's okay because we're going to walk through how to identify and pick out an issue, all the way through researching and then eventually creating. My hope is that as you follow along with my process and see how I digest information related to my specific topic, you also have a guide for how to feel through your own topic and how to identify key points that you can also turn into art. I would love to see what you come up with. After you create your piece of art, upload it to the project gallery and even better, share on social media so that everyone can see it too. Well, I'm ready if you are, so let's go ahead and get ready for the first step in the process, identifying your issue.
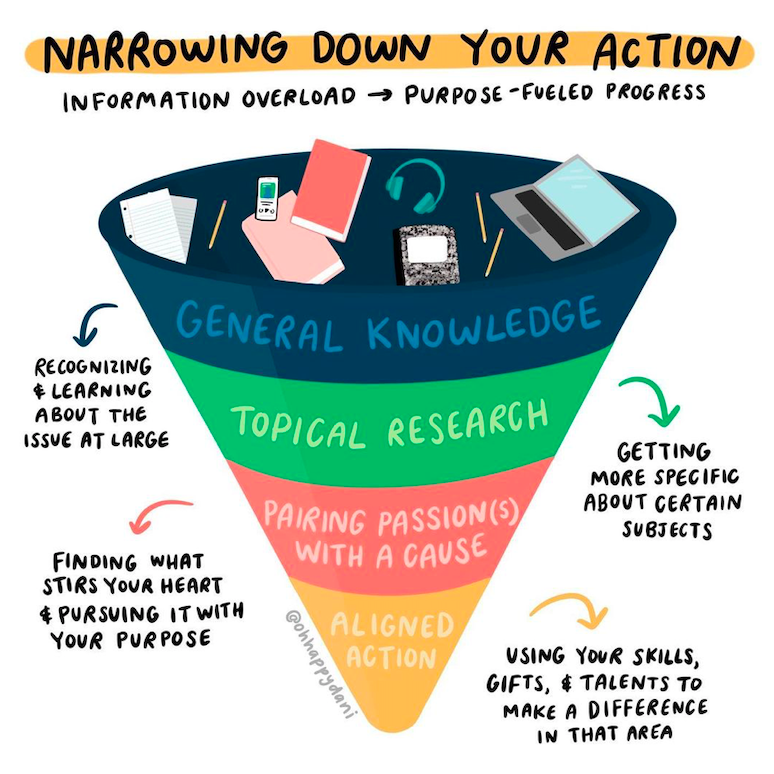
3. Identifying Your Issue: In this lesson, we're going to talk all about how to identify your issue. It can be tricky to decide what topic you're going to illustrate or dive deeper on, and so something that I like to say is, it's super helpful if you illustrate about an issue that is something that matters to you, or is close to what you're passionate about. When you identify that passion, you can also identify a need in that area, so something that you can speak specifically to within your topic that would make sense as you illustrate the journey, or the steps, or whatever you're going to do related to your issue. One thing that really helps me identify and narrow down what specific issue I'm going to illustrate about, is what's happening in the world around me. I do a lot of listening, and I like to say that I'm listening to two different things. One, I'm listening to what's happening in the world at large around me, so what's making headlines? Is it COVID-19? Is it Black lives matter? Like what is currently being discussed worldwide. Then I also I'm listening to what's happening in my community. What are people talking about in my circle and my sphere of influence? Better yet, what are they trying to process through? What are they thinking about? How can I speak to those often unspoken needs or ideas that people are processing through? That is a really helpful way for me to decide what I'm actually going to illustrate, or discuss. This process never looks the same for every single piece, but I can walk through a few pieces where I've used this process of listening to what's happening around me, and what's happening in the world at large, and show you how I identify and narrow down certain topics. For the first example, we can go to this piece right here, why COVID-19 is ravaging Black America. Now this piece was speaking to systemic racism and the adverse effects that it was having on the Black community during the COVID-19 epidemic. For this one, I was listening to what was happening in the world. It was April when I created this, so we were just now learning the very beginning stages of COVID-19, the effects it was really having on our communities at large, and so that was happening in the world around me. But then, in communities people were saying, "Well, I don't understand why COVID-19 is having this adverse effects on the Black community specifically. What contributes to that? I can't really put a finger on it." By listening to both of those issues I said, "Okay, I can create an illustration that talks about COVID-19 and the effect that it's having on the Black community to shed some light on what those disparities are and the root cause of those disparities, which was systemic racism." That is how I processed through that for this piece. Another example of this would be this piece that I call sphere of influence. What was happening in the world around me around this time, which was June 13, was a mass awakening to the severity of systemic racism and racial injustice in America, and a lot of people were discovering that they themselves had a part to play. What was happening in the communities around me, was that people were wondering, "Well, what exactly is that part? How can I do this without getting overwhelmed, but also how can I find where I fit in this grand scheme of things?" In this illustration, I spoke to how you can identify your sphere of influence so that you know what your role is in the larger story. Then I also spoke to how you can positively affect your sphere of influence for the cause of anti-racism, and racial justice through the many different avenues that are presented to you in your own community. What you can do in your home, what you can do at school, and the businesses you can support, and so I gave practical steps through this illustration on how somebody can make a difference in the world around them. For the third example of this, here is the piece that I call narrowing down your action, and what was happening in July was that as people were diving more into anti-racism education, especially people who have never done it before, they were getting extremely overwhelmed. In the world at large, we're hearing about how anti-racism education and the need for it was picking up speed. In my communities I was hearing, "Yes, it's picking up speed and I want to dive in, but I'm massively overwhelmed. " information overload. They weren't exactly able to identify that it was information overload, but that was the part that I stepped into play and say, "Okay, you are overwhelmed because you're experiencing informational overload." I used that opportunity to speak to how you can narrow down your action and take more specific steps to align action within your own community. That is how I applied that framework to this third piece. Another part of listening that helps when trying to decide what you're going to illustrate or what issue you're going to choose, is also listening to what's happening timeline wise. Like, what month are you in? Or what holidays are near coming up? Black History Month was a pretty big part of my story, and it's where a lot of these illustrations first started for me. In reference to the piece that I'm going to do today related to the Freedom Riders, I was really drawing on the inspiration that accompanies Black History Month. In knowing that I want to post this illustration for Black History Month coming up soon, I wanted to tap into that and listen to what things can I celebrate during Black History Month that talk about hope, and moving forward, and really changing systems and fighting for justice where people did that right where they were. Now it's your turn. Let's identify an issue that you are going to use for your project. You can discover this issue through the steps that I took for listening. What's happening in the world around you that makes you want to say something? Or what are you hearing in your spheres of influence or your communities? What are you passionate about? What issues stir your heart? These are all really good starting steps for picking on. You might also be wondering, is an issue ever too big, or is an issue ever too small? I would say, it's not about the size of the issue itself, but how you're going to pick out points and practical steps in the issue that you are going to use for your illustration. That all comes with research, which we're going to do very soon.
4. Researching Your Topic: Now we're going to dive into the process of research. Research is a really big part of this process for me, and honestly, takes up the biggest chunk of time. For me, research often begins with Google. I'll jump right on and search the topic or the words that I'm using to make sure that I've got everything sorted out with the existing definition, what the word means in many different contexts, and just a basic general understanding of the topic at hand. After that, I'll seek out many different sources that are credible, and I'll use that to further and continue my research. I also do some research offline sometimes, I will look at books, for example, for my antiracism content, I'll read books like So You Want to Talk About Race or How to Be an Antiracist, and I'll use these books to find existing definitions, to broaden my perspective on a certain topic, and really dive in deeper to any specific issue. Sometimes, in research, you'll stumble across organizations that are already doing a lot of work in this area, and this can be a really great spot for research as well because they often have a plethora of downloads, PDFs, pamphlets, and things that you can use to go deeper from people who were actually on the ground doing that work every single day. That's a big part of the kind of research that I do sometimes because going straight to the source often proves very helpful and help save time. As I'm researching and I'm coming in contact with all of these different sources and informational resources, I definitely like to compile it all into one big document, so that I'm able to keep track of everything that I'm finding, as well as make sure I'm including all of the sources so nothing gets lost. I'm going on ahead and get started with a blank document. Here's my blank Google doc. I'm just going to go ahead and name it the name of my topic, which for me is Freedom Riders, and then I'm going to go into Google and go ahead and search just Freedom Riders and see what comes up. I really like history.com as a source in general, so I'm going to go ahead and pull this up. This is the part where I go through and I read generally what's going on, what are the key names, the key topics, the key dates. So I see here John Lewis, and we're talking about bloodshed faced in Alabama, and we're seeing the dates that it started, and so I'm seeing a lot of really important points that I'm probably want to keep. So I'm going to keep this tab open and go ahead and add history.com as a source. I'm going to make a section for sources and go ahead and add that one as the first, and then I always hyperlink these, just so I can easily click on it and get that link. I'll go ahead and name history.com as my primary source, which means that's where I'm going to pull information for quotes, and I also want to make sure that I'm using that there, so I can cite each quote that it came from history.com. I'm going to continue on looking at additional sources. Let's see, britannica.com. I really like using a source like Britannica also because if you know it's credible, also, as an encyclopedia, it gives you a lot more in-depth information. I scroll through here, and I see names of organizations that are super important. I see the name Journey of Reconciliation, which gives me context, not only about this set of Freedom Rides, but the ones that occurred before it in the '40s, which will help me get additional context, so I'm going to use those for sure. After scrolling and seeing that there's a good amount of information, I'm going to keep this on as a source for context. So I'm going to copy that link and hyperlink that's as well. I'll keep going and finding more and more sources related to this topic until I feel like I have a good amount. This can last me anywhere from 30 minutes, maybe even 45 minutes, as I'm doing the essential groundwork for the context of my topic. I'm going to keep going and add more sources. Now, that I've compiled my list of sources, I'm going to go ahead and pull from my primary source some more specific quotations. But before I do that, I'll go ahead and point out that I've got a couple of different sources from maybe the same website, and that's also helpful because you'll find that, as you're looking at one link within that article, it'll take you to another link that's related, so I always like to cite both of those so I can make sure I don't lose track. Then up here, I also linked a documentary, because while PBS was one of my sources, they actually had an embedded documentary all about the Freedom Rides, and so I actually sat here on a Sunday evening and watch that entire documentary, just so I could have a better understanding and contexts for the topic. Back to the primary source, if I go to history.com and go to this section right here, so after reading the introduction, I'm going to go in and see if there's any core information that I want to go ahead and pull out. I like this topic right here that talks about how the Freedom Rides sought to test a decision by the Supreme Court. So I'm going to go ahead and take that information and add it here, and this is just going to be a section for general information. Don't feel like it has to be super organized, it's just a way to collect the information. I'm going to put these in quotes, and then I'm going to make sure I put H for history.com, so I know that that's where I got that from. I'm going to pull another quote that was right beneath it that I thought was super important about how, in both actions, what they tried to do with the Freedom Rides in the '60s mirrored what they were trying to do in the '40s, except now it's updated to where they included women in the initiative, and even where segregation continued to occur, that's where they wanted to focus their efforts on integration and these Freedom Rides. So I'm going to copy that information and add it as a second bullet point, and I always like to format it just so it doesn't mess up my entire document because that's never fun. After this, I go ahead and quote this as well, and add that H in there. You can also feel free to find the specific person or source that said this information. For me, I'm citing the article as a whole, so I'm just going put that H and remind myself to go back and get the name of that article so I can add to the bottom of my illustration. I'm going to keep doing that and pulling from his primary source until I have a good list of facts and information all about the Freedom Riders from history.com. Now, that I've collected a bunch more information, I'm going to start looking for commonalities in ways where I can connect this information to eventually be able to pull out some key points and key facts. One thing I'm going to add right above this section is a key, and in this key, I'm going to show how I pulled these commonalities out. The first commonality that I'm going to try to pull out are these dates. Each fact is led by a key date that the author of the article took note of. So I'm going to go in here, and everywhere I see that date, I'm going to go ahead and highlight that. This helps me decide, "Oh, do I want to go maybe in the timeline direction? Or do I want to see if I can do this in a chronological order way in my illustration?" These are just helping me to think through those early ideas of how to organize all of this. As I'm going through this information and have already picked up key dates, I'm looking for other points of commonality, or connection, or something that can help me view this as a journey of some kind. As I'm doing this research, it's sticking out to me, well, the Freedom Rides were definitely quite literally a journey, and part of the art that I create is always pretty literal. When I find a commonality like that, I want to go ahead and latch onto it. As am looking through this and I'm seeing the Freedom Rides, I'm seeing that the first violent incident occurred in Rock Hill, South Carolina, and as I continue to read, I see the original group of Freedom Riders, their group actually split and one group went to Atlanta. So I'm seeing Atlanta is another city, but then I see on May 14th that Anniston, Alabama was the first location where a giant angry mob of about 200 white people came and surrounded the bus, and that's another incident of violence. So I'm starting to notice that these cities are quite literally tied together by moments of violence within the journey. So I'm thinking that is a pretty prominent connection that I can make. Now that I've seen that, I am going to go and add cities as another primary way to organize the information, and I'm going to go in and underline and make red every city in the research. Now that I've completed that part and I have all of the key dates highlighted and the key cities underlined, I'm starting to visualize the way I want this illustration to look. Because I'm seeing, again, that this is a journey, the Freedom Riders literally started in DC and made their way through the Deep South, and so I'm visualizing that like, "Oh, that's a journey." With each date, that's also showing chronology, and so this is happening in chronological order as well. Now I'm at the point where I'm thinking I want to go in the roadmap direction. That is something we're going to talk about a little bit later as I show you how I go through different types of visuals and solidify which one I'm going to go with. For now, with that in mind, I'm going to go ahead and decide what parts of these key points I'm going to pull out for visual aspects. I'm going to go in there, and I'm going to actually type key visuals, and I'm going to italicize these and make them blue. Now, I'm going to go back into the research and identify which key visuals I want to pull out to eventually make into my illustration. I'm noticing that Greyhound is a pretty big visual indicator, a lot of these Freedom Rides took place on Greyhound buses, so I'm going to go ahead and bold and italicized that and make that blue to let myself know that I want to illustrate a Greyhound bus in my illustration. Then I'm going to continue and keep pulling out some other key ones, for example, this angry mob visual is one that happens and comes up often, and so I know that that's going to play a key part in illustrating the journey that these Freedom Riders took. Then I'm going to go through and pick out maybe three more, and after that, I'm going to show you which ones those are, and I think five for this is going to be a pretty good amount of key visuals to pull out for my illustration. Now, that you've seen my process for collecting research and organizing it, it's your turn.
5. Developing Your Visuals: Something that I really like about the process of these notes is that I went ahead in the last section and picked out key visual elements, things that I definitely want to make sure that I illustrate. As I look at the relationship between the dates and the cities and the key points, I'm realizing that I want this to be a visual timeline journey. So for me, I think that a road-map visual is going to make the most sense. Now, I don't always go with the road-map visual. I actually have quite a few different types of infographics that I generally pull from as templates. I'll go through a few of them and explain them to you, so maybe they can give you ideas for an infographic that you can create. The first kind of illustration that I like to do is what I can just call a simple illustration. It'll be one drawn element and it'll be the focal point of the image itself. It'll be in the center and may be accompanied by minimal text above or beneath. This is when I'm trying to communicate a pretty simple idea or one that doesn't require a lot of words to convey. The second infographic type of template that I might try to use is a mind-map. This is when I'll have a central idea, a few words in the middle, and I'll have arrows that point out to different key points that I may have pulled out for my research. I use a mind-map if I'm trying to explain different elements of a single idea or topic and how they all flow out of that central idea. The third type of infographic is an icon chart. This is basically where I'll illustrate quite literally however many points that I have in the research outlined. Let's say if I pick out five key visuals, I will literally illustrate all five of those or six more commonly, and then spread them apart in a chart-like format with a descriptor beneath each one, and that's how I use it to just get straight to the point if there's multiple aspects to a single issue and I want to spend time focusing on each individual aspects. The fourth type of infographic that I like to do is a funnel. I love this one when I'm trying to communicate a larger idea and how one should hone in on a singular idea after interacting with the information. This might start out with having a lot of information at the top and guiding people through how to think through that concept in a way where you end up at one singular key takeaway. The last one that I commonly use, which is the one I'll be using today is the road-map, and that is when I'm illustrating a timeline or a journey that I want to take the viewer on. Normally, I use the road-map when there's a lot more points or stops on the journey, or I want to get a little bit more intricate with the details to fully explain the overall idea while still walking with the viewer through the information. I didn't start out with all of these templates or frameworks already built up in my apps, I realized that this is the way I was going after reviewing a lot of my illustrations this year. Normally, when I'm presented with a topic or I'm picking out an issue that I want to dive further into, I'm naturally very literal in thinking. If my purpose is to explain a topic or idea, I want to make sure that the imagery that I'm using, best does that. Yes, it's an illustration, but yes, it's still also an infographic. I want to tap into these preexisting frameworks for information that already are out there. I don't just randomly come up with the funnel. Sometimes I'll go and I'll search and I'll look at different types of funnel type infographics and I'll see how those creators take the information that they have and gradually hone in on a topic. Now that I've solidified that I want to go with a road-map, I'm going to prep the information to be translated into a visual format. That doesn't mean I'm going in there and deciding exactly what words I'm going to write on the illustration or exactly how I'm going to frame it up, but I do know what order I'm going in, and it leaves room for me to take this information, make it a little bit more succinct, and then transfer it onto the illustration when it comes time to draw. As I continue to prep for the image, I'm going to go ahead and switch from informational or research to visual research. This is the part where I dive in on exactly what the imagery is going to look like. As part of the document, I'm going to go ahead and create a new section after Key, and I'm going to call it Visual Research. This is where I'm going to go ahead and brainstorm, what kind of imagery do I want to draw inspiration from? Where am I going to find that and how is that going to translate over to my illustration? Firstly, I'm going to want to look into what a Greyhound bus looks like. I already know that I want to illustrate that, but do I actually know what that looks like? No. Even more importantly, do I know what that looks like in the 1960s? I don't. I'm going to go ahead and look up Greyhound bus 1960s and see what comes up. Here I see a bunch of different kinds of Greyhounds, which is super, super cool. But I also want to stay true to the actual Greyhound bus that was probably ridden on by the Freedom Riders in the 1961. I also want to look for, let's say Greyhound Bus Freedom Riders and see what comes up there. There I can see a bunch of different images of the actual kind of bus. One thing that's super cool is here, it says it's the Freedom Riders' national monument from the civil rights trail. That is going to be a pretty close depiction of the actual bus. I'm going to go ahead and open that in a new tab and make sure I have that with me. Then I also see other images more up close. Like this is a pretty cool zoom-in on the details of the bus and you can definitely see how it was set on fire, which is something that was happening during the Freedom Rides. I'm going to open that up. Those two images are pretty helpful for me. I can go ahead and use those, and if I search and find more I can add that and just go ahead and save those images so I can use them as a reference. I'm going to go ahead and add that to my list of visual research elements and save those photos. Another part of my visual research involves color. I want to see what kind of color palette I can use that stays true to the color palette that I'm already using on Instagram, but also reflects natural colors that are a part of the bus, a part of the movement in a sense and make sense literally. Now I'm going to search Greyhound ads in the 60s. The reason I'm doing that is because it's going to involve the color palette of the Greyhound bus but also I can tap into whatever this color palette is for the rest of my illustration. It's just another way that I want to pay homage and be as historically accurate as possible while also having fun with the color. One of the images that I really liked was this Canadian travel ad. I love the colors here and I also love that it incorporates that Greyhound blue. I'm going to save this image and use some of these colors as inspiration for the color palette that I'm going to use for the infographic. After that, I'm going to keep going and researching different visual elements for the art like what does a map look like of the actual freedom rides through the Deep South and other things like that. Once I compile those, I'm going to go ahead and add them to this list and continue on to drawing. A couple of tips that I have, when you're Googling for visual research purposes, make sure that you don't cross the line from inspiration to copying or stealing. One way to make sure that I'm not crossing that line is by looking at photos and realistic depictions of what I'm trying to illustrate, as opposed to another artist's interpretation of what I'm trying to illustrate. That's a really good way to stay true to your own style and still getting that realistic, literal aspect that you want to tie into your infographic. If you want a little bit more inspiration with color palettes or the way different elements can work together, I suggest even looking at Pinterest, I love going on there for color inspo, thematic inspo, and I think it could be helpful as you also try to decide stylistically what direction you want to go in. I'm going to continue with the visual research and wrap up this part of my research, but I want to go ahead and encourage you to do the same thing.
6. Creating Your Piece: Now it's time to actually get in, and create our piece of art. For my illustration, I'm going to be using Adobe Fresco. I really enjoy using this for illustrations because it is a vector based program, which basically means I can scale in and out without losing quality. This is super helpful when I'm drawing icons or smaller illustrations where I need to maybe make it bigger later or export in a different file size. Using a vector-based program, like Adobe Fresco is super, super helpful for me. Right now I'm starting out with a blank slate. I normally use a square canvas just because it's a default of mine, but you can use whatever canvas size works for you. The first thing I like to do is get in there and play with my color. I like picking a background color first just so I have a good starting point, I'll go ahead and make a new layer and fill it with a vector color, meaning it won't get pixelated and I can continue to scale. Next, I'm going to go ahead and illustrate the base of the roadmap, which is literally the path that I'm going to take. I like to start out with this just so I can have a bird's eye view of what the map is going to look like, and I don't necessarily draw at any certain way, I just want to create the idea of a roadmap, and if I need to adjust the shape eventually or make it longer or shorter to accommodate more stops along the way, I can do that later. Now I'm going to go ahead and start drawing the actual roadmap part of the illustration. I'll just start at the bottom corner and give an idea of the path, and one thing that I like to do is start smaller and then get big, and then go small again just to give space for the second part of the path where you're connecting both lines together. I'll go ahead and do that here as well, and this is, like I said, really rough and just an idea of how you're going to create your map. Now that I have this rough outline of what it's going to be, I can shrink it, play with it, fill whatever was missing, and clean up those lines. If I need to make it a little thicker here, I'll bring it around, make it thicker there. As you can see, this is completely me free handing, me eyeballing. I hope it's encouraging for anyone watching who is like "I'm not an artist," because I'm literally just going at it. We're finding what looks like it needs to be thicker, erasing what needs to be smaller, and I'll just keep playing with it until I get the shape of the map that I want. I also want to go ahead and make it lighter. I did it this way darker so I could see the map itself, but I'm going to go ahead and make it lighter. I selected the background-color and went to pull a lighter color to fill the map, and so I'm going to keep playing with it until it's easier to see like this, and I think this is the direction I'm going to keep going in. I'm going to keep refining the map and then we can move on to the next step. I went ahead and cleaned up the roadmap a little bit. The next part is going to be to start drawing in some of the icons and miniature illustrations that'll serve as stopping points throughout the map. Now if you'll remember, on my document, I went ahead and put in blue which visual elements I want to illustrate, and that's what I'm going to go in and start doing. The first one on that list is the Greyhound, so that's what I'm going to do first. I went ahead and imported my reference photos for what the Greyhound bus could possibly look like, and I'm going to freehand and illustrate my own version of that. One thing you'll notice about the way I'm illustrating this is again, I'm not looking for perfection. I'm literally drawing the outline of it and just filling it in and playing with it and not actually sketching anything in advance. That's because when all of these elements are actually within the roadmap itself, there'll be a lot more smaller in scale down. I'm not necessarily concerned with having it perfect, but more concerned with making sure that the idea of what I'm illustrating is there. I'm going to create another line for this stripy part of the bus. I like to go ahead and draw wiggly line and hold to straighten it out, which is a super cool trick that I love, because then I can just go in and refine the edges, and erase what's extra. Next, I'll go in and add the windows, and I'm going to use a little bit of a darker teal color, and I'm going to separate this out just in case. By separating the layer for each part, if I mess up, I don't have to erase the entire bus. I could just go in and delete that one layer. I might actually make that its own layer even so I can fade it out, and then I'm going to duplicate that shape might get a little bigger. Fill it with white to serve as the outline for the window, and then to save time, I'm going to go ahead and duplicate these windows, so I'm not drawing windows over and over again. I'm going to go back and clean all this up eventually. But it's good to just start out with playing with it and making sure the main elements of the image are on there. That's how I draw a Greyhound bus and of course it's not perfect. But like I said, what I love about illustrations like this is because there are so many components, the bigger picture is what's going to be the most beautiful thing about it. You don't have to worry too much about every slight imperfection in each single illustration piece, because once it's done it'll all come together and be beautiful. Now that the bus element is complete, I went ahead and added the other illustrated elements to this roadmap. I pulled this from the list on the document and went ahead and picked out those elements and illustrated them. Now I'm going to add the text which is the next step in this process and to do that, I'm going to need my laptop, so while I'm writing the words out I can also see the original information from its source. Now that I pulled up the document, I'm going to go ahead and find which point is going to be the first one and it's going to be this one right here May 4th, where I talk about how the 13 original Freedom Riders leave Washington DC on Greyhound. I'm going to write this in my own words although I'm still going to credit the source that I got all this information from. The reason I'm writing it in my own words is so it's succinct and will fit on the roadmap in a nice-looking way. I'm going to go ahead and write all those words out and each line is going to be its own layer. That is super important, so I can later on arrange the lines any way I want to without having to change or erase or delete any of the layers. Now, don't be afraid to start anywhere on the illustration and if you need more room just scoop the words over because in the end you're going to resize and move them anyway, so no pressure about where you end up drawing them. Now that all those elements are drawn I'm going to resize and arrange the line so that they look nice, and even, and symmetrical, and all that good stuff. Now I'm going to put all the layers in the same group so that they're easy to move around later, and then I'll take it and resize it. Now I'm all done with writing out that first point on the map. I went ahead and added a few more sections of text and I want to talk about this fun little section right here. You'll notice that the words are white and it's on this fun little red background and one of the reasons I did that is because with a roadmap like this as you saw from the research, they're like 13 steps at least. It can get time consuming to draw an illustrated element for every single step in the roadmap. What I wanted to do was provide a sense of differentiation between these two neighboring blocks of texts while still having that fun pop element that makes up for me not having an illustrated element along every single step in the process. Now as you can see, I've added all of the rest of the texts to the roadmap, and now every step in the process is accounted for it. I added a couple more of those with white text on a colored background just to give a bit of differentiation and fun to the roadmap itself and I liked being able to layer these different blocks of texts in different way. As you can see this part is where I might dip, so I rotated this one slightly to dip with the roadmap. I also allowed some of the illustrated elements to overlap the text or interact with the text in a cute little way to add some dimension. Now that I've got the body or the framework of this roadmap illustration solidified with the added text and elements, now is a time where I can go in and make it a little bit more fun and make the illustration pop a little bit. I'm going to go ahead and add some random elements while sticking with my color palette. Right here at the top I'm going to add a sun which I think is super welcoming giving that blue background. I'm going to go in there and play with that color. Nothing has to be like super perfect. Just some fun pops to bring the illustration to the life just a little bit more, and I already love what that did for the illustration. I went ahead and added a couple of more additional elements. In addition to the sun and the clouds, I've got the back of the bus showing it leaving out of the roadmap and to me that symbolizes the end of the super long and hard journey towards integration for interstate travel. Now for the final step, I'm going to go ahead and add the title. So the title that I landed on after doing all of the research is, journeys of reconciliation. This title came from when freedom rides first began in the 1940s. That's what they were calling them because that's what it was a journey towards reconciliation, and so I love that play on it while honoring the freedom rides that came before 1961. First I'm going to draw the backdrop for what the text is going to sit on, I'm going to make it white so that it pops and I'm going to do a little ribbon here. That's the title and then the last part of this that I want to add is the subtitle. That's just going to give added context because at first glance, journeys of reconciliation might not be as detailed as I'd like it to be for someone's understand what this illustration is all about. I'm going to go back with that Navy and add the subtitle, and that subtitle is going to be freedom rides and the road to integrating interstate travel. The last detail I want to add is just a subtle arrow that points to the start of the roadmap just in case someone's looking at in first glance and has any doubt about where the roadmap starts I want to make sure there's no confusion. I'm going to go ahead and add that as a final touch. One thing we cannot forget to do is add our sources. You can go in and add subscripts to each block of text if you have more than one source, but for me I pulled all of this information, this wording at least from history.com. I'm going to go ahead and make sure I cite that, you could also put the title of the article which is something I'll probably go back and add later. But for now, I'm going to go ahead and put that source at the bottom. You want to make sure that that source is not hidden, we don't want it to be extremely prominent, but we don't want to hide it either because it's important that we recognize and tell people where we got our information. Then I'll sign it with my handle, and there you have it. A completed illustrated infographic about freedom rides.
7. Exporting to Share: Now let's talk about exporting your art to share. For me personally, a big part of me sharing the art has to do with color and the colors that I choose, along with my Instagram color aesthetic. All of this is super important to me, but also kind of fun. I have several different reasons for why I choose colors the way I do. First and foremost, when it comes to the color on this image itself, it's important for me to be as literal as possible with these infographics. That's not to say that abstract art doesn't have a place in artivism. But for me personally, the idea with this illustration is that I'm making it make sense and making it tangible for the everyday person who may not otherwise encounter this kind of information. So one way that I do that is appealing to them visually through color choices that allow them to tie something that they see in the illustration to something that they've seen in real life, like this roadmap and the blue with the sky and then the sun and everything. People are looking at it and saying, "Oh yeah, this is a literal roadmap. The colors that I picked here, you'll remember I drew from those greyhound ads from the '60s, but I also made sure to stay within the color palette that I already use for my Instagram page. The marrying of those two is what really helps an illustration come to life and helps that same illustration fit into the puzzle. That is my Instagram grid. Another thing I like to do with certain illustrations is export the image itself with different background colors. Part of why I do that, besides it being fun, is that it allows opportunity for more people to share to their stories or to possibly repost it to their own accounts. Because it's more opportunities for a color that I choose to fit their own personal aesthetic or grid. Part of the reason why I do that is because I want to encourage sharing and I want to encourage people who are conscious of their aesthetic still be able to share the art. I don't do it for every piece. There's some pieces where I definitely want the one-color background that I chose to be prominent and to be the only option. For example, if I'm illustrating something that has to do with the night sky, like a recent poem I posted, the night sky, I want it to stay that dark, deep blue with the stars because it just fits for that illustration. But with one like this there's room to play with color. I'm going go ahead and show ways that I do that. This blue is good and it's going to be a little interesting, change in color because I've got the sky and the clouds in there, but it's also not mandatory to stay there. I can take those out if I really wanted to. Let's say I wanted to change it to pink. I'm actually going to go to my personal color library and pick a pink that is branded and drop that in. I've changed the background then I also need to go ahead and change the pathway to match that. I'm going to choose a lighter, brighter pick, head over to the path and color that in, I love that. Like you can already see that it's the same type of idea, just a little different, puts little twist on it and someone who really likes pink might want to choose this one to share over the other. Also when I do this, this way, I want to make sure that the title colors still matches. Because the last background was blue, I wanted to pick the blue for the title. Now that this background is pink, I want to pick this dark pink and go into the title and change that color there. So I'll tap all the way through. There's probably a quicker way to do this in Fresco, but I don't actually know what that is. So I'm just going to tap in and color all of these letters in with that pink, and bam, there you have it. I love how that looks. I would do the same thing with maybe green or yellow or any other color that I have in my personal Instagram palette that still compliments the color palette that I chose for this specific piece as well. So you've really got to marry those two pallets together to create something that is unique and stands out but still fits in with your Instagram aesthetic. There are instances where the illustration type welcomes different kinds of backgrounds. For example, if I'm just doing a simple illustration like I mentioned before where it's the focal point of the image. Changing the background is not as much of a hassle necessarily because the illustration is simple. It's a lot less likely to become grainy and pixelated because there's not too much going on. The file size isn't too big. If I'm doing an illustration where it involves multiple skin colors and I really want to make sure that I'm using all of those skin colors because it's the point of my illustration. I'll be sure to be like, "Okay, let me make sure those backgrounds are lighter or let me make sure that I'm not having too much going on to distract from that color wise. So that's how I decide how to do colors or when to change up color backgrounds. I've gone back to the blue version of this illustration and now I'm going to show how I export the file. It's actually pretty easy with fresco. I go up here and I do the publish and export one. Quick export just shares a quick snapshot. It's like taking a screenshot of an image on your laptop. The quality is just not as high as it could be. So I always want go to publish an export where it says social media right there, and then I export as a PNG and I save that image to my camera roll. I will do that for each colorway until I have them all in my photo gallery. So you may not always find it necessary to change the color of your art. You might very well be satisfied with the original colors that you've chosen. Either way, go ahead and make sure that you're exporting it using the highest quality selection possible and saving that to your camera roll no matter how you illustrated your piece. After that, we're going to go into how to write a caption and get this illustration ready to be posted.
8. Writing Your Caption: Now that I've got the illustration exported to my camera roll and saved here, I'm going to go ahead and AirDrop it to my phone so it is in my camera on my cell phone. Now that I've got the illustration on my phone, I can move on to the last step here, which would be writing the caption. I always like to write the caption out in my Notes app. I just find it easier to copy directly from Notes and paste it into Instagram, and then that's where I go in, add the emojis and all the fun stuff. But I do want to talk for a second about how I format and structure this caption. Firstly, what I like to do is just write out my ideas as I'm processing through the illustration and how I can supplement the illustration with the caption. I never want to say exactly what I've already said in the illustration in the caption unless for accessibility purposes I'm providing an image description or something of that nature. What I like to do is instead make a meaningful caption that encourages someone to take a specific action, or helps them to reflect on a takeaway that I think should come from the illustration, and then I always like to process that out through here. This caption that I have is for an illustration that I've done a little while ago, and it just talks about empathy in relation to the illustration that says it shouldn't have to happen to you for it to matter to you. When the caption I wanted to dive into that and say, what shouldn't have to happen to you for it to matter to you? That's what the text says, but how can we dive in a bit deeper there? I made a pretty long in-depth caption for that one. But for one like this, where the illustration is much more detailed and you get what you need just from looking at it, I want to do a shorter caption that still sums up what's happening, but it's meaningful and gives a strong clear call to action about what I want the audience to do, whether it's leaving a comment or asking a question or dropping a fun fact about something that they may have learned while researching the topic that I'm explaining. That's how I approach captions after I'm done illustrating and exporting my art. If I mentioned a source or organization that I've cited on here, I will include that organization itself as a source on the image, but then if they have an Instagram or social media platform, I will add them in the caption. I don't always tag in the photo. It just depends. I think it's good to tag. I just don't always want to just randomly tag a bunch of accounts, but if I found the Instagram, the information is from them, I do always want to make sure I'm linking directly to the source so that anyone who is looking for them can find them. That can happen in the caption, in the image, or both, which is what I do most of the time. Now, it's your turn. Take some time to create a caption based on this image, and before you post the image to social media, be sure to post it in the project gallery so we can all see what you've created.
9. Final Thoughts: We did it. By now you should have a completed piece of art that speaks to the issue that you've chosen and helps to take that complex idea and make it a little bit easier to understand for anyone that comes into contact with your art. Now that you've seen the way I create art and my thought process, I'm hoping that you're able to adapt any of this to your own personal process, and that you can continue on creating powerful, meaningful art that speaks to really amazing causes and also encourages people to take action as well. Please upload your art to the project gallery and I am so excited to see what you've made. Thanks again. Bye.
10. Bonus Lesson: Danielle's Story: I definitely view social media as an incredibly powerful tool, especially when trying to further conversations like this. Starting in January of 2020, I illustrated as a hobby, just doing basic drawings, and Martin Luther King Junior Day came around. I wanted to make an illustration talking about how Martin Luther King Junior's legacy has been changed and shifted over time. I felt as though sometimes he's painted more like a passive peacemaker when a lot of the time he was a pretty radical disruptor who fought for change and challenged the status quo. I took that thought and put it into an illustration and posted it. I only had about 700 family and friends that followed me on Instagram anyway, so I didn't really think anything of it. The next month was Black History Month and I decided to continue creating illustrations along similar topics like racial injustice, how to have conversations, what allyship means, and different topics of that nature, and pretty soon, more and more people started finding my art and finding me in this space. At the same time, police brutality, especially in America, along with systemic racism and racial injustice started to take center stage in a lot of our conversations. As I was processing through things that I was witnessing, I would take those emotions and process through them with my art and then I would share them with my audience and the people who had found me on Instagram and social media. The more I posted, the more I started to realize that a lot of people were finding my page and following. My first thought was, what is happening, and then secondly, where are all you coming from? The insights tab on Instagram tells you the change from day to day. I saw a change within a week and it said 300,000 plus people, and that's when I was like, okay, this is definitely wild and I don't know what's coming next, but I do know that there are people here that are willing and ready to take the next step, whatever that next step was going to be. I would say to any artist looking to grow their social following, to not focus on how much you want to grow your following. I think that the effort that is normally put into really wanting growth is better spent investing in consistency, authenticity, refining your unique voice and your unique style, and listening to what's happening in the world around you so that you maintain some degree of relevancy. I believe that social media is an incredible tool because the art that I'm making is getting to get into the hearts and homes of so many different people and it is through that I'm able to actually help people think through and process through ideas that they would not otherwise have necessarily thought of or engaged with. They are led to that real-world tangible activism that we want at the end of the day. Thanks for watching. For my full class on Skillshare, click the link below. Can't wait to see you there.
 Danielle Coke, Illustrator & Advocate