Transcripts
1. Project Intro: Hello, welcome to my
new Inkscape course. And thanks for joining
me in this course. We're going to
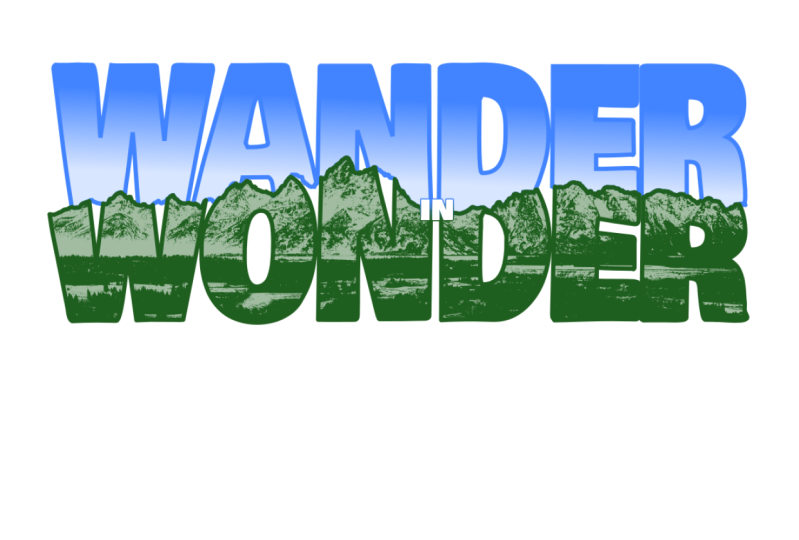
create this sticker, which is wonder in wonder. We're gonna do it
all in Inkscape. We're going to use some of
the more advanced features and I'm gonna go a little quick. So if you're new to Inkscape, you might want to take my Inkscape Quickstart
course first. But if not, then just jump right in with me and we're going to
have a lot of fun. We're going to create the
sticker from scratch. We're going to order it from an online sticker maker
and receive it in. And it's gonna be a lot of fun. And it'll give you an idea of how to make
your own stickers. I would like to see your
own designs and see your stickers that you make and what you do with
them and all that. So let's jump in
and get started.
2. Project Explanation: Okay, The idea for this project, and I just wanted to
create a sticker. And I want it to be to represent
some places I've been. And something I like. My wife and I a
couple of years back, went to the Grand Tetons in Wyoming and we
really enjoyed it. It's a beautiful,
beautiful place. I wanted to incorporate that. So the thought is, is to use the Grand
Teton mountain range and incorporate that into a sticker that says
wander in, wonder. So it's a little play on words, but we'll get into that. But the I couldn't find
any in my own photos. I have a lot of good pictures but nothing panoramic enough. So I went to the
National Park Service and found a picture here.
So I'm going to use that. If you're using stuff in, in something you're
going to sell, you might want to, you really need to check
copyrights and stuff, but I'm just going to
use this for teaching. So I'm going to
right-click on that, hit open in new tab. And I noticed that when
I tried to save this, it comes up as a web p, which I don't want, I want a JPEG that's behind it. So I'm just gonna go ahead
and get rid of all of this to just the address
to the photo itself. And now there's the photo
now hit Save Image As. And I'm going to put it
here in my resources. So I'll give this
along with the course. If you want to recreate
this, you can. Okay. So there's that I
have our image, then I'm going to
use in this thing. And I'm going to go ahead
and close that down. Now let's first get Inkscape. I'm in a new document
here in Inkscape. So we're going to save that. Let's save that to my
projects here and we're going to call it wonder. Okay. Now first thing I
want to do is I want this to be landscapes. So we're going to change that document properties and just change this to
landscape right here. You can change the
format if you want, but we're not going to
use this page at all. It just gives me a good
background to go on, good size to go on. So I'll leave it at that. Now we have a page's
about the right size. Now if you want to
pan this around, you can just middle
mouse button and drag. And that allows you to pan around control and scroll wheel
that you zoom in and out. So I'll be doing that a lot. Alright, first thing,
let's bring our photo in. So I'm going to go over here to our resources and just
drag it on in here. And it's going to
ask me some stuff I'm just going to hit Okay. And now we have that and it's way bigger
than I want it to be. But that's okay for now. We will bring that down
here and a little bit. Actually, let's go
ahead and do it now. So I'm gonna go ahead
and start resizing this. And you can see I'm able to
stretch it and all that. We don't want that to stick that in the
right aspect ratio. What you want to do is hold down the Control
button while you're doing this and that will allow you to keep it in the
right aspect ratio. I just want to get it to
where it fits on this page. Good. Just make sure you hold
that control button down. We don't want to squash photo. Photos are very amateur looking. Alright, so we're gonna hit
for the Zoom to everything. Okay, now we have our
reference image on our page in our project setup and we can move on to our
creating Our project. But before we do, let's
go ahead and hit File. Save so we don't lose anything.
3. Tracing the Tetons: Okay, so the first
step of this is we're going to trace this
mountain range. We're going to put the silhouette
of the mountain range. And what's neat about mountain
ranges is a lot of people, just by the silhouette of this, we'll be able to tell
you this is the Tetons just because they're
familiar with the shape. There might even be, I'll tell you what
value is taken in. So that's kind of
neat that you aren't will be that recognizable. Let's zoom in here a little
bit of a pull this over. And I'm going to just
control and scroll wheel n. So we get a nice little section here
that we can work with. We're going to use
the free hand tool and we're just going to drag it along with top of this thing. So let's select that. One thing you got to pay
attention to here is smoothing. Smoothing is how smooth
the line will be. Let's just drag a line here. First off, let's change
the stroke of that. One thing you've got
to pay attention to in Inkscape is the lines and fills and strokes and all that stuff can
get you into trouble. You can draw something and
it will have no outline, no fill, and I'll be invisible. And sometimes that
gets saved as a, as the default because it just uses what you use last time and you can be confused
at what's going on. So you can look down here in the lower-left
corner and you can see the stroke is
black, fill is none. And this is your stroke width. And if you click,
double-click on any of these, it'll take you to the
Docker that has those. So like if I double-click
on the stroke width, it's going to take me
over here and you can see stroke style and there's
the width right there. So I'm just going to
bring that start, bringing that down to
where it's visible. But I can see what's
going on there. So that's a good with there. So I'm going to delete that one. Let's go ahead and select
tool and delete that one. Start another line. I'm going to do a
real squiggly one. You can see it's maintained
in squiggle pretty good. If I took this up to just say 80 to go extreme and hit Enter, I will do another squiggle
just about the same. And you can see
it's smooth it all out. And that's
not what we want. And that wouldn't be a very
interesting mountain range now very recognizable. So let's take this back
down to maybe say 20. And we'll try this
mountain range and see how it comes out. So let's just start over
here and just start dragging real slowly and do a
little section of it here. You can go is zoomed in as you want to see how that works. So that's looking pretty
good. Let's control. Zoom in here a little bit more. I think it's squiggly enough. I think that's pretty good. Alright, so we're
going to just keep on going down through here. And every time we
start a new one, we're going to make sure this is highlighted red
and start on that. And that will
continue that line. So we can just work our way all the way down
this mountain range. And it will have a mountain. Say you mess up like that. Just let go, Control
Z and start over. No pressure loops. It doesn't have to be perfect. Once we zoom out will, it will be very recognizable. We're getting some pretty good detail here and
we're going to make this line thicker later anyway. Alright, kinda messed up there. I don't want to redo all that, so let's, let's fix that
before we go any further. So the way to edit
lines is node editing. So this is node tool here. If I move too fast
all in all this, and you want some
more instruction, I have a Inkscape
Quickstart course that you can check out and it will walk you
through more slowly, all these details,
not too slow though, that's why it's
called a Quickstart, but it'll get you up and
running pretty quickly. So let's go ahead and window around all of those right there
and hit delete. And you can see it's
pretty much back this up. And now we're gonna go back
to the, the tool here. And we're going to head on
down the mountain range. So let's go ahead and middle mouse button click and drag this all
the way over here. So we have some room to go. And then start there
and just start drawing. You don't have to get every
rock and everything in there. Just has to be good enough
where it's recognizable. Alright. Right-click and drag. You can do this for
tracing photos. Using it to cut out photos. Which I have another course that's created a
video thumbnail. That shows how to use this
to cut out a photo and well, I'll do a little bit
of that in this too, so you'll see it here
in a little while. I'll teach you how to do that. But you can see it's
pretty easy to slowly, once you're zoomed in, get a
good representation of this. Alright, what are the
main peak here now? Say we're probably
around halfway. Can't remember exactly. Okay. I'm done a
little valley here. Again. I don't really want
to do all that again. So we're gonna go to a node
at it and you just want to N on the keyboard it will
jump into note Edit, select the end there, hit the Delete key. Now we're back to drawing. So let's start that
over to the left. Then we'll go on
up the range here. Getting there can be
a little tedious, but I find it to be fun. Just fall on this and the
results are pretty cool. So I think we're about there. Again. On your desk when
you run out of room, it kinda gets hard to follow. So note Edit. Let's get
rid of those three. Delete. Start again. Whoops,
started again. And also if you want to know
the difference between some of these tools that
I'm not going to use, like the pen and the
paintbrush and all that. Then my other courses, what you'd want to go check out, this is just going
to create a project and we'll use what we use. Alright, so let's go. Let's hit the F4 key and then I'll zoom everything.
And now look at that. We have a nice little representation of
that mountain range. And I will clean
this up over here. Delete, delete.
Just to show you. I can drag this on up and you can see
there's our mountain range. Alright, so that's pretty cool. Control Z, put that
back down there. Now one thing I want to do
is on this mountain range. Let me zoom back a little bit
so we can talk about this. So I'm going to
put, wander with an a and wonder with
an OH down here. So it's gonna be
kinda split up and we'll follow the mountain
range with the words. So I need this mountain
range and I need a shape up here and
a shape down there. That's what I wanna do is
go ahead and extend this out both, both directions. And then I will use it
to split a rectangle. So let's go ahead and
add to each side, I'm going to hit the Z key so I can zoom in real
quick over here. Go back to the
tool, pencil tool. Select that first way. I'll have it pencil
tool and see, you know, my node shows up. I'll just click here and
shoot straight out that way. Now we want to go hit
the 4.1 drag over, zoom in here Z key. And pencil tool again. Just drag right over
to the selection tool, hit four, Let's see everything. And now we just want to create a rectangle that will encompass more than
our whole sticker. It's not going to stay around. We're going to delete it later. We're going to use it as a tool. So I'm gonna get outside
the mountain range here, angle up here, and just
draw a nice size rectangle. Okay? And now I'm going to use a command in the path menu
here, it's called division. So if you hover over
each one of these, that kinda tells
you what they do. So division cuts the
bottom path into pieces. Alright? So you have to know
what order you're in. So to do that better besides just forcing it
one way or the other, which we could do that too, is let's select that and
we're gonna give it a fill. So let's just make it yellow. Alright. Now you
can see that's on top of everything because we can't see anything behind it. Alright. So let's
go ahead and grab this mountain ranges
sticking out here. And we're going to
bring it to the top. And to do that, you
hit the Home key. Instead brought it
right to the top. You could go to object
and then raised the top, which seeing it's the home key, sending it to the
bottom is the End key. And then there's a
page up and page down to raise and lower. But we just brought
it right to the top. And now we have
what we need here. So let's go ahead and select the mountain range that we drew. Yellow box and we're going
to hit path division. You see the mountain range
that we drew and away. Now we have two sections. Alright, and we're going
to use these as tools. Undo, undo, and I want to select both of these
and give it no fill. So we're just going to
click on None here. And now we have two
tools that we can use to do the rest
of our work here. And we'll get on with
that in the next lesson.
4. Adding Text: Okay, let's add
some text to this. So as you can imagine, when you use the text tool, you just select here and
I'm going to type, wonder with an 0, an all caps. Just like that. And there's an example
right there of how Fill and all that
can get you in trouble. It looks like nothing happened.
If I select off of it. It just invisible is there and is actually just
white text with no outline. Which on a white background
it looks invisible. You could actually have white
are no fill, no outline. And no matter where you put it, it's even hard to select. Um, it's just invisible. So you can see how that
can get kinda confusing. So if you end up with
something weird, just start messing with this
stuff down here are the, the stroke, the fill
and the stroke width. I'll show you another
example of that. Like if I change
the stroke to read, That's a right-click
and set stroke to read. What if I make that
just really big? Let's just say, I'm
gonna make that ten. Imagine if you typed your text
and it came out like that. I even delete that
and start over. It saved that. And if I type, wonder, you know, like what
the heck is going on. So the way to do that is
go ahead and just get it selected and double-click on any of this stuff down
here, especially stroke. You can see it's
ten right there. And just start changing
some of this stuff to make it be better. So we're gonna make it one. Actually I'm going
to make it none. Stroke style. We'll just go to you. Can you just say
none, Hailey, no, no, none. Here we can. Right-click sets,
stroke to none. Set fill too. Let's just go with
green for now. Okay. That was a tangent, but
hopefully that'll help you. So we're going to just put
this all the way across here. Let's make it bigger
to begin with. And sometimes with texts, I don't use the control. Let's start with a control and will squish it on
purpose if we want to. So we have wonder here
now let's choose a font. Alright, so to get
the text options, he's got a text, texts and font, and it'll pop up in
the menu over here. It'll pop up in the
darker over here. So we're going to run down
through and find some, I want something fat that
takes up most of the space. Good way to do that is
have your text selected. And right now it's too big. So let's go ahead
and bring that down. Holding control to something where we can actually
see the whole thing. There we go. That follows the actual size
of your text over here. So it's good to
have it there and then we can make it bigger. After we're done now we
can see the whole word. So if we select the top thing here and just start going down through here, we can see the
preview down here. So let's just run down through here and find something
that's big and fat. There we go. Like that. So that is Bobbi. So I believe that
came from Google. So if you don't have
it on your system, you can go to Google
and probably get Bobby. I believe that's where I got
that from another project. And I like that it's big and fat and takes
up a lot of space. So let's go ahead
and apply that. Now. Wonder is applied there. And now let's get it to fit
our bottom section here. So we'll just go wonder, great, big end to end. Be right along the
mountain range here. Something like that. Looks pretty good. Now, I want these to squished together
a little bit more. So the way to do that is
a thing called kerning. And to get to that, you have to be editing the text. Let's double-click this
and select it all. So let's go ahead and select all this and say spacing happier. And then this is
the letter spacing. So minus, you should see these start going down minus one. And we got a little bit, but a long way to go. So let's go minus five. That's doing it. Minus eight. So they're getting
squashed together. That's different than actually
squishing it by scaling. This is actually changing the space in-between
the letters. Okay, that's pretty good. It's pretty good. Start.
Let's go back to eight, I think. Enter. Alright. Stick with that for now. So there's our wonder now let's
go ahead and make it fit. Alright, there we go. Now we want to kind of make this sort of follow the mountain range and where
it's gonna be a few steps. But let's go ahead and let's go ahead and put
our other wonder in there. So we're going to duplicate this by Control D. And then nato. See I have two of them.
They're just does it right on top of the
other control paste, Control Copy and Paste will
actually move the object. So I like to get used to
using Control D. Okay, So this is gonna be wander
like WA and D are. Okay. So those are two words. They're squashed together. Good. So let's change this to, I want it now to be this, to be the stroke and no fill. So Phil, here we go. And that is huge. What do we have it set on? So five, let's go to maybe one and start going up from there. Wouldn't
be pretty thick. I like that. A little bit less. There we go. Okay, so now let's do the
same thing that this one. We will make this the stroke by right-clicking set stroke,
right-click Set Fill. And then we'll change this
to was that 1.6, 0.6 enter. Okay. Now we're getting somewhere.
Alright, so let's make these a color that
we can see better. Let's go set stroke to read. There we go. Okay, so now we want to kinda get
this fit in there. We're going to mess with
this one a little bit later, so we will put it out there. So to make this kind of
follow the mountain range, we're going to do a path effect. So first thing to
do a path effect, it has to be a path. So right now this is an object. If you look down here, you'll always see what you're dealing with,
what you have selected. And this is text. If we select this, you
can see it the path. We want this to be a path so we could do a path effect on it. So path, object to path. And now you can see
we have a group of objects which are inside. They're just pass. If I Control,
select one of them, you can see that the path I just selected that object
inside of a group. So anyway, like I said, all that's covered in more
detail in my main course. Okay, so now we want to go path. Path effects. Not open up this
darker over here. You can see there's nothing. This is a little bit confusing. So there's nothing in it. One thing is if you
have nothing selected, you can't do anything with this. I mean, everything's grayed out and there's not much
there to begin with. But if you select this
thing that is a path, you can see this
little plus lights up. We click on that and it gives you all the different
operations you can do. So we're going to use this thing called
lattice defamation. If you select that, it will pop up in here. Now we have a lot of lattice
deformation applied to this. And if you notice when we
click over here, it's gone. So this is per object that has lot of stuff
formation on it. And this is also confusing because now we have
it on there. What do we do? I mean, it doesn't
look like there's can't even see what we need
to work with at this point. So to work with
last deformation, we have to be in the note edit, which is this little over here or hit the N on the keyboard. Then once you're in node at it, you can see now we
have this little grid. Now we can move
these around and it deforms per each little node. We're gonna get that
going up here and kind of make it a little more, make it fit a little bit better. This is a big dip. We're going to have to
worry about that later. But right now, we're
going to just get everything pretty
close to fitting. And we can. Make other things. Make other adjustments later. Okay. That's getting started. Do I like the look
of it? I think I do. It looks pretty good and that's kinda starting to go downhill, That's going uphill,
will take care of this. That's a little extreme and
we have no node to edit. So we'll take care
of that later. Think that's pretty good. Okay. Okay, so we want to
work with this W here. So let's get in there so we
can see what we're doing. Let's hit the Z on the keyboard and just drag a
window around that. Now are in here close. Let's go back to
the selection tool. And that's make this yellow
so we can tell what it is. That stroke. Alright, there we go. Now, you can see we're still have this last deformation hanging around. We need to get rid of that so we can just the node see
if we go to note Edit, we're just in this
lattice deformation. So what we wanna do is we
want to go to the selection. So you can see we have a
group here and we want to ungroup it now, we lose all that effect. So we don't wanna do
that and did that. Well, we wanna do is
select it and go to path and object to path. And now you can see that's gone. Now it just a path
at this point. So now if we go to node at it, you'll see we can edit
each object and its nodes. The lattice deformation is gone. So that's what we want.
So now we can go in here and select some
of these and make sure that each of
these portions go over the top of the
mountain range. And the reason for that is, is we're going to use the mountain range
to form the top of this. You'll see what I mean
here in a second. Just go ahead and make sure
that's all over there, okay? Okay. So another thing
that can get you confused here in trying to do it we're
getting ready to do. We're gonna do some
path commands on this, but it is a group. So if you try this, I'll just try real
quick to show you. If you select that and
hit path difference. Nothing happens. And it says down here one of
the objects is not a path, but it's pretty quiet about. It just shows it down here at the bottom if you're
not paying attention, and then it goes away and
you can kinda miss it. So that's kinda confusing. So one of the officers is not a path because
it's a group. So we need to ungroup this. So object. And you
just choose Ungroup. Or I like to use Control
U on groups that also. But now we have just a bunch of objects down here and
not a group of objects. So you can see this is a path
here, and this is the path. So what want to do is
select both of those. And we want to say
path difference. And you can see this creates a difference of
the selected path. So bottom minus the top. If we select that, you can
see it's now we want it. It took the bottom and
took the top out of it. So what we wanna do is go ahead and bring
this to the top, which is home. Remember? So now you can see
that is on top of the w. I'm going to select that, select that path difference. Now, we have the top of the W following the
mountain range, thrown a run down
through here and do each letter and make sure. But one thing I forgot is it consumes the path when
you do that. And do that. First thing you
want to do, select the path Control D
to duplicate it. Now there's two of them there. The one on right on
top of the other, select the W path difference. Now we still have our
mountain range tool there. So let's do that for the 0. But I want to make sure the OH, is showing up in there. I want this to be part of it. So let's go ahead and
do some note editing on this and bring this
up just a hair. I keep it somewhat
same as what it was. Let me bring this
one. Whoops, bring this one down. There we go. That'll be good. Now we
want to select the path, which while we're at it, I'm gonna get rid
of this bottom path because we have two here. And this could get
kind of confusing. Let's zoom out a
little bit and take this one which is
on the bottom and we're just going to drag it down to get it out of our way. And we'll put we can
put it back later. I didn't think we
were really need it, but we'll make that decision
when it comes control. We'll zoom in. Select the path Control, D, select the other path. Path difference. Lips. My duplicate didn't
work, and do. Get a hold of that. There we go. Control D. Select that path, path
difference. Now we got it. Now the top of our 0 is
following the mountain range. Let's take care of the n. You could probably do this
all in one big fail swoop. But you know, I like to have a little more
control than that. So Let's grab this one. And first thing, let's
do this side because it's going to go way
up here like that. And then this one is going
to go at that angle. So I want to keep
it going on up. There we go. There's that one. This one's good. Now
I'll do the same thing. Selection tool. Select that, duplicate it away, it doesn't go away
on this shift. Select the n and
path difference. If I'm going too fast, you can just pause, rewind, slow it down. I think there's some
speed controls on here. Now the D here, we're going to lose what this is or Control
and zoom back a little bit. We're not even going to
know what this is if we just chop it
right through there. So let's go ahead and squash
this D before we start. So that way it will
still be open to know what the form is. And I'm actually going
to bring this side up. So let's do about
half of that and we will select it again. We'll get some deform options. Remembering now I don't wanna do that because I don't
want the bottom to change. Go ahead and try to make
it a little bit bigger. Tried to, we're just trying
to keep that center in there. Go to known editing and
see what this does. If I just started
bringing some of this up, actually won't be too bad. It gets kinda look pretty good. Let's leave it like that. Let's do our difference. Control D to duplicate, shift, select the D path and
difference. Here we go. I worked out pretty
good. The E is pretty much already ready to go and the Rs pretty
much ready to go. So let's just do
each one of them. So select that and
Control D. Shift, select the E path difference. Boom. Select that control D to keep that shift select
the path difference. Okay, Now let's hit F4 and we'll see everything
and there we are. We have wonder that follows
the mountain range. Alright. Now let's
in the next segment. I'm going to break this here because it's getting kinda long. And we'll do the wonder
in the next lesson.
5. Tweaking Text: Alright, so now let's
do the top wander. Let's go ahead and
drag it down here into place as close as we can. And keep it centered. Maybe about there. Let's see. Keep that up above. Make sure that a doesn't lose definition because
we have to have this little part and
put it right there. Okay, so let's go ahead
and like we did before, path, object to path
and path effects. And we'll add the last
information onto it. Now we will note Edit, start dragging this thing
around a little bit, and let's bring that down. Bring the W and make it
look a little bit more. Bringing this up the
n, Definitely up. I think D is gonna be
the problem again. You just play with
this until it looks like the way you like it. That's all starting to
get there pretty good. I can finish editing
that with nodes. So let's stop there. Because Selection
Path, Object Path, again that way it takes
that lattice off there. Now we're back to node
editing properly, but we have a group
of objects again. So let's ungroup that control. You can see it's six objects. Now let's go down
here one-by-one and start cutting the
bottom of this off. I thought we needed this.
We don't really need this. We're going to continue to use this and I'll show you
how we'll do that. But let's go ahead
and zoom in at the Z, zoom into the w, start
working with that. Note that it's stuck
the w to make sure all this stuff is below the cut. 0.1 thing I should
say, like right there. That's a handle, not a node. You want to make
sure you get a node. Which of these diamond shaped
ones in the square ones? I'm going to grab that diamond shape
one there and you can see I can grab them all. Okay. That's a good, the fine line there. So once again, we need to
have the path on top of this, which it is, because we brought
all the way to the top. Select it, Control D, shift, select the W. Now, on this time we want to go path. Instead of difference, we
want to use intersection. So let me show you
what that does that create an intersection
of the two paths. So now it takes anything
that's inside that other path, which is what we want here. Okay. Move on to the a
that would edit, select some of these
bottom pieces, and drag them down and make
sure we got to handle again. Make sure we get it
all inside there. Same thing here. Again. We go. Okay. Select the mountain range. Control D shifts like
the a path intersection. Okay. Let's do then. I think
the n is just fine. I don't think there's anything
that had to do to that. Oh, right here. That needs to go down. So for node at it and
just go ahead and start. I probably just need
those right there. Bring them all right there. That's going to be perfect. So it looks a little funny now, but it will all be cut
away just perfectly. So. I select the mountain
range Control D to duplicate. And if you ever lose
your mountain range, just control Z back up. Do you have it again because
you forgot to duplicate it? All right. Path intersection. There we go. Do something with that. We'll worry about that
a little bit later. Shuttle a point there. I'm not sure I like that. Let's go to the d. D looks pretty touching here and let's go ahead and drag
it down a little bit. And then at the same
time I'll note edit it and just start dragging
this stuff down. I take all these, add those to bring bring
those down to. Here we go. Alright. So select the mountain
range selection tool. At the mountain range
control D, shift, select the D path intersection. Here we go. The E don't have to
do anything to the E. Like the mountain range
control D, shift, select the E, path intersection. Same last thing here. Control D shifts luck
the R. And oh, nope. I want to fix the R.
N for note at it. Let's drag all of, grab all of these. Down below the line. Here we go. That's all I need to do. Okay? Now I've already
duplicated the path, so let's select the path, select the path intersection, and hit for something,
see everything. Starting to look pretty cool. Let's just get rid of this so we can see it for just a second. Just deleted it so I can see it. It looks pretty cool. Control Z to undo that. And let's save this while
we're thinking of it. And we will continue
on in the next lesson.
6. Image Tracing: Alright, so now I wanted to
take this image and make a simpler vector
representation of it. So start by selecting that. Well first let's start by
getting this out of our way. We don't need this
anymore. Delete it. I'm going to leave
this one here for now. And so right-click
on your Image. Trace Bitmap, and that brings up the Trace Bitmap and
the darker over here, we're going to use
a single scan and we're going to use
and brightness cutoff and update the preview. And that looks pretty
good right there. Yeah, We're gonna go with that. So apply and working on Use. It takes that long,
but we'll see. Okay, that took a
lot longer than I expect it to, but
now let's move on. We can remove the bitmap. Now. Now we have this
representation of it that's black and white. And we want to add it
inside these letters. So to do so we need all
these letters to be the same object again,
but not a group. It's a little different. So I wanted to shift, select each one
of these letters. We're going to go to
path and combine. So that makes one big path
out of all of these shifts, select the image and the word, right-click and hit Set clip. Okay, that's what
we want except I want the words to be there, so I'm going to duplicate those. So let's undo that. Control D to duplicate. Shift, select that
right-click Set clip. There we go. Now. We have a clip path in there and we can change it
to whatever color we want. So like if we hit Set Fill, It's going to change the fill of the actual traced part of it, so that's what we want. And then two objects
here we have the path, that is the words, which you can see
the yellow here. And if we select that, we have the inside of it. So let's go ahead
and change the path. Will change its color
to there we go. I like that, but I wanted that to be a little
different color, but let's go ahead and go
ahead and get rid of this two. I think we're done with that. Let's go ahead and make
this all one piece too. When you go to their
path, combine. Now I'll select this. Let me change the saturation of that until I'm happy with it. I think that's pretty much
what I want right there. Now I'm going to use that
for my outline color. To do that, I double-click
on it and I'll grab the eye dropper. Select that. And now let's
add that fill back in. So to end that fill in, we will select the Allen
again, there's filled none. We're gonna give
it a color fill, and I'm going to bring
that opacity down. Make it look about like
that. I like that. Okay, for so we can
see everything. Save that like it is. And now let's do the
top portion of it. So the top portion of it, we want to start with a blue. Let's change the stroke
to a blue color. Getting in there. And then we want to
create a gradient. Are going to flip that over, just do that way. I didn't flip it over. There we go. Now let's change
this color here. So double-click on that. And we will have to change
the fill right there, and that's the
gradient right here. So let's grab a new
color off of that. Like that and maybe a little bit green and a little
bit too saturated. Now there's some green in that. That's why this. We just wanted to be
white. There we go. That's looking pretty good. But I want the green
to take precedent. So put all this behind, so send this to the end. Now why the greens, the main color here. And see if there's anything
in here I need to change. I'm going to fix that
gap on a fixed that gap, and fix that little point here. Let's do that real quick. So it's gonna be a blue line. Just grab this here
and go. Draw that. And know that it fix this little point
there. There we go. That's pretty good. That's
a net harm to the n2. And here's one right here. Then I'm right there. Make sure it has no fill.
So that green shown up. It's trying to fill that. So let's set it
felt and nothing. And then we'll send
that to the end. That's pretty good. And I wanted to fix this little point here because there's no reason for that. Note at it. Sure what it's trying to do, their friend just delete that node. It's a good start. Here we go. Much better. For you see everything
were pretty good. I want this to be
a little darker. So let's edit the
gradient a little bit and just drag this
down further so it stays darker longer. See that? All right, I think that looks pretty good. And I'll finish it up
in the next lesson.
7. Add IN and Border: All right. I wanted to do a
little bit clean up of a couple of things I see, and then we'll finish
this thing up. So one is this little
piece up here. Someone zoom in here and there's something
going on there. So let's go to note at it. And there we go. There's two nodes,
they're on top of each other and it didn't
know what to do with them. That's better for,
um, let's see here. And a little point right here. I didn't not crazy
about siblings. Fix that too. It's been just delete that one. There we go. Okay. Fixes that one. Hit for This E is a
little bit wonky. See if I'm starting it
up without messing up the clip that's inside of it. So let's do the same thing. Note at it. I try to drag some of these up and see there's the
clip coming out of it. So I don't want to see that. That's fine. I bring
this down here. Just just straighten it out
and make it look a little nicer. Yeah, that helped. I need any of these. Delete these nodes here. Now I can straighten that out. Let's go for, to fit it. Think I'm liking that. So now the next thing is I'm
going to put in right here. So let's just add some text
and say I n and capitals. We're going to give it no stroke and fill of white and
opacities way down. So we're going to bring that
opacity all the way up. And then put that
like right there. Wander in, wonder. Okay. We just have a
little point here. I don't like, let
me fix it and then we'll put a border on
it and call her dad. I don't know. Yeah. That's better. All right. My stop being
picky and put a border on it. So I want to select
that and outline here. I want to duplicate them. Control D. I want
to path combined. Now they're all one big path. Now I want to start. Just go ahead and make
them a white fill and no outline and change the opacity all the way and send
them to the very back. Okay, good start. Now I'm going to go
path into an outset. I need to give this a stroke or I can't see what's going on. Set stroke to black. Let's make it a real thing now, which it might already
be stroke style. Now, let's go down to that
and keep going outset now. So path outset, outset. What this is doing is just
outlining the whole thing. Path outset. See how it's bringing
it out further. Path outset. That's pretty good right there. Okay. And we can fill that
a different color just so we can see
what's going on there. Some of these opacities
are messing with us, but that'll fix when we
turn it back to white. But you can see where
were outlined now. And I think that's a
pretty good outline. I take a one more
time path, outset. There we go. Now we want to get rid of
all of these intervals. I don't want any
of these internals cut out and I don't
want that cut out. This is gonna be our outer
border of the sticker. So let's go ahead and fix that. So the way you do that
is you go break apart. So that just made all these
little bitty pieces separate. And now if we go path union, it'll consume all those. So now we're good. Now, if we change it back to white fill and get
rid of the outline, we now have our
finished sticker. Let's save it. Now. All we have to do
now is export it so we can purchase
this thing online. So first off, let's export. So File Export. It gives us this
little box here. And we want to
choose a PNG file. We're going to call it wonder. And it's in projects. So we'll just let it go
ahead and output there. And we will leave it
as is and hit export. Alright, let's go over here and see what
we ended up with. Okay, here's your file.
Double-click on that, and that's what the final
dicker will look like. In the next lesson, we will go online and we'll actually order
one of these stickers.
8. Order Stickers: Alright, so I chose make stickers.com for no
particular reason, just like a good option. I don't get anything from them, so choose wherever you want, but I'm going to order
the sticker from them. So I'm going to choose
custom stickers and die cut and
uploaded design here. So it's uploading an image. Go to my folder here
and drop our design on. It's loading it. There we go. Lucky there. That's what we wanted to see. Now. We're going to choose glossy because I heard that if you wanted to stick
these on your car, glossy is UV protected. So I read that on
here somewhere. This is kinda nice. Now it gives you the
actual sizes if you chose a width or the height
would be and vice versa. So I'm gonna go five and then I'll make
it about 2 " tall. I got it seems like a good size. One and it would be 122, would be 13 something, five would be 15. I'm gonna do five of them
just for the fun of it. Add to Cart. So go ahead
and check out now. Okay. I'll go ahead and finish
checkout and then we'll wait for the stickers to get
here. And I'll see you then.
9. Unboxing Outro: Alright, I got my stickers. Human Male today came in
FedEx, as you can see, it coming up letter envelope inside a couple of cardboard
sheets and to protect them. And then in-between that are the stickers took
about four days to get here. So
that's pretty good. I think that's what I
chose as far as shipping goes to pay little to get that. And inside this little
cellophane bag there is couple, they'll add pieces. And then the stickers. And it looks like
I had six of them. I think I ordered
five, so that's cool. I got a bonus sticker. I think it came out really
good. Can you see that? Yeah. So it's pretty good. Quality. Vinyl has a split back on
it. So it's easy to peel. Feels pretty sticky. And I got the glossy
because they said the glossy was UV stable so you can put it on a something outside and it won't fade. I'm going put it on your car, bicycle bicycle helmet,
something like that. Not sure. I'm going
to put it yet, but I think it came
out pretty good. Hopefully you followed
along with that. Hopefully it gave
you some ideas of some stickers that you
can create your own. I'd like to see your designs. I would like to see
where you put them. Like to see your
project file and a picture of it on
something that'd be great if you could post
that in the projects. I'm going to look at them all, so I would love to see that. And if you need any help
along the way, just posted, post a question in the questions
and I'll help you out. So anyway, hope hope you had
fun with that. I sure did. I'll see you in the next lesson.
 Dan Webb