Transcripts
1. Introduction: Hi. Welcome to my class, where I'm going to teach ink and watercolor. Easy though illustrations I have for the day Syria, the artist behind Limitless, are on Instagram. I love painting with watercolors and a lot beating a lot of different teams, and one among this is thes men. Edo illustrations in a colorful in a very vibrant state. These illustrations are so much fun to be on this loose watercolor and in style, and in this class I'm going to share all the skills that I used. Toe pain. Such doors. I have structured the class so well for you that you would learn about proportions and learn how to award different shapes off those by using simple tips and techniques, and also share some pieces schedule skills that would be required to develop your initial thumbnail sketches and then I would fathered help you to illustrate them with a pen in the guide list. By step and painting the door illustration. You would learn how to paint breaks, planted ports, plants and also how to paint colorful trees and get the foliage effect. Being guiding you step by step from scratch comes catching, too. All the finishing touch is required to finish up in on. By the end of the class, you would have two beautiful door illustrations painted all by yourself. I hope you are excited to paint the still illustrations with See you soon in the close by.
2. Materials required : the materials required to take this class is very simple. You need a war tickle of people and I'll be using the Fibria no studio watercolor people with just 25% Corton and 300 years, if you have people, would do 300 GSM. It is good for the class. Any watercolor paint is fine for the class. You can take some basic shades. I'll be using my prima classic and vintage based confections. You can use my coat to get 15% off at their website. For the class, you would need to round brushes one off medium size and one off a smaller size. I'll be using my terrible black 100 precious size eight and four. You will also need these basic sketching tools like pencils. Raisa, on the rule of for the pens you would need. Oh, my crone. Ben, this is a Sakoda micron off size 0.1 and this is off 0.5 and both are waterproof. Make sure that your pencil waterproof and this one is Univ. All white signal, which is not waterproof and would be using that only for highlighting. You would also need sketch people or any other people which is good enough to sketch because we would be doing the basic lessons and sketching exercise in that cheat. And you can also just ill micron pens and see that if they're waterproof, it's not necessary. You need to have these brands any even the normal cheap gel pins, also sometimes a waterproof, so that should be fine, too. And lastly, a people trouble and a jar off Clearwater. Also, I wanted to say that most off my illustrations are done on a small piece of paper like this , and it's a watercolor part, which means it is glued on all the four sides. But in today's clubs, what I'm gonna do is I'm gonna beat in a big sheet like this and then cut it into halves like those ones I'm dumping. And if you're gonna follow the way I'm going to do today, you don't require masking tape because we'll just read apart off the people and the people wouldn't buckle up. But if you couldn't do it in a piece off people, which is pretty good already, please use your masking tape borders. The people will buckle up as you mean for the additional supplies. I will be using the's concentrated liquid from prima. I love painting with liquid watercolors because they're so transparent and vibrant. And since most off my doors illustration that have painted is with these colors. So I would be painting one off the illustration with this and makes off half band watercolor if required. You can also have an additional palette for mixing being all right, so the sediment heels required. And he would bacon with a basic sketching exercise in the next lesson.
3. Understanding proportions : understanding proportions are very important when you being such subjects. So in this lesson, I'm gonna help you understand proportions and show how much difference they can make when you do them right. For example, this painting or he'll which have already done, is personally not in proportion for me. Because I feel the size off the door and the proportion off the land and the vet is not right. I'm just catching oh box, which represents of people just drawing to off them. So one I would show what the right proportion is, and the other one is the wrong proportion. And I'm just dividing into grid so that it is ready. Easy to understand the proportions. You don't have to draw along with me. Probably you can just watch and see what I'm trying to tell. But you can feel free if you want to sketch and understand it by yourself. To start with that subject, the first thing was always to sketch the door. I've just placed door in the centre off the grid, and I'm just hatching it. So the most important thing is to draw the door in the right proportion. If you draw it in the right proportion. Then automatically, all other elements will fall in proper proportion, like trees and the plan toes and any object you want toe, you can add. And it would be much easier and it would look well composed. So this is the right proportion. And in this one, I'm gonna show you how even the slightest increase in the doorway of the height would make a huge difference when you're draws that subjects. So once the door is drawn little slightly bigger, the planters and three everything starts looking off proportion. So now do you understand why it is so important to sketch them right In the beginning? It's a very simple subject and easy toe pain, but only if you have your basic sketches, right? Even the smallest increase in the red or the length poured make a huge difference. So yes, sketching this really important. And now that you understand the right proportions for door, I think this lesson is going to be much easier for you. And this would me. It's easy for you to paint any type off those and Windows or any thought subjects. How would this is? Very basic again. But If you want to get into more details and everything, it will include perspectives like one perspective when two point perspective and all. But this is just a very loose tile watercolor with, I think so. I'm just keeping it very simple. And I just thought the biggest six, which is required for before the lessons off the class.
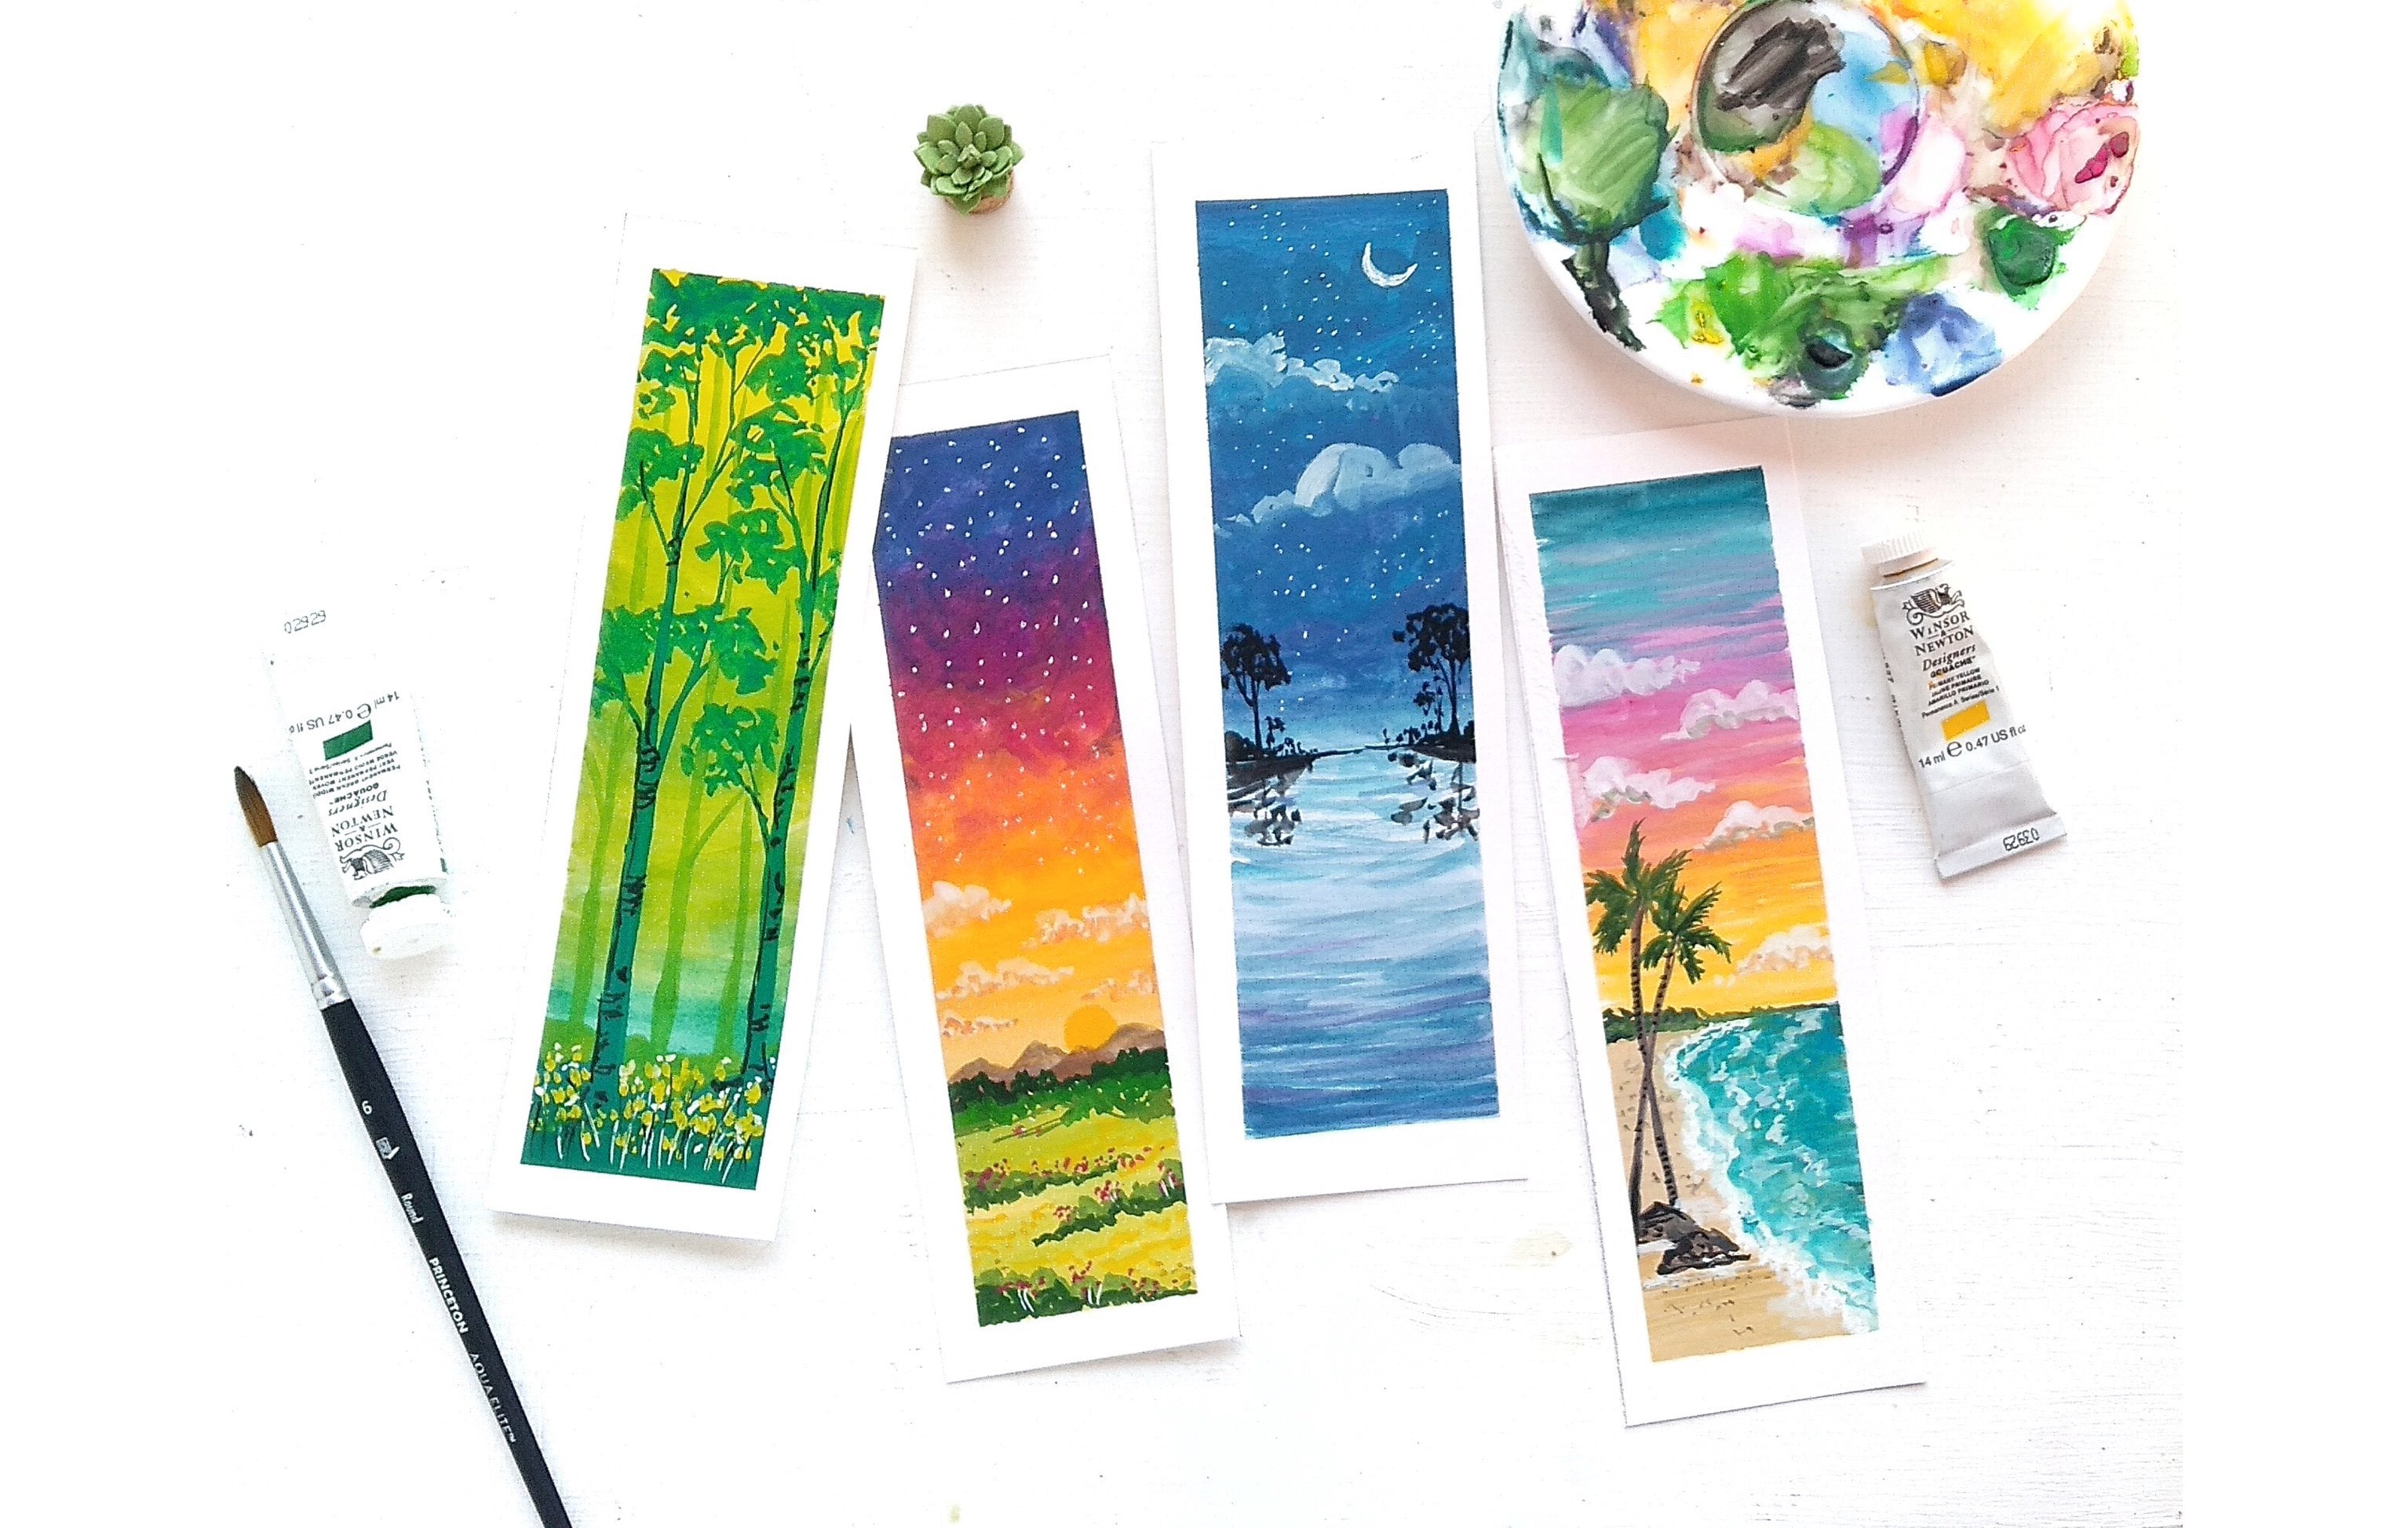
4. Basic Sketching excercise: This is a basic sketching exercise lesson, and I'm gonna share Deb spit you to sketch free hand and not used rulers. First, I'm going to show free hands catching exercise off different types of those. So to begin with, all you need to do is draw off basic rectangular shape like this. And then if you want an arch door, you can just simply drawing arch like this and then darken it with the pencil again. And it is an AJ tour, and the next door is gonna be over top art store. I'm not very sure off the technical tell or the right tone for it, because it is different. Every best. Just gonna name it a top arch door which has AJ on the dog off the door. I mean, which is fixed to a wall or something like that. And bottom is the door. So basically the top arch would have some details for it, and that's the door. And the next door is another cope door, which is probably called as the Syrian arch door. But you can just avoid the technical term, and it just looks something like this, which is slightly called on the door. You can just draw a rectangle a basic shape again and then draw the slight go on the top and then pulled the rest off the door lines. And that's it. You have another type, so it's just like the basic rectangle, and you can evolve as many associates you want, and you can be creative with em. It makes easy for you to draw any type of door. The next one huge is the double doors. I'm just drawing center line in between. For this one, it is slightly because Dan, though normal rectangular shape because you need to have two door panels and proportions. Another door is a Gothic arch store, which has a pointed arch, and that I'm just drawing a center line like this and extending it on top door and drawing to goes like this. So this is another type of AJ door. You can keep creating as many as you like and for the details inside the door that there's so many reasons. And if you want to keep it simple, you can just draw some lines and divide them into like equal halves and then put a door knob. So once if you understand this basic sketching thing. But I thought drawing those and painting a subject with those becomes very easy because you don't need toe. Look out for reference pictures on Pinterest. Always you can just draw them in their own for the door and then just keep adding elements and be creative. And when you do that output or the painting, you pain is out off your own imagination and creativity. So that is the secret behind all the doors and windows that are painted. And the reason why my paintings look unique because everything is from my imagination. And just to remind you again lay about the proportion that I said. It is very important again. So you need to know, like even if you're draw our door and then you need to observe and see if the proportion is right or wrong, so keep in mind while use catch. The next catching exercise is on the planters and the plants. So in this style off painting that I'm going to teach today, we need to have love and lose catching skills. For that. It doesn't have to be a perfect leave or apart are a flower for it. So I'm just gonna show how to loosen up your sketches, drawing a simple port shape and then just ready rough leaves like this. I think that takes little bit off practice to losing abuse, catching skills and draw in a free style because most of us are used to pop everything like perfect sleeping that plants and flowers and everything. But this one is a very loose style. So it's even for the flood, just like a small drowned and just very loose and some leaves like this. So this is oh, planted board with flaws and another one. I'm just drawing a longer one. You see how this catch is and how we have painted. So overall, when you paint, it's gonna look very nice. It might look very rough and might not even make sense to you while you sketched them freehand. But trust me, keep it loose and free hand, and it's gonna look beautiful and be paying them. And just, for example, I'm sketching or perfect Atlanta with, you know, the old NYSE shaped leaves and all, and you see how it looks very perfect, and it doesn't match with the style that we're gonna being to be so soon draw and like this , I want you all to have loose catches. So that's it. We're done with the basics catching exercise off the doors and plants, and the next one is We will see how to paint some trees if you want. I'm just picking up reference the majors, which has trees like this one and another one. It just has a very rough outline off. Three. And I've just played with colors, so it's very simple and easy for that trees. I'm just drawing a branch on a tree trunk and just branching out and just like small scribbles. Or do deals like this represent tree? And, um, that's it for both the trees over here you have illustrated in the painting. I've just done the same, and that's also I hope that with this basic exercise, catching would be much easier for, you know
5. Warm up and creating thumbnail sketch: this lesson is gonna be already quick warmup sketch forward. We're gonna paint, and we're gonna implement all that we have learned in the previous two lessons from understanding the proportions and the basic warmup sketch. And for the first class project, which is going to be something similar toe water painted already. And we're just gonna sketched that roughly like this so you can just divide the people into grids like this. Also, the greats here, which drawn, is very rough. And it is not even divided into equal house because the sketches only for my understanding . Like I said before, if you draw the door in the center first, adding elements and the surrounding becomes much easier. So here's the door on the sites adding these plan toes, And even while sketching these, I'm tryingto balance out the elements like on the left side. Um, adding to planters. And I don't want to be overcrowded with elements. So on the other side, I'm adding things. Just some grass in the bottom and off while plan toe. So this balance out the entire composition. And now off the sketching and composing the element, I feel the door with can be a little move, Vaida. So I'm just over doing that. And I'm just making the sheep like so when you take it to a fair sketch on to your people, you wouldn't know how this would look.
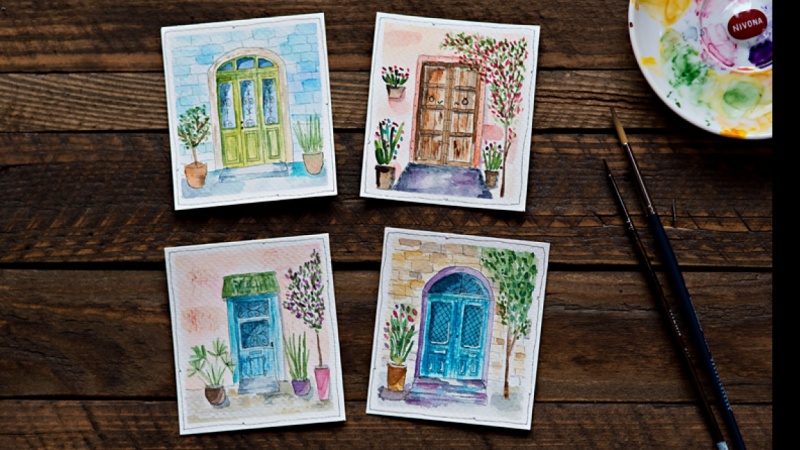
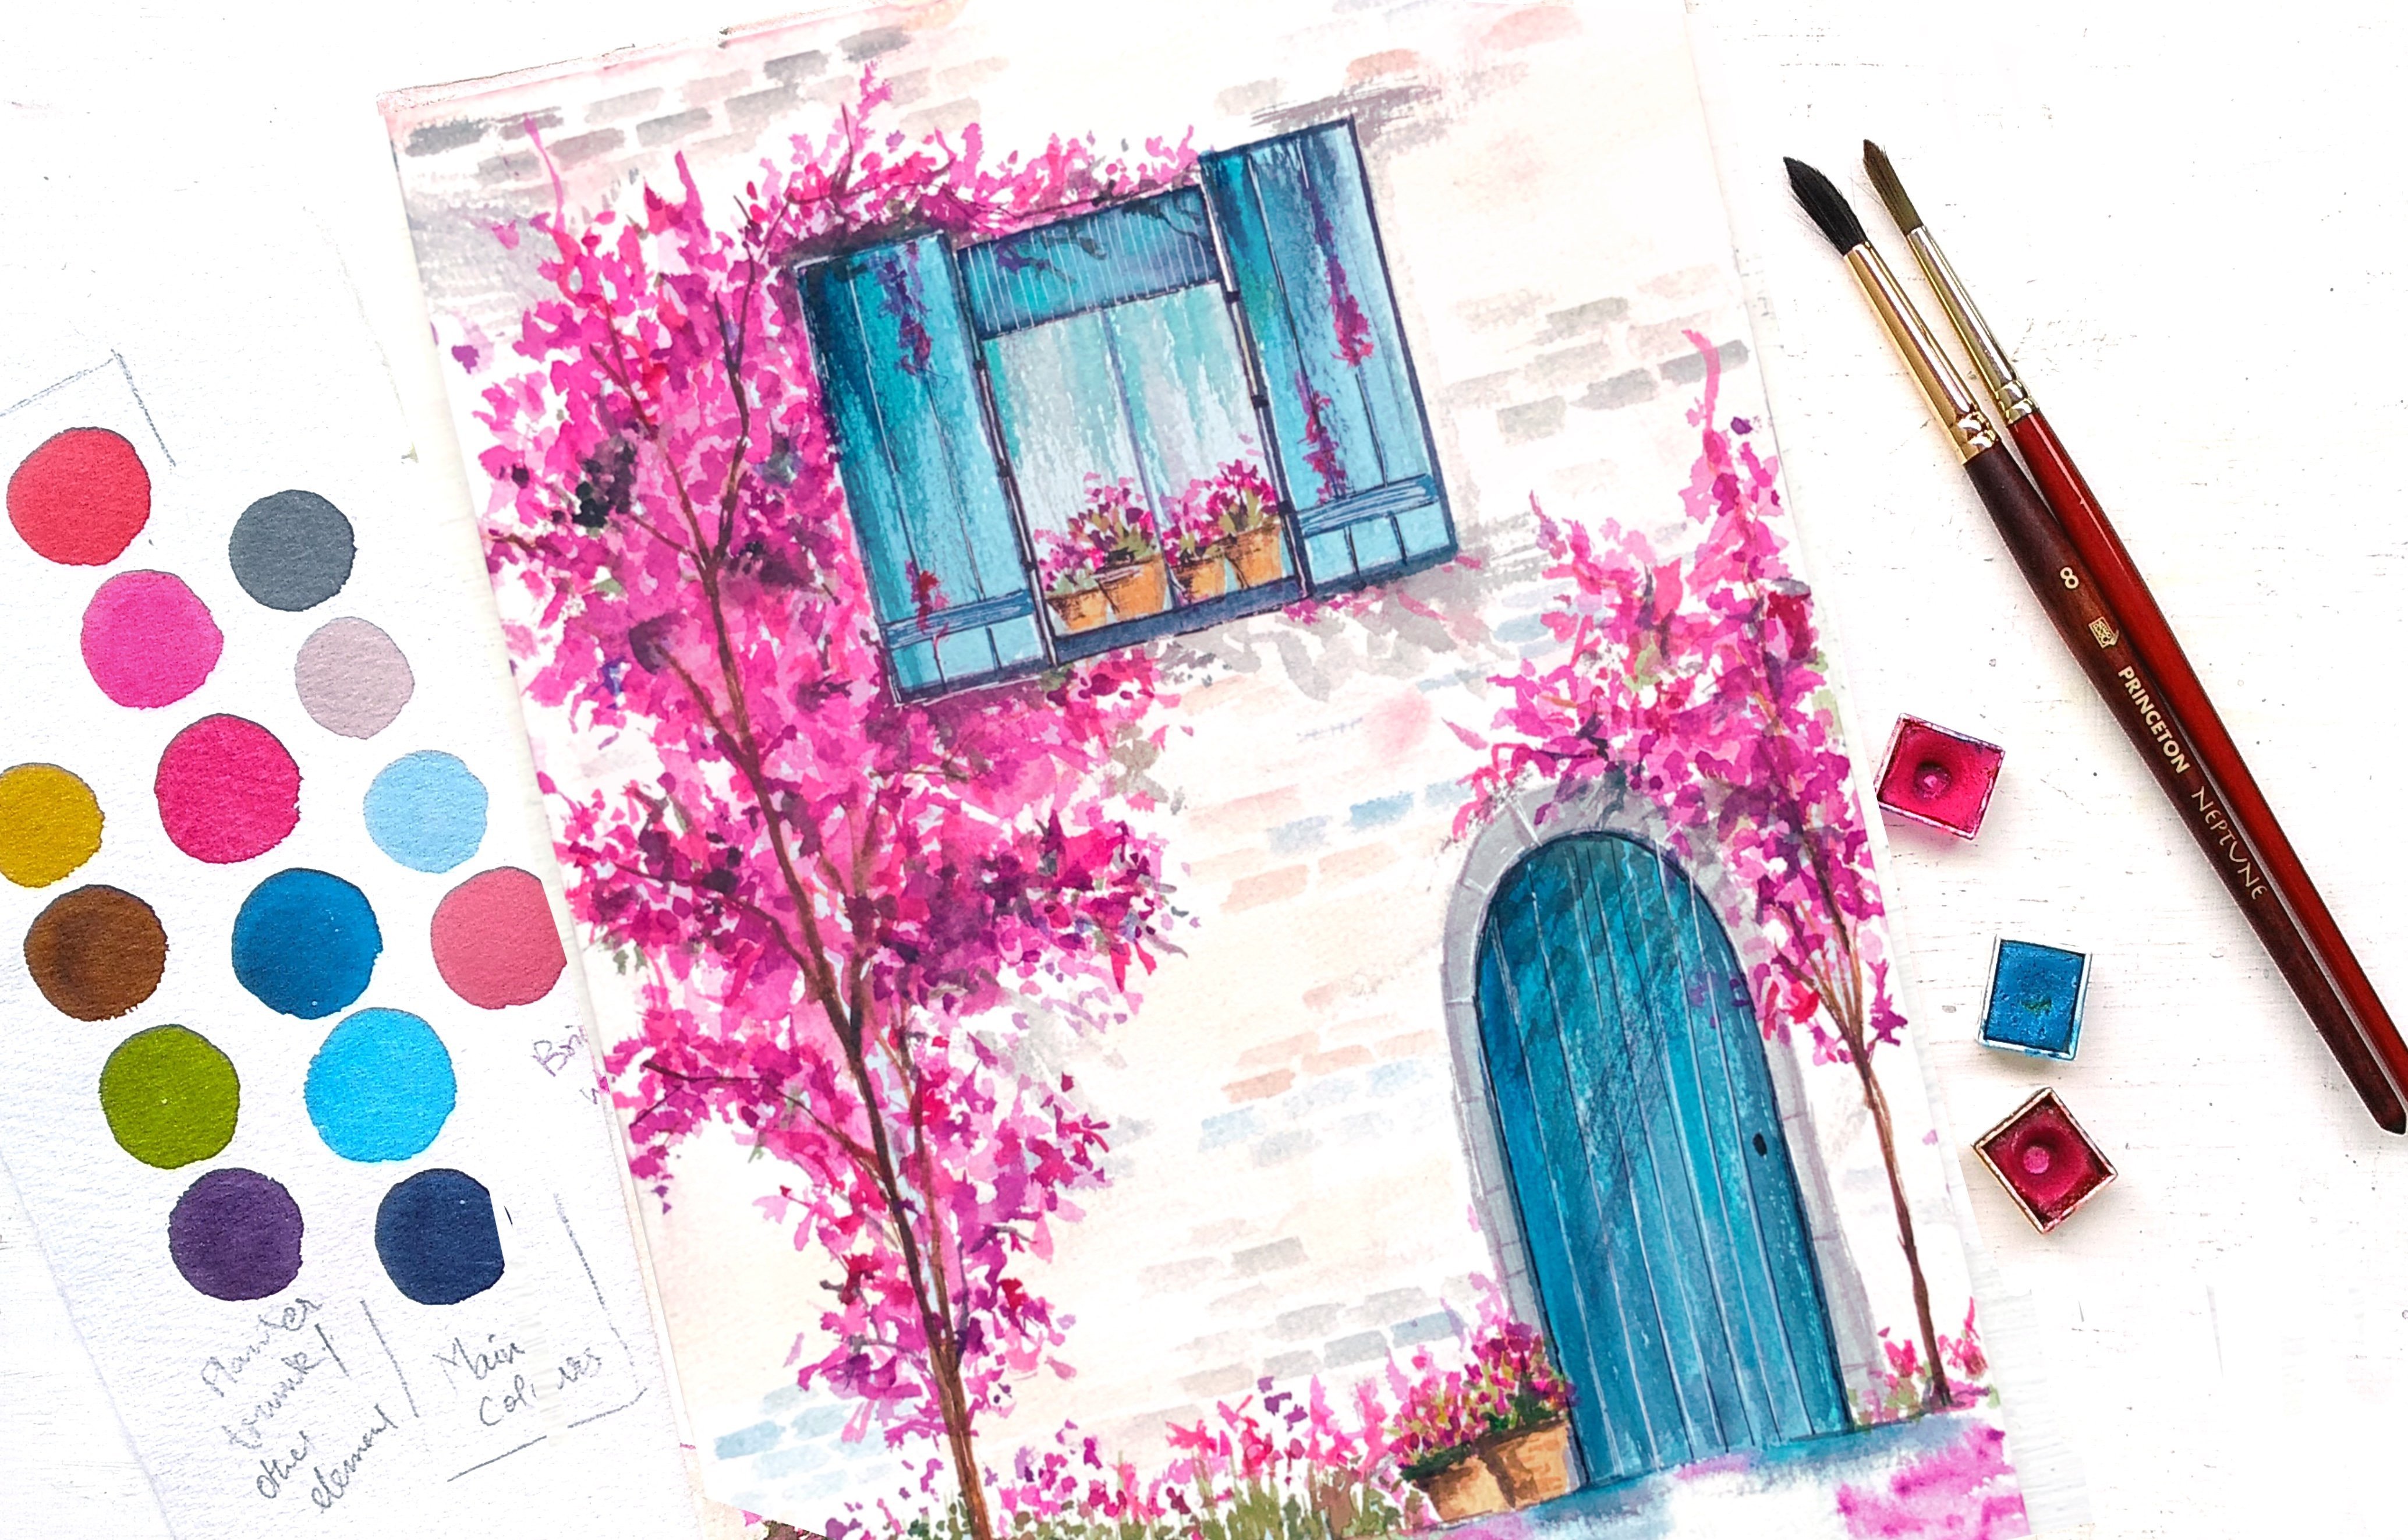
6. Sample class project - Door 1 - Part 1 : after having Lord off practice and basic sketching lessons, we would move on to our force class project, where I would be teaching you how to be the store, which have already illustrated before. First, you need to make a basic outline like this. I quitted in the last lesson, but it was a very rough with understanding. And then this one, you would need to do a fair sketch like this. Very rough. Just the outlines will do. No details are required after you're done. With this catching, you can take your pen and convert those pencil lines into pen lines. It was just very likely you don't have to formally press you open and then do it. Just single line or planes were doing. Don't overdo with your pens like 2 to 3 times. Just one fine line would look meat. And then, as you're illustrating the door with the pain you can all soldiers roughly draw these details on the doors. I'm comfortable doing them just with directly with pain because I'm used then I have a lot of practice, but if you're not very confident about doing them, like with Ben, you can always told them but pencil first and then probably do it again with the pen, adding some simple details to the top part off the edge. And I'm just drawing some random patterns. You can also do whatever you feel like, and I just finished off. But make sure that it's very simple and not complicated. And to find David the door looks fine to me. Now I would think the planters, and one more thing is that you don't have to also, necessarily for low your pencil marks except for the doors like you see here for the plant . I'm just randomly doing it on my own, even though I have sketched it before. It's like it just comes in the floor so you can only do that after you're done with the plant owes. The next is the Briggs. Brakes are very simple. You just do these L shaped lines and keep it just alternatively in every row that you do. And another thing you need to keep in mind while you do. This is you don't have to put a Lord off fresher and then have those perfect brake lines. But if you just do it little freehand and with less pressure. You will get thes knives, Lines will just take. And 10 which would automatically make your sketch look interesting. And like, Imagine, of huge is put all the bull lines for the break. The break is going to be the highlight and you don't want it to be the highlight. So you just followed this light way off sketching the brakes and the bottom. You can just feel it off random lines like this. And once you're done with sketching, you can grease off all the pencil marks and you're ready to paint. Ah, first class project.
7. Sample class project - Door 1 - part 2 : uh, after all the ink workers done, we would for the moved on to painting the store illustrations step by step. And I've kept a video mostly really time so that you can paint along with me first for the door. I'm giving a wash off light blue color, and I'm just painting that all over the first layer is just the light layer, and the next step is to put a background for the bricks. First, I'm gonna read the entire wall area with just clear water and just put this page Carlo and do the weapon with technique. If you closely observed, I'm not painting all over the break area. I'm just painting fuse random areas and leaving other pleases. Wait. If you don't have a perfect beach color like this, you can probably use a ready diluted brown for this after the brick wall. Next we would paint is the sports, and I'm just putting a brown color on the top off the board and just with Clearwater pulling the pigment and spreading to the rest off the part. So this gives our grated wash effect, and I'm adding a little yellow color to bring in some contrast, I will repeat the same for the plant toe, which is attached to the wall after bending the boards. The next is painting the plans for which a big allied green color on painting these long brush through, um, on the rights that, um, painting smaller brush tools, which would cover the area off grass. And when this is still wet, I pick a little darker shade off green and then just randomly put it or the lighter shade so that it brings in some light and dark contrast. And later on, I'm just picking little off bright pink color and doing the small brush talks, which re prison flaws. It need not be very both. It can just be ready to lose and random style, and to bring in more con trust, you can add another color like I'm adding little off poeple, which would give a nice contrast pink, purple and green with the blue door. And then he was the seam violet color. You can paint the outline off the door and which would represent the shadow part, and then they would come back to the door and giving some picture to the door. So basically using the dry brush, Take me and a big Sadako shake off the same blue that is like more pigment and less water and doing this driver stroke, which would give in a plastic effect of the door. And when the blue Leo that we added a still. But I'm just taking a little while it and adding a word so that it brings in some a little contrast to the entire painting, like it would be in sync with the flaws that we add in the background and everything I feel it looks really impressive.
8. Sample class project - Door 1- Part 3 : after the basic layer. In this lesson, we would be adding some additional details to the store illustration. So first I would start by he telling the brick quarter forward jump, adding a little lighter shade of brown and just doing these random stalk with food, we could look like the rustic break. Do not paint this brown all over the wall area because we don't want to hide the previously or that he added to just painted very randomly and lightly in here, in there, - after you happy with your brick wall, we would add some reflection towards text a mixed black with little purple over here, and I'm just doing a radiant wash from top towards the bottom. Off the step and with the same color, I would add another layer to detail the talk part off the door. You observe, have played with the violet color and my plants. I mean the flaws, the reflection on the step and the door and reading. So when you have some random colors here in that overall painting looks ready, expressive, and that is how I paint most off my door paintings. Now I'm adding a little bit off shadow toe the plants and somebody close to the boards, just a diluted black. But if you wanted little more doctor, you can do it. Little Darko and I'm adding a little bit off poeple here in their win. It is still bread, also adding some purple toe the steps, and after you're done with firing, the basically is you can take oh black gel been I mean, though, micron pen, and then you can add the's highlights with the pen because it is ink and watercolor illustrations. So when you add some shadows with these fine strokes or to find a pen lines, it would look more impressive. And I think the no looks little empty. And so I think I would add some details toe wet like off read just drew a simple so called directly with the pen and just with pink color, I would be very random stalks would being something like which would look like flus. So all the small details when you add your painting becomes much interesting to look at, um, adding some more final touch ups to the painting, like some dry brush strokes and from highlights and shadows. But if you feel like your painting. It looks pretty as it is. You're going to stop and not at any more details. I'm just adding some random strokes again, and now it's time to add some highlights with the white gel pin. So adding this highlight with this white friend is not like outlining the door or the entire did just like adding cured in the white lines. - And once you're done, looked back and admire how beautifully painted it is very important toe enjoy while painting rather worrying about the output and the final. Anyways, this was a sample class project where you try to lose, it appears, kills and try painting a door. And the next lesson I would be showing you how you can peaks Year two and paint your own different types off your illustration.
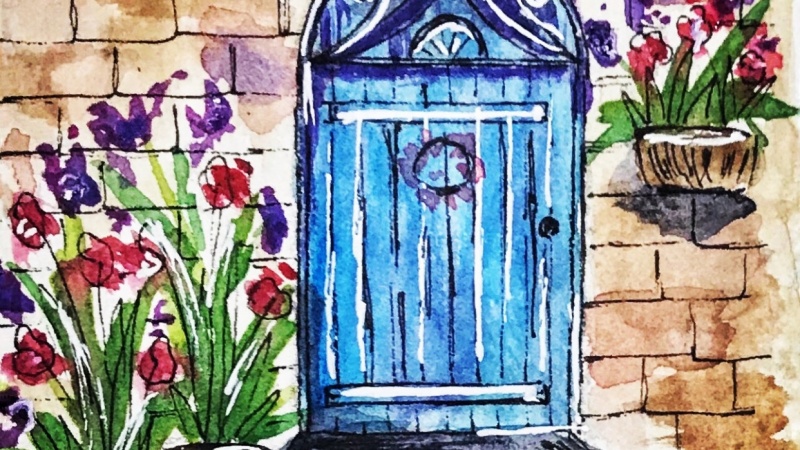
9. Final class project - Door 2 - Part 1 : Now it's time for the final class project where you can be completely creative with the ideas you already have. All probably you can even dreadful for idea. But if you're not very sure what to do, then you can follow me and see how creatively I evolved. Door illustration. So to begin with, I'm doing great, and this is like a Tom nails catch you besides on the elements that you want. I'm choosing a Gothic arch door between did in the practice lesson and in this one would be adding trees so that you can learn how to paint a tree and that foliage strokes after the thumbnail sketches. Then you can transfer the sketch into your watercolor people and draw it neatly on the size that have chosen this comparatively little bigger than the type of illustrations, which I toe because I'm not very sure if everyone can paint in that size. And the paper here is not very good into any size. But if you want to do and proper size of people, you can do models. You can just draw such boundaries and then paint, and the sides you can probably use to do another painting or practice. So first is the door, as I said before and for this one instead off steps. It's gonna be a road kind of thing about three. And another thing is that when you have a Tom Neal sketch, it's not necessary that you need to stick toe those elements and what we have sketched in that you can add it like extra elements like trees and more plan toes and all that and and then I also adding or lamppost to this one. And once you're finished catching, you can take your pen and just think the illustration, and then you can sketch the break like this all over the wall area. It doesn't matter, even if it overlaps the tree, and lastly is catching the detail off the door, just offsetting the door shape and dividing into different Hobbs. Big this. Make sure you it is all the pencil lines before we start painting this in the next
10. Final class project - Door 2 - Part 2: for a change. I would be using the's prima logical of concentrated liquids to bread the war regular half pants, mostly because they're so vibrant. And most off my many door illustrations are painted us with this liquids and they give a wonderful effect. So I'm gonna make sport and use them in this, and you can also see how different they are. But you don't need to have these. I'm just showing you so that you can see you can paint with the watercolors that you have. Also, this lesson is gonna be a little speed up because the first layers are almost the same as the sample projects. The first step is to obey the door, and my color palette is gonna be almost the same as the previous one. Because I really like painting those in this color scheme, which is which makes it look magical and whimsical. You can choose your colors if you want. If you want to change the colors, you can probably teaching. But I just want to keep a little whimsical and, you know, magical Door City. So this is my color scheme, and I'm giving a background wash to the brake oil do. And since we have lamb posed, I'm giving a little light yellow shade over here as if it's like lowing and smudging with the brick Kahlo. And then just to make it a little more colorful, I'm mixing little brown with pink and giving this peachy brown by grown for the brick wall . And like we did in the previous painting, the sample project, I'll be painting the bods and the plans and plus, so you can also do the same.
11. Final class project - Door 2 - Part 3 ( painting tree ) : after the basically er is done, he would be to tree now this lesson escape really time so that you can paint along with me and learn how to paint a tree with the foliage strokes to force them. Just painting the branch off a tree with brown color. And before we've being directly though foliage, I'm just gonna the street in the side and show you how to be. Probably you can also do in a practice sheet. These strokes are very simple and easy and very random. So first, what I do is using a 10 a brush. And with that, what I'm doing is I'm creating smaller strokes in different angles. And then, after creating keystrokes, I paint them closely without leaving much off cap, just repeating the same again so you can watch it closely, just like different angles. I don't bottom side and all that, and you can even overlap them off, probably to say it just like just scribble or doodle something with the paintbrush. So there is no perfect way off doing this just buried random and mindless and as simple as that, probably you may require a little more off practice like this before you do it in the painting. Now, I would be in the tree in our illustration, and I'm just repeating the strokes that I thought you. And another thing is that when you come towards the bottom like somebody close to the door , you can probably add some small like foliage teachers and something lose. Like, you know, you see, however, did these thoughts and small strokes and to bring in more contrast in to see what I'm doing us a mixing little purple and I would paint it over the being clear and also in between the pink foliage that were being just really randomly. And I think I need to diluted a little more so that the bubble is visible. Yes, this looks perfect. And I'm just trying to believe doing the strokes excited for the big one. Okay, to be harnessed painting, thes foliage stakes, a little bit of practice, and it doesn't come and just wanna do painting. There are chances that it might destroy our entire painting, so a bubble of practice would do. It still takes a little effort for me to be in them, even though it looks effortless for you. Yeah, and once, um, done with the violet clear. Probably next. What I would do is add some green in between and I'm adding green is because toe bring in the color violence on the contest and the entire painting. If you observed that the bottom have painted the plants, which has more off green and a little bit off pink and violet and on top balancing the Kahlo's by adding more off purple and pink on a little bit off green thieves. And they're definitely going to be these white gaps in between. And what you can do is a diluted painting color, which was basically a light pink alot, rather adding or pigmented think, and I'm repeating the same for the tree on the left side. But since those already a lot off college on the right side for this side, I'm just keeping it reading, minimal and less. And a very important thing that you need to keep in mind while you're being these trees is to look back and see if you feel satisfied with it. Because if you just keep doing these, it might just pouring the painting. So you really need to know. I went to stop it
12. Final class project - Door 2 - Part 4 - Detailing : in this lesson would be adding all the final details necessary to complete this painting. And to begin with, just pinking thes Blakes with a lighter brown Carlo. I am just painting it around the tree and the foliage and the plants and very would that is the white cap. That is often a point where you feel that being think looks No way. But the painting actually begins to shape and come to life only when you had these details . So when I'm gonna add these details, the painting is gonna turn completely different than it looks. It might look very dull and unfinished, and you might not even be encouraged to finish like you're painting when you have free throw. It happens to me so many times. But then I know that the details worked like magic. So never be discouraged. Toe, leave your painting and half, no matter what it is, always complete them because you never know how your creativity will flow and what you might end up in tow. Okay, now, coming back to the painting, I'm just putting a bluish wild color on the blue door when it is still a bit so that It brings in overall contrast in the entire painting. And next I'm taking oh, Freddie, pigmented violet Kahlo and just painting the door frame with that color. So it becomes like a shadow. And then another favorite thing to do here is just put a little wild color and then do grated wash to the entire pathway and do some reading red. So it would be like reflections on the part tree, and it would give a beautiful effect. When it is completely tried. You see how it is already making the painting look be beautiful, Dan itwas before adding , Somebody deals like the flaws on the side of the door on the wall plan toe and that's it. You almost done. And next you can just grab your white men and do some tailing in the door.
13. Conclusion : After cutting out the painting, you would have two beautiful dough illustrations, all painted by yourself. I hope that you enjoyed painting these illustrations today. I would really encourage you to paint more such two illustrations in different styles and colors that you like. My personal favorite color combination for such lose door illustration is the pain blue and the violet. That is what we used for today's class. But you can always play around and create as many unstow illustrations you like, and these are some experiments with other colors, which I'm not really happy with, but I still keep trying. And before you leave the class, I would really appreciate if you could take a moment to write a class review and let me know. What do you think about my class and your thoughts on my teachings? You can also share your class projects with me on instagram and also skills. I would love to see what you create. I will see you soon in my next skill shackle us. Until then, happy painting took you and remember to have fun while you paint and not worry about the distance. See you have a good day. Bye
14. Love watercolors ? Here are more class suggestions for YOU : way.
 Viddhi Saschit, Author|Artist|Surface Pattern Designer