Transcripts
1. Introduction: If you're anything like me, you want to dive in, sketching and drawing, creating your art. But the first sketch of the day often just
seems to go wrong. Luckily, there's a really
simple way to avoid that. That is warming up. Having a set of warm up exercises that you can pick and choose from to suit your mood and to suit your
scene can really help actually save you time in the long run it means
you're warmed up, ready to go, and you've honed in your sketching
skills for the day. My name is Toby, known
as Toby Sketch Loose, and you can find me
across the Internet, as well as of course
here on skill shap. My style of loose, ink and watercolor sketches are often using
continuous lines. Needs a bit of confidence, and I get that confidence by
making sure I'm warmed up. That's from very simple things like testing my mark making, getting my grip feeling
good for the day and getting those shapes
feeling loose and light. I then move through from very simple exercises to more real world
three D exercises, practicing a couple of
shapes here and there and working on my textures to
make those shapes feel real. Finally, I'll do
some thumbnails, especially if I'm faced with a challenging or scary scene. A thumbnail and focusing on specific things in
each thumb nail can really help me
feel confident and then nail my final piece of art. Most importantly, all of these warm up exercises are
great places to experiment, to give yourself the freedom to make mistakes and
feel good about it, to learn things and to
improve our art skills. With that, I'd love to show you the things I do to warm up, and I hope you'll
join in with me, have a bit of fun and perhaps
even learn something too.
2. Why Warm Up?: So today is all
about warming up. Warming up in sketching gives us a couple of key
little opportunities. Firstly, we check
our pen is working. It's flowing freely. If
it's a fountain pen, or the nib is working
nicely and not damaged. If it's a fine liner, you might want to check your
pencil sharpened knife. And in doing so, we avoid making that
very obvious mistake in our first real
piece of sketching, our sort of finished art we might be trying
to make today. The other thing is it breaks
us out of bad habits, and it ingrains good habits. For example, we might have
spent all week writing, and we're holding
our pen so tight. You can kind of feel that
tightness in your hand, and what we want to do,
instead of holding it, really tight, we want to be
holding it as a sketcher, as a drawer, as a
draftsman, nice and loose. And giving yourself
just a few minutes to literally practice the very basics is really important to making that
first sketch go well. Because I know, for me,
if I don't do that, my first sketch it
just doesn't work, and I can never
quite work out why. Until I remember, I
haven't warmed up. Now, the structure of
today's class is lots of little bite sized
lessons as usual on skill share with the idea
that we have three sections. The first section is looking at simple mark making two D shapes. The second section is building
that into three D shapes. This is where things
become a bit more real. The final section is a real practical
application of the warm up directly onto your scene or the type of scene
you might be choosing. I've chosen a fun night scene today to do my final section on, but you might be out and
about urban sketching. So instead of choosing
a specific scene, you just choose a
range of ideas, urban ideas that
you might sketch, or perhaps you're doing
some still lives. So you just choose a
couple of different still lives to do your
thumb nails around. When we're all done, I'd love
you to upload your project. Now, that might be one of the first two pages we produce of little warm up exercises, or it might be your umnails,
or it might be everything, or even the finished project, the finished sketch you
create after warming up.
3. Supplies: All you'll need for today
is a pen or a pencil. I'll be using my fountain pen, but you could just as
well use a fine liner or, as I said, a pencil. The other thing that
we'll need, and there's literally just two
things is a sketch book. So I'm using my very cheap
own brand sketch book here. This is letter size, and you can see I've
divided my page into four. But if you're using a
smaller sketch book, you might do one exercise per page or two exercises per page. That's all that you need today. Now, remember, today
we're going to go through all the types of things
I might do to warm And in doing so, we'll create a lovely few
pages in our sketchbook. You don't need to feel
the need that this is something you have to do
before every little sketch. Instead, this is a series
of tools you can use. In your little artists
kit bag, if you like, little tools you can take out
to feel more confident in starting your sketching and in approaching more
challenging scenes.
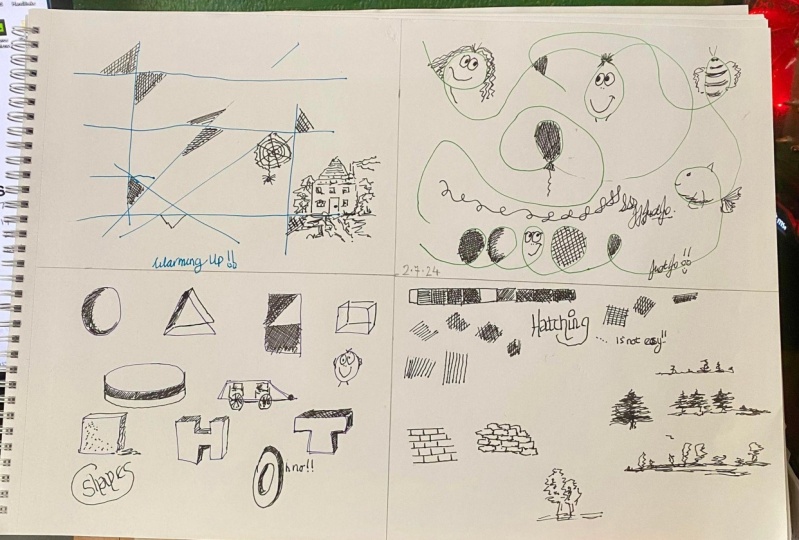
4. SECTION ONE: Here we are. Section one. Section one is the
simplest of the warmups, but in many ways,
the most important. Everything we're doing is
two D in this section, simple shape, simple lines, just getting the pen
flowing, the pencil working, nice and sharp, and feeling that confidence in our
loose and character lines. I've divided my page into. This is an A or letter size
sheet of paper I'm using. If you're using a
smaller sketchbook, you might just divide
it into two or even use a different page
for each exercise.
5. Lines and Marks: This first exercise is
all about mark making. Here, we're checking
our ends working, and we're getting out of that tight writer's grip and into a more flowing
characterf line. There's keys here, though
to keep the line controlled that we're going
to talk about and avoiding scribbling as well. Ingraining those
good habits right now for the rest of our
sketching session today. Nothing we're doing
today is rocket science, but all of it has a
little bit of a point. And the first exercise is simply to get our line character going. What can happen when we've been sort of working all
week and doing lots of drawing and writing and holding our pen with
this kind of writer's grip. Suddenly, when we try and draw, everything ends up old and clunky and sort
of uncomfortable. And if we draw a line, it looks a bit like
this, which is fine, but it's not fluid. It's not flowing,
it's not exciting. So we just need to remember to just drop our grip,
loosen our grip. What we're aiming to
do with our lines is have them a
little bit lighter, a little bit more agile, that little wobble in them, which just feels
more interesting. Suddenly, if we draw
this same house, and we have our
looser lighter line, it kind of evolves
in front of us. It's a far more
interesting shape. This is just as important
whether you're using a pencil. A fine liner. Or, of course, what I prefer using,
which is my phantom pens. We're aiming for that
light and loose grip. Try different characters of
line and see what happens. Now, all we're doing then in
our first minute of drawing our first warm up is focusing on that loose grip,
trying different grips, loose like this,
loose like this, just avoiding that
tight writer's grip, and drawing lines, keeping them loose and light with a
little bit of movement. Draw them at different lengths, bit longer sometimes. Try different directions. We'll come to this in one
of our future exercises, but we'll all have
different directions, which are a little
bit harder for us to draw in than in others. For example, for me, this
line, this is the hardest. And just work on keeping
that line feeling straight, but also feeling interesting and not bold. That's
all you need to do.
6. Flowing and Looping: So we've mastered our
straight lines again, we're going to
move on to looping and swirling lines, here, feeling a bit more agile and getting a bit more variety
into our linework. Having mastered a ha pen and
got it flowing again nicely. The next thing to do is try looping lines and
swirling lines. Here, instead of doing
long straight lines, we're trying to gradually introduce curves and
changes in direction. Again, we're trying to avoid
that scribbled feeling. Instead, this should be a line of controlled looping lines. You might also, at this point, start playing with line variety. So what I mean by that
is press a little bit harder at times and you get this idea of this
line flowing out, a little bit like nice
calligraphy writing. And just again, connect the
sort of swirling lines, try and create something
which looks a little bit mindful and
pretty on the page. And that's all you
need to do for this. Getting into that motion,
that smooth swirly motion.
7. Average Your Shapes: Next up, simple shapes, two D shapes, circles, squares, triangles, other shapes with more sides than that. The idea here is, again,
to keep things loose. Avoid just because we're
doing something slightly more complex or slightly more
exact in how we're doing it. Avoid going back to
that writer's grip, allow e shapes to average out. And I'll show you
exactly what I mean by that in this next
couple of minutes. Having worked on
our straight lines, our swirly lines, and
kept that control going. The next thing to do
is build into shapes. So here, again, we're trying
to avoid that writer's grip. Whatever pen you're using, if you hold it really tight, you'll end up with
these bold shapes, you'll end up with things
which don't feel good to do, and they don't feel
that good to look at. And when they sort of build up, if you're building
up your shapes into some little scene
lots of bold shapes. Tend to not feel great. They tend to feel overdone, claggy or like a slightly
childlike bit of art. So when we're warming up, we're remembering these things, we're remembering
how to loosen up, and we're going to just
literally draw some shapes. They don't need to be perfect. In fact, what I would suggest is when we're drawing
things like circles, if you try and draw
a perfect circle, it will almost inevitably
end up quite bold. Instead, consider drawing
an average circles. You can do these sketchy lines, which kind of average
out to a neat circle. You can also play
around with ideas. So sometimes when I'm trying to draw a circle,
I purposefully go, you know, what I'm
going to enhance the texture of that circle. So this here, could
be a tennis ball. It's a circle, but we've just enhanced the kind of textures
that are coming from. Similarly, an apple, rarely is it a perfect
circle like this. Normally, an apple will
have divots and curves. So remembering that we're
trying to draw shapes, but we're trying to draw
shapes which might actually exist in the world in reality. And so having these
kind of bumps and bends is absolutely
okay, if not essential. So the exercise is to continue
on our little page here. Now, you're just going
to draw some shapes, not worrying if they
don't quite line up, being prepared to gently
average out that shape. When you're averaging it out, But you don't want to
create a really bold line, but going over and
over and over. Instead, you're just
accepting there's now two lines at some points forming the outside
of this shape, and you can do lots of squares. You can change them
to rectangles. You could move on from squares and rectangles to triangles or circles and the
dreaded ellipses, of course, often being one of the hardest things to
feel that we can master. But by just warming up and by remembering our
simple shapes, we'll suddenly be able to dive into our scene,
whatever it is, because everything in the world, in my opinion, it
is made of shapes, and we'll be able to
dive into our scene, just feeling a little
bit more confident about our shape finding shape
drawing abilities. So there you go. Finish off, fill up your little page or the sort of segment
of your page with shapes of different sort of angles and different
numbers of sides. And then we'll move on to the
next little exercise. Oh.
8. Hatching: Moving on now to textures, and the first texture we need to explore is the idea of hatching. This is a little way to warm
back up into your hatching, make sure your hatching
is nice and fine and nice and sort of
symmetrical and consistent, which is really
important when you move into using it in
your first sketch. It's time now to
work on textures. The first texture that we
normally use with drawing, be that pen or pencil, whatever we're using,
is a bit of hatching. H hatching is simple
repeated linear marks. These, perhaps unlike our long lines
we're drawing before, need to be quite uniform. Because if they're not uniform, if they're either
different in length, or different in direction, and they curve and move
in odd directions, or they're different
in their weight. Suddenly they're just
a bit too distracting. The idea of hatching, of course, isn't to distract division, but it's to start creating
the idea of light and shadow. So we can have a
simple value scale here, split into five. We go from light to
one layer of hatching to two layers of hatching to
three layers of hatching, and you guess it to four
layers of hatching. And it does take practice to
feel comfortable doing this. And I mentioned we'd be talking about directions here
feeling important. Because for me, hatching
in this direction is far harder to achieve than hatching in any
other direction. So it really is something
worth practicing on both for consistency, but also to reliably build up layers and depth
in your hatching. So back to my warm up page, and I'm going to start
by simply hatching. And I'm just going
to use the top half of this little square. And I'm going to try hatching
it consistently in patches, but at different lengths. And you'll find longer
hatching often, much harder, certainly
for me, it's much harder. We need to warm up our
wrist, our shoulder, even because one of
the keys to long hatching is if we just
do it with our wrist, we'll get this big curving line. And this always captures
me by surprise. If I haven't warmed
up, I haven't just practice my
hatching a little bit. I'll mess up the
longer hatching. And then complete the
other directions, get all of those little
directions warmed up. And then the last thing
to do is just try varying how close
it is together. So you get really
dense hatching, even just in one line. When you're feeling happy with how your hatching is going. We can move back
around our page, and we can use other
bits of our warm up to almost create fun little
bits of abstract art. This helps you practice the hatching within
a confined space. So you can practice how you
like your lines to meet up. So for me, I I've got a tiny bit of
overlap in my hatching. That's how I like to hatch. You might like it much neater. So you can practice now
moving your hatching on from simply just
practicing the motion. To practicing the motion what
could almost be ale scene. Do it in the swells, as well, do it in
between the swerves, and just have a bit of
fun filling up a few of these with little bits of
hatching and cross hatching. Now, one tip, Don't fill up
everything because we're going to want a couple of these for the next
exercise as well.
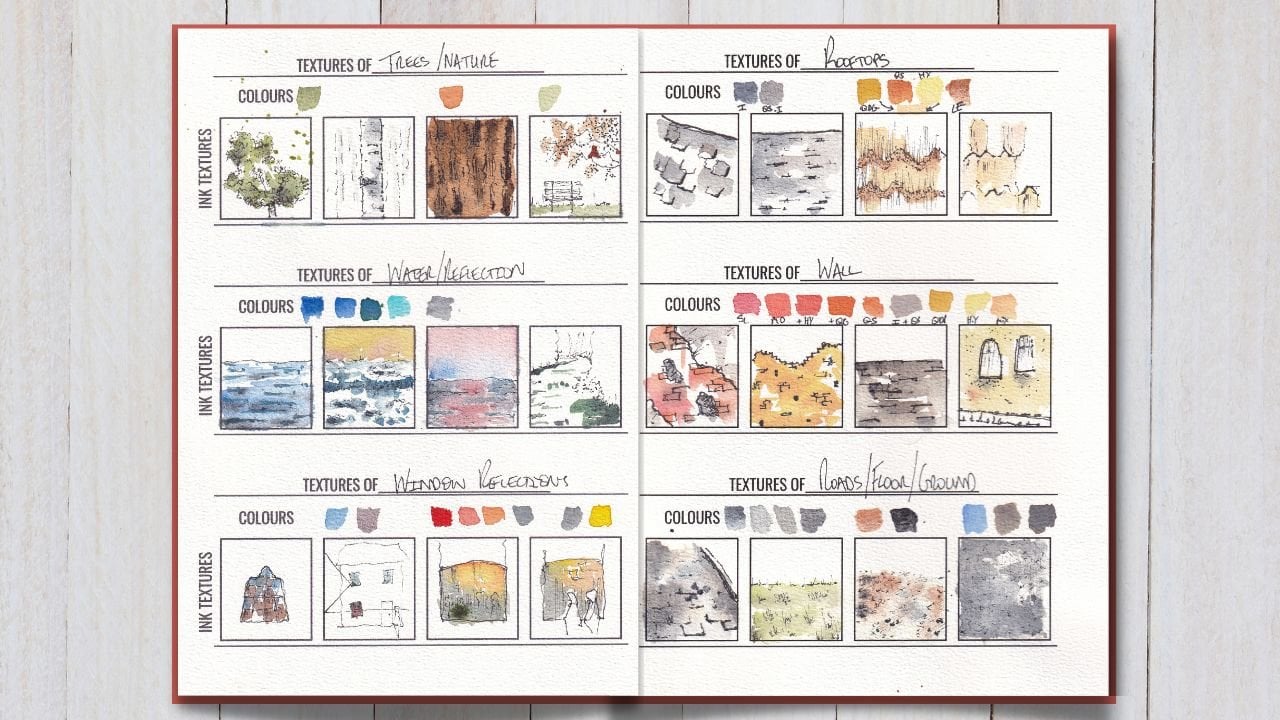
9. Textures of Materials: Of course, textures become more complex and
simple hatching, and that's what we're
doing just now. Think about
naturalistic hatching or natural textures
of bricks of leaves. Here, I would suggest you focus initially on things you
might be sketching today. If you're urban
sketching, that's going to be bricks and tarmac. If you are sketching
in the countryside, that might be leaves and grass. But also allow yourself to
explore abstract textures, circles, squares, odd shapes,
and things like that. Next on our agenda is to
keep working on textures and hatching like this
is one kind of texture. But another kind of texture or those natural textures we
do find out in the world. So for example, we have
textures in walls, a really easy example. There are lots of ways
we can achieve texture. For example, we
can get a sort of modern red brick by
gently using our long, slightly character lines, and then joining them
up with verticals. Equally, we can do
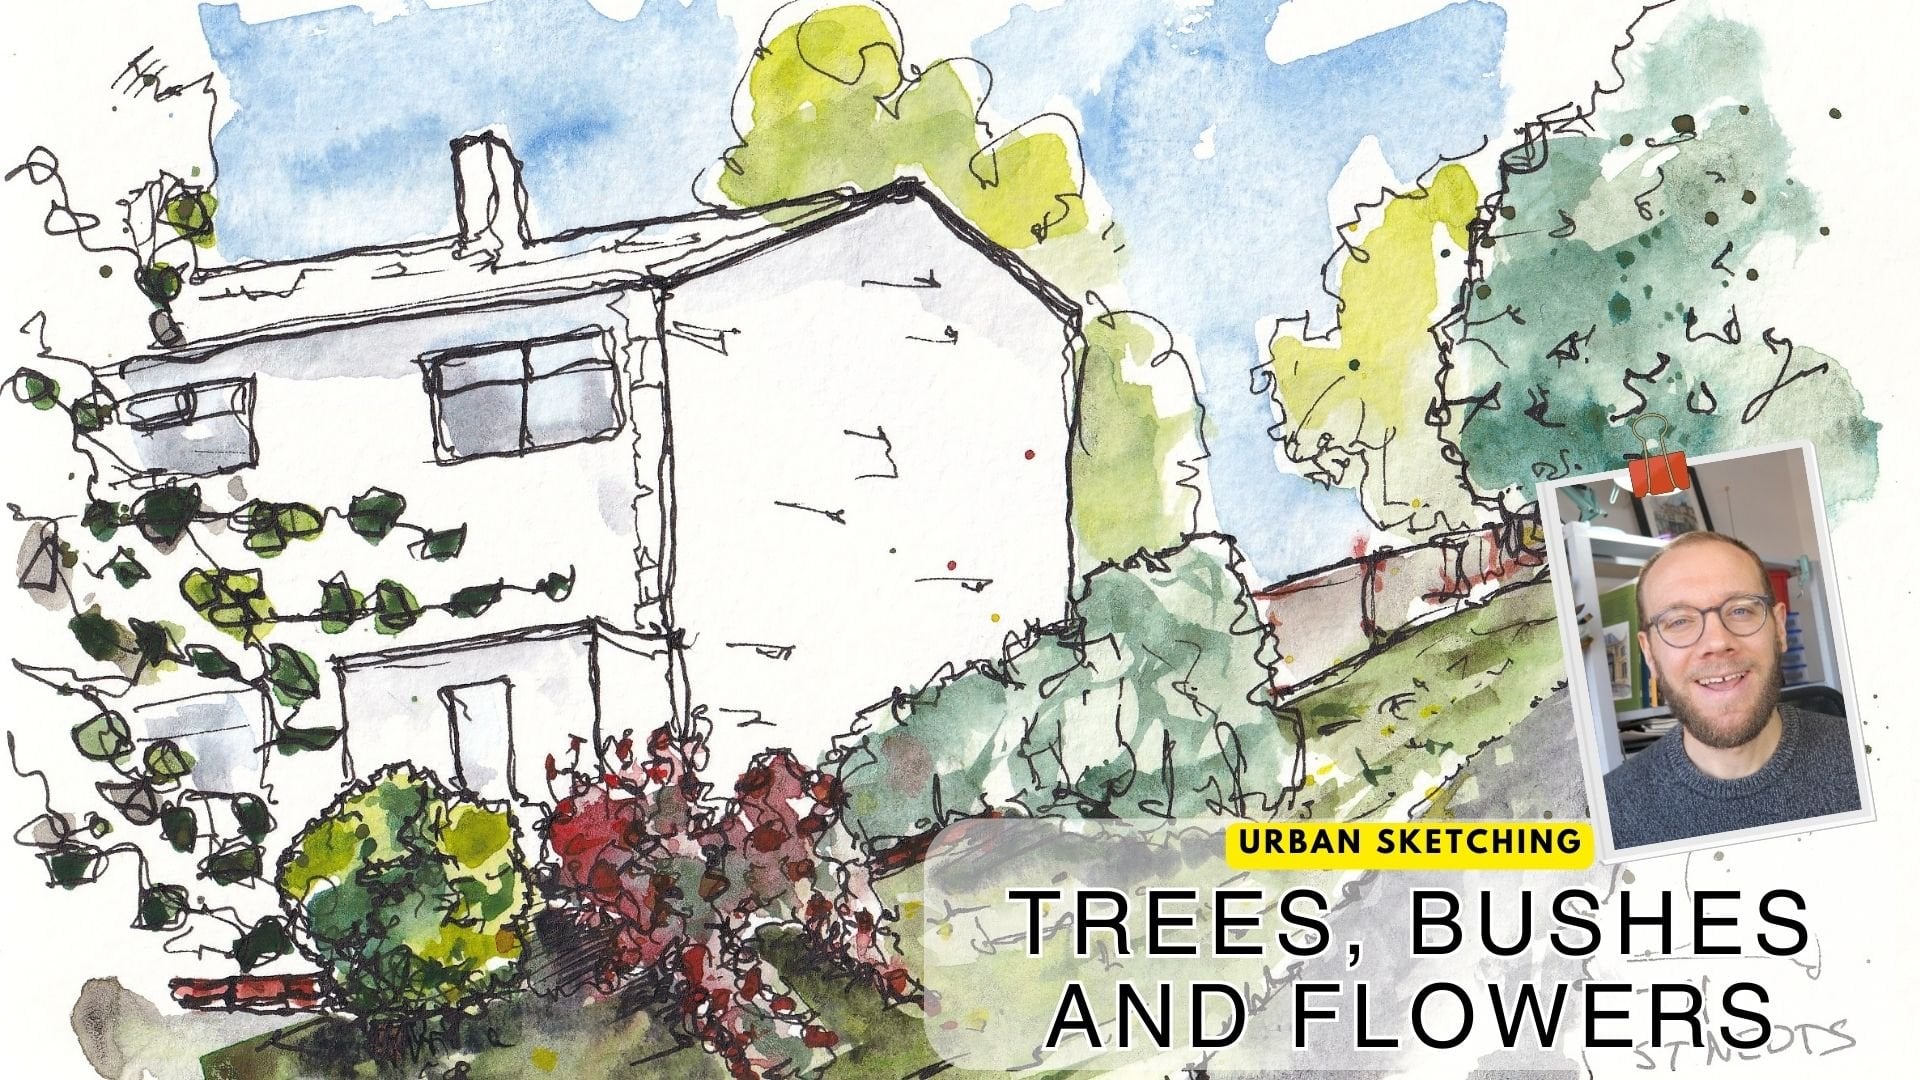
natural textures. So we can move to a tree. Now we've got our
sort of swirling looping circle that we've
practiced with again, lots of variety in character. And within that, we're going
to have different textures. We're going to have these
kind of natural tree like leaf like
shapes building up. And again, working
out different ways that we can do this
is how we're going to warm up and how we're going
to feel confident when we come to our scene that
we can actually do this, and we've done it already today. So moving to our warmup page, we've got our little
textures box now here. With this, we're
getting a little bit more realistic, aren't we? So I would suggest
trying the kind of textures that you
expect to encounter today. So if I'm out sketching in
the countryside, for example, or I've got a reference
of the countryside, I might start by doing
little simple bricks. So building up Well,
not even bricks. I mean like these uneven stones, which you might find
in a dry stone wall or you might find in an old
church, for example. Remembering that
kind of variety. Remembering also a little
bit of hatching might assist some of the
texture in our wall. We've done our red
bricks already. But if red bricks
are something you expect to encounter today, you might want to
really practice them trying them in
different sizes. These are quite square
red bricks, aren't they? But you might find really narrow long ones at other times. So just trying
different varieties of these different textures is something which you
can really get into. Really help you warm up into the rest of your
sketching today. Let's make mistakes now
and avoid them later. Moving on diferent bricks, you might want to try
textures of horizon lines. So you might find a sort of line of grass in your sea and just practicing,
do we like this? Do you want it more
loose and swordy? Perhaps in the distance
we have trees. So we are going to use our swardy lines here and
try different ways of producing trees in the distance as a little texture,
even like this. And then we can zoom in on
those textures as well, as we did before, try different
ways of producing leaves. Perhaps these little
angular shapes suit the trees you want
to be sketching today. Perhaps, though, you're not
sketching a tree like this, you're sketching a pine. So you want more sort of
lengthy or pointy kind of shapes to produce your
textures. So have a go. Think about what you
might want to sketch today or what you're
working on at the moment. And of course, you
might be expecting it, but the next thing
to do is going to be to start using
these same textures on the rest of your page. So just explore the
rest of your page, filling it up with
different textures. And whilst you're filling
up your page textures, don't be afraid to be
a little bit abstract. Textures are often about simply repeating the same little
shape over and over again, or with a little bit of variety. So literally practicing
lots of little circles, lots of little squares,
little scratching marks. All of these things
you might find have some utility in your
sketching in the future.
10. SECTION TWO: And with that, we're
on to Section two. And in Section two, we go
from two D to three D. Here, we're working out how
squares become cubes, how triangles become
pyramids and how, of course, circles
become spheres. I'm using a new page for this because I filled
up my last one. So let's move on and start
exploring the three D world.
11. 3D Shapes: It's time to get
from two D to three D. In this first little section, all we're doing is creating some three D shapes and getting our mind around
different viewpoints. And this has direct applications to what we might be sketching, and we'll look at that in this upcoming couple of minutes. It's time now to move from the bravely into the new world, the three D world. So all of these shapes here are two D. We've got s
triangle circle. They're all flat on the page. Now we can start advancing that. Instead of having
simple two D shapes, we're going to remember
our character fur lines, our law of averages when
it comes to our shapes. And we can start
making these three D. So we turn a square into a cube, we turn a triangle
into a pyramid, and we turn a circle
into a sphere. But we can see, it's not
as simple as that, is it? Because this circle still very
much looks like a circle. Now, don't worry about that. We're going to be
covering this in the next of our warm ups. But for now, I'm going to
go back to my warm up page, and we'll be practicing these more obvious geometric shapes. So because we've filled
up a page already, I'm onto a new page, of course, Here we're going to practice those three D shapes. Stick with things at the
moment, which aren't spheres. We'll be coming to those shortly in the next little
warm up exercise. Remember, lightly does it, Law of averages and try
drawing objects well, simple three D objects
in different viewpoints. We can find that one cube, we can see two
sides of this cube. We can see three sides of. Now these exercises are
sometimes a little challenging because it's easy to slip
up and get things wrong. But that's where these
light lines come in. And you can imagine
this could be a balcony on a
building, for example. And it is frustrating, isn't it? When we get that balcony wrong, and it all goes out
of whack because we just slightly misjudged
the perspective, for example, by practicing, moving cubes around and just, you know, not for hours. So people recommending
this for hours and hours, and if that's
something you enjoy, then by all means, but for me, not something
I enjoy very much. So It's just something to warm up with and
recognize that actually, a tiny little warm
up like this can really help in the
real world, you know, this could be a balcony, then this pyramid could
literally be a pyramid, or it could be with a
little more character, it could be a kind of mountain
or volcano in our scene or even the top of a tree or
something else in a cafe. So just practice
drawing these shapes, turn the squares as well into rectangles and see how
that changes things. And remember to try and
just imagine things in all different not dimensions, but all different viewpoints. And that way, you'll get
a nice well rounded page. Lots of mistakes, I'm sure, because that's how
things should be. If you haven't
made any mistakes, then you probably haven't
sort of stressed your system enough how to improve or
discovered your weaknesses. And we all have weaknesses. And just fill up this little square with
shapes with three D, with things which feel a
little bit more alive. When you've done
that, we're going to move on to the next exercise.
12. Shadows and Spheres: Now, we mentioned
there that we were swiftly and strongly
avoiding our spheres. And that's because some
shapes aren't easy just with an outline to go from two D to three D. Instead,
we need something extra. We need a bit of light and dark. And this is where our
practice with textures and hatching comes
to meet us again. So next, we are adding something else to
make things feel more free D. So these kind of feel three D already, but
not perfectly so. And this doesn't
feel free D at all. The thing which three
D objects have, which two D don't are
light and shadow. And this is where all those
hatching and textures suddenly come back into play. We can suddenly discover the
hatching has a real use. Not only does it
create a light side and a dark side of this cube, and sudden it
becomes more free D, it also displays its
interaction with the floor. This is no longer
floating because the shadow is on the floor. Here, this could be
floating because the shadow is being cast down here and we pop
in a horizon line. And suddenly, this is elevated off the top of our surface, whatever this happens to be,
whilst this one is sat down. Now, with a sphere, there are two main options that we
can do for our hatching. Drawing two bigger circles, and look, the law of averages, it works sometimes and here, we've got a one key circle, but just by keeping
the lines light, I'm able to get over that. Two ways to do it. So we can use our simple
linear hatching. That works absolutely great. We can just apply that simple
linear hatching and get it darker and darker going
towards the darkest area. Also, we can use hatching which follows
the natural curve. This is a little
more time consuming and definitely worth practicing, but you just introduce
lines which are curving around with the sphere. They need to stay
parallel to one another, and they still need to
not be inconsistent, but they can come
round both ways, so we can come round like so. As well. These are
all just building up that sense of light and dark and a little bit
with hatching like this, it builds up the sense
of the form as well. It builds up the sense
of a smoother object. Now we can take
all of these ideas back onto our exercise page. So draw yourself some curved
objects over this side, some circles to practice on, and Also things like
rectangles with an ellipse on. This is now a cylinder, and we can draw a couple of different sized
cylinders as well. And on these, we can
start practicing our hatching which
curves just at the edge, imagining a little bit of
light coming from the side. At some point in a normal scene, there'll be a horizon line
where the hatching is flat. And then it curves down. That's why the ellipse at
the bottom is curved down, the ellips at the
top is curved up, at some point in the middle, it will be in the middle. A little bit of
vertical hatching. This is where we practice
that long hatching, which is not easy to do, and you'll see mine
is far from perfect. Maybe there's a
bit of hatching at the bottom, bit of
hatching at the top. This is where things
are becoming very real. Because look, if we
pop a cone on the top, remembering a cone
is a three D object, perhaps we've got a tower. A couple of other
shapes in there. And we've certainly got a town. So hopefully, you
can start to imagine that these warmups are really directly relevant to what we're trying to achieve in
our sketching in general. They're not just nonsense.
They're not just silly. They're not just pointless.
They're really going to help. If you focus them around things which are of concern to you in your daily sketching practice or things which you're
going to be coming up, perhaps for example,
drawing a tennis match, perhaps you're drawing
some doughnuts, perhaps over here, you're
drawing some mountains. These shapes, all
this will help. Now, we can also move on
from using simple hatching, and we can use that what I
call naturalistic hatching, but those other textures. Here, we could have
these being brick walls. By building up more of the texture in one
side than the other, We suddenly end up with
a brick wall which has got a light source
coming from down here. The same with here and
perhaps this is a mountain, but we do more texture
to that mountain here, more trees, more
darkness underneath. On this side, we
leave it very light, just a bit of hatching
at the bottom. Now we've got a
mountain with texture. Equally, we can keep
it nice and simple. So just explore now with these ideas, explore
with hatching, explore with textures, turn your simple shapes
into three D shapes. Now this is supposed
to be a warm up, just do the things which
feel relevant to you today. Don't forget, you're also
allowed always allowed. Everything's always
allowed, but you're encouraged to try
abstract things, try different textures,
see what those might do when you're trying to build up a three D sense of an object.
13. Simple Observations: Now that we're feeling
more confident with three D shapes, it's time to put three
D into sort of reality. So take a really simple object. And I'm going to show you how
I will now start to explore observational skills and using all these other things
we've been warming up to. So observation meets three
D shapes, meets hatching, textures, and even we might build on that in a
clever little way at the end. Now that things are
feeling more real, it's time to start
drawing objects, little things in front of you if you're needing
a bit more confidence, and this helps with our
observation skills. We can draw really simple
things I could take, for example, this bottle. What I'd suggest is
starting off with a really gentle conto drawing. So we're really constantly
focusing on that bottle, getting into the zone for observing and because it's
a nice and simple object, we can't get to
stuck into details. Now, there'll be
errors that we make, but we're trying to just get that idea into our head of a
simple, interesting conto. So that's that varied
line that we practice. That's the straight line,
but with character. Also, we're starting to look
at how to make this three D, how to accurately
get the shapes, and how to accurately
get the textures. It doesn't have to be
super accurate, of course. Here we've got light coming from this side going over there. I'm going to start by
some simple hatching using these simple hatchings that we've already looked at. A bit of hatching down
like this as well. Now here, this is paper, and I don't know if
it comes across, but you might be able to
hear It's quite rough. So I'm going to be
able to just get that idea of that
rough texture using some of these
interesting mark ideas that we've been
playing with earlier, as well as getting
some of the value. And if we want, we can
do some of the details, so we've got a big six here. Number 60, and this is the
company name up here as well. There's also a big line
of light coming through and it'll be slightly
different I imagine on where you're seeing the reflection to
where I'm seeing it. I've got it about here. And then underneath. I've got lots of darkness. Lots and lots of darkness. Now, if you're
feeling really brave, you could continue this idea. Look, I'm holding my
pot with my finger. So now my fingers can become part of our
warm up exercise. So we've naturally moved on from simple observation
of a easy subject, relatively easy,
although the reflections aren't easy by any means. And then we're moving to definitely what is one of the
world's hardest subjects. Drawing hands is
really difficult. But just give yourself a
bit of time and space, allow yourself mistakes.
This is the perfect time. You warm up is the perfect time to make mistakes,
challenge yourself, and perhaps even discover
something Little knew about what skills you
might not recognize you have. Again, simple hatching onto onto my fingers and my
proverbial fingers on the page, and we can suddenly say, L, we've got quite a
cool little sketch, and that is just
warming up observation through using a simple
object in front of us.
14. Brave Observations: Having done your first
simple observational sketch, perhaps built it up in a
slightly more complex way. You might want to then
explore something quicker and more challenging. So what I suggest now is
you try the same ideas, but do a continuous line and choose a more
complicated object, something a little
bit more scary. Allow yourself to make mistakes. But this will show you where you're perhaps
needing to focus today. Sometimes our line
quality is great, sometimes it's just not. If we have worked that
out at the beginning, that's what we need
to focus on today. It means that we prevent ourselves making
obvious mistakes when it comes to producing
our main project of the day. A fun exercise like this, do feel free to just repeat it. You know, these things
could take seconds. And what we can do is we can move towards more
complicated things. So here's me trying
to capture my camera, but I'm going to do
it this time with a quick continuous line. So this sort of puts a bit more pressure onto
the observation skills. It means I'll definitely
make more mistakes. The subjects more challenging. The way of drawing
is more challenging. But It also helps just get that muscle
memory in that flow. And it makes me
discover, you know, what am I doing right today? What am I doing wrong?
So perhaps here, when I've lost
concentration on my scene, what I've lost a little bit
is that light and loos line, this lines a lot
bolder than this one. So that's good. I've
used my warmup to discover a little flow in
my drawing process today. And that means that
I can correct it, or I can be aware of it rather than it being in
my first drawing, the first important drawing
of the day, then actually, it can be not in my
first important drawing. It can just be a part of the warmup, something
totally forgivable. And something that we can
move past really easily.
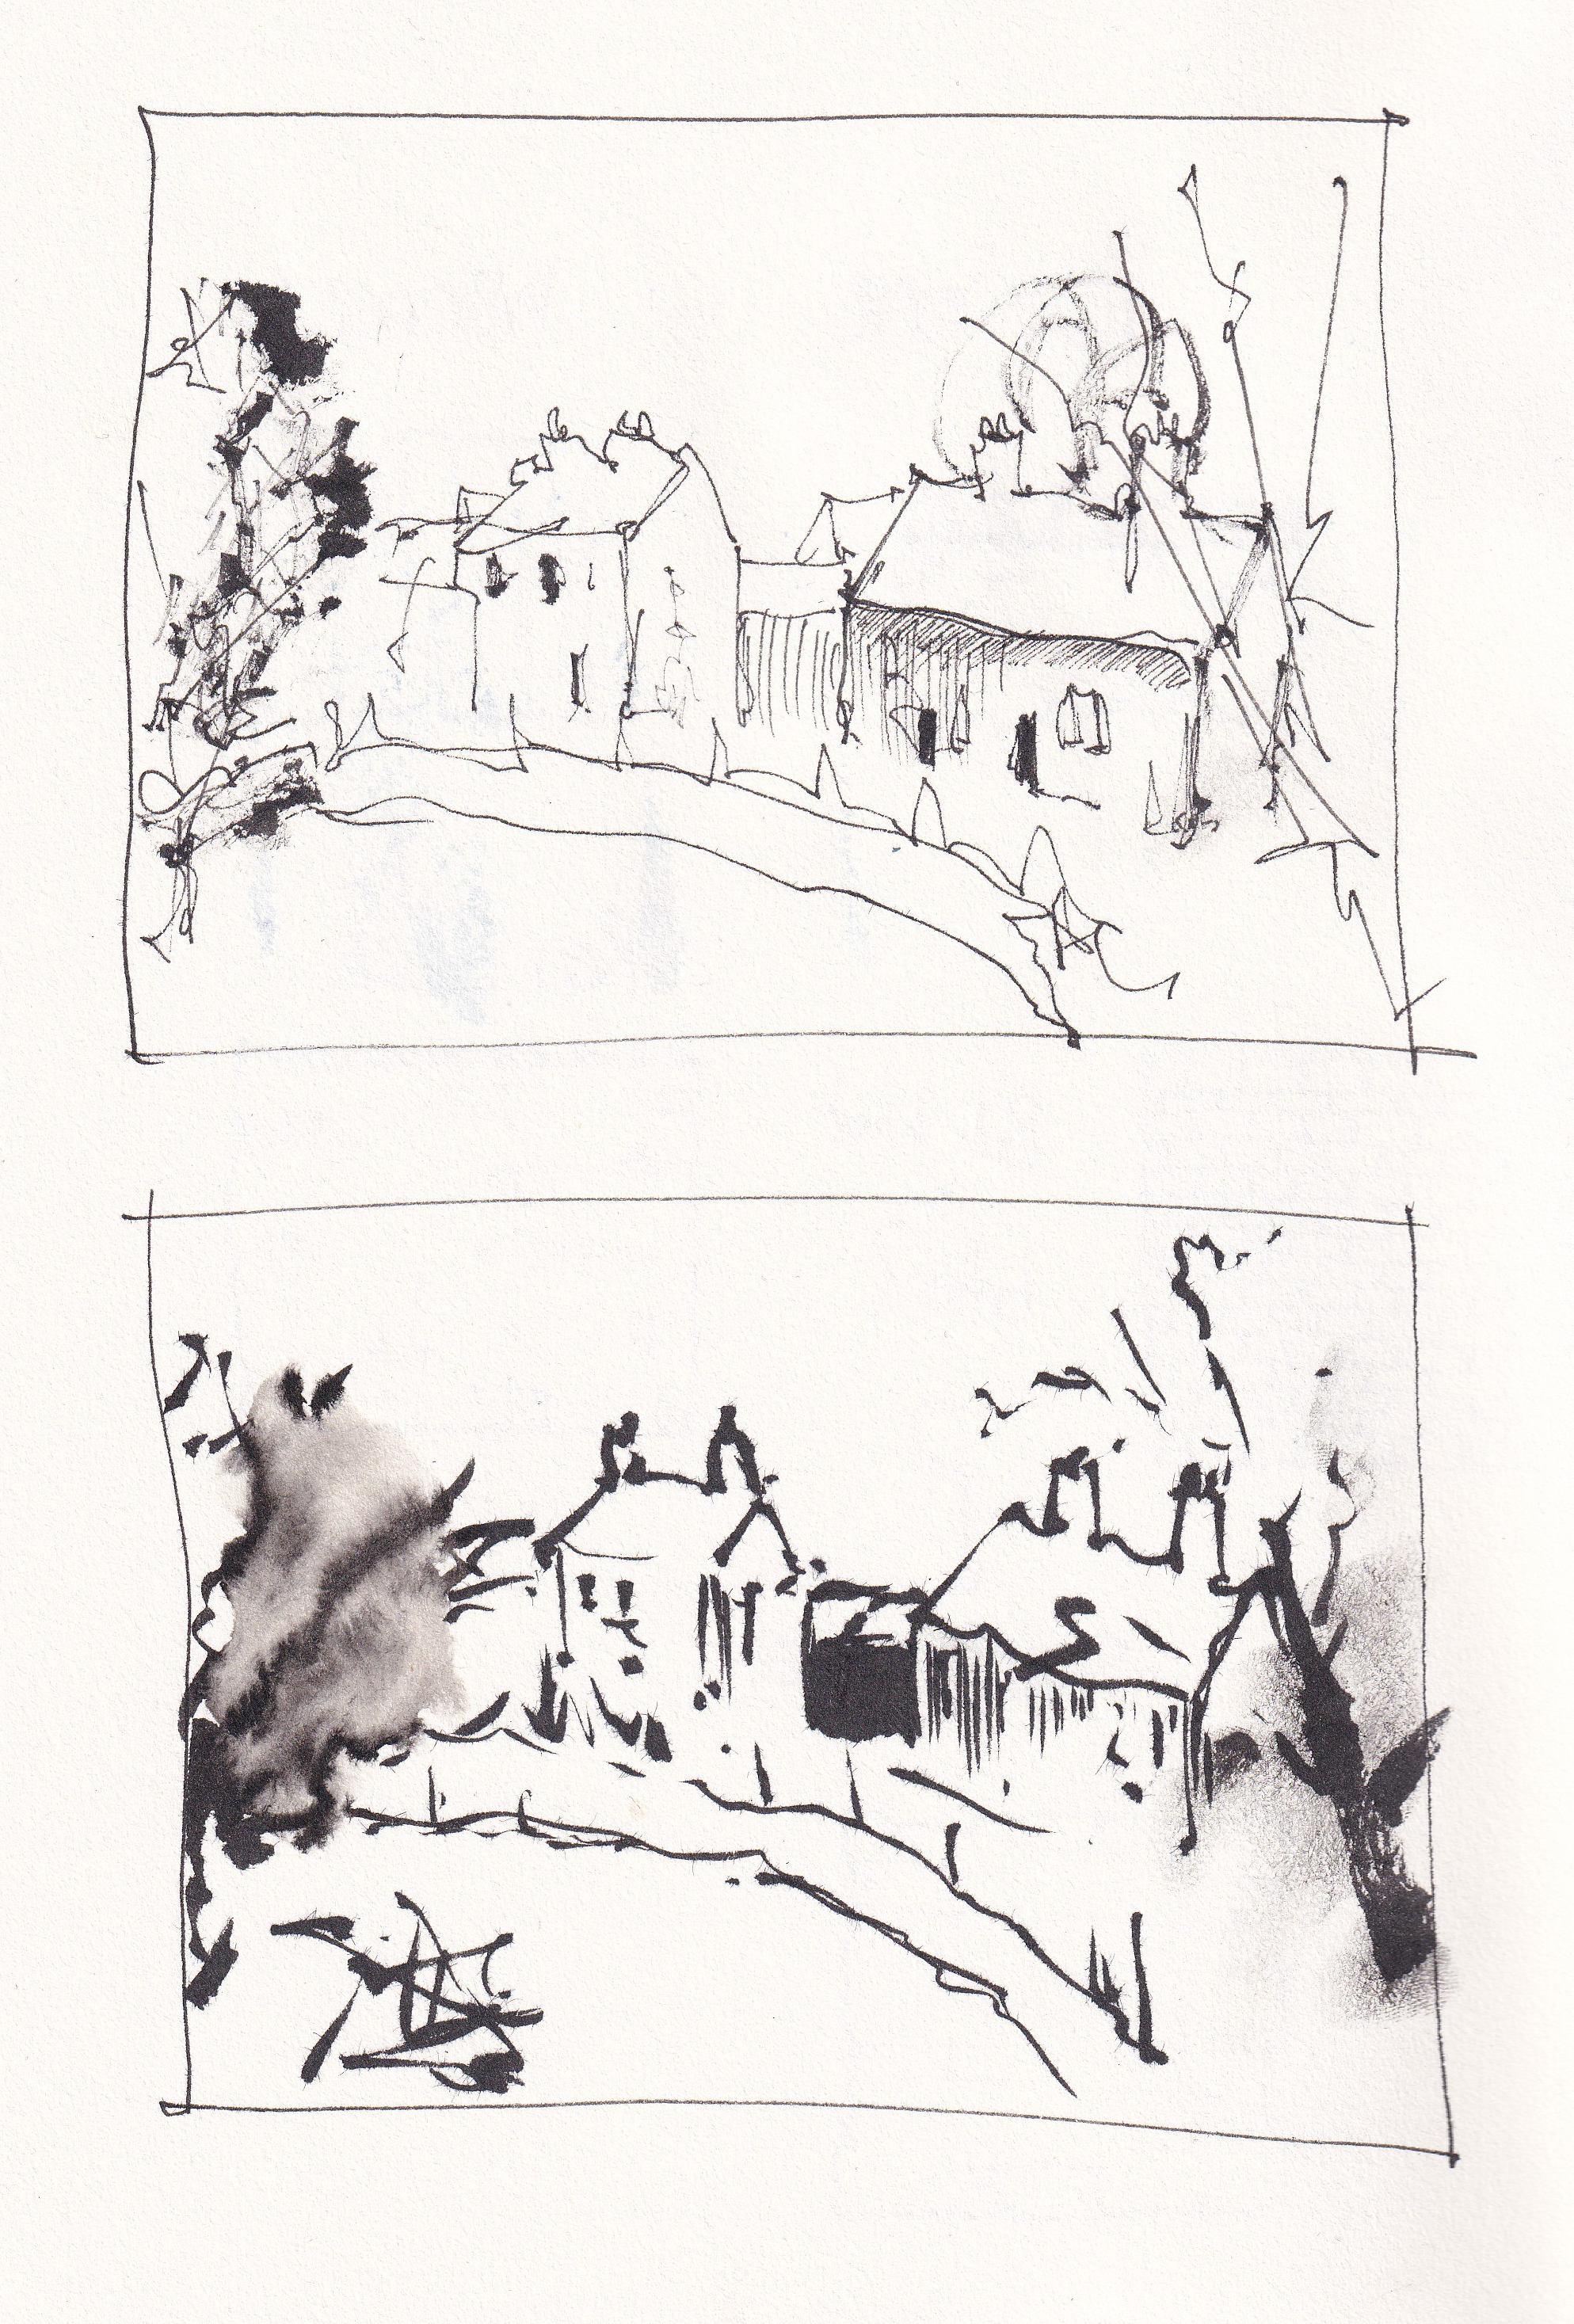
15. SECTION THREE: And we're into the
final section. In this section, we're
making some thumb nails, and Thumbnails are
small, little, thumb nail sized paintings,
sketches, drawings. That represents something
about our scene. Of course, when
they're very small, they're not going to be perfect. So each of our thumb nails
today is warming us up, focusing on a specific
element of our scene. For me, I've got this
fun light scene, which allows us to practice
all these different aspects in a perhaps more unique
or difficult scenario, which would be scary
to jump straight into. And that's where these warm
ups become so important. If you are out and
about sketching today, if you're sketching still lives, if you're sketching
rural scenes, I'd just suggest
choosing a reference which fits the ideas that
you want to warm up with.
16. Simplicity in Thumbnails: So thumb nail number one is all about
simplicity in shapes. It's our first
exploration of the scene. And it's where we're
working everything out. By finding the shapes,
we'll find the proportions, we'll find the perspective, and we'll find also
the challenges, the bits where we struggle
to make it accurate. Now, the last warm
up exercises I'm going to suggest are thumbnails. And thumbnails are
tiny sketches. So we're going to do three
different thumbnails of one scene here. And this is how I
will always warm up, especially if I'm
outside, especially if the sen is challenging. I will always do
some fumb nails, and Fu nails can have
multiple different purposes. The first is going to
be simplification. We can get to a s and we see it, and all we see is
all the details. But everything can be broken
down into those shapes, and we've already
practiced our shapes, both two D and those
three D shapes. That's exactly what we're
going to do with our first. From now, we're
going to work out where do we have cylinders? Where do we have squares?
Where do we have pyramids, and where do we have cubes? And all of these shapes
can suddenly build up into an actually pretty
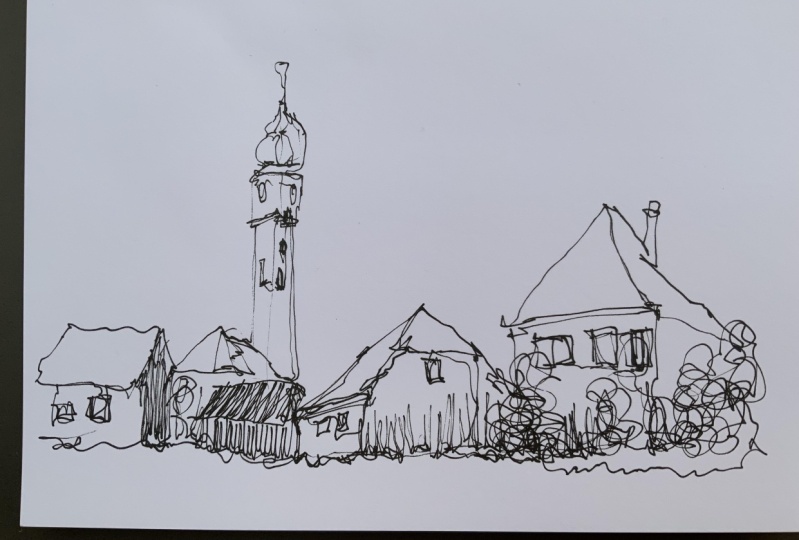
handy little warm up exercise. So to explore this idea, first, we have this rather
interesting night scene. And it looks very scary. But when we start just looking around and finding
simple shapes, be that spheres or circles, breaking it down
into easy shapes. I know that this bit of
the tower is not a cube, it's more complicated,
but we can start by identifying it as a cube and identifying this
as another cuboid. Underneath, we've got
a series of triangles, which build up into
something more complicated, series of rectangles and
another triangle underneath. And just by finding these
really simple shapes, not over complicating things, not trying to draw the
entire scene all at once. What you'll find is you'll be able to draw the
scene pretty quickly. The trick is not to over
complicate the shapes, to really simplify to the max. This is a simple funnil. Just draw what you can see, not what you think you can see, but just draw what you can see. And before you know it, scary, complicated scenes will suddenly become a little bit
clearer in your eye. And you'll be ready
to perhaps even now, move on to start capturing it. Or we can do another
little exercise, which will gain our
confidence even more in producing this scene.
17. Value in Thumbnails: Next, we're going
to work on value. Value is where we've built our hatching up in
the first section, where we've added a three D
shadow in our second section, and now it's all
coming full circle. And it's really
important, especially in the scene like this,
but in all themes, to make it feel
like there's light, to make it feel like
there's darkness, to make it feel
like a real place. We need to understand
the value in our theme. So we've done our shapes, and everything's
nice and simple. The next thing we need
to look at is value. And value is the idea
of light and dark. So we've got zero, one, two, three, four, and we build up
all the way to if you want, five, which is going
to be pure black. Even this though is
more than we need, and we can actually
start by thinking about our sketch in the sense of white or light,
gray and black. If we take our C here, and we take advantage of our increased confidence to just draw it out again
nice and quickly. This time, focusing really just on gaining confidence
in those shapes, rather than trying to
keep them too accurate. I, you might notice I'm drawing more of a
silhouette this time. I'm not drawing all
the shapes in between, I'm just drawing the
simple silhouette. Now we can look around. If you squint at the image, or if you turn it
into gray scale, you can suddenly see
the values much easier. We can see that most
of this is bright. But then we have
gray here, don't we? We've got gray here,
we've got gray in here, coming all the way around. We've got a little
bit of gray just underneath the roof here
and also all around here. Many of the roofs themselves though are much closer to black, so we can m not quite, but almost just block those in. And remember, here, I'm just
trying to explore the image. Again, this is
about observation. So this is not the neatest
hatching in the world, and I wouldn't
want to hatch this untidily or this scribbly
in a finished image. But as a from there, where
we're just seeking to gain our first ideas of where the
dark light and grays are, then this, I think is a more than acceptable way of making the process
nice and quick. Not overstressing yourself
about getting it done and not spending hours equally if you really want to
work when your hatching, What you might want
to do is not do this. You might want to
do that gentle, slow build up of hatching to get the process down as well. All I'm doing dotting
around, moving around, finding those areas
of light and dark and hoping that the seam will just come together through that. Instead of drawing
all the lines, the sea will start to
feel like the scam. Just through the exploration
of light and dark. And I think, actually, it does. But there's one thing missing. And this is where the
observation is really important. Because, look, the sky
normally light today isn't. So we can practice just a
little bit of tone in the sky. And if you're going
to paint the sky, this is really important
because you're going to need to recognize that
the sky isn't light, the sky is a dark, deep blue. And you'll need to go
paint accordingly. But it's also not super dark. So it's really important to just have worked
through these things before you dive in with
your finished sketch. And that's what warming up. Getting used to things is
all about, and there we go. And that is number two, values, who we've
gone shapes, value. Number three will be
the most exciting yet.
18. Confidence in Thumbnails: And last but not least, this is what I do to boost
my confidence in the scene, to make it more like
my art and to see, H I really worked
it out properly? So I'm going to just go for it with a continuous line sketch, add in a few textures, use a little bit of hatching, and then take a step back
and see what it looks like. This again, shows
me if I need to go back and study something
else about the scene, or if I'm ready to risk
it all in my final piece. So number three is
where I'm really starting to gain a
bit of confidence. What I want to do is
explore a couple of things. Firstly, I'm going to
do a continuous line, so a really quick,
continuous line sketch, and that's going to let me know if I can get this nice and accurate with a continuous
line, that I'm confident. So it's going to build my
confidence from my scene. It's also going to
show me where I make mistakes and
where I need to concentrate more when I come
to my finished version. The other thing is
we can add on top of that our textures
in a few places. So we can start identifying
more details and textures as well as these big
shapes and dark values. Like that, I'm just going to start showing my
continuous line. Remembering everything
we've been doing. This is about keeping the line light loose and
character full agile. It's about finding little
details this time as well, and dotting around the scene. Doesn't matter if
we make mistakes because that's what
this is about as well. It's about exploring our
confidence with the scene, exploring where perhaps we need to concentrate work out
something a little bit more. It might be I go
terribly wrong here, and then what I need to do to come back and do a little bit
more of the shape finding, a little bit more of the value finding or something else to just understand my
scene a bit more. Coming down, we come to
this last house here. And I'm adding in a few details
as I move around as well. C find the texture, for
example, of this grass. And then underneath this house, we have the windows, and I've got the windows
in the wrong place. So that's something
to note, isn't it? Coming along here. And I found another
mistake as well. So I've got the number of position of the
roofs a bit wrong. So that's useful tonight. Something for me to take note of when I do my next sketch, and to be able to correct now that I've worked
that one out. Nice couple of
windows here as well. And then there's
little fun details. There's sort of
clock faces here. We got windows coming down. And if I want, I can also
just gently explore some of the tone and start considering the brick
textures I might add in, are these bricks too much? Are they actually going to
take away from my scene? And like that, my
thumb nail is done. So we've done our three
thumbnails all building up. And if I wanted to,
I'd be ready now to move on to my final
version of the scene. Now, in the next lesson, what I am going
to do is show you a time lapse of me
finishing this scene, creating it with
ink word colors. But that's just for information. It's not the aim of this scene, but to give you a little idea of what you could do to move through all these
warmups and then finish off with an
amazing little project.
19. Timelapse for Inspo!: Now, today is all
about warming up. It's not about creating a beautiful, finished work of art. In fact, I think these
little warm up pages look pretty cool in
and of themselves. However, I did want to just show you what I might do next. To this is a super
quick time lapse of me taking the information
we've used today, taking these warm ups, and applying them
directly into your scene. So sit back relax. I'll talk you through
what I'm doing. And if you want to
take the next step, move through your warmups and create a scene by all means do. So you can see here initially, I'm building up my scene,
using those shapes. This scene looks very similar initially to both that
shape based scene, and also the silhouette that we did in our first two thumbnails. I'm finding, as well,
the darkest areas. I identified quickly
that for me, some of these windows
were the darkest areas. Now I start thinking
about the other areas of gray scale of value, and we use our hatching, some of the hatching in
different directions, some of the hatching a little bit longer
than I'm used to. All of this gradually
building up the value. And I'm keeping lines
light and loose. I'm keeping these three
D orchard shapes, also light and loose. All of these things are
things that we have practiced in our in our warm up. Now we didn't practice
watercolors today because today was all
about ink sketching, but you can still see here
an attention to value, which has come from
our thumb nailing. So the sky is not light, like it normally would
be in a blue sky, in fact, I have to remember, it's a lot darker than some of the buildings. That's unusual. Similarly, we have
to work lots of darkness into those areas
where we've hatched. Though we've only warmed up with our pen and our ink
perhaps our pencil. These same ideas are still
having a huge impact on how I'm able to proceed with confidence in this
painting phase. Again, applying
really dark areas to my sketch and also more
subtle midtone shadows on some areas. Notice I've also left
really bold bits. Now, negative space is a really
lovely technique to use. And although these areas
are dark in our value, all these rooftops are
bright white in my sketch, but dark in the real reference, you'll notice I've
left them blank. And that, again, came
from my warmups. It came from me
practicing the scene and seeing what was going to give me the biggest punch and the most impressive or most
durable work of art.
20. Final Thoughts: T hank you very much
for joining me today. I hope you've enjoyed and found something a
little bit interesting. I'm sure that you've
all scribbled and made little marks before. But maybe in this class, you've uncovered the reasons why we might want to do that, and also discovered
that there's actually some utility in it when
we think about it. So instead of just scribbling with our pen at the
very beginning, just getting that control
and getting that grip, actually consciously
thinking about these very simple things can really help us get off on the right foot when we start
drawing and sketching. If you've enjoyed this class, do please leave me a review. I'd also love you to
post your project in the class resources
and Projects tab. I'll come back and leave a comment, give
you some feedback, and of course, most importantly, some encouragement
to keep creating. If you enjoy my
classes in general, then don't forget you can
follow me on SkillSha. I've got over 30 classes now, Loads of things
where you could take these warmups and then
take the next step. Most importantly,
from this class, don't feel that you need to use every single warm up
before every single sketch. That would be a very long
and challenging process. That's not what this is about. This is about giving
you a series of tools that you can use. To warm up before
a given sketch, if you're feeling
super confident, then maybe just do
one simple exercise. If it's a challenging scene, then perhaps you choose two or three or
four or five things to really get yourself
worked up and ready to go.
 Toby Haseler, Urban Sketcher, Continuous Lines