Transcripts
1. Introduction: During this class, you
will learn how to create cool and playful scenes
and rooms in Procreate. I will walk you through
my whole process. From an empty canvas - To this bubble bath illustration
with a cute hippo. Hi there! I'm Emelie Nilefrost - I'm a surface
pattern designer and illustrator based in
Gothenburg, Sweden. I love to create playful
illustrations in Procreate. All of the steps that
I will show you during this class are steps that
I myself use when I, for example, illustrates scenes and environments for
children's books. I will share all of my tips
and tricks in order to make your work as fun
and easy as possible. This class is for creatives
who wants to learn a fun way of illustrating
scenes and rooms in Procreate. The goal is that you should have an illustration
ready to be put in your portfolio or use for a commission at the
end of this class. Are you ready to draw some
cool scenes in Procreate? Let's get started!
2. Class Project: For your class project, I want you to step-by-step create your very own
environmental piece. I also wanted to say
that I really want this task to be
beginner friendly. I made my first scene
ever three months ago. It's inspired from a cafe that my girls have at
home in their group. When I was finished with this piece and a handful
of other illustrations, I sent them to all of the children's book publishers that I know in
Sweden where I live. Two weeks later, I signed my first contract as a
children's book Illustrator. If this can happen to me, It's going to happen to you. Tried to not overthink
or be afraid. Practice makes better. I really hope that you
will find the strength and courage while creating
your class project. I will walk you through
my whole process from idea and sketch to
final illustration. The goal for this
project is that you should have an
illustration ready to be put in your portfolio or use for a commission
that you're working on. To be able to use
your illustration, It's really important that
you truly make it your own. Another important
thing is to have fun and let your creativity out. I look forward to see your Illustrated scene in
the class project gallery.
3. Tools: Before we get started, I just want to show
you the tools that I'm going to use during this class. This is the iPad Pro,
fifth generation, the Apple pencil
second-generation, the drawing app
Procreate version five. I encourage you to learn by
doing and have your iPad, Apple Pencil, and
procreate ready to go. During this class,
we will gather some inspiration in
the next lesson. See you then.
4. Finding Inspiration: Before we dive in, let's try to come up
with some sort of overall theme of
our illustration. What kind of scene or room
would you like to create? Living room, grocery store, or maybe a cafe? Think about the
overall mood that you would like the illustration
to capture as well. The possibilities are endless. You can really choose
just about anything. I wanted to create a colorful
bathroom with the tub. I also want to illustration to give a hat and play fulfilling. If you want to, you
can try to find photos, to find inspiration. These can be folders that you
either search for online. Maybe a photo that
you've taken yourself, or maybe you have sort of like a mental reference of something that you
would like to create. Use whatever works best for you. Just keep in mind
to make it your own and not copy someone else. What do you want to highlight
in your illustration? Make list of
everything you would like to have featured
in your illustration. If you have ideas for what
colors you want to use, add them to the list as well. So before the next lesson, I would like you to decide on your overall
theme and mood. Create the list of
everything you would like to have featured in
your illustration. I will walk you through my
sketch in the next lesson. See you soon.
5. Create a Sketch: In this lesson, I
will walk you through my entire sketch of my
bubble baths illustration. In this lesson, I
will walk you through my entire sketch of my
bubble bath illustration. I will start with showing
you my canvas information. The dimensions are just as
the screen of the iPad. And I have 300 DPI. Use RGB colors. Okay, let's start
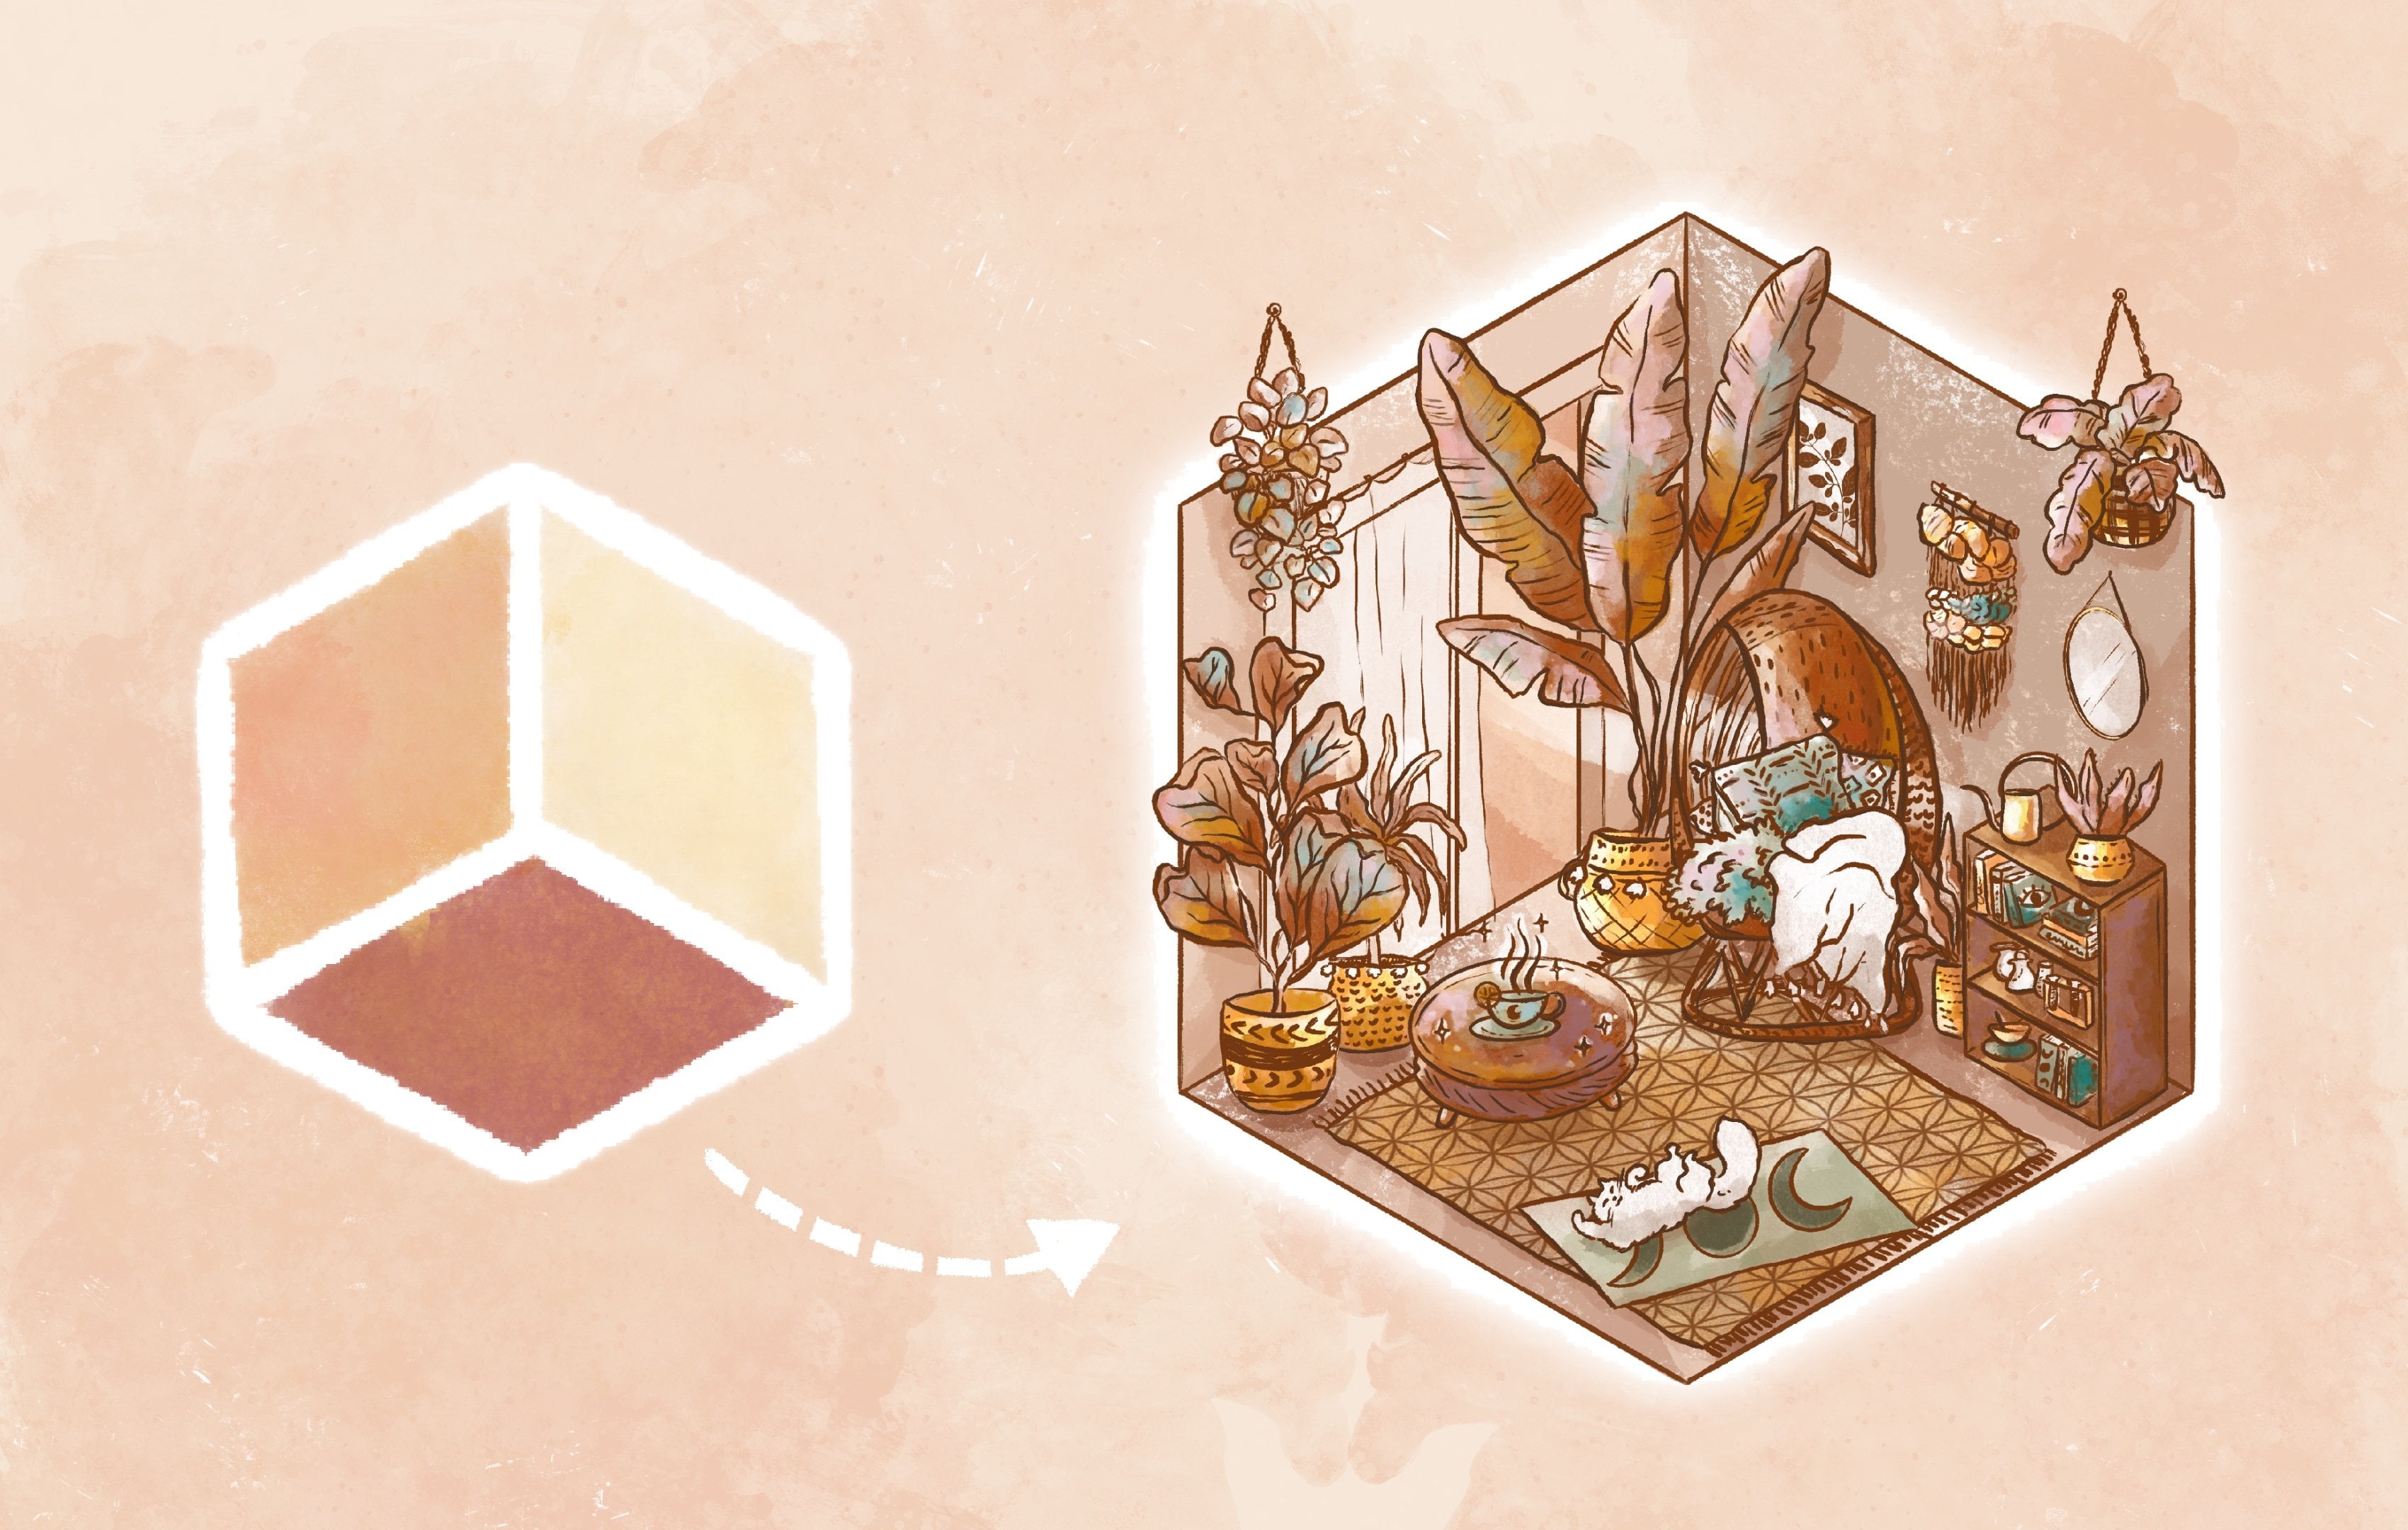
with the floor. When I make my illustrations, I tried to think a lot
about simple shapes. These are more or less
just small squares. If we create a new
layer, change the color. I'm going to make the line. Press hold still and procreate will help you
to create the line. Then you make more lines to create sort of
like the tiles. One more line over. It's really the way I work
with this is really simple. It's lines, lines, lines, which has become squares here. Here. We have a carpet on top here. When I create my illustrations, I always try to use
the entire canvas. You can only see a little
piece of this carpet here. But I find that
very interesting, at least in my pieces, because then my mind
starch through, think about other things
that can be in the room. Here I have some
similar thoughts. When I created this mirror. It's cut off at the edge here. You can still see that it's a mirror that you
can't see all of it. Once again, I'm using
really simple shapes here. You can try to create the
circle you hold still impress. Use the quick shape tool and procreate will help you here to create a
circle or an ellipse. You can, if you want to
have it on the edge, you can just move it
outside like this. Then I'll show you my lamb. It's also the same thought. So it's a straight line. One big circle, two smaller
circles or maybe ellipsis. But try to put on your simple shape
goggles and you will see these shapes
everywhere around you. There is a chair
with two towels. The towel is also cutoff here. The chair and the lips, more or less like rectangles. Legs have a Meta window. It's more or less one squared, one squared inside
two lines here. Rectangle bottles. When I create the
displacement here, I wanted to do
different directions. One leaf goes up, another one goes to the left, one to the right. It gives a little more
feeling to the picture. My top is like the main piece. I wanted to make it really big. So it's a lot bigger
than the chair. As you can see, it's also more faced against the
wall maybe than the chair. To give it a little
bit more dynamic. It's half ellipse. And also the bubbles. They are here in the water. But they are also in
different directions, sort of like with the
plants here we have someone someone's going to the left and up here we have to the right. Just to give it a
more playful feeling. I have some shelves
flower that's directed to the left
and towels that are more stacked
up on each other. The lower shelf as well. Hanging plant. So that's something
happens down here. This bottle is on its
way down to the floor. Also to make it more
playful and also to get another sort of
direction to the right ear. When I make my illustrations. As I said, I love to
use the entire canvas. It makes the scene
more interesting. Lamp is completely
from the ceiling. It goes all the way up. Mirror or a furniture or something else that
can be cut off. At the side. Small piece of the
carpet is showing. And all of these elements
on the side mixed the room feel bigger and wider. It gives you the feeling that
there is more to this room, which I find very interesting
when I create my pieces. Because then my mind starts to think of these things as well. And also, like I said, really simple shapes,
like circles, lips, line, rectangles, different
directions and beliefs. The bottles, something
that is hanging, maybe something that's
directed more towards. Going back to the
list that we made earlier with the theme mood. I want to create a colorful
bathroom with the tub. I also want to
illustration to give a hat and play fulfilling. I want to highlight the
tab and my character. I want to use tiles
on the floor. Towels have a lamp, and the mirror tab with some
bubbles and character in it, window, plants and bottles. And I want my character to do some sort of swimming goggles. I want to use colors such
as pink, green, and yellow. Do we feel like the sketch is giving me all of those things
that I have on my list. I actually think so. There are a lot of
different elements here. And I really think
that all in all, this will be a happy,
playful illustration. I hope that you could
find inspiration from my sketch and also from my
process of creating my sketch. Before the next lesson, I want you to create your very own sketch for
your illustration piece.
6. Choose Colors: Now that we have our sketch, it's time to think
about what colors to use in our illustration. In this lesson, we will talk a little bit about color palettes. I have created my own
here called bathroom. As I stated before, I wanted to use the colors pink. So there's two
variations of pink, green with three different
green ones and the yellow. Since I want the window and I want it to
be during the day, I will also use some
light blue colors. I have white, off-white, the dark one that's
almost black. I also love to use gray
because I think it's a great color to mix and
match other colors width. When you try to create
your color palette, try to limit it to a few colors that you
really want to use. It will make your
illustration more cohesive. Think also about getting some contrast in the colors
that you will be using. I also used the same color for different items
in the illustration. And I will show you
more of that now. I have few layers here. Maybe we can take them one at a time and it will be
easier to follow along. Here we have one of
the green variations. One green color. I will use it on the floor for the bottle, the plant towel. Here I have the darker
gray one, you know, drawn super lethal to just
show off some color bubble. I will be able to see
what color to use where. And when I do this, I also want to use
the same color for different elements
because I think it will tie the illustration
vector together. Also, I try to have them
on different spaces. In my sin. Here I have something
to the left. To the right. Here is a little lower, Here's little more higher up. Just try to place them. Different ways. Here is the light grade will be used on these
lines in the window. This is the pink one
that I wanted to use. Small details like this. I think it makes very
much to the picture. The yellow, the top
that I wanted to highlight will be yellow. For example. Here is the other green. They are very similar, but they're not
exactly the same. Light green to
have on my carpet. And also in the plant. Blue for water and for
the swimming goggles. Nother light-blue to
have for the window. And I want this to
be sort of like a vase made out of glass. Since I want a lot of pink
in my illustration as well. The whole wall here will
be pink, this light pink. This is an off-white
that I will be using for maybe some smaller details around in the illustration. Maybe it's a bit hard
to see right now since it's not
colored all the way. It will be more visible layer. The one that's almost black. Tried to just show off
a little bit here and there where I want
the colors to be. Of course, I mean, this can change when you create
your illustration later. But to me, this at least
helps me in my color process to understand a
little bit vector of how I want it to look
when it's finished. Before the next lesson, I wanted to do to decide
on what colors to use and also where in your illustration
you want to use them. As I stated, this can of course change a bit when you create
your final illustration. With making this
first color step will help you a lot
in your process. Now, you have your sketch
and you have decided on what colors to use and
where in your illustration. In the next lesson, we will use these colors in our final illustration
and make it awesome.
7. Create Your Illustration 1: It's time to create our
finished illustration. It's time to really
create our illustration. We'll try to walk you
through my entire work. When creating the illustration
on top of this sketch. I just wanted to show
you what I have here. This is the sketch
that I showed you before with the color blobs. So that I'll know
what color to use, where the opacity set to around 20% so that I'll be able to see the
new things that I create. So we will take a new layer
underneath the sketch, will be a lot more easy
to see what we're doing. While also having the sketch. I will start with the floor that needed or that should
have this green color. When you create floors, of course you can
create the line. Just draw a line like this, press and hold still. Another way if you want it to be aligned really well is to
fill the entire cameras. Have this snapping tool enabled. Then you just move
it down, down, down to where the sketch
and it like that. This is a way to
create the floor. We can do the same
thing with the wall. I wanted this light pink color and I chose a new
layer to have it on. Just fill the entire canvas, then move it until it
snaps with the floor here. Cool. Now, we'll create
a new layer again. I will have one layer
for each color, and I will also
group my layer soon. You'll see that as well. Now I want to create
these tiles in the floor. I can draw, you
know, just a line. We can also do the
same thing again. Filling. We'll just move it
down, down, down, down until it gets super thin. Accidentally draw,
drew something. Okay, Now move it down,
down, down, down. So it's really thin. Maybe like that. Scroll out again. And then we can just
move this white on top. The one that we
created in our sketch. I swipe to the left, press Duplicate, move
it down, down, down. I have the same one. Maybe I want to note
just take this up a bit. Maybe not. I'm not sure. Just a little bit. We'll see later as well. If you want to, you can
duplicate it again. Then press this move. You can rotate it. If you want to use it for the other lines that you'll
be using when creating tiles. Okay, cool. And then I duplicate that one. I move it. Then I usually, I put these together,
I merge them. They're on the same layer. I duplicate them again. So now I have two lines. It's to make the work
a little bit faster. Merge, merge, duplicate. Then we move and we do this
until the entire floor. Is done. Maybe something like that. I also wanted to show
you something here. We can remove or not
remove would just hide it. We create the new layer. Now we can just tried to
make a straight line. What was going to do was
to In duplicate that one. Move it again. But now, if you want it
to be equally aligned, you can duplicate it again. So you have two of these. Then you move it just just on top of
each other, like that. Then you can go to the layer underneath and do remove
the one that you had there. This you can do if you
want it to be completely aligned on have the exact
same spacing between. I usually don't do that. It takes a bit more time. But I wanted to show
you that you can if you really want it to be super XXX. We have the floor and
the wall will now swipe to the right
so that all of these become blue and
press this group option, rename it to floor. Here we have all of
our floor items. Here is the rename that to wall. Now, let's see what we can do. Maybe take the mirror. I wanted it to have this
dark gray around it. Will try to create a circle. And then just press
here, hold still. Procreate will help us here. Like that. Awesome. Now, I will actually
duplicate this one as well and use the
one on the bottom. Change color to white. I will press it and
use Alpha Lock. Alpha lock will help me to only coloring what was gray now, but I want to fill layer
with this white color. Now you may not see very much, but it's a way so that I
will easily be able to drop the color inside
of the mirror. I wanted to use this
off-white for these lines. So just try to draw a line, press down and procreate
will help me again. Just simple, simple
shapes all around. It's hard to see everything when the sketches still visible. This is the mirror
that we just drew. And swipe to the
right, make them blue. Group, this one as well. Meter. Okay. Let's continue. We take our lamp, dark gray here as well, the same as the mirror
to try to tie them up. Straight line. I feel like it sorry. It sounds like I say
the same thing all over again, but simple shapes. I really loved them,
helps me greatly. White color. Try to make an ellipse here. Use some yellow color
for these ones. Then just drop and
new layer again. Make it a bit bigger. For this one, I will
decrease the opacity. It's just because I want the
lamp to give some sort of feeling that it's
actually lit up. Now I will take away
the sketch so that I'll really be able to
see what I'm doing here. I'll just make a
straight line here to put the lamp together with the other things like that. When I look at this,
as I've said before, it's just lines, circles,
all the way around. Put on those goggles and you, I think you will find it
a bit more easy to create since Onto the next thing, maybe make shelf. Down here. I tried to make something
like a rectangle like that. Light-blue to use on
the glass vase here. Let me correct angle of it. Filled with color. Green for my flower. Pink here. And as before, I just press Create sort
of like an ellipse and some white in the middle. Whoops. Maybe on the same layer since they're going to
have the same color, I can draw this towel here. This will be a lot
easier to see. Once we remove the
sketch soon to see exactly how the
towels actually look. I will hide that for now
and try to make it more. If you want to change the
color now to just white, you just press
here. On the white. You'll get that color. Cool. One shelf is finished. It's time to group. These. Swipe to the right. Create a group. Shelf. Back to the sketch, create a new layer. Here. We can just duplicate
from the other shelf, remove that out from that group. Then we move it
around like that. Let's take the light gray. Create this. Something like that. Could have a white top here. I want to move it a bit. It's a bit hard to see
sometimes when you have this sketch visible, but I mean, you can just move things later
if you want to. I usually start
to draw like this so that I'll have
Something to use. And I had these on the
same layer since they have the same color. But if I need to move
some of them later, I need to think about that
so I won't move everything, the bottles, and also go back to this white layer and create
some things for the plant. Now underneath this layer, I will use some green
color like that. For this hanging plant. Here. I'll just shoot. I wanted it to have
some different. This one is further down, this one is higher up. Just to play with it. A little bit. Shelves are ready now as well. Let's drag swipe to the right, group, it, rename
it lower shelf.
8. Create Your Illustration 2: It's time to see what we
have left on this sketch. We can take a new layer and
choose this light green color and maybe create carpet. New layer, dark gray. Try to create the chair, make an ellipse, fill it. A new layer again. Take the yellow
one for this term. Pink color for the third row. That should be on top. Use the white color for
these small patterns. Create a group. Share. We're getting somewhere. Should we try maybe
to create the window? Follow these lines here. Just move it out. Sorry. Another one that take this dark gray, want to have it
sort of down here. Another layer, use this light gray line. Cool. Now we'll take a layer
underneath it all to use. For the actual
like window glass. Maybe you can't see it. But I'm drawing
underneath the white. And then I will just
fill it like that. This is how it looks. Now, you can see here that maybe this light gray wasn't really as
awesome as I wished. Will make it one more time. I sorry, it was a bit to make it nice. Let's continue with the fill this with some off work. Now we will select
this face and draw on another layer to be able to make these lines on top of it. The reason for why I use select like this and drawing
on another layer is because then you
will be able to change the color over
these lines later. You whatever like to do that. You can also do it
with alpha lock right onto the pink layer, but then you won't be
able to change the color. That's why I'll do
it like this and then just take that away onto the flowers. I tried to use simple
shapes with this as well. I just draw a little
bit and then I press Procreate helps me
to make a bit more oval. Will take new layer and have it underneath with this
other green color. We'll just draw underneath
and then fill it. A new layer again with
this light green. Just the bottles are left. I will just start to group. The plant, will have that. Separate. The skin may be. We can also write now we
can truth this white color. We go to some sort
of air brushing, pencil, maybe this soft brush. This is what I use when I
tried to make sort of like a cloud or something outside here just to give it a
little bit more life. Now onto the bottles. Just group the bottles. Here. We will try to make the curtain great. So we're on. The last thing here. With the hippo.
Create new layer. Take the yellow one. Great. So here is our I used this white one for the bubbles. For the bubbles, I'll
just make a circle. Then I make a little
dot in the middle. Great. That was the bubbles. Let's continue onto the HIPAA. Hello, my friend. We're almost done. You guys, this is crazy. Here is the hippo group. Were still have a rubber duck. This is great. I also won some
white on the floor. So I went back to
the floor Group. Now, I'm just going to
choose some of these. Since I used the same color. Maybe can't see super
much right now. But I made a square here because I want some
of the tiles to be. Once just to enhance the playfulness. Great. I actually think that my
piece is finished now. I'm really happy with it. It's super fantasy it. Now that you're finished. Awesome. I also wanted to show you
some of my previous work. Hopefully it can help
you to see similarities and understand even
more of my process. Here you can see this
drawer over here, cutoff here at the edge. Almost an exactly similar lamp
all the way from the top. The bed goes all the way
to the left over here. I tried to have something planned hanging
down here as well. And another one going up. Different heights on everything that you see in
the illustration. Also use the same colors
on different items. This darker blue here and here. Lighter blue on the bed and
on this girl's pajamas. The gray on the bed
and on the floor. Also the yellow in her
hair and in the lamp and in the pajamas and also
over here on the flowers. So it's very much similar to what we did with our
bubble bath illustration. Here is another one of a forest. So these darker pink
ones are the same. They are also in the tree. Yellow. Something is upfront,
some things are behind. If you have a cloud here
that's more at the top. And this one. Same
thing with the bunnies. They're on different heights, different dimensions in
the piece. Let's see. This one. Lump all the way to the top. The bonds are falling
just to sort of have another direction
here as well. That's something is
happening. With this. I just wanted to show you that you can use similar Thoughts, similar ideas, similar process when creating a whole
bunch of different pieces. I really hope that
you feel like you have enough knowledge
to create your sin. Now, as I stated before, try to not overthink or be
afraid just because it's new. This is how we all grow. We push our limits and we
broaden our comfort zone. Let's do this. I can't wait to see your Illustrated scene in
the class project gallery.
9. Conclusion: Hey you. During this class, you have decided on your
overall theme and mood. Create a list of
everything you would like to have featured
in your illustration. Made a sketch of
your illustration, decided on what colors
to use and rare. Made your own
illustration, please. This is truly
awesome, my friend. I really hope that you can use your illustrated
piece right away, or that you at least feel like you have gained
enough knowledge to practice more and more on creating scenes and
rooms in Procreate. Also make sure to show us your illustrated seeing in the
class project gallery. In the next lesson, I will share some of my
final thoughts with you. See you then.
10. Final Thoughts: I really hope that do have
fun while drawing your sin. As I've learned something
new and useful, I would be so happy if you
wanted to leave a review and tell me a little bit about your experience
during this class. Also, if you have any
comments or questions, just leave them in
the discussions and I will get back to you. Feel free to connect
with me here on Skillshare and Instagram. If you visit my website, you can also get some freebies and subscribe to my notes later. Thank you so much for joining
and I'll see you later.
11. Bonus Video: For this bonus video, I wanted to show you my
illustration portfolio that they made my first contract as a children's
book illustrator. I wanted to show
you my illustration portfolio that gave me my first contract as a
children's book Illustrator. This is just a front page. Here is my about page with
some contact information. And I just wanted to talk a little about, about
these illustrations. So why am I showing you this? Some of these illustrations? I'm not really satisfied
with any more. But they're still
part of my journey. When you try something new, you, you always start somewhere. Even if I've grown and maybe aren't super happy with all
of these illustrations. They're still part
of my journey. These illustrations will always
be the illustrations that made the first author
say yes to me. I really hope that
these illustrations and my journey can inspire
you on your journey. You just need to
start somewhere. By tomorrow. You will have grown. And being one year. Who knows? Just go out there and have fun.
 Emelie Nilefrost, Surface Pattern Designer & Illustrator