Transcripts
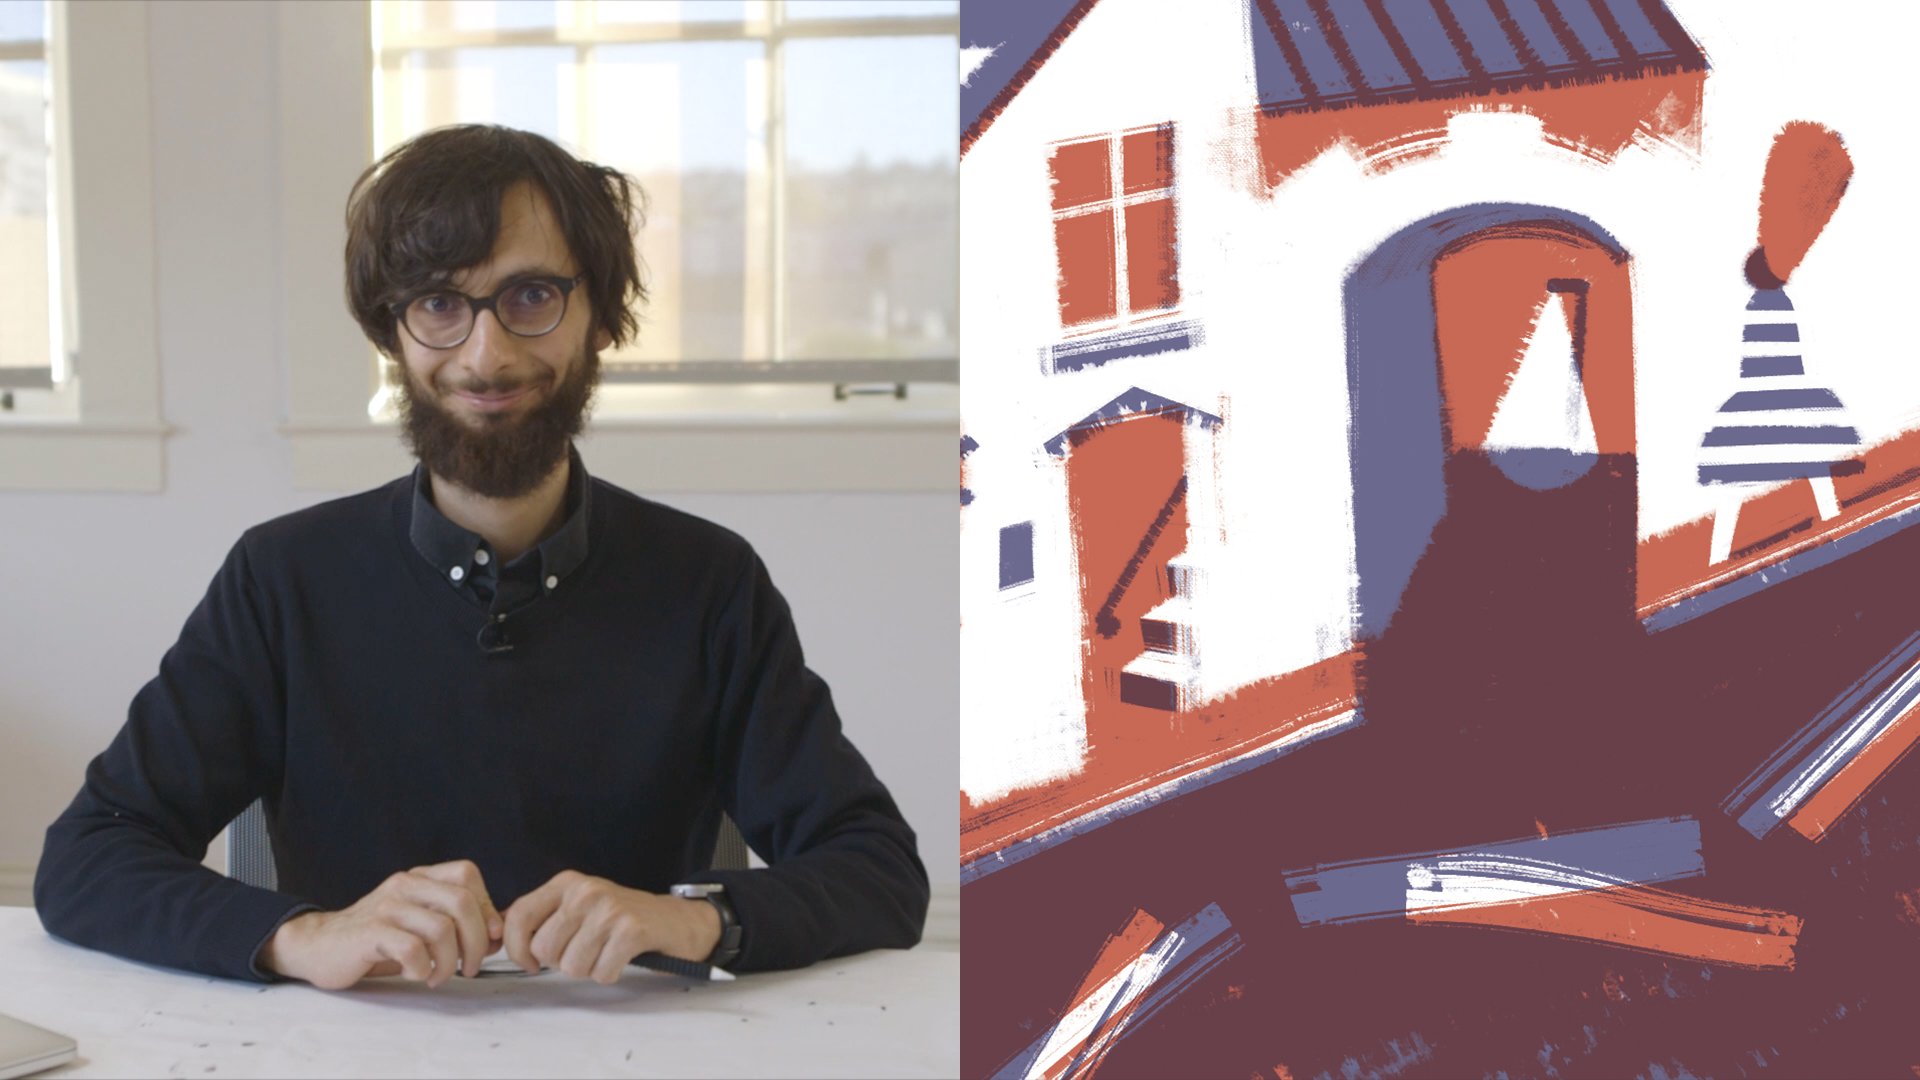
1. Getting Started: I think it's always hard to describe your own aesthetic but I like to think that for me, working with lettering is an opportunity to have a really broad range of styles. So, some of my work can be really loose calligraphic brushwork and other pieces can be really intricate, detailed, labored illustrations of letters. My name is Gemma O'Brien and I'm an illustrator designer and letterer from Sydney, Australia. So, I've been an artist for probably about seven or eight years. I started working in a big design firm and then began freelancing about five years ago. One of the companies I was working for actually ended up going bankrupt which was horrible for all the employees but for me, it was the thing that kind of pushed me to go, "Well, if there's any time, the time is now to go out on my own." So that's what I did. I was so worried that I wasn't going to have enough money to live that I actually went back to my job that I used to do on the side when I was in university which was selling flowers at the markets. I started to do that and then gradually over time, I built up enough of a portfolio and a client base that I no longer had to do that. I definitely think that selling flowers at the markets inspired my work. I started to see the parallels between design where you have color and structure and scale and layout and all of those design principles could play back into illustration and lettering. So, in today's class, we're going to be doing some illustrated lettering. We're going to be focusing on an individual letter. We'll start with taking our inspiration, using that to sketch up some thumbnails, choosing which thumbnail is going to work best for our composition, and then adding those illustrated botanical elements to make our final piece. So I think for anyone that loves typography but also loves illustration or drawing, this is the perfect way to do it. Not only can you gain an understanding of which particular lettering styles lend themselves to working with illustration but also techniques of combining different illustration elements together, how you can use contrast and shadow to add depth and detailing inside the actual botanical shapes, and then how you can bring all those pieces together to create a beautiful composition. So, I'm really excited to share this process with you today. I can't wait to see what you will come up with. Make sure you upload it into the gallery and you can share your designs with everyone. So, let's get started.
2. Gathering Flowers: So, the first step of this project is gathering inspiration. Now, the inspiration for the project as a whole for me came from some previous illustration and typography commissions that I had. So, the first one was for a Spanish magazine. I had to create the word pure. So, I wanted to find a way that I could create these organic, unique letter forms that were made out of botanical elements and twigs. So, you can start to see here, using the twigs for the main central part of the letters and then bringing in these other little flowers and elements to add a little bit more interest. So, from that point forward, that process led to a few other commissions of a similar variety. So, this was for the LA Children's Hospital, and this was for the Five East Wing. So, they look after children with cystic fibrosis and the rose is a symbol of cystic fibrosis, so they wanted the five to be made out of roses. So, you can start to see here how the inspiration may be from a particular brief might guide, the flowers that you select or the botanical elements or that could be completely based on something more visual. I'll also point out at this point, you can start to see some variation in the sizing of the flowers. So, you've got some hero flowers, some really big roses that fit within the shape of the number or the letter, and then, smaller leaves, and then some tiny berry-sized elements. So, you can really fill out the letter in that way. Then more recently, using the same process, I created the letter Q for a question section in an editorial piece. Again, you can start to see how the shapes of the flowers can help dictate the position inside the number or the letter itself, and that can really guide the design. So, the first step in this project for you will be going out and gathering some botanical inspiration. Now, the best way that I find to do that is to get a broad range of flowers. So, you don't necessarily have to buy everything. You could find a leaf in the park or maybe your mom's rose garden. Wherever you can find a variety of different shapes and sizes and varieties of flowers and plants. I'm in New York at the moment, so I went up to midtown and to the flower market and gathered a range of different flowers. So, I'm going to talk through those pieces for you today. So, as I mentioned before, you want to have a variety of different shapes and sizes. So, this flower here would be perfect in terms of maybe a hero flower. You've got this beautiful round shape. I like working with white petals because you can see in the shadows a lot of the lines that can be really brought out in the illustration. So, you want like a round hero-size flower. A hero flower, when I think of it, is like the leading, like the star of the show. So, because of its scale, you'll be able to draw a lot of the detail in there. So, in relation to the other flowers, it'll really stand out and give a bit of variety and balance in your piece. I think that certain flowers lend themselves better to being the hero in the piece. It often actually depends on the scale in relation to the other flowers. So, if it is literally bigger in real life, then I like to keep that scale relatively the same so it feels a little bit more realistic, but it could be anything. Then you also want to select maybe something that's a similar style, and so you can see how they're both round when you look them overhead but there's a variety in the scale. So, you could have these interweaving within that main piece. It's also good to have some elements that have a little bit of a curvature to them, so that once you start placing them in your composition, maybe that would lend itself more to an edge. I often will take them down so you can adjust the positioning as well, so something maybe a little bit longer or a little bit thinner. So, then in terms of the scale, you really want something that's going to be smaller than maybe the middle-sized flowers and these longer elements. Almost like a berry is a good gauge, I think berry-sized flowers. So, these are going to come in handy at the end especially when you have small spaces, negative spaces that you want to fill. So, some kind of small, berry-shaped flower. Then finally, some leaves, so some foliage that can just really come in between the shapes of the flowers. Also, I think another good thing with these particular style of leaves is that if you've got a white hero flower, you want to be able to have some contrast between dark and light so that can sit in behind. So, because for this particular project, we're going to be working in black and white, it's really good to think about contrast. Some particular flowers have patterning within the flower itself and in a moment, I can show you some of the photographs of flowers that I've taken where you can actually see on the petal maybe there's some dots or maybe there's some lines. At this early stage where you're just hunting and gathering, you can think about these things because when you start drawing, having contrast is something that's going to be really important. So, looking at the pattern and detail within the flower itself. In terms of the color, once we start drawing for this particular project because it's black and white, we won't be worrying so much about the colors. So, as long as there is some contrast, so as I mentioned before with the leaf, dark and light, and that if you can see that within the flower itself, that's a good sign. Once you've gathered your botanicals for this particular project, part of the process is physically photographing them in the position. So, you can almost see in this example here in the background, these flowers are laid out within the composition of the letter, photographed, clumped together, and then that becomes the basis for the drawing. So, it is important to have elements that you can see will interact with one another so that you can almost start making your composition in real life which becomes a photograph which you can then draw from. So, this is a very broad, quick introduction to the style of flowers that you want to get. But I think variety and size are some really good things to think about when you start selecting them, and then you can bring them home and start working with them for your project.
3. Researching Typefaces: So, once you've gathered your botanical inspiration elements, we're going to now start focusing on the design of the letter itself. What we want is to find a letter that has a lot of area that we can fill with illustrations, some contrast between thick and thin. So, if you have some knowledge of typography, as soon as you think of high contrast, you might think of Didone, or some of the French typefaces that came out around the beginning of the 19th century. So, this can sometimes help with your search terms. So, you could write Didone, or potentially high contrast, modern. All of these words will start to get you some of the results that you want to see. So, let's have a look at Didone. So, I'm on myfonts.com, which is one of my favorite websites just too often, not only licensed fonts to use in projects, but also just look for reference for particular styles. So, we're going to start to have a look at some of the results here. As you can start to see, we can have some letters, some S's here that have this contrast. We've got some bold terminals, which could be good. You can start to think how might the flowers fit within this particular letter shape. So, any large areas that could be filled with illustration are great. So, I think that now, we can start to see some of this modern style coming through. We probably want to refine our search even more to make sure we're getting this real kind of ultra or fat face in our particular design. So, I'm just going to add in my search terms, "Fat face didone," and somewhat, you can start to see here is, some really great examples of maybe how do you want to have the terminals on your letter? Now at this point, I'll probably mention, if you haven't already chosen your letter, you could choose a letter based on maybe somebody name, or someone that you want a gift to. For me, I chose letter S. Well, one, because Skillshare. Two, because spring. So, obviously, working with flowers and botanicals, and in a few days back in Australia, it's going to be the beginning of spring. So, I'm going to do an S. So, we've got lots of nice curves. You can look at the way the terminals work here. I think probably these are not in the right vein that we want to look at, but this is a great example. You can start to see how maybe you could combine one terminal with more of a a bold terminal, with coming to a tip there. So, I'm going to start to look at these, and maybe,in addition to having look at the fonts that I've already licensed to my computer, build up a body of examples that I can start to use for reference for sketching. So, if you don't have time to draw a complete letter from scratch, or you found a font that you really love, that you want to use as your base letter, you can license and buy that font to use that letter. But I think it's always important to make sure that you do that, to acknowledge obviously the time and energy that goes into the design of typefaces themselves. So, there's a few great examples here, and there's actually a few that I've already bought. So, one of my favorite contemporary Didone is, its called Lust, and there's also Lust Pro. It has this really beautiful contrast between the thick and the thin, but it's also got something else that I don't even know how to describe. It's like a sexy typeface I would say. So, this is a great example of what we want to start to look out for our drawing. The only thing that I would note is that with high contrast typefaces, you obviously have really thin hairline elements within the font, and we're probably going to want to make that a little bit thicker once we start to draw. So, that's just something to keep in mind for our sketches. So, once you found a few that you like, if you don't already have the license for them, often what I'll do is, I'll take a screen grab, just so I can have a little reference, so that I can come back to if I choose to buy that particular one, I know what it's called. So, we can then go into and create a folder of some references. So, these are some that I already have. So, I have Lust Display, Sahara Bodoni is a great typeface that has high contrast, and Stilla is also a great one. So, we've got the font references. As you can see, I've selected a few that I want to look at. I've got Sahara Bodoni, Acta Poster, Lust, Carousel. So, you can see this very subtle differences in these. So, when I start to draw, I want to think about, maybe I like the thickness of the stroke in this one here, but I prefer the terminals in this one. So, that's where your lettering skills and your ability to draw from these references can start to begin, and make it something that's completely unique, and that will work with your composition. I think that having at least five or six references is good, because you don't want to fall into the trap of just making it exactly the same as an existing font. But you want to have enough reference so you can see all the subtleties of the ways in which you can draw. So, you could have two fonts that look really, really similar but just have a very subtle difference maybe in the width. So, these can sometimes just help you. If you can see an array of six different typefaces, then when you're drawing, you can go like, "Oh, okay. Well, maybe I can just adjust this small thing like they've done here," and it can help you make your design fit perfectly for the scale and the ratio of the paper that you're working with, and also to accommodate the illustration. I think that at this point, it doesn't matter so much the botanicals that you've selected. As long as you have a variety, you can then fit them in. It's the most important thing, is just to make sure that there's enough space within the style of lettering itself to accommodate the flowers. But you don't need to get specific into, "The daisies are going to sit here." That can come at a later day. So, once you've got a good selection of type references and we've got our botanical inspiration ready to go, we can now start moving into the sketching phase.
4. Sketching Letters: So, you've got your botanical reference, you've got some font and typography reference, now we're going to move into the sketching phase of the project. So, it's a pretty basic set up for sketching, I've got some of the references of the fonts that I particularly liked, that I want to use to help me refine and be inspired by the elements to include in my particular letter. You just need a trusty pencil, an eraser, I like to use grid paper this is literally just printed off online, you can also just buy grid paper from the art store just to help give you a bit of guide and keep all your elements in check. So, I like to use either like a bond or a bank layer pad, so you still got a little bit of transparency, you can see through to the grid enough to get some guidelines but still have enough opacity in the texture of the paper that you can see your design come to life. So, the S's that I've got here as an example are already in the proportions of the size that I'm working in which is like a rectangle. So, if you want to work in a square you might want to keep that in mind when you're drawing your letter as well. So, I'm just going to draw in a baseline probably around nine or 10 centimeter letter height. So, I've got these S's here which I have printed out from the fonts that I liked in the inspiration phase of the project. Now, you'll start to see some similarities in the ones that I've chosen, they all have this really dense main-stroke that's running through which is going to be great for positioning, be it a flower and the main body of the botanical elements. Now one of the one things that I really want to change is to make sure that these hairline joins here in the letters, need to have a little bit more density. So, these are really great for when you're working just in black and white, and it's just the ink on the paint, but once we start to add maybe like a curved twig or a stem of a flower, you want to have enough thickness there that you can actually fit that elements in. So, that's something to keep in mind when you're sketching. Another good thing with the reference here is you have the variety of different terminals that can help inspire your particular shape. So, let's begin. One thing to note is when you start to get onto this curved element of the S here, you want to see that the curve actually comes out a little bit further from this terminal up here. With these elements here as well, you don't want it to be a straight line, you want to have it a little bit curving in to give it a little bit more shape there as well. So, once you've got the loose outline you can kind of rework that a little bit. As I mentioned before you want to make sure that these elements here have enough thickness so that we can use them later on. And then you can go in, it's really good once you've got your outline to start to see what it's going to look like with that field, so you want to start shading it so you can really start to see how those negative spaces work. So, once you've got that S nice and filled with the shading there, you can analyze these negative shapes here and make sure that they've got some smooth curves, maybe readjust the straightness of this terminal here. But that's a pretty good starting point. So, from here I'm thinking this is pretty good, I like the way that these two elements balance, but maybe we could try something different in terms of these terminals. We've got lots of different options here, we've got like a bold terminal, something that tapers out, maybe a combination of the two. So, what I want to do is just get another piece of paper. We've already got that basic shape there, we can probably just move this out a little bit further and just refer to them when we need. We've got the basic shape we're going to just have a look at changing this element here, the terminals. So, maybe we'll try and have like a curved, almost like a tear drop point come in. And you still want to make sure it's coming out further enough around here to be in line with the other curves in the S down the bottom, and you can pretty much keep the body of it the same. I often use the rule that if it looks right then it often is right, there's lots of rules in typography that, these should line up and these little bits and pieces which are always helpful pieces of knowledge, but I think for me, I can see here that this feels a little too light compared to the main body. So, I can just redraw this in here, and while a history of topography is useful, I think that drawing and observation, and that's why having this reference here is always a good way to start as well. So, you've got those kind of basic shapes, and again we want to start shading it to see what it's going to look like when you have that dark and light really clearly defined. So, even though shading it in might seem like a pointless task especially for this particular project when we're ultimately going to be adding in the illustration elements, it does actually change the way that it looks. So, when you look at something, when it's got that clear contrast between dark and light, you can really quickly see if maybe that curve is a little bit off, or you can hold it further away and see how it's going to read. And because we're going to be using this silhouette of our letter pretty much exactly as the basis for our illustration elements, we want to make sure that that silhouette is really nice and balanced. Another thing is that while it might seem like I'm shading just randomly, the reason that I'm shading in this vertical line is because that's where the slant of the letter is, so if I was working on more of an angle, more of a calligraphic stroke, I would shade in that angle as well. But as you can see is you come across, you get a little bit tighter, and you get bigger, and it kind of you filling out the volume. And you can actually do the shading sometimes first as a warm up, and then come around and bring those lines in, so either way it works. All right. So, that's pretty good for just a pretty rough sketch, and we can now have a look and compare the two options that we've got. So, just so that we can have them sitting next to each other, I might just cut this one out. Okay. So, you can start to see how just that subtle change between the two terminals here can create a different feeling. I almost feel like this one can start to look a bit like maybe an eight, so, I love this design maybe a little bit more. I also quite like how the contrast between this sharp point is actually a little bit different to the main curves of the letter. So, this is sort of the things I'm starting to think about when I'm going to choose my design. So, from this point forward you can really go wild, in terms of the number of options you want to do. I often will do maybe five or six initial thumbnail sketches, and really just look at the details. Maybe I'm going to make this main body a little bit thicker, maybe I'm going to try a bold terminal here. So, you can really take that initial sketch and rework it to have a variety of options to choose for your final. So, here are some of the ones that I have experimented with. So we've got, this is quite similar to these same kind of tear drop terminals. It's on a little bit more of a slant, so it feels a little bit more lively. In this instance I'm probably going to head towards something that's more upright to fit perfectly within that rectangle. You can see here also maybe this one is a little bit wider, so if you're working in a square maybe I'd look at extending that out, and then getting a little bit more experimental. I really love this one here, and this was inspired by this existing font which was lost with a swash S. So, I love the way that, that kind of curved in here and then added a bit more thickness, so that's also an option that you could use. So, once you've explored a number of options, it's then the point where you have to decide which one you are going to take through the final. Now, as I mentioned before I love the way that the sharp edges here contrast with the main curves, so I think that this is the direction that I'm going to go. I think this one's probably a little thin, so my favorite one would have to be this S right here. So, as you can see from the initial sketch, I've bulked up that middle section a little bit more, I've reworked these negative spaces so they feel like they're a little bit more in harmony with each other, and redefined these lines to make sure they're straight and balanced with the curves. So, I think this is the one that I'm going to just take through and introduce the botanical elements and start working on our final illustration.
5. Photographing & Composition: So we've just finished a thumbnail sketches and you've made your selection of your favorite one to take through to the final illustration round. One of the things that I like to do is scale it up so that you can start to see inside the actual letterform, where you can place the botanicals, and where they fit to complement the overall shape. So, I'm just going to photograph my selected S. Often it doesn't really matter if you scan it or if you just use your phone because obviously the final result will be illustrated separately. So as long as you've got good lighting and you can clearly see it. So once I've got that shot, I can send that through to my computer, and I usually will scale it up probably about four times as big so I want to be working at tabloid size. Here is the larger version that I've already scanned and prepared. If you don't want to go all the way to FedEx or Kinko's to get it printed, you can use the low five technique that I do, which is printing two letter size pages and typing them together. Once you've got that, we can move out of the little thumbnail sketches. This is going to be a great base to start positioning our flowers. What I'll do is I'll just grab another piece of white paper. You can still see the actual silhouette of the S there but you've got enough white that if you want to photograph the flowers, it'll still come out quite clearly. So from here, we can take now, maybe let's start with the hero flower, and that looks nice so far in the middle. I've also got here some speckled little leaves which I selected specifically for their speckled nature. This is going to come out really nicely once we start illustrating these elements because you can see that that part you can imagine that in black and white, and it'll be quite crisp and clear. You can really just start to position these based on the layout of the S and I think it's really nice to complement those overall curves, so you can imagine this kind of travelling through, and the more that the actual shapes fit within those, the better it's going to look. I also sometimes use tape to actually just position them a little bit closer to that curve than they might naturally sit. So that's one option you don't have to fill the whole thing, you can just start to place these elements there, and what I'll do is I'll photograph them as I go along. You don't even need to get the full S in the photo, you can just kind of zoom in on those elements. As I mentioned before, having that variety is perfect when you start to see how much room you've got left here. So maybe, we could nestle in some of these little berry shapes. Now with these curves up here, as I mentioned before, we don't want them too thin because we want to incorporate maybe a stem. You can even take of the leaves of an existing stem and start to see what might curve around them nicely and you're definitely going to need the tape for that stage. So once you've photographed maybe one combination of flowers and plants in that position, you can just take them out and maybe try something else. Now, there's one particular flower, this one here, which almost looks like it was designed specifically for this S, so you can see how that would sit quite perfectly there. You could also imagine how maybe using these smaller elements along that curve. You're really just mixing and matching and seeing what works. I often like to have maybe not just one element by itself but have a few in a bunch, and then you can also photograph that and flip it and use it in another part of the shape where it sits as well. Once you've got some of the elements in the actual position, it's also great just to have extras. Say, for example, you just want one of these leaves or maybe an individual berry, it's always helpful at the end once you stop comping the elements together, to have some options. So you can get some individual elements as well. Now you should have a nice little library of photographs for reference for maybe some different positioning of the different flowers. We're going to take those photographs with our initial sketch and move onto the computer and see how we can bring this all together.
6. Collage & Design: We're now going to take our project into the digital space. We've done our pencil sketches. We've used those to start to position some of our botanical elements and we've got a little library of reference images that we can start to bring together into our final composition. Now, this stage is almost like a digital collage. You're going to take your photographs. You're going to place them, re-position them, kind of like thinking out the design in a digital space in Photoshop. So, you want to have a variety of different options of your photos of the flowers on the letter, but you can also refer to some other photographs of flowers maybe you've taken in the environment where you selected them from or other things from your reference library from your travels. So, I've opened up Photoshop here. So, here's the S that I ended up choosing. So, you've got your base level here. This is basically the silhouette that you want to use to guide the placement of the flowers but also, you want to look at the shapes because I've got this S, it's got that beautiful big curve that's kind of running through the shape with the letter. So, you can think about how you can actually position the flowers to complement that shape rather than go against it. So, in addition to the real-life flower reference that we've taken photos of and have a look at already, I also took some pictures actually at the flower market without having to buy the physical pieces. You can have that additional reference on hand. I will usually go through and look at what I've photographed. Now this particular flower here, I'm noticing, okay, this has got this really interesting line work that's coming out from the center and there's quite good contrast again with the dark pink in the light. So once we move into black and white, I think that this might be a good one to use. So you can start to play with those images, put them into black and white, and see how they might look. So this one's being flipped. The dark areas have been enhanced so you really start to see, well, this could translate really well into a line drawing. I'm just going to go through, look at these flowers, really roughly cut them out in Photoshop, turn them to black and white, and then start to almost have like a collage of these different flower elements that I can cut and start to bring into the piece itself. So, if we go back to our Photoshop document here, I've already prepared some of the elements here. You can see here, this is one of the flowers that I've cut out from the picture from the flower market. Here are some that I've taken over the head from the flower references we talked about before. You can start to see how different shapes blend themselves to different areas within the letter. So these flowers here, I can start to see how this is going to fit within that terminal really beautifully up here in the top of the S. There's a really nice pattern you can see inside this particular leaf here, so I want to make sure that features because once we start to draw any kind of pattern in, will really come out well in the black and white. So you can just play around with the position of these elements. You can try a few different positions. So, the best thing about this is to have lots of different options. I really like this flower up here. But maybe, that's going to steal away the attention from the other smaller elements so I might just take that out and maybe re-position this one to fit within that shape. Another thing, with the tip coming down to this kind of tapered point, it's great if you can have these little buds of an orchid that decrease in size. That kind of thing is perfect and really complements the shape of the letter. You can move these around. I also love the way that these particular flowers are pointing outwards and as I said before, you want them to complement the volume of the S as well so you can kind of fit that to that same curve. This collaging step is almost like digital sketching. It can be quite time-consuming and you're trying lots of different things. This phase can sometimes take between maybe one hour if you know exactly what you want, or anywhere up to three to four hours if you want to try different options. So I think this took me a couple of hours when I was working through the best layer. I think I want to go with these small flowers of the top so I'm going to get rid of these ones. So, that main area where I had the hero flower in the center I think is perfect to carry on through. I'm going to integrate that. Then this is the final piece that I prepared earlier. What you've got here is now like a photo collage that is really close to what you're going to be drawing. So this is basically what you're going to use as the reference for your lights and your darks. You want to make sure that you can play around with the levels a little bit. I often do this just to make sure that you are getting enough contrast so that when you start to draw, you can really clearly see some of these patterns that are coming through. It's always good as well to just zoom out and to make sure that the balance is nice, you've got a little bit of pattern coming through. You can see why having these hero flowers is good to just have something where your eye directly goes to. I often keep the initial pencil sketch underneath, so you can see those sharp lines. But ultimately, we're going to draw and we're going to just use our imagination to fill in those areas with smaller little vines or dots of leaves so that the final shape, even though it reflects that silhouette, looks like it's completely organic. So from this point, we want to print this out. As I mentioned earlier, what you want to kind of have enough detail so that when you scale it down, it looks really rich and intricate. So, I'm going to work at 11-by-17 but with the view in mind to scale it down. You can print that out and then we can start moving into pencil and ink.
7. Sketching: So for this next part of the project, we have got our digital collage and we printed it out, and this is going to really be the basis for our drawing. So, we've saved a fair bit of time in terms of the thinking through the sketch, by making this composition already. So, what I like to do now is to move into a very loose pencil outline. You can do this from scratch, but it's often faster especially because we've spent so much time working on that shape of the S, to just do a really light pencil outline. So first of all, you want to make sure you get these hard lines of the letters, but you also just want to get the large shapes of the flowers. So, ultimately we're just going to be using this as a reference, so that we can start to say like, where are these details. And then we're also going to use this in conjunction with the actual flowers themselves, so that we can get even more detail which you can't capture in the photograph. So, what I'd like to do to make sure that our sketch doesn't move around, just in case we are shifting paper, or maybe we're starting the drawing in one place and moving somewhere else, is to just tape our digital collage just lightly to the back of the paper, so that way you don't have to worry about it moving. So, if you just have that loose outline of the letter, it's a lot easier to draw the actual letter shapes smaller, because you can see those negative space elements and the balance of the of the letter foam composition a lot easier. But then once we get to this size, it's much faster, if you can just scale it up like we've already done. So now, we want to get the bulk of those flower shapes in here. So, let's start with this here, our flower here. Now, we're not going to draw in every single element, but you just want to know almost where the center of the flower is. You can do the individual petal shapes, as well. While you don't need to draw the actual details inside the flowers, it's good to just have one line that indicates the directions, so that once we get into inking, it's a lot faster as well. So, we've got this beautiful big patented. I think it's called A Prayer Plant, in here, as well, so that leaf can through. Again, with this flower here on the curve, you don't need to draw every single tiny dot, but just indicating the direction so that you can add the detail when we're inking. So, while it's good to get the main overall shapes. Once I've got those in there, I do like to add a little bit more detail so that the inking stage can be a little bit more seamless. So now, we've got a little bit of detail coming through in the pencil sketch. This is a time where I'd usually want to look at trying to lose these hard edges of the letter. So, I'm going to disconnect this from our digital collage. So, what I like to do is look at these edges and think, well, how can some small elements come out to that same point so that silhouette still the same, but make it a little bit more organic. So, often we can take inspiration from little berries. There are often a good source to put in there to the edge. You also want to think about, is it going to be dark enough? So, maybe these are going to be darker berries. Maybe a little bit about like a weaving line around. So, you can see that that makes the illusion of a straight line, but you can actually come in there and rub out the straight line. So that it feels a little bit nicer and more organic. So, you can follow that same process around. Maybe something here. Maybe this would be better if it was made up of grass-like elements that matched that curve. So, you maybe could even come out just a tiny little bit, but not so much that it messes with our nice silhouette, and you can continue this all the way around. Some of the flowers in our composition already come out, which is quite nice, and I think that also helps to make it feel less like just a piece of lettering that you've masked over some flowers, and more like something that's being crafted to suit the letter exactly. So, I think this is probably enough for me to work with to start inking, and you can kind of just start to indicate that, and then you can always make it even more refined and unique, once we start inking. But I think we're in a pretty good spot now, to have enough to go off to, stop moving into, the fine line of maker phase, and just remember to keep your flowers on hand and you still have your digital college there, just so you can really get those nice fine details into the finished pace.
8. Inking: Hero Flower: So, we're now at the final stage of the project and this is my personal favorite part because we're going to start inking up our sketch. So, it's almost like a lot of the hard work has been done, a lot of the design thinking has been done, and this is like the therapy stage where you can just sit there, peacefully working from your sketch and ink up the design for however long it might take. What we have here is the pencil outlines. We've got our digital collage for reference. So, what I like to do is, especially in this instance where we're going to be working large scale scanning and then scaling down the artwork, I like to work on tracing paper. Now, part of that is obviously because you can see the design through the paper, but it's also really nice for the pens to smoothly glide across the paper. I'm going to be using a variety of Microns. Now, I'm just going to show you a few things about these. As you would know, if you've worked with these fine liner pens before, they come in different sizes, ranging from 005 to 08 and it's important to note that they can be really helpful in establishing like a hierarchy in the line. So, for the main outlines of the shapes, if you're looking maybe at this hero a flower here, even though you might start with a lighter, thinner line to come back in with that 08 and have a really prominent outline in the design, is really good to know, and then you can use the finer markers to almost do like a shading as you would with a pencil. So, I'm just going to quickly show you some pre-inked floral elements that I've used in previous designs, just so I can show you how this might play out. You can see here, in this particular flower here, it was drawn in a smaller size, but that outline on the line is quite defined compared to these inner shading elements. That's really good to keep distinction between the elements, and you can also start to see how nicely pattern and texture can come up when you're working just in black and white. So, it's all about accentuating this contrast between the light areas and the dark areas, so you're almost making like have patterned, stylized version rather than a realistic exact version of this photograph. You want it to have something of your own style in the final piece as well. So, let's get started. As we did with the previous round of sketching, I always like to just tape that tracing paper on top so we don't have any movement happening while we're working. I'm going to start with a point five, just because of the scale before I know how it's all going to look. I don't want to move straight into a really dark defined line, so it's always easier to build up to a thicker line rather than not be able to go backwards. So, you can start anywhere, I'm just going to start here on this flower because this was the one that I was working with earlier, and I'm just going to have this nearby, just so I can have a look at those really fine lines that appear in there as well. So, I can already tell that this is pretty good I think in terms of the size that I'm going to do for the outlines. I'm just going to quickly test the fine liner to make sure that it's going to be good for the details. Yeah, that's quite nice. So, I'm testing out these kind of line white straight away, just so I can see if it's going to work and if not, if it's going to be a bit too thick, it's easier to change at this stage rather than later, but I think ultimately, because this is going to be smaller, it's probably good to have that defined line. You can kind of see from your slight pencil outlines that's really helpful to indicate the direction of the shading and then you can build in the extra elements, the extra lines that really give it a little bit more depth. I often like to have, maybe two that I'm working with, the darker outline and then the really fine ones, so I can shift in between as I reach a different part of the drawing. You can also start to separate the trace from the back just to kind of get a little bit of a look to see how it's sitting without the pencil underneath. And what I'm doing there with the, kind of, it's almost like a flick, is you take the direction of the stroke and you kind of release the pressure as you go and it tapers out slightly at the end, which can often make a nice effect, especially when you're working with floral elements, and almost like a slight shadow once you're zoomed out as well. And once you've done one petal, you almost know how to do every petal as long as you have the direction of the shapes that you just kind of follow that directional shape around and continue on with that shading from the top and the bottom of the petal tip. So, we've almost finished the petals. Now, it's nice to move into, this is an area where we didn't really draw too much detail in the pencil phase, and that's inside the middle of the flower. So, we don't need to get super detailed where you actually have that formation, but it's good at this point to think about how can you stylize this interior element of the flower to distinguish it into black and white? So, often I'll do that by drawing tiny little circles and then filling in from the inner side outwards. So, it's kind of facing this way, so I'm going start in the middle and almost draw just a tiny little circle which you can then fill in. And that might actually work with the larger tip, because ultimately, we want it to be darker so it contrasts with the white petals, so it's okay to be only leaving a tiny little bit of white. It will still have enough effect to show more detail. Okay, so we've pretty much at the beginnings of our first final flower. What you can do is put a piece of white paper underneath to see what it's starting to look like as well. So, it's looking pretty good. I would probably come back in, see here, those lines on the outlines of the petal feel like they are a little thin compared to the rest so add a little bit more. It's also nice to think about the shadows here. So, if you look at the layering in the petals, the ones at the back are obviously going to have a little bit of shadow from the top layer coming in. So, you can indicate that a little bit more to give it a little bit more depth. Another thing that's good about this particular process is because we're not doing botanical illustration, it doesn't have to look exactly like this flower, and no one's going to know. So, you can essentially invent your own flowers. That's looking pretty good. I'm going to leave that where it's at for now, and often what I like to do is kind of build outwards from that area so that way you can start to see do I need, maybe some darker areas underneath the petals so that it stands out more, and you can gradually fill the whole shape.
9. Inking: Details: So, maybe we'll actually move down now into one of these beautiful little speckled leaves. Now, the patterns on these change pretty much depending on which leaf it is. So again, you can have some creative liberty. Because of the design I'm looking here, this is as nice as a dark area. I probably just going to start straightaway with the thicker marker and just start going in straight away into those fills. So in that pencil sketch, I didn't draw all the finer detail so you can make it up as you go along and add some extra dots. So, if you have that center line drawn in down the line of the leaf, it can sometimes help you just direct with the patterning. If you feel like you're getting lost, it'll at least shape the direction that you're drawing. Because this area here is going underneath, the petals of the flower, I'm just going to fill that in to make the flower pop a little bit more. So you can fill it in but then still make it look like it's integrated into the pattern, maybe with a few little open dots. Okay, so that's pretty much that leaf and we might leave that edge open and see what happens around it to decide if we want to make it a little bit darker and close it in, but that's a good place to start. Now, I'm going to work on this area here. So this is still got that hard line from the S, but I want to make that a little bit more fluid. You can bring in the pencil as well because you can always rub it out. But I think I'm going to have like a bulbous maybe similar to these bud shapes here. Maybe coming up from this way and maybe it'll have like a stem. So, if you make this almost like a stem, it becomes still in the same shape with the S but a little bit more natural. Then, we'll just get some volume lines coming in again using that same technique of a flick. This is going to bring the leaf out a little bit over there. Here, I think it might be nice to have like a dark, small, tiny berry about this size. These dark small berries, I use a lot in my work to fill in little gaps. So, all of this is really just the black circle with a tiny bit of light hitting it. You can start to see our shape of that side of the S coming together quite nicely, and you can see how that pattern in the leaf really nice, little contrast with the white area of the petals. So, we're going to keep on tracking on with our elements. Now, let's do something a little bit different, maybe these darker flowers here. I mean, some of these darker leaves up here at the top. Now, they will work well if they're almost like a solid dot color. We still want to have a directional line showing the shape of the leaf and that'll help give it a little bit more of a realistic touch. So, we can draw the outline in. So, what we can do with this is just only drawing again a center line, and I might fill this whole left hand side. When I fill it, I still want to draw the fill in the direction of the shape of the leaf, so that you can just get tiny little bits of white showing through which is quite nice. Then, almost come in from there with these directional leaf lines that are quite close together. So, we can always come back to this if we feel like it's not dark enough, once we've drawn on the other elements, but that's a good little starting point of the direction. Now, because this is quite close to these tiny little flowers, it's probably a good time to start drawing those in, and they've got these beautiful almost like vein-like elements showing through. So, I'm going to try and capture that in the final. So, while you've got the main leaf or maybe an under leaf flower here that have a little bit of line work, to give it a bit of depth, you can completely fill this gap in between. Also now that I've started to introduce these small little black berries, it's good to have a few of them throughout the design that help guide the eye because they do actually stand out quite a lot even though it's just a small black circle. I'm feeling like we need one here. Cool. Okay, let's move over to this flower here. So, it's pretty much the same process again just looking at that reference. Now this particular flower, we don't have it our physical reference but it's quite clear what you've got there in the patterning, so you can just look at the photo. So, that you get this tapering, you can use that same technique I was drawing before. We can kick-off and then redraw over the top. As long as you lift the pen up towards the end, it'll naturally get thinner. Because these ones have a bit more of like, you can see that they're curving outwards, you can use the really fine pen to just add a really subtle. It's almost like a directional shadow coming in. Again, I think it's time for another little black-ball-berry-flower thing up over here. These areas here are quite dark, in our reference as well. So, to be able to balance out this, we can indicate that there is something going on underneath there but still make it quite dark. Another good way to add more contrast is to almost add a drop shadow in the flower to make it pop out a little bit more and give you that area or black that sits underneath. So, any areas that you completely fill with this black area will look quite solid once we scale it down, and any areas where you shade quite close together will almost become like a grey. So, as much as you can vary those, the better. So let's look at this giant, I think it's called a prayer plant leaf. Now, this one was the only plant I think I didn't have a reference for it but I did see it in real life, but I specifically chose it for its amazing pattern. I'm just going to tilt the page a little so that we can get that nice shape of the leaf and complement your arm curve as well. So, let's draw that. So, it's good to draw the center line and the outline. So, this prayer plant is the perfect example if you're traveling or if you go to the botanic gardens, and you see a plant or a flower that has really great patterning, that's an excellent place to stop taking photographs and having them on hand when you do approach it like this where you can read something that's got really great black and white pattern. So once you've really chosen which two pens you're usually working to it with between and you've found a good groove with illustrating these elements, you can really just get stuck into it. This is usually the point where I'll listen to a few podcasts. So, my favorite radio station and just really gets stuck into it. So, I think I'm pretty much done. Usually at this point, I'd want to see what the artworks looking like on a white background, so you can just flip over your pencil sketch. So now, we got a nice white background, you can see any final touch ups that might need to be done even in the blacks or potentially, some of the petals could need a little bit of refinement on historic as well. I think it's looking pretty good. So, we have our finished illustrated S. So, once you have your finished drawing, at this point, I would scan this in or photograph it. But most likely scan, so I get a higher resolution. If you don't have access to a large enough scanner, what I would often do is scan it in two elements and just come put together in Photoshop. At about 300 DPI, in that way, you still retain all the detail and you can scale it down to the postcard size, or a little bit smaller and give it to your favorite person who's name starts with S. So, once you've scanned in your artwork, sometimes, I like to do some tiny touch ups in Photoshop. Perhaps, I'll be able to see one's, its other smaller size. Maybe the levels need to be tweaked or just cleaning up some tiny little bits and pieces, and then it should be ready to go. If you're sending your artwork to the printer, usually, it's great. If you have it that needs X size, you want to get it printed at a higher quality print level PDF. So, just some things to keep in mind in terms of the printing and the resolution, as I mentioned, I often like to draw the artwork on paper a little bit larger than what I'm going to finally get it printed as. If you did want to scale it up, you can scan it as a higher resolution, so maybe 600 DPI if you want it to scale it up twice as big. In that way, you will be able to still pick up on a lot of the detail. If you wanted to make it even bigger, you can do that. But often, I like to think of it as long as the artwork's going to be sitting somewhere where you have a big distance between the viewer and the artwork. Then, your eye makes up for the lost detail that you might have in the drawing. But otherwise, the higher resolution you can scan it, the more options you'll have.
10. Closing: So, thank you so much for taking my class. I hope that you could gain some insights into my process, maybe learnt some ways to combine analog and digital processes. Now, I'm really looking forward to seeing what you create. So, make sure you share and upload into the gallery and get outdoors and try and find some botanical inspiration to get started. Thanks so much.
11. Bonus: "Make It" Skillshare Short Film Featuring Gemma O'Brien: I remember thinking that there was only one aesthetic and that the typography aesthetic was slick, clean lines, and that anything that was hand-drawn was messy, or clumsy, or not finished. But I think that I slowly realized that there is a way to have something that is considered and refined, but then also it has a human quality. I love working by hand mainly because it's like your thinking made physical. It's like something you imagine can suddenly become real, whether it's on paper, or whether it's a wall, whether you're making something. For me, that's really satisfying. My name is Gemma O'Brien and I'm an artist, designer, and illustrator from Sydney, Australia. What's that movie we're just like, we're going to need a bigger boat? That's maybe with the bags. I'll probably take my painting pad to change into. So, I've arrived in New York and I'm about to start painting a mural at llreps, which is my agency. Today, I'm going to go and look at the space and start projecting the pencil outlines, so that'll probably take a few hours. Then, I've got about four days to finish the whole mural, which is quite a tight turn around given the scale. I'm feeling a little nervous. I think deep down I always wanted to be an artist. So, I was very creative when I was a kid growing up, always painting, drawing, making little books, but I always felt like I needed to choose a career that was maybe a little bit more of a smart career, or that made more money, and so I actually ended up going to Law School. I was coming home and I was spending six hours a night reading and just the basic cases and I felt this can't be my life. I started to look up design courses one night and I remember just getting so excited at the prospect of switching. So, it was about a year after and I left Law School and made this switch to design. In the first year of Design School, I had the first introduction to typography and initially, I found it really boring until I had an opportunity to set type by hand in the letter press studio. Suddenly, it's physical, I could pick up an individual letter with my hand. All the fonts were in a drawer that you could physically pull out. For me, that was the moment where I was like, wow, this is a whole new world. I became so obsessed with typography at this point. Walking down the street, I couldn't ignore every form of hand-painted sign, or neon sign, or anything that was the printed word or the written word, I just couldn't escape it. But in terms of where I would fit within the typography world, I didn't know exactly where my place was, initially. When I first started to go freelance, a lot of the commissions that I was getting tended to be shaped by the trends that were happening in the design world at the time. There was the grand chalk trend of 2013 which was shaping a lot of my work, and there was a lot of intricate, flourished, inspirational quotes, and so many of the jobs that I would get were driven by that. So, I really wanted to find a way to make work that was unique to me. So, the way that I did that was to come back to what I was really interested in and strip it back to drawing, and writing, and finding a way to illustrate lettering and make it into an image in itself. When you see a trend, part of me thinks well, it's easy to jump on board and try and create something that fits within that trend, but maybe has a new spin on it. But for me, I wanted to get ahead and do something maybe that other people couldn't do or even if they could, it would take time for them to catch up in that trend cycle. So, it was definitely driven by trying to find a unique voice in a very busy and saturated market. Once I've done the design, once I've projected the pencil outlines onto the wall, the painting part is my favorite. It's almost like the hard work is being done. You could have done all the design, thinking and the painting part is almost therapeutic. I love being away from the computer and you have to physically use your whole body. There's often a lot of thinking on the go. How can I access this point? I just love that process. The first time I worked on a large-scale piece was about four or five years ago. I was invited to do a solo exhibition. I had the opportunity to do whatever I wanted and it was a huge, big room and I arrived a week earlier to do an almost like an artist-in-residence program. I thought why not just paint directly onto the wall. I drew all the artwork by hand. Had a projector and just started painting. It was the first time I've worked at a large-scale and it just was amazing. I love the process of creating large-scale letters. It feels like it has this presence and a power that I think is really awesome that it takes something that was traditionally just on the page into a large-scale space. People responded to it really well and that was the motivator and gave me more momentum to continue down that path of exploring my own style. So, on Wednesday with the pencil outlines, I finished about 11:00 PM. So, that was the first day, then I came in, did about 10 hours of painting yesterday and probably around 6 today. Are you feeling good about how it's turning out? I'm feeling really good about how it turned out, actually. I feel like the design is perfect for the wall and when you stand really close, you almost can't see, what do you see? You have to step back and it's a whole new experience. I think that when I do the last stroke of the mural, I'm usually sleep-deprived, exhausted, but also excited. It's not until the final stroke is done that I can look back and see its full effect. Even the process along the way, it looks great to see it coming together, but when it's there and you can just step back and experience it, it's a great moment. I think that there'll always be a place for a handmade work. While that might change and obviously, there'll be new tools and new digital ways that people will work, there's something about working by hand that just feels more natural, it feels more relaxing. It's almost like there's a direct link between hard work and physically moving your body, and then creating something. I think that that's really rewarding.
12. More to Explore: way.
 Gemma O'Brien, Designer, Lettering Artist