Transcripts
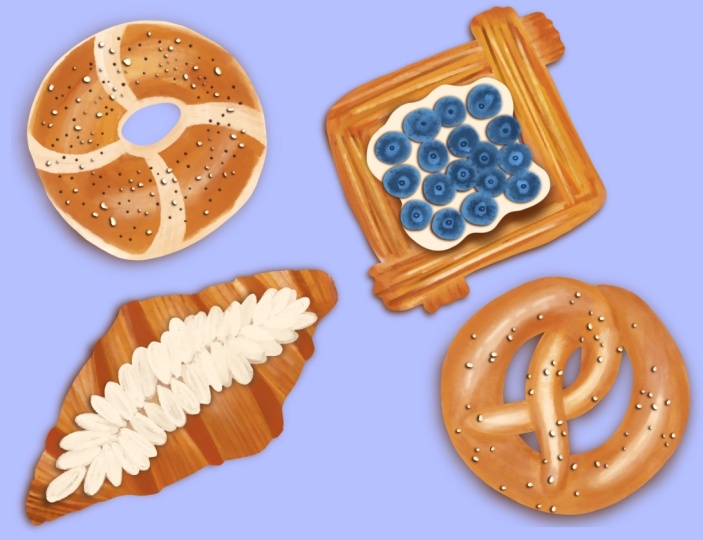
1. Introduction & What You’ll Learn : Hey guys, Welcome to my class. My name is Vinita I'm an illustrator and pattern designer
based in Singapore. And in this class I'm going
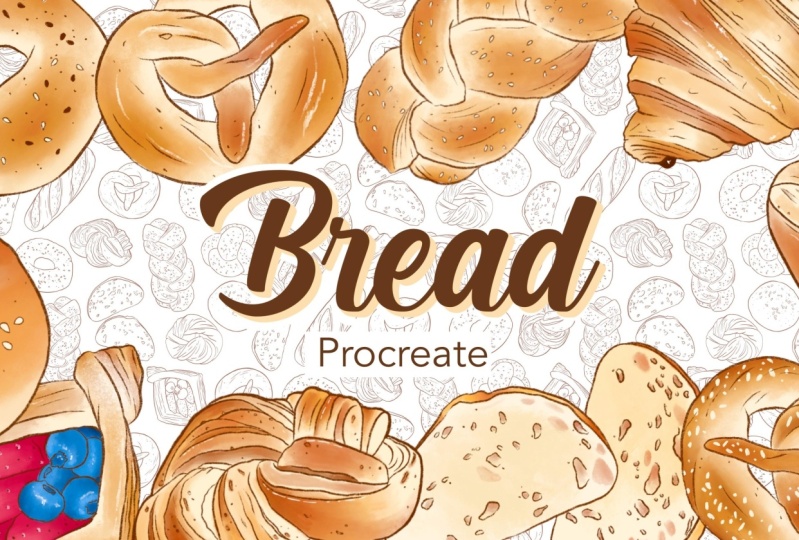
to show you how I made these fun bread illustrations
in Procreate. Illustrating phi
types are bred in this class with a hint
of royalty-free images. The brushes will be using
in this class will be default brushes from the
Procreate library itself. We start our illustration
with the liner for language, the base color, and then adding shading and highlights
to this base color. I'll be showing you, look
for examples for each grade. This will give you
an idea on how you can make your own version
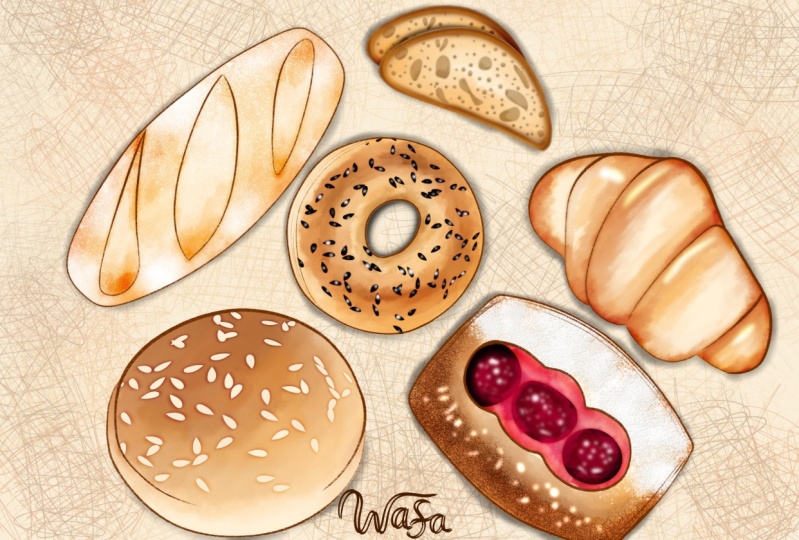
with the same bred. I've attached more than 50
royalty free reference images in the resource
section of this class, you can even choose a brand of your choice and follow
along in the class. There are a few
ideas on how you can turn these bred into a product, which can be a digital
or a physical product. By the end of this class, you will have a small
cohesive collection of bread with a lot of tips
and tricks on how to illustrate on the
drawing app Procreate. Thank you for taking
this class with me.
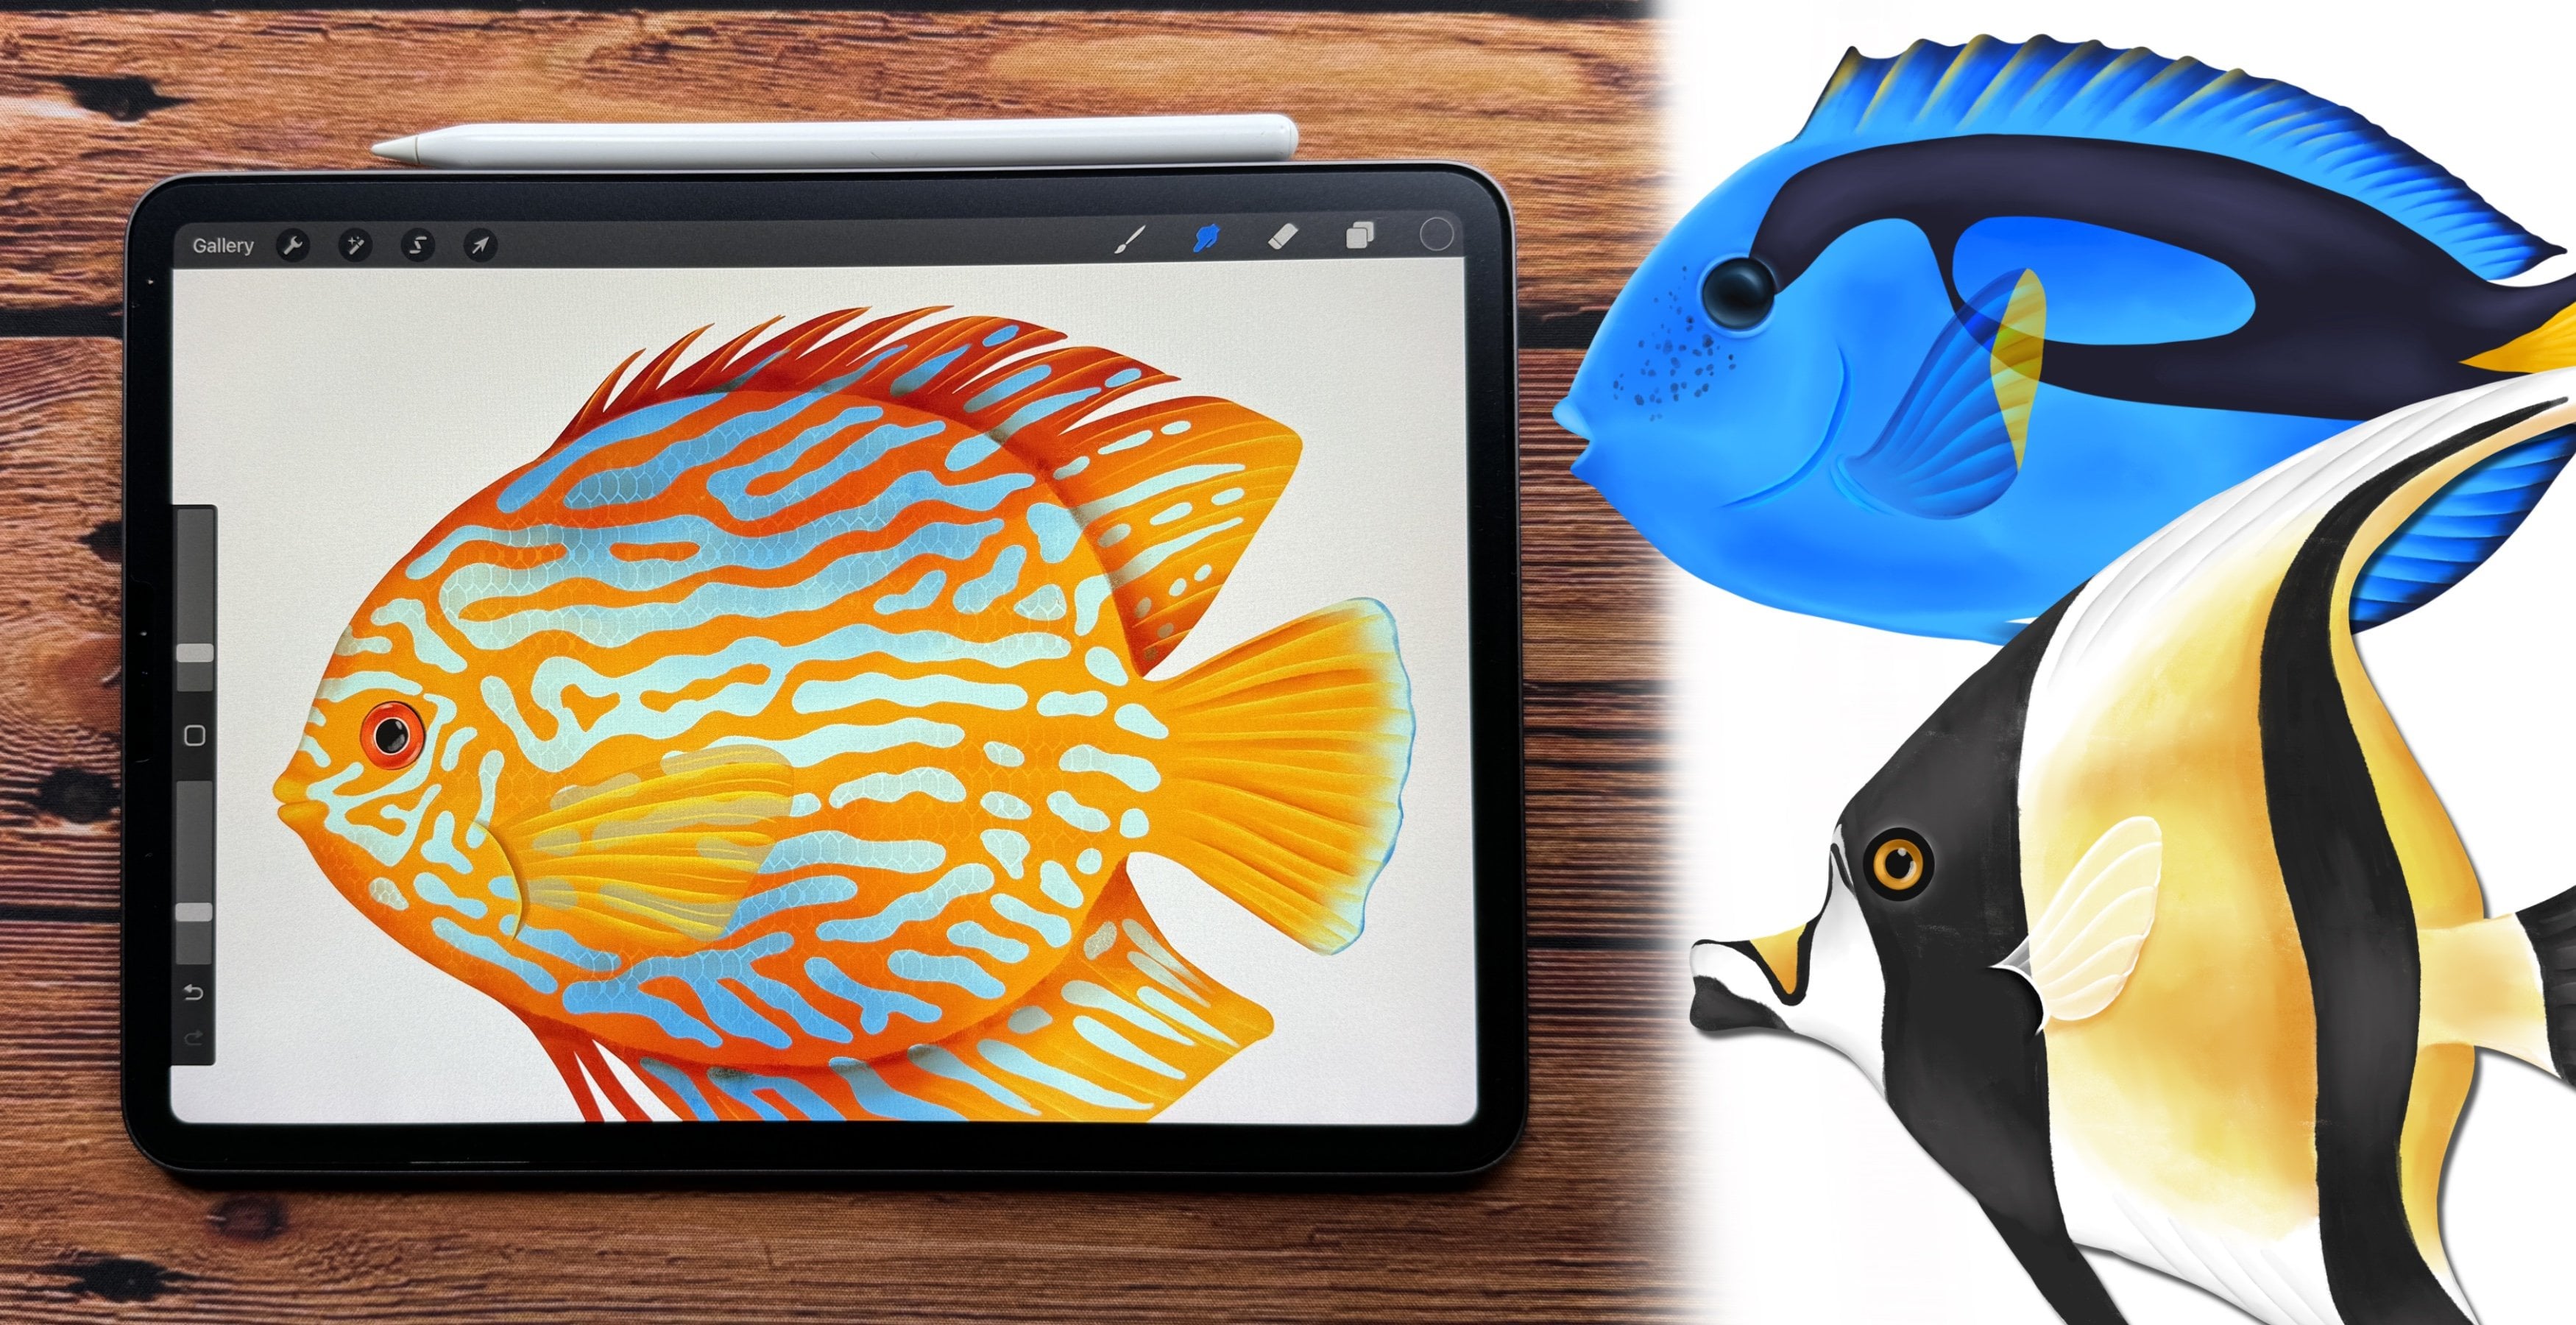
2. Canvas & Brush Setup: Let's start with our
canvas and brush setup. Our very first step is
to create a new canvas. For that. I'll tap
on this plus sign. Again on this tiny plus sign that we open all our setting
to create a new canvas. I'll keep my canvas as
4,000 by 3,000 pixel. And the DPI is 300, which is standard for printing. 51 Leos are more than enough
for this illustration. There's another
setting I need you to know is under time lab setting. This has been, you need a good
quality time-lapse video. The few options here. And for a good
quality time-lapse, I'll keep this as four
K and tap create. Our canvas is ready here. Let's move on to
our brush setup. For that, I'll tap on
the Brush Library. And our very first step is
to create a new folder. I'll tap on this plus
sign at the top. This will create a new folder. I'll rename this
folder as bread. Our next step is to drop all the brushes we
need in this folder. The first brush we need
is under sketching. You can try any of these
sketching brushes. I'll be selecting 6 ft and
I'll duplicate this brush, this brush, and we'll drag it to our new folder and drop
it in this folder. Our next brush is under inking. Here, I'll be selecting
technical pen brush. I'll duplicate this brush, hold this brush and drop
it to add new folder. Next brush is under artistic. I'm not sure how to
pronounce this brush, but it starts with letter L. I'll show a bigger size of
the brush on the screen. Again, I'll pick this brush and drop it to our bread folder. These are the only
three brushes we need for our bread
illustrations. Next, let's move on
to the color panel. Here, a half this color palette in the resource
section of this class, you can download
this color palette. These are the colors I'll be
using in this class today. Next, let me show you how and where we will be
using these brushes. I'll select my very first brush. That's the 6 ft pencil. We will be using this
brush for all online art. It's a pressure based brush. So when you apply
pressure on your pencil, your line can get thicker and
thinner depending on that. Let's move on to
the second brush. That's technical
pen will be using this brush to create the basic shape for
our illustration. You can try a lot of
other inking brushes too. I like this brush because
this has a smooth edge. Now the third brush, this brush is mostly to add
detail to our illustration, to add shadow and highlights. It's a pressure based brush. So when you add pressure
on your Apple pencil, it releases color on the screen. And it also works
as a smudge tool. When there's less
pressure on the pencil. It works as a smudge tool. We'll be using
these three brushes for all our illustration. Now before we start
our illustration, we need to set up our canvas
with the reference images. For that, our first step
is to go to Action. Insert a Photo, swipe left, insert a private photo. These pictures are also in the resource section
of this class. You can even choose a
breadth of your own and follow the technique
I'm showing in this class. Once you're done
choosing your bread, I'll tap on the picture and
it will import on the canvas. I will be adding five
reference images of these bread to make it
look like a collection. Tried to select bread with
different texture and shape, maybe a little color. It will give a lot of depth and interesting look to
your illustration. Especially when
you're turning it into a seamless pattern. And make sure you select, insert a private photo option. This will help in hiding your reference images for
your time-lapse videos. I'm going to quickly add
all my pictures here on the canvas and make sure there's enough space
for each illustration. We will be illustrating a
collection of these bred for it to look cohesive and
to look like a collection, we need to use the same
technique on each brand. Once you're done adding
all your reference images, our next step is
to go to layers. And I'll pinch and merge all
our reference images into one Leo and will reduce the opacity and reduce the
opacity to around 50 per cent. And our canvas is ready here. Let's move on to
the illustration.
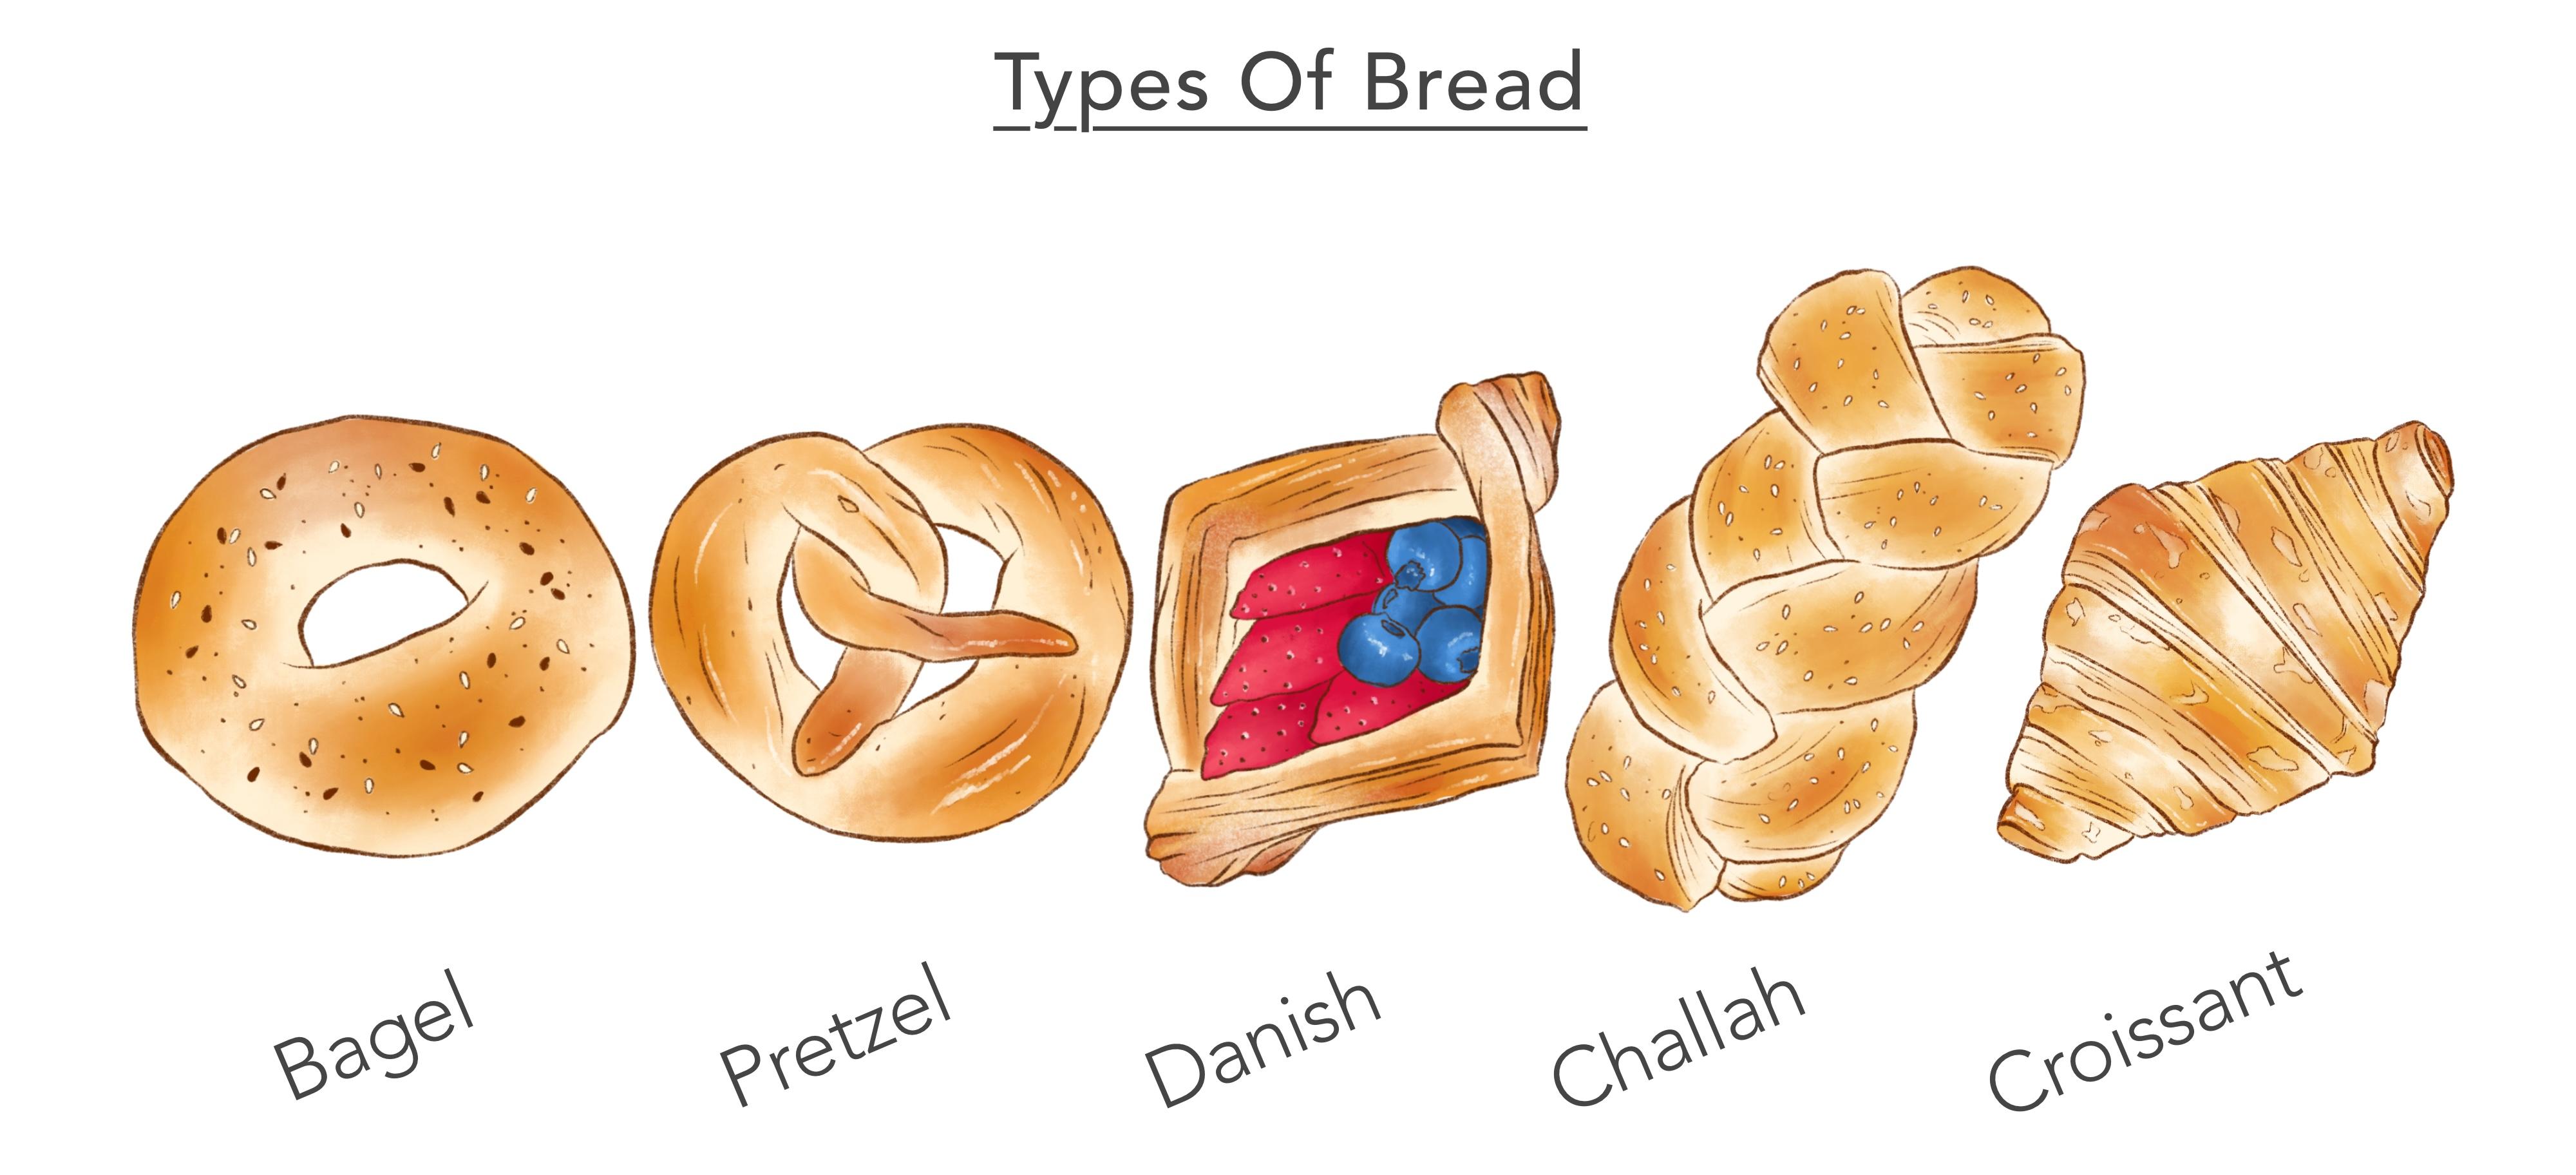
3. Bread: Bagel: Let's start with our very
first bread, that's bagel. Our first step is
to go to Layers. Make sure you have
a new layer and rename this layer
as bagel outline. We'll start with
the outline first. That's the line art, go-to brushes in
our bread folder. I'll select my six B pencil. Go to Color panel, and I'll select the darkest
brown from our color palette. I'll zoom in the
reference image of the bacon and start adding
these uneven outline. Now this can be different
depending on your style. For example, you might
want the lines to be thicker or thinner or more even. Or maybe with a
different brush tool. You have to also make
sure the images you're using for reference are
royalty-free images. And while you're drawing, you can make your
own changes and add more details depending
on your own style. Now, to add detail in the
center of this bread, or reduce my brush size
to around 20 per cent. You can even tap on this
and tap on this plus sign. You can remember what
brush size you're using. I'm randomly adding these
outline to the seasons seeds. I'm not exactly
following the image, just evenly spreading
all over the brain. You can even illustrate
your own version of begun. These are two more examples. One is with a reason and the
other one is with the oats. At this stage, instead of
adding these tiny seeds, you can add any other
doping of your choice. The detail I want to add
are these tiny dots. It's just a cute detail
to the illustration. I'm done with my line art here. Next I'll go to layers, hide my reference image. Next we'll add a new layer below this layer below
our outline layer. And I'll rename this layer
as bagel base layer. This will be our base layer to add details and
texture to our breath. Now for the base layer, I will select my
technical pen brush. Go to the color panel, and I'll select the lightest
color for the base. And I'll start adding this
outline to the brain. You can even make your
background darker so you know, you're not missing or there's no space between these lines. Because we will be filling
in the same color. Having a limited color palette, and using the same
illustration style for all the bread will help your illustration
look cohesive and also looks like it's coming
from the same collection. And I'll fill in the same color. Now, our next step is
again to add a new layer. And this layer will
be to add detail. So we need to add clipping mask. Select our third texture brush. Next from the color panel. Select this bright yellow. My brush size is
around 20 per cent. And I'll add this
texture in few areas. Now for this, you can go through a lot of
reference images To understand how
a bread can look naturally and which part
is darker or lighter. I'm going to add
these details in few batches and leave
few places as lighter. This brush can work as a brush and smudge
at the same time. So when you apply pressure, you can see the color
getting darker. And with less pressure, you can smudge those colors. You can even see my
Apple Pencil is stilted. That helps me get a
little broader brush. If you need to smudge further, you can even select your smudge
tool with the same brush. So you go to your brush folder
and select the same brush. And you can even
adjust your opacity. Mine is around 50 per cent. That reduces the
intensity of the sponge. And I'll smudge
few places where I feel it can get smoother. Next, again, I'll
select my brush tool, the color panel, and
select this darker orange. This can also be
done on a new layer. Doing it on a new layer
helps you in future. If you're not very happy with
the color or the smudge, you can just clear
that particular layer. If the illustration
is looking to light or you need to add more detail. One of the step that I
love to do is by going to layers and duplicate
our highlight layer, swipe left and duplicate. You can even adjust
the opacity of this layer if you feel it's
too dark or too bright. Now let's move on
to our next step. For that, I'll add a
new layer and I'll rename this layer as detailing. Go to my Brush Library and
select my technical pen brush. Select our lightest color
from the color palette. And I'll start filling
in some seasons seeds. I will be keeping
a combination of lighter and darker
color of the seeds. So I leave you for
the darker shade. Now for the dark Coven, I'll go back to the color
panel and select our darker brown and fill
in the rest of them. And be done with our
full spread here. Next we group all the
layers for this bread. Select all the layers
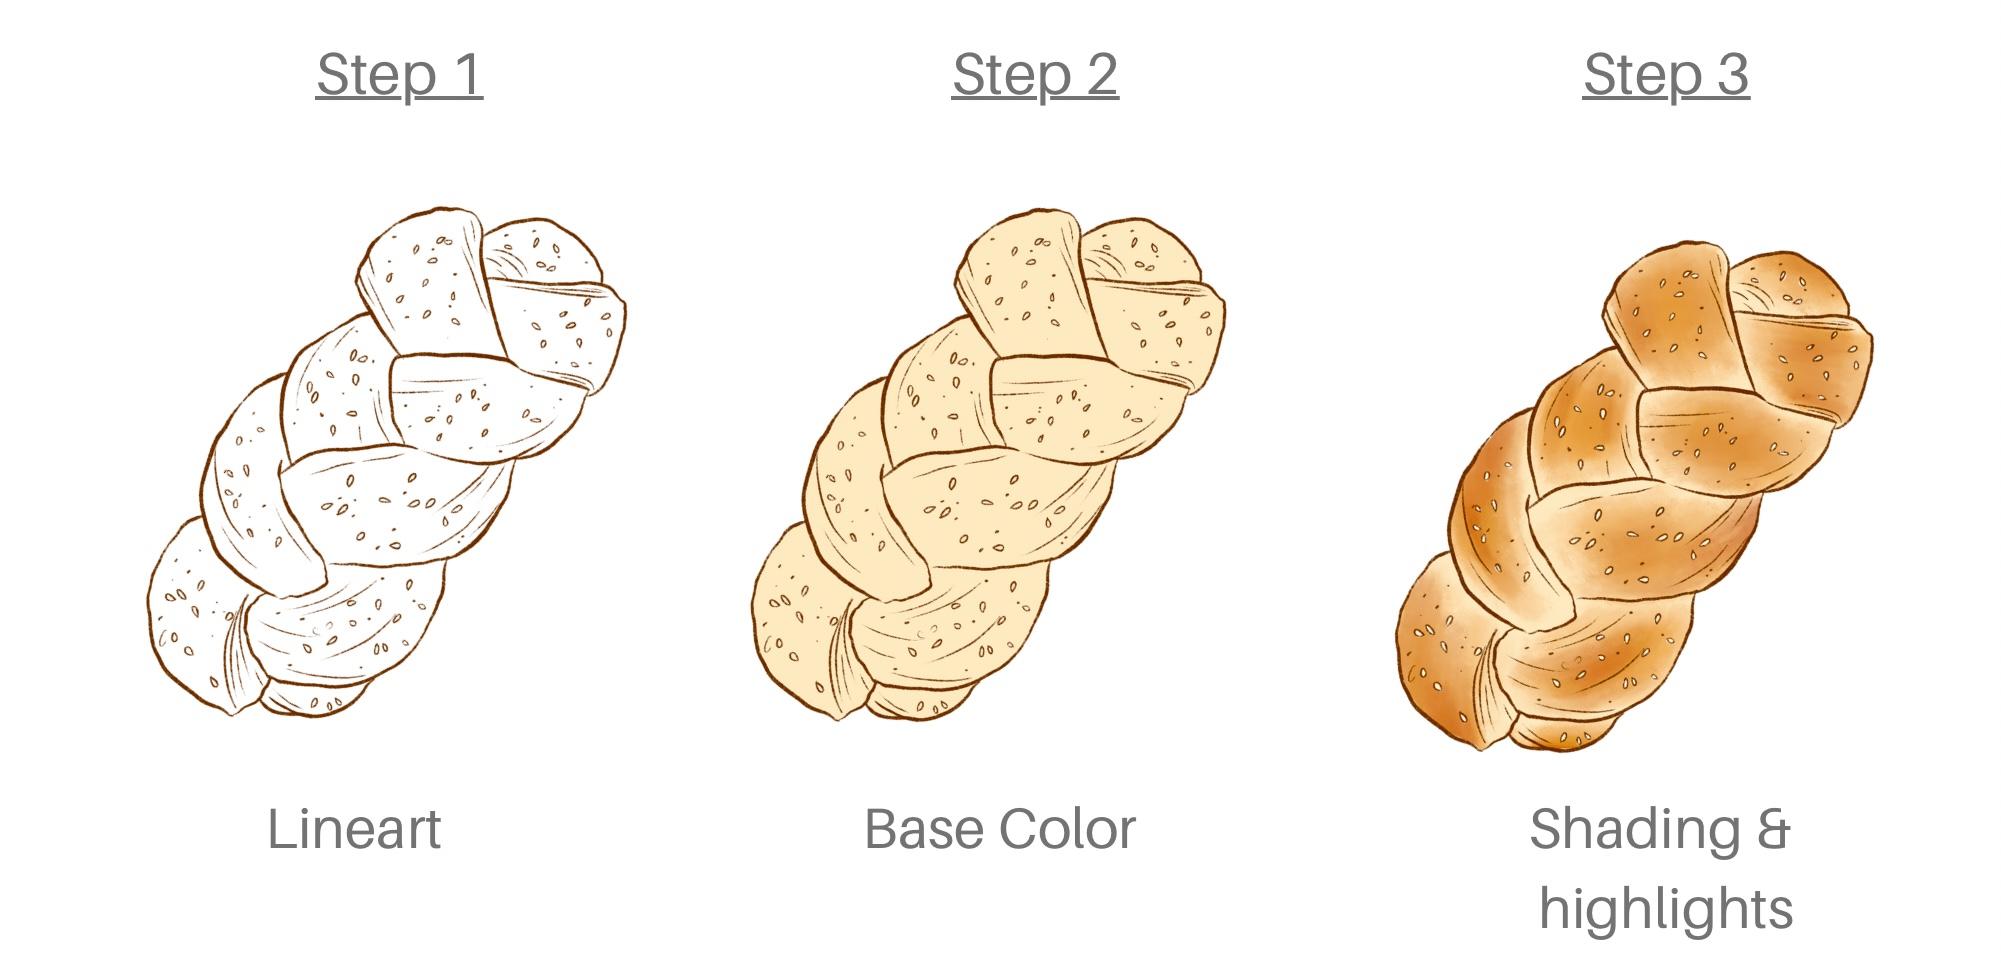
and tap group. There are three major steps to be followed for this bread. The first step is line art
than adding a base color. And the third step is adding shading and highlights
to this base color. Two more examples
on how you can use the same bread with different
details of your own. The first example
has some reason, and the second one
has some oats. Let's move on to
our second brain.
4. Bread: Pretzel: Our second bread is pretzel. Our first step is
to go to Layers, unhide our reference
image layer, add a new layer, and I'll rename this layer as pretzel outline. Next I'll go to
the Brush Library. Select my six B pencil brush. Select a dark brown color
from the color panel. And we'll start adding our
lineup to the second bread. I'll keep my brush size to 30%. I'll add these uneven lines following the reference image. While you're adding these lines, you can make your own
changes to the shape. You don't have to exactly
follow the reference image. You have to make
sure the style of your line art and the color
you're using has to be consistent all over your
bread illustrations for it to look like a
cohesive collection. At this stage, you can add your own version of
toppings or seasoning. These are two more example
on the same brain. Once we are done
with our line art, our next step is to
add a base layer. For that, I'll add a new layer, this layer below
our outline layer. And I'll rename
this as basically, go to the Brush Library. Select our technical pen brush, the lightest color
from the color panel. And we'll start adding
an outline to operate. While you're adding
this outline, you have to make sure
there are no open ends because we will be filling
this with the same color. You can even change
your background a little darker shade. So you can see this
light colloquially. I'll drop this
color in the shape. Our next step, I go to layers, add a new layer, tap on this layer and
tap clipping mask. Next from the brush library, I'll select my third brush. Select our bright yellow
color from the color panel. And then start adding these small patches
with this yellow color. You can just flip to a lot
of reference images to understand which
part of the pretzel looks lighter or darker and how the shadow and
highlights can fall. Next, I'll select
my smudge tool with the same brush and
I'll blend the edges Go back to my brush tool and select the darker orange
from the color panel. And I'll add this
color on top of all the yellow areas to give this nice
golden brown effect. Now, this will be the last
detail for our bread. I add a new layer and rename
this layer as detailing. Using our same third brush. Select an almost white
color like off-white dish. And I'm going to
add this detail, looking like a
shine to our bread. One of my favorite step to
duplicate our highlight layer. You can adjust the opacity if it looks too dark or too bright. I'll keep it around 50 per cent. Last step is to
select all the layers for this bread and group them. And we are done with
our second red here. There are three major steps
to this illustration. Starting with the line art, adding a base color and shading and highlights
to this base color. Two more example
with the same bread. The first one with
the salted seasoning, and the second one with
the pumpkin seeds. You can illustrate
your own version and add your own details. And the bread will look
completely different. Let's move on to
our third bread.
5. Bread: Danish: Let's start with our code
bread, that's Danish. Our first step is to go to Layers and hide our
reference image. This is our bread here. Add a new layer. Rename this layer as Danish outline or the
initial line art. Next we'll go to
the Brush Library. Select our six B pencil brush. Next, go to the color panel, and we'll select
the darkest brown from our color palette. I'll start adding our line art following the reference image. You don't have to exactly
follow the reference image. You can add your own
details in your own style. Like your lines can be
thicker or thinner. Or you want to add
more curvy lines, or want it to be more flaky. Once you're done with
the bread outline, you can have your own
version of filling inside. These are couple of more
examples that I've done with the same brand but
with a different filling. For this illustration,
I'm following the reference image with
blueberries and strawberries. So if you're planning
to add another filling inside this bread, this is the time
where you need to add your line art for that feeling. We are done with
a line out here. Next I'll go to layers, hide my reference image layer. And we'll add a new layer for our base color for this layer
below our line art layer. And I'll rename this
layer as base layer. Next, go to the Brush Library. Select our technical pen brush. Next to the color panel. I'll select the lightest
color for our base layer. And I'll add an
outline to our brand. Make sure you don't
leave any open ends. We will be filling it
with the same color. Once you're done
with the outline, I'll drop the same color
inside this bread. Now for the fruits will add base color on different layers. For that, I'll add
a new layer and rename this as strawberry. This bread will have more steps compared
to the other ones. As we have additional
elements to this brand, that's the fruits. Next, I'll select a bright
pink color for the strawberry. Make sure you have your
technical pen brush selected. And I'll add an outline
to the strawberry. We'll fill it with
the same color. And I'll follow the same
steps for the blueberry to add a separate new layer
for the blueberry base color. I'll select the lighter
blue from the color panel. I have this color palette in the resource section
of this class. You can even download
that if you need the same color that
I'm using in the class I'll add outline to the blueberry and fill
it with the same color. Now we have three
base layer ready. One is for the bread, one is for the strawberry, and one for the blueberry. Next we'll add clipping
mask to each layer, add a new layer, tap on the
layer and tap clipping mask. Next from the brush library, I'll select our third brush. Select our bright yellow
from the color palette. While you're adding your
shading and highlights. Having a reference
image can help you understand how the color falls
on that particular bread. You can understand
the darker and the lighter areas on
the read naturally. So when you apply
pressure to this brush, it releases color on the screen. And with less pressure, you can smudge the same color. Also, you can tilt this brush. It gives you this
broader brush size and smudges also very well. Next, electing the darker
orange from the color palette. This gives you a
nice golden brown. We are done with the bread here. Let's move on to the strawberry. Tap on the strawberry, add a new layer and add a
clipping mask to this layer. Next to the color palette, I have three colors here. I'll take the lightest shade. I'll add disliked the shade towards the tip of
each strawberry. Next, we need a darker
shade of the same color. The one that I have
looks too dark. I'll select my midtone and pull this diagonally
towards darker. This is towards the shadow area. For the blueberry two, I'll follow the same steps. I'll add a new layer, add a clipping mask
to this base layer. From the color palette. I'll select the darker
shade of the blue. I'll add shading and
highlights to the blueberry. You can even follow a reference image to
add these details. Now, a lighter shade
of the same color Next, a darker shade
of the same color. For the shadow areas
of these berries. I'll duplicate our highlight
layer for this bread too. If it looks too bright and reduced opacity to
around 50 per cent. One of the last step
is for the detailing. For that, I'll add a new layer and rename this layer
as the tailings. Select white color
from the color panel. And I'll add this
little shine on our blueberry and strawberry. And we are done with
our third bread here. Next, I'll go to layers and group all the
layers for this brand. Swipe left on each
layer and tap Group. And you can collapse this
group with this adult. These are the three major steps we followed for this brand. Starting with the line art, following with the base color, adding shading and highlights
to this base color. And these are two
more example with the same brand but with
a different feeling. You can look for a lot of ideas on Pinterest and other websites. Let's move on to
our fourth brand.
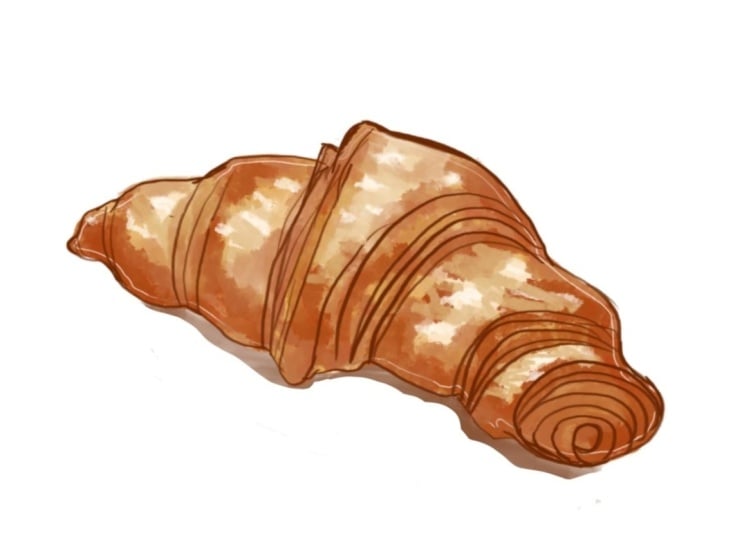
6. Bread: Croissant: Let's start with our food,
bread that's growing. So I'm not very sure if I'm
pronouncing that correctly. We start by adding a new layer. For that, I'll go to Layers
and hide my reference image. Here is the bread. I'll add a new layer, rename this as outlined. Next, we'll go to
our brush library. Select our six B pencil brush. Tap on the Color panel, dark color from
our color palette. And I'll start adding
line art to operate. Like I said in the
other bread lessons to you can add your own details. You can make your own changes while you're adding
this line art. These are two more example
of the same brand. You can have your own flavor and toppings depending on
your style and project. And I'm done with
my line art here. Let's go to layers, hide my reference image layer. And we'll add a new layer
for our base layer, this layer below
our outline layer. And I'll rename this
layer as base layer. Go to my Brush Library, select my technical pen brush, go to my color palette, select the lighter color
from our color palette. And we'll draw our base layer. I'll draw an outline and
fill it with the same color. Once you dropped the same color. We add a new layer to add
our shading and highlights. Tap on this layer and
tap clipping mask. Next from the Brush
Library and select my third brush from
the color palette, the bright yellow color. With the help of the
reference image, I'll start adding this
shading to our brain. If you notice all
of these bread, the folds and corner are always lighter than the top areas. The top part are the ones that has this baked and burned colors Next, Add select our
bright orange color. This will add a nice burnt
orange effect to our brand. One of the last
layer that I want to add is for the detailing. I'll rename this
layer as detailing. This is to enhance the
flaky effect on the spread. Next, I'll go to
the color panel, select our light color. I'll keep it more lighter. Make sure your third
brush is selected. And all I'm gonna do is
fill this flaky ADRs. We are done with our
food bread here. Let's group all the layers. Swipe left on all the
layers and tap group. The one step that I missed is to duplicate our highlights
and shading layer. This helps my bread
look more vibrant. I lowered opacity to
around 15, 20 per cent. The three major steps
that we followed for the spread is starting
from a line art, following with the
base color and adding shading and highlights
to this base color. These are two more example
with the same bread. One is with the
chocolate flavor, and the second one is
with the strawberry. There are so many more versions that you can do with
your own style. Let's move on to
our fifth spread.
7. Bread: Challah: Let's start with our fifth and last spread for this class. First step is to go to Layers and hide our
reference image. Add a new layer. I'll rename
this layer as outlined. Go to our color panel. Select the darkest color
from our color palette. Select our six B pencil brush. And I'll start adding
our line art to the bread with the help
of the reference image. I liked my liner to have a combination of thin
and thick lines. But you can do a lot of
experiments on line art styles. While you're adding
these line art, you can make your own changes and add your own details
in your own style. And also you have to make sure the images you're using
are royalty-free images. Once you're done adding the
major part of your outline. This is when you need to decide your seasoning and the
toppings for these bread, I'm adding these tiny seeds, some seeds to my bread. These are two more example
with the same brand. You can start adding your own version or
your own detailing. Before we start our
shading and highlights. On my first example of bread. You can see few Almand
pieces on the top. So instead of my see some seeds, I will be adding line art
for big chunks of almonds, adding some detail for
the folds and the curves. These details can also
be done in so many ways. You can add some dots, you can add some
tiny check effect. Some places with flaky effect. We're done with
our line art here. Next we can go to layers, hide our reference image layer. Go to the Brush Library. Select our technical pen
brush from the color panel. Select the lightest color
from our color palette. Next, go to layers, add a new layer, this layer
below our outline layer, and rename this
layer as basically, I'll start with an outline first and fill it
with the same color. Make sure you don't leave any
gaps between these lines. And drop the color
in the outline. Now Next to add shading
and highlights, I'll add a new layer, tap on this layer and
tap clipping mask. Next, go to the Brush Library
and select our tone brush. Do the color panel. And I'll select our
bright yellow color. Now to add detail
to these bread, it's always better to
have reference images. If you see in these
reference images, the areas closer to the folds are lighter compared to the
ones that is on the top. The top areas are the
ones where you can see the big and the bond colors. Thank you. Next and go to the color panel and select this bright
orange color from our color palette
and add this in few areas where I need a
darker brown blonde effect. Next, I'll select the smudge
tool with the same brush and smudge the areas where it is too dark or looks unfinished. Next, I'll go to layers and I'll duplicate our
highlights and shading layer. Now here we can
adjust the opacity. I'll keep it around 50 per cent. Next, I'll add the last
layer for this bread. I'll rename it as detailing. This layer is to add
colors to the CCMC. I'll select my
technical pen brush. Select the lightest color
from our color palette. And I'll just start filling in colors under the
sea, some seeds. We are done with our
fifth bread here. Let's group all our layers. Swipe left on all the
layers and group them. This is how the collection
of our bread looks like. These are the three major steps we followed for our bread. Starting with the line art, followed by a base color and adding shading and highlights
to this base color. These are two more examples
with the same bread. One is with the element and the second one with
the green onion. In the next lesson,
Let's see how these bread looks on products.
8. Project & Products: For your class project, you can illustrate any
brand of your choice. I have more than 50
different images in the resource
section of this class. There are plenty of examples in the class with the same brand, but with a different version. You can illustrate any
brand of your choice with your own version using the same technique
shown in the class. This is how it looks
as a seamless button. This is another version
of seamless pattern, whereas only use the line
art from our illustration. These pattern can be
uploaded on print-on-demand sites or even licensed
to companies. These bread illustrations can be converted into Jeff's for
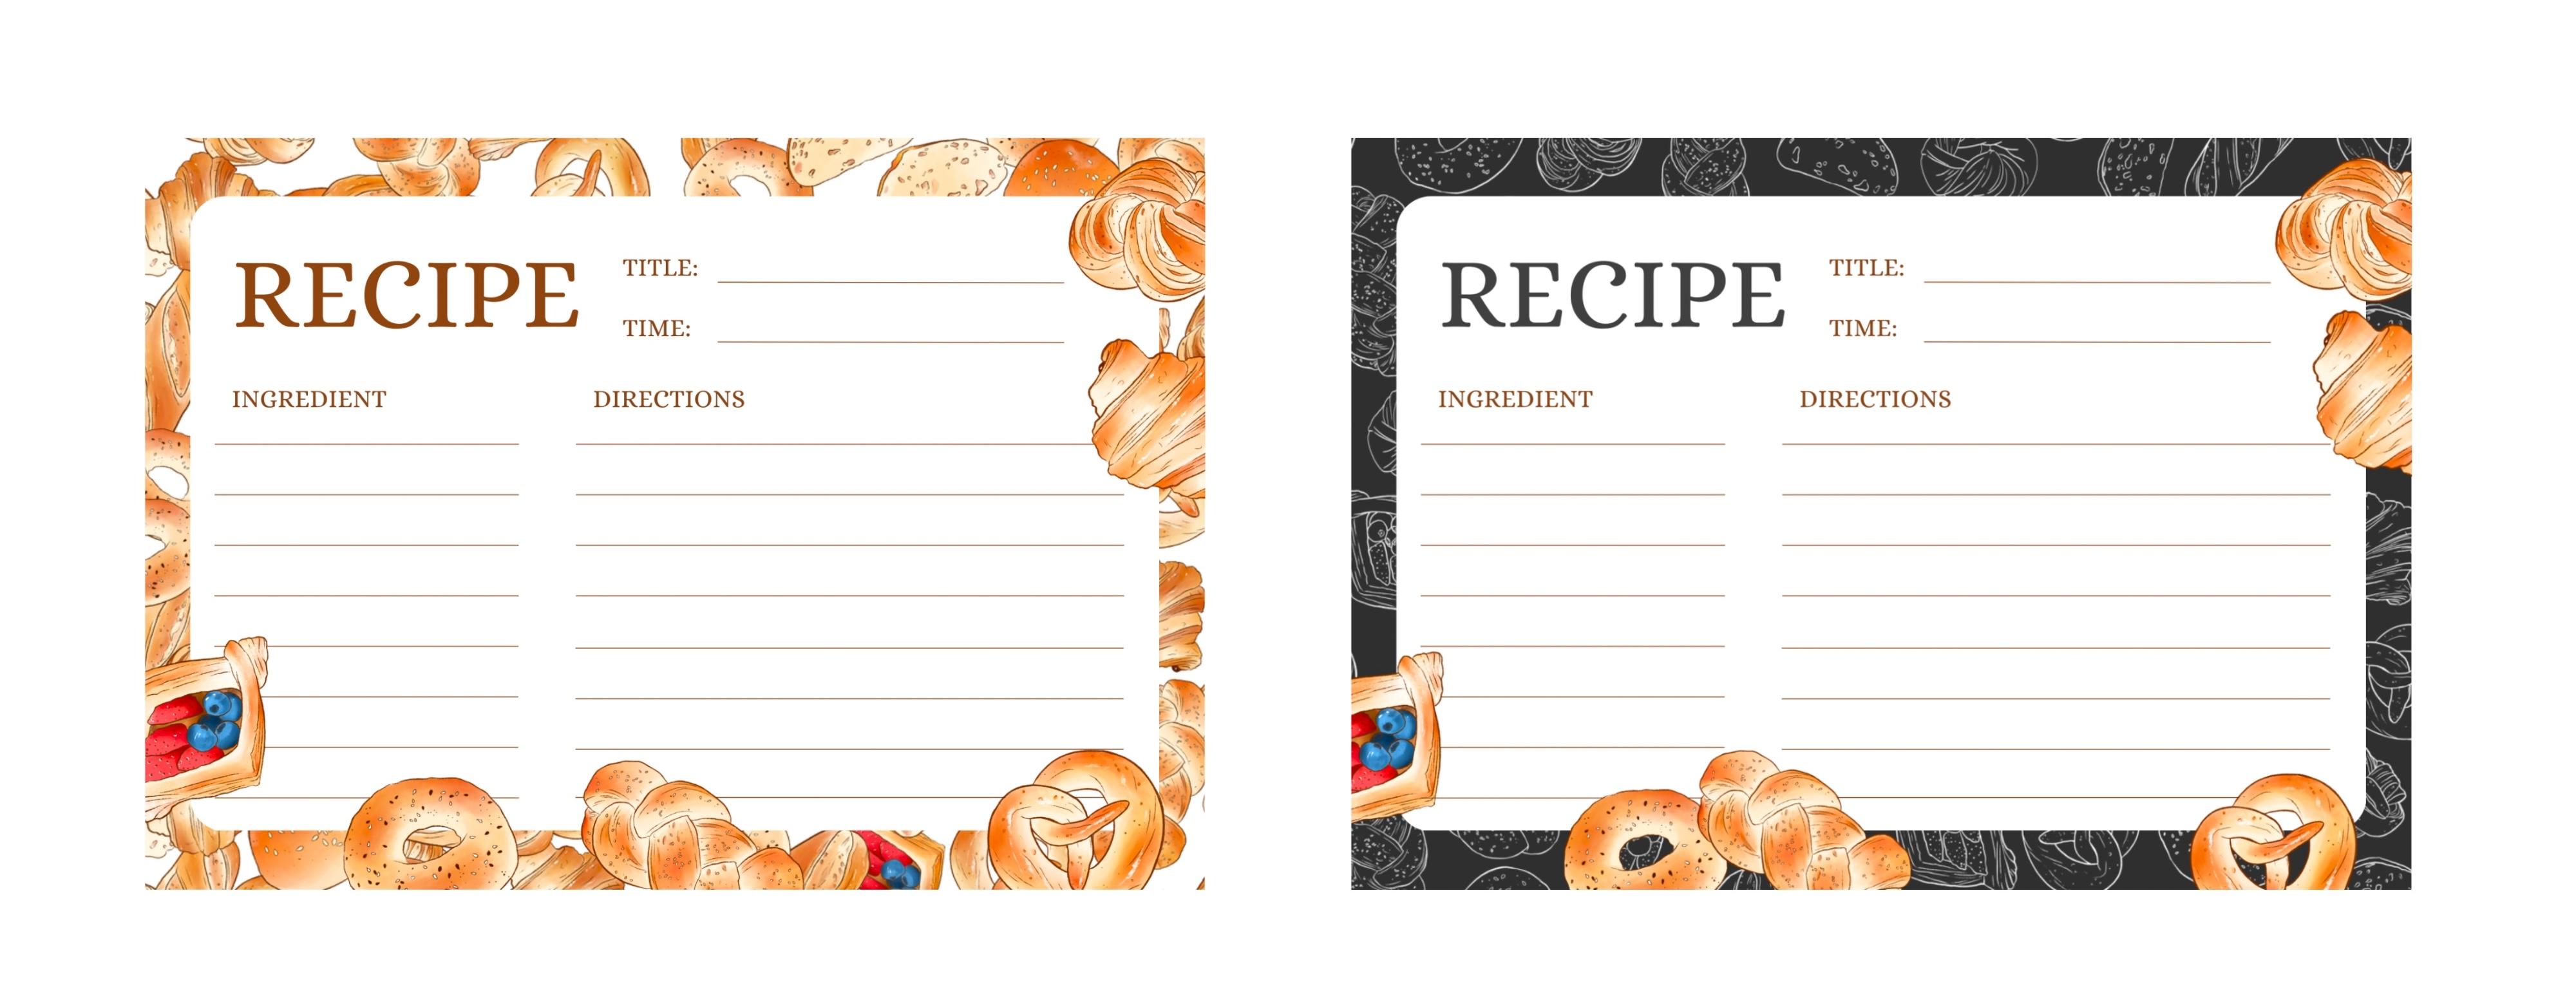
your social media too. I animated these on Procreate another product or these planners and note pads. These can be digital downloads
or even physical products. These can be sold on
websites like Etsy or on your own websites to another project can be for
your personal food journaling. Recipe writing can be converted into Qt
stickers like these, can be sold as a
digital element on your website or on other websites like
Etsy or marketplace. Please post in the project
section of this class. I can't wait to see your
beautiful bread illustrations.
 Vinita Upadhya, Illustrator & Pattern Designer