Transcripts
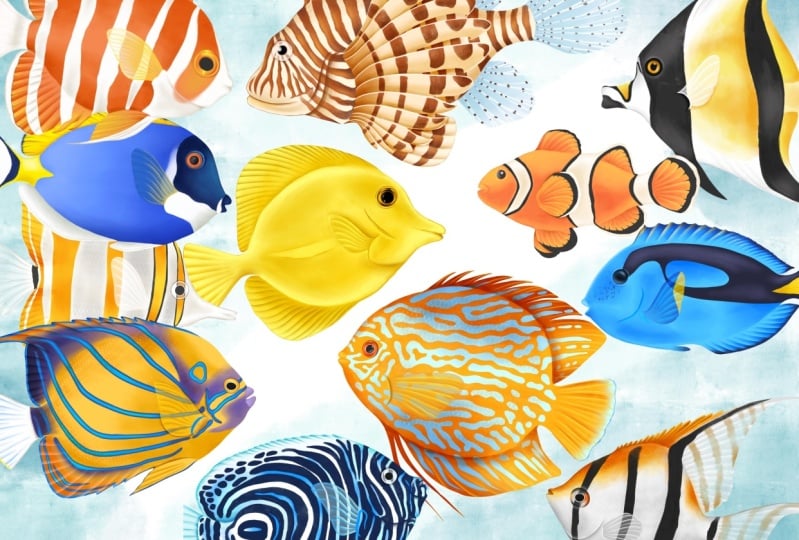
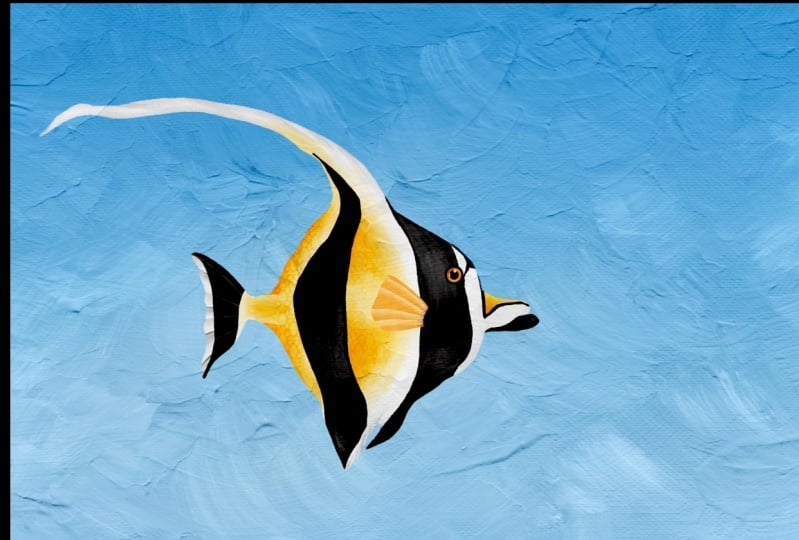
1. Introduction & What You'll Learn: This class is all about illustrating tropical
fishes in procreate. By the end of this class, you will have two tropical
fish illustrations. Plenty of tips and tricks on illustrating various
body parts of a fish, and a lot of example
that will inspire you to start your own
tropical fish collection. Hi, my name is Vanita, an illustrator and a
designer based in Singapore. My illustration style can be
described as semialistic, mostly inspired by
botanicals and nature. This class includes
five sketches that you can download
and follow along, a brush set, a color swatch, and more than 50 royalty
free reference images. We will start this
class by setting up our cannabis and
knowing the brushes. I will be showing you the
process I follow for sketching. We will be referring to multiple royalty free reference images to create our own unique sketch. There's a lesson showing with a lot of tips and
tricks on how to illustrate different body
part of a fish like fins, eyes, and even the scale. We'll be illustrating two
types of fishes in this class. The first one is Moorish idol, which includes basic
steps to understand how you can illustrate
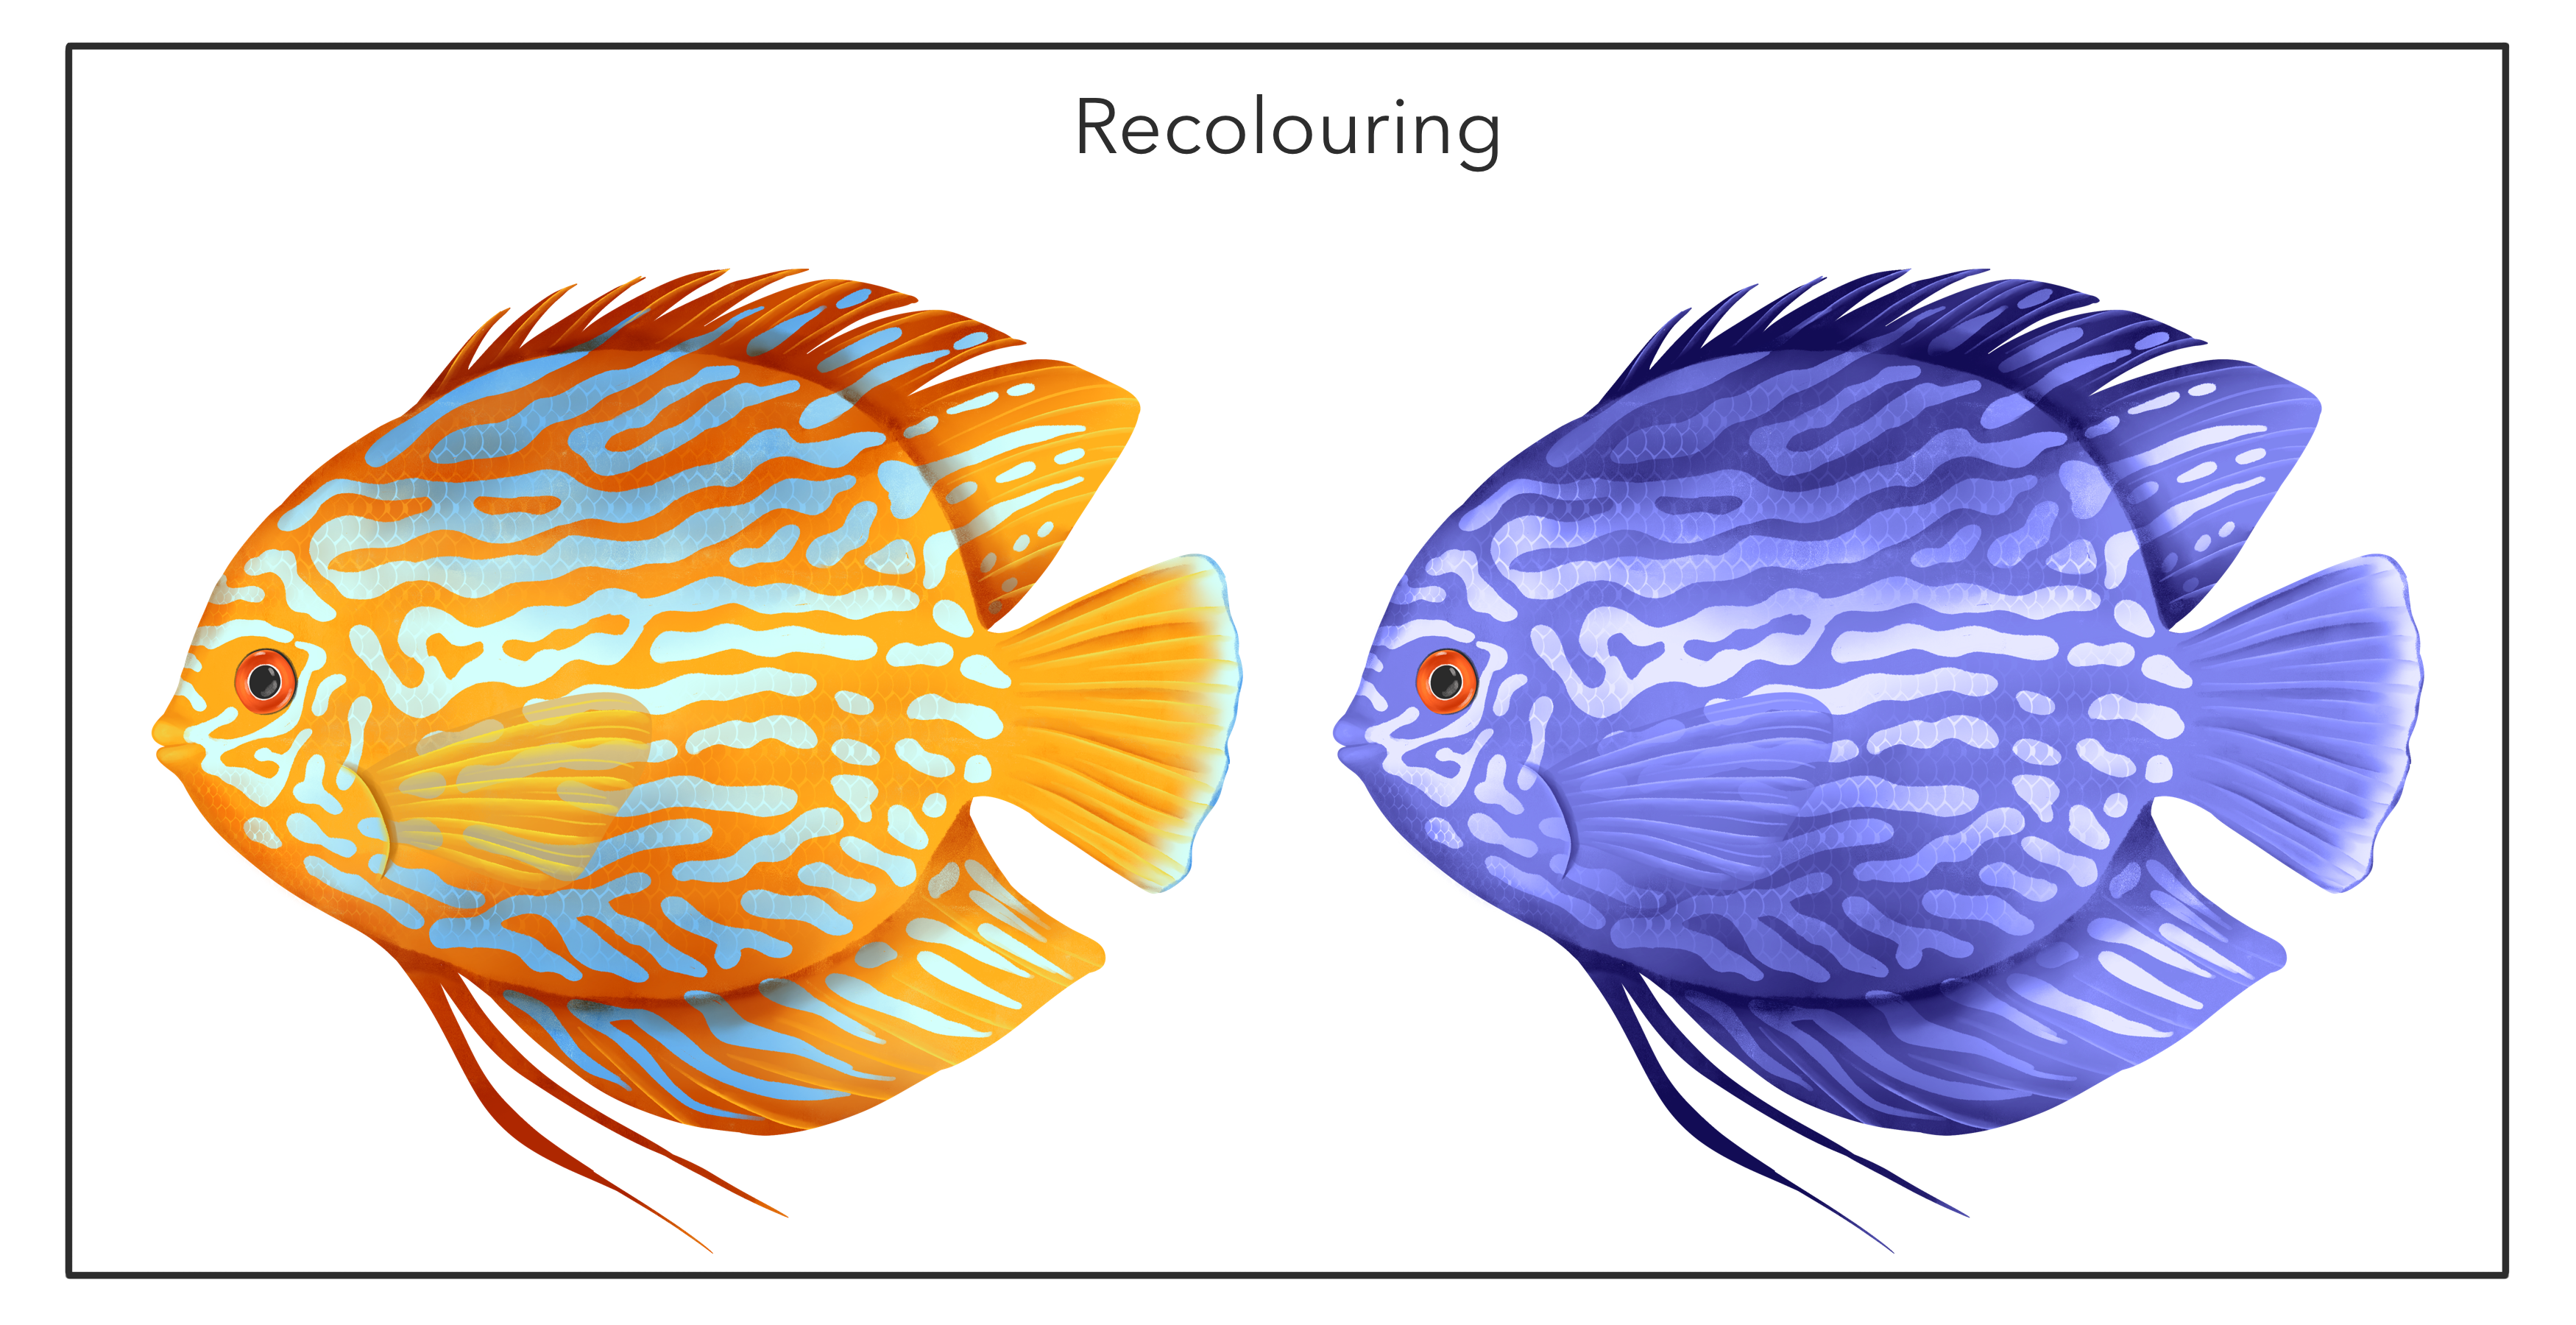
any fish in procreate. The second one is discuss fish. This includes slightly
different steps with two layers of
gradient effect. We'll also see how we
can recolor this fish. I'll be showing you
two different methods of recoloring them in. Procreate also includes
a quick lesson showing how to create your
own scale pattern brush. There are plenty of
examples too that will help you decide your
own scale pattern brush. We will also learn how to add
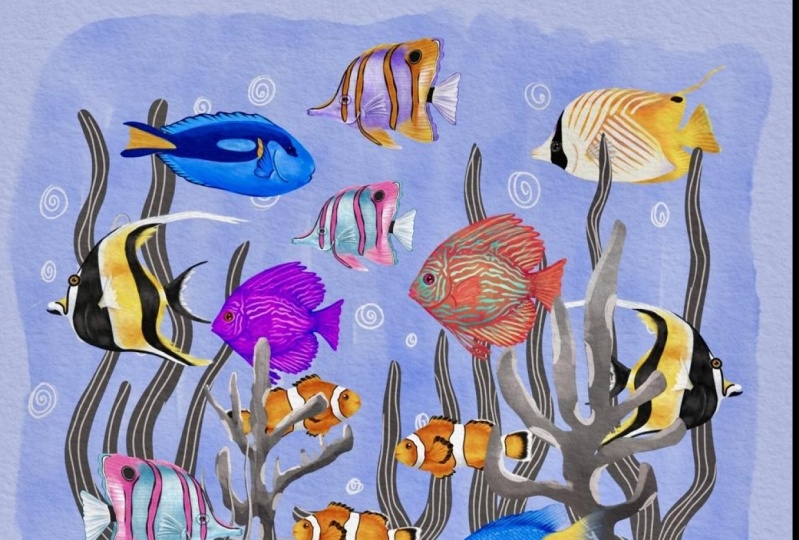
this to our illustration. There's a bonus lesson showing time lapse of more than
six tropical fishes. These illustrations
can be sold as clip art or art prints
on online platforms. Or you can turn them into seamless pattern for your
surface pattern design. There are plenty of ways you
can turn them into products. Let's dive into the world
of tropical fishes.
2. Canvas & Brush Setup: Let's set up our canvas brushes. When you download the sketches and open your procreate app, you'll be able to find your
sketches at the top here. Let's stack them
into one folder. For that you need to tap
on the Select option here. Select all the canvas
that you need to stack and tap on this
option called stack. This will add them into
a folder and tap cancel. I'll tap on the stack to open. Now let's move on
to the brushes. I'll create a new
canvas for that. I'll tap on this tiny plus sign. Again on this plus sign. Now most of my illustration are either 3,000 by 3,000 pixel, or 4,000 by 4,000 but
the DPI has to be 300. The size of the
canvas depends on the purpose or the type of the
project you're working on. This is just for the brush demo. I'll keep this as 3,000 by 3,000 pixel with 300 DPI
and tap Create. When you download your brushes from the resource
section of this class, tap on the brush library. You will be able to
find your brushes at the top here with the
name tropical fishes. You'll be able to see four
brushes in the folder. These are basically
the default brushes from the procreate
library itself. But I edited them depending
on my requirement. The first brush is a six
pencil for sketching. I use this for sketching. By editing them, I
made it slightly smoother by increasing
the stabilization and the pressure for this brush, it's a pressure base brush. You can also use this
for small details. Let's move on to
our second brush. I'll select my second brush. This is basically to create all the base shapes
after sketching. When you create a base
for your illustration, you can use this brush. This two is a
pressure base brush. This can also be easily
used for leaf like shapes, which is also perfect for a
seaweed or a coral shape. Now let's move on
to our third brush. We will be using this for adding shading and
highlights to our fishes. I'll select a darker
shade of yellow. This, again is a pressure based. The more pressure you
put, the darker it gets. With less pressure, it gets lighter and it gives you
a very watercolor effect. You can even use it as it is on your illustration or
smudge the edges later. Now let's move on
to our fourth brush that is a fish scale brush. This is not a default brush, this is what I
created from scratch. Let's try it on this leaf. We can add this on a new layer. I'll add a new layer and make the mode as multiply with
very little pressure. This is how it looks. You can even increase or
decrease the size of the brush. With smaller size, it
looks something like this. And with bigger it
looks like this. Let's write with a
different color. We are done with
our brushes here. The color palette that you can download from the
resource section is you can set this as default, and that will show in
your color panel here. Let's move on to
the next section.
3. Sketching Tips: I will quickly go through
my process of sketching. There can be multiple
ways you can do sketching for
your illustration. I will show you one
very common way of sketching in procreate. We'll start by
creating a new canvas. I'll tap on this tiny plus
sign for your rough sketching. You don't really need
a very big canvas. You can find a lot
of options here. But I will be going
with the screen size, It's a comfortable
size to work on. Now from the brush library, I'll select my 60 pencil
brush from the color panel. You can select any
color of your choice. I'll be keeping mine
as this dark gray. Now our next step is to get all our reference
image on the canvas. For that, we'll go to
this Wrench Ic menu. Tap on this. Under Add, you'll find this
option called Insert a photo. You need to swipe
left on this option. This will keep your
photo private. Tap on the reference image and that will insert the
image on your canvas. I always work with more than two reference
images. I'll deselect this. We go back to the wrench
icon menu and keep inserting the images that
you need for reference. All of these images
are royalty free and I have a lot of these images
in the resource section two. You can download them
for your sketching to. Once you're done importing
all your images, I'll arrange them on the canvas. I will have one big image in the center and all the
others at the top. I'll go to my layers and reduce the opacity of
the one in the center. Because I will be
sketching on this image, and our sketching lines
should be visible. Now we need a new layer
on top of this layer. Tap on this plus sign
and add a new layer. I will start with the
circle for the body. Hold your pencil
tip on the screen. On this option called edit, you'll find these
tiny blue nodes. You can adjust your
circle with these nodes. Next, we need a vertical
and a horizontal line to understand the
center of this fish. I'll add a new layer
on top of this layer. Now I can start sketching with the help of this
reference image. Now you don't have
to exactly follow the reference image
while you're sketching. You can make your own changes if there's a particular style
that you want to follow. For example, for the fan, you want it to be slightly more geometric than the
reference image. For example, if you see
in this reference image, the way it is
attaching to the body, I want my fin to
attach the same way, like the reference image
even for the tail. I want to follow the same
fish even for the eyes. If you want to follow
a particular shape or size for all your fishes, that will help your
collection to look cohesive. Now for the lower fin, I want to follow this
fish for the shape. If you see there's
a tiny little slit or you can say a
little cut there, I want to add that
detail in my sketch. Now for this part,
you can see the fin in the reference image
is stuck to the body. But I would like to add my fin
to be something like this. So I'll add this tiny fin here. Now let's add a little fin here. Let's see how it looks on
different reference images. I would like to add
this little curve. They look transparent and they are of the similar
color as the body. Let's catch something
similar on our image. Now let's move on to
this little slit here. Check on all your
reference image to see which one
you want to follow. I'll add a little gill
slit just above our fin. For the eyes, I'll draw a circle and hold with one finger on the screen to make
it a perfect circle. You can even move in and out to make it smaller or bigger. Another tiny circle
in the center. Hold. Again, we're done with
our sketching here. I'll hide my reference image. Now this is how your
rough sketch looks like. After this, you can even add
another new layer on top of this sketch layer to
refine and sketch again. One final sketch. I will quickly show
you how that looks. I'll reduce the opacity
of this sketch layer, add another new layer
on top of this layer. I'll start sketching
on this layer. Like for example here, I want the tail to
be less curve here. Now this will be
your final sketch where you can edit your lines. You can remove or add
anything you want. This can also be done
with a different color, like red or green, so you can differentiate between your and
the final sketch. We are done with our sketch. Here, I'll go to layers, hide my rough sketch and also
all the reference images. This is a sketch we created using multiple reference images. It is also a combination of elements that
we would like to add in a particular fish
even now if you want, you can refine this
further by adding another new layer until you're happy with
your final sketch. Let's move on to
our next section.
4. Tips, Tricks & Examples: Let's see some example of
these fish illustrations. On the left side is my
complete illustration. On the right side is my
canvas where I'll be showing you how to
illustrate these body parts. This is a regal tank
fish for this fish. I will show you how you can
illustrate this type of ice, this little slit here, which is also known as
gills or gill slit. Our first step will be to
add a new layer for the ice. For that, I'll go two
layers and a new layer. Now we can go to the color panel to select the black
color for the ice. From the brush library, we can select my base brush. I'll add this little black
circle following my sketch. Now our next step is to add
this little shine on the top, for which we need a new layer on top of this
black circle layer. From the color
panel, I can select this light gray or
light blue in color. And from the brush library, I'll select my shading brush. My brush size is very small, around two or 3% We can add two crescent shape lines on the opposite edges
of this circle. Next we can select
our smudge tool, make sure same
brush is selected. My brush size is smaller
and even the opacity is less than 50% We'll
start smudging inwards. Make sure you're only
smudging the inwards, the inside layer of
these crescent shapes. I've increased the
speed of this video, but you can take your
own time and make sure the lines and the shading
is as smooth as possible. Repeat the same on the
opposite crescent two. This might also take
some practice to understand how the smudging
or how the brush works, also how much pressure you need. We are done with our
shine layer here. Let's move on to
this outer circle, the circle around the eyes, for which I'll add a new layer. And this should be below
our black circle layer. And make sure your same
shading brush is selected. I want the brush to be smaller. Select a light blue color. You can either select from an image or from
the color panel. And I'll draw this
circle around the eyes. It shouldn't be too thick. Now with the smudge tool, again, smudge the outer
area of this circle. Now our last step is to pick up a darker shade
of the same blue. And following the same steps we did for the lighter circle, we'll draw a circle around with this dark color and then smudge it the same way we
did for the light one. There is another tip that I
would like to add is if you feel one of your shading or high lights look too
dull or too light. For example, the white
high light layer here. When I duplicate this layer, it multiplies and it looks
more brighter and heavier. You can even adjust
the opacity to see if you like it
lighter or darker. We are done with
our first eye here. This is another example of a similar that I did
for the clown fish. Now let's move on to the
second part of this fish, that is this little
curve slit Here. I have this sketch mark on my demo fish that I can follow. I'll select all my eye
layers and group them. Collapse this group and I'll add a new
layer for the slit. Now under my brush library, I have my shading and
highlights brush selected. Now from the color panel, I'll select a darker shade of blue that can help us
create this depth. Slit. Following my sketch, I'm going to add this curve,
crescent shaped line. Next we'll select
the smudge tool, make sure same
brush is selected. My brush size is very small
and even though opacity is less than 50% I'm going to smudge only the
right part of this line. If you see, I'm not smudging
the left edge of this line. Now if you notice it is
already looking like a slit. To give it more depth, we'll be adding some more
high lights For that, I'll select a very
light shade of blue. My brush size is
very small and I'll add these lines on both
the edges of this slit. Now selecting the smudge
tool with the same brush, I'll start smudging
these lines outwards, trying to blend it with the
lighter part of the body. I'll hide my sketch layer and we are done with our second
part of this fish. Another example of
the slid detail that I did for the yellow time. Let's move on to
our second fish. This is the lion fish. For this fish too, I want
to show you the eyes. The eye for this fish looks slightly transparent
and bulging. We'll try to achieve
that on my demo fish. Our first step is to make
sure we're on a new layer. I already have a new layer here. Next, I'll select a white
color from our color panel. Now from the brush library, I'll select my base brush. Now we can draw a little
circle near the area. If you have a sketch, you
can follow the sketch lines. Once you're done with
your first circle, we'll go back to layers. And we need to reduce the
opacity for this layer. It can be around 50% We can
even adjust this later. Let's move on to
our second step. I'll add another new layer, Select a black color
from the color panel. I'll add another little
circle in the center. Let's move on to
our third layer. I'll add another new layer. Select a white color again, Go back to the brush library and select the shading and
the high light brush. Now with a smaller brush size, I'll draw an outline
around the white circle. Once you're done
with the circle, we'll select our smug tool. Make sure the same
brush is selected. Again, my brush size is
smaller and if you can see, even the opacity of my brush is less than 50% and smudge only the inner
area of this circle. Try not to touch the outer
edge of this circle. Now with the same color
and on the same layer, we can add this little
shine detail in the center. Now the last step and the last detail we
can add to this ice. I'll go to layers
and add a new layer. This should be below our
transparent white layer. Select one of the
darkest brown color and I'll draw a circle around our white
transparent layer. I'll follow the shape
of the white layer. And we'll select our
smudge tool with the same brush and
smudge it outwards. This gives depth and
shadow effect to the eyes and helps the eye look slightly
bulging and popping out. We are done with the
eyes for our lion fish. Here, let's move on
to the third fish. This is a peppermint angel fish. For this fish, I will be showing you how you can illustrate
the little fin. We'll start by adding a new layer on top
of our fish layer. I have my sketch here. I will be following my sketch
to illustrate this fin. Select my base brush
from the brush library. Next we can select the color. I'll select this bright yellow. We can draw a base
shape for the fin. Drop the same color
into the shape. Now our next step is to reduce
the opacity for this fin. But that will go to layers. I'll reduce the opacity to around 40% You can even adjust this once
the whole fin is done. Next, add another new layer
on top of this base layer. Select shading brush
from the brush library. With a very small size brush, I'll start adding these ins, lines starting from
one end to another. Make sure it is slightly curved and follows
the shape of the fin. You cannot add clipping
mask to this layer because that will reduce the opacity of
your in layer two. You also need to add an
outline for the whole fin too, once you're done
with your outline. Next we'll select
our smart tool. Make sure the same brush is selected and we can start smudging these
lines to words in word.
5. Moorish Idol Illustration: Let's start with our first, that is Moorish idol. That's our first canvas
here on this canvas, this is how the
sketch looks like. You'll find this sketch
in the resource section. You can download
and follow along. When you go to layers, you'll just find this one
layer with the sketch on it. Now our first step is to get our reference
image on the canvas. For that, we can go to
this wrench icon menu. Tap on this Under canvas, you'll find this option
reference total on this setting. This will open this tiny box where you can import
your reference image. Tap on this image
option on import image. This will take you to
the photo gallery. You can import your
reference image here. Once your image is here, you can hold in one corner and you can adjust
the size for this. You can even zoom in, zoom out, I'll keep it in this left
corner and adjust the size. Now let's move on to our layers and reduce the
opacity of our sketch. Tap on this tiny and you
can reduce the opacity to around 50% Next, we need a new layer to
add a base to the fish. Add a new layer and pull this layer below
our sketch layer. I'll rename this
as my base layer. Tap on the layer and tap, rename all our
illustration layers will be below our sketch layer. The sketch is always
visible to us. Now for the base, we
need to use white. You can see here in
the reference image, The fish base needs
to be white in color. I'll slightly change the
color of my background. Our base color, which is white, will be visible to us. I'll keep mine as this
light blue color. You can choose any
color of your choice. Just make sure it is slightly darker than the white color. Next, we can go to
the brush library. Select my base brush, that's the second brush. Go to the color panel and
I'll select a white color. Either you can directly select a white color or you can
double tap in this area, that will automatically
give you the correct white. My brush size is around 4% We'll start
by drawing an outline. Just go to layer and make sure
you're on your base layer. Before we start,
there's another setting that I would like
to show is go to your color panel and go to the tropical fish color palette that you'll find in
the resource section. Tap on the three dots
and set this as default. This will keep your
palette default and it will always
show in this section. Now let's continue with
the base of this fish. I'm going to follow
the sketch lines and draw an outline
for this fish. When you're drawing these lines, you have to make sure there are no open ends because we need to fill this with
the same white color. If you miss an open end somewhere and you drop
your color in this shape, it will spill all
over the canvas. Once you're done
with your outline, we'll pull this white
color into our outline. If it is spilling
all over the canvas, there are two things to check. One is the threshold and the second one is if
there is any open ends. Our next step is to add this
black pattern to the fish. For that will go two layers. Add a new layer, this should
be above our base layer. Rename this layer
as pattern layer. This layer is to add this
black pattern on the fish. You can see it's near the
mouth and even near the tail. You can even follow my
sketch as a guideline. We can start with
the mouth first. Let's zoom in the
reference image. We'll select the black color
from the color palette. This black, if you see
it's not very dark, it's slightly dark,
charcoal black. To the brush library. And I'll select my third brush that is the shading
and highlight brush. Make sure you're on
your right layer because this mistake
can happen a lot. I'll keep my brush size around 3% and start adding
this pattern to our fish. Okay, we forgot to add
clipping mask to our layer. We need clipping mask to our layer because when
we draw our pattern, it should not go
outside our base layer. You go back to your layer, tap on this layer, and tap clipping mask. Now when you start drawing, you will see your brush stroke will not come on
your background. It will be inside the lines only showing
on your base layer. Now I need a smaller brush
size for this shape. Now following the reference
image and my sketches, I'll add this pattern
to the whole fish. I will increase the speed of this process so that the
video is not too long. Now, once you're done
adding this pattern, let's move on to the next step. We need this yellow color
below our pattern layer. For that, we'll go to layers, add a new layer, pull this
layer below our pattern layer. Now in the reference image, you can see this yellow area. We'll go to the
color panel and I'll select this bright yellow
from our color palette. Let's add with the mouth first. For this, we need
a smaller brush. I'll fill this tiny
area with this color. Now let's move on to the body. For this, we'll need
a bigger brush size, around 10% You can start with
a little pressure first. The more pressure you add, the color gets darker
as you start working. Maybe in the second layer
you can add more pressure. Let's add another
layer of this color. But with slightly more pressure, you can see it gets darker. I'm going to add this
in the shadow areas. I need another layer
of a darker shade. So I'll go to the color panel and select this bright orange
from my color palette. I will add this in the
darker and shadow areas. The pressure on my apple
pencil is very little. I start with a very
little pressure. Maybe later if you
want it to be darker, you can add with more pressure. I need another layer
of this orange. Again, for it to be darker, I'm going to add it
with more pressure. Pressure size can be
slightly smaller for this. Now, let's move on to the mouth. We need some towards
the bottom here. Now our next step is to smudge
and blend these colors. For that, I'll tap
on this smug tool. Make sure under smudging
the same brush is selected. The opacity of the
smudge tool can help you increase or decrease the
intensity of smudging. My brush size is around 6%
but as you start smudging, you can adjust this later. Now, this depends on
your illustration style. You might not want
to smudge a lot and leave the texture of
these brushes as it is, or you can just smudge the edges where you feel it's
too strong or too. I like smudging a lot. I like to leave very little
texture on my illustration. Once you're done smudging, let's move on to our next step. We will be adding some
highlights to our pattern layer. I'll select my brush tool. Go to layers. Add a new layer. This layer should be above our pattern layer on this
layer and tap clipping mask. Go to the color
panel and I'll be selecting this dark gray
color from my color palette. And I will be adding this in the areas where I want
to add highlights. I'm adding this
very rough strokes because later we will
be smudging them, adding another layer
with more pressure. And also only towards the
center area of this highlight. Once you're done adding
these highlights, let's move on to the smudging, select the smudge tool, make sure the same
brush is selected. You can keep the size around three to 4% and the opacity is around 25% You might
have to keep adjusting this depending on your
preference while smudging. You have to make sure you're following the shape
of your object. For example, here you cannot
go horizontal or wavy. You have to go vertical, following the shape
of this fish. Now let's move on to the ice. For that, I'll go two layers. Add a new layer on this layer
and rename this as ice. Go to brushes, and I'll
select my base brush. Go to the color panel, and I'll select this black
color from my color palette. I'll make it slightly
more darker. I'll keep my brush size around 7% and draw a circle
following the sketch. Now for the next layer, I'll add another new layer. Go to layers, Tap on a new
layer from the color panel. I'll select this
bright orange color and I need a slightly
darker tone. Add another little
circle in the center. If you want to slightly edit, you can just go
select under Wrap. You can adjust the shape
with this little nodes. Once you're done, select Next, we can go to layers, Hide my sketch layer. Next we need another new layer. Again, I'll select
my black color and I'll add another tiny
circle in the center. Once you're happy
with that circle, I'll go back to my orange layer. Select this orange layer, tap on this layer and tap Alph
lock from the color panel. I'll select a lighter shade
of this orange color. From the brush library, I can select my
shading and highlight brush with a smaller brush size of around 2% I'll add this crescent shape
on two sides of this eye. Next we can select
a darker color of the same orange color. Select the color
and go down nally. I'll add another crescent
stroke with my smudge tool. I'll smug the areas where I feel it's too
strong or too rough. There's also a lesson
showing more eye examples. You can even watch
them to understand how you can illustrate
different types of eyes, let's add some
shine to this eye. For that, we will
need a new layer. And this layer should be on top of all the other eye layers. And we can select
a white color from the color panel with
my shading brush. And the brush size has to be smaller with very
little pressure. I'm going to add this
little brush stroke. Now let's move on
to the last step. For this eye, we
need a new layer below the last circle with
a little light gray color. I'm going to add
this little outline around this black circle. This step is very
important when your eye and the body color
is of similar color. Once you're done
with the circle, we'll select the smudge tool and smudge it towards
the outer area. Let's move on to the fins. I'll go to layers and
unhide my sketch layer. We can group all the layer. I'll select all the
layers and tap group. Now we can add a new
layer for the fin. I'll add this new layer
below our group layer. Now from the color panel, I'll select a white color. Select my base brush
from the brush library. Now following the sketch, I'll draw this shape and
fill it with the same color. Now to make this fin
look transparent, we need to reduce the
opacity of this layer. For that, I'll go to
layers, tap on this, and you can reduce a 70%
We can even change this. Next, we can add a new layer. Go to the brush library and
select my shading brush. Now with a very small size brush and with the same white color, we can start adding
these veins like lines starting from
one end to another. Also a few strokes on the outer
edge and at this C shape, where the fin starts. Once you're done with this
step, we'll start smudging. Select your smudchtol and we
can start smudging inwards. We're done with our fin here, but let's add some more
details like shadow and depth. I'll add another new
layer and I'll select a black color because this
place doesn't look very clear. I want to add this little
shape and smudge it. Another shadow I want to add is towards this
part of the fin. For that, I'll add a new
layer below the fin layer. I'll select this
dark orange color from the color palette. Now with my shading brush, I'll add a little shadow here. Now selecting the smudge tool
and smudging it outwards. We are done with our fin here. Let's move on to the last
detail for this fish. We can add some details to the other fins like
you can see in this reference image on the top here for which we
need a new layer. This new layer has to be
below the fin that we just did and add to this layer. Select a gray color, a lighter shade of gray. I'll start adding
these baby lines. On the top, bottom,
and back fins and now smudging it
with the same brush. Select your smudge tool and make sure while
you're smudging, you're only smudging inwards and not smudging the whole line. You can even give more
time to these details. I don't want this
class to be too long, and I want this first
fish to be simple, so that it gives
you a basic idea on how you can
illustrate a fish. Let's move on to the tail, now to the bottom fin. Now there's another detail that I would like
to add to the tail, for which I'll add
another new layer. Tap on this layer and
tap clipping mask. For this, I'll select a black color with
a small size brush. I'll add these wavy
strokes again. This time I'll be adding them in between these white strokes. Next again, I'll be smudging these lines following
the same steps we did for the gray ones. Now this is one of the
last step for this fish. This is mostly when you have a fish with a white base color. Like for example here. If you see at the edge, if I am changing my
background color to white, you will not be able to see
the edges of this fish. We will be adding an outline
with a light gray color. For that, we need a new layer just below our pattern layer. I'll be adding a thick
outline with this gray color, mostly where the white
edges are visible. And now smudging these lines
to get a smoother effect. These steps can also depend
on your illustration style. You might want the
thicker lines to be as it is and not smudge them. Let's change the background
to white color and see how it looks on this background
and I'll make it white. You can even make
these details with a gray color, darker or heavier. Let's cancel the
reference image. Tap on this and you'll get this cancel and we're done
with our first that.
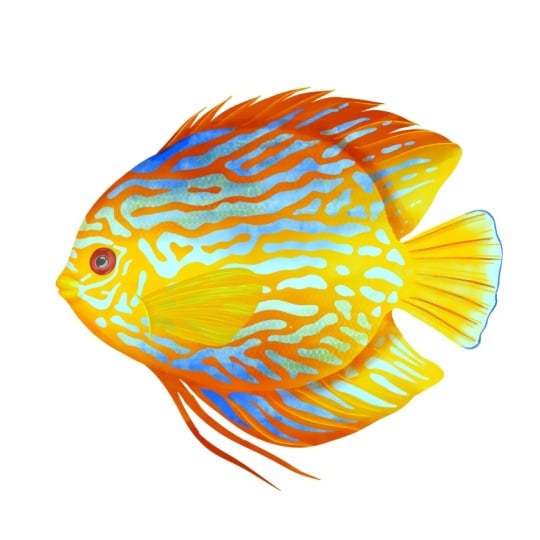
6. Discus Fish Part 1: Let's illustrate our second
fish that is discussed, Fish. I have attached the sketch for this fish in the
resource section. I'll tap on my sketch, the second canvas here. This is how the
sketch looks like. If you have my file, when you go to layers, you'll be able to see there's just one layer with
the sketch on it. Before we start the
illustration of this fish, I want to show you a
few reference images. This is the version we will be illustrating in the class today, but there are plenty of more color combination
these fishes come into. You can choose your
own color combination. Before we start illustrating, you can follow along my steps, but in your color combination. Later at the end of this class, I will also show you how you
can recolor these fishes. I'm going to start my
illustration with this version. Coming back to procreate, my first step is to insert
our reference image. I'll tap on this wrench icon
menu here under canvas. There's an option called
reference togal on this option. And you can see this tiny
box on your canvas here. You should be under Image, Tap on Import image, Select your reference
image and you'll be able to see your reference
image on the canvas. You can even adjust this reference image by
holding in one corner. Now let's move on
to our next step. That is to reduce the
opacity of our sketch layer. You can reduce it around
50% Next to add our base, we need a new layer. Tap on this tiny plus sign and pull your new layer
below the sketch layer. Tap on this layer and
rename this as base layer. Next, we can go to
the brush library. You'll find my brushes
from the resource section. Select the second
brush for our base, make sure you're on
your correct layer. That's the base layer. Now if you see in this reference
image, if you zoom in, you'll be able to see
this gradient effect with a combination of
light and dark blue. Try to achieve that. For that, I'll go to the color panel and I'll select
this light shade of blue from my color palette and we can start adding
an outline to our. Now, while you're
adding these outlines, you have to make sure
there are no open ends. There shouldn't be any
gaps between these lines, because we will be filling
it with the same color. If there is any gap left, the color will spill
all over the canvas. Now we can fill this
with the same color. I'll pull this and drop
it into our outline. Now our next step is to
add another shade of blue. You can see in the
reference image, it is around the upper and
the lower area of these fins. We need to add this on
top of our base layer, for which we need a new layer. Go to layers, add a new layer, tap on this layer,
and add crip mask. For this, we need another brush. I'll go to the brush library, select my shading brush, Go to the color panel, and I'll select this royal
blue from my color palette. My size is around 10% and
we can add this at the top. And the bottom area
near the fence. I'm adding this with a
very little pressure, another layer with
slightly more pressure. Let's move on to the bottom. Now the second layer with
slightly more pressure. Now, selecting the smudge tool. Make sure the same
brush is selected. My pressure size is around 10% even my opacity is less than 50% And I'll start smudging the edges with a very little pressure. You can take your own time. Make sure you're following
the shape of your fish. You will need some practice to understand how
these brush works. Now let's move on to the bottom. So we're done with
the first layer of our gradient effect here. We'll move on to
the second layer. For that we'll go to layers. Add a new layer, tap on this
layer and tap clipping mask. Make sure underbrush library your shading brush is selected. Now for the second layer, we will be adding this
yellow and red shade of gradient effect. We'll go to the color panel and I'll select this
bright yellow color, the darker shade with a
slightly bigger brush size. I'll first cover the whole
fish with the yellow color. We'll add the red color later. I'm adding this with slightly
less pressure first. We can add more layers
of color later. Now the second layer
with more pressure, I'm trying to even
out the color. Now let's move on
to our red color. I'll be selecting this
bright red color. We are on the same layer. I'll add this gradient
effect on the top and the bottom area like we can
see in the reference image. Again, I'm adding this with a
very little pressure first. We can darken this with
more pressure later, or even by adding more layers
of color on top of this, adding another
layer on the edges, You can see it gets darker with more pressure and
multiple layers. Now I'll be adding
another layer of darker shade of this red
from the color panel. I'll select this
darker shade of red. Now we can add
these to the edges. Let's start from the bottom, like in the image you can
see at the bottom here. Now let's move on
to the top here. Two on the edges. I'll add these brush strokes following the shape
of these fins. Now we're done
adding our colors. Let's smudge them and turn them into a softer
gradient effect. Select your smudge tool and
make sure the same brush is selected and we can start
smudging on the edges on the fins. Make sure you're following the
shape of the fin. I keep changing and adjusting my brush size depending on the
area I'm trying to smudge. Now back to the bottom again. Now once you're happy
with your smudging, we'll move onto our next step. Now for the next step, we'll be selecting our eraser tool. Now under eraser, I'm selecting
the same shading brush and we will be erasing these wiggly lines
following my sketch. Through these lines, you'll
be able to see the layer below the blue gradient effect that we created before this. And you'll be able to achieve the two layers of
gradient effect. This step of erasing took
me a very long time. I squeezed this lesson
into 35 to 40 minutes. But if I go to my settings, it took me more than 2 hours. To illustrate this, you can pause this video and take
your time for this step. For this, you can
select any other, even the base brush. Depending on the
brush you choose, the effect will be
slightly different. If you select a
softer edge brush, the whole illustration will
give you more clean effect. Once you're done,
you'll be able to see these beautiful shades of blue coming through
these yellow and red. Let's continue with
the second part of this fish in the next lesson.
7. Discus Fish - Part 2: Let's move on to our next step of adding an eye to this fish. We'll need a new layer. Tap on this layer
and rename this As we'll go to the
brush library, and I'll select my base brush. Zoom into the area, make sure you can clearly see the eye in the reference image. You can either pick up a color
from your reference image, we need a bright red color. Or even if you go to
my color palette, you'll find one of these red. We need a very midtone, kind of red for our base. I'll add this little circle
following my sketch lines. The little light gray circle in the center is from my sketch. I erase that in the final
sketch in the resource section. Now we need to add another
little black circle on top of this red circle. We will be doing
that on a new layer. Tap on this new layer. We'll go to the color panel and select a dark gray
or black color. I'll add this little
circle in the center. Again, because of my sketch, it looks very light, but it is actually black color. You feel it is not in the center or the shape is not correct. You can fix that by going
to this selection tool. Now we will be adding some highlights and
shadow to the red circle. I'll go back to that layer, tap on this layer
and tap Alphiloc. Go to the brush library and
I'll select my shading brush. We need a lighter shade
of this red color. I'll select this color. Go to your color panel and
I'll go up diagonally. Now we can add high light following the shape of this ice, adding some on the edges too. Next, I can add some darker
shade for the shadow. Again, select the color and go diagonally down for a darker
shade of the same color. Now we can smudge these colors. I'll select my smudge tool, make sure the same
brush is selected. Now under layers, I'll
hide my sketch layer. Now we can start smudging in the areas where you
feel it's too rough. This also depends on your style. You can even leave it as
it is or smug very little. Next we can add some shine
and reflection on the eye. For that, we'll go to layers. And we need a new layer on top of the black circle we made. Add a new layer. Select a white color
from your color panel. Same shading brush. We'll add this little
shine like detail. You can even follow the
reference image for this. Now let's move on to the
last step for this eyes, for which we need
a new layer below all our eye layers that is
below our red circle layer. And I'll select the same
black color from the center. If you zoom in your
reference image, you can see this black
area around the eye. We can add that black
detail on this layer. We're almost done with the eye. You can even skip this step, but because I can see it
in the reference image, the white ring around the
black circle in the center, and we are done
with our eyes here. Next, we can start
with this front fin. When you zoom in this
reference image, you can see the fin is very transparent with a very
light shade of yellow. We can start by adding
a new layer for this. Before we add a new layer, I'll keep all the
layer in one group. Select all the layers
and tap group. Now we can add a new layer. Below this group layer. I'll tap on this layer
and rename this as Fin. Now from my brush library, I'll select my base brush. From the color panel, I'll
select this bright orange. Now we can start by adding
a base shape for this fin. Following the sketch, I'll draw this shape and fill it
with the same color. Next, we need to
reduce the opacity for this fin. Go to layers. Tap on this tiny, we can
keep this around 75% Next, we need a new layer on top of this layer to add some
highlights and shadows. Next, we'll go to
the color panel, and I'll select this
bright yellow color from the brush library. I'll select my shading
brush. That's the third one. Now with the very
small size brush, I'll add these lines
from one end to another. Even for this, you can
follow the sketch lines. I'll hide my sketch layer
so that it is clearly visible next to
smudge these lines. I'll select the smudge tool, make sure the same
brush is selected. We can start smudging
these lines. We have to make sure
the smudging is only on one side of this
line, the lower edge. This helps you get this nice
gradient shading effect that looks like
veins to the fins. Another detail that
I would like to add to this fin is
with the same brush, with a small size brush, this very thin line
between each in now we can add this detail where the fin is
attaching the body. Like you can see in
the reference image, it's like a little curve. For this, we need a new layer on top of both the fin layer, we need this darker
shade of orange. I'll draw this thick curve shape now with my smudge tool, I'll just smudge one
side of this curve. Make sure it is the
side facing the fin next. To add more
depth to this opening, I'll select the same brush
with this bright yellow color. And I'll draw this curve
following the edge. Now with my smudge tool, I'll smudge this on
the opposite side. Now if you see, it looks
like an opening for the fin. Now our next step is to add
details to the other fins. I'll unhide my sketch layer. We will be adding a new layer, and this new layer should be
below the front fin layer. Add a new layer, tap on the
layer and tap clipping mask. We'll start with the
upper fin first, make sure your shading
brush is selected. Now with a very
small size brush, I'll add this thin lines
following the shape of these fins and I'll
add this to the upper, lower, and also the tail. I'm going to increase
the speed of this process so the
lesson is not too long, but you can pause and
take your own time. Now with the smudge tool and
the same brush selected, I'll start smudging each line. Now our next step
is to add shadow to the fins where the fin
is attaching the body. For that, I'll add a new layer. This layer should be above your yellow and red
gradient layer. And we can change the mode
for this layer to multiply, because this will help us add shadow to all the colors
at the same time. I'll unhide my sketch layer. This will help us follow
the sketch lines. Now from the color panel, I'll select this
bright red color. Make sure your shading
brush is selected. I'll keep my brush
slightly bigger. This detail will help us add depth to this fish illustration. Now I'm following
the sketch line and with very little pressure we need to do for
both the sides, upper and the lower fin. Next, I'll select
my smug tool with the same brush and
smutch the outer area. If you feel the
shadow is too light, you can just go to
layers and duplicate this layer that will multiply the layers and
it will get darker. You can even control this by adjusting the opacity
of this layer. Now on the same layer, we can add some more shadow to the body and the
tail of this fish. Next, with the smudge tool, again, smug only one
side of these lines. Now let's add some detail
on the mouth of this fish. I'll select my shading
brush from the color panel, this very light,
bright yellow color. Add a new layer, and this layer should be
below the fin layer. And I'll add this two
horizontal drop like shape. Next with the smudge tool, I'll soften the edges. Now with the darker
shade of orange, I'll add this shadow
and depth defect. Now, slide smudging. If you see at the
tail of this fish, there is this blue
gradient effect for that will erase some
part of this first layer, that is the yellow and
the red gradient layer. Select the eraser tool. Under eraser, I'll select
airbrushing soft brush. You can even select the
same shading brush. My brush size is around 6% I'll slightly erase this
first gradient layer. You'll be able to see
the blue layer below it. Next, we can add a darker
shade of blue on the edges. I'll go to the lower
gratian blue layer. Select this royal blue
color from the color panel, and I'll add these
details on the edges. We are almost done
with this fish and we don't need
this reference image. So I'll tap on this and cancel. Let's add some scale effect to this fish. We'll go to layers. We need to add a new layer
below our front fin layer. Add a new layer, and it should
be below the fin layer. We'll change the mode for
this layer to multiply. Next, we can go to
the brush library and select the scale brush. Here we can reduce the
opacity for this brush. You can move this
minus around 75% Next, from the color panel, we'll select this bright orange color. I'll make it slightly lighter. You will need to experiment with the size and the
opacity of this brush. Now I'm adding this to our fish with very
little pressure, I will not cover it to the
whole fish just in few areas. If you zoom in, you can
see the scale clearly. I'll add some at the bottom too, so we are done with
our second fish here. Let's move on to
the next lesson. In the next lesson, I will show you how to
recolor this fish.
8. Recolouring Discus Fish: Before we start recoloring
of this discuss fish. Make sure you duplicate
your original file, swipe left on the
canvas and tap, duplicate, tap, and
open one of the canvas. Now our first step is to
merge all the layers. Go to layers, I'll
delete my sketch layer. First, merge all the
layers for the body. We'll merge the group
layer separately, pinch and merge them. We'll keep the layer
as it is for now. Swipe left and duplicate the body layer that we
have an extra copy of. The original layer now
hide the lower body layer. Now we can recolor and
experiment on the duplicate one. Our first step is to
go to adjustments. Under adjustments, we'll
go to gradient map. This will open a rectangular
bar at the bottom. You'll find a lot of default
color combinations here. You can slide these
tiny square and you can see the color
changing for the fish. You can even create your
own color combination. To create your own
color combination, tap on one of these color combo that will open and gives
you option to edit. Now you can see two
tiny squares here. You can tap on one of them
and change the color. While you're changing the color, you can see the
preview on the fish. Now here you can experiment with the colors until you're
satisfied with your result. You can even slide and
move these squares. You can even have an original
reference image to follow. For example, I'm trying to achieve the one shown
on the screen here. Now once you're happy
with the results, tap again on the
adjustment icon to exit. Let's see another way to recolor this fish duplicate the
original layer again. Next, we can hide the
one at the bottom. Make sure your duplicate
layer is selected. Now we can go back
to adjustments. Again, under adjustments, tap on hue, saturation
and brightness. This will open this
rectangular bar at the bottom with few options
to recolor your fish. Now under huh, you can slide this tiny circle and see the color changing
preview on your fish. When this tiny circle
is in the center, that is at 50% that was the
original color of your fish. So you will have
to slide left and right to find the color
you're happy with. When you recolor
with this option, you might not be able
to control the colors. We are done recoloring
our fish here. Let's move on to
the next lesson.
10. Project & Resources: For your class project, you can illustrate any tropical
fish of your choice. There are plenty of
examples, tips and tricks, and even resources for you
to start this project. Let's see how can you download these resources On
your class page, you will find this option
called Project Resources. When you scroll down, you'll find this option
called Download Resources. You can find all your sketches, brushes, and swatches here. When you're on your ipad, you simply have to tap
on this and download. You'll get this
option at the bottom to download on download. Next, you can tap on Open in, You'll find an option
to open in procreate. Now when you open
your procreate app, you'll find your swatches
at extreme bottom. Now for the brushes, when
you open your brush library, you'll find it at the top with the name as
tropical fishes. This includes four types of brushes in the
canvas and the brush set up section I'm going to show you how are we going
to use this brushes. Next are these five sketches. When you download these sketches from the resource section, you'll find them in
your procreate gallery. I even have a Pinterest
board that you can follow for more reference
images and inspiration. I have a link to this in the project and
resource section two. These are mostly
tropical fishes. I can't wait to see your
beautiful tropical fishes in the project section
of this class.
11. Scale Pattern Brush: Let's see how you can create
your own fish scale brush. Before we start, let's see some real examples of
these fish scales. There are more examples in the resource section two
In the reference images. I want you to see these images and the examples that I created. You can follow along in the class with your
choice of scale. This is the scale
brush that I have attached in the resource
section of this class. We will be using this as our base brush to create all
the other scale brushes. To create this brush, I started with this shape, tie this shape together, and turn it into a
seamless pattern. This is another
example For this, I started with a
shape like this, tie them together into
a seamless pattern. We will be pasting
these seamless patterns under the grain section
in the brush settings. You can even find
another version of the same brush by tapping with two finger and inverting
this image and tap done. This is how the inverted
version looks like. This is the third example
for the scale brush. For this, I started with
a shape looking like this and turned it into
a seamless pattern. Again, for this, let's see how it looks when you
invert this image. Under grain, tap, edit, Tap with two finger
on this image. That will invert the image done. Now let's try this
on the canvas. Every grain can give
you two types of effect just by
inverting the image. Now let's create our own brush. We'll start by adding a new canvas that tap
on this plus sign. Again on this plus sign, I'll keep my canvas
as 3,000 by 3,000 pixel with 300 DPI tap create. Now our first step
is to switch on our drawing guide for tap on this wrench icon menu under canvas Togal on the
drawing guide option. Tap on Edit Drawing Guide. Here you should be
under symmetry. Tap on options. Vertical should
be selected here. This will also depend
on the type of scale you are illustrating
and tab done. Now from the brush library, I'll select my base brush
from the color panel. I'll select this black color, make sure it is
completely black. Now we can draw the
shape we need for the scale for this demo. I'm just selecting
a basic oval shape, but you can pick up any
shape of your choice, even from the example I showed at the start
of this class. Select this shape
and make sure under snapping your magnetic
and snapping is on. We can get the exact
center of the canvas. While we are moving
this shape around, I'll make it smaller and
place it in the center. The vertical and the
horizontal golden lines means they're exactly
in the center. Now I'll keep duplicating this shape layer and
tying them together. It doesn't have to be
very accurate and exact. I'll group all of
these five layers and duplicate the group. And I'll repeat the same
process of placing them and tying them until my whole canvas is filled with this shape. There are plenty of ways you can create a seamless
pattern in procreate, you can do this with
any other method. You know one I'm showing in this lesson is with the
help of a layer that is filled with color
that works like a place holder and helps splitting the pattern
in a seamless manner. Once my canvas is filled, I will pinch and
merge all the layers. But I'll save this one layer
with this scale shape. In future, when we need
to fill some extra space, we can duplicate this layer. Now add a new layer and fill this layer with
any bright color. I'll select this
bright yellow color. Drop this color on this layer, reduce the opacity
of this layer to 50% Select this layer and the
merged layer and group them. Now duplicate this group. Now we can split
this horizontally. Hide one of the group layer, select one group and slide
it left until it snaps. And you can see
these golden lines. Now unhide the second group, slide right until
this two snaps, and there's no gap in
between these lines. Now delete both the
color fill layer, merge the remaining
pattern layer. Now again, I'll start filling the gaps here with
the same shape. Our next step is to split
this pattern vertically. I'll merge all the layers again except for the
one extra shape layer. Now we'll repeat the same steps of splitting the one
that we did before. We'll add a new layer and fill this layer with
a bright color, reduce the opacity
of the layer group. The layers duplicate the group. This time we slide vertically, slide one of the
group until it snaps. Slide another group down
until there is no gap. And it snaps to delete the color fill layers and merge the pattern
layers into one. Now again, I'll start filling these gaps until there
is no space left. Now again, for this
just one shape, I'll split it horizontally using the same
techniques so that there's no gap in between there. Merge all the layers
together into one layer. The seamless pattern
for our brush is ready. Now our first step is
to copy this canvas. For that, I'll tap on
this French icon menu. Tap on ad copy canvas. Now under the brush library, duplicate my fish scale brush. Tap on one of the brush here. We just need to change one
setting that is under grain, tap on grain, tap on
Edit, import and paste. This will paste our
canvas here and tap done here, under scale. You can change the size of
your pattern in the brush. You can increase or decrease the size depending
on your requirement. Once you're happy, tap done. Let's try this on our canvas. Now, another way is you
go back to the brush. Tap on this brush, tap, edit. Tap with two fingers and inward
this image and tap done. You can create
another effect with the same brush just by inverting
the image in the grain. This is how it looks
with inverted image. Let's increase the
size of the brush, and this is how it looks. Let's try this brush on one
of my fish illustration. We are done with our
scale pattern brush here.
 Vinita Upadhya, Illustrator & Pattern Designer