Transcripts
1. Introduction: Hello to all of my dear friends. Welcome to sketching and illustrating bird characters
course with pencil. One of the most important
parts and aspects of a sketching characters
for our students would definitely be a sketching
the bird characters. In this course, you
will learn that how you can
illustrate and sketch different bird characters
with the use of geometrical shapes and
a specific principles. In this course, you will learn the Character
sketching of parrots. Can see bird, pigeon, Turkey, crowd, flamingo, Hen, rooster, duck, all in different
models and positions. I hope this scores will be
helpful and beneficial for you and I wish you would
enjoy it the most.
2. Introducing the tools: Hello to all of my dear friends. We are here again and
today we want to learn about the equipments and tools which are needed
for this course, which is characterizing
the animals. I would start with my etch it. Because first symbol. We are going to create our primary sketch
for our characters. And I will do it with
the use of my at it. And I would also
use b or B2 pencil. It is going to be
needed for our work. This is B and this one is B2. I've chosen these
pencils because our primary lines for our primary sketches are
going to be drawn lightly. And then we've made sure
that our work is okay, and it's correct in all aspects. We can use pencils with higher
numbers and fix our work. But for the beginning of it, it's better to start our
work with B or B2 pencils. Now, for our attitude, we also need this. And just pay attention
that the type of your edit and the type of
your lead or it's a tip, would be the same. So if you choose one of them, 0.5, the other ones should also be 0.5 you
shouldn't choose. For example, is 0.7
lead for 0.5 at it. Even if you can't see the
leader violated is to be. It should also
match your pencils. So you can create softer lines. Now, after all of these, we need obviously a
pencil sharpener. These are which have this kind of a case at the
bottom of them are the best because it will make
your work easier and faster. You would also need a
sharpener for your pencils. And after that, we
definitely need erasers. We would definitely definitely
need our dough eraser. This is a necessity. So you should definitely
have a dirty eraser. You can also have
pencil erasers. I have the fabric
castle type of it. Something good about
these pencils is that at the ending part of them, they have it brush, cell venue, erase any
part of your work. You can use your brush to get the extra things off your work. Your work would not get messy. It would just make
your work easier. Can also use this kind
of brush erasers. But again, I say do
they worry, sir, is a necessity and you should definitely have it or otherwise, you can note, do your work. Another kind of eraser that
you can have is this eraser. That they have some kind of an eraser tips inside of them. You can change them or wherever. Your work is so thin and
you want to erase it. You can use this
kind of erasers. So this is another type of eraser that you can
use in your work. Then another point that
I should tell you is that you can use this pencil
holder for your pencils. This can come to
use for you when your pencil would be
too short and small. Therefore, you can
place it inside of this pencil holder and use it. One of the most common problems that people have is that then, and pencil is short and small, they cannot properly use it, but this pencil holder
actually helps you to use your pencil still. I think this is also
necessary for your work if your pencils are
short or a small, okay? And we are going to have
some works with colors. Therefore, we need
some colored pencils. For the parcel. You want to use some shadings. You might even need a fader. We will just use this
fader limited oddly. But if you like it, you can use it more. And I also have a brush. Therefore, I can get
any extra things off my work so it would be clean
and it wouldn't be messy. My paper and my sketch
would know AS get messy. I use it, especially for the, for the times that you use. You want to use
color on your sketch because it would not let
your work to be dirty. And therefore, it wouldn't
make your colors look dirty. You can use 1212
number colored pencil, or 28 or even 108. Depends on how much costs
do you have for this, how much you want to
pay for this stuff? And you can also consider
your colors more than this. It depends on you also need some papers for our work
and normal lie cheat. You can also use some
board that you can place it underneath your
paper and your hand. You can also have
some paper tape, and these are just
some accessories that you can have if you want. The board will be also
kind of unnecessary for you because it
would be placed underneath your hand
and your paper. And it will actually fixate, fix your paper on your
board so it wouldn't move. These are all the tools that
you're going to need for this characterizing
course of animals. And you can provide them.
3. Basic principles of animal illustration: Hello, My dearest friends. We are here. We did course
of characterizing animals. We want to see what do we
need for the beginning of our course of characterizing the animals and what
things are important. So I would teach you a general structure
for the animal's head. We can consider this and
start this with a circle. The beginning of our work
is creating a circle. In general placement
of the head. This would be different
in different animals, but generally do face of most of animals can start
with creating a circle. Then we would determine the
placement of our animals jaw. And then depending on the
animal that you're working on, this area can be different. It can be bigger or smaller
than this. Either way. Based on the animal
that you're creating. This part can be different. For example, for a
rabbit or a bunny, This part is not too big
and it's not too small. A medium size compared
to the size of the face. For example, for the dog, you should create bigger nose. For a rabbit, you should
create a smaller nose. All of these that
happen in creating your face depends on the
animal that you are creating, on which animal that
you're creating. I would also tell you another
point is about the eyes. You can create the
eyes completely, simply, completely
simple, sorry. The shape of two
ovals like this. Or you can just get eyes closer together or
event in some animals, you can create the
eyes as smaller. All of these depend on
what kind of animal you're creating and it will differ from each
animal to another. But generally for the dogs, you should create
the jaw longer. But in some other animals, this is not possible. In the front view, it's not possible therefore. For example here this
would be to nose of a dog. And then they would
have the line for its mouth are almost also create a tongue
for it, for example. Then for this part
above the nose, we will create one or two
lines in order to show the depth of the job because in front view you cannot show
the length of the jaw. But if you are creating
your animal in the side view or
three phases view, showing the jaw is
so much more easier. Example for this side view, depending on the dog
that you're working on, you can change the
shape of the nose. For example, you can
create it like this. Or you can make it
look like this. If this is your jaw, you can create your nose
like this in this shape. You would actually create the nostril for your nasal area. Again, I say depends
on the dog that you're creating and the view that
you are creating your dog in. It can have so many
different types, so many different shapes
for creating the jaws, the eyes, the nose, or even the mouth. Generally, you should
pay attention that which kind of animal
you're working on. Another point is about the ears. They are XO of animals. Again, depends on the type of animal that you're creating. You might, for example. You might be creating a cat. Therefore, you should
create a small ears for it. Or you might want to create
a rabbit, therefore, you should create long and
thicker ears for it like this. Then with some lines you would definitely show the
volume of the ear. Then for example, for
inside of the air, you can use some lines
to show that inside of this ear we have a volume
at a depth or an event. Now, you might have
some hair inside of it. You can use these
kinds of lines. You should consider that
everything that I'm telling you generally right now, we will actually apply them
in each one of the animals one-by-one in their own episodes and you might not worry
about it right now. I'm just telling you
the general principles. And then later I will
explain them one by one in each episode. For example, if I wanted
to create a mouse's ear, would look like this. So as you can see, we have different types of ears, nose, eyes, even jaws, and so many other things. It really depends on what kind
of animal you're creating. But as I said before, most of the times is start our work for the head
fruit creating a circle. So this was about the mammals. But if you want
to work on birds, this structure of their heads can be elicited bit different. First, we should consider an oval for the
placement of their head. I mean, for the
most of the birds. But if, for example you
want to create a pigeon, you can start with a
circle for its head Bug. Most of the birds would be a start with an oval
as their heads. Then it was determined or placement of the
eyes and our birds peaks because birds have also, the shape of the beak can
be different in each bird. Exactly the same scenario Davy had for the jaw in mammals. We have it in beaks. For birds, we have them long, short, thick, or thin. It depends on the type of
bird that you want to create. If I wanted to give you
an example, for example, if I wanted to create a doc, you will create this oval. If you want to work
into side view, you should create
it speak like this. I will consider it a general
placement for the beak. And because you are
creating a dog, you should also come
inside of the face and determine these placements, but you will come up to this area and then
from this inner side, you will come out and in again. This would be deep
beak of a duck. From this side view, this is the placement
of the eye. As you see, for example, this is a structure
of duct speak. But if you want to create
power it for example, you should change the
shape of your beak. You can see Debbie cuff, my parrot is more
volume and it's chubby. Or actually first
we will consider an oval and then you'll bring
it toward inside like this. And also from this side, you will come toward inside of the face and then
from this lower part, you will create the lower beak. You can also determine the placement of the
nostril on the bake. This was about the bigs and they would also
differ from each other. And it depends on what kind
of a bird you are creating. You should definitely
consider this in your works. This was an explaination about the general structure and shape of the animals and
the birds heads. But I will explain them in
details in each episode.
4. General illustration of the first Bird: Hello, dearest friends. We are here again with another
tutorial session for you. Well, this session
we are going to start creating
birds together and we want to see how we can create different types
of birds together. First of all, I
start with creating a circle for my
first bird's head. Then for its body. I'm going to consider a shape that on one
side it's straight. And on the other side, as you can see, it has a curve and a shape, kind of like an oval. It's like an oval which
is straight on one side. That on one end it
would be wider and the, on the other end it
would be more narrow. On the back of my bird's head, I will consider a shape for the feathers which are going to be placed on the back
of a bird's head. Then I would also consider a general shape
for my bird's tail. And then I can create my
birds feet, legs or feet. I create two triangles next
to each other as its legs. And then I come down
to create her claws. Actually it's feet. I just create some
volume for its feet. After I've created the lines. This is a general
shape of my bird. Then I would also determine
the placement of its wink. With two lines, I will determine the placement
of both wings. One is on this side, which is closer to us and
we can see it completely. And the other one is on the
other side of the body. And we only see a little small part of it
because it's on the other side. Now I'm going to determine
the placement of my bird's beak with
a general shape. Then we will actually
create the rest of our work in our detailing phase. So we are going to
do it on Next step. This is the general
shape of our bird.
5. Drawing the details of the first Bird: Hello again, my dearest friends. Now we're going to continue our work on our first
bird character. In this phase, we are going to add the
details to our work. I start from my bird's
head and detail, this volume that I've created for the feathers on
the back of its hit. Okay, now I will start
from my character's head. And then this way I
will separate a volume. Then again, I come a
little bit forward and I separate and another
shape, another volume. Like this, I will continue. Consider warm part
smaller because I want to have some kind of a
distance between my feathers. I'm just shaping this area. And I am actually creating these lines without
any special order. Because if I give it
a very special order, it wouldn't look good
because the feathers of my bird does not have any
special order for itself. Then I also create a very tiny feather for the
front part of the head. Now with the use
of my guideline, which shows the
direction of my face, I'll determine the
direction of bird's head. Then I will determine
the placement of the eyes and then I'll
create them on that area. This I will be created first
because it's closer to us. It's more in front. You can see. Then I would move on to
create the other eye, which is in the back and
it's further from us. Like this. Then for
inside of the eye, I will create the pupils. Then I will also create two
lines as my birds eyebrows. Then from this side of
the face, I come down. I come out a little. And I will create the texture
of feather actually here. So with creating some lines, I'm texturizing this part to show that its body is
covered with feathers. Then after that, I will
create my bird's beak. I will shape it in this way, looks like a triangle. Almost. But as you can see, I've stretched my triangle. And this would be i, that will be actually
the upper part of my bake and for the
lower part of my beak, I also create another triangle. If you pay attention, both parts of my beaks
are on top of each other. But because we wanted to show that there is a volume here, I will create a little
wide open like this. I want to work on
my bird's body. And just like this, I will create this
wing at first. Then I will start my tail a little bit
lower than the wing. I come down and I shape it
like this as well. One. And then two feathers would
be created over here to show that our bird has a volume of feathers as its tail and we denote create
it all in one piece. For the legs. From the ending
part of the tail, I will come down
toward the legs. Then I will create them as this. Then I come down this line and I create my birds Applause, or better to say feet. Then I would create the fingers, which are basically
the clause here. I will create each one of them separately in order to show that it's not also all one piece and they are each different
from the other one. Then I just do the same
for the other leg. Exactly as I did for this one. In this way, I'll
create the legs, the feet cause and its chest. Now that we've created
the legs like this, the feet like this. What can also create a part
of a branch beneath its feet. So we can show that bird is like standing or sitting on a French. Then I will create other wing, which is in the back. And I'll create it just
like this so easily. Then for chewing that in the chest we have a volume
and a volume of feathers. Specifically. I'm going to create these lines. I'll consider a shape like this. Then. On the back that we've created these feathers on the
back of the head. I'll connect them to my
bird's body. Just like that. I have a very beautiful
and cute bird which has been characterized. Now, I'm going to use my eraser. I will erase any and all extra
lines and my guidelines. Then my bird would be very beautiful and complete
and we are done with it. This way. My work looks
cleaner and better. This is my beautiful bird. The first bird
that we've created together from the
beginning to this point.
6. General illustration of the Parrot: Hello, love my dearest
friends. We are here. We didn't another
tutorial session for you. And in this session, we are going to
create another bird. And for this one, I've considered a parent. It can create it together. Okay. Now I want to start with my
general shape of the bird. I will start with an oval this time for my birds hit like this. Then after that,
for my bird's body, I'm going to create a volume
and shape almost as an oval. That one side of
it is more volume and prominent and the
other side is straight. Just as we did for
our previous spurt. For the feathers on
the back of the head. I should also consider
a general volume, and I will create
it in this shape. Then later, I will add two
feathers in this area. Then for my bird's beak, I will consider and
general volume again. Because as you've seen, parents beaks are a
little different. Then I will create
my parrot swing. And I'll create it
with this volume. I would also create
the other ring, which can be seen
a little bit of it because it's on the
other side of the body. For its tail would also
create a shape like this. Then I will continue
to create its legs. Just in this way. I will create a general
shape for its feet. I would do exactly the
same for the other leg. Just with the difference
that I should create the other leg little bit smaller and further because obviously it goes
into perspective. It would look like this. All right, This is the
general shape for my bird. Now, we're going to add
the details to our bird. And next step.
7. Drawing the details of the Parrot: Hello again, my dearest friends. Well, I'm back with
continuing my work on my parrot and my
second bird character. And this time I want to add
the details to my work. All right, well, I'm going to
start from my bird's head. And obviously we'll
start with creating the feathers which are placed
on the back of the head. Just like this. I will just determine
a very small volume. Then I create a
bigger one like this. And dressed a little. I bring these feathers
down too much, just a little. This is it. Then. I would also create some lines between these shapes
that I've separated. In order to show that some of the feathers are
actually shaping this area. It's not just two
feathers and that sit, we have a medium amount
of feathers over here. Then I come down
from my bird's head, Dan, I get to speak. Then I will consider
volume for the upper beak. Length. This. Then I will consider another part for my
lowers big volume. This way I have my whole
big with this shape. Then I would also create a line in order to separate the
upper part of the beak from the lower one is
shaped like this to represent my birds
tongue actually. Then I will create
the volume for the neck and some
feathers over here. That these feathers are actually separating the neck from
the head of our bird. Then I would definitely
want to create the eyes. I will create it as well. Obviously, I should also create a pupil for it in this way. Then one eyebrow evolve its eye. Definitely as we
always did before. Now, here from the back
of the head I come down, I get to the back of my Bert. I still go down until
I get to the tail. Again. We should show that
detail is made from feathers. We're just trying
to separate it to different parts in order to
show the feather texture. Then I would also
work on the wing. For the continuous of my wing. Again, I will do this. I will create some feathers. I can also show my wings in
this way with a good texture. Then I move on to the wing on
the other side of the body. Then I bring the chest
area down to the stomach, to the bottom of its body. I would also work on
the legs and feet. It's just very easily here. You don't have to do
anything special. I move on to the other leg. And I will create my
birds feed fingers, claws actually, and nails. It would all and
all look like this. Now at last, as usual, what we're going to do is we get our eraser, especially
our eraser. You can also use
your eraser as well. I'm just more comfortable
with my acids eraser here. You get it in your
hand and you erase any extra lines or
any guidelines, any extra shapes that you've created and you
don't need anymore, you will erase all of them. Your work, your
main work would pop out and it would show
itself better and more. Just as easy as this. This is our second character.
8. General illustration of the Toucan: Hello, all of my
dearest friends. We are here again with
another tutorial session. In this session, we are going to work on another bird together. And I want to create
a bird for you, which is actually on the
contrary of our other two birds. It has a big beak and
it has a smaller head. Okay, now I'm going to start. First. I will start with
creating my primary sketch, which is an oval in this shape. And then I would create my bird's beak that has a shape like this. Has a very big shape. Intuitive be shaped like this. Actually, you might say
that you are creating an oval which is curved on one side and straight
on the other, worn. Then for the lower beak, I'm going to create
a shape like this. Shape which has a very sharp
I want to work on its body. The body of my bird
has a shape like this. That on one side it's
more wide and on the other side it's more narrow. This Sway. Then for
my bird's tail, I will consider a
general shape like this. Then for its legs, I would do the same as
I did for other birds. I will create two
triangles here. Then I'm going to use two lines. Then I would shaped feet. And we finish our
general sketch. I'll create the rest of
the work the same way. Now, I would also determine the placement for
my bird's wing. Because the volume of our
bird's body is a bit much. We do not see the other
wing on the other side. This would be the
primary shape for our bird that I've created here. Next step, I can
add the details to this bird and complete it.
9. Drawing and Painting the details of the Toucan: Hello again. To all of my dearest friends. We are going to continue
our work on our bird. And we're going to add the
details to Albert this time. This episode. Obviously, I start
from my bird's head. So in this way, first I'll create a line. Therefore, the
volume of the face would be separated
from our beak. Then I determined the placement
of the eye in this area. Then I connect the beak
to the head in this way. And I would have my eye in here. Just like you can see here. For the eyebrow. I would also go out of
the head and little. I place my eyebrow. Then for the back
of my bird's head. I would also create
several small feathers. This shape. Then I move down. I want to work on
my bird speech. And I would also want
to complete that. We will sharpen,
tip off our beak, the end of it. Then we go down. We get inside of this area which actually connects the upper
beak to the lower one. From here, we're going
to start lower beach. In this way. This
would be actually, this space would be actually
inside of our lower beak. Then for outer part of the beak, we would create a
shape like this. Means that we just considered a volume
and little bit more. Then on my beak, I would create a
shape like this. I want to move on
to my bird's body. I want to shape it this way. For this area, I will create a shape like this. I would separate these
two parts from each other and then come
down from this area. For the tail. I will just create
feathers and separated way with some lines that I created here. Okay. No, I wanted to work
on my bird's wing and I would also want to create
the wing with several lines. I want to show the feathers of the wings with these lines, which are actually separating the feathers on the wink. Okay. I want to work on
my bird's legs and I would also create
them in this shape. I will create two fingers
actually he too clause. We're just going to call
them finger right now. Then one would be on the back, so two in the front
and one in the back. I would do the same
for the other leg. To India from two
fingers in the front and one in the back. This way. So this is the
shape of our hurt. Now, exceptionally, I'm going to color
this spurred for you. You'd also get to know
how you can color these birds on your own taste and with the colors
that you want. I'm just giving you a
model and a sample. I'm going to use a dark blue and then maybe
I would use some oak color. First, I will erase
the extra lines. I mean, I would erase any guide or any extra lines
that I have in my bird. And then I would just
color it so easily. You would know how it's done. I'm just showing you
how you can do this. If you want to do
it on your own. I've erase the extra lines
of my primaries sketch. I'm going to use the color 344, which is a dark blue For around it's this way. Depart that I've
separated from my body. I mean, I will color the
outer part with this color. As you can see, this inner part would
be left white and it would not be colored
in any ways. And the shading for this
area would be like that. Easily. In this way. Very, very easily. I'm just shading this area with some shadings
and hatchlings. I would also call
her this triangle, which I've created for the legs. Then for the feet and fingers, I will use the color 314. Day would have different colors because they are from
different parts of the body. Then I would definitely
do the same for the beak. I will use the same color for an A-B-C. In this way. Then I'll use the color 383, which is my AUC color. I will place a layer
of it on my beak. Therefore, my colors would
look better, more realistic. Then for this tip of the beak, I'm going to use the color 376. So I'm going to use
it for this tip of the beak just to create
a cute contrast. But remember that for
a whole of your birds, you can use any different
color that you want based on your personal
taste because these are your creatures made up
from your creations and your creativity,
your imagination. I would add a bit of this
color inside of the mouth, so it would be a little darker. This is our beautiful
bird which we've colored. For adding even more details. You can also create some
more lines on defeat. You can create some
designs there. And they would look like this. This is it.
10. General illustration of the Seagull: Hello, loved my dearest friends. I'm back again with
another tutorial session. Obviously. In this session, we are going to work on another
different bird together and we want to create it all by ourselves
from the beginning. I don't want to
see how it's done. I will start with creating an oval for the
beginning of my work. Then move on to create my bird's body. Now we are going to
work on its body. We would create a
shape like an oval, but we will make it
wider on one side and it will make it
narrow on the other side. Like this. Then after that, I want to determine the
placement of my birds. Actually, I will create a very sharp triangle for
the placement of detail. Now, for my birds, like I'm going to consider
them tall and long in display. Then I would also create the
other leg right next to it. Then for the fingers, will create almost
another triangle here. And then for the other leg, I'll do exactly the same. I'm just creating in general, another general shape in
the shape of a triangle. Now, I would also determine the placement
of the wing here. This way. Then. I would also determine the placement
of my bird's beak. I want to head of
bird to be turned. I will create my bird speak in this direction in this way. Then after I finished with
general shape of my work, I'll move on to the next steps so I can add
the details to my work.
11. Drawing the details of the Seagull: I love my dearest friends. We are continuing our
work on our character. And this time we're going to
add the details to our bird. I start from my bird's head. I will create my
burden this way. For civil. Create the line for my bird's
heads direction this way. And then I will determine
the placement of its eyes with creating a circle in this area. Then inside of the eye
would be shaped like this. Dan I would also create
the other eye as well. Then I would complete
the beak area. First of all, we are going to complete the shape of the beak because our eye would replaced
in this area which is, which has gone down a little. Therefore, we will create the
beak and the eye together. Then obviously I'll create
two eyebrows for him. For my bird. Then I would complete
the beak. In this way. I go up again. This way. Then after that, I'll move on to shape
my character's body. And also did Nick area. Then from this side
I would also come down and continue down through
the chest and stomach. Like this. I would move to my birds. Wink. I'll create it. This way that you're
watching right now. Then. Also determine
the feathers. Then move on to my birds tame. And I would also create that. And just creating some feathers. I was complete detail. I mean, I just create some feathers as our presenter
for the rest of them, just to show the
texture of detail. Then I would move on
to get to the legs. Because I want to show both the feathers and
the part of the leg. And also for our
work to be cuter. We will show some more
textures over here. We would do the same
for the other leg. This way, I will
show the feathers. Then I would move
on to the leg area. As I come down. I will consider an
area for this part because bird's leg can
be bent from this area. Therefore, we can show it with this bump in the
medulla of the leg. Then I want to work
on my birds feet. On its feet. We don't
have actually fingers. We show it like feathers. Because our bird goes into
the water, therefore. Its legs and feet
should look like this. It doesn't have any fingers. It's like the ones
that you wear in swimming suits,
naturally diving suits. I would just do the
same for the other one. I would also create this
kind of feed for this one. Now. I will create this front of, front part of the bird's
body with some lines. Then I would shade this inner part of the beak. This I would separate it
exactly as you can see. Then after that, I will erase any extra lines
I have in my work. I loved my work would
look cleaner and better. I'll erase the
extra useless lines which were just created
for guiding us. We will erase all of
them in order for our work to show itself
better and more. Here we go. Like this. Now we are finished with
the details we've created textures for its body and
any details that was needed. And we've also erase the extra lines and extra
works to show it better.
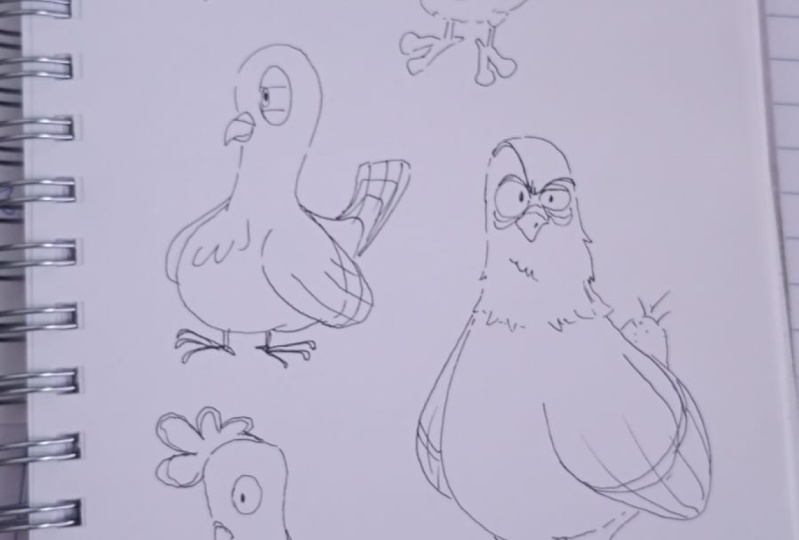
12. Illustration and drawing the Angry Pigeon: Hello, My dearest friends. We are here again with another
tutorial session for you. And in this session, we are going to create
another fun and cute bird lady together. Then I will use a circle
as my bird's head. Then after that, I will come down and from
the Missoula of my work, from the medulla, my circle. And I'll create my bird's
body with another circle. Looking like this. Then I will connect these
lines together from the side. And we will shape our bird. I would determine the
placement of my bird's wing. Hey, detention. All of the birds that
we've created up to now are in side view, in profile, or in
three phases view. But this time we're
going to create a bird from the front view. Therefore, it would
definitely be more different. We created in this angle would also determine the
placement of my bird's legs. In this way. I would also show a little bit of the
swing for here as well. Now, my bird's stomach
has turned this way. It's head is in the front view. Therefore, I've
created this wing more and the other one less because it's in the front view. So you should also know that the body has
turned a little. This is my bird's leg, which would be placed in this shape and in
this direction. Finger area. And then dip back finger. Now we want to work
on this other leg. We will do exactly the same
thing as we did over here. We shape it like this. It would be just the same shape, but in a little bit more
different direction. I come down a little and
complete it this way. This is our other leg. Now, I will create
my bird's wing. Also, my bird's wing can be
seen underneath this one. In this way. Now I would move on to my bird's face. Its face is a front view, as I said before. Therefore, we will
consider a central line. I want to create one of my character's eyes bigger
and the other one's smaller. In a way that I want to
show our bird has seen something and it's in
a shock or surprise. In this way, again. Then I can move on to its peak. Just like this, I will create
my beak on a front view. Well basically we are going to create a corner raised line. Then we shape the
upper area like this and a lower area like this. These are for the weeks that are being seen from
the front view. They would be shaped like this. Then I will create
dual eyebrows. As I said, are birdie
is in a shock. It would look like this one
I bigger than the other and the eyebrows would
be in this position. Then for the shape of the head, I will create my lines
in this direction and in this shape. Right? Then. I will erase the extra lines
around my bird's head. Well, this is our
beautiful bird, which we've created
all together. Erase this leg and
I'll create it again. Because the lines are a
little bit mixed together. This leg cannot be
seen really well. Now I want to
create the fingers. This way. As my leg is turned, its facing forward. This is our bird, which looks like this. Clean and beautiful and cute.
13. General illustration of the Fat Pigeon: Hello, dearest friends. We are here again with another
tutorial session for you. In this session,
we want to work on another shape and another
different form of a bird, which would be actually
the last part of our bird characterizing for my bird's head outcomes, CIDR a circle. Obviously as usual. Then four. My bird's body. I will consider
circularity shape on this. It's not a complete
circle because I want to create a complete
chubby bird character. Then. This time,
I want to create the wings of my bird. This way. I want to create one of
them open like this. The other one would be
placed on the body. This way. Well, actually trying to have any possible way. Any pulse civil model
that can be created here. Because when you want to
start working on your own, you can also create different
shapes and different forms. Now, for my characters leg, I would note create them
like my bird is standing. I would create my bird in a
sitting position this time. Therefore, we can not see too much of its leg and you would
not create too much of it. This way. We will create the other
leg as well in this shape. And as I said before, the fingers and legs
cannot be seen that well. This shape. Now this is a general
shape for my bird's body. Now we want to move on
to the detailing phase, and we want to add the details
to this chubby, cute bird.
14. Drawing the details of the Fat Pigeon: Hello again, my dearest friends. We are continuing our work
on our last type of bird. And I will start from my
bird's head for detailing it. Just like this. I will create fun head for it. Now I want to place
the eyes for my bird. Will show the placement of
the eyes with two circles. Well to head of our bird
is a little bit turned. So we use it to our benefit and we consider
it while we are creating it. Then I create a pupils for
my bird inside of his eyes. And then I would
move to its beak. And I would also create
the beak in this shape. For this upper part of the eye. I will consider darker color. For this part. On the back of its head, I'll create two
very fun feathers in order to make it look cuter. And also in here, I would create some more
feathers like this. Now I want to work on it, swing and I will create the wing with creating
some feathers. Looking just like this. This very same direction
that we've created here. We will create the
feathers for the wings. Now with a line, we will determine direction
of the wing as well. Also with a corner ray line. Now that we've added the
feathers for the wing, we are going to go down through the stomach to shape
our bird's body. We are using so
many curved lines in the wings in the body. We also create some lines
over here obviously to show the texture which is feather on its body and also the direction, the volume of the body. Now we'll move on to
our bird's wings. And we will create them as well. This way. I would definitely work on these
lower feathers for the wing. And I just show them with
several lines like this. Then again, I come back up
to the back of the head. Again with the use of some
lines I create the texture of the feather all around
and all over the body. Did I move down to the
ending part of the wing? And then at last, I would definitely want to
work on my bird's tail. I would shape it this way with some lines right next to each other. I will detail this way. Then. I would also work on
the fingers. It's feed. I mean, they're not actually
fingers but whatever they are there cause we created
easily like that, like before. This is our last
cute birds character that's complete now.
15. General illustration of the Turkey: Hello, dearest friends. We are back again with another
tutorial session as usual. In this session, we
are going to create a cute Turkey together and we
want to see how it's done. So first we start our work with creating an oval like this. Then for its speak, we're going to create
an oval which is choppier on one side and
thinner on the other side. Now after that, for its neck, I will create a shape like this. It's a very long shape
that I will consider. For its body. It's even better
if it's a little curved and it wouldn't be a straight one side
of it obviously. And on the other side it
just comes down to straight. Now for its body, I will consider
bigger oval here. This way. Then, for the wing which is facing us on this
side of the body, consider a shape which
would look like this. That on top side of it. It would have rectangle
looking like this. And for the rest of it, I'll just continue
this downward. Then. From this side of it, when I finished creating it, I will create a shape like
this, similar to that. A bit more corner rays
then being straight. This is a general shape for it. And obviously later we're going
to add the details to it. Now. For the tail, I
would also create curved and coroner ways volume just like a circle but
not to circularly. It's actually
something between an oval and a circle
that we created. In this shape. We will reach to this shape
outlast Dan for its legs. I want to create
shaped like this. I bring it down. Then after that, I will do exactly the same
for the other leg. There is a difference
that you cannot see the other leg because it's on
the other side of the body. I would have a general shape for the leg area
determinant like this. Then I just create the other
leg right next to this one. This is our other feet. This is a general
shape of our work, our turkey, which the placement of
everything is determined. But I want to also create the other language can be seen from the other side of the body. I want to create
a little love it. I will create a
shape like this to present the other wing on
the other side of the body. We can have that too. We're done with our primary
sketch, with our designs. Now in next step, we're going to add the
details to our work.
16. Drawing the details of the Turkey: Hello, my dear friends again. We are going to continue our
work on our character here. Well, we've created the
general shape of our turkey together and now we want to move on to the
details of our work. Now, I'm going to start my work with creating the
volume shape of my head. I just develop it like this. Then I will determine the
placement of the eyes. Well, our character's
eyes are very big, so we're going to
show that this shape. I would also create the other I exactly a stuck to this
one right next to it. Then I will determine the placement of the
eyebrows looking like this. Then after that, because
the head is a bit pressurize that is
just too small. I just add a little bit more
volume to my head like this. No big deal actually. Then I would also consider two shapes for the top
of my bird's head. Just to make it look cuter. That so then like this, I'm going to shape the
eyebrows more and more. These were the eyes. Now I want to work on the
darkness inside of the eyes. Then I move on to
my bird speech. I would also shape it like that. Just like this. I will shape my bird. Then from the side of the eyes. From here. I will create that extra part
that I should create. Because if you look at turkeys, they have something like that. Coming right down next to
their eyes and their beaks. It's actually look like what
some roosters have on them. I would also add the beak. Then after that,
I will bring down didn't Nick? Like this. I would add the neck with the wrinkles that
we can see on it. Like this. Then we're just creating some sir, it calls I would shape this volume like this. It looks like a semicircle. Dan from the back of the head. I will continue the body. Obviously after that, I will bring down my wing
from this area. And then we will
separate the wings. Hey, exactly like this. In this way. Then I want to work on the back of my characters neck and
shape it in this way. I'll create my lines. Then I will move on to the wing. Started from here. Then we will show
the wings like this. We can have the
volume of our work and we would just
have some feathers representing the whole body
because you want to show the texture that is covering
our body, which is feather. We're doing both simultaneously. Creating these feathers. We are creating a better volume and we are showing our textures. We continue to wing and
we move on like this. And we just continue the general shape that
we've created before. We move on that. And we create our wings. Now after we've created
both of our rings, we can just move on and
create our bird's tail. From this various
spot that we've started to create
our primary sketch. We will start to
create our feathers. We move on from both
sides equally in order not to have any extra feathers in
the middle of that. I can't even create
some space between these two feathers in order to make our work look a
little cuter. And that's so. But before I move on, I will determine the number
of feathers and Dan, I will create them one by one. From both sides. I come towards the
center of the tail. Therefore, the feathers
that we are creating, the FBI would not be
too much or too little. I mean, it shouldn't be in a way that one of them
would be so wide and so big and the other one would be
so small or too narrow. First, I determine the
number of my feathers and I consider kind of a different
but not too different width for each of them. We can even create a feather
like it's in the back. Then the other one
would be placed on top of it. Like this. We will also create next
feather in this shape. Then we get to
these two feathers that we've created at first. Now if you pay attention, you can see that we've created
all these feathers without any special order and they don't have any special
order in nature. All of these feathers
should be placed just disorderly in order for
our work to look better. And it wouldn't be
just too weird. Then with some curved lines, we can even decorate our feathers and give
some designs to them. Not so this is our bird's tail. Then for the legs of our turkey, we will move on our
work like this. We are actually
developing our work. Just gave some feathers too, as far as its leg as well. In order to make it
sill cuter, funnier. Then I would work on the leg area, make it stretched a bit more because I wanted
to be seen better. And also, it looks so well
in the whole picture here. Then. I will create the fingers. Then also we will create days nails for him. For this one. We will actually
shape it in this way. Then we would move on to
the other leg as well. We just easily shape it this way because we don't see this
finger on the back screen. Kids love it, not all of it. And then just like that, we create the rest of
the fingers next to that would create nails. Exactly like this
as we did before. This is our turkey. Now I am going to erase the extra lines in order for my work to look
way more better and it can show itself way more better. This way. I'll erase this
extra place here. And even if there are some lines which have
been erased by accident, we can easily create them again after we are
finished with erasing. I mean, first you should erase any extra lines when he
got lines that you had. Then if you've removed some
main lines accidentally, you can come back again with
your pencil and correct it. I do it for the
extra lines here. I'm going to work
on everywhere that is being created extra. Then I would also work
on the parts which have been removed or
erased by accident. Just going to create them
like this and wherever I have to make an area
darker or bolder, do that as well. In this phase, it can even shade this area a little in order
to make it show itself more. Sorry, here we go. This is it. This is our bird, which looks like this. For this area on the
back of the beak. We can also create
some lines in order to show that there is
some volume behind it. That's it. This is
our complete Turkey.
17. General illustration of the first Owl: Hello, love my dearest friends. I'm back again with another
tutorial session for you. In this session, we
are going to create an owl together and we want to see how it's
going to be created. Now I will start with
creating an oval shape. I just start my work with that. Although it could actually
use circle as well. But I've chosen to
start with an oval this time. This way. Then, for detail of my bird, I will consider a
shape like this. Then for the legs, I will create a shape like that. I would create lines as
representer of the legs. I would also create some
kind of a shape like this. Liked to feta of
other birds that I've created there
actually clause, but we're just going to
call them feet for now. Then. I can move on to the
rest of my bird and create the rest of
my character's face. I mean my owl face. Because I wanted to direction
of the face to be this way, I will create a
guideline for that too. Then I come to the eyes and create two very big
circles to have the eyes. Obviously because our head
is turned this I would be seen less wouldn't
be seeing complete. Then I would also determine
the placement of the beak. And I just create a general
shape for the beak like this. With this volume. Now for the eyebrows of my owl, I'll create another
shape like this. I started from here. Then I bring it out of the face. And I would do the same
exactly on this other side. In this way. These
are the eyebrows. Then I would also create two very cute and fun feathers
on the top of its head. In order to make it
more fun and more cute. I can even bring the
body a little bit more forward and down. This is actually a general
shape for my owl bird. It has this small
wing over here too. Now I'm going to add the
details to it in the next step. All right. That's it.
18. Drawing the details of the first Owl: Hello again, my dearest friends
weren't going to continue our work on our owl
character. This time. I'm going to start from
my character's head. I would also create these very two little feathers
on the top of its head. Then I will move on to create my bird's
eyes and eyebrows. From here I go down. Because of this, I would
be placed behind the beak. So I'll just do it this way. And I will add my volume here. Then I would move on to create this inner circle for
inside of the eye, which is actually the pupil. I easily created as well. This way I would also
have my PO pill. Then I will darken
this upper eyelid. We can even create a
line behind the eye. Then I move on to the eyebrows. I would also work on them. Just several lines. I would move on to the other. I just do the same for
the other one as well. I will determine the circle
for N's inside of my eye. Then after that, I will place that darker spot inside
of the eye, the pupil. I will also darken the upper
eyelid and I also consider a line for the upper
part, upper eyelid. I can also agree to
lines for below the eye. Now I would show
the other eyebrow with the shape like this. Then I will darken inside
of it this way very easily. Now. We'll move on to my Elle's body. Then with three feathers, which can be created like this. I just complete
my tail this way. Then. I would also create the
wing looking like this. Now this was about my
bird's body and head. Now I move on to my characters
leg and very, very easily. Just move on my primary lines which I have had in
my primers sketch. Then for the beak. Again, I move on. My primary sketch. Then you can also
place a line on the nose under beak actually
to represent a nose. Then it would look like this. Based on my big, I will shape the circle of
the eye even more than this. I will erase any extra
lines from here. My character would be complete. This way. Then I would erase my guidelines and the other lines that I've just used to move my
body or edit any parts. Now, I'm going to create
some lines around the eye in order to make my work looking
more fun this way, it's just very, very easily. I'm just creating
these lines in order to make my character cuter. I would also consider some lines above my eyebrows
and on the top of the head. This is our beautiful can also shade the wings or tails a little in order to
make them stand out. Or you can even use some
lines in front of its body, on its chest in order
to show the textures. And actually in order to make it different and can even create
some designs like this. Just like that. I just create several
designs on my owl's body. Then I will shade it. Now if you've paid attention, you might know that body
of an L has kind of a design on a front part of it that we've
created like this. This is our owl.
19. General illustration of the second Owl: Hello. Hello, My dearest friends again. We are here with another
tutorial session for you. And in this session, we are going to create
another kind of OWL. And we wanted to
see how it's done. Well, I will start with creating a circle for my owl's head. This way. For my owl's body. I would also consider
a general shape. In this way. Then from both sides, I will complete
this general shape and I just connect both
sides of it together. Then I would also add
apart for my bird's tail. Then I move onto its swing and I will add it
to that as well. In this way. Then. I will the legs to this lower
part of my bird spotty. And as you can see, the body of our bird is
kind of in a three phases. Between a side view and
a three phases view. But I wanted to turn my
bird's head toward me and I will actually
create its head on its face in a front view. So I will just create a very straight line as
the guideline of my face. If I wanted my
head to be normal, I would've created I would've created this line corner
ways or in sideways. Then I will create
the general shape of my legs for the L. In this way. Then I would also do the same
for the other leg and all their foot forwards head. I am going to determine the
placement of the eyebrows. Obviously. Then I bring it down to separate this inner part of the face from the
outer part of it. And this inner part
of the face would be separated as a shape of a heart. As you can see. Dan, I would place eyebrows
on this upper area later. Of course, this would be
the placement of the eyes. Just so easily create
the eyes in this shape. Then at last I will determine the
replacement of the beak, which would be in this area. Now after I've created
the general shape, move on to next step, which is actually adding
the details to my work. That's it.
20. Drawing the details of the second Owl: Hello, dearest friends. We're going to continue our
work on our owl character. I will start from
my bird's head, will create my main lines
starting from here. And also the details obviously. First of all, just go
down to shape to head. From the sides. I will make the
face a little bit more narrow and smaller. Then I will shape
my birds eyebrows. And I would also create
them because, you know, eyebrows are one of the most
significant things in owls. Even if you've seen
cartoons or animations, you can see that always owls have big, significant eyebrows. Okay, I darken both
IRRs and I create them. I move on today eyes. I create them. And then I would also place
the pupil inside them. Then I will darken this line for the upper eyelid a little
as I did in my previous L. Then I move on to the other. I like this. I would do exactly the same
for this other eye as well. Then I would also darken this
line for the upper eyelid. And then after that, I move onto my bird's beak. I created speak in this
shape because we are actually looking at
it from a front view. But I just tilted a
little toward this side, turn into little to the
side because I just wanted to show a little bit
of our lower beak as well. Then I would also apply one line above to beak in order
to show this area more. In order to show that it has volume actually and it's coming out of the face
from sides of the eyebrow. I come down, I go around
this heart shape. Then I would move on
to my bird's body. I bring out the chest a little. Ok. Now I'm going to create a wink. I'll also bring it out
a little bit more, making my wing bigger. I bring it down toward detail
and the end of the body. This would be the back of the
wing and tobacco vibe bird. Then for the wing, I would also create
two feathers in order for my wing to show
itself better and more. And then I create some designs for this
inner part of the wink. Like this so easily. This is actually my bird's wing. And then for my bird's tail, I will create two feathers. As a presenter of the Dan, I move on to the legs, which I should easily
create as well. I just use some lines and the ending part of
the leg in order to show that our bird's body
is covered with feathers, even in this area. Then I move on to the fingers, to the clause and
I'll create them. Shape this area. This way. We will actually make the tip of these clause L is
a bit more sharper. Comparing to the ones that
we've created before. Keep the tips sharp. Again. We'll do exactly the same for the claws on the other
side of the body. The other leg. Obviously because
these two legs are being placed in
front of each other, we cannot see all parts of the fingers or
clause completely. Just create two of each of them. Use my shadings to
some places like some parts of the wings
or tails in order for my work to show
itself even better. So just liked it. I will shade around
the sides of the face. And also this inner part of
birds stomach and chest. First I divide this area. We did a design like this. And then from here
I start shading again until I get to
this separated area. Then for the wing area, I'm going to use
different hatches and different shadings
because we want to show that this volume is different from the other one that
we've created before. Looking like this. Then again for the feathers which are on this lower
part of the wing. Again, I'm going to change the direction of my
shadings and etchings in order to show
that these layers again are different
from each other. Like this. I would not place any
color in this area exactly as I did for this
inner part of the face. I would not color in
her pride of the body, the chest and stomach. Then again on detail, I use different direction of shading and also these
parts of the legs. Now I will erase all the extra lines and
this stomach, chest, and face in order
for them to show themselves more and they
would just pop out. Here we go. Now this is my owl's face. This is actually in
another type of Al that is really different
from the previous one. Then I can also create some more lines
for this front part of its stomach and chest
in order to show that there are also some
feathers over here. Then this is it.
21. General illustration of the third Owl: Hello, My dearest friends. We are here with another
tutorial session for you. In this session, we're
going to create a baby owl together and we want to see how we can make it
look cute and fun. First, I'll start
with my L's face. Create a circle for
that in this way. And then for its body. I'm going to create another
smaller semicircle. Then after that
for the tail area, I'm going to create
a shape like this. Then for the feet, I'm going to create two lines next to
each other, downward. And then the placement of
the fingers would be here. Then I would do exactly the
same for the other leg. Just create my fingers
in a general shape. Then I would also create
my baby baby bird wing. I would also create
the other wing in this way because it's on
the other side of the body. We are just going to
show this this much. Then. I would also
determine the placement of the face parts and phase components in this
way, in this direction. Then I can move
onto my next step, which would be the detailing. We're going to create two very
big eyes for our baby owl. And then I'll come over here and I'll
determine the placement of the eyebrows on my owl's
face with a general shape. I'll do the same
for the other one. This is a general
placement for my eyebrows. For this size of the face. I'm going to determine
placement like this for the feathers, actually, for
placing my feathers. Now, for the next step, I'm actually going
to add details to this general shape that we
have created together now.
22. Drawing the details of the third Owl: Hello, I love my dearest
friends are going to continue our work on
our owl characters. This time we are going
to detail our baby owl. Again. I'm going to start from
the head for adding the details and going
over a domain lines. I come to this side from this area in the
middle of my eyebrows. And then I will shape
the eyebrows like this just to make it more
different from the other two. Then again, I come
back down and to the central of my eyebrows. I would do exactly the same
for the other eyebrow. Creating several lines, we
will complete the eyebrows, both on its volume and on
its texture and shape. Now, I would have to darken
these two parts like this. Then I will actually go on creating general
Shea for its face. From here I come down, I bring it down to the
ending part of my face. I can create chubby face
for it because it's a baby. From this side. Again, from this corner of
my eyebrows, I come down. Then I move on to
the other part, to the other side, to the end named
part of the face. Now for these parts which I've chose you to create an
ear primers sketch. We are going to come
down from them. And with the shape like this, we are actually going
to show the volume of the feathers on its head. Now, I want to work on it. I will create dies in
this way, completely big. Then for this inner
part of the eye, I will also create
shapes like this. And a darkness inside of the eye would be
placed like this. And on this upper area can just create
Elizabeth bit more shape in order to make it cuter. Like like an upper eyelid. And even above it. Now I'm going to move
on to the other. I just do exactly the same
for this other eye as well. I created in this shape first, then I'll create this
inner part of the eye. Then the dark spot inside of it. Again, the procedure is
completely the same for this one. Again, for this upper part of it's just as an upper eyelid
and dress as the previous. We will consider this shape. Then in this way, I will create it. Right? Now I will move on
to create the beak. Obviously because we don't
want to forget that. Because it's a baby owl I
created speak in this shape. Small and cute. I will create it in the
shape of a diamond. Then also create the
lower part of the beak. Lower beak actually. Then I will darken this area because I want to show that
it's inside of my lower beak. Its mouth is open. I would also darken
this area above the eyes to give it
a specific volume. For this area for
the cheekbones. I can also play some more lines. I'm just going to
create two lines in order to show my
owls cheekbones. I wanted to work
on my owl's body and I will bring down
it's Friday from here, down from here actually. And then I will move it
towards the next wing. I would also create this
swing which we can see less because it's on the
other side of the body. Now I get to this other wing which is closer
to us and in front of us. I created, in this shape, I create two feathers on it. In order to show that
it does have a volume. And our creature is
covered with feathers. Then for the tail, I would also consider several feathers as a
presenter for detail. Then I would move on
to my birds links. And I will create the legs
clause in this shape. For our PBL, we can actually
create feathers over here, which the leg connects
to the clause. Feet. In this area. We can even play some
feathers because we are working on a
baby el not grown up. I'll determine the placement of the fingers here to close. Actually. I'll create the next
one exactly the same way. Basically the procedures on both sides of a bird
or not too different. Then we can even
Roundup the tip of its fingers are clause
because it's still a baby. So this is our bird are
actually baby owl character. We've created two
other different shapes and this time we've
created and AV1. Now I can also add
some more lines on the chest area in order to show the volume of here and also the texture of here,
riches, feather. Then obviously we can erase any extra lines and
finish our work. I get my eraser and erase all extra or guidelines
that I can see here. Whatever is left from
the extra parts, I will just easily
erase them right now. Fingers are a little bit longer. Then I'm going to
create these again. Another thing is that
I am going to actually shade on the top of the head and also on the
sides of my face. In order to show
that this area is different and it would
actually pop out more. Also go on the wings
and the tail a little. Obviously, the legs too. This is our very cute
yet beautiful baby L. We just create this line
on both sides and that's it.
23. General illustration of the Crow: Hello, I love my
dearest friends again. I'm here back with another
tutorial session for you. In this session, we are
going to create a crow together and we are going
to see how it's done. First of all, I started
with creating a circle, definitely for the head
of my Crow character. Then I will consider
a volume for it. Speak like this. Now, I'm going to
create its body. For this part. Above the body, I create an oval
and I would create another oval for the
lower part of its body. In this way. Then after that, I will connect these two volumes
and shapes together. And from this side, I would also create
a shade farm. I, birds swing. Now. I will create my
bird's tail like this. Then I'll create the other
wing on this side as well. Actually my bird has
been turned a little and we are looking on its chest and this inner
part of its stomach. We see this wink completely because it's closer to
us and it's this side. But the other languages placed on the other
side of the body, we don't see it completely and our bird's head is
inside view and profile. I will determine the placement, the general placement
for the legs. Then also clause would be place like this. Then for this call on the back, I will have a shape like this. I would also create
the other leg exactly as we did for this one. Then base to that this
leg is closer to us. This one is a bit further. Therefore, it would be
a smaller and a little shorter because it goes in perspective and
recreated like this. Now that we've determined the placement of the body parts, I will also determine the
placement of the eye. Over here. Obviously the general shape and then later I will
add the details to it. In next step.
24. Drawing the details of the Crow: Hello, Joe, love my
dearest friends. Now we are going to add
the details to our CHRO. Now, I will start
from my bird's beak. Then create the tip of
the beak very sharply. Then with this shape, I bring it back toward the face, bring it up a little, make a curve, and down
straight to the face. I'm going to shape
beak from here. This way. I will connect it
to my lower beak. Then again, I bring it toward
the tip of my whole beach. Now this is our beak. Now we can also determine the placement of the nose on it. All right, I'm going to
move on to my birds. And I would also shape
the eye this way. Then for the lower part of the, I would also consider this line. Now for inside of the eye, I'll create a
circle and a pupil. Then for my birds eyebrow, I will create a
very angry eyebrow. Then move on to the
top of the head. I will shape it. Toward the end. I will create a shape for
showing the feather texture. And then I come down and
I create the rest of the feathers in this
shape and in this design. Also from below do beak, I will come toward inside
and I will create the neck. Now for the area. I would also create a line for the back of my eye and then also create another line
for this upper part of the eyebrow and
another one below that. In order to show the
shape of the eyebrow even better than I will darken
my eyebrow this way. Now I'm going to move
on to my bird's body. And from here, I'll create
a line for the chest. And I will have my
wind behind this line. Then I will bring down
this line for the body. For this part
inside of the body. I will determine several
placements for several feathers. I mean, I want to
show that there are some feathers on
its chest as well. Then I would move on to the wing which is closer to me
and is on this site. Therefore, I'm going to show it this way with kind
of a curved way. I come down with a curved line. And I do not create any straight lines for
our ring because we want to show the volume and the shape of the chest as well. As well as we are showing
the shape of the wing. I mean, then again, I move on to the lower
parts of the feathers. Just like this, I'll determine
some feathers for my wing. Then I move on. The neck area. Then I will consider several more feathers for this upper area in order to show that all of my crows body
is covered with feathers. Then also for this
lower part of the body, for the stomach below the chest, I will add some more feathers. I move on to my bird's tail
and I will shape it this way. I would also show it
with two feathers. I'll show detail
with two feathers. Therefore, we will. We are actually showing that it's body is covered
with the feather. I also create a little
one at the end of the tail in order to make it
cuter and be more unique. Also for the leg area, I should create some shapes as a representative of feathers. Right next to each other, small ones right
next to each other. Then I would have my
leg coming out of my feathers downward
in this shape. Then on the leg we're
going to create some curved lines as kind of a design for our
clause and our leg. Then we move on to the fingers. I mean, the clause actually. Then after I've
created the clause, I would also create
several more lines on them and move on to the next
finger that I have here. As you can see, I'm simultaneously completing
these fingers and close and applying these
designs on all of them. Just be careful based
on the direction and the angle that our call has. Finger has. We will going to create these
designs and these lines. I mean, we shouldn't
just consider all parts as so flats
and just a surfers, all parts are actually
volumes here. And therefore, depending on
their angle under direction, we are going to determine and create the lines into
correct direction and angle. Well, definitely I would do
the same for the other leg. Again, I create some are
feathers on this area. Did I bring my leg out
of it with its designs? Just like the previous leg. I'm going to use some
lines as designs here. Then I will create the claws. This way. This is the last finger over here. Then I will consider
this middle finger a bit bigger and thicker in
order to show it better. And the last finger
would be very, be actually seen very thing. This is actually the
shape of our CHRO bird. For the last step, I'm going to use my
eraser and erase all my extra and guidelines in order for my work to show
itself better and more. Just like that. Okay. This is our Crow, which is complete right now. Step by step. If you created, you would not face
any problem at all. Here we go. That's it.
25. General illustration of Flamingo: Hello to all of my
dearest friends. I'm back again with another
tutorial session for you. And in this session, we are going to work on if flamingo together and we
want to see how it's done. Flamingos, a very cute
and beautiful bird, and it's very unique
in its shape. As usual, I will start with
the circle as my bird's head. Okay? I will create a circle here and then determine the
placement of my bird speak. Then I'm going to create
kind of a general shape. And then later in the next step, I will add the details to it. Therefore, it's really
important that if you're first and generally shaved would be too much
different or not. It's enough if you can determine the placement of
different things on it. On your head, on your face, on your beak, and on your body. This is a general
shape of my head. Then I will consider very long
shape for my bird's neck. Actually consider
tall cylinder shape for my bird's neck because
it has a long neck. And then for its body I'll
create an oval like this and consider a shape, a triangle. A triangle shape
for my bird's tail. Obviously, it needs
wing because it's bird so well-considered this
area for my bird's wing. Then after that, I will
create my bird's legs. Obviously it has very long legs to flowing goes are
very unique as I said, they have very long necks and very long legs and
also long beaks. We are actually
going to show all of them exactly in our characters. I create two shapes over here and then we'd have very thin, we'd actually two thin lines. I come down and then again I create another
corner raise line. Also bring this one down. And this area, I would
place my bird's foot, the ending part of the lake. I would do exactly the same
for the other leg of my bird. Again. I come down like that just a little bit
more above the leg, which is closer to us
because as I said, it's closer to us and
this leg that we are creating right now is fair there and is on the other
side of the body. I also create some circles and small circles as the
joints of the legs. Again, I put the leg in the
perspective and I create the leg and the food in
its correct placement. Alright. Okay. This is a
general shape and a primary shape for
our flamingo bird, which we have characterized
and sketch at the same time. Now we should determine
the placement of the eyes as well generally. Then a next step, we can add the details to
each part of our bird. This is it.
26. Drawing the details of the Flamingo: Hello, my dear friends again. We are going to continue
our work on our bird. And this is simp, I'm going to add the
details to my bird. All right. I start from the
top of the head. Obviously. I will shaped ahead. This way. I'm going to consider two
feathers for the top of the head dare for
it would be cuter. And we can show that
bird has some feathers. Now from the lower part of
the feathers I come down. I will create the skull of my bird toward out and
then I bring it in again. And also from this side, I go down like this. Then I'm going to create
my birds eyebrows, which should be like this. I would also place the other eyebrow
underlying of the head and then I will move on to the
eyes and create them this way. Alright. Now we would also work on this dark
area inside of the eyes. Then we can move on to
create our bird's beak. From hearing the
medulla of the eyes, I move on to her, the center of the eyes, and then the shape of an oval. I bring it down and this
area would be the lower, big lower beak of our bird. Then again also I can find the center of this curve
that I've created and I create a line and
bring it down to show actually to separate
the inside of the mouth from the
outside of it. And I also darken this
area inside of it. This way we can show
that its mouth is open. Now from here, I'm going
to bring deadline down. Going up again, we
did very smooth line. We would also create this
upper part of our beak. This way. Then for the tuple of our beak, we will actually
separate an area and the color of it can be different from
the rest of the beak. Therefore, we will complete
our beak as easy as this. Now, for my bird's neck. From the lower part of the beak, ME from below the beak and
from the back of the head. I come down. This way. As we come
down from the top, in the middle of the neck, it would be thinner. Then again, as we come down, we are going to actually increase the volume
of it this way. Now from this way
it's the same as we come down from the top. Neck would be thinner. And again, as we
get to the bottom, we will add the volume actually. Now for the back of my neck, I will create a small line. Then. I'll create a volume for its back looking like this. Then for this front area. I will come down and again, I move toward defeat
to the legs actually. Then I would want to
work on the legs. And also I'll consider two parts for where
the legs would be starting and then I will shape
them very thin like this. I bring them down. We'd keeping debt
width of it very narrow and thin in this area. I twist leg downward
in this way. Then I move on to the other leg. And I just do the same for
the other leg as well. I'll bring it down this way. Then. Just like that. I will determine the
bottom part of my feet. I mean, where I have the
lower part of the leg, which is actually the feet
would be created like this. And we can move toward
this inner area a little, not too much. As you know. Leg can have a shape like this. Would also work on the
other leg like that. So easily. All right. This was the legs and
feet for me now I'm going to work on the wings
and the rest of the body. Well, from here I bring
to it weighing down and, and I bring it toward
the end of the body. And obviously I'll create several feathers on
the body in order to present the whole feather
texture on the body. Then you can also use a line to separate the tuple of the
wings from the rest of it. And then you can shade
it in order to make a design on the body and
make it more unique. Now I'm going to work on my bird's tail and
I'll create it. It's like this. Then for this area, I will complete the
stomach actually. Right now this is it. For this area that we've set, the color of it is different. We can use some
shadings in this way. Then we can also
darken the eyebrows. We can also work on
this upper part of the eyes and make them darker. This way. When you clear this extra lines, the shape of our bird will actually show itself completely. In this way. Now we can erase all the
extra and guidelines here in order for you to
know that in at the end, which lines are
actually main lines and which lines are extra. And guidelines. As this. This would be our
complete flamingo, which is very cute and fine.
27. General illustration of the Stork: Hello, love I dearest friends. We are here again. We didn't another
tutorial session. In this session we are going
to create a stork together. I'm going to start with creating a circle for my
bird's head as usual. And then I will determine the placement
of eight speak over here. As you know, Starks
have very long beaks, so we create it. Then in here I create
a lower big as well. Just pay attention that
you're lower big should be definitely shorter comparing
to the upper beak. Because it's going to come
up and match offer beak. Therefore, it should be shorter. You created in this position. Then I'm going to
create my bird's neck downward with almost a
long cylinder shape. And then for this part
of my bird's body, I'm going to create an oval. Consider an oval for this
part of my bird's body. Dan, I'm going to
work on the legs. I would also create
them as well. This shape, obviously one of the legs
would be more in front and the other one is
more in the back and on the other side of
the body in this shape. Then I'm going to create a feed. Again like always with three fingers into Friend
and one in the back. I will do exactly the
same for the other one, which is little bit
further from me. Therefore, it would be a
little shorter and maybe a bit smaller because it
goes into perspective. Then I'm going to
create my bird's tail. I'll consider a shape
like this for its tail. Then at last I'm going to
create my bird's wing. This shape. That will be the
last of the body. The last thing we want to
do in our primary sketch is to determine the placement of
the eyes just so generally. And then in the next step, we're going to add
all the details to our stark. That's it. This is a general and primarily shape of our bird
that we've created together.
28. Drawing the details of the Stork: Hello, My dearest friends. We are going to work
on our bird and add the details to our stork this time and we're going
to complete it. Now. For the top of my bird's head, I'm going to shape my
head a little bit more, making it more developed. From the back of the head. I'll do the same and I come
down until I get to the neck. Then in this area you can even
add two small, very small, tiny feathers in
order to make it cuter as we did for
some of our birds. Then I'm going to add
my bird's eyes in this way and two
eyebrows as usual. Then I'll do the same for
the other eye as well. Dan, I will place the
pupil inside of the eyes. Now I'm going to work
on my bird's beak. I will continue my beak all
the way down like this, make the tip of its sharp. I go back all the way
until I get to the face. Then for this area, obviously as we did before, I create a curved
line and shape it. Then I bring it down. I get to the lower beak
and shape it in this way, also creating a line
over here to separate the outer part of the
beak from inside of the mouth and shape
it like that. And obviously you
can just separate, apart on the tip of the beak and shaded in order
to make it more different. Dan, I move on to my bird's neck and as I come down from
the top in the middle, I'll make it a bit thinner. I would also do the
same from this side. Then I move on to the
shape of the body, the chest like this. I'll complete this
stomach over here. Basically from inside
of my primary sketch. I'll separate my
body's shape and I will leave a part for the other wing which is on
the other side of the body. Then we come to this swing, which we can see almost completely and create
general shape of it. And then I'll separate
an area to show the feathers on the
wings like this. And obviously you can also shade this ending part to show the difference
over here in this area. Then I can come to New my body and connect it to the neck. All right, now come to my birds. And I will shape it in this way. With creating several
different feathers, I will show detail very easily. Then obviously at last, I move on to the legs
are so easy to create. As you can see, I'm just
following my primary lines. I go down, I shaved it, fingers three indifferent,
one into back. And that will be it. I'll do the same
for the other leg. Then. I will definitely erase all these guidelines
and extra lines. My work would look
cleaner and better, and this would actually
complete my whole work. Very well. As you can see, I've erased all the extra lines
and now my work looks very complete
and very beautiful. And you saw that we'd very
simple geometrical shapes. We've created our creature and our cute Bert river
rehab guidelines. We will erase them with
our attitude eraser. This is our final
work and our result.
29. General illustration of the Hen: Hello, My dearest friends. I'm back with another
tutorial session for you. And in this session
we are going to create a hen together. Also goes by the name chicken. Going to learn how we
can create a hand. Obviously, I'm going to start
with the general shape of my character and then detail
it in the next steps. For the beginning of my work, I will create a circle
as my character's head. In this way. Then for my hands head, I will have this shape
to move forward with. Considering that I
want my hand to be looking this way and I want its face to be in
this direction. Therefore, I also determine a guideline for my
faces direction. Then with an oval shape, I will consider my hands body with a bit of distance
with my circle. For you can also and create
a corner raise line for your hands neck in order to get the distances and
sizes correctly. I create a body with the
distance from the head. Then I will consider an
oval for my hens body, a very big one and a chubby one. Then I will connect
the neck to here. Actually, I will connect the head to the
body with the neck. I'm basically adding the
neck to my whole work. So as you can see very easily, we have got our primary shape. Now for the tail of it, I'm going to create a
shape like an overall, which is more round on one side and on one
side it's coming down. This would be shaved
for the tail. I'm going to work
on my hands, legs. I will create them
with two triangles. And then I would
have them like this. You have already
noticed up to now, for all the bird animals, we can create their
legs like this. I mean, we can use two triangles for the
placement of their legs. Almost all of bird animals are like this and they can
be created the same way. Bring it down. One of the feet are facing to the front view and the other one is toward the direction
of my hands face. Then after that,
I will determine the placement of my hands. Wink. Of course, they can't
fly but they have wings. Then I will place another oval for the
placement of my hands. Wink. All right. Now, something which
is very significant in my hands face is actually speak. Therefore, I should also
determine its placement. I just created general
shape for it for now. Because later I know I'm going to actually develop
it and detail it. Now I'm also going to create a general
shape for my hands. Crown is actually a crown and we have just created
a general shape of it. In next step we are going to
add the details to our hand. The eyes and the
rest of its body. Would we created
completely with details, then it can be shown
better and seen better.
30. Drawing the details of the Hen: Hello job, I love
my dearest friends. We're going to
continue our work on our hand character and adding the details to this character. All right. I'm going to start
from my hands head. I'm going to start
with it's crown. The crown. I'm going
to create several small as semi-circles like this. Then for the back of the crown, it would be the same. Basically. We are creating three kinds of oval shapes for our crown area. Now for this front
part of my hands head, I'll go down like this. And I'm actually give a shape
to this side of my face. Now, I'm going to determine placement of the
eyes. Based on that. Actually our beak is over here. I will create one on this side, which is definitely being seen. Smaller, endless. And I create another eye over here which is
obviously bigger because it's closer to us
and it goes into perspective. Just like that. We create it. Then I'm going to create
the darkness of the eyes. In this shape. Depending on where your
eye is going to look at, you will determine this area
actually above the eyes. You can actually
make your lines a little darker to emphasize
the upper eyelid. And then I move onto my hands, eyebrows and I'll create
two of them for her. In this way. It would look cuter. Now we two lines. I can create the shape for my, I know I want to work
on my hands beak. And I want to
complete it this way. I create the general shape. Then I will open my beaks, my hands beak like this. In order to show
the mouth is open. Then I will connect to
lower beak like this. After that with a line. I separate and inside
of the big from the outside and I connect
its mouth altogether. Now for my hand, I would also consider kind of
be heard it's not a beard, it's actually something that's
dangling from its beak. I will create it
for, for my hand. You should consider that
we are creating a hand. And later we will
work on the rooster. And then you can actually
compare these two characters together to see where they are different or where
are they are similar. Then I come down from the neck. Then I create the breast. And I just determines
some feathers for this breast area
in order to show that it's spotty is
covered with feathers. As you can see. I'm showing this
with these kinds of shapes to create the
feather texture. Then I will work on
the hands, legs. I create this semicircle
very softly and very smooth. I make it coming out like this. Then I would work on this leg. Just like that. I will bring out
this leg out of it. Then I create the
shape of the feet, going to complete it actually. Alright, now I will
create my hands, fingers in this
way, in this shape. Then I would also create these back fingers
looking like this. Then for the tip of the fingers, I'm going to actually
add a name for my character in order to
make it more developed. Okay, now move on to
work on the other foot. And we can almost say
that we are looking at this leg and this
foot from a front view. Therefore, I'm going to show
it with a shape like this. It's a little bit different
from the other one. This is the third one. I would also create the
back finger like this. Okay. Now for this nail area, I'll consider a shape like this. This way. All right, now these are
the fingers of my hands, nails that we've
created together. Alright, Now from this
side of the foot, from side of the leg, I come up until I get to detail. I'm actually going to
shape the feathers for our tail area because we should definitely shows some
feathers on our tail. Otherwise it wouldn't look at. I'm going to create them
with the shape of feathers, which look like this. And they are connected together in this shape
and in this order. Another row. This lower area would be
created for my feathers. Then with several solo
feathers, create another shape. And I'm actually
completing my tail, as you can see on my tail. I have three rows of
feathers in order to make a good volume
and a good shape for it. Then I come down from the to above the tail and I
create my hands back. I continue this line onto light goes through the neck
and I get to the head. For the back of the head. I'm going to shape my lines in this way and I bring it also from the head
down to the neck. At last I'm going to work on my hands wink and
as you can see, I'm just going on my
guide and premier lines. But then for the
ending part of it, I should also create some
feathers to show that its wing is also
made with feathers. Then again on the back, I'll do the same. I would also consider
some more feathers for different parts like this. You know, there to
show that all of our bird's body is
covered with feathers. And we're just creating these as a representer of our body. We would want to
show all of our body is covered with feathers. Then at last, I'm going to actually erase all
the extra lines and all the guidelines
as usual to make my work looking
better and cleaner. This way you can see your main lines better
and they will pop out. Then you can see
your final outcome. Just like that. I will erase these extra lines, especially for parts that
we have these feathers textures because then you erase these extra lines from
your primary sketch. You can show the shape of feathers on the
tail, on the wing. Way more better. And it will help your work
to look better overall. Now, I'm going to also erase this extra
lines for the crown. When they've completed my shape, we can see it
together like this. This is my character.
31. General illustration of the Rooster: Hello to all of my
dearest friends. We are here again. We didn't another
tutorial session for you. In this session, we
are going to create a rooster together
and we want to see how it's done and what differences does
it have with our hand? All right, I start with
creating a circle. Considering my character's head. Obviously. In this way. I will create my circle and then I determine the
direction for my face. I want my rooster to
look this way. Okay. What I'm going to do now
for my roosters neck, going to actually create a very long and complete
general neck for it. Under contrary that we've
done for our hint, I mean, the differences between a
hand and a rooster is that a reserve has definitely
longer and taller neck. So for our roosters neck, we are going to create a
very tall and long oval. Generally. Then I'm going to work
on my roosters body. I will show it with
kind of a very smaller oval and I create the
general shape for my body. Then I can move on
to my roosters tail. And obviously, roosters tail is again longer than our hand, and it has even more
feathers on it. I just put this general
shape for my rooster. And then later I'm going
to work on its details. Now I'm going to
determine the legs, as I said before, I'm going to do this
with two triangles. Dan, I'm going to
create dielectrics. Well, even the legs of our rooster are longer
comparing to a hand. We see this part longer. Therefore, it's one of the other differences between
our roster and our hen, and it has also a longer fingers that
recreate them in this shape. All right, For the other leg, I'm going to do
exactly the same, creating the fingers
in this shapes. Then this finger comes behind the other and we
don't see it anymore. Now for my roosters wing, I'm going to consider a very
general shape like this. Then for its crown on her head. Again, I'm going to consider a very big crown because this is another one of differences between our hand
and our rooster. Then for the beak area in the direction that I
want to place my face, I will create my
beak in this shape. Another difference
between our hand and our rooster is that that
part that have been dangling from below the beak of our hand is longer and
bigger in our rooster. Then we also create the eyes bigger
comparing to the hand. And as you can see, I've even used more exaggeration in my roster and I wanted you to see how you can exaggerate
parts of your character. For example, this time
I've chosen that I want to exaggerate my neck
because it's very significant. Or if you don't want to do that, you can also create
the body bigger. But I've chosen to
exaggerate the neck. And you can create normal life. What we've done for the hen. In next step we are going
to work on the details.
32. Drawing the details of the Rooster: Hello, I love my
dearest friends. As you know, we're going
to continue our work on our roofs are
character and this step, we are going to add the details
to our rooster. Alright? As I did, usually, I start from the head
area at the top of the head and I start
from our reserves crown. And I'm going to
shape it this way. I've created one part of the crown toward up
and the rest of them, I'll be creating them
short back in this way. Well, because crown of our
rooster is actually heavy, therefore, it's going to the back of the head
and also it's cuter. We can easily create
our character. This way. This is our research crown. For the placement of the eyes. I will create kind
of a crescent shaped downward until I get
to my roosters beak. Like this. Then I will create the
other I like this. I'm actually separating it because I wanted to make
my character funnier. And also I want to use some exaggeration on the eye because our characters are Rr. Okay, then I'm going
to create the eyes. You should always consider
that with exaggeration, you would have
funnier characters. Definitely don't doubt it. Okay. I'll create the other eye on the other side of
the head like this. Then I'm going to determine
the direction of my eyes. And I want them
to look this way. So I consider them
looking this way. I would apply the
darkness inside of my roosters eyes this direction. You should consider that
because I want my roof, sir, to be funnier. I can create the eyes
closer together. Or even if you don't want that, you can just create your
eyes in a normal way, in a normal position. You should consider that
you can actually test all these shapes and
you can just try them. I'm not going to
create any eyebrows for my risks are
because this shape that we've created on
the top of the head can also represent the eyebrows. Then obviously I'm going to
work on my roosters beak. Like this. I will complete it with this shape
of the eyebrows. And another thing that
you can consider is that roosters always have
some kind of an angry face. And with this work
that we've done here, we can actually show
this face more. We can create our rooster
looking more angry, the shapes that we've
created now we're going to create our roasters beard, which is actually I
said before apart, dangling from below the beak. And as I said before, we're going to
create them longer. Comparing to watch
we've created for the hand and we don't see the other one on the other
side of the beak completely because it's been placed on
the other side of the body. And we can't see it completely. Like what we can see
from the other eye. Here I'm going to create my neck a little bit more
volume and I'm going to bring it down in this way. Now, from here, I will
create some feathers in order to separate the
neck area from the body. In this way. Then for
the back of the head, I come down and get to
the end of the neck. All right. Now I can move on to my
roosters back and it's spotty. First of all, I started from the back and then I
come back to the front and create its chest
leading to the stomach. I'll determine the volume
of this area and then I can move on to create
the legs of rooster. Then I will create the fingers
of my rooster in this way. Then it's last. Obviously, I'm going
to add the nails, fingers or clause of my rooster. Then I'm going to move on to the next finger and
created in this shape. Then you should
obviously consider that this finger should be
a little bit smaller and it can be seen
too much because it's closer to the other
leg and other foot. It can also create a shape
like this above the feet. For your roots are character. I mean, after you've
created the last finger, you can come up a
little and create a shape like this
for your rooster. And the back of the
leg above death foot. If you want, if you don't want, do can actually eliminate
it from your work. I just execute the
same procedure. I apply the same process. On the other leg, fingers, the claws and nails, and everything they've
done for our previous one. Just as you can see, I'll consider the nails too, because I can say that this
leg is from the front view. We cannot have that area
at the back of the leg. Now, I'm going to create
my roosters ring. And obviously going to
create some feathers on my roosters ring in order
to show its texture, the texture of the wing, and obviously the texture
of the whole body. And then add last, I'm going to create the
tail on virus, sir. It's actually one of the significant parts
of a rooster's body. I'm going to create almost a very big
tail for my rooster. Going to create
them long and big. And actually we are
not going to create very short and small feathers
for our resource tail. Exactly the opposite of that. I'm going to create bank
and tall feathers for that. Then with this shape, I'm going to connect
tail to the back of the wing because it goes through the body behind
the wing actually. Alright. This is our
final creation of ours, sir, that you can even add some more lines beneath the eye. And then you can go over the upper eyelid
making it bolder. And as we've always done
before for detailing phase. And at the end of
the detailing step, I'm going to use my
eraser to erase all and any extra or guidelines
that we've had in our work. Whenever you are creating
the feather texture, I think it's better for you
to create a separation, create a distance between one of the feathers and the
rest of the feathers. Exactly as we've done
here, for example, for the tail or for its crown. I think it can just
make your work looking better and more improved. So just like this, I am erasing all the guidelines, all the extra lines over here
from our primary sketch. That was for the general shape. In order for our character to show itself better and more, it would be cleaner. It would look more
developed and complete. Obviously. This is it. This is our final result
as our rooster character.
33. Illustration and drawing of a Chicken: Hello, My dearest friends. We are back again with another
tutorial session for you. In this session,
we're going to create a chick together and
chicken actually. And we want to see if you want
to do something like that, how we can create it to make
it really cute and fun. Obviously, as usual, for
creating my chicken, I will create a circle at first, but a small one for its head, because it's a chick, it's small and cute. And then for its body, I will consider another
circle which is a little bigger comparing
to my first circle. Then I will connect this part to the body. This way. Then from this
side again I go down and completely I connect
to head area to the body. Then I will consider a very small shape over
here for its tail. Obviously, I'm going
to show the legs with only two small lines, several smaller lines
for its feet and claws. Then for its beak. I will create a very small
shape, again like this. Then for the wing, I will create this shape
that you can see here. If you want to make your
chicken even cuter, you can create a very, very small crown on its head. But you can eliminate it as well because it's a chicken
and it might not have it. It's optional for you. Then I'll determine the
placement of the eye. Now, I'm going to add the details to my chicken
because it was small. And it's one of the easiest
thing that you can do. We're just going to move on
to the details very fast. I started from the
top of the head, obviously from
creating the crown. I created like this, just as simple as this. As I said before,
creating chickens are one of the easiest
work that you can do. Then I come down until
I get to the beak. Then I'll create my chickens. I, I'll consider an eye
like this for our check. Its pupil in scientific. Dan, I will create the beak. Very, very small, big as this. Then I come down to the stomach
until I get to the tail. For the tail area, I'm just going to create
several feathers, several completely
small feathers. And then I go back up to the back of the head until
I get to the crown again. I'm going to create its wings with only two feathers
shaped like this. Separated like this. For the leg area. Again against so simply we'd creating some lines
toward actually forward. We are going to show
the leg and declare. It looks like this. It was very easy and
it looks so cute. The same time. And at last, obviously you can erase your extra lines
with your eraser. Just as simple as this.
34. General illustration of the Duck: Hello, My dearest friends. We're back again with another
tutorial session for you. Obviously. In this session we are going
to create a duck together. As usual, I start from the general shaping
of my character, just a primary sketch. I am going to create a long and tall oval
as my ducts head. This time I'm creating
the head within oval. Then I will actually divide
this oval into half. This. And then I'll determine the replacement
of the parts in the face. First of all, with a line, I'm going to determine
the direction of my face. Then after that, I will determine the
placement of my dogs. Be KX because it
talks speak is one of its most significant
parts in its whole body. Just like that, I've determined the placement of the beak, general placement, of course. Then I can move on to
create my dark snake. I also create a long neck
for my duck, almost lung. Then for its body again, I will consider another oval. But this time in this
position and in this shape. Then after that, I will shape
this area for its tail. Then I will place the
wing on dead body, definitely in here
and in this shape. Then at last, I will create a general shape
for my dog's legs. Two lines coming down. Then this bottom
part of the leg. Just a general shape. And I would do exactly the
same for the other leg. But I only pay attention to that because
it goes in perspective. I should create the other
leg is smaller and a little bit shorter because it goes in perspective and it's
further from us. Now that we've determined general placement
of our body parts, we can move on to the
next step and add the details to our
duck character.
35. Drawing the details of the Duck: Hello, My dearest friends. I'm going to continue my
work on my doc character. And this time I'm going
to work on the details. I start from the top
of the head. As usual. Like this. Inside of my design
and my primary sketch. I determine the placement
for my body parts. For the top of its head, I'll create two feathers
in order to make it cuter. Represents its hair,
some kind of hair. And then from the corners, from the sides I come down. Then I come out a little to
create a shape like a cheek. Because if you've seen dogs, they have cute chicks. Then I will determine the
placement of the eyes. I will do the same for
the other eye as well. Then for B little my eyes I
will shape form like this. Again, I say in
order to show that my doc has cheeks
and it's also happy. And I will also create
it for the other side. I'll determine the placement
for my eyebrows in this way. And I also darken
inside of my eyebrows. I create the other eyebrow. Then I'll darken it. I want my character
to look this way. Therefore, I created its
pupils in this direction. I obviously do it on both eyes. Also determine the
placement of its speech. Just as this will determine the placement and
also the shape of the beak. We created in two steps. First I come, I bring a line
down until I get to the tip. And then in this area, I create a shape going
out and coming in again. Then again from here,
from the inside. I come out and I turn
it and bring it back to the face to depart that we've
created for It's a smile. Also from this side, I come toward inside the mouth. And also we come down a little. We can even determine
the placement of the tongue for our doc. Then last wish to
darken this area in order to separate from
the rest of the mouth. For the lower beak. We come from the corner, we come down and we go up again until we get to the
beginning of debit. And in this way, we will complete our
dots, face and mouth. Then after that, we're going to start creating the neck
from here, bring it down. I would also create
a back of the neck. As I come down. In this area, we can also create some feathers in order to show the textures
of our dog's body. You want to show that its body
is covered with feathers. Now for its chest again, I will create some more
feathers like this. And then I go down to the
stomach and the legs for this, actually for his front
parts of the body, I would also create
some more feathers. Before I create the legs, I would create my dogs wing. As you could see. I've just shaped it
a little bit more to make it more
developed, an advance. And then obviously at the End of the wing, I would create these shapes in order to show the feathers. And I create each one from
little bit inside of the wing. I mean, I create each one
shorter as you can see. Even on top of them. I created some
shapes to make sure that they can show feathers. Then here we would
have the legs. I make this part a
little prominence. Then. Because I want to show that my leg is
coming out of some feathers. I will create the
second curved line. Dan, I just create the leg
and its fingers at the end. Then we'd two lines. We can just create some
designs on top of the leg. I would just do the
same for the other leg. Bring the lines down
and then create the leg itself and two lines for the other leg as well as
I said, exactly the same. At last. I want to work on my dogs. And even I'm going to use several more feathers
for the tail. And for the back of my body. I start from here, I come down. I create, open down over here. Again, I say because you
wanted to share that they are actually some
amount of feathers. And just like this, I finished my work. That's it. That's the result
of our doc character. We are finished
with the details. We can also create a nostril, this area for its
nose obviously, because it needs to breathe, can even create a little part of the mouth on this
side of the beak. In order to show that our
mouth is actually continued, its laughing and we can see
it on the other side as well. For the last thing, overall, for my
overall character, I will take my eraser
and I will erase all the extra lines and
guidelines to finish my work. Well, obviously
details will make your work much more better
and much more prettier. But you shouldn't Astarte from, you shouldn't start creating the details from the beginning. It will actually have the
reverse effect on your work. It will make it not look good. You should just start with general basic shapes and then complete that
a little bit more. And then at last, you should add the
details to your work. Don't ever forget that in
everything that you do. This is the result of our work.
36. General illustration of the Duckling: Hello to all of my
dearest friends. We are back again with
another tutorial session. And in this session, we are going to
create a Baby Doc together and we want
to see how it's done. Alright? I start with creating the general shape of
my Baby Doc as usual. And then later I'm going to add the details and I
will start with my baby docs head that I will
create it with a circle. Then for its buddy, I'm going to create
an oval here. In this way. Then at the end of my wall I consider a part for its tail. It also looks like
a drop of water. If you can see. Right. Now I am going to determine the placement of the
wing on its body. It's more in the
back of the body. Then obviously the
placement of the beak. And I will create my beak in
the lower part of my face. I mean, I'll consider
this shape for it. I add a little more
volume to my face. And here I also determined the direction of my
baby dog's face. Then I determine the
placement of the beak. Over here. As I've said before, only a general shape. And then later I will
add details to it. Like this. I will also determine the
general placement of the eyes. And also I'll create the placement of the legs again
with the general shaping. And obviously because we
are grading a baby dog, everything would be
smaller and simpler. This is a general shape of it. Now we're going to add the
details in the next step.
37. General illustration of the Duckling: Hello. Welcome back to the rest of
our work on our Baby Doc. Okay. I'm going to add the
details to my character. I will start from
the top of the head. I will create some
small cute feathers on the top of the hit. In order for our
character to be cuter. Then from this side of the face, I come down and I
make this part a little prominent in order
to show it's cute shakes. Then I go back again
until I get to Nick. I get to the next sorry. I will also do the same
from the other side. I come down from the side. Then I come out a little
to make a prominent area. Because in this area, we are having our beak. We cannot see the other
side of the face too much, but generally we should
come toward down. Then I am going to determine the placement of the
eyes and create them. You should consider that because we are
creating a baby duck. Again, I say the eyes should be bigger actually because it likes it actually
make it look cuter. And because you want to
show that it's a Baby Doc. Because because this
eye is closer to us, it's a little bit bigger
comparing to the other one. Little, not too much. And we created this direction. We've created it.
For the other eye. Both pupils should actually
aim in the same direction. And then I will create DI
browse here for my character. Then something that
you should know. We are actually going to make the upper eyelids and little
bit bolder and darker. After that, I'm going to
determine placement of the beak. Very specifically. I will create it
between the two eyes, and I'll create my beak. This shape. From this side. I go out like this. I'll create around cute
beak for the baby duck. Then from inside of this shape, I create another line or
a curved line going down and again go back to the
inner part of the beak, actually the part below the eye. Then I use the same line. And when I get here, I go down and I create a turn in the middle of the beak in
order to shape our lower beak. Then get back to the face again. Then I connect this
part together. And just as easy as this, we've completed our beak. Then we can create
inside of the mouth and we darken it in order
to separate the tongue. And we can even add a nostrils at two nostrils on its beak. Then we can move to
the rest of the body. This way. We will create
them from below to beaks. We go down and we can even bring the body a little bit lower in order to make
it a little choppier. Yet it stays a small. Then we turn it would
complete detail and we create a lizard
part for its back. I'm going to create a wink
and complete it actually. In this way, we
complete the wing. We can even create two
very small feathers with for the wing
it to small lines. Then for the legs. I'll start creating
lines at first. Coming down. Then I will create the legs
completely with its shaves, which looked like a finger. Because this leg is more in
front and is closer to us. It would be a little longer and bigger comparing
to the other one. Because it definitely goes into perspective and you should consider that in all
of your sketching, it can also create a
line in the middle of your leg in order to show that it's a volume and
it's not just a surface. You can also add some more lines in front of its chest to
show the feathers. Then at last, as we always do, we get our eraser. We erase all the extra
and guidelines in order to make it
completely developed. And it would look like this. All right. This is our cute baby Doc
next suits mom or dad. As you've seen. We've created both an adult dog
and a baby duck. You would know how to do on each one of them and how to
create each one of them. Alright, this is
our final result, which looks so good. I hope you've enjoyed it
and it was helpful for you.
 Amelie Braun, Artist & Cartoonist