Transcripts
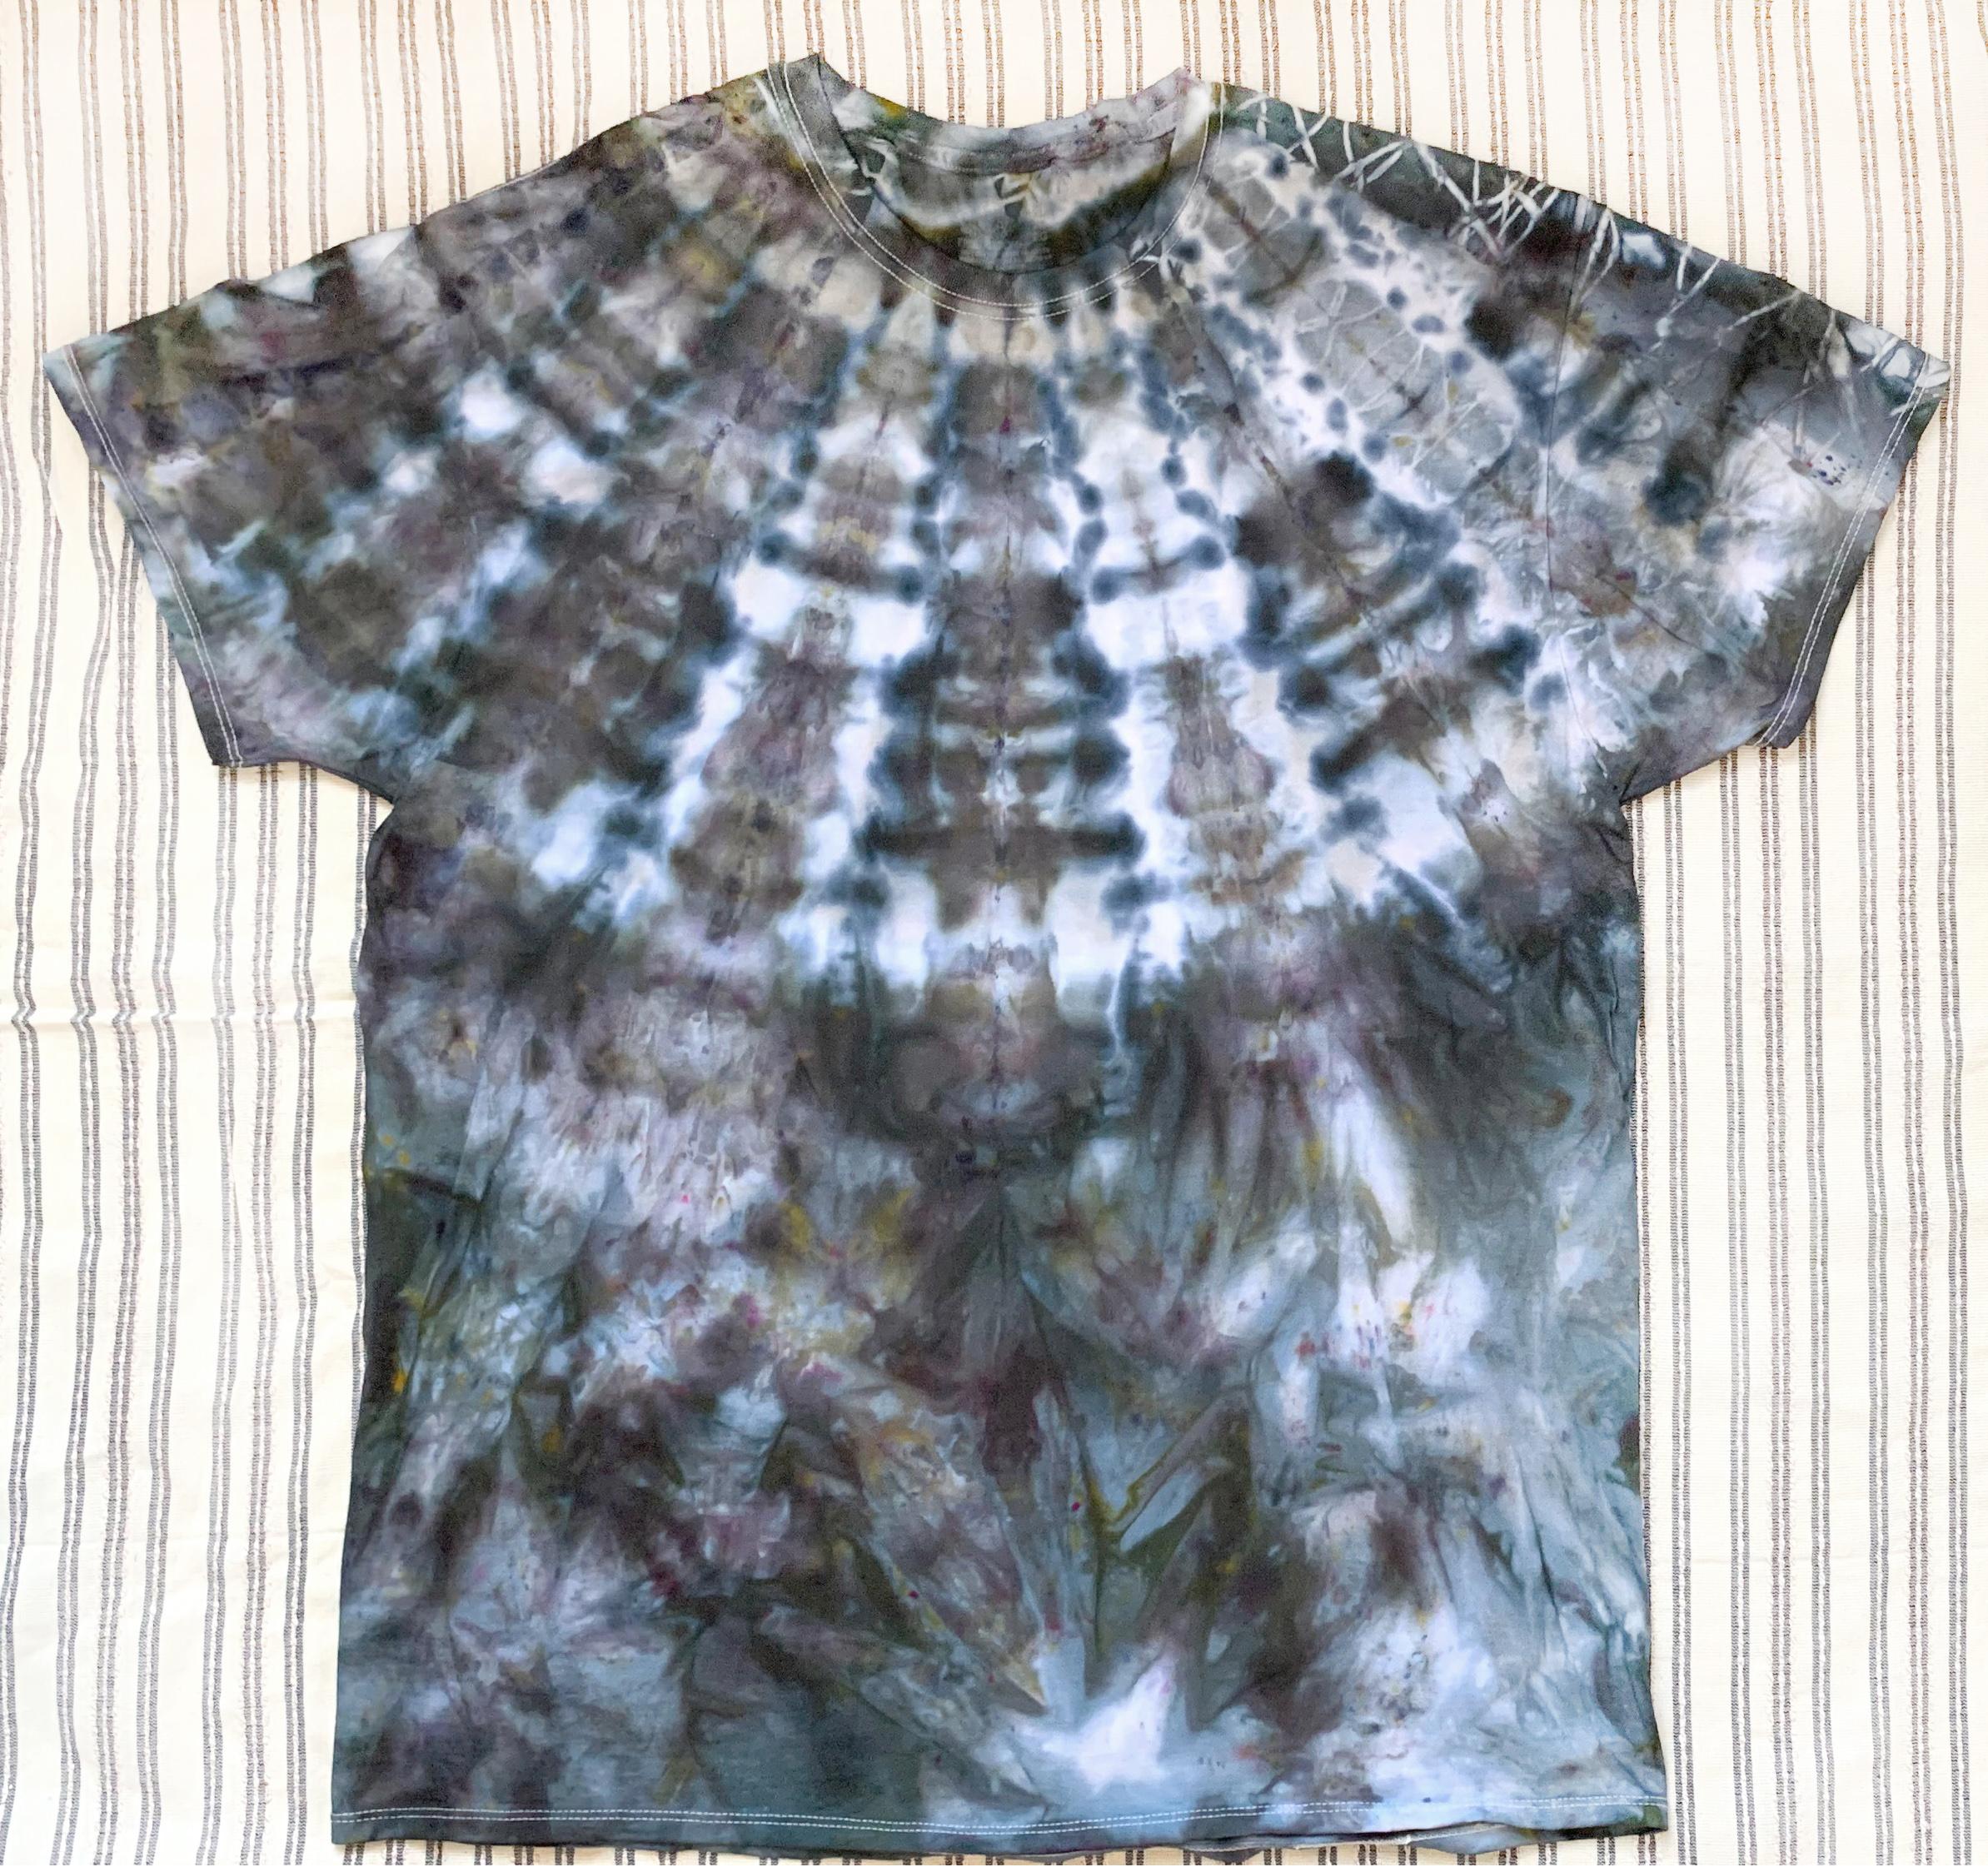
1. Intro to Ice Dyeing and Project: Hi everyone, My name's Catherine rule. Welcome to my Skillshare class about ice dying. I am a textile artist and designer and YouTuber based out of Brooklyn, New York. And I am so excited to share with you step-by-step instructions of how to do ice dying. Today, I'm going to go over how to make this shirt, this pattern on this shirt, and tell you how I got these colors. So believe it or not, this is actually achieved with just one color of dy. And that's one of the really cool part about Einstein. So I'm going to do step-by-step instructions for you and show you how to get these results. So stay tuned for the next videos.
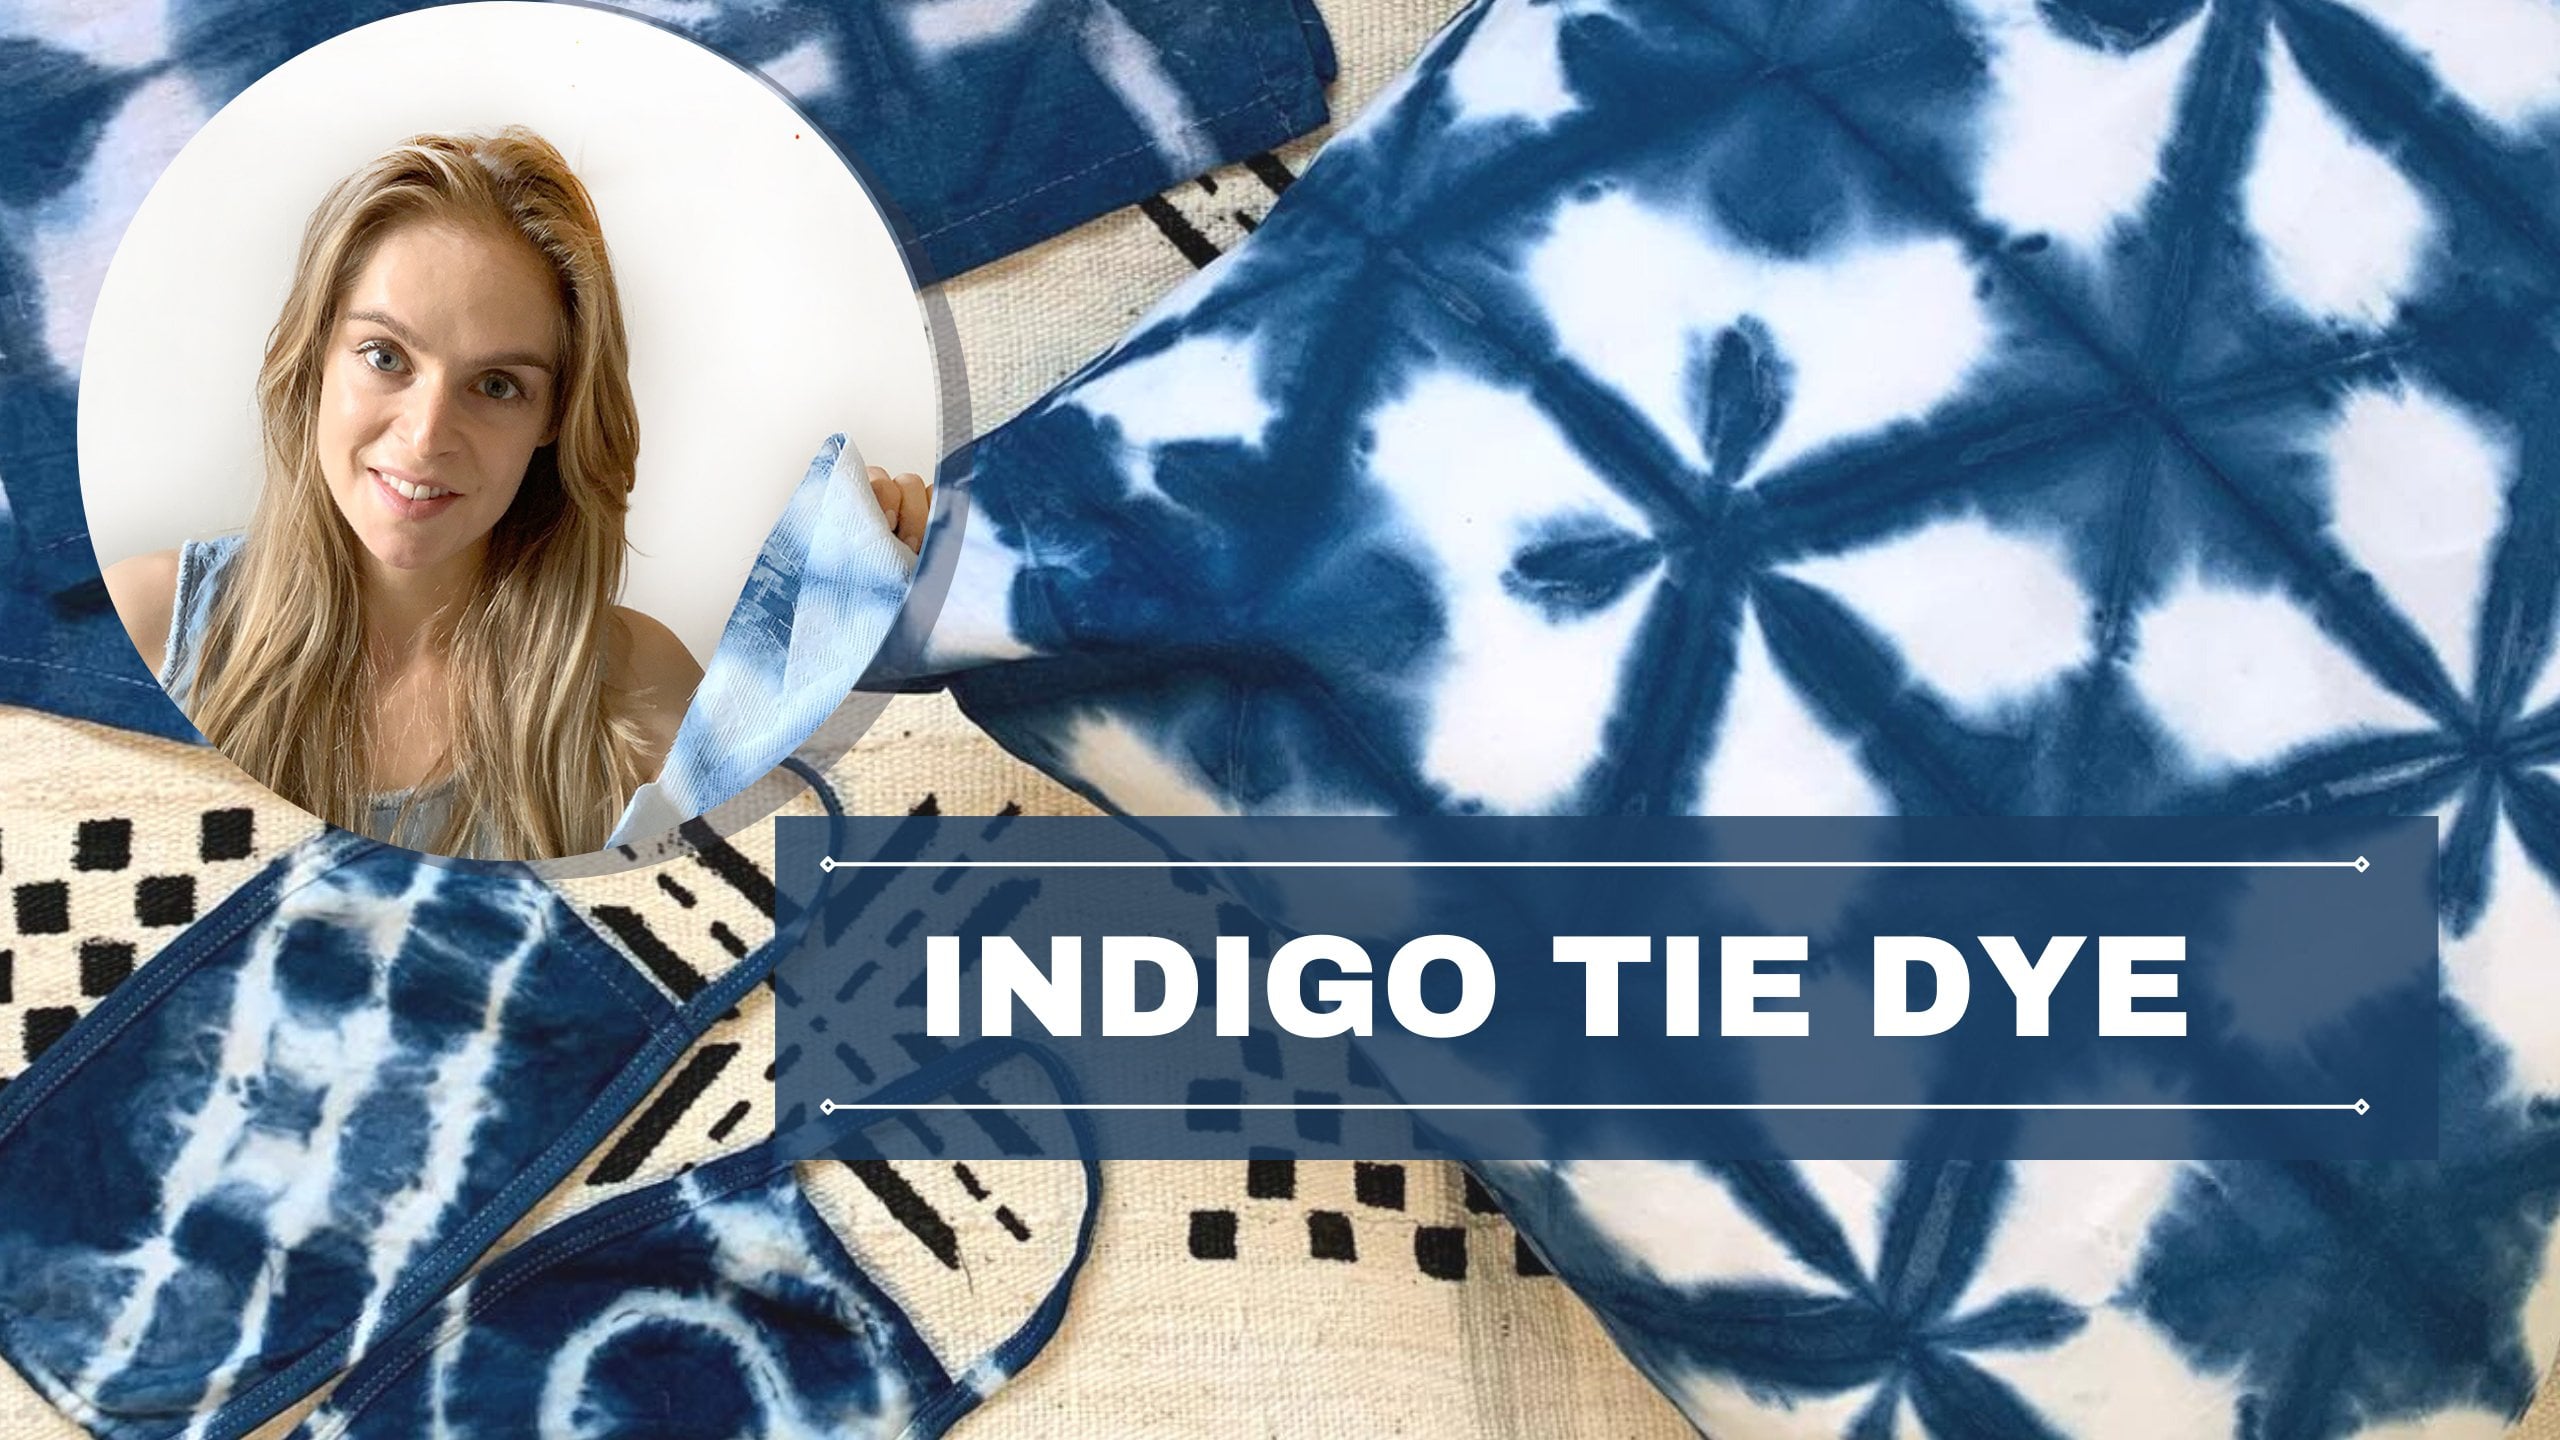
2. What is Ice Dyeing?: So in this video, I'm going to explain to you a little bit about Einstein. Einstein is a really cool way of doing tie-dye. And instead of mixing the dye with water and shaking it up and applying it with a squeeze bottle is applying the dye with powder and then putting ice on top of it and allowing the water to melt into the powdered dye. So normally, when you're mixing up tie-dye, it's one color and you mix it with water and you shake it up and it gets mixed really well. So no matter what color you're mixing, it's always the same. But with ice dying, you mix it with a slow release drip of the ice. So it slowly mixes with the water. And as you know, most colors are made of multiple colors. And when the water starts to hit the dye, the colors split, which is a really, really cool phenomenon that happens only. And Einstein and I can show you on this piece of fabric what I mean by the colors splitting. So this is actually just one color, like I was saying, this is Raven from Dharma trading and it's a black color, but as you can see, it has multiple colors. It has blue that has purple, that has grays. Which is really, really cool. And it gives the shirt a very sophisticated and unpredictable results. I just love Einstein for this reason. So that is basically how Einstein works. And there's a few different techniques that you can use for Einstein. The first one is called on the rack, which means you put it on a rack above a tray and you put the ice on top and it starts to melt down through the tray or the screen or whatever it is that you're using. And the dye will go onto the fabric as it's passing through the screen. This will give you a much clean, cleaner look and a lot of negative space in your piece. The second way of doing ISI and called in the muck. And that means you put the piece in a tray directly and then you add the ice and the dye on top. And then you allow everything to melt. And it forms like a pool of sort of like a weak die. And you let your piece sit in that die for 24 hours. This piece here was done in the muck. So it has a very saturated look and it got quite a lot of dye. Both ways are right. I'm gonna be showing you how to do in the MC today and they just give you a little bit different results. Another way that you can do a variation in Einstein is by putting the colors directly onto the fabric and then putting ice on top. So that's going to get deeper into your fabric. Or you can put the ice directly on your fabric and then sprinkle the powder on top of the ice, which will then mix and fall down through the ice and onto your fabric. So this one I did with the die on top of the fabric and ice on top of that. And I did it in a tray so that it could sit in the pool of dye for 24 hours. So that's what I'm going to show you today. It's just a really fun, cool way of dying and the results are always really fun to take out. So I hope you guys have fun. And now we're going to get into the supplies.
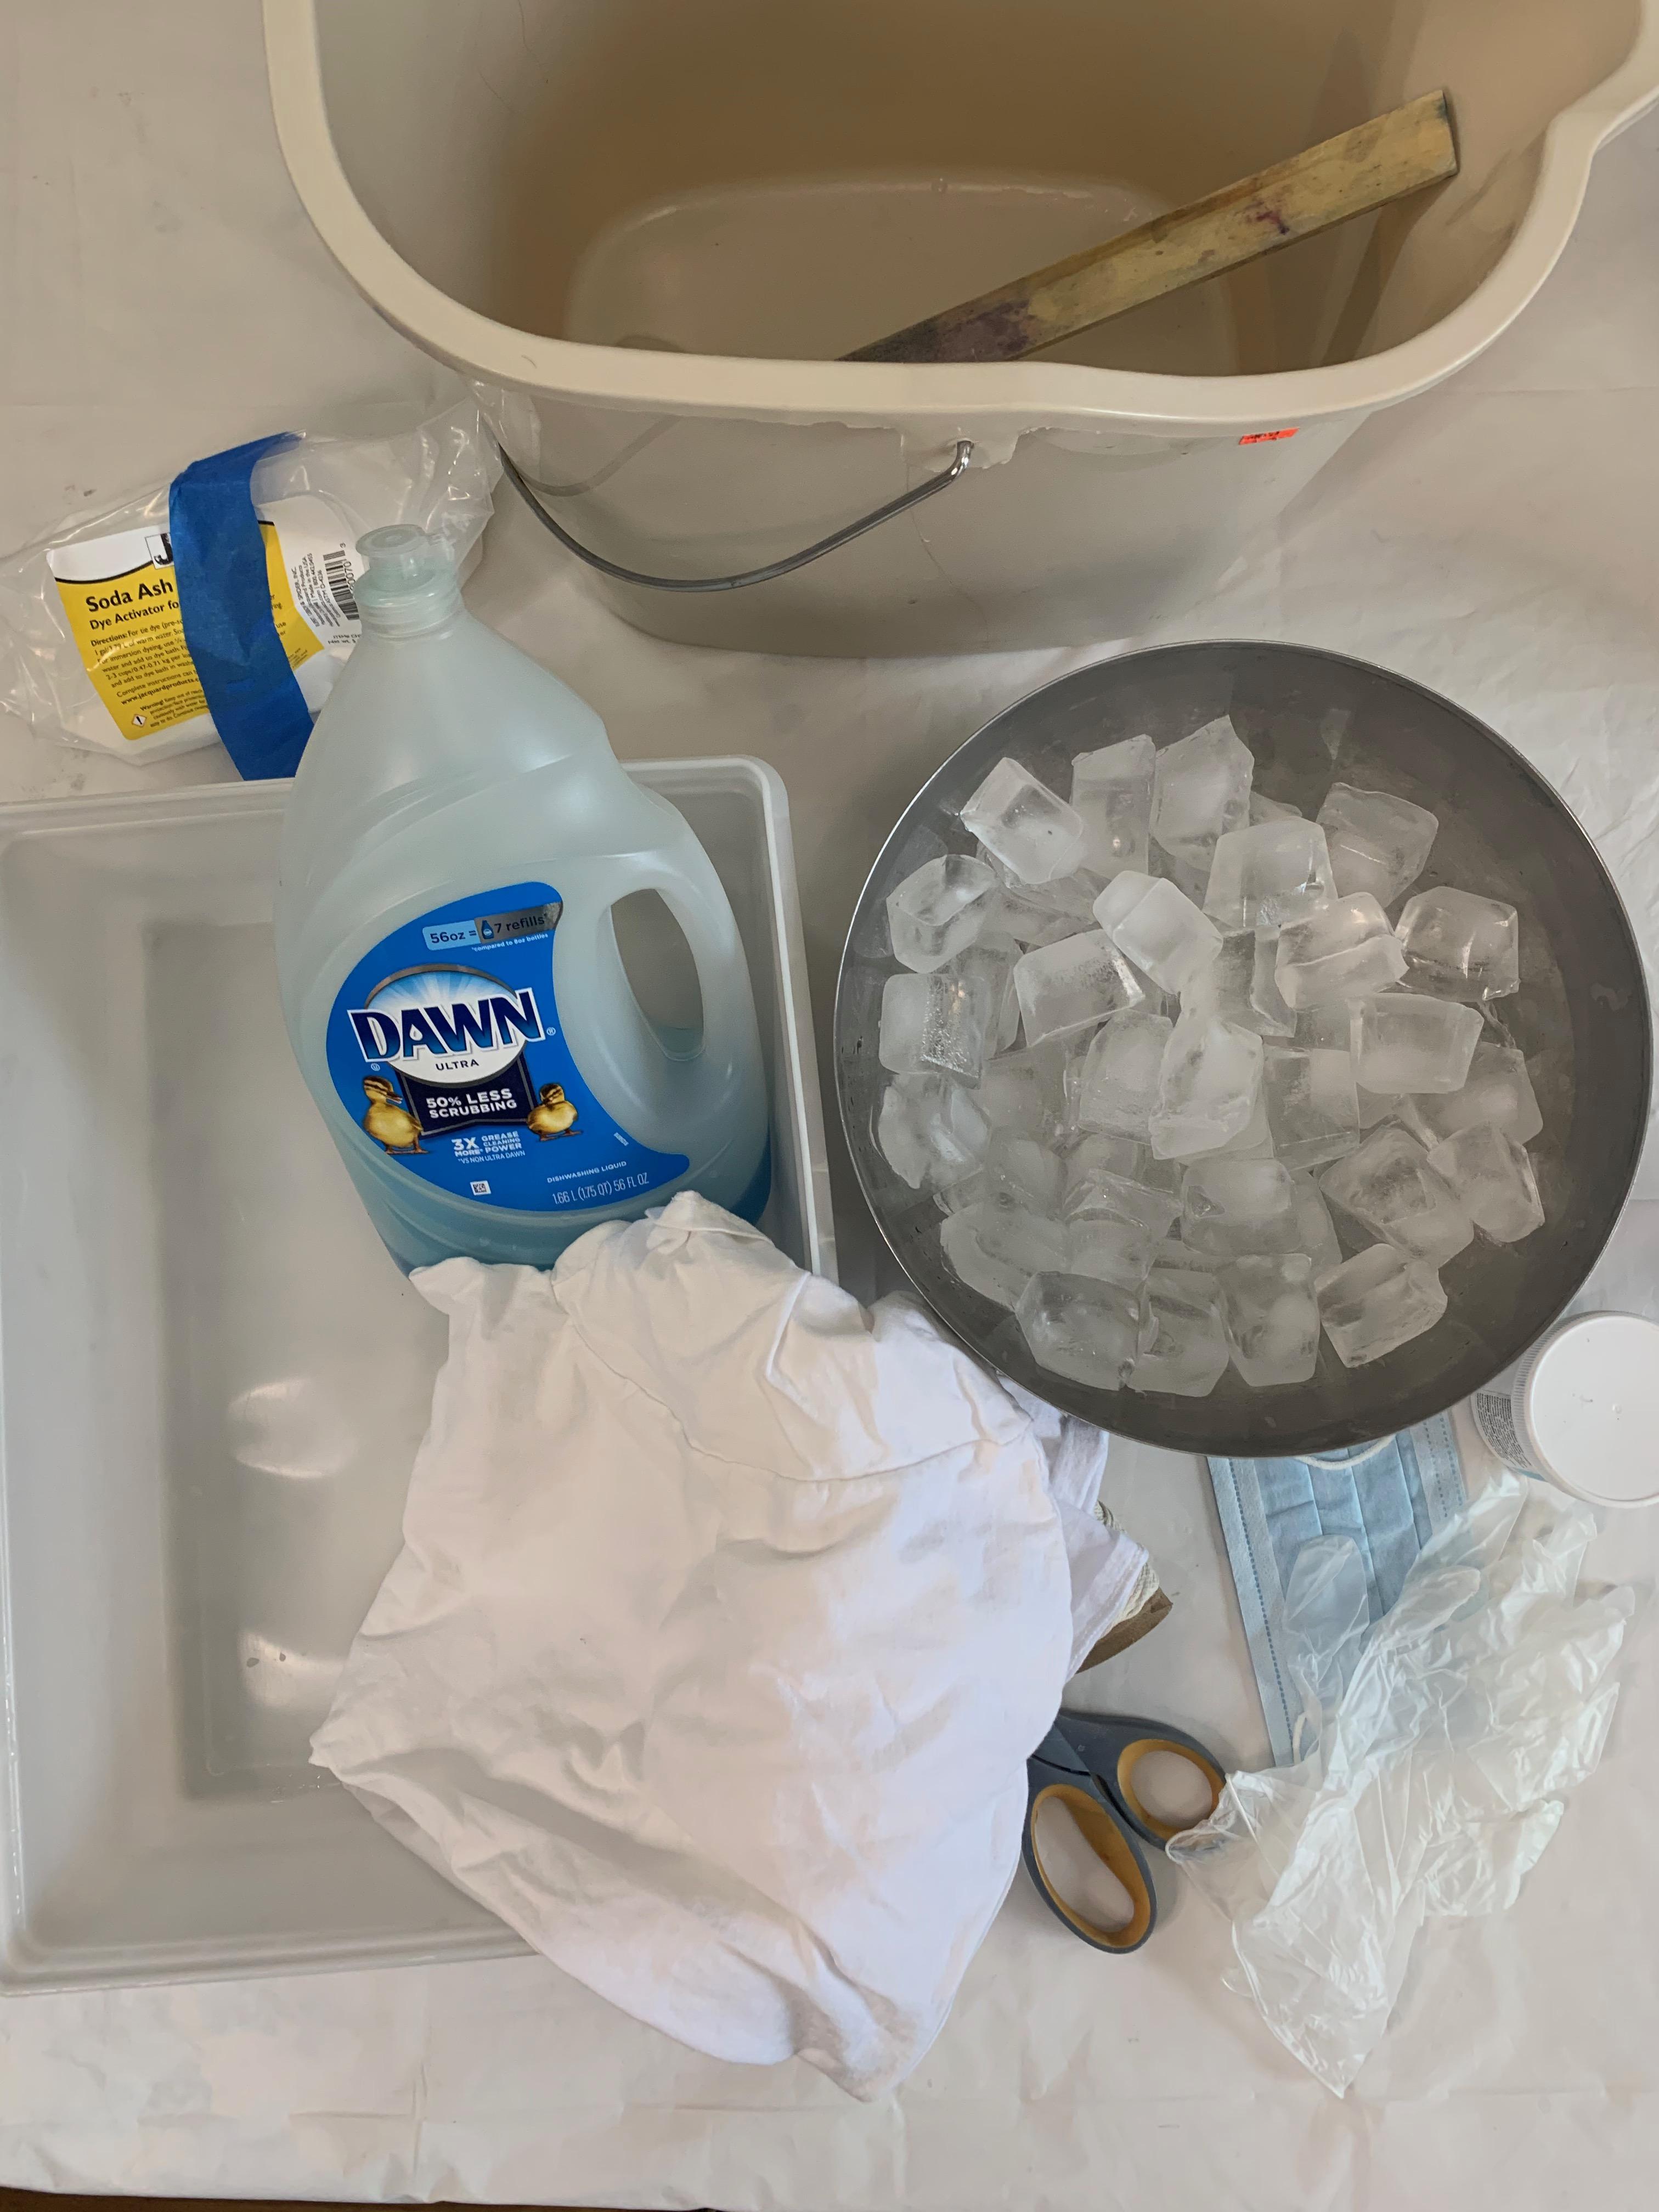
3. Supply Overview for Ice Dyeing: So first you're going to need a cotton T-shirt. Just make sure it's mostly cotton if it has a little bit of spandex in it. Okay, but cotton is the best when it comes to tie dye because it is going to take the die really well and it's going to keep the die after you wash it. I mean, you should pre-war SHE your t-shirt before you get started. Whenever you're doing any kind of dying, you should always pre wash everything. The next thing you're going to need is soda ash. So you're going to need about two-thirds of a cup of soda ash. And soda ash is going to prep your fabric for the die and it's going to help the dye stay onto the fabric. When you wash it. It's the secret of getting really nice, beautiful colors. So you don't need that much, but you're going to need two-thirds of a cup or so of soda ash. You're also going to need water and a bucket to mix up your soda ash and a stir stick, then you're going to need your die. So this is Dharma trading, Raven 200. This is a great color that splits, there's other colors that splits some off the top of my head. Our shutter talky, brushed steal. Those are really nice colors that split. You can try all different kinds of colors, but this is the color I'm going to be using today. Then you're going to need a mask for when you are working with the guy. I always like to wear a mask just to protect my respiratory system because the dye is powder and it can get in your nose. Then you're going to need some rubber gloves for handling anything with soda ash or die. Always wear gloves. So I like these gloves. Then you're going to need string for tying up the T-Shirt. Then you're going to need scissors to cut your string when your time and to cut the string apart after you're done. Then of course you're going to need some. This is about six cups of ice maybe, depending on how big your t-shirt is, you might need more or you might need a little less, and you just want to make sure you cover your t-shirt. So I like to make sure I have plenty of ice in the freezer before I get started, so I don't run out. Next, you're going to need a tray for putting your shirt in. This is a plastic tray, it's about 17 by 11. And you can also get like a tin tray from the grocery store. And they sell those like, you know, lasagna pans. You can use something like that too. This is plastic. I just like to use this over and over for all my dying projects because it's super durable and easy to clean. And then you're going to need some dawn to wash your T-Shirt after you're done, dye in it, you don't need this much. You only need about a teaspoon or so. It's like very strong obviously, but I like using dawn for Washington tie-dye. So that is all of the supplies you need to start Einstein. And in the next video, I'm going to show you how to fold.
4. Folding for Ice Dyeing: Now it's time to fold the t-shirt. I've washed and dried this t-shirt to make sure all of the grease and dirt and sizing, anything that could be from the factory is off the t-shirt and I'm going to line up all this seems as best I can. I'm going to start by folding it on the center front line. And that is going to be the first fold I'm going to do and I'm going to flatten out the color and start to fold a triangular sunburst type of shape coming from the color and down through the body of the t-shirt. So I'm going to accordion folded it, which means going one direction and then going the opposite direction. Now I want the color to be kind of a point, which is little tricky because it has the binding on it. So I'm going to just do the best that I can and just sort of press it with my fingers. So I have the full established on one side and I'm going to turn it over and do the same thing on the other side. So I'm going to Accordion fold the other side into the same shape, sunburst triangle. Just going slow and making sure that it's all laid flat. I'm going to work the sleeves into the triangular sunburst. And I'm going to tie string from the caller to the end of the sleeves. So that's kind of a mark that I'm going to use when I'm starting to bind. I'm going to take my string and I'm going to start in the middle point between the color and the end of the sleeves. And I'm going to just tie a knot in the middle and leave a little tail. We're going to tie it really pretty tight. And I'm going to start to wrap the string around the triangular shape. And I'm going to come up to the neck line. And then I'm going to come back down and just wrap the string around it very tight. And once I come to the middle point where my original naught is, I'm going to go past it and keep wrapping that string around until I get to the bottom hem of the sleeve. Once I get to the bottom ham, I'm going to come back towards the center point. And just keep wrapping is tight as I can. Going to keep going back up just to make it as tight as possible. Because I'm going to let this one soak for a long time. I want it to be really tight. I want to get a good resist, especially at the top. So now I'm going to trim my string and tie it off with that tail that I left. So now it's all ready and you can see that the bottom of the t-shirt is loose and the top is completely tied up. So that's gonna give you the pattern at the top of the T-shirt and a little bit more of a free organic dye distribution at the bottom of the t-shirt.
5. Mixing Soda Ash and Prepping the Fabric: In this video, I'm talking about mixing up the soda ash and the water. You're going to need about one gallon of water and two-thirds of a cup of soda ash. Soda ash is going to help get the fibers ready to receive the dye. And it's a really important step for getting brilliant colors that will stay on the fabric after you wash it. So I'm just going to mix it up until it is completely dissolved. Keep in mind that you can save this soda ash solution and reuse it for multiple ice die or tie-dye projects. I always have a bucket of soda ash solution in my studio that I just keep for projects like this. You can see it likes to kick up at the bottom, so just make sure you get it nice and dissolved and just keep stirring until it is completely dissolved and then you can add your t-shirt. So now it's completely dissolved and I'm going to put my T-Shirt into SOC for 10 to 20 minutes. And I'm wearing my gloves because I'm working more closely with the soda ash. Make sure to wear gloves and wash your hands when you're dealing with soda ash.
6. Adding the Dye and the Ice: After my t-shirt has soaked, I will set up my dying station and this will have to be sit for 24 hours. So make sure to put it in a place where you can just sort of leave it, maybe like in your garage or something. You can see I have a drop cloth down and a tray and I have my ice close by and my dy. So I'm just going to take the piece out of the soda ash and wring it out and then start to arrange it in the tray. So I want to get it all sort of in the center of the tray together because I'm going to have to put ice on top of it. And I want everything to be sort of central. So I don't have to have ice everywhere. So I'm going to make sure I'm wearing a mask when I'm handling the powdered dye. And the next thing is to put little bits of dye onto the wet fabric. You can see I'm just using a plastic knife to apply the die. I like using a knife better than a spoon because you can get less on the knife. It doesn't sort of clump as much and It's just easier for me and you can get smaller amounts on. This die is really powerful and a little bit goes a long way. This amount of dye that I'm putting on is going to be actually very, very dark and saturated. So just keep that in mind. You can always add more dye to as the ice is melting if you think that it needs more. So, you know, I would just be careful not to put too too much tie on. So I'm just going to keep putting it on a little bit at a time and sprinkling it all over the fabric. And like I mentioned before, this is the technique where I'm putting the dye directly onto the fabric and then putting the ice on top so that the die can really sit on top of the fabric and melt into it. So this is going to give a very dark result. If you wanted less dark results, you could put the eyes on first and then put the dye on top of the ice. So I just wanna make sure I'm not wasting die and I'm going to just pick any up and put it back onto the fabric. And my focus is to really make sure that the tied up part of the t-shirt is getting enough dye. And the part that is free at the bottom will get plenty of die. I'm not as worried about it because the water's going to run all over it and it's not tied up, so it's going to get plenty of dye on it. And I'm going to kind of allow the ice to melt and give it that natural look. And now I'm going to add my eyes. I have all my ice and a big bowl by me. And I'm going to just carefully add it on top. I want to make sure it gets totally covered with ice. And I have some extra store-bought ice that I have on hand just because my freezers small and I'm going to cover it completely. I want to make sure I have enough ice to completely cover it, but I don't want to put too much ice. It's going to melt and dilute the die. So if it's too much water, it's going to make the dye solution weaker. The next step takes quite a lot of patients. You have to wait for the ice to completely melt. And I'm going to let this sit in the dye for 24 hours.
7. Revealing the Design and Laundry Instructions: So it's been 24 hours and my t-shirts been soaking in the pool of dye. You can see how the ice completely melted. I'm just going to wring it out as much as I can. And then it's time to start to reveal. So I'm going to start cutting string with scissors and I'm being very careful to not cut the T-shirt. It's really easy to accidentally cut your t-shirt, so be careful when you are opening it up. And you can see I'm working on some scrap paper that I have so that I don't make a mess in my studio space. Once I get all the string off, it's time to reveal the resist. And I'm so excited to see how it looks. It's always a bit of a surprise. Each piece is always a little bit unique. And I think this one turned out really, really awesome. It's really dark right now because it's still wet and I'm going to rinse it and some of the excess dye will come out. So it will look a little different once I've rinsed and washed it, but I think it looks awesome. So I have rinsed this one with cold and washed it with hot and use Dawn. And then I dried it on hot to set the colors. And you can see how the colors have split, and it looks really, really cool. The bottom is a little bit more free-flowing and the top has that resist pattern. You can even see on the shoulder some string marks which I love. So I think it turned out really beautiful. Be sure to add your projects in the project section. I love to see what you guys come up with. You can check out my other videos for more inspiration. Thank you guys so much for watching and I'll see you guys next time.
 Catherine Ruhl, Textile Designer and YouTuber