Transcripts
1. Class Intro: Heller. But the end Welcome back to another course. My name is Gena, and in this course I will show you how you can create this ice cream character with under 2.8 Ito. So in this course I will show you basically Knicks of the Model Inc Later on, we'll apply. Materials took it. And also I will show you and teach you how you can make this character from scratch. So stay till the end. Because in the end I will show you also how you can create background for this character using compositing. And I will show you how you can ended the whole scene out. So let's begin.
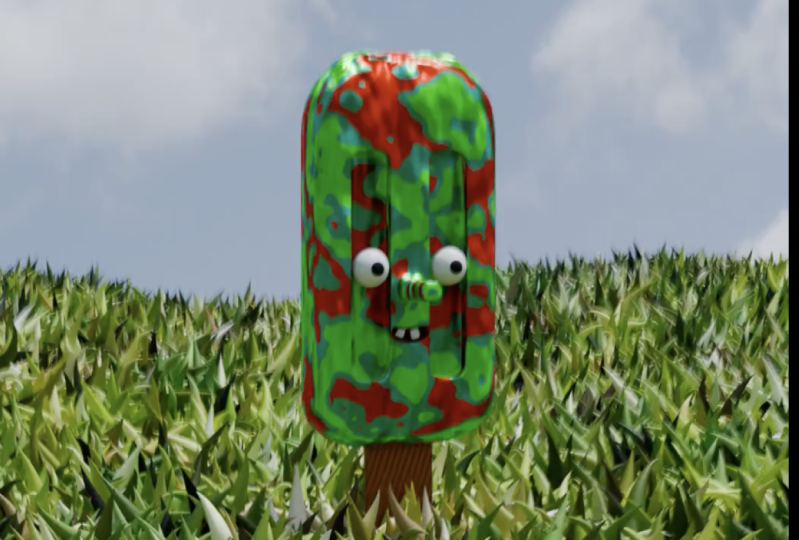
2. Modeling Popsicle: everybody and welcome to our first idea. So first thing that we are going to do, we need to open our blender. And here you see the time or Qingqing under tow by eight to and difficult to get any version above decisions. Get it because it's really it's usually the best of work. Late story, because developers are fixing issues that are having the previous surgeon and also added there adding new features. So here, under new file, I'm going to get, you know, general violent. Here you can see that they have our our different scenes without default Europe in the middle. So before start debating, getting thinking, wonder to turn asking guests all right here to see but tumbling. And I'm going to get it off my default cube. And now we are going to start working on our obstacles so that the first thing that they're going to pay it in the street So Popsicles really needs toe Go. He stopped photographic you for now on with shift. Today we are going toe adds circle. So right now I'm going to zoom in and with death I go in the boat so we have you need only half off this circle. So I'm going to select all of these. Worthless is on the side also, if you have anything tracked. But sisters go here, jacket and I'm impressed X and delete. Those were just so right now with the A ever select the the right side that I'm having and shifting de located on the X by pressing X And now rest era by and 180 So air y and 100 just by 180. So like this and now I'm going to marriageable this. But first I'm going to go because I want to have some some let the obstacles. So right now I was like those two over teaches and I pressed f and now I think is pressed at the same, amputated his left everything and pressing. We'll feel those those were disease together. And now we have that the trans shaped we need for our obstacle. So now we need sickness on it on it and going in front of you with beginning stewardess down just a little bit. So something like this and we created our popsicle. So now we need to travel. Those just just a little bit. So I'm going at selection and I'm going just like those two had edges with shift and left click and also need to hold out to select ash Look. And now I can go and rest Control beat toe devil those Or you can go here under bevel and here can just go and double it So just a little bit So we have Uh huh her number off polygons And later. So maybe I just pulled this just a bit more And I think this one is going to be fine so we can go and rest, right? Click and train shading to shade smooth And here we created our obstacles. So now here I'm going to train emits And that's just about this video stating, because the next video, we're going to get a body for our ice cream. So see you there
3. Body Creation With Face: Hello, everybody. And welcome back to our second reading the scores so I could see that we already made our Popsicle and lavished work on creating party for our escape. So first thing that I'm going to do, I will press what, going from 30 dumping fuel and as conceiving to rotate our Bob school because I want to step from in front of us in front of you. So rest y and I did so now it's standing straight, but I want to be rotated toward us. So we will need to rotate it also for 90 degrees on the location and you can see square big . So I repressed us to skill down. So now, for our body, I will add new cute are seen. And here you consider t needs to skillets down. So first up with GNC to Lakhan Z axis and breast us invite to skilled Countywide exist like this and also on the Z. So something like this. Now let's been around to see if the scaling is good. So maybe we should just go ends. Actually, I like how this one how this cube is here. It's going to be good size and now, as can see if you go in edit mode, you can see that we have a low polygon number that you can work with. So I will go in my diverse and here I will add subdivision service. And also we were graced number off subdivisions and I will go also change shading by pressing right click and you could save between now we could see all these polygons and in your breast, right click And here, James shading so strange, so small You could say that now the whole matter became smoke So now in at this multi avago and at some edge loop. So first and all the way down, by the way, can add absolute by addressing patrol there. So so about here something like this is goingto be fine. And now I will go and rest Control And there I've had vertical. So I'm doing that. Let's say by the way, taken increased number off actual by scolding there must feel and degrees it by scrolling down. So what's May to about G for must make four edge Lopes So something like this and our best right week cancel any kind of moment. So now I will go in face election and I will select this face here. This one here and also those two on the back. And I want to have some places on our ice cream. So now I also need to change individual point because I want to suit extruded those spaces inside. And here you can press now, e and just likely both in solely this night way have traces on both our site and now for the boat. We could go and select those traces and cheesy way can pull them up. And also maybe those places as well. And now we will need to add slopes here. So Greece is. But before that I am going to go and add one edge. Look here, cool it all the way. So now I can make in the shape of creases that I want. So something that this is going to be fine. Go also now we can actually start attic actual inside of these some here as best controlling their told the way inside also here. So in all four cases, I want to have the strong bases inside for our body off our guys group. So here, so one inside and also outside Circassian. What kind of shape get just from what link They can go and does It goes now. Everything skated. Don't also X. So we're just trying to get into your good shape for I don't know. We can go and at out and also knows. So here are go and add two x lopes by pressing control and and also ill put down like this . And now with S and C being skilled down. But I need to do media point. So something like this and go to about here, let's say and now I will go in at moves and let this face here and now I just go and all this inside backs reading it. And also add edge loops Not here, but just minutes, year and bullet there also inside and on the outside. Moderate, we can add one actually right here in the middle. And now, for example, we can go and press tree and see and pull this down. So now you see that our ice cream started smiling and that's good effect and just want to be are aiming for so next. But But next year, actually, I forgot. It also had no So Gremel, my middle middle middle actually dedicated. And here also once again get to our troops, Pull it down and the same effect Breast s Z and something like this. So now I'm going to go here. So let this face here that face the delegate And here I knew face. But this time I'm going to scaled down by Jessica's ex. And now I just go and extort that new faces out. So now you can see it. Did he go out nose and, for example, tinkle And there. So we have nose and we have our Maltese. And now, for example, we can go And at one at Look here in the middle today the people You're not touched it. Now I can go and select those two and g and C down. Now you can see that our ice creams start smiling. So that's it about this video and see in the next video very are going to add our goats and also eyes for ice cream. So see you there
4. Face Details: everybody and looked Arthur video in to score. So here consider dedicated body for our ice cream. And the next thing that great isn't to be ice And those thoughts on maybe some Jake bones. So first, let's make eye So are going to be very simple. So with a shift in a tow ad, you ris fear toe are seen. And also I will go e under modify recent I will apply your money. So right now if you go in edit mode, you can breath g and more your you this year to decide. And now you will be immediately having the other ball get Harari on the left inside as well . So now I'm going to press their why Entine xn 90 Because someone said this be rotated toward us. So this endpoint of this year and now I'm going to scale down its tree. I removed in the front and here were destroyed. Find good position for the ice. So something like this and now ever go environ rainbow by addressing Z and going on the left off this fine menu. But this and now our energy and by and I just slightly out. So now I'm going to see if this is good. Actually, let's pull them inside So something like this is fine And I will go out at the moat and I will change Trading shade smart boasts some maybe just skilled this post more down so way Got our eyes dreaming, bringing our mash body part And now we will need to make do it's I actually did with a shift in day I bring new cubed are seeing and also in edit mode So with us I was killed is down and g and by moving forward so again once again I'm going to add a new mirror modifier Because I want to have two cubes with same size on both right And now I'm going to scale this down and I just bullet inside off Come out So something like this and Genc up and best g invited them more site. So once again, the writer to get you are going higher Primo and he will see the But we will need to scale this down. Looks like this on the why and maybe we can go and pull it down in the front after the appeal weaken scale those on the X. So now that speaks to some of you. So let's see how this is looking so far. But because mouthpiece don't have I didn't hear actual up this way. Will need toe pad it Because what have this almost hard surface the edge here. So at that looked by pressing control in there. And actually I'm going to cost it destroyed the whole mash and I like this movie lines around. So I just instead of doing that, I just know those back on so something like this. So now let's mother lows. So I will go in air selection and so, like those to just end with control and be every pebble those two sides, and by scrolling up and down your mouth will you will be able to add more more bevel. So I want those to be almost almost rounded. Something like this is going to be fine and train shaping be smoke And also I go. And here there public this manual I go here under strangled. They did the property center on outsmart a swell. So I have those will be fine and also you go take it and both. So for example. Go and shifting. And here, for example, you can rotate it for 90 degrees, subsides and actually and here breast health and all those up Circuit City that that smiley faces that have and also, for example, on went Kato's and go in edit mode. Scale those down because I have some king loss with this, but this one, I will just pull them inside a little bit. So So so here we created face for our character. So, Doctor, about the street here staking because in the next video we'll show you how you can make this character ice cream in black. There's toe, find a toe, so see you there.
5. Rigging And Weight Painting: tell everybody and welcome back to our fourth video discourse. So here can see that we have created our body angles to the abbot eyes. And I'm going to rename those and also so goods. I believe it's spelling like this. I'm not sure about that. So now I'm going to show you how you can make this scared there. So with shifting a I'm going to bring new images that are seen, so let me just find it. So it's right here. So basically, I will just move the decides. So basically, this is one single bone, and we need to attach these bones toe this body, and with this bone, you will be able to more your character there, and you will have control on off on the moment. But for now, I want to have to bones for my characters so you could see that you have our Popsicle and our body. So for each, I want to have to bones. So I'm goingto go on here under view for this play there on in front. So basically what this option is doing is, for example, if you now move this to the site or anywhere inside of this measure will always see this bone this bone in front of everything. So right now, rest in. And here I just changed the location because I want to be right here in the middle. So but GNC, I pull this down And now if I go in edit mode first and with GNC ever bullies down so like this and here you can see that you can see it's like one of these Mitterrand G You can also for scaling on rotated as well. But for now, I'm going to slow things bone here and in remote. I'm going to pull it almost until the end off this Popsicle. And here I don't need the second bones, and I will do that by pressing E for extruded and Z for looking on the Z axis. So somewhere about here way have those two bones. So the next thing that I want to change, I'm just going to move it to decide we need toe bear our mash before before, for applying this amateur toe on our getting there. So first I'm going to go and I would just hold shift and left click. I'm going to drink all of these together. And the last thing that I want to click is going to be this body. And here I am with Breast Command and J or Control and J. And now I'm going toe during all of these together. But I will need to go back months because I need to apply all of these modifiers it. Actually, I'm going to add subdivision surface on this one here because I want to have more geometry for our Popsicle. So something like this. Anyway, we are going toe add procedural material. Toe this one here. So you don't need to worry about those d smash here. And now I'm going to go and supply big booms. And now, with shift, I would select one scan. Everything like this and lasting has outlived the measure. I want buddy. And now I pressed Monday, Jay, drink all of these together. So now we have one single mesh you can see here. And also I would go under update and I don't like old response. So now you're dressed and you can see the skills one between needs. And now I will go with three and excellent my my amateur right here in the middle. And once again I would just go hand change the allegation bit and G and C, I just pulled this up to be about this This one here and now You can see, for example, if you go on both small, too conceited. Now we can rotate this bone and resentful if you're into this because I created the second bone from this acidity are also moving operable does because we extruding from this one. And if you go here on the relations actually because this is only one single bone we don't have any parent, but basically you can read it this alone But for example, curative this you will not be able to write it Only this the street actually needed. But I want years have actually like more German TV. I want this toe to scratch a little bit, so I needed to change the type of bone. So here on the object I'm going to there on actually have a need to build invented more with a select everything and I just find it so here, if you go are under data properties, so here can see this small guy in this properties menu. You could see that we have Display s a doctor up the head roll, which is three strip here and here. I would just need to change the people. So now we have those two sticks. So if you go now under Boom said things you can see that we have segments. And here on the bendy bums, I'm going to be segments for those And here, Aziz, you go up. You can see that we are having more more segments for each bone. So for this one ongoing needs, for example eight. And now I'm going to select the second Boone. And here, for example, let's go and make IDs. What's making that? I will just go and change this six that much. So now the last thing that we need many toe touch this bone. And basically I was struggling. Now how do it But before that I will show you now how disbanded bone is behaving so you can see that he's scratching and for example, breast I click and subdivide second bowl. So basically now we will have g bones and knowledge and just go and sequential this. And as I over dimension now we can bend those. And that's the fact that and now we need toe touch this bone with our matches. So the way we can do it is going to be very simple. So with the shift, I'll select those tools and so first actually have needs left my mesh and next is going to be our amateur. You need to follow that order and actually going to be opposite. So we need toe touch armature to body, surf, hold shift and first let amateur and now body and with control and be But okay, so first it's like buddy and now amateur and basically with patrol and be I'm going to set this bear to set this Parenteau with amateur rate automatic weights. So here, if you so like, this is going to take a while. But now, if you go in post smote, you can go and scratch It is those two together. And here you see that they're having problems. And the problem here that we have is going to be because we need to attach those some bones so basically undrinkable and select this bone here and now select Nash and you go underweight, basting you can see it that we don't have a boom is no control at all. So if you go under this data property city, see that we have three bones created. So we have this bottom bone. We have the second born and also turn bone, and you can see that we don't have any any bone attached, toe cheeks and also goods. So I'm going to select my second bone, which is bone 001 And here I will go at the remote and the select everything by a by selecting double A and little else, I will select everything. What's linked? So I need to go back. And I was left all of this you said basis. So with the help, you will be able to select those. And here now, breast assign you will touch those with the middle bone. So now this middle bone is controlling all of this inside stuff, and the other stuff is going to be fine for now. So if you're going out in object mode, for example, and select amateur, you conceded Now the whole national is going as it's written. So that's it about this video stay June because the next video, we'll start meeting our character and also later on we will prepare our skin character to be rendered. Oppose it. And so so see you there.
6. Animation: but the end level 50 doing discourse. So here conceded we are done with breaking our character, and our character is ready to be animated. So if you press zero, it will be able to get Mario's. So before start animating our commit our character, we should see Howard There is going to look like and we'll need to set up our camera. So Brazil, you agreeable camera views. So basically, this is going to be rendered. And if you breast shifted great e, you will be able tow entering fly mode and now with the Keeper to be able to buy around your scene. And here I'm going to just go and see how our animation is going toe look like. So I want my character to be in the middle off my camera, and I want to be some do about here, my camera to be like this and if you go under camera said settings able to switch between cartographic and perspective and here labeled stranger focal length, depth of field as well. And so so, for example, if you go under you poor display and see the space part out, you can go on decreased one and now you be able only to see. But your camera is seek, not anything. That and also you can go. And there are some of the compositing guys. For example, turn on center and also, if you want to follow something 3rd 3rd rules and also golden ratio. But for now I would just school enter on my center. There's anyway. It's not about those signs you can see. You can see them, you only to see You can only see the those here in your work, but not in render. So right now I'm just on my over lease and everything is going to be fun. So I want this one to be my my position off camera. So now we can go and start animating car Castor. So I will select now amateur and impose more. I will be able to go and animate are getting so I'm going to pull this up a little bit and you can see that you're having the 250 fans. That's way too long. So I'm going to Let's go 40 now. So what Money makes to be 40 and I want to make some kind of loop animation and basically for this character. I want him to jump up and scratch in gear and go back. And I want to be a look. Make lope animation. So with a it was like the whole amateur and I a new location, rotation landscape. So this is going to be in my first friend and with shifting d ever go all the way till the last frame, which escorted fair, and I advance for Toby, this starting position and ending position because we are going to make look. And, for example, if you go into 10 K's fame, for example, we can go and pull this up. Do both here, for example, and Z and I won t to go and just scratch year. So some kind of this moment sent destructive it like this. You can make any kind of moment in the air, for example, something like this and with a averages breast I and it's a location invitation skill, sir conceded. Our character is dropping cup, but I think it's going wayto being behind Change that. So I will go and leave this middle frame. So once again I put up, I just go and bend it here, so I pressed. Enter. You can also fast couple, and if you want to bend it more actually, that's, uh, gimble in irritation. If you dressed up there so it's not, it's not following your your view. So something like Let's go ad you can view, for example, Here is the best seat it's I want This stopped Part B event this year and let's start this one soil breast I and he said, Application, rotation and scale. So now, now it's looking much better like this, this kind of moment. But I need to change my camera. Also. I want this one to be with more in front, but for now, you can see that we have this kind of moment. Our animation is good, but it needs some some life in it, and the best way to add more life to our animation is going to be anything can camera. So I will go out of those most in object mode handle sudden on my are the lace on the first day, I wanted this to be the position off my camera, also in the last frame size, duplicated by pressing shift in de and on the 28th frame, for example, I can go and move closer and pull it up as well. So something like this and here I can insist another keep rain. So now you can see that we have really cool moment for our Jack there, and we are done with our animation. You can also, for example, go both modes and here, Rangers stool. You cannot select the amateur. And here, for example, we could change the interpellation Most So, for example, Incan making leaner. So now it's perfectly perfectly looking. There also do the same for camera Isabella. So in a multi go and select camera with D, you could make interpolation moat cleaner. And now you go and check over lace to see if the information is good, and I think we are done with an immediate car character Later on, we're going to turn on also after feel, but we'll do that at the end with add, he had, uh, arms deals. So that's it about Studio ST June, because the next video we are going for on deals and prepare our animation to be rendered and also to some proposed. So see you there
7. Applying Materials And HDR: everybody and welcome back to another video in this course. So here concede that he already animated our scene. And now we need some lights and or some material to render this out. So before applying material, I want to have lights on my scene and change some of the setting. So first I'm going to go under rendering you. So right now I can see what's going to be rendered. And for my render engine, I'm going to use cycles because I want to have more quality render. And here I will just turn on also emotional as well and under layers, properties of property, essentially or actually under a beautiful properties. If you go all the way down, you will be able to see the nosing. So also, I'm going to turn on that. So now, as ever decide to, we need some lights and here you can see Does he have are buying like that. We had from the beginning of this course, which is the vault, and I'm going to get rid of its and right now you can see that they don't have anything any light. And for my lighting, I want toe use HDR So best way toe find three d rice is going to be a dear heaven. So you can go on this page and search for HD rice. And here it can use all of these HD rise for your sees. So for my scenes for my scene, I'm going to use this sunflowers this nature. And here you can see the preview of materials that you have in your seat. And of course, you can play with others. Other HD rise as well. You can pick any of those and I got mine. So I'm going to go back in a blender and here I go under shading so here conceded we have object and we need to turn the world. And if you zoom out, you conceded we have world output and also background. So right now, with a shift in day, I'm going to find environment pictures and I Blackett bugging color to color. And also here I would just search my age. Did I end? Open it like this. And now if you go on the rent review, you will be able to see to see the age dear. I saw also Now I'm going to search for texture guardian and also for mapping Note. And now I'm going to like in generated on director and also vector to vector. And now I'm going toe Remove the another one that I had below And here now, with this note, you will be able to write it around your your age, dear I and you will have control on your lightning. So here I like the way how my default people in my remedies it's like turning off my asking character. And now I will go under under this trading bold space here, go back, object. And now I can start buying material. So first thing I will need to select my ice cream and I'm going t o applying new material. So now if you train to this base color to see that is supplying on all material which we don't need for now. So I will go back shading and here I'm going to use this'll Medea this material slots for filling up the whole national a different kind of material. So flip for, uh so that we need to go in as a remote. And now, with we're going to start, for example, that start with the ice. So for the ice, I will need to select them first. And I can do it by pressing l. And also I want does Tobey the same color. So I would best l to select everything leaked Andy considered to have separated from mash in that multi press l and I want those to be white material so great a new material. And here I will just press new and I will assign that new white base material or two. Now I'm going to de select everything. And now we see I'm going toe just paint actually there on face election and I will just go and select those those circles here and here I would get new material and this one is going to be just like basic black material. And you don't you need to assign this material to that. So now I'm going toe de select everything and next thing that I want to change things, to be this inner side off, off them out, so first thing exceed it is going to be a little bit hard. The work in this insight and the best way we can do is going to be to hide those by pressing age. And now we shift and left click and those out. I'm going to select this inner inner, but so these inner loops and I want to apply black material on it. So I would just go inside and feel it here. So you need to be careful what you are selecting here. Just go back. And also now you can go and prophesy, and it your most really will be able to case the circle. And you can now just pay their around and maybe also Despont and see if you have more somebody to zoom in. Maybe the last one is going to be this one. And I want this, you know, in her mouth based to be black. So actually conceded we have here in first up front or photograph you we don't need that much. So I want this only to be a black. So now you have breast side. You can see that we have, like, inside off the mound. So now let's go back again and I will de select everything. And now for Jake Bos, I'm going to apply another Medea So breast new. And here, for example, change for my color toe. Let's say some some red color like this and I just need to press a science. The next thing that I want to work one is going to be body parts of a select just l And here I was just a sign new material to it. But actually, the best way is going to be work on this first basic material that I created and this new material I just used for my Popsicle. I will create a new material and just press a sign. And now I can work separately on each of these. So for my for my extreme material, I'm going to use a couple of nose to increase the quality off my basement deal. So now I'm going to go on the rendering view, and he could see the preview of surrender. So if you press zero, you'll be able to enter in camera view, and now you can see the whole the whole scene. This is going to be weight around. We are going to work on a positive, but for now is going to be fine. So we need some more details toe for our ice cream and Now I'm going to do that by searching for wave Dexter with the shift in pay. And now if you plug in this to base color, see that we have This looks like around our ice creams, and people use that. That's to change some color sunny. So right now I search for color. Hammer toe adds more color street. And also I need rescue troll days toe. Bring a dash bond for them than I think, because I have my Wrangler note. Adam. Also, you can go under Ed us, and if you don't have it, you can just search for node Wrangler and turn it down. And this will basically research work. Oh, so, for example, mouth select and texture that you have and with control T will be immediately important mapping in Texas. Coordinate, and you can see that we have different sections that we can play with. So, for example, we can play with the scale and distortion is felt. But for now I'm going to search for some new color toe our measure. So, for example, let's find, for example, some red color and maybe some some orange as well. I'm going to keep this one as this which, despite maybe it's something like this is going to be fine. And I have a search for beast blind. Now I'm going toe. I actually haven't need toe have constant. So now I have I'm having those card hard, uh, hard surface hard edges instead of linear. So basically, with constant, you will be able to have the same effect. And here this one, I want to have to be black. Toby. Right. So I have a Baldwin there and I just waving those, like So. So now I'm going to decrease the scale. So I want to have your scale. And now if you go on the rotation, you will be able to write it your picture around, but for my language, just go back. And they're my increased scale on display texture because that's going to be much easier to write it Europe texture. So I want those to be let so like this and now you'll be able to play with people. Will the salutations so more And now I believe that those straight And now, for example, if you please scale, you be able to see different deals. So I want those two, something like this is going to be fine. And also, I need some distortion, effect and details because I don't want perfectly straight those to be. Maybe something like this is going to be fine. And actually, I meant keep it as this so something, ladies. And maybe I'm just going to switch colors here now, Now, now it's much better. And here, for example, I just distortion. So something like this is going to be fine. And we have done that here and now. I just over my roughness number, and I just base also speculum this a little bit. So I'm having those those kind of reflection from my skin not told the way. But for example, 0.1 around there is going to be fine. And now, for example, you can go and search for the displacement note. And now, if you plug in this displacement here and search for some nice texture now you can like in this got a nice texture toe height, and here decided it's affecting the whole the whole. It actually displays the whole measure just a little bit because we don't want perfectly straight state mash, So here I'll just go and decrease scale 20 and now withholding shift. I just add a little bit more nice there and here I just as well, for example, a safe. And now I'm just playing a game here with the scale. So here I would just write down by an 01 and let's zoom in. So it actually this way too big scale here. So what? Love it back to five. And now it's Dr Better. Is he here? Lost is going to be are Popsicles And here, for example, we search for some. It's a color, some, some something with being brown and yellow. So let's say something like this is going to be fine. And, for example, we can go and search for the same wave lecture and it's called Qala Ramp. You will have controlled for how this big picture is going to behave so like in discolor Theis texture and this one together and also plugging toe basic over here and now I just go answer basket lt here on this faith extra So I bring napping and extra corden together here and no, I just changed the following year, so I have a little bit more different shape for this year, this Popsicle. So let's find some dark brown and, for example, you go and increased scale here. And let's strange discolor here as well. And let's also add distortion. Not that much, but just little bit. And I like my unlike how this particle is looking now. So let's try the other most year. I think the linear is going to be fine. And also, for example, e paving station here and you could breast. Plus you'll be ableto add no Hillary as well. So, for example, add some some yellow did you find? So let's see how our jails are looking so far and maybe we can go and the case make it more doctor district bones here and everything is ready to be rather so that it about this video ST John, because the next video we're going toe compositing this and prepare this for final rendering. So see you there
8. Final Render Settings And Compositing: but the anvil backed are lasted in discourse. So here can see that he added added extra gear I and also materials go our to our character . And now we're going to prepare our our characters to be rendered and our animation as well . And also we are going to do some compositing. So first thing that you need to go, we need to go. That we need to do is going to be under under properties to change some of the setting. So here I sit here, dent on motion blur and under feel. I'm going to turn on transparent. So right now you could see that our background became transparent. Also, for color management, I'm going to change. Look to medium high country. So right now, you consider to have a little bit more contrast also in play with other ones as well. So I'm going to leave mine to be medium interest, for example, it can also play with the curse so you could turn on this option as well makes tractor or doctor and so on. But I'm not going to touch that for my render. Next thing that I want to change and to is going toe. I want to turn on my dinner. See data. We should lead for our for our busting. Now I'm going to go put settings. Just just find it. It's right here all the settings and here contains the resolution off your render and the other stuff as well. And now I'm going to change my file form to be a BJ pick, and I will increase quality to be 100%. Now, here you will be able to select your output while destination. And I do have may. I already made my here and now I will just rest except for animation and save It's good there. So already changed that. And now I'm going toe start rendering one single frame and you will need to wait a couple of 70 seconds. By the way, we will use now composting for making our background. And I will show you basic needs off compositing in a blender. And how you can is a great is a great background with some some Blore for your for your under. So deceived that is going to be very quickly because now he's just completing the inside. Then, uh, other parts are going to be very fast and the other determine on the nosing Soviet. You could see that we have high quality and they're here. So even needs to wait a little bit. And now I'm going toe Move this down and I will go on the compositing And here you need to turn on note. So now you cannot see anything, but we'll need to tow ad with shifting a we need you were note, which is this One year and two need to pluck in image to image here. So now we can see what's going on time and here it's like this note You see the whole cameras here. So now I was served for dinner using the nice note. And here this will help us to be knows a little bit more as well. And now I need to search for box mask and this bus messed on box mask. I lose for gating a blower behind. So here I will just go and because the size it so maybe something like this like this. So election squares they're five and their five here and now I would just go and search for Blower and I will change the floor which is passed Gush and I would turn on relative. So now I would just back in this the image here and here complain with the glory. But for that you need to find some colors to see to see it behind. So now I'll turn on this to be here and I will just bugging thesis mixed Note your note so you can see behind what's going on. And here I will just change the color. And you can see that we have this square here because we don't have any any any effect of this goal or know that the edit. So for example, now if you go and visit, you can see that now are below is start appearing here. So I'm off this year to the side and also this one here. So no, you can play with all of these settings. I'm being changed color here. So let's go the best way that you could see the final and the result is going to be, I think, also were not so. Basically this off our note. It will help us to combine this background that we created and also are already rendered layer, which is this one here. So now I'm going to plug in this mix note in off over note. And also I was back in this Denyce notes damages And now I was just working this off over notes toe your note. So you see that this compositing and now you will be able to see the final result. And now we can go and play with color here. So let's try different colors. So we have this floor here and maybe we can go in search of orange, I think one I think I'm going to use some kind of yellow color here for my background. So something like this is going to be fine. And now we are ready to be to render our final render and before stuff rendering here on the render and renders information I want to turn on and you will actually need to turn on this off over note two compositing. No. So, basically, now this off over note will affect the whole whole scene. Also changed background here thesis despite colors we had for our lord. But I want to be mine to be white. First I was more and I think this is with a big some big toe. Decrease it or actually, still a little bit 25 will be fine. And this color here, I'm not sure. Should I use green or orange? Doesn't Mr. Anyway, you can play bands, create your own style and decide which color you use. So I'm going to give this thesis nae nae and non green color here that I have. And now I will go and press fender and rendered animation. And now our an animation is going toe Start ending. So that's it about this course. I hope you like it And seeing the next course by
 Nodiken 3D, 3D Artist and Animator