Transcripts
1. Class Intro: Hello, everybody, and welcome to another course. My name is Dana. Any discourse have will show you how you can model and created this coterie blender toe boring dated toe. So in this good 72 how you can use basic modeling kidneys and how you can use modifiers and what they are Also, I'll show you a couple of evidence that can help you to be better in blender. At the end, we were going to put materials and also use HD rise for lightning car seen. So these courses for beginners, but also more experienced people with blender can use it for exercise. A dent. We are going to have this model which we can use for our both for years, so it to our friends and also use it for our games or animation. So let's begin.
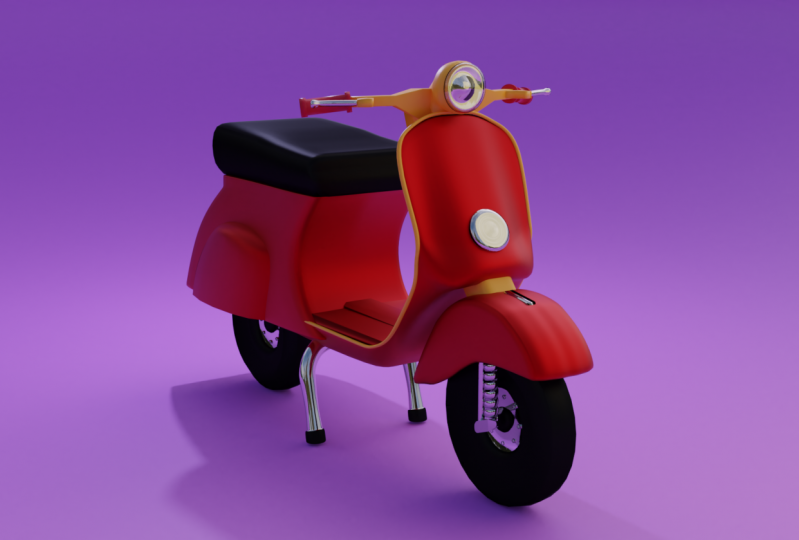
2. Importing Reference Images And Modeling Tires: everybody and welcome to our first deal in discourse. So first thing cause. Usually, let's open our blender and just go full screen and here to see that I'm in 2.82 And if you can get any above version, you you should do it because that's better than the previous one. Obviously. So the first thing has usually located your file under General, and I will get rid off my default you by pressing X and lit. And also let's just turn on my screen test. So right here you can see what I'm doing. So first, I want to have some reference photos. Poor start modeling because it will be easier toe follow some shapes than remembering from our heads. And now but shifting A. I'm going to go and search for image and have a look at a reference image. I also found a couple of image. Did you get from who? You We are just going to use them as a reference. So we just tried to go and search for better Vespa or scooter images and used for references. So right now I I imported this one in front of the graphic you by pressing one. So every time I press one, I will be able to see my reference and this is going to be my main reference image and I'm going toe just decrease capacity. So I will see true, maybe a little bit more about here. I think this and also disabled this picture to be seen in perspective notes, so I will not be able to see it in perspective on cartographic. Well, son, the filters are disabled. This picture for pigs being selected. So now with shift and a let's add those two. But those are just moved him to the side. And as I model, it will be. I will have have them here every time in front of you to see the reference from real really mark bit life. So I also that one more so basically we are going to model something like this. And here we have our the first thing that we are going to model for this Muppet is going to be tires. And here I'm going to change my data cursor with shift and right click toe position where it should start. And now with shifted a I'm going toe, add new let's start with. So it's going to be a circle. And now I will go and find, uh I just work with cylinder and also with their ex and 90 Abla rotated the circle for 90 degrees. So now I have a need to scale it. Inv isil press s. And why in writer to the few. And now I'm going to skilled all the way down to about here. So here I have 11 tire that I hated. And now we need more Juli Armitage to play with it. So first I go in edit mode by pressing Deb and face election. I'm going to delete those two faces us for now. So I'm now having calmly This outline saluted our reference image. So basically, you can see that it's like bent and it's very, very thin tire. So now we need to look in the middle, so best controlling there and here I will increase the number off edge loops took three. But it's calling up my mouth feel like this, and I will accept it to be right here in the middle. So now, without and left with, I'm going to start to this middle middle look and I'm skilled up like this. And also now I can go and let those two. And also I can go and kill them both, by the way, users from whole truth, because you have more control on scaling. So maybe something that this is going to be fine. So I like the way how this turned out. Now I'm going to select everything with a and it's killed down a little bit. And now I'm going to select this edge, look by holding out and left like and also holding shift and out left legs, others. And now, with E. I'm going to extrude doubt. But I cancelled. Try click, and now I can go and skill this down. So here you can see the time already ill educated tire. So let's struck our reference image were not goingto go full detail. We're going to make some style civilization, but this is going to be good exercise for beginners and also for more for advanced users blenders. They can go and exercise like this by just modeling everyday objects and try to make some style there and here with control. And there have gained X loop here and also on the other side. Don't forget that you have both sides so something like this And now I'm going just like this one And, uh, the other one. So those those store So I mean this at Philip here. And maybe this one here that one disliked that. And now I want those to move them to the side. So it's like this one and I would just slightly without also on the other side, something that this will be fine. And now I can go and continue working in this inner part off tire. So I was like those lost edges like this and now in front of the ref acu by pressing one, I can go again e for extraordinary against cable down maybe Once again, Steve down de once again scale it like this and he once again scale it. And here again, actually underneath here more agile upside press here just have to fill those holes. And now I'm going to select things here and let's see, actually, let's go in edge selection and select. I will select maybe this year and falls on the other side, actually left listening for on the other side. We are going to mirror those so because it will be more professional like that. So here I was like this church right on my head and here I just pull out those things now Face election ongoing. Select all of these faces here and I just moved them out with Ji and Bhai. So something like this and also this thesis part here we connects truly doubt like this with a maybe one more time. So just rest here. Maybe started down scared. Don't leave this And here I'm going to babble this edge here because it's way toe shark. So we control be be able to travel it in time with case number of polygons, something like this. And now in the upper terrific you I'm going to delete this bottom half, so I would enable X ray mode and it's very selection. I just go and leave this but half by pressing X and lead over Texas and also this part here . So now, in update mode on vector plight mirror party fire under modifiers. So it's right here and here even needs to select where you're mirroring is going to happen . So see very something right now and we need some mirror it on the X, Actually, some z z X is. And now I'm going to apply this mirror money fire a basic apply in object mode. And here we created our first time. So also, we need some bolts around for this inner barbed and bolts we're going to create. So here can see we have some balls that are holding this inner in the part. So let's zoom in on seat. And maybe we should go and return that mirror modifier because we need toe makes changes. So maybe selection. They just let all these edges and I will just pull them out. So now it looks much better. And also maybe this fun here and the search on those faces here as well on this one here, just like any insight this on go X and X treated for more time. So now we can the mirror applied normal differ. So here vacated our first there, and I want to have some bolts around. So it shifted a let's bring cylinder Taurus Fear with terror and next we're going to rotate for 90 degrees skillet down. And now, with G and C way can go and pull this up with a scaled down and you need to scale this on T y. So this but not that much. Maybe just a bit. And here I want to have bolts around, go a little bit more inside and now in edit mode by pressing tab, we can go there and it s selection. So let's dispatch here and on the other side as well by holding shift and now we control be here to travel this out. And no, we are dessert here and this one here and here We are going to choose extrude region and change our build points to be individual Largent's So if he were to extrude them and also killed him in this a little bit of both side and here you can see that this is not perfectly flat soap when you took fix it. So in edit mode we're going to go and select our tire first and let's just go selection mode and here way are going to slept this edge loop here and this one here actually let's go first on one side, you need to do it with that way. So if you press s why zero You will be able to play this out, and now we will need to do the same for the other side s. Why zero. So now they're perfectly state, as you can see, actually, flat. And now we're need to scale this down. Obviously. Which way? Too big Aunt Bullet holding out. And now, with shifting D, We're going to duplicate this on Dizzy like this. Now let's like both of this shift D. Once again cancels, try Click. And now we need to drive those two together by Best Control and J So I was like, those to control and J. And now we need to change Arjun trying to beat entreaty, cursor. So here it considers on our top boat. And we need to change it to be Fortunato really courses. So now if you're a date, you can see that there are sitting around critical, sir. And now I'm going to write down 92 right potatoes for 90 days. Now I can select all of these boats and with talk J, I can join them together and once again change destination off our origin point being the treaty coarser with shifting they duplicated one more time can to location by passing right quick. And now I'm being pressed there and maybe 45 to be fine. So, yeah, now, during all of these together by pressing Vermont Jay And now we can go and renamed them to be dire bolts. And so sorry. Name this one. So now let's let everything And with shifting day, we're going toe duplicate it on the other side So here we have a good starting point for modelling our puppet. So let's about this video Stay tuned, because the next video we're going toe work on the steering wheel and maybe on this front, light and sound so see you there.
3. Front Light And Handlebars: What about the end? Welcome back to our second. We did the scores. So here you can see that we model it, be over the model, our tires. And now I can go and select both of them and Breskoo Month and Jane to join them together. So now I can lead this number numbers. So now we have because, like both terrorist, by just pressing once and also we are going to do the same for our vaults because that's the best way to stay organized. So you can go and rescue my command and Jay to join those toe match together or control and J. And the next thing that we are going to model is going to be the steering wheel. So now we can go and check the reference emitted from real life object that we have here. So here you can see the shape fit and let's start with those handles. So here you can see the damage off cylinders and go on. It shifted a let's eight cylinder. Now we'll need to rotate it for 90 degrees on the x axis of this. And now we can go and skill this about killed his down and now edit mode. I'm going just to move this to the side because I want my Arjun going to be right here in the middle off our great And now I can go apply are near modifier on the Z location. So now you see everything. What we do on our left side here. But it's going to be mirrored on the other side as well. So now we can focus on the one month side. So here, you see that we need to scale this out. The wife so breast s and I just killed out. And now maybe we can go on, pull them out a little bit. Why? Something like this. Now for a dissenting point, I'm going to rescue for extrude as cancelled by breast traffic and now located faces around detective scale the moat. And now I single and extruded doubt. But here are my was trying to be medium because in the previous video vacated on, change it to individual origins. So now we paid our samples. Maybe you can go and pull this off more out because I want this part to stick out a little bit and here I will press I for inserting face. And now I can pull this inside because I want this whole have there. So here they look cool. So now let's go and check our reference image so you can imagine the shape off this this front light. And also we have brakes here and here to see how handles are there. So now you can see that we need to do the same for the other side off handles song, stretch one more time. Handle school. So now in that small, I'm going to select this face here and maybe a shootout rest strictly against link. And now I can go skill, doubt and make it bigger than the previous one. So now I'm going to select everything by pressing a and maybe you can go and kill them a little bit more something ideas. And now, with air, I'm going to rotate them like this. And now I can go and continue working on this front part here so you can see the shape of it. And let's begin vacating suing there for this thesis part here. So I'm going to go in object note and I'm going to change three deckers to be right here in the middle of this front fight by holding shift and right click. And now with shifted A I'm going to bring another cylinder to our street. But this time we need to run date on the wild location by 90 degrees. So I press air by 90 and now I'm going to scale this down something like this. And also they're xx iss. And now I'm going to hold it. He said a little bit. So now let's check our empress image so you can see that we have this outs out part. And also this is this is a bit extruded inward, So let's try and work at birth. So in edit mode and then to go and here I get rid off those faces. Best extra bleat this back face. And also we can go and believe this front face. So now edge selection. I'm going to go and let's just see how this funny looking So now I can go and dig through this face, cancel it by right click and now I'm going. Just tow it out a little bit. Just see, I don't need to put it on the X axis and now I'm going just toe scale it down a little bit . So something like this. And now I can go press e for extrude one more time and now I will need toe scale this down . So now I have this front And now I can go and press the once again to extruded faces Cancel it. But you already know the tack it in new faces And I can go and skill this by pressing S and G and X to pull this inside So something like this Now I can go up and I would breast have to feel that whole So we created that front light and here I'm going to create a slope in the middle of something like this. And now I want to babble this edge one more time because I think it's big. Toe straps are breast control. Be for beveling. And I was just Beverly device bicycle my mosque up. So something, ladies. Okay, but here we will need to fix this inside part, because it's really not a threat. So here I'm going to breast feed, for instance, inserting face like this. And now I'm going toe press G and text to pull this out. But if I breast control and be I will be able to label this front and now, like, aided that shape for our light. I'm going to go in edge selection and by pressing double double double J, you will be able to go toe edge, edge, slight. So I will just go and fix some of these. Maybe this could be more out. And so now you can see that the whole edges money. So that's a good thing. And here, now, no like that That's shaped it. We have there also Maybe can go. And Kate Moretti look there and for example let's see. I like this part. Maybe you can go and kill them. So now we can continue working on the steering wheel. So I'm going to go in edge selection. And here are Breschi for extraordinary on the X scale. Given don't even one more time scale rotated. I'm just trying to follow this shape here that I'm having. And also don't forget to check reference image. So here you can see that this party's extruding out. So this now, once skillet, this best thing s and now it can go and skill this down a little bit and bullet down with Gen Z. So this is our front right now. We need to continue working for with those handles and I believe that there way too far from each other. So I'm going toe fresh, green and white. Pull them inside like so. So now I'm going to go in face election to select this face here. I'll Christie for extortion. And I will change. They changed their anything. I would just start extruding this part out. So this and now don't forget they're limping. So now those are merging together there. So let's see and see our reference image. Actually, we are not going to do like that because you can see that this is like a one part. So here, I'm going to go and lead all of this Command and Z to return starting point the school and work with this part here. So now, in edge selection, I'm going to let this part here for extrude scaled down date this, I'm going to press age to hide the handles and here I'm going to go and extruded part out. So So this couple of times. So this part needs to be left like this. And here I'm going to go and look. So now I can go and start. I think this part here. So basically, I'm just irritating and scaling down those parts and trying to fix still Jiamusi. So this part here, skilled, skilled down This one is to go this and the last one is going to be this one. Maybe here I'm going. Toe edge slight. This part. Oh, this one last month. So here we created our starting point for our steer real and also a gated our handles. So staging, because the next we do, we are going to finish our steering wheel and we will focus on body off our pump it so see you there.
4. Tire Parts And Connecting Wheel: but the end. Welcome back to our 30 deal. So here you can see that we made our front light and also handles and Hendel bars. And now we are going to connect handlebars with front light. And you're going to work on this front piece discovering tire. So this piece here. So now we're going to connect first handlebars. So with shifted A I'm going to bring your cube to our scene. And also I was killed down by pressing X, and we need to mirror modifier for this because he's going to be much easier to work on one side. So here you can see that way actually need before playing communal modifier. We need to go in edit mode and we need to cut half off our cube. So about here now I'm going to go and select those forwards is get rid of them. And now with this half, I'm going to bring your modifier and change from X to y. So now we can work only on one side. So first thing I'm going toe this up to about here. And now let's don't forget they're on the pink because we don't want overlapping geometry And now we can go and scale this by so something like this. Now, I just to about here maybe something like this. So let's been around to see how we are going to solve this issue that we're having here. So I'm going to skill these down Maybe a little bit. Now I'm going to go and select this face here, and I just extrude one face out, scale it down a little bit. And now go this invert And this face here, you're going just to go and rotate it. So this and now we can go and extruded where our handlebars are. So something like this we have here now with face election I'm going to go and skill this all this about this on also the x Also this part here, things like this. Now I'm going toe extrude this down and getting too scary Ex pull it down And now with e were going toe stood it all the way down Go and invert like so And here we are going to go and pull it out. So we have something. This there now I will just go and pull this edge here on the tub. And here the last thing that I'm going to fix it this part here. So, like how this turned on and I'm going to go and create one Hegel there. Now I will go and turn on my extra mode so I can see through it. And I'm going to go and select this face. And here I will just kill down a little bit. And no, I can't a little bit more on Jammat E. Here, fill this out. This here, it's going to be fine. So this is our final look off our steering wheel. And here I go back and select one more time. Our front light, Presti for extrude. Now I was killed out more and no, I stood it all the way down and skill just a little bit. Anyway, we are going toe this with this front by depart. And here we have this box here that we had to the other side as well. So we're going to keep it is, But I want to bell some off the address service that this edge here and also this one here this bit this edge here as well. But before that way can go and bring this little bit up. Like so. So now I will just go and select all of these address around. Actually, we don't need that. Actually there. So the search here, maybe such years. Well, this'll one so basically pulled edges around on this one. And we need this in their side one and now is controlling big. Let's go and try to build this out. And I just scrolled my mouth. Feel up to create more. My face is so something like this one to be fine. And here you can see between need skill just a little bit. Actually, we're going to scale go through this part, This part here, out this. So let's go on to stand there. I would like this part here to be, but between site So it has some some fine details there. Rentals. Actually, we're going to keep it city. So we have our steering wheel for our scooter, as already mentioned is not going to be photo realistic ones. We're going to go between stylized and lowballing modeling this time. And now let's go and work on this part of discovering are dire. And we are going concepto at those details on our front front tire. So for this part here again, we will need to give. So with shifting today we're going to bring cubed are seen and now I go skilled down like this. As you can see, it's covering the whole well, the whole tire and we'll need toe go and match the size of it. So basically what I'm going to let go and skill it all the way up like this. And now I will go and create a fluke here, and I will go and delete this other other side. So let's let all these vortices and again I go and apply mirror modifier on the Y. So now we can focus on the one side. So the best way for ratings the shape like this was Just think about it. So I believe is going to be by traveling Cube and later on we can add some edge loops and try to cut it. So let's try like that. So already we have Cube and now I'm going to select this edge here, This one here and let's just go there, X ray and also this one here. So now if you travel it way we get something like that. Maybe we can bevel this edge here a little bit. So something like this. Now I can go and create absolute here like this. We can go and skill this down. Actually, let's not scale it all the way down because we need toe delete some of those. So first, let's go and pull this out. Put this down to about here and now I'm going to get it off. Say those and maybe those worthless here. So I'm having shaped like this. And now I can go and focus on learning those points as well. So first I have a goal and extruded this part here. They like this with e have a Keitel than your faces. And now I'm going toe also were on this part here. So here we will need to connect those. So I was let on those do and breast control and and actually Alton em to merge those at the centre Also this part here and the last part to be this part here center. So now we go and align all of these. So this one here this part here Maybe those here don't forget the working in X ray mode so you can select backside as well and fix the last one. And we have something like this. So let's see how this this one is looking. Now go and select all of this face here and press f to feel this. And now we can go and delete all of this bottom part. This is faces like this so we can go encircle selection by selecting, see and I just go and paint it out. And here we are going to lead faces. Now we can go and scale it on divide like this And here you can go and get one more edge loop handles One more here and you can go and it will be toe level this out and now you can go on started scaling a Trudy's so something like this See good shape for that. This one is to be with some disco and selecting Dietrich decent shift scaling it out. So I got shaped and I I like to have British now I can go on just slightly skilled. Maybe they did this well, So now let's go back and see. So here you can see that we're having this line here and this front. But on this side we don't have that. But let's start make something like that. Help. So don't also forget whipping. So let's see the shape of it. But we will need those toe ad solidified modifier. So we want this inner part toe to be a ticker. So maybe something like this will be fine. And let's see one more time Maybe we can go and skill all this out. So now we need another cubed are seen on a scale. Don't I want to This front part I'm going to go and scared Z No, I And now I was like this front place here ive for extrude it. Now you press ESC skillet down and I'm going to go and select this fresh loop here and does this on the other side. Maybe this fun as well. So as a national have need to dispatch look So those those and those and now which control be we can bevel them. But I didn't like this this one So it will be bevel Hold shift a little bit So we have something like that and now we can go and scale it don't and that's just pull it a bit in worth. So we've got something like that. So now we can go on the fly mirror modifiers to those And here we have this face here that I don't like. I'm going to get rid of it. And now we can work on the front front tire. So here we have this compressor. So for that one, we will need to enable modifier because we don't have it by default. So in edits are going the references and here research object and he will need at curve extra objects. So now we will have more geometry to add breath shift and a So if you go now on the girl we will have all of these new curves that you will be ableto to add to your scene. And here if you go on the car spirals, you can find this 1st 1 are the media and basically now this could this This will help you to create the dead compressing very easy. So with curve, you can go and select spirals comedian And here on this default setting Don't forget this wrong appear when you first time when the first time at object or scene. So here you have all of these settings. So, for example, Jews turns growth. Also radios. And here, if you go and select height, you can see what basically, this is doing. So he it's creating that spiral look. And here you can select number off steps and the height as well. So let's try to find the good settings for it. So I will go and increased radios, increased turns as well. So that means so here on the radius growth, we will need to skill this down and let's make it zero. And now also, let's kiss, fight and number off terms to be Let's see, State was making then and also a little bit radius. So now we have aspired. And for this one you need to go under curve settings under data properties and here under geometry, you can go and add depth, and here you can see the Big gate. Easy is expressed her there. So now I went to grab it and let's see the position. If it's so here, here, you see how it's it's actually under under under this this part here and now I'm just killed down and rotated. Actually, we will need to skillet on Dizzy, and now it's shifting day. We are going to duplicate on the other side as well. So they have something like that way. Don't need to worry about this inner, some inner, but it will not be visible anyway. So now I've been toe and land those two together, skilled out. Pull it and now you need this part that connect those two So this fronted birds and we can do it by anything. Do you tow are seen? So now I'm going to kill out like this and let's go and extra this part here. Let's make it smaller. I actually wanted to make a smaller on only on Z location and it's skills. Why now? You need to pull this out on the X like so And now let's bevel some of the edges, so let's better. First, those now we will need to go other side as well. Indicated that part. They're so now I'm going to kill out, and you need to bring it closer, rotated slightly now with shifting day go and we'll bring another cylinder. The sphere foreseen and skillet on the location. So now we have that support for this part here. Now, I could go on and pull this their skill, this part. Go and see our offense image. So this is, uh it just goes up. Now, what's duplicate on the other side so we can get rid off the 2nd 1 and all of these parts. I actually only just kill this. I went to change transformation. Look. Oh, so skilled on dizzy properly and now, shifting day. I'm going to duplicate this on the other side. And here I will go on and on religious school, those and this fund needs to go in worst. And now we created that part or are so stay tuned. Because in the next video, we are going to work on a body and also on our seat.
5. Front Body Part Modeling:
6. Back Part And Handbreaks: everybody and welcome back to our six video discourse. So here, consider tickets are front body part and also we got this small detail in front. So now we are going toe Continue working on the rest off our scooter. So first, we're going to go and change location off RTD cursor And here I'm goingto bring another cubed are seen and I will just go and scaled out on the X this anti also food here. So I want this one to go all the way through the end off this this quitter. So essentially this I just put it now I don't need to scale this out, do I? A swell. So we have something like this and now I'm going to go into edit mode here and just close this and I'm going Just pull this here and let's see what else we have here. So things part here, we will need toe, pull it in front, and now I rotated as well. Actually, we can go and be precise, so instead of frustrating, can just fold it like so So this is going to be a place for our foots. And now we need this place for sitting. So that one we're going to create with Cube. So the same way we did all of these other parts. So I will just school in Kate, that cube back and now scale it down. Wife some rest us invite skillet and in edit mode, as usual. So that's the best work to work on in one set. Create edge, look by pressing control And there and here are get it off other side of this cube. So here are press extra bleat, disses and I would add mirror modifier Why? And don't forget to turn on me. Think so. Here, if you press zero will be a huge country camera, so you can see how far is look, you can see that we have this but gold. For now, I believe we will have really good on result. So now I'm going to scale it. I'm just going toe skills down and I will go in edit mode. So then forget always to turn on X ray so you can select all of these back off your mesh. And here I was just trying to align all these position. So this part headed to there. So now I had a look. And now basically, I just school and a line. All of these vortices, they're So now I can go and at multiple by schooling up my miles field. So let's add four for now. And now we can go and pull those back and just needs to align them by pressing G. And so here, conceited miss one, as you look so something like this Now you can go and for Auntie back birth. And here I'm just pulling all of these verses in the right position, and I'm trying to follow my reference image. So this part here with aligned them so oppressed S Z and zero. So now it's perfectly straight. And now we can go and be more precise with all of this for Texas. So now, as you can see, we have something like this and that worked for that part. So maybe go and add on actual up here. And maybe we can just go and dislike this part here. This but birth this actually. So if you go actually, I need to change my selection, be a box selection, and now I add one natural here. So now Professor, like this This, uh, look, I go and receive and see. I'll be able to enter in circle selection. And when your circus election, if you press middle but Middle mouse, you will be able to select where this is and it left Leak. You'll be able to select what this is so something like this. But with this part here and maybe go and slightly also need this top part here. So I will disliked those stuff, and here I would just kill it out a little bit and maybe I'll keep it as it is for now. So let's turn off experiment and let's go and see a reference image. So that's this part here and here. You can see that part for Lex, and basically, what we can do, we can go and add to etch groups here for that. And we are going just toe extrude is out or we can go on 50. And why did you dream Zito bring it up? But going to be that stood face to our scene and maybe this next year in Russia on the X so something like this and maybe this is too much. So I'm going to let this face here and now I go and pull this inside this and maybe I can go. I can't go out like this fake face here in this one here. And put those two down, maybe two months here. So let's look so far, it's looking good. So maybe we can add Subdivision surfaced That part here, change it from Chez Flatter shape Smart. And here we can go and add some support loops. So for this part here and maybe one at the bottom here so you can see that it's Miss Inc and here concede that you need to pull for this. I'm also on the other side song going to both extremo so true and I was left over this and Jeep with key and acceptable. All of this in Bert. So now no longer be able to see those back. Also, we can always go and here at one actual opened up a little the way up and here to see that you need toe changed the position for our handlebars. So they're sliced back and also to rotate it as well Also need to rocketed on this. So this is their original position. So Now we need to select this edge here and now. You need to try the line even better. Our our steering wheel. And now it's looking much better, I believe so. Maybe you can go and bolt this a bit. Thank. And also our handlebars there and here we wanted just like this look and pull it down onto the location. And also there is one more thing that I want to add in this video, and that one is going to be her handlebars. So here I will go and create look, and one more actual appear now face election. I will go and stood this part here like this and I need one more look. I can go and people disrespect and this one extruded tote. But this Maybe we can go and skill this part out. This one, this one here, just like that. So now it's better. So we'll see. How are handlebars are looking So basically it's cube and here's two different ones. So now I'll go and Kate duped are seen, and immediately I will apply a mirror modifier. Now, if I go in edit mode refugee agency this morning and mirroring got the X, But I need divide. But because I'm in mirror mode and when I move measures, you can see that our are, um margin buying. Staying the same. So now I can go and just model out quickly. Handle, handle. Biggs and pigs actually handle breaks. They're cold handle breaks. And now it scaled out this and I will add as well mirror modifier with something translating Too smart. And now I could go on like this part here first catch full support for that in a birth. And no, even it took. Stow this out. Maybe like this. Now I'm going to go and extrude it one more time here, but cancel it scaled up. And it's true. Just for more time. So now I k the temple handle breaks as well, but I believe in it. Rotated. So here in, in writers together you were going to select handle breaks, and you're just going to rotate them. And now we position them again, and now they're perfectly standing there. So that's it about this video on. You can see that you created this second body part as well, and we're at the handle breaks. And in the next video, we're going to add our seed and also this backlight as well. And also the standing cards for for our scooter and this box here that that needs to be also will make this input for for arm soc there.
7. Seat Modeling: a little body to another. We doing discourse. So here you can see it that we create our back, that part, and also we create Temple Bar on breaks. And now in this video, we're going to focus on this part here and also on our seat. So for this part here, we're going to add simple job skill down. And now I'm going to go in edit mode. There will be able to modern this out so I can see that this one is very simple one. So basically what I'm going to go and no job, but we will need to Skillet, uh, back like this. And now I'm going toe grab this face here and spool it there. And now I will go and stood this part here. Now I just rotated and hide it with this part. And now we will need to another part here. So about here about it. And now we can go and disorderly up. Scale it DX like this maybe more. It's killed up and maybe that's at toe edge loops. And now we're going just like this inner part. Those in their faces and their They just killed him. Z so make sure that you don't have any emissions front. And here we are going to make the queue key. Uh, input. So this part, we're interested, let alone those three faces here. Now I'm going to go and just go and press I for insert off scale. What's changed? The local. And here we will need to scale this. I'm going to go and just pull those there to make a square. And now with this face elected way, we're going toe extrude this part out. Now go extreme wrote a selection. I will go and select those worthless is here. Put them there. Now we need those just to align them too much reference photo with a bit better. So this partners will here. But at one edge Look here and maybe we need more to about here. So this and all of these are good for now. I believe so. And here we get that front part. We're not going to give away details that we can add subdivision surface, train shading smoke, for example. And here we will need, as you can see, that support maybe one more from the sites here. And so here here So we have hated that part there. And here you can see that you need I get dear. So that's it about that part. So now we can go and focus on our seat. So for CTO see the shape fit. And here you can go and crafts image So very simple. So let's start with Cube now. I'm going to go at it moat, And first I need skilled. Too much talk. Now I can go in turn on extreme mode, and here I will try to position all of these all of this for Texas to natural reference image. So this one needs to go there. So now I'm just like this part here and extruded don't and maybe it one more time, this one down and here as well. So we will need to go back up here. You already have their and also one here. One more here, and I'm going to pull this up in front like this. And now I'm going toe Add one more look. No, But here. So now I'm going to go and create actual appear in the middle. So basically now I will go and tryingto aligned all these together as it is here on this one needs to be like this and those those two need to bring those. So now also, you need toe loops here in the middle. So let's go out Extreme mood to see what we got. Let's add sub to surface. And here we will need to add edge looks. So one had to look here at the bottom. Let's make it smart. So what support edge for that part here and those stop part. And now we can go and select those just here those and give out a little bit like this. And now I'm going toe let everything and I was just killed up. Now in extreme owt else like this part here just likely pull it back. And I like the shape of this fund. Now I will go and good Same for this part here. This one needs to be worth so something that this will be fine And let's give it out. Why and we created also see it. So that's it about this video. Stay tuned because the next video we're going toe add back lights. And also this despite that, discovering engines off our muppet. So see you there
8. Modeling Final Details: everybody and welcome back to another way, doing discourse about creating moppet. So here you can see that we could see it. Sandals, we at this front books. And now in this video, we're going to make this out part off this front body part. And also we will add this this those parts that are covering tensions and the other stuff. So first we can go and create this out out part. So let's like this front, part and here way are going to go and select this agile appear with and also they don't need this part here. So I will hold shift and selected. So we need thesis edge here and now we will need also just stop part here. So now our best shifting day for duplicate Cancel it tricyclic and I'll breast be for separate this part. So now I'm having a new object to our scene. And this one is, As you can see, we have thes separate edge, but here could see another edge. And that's because way have so defined modifier on and did not need that. So now with this object selected, I'm going to go in a tits mode in edit under edit and here under a break to search search for convert. And here I've converted this object from being mashed occurred. So right now, if I go here under a curve properties under Ji Amity I will have depth And here you can increase the size of fit and he will be a little help that out out part and chicken breast , right click and change heading to sport So very simple and easy for creating that out part . So the next thing that I want to create is going to be also stand for our Muppet and also we will need We will need backlight and departed discovering engines. So first we can go and create our standing So we can do it by going on adding new cooped are seen And now in edit mode more disk you decide So right now are are different states in the middle and here we are going to apply mirror modifier on device and now we will need is well subdivision surface with number of subdivision, toe toe and here in object mode way We're going to train shading toe smart Now let's go and skill this all the way down and let's make our stent. So, stent, it's usually here and now I'm going to go. And I went there in face election and here on the back I was like, this place here and I just were bitten. The bullet inside Locate one edge Look. So it was worth that? No, I mean, uh, face election. I will go and stood this out. And now I will just go and start this one more time Here on I can rotate it as well. So press SZ zero toe, flatten it out and here I will go and at support looks No, I was just killed. And here actually they are not looking good. These airway is going to be just simply to add to add Let's go with a shift in a And here we are going toe Great No Dora store scene. And here let's increase number off segments to be, for example 20. And now we can go and as this one. So in that moat with face election with Arctic selection, we're going to get rid off Also she on x remote half of tourists and also you need to relate this other half spell. So we need on the 1/4 off Taurus, and now this shape is going to help us for creating that standing. So now I just go and extrude this part out, and now I can go and scale it down. So here it issue could see how looking And now you see that we need to make it longer. I will press for extruding out, right click against with skilled out a little bit and even more time Now I could kill that part out for extruded on the X and I couldn't school skill this all the way down to about here I can best be f actually for my feeling the face there and here I can go and at a sport look So now basically what I can do I can go and just like this part here and pull it Dubai. Now I want this one to be standing in front this But before that considered, people need back around. So I'm at simple plain Darcy jeans. He moved there, and now I'm just going toe pull it and to see if it's on a good position. So I'm going to scale down a bit change, transformation toe global. And here I will just try to place it in the right position. So something like this will be fine. So let's see it. We will need to tow select this edge here and now they extruded inside Now with shift to see, I would turn my tree diggers in the middle. I parasite like to change origin 0.23 the Gerson. So right now we apply in their much fire in Dubai We can see it it feels have on the other side as well. For now I will not apply yet because I want to make a good position for this one. And maybe this one's actually should show that date a little bit more. I think this it was killed waken go select this part here and actually x remote. So now you can see if it's like both tothis that we need to pull this Don't this more so something that this will be fine. So that's it Way are almost done with modeling, as you could see also for now, I would like to add that covering parts for our engine so we can do it by creating a new UV sphere door seen so breast tripped on day and search for you. This here now in that moat moved us fear to the site I shall selected and to the side. And I will bring commuter modifier on the X location under wire, location on the Y axis, actually. And now this new This year I've been directed for 90 degrees on the X soil breast, Air X, and 90 and red on that. And here I would get rid off half off this for Texas. Don't forget to work in X ray mood. And now, in front or together, you I'm going to get treat Also first I need to get rid of this stop part here like this. And now, front of the queue, you can see that I have created that that shape that will be very useful for representing that on a good starting point. Actually, for that part, discovering are, well, our thers and engine as well. So now in ah, in Addis Moat I'm going to turn on my X ray mode so you can see that shapes not perfectly straight, perfectly rounded and here and fix it. But before that, I want to close this So our breast right click skilled is down and pull this down on the Z This and I'll have to fill that hole there. Maybe we can go at MSG and hold it out a little bitten like this. Now I will go and select this bottom half. I'll press SZ zero So now they are perfectly straight and for example, was we could do now if we want to get the shape as it is so here conceal the shape that we are aiming for. For example we can go and turn on a proportional that I think so. Now with proportional that you think you see that we are affecting the whole measurement of year crab or rotator do any kind of moment. And for this one we can go and for example, grab some of these vortices and here you will be able to see the circle around anti school mouse. You will be able to select the effect how much you want. So for example, we can go and increase this good bolt here and pull this a reference image. So now, for example, we can go and select this bottom birth and I need to turn off my proportion. Let think And I can now pull this in birth. So, for example, on one month's again, my proportional and think and maybe this one there and that's it. We created our covering part. So now I believe that they could be a little bit smaller wife. So breast s why and scale it on the wife. And I put them in and then off my X ray mode so I could see and you can see we are done with modeling. So the last thing that we need to fix is going to be here. We are going to add subdivision surface. So let's see other fixes. Because in the next video we are going toe, apply materials and start preparing this model from being Toby rendered. So we're not going toe contention because we will not be able to seeking render view. You can also very easily and quickly branded it out just on model doubt cylinders. And for example, I would like to have a this backlight just in case if you want toe and, uh, backside as well. So here I added milk duped are seen and also add subdivision surface And here I'm going to go and create agile oops here And also for this part here I'm going just to go and actually rotated. Now select this front. But I'm just going toe stood it out time I actually have a need skilled under Z and down So something like this. And now I need to add more edge sports on X ray mode. So see better inverter selection. We will be able tow match our reference image and what this is all So this funnest lower And this morning as well Both this up and this one needs to go down. Actually all of this, they need to be on the same height. Now we can go. President Lee can change shading to be small so and here we'll need support. They're just here. It's on the bottom part as well. One more middle and that's it's vacated are back backlight. So what does it mean? Fix here? We need to translating to be small And also, for example, we could go and select all of this front parts here and G and C go and pull this up a little bit and also we can go and being new, fill in depth talks, fear killing down. And now we can go and just place it here in front. So now we have connected those parts together. I'm going to change shading smote. It's not visible anyway. Also, for example, that go on at he's back part as well. So next remote way Go on Metro Reference image. So this part here and now I'm going to start this one. Don't and we have done with EarthLink are our Muppet. So now let's clean out a little bit are our climb So here you can see that three made a mess. So for this one, let's go stand. So we have tire pulls on Styer Now We have slept both of this and we are going to drink them together, but we need to convert them to be matched. So under a parade to search, we're going to convert toe mash, and now we can go and trying those together that's renamed suppressors. So all of these stuff that up there that are going to be the same material were going to train them together. Actually, we cannot to do it because they have different subdivision surfaces on, but we're going to apply all modifiers before during this together and it could be fine. So now you're trying. Those did not change. And now we can renamed it Be real. This is food stent back part. You know the name free. So this fun. Thank you. Back light. So I see it. What else we have here? Back front birth, Actually, Let's drank those two together j Also this soon There, there, That's called him Barnes and way. We're going to join them together with those parts as well. This is from light and and divers keep books Ample breaks and we have those parts is wealth . So we will join them with other parts as well. And we have and hand brakes and pigs and bakes And I believe that everything is done. So we have Barth's does that help? Fine. And this one is and I believe that very name everything. And now I'm going to hide that back back images that I had four So that's it about this video state your because the next video we're going to prepare our are to be rendered. So see you there
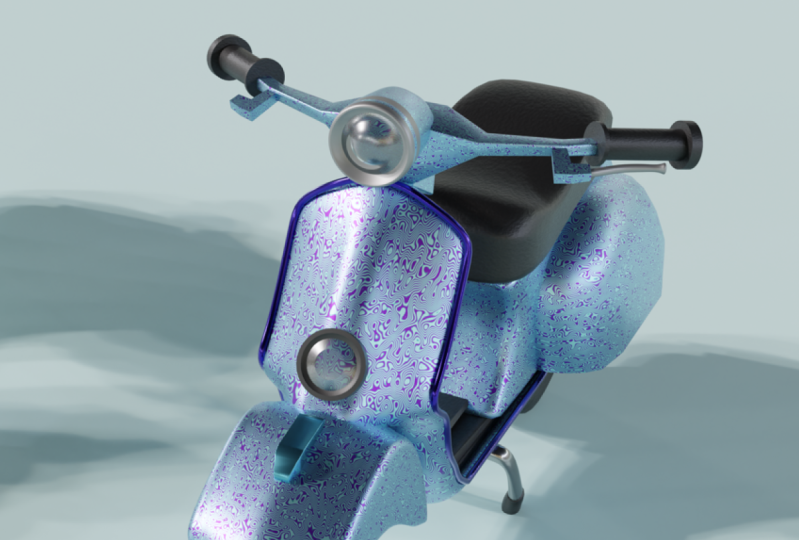
9. Applying HDR And Materials: Well, everybody and welcome back to another video in discourse and here to see that here done with modeling car moppet. So now we're going toe repair our month but for being rendered. And also we will buy materials and place for our final Orender. So first thing I want toe add new lighting toe are seen. So if you go under rendering you you can see that we have only this basic flight and I'm going to get rid of it. And for this one I want to use HDR I Fatah. So I will go under shading and here you can see that it's an object. So I will change the world. And if I zoom out, you can see that we have background connecting the world output. And here is 15 Davey will surf for environment texture and now I'm going to connect this color to color. So basically this entire objection is now asking us for hdr Fatah. This will use for rendering for lightning this scene out. So for best way for finding free, if the rice is going to be aged that I haven't so it can go on aged er heaven dot com and here, Concert jewel of these three deride the chicken use for final render. So, for example, for this fender I'm going to use, Let's go on. And here you can see the preview off your material. Pent. Let's use, for example, I'm going to use this Sandy and the press here and I'm going toe down. Not too. Okay. And here it's elastic. Where is going to be saved And I save it on my shoulder. No, I'm going to go back, my seeing eye open. And here you can see the did I that I don't love from a dude. I haven't anti fight imported there. I can go and drinks to render you. And he conceded, suddenly, we are on the beach with our school. So now, for example, if you have Grendler, Adam turned on which you can go and search for references and here mode Wrangler at them, so you should enable it. No, basically, you can go at Best Control Day here and immediately it connects mapping and texture, so under rotation will be able to write it. Your you're aged era around your object. So let's go and find some good life. Think way we're going to fix on or pull it more later on. So for now, this one is going to be fine. Now I'm going to go in layout you And here we have our camera. So if you are a zero, you can see that we will be at enter in camera view, Anti free press shift and cakey Crave key, which is key above depth, will be entered in a fly molded camera. So now with your keyboards Between the A s day you will be ableto move your camera around and now you should decide. Decide how your final render is going to be and where So, for example let's go. I want to be somewhere like this. Let's see something like this something that this Now I'm going to give my background also , if you go on the camera, you will see Have you put this place? And here, for example, you can turn convert combusting guys, for example, the concern center to see center and also thirds rule of terrorists. And from now I'm going to keep this fun. Is this so now we can go and start adding materials to our are I'm a bit. So first I'm going to select this body part and here on the material, go and create a new material. And here, under surface, you will be able to select color. If it so, for example, I want to mind to be some something being orange, yellow this and now I'm on metallic to be one. So let's see looking so far I will go and change my brother to be TV now to be cycles because I want more hard quality render and here you will be able to select roughness of it . So let's see how this one is looking so far. And actually this color isn't too good, so I'm going to keep it And what to base Roughness will be down because we need some reflection here. So maybe something like this would be darker. Let's see what color Bishop, Maybe something like this will be fine. And actually, I think I will keep this color here. So now for this outline part, I'm going to keep basic gray metallic color so I'll turn on one. So the next step distinct is this steering wheel and I will give that they're the same. Now we can go ad for your seat. I go now for concede So here for a seat. Because of this, we are now in both settings and I need to go in objects setting. And here I'm going to keep to go and changed the base color to be dark, very dark black color like this. But here with shift day I'm going to serve a nice texture. And I'm going to pluck no structure, basically base color. So here also I'm going to serve for cholera with a And now I will be able to select the color here. I'm just going to bring it here and now with my note. Inventor Adam, I'm going to press just control anti and Timmy. Did they have, I think, an extra ordinary now I will search also for bump notes because I want to have some bumps and for example, let's go speak to look them you so we can see it's faster updates And now I'm going to block a bump bump note Normal. So connect those two together like this and I'll duplicate this No structure here and I was just connect no structures back note So here can see that they're having some bumps for our seat and here, complaint with details and skill as well. So let's bring rain gets picked up. Maybe school 15 for scaling. Also 50. So something like this and here could play with spectacular and roughness so blessed, in case a little bit roughness this material. And here, for example, case number of details that is creating this notes texture. So that's it about. See it so the next is going to be. Actually, we can use the same McDaniel that used for our state. But this one is meant to be Nixonian depressed, that number there. And maybe we're going to go under shading and to disconnect. We're going to get better all of this for our handlebars. So I was just breast X and lead those and keep this fun based this basic color here. Now we need for breaks, breaks up, use the same color that I had for my outline here. No go and work for this small detail. Parts have a great material for this. And let's see, I'm going at it and actually we can go and switch to look at you. So here for this front part of breast health and let's see what else could be the same deal . So this part and this part here and this one here are going to be the same day off, so I'll breast a sign, and here I'm going to change color to be. Actually, I need to rest bus and create new because you made it a tow. Apply on old part. So here are breast descent to make unique. For example, you can go ends, make this part for example, something like, incidentally, this actually disliked now. And l I will go and select my So despite here, I don't need to go in except more so we can select on the other side as well. So those are going to be the same material this great deal that I have created before And now for this second material, I want this one to be able to the same and actually just this part here. So scientists want to other my deal. So now I go out that moat rendered to and let's see. Look, this actually, it's not so those are you leave some metal parts, so it means we need toe this all the way up. And also the 1st 1 needs to be the same. But this one I'm going to make it brighter. It is now for suppressors making. See how bread is looking and I want to Despont different materials.
10. Final Render Settings: for now, I'm going to keep as it is that the's box should be the same color as other parts fell. Now for this front light on for this backlight. Actually, let's go and work on this front part. I just looked at you and here I just pressed new toe apply material on the whole object. But from this actually are revoking X ray and with circle selection and metal like this, Like this front. But because I want to this inside part to be the same color as the rest of the body. So I was said for that. But material and I would breast a sign and immediately have connected all these birds here . So no, my king. Go on, select this worked everything. And for example, I'm going also to assign this. Let's look here doesn't deal. But now, for example, I can go and sign different gun off material for those and those and also way I see it. So for those I want to have the same deal to go back. And also this one here. So I will press a sign and for example, this one can be the same deal. Has this outline here and now Crest plus again. And he advocated new material. And now I would just like this inside parts because I want to those bus to be the deal Salt , Best sign. And, for example, I go under fading and here are going to search for glossy and this here. So now we have glass actually believed concerns for glass material, and we can mix those together by searching for mixed note. And now we can fuck this here, this one here and this one surface. And here you can play with the roughness of this and within this off reflect off reflection . So something like this is going to be fine. So let's see how this one is looking. So now for our stent. Actually, I like this color here, but first, I'm going to go hands like my tires for tire wear to go black. Deal also for stand give this same tale that we had for all this stuff, but things Bottom person, it's a different color. So I'm going toe ex remote and I was like those about the bus and here the same deal and the Scient this black tail on the sign for this bottom part off stent. Okay, so we're done with that part. So now I'm going to go and select. Let's see what we need to fix. Actually go. And I like this part here. Last bus, assign it. And for this. But we search for this last material because we can use this one will be less as well. But let's make it unique. And here you see how how this one is looking. So, for example, we can go and increase roughness a little bit now for this part here and create a new material. Let's make it, uh, this body material as well. But here I'm going to go on and on my ex remote and I will select everything. And, for example, I just de select stop part. So I've done on my ex remote, and it's a circle selection. I will dislike this stop. And also those here and for example, go find this basically, because this one is for Lex for this one. We're going to create new material at that, uh, last material sold its search It So is this one. But I want this one to be read, so I'm going to change color to be read also here. So something like this and for example, I will decrease interest off election stuffiness like this. So does needs to be Dhammika as well. And I don't like this material there. Oh, so that's going to see how everything is looking so far. And here also, you can see that change. It thinks front less saloon. It made this one unique. And here I'm goingto bring this white material back again with this front because I don't want to be raped. I want to be that business too. And also for this here and now lost to be are there. So it's surgical selection. I'm going to go and selected this inside part here also on the other side, you can encase the brush size off circle always work in X remote when we are doing stuff like this because we need also the same with video, the other side. So here I'm going to get new material. And here, for example, select kind of color like this one. Let's make this one public. And also this one is to go Daleks. Always. When you're working, you decide if it's metallic or not. And if it is being this for one, there is no in between metallic or not public. So everything is one or zero here and for example, with tires. I'm going to select the same deal dead as this one. This part here. But we're going toe a little bit more with I'm not so going to school. Search for it. And here, for example, see what you could do here. So, for example, case struck miss one. Actually, we are going to get scared. That's Trent as this maybe just scale. We are going to increase to 150 and I believe that we are done. So now we can go in layout modeling. Press is here to go camera view. And also now we go enter on our did you So you can go and different colors over that don't But for adding changing color toe background. I want to change the position, son. So here, once again, I changed towards settings and I'm going to change the rotation with the sun. So, for example, something like this is going to be much like this here that we have, and I'm going to keep this one as this year. But I don't like this their color. So I will go back in object selection. And here, for example, you can go and make quite stays like this. So now we're ready to render our scene out A czar dimension You go and change the color off background. So, for example, the first color here, Maybe something like this is going to be fine. So let's see. And no, you can go And then on color management and here we have a different kind of looks. So, for example, in case the contrast of it so put medium contest off meeting high contrast. And I would like my that can't be black. So here also, you can tell on curves. So, for example, in case and the case number off, you can change the how your color is going. Toe behave here so something like this is going to be fine. And I'm going just crazy, uh, trench factorial on this this part there And now let's go in settings. So here consists. Let your dimension for your final render. I'm going to give my full a JV. She's 101,000 and 920 by 1000 and 180. You're not going toe change here, but we need to change former so actually BNG if you want to. Two x export this as PNG and here I would just select my destination folder. Wait to find this one here. Let's call this final render That's breast except everything is fine. But here on the layers layout setting Sisto. So turn off, turn on the nosing and now we're ready to render are seen out. So there's omen once again to see if everything's good and actually this part here, starting with the colors, I can't decide both color I seduce here. It has spent a bit more time for debt, David the colors and the combination for for your final gender. So that's it by discourse. I hope you like it be modeled off full from scratch, the whole mop it here, you can use it for your portfolio, and also you can render it out and show it to your friends. And also you can later on rictus and create some animation and also uses for games. And if you want to render this, you can just go on the render and image and you're rendering is going to begin. So that's it about this course and seeing the next one by.
 Nodiken 3D, 3D Artist and Animator