Transcripts
1. Welcome: Welcome ladies and gentlemen to this blender beginner's class on creating a simple human character week. In this class, we're going to be creating a weak form scratch for our low poly character. You can use either the character that we have supplied with this class or you can use your own character to use IVR white doesn't matter so long as you're using a human character model. Before we begin, let's take a look at the checklist or creating a human character week in Blender. So the human with checklists is as follows, and we will be doing each of these during this class. We will start by setting up our scene to add an armature. And armature is an object that uses bounds. Much like a mesh object, uses geometry like vertices, edges, and faces. Then we will add our first bun, which is the master control burn. The master control bone is used to control the entire rig. Once we have the master control bone, we will then begin adding the deformation bones in the center and live outside of our human character. The deformation bones make up the skeleton of the rig. So the back, chest, head, arms, legs, feet, and hands, nodes that we will only be doing the center and live outside of the week to start with. Later on, we will be moving the bones on the right-hand side over to the left to help with our workflow. Then at step four, we will add control and IK bones. These are going to be used to control the movements of our rig. Once those bones had been added, we can then begin creating relationships between the bones. This will be done through parenting. Now it's important to note that the relationships must be specific. So we must have specific bones parented to each other. Even if one parent child relationship is wrong, it will mess up how our wig is going to work. Once we have the relationships in place, we will then apply inverse kinematics to specific bones in both the arm and the leg of our model. Inverse kinematics is going to be an important step for getting the bones to behave exactly like a human skeleton would behave. Then with that done, we will move on into mirroring the right bones over to the left side of our weak. At that point, all of the bones required will be on our human weak. And it will then be a process or first of all, unchecking the deform option, put all the control bones. The control bones, of course, will be found outside of the mesh of our object. Therefore, they will not need to have the the form option ticked. You'll see what I mean by this when we come to it in the class. Once all that is done attached to rig, to the object and then test to make sure everything is working correctly. So with the human rig checklist in place, let's move on to the next video of our class, where we're going to begin by adding an armature to our scene.
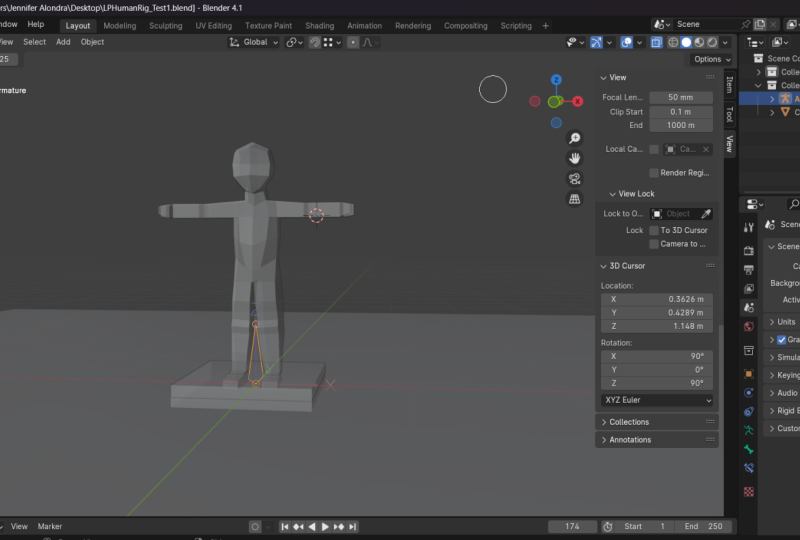
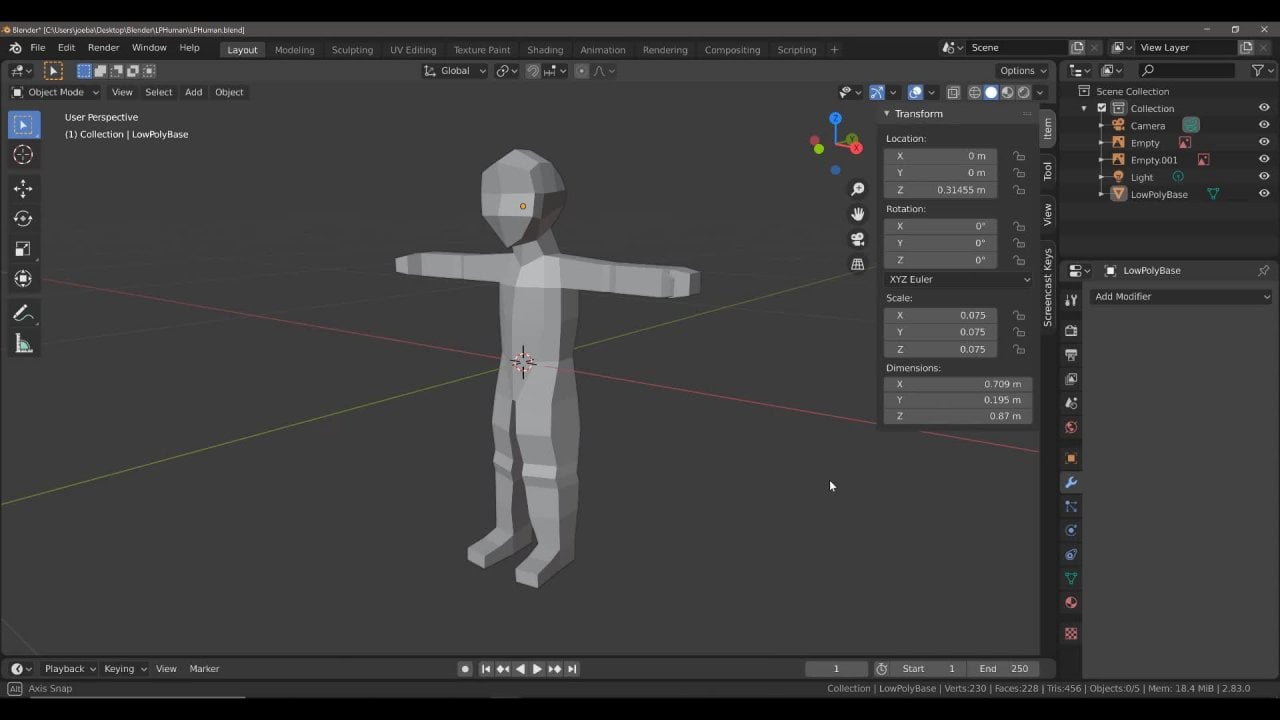
2. Setting Things Up: Now, before we begin actually rigging our human character, there are a couple of things that we need to ensure are in place before we begin wicking. Now what we're going to do is we're just going to set up our scene so that we can minimize any issues with our weeks later on. So here I've got the scene with a human character model and applying for it to stand on. At the moment, we have our human cancer model with the objects origin located in the center of the geometry. But the objects or gene is not located at the center of the world or virgin. What we're going to want to do is we're going to, once you position the object over chin At the world origin for both the character model and our wig that we're going to be creating. So the first thing I'm going to do is I'm actually going to reposition the objects origin down to the bottom of my human characters feet. This is personal preference for me, where I like to place the objects, origins, gene of characters at the very bottom. To do this, we're going to use the snapping tool. So turn on snapping. And then make sure you're snapping to the vertex. Then go to options and form this selection here. Select origins. Well, I'm going to do now is I'm just going to orbit my view soda. I can see one of these bottom third sees from my feet. Hit G, then lock it to the z-axis. And then hover my mouse over one of those vertices at the bottom of my character. Then left-click to confirm. This is going to position my objects origin at the bottom of my character. Then come back to the Options menu and turn off this origins option. So when it comes to the geometry itself, our objects or June is in the correct place. We now want to move our entire objects to where the 3D cursor is, which is the center of the world origin. To do that is very easy. Just go to the item tab in your side panel and then change the location on the z-axis to a value of 0. Now, your human character should be sitting on top of the world origin. Let's do the sign for the plane. So grab it on the z-axis and use a value of 0. So now everything should be implies to begin adding our armature. I'm just going to turn off my stopping tall while I remember and then save my work. Now you can see I already have a pre-existing say file. You can save this as whatever file that you want in any location. I'm just going to make sure that this is site and bite away. Because rigging is a process where it's very easy to make minor errors that can snowball lie along. It's important that you cite regularly and that you also save a backup. What we're going to do here is, well is we're going to go File Save As. And I'm just going to come down here and say B, you for backup. And then one. So this is my first backup at the point where we have the objects all gene in the correct place. Next, we're going to add ourselves and armature. And armature is a type of object in blender that uses bounds similar to how a mesh objects will use vertices, edges, and faces. An armature will use bombs to add an armature, hit shift and I. And then in the Add menu come down to where it says armature and left-click. Now, because more human character is about 1.6 meters tall, the bonus created is normally set to a value of one. So I'm just going to reduce this valley. Let's try 0.2 and that will be a much more suitable size. Now the sizing of this bone isn't really going to matter because this is going to be our master control bone. This is going to be the Bowery that's going to allow us to move our entire week. Now, what we want to do here is we want to give this a nine. So to give a specific bone its own nine, we want to come to the Properties panel and select the bone properties tab. So left-click on the bone properties tab. And at the moment it's labeled as bone because it's the only bone in our armature. We are going to left click and rename this as mousetrap control. And now we have the indication that this is going to be our master control burn. Now before we go any further, what I would like you to do is come back to your object data properties, which is located directly above the bone properties. And then where it has a viewport display. Make sure you open this up and check the box that says in front, this is going to come in handy when we begin creating our bones that are going to exist inside of our armature. So left-click to make sure that's enabled. Nothing will change initially because our only bone is already outside of the mesh. You can also change that display as option. So commonly it sets octahedral. And you can choose from any of these here. So you can go with stick the bone, envelope and wire. But this course, I'm going to stick to octahedral. However, in the next lecture, I'm going to show you how you can actually create custom shapes or specific buttons, which is what we're going to be doing with our master control bombs in the next video.
3. Custom Bone Shape For The Master Control: In the previous video, we looked at creating our first bone, which was our master control bone. After setting up the same to have the master control bone located at the center of the world origin. In this video, we're going to change the look of the master control bone exclusively by adapting it's viewport display settings. To do this, what we need to do is we need to create a custom shape. I'm going to create a custom shape and I'm actually going to make sure that the custom shape is created at the same location as the world origin. So any custom shapes that you do here should start from the center of the world origin just to minimize any potential errors light wall. Before I do that, I'm going to create a new collection for my custom shapes. So come over to the outline, a panel, right-click, and then select New Collection from the outline that context. Many double left-click and nine this as bone shapes. Next, we're going to hit shift and I add a new shape. But the master control bone, I'm simply going to use a cube objects. Let's reduce the size of the cube in the operator panel. It might appear is this when you first create the cube. So just open up the operator panel and reduce the size. I'm going to reduce it to where you 0.1 value. And then what we're going to do is we're going to scale this on these flying. So to scout the cube on the zy plane, the SKT scale, which initially will scale on all three axes and then hit shift and z to lock it to the z plane, which is both the x and y axes. We then going to position it about here. Hit Control and I and apply all transforms. Now, this shape is not going to be the bone itself. You can see that they are still two different objects. What we want is we want to tell blender that this bone is going to use this shape. So to do that selects the bone, which is commonly the whole armature in objects mode. And then we're going to go up to objects mode here. Open up this menu and we're going to select pose mode, not edit mode. We're going to select pose mode. Then we're going to left-click on our bun. If you zoom in, you can see that the bone has a blue highlight whenever we are in pose mode. If you haven't seen pose mode before, it's exclusive to armchairs and is used for creating different positions for your characters. So what we're going to do with our selective bone is we're going to go to our bone for parties. Then scroll down until we come up to you bought the supply. Now underneath the viewport display, which you may have to open up. You have this custom shape option. And then the chance to choose your custom objects. Left-click and then select your key. As soon as you do that, you will see that the shape of the bone has changed to match the shape of our key. There are a couple of things though that we need to change. First of all, the rotation is incorrect, at least for what we want. And also the scaling. Now I'm going to uncheck this box, stop it scaling to the length of the bone itself. Then I'm going to left click on the option below to enable wireframe. So as a personal preference, I prefer to use wireframes or by custom shapes so that I can see food owes bones more clearly. Now we have this minor issue where our master control bone isn't rotated correctly. One method of solving lists is to go back into object mode, selects the original shite, go into edit mode, and then rotates on the appropriate axis. If we rotate this on the x axis, you can see that as we rotate the object, the shape used by the bone is rotating as well. So I'm going to use a value of 90 degrees and then press enter. Then we'll, I'm going to do is I'm going to go into objects mode and I'm going to hide this cube. So left-click on the eye icon in the outline, a panel to hide the key. This won't do anything to the shape of the master control bone. Now if you go into pose mode for your master control bone, you can see that it has the correct shape. Now this isn't the only bone on our rig that is going to have a different shape. But we will go onto those when we comes to them. In the next part of this class, we're going to begin creating the spine of our week, going form the lower back up to the head.
4. The Head The Neck And The Chest: In this video, we're going to begin creating the bones that are actually going to form the skeleton of our week. So what we're going to do is we're going to go into edit mode or our armature. So go into edit mode. And when you go into edit mode, you see that the custom shape is no longer there. So to master control bone now looks like a normal bone. This is perfectly fine and the correct behavior for blender. Next, what we're going to do is we're going to position the 3D cursor up into the body. So we're going to go with the cursor at all. Go to you in the side panel, and just increase the Z value. Hold down the Shift key to make it easier to adjust the positioning of your 3D cursor. I'm going to use a value of roughly 0.8, which is about halfway up my model. If I zoom in here and perhaps pan law view a little bit. The idea is going to be to create my second control button, which is going to start here and come down here. Now I'm going to hit shift and wow, in edit mode, this is going to add a new bone. There aren't any other options here. You just create a new bone when in edit mode for your armature. The head of the bone is always going to be selected. So the standard bone, which is an octahedral bone, has a head and a tail, and actually they all do, but it's most visible on this type of bone shape. So the head is where the shape sort of comes in to the circle and its thickest at the time. What we're going to do here is we just can't hit she then z and just move this bone down to here. Let's hit the period key on our number partner to zoom in on our selection. This bone, Lai, He is going to be our hip control bar. So we're going to name it as such. Naming bones is very important, perhaps even more important than the name of your actual objects. So every time we create a few new bones, were going to go here and rename each bar. This is our hip control burn. So type hip. The next step is to select the head of this fund, which is actually located here because we have reverse its direction. We're then going to hit the E key this time to extrude. So we're going to have a new bone that's connected to our existing hip control bone. It eat to extrude and create a new bone. The title of this new bone is the head of the hip control been lock it to the z-axis and move it up to about here. Then left-click. Let's just hit the period key to zoom in. And then Suma again, just to make sure that our view is centered on this bar. We are also going to hit one on our number part. It's a go into fun orthographic view. Then we're going to hit again to extrude another bomb. So the bound that we created just a moment ago was our lower back. This bone is going to be our upper bone. And then we're going to create another bone on top of that, which is going to be the chest. So log this to the z-axis, move it to about here. And left-click. Then hit E Again, locked to the z-axis and Extrude two about he. At the moment, I think this rig, these boundaries a little bit too low for my liking. So if you get a set of bones that you want to move all at the same time. You can do so by pressing the arrow key on one of those bonds. At the moment, these bonds are not directly connected to the master control bug. So we can use the LP to select these bounds and move them. So I'm just kind of locked them to the z-axis and just move them up to about here. Then I'm going to press F3 on my number pad. And I want to extrude the neck, but before I do that, I think I need to move these bones back a bit. So He Ji to move them back. And we're going to move them back on the y axis to a bound. He then select the head of this bound here and hit E2 extrude. Now this time because our neck is moving forward, we're going to do the same with the neck been supposition about here. And then extrude one more time to create the head bone. Now it's a process of naming each of these bonds. So we already have the nine for the hip control bone. But each of these will have the nine hit Control and then a number. So hit Control got seriously or one thought serious theory to et cetera. These names aren't any use to us. So we're going to select this bone here. Make sure you have selected hit Control 1-0-0 one and call it lower back. Then select the bone above and just call this upper back. Now, yes, I know this isn't the actual upper back of the character model that's actually located here. If you want to use the anatomy correctly. But we're just coming up with easy naive just for nasa that we know exactly which bands are which for our week. So the next bone is going to be the chest. And then we have the neck followed by the head. Now, before we move on to the next step, which is going to be it's create the shoulder, arm and hand bonds. We want to change the shape of our hip control bang so that impose mode, it looks different. So what I'm going to do is I'm going to go into objects mode and create a new shape, making sure that the 3D cursor is located at the center of the world or June. I'm going to hit shift and I add mesh. And this time I'm going to select a circle. In the operator panel. I'm going to reduce the number of vertices from 32 down to eight. Having a lot of Earth sees on your custom shapes not going to be of any benefit whatsoever. And it's actually going to be much easier to use custom shapes that have a small number of vertices. We're also going to reduce the radius to suitable size. And for the hip control bone, I want you to imagine the size of a hula hoop. So if you're doing hula hooping, what is the size of that Hoola? And try and make your hit Control bone at size so that it creates a ring around our model. So I think 0.34 is a good radius for our custom shape. Next, we're going to select our armchair, go into pose mode and with the hip control bone selected. So confirm that in the outline a panel. Make sure you scroll down to viewport, display, customer object, and then select circle. Now again, like before a couple of things we need to change. So turn this off. Turn this ONE, although it won't make a difference here because the custom shape already has no faces. And then we're going to just go back into objects mode, select our circle into edit mode, and just rotate this on the x or y axis. Let's see which one works here. So R then x, that works out pretty well. So let's type in at 90 to rotate it by 90 degrees on the x-axis and press Enter to confirm. Then we'll hide the circle shape in the outline a panel. Go into objects mode and select your armature. And just confirm impose mode that it is set up correctly. So we have our hit Control bone, as well as our bones for the spine, chest, neck, and head, as well as the master control bone. In the next video, we're going to be moving on to the arm of our human character.
5. The Arm: In this video, we're going to be creating the arm for our week. So what we're going to do is we're going to go from pose mode into edit mode, then go into front orthographic view. Now what we want to do here is we want to adjust the location of the 3D cursor. So in the fields have of the side panel increased the location value. Hold down shift. If you need to get more control, positioning about he. Then move it's on the X axis. Again using shift if you need to about here. Then hit shift and I to create your next bang. Now, what we have been doing up to this point is we've been naming our bones of the creation. But whenever we use shift i, we are actually able to name our bones straightaway. So I'm just kinda do that here by naming this as my showered upon. And then I'm going to grab the head and position the head about he. Let's just zoom in on our button here. And then we're going to extrude outs to the elbow point. So this is going to be the upper arm bone. It y_2 extrude and position. And our view E2 extrude. And then extrude one more time for the hands. Now before going any further, what I'm also going to do is I'm going to hit seven on my number pad. And I'm just going to reposition these bones to be in a more suitable position. So hit L to select them all. And then He Ci and just move them back to about he. And a handy thing he is going to be select this area, which is the title of our lower arm bone, and just move it back just a little bit. So there's going to come a point where if you have a straight line, It's going to create an incorrect hinge, which is guns creates an issue for when you begin moving your arm with the weak. By moving this tailbone back little bit, it's going to hinge in the correct direction. You're going to see what I mean by that a little bit later on. So here we're just going to select each of these bones and then rename them. So this is upper arm, this one is lower arm, and this one is hand. Now, if you've got a much more detailed hand with fingers and everything, then you're going to need more than just the one bone. But because we have a very simple low poly counter here, which is going to use a single bone just to keep things nice and simple. So that's the arm really created. We're not going to do the second one yet. Before we go any further down. We have created four different bones here. However, we need to do two things. First of all, we need to create a control bug. This is going to be used to move the arm. To do that, select the hand bone and hit Shift and date to create a new bone. Then just hit the right mouse button to put it in the same location. It only needs to be in the same location for now and rename it straightaway to hand control. Now one thing we haven't done yet with these bones in particular is we haven't determined whether they are the white side or the left side. This is a very important step. So what I want you to do is I want you to put a period k or full stop and then press R. Now I'm going to use a capital r and press enter. So this control bone is hand control. We're going to add this suffix onto each of these bands. Now to make selecting bones easier, toggle XY to select through our objects. So if I left-click again, I have selected my hand bomb. So let's nine this hand dot r. Then we're going to have lower arm dots are, we're going to have upper arm dots are. And then finally, shoulder dots are. The last thing we're going to do in this video is we're going to create a custom shape or our control bomb. So with the control bone selected, we're just going to go back into object mode. Then we're going to reposition the 3D cursor and add a new object. This time, I'm going to add a cylinder. I'm going to rotate this cylinder. So let us try rotating it 90 degrees on the x axis. This might be wrong. But I'm going to reduce the number of vertices Dan's, i'ts the radius down to about 0.9.09. And then the depth is going to be reduced to about 0.2. Then what we're going to do is we're going to go back to our armature, go into pose mode. And we're going to change our customer objects, form the standard object to our cylinder. Turn off scale to bone length. Then select wireframe. And at the moment it's in the incorrect direction too I want. So I'm going to go back into object mode very quickly. Select our cylinder. Edit mode, rotate on the z-axis. Ok, that's not correct. Let's try the Y-axis. X-axis. There we go. So rotate on the y-axis. And ironically that ended up being correct in the first place. So let's rotate that by 90 degrees. And that should be perfect. So now let's hide our cylinder and select the armature. Go into pose mode to just confirm the shape of our hand control bound. In the next video, we're going to be doing the leg. So we're going to be doing the white leg of our human character.
6. The Leg: In this video, we're going to be creating the bones 40 lower whites leg. The process here is going to be similar to creating the arm. So make sure that the 3D cursor is first of all located at the center of the world or virgin. Press one to go into fun orthographic view. Then move up the 3D cursor from the side panel. Use the shift key. If you have two For more control. Position, your 3D cursor about he, and then move it slightly on the x-axis to about here. Then press free to go into right orthographic view. Moving it back just a little bit on the y axis, if you need to. It doesn't need to be in line with the rest of the armature. It just needs to be in the correct position that the geometry that it's going to be assigned to. So here, I've only changed it very slightly on the y axis. Then in front of graphic view, change from post mode to edit mode and hit shift and I to add another button. Name this bone as upper leg. Now, as with the arm, this is going to be one side of our character. So make sure to use the dot r suffix, like we did with the arm bombs. Then grab and reposition to about here, where the needs should be. Hit the period key, and then zoom in just to get a better view of your wig. And hit ie to exclude down extruded noun to bow here, and left click. Then go into sideview and move the head of this bound back a bit. So move it back to about here. Take the title of the sign bone and just move it forward slightly. Then go back to the head and he e one more time to extrude out the foot. Next, we're going to select this bound and we're going to rename it as lower leg dots are. Making sure to get rid of the number extension. So the name of your bound should always end the sign so dots are the same as with your other bones. Select the foot bone and rename it as dots are and press Enter to confirm. And that's it. That is as simple as that to create the free bounds needed or our White Lake. In the next video, we're going to be creating free more bones, which are going to be very important when it comes to the behavior of our model. One of these is going to be a control bone or our white leg. The other two are going to be known as Paul targets, which are going to exist outside of our human character week.
7. Adding IK And Control Bones: In this video, we're going to be adding free more bones to our week. Now, apart from the bones that are required to go to the left-hand side, these are going to be the final newborns that we are going to be creating. The first is going to be a control bone, the leg. So we're going to select this title. He hit the period key to zoom in and free to go into why it's orthographic view. Then hit Iike to extrude. This bound here is our leg control bang. So we're going to name this as Lake control. Dots are. Then we're going to create two Paul targets. We're going to create a poll targets. He for our whites leg, and then a pole targets here for our lights elbow. The pole targets are generally used to help with the rotation of the appropriate bones. So to create the pole target, we're going to move our 3D cursor to about here. And then we're going to press one on an amber patches to confirm that it's roughly in the area which is So I think I'm going to move it ever so slightly on the X axis. So let's use a value of 0.092. Unless Skype it more NADH as go 0.096. And that looks like a good location to add the first pole target hit shift. And I while in edit mode to add the pole target. And then G and position. Then left-click about here. It's seven to go into top orthographic view. And we're going to move this pretty cursor to about here. Now, if we were to left-click here, what would happen is it would say probably snap the 3D cursor to where the plane is, which we don't want. So which is kind of move it within the side panel. So we're going to move it to abouts probably 0.35, looks like a good value. So 0.35 and then Enter. And that will be the location of the pole target for our elbow. So hit shift, I get g And we position. You will notice for these two pole targets that the head of each targets is going in the opposite direction. So the head will go in the direction where you want the elbow or need to points with these bones in position, selects and 39, each of them, making sure that you have your selection tool. So select and rename this one as LBO. Ik, dots are and press enter. Then select this bang and go. I chi dot r. We now have all the bones that we need on the right side. In the next video, we're going to be connecting these bones together with the appropriate relationships so that we can get our week working the way we want.
8. Relationships Between Bones: In this video, we are going to be focusing on the relationship between the individual bones, making sure everything is connected together correctly. So for example, if we went into pose mode, what we want with our master control bone is to select it, grab it, and move our entire armature. That is not the case here. So we need to adjust the relationships between these bones to fix that. The first thing we're going to do is select the shoulder bone, hold Shift, select the chest bone, hit Control and pay and keep offset. If you go connected, it's going to connect the two bones together, which is not what we're looking for. To correct this goto make parent, parent type and change from connected to keep offset. Next, select the upper leg dots are bone, then hold shift and select your lower back bone. Do not select the control bomb near, hit Control and pay, and then select key offset. At this point, you now have the leg bones and the arm bones connected in some way to our central bones here. Now we need to take our control bones and IK bones, parenting the IK bonds, also known as the pole targets to those control bums. So select your knee IK dot star, then shift, select your leg control. Dots are heat control and pay. And keep offset. Then select your elbow i, k dot r, and then hold shift and select your hand control. Dots are bone. Make sure it's the hand control button. And hit Control and pay and select Keep offset. Finally, we're going to select and what free control bones and pin them to the master control bone. So select the hand control bone, make sure it's selected. Then hold down the Shift key and select the foot control bone or the leg control bone. Then finally select the hit Control bone. Make sure in the Properties panel that the correct control bones are selected. Then finally, select your master control bone here. It control unpaid and select Keep offset. At this point we should get a lot of these lines appear. If we go into pose mode and select our master control bone and then he G to grab. You will now see that we are able to move all of the bones in our armchair. If we select our leg control bone, you can now see that we should be able to move our IK by. If you select the hand control body, you should be able to move the poll targets as well. And finally, the hip control bone should allow you to move pretty much everything except for the IK bombs. The last thing that we are going to do in this video is go into edit mode. And then we're going to select any of the bones that are on the outside. And we're going to in the bone properties have come down to where it says the form and uncheck this box. So uncheck the form for the IK bones or the pole targets. Do the same with the control bones. Making sure that the control bone is selective for the hand. And then the master control bone here. And finally, select our hip control bone here and antique the form. In the next video, we're going to be using inverse kinematics to finally get the behavior that we want for our week in terms of its available range of motion.
9. Inverse Kinematics: In this video, we are going to be finally getting our wig to behave the way we want. Let's do that. We need to add IK constraints. Ik is known as inverse kinematics. Now you don't need to know the specifics of what is meant by inverse kinematics. Kinematics, or you need to know is what it does with regard to your week. So let's start with the arm. We're going to select the lower arm bone. So make sure to select the lower arm bone and then go in suppose mode. With the lower arm bone selected. Go to the bone constraint properties and add a bone constraint. The option that we want is inverse kinematics. You first of all have a target. The target is going to be the armature. The bone in question. Your target bone is going to be your hand control. Dots are you pull targets, is going to be the armchair. And then the elbow, IK dot r. Now this instantly looks weird, but what I want you to do is adjust the chain length here to a value of two. You should then get this. So to recap, the initial target is the armature. Then choose the hand control but are so the target is the point of control. So the armature as the object and then the hand control gods are as the bone. You then acquire a pole target, which is again the armature with the elbow IK dot are selected as the bug. If you've done this correctly, what you can then do is you can select your control bone, Hit G, and get this kind of behavior where we're beginning to actually bend our arm. Now, it's not bending correctly, but this is a very, very simple fix. Simply select the bone in which we apply the constraint two and change the power ankle. So if we change the polar angle to 90 degrees, for example, select our control bone and attempt to move it. You can see it's now bending in a different direction. It's still the incorrect direction. But since it's going in the opposite direction, we can just change this from 90 to minus 90. And then if we test again, we can now see that we are getting the behavior that we want for our arm. If we select our elbow IK.com and then begins to move this around, what you should see is the bones of the arm being rotated based on the positioning of our pole target. And this is going to make animating the arm very easy. Dan align. Let's do a similar process with the leg. So we need to select the lower leg. Then at a bound constraints and go inverse kinematics, the target is the armature. The control bone is the foot control bone. So locates the corrects bone, which in my case is leg controlled. Dots are. Then select the pole target, which is the armature. And then PNIAI K dots are changed the chain length to two, and then adjust the pole angle. Now the pole angle, you can actually see this more visually because the foot bone here is actually pointing in the incorrect location or direction. So a justice to about 90 degrees period from the front. That looks pretty good to me. And then what we can do is we can take this bound here and he j. And we should get this kind of behavior for our leg. We can also take our poll target to rotate the armature bones border leg. A couple more things that we can do here. For example, if we wanted to make sure that our hand bone moved and loads hated like our control bone. Then we can very easily select the hand bone at a bone constraints and select Copy, trial, copy, rotation. Then select the target which is going to be again the armature. And the hand control got our bone. Now, if we were to take our control bone, we can move it same as normal, but now we can also write rotate the control bone, which rotates the hand bomb with inverse kinematic set up. All that's left to do is to mirror the bones on the white side of our model over to the left, which we will do in the next video.
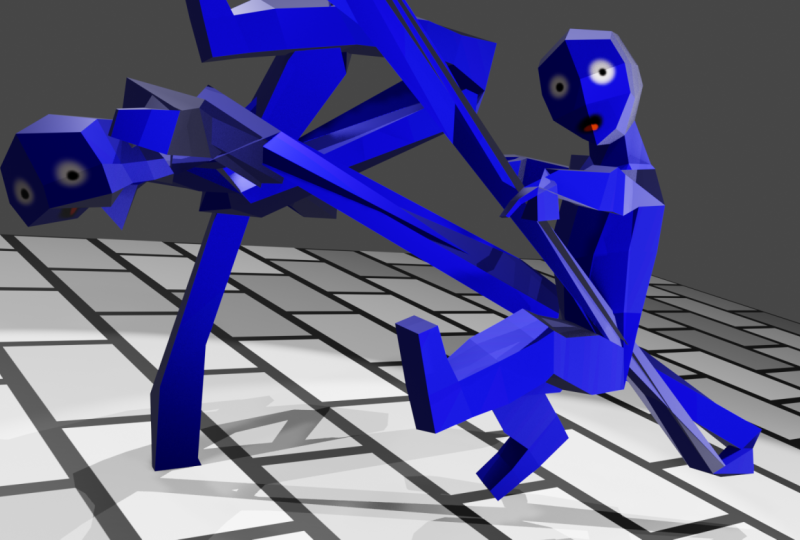
10. Connecting To The Mesh: In this video, we're going to take all the bones on the white side of our armature and we're going to mirror them over to the left side. We're then going to connect the armature up to our human character. So this is what I would like you to do. Go into edit mode. And then select all of the bones that represent the right-hand side of your model. So I'm going to press C and just select all the bones on the white side. I've selected the master control bound by accident, so I'm just going to use the middle mouse button on my mouse just to de-select the master control been confirmed that I have everything from the white side selected. Then I'm going to go to options and select x-axis miller. This should be the only option available if you are in edit mode for your armature. So I'm going to left-click to an Ebola. Then I'm going to hit the right mouse button to bring up the armature context menu and select symmetrized. You should now see, is, you should now see that all of your bones that you will settled had selected before, have been mirrored over to the other side. Make sure to test these new bounds, to make sure that they are working correctly. So go into pose mode and start by testing the master control. Correct? It control. Good. Trials. The control bones for both legs. They both appear to be working correctly. Then we have the hands which both appear to be working as well. Okay. So everything seems to be in order for our armature. If we check any of the bones that are on the left hand side, then we will see that I have the sign names and the right hand side equivalence. But instead all dots are, they now read as dots l. So we have lower leg dot l, upper leg dot, etcetera. That means that everything is in place and it's time to connect our armed shot to our week. So this is, this is the ultimate test. Go into objects mug, select your human character first, then select shoe. Armature is second with shift left click. Then hit control and pay. Now do not set the parent just to the object. We have additional options here for the armature, the form. You can choose any of these, but the easiest ones get started with is automatic weights, which is going to assign weights to the various parts of your model based on the location of the bones in your armature. So left click there. And initially you won't see anything has changed. But if we select the armature and then go into pose mode, if we take this hand control bone and grab and move it, you can see that we are now moving the model itself. So we can't manipulate the pole targets as well as the control bones to reposition. But different parts of our model. So now we can create a variety of poses for our model depending on how much geometry is available, and also depending on how the weights have been applied. Now we're not going to be going through weight painting in this class, but just to see what it looks like, if we select our object. So we select our mesh objects and then go into white painting. Then you can see that most of the objects is blew apart form the lower leg in this case. And that's actually because the last selection was for our lower leg bone. And just as a very quick example of what this all means, basically blue means no influence and red means total influence. So you can, with the white paint mode enabled, you can left click over vertices. And you will see that the influence on those vertices for that selective bound increases as you continue to left-click over those selected vertices. I'm not gonna go into too much detail there, but that's just a general idea of how white painting works. So you would manipulate the values here in White Painting mode to adjust how you want the bones to affect the geometry. The, nowadays, we've done exactly what we needed to do. We've created a week, and we are now able to use that wig to create various poses for our model. One last thing before we finish. There are two different types or position for our week. So we go into pose mode. The two options that we have if we go to our object data properties are posed position, which is the position that we have created by moving all of our control bones. And then the rest position, which was the original location of all the bones for our armature. If you want the postpositions match to rest position, then you can do so by just hitting out G, R, and S to make sure that it is all repositioned back to how it was in the West position. This brings our class on creating a human character week in blender. I hope you've enjoyed that guys, and I will hope to see you in the next class.
11. Your Homework: The class is now complete, but you're learning is not. So for your homework, for this class, I want you to first of all, test your memory without going back to the course content. Create a new week from scratch to see what you remember. Create at least three different vendors using different poses. Created impose mode. And also, can you make something else like an animal or vehicle using the skills that you have learned in this class. Complete these free homework tasks as a means of improving the skill set that you have learned in this class. Thanks guys, and I will see you next time.
 Joe Baily