Transcripts
1. How to Write, Create and Publish a Childrens Picture Book: Hello and welcome. My name is Ronnie, and thank
you very much for joining this course about how to create a children's
picture storybook, or the bestselling author, or the creator of
over 350 books. And I'm also the founder of the life gradual
Publishing Group. Now, what I want
this course to be about is how to teach you all of those skills and
tricks to be able to create your own children's
picture storyboard. I've created a number of
children's books myself. Therefore, I want
to lean on that experienced teach
you what you need to know to be able to
load those books up onto platforms like Amazon, Katie pe, and english Spark. So during the course, I'll be showing you how to
create books like this one. Similar to this one. But I'm going to go
through the process that I take to
crack these books. So let's get into the
content of this course. Second, show you everything that you
are going to be learning. So let's run through the different things that we're
gonna be covering and the different steps that
you need to do to create your own children's
picture storybook. Now the course is split up
into eight different sections. Personally, we're gonna be
covering the journey ahead. So what is your purpose for creating your children's
picture storybook? And also cover the five
keys to running success. Section two will be creating
your framework that will involve the book research in creating your manuscripts. Section number three,
your title and subtitle. So what are the
things to consider? And making sure you're using the right keywords in
your title and subtitle. So your book can be found section number for the
format and the structure. So we're looking at a, designing your book and what
that's gonna look like. And the type of book to create. Is it a hard book? Is The paperback,
isn't an e-book? Is it a combination of all three section number
five of the design? So we're talking
everything designed, bringing together the
elements for our book, making sure we get
the illustrations. Do we outsource for
illustration work? Do we do it ourselves? If so, where can we
find those images? Section number six is
the upload process. Now if you don't already
have an Amazon kVp account, I'll show you how to create one. Next is how to upload your
book correctly to Amazon, kVp, and another platform
called Ingram Spark, which is also another
global distribution channel that you can use for your books. Then we're looking at a
marketing and advertising. Now, marketing and advertising
are two different things. And I'll show you what they are. And we're going to look
and identify ways we can advertise a book and ways
we can market our book. Number eight is the conclusion. So, uh, wrapping up the
process and bringing all the skills and all the steps together for one final look, before we finish up the course. I'm really looking
forward to sharing my knowledge and teaching you all the steps that
are required to create your own children's
picture storybook. So let's get into
the course now.
2. Publishing a Childrens Book in 2025: Hello. I just wanted to
provide a 2025 update, and to provide you
with reassurance that what you're about to
view in regards to the course content is as
highly relevant today as it was when I first created the course a
couple of years ago. Now, since that time, I've had thousands upon thousands of students that have
enrolled in the course, which is just fantastic. And I've had some excellent feedback and brilliant reviews of students that have gone on to publish books and be very, very successful
self publishers on platforms like Amazon
KDP and Ingram Spark. I continue to publish
children's books. I love the opportunity to
create a positive impact, and you'll probably see that
within the course content. I love to be passionate
about what I'm teaching. I want you to succeed, and I want you to have
fun doing it, as well. It's not all about creating books to create a
passive income. Yes, that is something that comes with creating great books, but you need to have a passion towards creating and publishing the books in the first place and wanting to make a
positive difference. So I really hope that
you enjoy the content. Again, it's probably one off if not my most popular courses, and it will probably
continue to be that way. I will make adjustments
and changes to the course when things might
change within the industry. But as it stands right now,
the course is up to date, and I really hope you enjoy how to publish a children's
book with Amazon KDP. So without any further delay, I look forward to seeing you
on the course. Good luck.
3. Section 1 Introduction - The Journey Ahead: Welcome to section number one, the journey ahead Sign. In this section,
we'll be covering off these four key areas. Number one, your purpose for creating and
publishing your book. Number two, why self-publish? The three, Five K's to
book creation, success? And number four, your pen name. Let me get into
these lessons now.
4. Your Purpose for Creating and Publishing Your book: In this lesson, I want you to
identify what your purposes for creating and publishing your children's
picture storybook. There are many different reasons why people create
and publish books. It's important that you identify what yours is because
it's gonna be the driving force to make sure you get all
these steps done. And make sure you
can get your book published on Amazon, kVp, on Ingram spark, or even approach a publisher about
publishing your book. Now, h of us have
different reasons and, uh, why, why is it that you
want to create this book? Now, Moby, to become
a first-time author, it might be that
you've got a dream of Credit Mobilier and making
a positive difference. Perhaps you're part of
a group or a network and you have an expertise
in a particular area. And creating these book will
help to spread your message. What if the reason is, whatever the
purposes you need to keep it front of mind when
you're creating your book. Guarantee. They're gonna be Tom's where
it does become challenging. They might be hurdles
that you need to overcome when you're
creating your book. But whatever happens,
you need to make sure you keep in front of
mine what that purposes, what is your why? And it really helps to
establish some goals around your publishing and
what you really want to achieve at the
end of this course. Now these lessons, again to be tiled towards the steps
that you need to take. But make sure that when you identify what your book
is gonna be about, that you really try and Tyler, the steps and I'm talking about towards your book and
creating your book. I want you to pause
at the moment, even just get out
a blank piece of pipe up and to write down, why do you want to
create these book? As I said, it could be that you want to become a
first-time author. It might be that you
want to pause it, have a positive impact. It could be that you wanted
to create a small business. A large business. It might be a publishing
business log off, or it could be to create
a passive income or long-term passive income
stream that you can name, create more books on, and create a bit of
a series as well. These are the things
that are important. And even though it's a part
of the book creation process, we're not actually physically
doing anything apart from maybe writing a few things
down in regards to goals, it is a very important
part of the process. As I mentioned, make
sure you pause, write down what your purposes
for creating your book. That will then
establish a bit of a framework about what
you want to create. And therefore, it will also
help you to think about the con of book that he's gonna help you to achieve your goal. So hopefully that listen helps.
5. Why Self Publish: Welcome to this lesson. This course is about creating
your children's picture storybook and pretty
much teaching you how to self-publish
your book. But why would someone
self-publishing book? Well, all that
experience we'd bought, I've had a book that's been published by global publisher, but I've also published
many, many books myself. I had experienced in y, I would consider
self-publishing and why. You might also consider at some point in time
getting it published. But there are pros and cons, but let's identify
why you would look at considering self-publishing
your own book. Firstly, you have greater
control over the process, including the design,
the storyline, and many different elements. When you do add source that
process too, I publish them. You do lose a lot
of that process. And it's why I
decided to go into self-publishing because
the first book that I had published under
a major publisher did lose plenty of that control. The, I didn't use
the front cover that I wanted and I changed up a lot of the manuscripts compared to what I
originally created. And then when it did
go out to market, the marketing and
advertising they used didn't really appeal to me. And in the end of
the book didn't sell a great deal just because
these elements were missing. So I felt that he fall. I could self-published
myself ahead, greater control over the
direction of the book. Number two, you will make a greater return or dollar
value on each salad your book. Now it obviously depends on how many books
you're selling. You might only sell three books, and you might like idlis. But if you had a
major publisher, they might sell thousands
of books for you, therefore, generating
a lot more money. However, if you were to self-publish and you were
to do it the right way, then the percentage
d e receive as a self-published is
significantly greater. As an example, if you
had a $15 US book, then you are likely to make a random bat seven rule ICT
us doughs per style after printing costs that come into play with the scope for a group
like Amazon cardiac pain. And then there's also a 60%, 40 percent revenue split
between the publisher and KP. There is a certainly
a greater amount of revenue you can generate
by self-publishing. But that also comes to density, the number of books you're
gonna be selling and wiring up with having the opportunity
to market your own book. He's gonna be more
beneficial to you because you have
maybe a social group, our social following,
media following. You think that I made
you publish that would do a better job at
marketing your book. And he'd rather than
sit back, relax, slight things happen
for economy approach rather than proactively going out and marketing your book? Number three, the
timeline to create your own book by self-publishing is
significantly reduced. When I went through the traditional route of getting Mod book published
by I published, the process took between
eight to 12 months. When you self publish
your own book, you can literally have it
done in a couple of dice. Now, I wouldn't recommend
that because I want you to take your time to
get these elements rot. But realistically, geek could
create a picture storybook, children's picture storybook
in a couple of weeks. If you had the rod
elements, the right steps, you put it all
together, then there's actually no reason
why you couldn't. So that's part of this course
teaching you those steps. You can go as fast or slow
once you have control. And therefore, he had
the ability to be able to create your own
books at your leisure. And you can create one book, the correct 200 books. And that is the beauty
of self-publishing. There three areas or three
key things you need to take in consideration when looking at self-publishing
your own book. And also at a later date. Once you've published
some books, you might also have
a combination. Some books your credit itself, I need might be some books. So you approach publishing
group and they can take control of it for you and you can let things
go that way as well. So I'm do hope that that
information helps you out.
6. How is 'Archie the Bear' performing 9 months since release?: Hello and welcome to
this updated lesson. I thought it would be great
opportunity for you to share an update on one of
mine books for 2023. So currently it is
the end of May 2023. So we're going to have a
look at Archie the bay, see how it's performing. And I'll give you some feedback about what I've learned during the process of
launching the book back in August last year. So what things have done that I felt that have allowed that
book to be successful. So let's go and have a look, actually the bed to begin with and look at
its performance. So I'm on Amazon right now and I've got the paperback
version selected. So this was released
back in August 2022. On, in 2022. So let's scroll down
and we'll have a look. We've got my a
plus content here. So I wanted to show some of
the illustrations from inside the book so that customers can really see
what they're going to get. I've also got some
editorial reviews. And if we have a look here, the bestseller rank at the
moment is a BSR of 29,738. The lowest it's been
has been about 12,000. The highest being
maybe it's 150,000. I've got some really good
reviews that have come through. And I think that
has really helped with the social
proof of this book. So if I scroll back up again, what we might do is have a
look at the hardcover version with the hardcover because
it's under 75 pages, which is a requirement
for Amazon kVp. I've got it listed
with Ingram Spark. Now, when you list your
book within Spark, as long as everything
is the same, so the same title, same subtitle, same number
of pages, same everything. Then you can get that
book to link up. So that's what's happened
in this situation here. So I've got my
hardcover listed at $18.99. So I'll click on that. And again, I've got the look
inside feature selected. So if you go to look inside, I think I've got it allocated at a bat when t percent
or maybe even 30%. So customers again can see what they are going to
purchase and they can see the quality of
the illustrations. And I always do that. I always increase the
look inside feature. So let's click that
off. We click that. Let's go down and see how it's performing again, 32 pages. And it's an 8.5
by 8.5 inch book. We scroll down here. It's performing at
213,000 as a BSR. And I'm comfortable with that. Not as many people
may buy this in a hard copy version
based on the price. But I can't really
get much less than that just because of the
way that Ingram works. And with your wholesale
discount on probably making a bet $1.80 to $2 per book
with the paperback book. I'm making proximately probably the same that to those $2.20. So that's the performance
of the book that way. Let's have a look at
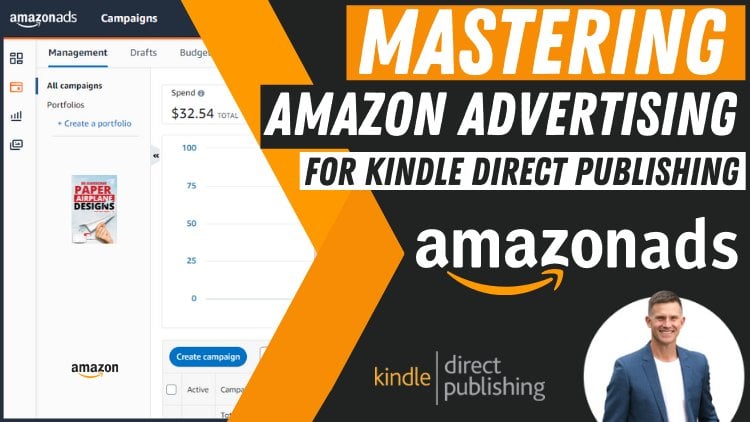
the Amazon advertising that I've been running
towards this book. So I'm gonna go to
my campaign now. This is the current
so last 30 days. So that takes us back until late April 2 now the end of May. And you can see that I've
spent $91 over the course of the last 30 days for sales
of $571 and a cost of 15.97. And you can even see here really kicked up in the last dial. So I had $43 in sales for an a cos of 6%,
which is fantastic. You can see I've got
the one product and I've got 221 different
keywords that I'm focusing on. Some of actually
got switched off. And I've also ensured that
when I'm doing these, that I'm I've got a
budget of that $4 a day. I've actually reduced it. It started off with a budget
of about 10 mi a day. And I've slowly brought
that back because I just didn't want to keep on
spending too much money. But what this means is there
might be sales of $571, but that's not my profit. That's the core
price of the book. So if I'm selling my
book, Kindles 99, then collectively,
the books that I've sold of added up
to Father and $71. The profit on the sales
are probably need to get under an a cost of 20%
to start making a profit. But what this is effectively
doing is helping with the algorithm and getting
my book continuing to be placed really
well on Amazon. So that's why I've
continued to run the ads. And the spend is $91 per month. So I'm in front. I'll look at what the sales
are compared to the spin. And I can probably continue this to run this ad for a long, long time because
it's converting. Well, it's not costing me anything on making a
small profit from it. But the organic sales where things really
start to kick off. This book currently
would be making about $1,000 US per month. Maybe more on some months, maybe a little bit less
depending on how it's tracking. But that's the performance
of the books so far. So hopefully that really helps. I think for me, the launcher is
really important. And I'll talk about the launch in one of
my other courses. It's running of the ads in
getting them tracking well, again, is another course
on Amazon ads that I have. But just ensuring that you're doing what you
can to market the book. I've also got another
video that I created, which you may or may not have
seen about video animation. So I'll quickly show you that animation and you can
put that on Facebook. You can put it on Instagram. You can put it on LinkedIn
if you wanted to. So I'll show you
that animation now. And I can show you, we can
get that gig if you wanted to create an animation for your children's
future storybook. And here's the video
animation. Now got done. I can say that's the animation. It's a fantastic
different resource. You can have to
market your book. And I had that done
with the father gig. So I'll quickly show you
where I had that keep done. And you might want to
get one done yourself. The gig is through fiber,
through Francesco. And you can choose one of
these two options here. And this is an
Australian dollars, so it's approximately ten
or live in US dollars. Click on There, you go
through the details. So for basic, you get 25
second animation video, standard 40 s and
premium in 60 s. And I just think that it's unbelievable
what he can create. And I've used Francesco five or six times myself and I couldn't recommend
them highly enough. So that's an option for you to choose if you want to
market your book as well. So there's an update of my book, Archie the bay becomes
a big brother. Just continue to work hard
at marketing your book. Advertising, at creating
those book animations, using Amazon ads and just create great books
the customers love. And ultimately, if you do create a great book and you can get
some traction initially, then that really does
help for the long term. And you gotta think long
term with your books. It's been great to be able to share this information with you, and I really hope it helps
with your journey if you're creating your Children's
illustrated storybook.
7. The 5 Keys to Book Creation Success: In this lesson, I
want to identify the five keys to book
creation success. What do i is five critical things you
need to make sure you apply to give you a book
every chance of succeeding. Now it's not an exhaustive list, but I believe these
five things are key to making sure you do have success in your book and the
creation process. Let me identify those
five things now. Number one is having a comprehensive plan and structure or what we
call a framework, all eating into the
creation of your book. If you don't have that plan
and that structure in place, then the foundations for what you're building
could be compromised. We need to make sure that we do plan accordingly and we had everything organized so we have flow in the
development of a book. Number two is a story that is
engaging for your audience. Then this will be a bat. You are identifying who
your audiences through the research process and having an engaging book and
tile it to that audience is one of those critical
areas for your success, for the creation of your book. Number three, it needs
to be well-researched. So you have a topic
or an issue mine that you can then create
your story around, create your illustrations or your graphics or
your design around. It needs to be well-researched. Number for includes
the key elements. And we know that a great
cover is gonna be critical. The description and
the story flows. These are the things
that we need to look at to make sure
we have success. And the cover design is one of those areas that we are
going to be covering in the course along with
the description. And when you create
your storyline, that's where we think about
how it's going to flow. How it's gonna start, what's the midpoint and
what's the endpoint? And number five is
created with passion. If you can create a
book with passion, that will come out. If you don't have a
passion towards the topic. Sometimes you can
see that in a book, the professionalism
might not be there. As he is, as important as it is to research your
topic annual niche. You still need to be
passionate about your book. And you need to make
sure you're aligned with the purpose of your book as over outlined earlier in the course, you need to have that passion. Because when you
had the passion, when you have the drive,
when you have the goals, you make these steps happen
and they become a much, much easier process
to bring together. When you are passionate
about your book. These are the five key things that you need to consider when we're making our book through the creation process
to bring together, to give it every opportunity
to be a success.
8. Your Pen Name: When you create your book, you don't have to alter
the book and you're nine. There are many
different options that you need to consider and how you're going to position your book when
you do publish it. When you do load your book
up to Amazon kite API, you had the option of choosing what your
paint is going to bake. Let me show you that
process and I'll be going more into depth
in these later in the course when you
do upload your book. But let me show you where you
do into that information. When you're on Amazon card, a PE, when you've gone
to your bookshelf. Again, this is gonna be shown to you when we do the
upload process. But when you scroll down, you're entering the book. Details, the title
and the subtitle, can add series information. This is where you can enter
your author information. Now it doesn't have to be your first-name
annual last night. It could be your brand
for your publishing. It could be a name that
means something to you. When you're choosing
your pen name. You do need to think about
the long-term though, because you can't go back
and change that night once it's put in place when you publish your book, that seats. And that's where you need
to think carefully bad at even give it a dye to think
about what you're gonna do. Now I'll have a number of different pin names
and I operate on them just depending on the
kind of book on creating. Now, for some more
longer phone books, I've used my real name. When I've created some books under some children's
publishing, it might be under
another pin nine. And there are different
ways that you can organize your pin names so that it is to do with the kind of
book you're creating. You might have a gift book
series creating underpin nine. You might have longer
phone book, Richie create. And that might be under your
own personal brand name. You might have a set of books under your publishing
brand name. These are the kinds of
things that you need to look at when you're
creating your pin nine. Now for many people, we can just use your own name, which is perfectly fine and will in fact give you
some great credibility. Particularly if the
book is a bestseller, then you as an author will be the person who's attached
to that bestseller tag. And that's a great
thing to have, particularly if
you're looking at expanding your publishing
under your own pain. That's where it is there. But let's have a quick look
on Amazon at different pen name examples
that I can show you. If we have a look at a
few children's picture storybooks about this
during the fire station. On this one you've got Jupiter's Leslie Maguire
and Joe, and f2. Then you've got fire truck
dreams by Sharon and dive. Then you've also got
one here by decay, then these ones by Jacob design. So this shows you don't have to put that you can use your
first name and last name. It could be your
brand name as well. If you look down here,
but the more you can probably safely go
to the next page, you'll see some other different options that
people have done. Blue wave press. This is Mark, he's done
one normal Bradwell. Love your neighbor code. It just gives you some
examples of the Y that people can structure their
books with the pin names. That's for you to consider. What's gonna be best for
you for the long term. This one, for example,
to tender monsters. So if we click on there, then this will actually bring up all the books that to
tender monsters have. And they might have
children's books. They might have different
publications for learning. And you can see all the different
branding ones here that customers are also ballpark. If you went to little
Brian publishing, then this person hasn't used
there the personal name. They've used a brand name
when they publishing. And that is considered
at pin nine as well. Hopefully that helps you in
thinking carefully at that, what she wanted to do regarding your pen name and
how you want that to reflect your
long-term publication for a children's
picture storybook.
9. Section 2 Introduction - Creating Your Framework: Welcome to section two. Section two, I want to create
your framework so it is the basis of your book and we need to cover off some really important elements in this. So that's gonna be research
and finding your book idea. It's Amazon niche research, creating your story, creating
your written manuscripts, grammar, and spelling check. And then finally, pitch camp. Bank. How many pages should
you make your book? Is there a specific amount
of pages you should create? Or is there a formula that
you should be looking at? Let's move into
these next lessons about creating a framework. Making sure that we can
create a structure, a ran a book to make
it a successful book.
10. Research and Finding Your Book Idea: Part of the success of your book will all come down
to your research. And generating ADI is from that research to help you
with a book crashing process, self-identified a few key things that we need to do when we are completing our research and the reasons why we're getting
up doing your research. Let me show you those now. Instead, these are the key
things that are identified for the reasons you should be
doing thorough research. Number one is odd
Dia collection, getting those ideas
down on paper. So we know what
we're looking for. Data collection, we've got some Chrome extensions that
we're gonna be using to make sure we get that data and making sure that what the idea is that we do have
are actually gonna be suitable for a book creation. What works and
what doesn't work? What are the kind of books
that actually are working? And what are the common themes that are working as part
of the development? Training patterns? What are the things that are
actually working right now? Inspiration, you do get a lot of inspiration from your
research and you'll be surprised at how
many ideas you do get that you can actually
focus on for another book, elimination, we're eliminating some
initial ideas that we might have had that really
probably aren't going to work. We've got different
marketplaces. Are the different
markets for yearbooks. One bookmark work well
in the United States. One bookmark work well
in the United Kingdom, and another bookmark work well in Germany or Austria,
or even Canada. Finally, do we have a book that is evergreen
or is it short-term? What is our target? Do we want to book that's gonna be selling for yeast to come? Do we want a book
that's only going to be selling for the next six months. For me personally are lot to create what we call
evergreen books. Books that they're going to
have a long-term future. So once you create that book, you had the opportunity
of generating styles and having a
longer-term impact, or sorry, having an impact for a much longer-term
period of time. These are the things that
we do our research for. Now. When we deployed our research, we need to be documenting
this information down. And our recommend that you use what we call a research
truck or a niche trek up. And let me show you
what our develops and something that you can
simply create yourself. This is the document and
an Excel spreadsheet of keyword or book titles that
are not document here, we've got whether
it's called a long or short tau keyword. And I'll talk about this
more in our research. Now that's the book
ranking on Amazon again, or go into more detail
about what the bay SREs. We could search results under
different book categories. And we've got the number of
books under 150 thousand BSR, which is here, That's the
book ranking on Amazon. And we've got whether
it's a piece on the first page of your search results
when we're doing it, or how many pages
down with these. But I'll go into more detail in the following lessons about what these different
statistics are, what the information is. So you can actually create your own tracker and use
that for your research, for your children's book that we're going to be creating
as part of this course.
11. Chrome Extensions: When we perform our
research for a book, you need tools that
are going to help you. And there are two Chrome
extensions at all, personal use that
are free to use, that I think you'll
find very helpful. Now if you have it already
uses Chrome extensions. I'll give you a
quick overview of what they are and how
they can help you. So one is called IMC
extension, expand. And I'll be showing
you on Amazon have these Chrome
extensions will help you. The second one is
DSM zone quick view. Again, these are
really good tools when you're doing a research to get that extra data that we need to qualify
whether your book is a book that customers are potentially going
to be searching for. It, that is your
angle bangs styles. But you might have a different purpose
for creating a book. But I want to make
sure I show you in each GCE today's
Chrome extensions. Let me show you how
both of these would work if you're doing your
niche research on Amazon. Now I'm on Amazon. And if I was to think about a different area
that I'm looking at, perhaps writing a book on. What I might do is say, books for children
about the beach. What I would do is rot that. And what I'm aiming to do is get as much information
as I can. Click on it. And if we scroll down, you'll see these little box
start to light up just here. Now, that is this
one which is the Ds, sorry, DSM is on quick view. And you can see the
Chrome extensions at work up the top here, the one across here, that's the IMC expand. And I'll show you how
both of them work. Let's do this. 1 first, the DSM, Amazon quick view. The DSM is on quick
view will show you the ISBN number and
the book ranking. Now that's called the BSR. And it's basically the base R is the ranking that Amazon has across all the books
that are on there. So for example, if
we go down here, Let's do one more. Let's go to this one
here. Ketone plugged. This one, is ranked 36,471 out of all the millions of books that are on Amazon, you've got the ice in number. So that's similar to
an ISBN number or the book identification number
that we have for Amazon. Now, if you wanted to, you could pie some
more to get what they call a price history that I just use
the free version. And you can use this data when you're adding
it to your research. So we just scroll down
and it will really help us when we're doing our
research to see how that book, all those particular
books are ranked. This book here ranked ICT 1464, this book down here, 190,224. Now it, That's the
suggestion expand. So if we go back
and just say we did children's book on,
these are team. This will start to expand
the different things. Let me just fix this. We'll see if we can
bring something out. So children's book on and see how it starts to bring up all the
different options. And then these are extra keywords that the
suggestion expand at least doing. If we did kids visit to what might happen. Doctor visit log book for kids. Let's see if we can get one
word expands even more. If we go hospital visit. This will start to come up with different keywords as well. Expense them. Now, another really good
one more up a spelling book for and it's got Tori Spelling
Book, Spelling Bee book. So the expanded just gives you
additional keywords there. Sometimes you get lots, sometimes you don't get many. Now, I use these
additional keywords that expand a has just a
tap into different niches, and this is perfect. Here we go. If we
just need spelling, It's got spelling
right for spelling for Minecraft is
spelling for dyslexia. Spelling and vocabulary. Spelling with love. These are the expander
keywords that we get if we didn't have the Chrome extension put on for the IMC expander. We would only get these ones
here, which are Amazon's. But the expand it gives us a lot more and we can
start to plug those in to our niche trek out to see what keywords people
are searching for, all customers are searching for. I really do like it. If we have a ***** book, you can see the different
words that are coming up. Beach books for
toddlers, for example. And then we can for Let's do eight. If anything comes up. Now it doesn't come up at the moment. But what we're looking for, popular books that we can use. Now the other different
extension that I use, but it's a paid extension, is this one just here? It's called KD spot and it's
a once off lifetime payment. And what this one
does is gives us some more information
about the ranking. Keywords in the book
enhance ranking. Swipe for this to light up, so far I wrote beach
book toddlers. Then the average styles, right? And that means across
all the books, across those keywords, it's actually ranked at 12,053, which is very, very good. We're looking at having
an average styles rung a rank under
Beta 150 thousand. So it's very good. The
average monthly revenue for these keywords is 44 thousand. And you can see how these books are ranked
based on an information, popularity potential
and competition. You do have the option of using those free Chrome extensions. And also if you wanted to, you can get that
software called KD spot. You can consider that. Now. We would scroll down and we can see the different
rankings that are here. And what I would do with my tracker is start
to rot down the words that are actually popular or Familia the customers
are looking for. Let's go down a
little bit further. These different ones here,
what are we looking at? What's the nine? Let's do visits. Books. We do a search. This society is 3 thousand results across all the books using
those keywords. You can, you can see some of
them aren't related at all. But if we did kids visit books, Theta is 375 results. And this will start to show us a few more books that
we're looking at, creating a kid's
sightings ocean. That's a start at
children's book. This gets first day,
first pitch day, and another one on
looking to see if there's anything in here that I can create
multiple column. I can say it is a
visit to the doctor vanishing like that's a
spots I call a sponsor book. Now I do go into
more detail in this, in another course about
Amazon kVp publishing. And that might be a good course to look
at because it does have specific information
about the niche research and going to significant depth about what you should
be looking for. For us. What I think that we
need to be looking for right here is
just some ideas. As I mentioned, we're looking at eliminating some oddities
that aren't going to work. We want to see what is. So let's, let me show you
another way we can do this. Online. Children's Picture Story book. Let's just say what comes up
here is 70 thousand results. We want to make
sure that we're not competing in 70
thousand on the books, we need to come up
with some keywords that a G9 to niche
down a lot more. If I had children's
picture storybook about let's say, police. It's a thousand
search results here. And we're looking for books that might
give us inspiration. Books we know we can
probably compare it against. So what I would do, we've got the Amazon
suggestion expander that we can look
and see if there's any other words that expanding
doesn't look like it. So we can leave that one. But what we can do is use
the D Amazon quick view, have a look and see
how these are ranking. These ones here is ranking. Eleven thousand, one hundred
and nineteen thousand. If we hover over the picture, you can also see where it's ranked in
particular categories. So children's jobs and caries, reference books.
This cell is rank. These will give us information
about the number of pages which we'll be
covering in another lesson. This one is 24 pages. Paid. The cat is ranked 3,640 x
are really well ranked. We can hover over
24 pages again. The other thing I look for is a sizable this is an eye point, sorry, eight by eight inch. And these are the
things you need to look at when you're
doing research. And it would be worth
writing these down as well. Let's have a look
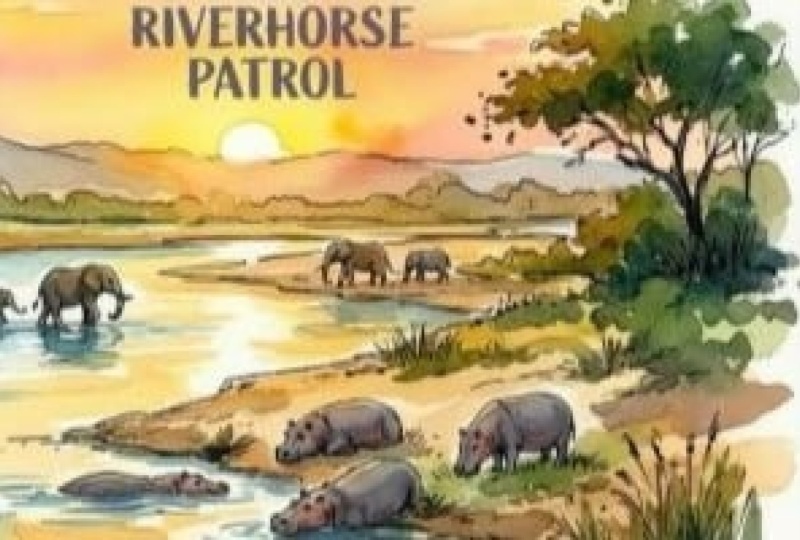
place officers on patrol trend in 12
thousand we would probably looking for books under ranking of about a 150 thousand. He's probably ideal. Diet or PlayStation, 25 thousand died the fire
station, 2 thousand. So these are popular books, books for kids about
visiting the police station, books about visiting
the fire station. Let's have a look at what
other ones might be trending. Let's have a look mod dog. Awesome ambulances. What I would do is click on it. They didn't have a look at
inside the book to see how hot this book would be to
credit our own version. Let's have a look. I've used an
illustrator for this. You can see a few pages in and how they're actually
rotting the story. I can see it is quite simple
what they've written here. You can then see the
back information. Let's have a look a
bit more into this. It's ranked really, really well. It's got a 4, I'd
out of five stars. Then what we can do is again, look at the size is
7.8 by eight inch. It's ranked 301 in
this category, Five, 23 in this category, and 609 in this one. What I also like to do is look
at the different reviews. And what you can tell from these reviews is what's
working, what's not working? What could be improved? What could you do if you create your own children's
book on awesome, that ambulances, the G
could actually create your own little gap in the market to create your children's
picture book as well. That should be a
source of inspiration. Remember where we're looking
for things that are working, things that aren't working, improvements that could be made, data and these, it needs to be written
down in your truck. You can find app if this is
a book you should create. Let's have a look as well. If you look along here, you can see other
options that you choose. There's another
ambulance book, David, that's not really
what we wanted to do. Kc going along. They might or might not be anything here that
we can look at. That's a good way of looking
at the different results. Let's go back again here. Scroll down and be
further police officer. It's probably gonna
be ranking 300s, I think once it loads 34. Well, let's have a
look and see how this person has done this side. My daddy is a police officer. It's obviously popular. We look at the Pij is 24 pi
just seems to become thin. It's an eye point fought
by ICT, 0.5 inch. It's got lots of reviews, very, very good reviews. Let's have a look and see how
they've written this book. Illustrations of quite simple doesn't show us a
lot in the book, but sometimes the
reviews do go down here. And also you can see my day is a police officer that place I bases place opposite daddies. This is obviously a thing
that the author has gone for. Going down. Here we go. This will show us
inside the book. Before we go to work. My dad, he wants
to meet tonight. You're quietly say could not
and keeps me on my head. Let's have a look at it. Read about that information. Let's go to the next
one. There we go. It can read through it for net what's working, what's not. Can avoid bends in the book. Paralyzed reviews. And you have a look at what is good about these
kinds of books. 4.9 out of five. What I'd be doing is noting
down a police of a book. And then I would look inside and see what the writing
style is like, what the illustrations
alike or the California one of
the graphics lock. These are things that
I will draw it down, went on doing more research. You need to find niche of yours that you think
work well, it could be. A bad place. It could be about the ambulance. It could be a bad dig is it could be for thought of books. But this is what
I do when I look through the different
research and I'll do, let's just go back here. And we might just
do one more look. Stoke children's picture
storybook, three days. Let's have a look down here. Bear and Fred, 764. So that's not what
we're looking for. We can say that caught die. So you might want to credit
children's book a bat costs. Keep going down here. Feed the bear, and
then the bay book. Let's have a look down here. We're looking for those cheap children's picture storybooks. One is about the width up. So let's have a look at this. Created back in 201532 pages. Point IT Inch Pretty much. Let's have a look inside. It's really well illustrated. And it will give you a bit of information
about head around it. Now this will show you
how simple some of these rotting and creation
of the rotting is. Drip, drop, skip and hop. Splish, Splash, sidewalk dash. When, when we go square. So I can see it's more
the illustrations doing the talking,
the actual writing. And you can see how well
it easy illustrated. And it's obviously
very, very popular. Being ranked at, if
we go down here, say the ranking at 756, add up all the books on Amazon. You can see the ranking
in the categories. And these are things you should
be rotting down as well. The categories that these books featuring in they know
what I'll do is go down, have a look at any
reviews with the images. And then also have a look
at what reviews are saying. You might want to go to
the three-star review and have a raid, foreign edited things,
anything in there that you could
improve on as well. And this is where I would use a similar niche track
out to what I showed you. Or you can create your own. If I was creating
one here on lot, put here my keywords or title. Then you might want to
have the actual niche. So it might be a bad place, officer might be a
BATNA ambulance, sloppy about far thoughts
and might be that the beach could be
that swimming safety, all those sorts of things. I would note that down. Then you could put the base
off for that kind of book. Now if you did have KD spy
and you wanted to look at it. So if we go here, we got back at children's
picture storyboard bear. Then I could use KD
spy if I had that. And I'll just check this. And now as keywords have
an average sales rank, a bite IT, 70 thousand. So if we go back to our tracker, we might want to
have average base and you could rot
that number in there. So we're really looking for books under Beta one
hundred and fifty thousand, a hundred fifty thousand BSR. If we go back here again, we can see by using Katie spot, you can go to keyword analysis. It will show you
whether those words are actually in
the title or not. And keyword results are
world-class or word cloud. These will tell us across all the books that
KID spy showing what are the key words
that are actually coming up in those
titles or subtitles. Psychiatry, spy, something
you can also use, but remember the ease of charge, a one-off charge to use KD spot. But you can still get away
without having to spend any money on those free
Chrome extensions, which we look up here, which is DSM is on quick
view and the IMC suggestion, expanded data, things you need to look for when you're doing your research.
12. Amazon Niche Research: Welcome to this lesson. We are going to be going into even a little bit more depth for your Amazon niche research, we need to start to identify
what books that you might lock to create based on the needs and
wants of customers. But also there might be
some inspiration you can get from doing this
niche research. Now using Amazon is just
one tool that chicken news. You can use a lot
of other platforms to do your niche research. But I've found that if I'm using the world's largest online
bookstore for my research, then it's gonna be giving
you a pretty good idea about what a need and want
there is from customers. Now when I do my research, I tend to use Amazon.com because it
is the biggest market. Therefore, I have more
data to work from. Let me show you a bit more information about
Amazon niche research. And then also make
sure that we're using our spreadsheet so that we can keep track of any
ideas that also come up. Let's get on to that now.
Now got onto Amazon. And what our tend to do
is go to the bestsellers. You can see the link up here, amazon.com forward slash
bestsellers books. Amazon, that will give me all the current
bestselling books. And I also make sure I've
got an American zip code. And then I'm also
in incognito mode. Now the reason I
do that is because if I don't have incognito, Then Amazon, the algorithm
of Amazon can pick up other books or
interests pain looking at. Therefore, it might obscure the data and the results
that we're looking for. Now, what would be the first
thing that I would do? Well, it depends on if I have a particular niche that
are already have in mind. If your research is going from a place where you have no
idea what you're looking for, then this is probably
the best place to start. If you already have
identified a niche, you can start to topping
what that niche more pay or that idea into
the search bar up there. Now one thing that you probably could have on hand
is your truck out. And so that would be
a simple spreadsheet that you could start at least any ideas
that you come across. And also how those books
particularly ranking on Amazon as well and
therefore in natal not. Let's get into firstly, the cons of things
that all will look for where the area is
not going to first, just to check out what competition MOP and whether it's a niche that
I've published, we'll be looking at, again, it depends if he already had a predetermined story or nature or did you want
but let's just go. Assuming that you
don't have an idea at this point on this guide
to children's books. What I would do is just scroll down and at the time of filming, it's just before a star. Therefore, a lot of books
are going to be showing. You can see there's
a common theme amongst the best sellers at
the moment for an ethane, what I would normally
do is start to go a bit deeper with
my niche research. I might go to,
let's try animals. They might go for, let's go for farm animals. And then what I
normally do is fine, if there's a common theme
throughout here. I can go down. What we're looking
for is the base of our rank and say what's
coming up there that remain. Remember that is the ranking
across all the Amazon Books. The problem we're going
to say farm animals is that it's not being
specific enough. So I'm not even go a bit deeper thinking about creating
a book about the beach. So I might go back
and see if we've got something about holidays were
AT tools. Let's go here. Let's go. If there's
anything here. Water sports. Possibly. If I created the book, a bat, go into the beach. Pete the Cat is a popular book. It's one hundred, ten hundred,
four hundred and three. If you look at other
swimming books as well, you need to say
whether they are bad the beach with a better pool, whether they are bad, sweeping, safety sorts of things. If always looking here, mesial and swim, pool time. Let's stop me. If
we keep going down. What I'm looking for, different things that
might be popping up. Definitely want to
swim books or not. Let's have a look
at the key words. Total. Book. A lot of results here we are looking for under maybe 2 thousand results. Other thousands even better. This mob mainly, that's very
broad toddler beach book. So maybe we have a look down one of Daniel's
day at the beach. Let's find out what
categories these bookies in. Children's books
on seasons ranks at a 111. Let's go there. Probably bring up more about
the weather and things. So let's just go back. Let's try and find
a real ***** book. Maybe if we go back
to the Cat book. So have a look. If we scroll back up
here. Pete the Cat. So if we go here, beach, It's a bestseller in
children's water sports books. That's an idea to have
a look at as well. Can you experiences
children's Cats books? This is just what
I normally do to find out if there's
any need for it. I'll click on the category. We're back to this again. What I could probably do in this particular
niches for toddlers. Scroll down, Let's these
stringent 29 results. So that's much better. What I would also probably do is check out the
results for KD SPI, which is a software that I use. And this will actually give me the k words which we looked at. Average sales rank at 65
thousand, which is very good. What I would normally do is
eliminate a couple of days. It's probably really good
keyword to get involved with. What all would then do
is write this down. So what I'll do, I'll show
you exactly what I mean. So I have a spreadsheet
where do they go? Putting a keyword,
search results, we get back up to
search results. And we can't here, we've
got 329 search results. So we put that down as
well in the truck out. We are looking for
maybe under a thousand. So that's really good. And then the next
thing I want to do is font and how many books are under a 150 thousand
be a sound page one. So let's have a look. We can go 1234579. Sorry, is roughly 14 books,
which is very, very good. We're looking at for
maybe five or six. That's very good to have that there would continue
in my searches, search for a particular niche. I'd start writing down what particular keywords are
being looked for as well. So if I go back
up here and I use my expander books for totalled. It's not really about swimming, but it could be books or
toddlers to 40 girls. I could use that
maybe in my subtitle. Books for toddlers
two to four years. Probably put even subtotal for toddlers to four years. Therefore, that could be
something on need to include in my subtitle when
I'm doing my research. So that's where the
expander is really helpful. Today's SPI gave me
some more information. So if I went back to katy
spy, move this around. What I'm doing is we're clad. They PayPal llama. Okay, with analysis, this would tell us how many
books had that in the titles, the keyword, in the title, keyword and description,
number of views, cells, rank, and popularity,
potential competition. The things that we need
to keep an eye on. As we scroll down, you also should look at what book smart stand
there for you did you can have a bit of a look and see how popular this
one paper the peak, it's a popular title. But let's have a look here. See whether we can have a sod. Sorry Burgess hit my window. Books. Normally just locked
to look through. Have a look at the
information that is part of these books as part of my niece initial research. Now, what we also need to do is identify if there's
other books within the children's books to
be thinking must be able to create so on looking at
doing one on the beach, just because it
looks like there's a need for it,
keywords or strong. I think I can get illustrations
done at that the beach. As part of my process, there'll be showing
through boat, go back to children's books. We can say all these
different areas so we can go children's holiday books. And this will give us
another good look. And then you go deeper again. So this will keep on
bringing it down. Nation rock down
as much as we can. So if we have some of books, the cat is obviously popular. Spot is obviously very popular. Another thing is you
need to take note of when you're doing research
about what standing out, what colors are working. This obviously is not
working too well. It's ranked at one million, one hundred and ninety eight. This one looks like
speed stretched, and it's a coloring
book as well. Again, not not
standing out to me, these covers going down. I think we'd go back. And we have got 19 results. I'm not sure how popular
it is going to be better. It does have a book
here at 6,497. Sponsored book, which
means it's someone who is paying for Amazon
advertising for that book. Here it is here. What we could do is have
a quick look on these. Safe. It's something
that you could create, illustrations or getting images that could be
potentially free to use. So we scroll down. These are just images, stock images that you could
potentially use. And they've got one
on an airplane, Dr. haircut road trip. It looks like the
reviews are quite good. I've also got one
as a Kindle book and a book and a paperback book. And 28 pages. Scroll down here. We further some before and children's around
the world books, children's books
and children's play in an aviation books. That's another ID go into
it so that could be heavy. I'm going to write
children's books. Aviation. You keep going down. Have you looked at
here travel books, all kinds of things. Now remember the
point of this lesson. Make sure that you're
writing these down. Check for any totals that are standing out to any
subtotals and information. So if you go back
to this book here, we're going to have a look
at the title and subtitle. Going on an airplane, a total of total books. I think I could
probably have added a few more words in the
subtitle. They want. You can also do
is have a look at how they've done
the description. We're looking for a
size of these books are the 28 pages.
This one is 9.5.5.5. We're also looking at reviews to find out what
might be working, what isn't working as well. And that is a form part of
your Amazon niche research. All of these elements come
into place and you need to find something that is going to be exciting for
you to create. Because you're going to be
investing your time and effort into creating
something that is popular for customers and book that's going to stand out to what's
currently being sold. What we're aiming for is a children's picture book to really stand out for customers. That guy, look, I
love this book. I'm going to add to the
cat on the bite now. Therefore, you start getting
more attraction with your styles and it will rank
better with Amazon as well. This is a bit of
extra information in regards to your
niche research. Remember, Amazon pays alley one, you could go to many
different other websites, online bookstores, and see what might be
training on those sites. I booked a positivity, come up book type yet.com, the Nile bonds and novel target. All those places online stores have the books for you
to be able to look at. And they're great source of information and data
for you to look at. Remember, do your research, find out what's training, user track, and try and find something you're
excited to create.
13. Creating Your Story: Welcome to this lesson. It's back creating your story. Now this is gonna be
an important part because we need to get together elements in a structured format that will form your
book moving forward. And if you get these
elements right, you'll have a much
better success right, at making a great book that
will stand out to customers. There are two main parts and
I'm gonna be covering here. And I'm also gonna show you a template that I developed
when I create my kids books, children's books,
that will help with the generation of that book
and the flow of story. So let me get onto part one of what you need to
cover and then part two, and we'll have a look
at the template. This is what, a Copart one. And it's got five
key areas to it. When you're creating your
template for your story. Number one, you need to
determine your customer. For example, at I2 to
six-year-old child, an eight year old child. Are they a boy or a
girl or boy and ago, this is where you bring together these key elements when
you creating your story. Number two are the
characters of your story. What are they going
to look like? How they gonna sound? What impression do you
want them to have on your radar or your
avatar, as we say. The next one is the
plot of the story. How's it going to flow? What are the key elements in it? And how do you want
that to come out and become live form in itself when you're creating
your children's book. Now before is the theme
and message of the story. These are particulars message
that you want to convey. Something in there that
you want to bring to life. For example, I'm going to be
creating a book as part of this course around visiting
the beach and about beach safety and having fun at the beach,
those sorts of things. So that's gonna be
my theme and I'll show you how put that together. And then number five
is the kind of story. Is it a running story? Is it the sentences that come together to bring along your characters has a
kinda come together. For my story. It will be a rhyming storyline. I locked that writing format for me as a creator
and as an author. But also think that
at times it brings the imagination of the child
to that will be part one. And I'll show you
what part two in part it as part of your process for your structure,
needs to look like. And it's part of your structure. You need to consider the
number of illustrations. Do ADA going to get outsourced
and get completed for you? Or whether this illustrations
you'll get done yourself. So that's a consideration. In the other part, with part two will be
creating your book structure. As in when you put
your book together, where are the illustration
is going to go? How's it going to flow? What part of the stories on a certain page have that has
that kind of flow for you. Particularly if you need to
add social illustrations, which I do need to create a book structure so that our handler until
the illustrator, then I know where things
are going to be positioned. Let me show you a template
that are created. And what I'll, what I'll do is actually
put that to get up. So you can actually see
a finished or completed book structure for you when
you want to create your own. Template can be created quite easily just
on a Word document. I've just targeted children's book story outline Part one. And these are the key
things that we need to consider when we're doing Part
one, last story structure. So we're going to have the
title and the subtitle. And these are things that you don't need to do from
the very beginning. You might come up with
a title and subtitle light around when you've
done a bit more research, or you have completed your
manuscript and you get a bit more of a feel of the characters that doesn't
need to be done immediately. But I'll just like
to include it there. The categories where
they get to sit. And when you're
doing your research, it's good idea to write
down a couple of categories that your book can fall under. The customer age
and demographic. Then you've got the
story characters, the other view of the story, and then the theme and
message of the story. That would be part one. And I'll show you a completed
part one in a moment. But let me just show you those
last couple of areas for part two that you
need to complete as well when you're
creating your structure. This is part two
of the structure. So the number of
illustrations you are going to be including
the top book. Is it a paperback or
hardback and a book or a combination of all three
layout and the size. So what size is it going to be? Is it going to be? I point to five by 8.25, which is the square kappa? Or is it going to be rectangle? You just need to
work through what's gonna be best fuel
story or can see that what's going to be best
because that's going to be important when you're
doing your layout. And then the number of pages
the books are wiping doing the research on really
were about 24 to 30 pages. My book, I'm gonna consider
doing probably that 40 pages. Let me show you a
completed version of what this would look
like for the book on creating for this course. This is the outline that
I've done for my book. My book is called at this
point in time it might change. It's called Ali and take
the beach adventure. Then the subtitle, the
exciting adventures of oriented sun and beach
safety for toddlers images. As I said, this smart change. But the characters that I've
got all the intense at all, it would be about four years old and he's got his teddy
that he takes everywhere. And I do a lot of different
adventures together. The potential
categories could be Children's water sports books and children's new
experiences books. So these are two
categories that you can find when you're looking at other books in your
particular niche, you click on it, scroll down and have a look at the
categories that they listed under the
story characters. As I mentioned, I've
got all instead. And the book will also
include all these parents. The other view of the story. So it's all instead of
visiting the beach, I'm super excited that visiting all entailed learn about
safety at the beach, sun cream, swimming, etc. And then having lots of fun making sand castles and things. Then the theme and
the message of the story is about
beach safety and having lots of fans that needs to
flow throughout my book. Now you might go to a lot
more depth with your outline. But I feel that this
is what our new just to get spin inspiration went
on creating more storyline. And what that's gonna look like. That will be part one. Let me show you I complete a PO2 of the template
that I've created. This is on Pat to structure. Let me just scroll up here. The number of illustrations at this point in
time on thinking about item baby,
it's gonna be less. Maybe it's gonna be more. But it's I'm thinking around
about 38 or 40 pages. It probably wouldn't need to include a bad itanium
illustrations. But that might change
once a create the story. I'll need to think
carefully about that. The type of book I'm gonna do, all three forms or PAG
back, back at an e-book. The layout or think and I, 0.25 by 9.25 is a good size. That is the quarter square
sort of a book that you can actually have plenty of room for children to afflict
through and look at as well. And I do think that the high 0.25 is gonna be a
big enough to be able to have the
illustrations that are won't notice and cleaves a children can say them and
engage with them as well. As I mentioned at that 40
pages, That's my outline. That's how I do more
books structure when I'm first thinking
through the ideas, what I want to do
is make sure I'm capturing that information
to begin with. So therefore, when I do start to create the rotting
element of my book, they don't know what elements
on it to bring into it, such as the characters, that theme with a story. And those sorts of things are what bring together
a great book. If you get that
structure rot initially. Hopefully that helps
when you're creating your own structure for
your own children's book.
14. Creating Your Manuscript: Creating your
manuscript is something that is very
personal to h of it. I can tell you to write a particular way or to do it
this way or do it that way. It depends on what
gives you inspiration. What is your comfort zone
when creating and writing? For me? I grew up having a
lot of speeches, storybooks rate to me that
we're running storybooks. I've got the most enjoyment
out of those kinds of books. And I even feel that
mine children have more impact if they read
books with rhyming stories. But this is me personally, you might have a
different tight on what you want to create with
your picture storybook. And it depends on what your strength is
when you are writing. My strength does fall
in robbing storyline. And I'm gonna show you a part of my story that ought been
creating to help give you some, some tips about how our rot. So when you create
your own book, you have some information about what others might be doing
and how they creating it. So as I mentioned the
previous lessons, you need to create your structure first to
get your characters. Then it might be
worthwhile spending a few hours just sitting
there going over a few different ways that
you're thinking about rotting. Now you'll reach and
manuscripts could take a few days or
even a few hours, but it could also take a
number of weeks or months. It depends on the time you're
going to invest into it, how much you really want to
create the book and the tom want around that when you'd
love to get it published. So these are sort of things
that I can't tell you. This is absolutely how
you need to do it, but I will show you what
I'm creating it to try and give you a bit of an indication of what that
might look like for you. So let me show you a few, a few components of
my story that I'm creating for this course
that might just help. I've been spending the
last few days creating a manuscript around my Ali
and tidbits adventure book. These are the first
few lines of the book. Grab your sand Bucket,
yell Daddy, from the door. We're off to the beach to
enjoy the foreshore orientate. We're excited. The
beach was always fun. Rock pools, sand castles, and warmth from the sun. They applied this
on cream to cover their skin on the United States cheeks
and under their chin. You can see how my
roaming storyline, um, I hope helps
engage the children. And I can actually see
the storyline unfolding. And what I've been doing is incorporating elements
of my book structure. Look protection from the sun into my storyline from
the very beginning, so that I can actually
get the children thinking about what they need to do
before they go to the beach. They just a few of the lawns and start creating my own book. And each paragraph
will end up paying. Probably have an
illustration behind that. But as I progress further, what I need to now do we
start to think through the story and where I'm gonna
apply say's illustrations. For the first one,
grab your sand Bucket, yell Daddy from the door. We're off to the beach
to enjoy the foreshore. Not include a illustration rot at that point in time at the
very beginning of the book. And we've got a dad yelling from the house door that they're
bad to go to the beach side. That would may need to
be something only to structure for this
particular book. Then all integrity or
the beta was always fun. Rock pools, sand castles, and warmth from the sun. That could form part of
that first illustration. Then the next one
illustration would probably be applying the sun creams. I applaud this sun
cream to cover their skin on the
United States cheeks and under the chin. So they could have an
illustration or could have an illustration of the Book of that sun crime being applied. So the children can
see had a son crime is applied only in theta. Having fun with that when they're applying that
sun cream as well. That gives you a bit
of an idea about hemos story is going to
look, as I mentioned. I'm gonna do a running story needed to complete
the story still. So I'm just going to be spending a bit more time to get that rot.
15. Grammar and Spelling: Ensuring that you have
your correct grammar and spelling in your
manuscript is gonna be very important if you're
not at sourcing some editing and proof
checking for your story. What I love to use is a platform or a software
called Grammarly. Now, I'll take you to the
website of grammarly now. There is a free version. You can download the Grammarly, Grammarly or I paid version. So let me take it that website, grammarly.com and you can download the free
version of grammarly. Grammarly will
check your grandma, your spelling, your punctuation, all of those elements. Let me give you an
example of what it looks like and how you can use it effectively with checking your
spelling and grammar. Now, as I mentioned, you can just download
Grammarly for free. What I have is a
version on my computer, and it actually can be added to your top checking here
for your Word documents. And if I wanted to check
the grammar and spelling, then all I do is open Grammarly, initial start
initializing the session. And it'll pick up any little
areas that might be on here. I forgot down here,
you click here. And it will give me suggestions if I want or I can ignore them. So it would be
this section here. So if I wanted to, I
can change it to that. The next one, spelling. So it's suggesting that
rock pools in one word. I'd click that and saying
castles, check your spelling. It, suggesting that it
is one word as well. Now you can use grammarly for your whole manuscript,
for descriptions, for all of these elements
that you need to have something due the
manuscript check to ensure that it doesn't have any spelling errors because
that is going to be something that you
don't want to have to change once your book goes law, if you'd rather make sure
everything is checked before your book goes live. That's grammarly and I
use it all the time. As I mentioned, all the
easier when we created the book description for
our children's book. And I'll show you again how it works, but highly recommended. You can use the
free version or you can use the paid
version which I have. You're very welcome
to check that out.
16. Page Count: So how many pages should you include in your children's
picture storybook? Off saying some books
that are as low as item in pages and
some are a 100 pages. It all depends on your storyline and how
you're creating them. But what all would
definitely recommend you do is get onto Amazon. But have a look through some of those books that you're going
to be competing against or gonna be books that are similar to yours or
a similar theme. So let me get onto Amazon. I'll show you some examples
because I need to also consider the book that I'm creating and the number
of pages that I have. But again, it depends on the number of
illustrations you want, the length of your story and the kind of story
that you're doing. Research is usually
your best friend in finding out what is probably
the recommended page count. Particularly for the demographic
or the kind of avatar or child that you're aiming
to have your book created for someone
to Amazon now. And what I'm gonna do
is my unresearched towards the number
pages that are maybe in might be shooting include for my beach adventure
book. If we do total. They took us have a look. I'm just trying to find a book that might be similar to mine. So if we even go to this one, we can have a look here
at these 24 pages. You can see just here, just by hovering over the book. This one here is 12 pages, so not many pages at all. Llama, Llama is ten pages. Not many. Had to catch a murmur. That's 40 pages. Paint the cat. Thirty-two pages. This one he had Daniel's
dead pages, 22 pages. That's a National
Geographic book, 24 pages, bluey 24 pages, ten pages, 24 pages,
12 pages, 24. So it seems to be the 24 pages or bear about is the sweet spot
for creating the book. That's 30 pages. 20. Need to think carefully about how I'm
putting these put together. I think 30 i pages is gonna be too many for the
economy book on creating. If I were to click on this book, it's a board book, which means like it's
a hardcover book. And we can do hardcovers. Well, if we scroll down, sometimes we can see
inside and say the format. This is the format
of this book that got the rotting on
the top section. And then they've got
that writing there. You can see how this book
please put together. The picture is a nice and
clear and easy to see. There we go. So that shows
probably about 20 per cent of the book for that look inside and it's a good
opportunity to see how it looks. The other things that you
need to look for when you're investigating the
number of pages for your book. Remember, you don't have to copy the number of pages that
other people are doing. But it's always worthwhile
just researching, getting that data and
information to find out how many pages authors are using to create
nice, they're popular. Well, you don't want
to change it too much if we scroll down
here, but further, this one here is 12 pages, 12 pages, 16 pages, 40 pages. So that's 32 thousand ranked. If we look inside, It's not showing us too much. It's a watercolor kind
of book that we guy. It's got some really
nice illustrations gonna be quite engaging
for kids as well. And also have a look at the
processing while we're here. So the Kindle book is 50
and it's a hard cover, which is roughly $15.54, that they're not
offering a paperback. Which is interesting if we have a look at the size
of the book as well, while we're here,
we scroll down. It is 9.3. I bought
10.38331 inches, which is a unique saws. I hadn't really seen
that psoas before, but it is ranked very well. That's how I determine
the number of pages just by doing
the research, but also thinking through my story what's going to
have the biggest impact? Or don't want to make the
book too short if it's going to interfere with
how I'm creating the book. But also don't want
to make it too long because you need to look at what other successful
books or authors are doing. And if they're
short sharp books, they might be that's put
on later IN for as well. That was just a bit
of a lesson through some of my research
strategy that I use, falling at the number of
pages that I should create, that he's working successfully
for other authors.
17. Section 3 Introduction - Titles and Subtitles: Welcome to this new section of that title and
subtitle creation. Now the title and
subtitle can form a very important part of your book because it's what
people are going to see, what they going to
feel a connection to. And also the keywords that you use in your title and subtitle a very important for ranking on platforms like Amazon keda. In this next lesson, I'm going to go into depth
about your title and subtitle creation and
things you need to consider when you
are creating those. Now, what I want
to do is run you through the process at all
would normally go through. It gives you an idea
of the thinking behind the structure of the total and what other
words are using the subtotal to make sure I get the book ranking
in the rod places.
18. Title and Subtitle Creation Process: Creating the right title and
subtitle can really help your book to rank on whatever platform you
decide to load it up too. If you're deciding to go down
the self-publishing route, or if you're using a
traditional publisher, they'll also expect that the keywords are using
your title or subtitle, Gandhi, ones that customers
are searching for. There are things that
you need to consider when you're doing your
title and subtitle. Unless you have a huge
social media following. Or I can do a really
successful book launch, then you need to ensure that your title or your subtitle
includes the words that people are searching
for when I taught that particular topic in the search bar of
Amazon as an example. Now when we creating
a title and subtitle, we need to do some research initially to pick up those keywords that
people are typing. Now, your keywords will include words that the
customers are searching for, but then also elements of your book that you
might like to include. Now if you can't
fit these keywords into your title
or your subtitle. You can include them
in what they call the seven that gain
keywords of KD API. This is something I'll show you when we're loading up our book. But the seven
backend keywords on Amazon KD API allow your book to allow your keywords when
you're loading up your book to be noticed by the
algorithm of Amazon. What I'm gonna do in
a moment is I'm going to show you the
template that I'll use. And it's very similar to finding popular niches or
categories to create your book. But we need to
start to write down some of those key words that are in titles and subtitles that waken also use in our book, but also what the customers
are searching for. So let's get on to that
main template now that she can create using say,
an Excel spreadsheet. And you can then start
the process that I will follow when I'm looking at creating the title or
subtitle of models. This is the template
that I've created to help me develop the
rot title and subtitle. So I've got the nature
of the category. The key words, whether they are long or
short tail keyword being a long-tail keyword usually comprises about
four or five words. Plus or a short takeaway
might be two words. The average BSR of that book. The last couple of columns
you don't have to include, but it might be something
locked to include. Then what I'll do is once
I've got those keywords, then start to develop the
title and the subtitle. I also includes any
keywords stock can't use in my title subtitle
in the backend keywords. What are main bar that
I'll quickly show you on Amazon when you're going, when you're adding
the seven backend keywords where these will go. When you're on the Amazon
Cloud API platform when you're about
to logic hookup. Again, I will show you through this process
later in the course. But when you feel it in the
book title and subtitle, now the seven backend keywords
and these ones just here. These are the words that if you can't put them or
place them into your title or subtitle
because I don't make sense or their words or
keywords you want to rank for. You would include,
include these keywords in these seven boxes that
are provided right here. That's the spice that you do. So when I'm talking about
the seven backend keywords, that is the place on the Amazon cat API platform that we're gonna
be including them. But let's head back
to the lesson, back to research track. And you can also find, gather different keywords via these different
platforms as well. And we've already spoken about the Chrome extension that she can have when you're using
the Amazon platform. We've already spoken about that, but let's go to Amazon now to try and find
some main keywords. We're gonna be focusing on the beach theme
just as an example, because that's the kind
of book that on creating. And then hopefully you can
see the process all correct. By doing that, let me
jump into Amazon now, the first thing I'm
gonna be doing is talking something in the
search box just up here. And net will start
to trigger off different words that
customers are looking for. We might do law. Book about the *****. See how it's called here. What I would do is record toddler books about
the beach in my truck out. So I go back to
my checkout books that you can actually sorry, I need to put that here. Initial category might be. Total low-water activities. What I need to do is start list of the keywords down here. But before we do that, we go toddler books
about the beach. We call this the long tail keyword because it's
got more than three. So the keywords involved there. Now what we do is once
we start searching that, we click here, then we have
looked at the results, is 2 thousand search
results there. So I'll probably
include that here. The average BSR, you're welcome to include
this if you wanted to. But that would be if
you are using KD spot. So what I'll do, I'll
wait for that to load up. The average sales
rank is 50,400. Could probably get rid
of that one there. We'll just say 30 thousand. So we go back here, 30 thousand. And we can also find the
number of books that are under 150 thousand on page one. So what we do, we have here we just wanted to make
sure we include the rot one. So we got 123456789101112131415. I think it's about 2525 books under a 150 thousand
are on page one. Night. People are
searching for a toddler, books about the *****. Now probably wouldn't
be something I would include a title. Definitely consider including
that email subtitle. I'll go back to caddy Pago. I'll start with other books. So we might see kids. Books like that. Keith spoke about the beach. Let's have a look. So there's 2 thousand
search results. So what I'll do is copy that. Another long time. It's 2006 years old. Average BSR. So let
me have a look again. This is not compulsory
for you to do this. To just check to see how it's
tracking with Katie spy. We have up here, get rid of
those couple, 56 thousand. And you could count the number of books, but that's a chi. Then what we do is
go back into this again and we can
write something else. Let's have a look. This brings up any else
kid's book about beaches. Kid's book a bat the beach. Let's have a look here. Similar. So I probably
wouldn't write that one down. What about book page
books for toddlers? Books, baby's speech,
the children. So these are ones I would probably brought
down Beach books for toddlers, which is a sign. So what I would normally do
is Control Print Screen. Try and remember them. Page books for toddlers, babies. What I would do Beach
books for children. That what I would do is just check what the
most popular read, 50 thousand search results
for beach books for children. It's probably too many. Let's write down. We've
already got it written down. But what we need
to do is just have a look at what the mind keyword. Just scrolling through
having a look at the beach. Beach. Hello, lighthouse. Fancy Nancy saying counsels, Pete, the Cat paid at the beach. Just keep going down, having a bit of a look at
how people are structuring their title and subtitle. Ahmad even do a quick little caddy spy search on this one. The very low there,
which is amazing. But there is a lot
of competition. 32s, we'll just say 33,004. This one here. Let's see average sales
rank of Allah books on Amazon across those books
listed in the top 20. The average book rank
is 33 thousand out of all the books on Amazon
for people that are searching for books,
Beach books for children. You can say down here,
popular is very popular, but potential, but there's
a lot of high competition. You need to take
into consideration. What you do is just continue
to top in different books. This one here, summer
and beach theme activity book for
adult children. Probably wouldn't include that, but it might be a
backing keyword that you might like to look at. We can have a look,
obviously something that customers are topping. We have looked at Katie
spy to look at popularity. A few books here. Rankings where we'd be high, then all I would like, get rid of these really,
really high ones. Could potentially put it in. But there's not much
competition neither. So it's not too bad. Just included not really credit for adult
children though, but I'll will just put
it in just in case. What I'm doing is building
up my list of keywords. Therefore, I've got words
that I've been using, my title, my subtotal, it must seven backend keywords. We don't creating
my title or need to include maybe what
main characters are. Then need to include the
sorts of words in as well. What I could probably do, denture. Probably do that as
the main keywords. These ones are quite
there probably would be including my subtotal. So I could probably do
what's the most popular. So we can do some of
beach beach book. So it will Beach kids, kids, it looks a bit beach. That one's pretty well. So I'm just thinking through these toddler books about beach. You probably do. Total of what you can do is include that. We have. As long
as it makes sense, we need to make sure it flows. Including these main keywords. So what people are searching
for apical group here. So total a book about the beach. And we could also do story book for children. What I'm trying to do is include some of these key
words that were in my research in the
title and the subtitle. There are words here
that account includes, for example, Beach
books for babies. I would probably include it
in this section just here. Or I could do coping that wrong one copy
that I included there. And what else haven't. And toddler books with children probably include
that one as well. Now you could just have children rather than repeating it, but I actually locked to include the full words because that's what people
are searching for. So you just continue to
add the words in here. Beach, safety might
be another one. The safety. You need
to think about. Other words that people
might be thinking of. Some book. For kids. Again, I'm just thinking about what people are searching for, but I'm also using
the data when you formation and I received when
I was doing my research. And I've only done this
research for ten minutes. You should spend some
more time on getting the results to make sure that you're getting your words fewer, title, your subtitle, and
your seven backend keywords. Main thing that I want to
highlight is whatever you do, just make sure that it
doesn't seem lucky. You've just thrown in
words to include them as keywords in your
subtitle or your title. They need to flow, they need to make sense. And that is important. So I've got oriented
the beach adventure, my subtotal Bay toddler
book about the beach. Some of the same pizza
storybook for children. That would be fine. And I just need to find three other keywords
that would go into my backend keywords for my Amazon card API when
I'm loading it up. So that's how I would start to get my title and my subtotal. You just need to
make sure you're including the main topics and themes of your book in
your title or subtitle E7, backend keywords and use words that customers are going
to be searching for when they are topping things of interest into that top search bar because that's how your
book is going to appear. That has gonna be ranked by Amazon and nets where
you need to make sure that you do your study
and research to get the right words for that. Let's have a look
at one last one. The beach book. Let's have a look here. Pitch book. 50 thousand results. There's quite a lot
we probably need to do on the books again. Now, you can search and
all or under books. I tend to search
and books when I'm looking for my title subtitle. These Kate coming up book for toddlers or Beach
book for toddlers. They keep coming up as what the main popular
search words are that customers are looking at all. We'd probably stick with those
words if I was doing that. And you can also have a look at other titles to see
what they're using. Its peak, the beach, ocean. Daniel's day at the
beach first summer, dark and goose go the beach. Beach, die beach. Just make sure you
include the word beach. If that's what customers
are searching for, for your particular book. Or might be to do with the zoo, might be to do with
the jungle mop, be to do with first
airplane trip, whatever it is, just
make sure you include those words in your
title or your subtitle.
19. Mid Course Review Checklist: At this point of the course, I always like to just stop and just make sure that
you're taking action. And we've got some direction in what we're doing is
part of this course. Firstly, have you defined your purpose yet about what your book is
going to be a bat? Have you completed, you'll research on a
potential book topic. If you haven't, might be
posed the course this point in time and go and do
those first couple of steps. A lot of people that go through the whole course becomes a bit overwhelming and not
sure where to start. That's why I like
to pause midwives through cost just to make
sure you are taking action. Some of the steps. Number Three, started to create your book structure and the format and how that
book is gonna look. Convinced writing your
manuscript and story, which is a big, big component
of this whole process. He's getting that story right. And the last one is creating
know total annual subtitle. These are the things that
It's really important to start to focus on now
before moving forward. So you can get
these elements rot. And as you watch
the next lessons, you can name start to implement them when we
creating your books. Please make sure you do. You stop and pause, take action on the
things that I've already been showing you
in the previous lessons. And therefore, you've kept that is ready to go and you can start to implement them as a teaching new things
along this course.
20. Section 4 Introduction - Format and Structure: Welcome to section for weight going to be
covering a number of different lessons for formatting and structuring of your book. Now the format and
structure of your book will start to play a big part in
the development of that. In the next few lessons, we're gonna be
looking at the Con, a book you wish to create. It might be a type of back, a hardback, and a
book or all three. With that decision,
you will need to decide on the size of your book. We'll look at the different
options you have in the sizes that cardiac pay Amazon
offer and also Ingram spark. And then we're gonna be
looking at the blade or no bleed in the formatting and structuring of
your book as well. So blade, blade and
how that impacts your file top and
what you need to submit through when you're
getting your book published. So there'll be a few
things that we're covering in section four of the course.
21. Choosing the Type of Book: Welcome to this lesson. We're looking at choosing
the top of book that you want to create is
it can be a hardback, a pipe it back, or in a book, or it could be all three. Now there's no reason why
you can't choose all three. But it depends on the kind of book that
you were creating. Of course, if it is
activity book with children Monterey to be coloring
in or drawing something, then enable he's not gonna
be an option for you. But if you want to
create a pitcher storybook and the
format of your book, he's gonna be fine for a book, then you can create
that as well. Now let's have a look at
the different options at some other
publishes creating. Now there are some that we as
cell publishes can't create under the platform at
this point in time on Amazon or Ingram Spark, which is the other magic
global distributor. You can't choose
like a board book, which is one of those
really hard, thick book. So you see that children
sometimes have, you can't have books
where they might be different patterns
on the front cover that mod include
things that pop out. For example, might
be a book width. If you push a button, the fire engine
sounds on the truck. And as you flip through, you can change the sound. So I sort of books, uh, generally done by
major publishes and I'd got different ways of being able to do
that and sell them. But our opportunity is
self-published as heat. That's the thing that
you're wanting to do is the back of the book
or the apricot option. Let me hop onto Amazon. I'll show you some
of the options that currently authors
have to choose from. And then you can decide whether that format is going to
be suitable for your children's storybook and what the format is that's gonna be best for your customer as well. When we on the Amazon dashboard or the
caddy pay dashboard. Again, I'll show you this in a future lesson about how to get your account and how to have
these dashboard ready to go. You are provided with a
button here that says Create. Now when we push Create, this will then give us an
option of whether we want to do Kindle e-book,
paperback or hardcover. And so these are
the three options that we can choose from. And we can choose all
three if we want to adjust depends with hard kava currently pay offer approximately
five different sizes. And I'll cover that in a moment. With paper back. There are a number of
different sizes that we can choose from and a book. Then we use Kindle, preview up or create up to create our e-book for
that kind of format. And again, I'll show you that process in one of
the future lessons. These are the three different
options that we do have. As mentioned, you can
choose all three, but it depends on the kind
of book that you have. But let's just go onto Amazon. And if we have a look at
books again for toddlers, so I'm gonna go
to my total depth h. We have a look at the different sizes
that we've got here. So this one, if
we hover over it, this is an eye, 0.25 by 0.25. This looks like a similar
size, 9.757 plus 7.75. This one here is a
non-point for four by 12. These ones I naught 0.57.60.7. So there's a few different
varieties of books sizes. I tend to like the eye
0.25 or night by ICT. Let me show you an example of what one of those
books sizes looks like or gone grab a book for my catalog or more book
library right now. So this is i 0.25.8.25 size. That will sort of give
you a bit of an idea. According to the psoas my hands, how big that is. You can also choose a book that might be more of
a rectangle size. O grab one of those
and show you as well. And so this is
like a seven inch, seven by nine inch. So that's another option you
can choose from as well. There's a few different ones, but let me show you
the different sources that we have to choose from. But we'll be looking at the actual sizing of a
book in a future lesson. So on KD pay DC's the TVA options or what they
call trim size as you have. We can look through these. I'll be covering more often
this in a future lesson. But let's have a quick look
at providing a random bat, 15 In different options and
then hardcover trim size, these five different options at this point in time
we can choose from. And then Ingram Spark, which is the other major
distributed they'll talk about. You have very similar sizes that you can choose
from a slave. That I do an IPO, 0.5 by 0.5, but I
don't do an eye 0.25. So that could be a consideration as well when you're
creating a book, if you don't want to
have to re-size things, maybe just stick with the
one size you can use for both ADP and Ingram spot. But the sorry, this book here, that book there is a
seven by ten each book. So that's a book that
you can choose from. So these are the
different sizes. I'll go into more depth
in a future lesson, but let's have a little bit
more of a quick glance at what other author or
authors are choosing for the options for
the book creation. If you'd like to have
a look here, we've got a paperback book
and a Kindle book. This one here is a paperback
kindle and hard kava. This one here is a
paperback hard kava, a board book which we
don't have an option of at this point in time
on Amazon cardiac pain. You generally say that these
are by major publishes. Then we scroll down and
before pipe it back Kindle. Another one is a paperback
kindle hard cava. These are just some options for consideration that you
might want to look at. It.
22. Choosing the Trim Size of Your Book: Welcome to this
lesson about choosing the trim size for your book. So the trim size is actual size that your
cover is going to be for the front and back when you're
choosing a trim size, as I've mentioned in
a previous lesson, about changing the rod size, it's going to be perfect
for your customer. Is it gonna be a customer that is a young child
and lots of big a book. Therefore, the illustrations can be put in there nice
and big and bold, or it doesn't need
to be bit smaller. There are different sizes
we can choose from in both Amazon card API
and Ingram Spock. Are we talking about more about Ingram spark lighter
in the course? But for the moment,
let's have a look at both platforms and the trim sizes that both offer when you're
uploading your book. These little list of trim
sources we have to choose from, followed by, followed by ICT from previous
book or developed. It's only a quarter
a small little book that's a fought by its size. Typically a six by nine is what a lot of longer
form high content book. Authors or publishes choose. A sudden bought tin
is about this size, so it's a little bit bigger. Then if we are looking at, even if we go all the
way down to a 9.5 by 11, that is quantum much bigger book that probably most exercise
or activity books have. Then if you're
looking at children Size book other
night 0.25 or 9.5. These options just here, it's approximately what
we saw is just here. Just a few examples of the sizes that you
get to choose from. Now, HOD kava is
relatively new to pay at the time of
filming this course. So Diane, the Alpha, four different book sauces. That's where it's hard. If you want to credit
hard kappa under KD p, then it is difficult unless you choose
one of these sauces. But the option I tend
to choose when doing a hard kava is to
use Ingram Spock. So I'll go to Ingram spark in a moment and show you the
trim saws as diaper meat. But just know that these are the sizes that you
can choose from ADP. And you've got the
black and white PIPA, black pipe, black
ink and Crane PIPA, standard color a wallpaper. So when we're doing
a children's book, we need to consider the
color that we're using because Kayla does actually cost more for printing as well. That's a consideration
you need to think about. And you've also got
premium, Kayla. And you'd have a standard
choice or the premium, I tend to get premium artist wanted beta customer experience. And it can do the same with
the heart exercises as well. But let's go to the options
of alpha Ingram Spark. We've got the ink quality. So again, I've got Standard
and Premium color printing. They look, they don't
show you that the side or the printed paper is
done on 74 j is same. And this one has more
high-quality pipe, it's used. If we go down here, we've
got the book cover options, pipe black or hardcover. You've got the front cover, a net gloss cover. I haven't done a
digital cloth before. You've booked up
the book bonding, which is perfect band, which is this kind of bond, which is just, just thought that then he got nice laminate, which is the hard cover
and a jacket case, which is more organized
for high content books. And then if we look at the different trim
sizes are available. So they've actually got all
the way down or four by six, which is very, very small. If we look that got
the typical size of a six by 97 by ten. And dicot The we've got
an iPad or an 8.5 by 8.5. So if we go to Amazon, they caught the eye
0.55.5 as well. The iodine Ingram don't
have an eye 0.25 by 8.25, which is typically
this was sauce here. So that's what you
need to think about, is if you're looking at putting your pipe it
back on the boat, Amazon card, a PE
and Ingram Spock, then the eye 0.5 by 8.5 would probably be a better
option just because you've done it didn't need to reformat the front cover and the manuscript of fit
two different platforms. What our modern up doing for my book is choosing
the eye 0.55.5. Because therefore I can load them that sign manuscripts and front cover to both platforms without having to adjust
to anything at all. And then I can create by
kindle a book separately. Then you can do calculators as well about how
much it's gonna cost. Thinking through
the color options that you might want to choose, either the standard or premium. And when we apply
that book, OPR, show you the
different processing that occurs when you choose other black and white or
color blending premium or standard as well. But these are just
some considerations for the Zazi book checkout. Other books, find out what
sizes they are using. And then you need
to choose the size. It's gonna be brought
few audience.
23. Bleed or No Bleed For Your Interiors: Welcome to this lesson. We are going to be
talking about something that some people get
a bit confused about, about blade or no bleed. In this lesson, I'm going to give you a practical example of when you may or may not use
bleed for your interiors. Now, I do. I will mention this
during the lesson, but it doesn't have anything
to do with your cover. It's your manuscripts or
your internal manuscript. When we looking at adding
blade or no played, there is a calculation
that we need to add. Let me show you that. When we're uploading a
book to Amazon card API, it'll give you the option
of either choosing no bleed or delayed
in PDF format. When we're adding the bleed, we need to actually
add 0.125 inches to the width and 0.25 inches to the heart
of our manuscripts. Now remember that
only applies to our manuscript, not air cover's. So let me show you a practical
example by using Canva. And I'll be going into some
more depth of that camera in front and back cover designs and interior designs laid out. But let me just show you a practical example of
how that might work. Normally when you're
doing your interiors, you would do 8.5 by 11. But because we need
to add the extra 0.125 to the width and
0.25 to the height. We need to do it in this
section, section here. What we would do that
would now become 8.625 because we've added the 0.125 to the width and this
would become 11.25 inches. They weren't We do is
create new design that will actually now be sized
to the width and the height. When would we use our bleed
as part of our interiors? Will just say you had a
flower that you created. And we want change the
color H02, I blew. Then if you wanted that illustration to
go pass that inline, you would use bleed. Because what you'd find, if you didn't have the blade
that was just to 0.5 by 11. I'll show you what
you could potentially have if we had just gonna
get a shape for you. I decided to put this long here. If it was a normal eye, 0.5 by 11, we'll
make this white. That's what will end
up looking a lot. When we have bleed. Effectively, what it's doing is allowing that to be crossed
over that line there. If you had, let's
give you an example. So if it's like this, and we wanted this illustration
to go over the top without having
something like this. If it was watt, this is traditionally
what it would look like. If he printed it just
with that blade, you'd have a watt trim line that would run around and
would finish like that. That's when you would
use blade if you wanted to ensure that
your illustrations when all the way
across and you didn't have a watt line
that ran around it. So that's an odd around publishing with
blade or no bleed. Remember it's an option for
you when you're uploading your manuscript to callee pain. And it only applies
to the interior. You don't need to do Blade
two covers for example. And it's easy to organize with the sizing on Canvas if
you're using camera as well. Hopefully this has
helped you in regards to when you use blade,
what he's blade, and the actual measurements
of adding an extra 0.125 to the width and 0.25
inches to your heart. When you're organizing
the interior sizes when you first
start your creation.
24. Section 5 Introduction - The Design: Welcome to section number five. This is an exciting section
because we start to bring together many of the elements
that bring a book Alive. So let me show you what we're going to be
covering in this section. That's dying is quantum depth. But it's important that you
get to know these sections. Firstly, we're going to look at Canva up and how I use Canada design my books came up is a software program that
you can use online. It's all the fray or pied, and there's no reason why you can't just use the free version, but I'll show you the
pros and cons of why, why you shouldn't choose
that option, the X1, with doing talking about
illustrations and images, you might choose to add source your images or your
illustrations. You may also choose
to do them yourself. We talked through the pros
and cons in that as well. Next one, we're looking at
creating your front cover. We can either then we'll look at cranial back cover
with Canada as well. Then we need to have a look at how to create
our pipette back, back and add a books. Next one is
formatting your books correctly so that they
are suitable for upload. We're creating our
interior using Kanban, writing your descriptions, and then being published ready. So what other things are the elements you
need to have together to have your book ready to be published on a
platform like Amazon, kVp, or even Ingram spot. So let's get into section of a five with
the first lesson.
25. An introduction to Canva: In this lesson, I'm going to introduce you to the
platform of Canva. Canva has been a
tool that I've used for a couple of years and
it is paying fantastic. I initially started for
about three or four months using the free
version and then I'll upgrade to the pro version. And not just gave me so many more options that I could then use to
scale up my books, to sell more and to get
better graphics and images. And this quite a
few other things that you can actually do
on the pro version that you are limited to with
the basic free version. But let me take you into
the platform of Canada. Show you a few of the tools, specifically focusing on those we're gonna be using
for our book creation. And namely how to do our book covers and our
manuscript seizing Canada. It's just basically
an introduction. Then when I do go
into the lessons of back cover design and
a bad interior design, I can go a little bit
more into depth about how this software of Canada
will really help you. So let's get on to that now. Firstly, you can
just go to canva.com and you can create an account
by just going to sign up. It'll ask for some
basic details. Then once you've signed up, you can then log in and you
can start accessing Canada. And I'm going to
get onto my account now and show you some
of the features. Now logged into my account. What I'll do is just show you a couple of simple
things you can do. You can use a search bar up here to look for templates
and things. So if you write children's
book, click there. And then it'll show
you a number different templates locked to use. You can do the different styles. So many different
things you can do as part of your children's book. We're using Canva. Now, one of the
other things you can do is go straight to
creating a design. We can have a bit
of a look around on the different features and
things like that as well. But let's go to credit
design to begin with. We can do a custom design, these different things here. But we're going to
do an IPO 0.5 by 8.5 inch because that's the source of the book
that I wanted to use. But what we need to
do here is make sure we're using Nietzsche's 0.5.5. And we can go create
a new design. Then this will bring up the size of whether it's
gonna be more cover or whether it's gonna
be my manuscript. Now, if it's your
manuscript, innate, think through your
blade or no bleed, which are covered in
a previous lesson. But at this point in time, on just gonna be using
this for the front cover, just to illustrate a name. When we do the lesson
on the manuscript, open at the blade and show you how driven
measurements then. But on Canva up, what you can do is
actually look at the different elements that
we can use this uploads, There's different
ticks that we can use. Backgrounds that we
can also choose from. You can search the templates. And if we want to
say add some text, I'll show you how to do that
by simply clicking on text. It's different stores
you can choose, or you might have a heading, the heading, and you
can change this up. So if we just did, then you can actually choose a
number different font types. These ones you can apply
yourself sick and upload a font as long as you've got
commercial use of that font, you might want to use one
that's already there. So let's just use one
of these for example, and we can move it. The other things you
can do is click here. You can position it
so I can center it. You can put it in the middle. These are all different features that you could spend
hours on learning. What I really wanted
to do is just show you how easy cave at least to use. So you've got your
main templates. If you wanted to
say look up beach. They needs could be something you could use fuel
kid's book as well. What you need to make
sure you do though, is change up the elements or the rotting and things
like that that you're using. Because you yes, you can use Canva for commercial
use purposes. However, you need to make
sure you change things up. You can't just use, say, let's just choose one. Can't just choose, this, will just go replace count. You can't just use that and
then uses your front cover. You need to change elements up. You could, for example, let's go to this one. You can change this around. So you might want to have. This up. Sorry, these are the current
actually rot on these ones. These are actually
just move on once not having to do
that with this one, that one you can write. These ones I think he
can just get rid of. But there's different
elements that you can use and you can get into the inspiration by each of these as well. So we might go to this one. And once it loads up, we can click on
different elements. So those, those can
move around like that. Like the word party, but you don't really like
how that one is done. So you could then
copy it anymore. I want to have
stretch it across. We can make it smaller. And you might want to move
the hats, this thongs, you can move items around. Two umbrellas might
be too much for you. You might want to move those. The modern want these ones
here. You can send it. You can change things around, you can add pages. We start doing that when
we're doing the manuscripts, but when we're doing
just a front cover, we don't do that, which
I will show you I run. Then you can go to elements and you can draw out
what you want here. If you just leave pitch, then you can choose from photos, it can choose graphics. And you can use these
within your book. These atoms here. Now there are ones here, the couch, easy if you don't
have the prior version. So for 82 filter and
we did just the free, then we plot the filters. These are all the ones
you can use for free. And if you wanted to filter it, so you've got pro and
we get rid of that. Then these are all the extra ones you can
use for protein. You can see a little crown
that then hire lots. It's something you need
to have that provision. If we had something like this, we moved that down there. We can get rid of
this routing here. Want to get rid
of the hat, could get rid of the umbrella. Get rid of thongs. Can start to create your
little while your book, your front cover of your book. And it's just really easy
to use. With uploads. You can go to upload unique and upload any of your own photos, any of your own images. And I'll be showing
you that when we're creating my Olin textbook, you might want to add INFJ, the chairs there as well. This is really good
things. You can use. Backgrounds, you can
do different designs. So you might want to
right-click here. And you can find
different pitch, photos, backgrounds, and the Y that you can
use camera effectively. These by also in
the pro version, you can re-size it. So this is an excellent phage that are found with
a prior version. If I want to change
these to an EIP 0.25 inch rather than the eye 0.5 inch. Because
I'm creating it. You can copy and re-size
this or chromic, come up with a new tab and
now it's already done. Whereas with the free
version, you can't do that. You need to go and redo
the whole thing and move all the elements and
get it to where you want to be more fiddly. And that's why a lot
the pro version. But this is just a quick
introduction to Canva. You can change all your
different fonts, hops around. You can use ones
that got preloaded. You can use ones that
you've uploaded yourself. These functions with the
boat and you can do a fix. We can have now fixed, so we can do a shadow. You can change the
colors of the shadow. You can broaden it,
we can offset it. You might want to have. Let's change this
back to this one. And we got to fix.
And then we can increase the
transparency offset. You can change, you can see
how it's changed over time, the direction of it. We can even make
it into a blurred. You can change these,
make them hollow, neon knots and
brought backgrounds, different curves
you can do as well. It could, could show you for three hours the different
functions of kava, but it was more just an
introduction to show you what some of the simple features are that I'll be showing
you what I'm doing, the manuscript and the front
and back covers for Canada. So hopefully this helps just
to give you a bit of an idea of what you can and can't
do with all these things. It's quite incredible the different options
you have available, even under the free version, there are so many things
you can choose from. Hopefully that helps you with
an introduction to Canada.
26. Illustrations and Images: Welcome to this lesson. We're going to be covering
off images and illustrations and different options
that you have for your book when
you're creating it. Now, images and illustrations, There's a few things we
need to cover in regards to the commercial licensing of
the use of these images. And you need to be very
careful what images you use. Because what you
don't want is to be using images that aren't
for commercial use. And that could
compromise your book, the Future styles, and
it could even be pursued legally if you don't have
permission to use images. So let me go through
the options for you. And we're going to
be starting with a few different
websites that you can use to get commercial free
images for your books. Then what we'll do is
cover the option you have for illustrations
and what I personally do. So let me go into the
websites that you can use to our source different
images for your book. I want to show you four websites that you can use for the
commercial use of images. And these websites in
no particular order. But I think that these
websites will help you. There are some images there that it could be great
to use in your books. The hardest challenge
you have will be to get images that you can have flow through
your entire book. Because you can't just pick one image and have
that at the beginning. You might need to have similar
images that flow through. And that's where
getting someone to create your illustrations
might be the way to go. But if you do want to use
commercial use images for free, then let me show
you these websites. These are the four sites we're going to have a
quick look through. One's pixabay.com,
then unsplash.com, Victor asi.com, and canva.com. So let's go to pixabay.com. What we need to do is make
sure that you're checking, that you do have the
right to use them. So what we do, we can check here and when guy then
the illustrations, which is usually what we
want or vector graphics. So let's go to, we'll
just go to images. If we just go. Umbrella. Couldn't
find any matches that are exactly what we wanted. But we can actually
see that these are photos that we can use. We can go back, Let's choose
Illustrations. Beach. Then this will provide different illustrations
that we can see that using in our, in our book. Now if we wanted, for example, to use this one, if
we click on that one, then you can look at
the loss and seeing free for commercial use,
no attribution required. So you can have a look at the loss since here
by clicking on it. And it will go through
what content you can use and what's not
allowed to use as well. Don't sell unaltered
copies of content. And you don't want to have exact matches and
things like that. So always check that you have
the commercial license for any of these websites
that you want to or pitches that
you wanted to use. And all you need to do is
click on Free Download, click that and
that will give you either a JPEG or PNG file. You can also choose for
the victor images as well. You can have a look at
these different images too. If we go back. If we just did say playground, we got illustrations,
then you can see all these illustrations
again are available. If we saw a book, sorry, if we saw I picture,
lock this one. We click on it again, free for commercial use,
no attribution required. That's what we want to make
sure that we're getting. Just need to make sure
you're checking all of these things when you're
going to these images. So let's go back
to the next one. Let's go to unsplash.com. Here we go. On this one again, just check to make sure
you can use these images. So if we go here and what's
this guy? Beach again. We'll just keep a common
theme so we can see most of these ones tend to be photos. Unless you actually
rot in here, Fitch. Let's strike. Then you can get
some ones that might be cartoons or illustrations, but this one tends to
be more of photos. So it's not as good for
picture storybooks. I think the other ones that I'm showing you probably
going to be better. But you might find that they read some images that
you could potentially use. Remember, you just
need to have ones that have a common theme. And again, it'd be able to be used throughout
the book as well. Just make sure that
you check any of the And illustrations for
the commercial use and that you can actually
use these ones as well. So let's get at least one. Let's go to Victor easy.com. Now we evict easy. You do have the opportunity to use the free images for 50. To sell 50 items. Once you exceed that 50, then you do need to
go ahead and purchase a loss in switch spent
120 US dollars per year. But if you're selling 50, then it's worth that
investment to get that loss since to use
that image more often. And then you can choose many, many other images as well. It can choose here, you can go to photos
or videos or victors. And if we did if we did beach umbrella and we can go here and it brings up a
whole heap of images. You can see where it says free. I can choose these ones. You can go across here and
choose the free Lawson's. Or we can choose a pro. So this will give you the
free images on victor easy. Now if you wanted to upgrade and guarded the pro loss and then this will offer more options
like it would be Canva pro. So you can scroll down here. If we went to an image like
this one here, click on it. Free download. Attribution is required. So that's where you need to, to contribute something
for the use of an image. Free loss. Since what's this? So we go there and it will show you what the free loss
since what that allows. If we go back here and we
go attribution required, It's where you need to copy this link and then
include that in your, at the back-end of
your book to say we received that image, you knit modern need to have a section at the
back where you are providing attribution for
the use of those images. You don't have to
pay money for them, but you need to show
where you got them from. So it's at least at the back of the book with all of those sites where you're getting them. Now, you can have the entire law library if
you go to the pro version. That will that will provide that evening the information
that you can do, the free download
through Victor ASI. That's another one. And if we go back here, so done picks up by Unsplash
thick Daisy and Canva. Canva is my favorite. So if we go to cave
up and we would just create image credit design. Now let's go to the
customers on that Cisco and 0.25 by 0.25. Then we've got our L
and we got to elements. And if you've got
the pro version, you can use any of these. If you had the free version, then you're obviously
limited to what you can do. So if we do and you can filter, so if you had the pro version, you can do the free world Pro. We're just going to leave
it at both the moment. So if we scroll down and you can see how it's
got that little crown. That means that that's
for the pro version only. But if you click on
this little ellipsis, then you can say where you
can use the image for free. What's allowed? Media sites use this media
cyclin camera design for personal or commercial use. You can use these in
marketing or social media. Don't sell or distribute or take credit for unaltered media
provided through Canada. And he can't trademark
the designs. We stuck media. If you want to learn more, you can go about
into this link here. And it talks about in depth
Canvas loss and seen, explained, talks
about the differences in the free and pro version. Pro content loss since
what that allows, what's the LAD using content in your designs,
trademarks, and logos. It's really, it's highly recommended that she
go through the process of writing this information
so your crystal-clear on what you can and what she
can't use on Canva. But that's why a lot Canada and most particularly when
you get the pro version, because you just have
free rein to be able to and choose all these
images and use them. And then even if you go
into templates and rot, you found something on here, then you can individually
using images that are on here. So this one, you can
grab that and use it. You can use the girl here, you can use the hat if
you want to change it up. And you thought there was
an element in here that you wanted to use, such as here, you want to use a
clock, then you can just copy that and move it to your Pokhara or
your internal pages. And that's the great thing
unlock a lot of that came out. You can continue to do that. As I mentioned,
my preferences to get an illustrator
to create my images, which we're gonna go into in
a moment in your new lesson. But if you working
on using images from Canada or any of these
others for your books, then you know how, you know where the
exercise images and you know where you
should be checking. And if you go to say, picks up by, sorry,
go back a bit. If we go to or even vector, easy, if you go back to the website. So
let's go back here. We'll just wait for
it to load for you. Scroll down. You can even see the loss and
seeing agreement just tier. You can check out what is involved and what you need
to be careful of as well. And this is provided with
updated information, has got frequently
asked questions to make sure you check that out.
27. Outsourcing Your Illustrator: Welcome to this lesson about
outsourcing illustrations. Now this might be
listening can just skip straight
through because you might be great artist
itself and can design and do your
own illustrations. But for someone like me who
doesn't have any ability to draw on needed to outsource
my illustrations. And it took a little
bit of time to get someone that I could trust. They could take the
concepts that are head and design
them or draw them and bring those to life and to reality so that I could
put them in my books. Now, I did use a few
different platforms to do my research and find
someone or a couple of different illustrators
that could actually do these tasks for me. And what I'll do
is I'll show you three different platforms
that I've used previously, that it actually
really helped to source a artist that
can do these for me. So let's get into these
three different platforms. And I'm gonna show you
the process that I did to try and find the right
person for my books. The first salt we're going
to look at is Fiverr. If you haven't heard about
father before or a mini, these different platforms, they've freelancers that create, or they can help you by
creating what they call a gig. And that starts at five
US dollars and increases. And you can then really
try and refine the kind of person that you are wanting
to engage for your work. Now might not just be illustrations and
might be formatting, or might be other things that
you would like to get done. Pretty much this
can think of it. There's someone who's happy
to do that work for you. So what I would do, recommend you do is do
some research across a few different people that if you're wanting to
look at your illustrations, then I would simply go
to book illustrator. And what do you do
is do your search. Then this will bring up all the different options that you do have naked
do filters as well. So you can sort by relevance, you can solve by best-selling. You can sort by budget. So you might have
a budget if say, let's say $200 to 300 volts. And apply. What you can do is
start to look at different illustrators and
what they might offer you. What I tend to do is look at the illustrations
to find out if there is a kind of illustration that I think would sit well
with my children's book. You want, might want more of a hand-drawn book or a more of a sort of a
painting, sort of one. So let's look at this one. So I'll create children's
storybook illustration. You click on that one. And
then you can actually go and see what the different
illustrations look like. This one's quite really see, it's quite nice actually the way that these artists
is completed, these, these are more
sharper illustrations that's using the watercolor. Because as you can see, these artists has a
numbered or a good range of illustrations that
they can complete for you. So it just depends on
what you're looking for. Now, what you do is look over the different things
that are part of the gig. And it will provide this. So if you are happy with
EC, just push Continue. And if you want to, you can go the basic package. So that's one picture. You've got a standard, It's got two
illustrations or premium, that's five illustrations
or figures. And you always look at
the different fit or the feedback that's coming
through because you need to find out what that
feedbacks like. We stay responsive, whether they provide the complex
illustrations that you needed. You just have a look
through that sort of thing. Now, this will provide you with the packages are available. So you generally have a
basic standard and premium. And it'll tick the box of what you will receive
as part of that. I have a good look through that. Let's go back and
have another look at an option that
we might choose. Scroll down here. Let's go. Let's try this one. And we'll see if they provided
much more successful. You'll striations here for
coloring books as well. Have a look down. I didn't provide as
many illustrations is what all would
normally look for. I probably wouldn't
go for that one. So Kate going down and I always try and do a
bit of a combination of reviews and the illustrations and whether they're
standing out to me. You can also do just here. Just to illustrate that or children bookstore
book illustration. And have a look and see
if there's anything that comes up that you
think would be good. Is it same as we saw before? I keep going down. This one looks pretty good. It starts at $28. They sometimes are artists
that I just getting into father who have
more cheaper right. To try and get the truck or trying to get traction
and get reviews happening. They always worth having
looked at as well. So this person just had the one 5-star beta
Min distance is Simba. These are different packages
that are available. Just had the 11. So this might be someone
that is looking to, it gets some more work and they might really happy
to work with you. Obviously they can very
talented with what they do. You can look at this standard
packages and the premium. That's what I do with
father and I have found one of them are
based illustrate, this was Illustrator
on Father Dave. That's how I initially got
her to do my illustration. She's currently not on farther. She's doing her own thing, but I've kept in
contact with her and I do engage her for future
illustrations that I have done. But she was initially
part of father. Use that opportunity to engage her for two
books and then I'll use her for
other books as well. There are some
excellent artists, excellent opportunities here. And the reason I'll lock father is because
you can then do you sort on based on your
budget, delivery time. You can do it online,
sellers as well. So if you want someone
in your own country, you can do that as well. So all we need to do is join and fill in some basic details. Then you can start to search through all
of these options. And you can do different
searches as well. They might be default
ones that you'd like to do search for might be to do with Amazon
kVp illustrations. It could be just illustrations. It could be a hand-drawn
illustrations, all those sorts of
things you can use. That's farther. Let's go to the next one
which is Freelancer.com. This is Freelancer.com. Again, you can get
freelancers for a range of different jobs. You can get them to
do illustrations, formatting, conversions
for different formats, all those sorts of things. You can engage it in a
lot of different ways. You can actually
set up projects. So you can set up a
project and you can get a number of different
illustrators is sent through an example and then you
choose which one you want. We can just set up the one so you can look through
how it all works as well and get some further
information about freelancer. But you can go
browse jobs as well. And you can do illustrate. This is also for people that
are searching for jobs too. You can post a job or
you can search for jobs. Coming up with a moment. But let me show you some of the other things you
can do on freelance out once you've actually signed
up and logged in as well. What you can do on freelance
is posted a project. That's where you can
create the 90 projects. So it might be kids. Illustrations. For Bache book for example. You tell about the project, you upload a few
different things. E1 illustrated. What you can do is post
that project and Daniel has at least of 25 to 30 different
people that come back to you decided this is my cost is walk and do the
small portfolio. It is a good way to get a number of different
freelancers come to you. I posted a job back in 2020 and to create some
slides that I was doing. And I wanted some illustrations to accompany those slides. And those artists
that I reached out to or that are engaged
through freelancer. And I'll show you the
quality of some of those illustrations that
these artists sent through. So let me bring them up. Now. This is one just here. Let's go to the next one. Was told him that
a balanced diet. Do with the Success Academy. You can see the artist did an excellent job at bringing
to life what I wanted. That was one of
my favorite ones. You can see the fantastic it was to do the
law of graduate. These are the kinds
of things you can get your freelance to create. And they have some very, very good illustrators
that part of this network. As I said, you can create a
number of different things. You can create a project. You could actually sit a limit. So you can say I want ten illustrations completed
for 200 US dollar. And you can even if
someone to submit through an example of what the
illustrations a lot. So you get an opportunity to see that and use the
service that way. Let's Freelancer.com
have a good look around. It would take me an hour to show you all around
the platform. But there are a lot of
different options you can choose with Fatah, you pi upfront for the service
and then once it's done, you approve it and that money. So it is the pie and it's the on-hold with father and
then it is released. With freelancer though, you don't necessarily
have to pi upfront. You can wait for the
work and you can create. I hope one more thing. You can have an
amount that sits I a 100 US dollars once father
illustrations or down, and then it is released
after that period of time. And you can sit $250 after 20 illustrations
are done in the new release, that sounds like a part project, a math that he's released
as things are completed. Suddenly not having to
spend all that money, all the ones at the end, you can get that freelance, you can give that freelance
is some money as I, as I progress
through the project, which helps them with their cashflow and also
can help your cash-flows. Well, let's go to the
last one which is Upwork, and we'll have a
quick look at that as a platform to this is upwork.com very similar to Father and freelancer
in a few ways. Or you need to do
is do your search so you can sit projects. You can look for
different talents. Let's do book, strike
and then search. This will show you what
the alley right is, what the success rate is. Gives you a little bit of
a look at the portfolio. You can sit different budgets. You can do for free lunches and agencies or just freelancers
are just agencies. You can have. There's a lot of
different categories you can search for as well. And it will also show you what different
skills they have to and with a top rated
and how they perform. So if we clicked
on this, oh sorry. These illustrate all this
does on a rod hill here. It will show you
the alley, right? And it'll also talk through the different jobs
that are in progress. That's something you need
to keep in mind as well. If you're searching
for illustrators, think about the time that the turnaround time that you
named your book as well. If you're happy to wipe
that spawned it has got, if I've got a few
jobs in progress, but if you need it
quite immediately, just keep that in mind. We have a look down here. They're all range of
different illustrators. So you might find
something that he's going to suit the candidate
illustrations you want. If you have two more of
your futuristic book, then that might
be the way to go. If you want more of
a traditional book, then let's have a look
at this one here. I have a ray through their information and
what they offer and also view their previous
work or the profile as well. And that also helps. We have looked at the portfolio. Let's have a release. Need to sign in to do that. But these are things
that you need to look over the reviews and this illustrated here obviously
has an excellent history of providing exceptional
work. Marina v. Remember that one if you
want to look at upwork.com. This one, I'll actually show you the different
work that they've got to keep working down and having a look at the
different work that they offer. Obviously very talented as well. Have a look through
and see all of that work is upwork.com. So we've got our father, father.com, freelancer.com,
upwork.com. I'm going to use five actually, I might use Freelancer.com and ongoing to source
and illustrator. And I'm gonna get
some illustrations completed for my beach book. So I'm going to complete
the manuscript then ongoing to go to Freelancer.com. And I'm gonna read chat to a previous Illustrator that's done some work for me before. And I'm going to set that up. It will probably cost me maybe 400 US dose to get bad eye-catching
illustrations completed. I'm going to sit that
project for my illustrator. I get him to do that work. And then I will show you the progress of
those illustrations. And now I can show you the quality work that you can get through
Freelancer.com as well. That's it for the illustrations and add sourcing illustrations. You might have another platform
you might want to try, but I do recommend
other trialing father.com, freelancer.com,
or upwork.com. If you need to add
associate illustrations, just make sure that you had a commercial use rots or those illustrations
when you're engaging your illustrator
that were part of the ticket box scenario as
well when you're looking through down here as
well, Where is it? To have a look here? Usually on the on the
conditions it will have. You have the commercial use
of those illustrations. When you engage
someone, look farther, you actually own all of that
work once it's completed, not the illustrator themselves. Hopefully we'll let helps and make sure you do
your homework to get the right Illustrator
test a few at, if you need to do that, because it's worthwhile just doing your homework
to get the right Illustrator first before you
engage in for illustrations, get them to try
one to begin with. And if you lock they work, then engaged in the remainder of those illustrations that you've got that you need to get done.
28. Creating an Illustrator Outline: What I wanted to do
in this lesson is to provide you with a quick
look at what I provide my illustrators when they creating illustrations
for more manuscripts. Just needs to be a basic
outline of what you want for each of
your illustrations. Let me show you what I
gave to my illustrators. So it makes the job so
much easier and it brings to life what is in
my mind onto paper. And so I can include
that in my books. If all is providing the outline and it was
the oriented book. So I'd had the night saying plays night throughout
the illustrations, I wanted to highlight
the importance, some protection when they had the beach and want to ensure
all family including tidier, wearing a broad brimmed hat and a top to protect their skin. So what I do is I get them, I'll give my Illustrator what the manuscript wording
is from a book. So grab your sand Bucket, yell Daddy from the door. We're off to the beach
to enjoy the foreshore. Then outside. Number one illustration, dead standing the CAD or
categories open, strapping his surfboard
on the roof racks of the car is appropriate head-on, a single top, sunglasses
and B8 shorts, Laney up against the back of the caries or large
beach umbrella. And on the ground
is a picnic basket. He's in the driveway of their home and there
are some noss, green trees in the background. He's a big smile on his face. That would be
illustration number one. And then what I'll do is say that the second
section is now illustration required
for this writing. Then Number two, illustration
or GYN or provide the writing so they apply
the sun cream that cavities skin on the United States
checks none of the chin. Always Watson cream
that he's applied to. He's nice and he's always
on one knee and he's leaning forward and he's placing the Watson cream
to take his nose. Td is a small beach towel that
he has a randy shoulders. Ali's in his swimming costume to beside all the entities
ascend back in spite. To give you a little bit
of eye looking to what my illustrators
actually started to do based on this information, is I'll provide you an
illustration of a one. Illustration number two,
to show you following my description what
he has been created. So this is illustration
number one. It was dead exotic with
the surfboard umbrella is resting up against the back of the car and about to
head off to the beach. And illustration
number two was TD getting a sun cream applied
to his nose by Ali. And they got the sand Bucket
and this byte ready to go. So the illustrator has brought
to life what I wanted. And that's the importance
of making sure that when you do write out what
your illustrators to draw, that you do nice and clearly, and they are out to bring
that concept to laws. That's how I do my concept with the drawings and
for my Illustrator. And I'll make sure that it's
nice and clear what they are doing and when an illustration isn't required and
whether these, and I'm going to continue to
do that for the Illustrator. They are very, very clear on
what my expectations are. And if any changes
need to be made, then we can do that as
we go along as well. So that's just an
example of what are provided and I'll do that
for the rest of my book. For the beach adventure.
29. Progress by my illustrator for the book: In this lesson, I
wanted to cover off a few real life examples of the progress that I'm having with my
current Illustrator. Because I think it's
important that you get an idea of the expense, the time frame involved. If you are outsourcing your Illustrator to get your illustrations right
through your book. Now the process can take a
bit of time depending on how many projects your illustrator
already be working on. So you might be third in line, or you might actually
have two white, a number of months before the project can
actually commence. For me, I've got a
great relationship with one of my
illustrators that hey, actually gets going on my illustrations
within a bad awake or two from when our submit through more requirements
from our books, just depends on the work that
they've currently got on. And therefore, you've
also got to work out your budget and how
that all works. For illustrations for my books, they usually cost just under
a thousand US dollars. But that is inclusive of the time involved,
all illustrations. And it does, it does take a fair bit of time for them
to cry these illustrations. And it depends on
how many as well. So for your book, the MOD need 40 illustrations, some of the more alienated
ten illustrations, it just depends on the corner book that you're working on, how much you're
willing to invest, and therefore, these old
dictate the cost involved. Now, I've worked with
different illustrators that have only costs 20 US
dollars per illustration. Worked with some that
it costs upwards of 50 to 60 US dollars
per illustration. It just depends on what is involved with
this illustration. How much work is going
to be required by that? Illustrate them their experience
of a new illustration. And they're wanting to get
a few jobs up and going so they're willing
to discount they work to get some good reviews. Well, they might be a highly
experienced illustrator that charges a premium amount. It is up to you to
determine your budget. And I've been able to utilize income from
other books to be harder than use that money to reinvest back into NI
books around creating. Therefore mod budget
might be quite high, can pay to someone
that starting out. Remember my initial budget
when office started doing the Children's
illustrated picture books was approximately 200 US dollar. And that covered a BAT. It there might be
15 illustrations. And then with more
books that I've created that become
a bit longer. And therefore not necessarily have a bigger budget to be able to kind of
photos, illustrations. The current book
that I'm working on as part of this course of God's think it might
be illustrations. I'll just have to go
and double-check that. But I will show you
the progress of those illustrations and
the time frame so far. Pain whiting for about a month for these illustrations
to be completed. So it does take a bit of time, but I'm really, really
happy with the progress. And it's only a couple
of illustrations to go to finish off the project. And then I'll be ready to
start creating my interior. But I thought it was
important to show you the progress so that you
understand how long it can take. And therefore, you need to know what the steps are to get your books
illustrated as well. Let me show you a few
of the illustrations that I've had completed. Now the next stage after this, we'll be utilizing
those illustrations to then create the interior, which will form the
upcoming lesson a back creating your interior
using illustrations. Let me show you some of
these illustrations now. This is the progress
from my Illustrator. These are just a handful of the illustrations that
I am getting done. As you can say, they're
meeting my requirements, have nice fun, joyful, and colorful illustrations
that are engaging for kids. And they illustrated as sticking by what Marr requirements were
when I created my outline. And that's where it's important
to create your outline. So you've got dad holding up nice and high and
flying like a bird. You got Ollie intended that
are running down the beach, really excited there on
the wider the beach here. In this illustration, the damp all the rock
pools checking out everything but
making sure that I didn't touch anything dangerous. And in this one they're on the way to the beach
and having lots of fun and seeing different
songs about the *****. So these are some of the illustrations really
happy with the progress. And the next part of the
course will be actually using these illustrations to create
the interior for Apple.
30. How to Design Your Front Cover: In this lesson, we're
gonna be talking about creating your front cover. Now you may decide
to add source. You'll cover design
through groups like father or
freelancer on Upwork. But for those of you that
might get illustrations completed and then had the opportunity to create
your own front cover. Using those illustrations. I'll be able to show you how to do that during this lesson. The amount you illustrate
it up for my book has provided an illustration that I want to use for
my front cover. You can use something similar or use your
own illustration to create something
that I'm gonna be doing by using the same steps. So let me jump onto Canada. And ongoing to use
illustration that might illustrate is
provided to do just that. This is the illustration that my Illustrator has provided. And I'm gonna try and turn
this into a front cover. Now too, has some
other illustrations that are could choose. But a lot to see if
I can create this one into the front
cover for the book. And I'm gonna be using an
ICT 0.5 by 0.5 because that is a universal
size I can use for both Ingram Spock
and Amazon kVp. Let me upload this
illustration to Canada. They now can start to create my front cover and you can use similar steps
feel from cover. The first thing I
need to do is go to custom design. Custom size. I'm going to use inches
and I'm going to use the 0.50.5 inches. The InDesign here is more designed or the template
that I'm gonna be using, because it is a front cover. Just going to leave it
like that for the moment. Because what we do later on, if we're using Canva, we can bring both the
front and back cover together into one PDF inside it. But for the moment we just want to create
that from Kevin. So the next step you want to do is upload my illustration. What I'll do is go to Uploads. Then I click on upload media and bring that illustration up. I've done that now,
I'll click on that. What I can do is right-click
Set as background image. Now remember with your
covers you don't need to laugh at any bleed or
anything like that. You just need to
make sure you get the pizza where you wanted to. You can also add a border,
whatever you want to. Now the next step
is to add the text. So we're going to just do sub hitting the intended
net position. We just need to be mindful of. What I'll do is I'm
gonna change this to, I think it's cool. Bold. Going to change this. Now. Water can also do a could
put it across here. I'm just going to be, again
careful where I place it, not to get into why of anything, any seagulls or
anything like that. I need to change the color to a color that's gonna be brought. And it's going to stand
out from our book. What I would normally do is use some different color
combinations potentially. So this here is showing me
what if I did that color? It's going to be
signaled to the same. It's just going to blend
in. So we don't want that. We might be able to pick
up of a callus here. So we can get also
have a look at base purple is not working. Watt. Possibly we've got the
brand from *** as well. So if you want to check
out what the keller that is each tick there, got a little dropout and you
go down to the brand color. And then that will
show up there as well. We just got to work out what
color it's going to be. Now online, have a bit of a play around with
this for a little bit, just to try and get
the right color, might end up being black. And then I'll resume filming and I'll talk you
through what I've done. I'm trying a few different
things with the front cover. So I've got this option, but I've also got
this option as well. When I zoom back out, It's always good to try and
compare what might work. Both might look like is very hard to work
out with this one. I had to add a little
bit of blue in place. This I want to do
is send to back. You can see a slot line across
there which is not ideal. What we try to do is work out what cover is going
to stand at the most. Now, this one's got
wonderful colors in it. Some thinking on what
stop with this and see how they might be. Some small adjustments
are needed to MC. But this one works. The other thing I need to do is put my name on here as well. What we might do for
illustration purposes, we might use this top one. What I might do is delete
this and copy it up. It would not do a zoom
it up a little bit. And I can do is reduce this
up and put it down here. They're gonna put it
down here as well. It can always have a little
bit of a look Ronnie models a lot to include your
illustrate this just depending on whether that
is something that I are happy for you to put on there as well or give them credit. Some of them, some
illustrators do lock that credit and acknowledgement of his would prefer
just to leave it. I'm just going to leave this
lattice for the moment. So what I did is I
grabbed my illustration. So if I just add the page
or to show you again, I went to upload. I uploaded my illustration. Then our right-clicked and
said set images background. And we know that this
image is the eye 0.5 by 0.5 inch for front cover. You can play around with
your front cover as well. Now what you could also try and do if you go to templates, might find some
different rotting stalls that might work for you as well. Let's just say this routing
here, it looks quite good. If I get that gap
here, we might rot. We want to actually reduce
it significantly and psoas, Let's just make it 30. We change it to black. We might think that that routing is better
than the other one. I don't think so. These are
things you just got to test. Just to check if the
if activity a new one. So you go down here, Let's just get rid of this again by just a
tasting few things. Let's have another quick
look and safety is any other font hops that
could work for this book. Keep speech. What's
that writing there? Look, that is cooled more
sugar is cool, more sugar. So let's just say
with a more sugar has a rotting top work. That may work as well. So let's just straighten it up. Say to the wife moment. Could also work. Let's have a look and see
what that looks like. It's rotting top. You can also use that. I think I prefer the
other routing top. But it's always worth just
having a bit of a look, just checking to see everything as you want it to be.
Looked down here. They might be other
things you want to put on here as well. So let's just have a little look and see if there's anything from these templates that we've got lot to add. Let's
have a look on here. One of these things
here we got starfish, but we not going to be further. The crab there. I'm pretty happy, I think
with the font tops abused. Quite suitable for
young children as well. And when you're designing
your front cover, you just need to make sure
we get that size rot. So always using the
eye point by 0.5 inch. When you get your illustration, makes sure you had a border or stretch it and set the
image as the background. Put your mind hitting on there. Just try and utilize the spice. Just got to be careful and I'm utilizing space because
there are signals in the y normally I would probably make the
rotting a bit bigger. But in this situation
that's okay. And I have written
by Romney Nelson. That would be the front
cover that I'm creating. And that's what you would
do for that front cover. It just doing to make
sure that you don't have the writing too close to the bottom or RAM because we need to allow a
little bit of spice for any trimming that occurs when they are
printing the book. So it's always
worthwhile keeping a few millimeters
away from the edge. And you'll see that
when we do upload our cover to Amazon, you'll say that I'll
quickly show you an example of what that
law needs to look like. A manual cover. The cover that I used in credit for another
course that I've done. You can see the red line that runs around the
border of your book. You need to make sure that
there's no writing that falls outside of that red line. Images of fine that can extend
all the way to the anion. You can see this
an image that can extend through and that is okay. Anything beyond this
water and black line here could potentially
be cutoff. So you don't want
anything really any images that you
don't want to be cut off within the red line. That's where the
writing needs to be for both the front
and back cover. So we just need to
keep that in mind when we're designing a
kava using Canva. What I'll do now is go
up here it goes share. We're going to download
it and we need to make sure we save it as
a pain J image. We click Download. And now we have that image and we save it in the file that we're going to keep all of
that K images in nitrile. You do that when you
save your front cover. And we'll be reverting back to this front cover and joining
it with the back cover. Once we've created that, let's move on to creating
the back cover. Now.
31. How to Design Your Back Cover: Welcome to this lesson. I'm gonna be running
through the steps of that, creating your back
cover, this term. Now you're back cover
can be very simple or it can add a number of
different features onto it that might include illustrations that are in
your book and placing them on the outside of the book so that your customers can actually see what some of the inside
illustrations and lock. You might also like to include a description on the
back cover of your book. One thing that you
do need to make sure you leave enough
space for the ISBN, which is a barcode that goes to the back and that will provide your identification
for your book across the world
when you sell it. So let's get into this lesson. We're gonna get
back to Canada now, which is on a back cover. And then what we'll
be doing is bringing both the front cover and
back cover together. So we've got a mine
file top that we need when we submit
your book to Amazon, kVp or Ingram spot. So let's get into
the lesson now. What we need to do again
is go to custom size. We have an 8.5 by 8.5
inch creatinine design. And now we've got the
back cover that we can bring together the elements
that we want to use. I usually thought to
keep the tab open with the front cover so I
can drag things across. So I might copy this and then paste it and I can make it a bit smaller if I want to. They're not going to use
the beach adventure. Not going to include
that in here as well, just make it a bit smaller. What are usually
lot to do is try and get a color that are like, I would normally
go to background. If I want to find out
what one of these colors, then I can do that. So let's just say it's the light blue color
here and get elements. Then I just pick shapes again. Any, anything's fun, all I'm trying to do
is skip the color. So we go here, click there. And let's get that blue. That's the blue color there. We go, back to our back
cover. Click on here. Click there. At the top. The color that we've got
from Dan at the beach. What are normally
locked to do is grab some illustrations
that are inside the book and place
them on the back. That might be one, not this one. So I can put that there. I can get this one as well. We might want to turn
them on the side, slightly on the side. We want to do is make sure
they're the same size. So what are normally do is just either the top or at the top and just make
sure it's the same size. The other thing
is the angle sets on seven thought degrees. This one can go five
degrees that way. Just make sure it's
center is at the top. We've got the scientists
since on the sides. So when you're doing
this, you can see the square has lining
everything up. Now, what you might want to
do is go back to elements. If we do shapes, I'll go to the border. Not walk a little
blackboard around this. What am I aiming to do? Good, sorry, I'm just
focusing on nice is allowing customers to see what some of the illustrations
are locked in Saud. I just wanted to sorry, I
just wanted to check this. We're going five degrees and this one needs to be
fought degrees as well. What we tried to do is lack
customers to have a bit of a sneak peek of what
the inside is going to be for our book. Because if I can see a few
of the illustrations inside, then they might actually lock what I say
and I might think, well that's gonna be great. That's exactly what
I'm looking for. They don't do the cytosol, so we're gonna go too far. I'm bringing up here the top. Then when we reduce this, say a lot that you can keep
on playing around with these Smart Lock to add
something on the side. For example, we
might go to here. We're going to rotate
this on the side. We can bring this up here. We might have a look
at another color. Actually, we can go back here. We might use a cow. Let's have a look here. We need to get rid of that. I'm going to try and
get this green color is this green right here? So we just choose
one of these again. And we're going to pick
there the green here. Green color, not coming
out for some reason. We will choose it there. Copy that. Go back here. Click there. The grain Matlock to
write something in here. Kids. Six. Guy, we need to make sure that the rotting isn't too
close to the edge. Struggling to move
it where you want to on only just zoom
it up a little bit. We wrote there, I
think it's gonna work. We can add whatever
features we want. We want that to be watt. And that muddy them
look a bit better. And we need to
extend this beyond. What we can also do is
we can add some beach, beach theme in the background. We might lot to
grab an umbrella. Umbrella. You can have a look and see if there's
anything here that we can use. Saved me, say something like
that. You can go down here. When you're doing
this, you need to see that there's gonna be an ISBN code about there. It just needs a lab that
spice rot there for any ISBN is going to
be putting into place. They might be other things
he had not liked to include. So I have a bit
of a look through this one might be even
a good one as well. We might want to
replace that one. You can flip it. That way. What you would
normally locked to do is you can add a border
around, he can add. You might have an illustration that you can put
in the background. If I go back up here
and go to uploads, you might even like to include one of these
pitches in the background. Or it could be a
component of the beach. You might like to change it up, just depends on what you wanted to do with
the back of your cover. You can also, if I go
back, sometimes you can, even if you reduce the
page or this name, we got a to the image
background remover. This is on the pro version. You can do this. What it will try and do is just get
the seagull for me. Here we go. Well, it didn't quite
work, but what you do, you go restore
that'll restore that. It's not really what we wanted, but we just wanting
one by itself. If we get rid of this, we'll try it once
small guy there. Let's try and remove the
background from just an image. It might or might not work. It could be a good market. Rid of that. Now we mark it back. Let's try one more time. We can remove the background. Let's start with saying
that's what we can do. We're going to have that
seating rot or want to have it on top of pizza on
top up here somewhere. What we can do is just depending away we want to
put it be the tricky one. We could have it sitting
on top of there as well. If I could get rid of that, what you can do this, bring it down. There we go. Having seen that, now you might want to have some
writing on your soul. Show you an example of where you've created a back cover
with some rotting on it. So let me grab that
and show you now. Here is an example
of a back cover. We are, I've included
rotting a bat, the book, and I've also
included the illustrations. So that's something we can incorporate into
our design as well. So let's go back. And include the fault. I said that the app
and reason like that. What we'll do is go back so we can either
leave them with a black random or we go
to Edit Image shadows. Pij lift. Then that lifts up
the illustration that we want to try and do
the same for this one too. We might do that.
We got eight of the image chateaus pij leafed. Then we can increase
size like that. We're going to say Go
down to be like that. We can include a rotting, a little blip here again, making sure we allow for the ISBN that will
appear down here. That's saws at all. Spn will be let
me get I squared. It will be approximately
that saw is brought there. And I'll give you a quick example of where
that's going to be showing on a previous
book of credit as well. As you can see,
the ISBN would pay down the bottom right-hand
side of the back cover. And that's the size
that we need to allow the spice we need to laugh for on app
that covers well, so please keep that in mind when you're doing your design. We can actually leave that
there for the moment. We can always delete it during the process of
creating a back cover. Now what a model so do is include some quick little
bit of rotting here. And then we'll be ready
to save as a PNG. Now I've added just some
rotting join all entailed as I visit the beach
for fun field and exhausting day by the foreshore, only entitling about
beach safety and some protection and have a
wonderful time building. They're selling councils. I've just added that in there Of also lift the
space for the ISBN. There'll be going there. And so this is gonna be
more back cover. What are now do is
save the back cava as the as I pay and G.
So we go download, keep it as pain j,
we download here. And we wait for that to upload. And then what I need to do is cite that in the
raw file where I'm keeping all my files for this book that he's had
to do the back carve-out, remember it's the sine
domains and sub front cover. Later spice to the ISBN. And if you've got any
illustrations, make sure that, that if you don't
want them cut off, make sure they're a little bit further away from the edge. And remember, the writing
also needs to be within your zone that so it doesn't
get cut off as well. So it's always based
on move it a little bit more and be safe. That's how you do
the back cover. So you've got to have front
cover and back cover. Now we just need to
bring them together for a PDF file that we'll use
when we're uploading ebook.
32. Formatting Your Cover Correctly For Upload: Now the next step in the process is formatting your cover, making sure that you've got
the front and back cover in the raw format so they can actually upload
it to get a peep. Now, on this lesson, we're going to be focusing
on the paperback book. There are two ways that I
recommend you can do this. Now. We can use
Canva and we can use some calculations
provided by cardiac pay. Or we can use a software
program called Book bolt that takes away all issues regarding
calculating the sources. What we might do, we'll start
with Canva and then osha, you book bolts as well as that might be an alternative
way that you could consider creating know Piper back if you want
to save some time. So let's start
with Canva and I'm going to show you my
front and back cover. And I've actually made a
couple of small changes to my front cover since
the other lesson, just to make it stand
out a little bit more. But let's get onto
the next steps. This is my carbon out of my
day hitting a lot bigger. And I've also included the rotting and slightly
different font color as well. And my back cover is
this one just here. So I could, if I
wanted to change this to a similar font top is
this PSA can just copy that. Go back here, and
I can change that. And let's just save
it looks like hi. Just to make sure that
it's a similar sort to the front kabob satellite
actually comes up quite well. So what I will do
is I'm going to save this as the new cover. So downloaded paying j, It's Dan like that, I'll
get rid of this other one. Psi that replace my
previous back cover. And then I've got
both my front cover and back cover
falls ready to go. Now onto ADP kava calculator. If you want to find
these, just go to Google and just write kava,
kava calculator. And it will bring up
a page that you will have the opportunity to
plug in all the study here. Now it's important before
we get to this stage to know how many pages your
book is going to be. Because these will calculate
the spine width that you need to have when you're including your
internal manuscripts. So this might be
something you need to do, light up on when you're
creating your book. But for the moment of
creating this lesson, at this point in time, we can get our
cover clay colitis and to get up so
it's ready to go. I've done a manuscript and
it's going to be 40 pages. So what I'm gonna do is
go to the bonding top. So a nice example
needs pipe interior. I'm going to use
a premium color. The piper top, stick
Capet a watt pij, turn, keep it at left to rot. If you're doing the
measurements were doing at these niches, the trim size. So I'm gonna be doing
the eye 0.5 by 0.5. And the pitch camp
on doing 40 pages, that's gonna be the length of my book based on my manuscript, what I've written, the
illustrations have been completed. As I said, you may not know the exact pages at this
point of the course, but you can always
come back to these. Listen to create your Khabbab
and the calculations. Once you do know, we just go calculate dimensions. Then it gives us these
dimensions here. So this is what we need to put into Canva when we're putting together our front and back cover if we're using
that software. So we got to canva, we go to Custom
Size and we need to write these numbers in
here so that an eye 0.75 and we're doing
inches, height 0.75. Credit new design. Then this will
bring up the front. This is the side and
the back over here. What we name now need
to do is we need to get the template which
these also provides. So we got Download Template. It'll bring it up here. White fur to load. Then we're going to
use the the pain J. And I'm going to do
Control Print screen. So I'm gonna be getting
a copy of this. I'm gonna go back to Design. We do Control V. Then we need to do is
trim this rod up there. They're not going to do is position it
here and stretch it. All the way to the end. Now this provides us with the template that we
need to use for a book. So as you can see, we've got the template which
can be moved around on here, but we want that to sit this. Then when we put out
front and back cover on, you can see where
it's going to sit. Then we simply delete
this back template. Once we're done. We can see the pink that runs
around here and also the ISBN barcode area. What I'm going to now do is upload my front and back cover. And then I'm going
to place them in these ****** wrote here. So let me just apply
mod two images, the front and back cover case, I've got my images, so I've simply click
on that image. I don't move it. Just drag it to the
corners right there. Right there. Then you can bring it across
until it hits the end. Then we do the same
with the back cover. I move it, just drag it, clicks into place right there. Then you can bring
it rod across. Now it sits perfectly in place
for a front and back cava, there will be an area
that runs down here, that will be the spine. So that's where
we just got to be careful with the dimensions. What we can do also is drag this across just to sit there. And we can also have look with
a template as you can see, the thin watt area there, that is where the
spine is going to be. So we can even drag it drag
that picture rot there, and that one can go right there. That's a front and back cover. Now what we need to do
is save it as a PDF. Let's get that
organized right now. The first thing we need
to make sure we do is we get rid of this template so it
lifts it up a little bit. Click on the template,
delete the template. And what you can
also do if you like, is to add a background color. So go here, click here. And we're going to add
the background color. Is any gaps at all. It'll be the same color
as that sand right there. Now once that's all
done and you're happy with the positioning, deny the ISBN or find there. If we wanted to have a
look and say where it was, Let's just click
it back a couple. We can say where the ISBN will fit right there
or the bar code. So that is perfectly fine there. So let's get rid of
that template again. Let's add the background
color will just reverse. Grants working. Let's
try it one more time. Now we've brought together, if we were to list
it out, draw there. Now what we need
to do is save it. And we are saving this as I PDF, not a pain G, a PDF. We go down to PDF print. We downloaded, just leave these. Don't add anything there. We don't need the
crop marks and bleed. We're going to download that. That will then
bring will give us the PDF file that we'll
be using to upload book. It's important you site
is somewhere carefully. I'm going to now save
this file, this PDF file. And you can say it's
got everything we need. So that's how you
do it with Canva. Let's go and do
the same process, but we're going to use a
program called Book bolt. Now just going to save this file first and then
we'll go to book bulb. Mode files are kept
the front cover, back cover in the pain
j and Mike, full cover, the front and back that
we just created in Canada as a PDF document. So I've clicked on that.
That would bring up the PDF and that's what we need
to use for a download. Knock these two. Now the next thing we're gonna be doing is going to book bolt. And I'll show you a fast and simple why you can
do what we just did without having to create undo all the, all
the calculations. This is book bolt, book bolt dot IO. And it is a subscription model. It does give you quite a few free resources you can utilize, but we're going to be using the kava designer tool and Anita login to
my account and it's a bat tenuous doughs per month for the software and
IT is fantastic. I'm going to jump into and
login and I'll show you how we can do a cover
design and get that formatted very, very quickly. Once we're in book boat, we go up here and we click and we got onto
book bolt designer. Then what we need to do, we've got an option of
paperback or hardcover. In this lesson we can
do and pipe it back. So we go there, leave it as cover non
interior trim size. We go down to 0.5. By 0.5. We're using a premium, Kayla. We do our pitch
camp which is 40, then submit and we
just wait for it to generate the
template that we need. The Kaaba template
is now being done. So what are now need
to do is go to images and our drop my
images so that one. The back cover name, what I do is drag
the image across. And on A2 position it. Saudis rot. So there's a little gray dots. There implies a guy down here. What am I to start again? Clicking on once. Just drag it until those little
gray dots are on the lines and then drag
it across until it seats rot in position just there. Then I'm gonna do the
same with the bank habit. Drag it, hits the
bottom line across, get it in position. Now it might be B2 far across, I can say that law and there. So we want to make
sure that we're not too far across there. As long as a rotting is inside this gray box
that goes around. That looks to be
perfect at the moment. That's important. And once we've done that, then we can, we can
do the download. So we go up here, here. Just firstly, just make sure everything's rod,
as I mentioned, you just want to get
these position so it could go halfway through
the line here and then that one goes across slot that if you wanted the background
to be a certain color, I'd recommend going
to our color here. We can go to elements. I can find out exactly what
are these BAD doing L shape. So we just got it here. Let's find out exactly what the calories, it's
this color here. So we copy that. We'd go back to Book bulk
designer and we get a product. Put that code in there. And now if we were to move this, the color is in the
background there. Let's just get this
back into position. Short. Oh good. Remember the spine is gonna be running down
the middle here. So it doesn't necessarily matter if you've got a little bit of
color they're showing his, that's gonna be fun as well. It looks like we
are ready to side. Apart from that, we
need to make sure that he's on the lawns and ready. So I'm happy with that. Now, what we do is
push, download it, prepares it, and then we get to see if it's got
everything that we need. Now it says ready to download. So we click Download. And then this will show us
F front and back cover. And we simply didn't have
to download it as a PDF. So there we are. Now, as I said, you do have that gap
day which is the spine. If you did want to move
the image across, you can. And then what we need
to do is click on this. We need to save it so
we can save it here. We'll just call it
book bolt addition. And then we just
need to save that. Going here. There we are. Said that
is how quickly it can do the book bolt cover
rather than having to do the calculations
through cardiac pay. And with Canada, this is a much quicker and
more efficient way. And I've never had a
rejection on caddy pay when octane using book boat
with the calculations. So it's definitely worth investigating if you
think it's gonna be good for your future
books that you're creating. Let's get back out of this now. And just to finish
off this lesson. Now we've got our front and back cover all in one file as a PDF. Now this is your paperback. We can look at how we can do out hard back in another lesson. You can also use our book bolt to do
that hard back for you. And it is quite simple OVR to show you that in
the next lesson. And we also can show you
how we can do our e-books. But the next step is
to make sure that we've got a manuscript
or where do they go, all designed so that we can actually bring
it all together. So then we've got our file, a PDF file for our
pipe or back cover. And we've also got a file
ready in a moment for our manuscript as a PDF
document as well because they, the two files that
we'll be using to upload to pay for a
book to be ready. Sides that concludes
this lesson.
33. How to Create a Hardback Book Cover: If one of the options
that you want to consider is making
a hardback book, then this lesson will cover
those things for you. Now, we also will look at an a book and how to
format and credit that. But that will be part of another lesson
later in the course. But there's a few things for
consideration that we need to think about when we're
creating our hardback. Because today pay limit
the different sizes and the page numbers
that we can use to create our hardback
throughout children's book. Let's look at what those
limitations are now. Let's first look at
the different sides, size options we have for
Amazon cardiac pain. There's limited them to five. There's a 5.5 by five inch, a six by nine inch, and 6.14 by 9.21 inch, seven by ten inch. And I 0.25 by 11 inch. Further to that, we
can only create books that have a pij cap
between 76 to 550 pages. Now if you're creating a
Children's illustrated book, not many books are going to
be 76 pages in length plus. Therefore, the Amazon
KID pay option does limit your opportunity to
create a hardback book. What I use Ingram Spark to do my hardback books that
are less than 60, sorry, less than 76 pages. And we can create a hardback
books with income Spock. It's the only, both main limitation is you will require what
they call an ISBN. Isbn is a books
identification number. And the identification number is a code that you get that identifies your book compared to anyone
else's out there. The process range from $5 per ISBN if you
buy them in bulk, even free if you're from
countries like Canada, all the way up to a random
bit naughty dollars for one eyes begin. Now that can be purchased
via groups I bow alka.com. Or if you're in Australia, for example, it's dope Baca.com. But to get your ISP in, you'll need to purchase that. If you're using Ingram Spark, then that is definitely
something you need to do. If you're using Amazon pay, that will give you an
option to either use your own ISBN or to use the
free one using Amazon API. And we can cover that off when
we're loading handbook up. But let's get back
to this lesson about how to create humpbacks. What we'll do is, I'll show you if you happen to have a book that
he's greater than 76 pages or falls into one
of these saws categories. What you need to do. Then
I'm going to show you what you can do as an
alternative with Ingram Spark. If you had a book
that felt at sod of these dimensions
and you wanted to use Ingram for the
distribution of your hardback. Firstly, let's get
to Amazon kVp, and how we create our
template to credit Kaaba. And then we'll using
grim Spark to do the sign but 4.5 by EI, 0.5 inch book or square book and the options
that are available. I've now gone to the Amazon
kVp cover calculator, and that can be found
at Kite a P.amazon.com. Forward slash a n on the scroll. Us. Forward slash cover calculator. Even if you Googled
calloc calculator, will Amazon tidy pay
kava calculator? It would probably bring
to these Pij anyway. What I will need to do
if I'm selecting these, I'm going to choose hardcover
These TA1 interior. I'm gonna use the premium PIPA top watt pij turn direction, leave it at left to rot. Measurement units is going
to be as inches, trim size. This is when we choose one
of these five options. In this situation,
I'm just going to use a seven button just for
illustration purposes. We know we have a limit As a minimum of what we
can choose for pij can, I'm just going to choose
IC for this example. We then calculate the
dimensions and then we plug in these data house
right here into Canada. So what I need to do is go to canva home and putting
these dimensions. So I'm just going to copy this. We're gonna go into Custom
Size, put that in there. Then we got we need to
make it inches, sorry. Then we need to get a hot. That is the heart there. We put that in
creating the design. This will give you
a template again. Now what we need to do is go
and download the template. For it to download. I put it up. We can
open up the pain j. Then what we do is print
screen back here, control V. Then we need to get rid
of the asset side here. All the way to the pink. Then what I need
to do is position, draw it here. It's central. Stretch it to the corners. And just make sure when you're trimming it
that you get it wrong. You can always zoom it up
if you need to get it. So it's rather we just
stretch it down there. That is a template now we just need to bring
it up a little bit. That's a template. What we would need to do
if your book cover size, for example, is a
seven by ten inch, you would then need
to upload your image. So we let us use this
one as an example. What I'll need to do is
stretch it down here. Stretch it up there
to the black lawn and drag it across seats
rod on the spot. And if you want to use
the background color, so you can go background color, you might want that Sandy
Keller, the Beta background. So we go to the plus, use the drop-off, click there. And now that's the color there. But what we first need to do is you would add your
back cover as well. Now I don't have a
back cover. I do. I not I think I've got
a back cover for this. Maybe I'll do let
me have a look. Now. I don't have a back cava
for these particular size. I just wanted to show
you what it was locked. But if if this well,
let's get rid of that. We're going to copy this. If this happened to be
at back cover image, we will do exactly this side. We would size it,
wrote to the size. If you wanted to, you
can stretch it does a little bit over the black lawn. And the reason that they have
the logic pink area around here is because we
have Beck's is a fold-over that occurs
with the cover up. So they need to allow for that. Don't have any writing that exceeds these black law
and that runs around. And you can stretch your
PNG image into the pink. Just know that that's
gonna be folded over. Then once you've done that, you can delete the background. We can then add the background color if
that's what you wanted to. So we can just use the drop-off. Now that's the background. And you've got your front and your back cover if
that was gonna be brought. Now what we do is say that as a PDF file lock we did
with our pipe book. The same process applies. These get the template, apply your colors and your route to go once
you save it as a PDF. But what happens if our cover is a different size
and we don't want either of those options
that are provided in our trim saws is just here. What happens if it is
an 8.5 inshore and I 0.25 by 8.25 inch cover. Will you need to
use Ingram Spark? So what I'm going to show you is the Kaaba generator for Ingram
Spark and how that works. And then we use Canva again
to create the cover for us. What we need to do is go to the calculator or the
cover, generate them. And you can get that. I'll show you where to
get that right now. On Google, you can just go
to Ingram Spock how that template generator click
on the first link there. That will then take
you to this page. Now as I mentioned,
you will need an ISBN for this cover template
generator, the work. Now it would be handy to create an account for Ingram Spock, and it only takes a bad thought, attain minutes to
create that account. Therefore, you'll have
everything ready to go for that. Later in the course, I'm
gonna be showing you how to upload a book to Ingram Spock. And during that process, you'll see why I
using room spark for my hardback books as well. But let's insert the ISBN
that I have ready to go. Then all complete the details. So that we can get these
template ready to go. Just go here into that in there. Don't worry about the
publishing a published a reference number, trim size. These are the options if
we go down further and just make sure that hard back
in case laminated, ticked. And what we can do here is
go back here and these are all the different sizes in hardback that Ingram spark of a. So they're not limited to
those five that had a PE have. We are then going to
go down and choose the eye 0.5 by 0.5 inch. Choose that size. I'm going to use
color, premium color. You can choose standard
or standard calyx 70. I'm going to use premium choosing the hardback
Thyestes laminated option. I'm going to choose
gloss in this situation. Pij count mod book, he's read about 40 pages. Now you get to
choose a fall top. I just like PDF. I'm going to enter
my e-mail address. Confirm it. Don't worry
about the process, the currency, and download with the Prosci in the bar code. Then I'm gonna do
is submit this. And this will provide me with the template borrowed amount that I can name use on Canva. So let me go ahead
and do that now. Self narrowly say the email, I just simply open
up the document, the template that I provided me and I'll do exactly
what our deep before, but you need to get the
actual numbers here. These are the numbers we're
going to place into Canva, into our custom
size so that we can create our hardback
using this method. So what I need to
do is go back to Canva and create
these custom size. So the first number is this one which is the width 19.137, do not contain 0.137. And if we go back here, what we need to do for the hot, this is the hot
number right here. Now, let's just go
back to my tool. We've got our width and our hot. Yep. What we need to
do is go back to here. On A2, add 1.5 inches
to the hot side. If it's an eye, 0.5 inch hot, it will now become ten. If it was 11 inch hot, it would then
become 12.5 inches. You just need to add 1.5 inches to what this number is here
to inputted into Canada. So it would be ten inches. New design. This will blame
bring up the template. We go back to this
template right here, and I'll will print screen. And we'll go back to
my template here. Control V, then reduced this
all the way to the blue. All the white to the blue. Bring it down all the way there. Now need to position
it so we're centered. Here it is right there. Stretch it to the corners, and just make sure that you
have it as close as you can. Just like that. Quite happy with that. Now that you have this implies there are a couple of things that you
need to consider. The ISBN, and it doesn't always work
this way because i'll, I'll give you an example
of a book that are created using Ingram Spark initially on the template that
said the ice being was gonna be in the middle, but it ended up being
down the corner here. Let me describe that
book and show you. If I show you these,
the ISBN is right here. It's not presumed presented or position right there
where it's suggesting. So that's something
that you just need to think about when you're
creating your hardback. So don't think that it
is gonna be right there. 99% of the time. It'll be down the
bottom right-hand side. So you can go ahead
and you can use your initial pain J image that you used when you
created your pipe of x. So let me upload both eyes images and I'll show
you how to position them. So that way in the spot where this area that runs
right around here. So let me upload the two images that let me start
with the front cover. We uploaded at prints
in the middle, we drag it down here and we move the cover up to this
position right here. You can probably just got
extended a little bit. Now what you'll find is the
image as you bring it across, easing going to be right
where you need it. Say how there's a
quite a big gap there between the pink and the blue. So you just need to
keep that in mind. What are normally do. Is I will get the
top and the bottom. And I will just
drag it in lattice. They not bring that
into the middle, rot there, then drag it down. Therefore, on my
way, the rotting is, and if this pizza I
bring it like this, there is no rotting, which is gonna be going to the blue area. Now you can drag it a
little bit beyond h area. Just say that when
it gets printed, you don't have a
watt law and that runs around it, so
I do like that. So that should be perfect
for the front cover. Now for the back, let me get
the back cover ready to go. I've got the back cover now. I do the same process, drag it down. Drag it up. It doesn't matter
if extends beyond. I'm not doing sign here. Just bring it along here. To the end. You might want to
get it centered. What we can do to center
it is just keep it here and then bring it up so
we know where it is. What we need to do is
get it positioned there. Give his position just
a little bit over. That's a little
bit out of there. And that's a little bit either
they're just slot that. Then for the background, we can, once we've got our front
and back cover organized, what we need to do is
to do the back color. We can just go background. The drop-off. We might use, we might use a Sandy
Keller rod here. We do that. Then we get rid
of that template and we have a front and back cover
ready for our hard back. The last thing we need to
do is save it as a PDF. Then that cover will be ready
for upload to Ingram Spark. We got to share. And actually before we do that, let's just draw and
adventure back. Kevin. Therefore it is labeled
and listed their form. We say that we know
what are these. Now we got to share and
we need to go download. We are using a PDF documents. We click download. Then at document will
appear in a moment. Once it satellite
it. Here it is. We're just waiting
for it to download. This will be ready for
us to use when we decide to upload it to Ingram Spark.
Let's just check it out. There. We are all ready to go and we will cite that into
our file for lighter. So that's the process of using income Spock and
kava for our backs. And it's not an easy
y to be at a credit your hard backs
with a variety of different options for the sizes. As I mentioned, cardiac pay on layoff of the font,
different sizes. Ingram spark of a tan, or maybe even 14 or
15 different sizes. And we want to make
sure we say this PDF, we have that available. It's just that you need to make sure you leave
that gap that runs around and labial spice
for the eyes begin. Now Ingram Spock, once
you send it through, they will manually
check it to make sure it's the right dimensions and it makes it all
the requirements. So just make sure you use the dimensions that are provided when you are creating it using this and it's a
mail through to you. Don't use the KD
pay kava calculated to upload to Ingram
Spark because they can sometimes on different occasions be different sizes that they use just fractionally
that's enough to knock back for England spot
and you have to redo it. So just make sure you use
the right calculations that Ingram had provided when I email you through
the cavity implant. Now going to cite this and
we'll be ready to use this when we're uploading our HA back to England
spotlight around.
34. Creating Your Book Interior: The next major step
that we have as part of that creation process is
getting our interior ready. Now there are a few
steps you need to have ready before you
start this process. Number one, you need to have your story or your
manuscript ready to go and just ensure you've had
it runs through Grammarly. You've had someone
spelled ticket or grammar check it just to
make sure it's right. The second component is to
have your illustrations, your images, ready to go for your internal
manuscript as well. These will B, a path that can be tricky at
times to get right. But we need to make
sure we take our time. We formatted correctly, and then once we got
everything ready, we cite it as a PDF. Therefore, we have our color
in PDF format and we have our interior or a manuscript ready to go also
in a PDF format. Let me jump onto Canada now, and that's what
we're going to use to create our interior. I have my illustrations
ready now. I have my manuscript ready. It's just a bat. Bring them all together. And I'll need to work on, talk through how the structure of the book and the
format of the book works. So you get that right
from the very beginning. So the first step we need to do is create a custom design, which is 8.5 by 8.5, or that's my cover design. Using. So you need to choose what the
kappa design is that you're using on using
inches I 0.5.5. And we got to create new design. Now, if we were using bleed, we would need to
add the blade onto the ongoing to
actually choose blade. What I'm about to do
the calculations, I can show you.
What we need to do. Here is let me just do this. 0.58.5. If that's out
except to have a cover, then what we need to do is add 0.125 inches to the width
and 0.25 inches to the hot. What that'll end up being 0.62 inches multiplied
by 0.75 inches. I did there. From that number is added
0.125 to the width. And I added 0.25 inches to the hot basic gonna be my new
calculations for my interior. If I'm adding bullied, if I'm not adding blade, you just keep the dimensions, the sign as this. Please refer back to previous lesson in regards
to bleed or no bleed. And that will allow you to
decide what you want to do. But for this example, I'm gonna be using bleed. So I'll need to go
back to custom design. I'm gonna be doing ICT
0.625.625 multiplied by point. Correct? New design. Now this is our anterior. So what I'm gonna do interior venture. And I also 625.75. That will give me the actual
measurements. And all. Remember that for the interior, the first thing we need to
do is create pij number one. So if you think about
when you have a book, when you open the cover, the first pages on
your right-hand side, we normally put information
there that might be about usually the first part of the book that we
might want to create. We might add information on
page two, copyright page. We've got when we
open the book up, that's on the right-hand side. Page two is on your left, page three is on your right. Any any even numbers are
on the left-hand side. Any odd numbers on the
right-hand side of your book when you are
flicking through the pages. What I'm gonna do now
is add my interior. I'll start the creation and then I'll resume the filming
of this lesson. So the first thing
that I'm gonna do, I've just started this
first page because I open up the front cover just to
grab this information here. But what I'm gonna do is download all of the illustrations
that I've had created. So therefore they ready to go. What I need to do
is just continue to add the pages of the book and add the manuscript
information. So I'll need to have that
on the whole ready to go. They can just be in a Word document and copying
and pasting it. And then I have my
illustrations as well. So let me upload all my illustrations and I'll
have my manuscript ready. Then I can just keep working
through the book and adding the information
as sound participating, downloading all of
my illustrations now you can see them
all popping up. And in total I have IT
including the front cover. Can use some of these illustrations as
part of the first page. What am I do is use
this one just here. But what am I trying to do is
type of why the background. So I'm left with Ali and TD. Diagnose this will work or not. But let's see if I can use the background removal tool
to get rid of the sand, the background, it might
just get rid of the blue. But let's say what it looks
like if it does come up correctly, it didn't come up. The wire wanted to, even
if I went to a rise, would have to spend a long, long time getting rid of all the sand here and then it
becomes very, very fiddly. Could potentially do this. But what a model,
so I try and do is safe is another
illustration I can use, or a mop you how to use
the whole one in his spot. So this is to cancel.
Cancel again. We're going to get it
back under the pitcher. Could even do this
potentially. It's like this. Even if it is quite small, that it's not odd deal. Still think it could work. If I do a lot. These just got to be careful
that I've also got the bullied running around, so just need to be
careful with that. Could could have it locked that to get rid of
that altogether and just have my mine
at the top here. My illustrator
details down there. Leave it like that. So that's one option. So it's a matter of just
playing around with these try and get the rot
options suitable. Didn't put that up there. I just need to try and work out if there's something on it, put it in this place. Here, mod I didn't go
back to here, Olin TD. That could leave it at altogether. That's part of the process, is not rushing it, just trying to get
the design rot. I can show that where
you're putting words isn't covering up illustrations
and things like that. You might want to have
public class if we go here, probably find something suitable that maybe we can always
change the color as well. What are the cows
have we got here? Different bubble
might go back here. Let's have a look along here. See if there's anything
that could be suitable. Change it to blue. If we could see this in
watts, looks better. You can leave it like that. You could change things up. You might want to put
it up the top there. You might just get rid of this altogether and then
might apply again. Just draw a few different things worked through your book. Determine what's going
to be best for the book. I think that suits that spot. That might be fun because
when you open up the book. When you had the
front copy book, you're going to have that Pij. Then the first page
you see is that, which is perfectly fine. And the next page we
have we scroll down will be the disclaim or
the copyright page. So I've got the details in
filled in here already. And then the next
page after that, you'd just like to add
something about the old thigh. You could just have credit by and similar to
what I've done, as we look through the book, we would have pij or sorry, the front cover, page one on your right-hand side
as you open up the book, then that's on the
left-hand side, page two on your
right-hand side. Now what we need to
do is start to add the manuscript and we just need to put all of that
information in there. I'm gonna start to add my own
manuscript into my pages. And then I'm going to add a full illustration
here. For example. This one here, I'll
just need to look through page is going to be
leave it might be that one. And we're going to be
working in reverse lawyer through when you had your
illustration in place. Right-click. Sit as background image, and therefore you've got the whole image
costs a whole page. That's what I'm going to do
for this design of the book. Then I need to add my
own manuscript here. So I'm gonna grab
my manuscript from a Word document and start
to place the words here. I have my manuscript with everything I've got
four or five pages. What I'm gonna do is copy this. Go back here, and I'm
going to paste it. I'm gonna be using plying GI
and bold as my fonts hop. I don't need to make
sure you get the right consistency is saw as established 24 bit small, but I'm also going
to narrow it a bit. Position, center, middle,
money to go a bit bigger. Guy, position, middle. Grab your sand Bucket, yell Daddy from the door, Roth to the beach to
enjoy the foreshore. That needs to be a lowercase. This is what you
need to make sure you check before
you start doing it. So all I need to go
back and make sure my manuscript is accurate
and that each Tom, I add my manuscript words that they're gonna be fun and I don't have
issues later on. And the other decision or need
to Nike is the background. So do I use background
is color here? On my trot? Begin with and see
what I need to do. Just to get that background, get rid of that color. Just get the **** out of here. I think it's that color, which is just get rid
of this box down here. To the background. Color there. Anyway. Now we've got
our illustrations. You can do the sign color
if you want to with these, you might want to
change that to white. We're all not gonna
change it to watch. Just to paint is what's
going to look a fictive. Not be better in watt. Back and leave it at
watt for the moments. We scroll down here. Same bucket that if no door after the base enjoy
the foreshore. Now I'm going to keep adding the manuscripts and
my illustrations. And I'm just gonna
keep this style. It's quite simple, but I think
it's gonna be effective. And when you're creating
your manuscript, you just need to determine what the
right design style will be for your book. This bookmark be very
different from your book. Wouldn't recommend copying
the design side of things or the formatting
because it could be very different
from what you've got. But I'm just showing you
the prices I go through when our correct more
internal manuscripts and my internal document. So it flows occur to
thinking about the customer, the size of the writing, the position of the writing. Do I want full page
illustrations? Don't want half-page
illustrations with writing. Do I want the writing
to appear on the page? So as an example, you might want to
have a section of your illustration that actually has the rotting
somewhere on your, on your book or inside here. It's not gonna work because as illustrations aren't
suitable for that. But if you're creating
illustrations and you want your
writing to appear, you need to notify your
Illustrator or have your your illustrations
position. So can include the writing for this book on having
them separately. When the customer or the child, for example, opens up the book, you've got the rotting
on the left-hand side, and then you've got
the illustration on the right-hand side so they can see the rotting and
re the writing. And I can see the illustration
on the other side. I'm going to keep working
through this book. I'm going to use the same
background and then H Tom just going to add
an illustration as our scroll through it. So let me just do a couple
of others to show you. And then you can say that
process all the way through. So I have now pretty much completed the internal
side of my book. I started with that covered
that we looked at before. Then I had my disclaimer or more copyright page
that I had just had an author who I am credit by dinner started my manuscript. I had my first couple here. Then I have my illustration. Then writing again. Then I had my illustration
that I have my rotting again, that have my
illustrations are kept on going through the
book like that. Now, this guy and this
is my flow of the book, is gonna be suitable
to this design. But this think about
your audience. What's going to work
well within what structure is going to
be best for the child. When they radiate, the
size of the writing, the kind of rotting, they need to be able to say the letters and the outer rate, it needs to be large enough for kids
to be able to read it. And they need to be
at a flip through the book and see those illustrations and
had them nice and clear. The illustrations for me, I've decided to make them full page in an 8.5 by 8.5 book. That's gonna be quite large, but that's my intention. That's what I wanted to do. Now what I'll do is
I'll just go right to the back of the book and
I'll show you another case. They achieve what
she might like to include in your
books in the future. The end of the book, there's
last illustration with Ali entailed going to sleep
after a big day at the beach. And then I've got a bat. The author now just
got some little bit of information here,
picture of myself. But one thing you
can include would be a QR code that mod
direct customers to your author central
page or website somewhere that you might be able to sell more
of the same book. They might be other
books you have in that series that I can go to. You can create these barges, go into QR code in Canada, you entered in, generate the code once he thought the URL in there and
it generates it. That's how ACTs. And then you can just
say where it's going to. You can add whatever you
want to be able to add. Another bonus page here. There might be some information
for me, for example, that beach safety,
my heavier book about something else and
it might be another bonus. The concept that you might
like to include in your book, which would help
build an e-mail list. Those sorts of things that
are important to consider when you're doing your
manuscript and take you Tom, Just go back through
the manuscript, make sure you've got
the grammar correct. The rotting stall is accurate. We've got everything
place where you want to because from experience, the last thing you want to
do when you publish a book, he's saying era and after reload it and redo
it and reformat it, just try and take your time. It's best to spend
an extra two hours, half a day awake, getting the book right, get someone else to
double-check it for you before you site and have it
in the format that you need. The next part we need to do once we've completed our manuscript, we got everything right. They only need to do is go to store to download
the document. So we go to Share,
we go download. We're going to
download all 38 pages, but we need to make
sure it's in PDF print. Then we download it. And then we have
our document out internal manuscript ready to go. And that's an exciting
part of the journey. We've now got our front cover in paperback and hardback
if you have it. We've also got our
manuscripts now, remember minds in blade. If you don't want blade, just do the normal dimensions. But if you wanted
to blade to add 0.0125 to the width
and 0.25 to the heart. And that will give
you the bullied for this manuscript.
There you have it. That's the interior. All done. This lesson is complete. Now for the next lesson,
we've got coming up.
35. Writing Your Book Descriptions: Welcome to this lesson. I'm going to be covering
the importance of book descriptions and
the structure that you need to follow to
make sure they're as engaging as possible
for your customer. Now there are some key
things that we need to include in-app book
description as applicable, because not all books
will require this, but it's good to
have a general rule of thumb when he going through. So firstly, the k tips must be grandma error-free or as
close to it as the candidate, because customers will pick that up and they might
judge the Y that you create your book description with what is actually
part of your book. So you just need to be very careful when you're
writing a book description to be grandma and
and spelling free. What we need to do is
include a strong hitting. We need to make sure that, that captures the attention
of the customer immediately. So then I want to keep reading. Next thing is to include k
product pitches of the book, but only if applicable, needs to be well formatted. And then other k information that might flow as part
of the description. Now, Amazon cardiac paid
doesn't last to include an HTML as part of our
inclusion for ad description. But we can also use the
formatting tool within caddy pay. But there is capital
of tools that I use that or thought
to be better. Now using the HTML code
allows things to be bolded, better headings, and just
stands out a lot more. So getting those features
rot is important. We'll be covering
that. I'm gonna show you an example of a
book description. But I'm also going to go onto Amazon and let's have a look at a few examples of good and
bad book descriptions, anything covering
these key points here. Let's get onto my example
that I'm going to show you for the Ali and
Bache adventure. And be able to go through the key steps that I took and the template that
I'll create h time, I have a book Soft
followed the same prices. This is the structure that
are generally follow. I had the key tips up
here to remind me. And then I've got the title, the subtitle, the description information below,
product overview, and the HTML code which we
will create the k tips, again, creating a headline that captures the attention
of the customer. So firstly, the total Bay all entailed the beach
adventure subtotal, the exotic adventures
of all indeed, Sun and beach safety for
toddlers, new experiences. Now the description,
my heading will be explore and have fun at
the beach with Ali indeed, then my description is in
orientate the beach adventure all in TDD visit the beach for fun field and exciting
day by the foreshore. All entitled learn
about beach safety, protection and had fun exploring the beautiful rock pools while searching for sea
creatures and shelves. The Oregon TD first-time
experience series is a fun and enjoyable
pictures storybook using creative rhyming language and to lawful color
illustrations to help young children prepare and provide reassurance
for new experiences. With beautiful engaging
illustrations. Toddlers will love to follow all intake on all of
the new adventures. So what I've tried
to do there is include a key headline of God information in
there about the book. Now what I'm doing is k features or product features and
onto the dot points. So we've got an 8.5
by 8.5 inch book, 40 pages printed on
premium color PIPA, and available in paperback, hardback and a book, your model. So I like to say
that's a gloss cover. Or it could be a matte finish just
depending on what your undo. And then this bottom line is what I call a call to action. There's actually evidence
to suggest that by having these increases
your chances of a style. So I've got scroll up and click the Buy Now button, sorry, click up and sorry, scroll up and click the
Buy Now button to die. And what I need to do
now is create my HTML. But firstly, our
need to check that this information is grammar
and spelling frame. And I'll use Grammarly. I've got my Grammarly
connection here. And I'm going to click on that. And then we're just
gonna see what comes up. So it's initializing it now. It'll give me the options. So it'll say just here, visit the beach for fun
field and exciting day. Died thinks I am
going to lay that. Ethan. Yes, I'm okay with that. For all entailed learned
about beach safety. Some prediction model
leave that next one, rock pools, these two words. That's if I'm using
English, Australian, UK, or are you going to
leave the US spelling? Because that's my mine. Audience. Illustrations.
Now they're not the diet illustrations. Diet can be images, but I'm just going to
leave illustrations. And then here we go. Totals will love to follow oriented on the new adventures. We could probably
get rid of that. That covers off the Grambling. And what I need to
do now is to just bring that back in Montenegro
to change that to e-book. Just check that. Regard. I've got everything
on a never next tip that I usually do is I
add the HTML code. Now there is a great free
resource we can use. Now what I'm gonna do is
highlight all of this, copy it. I'm going to go to can-opener. It's kinda enterpreneur.com. Afford slash, Amazon Dash, book, dash, description, dash,
generate a forward slash. And what we're gonna do is
just going to get rid of this. Water provides you
is a place where you can create your HTML code. What we do, we'll come
up with a narrative. Begin with when we do this. That's a kite. We do it again. Well, we'll just make
sure it's all good there. Now, I did forget to put in
those other product features. So we need to do, we need to add this information in as well. We go back and add that. It should be all there. Now, what I need
to do is highlight these and you can have a hitting some mountain
like that, hitting four. Then Ahmad even bold, this bold. Just have looked through here. Product either view as a hitting a ball that it's already
got the dot points. But what I might do is use the HTML code generator
to create those for me. One of my shorts or
automatic correctly. So we haul lot those. We got back up here and
we can use a bullet list. And then I'm gonna highlight
that in bold and name. We've got everything right. So once that is done, you scroll down here
and I generate my code. This is the code. What I then do is
grab that code and go to another site Code
I blurb.github.io. This shows you exactly what customers are going to
see on Amazon card API. Now there's pain suggesting that Amazon pay limiting the
size of your hitting. Going to make mine and three, just to make it a
little bit bigger. And I believe this
still accepting that and I'm going to leave it. So then I just make sure
that everything is what it's gonna look
like when I go to Amazon or women Booker is live. What do I need to do
now is copy this code. Copy it. I'm going to place it into this section just here. You can reduce the size of it doesn't need to be
that full size. We can unbolded and we can
just make it like that. Therefore, when we go to
load up our book in Amazon, when we get to this
section just here, when we loaded up a book, we can include the
HTML code right there. This is on the first page when you're loading
up your details. And we can add HTML. So we could add it
loud that therefore, it is all set to go. And when you do go to
Amazon IPO feature, exactly a lot of these, it'll be able to
read it correctly. That's how I do my
book description. And that's an example
of water I would do for the Ali and tidbits
adventure book. And I'd have my k features
or run it through Grammarly. Make sure I've got
my dot points. I've got a code of action
of K Hitting as well. Put it through
can-opener to create the HTML code which is there. And then I've also done the Amazon Blue Preview just to double-check and
see what it looks like. And then when it does get to
this point, I can add it in, but just ensure that you save all of your details
onto your template. And therefore, when we do
go to load up my book, we've got everything set. So I'm just going
to save that now. Before we finish this lesson, let's jump onto Amazon. And let's see a few
different examples of the description formats that other authors are
using any there, including these
five key features just here or key tips
that we need to include. Now I'm on Amazon and I'm just going to go through
and have a look at C, has some other authors
are creating this. So let's go to Biscuits first speech day. Let's
have a look at it. I've done it. Now this
is very, very short. I would create more information, go to the beach with biscuit. And that's all I've done. Psi, that is very
basic information. Let's have a look at, Let's go down a bit further. Let's have a look at, Let's
have a look at this one. See what I've got here.
They got the dot points. So they've got the nine hitting, learn from home and explore the world with a span
and easy board books. Were young children love to play in the whys of the beach. He is Hello World book that teaches them all that oceans and the creatures
and plants that live there. Then they've got the
different series of books so you can include that
information as well. So that's how I've
done that book. Let's have a look at Daniel's
first, our diet, the beach. Let's go to here. They've got their main heading
or a couple of headings. And I've got some
information here about it. Again, they haven't got the product features are
being including a bit more to capture the
attention of the audience. Let's go down to look at some successful books
that are doing really well. So I'm just waiting
for the ranking. Let's have a look
at which one is it? Let's go to the next page. See if there's any more
Beach books are doing well. This book seems to
be doing quite well. Here we are. Here's some more dot
points so that I've got in mind hitting written, find out about what
leaves in the shell in his California will start
at nonfiction picture book. Then it's couple of mine
information has got dot points, further dot points. So that includes
my my information. And what you'll find when you
load your book up is you'll get the k product information
down here as well. This is 32 pages, the grade level, the rating ij. And so you're getting
a bit of an idea about watching need to include. And when you've got
your description, you need to have some
of those key points that hitting a bold. Italics might be dot points and the HTML code does it for you. Let's have looked at the beach. Bluey. It's got a nine hating here. It's got a bit of information. Again, I'd be including
more information just to try and attract the customer. But obviously this has been
effective at the moment. And it just goes
to prove you don't need a huge description, but you just need
to make sure it contains information
which the customer wants, needs to make that
decision to buy. That covers off the
information about our book descriptions
and our hope that it covers everything
that you need. A bat writing a book
description and formatting that description and lighter on when we're
uploading our book, you'll have that information. Where did he go to put
into Amazon keda in that description component
of the applied process. Hopefully that helps you get everything ready for
your book description. And you can also use a
description on the back cover of your book if you want to make an amendment
to that as well. So that's an important
information to feed through regarding
your book descriptions.
36. How to Create an eBook: In this lesson, I'm
going to teach you a simple and effective
way to create an e-book. And you use Amazon's
Kindle create. Now it's a free download
that you can do and only need to do is go to
Google and Google kinetochore. And it will provide
you with a download. I'll show you where that is now. If you just go to kinda create
and type it into Google, then you click
here kinda create. Then you'll be
given an option to download the PC or
download for Mac. Once you've downloaded it, it will then be on
your PC or your Mac. And then you can
then start to use that software for free
to create your e-book. And it will be
specifically tiled. All the files will be tiled
for upload to Amazon. And you can't use those
files if you're uploading, for example, to Ingram spot. But it is a great little
phrase software program you can use to
create your e-book, which is nice and simple. Now if you wanted to create
an eBook for Ingram Spark, then you can get people to format and create that for you. So you might have
different platforms like five or, or Upwork. And you can just simply
write a book formatting. And there'll be
plenty of gigs you can get to create that for you. But for the meantime, let me show you how to
create your a book, which is a great option
for customers to purchase using Keynote create. Once I've downloaded
the software, it will appear on your desktop. And all we need to do to
do is go to Create New. And then we start
filling the details. Then I'll give you a couple
of different options. It's either flowable
comics or print replica. Now you just need
to read through what is going to be most
suitable for yours. If you do flow, but we need
to choose other doc or docks. On the comics, you can
use a PDF document, and that's what I prefer to use. I'm going to go comics. And you can watch tutorials about how
to put it altogether. And it was say, the
compatible devices. So free Kindle Fire tablets or Kindle e-readers.
Going to continue. And we look at the rating
direction left to rot Ratliff, we're going to use left
to rot the landscape so I can now the single-pass
images are facing pages. Now facing pages is when
you've got the lift and rot together with my book, that's what it needs to be. So I'm going to
use facing pages. So you got one-page Pompey's it, if you want a single pages, that's where it's
going to look like. For this book on using facing pages or NAMI
to choose my files. So choose the files
or PDF or the jpegs. Then on a to choose
the file type. So you can either choose an
image or the PDF and the PDF. Now I've got here
my book interior. And that's more full book
interior with the blade. So I'll click that one and
I'll choose that file. If we are open. Now it starts to create
the actual document. So it's importing and
converting your document. Just wiped for this to
happen, import successful. Now what we do is go continue. Now it brings up my book. And so you can see how
it's all flowable. If we go to the next
page, we're gonna X1. We can see how it will
show everything together. This is how it's
going to be viewed. So what we need to do
is just go to the View. Actually what we'll do, we'll go to here and we're just
going to be facing pages needs to be adjusted here. We should just
have a single page that's automatically
done the facing pages. So I've got my writing, then. I've got my illustration, rotting illustration,
rotting illustration. And then that puts it
all together for me. So it's all together all
the way through to the end, which is the final
page just here. That's all set to go. And then on a to do is
to preview it so we can click and say what the
radius will actually say. That's what the rate is again, the customer C. And we can flip through each
page if you want to. And you cannot have
a visual look at, see what it's gonna be locked. So that's how it's going
to look on the radar. That's good. And that works out perfectly
for what I want. They want or need
to do is go up. We can just do this, get
rid of me just here. We close that down. And now what we do is do we need to size the
kinda credit in progress. So we cite it. What we need to do is go to the area and that's
going to be siding with the scroll to the file. That's the specific Amazon one. We're going to save that. Reduce the length of
like I don't need to do. I need to go back here. Save it. What we might do
is just get rid of these like that inside
saving the project. Now what I need to
do is generate it. So export your Kindle e-book to publish the Kindle so
we can generate that. We're going to do
the same thing. We might reduce the size. Back here. We save it. Now that your
file is ready to publish. If we go to where the file is, it actually shows you
a little box here. This box here contains the file and the
formatting when a, when we upload our a
book to Amazon KID pay. So that is the file here, the one that looks like a little cardboard
box that contains the files that will
be needed for keda. It's called the kinda
correct Previous. That's exactly what
it's going to be. Let's just go later. And that's how easy
it is to create your a book using Kindle create. It's very, very simple
and effective and it does all the hard work for you and size it all
formats at all, as long as you've
got the right PDF and we've cited the Rottweiler initially in the PDF document
when we started with Canva. That's how we do a book
for Amazon card API. Just to conclude this lesson, to be really clear, what you need to do is
have the Kindle create, downloaded onto your PC or Mac. Then what you do is have your PDF document ready,
no interior ready. And then you have when you
load your book up to Amazon, you provide the cover. And then you provide the Kindle create file
that I just showed. You got that little
cardboard box which then upload and I'll go
through the process and show you how that
all works when it's rotten to upload our
e-book onto Amazon. That is the process of creating
a book Nice and simple. You're a book using
Kindle create. And that is a free software that you can just download
nice and simply, and you can use it for Amazon.
37. Being Publish Ready and Format Types You Require for Uploading: This has been a big section of the course and we're
now getting to the very exciting where we're going
to be getting ready and the published ready to load that book up to
Amazon cardiac pain. One of the file types
that we need in preparation for having
high back at Piper, back at a book ready for
uploading to Amazon cardiac pay. And then what about the
paper back and back ready for other groups or
other platforms? Lock Ingram, Spock. Let's have a look at these different file types that we'll need to have a paperback
and the a book. And so we've also got
our interior documents. Effectively. We need a pipette back cover, and that's going to
be in a PDF format. We've got our hard back cava that's gonna
be in PDF format. And our interior. And all of those documents need to be put
into the one file. Show you what I do in preparation to be print
ready to be uploaded, ready for Amazon card
API and Ingram Spock. Organize my files. I've got a book, hardback and type it back. These are the three
top books they don't creating for this book. So what I need to do is I'm
going to click on a book. So if I'm uploading
my ebook on now, which fold up to go to this, we'll have the two files, the one Niger fall here
that I'll be using for the e-book uploading that are just created
on Kindle create. Then if I go back, if I go too hard back, then I've got my book interior, the interior with Blade stuff. I'll click on that.
That just brings up the PDF version
for me right here. So that's really the guy. Then if I click here, I've got my hardback
cabin in final format. That's the PDF version again. So that's part of the lesson we did when we
created the hardback cover. Then if we go back
here and we get back, I've got three fall tops
here because at 1 in time during one of the
lessons we created a pipe of back cover
using book bolt. Remember you can also use book both for your
hardback cover. We didn't cover that in the
lesson about the hardback. But I do provide you
with an option of creating hardback using
book boat as well. So that's something
for you to consider. We've got the sine
book interior. It's the same file as the one in the hardback or just copied it and put it in here as well. Then I've got the Kaaba
that we did on Canva. So we got that one to choose. Or I can choose the one
that we did in football, which was that one. So our market may probably
use the book bolt cover. Doesn't really work for me either one. These gonna be fine. What I need to do is have
all of those ready to go. So they should all be in PDF
format and ready to upload. You might choose a Word
document and that is okay. Fault hops in Word
document are okay. But when we go through the uploading process
shortly in a future lesson, tidy pay will stipulate
what fall tops you can use. But to be safe, I always
use PDFs and it tends to lock in everything and it's
much easier to upload. That's how I organize it. Mod book falls to uploading
a book, hardback, paperback. Their default tops of got my cover or more copies
across all three. Got my interior ready to go, and I've got a rockfall tops. And that's the
organization that I would probably encourage you to do
when you're using your book. Also applied you up. That's the end of this lesson, and we're about to move
on to a new section.
38. Section 6 Introduction - The Upload Process: Welcome to section number six of the course, the upload process. In the section, I'm
gonna be showing you the major files that we need to have to get up when we're uploading our books
to Amazon card a P, that also the opportunity of uploading your book
to Ingram Spock, which is another
opportunity that you can have for global
distribution of your books. Now the applied
prices is important because if you upload
the wrong files, the wrong fall taught you could potentially get a rejection from Amazon pay and you have to restart the process
and just delays that. Launched Pretty
much of your book. Make sure you watch
these lessons carefully. Take some notes if you need to. Look forward to delivering
the next lessons for you.
39. Creating Your KDP Account: In this lesson, I'm going
to be talking through the correct white to
create your kVp count. So let me jump onto
Amazon now and show you through the simple
steps to create your camp. The first step is to go
to card api.amazon.com. Forward slash in under scroll us backslash,
forward slash. So I'll put this in
the description notes, but that is the
dress ego to watch you need to do is to sign
up to a new account. That process will actually
take you through the steps that you need to do to
develop your ADP account. When you do start moving
through the process, just going to click on
create your account. And you can then start to enter the details and passwords
and details like that. Now the main criteria that
you need to include us, the things like nine, address, your
texts, information, bank account details,
and things like that. And this step takes you probably the steps take you
maybe random bat, bet ten minutes to do. But it is nonsense, simple. Kp have created this easy to do. And remember to only
have one account. You're not allowed to
have multiple accounts when you create a Kindle
Direct Publishing account. So please remember just the
one account and remember what a email address that is under and your password
details as well. That is very simple step process to developing your
cardiac pay account.
40. How to Upload to Amazon KDP For Global Distribution: So how do we upload
that book to Amazon? Keda paid. There's a few
different methods you can use, but all ought to be
organized before going into the process
of uploading my book. I've got a template that I use to make sure I've
got all the details. So let me show you
what information I included that template. So before I actually saw
it in to apply my book, I have everything
prepared and ready to go. My template of God's
seven different things that don't need to get together. I've got my title and
subtitle details. Here they are here. My author name. So it depends if you're
going under your own name, a pen name, published, a name, just make sure
you've got that ready. We've got to have description
in the HTML format. So that's what we just
put straight into Amazon. We could add categories. This is, in a previous lesson, we were doing some
niche research and we're looking at books
that were in the area. We're looking at publishing and the different categories
that we've got. But there is a way to ensure that you can check
the right categories. And that is through
another platform. So I'll show you that as well. Then we could have
seven backend keywords that we can talk more as
we go through the process. But basically it gets seven
keywords you can include that you want your customers to be searching for,
to find your book. That just help if you
can't include keywords in your title or subtitle is seven backend keywords
is that spot. Number six, we have our anterior fall and
a book cover file. And then we have an idea
of your book price. That could be something
you need to do some research on before
uploading a book. So you price your
book accordingly. Don't want your book to be
priced too high or too low. You need to be in the
market to get those styles. And you need to look at
the length of the book, the size of the book
where they're in color were there in
black and white. All of that comes
together to ensure you get the rock pricing
for your book. So we can have a little bit more of a discussion about that when we get to that stage
of the upload process, let me hop onto Amazon, onto my cat AP camp. And we'll go through
this upload process. Now, the first thing
we do once we've logged on and we're
under our bookshelf, what we need to do is click
this big yellow button here, and it says Create. Now that will give us the option of choosing either
a Kindle e-book, a type of bag, or a hardcover. Now in this lesson on
the go and do paperback. But the price is, is almost identical for the other
options here as well. Let's just do paperback. And we can run through this process of uploading
your pipe of Factbook. Two, kVp, click
Create Piper back. And this is where our
preparation comes into place. So we've got our language. So you choose what language
your book is going to bain On leaving that
as English book title. So I'm going to go and
bring up the details and say book titled copy, go back and paste. That's what's going
to be organized. Subtitle again, I'm just copying and pasting
all this information. Back to the book. Paste these
yearbook part of a series. So if you're east
part of a series, maybe you've already
created two other books. Then you can add that to the, it's for the minor. I'm just going to leave that, but this book will form
part of a series as a mike more books for Ali,
indeed, edition number. You can include the edition
number if you want to. I'm just going to lay
that at the moment it is optional author. What I'm gonna do is put in here and then I
do the contributors. So if you want to
include an Illustrator, you can do that. You just need to click
here and you might want to put the illustrators
name or the details. Just depends how closer
partnership bees that when you're
creating your book, is it someone that's being
a father gig and you just have formed a relationship while getting
illustrations done. Are they a long-term
Illustrator for you? And you've worked really
closely with them and you've discussed whether they should be on the book as part
of a contributor, data things you
need to cover off. You can't just go
adding paper without the knowledge of them
actually being contributor. So make sure you get
that check first. Then we go down to
the description. And this is where we
add in the HTML code. So we copy and paste. And we'd leave that like that. Then what we do is go
to publishing rights. You own the copyright and hold necessary
publishing rights. Yes. Now, some people do
public domain work. This means it's freely
available on the public dynein. I have never done that. Always about creating
my own unique books. So I'll just leave it there. Now, the seven backend keywords. This is when you, these
are words you couldn't keywords you couldn't fit in
your title or your subtitle, that would, you'd
lock your book to rank for on Amazon KD peak. For this one. You might like
to do some prior research. Don't overthink it
too much though. These optional, but choose
up to seven keywords to. In your book. There's a drop-down here
about how to choose them. Just make sure they're
relevant and don't repeat words during
the title or category, the description,
because that will already be found
in the algorithm. You just need to list word. So it might be safety for safety for toddlers. I'm just going to fill
out a few more of these and resume the
filming for this lesson. Now I've added these in beach
adventure for toddlers, Sun Safety for toddlers, beach swimming
books for toddlers, kids books about Beach, beach books for babies, water sport toddler
book, summer toddler. I've added these seven
keywords because these are potentially words that customers will be using to find the book. I've chose a nice
Now categories. I've listed these books, children's quarter sports
books under the categories. Now if we want to
engage with these, then there is a freeway
and a pied way. Look at the freeway
to begin with. So what we need to do is go to book bolt and it provides
a free categories search. I'm on book bulk now and
I haven't logged in. Just go to Resources
KTB, category fonder. So what I'm gonna do
is do my keywords. So let's have a look at, let's just do water
sports. See what comes up. These are the
different ones here, juvenile nonfiction sports
and recreation, water sports. That's the 100 want juvenile nonfiction
sports, recreation. Juvenile non-fiction.
We go down. We followed it. Sometimes it'd be hard to find sports
and recreation. We're doing water sports. Then the other one was
children's new book experience. I would just do new experiences. Go back to this one. Look. We go try and find
new experiences. If it's in here,
have seen it before, doesn't seem to be there. I might have another look. The other way we can do it is
by using publish a rocket, which is I paid way. But let's see if we can do that. So I'm gonna bring
up publisher rocket. I'm going to go to
category search. This is a paid subscription
publisher rocket. Sorry, it's not, it's
a one-off payment of about a 100 US dollar. And you get this
software philosophy. So we're gonna do is go to book. And if I do, Here we go. So this is the one we got to go growing up in facts and law, family law for new experiences. It's under children's books. And we need to try and
find that category. So let's see if I
can find that now. If I go back to
juvenile nonfiction, I believe it's in here. Social issues of the MOP under new experience
here we are. I've got the two
categories of selected a juvenile nonfiction
sports and recreation, water sports, and then juvenile
nonfiction social issues, new experience so you can choose to I'm choosing those two. Does this book contain language, situations or images
inappropriate for children that I didn't use
of age, definitely not. Going to save and continue. And then this will go to the
next page and take us there. Now, you can choose to
either use your own ISBN. So if you are uploading
to Ingram Spark, then you're welcome
to choose them or assignee of free
Katie pay ISBN. For this example. Use the freak ADP ISBN. But usually I'll
get my own Ingram, my own ISBN because I'm uploading to Ingram
Spark as well in the same eyes being
can be used for the Ingram book and
also the KDE people. Whereas if you use the kVp ISBN, you can only use it ISBN
for Amazon tight API. You can't use it anywhere else. It's the freeway I'm giving you, so you must not
use it in your OS. But for this example, I will choose the free one. And I'm going to have
more ISBN there. Now when we go down
public hashing date, I'm just going to leave
that for the moment. You don't need to
click a certain date that it was gonna be lost
unless you have an idea. Usually the publishing
Tom can be anywhere from 48 hours to seven days, even sometimes ten days
for books to be confirmed and available under Amazon card a P Once I've been reviewed. Now this is where we
do that print options. So I'm gonna go the
premium color interior with what PIPA for
these children's book. If you had another book and you just want a black and white, we can choose out
with Crane paper, with white paper, we
could do stand the color. The premium collages, Saints be a slightly thicker pipe out and Beta in much better quality. Let's have a look here
at the trim size. Now. I'm going to choose my
eye 0.5 by 0.5 inch. You've got a choice of the other square
book here as well. Now these are other
trim sizes you can choose depending on
what your book size is. Yours may not be the 8.5 by 8.5, but that's what I've been using to create the book as
part of the course. I'm choosing that one. Blade settings. This is where the manuscripts, where your internal document, if you added the 0.0125 to the width and the
0.25 to the heart, then you need to choose bleed. And it's a PDF document only. The cover. We can choose other
mat or glossy. If it's a book that's
going to be used a lot and might have some
grubby fingers on it. Gloss off. Bonnie is better just because
it can be easily cleaned, whereas the net tends
to be bit stickier. I'm going to choose glossy
for my children's book. We now need to do
our manuscript. This is where we had to
have our files ready to go. Now, you can upload
a doc, a doc RTF. But I tend to use the PDF
file, which is much better. So I want to do is go to
upload paperback manuscripts, and I'm going to choose a PDF. So it brings up my files we created earlier
in the course. I did a paper back room. This is the interior. Needs to go to this one
just here and got open. We just wait for
these to upload. It can take a few minutes, so just be patient
and let it upload. You'll see it come up
in a moment to say it has been announced, It's processing the fall. Next thing we want to
do is I put cover. Now you can use cover
creator by tidy paper it, I found it very hard to navigate through
and crediting decent. I'd rather credit line. So upload a caveat
already, have in PDF. Finally, we do that. We've got to upload your cover
on to select one of these. I'm gonna do this one here, which is my paperback that
are created on book bulb. I'm going to go open. Again. It uploads and we just need to wait for the
process to occur. Now importantly, once
this is uploaded, then what we need to do is
do a launch per viewer. What's important to do
during this process? Before you click
Launch, pray viewer, whites until the clade where it says
processing your file. You don't want to go
to launch preview before that happens because
it will take a lot, lot longer if you do
that. So just be patient. It could take five, maybe seven minutes depending
on your Internet speed, it could take a bit
longer or shorter. So just be patient and I'll come back once it is loaded and show you what you need to wait for before we click Launch preview. Now it's all ticked. Processing is being done. Now, the next stage
is doing just to ensure that
everything that we've been creating fits this
specific locations of TDAP could get an error on Mott, get an era which will
not need to fix, fixed on the manuscript
because it could be elements that it's detecting
that are going to be wrought when
you do upload it. So let's check if
there is an error. I'll need to go back and fix that error before
moving any further. Let's go to launch preview now. It's saying that I didn't
pick up any errors. Now sometimes it can look
a little bit blurry, but that is just the
KD pn, not your book. So just be mindful of that. Now the key things
we're looking for here. To ensure that we don't
have any writing these ads, all these red line here. So let's have a look around and check the documents
so you can see it's quite close to the red line
that runs around here that's following night is
still in the boundary. We keep running.
It's written very, very close there,
but it's still in. We keep going around. Just carry on the border net. There is. It's fine still. And the back description
doesn't cover the ISBN. So everything looks good. Now, the next thing we need
to do is go to the pages. What we need to do is
wait for this to load. Now, that is not going to work. See how that falls
outside that line there. What we need to do is
to go back and our need to move that just so that my writing doesn't go over that law because once
it's manually checked, that can sometimes pick that up and then you'll need
to re-do it anyway. So you may also get it
right the first time. Need to re-do that bit, but let's just have a couple
of other pages just to make sure there's no other
elements on need to redo. All the writing is fun
there. That's fine. This week get to see the layout of book, of the book as well. Everything is in the lawn
there. That's great. Just keep checking. That's good. So each saints to be all
really, really good. What I'll do is I'll
go through the rest of the book and just
check it and make sure that there's no writing
that he's going to be falling outside of these because otherwise it
will get a rejection. And I've got to the
back of the book now. And that's all fine. It's just that first. Let's go back to page
two. Page three. Notice back here. What I need to do
is go and fix this, re-upload it, and then
make sure that's right. So let me do that quickly now. I've just gone back into Canada quickly and move the writing. And I've decided I'm going to go and apply
this fall again two kVp just to ensure it doesn't get a rejection
because it's over though, that's special red lines. So
let's go back and do that. Now. I have just going to
exit Print Preview and I'm going to upload that
new manuscript documents. I go back to upload
paperback manuscripts. I've updated that now. Let's do that. White for that to upload. And again, we wait
until it stops, is assign processing your file. And we just had the green ticks and not that writing there. So I'm just going to wait
patiently for that to complete. The fall is now
correctly uploaded. I'm gonna go back to
launch preview and check it another
time to ensure that now it's not gonna be covering the red line that could
get it rejected by Amazon. Cardiac pain stuck at the front
and the back cavity here. Then I'll go to this
page that had the issue. So now it is clear and
I've got no writing over it and the
rest of the book is fun because I've
checked that before. Everything is ready for mind. It says that the quality check
didn't pick up any issues. And it's got all the details here that I've entered
previously as well. What we do here is approved. Once we've done the proof, we now go on to the next section and that
covers the processing. So we scroll down, make sure we got
everything that we need. These talks about the summary of what it's gonna cost using premium pipa to do the printing of
approximately 40 pages. So it's $3.65. So what we do is
save and continue. And that's American dollars. What we do is save and continue. And this will take
us to the next page. We now need to
determine if we want a book available in all
territories and worldwide. I always choose, yes, unless you had a book
that was particularly for a country or for a
certain language, probably knock apply some
meat leaving his Amazon.com, but you can change it to
any one of these ones. Now, the market price
or the processing, the books that I've been
looking at, a roughly $11.99. So if we do that, what we do is put
that into place. This will provide the
printing cost, which was 365. The right, which is what
the author gets us a 40%, 60 percent split between
Amazon cardiac pay and the author or
the publisher, 60%. So I would receive a $3.54 royalty for
every book that sold. They can do expanded
distribution. Now if you didn't
have plans to upload your book to another
platform like Ingram Spark, then you can click that button. If you are uploading
a book to England, spark, don't click that button. I'm going to leave
it because I will be uploading these book
to Ingram spark. Now you can adjust
the processing for each of the different areas. If you wanted us to
leave it, that's fine. You might want to change these two items
is 99 for the UK. I pound ninety nine. And then it'll show you those. Then we scroll down, you can see all the
different pricing here. You might want to do attend
those 99 for each of these. And it goes all the
way down at.com that i u and then the last one as well. Now, I'm not sure which NLS. These are all the
different pricings that you've got organized. Now the last thing you would
need to do is click here, publish your paperback
book and you are ready to launch onto
Amazon cardiac p. Now what happens from that
point in time is that you receive an e-mail when you book has been authorized and clean by the internal
review for Amazon card API. And it will say Your
book, he's now alive. You can click on this
link and video book. Again, it can take
anywhere from 48 hours to experience two weeks
before three weeks. So they can take a bit of time depending on the time that
you do upload your book. But expect anywhere from
four to five days is generally the time span that you can expect fewer
book to be cleared. They might pick up a couple of small areas that
unique challenge. That's why the book
previewing component is such an important part. And you've got
everything ready to go. Once you're ready to publish. Good luck. And that's how you do upload your book to
Amazon card API.
41. Using Artificial Inteligence For Creating and Publishing Chldrens Books on Amazon KDP: In this updated lesson, I wanted to provide my thoughts
and feelings and a bit of information around using
artificial intelligence for creating books for Amazon, kVp, but even other bookstores as well online book platforms. So what is my take on it? Well, let me go through a
few things about how you might be able to use
AI to create books, but also some strengths, weaknesses, opportunities
and threats. My own swat analysis
on where I think I might be going to for
your book creation process. Let's get into a
presentation now. I'll take you through a
few different AI platforms that are currently quite
hot at the moment. And then how I think that I might transform the way
that we do self-publishing. To start with, let's look
at a couple of different, or three different AI platforms that you
might be familiar with. And I'm going to
focus more on chat GPT than the others because I don't have as much
experience with the others. But let's go into that now. We've got chat GPT, which is our Open AI, which I'll jump on
to in a minute. Then these mid journey. And there's also Jasper. These are the three
that I'm familiar with. I'm sure there's
probably plenty more that will come out
in the near future. However, I am getting more
familiar with chat GPT, so I'll be covering more
of that in this lesson. And why is it you can utilize that to your advantage when
you're self-publishing. What I thought I
would do to try and create some structure
around this. I just went to Amazon and I've just written
children's storybook. And if I go down here I
can see unicorn book. And there's a couple of
other books, mermaid books. Let's, let's focus on, sorry, a unicorn book. And let's see what we can gather and create a story from that. So if we go back to check
GBT and they say, If we, if we had create a 300 word, roaming, roaming, a story about a unicorn,
learns to flop. Okay, so let's see what
this comes up with and find out if this could create a children's
picture storyboard. Once upon a time
in a magical land, sophie lived a unicorn with
a mean of silver here. She gazed in fields
dance in the sun, but one thing was missing. She had not begun to spread wings and saw
through the sky. She dreamed of flying
and learning how to fly. She asked the other
creatures big and small, but they all laughed and
said she couldn't get all. The unicorn was sad
and felt quite low. She thought you'd never
learn this skill. But then one day she
lay in the grass, she saw a bird
soaring past so fast. She closed her eyes and
visualize the flight. And when she opened them, she
saw a beautiful her wings. It's sprouted and she
was ready to saw. She flipped them once, twice, then off she did so up in
the sky sheets world and she spun with a Winona in Maine and the
sun at her tongue, she laughed with joy and felt so alive as she flew
higher and higher. She didn't want to dive from that day on the
unicorn fruit fly. And she spread your wings up in, up, in the sky so high. She amazed all creatures
with a Grayson of flare and they all cheapy parade as she
passed through the air. The unicorn learn
that anything is possible if you believe in yourself and make
it unavoidable. So whenever she felt, she felt down or
just wants to play, she spent her wings and takes to this guy for a joyful SLI. So some of these, I really like, some of
it needs some work. But this was created
in about 20 s. And what I'd need to do is adapt some of these to make
sure that it made sense and went through the process of making sure
grammatically it was okay. And that it does
actually make sense. But you can see the power
of this and how quickly it came up with a story about a
unicorn that learns to fly. But what would happen if
you copied that exact line? Would you get the
exact same story? And someone else is going to
get exactly the same story. So that's where the
trouble may delay. If someone created a
YouTube video, e.g. about a back reading a book about a uniform
unicorn that could fly, would everyone start
to get the same story? Now, let's have a look. You can refine it and
you can change it. So you could have a change to a 250 story. And then what happens?
That should have been 250. Let's stop that. Ray brought rewrite
250, we're storing. And let's try it again. Thinking. What I might have to do is
adjust this guy down here. It's going to want to see the change
I just saw here, to spread your wings and
soul through the sky. She dreamed of flying
and learning how to fly. She asked the creatures, but
they just laughed and said, flies off the media,
especially in your head. The unicorn was sad but
you didn't lose hope. She closed her eyes and
visualize a way to cope. So you can see how it
actually has changed things based on the word count. So you can do that as well. Now I'm going to keep
moving through this. Otherwise it can
actually use chat GPT, or an AI would be for keywords. Keywords for a
children's unicorn, storybook. Let's see. It starts to generate those. We can stop generating. Or we might want
to have a title, a book about a unicorn, lens to fly called Jim. Jim mom and the flying unicorn, a tale of adventure
and self-discovery. So I could say rewrite two AT this monophonic or an adventure in shorten it very, very short. You can have different
ways you do. So. You can see very, very quickly, I've been able
to come up with a story. I can show that, I
can lengthen it. I can then if you
do a sales copy, so if you want a
description of the book, a description of a
book for a unicorn. Mama, to flow. Here we go. Following your mom are curious and determined unicorn agenda, she discovers her
ability to fly. This heartwarming tale explores
themes or self-belief and perseverance is Gemma
overcomes challenges and spreads of wings in the sky. Join Jumana on a
magical adventure and be inspired to
reach for the stars. So it's actually
very, very good. So that's how you can
use chat GBT or OpenAI. It's extremely powerful,
but you've just got to be careful about putting your
own special touch to it. And that's what I see. The problem with these potentially is that they might be shortcuts,
that they can be taken. So just be very, very wary of that. But within a few minutes, There's some powerful ways you can use it
towards your book. And that's just the
tip of the iceberg. Now, I'm not gonna go into great detail about
this next one, mid journey or do your
own research on it. But from what I see, you can actually get II created illustrations
done very, very quickly. But all I'm going
to say on this one is just be very careful on the copyright side of things
and the ownership of it. Check the terms and conditions, but do your own research
about meat journey. And I think you'll be
amazed at what the ability of this system has to generate
illustrations for a book. The last one is called jasper. You can also use this for our new images and
marketing copy. So again, I would look into
what you can do with this. You can get a free
account to begin with. And you can generate
using stuff for art, and it will generate it for you. So this one, Let's have a look at the
different creating content. You can Rock content in
different languages. So if you had a book that you
wanted to get translated in different languages
and help you out. Now, one last thing, I just wanted to mention
that meet journey, that is a paid plan of
30 dollar paid plan. I believe it is. It might change by the time you actually
go to it and sign-in. But with the $30 paid plan, did you actually can get access and rights to the use of images. But there is CO license, which means that you
don't have full ownership of those illustrations if
you're using the journey, but please check out the terms and conditions
before you start using it. The commercial use of
those images with any of these AR technology
that you might be using. But they're three. So we've got our chat, GPT, we've got meet journey,
and we've got chess. But I did a three that I've
become aware of that you can start using if you intend to use AI towards your
book creation process. Now let me cover
off the strengths, weaknesses, threats,
and opportunities. It's what we call
our swat analysis. Strengths. I can be a massive time-saver. The time it will save you
could be significant. Any Saudi illustration
with a unicorn book, how quickly that
story was develop for me and for the majority, for the good part of it
was actually very good. Could be huge cost saver. So you might like to use
it for illustrations. And if you can pay a
30 dollar fee, e.g. for meat journey to create
illustrations for you, rather than engaging
in Illustrator. That could be a pathway
you choose to go down. But also in regards to copy
or sales copy and writing, the amount of time
site is significant. For that. Next thing, it cast the net wider than ever before
for niche ideas, keyword sales, copy, and
seeking additional data. So it's becoming the
opportunity for us to gather information that we can use is becoming even
broader every single day. The more input we
provide these systems, the more powerful
they will become. One of the weaknesses
we could be in breach would infringe on copyright
and trademark law. That's a serious thing
you need to look into and make sure you make
the right decision and check everything first. So there is a gray area when it comes to ownership
of inflammation then then you are opportunities for the commercial use
of that information for now and in the future. So imagine if you had a book, you created it using say, meat journey, making
a lot of money. And then I came to
you and say, well, by the way, we've
got a co license. We actually have partial
ownership of this book as well, because the illustrations, we want you to start
paying us now. So think carefully about that. And we could reduce your appetite potentially
learn absorb information when it's so readily available
and cats thinking Tom down significantly gain its
pros and cons about that. What are the
opportunities? When should we embrace the technology
that we have at our disposal? We need to think about how things are going
to change for you. These systems becoming
more intelligent and we need to continue to be at the forefront of
a new technology. So I think we should embrace it. You may not always
agree with it, but you do need to
embrace it and move forward and determine how
it might benefit you. So I will provide a whole new advancement when it comes to the book
creation process. Uses cave abilities
at a minimum of keyword research and
nice niche research, and assisting with
titles and subtitles. You don't use them directly, just allowed to come up with
a few different options for you to consider and then put your own
personal touch on it. What are the threats? Well, it's kind of a
technology will have a significant impact on the way that we create a regional
entirely books and resources. So I could impact
the professionals. Such should be professionals like illustrators,
copywriters, artists, many other freelancers
with some of the work can be done in a fraction of the time with a
fraction of the cost. I'm not suggesting that the
quality may be as high, but some people
might choose using the new technology
versus a human being. There may be a huge influx of
new and Facebook's flooding Katie pay and other
publishing platforms with this new technology, the market may become even more competitive than
these right now. So you need to think about a few things and
these are my thoughts. How you think of your customer. What would they want? They want to create
a children's picture storybook where the storylines
being cow created by AI. Illustrations with G personally buy a book that you
knew was created by II. It was about a penguin that
didn't know how to swim. Would you buy that or
you move away from it? You just need to think
about your customers. I often create books, but there is still a
critical phrase of a successfully
launching our books. So anyone to load up books, who will ever see them if
they don't know about them. So the launch of your
book processes critical. So don't ever lose sight of
quality versus quantity. And the human factor
of feelings and emotions is highly
unique to human beings. So we need to make
sure we tap into that. It's something that
an I-I can't yet do. So let's let's make sure we take advantage of that and put that into your writing
in the way you create your books and
your illustrations. If you're using
illustrations in your book. And finally, please be very, very careful and consider any legal consequences or ramifications using
AI technology. So don't be surprised if K p real line in
terms of business, but book publishing based on methods used with
a supportive II. What I'm saying is you need
to think of the long term. Don't just take
shortcuts using AI and get compromise your future within publishing because
you're doing that. So there are a couple of
things that I wanted to bring up using IRF4 book creation. And there are a
few more thoughts that are orderings
you to be aware of before you move
forward with it. So everyone's going to have their own opinion about
where they feel it. I will come into play
for book publishing. Now, for me, I think I'm going to different ways that
I can embrace it. Now. Not every part
of AI I agree with, but it's moving at
such a rapid rate that I think it's important to keep up with new developments
as they come through. There has probably quite
a few things that do concerning worry me about the self-publishing
space with AI, particularly the volume of
books that people might start creating with the advancement of time-saving methods
of creating books. But there are other ways
that we can utilize it. As I've mentioned in
the presentation, that will certainly
be to our advantage. I just don't want
it to take over elements of quality
versus quantity. That's my biggest concern. And I also know that
we need to think of the way that our
customers are thinking, which I covered it early
in the presentation. So hopefully that helps you. There is a lot to play
out in this space. Keep up-to-date with
how you can use it to your advantage without taking advantage of customers by providing them with poor
quality or my books. Just try and be as
original as you can to provide the best experience
you can for your customers.
42. An Introduction to Ingram Spark: Welcome to this lesson again to introduce you to Ingram Spark. And Ingram Spark is another global distribution
opportunity that you have. So let me introduce that a bit in more depth for you right now. Some of these lessons, I'll
go into a bit more detail. The ink from Spark and the opportunities that you have,
the global distribution, Ingram spark to have over 30 thousand distribution
partners across the world. So I do have a big footprint
to get your book out the odd based on income
Spock and lots of books up now for
a couple of years. And it actually has helped significantly with the
branding that I have. And importantly,
a lot more voxels rather than just having
my books on Ingram spark. The disadvantage, I guess, is that you do have
to pay for an ISBN. But if you think
of the long-term sales opportunities
for your books, purchase of an ISBN is
very insignificant, long-term opportunity
you will have. Now there are limitations on the cons of books that you
can upload to income Spark. Do you go into that in a moment with the video that I'm
gonna be showing you. But just know that
Ingram Spark is another opportunity
for you to think about the why that your book can be branded across
different marketplaces. And always consider not just having all your books on one platform because he's something happened
to that account, for example, Canada a PE, then you'd lose all your
income with your books. You just need to make sure
that you're giving yourself an opportunity to get as
much exposed usually can, but also minimize risk
when you're publishing to. The video I'm gonna be
showing you in a moment, does apply to a book that
is a low content book. It's not a children's book, but it still gives you an
idea to look at the platform, how I upload that book. And therefore, when you do want to upload your
children's book, you can follow that
same process and you just need to make
sure that you're choosing the right size, the right Piper top. And you also include the description and
information there as well, but that's all covered
in this video. I hope you enjoyed it. Let's have a look.
The main platform of Ingram Spark we'd before
we get into more features. If you would like to
expand beyond KD payout, definitely recommend you
look at using Ingram Spark. If we go to how it works, you can look at
different means of expanding your
distribution of books that help get recognition
for your brand. And it's another
platform offers e-books, paperbacks and how backs. But there are, there is an upload pricing schedule
you need to know about. But there are some workarounds in regards to this as well. You can do print
in a book for $49 and print book only for
$49 and a book for $25. If you scroll down, you need to own your own ISBN, which is International
Standard Book Number. And I'll talk about
that a bit more. You need to have your own
cover interior files. You need to have
your email address and PI methods as well. So you can do that. You just shows you there's different tutorials
about learning how to self-publish in distribution. But I do have over 30 thousand
different platforms or distribution channels
so that I can help you. And you can look at different calculators
it downloads as experts. It can help you. What you would need to
do is create an account and just follow through
the process of doing that. But let me jump onto my camp. And I'll show you some of the successor of
how within-group Spark. Then I'm going to actually show you a few things
you need to know about before you can see that with a publishing
with Ingram Spock, he's gonna be suitable
for you or not. When you log onto the platform, you have a solid penalty
in here and you can choose different things
about your titles and all the titles
that you have. And you can have reports
which is generated. So we're gonna go into print
sales report just here. And I'm going to choose print
sales report just here. You've got different units
that you can choose from because Ingram spark of a
distribution across the US, the UK, and Australia. And you can pick
your date range. If we did. Let's just
go back to say Let's do some August 1st and let's
do through to the end of October 30th of October. We're going to look at the
US area to start with, and we do US dollar now, down here you got two options. We can't keep both tick
till you get to choose one. So POD is print on demand, and Global Connect is
when they can actually through two different
markets like Germany, France, easily by distribute your books through
those areas as well. But you don't generally tend to get many
styles from that. So you just do print on demand. And if you wanted. Longer periods of time, you can request an
email with the PDF. But if you just want a
small period of time, welcome month up
to three months, you can just do a
screen display. You can also just filter by
different ISBN and totals. So let's do that period
of time that we've got just here and
see what results. This brings up four more books. Do submit. Now this will bring up all
the different bookstores. Got, you've got
the quantity sold, any returns or
returns can occur, then I'd be damaged or wasn't exactly what the customer
was looking for. You've got the NIC,
quality, quantity, styles, returns, net
sales printing charge. And then you got a new set of recovery which
is not charged. Then you've got your
publisher compensation. And that's the amount that
you receive as an author publishing through the
Ingram Spark platform. Let's scroll down now. These few books that are
selling well across mine here, and you keep going down. This is just for that
period of time than I did. So these are the books all over that period of so-called
non-linear 19 books. They were 35 returns, which is actually quite high. I don't normally get that many. I'm not sure what
happened in that space. Sometimes bookstores
can buy your books, then they can
actually sell them. They can return them.
Then you sort of have to pay for that return charge, which is you do get an
option or whether you want to allow returns or not. That's up to the author. But sometimes if you
don't allow returns, then you don't get
into bookstores are Brick and Mortar Bookstores. You then have the total styles. So 194 book's title
styles of 564, $4,643. But then you've got the
charge out for the printing. But this lift ME with publisher income of
2350 US dollars. And I have not had
to touch any days. Books is no marketing, no Amazon marketing,
nothing at all. So it's just really passive. Once you create your
books and load them up, then you get that
passive income. That's a good amount of revenue to generate over
that period of time. And of course, over
the whole year, it adds up to be quite
a significant number. But let me show you a few things you need to consider about Ingram Spark as well before you determine
whether it's Roth for you. Let me quickly cover off before we go into
this any further bit, wire would publish
through income. Spark wanted to spread more
passive income streams. I also, I increase
my exposure to more customers by using Ingram Spock and
not just guide API. If kVp changed its
algorithm or could limit more potential and this could create significant
income adjustments. And also I don't want
one online platform having major control over
more publishing decisions. You might start,
we've cut a paying, get quite a few books going and get some income happening. But either the longer-term, it is wise to diversify. So that's why I do also
published with Ingram Spark. What are the considerations
we require an ISBN and the ISBN is the international standard business
SRE book number. And that is an option you can purchase in bulk from a
group called Thorpe BellKor. Each ISP and you can purchase an individual one and a mop
be something really high, like 50 or $60. But you can buy in bulk for, I think, for example,
in Australia, I can get 100 ISBN for
490 Australian dollars, which is equivalent to
about 350 US dollars or a 100 or ISBN. So it is considerably cheaper
when you buy in bulk. The cost to upload Ingram
Spark, as you saw, is 49 US dollars for your book. Remember that that investment will come back to you if you
saw my income report just before and I'm generating quite a significant amount of money will have a
long-term effect. Keeps on going
well, I'm well and truly covering the
cost of uploading. Formally, they had
free applied codes, but there is a
workaround to cover that $49 US cost. What is that? Well, let's throw a
group called ally, which is the Alliance
of independent authors. And I'll show, I'll put the link in the description
of this lesson. But at present, as
of December 2021, that membership is
approximately a $120 per year at these prison time. Again, I may change this up, so you need to check
it out for yourself. But currently they're allowing five free uploads per month. So you pretty much get $244 of value with those
five free uploads, or $2940 per year by
Pine at $120 an image. Definitely look into
it as acetyl lay the description below for ally. And you can just check it
out and you can get those. You get a unique
code to upload every time two increments spark.
Just have a look at that. But there is something very, very important you
need to know though, before we consider
uploading to Ingram spark. You are not permitted to
upload no content books, the blank line
journals or anything with nothing within the
interior pretty much. But you can upload hot
quality low content books. That's at a minimum. We're not talking
about high-quality. You need to be I'm pretty
sure they're gonna be meeting the quality control
because I do have a content integrity unit that checkbooks
that are uploaded. And you just have to be mindful that you don't want to be
spending, for example, the money for an ISBN
and to upload your book, for it to be knocked back. And you can't continue
to upload and have a global presence
with England spark. That's something to
definitely consider. And you need to make sure that you are going to be providing. I've had literally
tracing books and things like that that have
been sold really well. Gift books that have
sold very well. And you just need to
make sure that they meet the content integrity
guidelines as well. And I'll provide a link to the content integrity guidelines as well as part of this lesson. And that's just
something to consider. But if you were to
upload to Ingram, sparkle does show you the very easy upload process
and how that works as well. The upload a title, you just go to the homepage
alveolar dashboard once you saw it in and
you go to add a title. Now this will vary, easy to walk, walk
you through it. You can choose either
the print in a book, depending if that's the option. Print book only sign price and enable kindly
twenty-five dollars. So you click on
that. And then Isa, Yes, I have all my files. So you would do that. And we said no a lot, just say the available
options for creating files. Now, but I went to my
total information, submit the false lighter. I can do that as well. Let's let's go to this one. And you just go print jacket. You can either choose. When you're talking about
the print jacket and okada, that is just your mind cava, and then you've got
your interior as well. So if you had an 8.5 by 11, It's the sine cover dimensions that you'd have to pay for that. And if you're using, for example, book bolt, that sign fall would apply to your upload
for Ingram Spark. And same with the interior. You just clicked both of those. And you have an option here of either printing,
distributing, and selling the book globally, or only printing the book. That means that if you had a, if you designed a
book for a business, for example, we
created a partnership. We created a book just for a business or organization
and it was exclusive to them. You would only print the book, which means that
you could go into your dashboard and
organized, say, 50 copies. And it wouldn't be available
to anyone else globally, just to you to be able to print. Let's see option you have here. But if we wanted to do
global distribution, we click that and go continue. Name. What we do is
complete the details. So you do your title, your language, so you
have different languages. So you can do those
languages as well. Plan two different
languages you can do. I'll upload the books for multiple different languages
including Spanish, French, German, and they've
all had some good success. Then you include your
eyes begin number here. So that's the number
that you purchase through group block balcony. Or in Australia, it's
Thorpe a backup. But some countries even give you a free ISBN, like Canada. This lesson are provided
in regards to the course. That ISBN and with the innate, the Monod thing you choose
the publishing rights. Then if you click here, it's important click that because included
a subtotal here. So I can include
other information like series name
or series number. If you've got an addition and additional edition numbers nine, sorry domain, then you can do the authors and contributors. So if you were the author, then you can just put your
first name and last name. But if you, if you had a brand name and your code
on the Creative Book Club, then you heard you
just say the creative and then you'd have
book club in this area, there was a brand
name for example. And then you can also add
different data files. So country, any
biography information contributed prior work, all that information
can go in there. Then when it comes to
categorizing your title, you can have the imprint of
your brand name if you like, months already just in there. And then you choose the
subjects is the categories. So if we were doing, let's say a GIF book for grandparents or
your grandmother, then if you just
did grandparents, do you search, then we'll give you that and you choose that. And you add it, and
you get to add three. You might have another
one might be motherhood. And you choose that one. And then you can
choose one more than the audience depending on
what your subjects are, you would then choose that. So tried or general
is just adults. What we can do
younger age group. But if we chose that one, it would say that we know how to choose those two there
because it needs to be for juvenile if it's
juvenile just there, but you also have young
adult categories as well. So if you're just
doing it for adults, just choose that one. You might have
different textbook, so you're doing remote, just do try general. Then you can add
different fields as well. So you might have the
call thermos subjects, which is sort of Neijing down in regards to the different areas. So you can add different areas which can be important
to find your books. Don't ever really include
the table of contents. I just normally lay
that review quotes. If you had some quotes or
reviews he'd received, definitely add them here. And net because that just adds
the social proof element. Then you will need to
include your description. Now you don't include
an HTML description is it's got an ability
to rot or to add. So my grandmother,
whatever it might be. And then you have, you
can just make it big. You can do the different
sizes as well. And you might already
had this been a format on Word document. And then what you do is just format it once
it's in here as well. I'll give you an
example, just get one of the descriptions that
we've used previously. So I thought I just grabbed
one that we've used earlier on in one of their sessions about
book descriptions. What I would do is
just copy that. And then I'll go to the screen. I'll just paste it. Then what I'll do is go through
and just make sure it's meeting so if we wanted large or we can even
do the heading, sorry, the heating
needs to be so hitting three might be even be hitting on getting four. And then you can start to add
different things as well. You can make sure you space
it out. You can add bold. You just spread it through. And then what you then do is do the K words now
the keywords you can use for any of those keywords used at the backend
when you're doing a description and all those
seven backend keywords when you're doing your
loading to cardiac pain, you could just go back and
refer to those and you just keep adding the keywords. You can actually add a bat, a 100 different keywords and maximize it uses
many as you can. So it's a great tool
to be able to do that. And you just keep putting a semicolon in-between
each of those. And then once you've
done that, then you go, actually, we can add more
fields to stand here. I can have a short description. What are normally
do is just copy these and I'll
paste it down here and just make it
usually hitting four. Yep. And then you've got 250, pretty much
characters used, 191. So you can just add anything that you
think might be good as a short description
for your title they want you to do is once you've
added all these details, then you click continue, and that will take
you to the next page. Once we come to the
next page, then true. Choose your trim size. So it just depends on the
book that you've decided. And you might have
a bit of a look at these are the different
options you have available. So very similar to pay. What I'm going to choose is, let's go down here on going
to be doing the eye 0.5, but I 0.5, that CSR is
gonna be choosing five. Then you can choose all the black watercolor for this particular book
on gonna do color. Then you get to choose
other standard, standard color, 70 or premium. Now this is an assign Piper top. These two, if it was a book where someone's
rotting in it, then you need that
extra thickness or even coloring so that the color color doesn't move
through to the next page. So I'm gonna do, I'm gonna do
standard PIPA on this one. You choose all the
paperback or hardback, so you get those two options. I'm gonna do Paperback. Perfect bands eat
only option you get, you get to choose your cover
finish glosso net cava. So I'm gonna choose gloss. Then if you do the pitch camp, my page is 42 pages. Then it gives you
your printing cost. Then what you need to do
is do the retail price. So once you calculate it, so for a book like this, it's going to be more
expensive than height API. So you need to factor
that in because it was what I call a
wholesale discount. With that's the discount
that you offer for re Tyler's to sell your book. Now, I'm going to do a
price of ten, not E5. If I do 1099, if I do the wholesale
discount to do it at 50, 50% percent actually,
I wanted to do 55. And I'll show you
because I do say that for
bricks-and-mortar stores, you have more of a
chance of selling into those stores If you have a
high wholesale discount. Now return IU wanting to have this book ethers are custom issue
and I returned it. Are you going to
permit that now? Yes. Deliver which means you have
to issue Pi for that or Yes. Destroy and only
two, yes, Destroy. This gives you a compensation
of a $1.31 thing. You just go through the
markets and do the sign. We're just gonna do this
all the way through. We have the same again, so we choose those.
They're all done. Just making sure
you've got the rot, profiting with the maths here. Just know that the entire easy, exclusive GST in Australia
that will organize a processing for you
automatically are normally I'm compensation is 0, I'm not sure what
it's going to 0 if we remove that down to 50. Before we got there we go. Just keep moving up zeros. So we need to make
sure these price, if we go 1299 and we did a 50, just need to make sure
you're not in the negative. I'm gonna go 55. You might want to
even have it 1199 just I aim for between a $1.17. $2 is pretty much what
I feel sells the best. You understand is to
destroy like citable, the process enable
the book inside. You can choose other,
these two as well, print publication we're
going to do as to die. We didn't just going
to choose that. You can do more
fields to optimize, but on only lay that
site and can continue. Then this is where we actually upload the interior information. So I'll do that and then
we need to do is continue. So let me quickly just do
that and pause the video. And you'll see that I've now
uploaded more documents. Now we got to continue. Then what it does. It does the total metadata,
metadata validation. Now sometimes this comes
up with a warning. I just ignore the warning if it comes up because
I've never ever had an issue regarding
the content or the United quality of the
images that I've been using. It is white for
these validation, to confirm for me that
everything's fine. As you can see, it gives
you a bit of a warning, but I'll never had
an issue regards to more books when
it's got that issue. And then I hereby authorized in group
to go ahead with it. Yes. Proceed. Then it gives you
the opportunity to put in your promotional code. So this is when, if
you don't have it up, it costs you
twenty-five dollars, twenty four dollars
coming to $49. But I'm going to
enter my code for my through the alliance
with alive or Ali, the outlines of the authors independence program
that I'm part of. So I'm gonna do that
then on going to agree. So once I get the code
organized, so I'll do that now. Once I'm on a lie, I go to approved services
discounts and deals, the AI product distribution. And then you scroll
down and you'll see where it has England
Spock in a moment. Just wide for this to
come up. Here we are. Free title setup. We've got more details and net will take me to
where my code is. So I can't show you that
code unfortunately, but I'll it at that now where it offers five free uses
per can per month. I'll do that and
I'll add that code to the applied process. Now I've added more promotional
code and it's at 0. Then I got a gray. And once everything is fine, then I click Submit. That is the process
that you need to go through for the Ingram Spark. And that's another wire can continue to generate
styles for more books. Sound now just clicked Submit. We just wait for it to process. Now it says the total
was excessively submitted and now just wait
for it to be approved. And then I'll get
I'll get an email and I need me to check the
interior and the capital, make sure that I'm
happy with it. Then I prove it on my dashboard. And it's either two in group two then distributed to all
the different networks. So that's how you upload
the title to Ingram Spock. That is one of the complete process of paying out to upload
to Ingram Spark. So just remember the key things that you need to have an ISBN. You can either pay the
$49 upload or join an author's independent
group log ally that potentially can
provide you with codes. And you need to make sure
that they really good, high-quality, low content books
or the minimum B can't upload no content books. But as you can see, few prepared to get them uploaded
to this platform. And it's not the only one. There's another
platform called Lulu. You can also look into for
being able to distribute, distribute your books
globally and not just on KP. I'm hoping this value carried a lot of value for
you and it gives you other options for your
printing across the markets. No matter where in
the world people are.
43. Section 7 Introduction Marketing and Advertising: Welcome to section number seven. It is about marketing,
advertising, and it's a component that
many authors trombone pass, but it's such a
critical component. Because when you book goes live, you should consider that
a bat, the 50% mark. Because if you don't
get your book into the hands of customers or they
don't know about you book, you won't sell any books. Therefore, when your
book does go live, you need to have it by
asic launch strategy implies and you need to have some white of
marketing your book. Now there are a number of different strategies
you can implement. And across the next few lessons, I'm gonna be showing you a
few of these techniques, few tips that you can utilize to really try and get your
hands into the customer. Because I want your
children's picture storybook to be
successful and be sold. Therefore, watch the
next few lessons and hopefully you'll learn some
grinding through mentioned.
44. Amazon Advertising: In this lesson, I'm going to introduce you to
Amazon advertising, or commonly known as Amazon ads. Now, Amazon ads can be
a very effective way of getting notebook to more
people and to get it noticed. So let me identify or show you what Amazon advertising
might look like if you just happen to be a customer scrolling through the books of Amazon and you'll see that they sponsored
ads for pop-up. And that is actually
public height publishes or alters advertising
through Amazon ads. So let me show you
a few examples. Follows on Amazon
and are just did a search and toddlers
books about the beach. You'll see these pop up. That's actually sponsorship. Then you can say how
it is sponsored. Rod here. These, these are Y4 publishes authors to get the book on page one of the
search results and two, Beta position where customers
are more likely to see it. You can see it's ones
there, another one, is there a name there is now advertising their keychain down. We might say another
one, he said another. That's another spots
called sponsored brands. It's a bit harder to create
if you keep going down here. Another one where
it says sponsored. So for the customer, they might not even realize
that it's actually an ad, but it does cost a bit
of money when you try to get your book featured in these spots and spiced
on a bidding system. So the higher your bead, the mole, luckily your
bookies to feature. However, if you spend too much, they need, could erode all the profitability
of your book. Now, because it is a
bidding system, the heart, the bid, then if your
bid is the highest, you will get the
number one place. But every time a
customer clicks on your, the link just here,
you'd have to pay. For example, if you had
$0.70 per click, as I bid, you would have to pi
$0.70 if I clicked on this rod now and it took
me through to the book. So it can get expensive. But let me just show you a bit of an introduction
through Amazon adds some key information and some tutorials that I
would recommend that you watch to get more of a look and feel for
Amazon advertising. What I want to do is cover some key points about
Amazon advertising. Things you need
to be careful of, things that you might be
should consider doing. So I've gone into some depth
about what these key points. So firstly, ads
can significantly boost your chances to
rank your keywords. Your keywords are those words that customers are
searching for. And if you do advertise, it can help because you
start getting styles, the algorithm of
Amazon logbook styles, therefore, your book starts to float to the top of
the search results. Amazon had many
marketplaces in the US, UK, Canada, Australia,
and Germany. Plus minimal, each require
a separate account. When you create an
Amazon ads accounts, you'd need to create one
in each marketplace. The USA is by far the most comprehensive, sorry,
competitive market. It's probably going
to be like that. Because just the sheer volume of customers at Amazon
have at Amazon.com. If you book, he's no good. Amazon ads will not
solve that problem. There is no point advertising
and marketing and heavily marketing and spending a lot of money on a bad book, no matter what you
invest in advertising, it would solve that problem. Firstly or sorry. Lastly, the ongoing
maintenance is important to what they call optimize
and avoid either spending. Because Amazon advertising
is a bidding situation. If you don't stop any what we call Amazon
marketing links, then you can start to run
out of money quite quickly. You also need to ensure that you are regularly going
in and checking your advertising just
to make sure that everything is going
as you wanted to. Therefore, why use Amazon ads? Well, Amazon ads can, as I mentioned the
previous slide, Dr. some initial styles. The most styles you get
in the first 30 days, the Beta your book will
perform either longer-term. If you can get those Amazon ads working effectively for
you to draw the styles in, Amazon will lock that. I push your book
up and you start to get on the page
one to page two. Now many customers
tend to scroll beyond page two, page three, when they're looking
for something that may not say it on page one, and that's as far as I go. First. Next one is increases
relevance for your keywords. When you put your
keywords into your title, your subtitle, and you save
them backend keywords. Your Amazon, Amazon
advertising will help with relevance
for those keywords. They are effective that Y2 increases rave reviews
do two styles. And reviews are important
for social proof. The more reviews you have. The most social proof you have, the most styles you
start to generate. Therefore, the ads will help get more customers to
buy your book and then hopefully provide
those reviews. And lastly, marketing through Amazon advertising is direct
to the Amazon customer. It's rare that you have
such an opportunity where a customer is
going to be on the site. And I see your sponsored ad rot there and I can click
straight on it. If you are advertising
through a third party, then it might be a
bit hard for you because you then need to get the customer to
click on the link. They need to have
an Amazon account. I then need to login,
get your book. They impart, and have
everything organized. So if a customer is already
scrolling through Amazon, more than likely they'll
have an account. Therefore, to
convert the customer to a purchase is going to be a much better way of doing it than trying to avatars
through other means. So let me introduce
you to a little bit of terminology and metrics
for Amazon advertising. You'll see when you are doing or Amazon advertising, you're
getting impressions. So this is when you're at ease. His flight to customers. Clicks is when a customer
clicks on your ad. Ctr means a click through right. Say Pay see is a cost-per-click. Styles is the title revenue
generated from adds. Another piece of information you might come across
or you will come across whenever
Amazon advertising is something you do
is called icons. I cost is the advertising
cost of styles. So basically it's a
ratio that lets you know how effective and efficient your adds up and the more
styles you get the list spend, hopefully you have, that equation works out
much better for you. But that's just some of the terminology
that you might come across when you're looking at doing Edmondson advertising. In this course, I'm not going to go into huge amount of data. How about Amazon advertising and the tutorials are things I have that in other courses. But to register, to
credit in the camps. Provided the dress
off the top here, advertising.amazon.com
forward slash register. The select your country
and you go through the process of adding Pi Min
information and details. But remember, you
do need to register for each country that
you wish to advertising. What are the other, what are the tops of Amazon campaigns? Can you create? Well, you've got
sponsored products, which is the one that
90% of most people do. And it's the one that's
often the most effective. And there's three main tops
you can do auto campaigns. Basically, Amazon choose
different keywords, different books
that I try and put your book Nia and search for. That allows Amazon though the
algorithm to pick up that. You can use Amazon
to do that for you. It can be a bit challenging. Nyc is sometimes the words, categories that Amazon books, your book in front of that accurate and you can
spend a bit of money. And Amazon advertising is all
that crediting revenue for Amazon units need to be careful
with using that method. You can have what they
call a broad phrase and exact keyword campaign. And you choose different
words that you can rank for to get
your book in front of. You can have broad term words, phrases, and exact words. The last one is, you can have a campaign by some categories. What I call ice and target. So each book on Amazon
will have an ISBN number. And you can target a
particular book IV, it's very similar to yours. And that book shows
your bookmark, the other above it or below
it are a couple below it. And therefore, if that's
selling really well, he might have a
chance of your book selling if it's close
by to that book, I'd recommend some
tutorials that you can use the learning console
via Amazon advertising. So you'd become a
student and you can enroll in these
courses here. So once code is sponsored, ads bootcamp, you can go about different
Add to, add tops. So I'd recommend doing
that because there are some good tutorials from
Amazon ads for that. The next one is Afri,
Amazon ads tutorial. That's by enterpreneur. And if you Google
keen enterpreneur, Amazon ads tutorial,
it will take you straight here and a
highly recommend it. It's a free course. There's quite a few
modules involved. And it is really
well-explained and provides a lot of good information
that gets you started. So as I said, this course, I'm not gonna go into depth. The bat and Amazon advertising
do provide that in another Amazon pay course that I have, which is available. But I would definitely
recommend that you start with this
one that's free of charge and you can start
to watch this information that the owner of kinda pronate that
dive chasing provides. So maybe check that out as well if you want some more
information about Amazon ads.
45. Amazon Ads Performance - December 2023 Update: Hello and welcome
to this lesson. I wanted to actually provide this updated lesson regarding
the power of Amazon ads. I know that I've
run through using Amazon Ants to help with your children's
picture storybook. But let me give you a practical
example of the power of Amazon ads and I'll show you my dashboard for the United
States but also Australia. This is a book that I wrote called Archie the
Bear Becomes a Big Brother. And you can see this
is the year to date, January 1, 2023
to December 2023. Nearly 12 months, I've
spent $1,327 on ads. However, the return on
that investment has been $6,834 in sales, equating to around about maybe 2.2 to $3,000 in
profit from that. So once you subtract the
spend and the sales, that's roughly the profit
that I'll be getting. Although you should not really aim for Amazon ads to
be highly profitable, it's more to get traction
and to get your book ranked. At the moment, I've
got an A cost of 19.42 So basically
that is the spend versus the sales that needs to be sort of kept
under 20% if you can. But that is the power of using Amazon ads to help with your children. Pick
your storybook. But let's look at the
Australian campaign equivalent to the year to date. So far it's actually got
a much lower cost of 11% I've only spent $73 but I've made $659 Australian
based on this campaign alone. I will continue to use this. It's got nearly 80,000
impressions and it's been fantastic to get that ranking on the
Australian marketplace. I'd recommend that if you're
going to use Amazon ads, make sure that you turn them on in a couple of different
marketplaces if you can, and depending on the kind of book you do publish and if it's going to be recognized by customers as something
valuable, definitely do that. But always be careful
of your budget with Amazon ads because
it can blow out, particularly during peak time in December of each year as
it goes towards Christmas. But in January and February
tends to be a lot cheaper. It's probably a
good time to launch campaigns that time of the year, but this one has been
running now since, I think, yeah, would be
probably December last year, maybe even January this year. It has performed really,
really well for me. So this is just an update
talking about Amazon ads, the power of using them for your children's
picture storybook. And having an effective
campaign which helps promote your book and to
reach more customers. So hopefully this
has helped you out.
46. How to Create Mock Book Images: In this lesson, I
wanted to talk about mock book images that you
can use for your marketing. Now MOC images allow a customer to see what
the bookmark look like. If we were sitting on the shelf, if it was on the bed, if they're already
at themselves. And that does help
to make conversions. I've got a couple of
different softwares that are do use
it a free to use. So let me show you
what those are because your MOC images can be used for a number of different marketing strategies
that GMR lot to implement. So let me show you the
software programs that I use that G can use as well
to create your images. The first one is
called Book brush, and you can create an account
for free with book brush. There's a number of free
mockups you can do. So I'm just going to log
in now by going up here. And once I'm signed in, what I need to do is go
to instant mock-ups. At least provides a number of different options
for your mockups. And you've got plenty of
free options you can choose. Once it loads up,
I'll show you what these options are and
how to create an image. I've got three here
at the moment. What I'll do is I'll show
you how we can do 14 I, I 0.5 or like a square version. Because if we go down
here and choose the 3D, these are all what you can
do for the free version. So there's a book ones you
can do these paper back. There's also hard Becky can do. There's even a bind you can do, and then you can use
the square version. So if I wanted to choose this one just here,
I'll click on that. I'll upload my image or
click on an existing image. I'll just click on that. Then what we need to
do is go to convert. Now, this will now start
to convert the image. And then it'll actually give us a pain J image that we can
then utilize for marketing. We just white for this to work. Download the image, and
then we just wait for the image to pop up.
We click down here. I open it up, and
here it is. Perfect. And that will show the
customer what they likely to receive when
they get this book. Nursing clear. And it's just such a great way to be able to show your book. Now you can also choose
different options. We're just going to
go to stop and close. Now if we were to do a book that was more
like a seven by ten, then you can choose
out just make sure you unclick that one. If you had another book, just say it was
this one just here. What I'll do is I'll
upload another image, which I'm doing now. So an image should
pop up in a second. I will just wait for
it to load a nap, the image is loaded up, I click on it, then
choose what I want. So you can also go
for vertical lookup, a square image as well. But when they've
got a locked image, diet only for people
on a subscription. So you can see the
different images there. We're gonna go to 3D game
and ongoing to choose. I'm going to go down a little bit fun one that might
be suitable for me. Let's choose just trying to find a suitable
one for Charles book. Let's go back up again. These ones are obviously idea that one's a really good one. I might even choose at one
and see what it looks like. Let's go with this one again. But you can choose
your seven by ten, for example, and choose
any one of those. But I'm just interested to
see what this one looks like. Let's convert this
download images. Let's have a look at this one. Yep, come out really well. So that's the hard back. And you can get that done
as a Maki image as well. Then all you need to do
is save that image into your folder and then you can use that for your publications. Let's go to another one now that was called Book brush.com. Let's go to this one is
called Book in motion.com. And what you can do is font
one that might be suitable. So let's go down here. Let's choose this one just
here on the bookshelf. You got to customize
this mockup. Then you need to choose an
image that is suitable. So you guys select
a cover image, a Monterey to get
the image quickly, which are just done now. This is the book that was, if it was like a seven
by ten inch book. And all you need to do then is right-click and you
guys save image as and then you can save your image to your folder
where you need to have it. So that is another good way
of choosing different ones. That's a book standing
on a wooden shelf. If you go back again, you've got all different
options you can choose from. These are other ones
that are phrase well, and the last one I
want to show you is called the three-day
book cover creator. You can do a composite
if you wanted to. If you had an a
book and the pipe, a bank for example, let's choose this one on
eight to go next on A2, browse and grab an image. Let me do that. Let's go this one. And then we go upload. We wait for it to upload. Quite F4 to take through. Now. Then what we need to
do is just go Next. We go JPEG. Then it will actually, it will create the image force, which is now
available down here. Click on here, and
there we have it. We've got one and unlock an iPad on a phone and
one as a thick book. Now the only thing is
with these MOC images, just got to be
careful that you're not getting one that has such a thick book if it's
not because you don't want the customer to expect
a hundred and fifty, two hundred page book when
it might be only 40 pages. Let's go back here again. And let's choose another option. If we want to choose
a single page, we click on the image. Go next. Browse, click that
one, get back. We upload it, white
for it to upload, which is ticking through now. Then what we need to do is
wait for that to load up. It will show us the
image to make sure it's the one that we want. And we are nixed. Then we click JPEG. Now this will just
white. This will upload. So he comes image
now, we click here. Then it brings up the
book. Again. Just be careful with the thickness. That's why logbook brush, because it provides probably a better Maki Mitch compared
to these thicker books. These afforded more for
a high content books. But it's still a good
option to consider having if you wanted these ones. So let's stop here. These are probably the
better ones that are think would work based on
the book brush.com. But there are some
options for you, and there's plenty that
you can choose from. And they are all
great to be able to use for your mockup images, for your marketing
and advertising. That was book brush.com, book in motion.com, and
DIY book covers.com. So they're the three that I
use that you might like to choose yourself to create
your mock book images.
47. 3 Step Strategy to Sell More Books : So when you book guys live, what are the different steps and strategies that
you can implement into your own launch plan that will help you
to sell more books. When you book does go live, you have approximately 30 days to really try and sell as
many books as you can. Because he Amazon algorithm
does logbook styles. If I say the book is popular, they'll continue to float
your book to the top and hopefully appear on page
one of the search results. Now I've created a
document that outlines stamp specific steps and strategies that you can
use to sell more books. So let me run through
that information now to be able to help
you in your journey. So step number one is going
back a few steps actually, it's getting the
core elements right. And we've covered
this in the course, the innate and make sure
that you get your title, your subtitle, your description, and your keywords right? Now if you feel that when
you've launched your book, you've got maybe
somebody description is not working or the key backend
keywords aren't working, you can go back and change that. What you can't change the easier title or your
subtitle. I remind the sign. If you want to look at different ways you can
increase your visibility, then make sure
that you check out your keywords and
your description. Because if your book is perhaps getting in the front of customers but they're
not buying it, then something is wrong with
the description because that is what will entice
them to buy your book. So make sure you go and check. Or even before you
launch your book, your toddler and subtitle, make sure we got the
right keywords implies. Then you can always change your seven backend
keywords and try and get your description as good and as positive as possible so that customers want
to buy your book. Let's step number
one. Step number two is to get eyeballs
on your book. Many believe that once
the book goes live, but that is done. But you were too
hard for you book, you make sacrifices to
get you a book created. You want people to
know about your book. There are different ways
that you can market your book, but free Empire. And you might need to get
some social proof as well for your book to start getting
ranking, such as reviews. You might like to
consider Facebook ads, LinkedIn, and you
might want to put a post on LinkedIn about
what you've created. There are Amazon ads you can run as well directly
to the customer. You can think about post on Instagram in something on
YouTube and also Google. They're asked that there are different platforms you can
do to help with reviews. So one is called Puppy.co and the other one is called
Book spread..com. So check those out if
you're interested in helping support your book
with some social proof, they can help as well. Let's go to the next one is expanding into broader markets. Amazon today pays just one year. It's the biggest in the world, but it's not the only one. Other platforms like Ingram, Spark, and Lulu drafted digital, and also platforms like
gamma wrote and ETC, also can help you
to get more styles. Now the last point is an
off had success with it is to get your books translated
for different marketplaces. Solve had success in
Germany, Italy, Japan. And spine of getting
more books translated. And it depends on the
Carnot book you're doing. If you're creating a
children's picture storybook and it's robbing book. Those words may not necessarily translate to well from
English to another language. But you need to pick
which books monetary, be effective and work well
in other marketplaces. Three different steps and strategies that you
should make sure you implement to get your
book styles increasing. And particularly for
those first 30 days, It's a height that
is three steps have helped you to
get a bit more of an idea and bit of
an understanding about how you can increase
your book styles.
48. Your Basic Book Launch Strategy: Welcome to this lesson. This is a strategy that
not many people implement because I think that they
book wants it does go live. That that's the end. And you can relax and you can wipe the styles
to come through. But you do need some form of book launch strategy that you do give you a book
every opportunity to sell. I've just outlined
a basic strategy that she can fall
in Austin nasally. And most of these strategies
will steps are fray, apart from a couple that you can choose whether to
implement or not. But it's a back-end
exposure for your book. You need as much
exposure as you can get. Particularly nice first 30 days. Let me show you a run down of the CPC can implement as part of your book
launch strategy. Just created this simple
spreadsheet or checklists. And a start with mono spot dies from
your book going live. One of the free
techniques that I have used and are do
you continue to use? Is Bye, looking into Facebook groups where occupy
potentially market model. Now you're not going into
these groups and saying, hi, I've got a book,
put it on there, and the admin mugshot that ****, you do need to form
some trust and you do need to be part of that group in the lead up to
your book going live. So it doesn't look lucky just using the group to
promote your book, you need to develop a friendship with the people
that are in that group and contribute and provide
some knowledge or experience or
value to that group. Once you book goes live, you need to think about what extra steps you can do to Dane start provided
models for days. They might be additional
categories that you can look to include. And what you can
actually do is contact Amazon card API and requests
a further six categories. That being a title of ICT
categories for your book, as long as they are irrelevant. But putting irrelevant
categories in, you can compromise your account. So make sure that any
categories you actually a book suitable for your book. Your book is live, then
you can add IPS content. So I plus content, do a Google have some videos
that are available in regards to adding
content to your book. It's basically an additional
layer of marketing. You can do di2, add those additional
six categories by contacting tidy pay
customer support. Also di2, my contact
with a Facebook group or groups and make your posts about your book
becoming available. And you'll link to your book. You can just copy and paste
that link in the post. Then after that usually
default to day seven, you have the look
inside feature, which is when you click
on the book and you can see inside it that becomes available is approximately
default as I7 bit of cayenne, what they up to ten days
for it to become a vowel. Now once the look inside
feature becomes available, we won't show first
Amazon ad campaign. And I'll usually go for broad
or fries keyword campaign. And that starts off with providing some keywords or think customers are
gonna be searching for. Then also day five, I increase my looking
side 20 per cent. So when you book
naturally is uploaded, contact I kindly pay, will allocate 10% of your book to be what
I call look inside. Now you can increase
it all the way up to approximately 70%. So you can, again look at some videos about
how to do that are provided plenty in the past of their head or
do them die six, add your pipe it back
and you hop back. If you've got both
forms to Ingram spark. And you also might want to create an e-book if
you haven't already. And then titanium or sometimes add a post to
LinkedIn or Instagram. It just depends what
kind of book it is and whether it's
relevant or not. Now for the first
30 to 45 dyes or review my Amazon ads every
two dice and continue to optimize or continue to review Facebook groups where
might be able to provide but book this in groups. You can do that in and
considering running a boost or an ad for
Facebook as well. And that can help generate leads and opportunities
for more styles. So that's just a general
bizspeak launch method. These are the things that
you need to consider doing when you're launching your book or when you book guys live, because these are things
that get traction, exposure and you want to sell as many as he came
first, 3245 days. This is the basic launch
method that you might want to look at implementing as part
of your launch strategy.
49. Update 2023 - Launching Your Book on Amazon KDP: I wanted to include
this lesson in addition to the previous
one about book launches. Now I've created a specific
book launch course now for Amazon, k p, since I created this
course to begin with. But what I thought I'd
do is go over a few of those steps that are
doing including the course, so that you can actually apply those to your children's
picture storybook. As I've mentioned,
launching your book is just a really important time. You get a short window
of opportunity to try and get your keywords
ranking on Amazon, K2, AP. Therefore, applying the
right techniques during the first 30 days will be important for the long-term
sales of your book. Let me just cover off a
few of the slides that are included in my launch
course that again, is specifically targeted at that approach and
what I personally do to launch my children's
picture storybooks. So let's get into a couple
of slides right now. So here's the timeline for your book launch and
important steps. And again, I do cover
this in depth in my book launch strategy
for Amazon kVp. But as mentioned, I did want to cover this a little
bit in this course as well. So number one, book goes live. So that's obviously
step number one, you've launched onto Amazon kVp. What do you next need to do? Well, critically, getting
social proof and that's review. So a strong focus on
early reviews and review greatly assist with
that social proof and therefore increase the
opportunity for more sales. The more people that
like your book, and the more people that comment positively about your book, the better chance you have. Animal sales. Number three is adding
your a plus content. So that's the additional
marketing tool that allows customers to
see inside your book. Number four is to add additional categories
and increase the look inside of your book. And adding additional categories will just allow it to feature in more areas for such
ability for customers. And you can contact
Amazon ADP direct to add an additional six categories in total of eight categories. Now I have been
informed that you might actually be able to
get ten categories. But as far as I'm aware, the maximum categories you can have as part of
your book is ite. But you might be, won't be able to prove me wrong. But at this point in time, you can add an additional six further to the tube when
you load your book. Number five is Amazon
advertising and convince your Amazon
advertising to drive sales. So I do have a mastering
Amazon advertising course, but you do need to learn how
to use Amazon advertising. And I'm finding it's even more relevant and important
these days with a number of books that are being
loaded onto Amazon to use the AMS or Amazon marketing
services platform to drive sales to your book. And therefore, by
driving sales you then you give your book more of an opportunity to
get more reviews. And that big engine
starts to take over. Number six is social media. So if relevant, make postal, create content for social media. That could be on LinkedIn, it could be on YouTube, it could be in Facebook groups. That could be Twitter, it could be Instagram. You just think of the different social media platforms
where you can market your book and effectively get it out there
for people to see. So what will your book sales
growth hopefully look like? Well, it needs to be increasing trajectory of your book sales. As you progress over time, then you will obviously
have a few down days. You might have a
couple of peaks, but you want the trajectory
to be in this line here. Now, Amazon loves the
algorithm of Amazon loves consistent sales
and not just sales, they just drop off a cliff
and not to be seen again. As you progress over
your first 30 days. Increasing the trajectory of your book sales will
be also important. Tips when launching your book. Make sure you complete
your keyword research and credit least prior to
your book going live. When you book becomes law, start with a broad
keyword campaign. And again, check out my Amazon Ed's course if you require more helping this area, what you're aiming for is
a five to eight reviews. If you book, as you start
to ramp up your Amazon ads, aimed to increase
the social proof file reviews as discussed. In the main course I discuss it, then increase the look inside feature with k p to 20 per cent. Just this enables
customers to get a better feel for your
book and optimize your campaigns for
Amazon advertising once the data starts to show. Now remember, Amazon
advertising data can be delayed up to 12 h. And my bonus tip is, do not take your pedal
off the accelerator. Monitor your campaigns closely for the next few months
as you optimize them. So I hope some of those tips to help you with your book launch. Remember, on this platform, I do also have the two courses that you can enroll in if that's
what you want to do, which is the how to load your book successfully
on Amazon kj P, along with mastering
Amazon advertising, now couldn't fit it
all into this course. So that's why I've created
two separate courses. So it's actually specializing in that area rather
than too broad. So check those out if you want to undermine instructor profile. So they have a couple of quick tips on launching your children's
picture storybook. So hopefully they
are helpful for you.
50. Ordering Copies of Your Books: One of my favorite stages of authoring and publishing a book is actually receiving a copy. So how do you go about
ordering copies of your book? You might like books
to get friends, get the family to
order for colleagues, to order for potential
business clients. There are many reasons why you
might want to order books. Are they individually
or in bulk? You can do this easily through your Amazon tidy pay account. If you've decided to self-publish and go
through that route. You can also order books through your
Ingram Spock account. Again, if you decided to create a book and loaded
it up to England, Spock. Ok, show you both methods. It's not an easy and you can easily organize your book either individually or in bulk to get copies delivered to
wherever you want to. Let me jump into my
holiday pay dashboard now and show you
where you need to go. Once you're on your dashboard. Or you need to do is scroll down to the book that you
wish to publish. I'm going to scroll
down to a book that would potentially
allowed to order. And I'll show you
the process book here down below that I'd like to order or
you need to do is go to In order author copies. You click on that. And then it will
actually ask you the number or the
quantity of books. You can do it all the
way up to 999 copies. And if we just did fall of copies and then you
do the marketplace, you go to S2.com
that I use for me. It will show you the
total cost just here. And that doesn't include
shipping or applicable taxes they want you to do
is go to Submit Order, putting in your details, and then it will be
organized for you. And Amazon has a tracking
system and you will save notification via email with the tracking number and
you can easily track it. That's how you order
copies through Amazon cardiac pain
and Austin easily. Now let's go to Ingram
Spock and I'll show you where you can order
copies for that platform. So all I need to do is go to my Asana and I'll
login just here. Then what will do? It'll take me to my mind, pij, and you just
need to go to orders. You click on orders. That will take you to
a page where you then select the pages or just
get rid of that popup. And you can either
put the toddling or the ISBN and it will find it. They know you need to do is
click on what you want to do and you scroll down and
you add items to order. And it's nice and simple. It'll actually to ask you what sort of
shipping you want to do. So I'm just gonna go to
this one just here in a FI guy down below
at arms to order. Then just wait for it
to process the order. Then what you need to do
is add the address state, how's the shipping details, the print like Haitian, how quickly it like
the order printed, for example, economy
express or rush. And how quickly would you
lock it to be deleted. So it is a printing
time and also a delivery pricing
structure you can do. When you go down, you just
go down and Submit Order. It'll confirm it via e-mail. I will also give you
a details of when the autumn has been
shipped and also tracking. So it's nice and easy to follow. And you can do that thousands
of books through Ingram, Spark and salt limited to
that 999 that tied a piece. That's how you order your
books through Ingram Spock.
51. Traditional Publishing: In this lesson, I
want to talk about some traditional publishing
options that you've got. A y that you can try and
find out which publishes or accepting books and the y to actually communicate
through to them. So let me get into my experience with
traditional publishing. It personally, I've had experience with both
self-publishing and using a major publisher
to publish one of my books. Now of course, is gonna be
pros and cons for going down the self-publishing rope or getting a magic
publish it or do it. Now one of the
significant things at all would highlight is
that you do lose a lot of control when you do
get I publish it to either see your book
and the launch of it, the marketing of it, and
even the design of it. Now that might actually
sit well with you and you might lock that control
is taken away from you. And at the end of the day,
you just pretty much received a royalty for some people locked to have more
of that control, to get an understanding, total have a personal
understanding of what they exactly once. Therefore, they can have a much bigger sigh in the
design, how it's marketed. But the Achilles heel
or the thing that lets most
self-published his dam, is the fact that you
do need a budget to market and
advertise your book, and it does need to be ongoing. If you do get a
traditional publisher, I do all that work for you. Although in recent times they will lean back on people
that do have a social media following to help
them out to get some traction and to use that social media following to
help get that book noticed. And two, into the hands of many, many people a lot
quicker than what traditionally you might have
happened in the moment. What I'm going to do is
just go through a list of some publishes that GMOs can see the sending through your submission of your
manuscript or your book. But remember it's
just a handful. There are literally thousands of publishers out there
that you could approach. But h of them have unique submission details that you need to make sure
that you bought, bought. In a moment, I'll show you
one example, but remember, just take the time to get the prices right and
Tyler H response as well. Either as either an overview
of all my experience, then I like a bit
of a combination. I'd do like the opportunity
to self-publish. And I do like having
that control of creating modern covers and
creating the manuscripts. Those sorts of things I actually
do really enjoy better. I can also say the
significant benefit of getting a major publisher, particularly the book,
goes exceptionally well. Then having that atom on our hands and didn't just
receiving a royalty check. Check is something
that I really lock. Let's get into the next
small sexual artists outline some of the
publishes and I, I'll give you an example
of what you need to do to submit your book and some of the guidelines if just
one of those publishes. There were many, many different options
you can choose from. These are just a handful of
different options that aren't gone through and found
that most of them, uh, currently
accepting submissions. Penguin Random House
at the moment, I currently closed, but it just depends on the
time of the year. Depends on the corner
book you've got. And also depends on how I feel like a market
and sell your book. Now what I'll do is just go to one of these websites
and I'll show you the general idea of
what you need to do to submit your book through to one of
these major publishes. And therefore, it's
good opportunity to say what happens
through that process. So let me go to one of these
publishes now and show you the website and the submission details
that you need to fulfill. This is big scar publishing. This is a magic
publisher in Australia, but you tend to find most of them follow this
particular framework. What you'll have is a submission component
of the website. Now if you go all the way
down to the boat below, you'll generally say Quick Links or something like that
where it's submitting a manuscript they weren't
will do it'll ask you to submit through
generally email. Some of them do have
platforms where we can include all your details and
submit it via the website. You just need to provide a short synopsis
or the manuscript. Generally the first
few pages of the book. You might have an either view. And you've also need to
provide some information about yourself and about your history of being an author or publisher, and perhaps multiple books that you've published
previously. What you need to do is just carefully read through
this information, make sure you're avoiding
bought their requirements. Don't just copy and paste to every single publisher because some of them do have
different guidelines and that'll be owed to
pick up pretty quickly. If you're just copying, pasting the same information
to every single publisher, might actually Tyler it. And just spend an
extra half an hour tailoring your submission
through today's publishes. That's an important
thing to tonight. There you go. There's a
few different options for consideration. There are plenty more at, they just do some more
research and find out what publishes or accepting manuscripts
at this point in time. There's some publishes
that might not permit particularly cons
of children's books. So you just need to read
carefully the font print, because I don't want to receive submissions when
they're not actually accepting submissions and
it'd be wise to fewer Tom as well as I did mention, just type the time to Tyler
H submission individually. Don't just do bulk
submissions all at one time. Take you time. You've worked hard to get your book
to where it is now. So you really want
it to stand out when it is submitted through
to a publisher.
52. Final Action Checklist: Now at this stage of the
course, we're almost there. And it means that you
need to start to take action on many of the things
that we've been learning. Now, one of the key
things that you need to do is make sure that you note down the specific tasks that you need to prioritize to start
your children's book. Now about prioritizing,
you then have focus and you have clarity of
what you need to get down. Now to help out with
these processes, to get some clarity around what the stages are that
you need to prepare. I've got a bit of a checklist. It's just a simple
particularistic you can put in place that will help
you through that stage. Now for many people, they almost exhausted by
the time I finish a course. But this is the
stage that's most important when you need
to apply your knowledge, apply the information
that you've learned and the steps
that you need to take. Because without taking
these next steps, your book won't come to life. And I want you to be able to create your own children's
book for the world. Just say, let me run through a few of these checklists
points to help you get going. This is the final checklist to take action upon
completion of the course. So number one, you have
to find your purpose. Really think carefully
about your why. What is it that you want
to create your book? What purpose do you have around creating it and what
differences you get a mike. The second one is
if you've completed your research on a
potential book topic, have you done the
Amazon KP search if you looked on
other platforms to do your research about what is popular and what might
potentially sell. On platforms like Amazon. Number three, you credit your
book structure and format. And you've got the outline
organized with the title, the subtitle, the
main characters, the number of pages, the
different categories, even a description or a short description
to get you going. The next one is to start
writing your manuscript. And these, it takes some time. It may take a few days, a few weeks, even a few months. But starting your manuscript and your story will start to bring the key elements
together and start to form the whole structure
around your book. The next thing you
need to do is create your title and your subtitle
based on your manuscript. It might mean that you've come up with your total previously. And that's fine because sometimes the title
and the subtitle can generate your story and your manuscript of what
you want to write. The next one is to
create your front and back cover paperback,
hardback book. That it's something you might
create yourself or you, or you might get
that outsourced just depending on your creation
skills in your design skills. Next thing is to
save your cover and manuscripts in the
correct format. We want to make sure we uploaded in the correct
format to Amazon, kVp, and Ingram Spock. If you are uploading
to income Spock. And the last one is
to load your book and have your launch strategy ready. Having your book uploaded
and ready to go. It can take upwards
of seven days, even longer sometimes to
get your book approved. But in that time, get your launch strategy ready, way you going to promote
it and avatars, your book. So a few things in regards to the final checklist
that I'd like you to consider and make sure
you have everything ready so that when your
book is ready to go, you have all those
components ready, all the steps completed. And you can really
celebrate the fact you've created your own
children's picture storybook.
53. Section 8 - Conclusion: Well congratulations, where in the last final stretch
of the course, and in the conclusion
of this course, I'm gonna be talking through a few key action points
that are lucky to take, because it's important
that you do take action when you've
completed the course. And then finally, it's the book review where I'm
actually going to show you the physical book that I've ordered and I'm going to
have it ready to show you. So let's get into the
final part of this course.
54. The Book Reveal!: One of the most exciting
and rewarding parts of being a self-published is getting you all the copy in the mail and you're
ready to unbox it. You haven't seen it even
in physical form before. And now it's the
very first time. Well, I'll make solid
to let you know that my package has just
arrived in the mail. I wanted to unbox my book after going through
the whole process, showing you everything
throughout the course about how to create your own
children's peaches storybook. Now, these monotone to reveal
what model looks like. I'm going to unpackage
it right now. It's in this package
right here. Brought up. Have a look. Here we go. Sorry. There we have it all emptied. The beach adventure is now out. And if you look at
the back cover, it's come up really, really, well, very happy with that. If we look through the
first couple of pages, I'll open one of
those up as well. This is the first page there. There's another page there. So the color is really, really good. Noss and vivid. It's really clear and I'm super, super happy with it. So that's how the book has
come up after going through the whole process and showing
you how to create a book, it is now in the
physical format, and that's what
she can experience yourself when you get your
book for the very first time. Is this such an exciting time? And I'm glad I was able
to share that with you. Now let's finish up
the course and talk through everything
that you need to know before you go ahead
and do your own self-publishing for your own children's
picture storybook.
55. Final Words - Course Conclusion: Thank you so much for joining this course about how to create a children's
picture storybook. Not only did you learn the
skills and the knowledge that are being older have OR gate I've last
couple of years. You also got to see
firsthand how credit my own children's picture storybooks throughout
the process, from firstly, come up with the idea and the
concept all the way through to having a final printed version to
be able to show you. And that's important. I wanted to show you that whole journey
of what it's like. So you know that you
can do yourself. Now there are many steps that were involved in this course. And remember, you can
go back at any time and watch those lessons
to make sure you implement the rot strategies and steps to be able to get your book through to
the production stage, to have your own
printed version, and to be able to sell across many, many different
marketplaces. And even you might get into a position where
you can convert that book into a
different language and sell globally to
different countries as well. Now I've really enjoyed
building this course for you. It's been highly enjoyable. There are so many things
that I enjoy about teaching and being able to
share my experiences with you. But again, thank you very much
for choosing this course. I do hope you have a great
amount of success in your publishing in the months
and the yeast to come. And I look forward
to sharing with you more knowledge experience with
other courses are correct. So until that happens, good luck and thank
you very much.
56. My SkillShare Instructor Profile and Self-Publishing Courses: Hello and welcome to
this updated lesson. Now, since creating this course, I've created a number of other courses in the
self-publishing space. And I thought it would
be good opportunity to introduce you to some of those courses and you can view those at by my profile page. So what I'm gonna do
in a moment is go to my instructor profile page and show you some of the
other courses that I have. Now, these courses
can take time. You need to make sure that when you are doing these courses, that you're stopping and taking action and applying
the information. Don't just become an
information junkie where you are absorbing information
beaten, not applying it. The most important
thing that I've found along my journey
of creating books and creating courses and
other information and content is that you need to take that critical key action. Now, it's just the first
step you need to take. Then you tend to
get some momentum. Make sure that you're jotting down some of your goals
that you want to achieve. What sort of things we'll you'd like to create in
the next 12 months. So let's go to my
author profile page now you can see
those other courses, and therefore, they
might apply to helping you to scale
your self-publishing. Or they might be
an area that you wish to specialize in
just a little bit more. So let me hit the instructor
profile page right now. This is my instructor
profile page for Skillshare. If you scroll down, you can see the different
courses that I have available. How to create low
no content books on Amazon Cloud API currently
has 3,004 students enrolled. I've also got my email
marketing course to increase your book sales and in also
increase your email list. If that's what you intend
on doing to increase the number of customers that actually know about your books. I've also got a course with over 600 students on how to create and
design a paperback. People can have book
covers using Amazon API and also a very
popular course on how to create and publish
a children's book. Another popular class which is growing is mastering
Amazon advertising. There's also a course on
mastering habit development. If that's what you're
interested in. The doses are looking to
expand outside of Amazon. Kvp of created a course on how to self-publish
with Ingram Spark. Now that's an in-depth
course that will really help you to provide diversification with
your publishing. And then finally, new course
at the time of filming. And that is how to successfully launch a book on Amazon, KD pay. So these are some of the
courses that I do have. The self-publishing space. Please check out my
author profile or with my instructor profile to access
these courses and you'll be able to join them along with the many other
students that have to successfully scale
yourself publishing business. So hopefully that
helps you to select other costs of created in
the self-publishing spice.
 Romney Nelson, Author and Course Instructor