Transcripts
1. Introduction to Measurement : Hi, welcome to the class date. Today we're going to
be looking at how to take the perfect measurement. And I have two maniquins here. This first one will be
showing us up to the hips. And then the second
one just behind me, I'll be using it to
show you how to measure from the hips down to the ankle. That's what the second
maniquin is for. So let's take the
measurements now.
2. Taking the perfect measurement: For every measurements
that you take, you have to be very organized. You can't afford to
be bending down, going up and down, up and down. You need to keep your clients
very, very comfortable. I also need to be
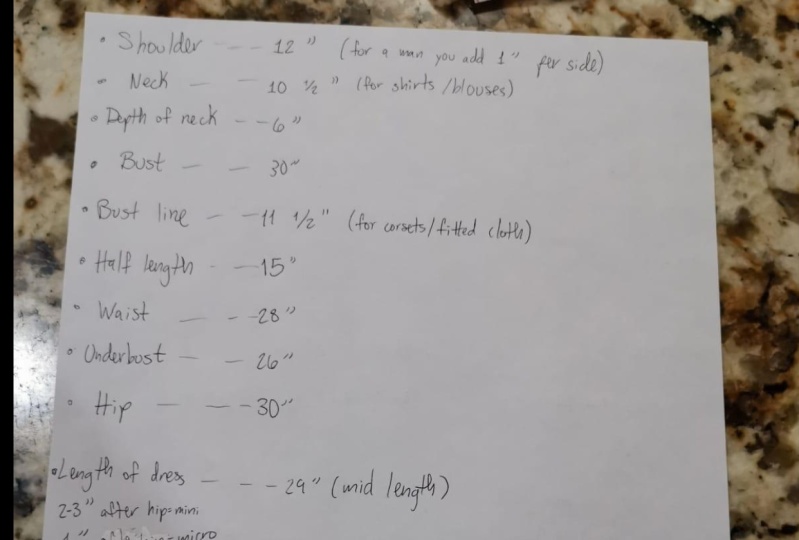
comfortable yourself, every measurement we're taking, we done in inches. All our measurements,
as you remember, are done in inches. So the first measurement
we're going to be taking is measuring
the shoulder. So we're moving
from top to bottom. As you look at the illustration, you start from one edge of your shoulder to the second
edge of your shoulder. So you can either measure from one edge of your shoulder
to the other edge, or you take it from
the center here, the beginning of your
spinal cord, to one side. That will give you
half of what you need, but the full measurement for your shoulder is from
one end to the other. So I'll turn the manchin again. I'll show you how you need to
stand before your clients. You need to make them very comfortable from one
edge to the other. Now I'll have 16 " one
edge to the other. Then if you're going to do
the halfway half measure from the midpoint here to the
shoulder, gives me eight. Half of 16 is eight. We'll quickly go
through the neck. If you want to measure the
neck of any of your clients, you take the measurement
round the neck. Round the neck area, you're taking the
circumference of your neck. Round the neck, you make sure
that the tape measure is sitting on the color bones and you take the
measurement round. This is usually used
for measuring a shirt. When you want to make a shirt, a shirt dress a shirt
for yourself or blouse, you can just measure
round the neck. And then to get the
depth of the neck, you take the measurement from the edge of your neck
down to the cleavage. To get your boast measurement, you take your measurement
around from behind, from the back to the front. Make sure it's to the
fullest part of the breast, where the breast lifts the
fullest part of the breast, and then you take
your measurements. Then the next thing is this. But before I move forward, I forgot to say earlier
that if you want to take the shoulder
measurement for male lines, there's nothing
difficult about it. It's just that you drop, if the shoulder is
16, you drop it down, you bring it down 1 " extra For a man of
this shoulder frame, you bring it just 1 " extra. Instead of 16, it becomes 18. And instead of eight,
it becomes nine. So the next step is I'm taking the bus line
measurement. Bus line. You put your tape measure at the highest point of your neck, just close to your neck. Then bring it over
the breast and down to where you have your bra level or if
you're not wearing any, Brad, the client is
not wearing any. Braun, the bust,
that's the bus line underneath the bust from
the neck over the breast, down underneath the breast, that's the bust line. Most times this is necessary
for a more fitted style. If you have a fitted
or a core set, you need the measurements. Then we move next
to half length. The half length measurement is sticking just from
the neck as well, over the breast, down
to where the novel is. But I will put caution there, because some Klein's
novels are downwards. An ideal measurement should
be for someone that is to 18-19 For someone
that is shorter, maybe 17 and below 17. But for an ideal person, for someone like really, I think my half length is 19. Someone that is taller than
myself could be around 20. But if you want to
stay on the novel, some people have their novels lower than usual,
lower than normal. So you won't really
get the half. And that means that if you're, if you're going to
cut your style, if you're going to have a
style that cuts in between, then it means that the
court will be lower. So, I think the basic thing
that should be done is when you see that your
client has a very low Novel, All you need to just do is as you the measurements, the basic measurement is 18.19 So as soon as
you've done that, you can then take your
tape measure out. You can see that the client
is still very comfortable. And then with not start taking wit measurements underneath the bust, there's a waste here. This usually is the perfect
wit measurement with time, and as people grow older, they tend to have wider waist. Underneath the bust is the
perfect waste measurement. We're going to take
that one first. We called it under
bust measurement. We take that first. You can
see that my my fingers are in between the tape measure to give it space so that it
will be too tight. I have my measurement round
the upper part of the waist, underneath the bust that is
on the bust measurements. Then I will take again
a waist measurement. The waist measurement is
just round your nerve, on your waist, round the nerva. I will take that
measurement as well. We're going to be using this measurements that I have here. We'll be using them as time goes on to make
our calculations. Then the next thing
is I'm going to take the hip measurements. I'm taking my hip
measurements around the fullest part
of the hip where it seems as if your
hip is protruding. You take your measurement
right around it. We started from the shoulder, the neck, the depth of the neck. We did the bust line, the half length,
the under burst, the waist, and the hip. Next measurement we're taking is from the length of dress. To measure your length of dress, you have to take it
from the top Again, that is your tape measure stays at the corner
of your neck. The highest point of neck that's just beside your
neck, you'll take it down. Now, this now depends on what
style your client wants. The person wants a short
dress, immediate dress, a knee length dress,
a short dress, a 34 dress, and maximum dress. Then you keep taking the
measurements downwards. Now after the hip, immediately after the hip
measurement is around 87, just like two or 3 " After
the heap is a mini rows. Now I'm going to transfer Maneyqins now so that
I can show you better. I've changed Maney quins now. This has a very
beautiful length for us. Just immediately after the
fullest part of the hip, which is around 27.5
you have your mini. This is mini. It could be micro, go higher, but this is mini. Then just above the knee
is the knee length maxi. Just by the calf. Then full length as long
as you want it to be. I'll repeat it again. Mini knee length. This could stand for
a short dress in knee length maxi
just by the calf. And then full length, I'm taking measurement
for the calf. Now you chunky part
of your leg is 16. And then I'll take the
ankle which is 12. Now in this case, if I have 12 for my
ankle or maybe 11, I need to be very careful that the leg can
enter into that is this portion of
the person's feet that is if you can see mine, this portion can enter into whatever
measurements you have. If I'm going to take
my ankle as 11, how would it be possible for
the leg to pass through, the feet to pass through? It's going to be difficult. The best bit is to
measure round the leg, the feet, I mean,
sorry, round the feet. That is another 1 " extra. Makes it easy to have a free
flow so that the feet can enter into whatever you are sewing. That we've
done all that. You saw that we went from top
to bottom, top to bottom. And then you don't have to
move your clients anyway. Person is standing in an upright position
and you were also sit, standing in an upright position. The only time I went down was
when I was measuring the, the calf and the ankle. Those were the two
times I had to go down and I measured
it at the same time. So now I would now
move to the sleeves. The sleeves now, now if
we had an individual, you know, that's the hand, the hand of the dress. You measure from the
shoulder downwards. Now one of the things I have
noticed that if you measure straight and you want to measure a long sleeve, it
becomes shorter. When you measure straight, all you need to do is
to tell your clients to fold their hand this way, this way, just across their waist so that you can
get the full measurement. Because if you do
it straight down, you'll be shot by 11.5 ". So you just tell your clients
to fold their arm this way. You can then take
a full measurement like this from my shoulder. Just tell your client
to fold the place just where the waist is so that you can
get a measurement, perfect measurement
of a long sleeve. The rest is easy. Where your elbow is
is a short sleeve. Then the three
quarter, where your, the hand looks to be wider
is the three quarter, and then the wrist
is just by the hand.
3. Measurement Calculations : Hi everyone and
welcome to class. In this session,
we'll be going over the rudiments of
calculating measurements. Measurement calculations
are very important. It might be difficult for
some and easy for others. We'll try as much as possible to explain it in the
simplest way possible. First of all, it's
important to note that measurements
are taken in inches. It's also important for
you to know two key words, M allowance and dart allowance. M allowance is the
necessary allowance that is needed for
stitching fabrics together. Your art allowance is the required allowance
for stitching in the art. In the next class, we'll
discuss how to create a dart and we'll have a
practical illustration. Let's get started with
our calculations. Like we always say, it's
important to stay organized. So we'll start from
top to bottom. The same way that we've
taken our measurements. It's the same way we'll be
calculating the measurements. As time goes on, you'll find it easier to
do the mental math. But for status, you need
to take your measurements. And we'll be going
from the shoulder, let's say our shoulder is 16 ", we have to add 1 "
for a seam allowance, divide that by two, and then we get 8.5 or
8.5 for the shoulder. We'll be cutting out
8.5 " for the shoulder. It's also important for
you to note that most of the cutting that we're going
to be doing will be on fold. Instead of cutting out 16
" straight out the bat, we'll be cutting out the
8.5 " because it's unfold. Next up, let's go to the bust. Our bust for today is 42 ". We divide that by four, and then we have 10.5 We add
1 " for the seam allowance, and then we have 11.5
or 11.5 for the bust. We're going to be cutting
11.5 for the bust. Then we have our bust line. Our bus line is 15 ". We add 0.5 or 1 " for
the seam allowance, and then we round up at either 15.5 or 16 " for the bus line. Our half length is 19 ", and we add 0.5 or 1 "
for the seam allowance, and we round up at 19.5 or
20 " for under the bust. We have 32 ". We divide 32 " by
four, we get eight, and we add 1 " dart allowance
and 1 " seam allowance, and we get 10 " for the waist. We divide 34 " by four, which gives us 8.5 We add 1 " for the art
and 1 " for the seam, and we have 10.5 for the
length of our blouse or shirt. We have 26 " roughly, and then we add 1 " for
the seam allowance. We have the hip, which is 44 ". We divide that by four
and we get 11 plus 1 ". Seam allowance makes it 12. You'll find that the bust and
heap have the same formula. The bus line and half length
have the same formula. Under bust and wait
have the same formula. And once you understand this, you're on your way to
cutting the right size. Back into our calculations. We have the dress length. The dress length is the
same as the blouse length. We only add 1 " seam allowance, and that gives us a 36. In this instance, for
the skirts length, we add 1 " for the
dot and we have 25 ". The sleeve length can vary depending on what
style you're going for. All you need to add
is 1 " for the dart. Then for the arm, we have 16 ". We divide that by two and
add a dart allowance, which gives us 9 ".
We have our wrist. Our wrist will be divided by two and we'll add 1 "
for the dart allowance, and that will give us 5 ". We've come to the end
of today's topic. We always say keep practicing. Make sure that you're taking measurements of as many
people as possible. And use this to calculate
your measurements. As time goes on, you will be able to
perfect your measurements. In the next class,
as we said before, we'll be talking about darts, your projects, and
other resources that you might need to build
your perfect measurement. Will be in the description box and under the resources tab, so make sure to check that out. Follow this page and see
you in the next class.
 Bosun Dada, Simplifying the Art of Garment Making