Transcripts
1. Introduction: Hello everybody and welcome to my course on how to
spray paint eyes. I'll go over the materials. You will need tips
and tricks and walk you through a
painting step-by-step. At the end of the lesson, you should hopefully
have all the tools necessary to get you started on your eye
painting adventure. My name is Melisa for TM, and I'm a multimedia and street
artist living in Berlin, has been spray painting
for about ten years now. And feel really lucky that my artistic journey has taken me to all sorts of cool places. Very excited to share
some of the skills I've picked up along the way
here with you today. So join me and
let's get started.
2. Materials: Let's first go over the
material is used to spray paint the eye
featured in this class. If you're just starting out, I encourage you to go to a shop and buy yourself
a couple of cans of different brands to see what kind of paint you
like painting with. The same thing goes for caps. Just grab yourself a handful of different caps and see
what works for you. This is just what I
used in this video, but it's always a
personal preference. It comes down to what
you enjoy painting with. And that takes a little
bit of trial and error to figure out what works
with your hand, what works with
your king control. Yeah, Just stick with
it. It'll work out. Don't worry about having to
have this many cans of paint. For the practice project. We'll be doing a
simplified version where we will paint an eye with only five cans of paint and I'll walk you
through it step-by-step. The important thing
is for you to learn how to control your colors, how to blend them
together so that you can create the shapes that
you have in mind. I want to talk a
little bit about the translucent paints
used in the video. As it sounds, translucence have a lower opacity than
regular paints. They have the tendency to
lighten or darken as a dry. So use them sparingly. You can always add more later. Before painting, made sure to shake your cans or you'll get some silly string
madness and you will clog your caps right away. If you're painting
and doors like I was, you want to make sure
that you get yourself an appropriate mask with
the right filters that filter out fumes so you don't die an
unnecessarily early death. Okay, That's a bit grim,
but you know what I mean?
3. Caps Demo: I like using the blue
skinny cat because I find that I can get a lot
of nice small details. This is of course, going to be different depending on what you like to paint with. So as I mentioned before, just try out different caps
and see what works for you. Practice making lines and holding the camera closer
and further away from your surface to see how precise or softer
strokes can get. I use this gap to do all of the blends and shading
in the painting. Tilt the can to
create a harder to find edge on one side and a
diffused edge on the other. Holder can close to your
surface for fine precise dots, slightly away for
more diffused dots.
4. Outline and Base the "White" of the Eye: Okay, so it's finally
painting time. As you see, I've primed
canvas with black. I like working on
a dark background because it really
makes the colors pop. I'm using my super
find skinny cap to drop in the basic
outlines of my eye. Again, I like using black
on black to start out with because as you
layer colors on top, it starts to soften
the initial hard edges and adds a touch of realism. Here's the simple
overlay so you can see the shapes that
I'm drawing in. Always a good idea
to grab yourself some reference picks. That way. You can concentrate on
painting without having to worry about inventing
the correct shapes of the, I can grab some pictures online or take a
picture of your own. I took a picture your
dogs or your cat's eye. It really doesn't matter. For this painting. I just
grabbed a quick picture with my phone of my own eye and
just use that as reference. I'm painting in the whites of my eye with a light beige color. I don't recommend using a harsh white because it'll make
it look very unrealistic. Use something a
little bit darker. Then the highlights, the super white highlights
that you put in later on will really
stand out and just add like a nice glossy effect. Whites and light cream colors such as this caused
the most over spray. So I want to get them in first
to avoid getting lots of spirits ease on my darker
detail colors later. I think spirit seizes the
scientific term for it. You'll see what I mean
when we get further along.
5. Painting the Iris: Then begin painting the iris by starting with a dark circle. This will add some contrast and provide some depth to
the shape of the iris. Used to paint eyes
by just applying the color of the iris right on top of the
white of the eye. But the overall effect was a bit flatter and
just didn't have the nice depth which you get by using the black outline
based in the iris. Here's some examples, some of my past paintings
before and after. So you can see what I mean. Now we start with
the exciting bits. I'm going to start
with my darkest green. To build up the
colors of the iris. Makes sure you tilt your can towards the inside
of the iris to get that harder defined
edge on the outside and the softer spray moving
in towards the pupil. Next, I'm using the
trends and some black to start creating the shadows
cast by the eyelids. Make sure to keep the
translucent black layers light. If you apply too much, it might start to pool
and become streaky. Always remember that
with these less is more. I'm gonna go ahead
and start using the lighter green to create the illusion of
light hitting the iris. Makes sure you pick a light
source and stick with it. My main light source is coming from the right of the canvas. So all my highlights and shading will try
to reflect this. I'm gonna go ahead and use to lighter tones of green
to build up the values. To make it look more like light is reflecting on the iris, which the regular black. I'm gonna go ahead and
paint in the pupil because I wanted to touch
more light in the iris. I added just a slight coating of yellow on top of
my green layers. Remember what I told you about using the lightest
lights sparingly. This is where I'm
gonna be putting in just a touch of highlight which will give the eye that
kind of glassy wet book. When you put in your highlights, blesses, definitely more. You can always add paint, but if you overdo it, you might have to start over and that's fine too.
That's all part of it. But just a little tip when
you're getting started, you shouldn't be
afraid to mess up. You should mess up loads. The more you mess up,
the more you'll learn. And the beauty of
spray paint is that it's really hardcore,
really opaque. So you can paint over it.
6. Details in and Around the Eye: A touch of translucent
white around the edges as a 3D feel, keep it subtle and build
layers bit by bit. The nice thing
about working with the translucent white on a dark background is that the
effects are really subtle. Takes time to build up
and create a shape. Remember to keep your touch
light and to let the layers dry in-between so you
don't have streakiness. Notice the difference when
I use the regular opaque white and how quickly the highlighted side
becomes brighter. By adding yourself a
couple of highlights. You've got yourself
a weird space marble or the beginnings of an alien
I, or something like that. Now that I've got the interior
of my eye to this point, I'm going to start working
on the surrounding details. It's always a good
idea to work from reference photos again and pay close attention
to the details and folds around the eye. I'm using a mid tone pink to
start defining the ridges of the inner eyelids and will then continued to paint the
outside of the eye. I'm using a darkish
Burgundy skin tone to start creating the shapes
of the eyelids and folds around the eye. Always keep these shapes in mind and paint in the
direction of the fault. This whole time I've
pretty much just been using the skinny probe cap, which is the black
with the gray dots. There are so many
different caps out there, some even specifically
for blends. But as you practice, you discovered that you can get a lot of effects
out of any one cap. I'm gradually building up the darker color
with light strokes. This will serve to provide contrast and there's a nice base for when I start applying the lighter highlight
colors on top. Remember you don't have to fill the whole
surface with color, especially if you're painting
on a dark background, leaving some of it exposed, starts to create a
natural looking shadow. I'm gonna go ahead and start creating highlights
with a very light pink. The goal is to create
soft blends and layers while always keeping
your light source in mind, the lighter colors
should be applied on the areas we're most
light would hit them. Don't worry about messing up. You can always just the
highlights back with your darker colors and
smooth things out as you go. I'm applying just a
soft dusting of pink on the cheekbone for
light might be hitting. Now I'm switching to a slightly darker pink to
continue building form with the highlight layer, your paint to soften the
transitions between colors and enhance the individual
elements surrounding the eye. Throughout the process,
I'm still keeping the application of
paint like this is I can produce nice gradients and avoid the paint pulling
in any one area. Use the translucent
black to gradually software decreases
and add depth. This helps to push things
back to make it look like they're recessed deeper in the eye socket, for instance. I'm also using their
translucent black to start adding some more definition around the finer
details of the eye. This will just add a
little bit more contrast and define the shape, especially around the eye
itself a little bit better. A little piece of
cardboard works great as a palette which
you can use to test out your lines
or blow out your cans before you go ahead and
work on your canvas. I wanted to add even more
contrast right around the eye. So I went ahead and
used my regular black just to outline it again.
7. Adding an Ambient Light Source and Final Details: Another thing that you
can do is to introduce a second or ambient
light source, where you introduce a
different colored light on the opposite side of
your main light source. You can pretend there's like a lamp with a neon
pink light bulb on the left side of the canvas
casting light from that side. Notice the difference when I use the regular opaque black to shade as opposed to
the translucent black. I'll go back over with
the translucent black to soften out the shading. The effect of the translucent
white really begins to show when you use it on
top of darker base layers. Use the brightest white to add just a couple of
touches, the highlights. And to make your eyes look wet, you can always use
the translucent black to knock it back a bit. Here I'm adding some
more that lightest pink to really make those
highlights standout. Just have fun with it. Can go back and forth with your lighter and darker
colors to create the blends and depths
that you want to achieve. Go back in and redefine
areas with your mid colors, but don't forget to shadow them, to push them back again. Having a stark outlined area will make it come to the front. And you want to make
sure it retains a natural curvature
by using shading. I've used both the
translucent black and the regular
black to do this. To really make the eye pop, I'm adding more of the
ambient pink color. Looking to pull out elements
of the form really helps define the reassesses
by providing contrast. Keep practicing and remember, some days are going to
be easier than others. So just enjoy the process
and stick with it. In the next section, we're going to do a couple of
practice projects together, including how to paint an eye with only five to
six cans of paint.
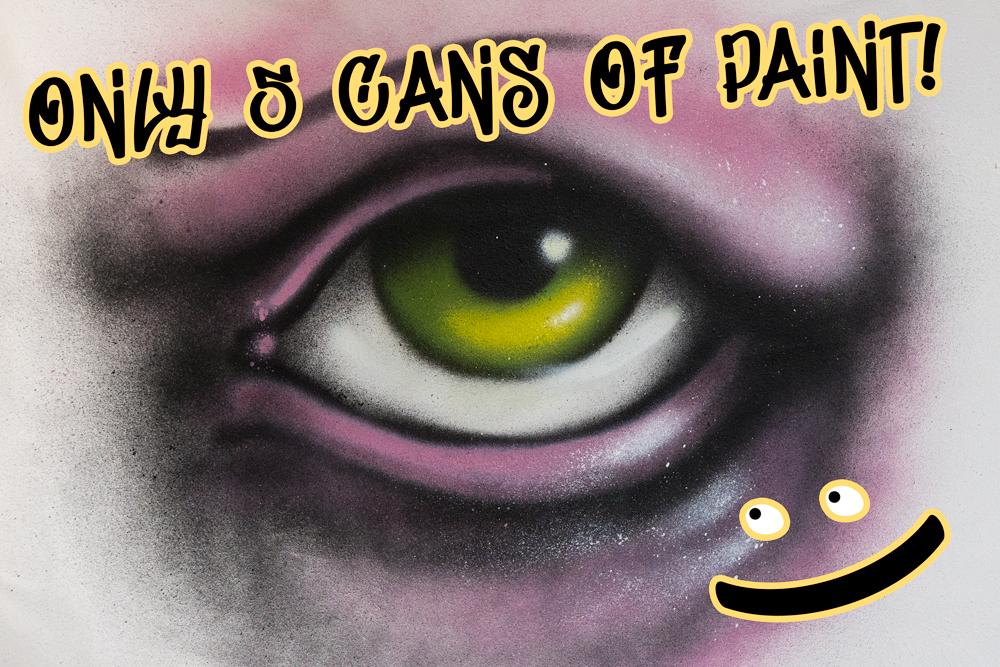
8. Practice Projects: Here's a simple way for you
to practice creating depths. Simplify the process by painting just the iris with
the highlights. Remember less is more. Start with your dark circle
and your darkest base color. Keep your strokes soft and
avoid having pools of pain. Collecting on the
surface of your canvas. Apply your lighter
color and make sure to tilt your camera to direct
the spray of the paint. Tried to paint with your wrist. This will give you more control
and more dynamic strokes. Layer the lighter
colors as you like. But remember, you can also do the same thing with
just two colors. Pick a dark base and
one lighter color, and it'll give you some nice
illusion of a highlight. Make sure to let
your base colors dry before you paint
your pupil on top. If you spray paint
on top of wet paint, it can cause your layers
underneath to crack. As always, start off light with your highlights and add
more if you want later. Once you have your iris painted, tried to imagine and
create the shape of the shadows the eyelids would be casting on the ground
surface of the eye. Use translucent
black to do this. See how the shapes come to life. Use gentle strokes to apply
the paint bit by bit. Follow the imaginary shapes of the upper and lower eyelids. Here we go. We're going to paint the eye using just
five or six cans. As I mentioned before, I've got a reference photo
just pulled up on my phone. And I'm going to start
with my black outline, just with the regular
opaque black. Keeping my outline
nice and simple. Primarily tried to
create the forms by shading and by
layering the colors. I'm starting the shading
process by dusting the black over the areas that
will be most recessed. Remember to tilt your kin and to paint in the direction
of your shapes. Start gradually indicating where some of the forums will
be through your shading. For the practice project, we'll be using just the regular
black know translucence. Just black. Cropping your iris outline
and pick your darkest color. I've used two shades of lighter green for my
highlight colors. But go ahead and just use one if you don't have
that many cans of paint, pink or pupil in and start coloring in the
surrounding areas of your I pick whatever mid tone
color that you like. You'll be going back
in with the black and a lighter color to create
the tones and shading. Don't be afraid to
put in your colors. You can always go back and forth between what you have
to balance things out. Use the canon Black to start shading the areas in
and around the eye. Instead of using
the translucent, we're using solid black here. So have a light touch and
just build it up gradually. The beginning, it
can sometimes be intimidating to put
in so much black. But remember, any
lighter color that you put on top will
really stand out. The lighter colors will also soften the black underneath it. I'm using the same pink I used before to define the
outside of my eye. After that, I'll just
use a little bit of the black to dust
the shapes back. This was the second
lighter green that I used, which I mentioned earlier. When you're painting the
base color of the iris, you could just use a
lighter color like this on top of it before
putting your pupil and found that the green
I used on top of my darker green and the iris was a little bit too close in value. So I wanted something
that was a bit lighter. The final step is to
add the highlights. Using just a regular
bright white. I'll be using the
same white to create the highlights on the brow
and underneath the eyelids. I've used the white
to do this to keep the total number of
cans to a minimum. But if you have a
lighter pink e.g. you could use that instead. So there you have it. I hope this shows you that
you can paint. And I with just a
handful of cans. You don't need to have
loads and loads of paint at your disposal to do
something really cool.
9. Conclusion: I hope I've provided you with some useful information
to help get you started. For a long time. I didn't
know how to paint eyes, so I just left them blank. But this often meant
that strangers decided to fill them in for
me, a sub-optimal results. Trust me, it's better to
paint them in yourselves. Don't forget to
share your projects in the project gallery. And if you enjoyed the class, please leave a review and share with your
friends and family. Thanks so much for watching
and see you next time.
 Talissa (TM) Mehringer, Multimedia + Street Artist