Transcripts
1. Intro: Hello and welcome to this
course on urban sketching, how to see and use perspective
from the real world. My name is Kill and I have been urban sketching since 2009. In this course, I want to
share with you the tips and tricks to sketching perspective. Now, this is not a
beginner course. This course actually complements the other beginner courses that I have already made on
perspective and urban sketching. If you are a beginner, I highly recommend you check out those courses first
before you watch this. In this course, I will talk
about one point perspective, where all the diagonal lines converge to a single managing. I will also talk about
two point perspective where there are two
vanishing points, one on the left and
one on the right. And how you can
draw such scenes, such complicated
scenes, more easily. I will also teach you
how to draw perspective where there are no
obvious vanishing points, such as these windows or that building in
the background where you can't actually see where the lines converge to
any vanishing points. Reference photos are
provided in this cost. When you are practicing
with the reference photos, focus on drawing the out lines. Do not focus on
drawing the detail. For example, with
this particular see, first thing I will do
is to try and find the Sal point Sal points. Next, I will use list lines or pencils to mark out
the composition. At this stage, what
I really want to do is to make sure
I get the pens. Make sure that I get
the perspective. Because at the early stage, if you get the perspective, perspective for all the
details will be formulated. It's very important to make sure your perspective is
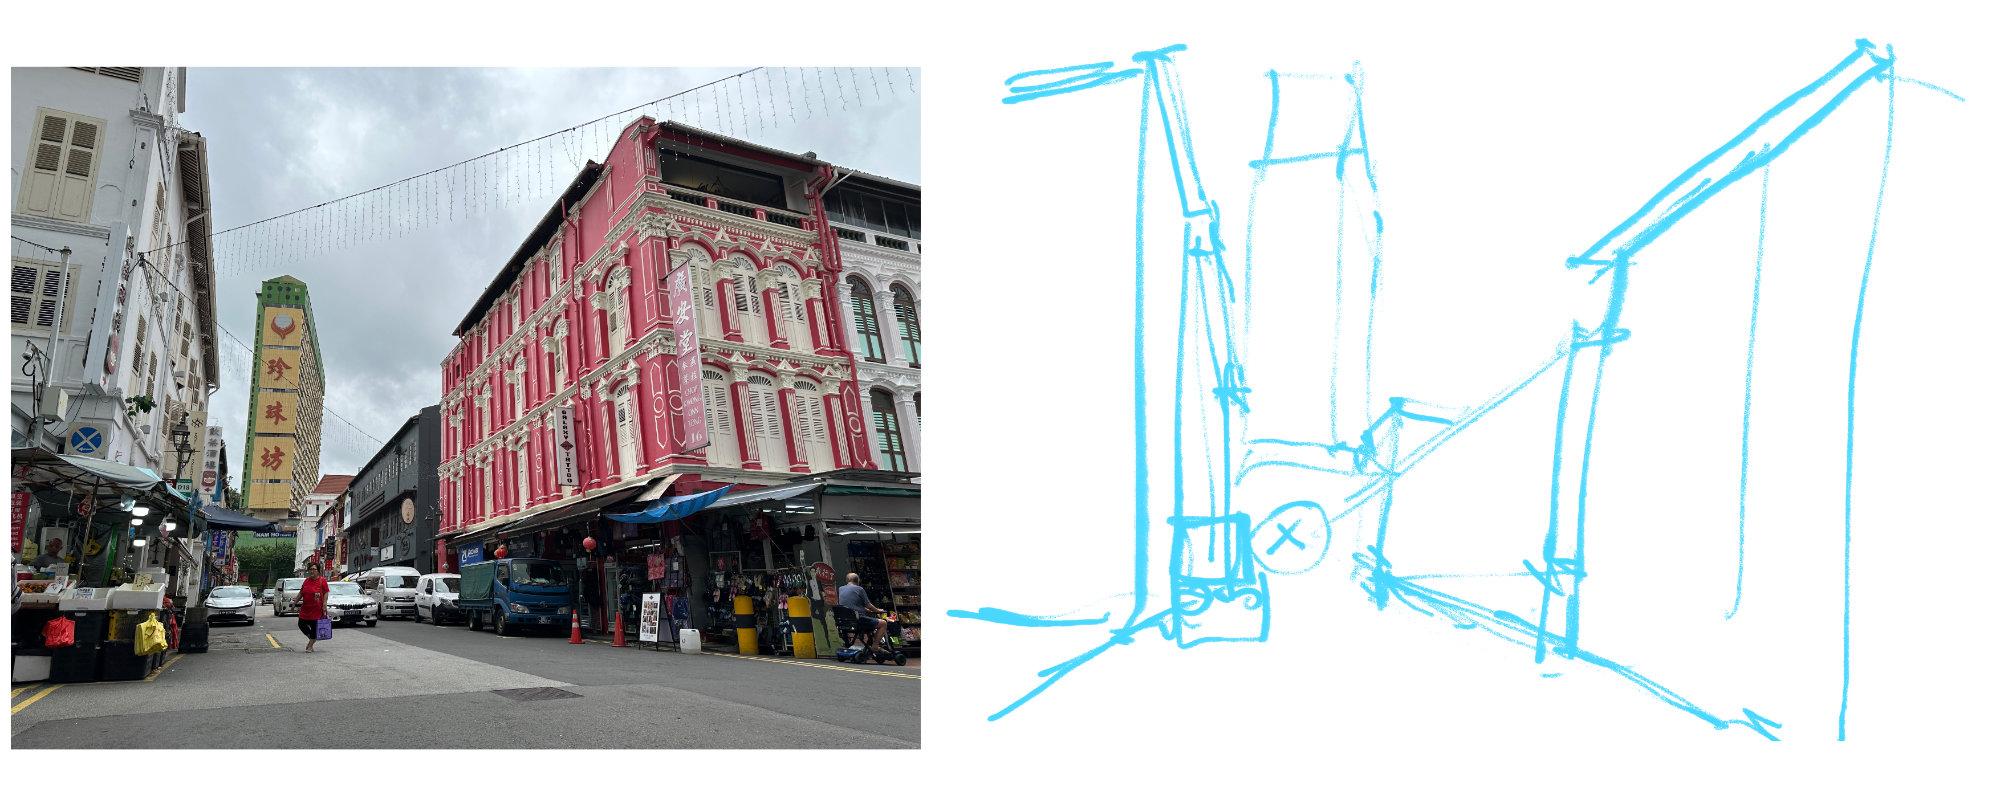
accurate and point. Here's another example where I will put for the
wrong perspective. The bunion point is marked. The perspective for the building on the left side is wrong because you can see the
typing line is 45 degrees. But it's actually much
steeper in the real world. And the perspective
for the building on the right side is also long. Because you can see
it's much steeper, but in the photo, it's lunch maybe 45 degrees. If you get the perspective
wrong at the start, all the details will have
the wrong perspective. For example, if you want
to draw the windows. Now all the windows will
be drawn one perspective because the perspective
for the big ship is wrong. And that's why all
the ships within the big ships do not spend more than
one or 2 minutes during the drafting stage. Now, if you want to develop
your sketch fully, yes, you can spend however
much time that you need. But don't spend too much time
during the drafting stage. Just focus on the
structure, the outline, but not the details
until later on. Now if you need even
more drawing exercises, you can check out
the full tutors that included as bonus
materials for this course. When you're practicing, try to get the perspective
to look right, to look correct at the start. Also, I have a favor
to ask of you. Do leave this course
a review so that other students can know whether
this course is any good. By the way, I'm actually here
in Chinatown, Singapore. So let's head on to the first lesson where I show you around
this neighborhood.
2. One Point Perspective: This first lesson, let's talk about one point perspective. In a scene where there is
one point perspective, there is only one
vanishing point. Usually before I
start sketching, I will look for that
vanishing point, which is usually on the
horizon, on the eye level. To find that vanishing
point is very easy. We just take a look at where all the diagonal lines converge. Look at where the
roofs are pointed to, where the lines on the
brown are pointed to. The vanishing point
is somewhere here. I don't need to find out where specifically
that venting point is, I just need to know which area that venting point is located. Now that you know where
the vanishing point is, you can draw the diagonal lines converging to the
vanishing points. With that knowledge, and also with observation
drawing techniques, when you know where the
vanishing point is, you can draw those diagonal
lines more accurately. For example, if you know the vanishing point
is somewhere here, you can draw the diagonal
line pointing to the venting point just
by using that knowledge. You don't even need to use observation drawing techniques, which you should use obviously. But you can use observation drawing techniques just to check and see whether your
sketch looks accurate. One thing about one point
perspective is you can actually shift your
sketching location. For example, if I
want to see more of the buildings on the left side, I can stand here closer to
the wall on the right side. This way I can see the windows on the
buildings more clearly. I can also see the
side profile of the people walking,
the tourists. And I can see this shop, this restaurant here
on the ground floor. It's not open for business yet. Now, if I move to
the other side, I can get another view. I can get the view of the
shophouses on the right side, I can see the shops
are not open yet. I probably will not choose this particular composition
because there is no activity. Try to choose composition, or a view where you
can see activity which will make your
sketch look more lively. Also choose a
composition where you can provide more information. So this would be a good view to sketch because we
can see more people. We can see details on the wall, we can see the windows, we can see buildings
in the background. We can also see some shops. And if the shops are open, it's great because we can see people
shopping at the shops. We can see even more activity. You can also use one
point perspective to direct people's attention. Right now you can see
all the diagonal lines, they are pointing at my head. If you want people to
focus at a specific area, just have all the diagonal
lines pointed to that area. Here's another example of a
one point perspective scene. I am recording this video with
an ultra white angle lens. There is noticeable
perspective distortion. More specifically, the vertical
lines for the buildings near the edge of this
video are actually cited at a slight angle. Now the vertical lines are perfectly vertical in real life when you're sketching
on location. But if you actually
sketch from a photograph, just note that there will
be camera lens distortion. Can you find the vanishing
point for this scene? Sometimes it may not be easy to find out where the
vanishing point is, but the general technique to finding where the
vanishing point is simple. Just see where the
lines are connected to. You can use the edge of
your sketchbook or ruler or a pencil to find out where
that vanishing point is. That vanishing
point is somewhere. One thing you can do to improve your perception
or understanding of perspective very quickly is to just go out and have a walk. And just look at
the perspective, the buildings around you. And try to understand
how perspective work. Try to find out where the
vanishing points are. And try and figure out where
the horizon or eye level is and see how the world
works with perspective. If you're sketching
by the roadside, always be mindful of
traffic conditions because safety
always comes first. This is another one
point perspective scene. And we can see the
diagonal lines, they are all pointed
to the end of the road there towards where
those tall buildings are. It's quite busy in the
background, nothing stands out. If you want to draw
a scene like this, I will probably recommend you use thicker lines
for the buildings in the foreground and
lines for the buildings in the background just
to create some contrast. Do know that all the
cars parked along the side of the road are also
affected by perspective. When drawing cars, it
can be useful if you use pencil lines to mark out
the diagonal line that goes to the vanishing
point for where the wheels meet the road and also
for the top of the cars. When you draw the cars, you can draw them between the bottom diagonal line
and the top diagonal line. This one point perspective
scene behind me is way more interesting compared to the one I showed you earlier. Once again, we can
see diagonal lines pointing to the end
of this street. And at the end of this street we have a very tall
yellow building, which is much taller than all the buildings that I'm
standing beside right now. This creates a nice contrast. We have a tall building
beside short buildings. And we have very nice space here that separates
the tall building from the shorter buildings. And we have the diagonal
lines pointing to the center to make this
the center of attention. This is a good scene
to sketch because I can include the colorful
red building here. And I can see many shops with activity on the ground floor. Now if I move across the
street to this side, the building on the left is not as interesting because
it's just white. Also, the tall yellow building in the background doesn't look quite right when it's just inside the red building and
there is no separation. It's difficult for me to see the structure of
the yellow building. When it comes to sketching, you should always walk around to look for the
best composition. Don't just settle down
at the first pot R. So those are the most
useful tips that I have for you when it comes to
drawing one point perspective. In the next lesson, we'll talk about two
point perspective.
3. Two Point Perspective: Welcome back. I'm still at the same spot When it
comes to urban sketching. You should choose the best
composition to tell the story. For example, if I choose this one point
perspective scene, the highlight is the tall yellow building
in the background. However, if I move
to the site here, I can use this two point
perspective to talk more about the area instead of just focusing on the tall
yellow building. So this is a two point
perspective scene. There is one venting
point on the left, another venting point
somewhere on the right, which is outside of the
frame or of the pitch. It's important to find out where the vanishing point is
because it's so helpful. The venting point on
the right side is somewhere here on
the right pillar. Now that I know the
vanishing point is here, when I draw the diagonal lines, I can just draw
the diagonal lines to the vanishing point. It's so easy, I don't
have to rely only on observation skills
to measure the angles. Note that the vanishing point can change depending
on where you are if I move to a
different location, if I move here, the venting point is now
somewhere here and there is a vision point of
the Po left he. When it comes to sketching
perspective scenes, I would recommend you move to
the site where you can see more details on the
side of the building. Let me very quickly
show you how I will approach
drawing this scene. I'm actually drawing
on the ipad, but my process workflow is the same when drawing
on a sketch book. This is a complicated scene. I will want to use a pencil to mark out the
composition first. That's the tall yellow
building in the background. If it's not tall enough, you can make it taller. And find out where the
vanishing point is. The cross is the
vanishing point. Now that you know where
the vanishing point is, you can draw all the
other buildings and have the diagonal lines go
to the vanishing point. This is the drafting stage where I try to figure out
the composition. The diagonal lines
for the buildings on the left side are incredibly challenging to draw
based on observation. Because the, the roof lines, they are at a very steep angle. So it's not easy to draw, but if you know where
the vanishing point is, you can draw those step
lines very easily. Just have those lines point
to the vanishing point. We have some buildings
on the left side. There is a truck in front
of me, which is here. Make sure you have
the ground line, the curve pointing to the
venting point as well. We have this building
on the left side. Once you are happy with the
perspective that you see, you can ink your sketch with more details if you make
any mistakes at this stage, you can always correct
the mistakes because you're either using pencil or if you're drawing digitally, you can just erase very easily. Do not draw too much details
during the drafting stage. The most important thing during the drafting stage
is actually getting the perspective right to
look accurate enough. If your perspective looks
off the start of the sketch, then the perspective for all the details will
be off for the sketch. So it's very important to get your perspective
to look correct, to look right at the
start of the sketch. If you're on a street and
there are no root junctions, then you are limited to
one point perspective. For example, right now I'm
walking on the street. I can't choose a two
point perspective scene because I'm not at the
corner of the building, I'm not at a root junction. I'm just on this street
which is a street street. In the next lesson,
I'll talk about horizon and eye level.
4. Horizon and Eye Level: Right, let's talk
about the horizon, which is this horizontal line where the sky meets the ground. And you can usually
see this at the beach, near the water, beside the sea. In an urban setting, the
horizon usually cannot be seen because the horizon is
usually blocked by buildings, traffic, people,
trees, mountains. We usually don't see horizons
in urban city scapes. How the horizon works
and how it affects perspective is very useful because it can help you
draw more accurately. The first concept
you need to know is diagonal lines
that are affected by venting points will be
horizontal at the horizon. If we look at this scene, which is actually a one
point perspective scene, this applies to two point
perspective as well. We can see the venting point
is somewhere around there. Because we can see
the diagonal lines, they all converge to that area. Venting points are
always on the horizon. This is the horizon line. For diagonal lines
that are above the horizon line,
they will tilt down. For diagonal lines that
are below the horizon, they will tilt up
because remember the vanishing point
is on the horizon. The diagonal lines
will always be pointing to the horizon. If we take a look at this
building on the left side, we can see diagonal lines pointing down and diagonal lines pointing up because
the horizon is somewhere between
these two lines. Now if I move down a few
steps down the staircase, you can see that this
line now is now perfectly horizontal because this line actually coincides
with the horizon. On the horizon, all the
diagonal lines will be horizontal when you're drawing, when you're sketching, and there are elements
on the horizon, lines that are affected
by vanishing points. You should draw them horizontally as I
move down the steps. I want you to pay
attention to how the angles of those
lines change. Right now, the horizontal
line is on the horizon. But if I move down the steps, this horizontal line will
be above the horizon. This horizontal line will
start to tilt this way. Let me move down the
steps right now, and you can see how the
angle of the lines change. This is how the horizon and vanishing points
affect perspective. When the horizon line is high, it usually means you are
higher above the ground. In this case, I'm actually
on the third floor looking down when
the horizon is high. You can look down at all the
details at the ground level, you can see the crowd. You can see how
many tourists there are stretching all the way
to the back of the street. When you're on the ground level, the horizon will be low. Since your eye level or the horizon is low because
your horizon is low, most of the diagonal lines
will be pointing downwards. Now you can move the
horizon even lower by squatting down to move
your eye level even lower. Now you can see the
diagonal lines. More diagonal lines
are pointing down. This is actually the
usual height that I sketch at when I'm seated
on my portable stool. This angle you can see that the awning actually blocks
off some of the windows. We can't see the details
and the windows. Now if I stand up,
this is, I would say, the typical touristy level that tourists used
to take photos at. This is not a very nice
perspective when sketching, I usually prefer to have a lower angle draw from
a lower angle because I don't want to see too much of the ground because there
is nothing on the ground, there's nothing
interesting on the ground. I try to minimize
the ground by moving viewpoint down so
that I see less of the ground and more
of the buildings. Now that you have the
knowledge of perspective, the knowledge of venting
points and horizon and how to change or move them, you can use that knowledge to change the way you
view the world and also change the way how
other people view the world. For example, if you want people to see more of the ground, just go high up so that you
can see more of the ground. If you want people
to see more of the details of the windows, just move into a position where you can draw
all the details of the windows or the
side of the buildings. Another very
important thing about the horizon is it will affect
how you sketch people. For example, right
now I'm standing, I'm about 1.8 meters tall. At this height, at my eye level, it coincides with the eye level of all the people you can see, all the heats that actually
coincide at this eye level, which is actually the horizon. Now if I move down, if I change my viewpoint down, now I'm looking at the
ways level of people. Notice how the
horizon is now lower. The horizon coincides with all the ways, all these people. Now if I move down even
lower to the ground level, to the ends eye, my eye level will be maybe 1
centimeter above the ground. My eye level will coincide with the shoes of all these people. This is a very important
concept because when you draw people according to
perspective at this level, for example, make sure you draw all the
weights at this level. And you can draw the body
here and the legs here. This. But as you move up, you have to make sure
that all the hits coincide with the eye level. Let me show you how the
horizon line affects how you sketch P. Let's say I'm
standing because I'm standing. My eye level is high, so the horizon is high. This is the eye horizon, which is high on the pitch. I'm going to draw a person
here, that's maybe me. That's my hit. We
have the eyes there. We have the body, the legs. Remember earlier, I said the eye level will coincide
with all the body parts. In this case, my eyes will coincide with all
the eyes of the people. If we have someone
standing further back, that person will look smaller because the person is
standing further back, but the eyes will still
be on the horizon. As you draw people, just make sure the
same body part, in this case the eyes actually
coincide with the horizon. You can draw them big or
small, doesn't matter. Just make sure the eyes are
on the horizon in this case. Okay, let's say I am now
seated on the ground. Because I'm seated
on the ground, the eye level is lower
and maybe I'm looking at the waist of the people
because now I'm lower, I'm looking at the
waist of the people. That means all the ways of all these people will
be on the horizon line. Once again, I can
draw like this. This is the wait, the bottom of the T shirt and we have
the head like this. And we can have hands as well. If you want to draw a
person who is standing in the background who
is quite far away. Same thing, the wait
should be on the horizon. Another person standing between person one and person two. The wait again will
be on the horizon. And we have the legs you can draw on people
walking as well. Sam, the waist will
be on the horizon. This is how you use the
horizon to draw people. You can draw someone
really tiny. Same thing was has to
be on the horizon. Let's say now you are at a high elevation and
your eye level is here. So the horizon is here. And the horizon no
longer intersects the body parts of
people that you see. When drawing people
from a high elevation, you should find out
where the horizon is and do not draw people
above the horizon. For example, in the scene, the horizon is actually here. When you draw people, don't draw people above the horizon, the perspective will be off. Let's say I'm
drawing some people from the stairs that
I'm at right now. That's the horizon line. It's quite high
because I'm high up on the steps as mentioned earlier, do not draw people
above the horizon. These are people in the far background and sometimes I just use
dots to represent them. We can have many dots
to represent many hits. We can have some bodies as well as the people
move closer to you, just draw them bigger. Draw from observation.
All right, it's very important to draw from observation so that you can draw more accurately for
people in the background. I'll just suggest them, instead of drawing details
for people in the foreground. They are bigger, so you
need to add more details. The important thing to take note here is the spacing
between people. This spacing. So this spacing is very important to create the
illusion of perspective. So try to get the
spacing correct. Another thing to
note is people in the foreground will always intersect or overlap people
in the background like this. This will create the sense
of perspective as well. Try and find out where the
bodies will intersect. For example, if I draw someone in the
foreground like this, another person is
in the background. Maybe the bottom of the
shirt is intersecting with the elbow or the
elbow of this person. So you can draw it this way. This will also help
you draw people at the correct position and also with the
correct proportion. You don't actually need
to know perspective in order to draw
from observation. However, knowing perspective can really help you draw more
accurately and faster. The knowledge of perspective is really very useful
for urban sketchers.
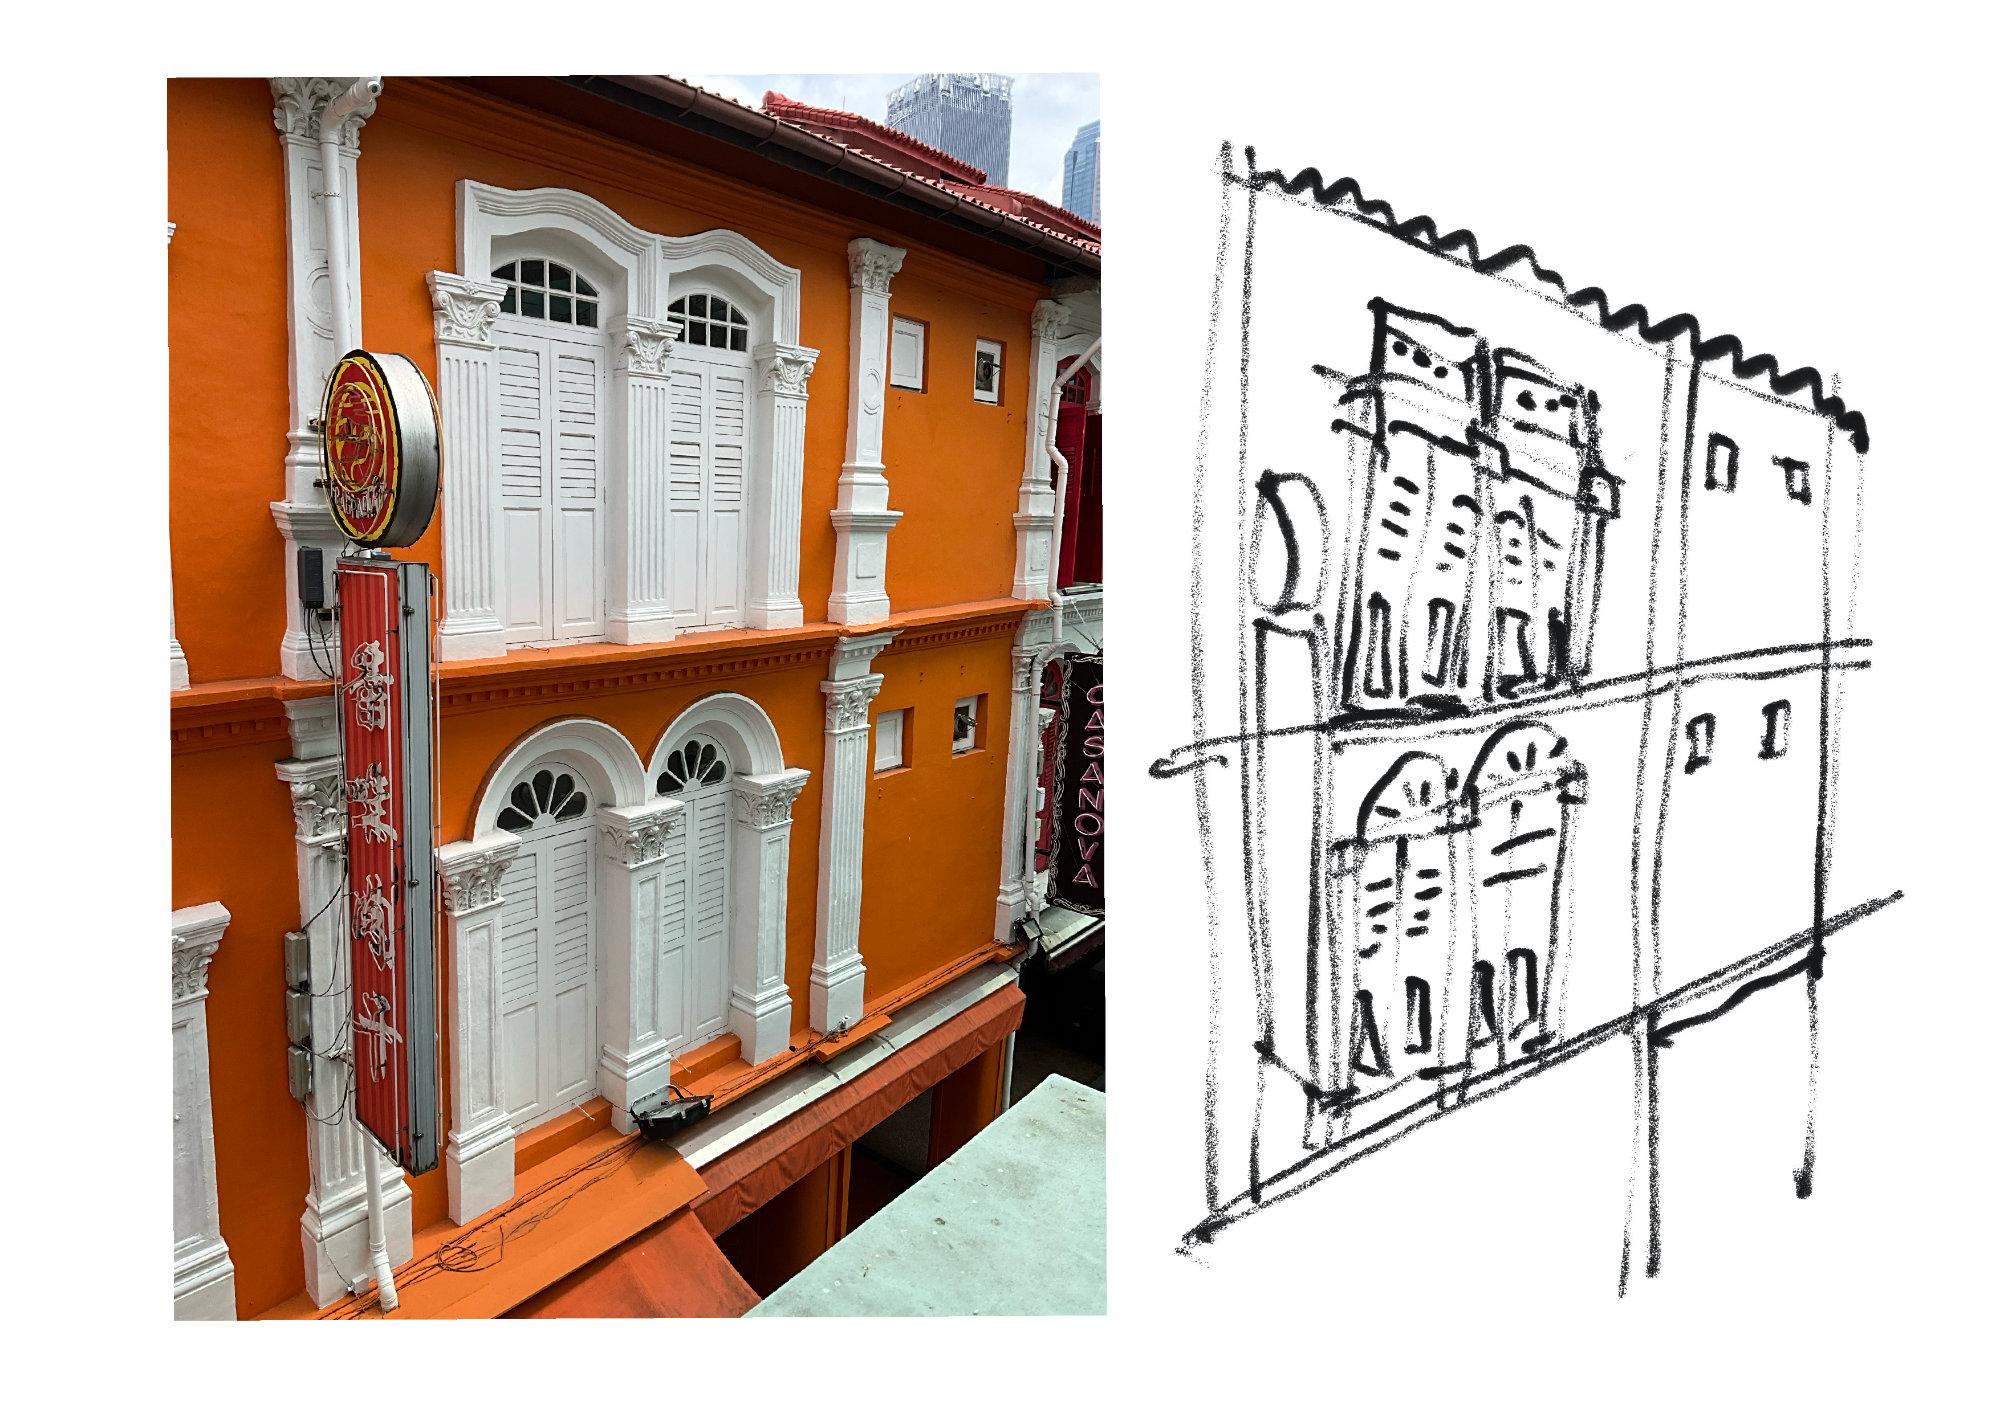
5. Drawing Windows and Tall Buildings: This lesson, I'm going to give you some tips on
how you can draw windows and tall buildings
with perspective in mind. The first tip is try not to draw windows or buildings in
general from the front, because the perspective or
the scene will look flat. Try to draw windows and
buildings in perspective. You can see the
windows on the right, They look more dynamic, they look less flat. Let's start the sketch by
drafting out the perspective. Make sure you get
the perspective to look accurate at the
start of your sketch, because that's going to affect how your windows look later. This is the general perspective. Remember, try not to spend
too much time at this stage. If you can use
pencil so that I can erase your lines if
they are not accurate, I have the big shape out
and now I'm going to divide the second floor
from the third floor. Keep dividing your big shapes into smaller and smaller shapes. At this point, you
may also want to add some structural details. For example, the signboard
on the left side. Now that I have blocked out the big ship and I have
four smaller ships, I can draw the windows
within those shapes. I'm going to draw the
windows at the top floor. First, I'm going to mark
out the general shape of the windows first as well
divide the windows into two, have some decoration at the top. Now, when you are
very comfortable with the perspective and the
perspective looks accurate, you can proceed to ink your
sketch with more details. Now for the windows
at the bottom, you can see the perspective
is quite dramatic. Same thing. Use a pencil to
mark out the perspective. First, divide the windows into smaller and smaller shapes
and add more details. When you have no idea
where to add more details, that's probably the
stage where you can stop adding the details. Make sure that the windows
aligned from top to bottom or from bottom to top because windows are
always stacked. And make sure the
pillars are also aligned properly from top to
bottom in a straight line. At this stage, you can ink your drafting lines
and add more details. Now if your
perspective is wrong, if your perspective does not
look accurate at the start, then the perspective of
the windows will look off. If the perspective at
the start just redraw. Because you did not spend too much time to create
the drafting lines. You can redraw very quickly. Also, during the drafting stage, you may discover some
mistakes that you make. That's a good way
to quickly find out mistakes so that you can redraw
to avoid those mistakes. Now that I have
drawn the windows, I can draw the smaller
windows by the side. When you're drawing windows, always keep in mind the
perspective, all right? Always have an idea where
the lines are going to tilt, whether they are going to t
up tilt down to the horizon. The second tip is if you
cannot count the windows. Don't draw all the windows, you just have to suggest
the windows instead. Now let's draw this tall
building with all the windows. As mentioned earlier, if you
cannot count the windows, do not draw all the windows
for this particular building. We can see the windows
are horizontal. That's the idea we want
to portray in our sketch. Let's see how we can draw this two point
perspective scene. Now the vanishing
points are actually outside of the scene. For this sketch, we
actually have to draw with observation
techniques. Let's start the
sketch by drafting out the basic perspective. First, let's draw
the shorter building at the bottom and make sure you draw the angles accurately. Next, we have the
taller building on top. And make sure to draw the angles accurately as well using
observation drawing techniques. Now in the reference photo, the vertical lines are tilted, but in real life,
the vertical lines are actually perfectly vertical. Next, we'd have to
draw the right corner. The right corner of the
building actually aligns to the halfway mark of
the tall building. With that in mind, we can draw the right corner. I'm going to start here. I'm going to place a point
there and join this to the. Shape, or the line
that I have already drawn and draw down like that. And there we have it,
the tall building. Now to draw the angles of
the horizontal windows, we can use the line at the
top that we have already drawn the line at the bottom
that we know where it is. With these two lines, we can divide the building into smaller and
smaller section. I'm going to divide the
building into half like this. Half again, half, half,
half, half, half. Just keep dividing the angles that you have just
drawn will be accurate. If you rely only on observation
drawing techniques, it's challenging to draw all the individual lines
at the correct angle. By using this technique, you can draw tall buildings
with accurate perspective. Okay, let me show you, let
me show you another example. Let's say you are drawing a building with
this perspective. You're looking down
at this building. We have the top line and
we have the bottom line. Same principle or
concept applies, Divide the building into
half, half, half, half. With this technique,
you can draw the angles of those diagonal
lines accurately. The most important thing here is to make sure that the angle for the top line and the
bottom line are accurate. This will apply to the
bottom building as well. Once you have these two
lines accurately drawn, you can divide this building
into half like this. To separate the top floor
from the second floor, You can divide the building
into different sections. This is how you would draw a scene like this
with tall buildings. If you look on the left
side of the building, you can see there are
several big yellow blocks. And on the yellow blocks
there are some red words. Same thing applies.
Same concept applies. Try and divide the shapes. This, okay. Now you can draw the red words. Try and divide the
shapes accurately. Try to draw the
outlines accurately. Now, if the perspective looks off at the
start of the sketch, re draw, if you use a pencil,
you can always erase. I can see my perspective
is a bit off, but in real life it
actually looks like this. But due to camera distortion, the line is actually
more tutored. Anyway, just draw
from observation, and if the perspective
looks off, just redraw. It's always good
to start out with a pencil if you are a beginner, if you're not experienced. But once you are
more experienced, you will be able to draw more accurately
and go straight in. Let's say I want to divide
the windows now with the yellow blocks on
the left in mind. Same thing. You can
see this section here. This is about, I would say, one unit which is divided
into three units. For the right side, it's also going to be divided
into three units. Just join the lines like this and divide
the shapes again. All right, divide
this into half, and divide, divide, divide, divide, divide, and divide. This is how the
sketch will look now, even though this sketch does
not have lots of details, but it actually
looks good enough simply because the perspective
looks accurate enough. So those are the
techniques that I use whenever I'm sketching
windows and tall buildings, especially when I cannot find or see the
vanishing points. When you are practicing, I
have to emphasize again, try to draw the
accurate perspective for the drafting stage, for the building first
before you draw the details. Because if the perspective is
not accurate at the start, the perspective for
all the details will not be accurate later on.
6. Slopes: Lesson, I'm going to give
you some tips on how you can draw slopes and
buildings on slopes. When it comes to drawing slopes, the slope usually has
its own vanishing point. And the buildings will have its own vanishing point as well. In a scene like
this where there is a slope and buildings
beside the slope, there will usually be
two vanishing points. If you extend the diagonal line for the slope all the way up, you will see the vanish point
is somewhere around here. But if you extend the diagonal
lines for the buildings, you'll see the vanishing point
is somewhere around here, which is lower than the
vanishing point of the slope. When it comes to drawing
a scene like this, what's most important is to find out where the slope ends, where the slope intersects
the side of the building. The most important point in this scene is actually
this point here, where the end of the road
intersects the building. And also this point here to
draw the diagonal lines, you can just measure the angle. Just stretch out your arm, lock your elbows and
measure the angles. And remember the angle
before you draw them on the page or on the paper. The angle for the roof here is particularly challenging
to measure the angles. Once again, stretch
out your arm, lock your elbows, and
measure the angle. You can see this line is
tilted in this direction. This line is tilted
in this direction, and this line is tilted
in this direction. Try to remember the angles before you draw
them on the paper. For scene like this, try and find out where the
function points are. Find out where the
end of the slope intersects the buildings
at the end of the slope. And draw the big shifts first. Just create the
drafting lines first before you draw details. Now I'm at the top of the
slope looking down. Let's see. We can use the same
drawing techniques to draw from the
top of the slope. If we extend the diagonal
lines for the slope, the vanishing point for the slope is somewhere
around here. If we extend the diagonal
lines for the buildings, the venting point is
somewhere around here. The venting point
for the buildings is higher in this case compared to the venting point of the slope which is lower. I would say the same
principle applies. Try and find out
where the end of the slope intersects the
building on the left side. And measure the
angles of the slope. And draw the big ships first. Draft out everything
with pencil first. Very loosely to get
a sense of whether the perspective looks
right or accurate enough. Right, let's see how we can draw the scene with a slope and building by both sides
of the road as usual. Draw the big ships first, try to measure the angles
as accurately as you can. There is a horizontal line here, because this horizontal line
coincides with the horizon. If we extend the top line for the roof and the
horizontal line, we can get the venting point, the VP for the
building on the left. This VP may or may not be the same venting point for
the buildings on the right. Now I'm drawing the
buildings on the right side, the yellow building
on the right side. The bottom of the
yellow building on the right side is
actually taller than the bottom of the building
on the left side. Next, we can draw the slope. So it's very important
to find out where the slope intersects
the building, whether it's intersecting on
the left or on the right. At this stage, you
should be drawing with pencil or drawing on
a drafting layer. If you are drawing digitally. We also have, we can see this
curve here at the front. Now when drawing this
particular scene, I want you to pay
special attention to the shape of this road here. Yeah, try to get
this shape to look accurate because
that will really help to make your slope
look more accurate. Once you're happy with the
perspective that you see, you can then we'll add more
details to your sketch. If the perspective looks off, looks wrong, just erase your pencil lines
and redraw again. Trying not to spend too long. Try not to spend more
than 1 minute or 2 minutes to drop
out the perspective, because you just need like
one or 2 minutes too quickly. I get a sense of whether or not the perspective
looks right. This is how the scene will look before developing it more. When it comes to drawing slopes, you will have to rely a bit more on observation
drawing techniques, because the vanishing
point for the slope and the vanishing point for the
buildings do not coincide. Now if the vanishing
points coincide, you can just draw all
the diagonal lines to the single vanishing point. But in this case, the VPs, the vanishing points for the slope and buildings
are different. So you will have to observe and change the angles of the
line and more specifically, find out where the
end of the slope coincides or intersects
the buildings. This scene behind me is
particularly challenging to sketch because one road goes
down, the road goes up. I'm going to provide you
with a reference photo, and you can try and draw this scene with the
reference photo. When your knowledge of perspective cannot
help you sketch, you will have to fall back on drawing with observation
drawing techniques. For example, with this scene, you would have to find out
where the roads intersect the building on the right
and also on the left. You can use alignment
techniques to draw the road on the left
and on the right, find out where the horizon is, that's where all the
lines are horizontal. Find out how the lines cute. Also, use alignment techniques to draw the corners
of the buildings. Draw the big ships first before
you divide the ships into smaller and smaller
ships to draw the windows and other details. One thing that I
have learned over the many years of sketching is if you want to improve fast, it's not just about practicing. You also have to understand the concepts behind
what you draw. If you combine the
knowledge with practice, you can improve much faster.
7. Bonus video: Chinatown Night Sketch (Part 1/2): Hello everyone. Welcome to
another sketching tutorial. Today we are going to sketch this night scene of Chinatown. Night scenes can be
quite challenging because the light comes from the lights and
not from the sun, so there is no shadow. In order to portray
the depth perspective, you really have to be good at drawing, at
capturing proportions. I don't usually
sketch night scenes because I work at night. So I don't usually
go out at night. This photograph was taken
a few days ago while I was out with my
family at Chinatown. Singapore, Chinese New Year
is coming and very crowded. I took this photo for you guys so that we
can sketch together. If I were to sketch this on location at this
particular time, it would be impossible because I was standing on
the staircase and there is just a stream of
people walking up and down. It would be impossible
for me to get a good spot to even
stand and draw. Let's take a look at the scene. We have some perspective lines
going into the distance. This is where the
finishing point is. Somewhere inside this
red banner here. Notice the people, as they are further
away in the background, they become much smaller. Take a look at the size
of this head here. All the size of this head
is almost the same size as the T shirt that
this guy is wearing. As we move into the background, you can see the become
smaller and smaller. We want to capture
the diminishing size to portray the sense of death. We see some lights here. The lights, they are bright
against the dark background. I may use the white Jew
pen later on or the posca, opaque markers to write
or draw over the black. We have some lights
here as well. Neon lights. The sky, it's dark. Hopefully by painting
the sky black later on, you can give you a sense
that this is a night scene. You can download
this reference photo in the video description below. The first thing I want
to draw is the pillar which will go to the center
area around this area. I don't want to put it
close to the pitch gutter. This is the other pillar which is further to the right side. When you draw
something like this, get a sense of this rectangle. I can draw the roof now based on the reference
photo that I have. The roof here is
actually cropped off. But I wanted to draw the roof to give it a sense of the top. Let's draw the other pillars. Now, the smaller pillar
will be around here. Bottom of the pillar
will be around here. Yeah, because there is this vanishing perspective line that goes to the banner here. Maybe I should draw
the banner first. It will be easier. I'm going
to draw the banner here. I can draw the pillar here. Let's continue to draw. As I'm drawing, I'm continuously measuring where the
vanishing point is. All these pillars that are behind the top will all align to the banishing point
here as well. On the left, on the right
side, this is the top. There is a horizontal beam. I may want to draw
the horizontal beam. You can see these pillars. They are more spread out. This pillar here, it's about
one third compared to this. With here, I want to
put it one third here, and the vanishing point is here. The bottom is going to end
up somewhere around here. This is me using perspective knowledge to draw
the bottom of the pillar, this third pillar
from the right side. This is about one third
compared to the wave here. I can draw that. Now, this sketch is pretty
sketchy looking right now. You can see I have overlapping lines here where I shouldn't have just continue
drawing the pillars. It doesn't really
matter whether or not you get the number
of pillars right. Just as long as the pillars look like they are in perspective, we can see the perspective line going into the distance here. The blanching point is here, 123, we have the escalator here. There is the escalator here and there are people
on the escalator. Now let's draw the stairs. Continue drawing the stairs. Now what I'm doing right
now is actually to draw the big shapes to get the
framing the composition. For challenging
scenes like this, you may want to use a pencil, but I'm going straight
with ink to save time. You see this part here.
This is actually going to the perspective
point as well, because this is parallel to the ground that
people are working on. This part here, this is
about, say, this angle. When you draw an angle
that is quite challenging, stretch out your arms,
lock your elbow, and measure the
angle and draw it. Now, this line, this
line is not parallel. In real life, it's parallel. But when you're drawing,
you should draw it in a way that this part here is thinner and this
part here is more spread out because
of perspective. The vanishing point for the two lines is different
from this two line. Because these two
lines, in real life, they are actually
sloping downwards, but these two lines are
parallel to the ground. For lines that are
sloping downwards, the vanishing point
will be different from those that are
parallel to the ground. Let's go here. Remember, two lines are parallel
to the ground. If you don't want to measure, you can actually just use your perspective
knowledge and draw those lines to the
vanishing point. This will be very accurate, but for this line here, this is almost almost
horizontal on the page. I'm going to draw it
like this and like this. All right, now let's draw the buildings in the
background, the shop houses. Let's start from here.
This point here. This is, this is the, so I'm not sure what, what's called the extension
where the sheet comes out. It starts here about two
fifths of this height here. So it starts here. And it will, and I'm not sure
where it, anyway, it doesn't really
matter where it ends, because this line here, this is parallel to the ground. It shares the same perspective difishing point as
this line here. You can actually, with the
help of the finishing point, just draw the line like this. You don't even have
to measure the angle. If you know perspective,
I can draw. There's a cut here.
There's a cut here, which is somewhere
in the mid point, if I use this as a reference. Yeah, there is another cut here, and this is where the
signboard is now. The signboard will go up
to almost half of this. The signboard will start here. It comes down here for
the top of the shophouse. Same thing. We can draw those
lines to the banner. Now I see inaccuracies
right now, because I probably
drew this too high up. Because if I were to draw the mid line here
of the shophouses, it's going to, now in the photo, the line is perfectly
horizontal. I'm going to cheat
a bit and draw it tilted slightly to
the vanishing point, because I have already set
up the vanishing point. If I were to draw the
line horizontal right now it's going to
look a bit weird. So now I have the shop
houses on the left side. I can divide, divide the shop houses into smaller and smaller part,
individual sections. So we have one part
there and one part here. Another part here seems okay. As, as the shop houses
move into the background, this front will be more
squished and shortened. You have to draw. Smaller and smaller. The distance between each lines will be smaller and smaller. Now we just have to
fill in the details. I can draw the windows later on. Let's draw the people
on the street. For the people on the street, I'm going to, let's extend the pillar all the
way down to the ground. First, the pillar
is going to stop somewhere here, midpoint here. And we have this, okay, the person that is here. We need to make sure that the size is in
relation to this pillar. Here. We can continue to draw all the
details later on. Now I just want to
draw the big ships first, the shop fronts. Make sure the lines here, they go to the vanishing point. There is another person here. Now, when drawing people
from a high elevation, when you're standing
somewhere higher and people are lower than you, make sure to pay attention
to the shapes that you are drawing because
there is going to be a lot of foreshortening and
we can draw this person here. The heat of this person
is going to be quite big because this person
is closer to us. We have another person here. I'm going to align him
about this and this area here now because I'm
using a wide angle lens. The people that are closer to me and people that are
to the extreme edges, the left and right edges, they are going to look
like they are stretched. That's the perspective
of the lens, not in real life. For the next person that's here, the T shirt is about the
same size as the head, this guy is walking down. Now this is a bit challenging if you are drawing
on location life, drawing people walking
down the steps will be challenging because
they are always moving. The trick is to
wait for people who are maybe not moving as much
and draw those people first. For the bottom of the T shirts, they will not be horizontal
because of their perspective. Most of the time, the
bottom of the ****, they are actually curved like this, because of perspective. For the right side
of the shop house, the pillar starts here, almost at the bottom
of the pillar. We can draw this
pillar here, goes up. Now this line, in real life, it's supposed to be horizontal, but in the photograph it looks horizontal.
It is horizontal. I can just copy it like that. This will go all the way
to the top stops here, the top of the shop houses will go to the vanishing point. So we can draw this like this. There are some windows here. I can see some windows here. You may not be able to see
properly from the photo, but in real life, if you were to be
sketching on location, your eyes will be able to
see all sorts of details. This wide angle lens, it's creating a
lot of distortion. Okay, this part here again, we'll go to the benching point. We can draw this line here. It looks like they
are selling the shop, selling a lot of
things In front, I want to draw some
people as well. In relation to the
height of this pillar. Here, the main
structures, the pillars, the diagonal lines, they
are almost complete. Now I can just fill
in the details. By the way, I'm able to
draw things that I cannot see because I've been
to this place for me, I'm always in Chinatown. I'm quite familiar with how
the structures actually look, but you guys wouldn't
know how it looks. So you have to follow
the photograph. Okay, so for the
following section, I'm just going to
time lapse this video because it's basically
filling in the details. One thing to note is when you are drawing pillars
on the ground, for example, we have
a dis pillar here. The bottom is horizontal
for people that are facing you versus those that are not facing you.
Here's how I do it. I can, this is the body, for example, and
this is the head. This would be a person that
is looking away from me. If I introduce a face
like that and the front, this would be a person
who is facing me. This is a person facing away. If I have the chest area, this would be a
person facing me. For people that are
really far away, you cannot just draw dots. This is simplification. You can use dots to represent all those people who
are so far away. All these people
are on the stairs. So I can draw some
horizontal lines. Now for the top of the stairs, the line will be
parallel to the ground. This line here should go to the vanishing
point on the banner. So it's going to be like this. Yup. So if you want to have
some perspective going on, this is the completed
sketch that took me around half an hour
to 45 minutes. This was run pretty quickly
because this is just an, A five sketch book. If I were drawing on a much
larger piece of paper, it's going to take me more time. And if I really concentrate and focus on the details on
getting the alignment, the proportion right, it's going to take me even more time. How much time I take to draw is dependent on how much
detail I want to add. And also ultimately, the size of the paper
that I am drawing on. Sketching on location
is very fun. When I took this photo, there were actually
some dances here. That's why you see
an opening here. If you're drawing on location, you can really remember
the atmosphere for me. I'm drawing at home. So the only thing I
can remember would be me creating this
tutorial for you guys. But if you're
drawing on location, your experience will
be totally different. I just remember that this shelter actually
extends all the way up, because this shelter
covers the whole decade. I do need to extend
this further like this and have it
cropped off right now. It looks, it feels
more right to me. In the next video, we will color this sketch with watercolor.
8. Bonus video: Chinatown Night Sketch (Part 2/2): Hello and welcome back. Now we are going to color
this with water color. This is going to be quite
challenging because I don't usually
paint night scenes. The colors that I'll be
using will be Hansa yellow, medium, pyro red, and flow blue. But first, I'm going to use up the existing colors that I
already have on my palette. So I can always reactivate
dry water color. I don't want to wet them. I will be using Posca markers as well. This will be used
to draw the lights. My strategy here is to paint the colors first and over with the gray and finally with and then we'll use the Posca
markers to draw the lights. Now I'm just
painting the people. We'll paint with the primary
colors first and then mix the secondaries
using the primaries I've just painted using
all the primary colors. And now I'm painting
the sky black. This is mixed with thalo
blue and pyro red. You can get a really
dark value color using color mixing
with these two colors. If you find a black dark enough, you can add more thalo blue. Now as the, as the semicircle
beams go into the distance, the gap between the beam, the sky will become
thinner and thinner. You see here in this
portion here, it's bigger. But as it goes into
the foreground, the gap becomes
smaller and smaller. That's perspective. Things in the foreground
will become smaller. One thing I noticed is a lot of people are actually
wearing black or grays. This type of things, you
probably will not notice unless you are observing them. I'm going to paint the grease and then paint with the black. This part is actually
the tedious part because there are so many to paint while painting. All the people here, I
want to create contrasts. I'm going to have
some colors against white, colors against black. Basically to have the color
contrast against each other. You will need to have a brush with a very sharp tip in order to paint
all these details. The paint will dry lighter. To make it darker, I
have to go over it with the flu blue and pyro red mix. I'll be painting the hair and all the black T
shirts with this mix. For the gray, I'm going to add the three primary colors
together bit by bit. Don't add too much paint or else the greases are going
to look very dark. Use a lot of water to
keep the wash light. There are some light sows
coming from the sides, from the left and
the right side. When you're painting
the pillars, the white support structure, make sure to paint on the
right side of the pillars. The stairs look like
they are brown as well. The pillars here, I can paint
with this color as well. Yep, I've already
run out of paint. That's why you need to
mix a lot of paint. You need to use a lot of water. So the buildings behind,
they are darker. So I need to mix a darker gray. But let's paint the
lighter grease first. This part here, this is darker. I can use the mix to paint
the grace here as well. I need it to be a
bit more reddish. Now, the light here is
actually a soft transition, so let me work very quickly, because I want to use my tissue to get that
soft transition. Oops, this is really dry, so you can see the
hot edge there. Let me try again. You have to work really fast, wash your brush very quickly, or have a clean brush stand by a clean brush and then fade. This will be much
easier compared to compared to using
just the scroll brush. Let's try again
this time around. We will paint this, make it darker with the clean brush fit for this part here. This seems to be darker. Let's have this big wall
here that is darker. This whole part here. Let me just overlay paint over
this whole building here, leave the highlights
areas in the black. I'm going to make them darker. I want to make the
windows darker as well. Very quickly wash
the brush and feed. I want to make the
stairs a bit darker. This part here, the
top will be light. This part here will be darker. And the steps
themselves will be Mu D. Let's paint the side. This is a mix of the three
primary colors and the steps. There are certain areas
that are much darker, so we need to paint
over those areas. Such as this part here. This part, everything has dried. So now it's time to
add some details. The lights using the white pen, white the post gun markers. We have some lights, reflections on the glass. There are actually some tall
buildings in the background, but you may not see
it in the photo. I'm just adding some windows for the buildings
in the background. For this part here, I'm going to add
some more details. Now, if you are using
pen over water color, make sure to turn
your fountain pen to the opposite side to draw
with the really fine lines. Because when you have
ink over water color, the lines will tend
to be thicker. But if you turn
the fountain panel over to the other side, it doesn't move as free inflow isn't as good for
the bottom here. I need to add those grills. Now the grills, they actually
follow the perspective. Make sure that they are
pointing those lines, they point to the
vanishing point. For example, if you take a
look at this window here. If I were to draw the grills, I will have to make
sure that the lines, they point to the
finishing point. For the windows. Notice how the angle of the lines they change. And now the lines, they
are pointing downwards. Now I'm using the white quash
to add some details back. This can be used for
correction as well. Now the Posca marker, this is not as bright
as fluorescent. I may need to go over another time to
make it more opaque. The thing with these
markers is you have to use them quite often in order
to get the ink flowing. If not, sometimes
they may actually dry up even though you
kept them properly. Okay, I see the problem here. This should be the background. Should be much I'm
going to pin this. In fact, I think
I messed this up, so I'm going to just paint over the postcar state and just make this really dark so that when I draw over with the postcar, it's going to look right. Meanwhile, let's move over
to the next signboard. All right, now the yellow ink, it's flowing much better. I can use the Posca markers
to add some details here. Maybe this is a gold
shop selling jewelry. I want to add some reflections for the yellow lights at
the top here as well, and some red light reflections
of the red lights. Let's try again this time. All right, now the ink
is flowing much better. You see the contrast. It's now so much better. I wonder what the
shop is selling. If you look close at the light, you may actually see that we all the colors are
actually beside the white. It's a bit difficult for me to do this with the white open. Let me try the Posca marker. It's very difficult to replicate
the glow of the light. I'm almost done here. I think I just need to add
a bit more contrast to differentiate the
vertical pillars against the shop house. So I'm going to see what's
going to happen if I paint. This is way too dark, so I need to add
a bit more water just to create a contrast. Let me wash the brush
and fade it away. Now I see a bit more contrast. Same thing applies here as well. It will be good if you can
do it right the first time. Because oftentimes when you go back to correct
your mistakes, the more colors
you add later on, sometimes it's going
to make it worse. Okay, I think it's
slightly better. So this is the completed sketch. You can actually go in
and add more details. Put some dots here and there
with the Posca markers. They add a bit more live. They make things look
a bit more exciting, more interesting, especially
in the background. You can add some dots
in the background. All right. A few
things I learned from painting this sketch.
The glow of the light. It's quite difficult to wrap it if you want to
fit the colors. It would be good to have one
paint brush with the color, another paint brush
with clean water, so that you can fit the
colors very quickly. Using the clean brush and
paint using the colored brush, here's a closer look. Now, the windows here
in the photograph, they are way more vibrant
brighter because of the light. Mine looks a bit
more pestile like. These are all the
people on the street. This is way more colorful
compared to what I have in the photo because most of the people are
actually wearing gray, dark blues, or black. But when you have more colors, it actually makes the
scene look more lively. It's almost Chinese New Year. Think adding the colors, it adds more appropriate touch, more appropriate
feel to the sketch. These are all the colored
dots that are added. That's the escalator going down into the train station
below the ground level. This is very far back
in the background, so you don't need
a lot of details. All right, thanks for
watching this tomorrow. I hope it's helpful. See
you in the next video by.
9. Bye: Thanks for joining this course. Do send me your
sketches so that I can give you critics
on how to improve. And other people
can also look at your mistakes and
learn from them. Because the mistakes
that we make during sketching are
usually not unique. Anyone can learn from
anyone any mistakes. All right, before you go,
I want to ask for a favor. Do leave this course of
review so that you can help other students know whether
this course is any good. See you guys in the
next course. Hi.
 Teoh Yi Chie, Sketcher, watercolour lover