Transcripts
1. Introduction: Hello and welcome to this course on drawing with a fountain pen. My name is Joe and I'm an artist, graphic designer, and video creator. I've been using fountain pens for Troy for almost 20 years. So in this cause, I'm going to show you what a fountain pen is, the different parts of a fountain pen, that type of inks you can use in a fountain pen. How to refute a fountain pen? The three types of phone benzene can use while drawing, and then we will jump into some joint exercises. This is an introductory cause on fountain pens and I hope by the anodic calls you will get a good understanding on what a fountain pen is and what it can do.
2. Parts of a fountain pen: And this first lesson, I'm going to show you some fountain pens and the different parts of a fountain pen. So fundaments can come in all sorts of shapes, sizes, and design to be considered a fountain pen, UPENN mass meet those three criteria. So let me just, I've kept this pen for you. It must have a metal nib. The nimby is usually made with stainless steel or some go alloy, so that doesn't rust with ink. A fountain pen must also have an ink reservoir, basically its own ink supplied. So in this case, the ink reservoir here is an Inca converter. And the third criteria is a fountain pen must use liquid ink. This out of different parts of a fountain pen. We have a cap and this cap has a clip. This is the barrel, and this is the ink converter. You can also use disposable ink cartridges with fallen pans. But obviously, using an ink converter allows you to reveal the pen with your own ink. And it's going to help you save money in the long run. And this need and section, sometimes I call this the grip section because you hold a phone panel like this. Some fountain pens allow you to dismantle or the parts completely. So for this particular upon him pan, which is a pilot fountain pen, you can actually twist this section here gently and Powell. Metal neat and feed. The feed can be made with Abu night, which is a type of HOD and robber or hot plastic. Ebonite has certain characteristics that allow ink to float better. So ebonite feeds are considered better compared to plastic. And for this particular field, you can see there are many fins, so this Finns will actually hold Inc. Not all feats will come with fins like this has put the pen back together again. Make sure you align the sleep, this line here to the slit of the feet. And press the two to get dir and pushed to back into the section. Some fountain pens may not allow you to dismantle the NAEP feed. So for example, we have this favorite custom fountain pen. The nib and the feet here is actually permanently attached to this pot. So if you want to change a nip, you actually have to change the hope hot, I do recommend getting a fountain pen you can dismantle completely because this allows you to clean the pen thoroughly. Because sometimes when you want to switch things, maybe you want to switch from using black ink to blue ink. You will definitely want to clean the pen thoroughly so that the color of the previous Inc. We're not mixed with your new Inc.. And now I want to talk a bit more about ink of converters. This particular converter is made specifically for pilot fountain pens. In converters may or may not be interchangeable. So to be on the safe side, it would be good to get an ink convertor decimated by the same company as the fountain pen. This particular Inc. convertor is the plunger type, so you can actually push this button here at the back end. It will suck the ink up. This is the piston type. So it'll refill this ink converter. You can use this pot to push and pull. So this will suck the ink up. And notice there is this little spring in sight. So when the spring moves around, it's also going to move the ink around because sometimes when you're writing the ink maze be stuck up there so you may want to move your pen around. Who move to encounter l. This is the twist type ink for the opening here for this converter and this one here. The size for the opening is very similar. It may seem like this to ink convertors may be interchangeable. Let's see what happens if I use the other end convertor with the section. So I am not able to push this ink convertor in because there's plastic design here, doesn't allow me to push. That is. So this incomplete there is part here. It's more narrow. It allows me to push it all the way. So try not to buy the wrong ink converter for your pen before you buy any ink converters, make sure to read the description properly. Some fountain pens we'll calm with ink converters and will come with disposable cartridges. Let me show you there ink reservoir. So for this particular fountain pen, it actually comes with acute in ink reservoir. This is the twist type ink reservoir. So you can turn here and this will suck the ink into this area here. The advantage of this design is this can hold a lot more ink from parent who ink converters. The downside is if you want to do regular maintenance or if you want to clean depend per thoroughly is gonna take more effort to dismantle this pen completely because all the parts here I actually built in, but 12, you can actually dismantle them. This is twist the fountain pen that has a vacuum refueling mechanism. So this reservoir is also built into the pen. To refute a pen, you can turn the knob here and put a plunger up. When you push the plunger back, vow is going to create a vacuum. And when you push it down all the way in the parking brake, and ink will rush into the ink reservoir. Now he doesn't work quite well when it comes to refueling ink, but it feels a bit gimmicky to me. So personally I actually prefer using in reservoirs or in convertors like this. Alright, so in the next lesson, we will talk about fountain pen inks.
3. Fountain pen inks: Let's talk about fun and pen inks. The most important thing to take note before you buy any inks is to make sure that the ink specifically states that it's safe for use in a fountain pen. Generally speaking, when it comes to drawing with a fountain pen, I recommend using what approve inks, because with waterproof ink, you can actually use that in other media. But a thing we've waterproof ink is most of the time they are pigment head and some of the pigment that things may actually Clock a fountain pen. So that's why it's very, very important to read the label, the description to make sure that the ink is safe for fountain pen use. So for example, with this bottle of ink, it says here that ink is waterproof. And he also specifically mentioned that you can use this ink with fountain pens. There is this additional instruction here that tells you that you should not let your fountain pen dry out. So this tells me that the ink, maybe pigment it. Let's take a look at another Inc.. There's a speed ball, super Black Sea is here. This is India ink or China ink. Whenever you see the words India ink or China ing do not use those inks. Insight any fountain pen because those things are heavily pigment it, and those pigments are physical particles. And those particles are usually much bigger compared to other pigment that ink. So you will non plan, you do not one those physical particles to clock your pen. Let me open this up to show you those physical Patek goals. You can see even outside the ink bottle. You can already see physical ink particles. Who imagine what will happen if this is inside your pan, it would be almost impossible to clean this out of your pen. Some india inks me also add shellac. Shallower is usually added to make the ink even more waterproof. So shall leg dries. It's going to form this permanent courting over the ink. The shellac can be so permanent that if you want to get the ink off your pen, you actually have to scrape off this, by the way, is the dip pen that I use with India ink and is ink coating here. This is almost impossible for me to scrape off. This is sailor key Walker who wrote, this is actually a pigment that ink as well. But the pigments are actually grounded so fine that this ink can be used in fountain pens. Now there is no label on the bottle telling you that it's safe or fallen pans. So you have to do your own research online to find out whether or not the ink can be used in fallen bands. And in this case here, this is actually quite a good ink. That is what a proof. When dry, when you use ink cartridges, you can use huge variety of inks. When you use disposable ink cartridges, ya'll just limited to the colors of ink made by companies. And another thing to take note of when by Inc. bottles is I do recommend getting shorter bottles. So this one, it's quite short compatible with this one which is really tall. The reason is because as you use up to, in, the ink level will drop, which makes it more difficult to actually put your pen into the ink bottle or to get the ink out. Alright, let me show you how to refute a fountain pen. Before you refute a pen mixture, you have a piece of tissue by this site for the clean up later to refuel a fountain pen, just so much to append nip in the ink mixture that Incan covers the pennant. Then push the piston down and then pull the piston back up again to suck the ink into the ink reservoir and use the tissue to clean this part. Most importantly, get the king of the group section because that's where you will be holding the pen. So that's pretty much all there is to refilling a fountain pen. And when you're not using your pen, makes sure to caveat pan properly so that ink will not dry on the pen name. Alright, in the next lesson, I'm going to show you three fountain pen nibs that are great for drawing.
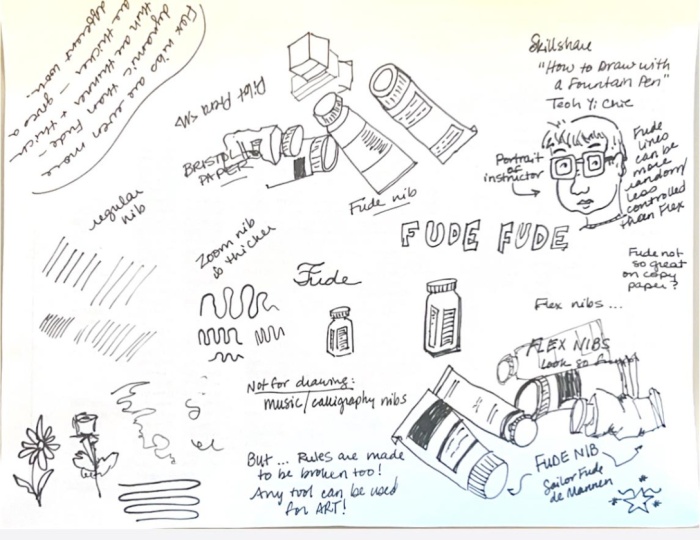
4. Three common pen nibs for drawing: There are many types of pen nibs available for fountain pens. In this lesson, I'm just going to show you the three most common pen nips that can be used for drawing and for the drawing exercises and tests that I'm about to show you, I will be using Bristow paper, which is basically for a smooth surface paper, which is great for pen and ink work. You can of course use different types of paper. There's, for example, is fine green paper with slight texture. This paper is actually meant for pencil, but of course you can use pen and ink on it. But if you just wanted to create black and white ink illustrations, Bristol paper is the best paper. If you want to use mixed media, you can use hot press watercolor paper that our first type of pen nib I wanted to show you is the very typical fountain pen nib. The main characteristic of this pen nib is it produces lines with consistent with this pen nibs are usually available in this sizes, extra fine, fine, medium and brought this particular pen tip that I have, it's actually a fine nip. Any pen nib that produces consistent waves or uniform widths would be under this category. And the reason why the produce consistent with is because the need is very Steve. So we impress Dao hot on the paper. Versus when you are drawing a very light pressure. The thickness of deadlines day you can create will be similar. Sometimes you may be tempted to press doubt and NAEP HOD The than usual. I wouldn't advise doing soil and unless you know that you are using a flex snip, so does particular pen emits conceited quite Steve. When I draw with light pressure, I get thin lines like this, but I can actually press down a bit harder to get thicker lines. But if you press down hot on her pen nip that's not supposed to flex. You may actually damage dependent. So please be aware of the type of pen nib you are using. Now one thing about this pen name, oh, about appendix is you can actually turn depend it around and draw even thinner lines. So when I turn it back and draw, you can see the difference between the line waves. Here's another pen, this particular pen nib is caught, does zoom nip? This also belongs to this same category of pen nib step produce consistent lies. But here you can see this line. It's much thicker. And with this NAEP, again, I can turn it around to draw lines. When you are using the fountain pen like this, you may have to draw a bit slower because the inflow is not as good when you are using the pen nib like this. The second type of pen name I want to show you is the foodie NAEP, which is basically a pen. It is bent at the tip there. So Fourier nibs are actually designed for writing Asian category B. But of course you can use to avoid drawing us well with this particular panic and see the V8, it doesn't have any fetus with foodie nibs, you can create lines with varying thickness depending on how you hold a pen. So for example, now I can draw with thin lines and when I use the brought site often NAEP, I can draw with thicker lines. And I can switch between how I hold the pen to draw thin and thick lines. The nice thing about this pen nib is you don't really have to make a conscious effort to changed a way. Hold a pen because when you are writing or drawing and their normal situations, you will already be moving the pen nib around. So this is a very versatile penny. I can draw a thick and thin lines whenever I want to. And for the details here on this ink bottle, for example, I can just draw with thin lines for the outlines of this ink bottle I control with thicker lines. The third type of pen nibs I wanted to show you the full text snips. So we're flex name, you can draw lines with consistent uniform weirs like this by applying a uniform pressure. But you can also press down and apply more pressure to get thicker lines. Notice how the line breaks here. That's called railroading. And it can happen if you draw too fast. When the pen nib is flexing. Next, nips are designed for writing calligraphy as well, and in this case, western category of fees. So for broached drugs or for vertical strokes, they are broader. And notice again, there's this real ruling. So you do have to write a bit slower when you are flexing. The flex nibs are also quite versatile. So depending on how much pressure you apply, you can vary the thickness of the line. So this is the same ink bottle I was drawing earlier. I can draw thick aligns BI vaccine, the NAEP, but I have to remember to draw slower because when it's flexing it uses a lot more ink. So you need to make sure that the ink flow can catch up. Let's draw the same ink bottle with a Narmer fountain pen nib, just to let you see the difference. So you can see when you draw with a flex 10k or with a foodie NAEP, your art will be more interesting. That's caused allies have more variation. There are many more types of pen nibs out there in the market. Then I can show you in this short lesson. And not off hand nips are suitable for drawing. Take for example, this pen. It, this is music nib or calligraphy nib. You may noticed a tip. It looks like it, it's cut off with this particular nib. You are going to get thick downward strokes like this. And if you have horizontal strokes are going to appear for within. So this nib has also made for writing category of fee. But the transition from thin to thick heavily depends on how you hold the pen. Let's draw the same ink bottle and see how it looks. So notice the horizontal strokes. They are much thinner and these are the details on the bottle cap. I actually want the details to be thinner. Bird with downstrokes, allies are going to be quite brought quite thick. Folder outlay of the bottle. I want the outline to be thick, but as I draw across, note is to line, it comes to thinner. So if I want to draw the label on the bottle with thin lines, I have to actually make a conscious effort to change how I hold the pen and it can be quite inconvenient. Let's compare the drawing with one that's drawn with a flex snip. So here I can control the thickness of the lies very easily just by adjusting how much pressure I apply. And it's easier and more convenient to change your lines using pressure than changing how you hold a pen. The visual difference between this two quick sketches may not be that significant, but trust me, when you are drawing, you will feel the difference and when you get more experience with more practice, you will also notice the visual difference in the upcoming lessons, we'll be drawing more detailed sketches using the three nips I have just shown you. Homer pen knit, the Freudian nib and the flux in it. If you need recommendations for fountain pens, you can check out the list that I have provided in the section on that list are some pens that I recommend.
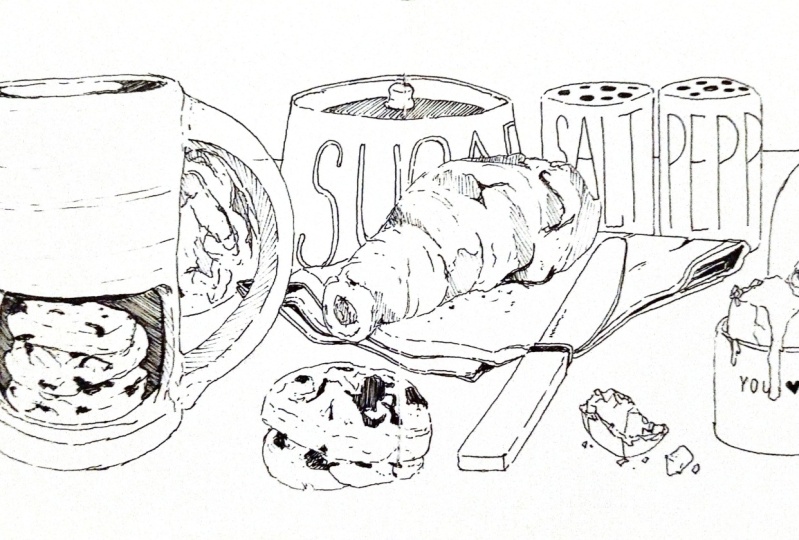
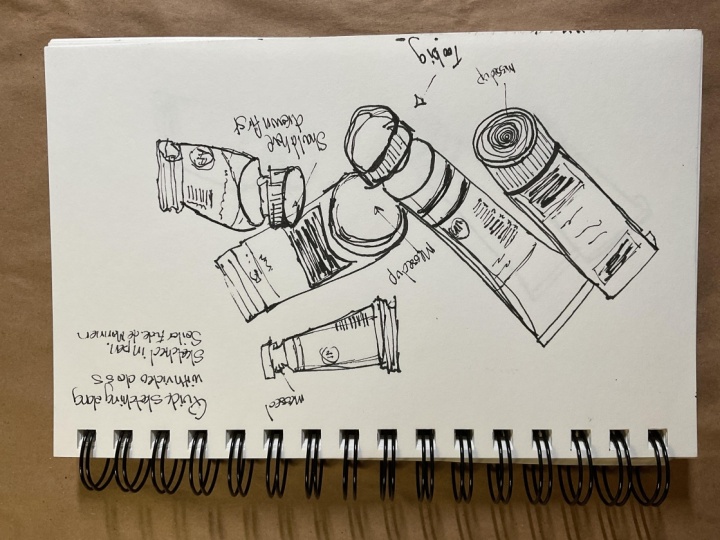
5. Drawing with a normal nib: In this lesson, we are finally going to get some hands on practice. So here if me Assam watercolor trips that I will be drawing. Now I have provided some reference photos then you can download that you can draw from. I will be using this photo. I do recommend drawing from observation, drawing from life, but for teaching purposes, I'm just going to be using a reference photo. I'm gonna start by drawing the watercolor tube on the left site because I am right-handed. I draw from the left to the right. So this is the cap of the watercolor tube. There are some groups on the site here. So to draw thin lines, you can actually turn the fountain pen over. Or we've sit in front of bands, you can actually hold a fountain pen more vertical to draw the bean aligns. For my style, I tried to close all the gaps. Now and drawing from observation. The trick to join accurately is to pay attention to what you see, like spent a lot of time looking at what you see rather than what you are drawing. So observation is key. So this is the second watercolor tube. If you draw faster, you're going to get a looser look. Now for the second watercolor tube. I'm going to place it behind the first heap. So when drawing, it's good to have some overlapping elements to create that sense of depth. The foreground and bet growl illusion. Next up, that's halved as big tube here on the right side. Don't be border if you cannot draw accurately. And this lesson I just wanted you to get comfortable with your pen, see what your pen can and cannot do. And also find out whether or not you like drawing with a pen nib that can only produce consistent with. And here I'm going to draw the other tube in front. So I'm drawing or rather loosely here. So these tube is almost used up and drawing. Try to enjoy the drawing process. See how the aim appears on the page. How the EN reflects light, how to Inca tries. So you can see this tube is in front of this, what I call tube. So it creates this foreground back brow element that gives you a sense of which I term is in front and which is behind. We have another smaller tube here. The cap design fault, this is different compared to the other, what I call the tubes. The grooves are bid, beaker. K. Sometimes you may produce lops, but that really depends on the paper you use. For this last watercolor tube. I'm going to draw it with the inner lines because it's supposed to be further away. So I'm drawing the back first, the Foldit end first. Generally speaking, elements that off way you can draw with thena lines because elements that are further away are supposed to be smaller due to perspective. I'm almost running out of space at the top. This is the barcode. I will draw lines for all the things that are supposed to contribute to the form. For example, the x t rear, the roofs actually do not contribute to the form of watercolor tubes because the groups are on the side of the capsule. If you don't draw the grooves is actually all right. And now if you want to, you can add some T2's. I'm going to add some details by holding the fountain pen more vertical. I'm going to add the barcode here. Maybe aid and label here. Some texts. I'm gonna use. The normalized soda can separate the details from the outline. Alright, I think this catchy is pretty much done. Why do you read where this sketch can be improved as I could have drawn this watercolor tube with thinner lines. So let me just redraw that pot just to let you see what's the difference. If I were to draw that with thena lines. So this is this tube here. And now I'm going to draw the secondary cheapness and 2P with the inner lines. So when you use a thinner lines, you will be able to separate background element from the foreground element. Because the penalize actually create a different look for this one I call it tube. I may want to place curves on it to show the curve of the tube. And maybe followed this. I can also play some curve on it. So just by comparing the two, you can see all the subjects here that we're drawing with lines with consistent or uniform waves, they kinda look the same. But here you can see it is back bro element. This was drawn lithium eyes and can see this separation. So even with a fountain pen nib there can only produce consistent with, you can still get some variation. Let me show you another example of how thin and thick lines can help separate subjects. So I'm just gonna draw something really simple. Just box, maybe cut bought Box o. This box is supposed to be in front. And I'm going to draw out a boxes with vena lines, maybe another box here. So note his, you get the illusion that does boxes in front. But now if you switch to drawing with thicker lines, again, that illusion is broken. So this is just a simple sketch to get you familiar with your fountain pen to let you understand what is pen nib can and cannot do. In the next lesson, we will be drawing the same thing again this time using a foodie.
6. Drawing with a fude nib: Welcome back. I've just switch to using a fountain pen with food in it, right? And that straw to same thing. Again. Food is very expressive. The lies that can create are very expressive. You can make a conscious effort to hold the pen differently, to create different types of wise. Or you can just do and care about anything and just draw however you please. And that would also create really expressive lights. So you can see some variations or 3D, the much a lines versus the lines that you saw earlier. Oops, I think I drew despite bit off. Yeah, doesn't really matter whether or not you can capture what you'd see accurately. Because the goal of this lesson really is about getting comfortable with your pen. Understanding what your pen can do. If you want to draw more accurately than at a tip I have for you is to draw a bit more slowly. So for the grooves on this cap, I can't hold a pen mall vertical Lee to get the thinner lines. Notice the thick lines here and lines here. Same thing here. I need to draw this cap first because the overlap status, what to call a tube. Oops, lying here as two straight, it should be more rounded because this is round cap. Notice the thick line. So you can make a conscious effort to create thick icy B12. But usually when drawing with this pan, I just draw as per normal. I didn't really think about holding the pen differently. I just let the pen and dependent do its job. K. So now that I have this element in front, I can draw this two and back. So this time for the tube in a bag, I'm going to draw with thena lines. I'm going to turn this fountain pen around to draw with the back of the nib. So notice the line, it's almost too thin. So I may want to 2D fountain pen or hold upon Panama vertical Lee to get a slightly thicker line rather than the extremely thin line there. So this thin line will create the separation, the foreground background separation. And just by holding the phone pen more vertical, the I can get a thin lines so I don't have to actually turn the phone and pan around. Let's say for example, there is another watercolour tube behind is tube. So in that case, I can use the much thinner lines. So let me just maybe draw a small tube behind. Remember to go a bit slower and you are drawing with opposite site of the fountain pen nib. So with a much thinner line here will create a separation from this tube that has a thin lines and from this tube that has much thicker lines. Another nice thing about this food in him is you can actually use the Broad site to quickly blocked out shapes. So for example, here I can just block out the tube is here. The ink flow for this well, isn't debt portrayed? I mean, for this fund pay, isn't that great? So sometimes I may actually have to push the ink out. But the thing is with foodie nip, it does use a lot more ink. So if you want to maintain the inflow while locking out shapes like this, you may have to draw a bit more slowly. So I can block out the ships here as well. So now you can see areas of contrast. White versus black block out here as well. And maybe here and here. And now I can use the tip to add details. And maybe some details here as will fall foodie nips. They are usually available in just one size, unlike the typical fountain pen nib, which is available in extra offline fine medium and brought fully nips are usually around this size. Although I've seen much larger Freudian nibs before, but those are much larger. Filenames are a bit more difficult to use mini Because the name is larger, so it uses even more ink, which means you have to draw even more slowly. For this tube. Here, I'm going to keep this thick line as it is, because if I block out this whole ship, the thick lines will be lost. And I'm going to just use very short lines here to suggest groups. Now when drawing, try to draw a continuous line. So you can see here are disliked. It's not that continuous. It's a bit hairy. So if you draw lines continuously without breaking your drawing, for example, like this, this is a continuous line. Your sketch, your drawing is going to look more confident. When I place these two sketches side-by-side, a visual difference is very obvious. So here you can see the lines they were drawn wave uniform thickness. And we, for foodie named the lines here, I'll way more expressive and the lines here overall, ah, just thicker compared to the lines here. And not just that, you can get a wider variation from thin to thick. So it creates law visual interest. So in this case, sketch here, it may look a bit more boring compared to here, but there is nothing wrong withdrawn with uniform lines. For example, if you take a look at Japanese animation, most of the animations were actually just drawn with uniform lines and they still look really good. I really enjoyed drawing with a foodie knit because of the expressive lines that NIPA can produce. So through these exercises, I hope you can find out or discovered a Stahl depend NumStat you like. In the next lesson we will be drawing with a flex snip.
7. Drawing with a flex nib: And this last drawing exercise, we are going to use a flex 10k. This particular pen that I have here is made by a blue do you? So we are going to draw the same thing again. With a flex name. You can press down harder to get a thicker line. So to drawing experience here, it's going to be different compared to using the pen nips. Drawing little details like this is very easy because you can draw without any pressure. For the outline of the watercolor. Q. I'm going to draw it with thicker lines. Generally speaking, you will want to put a nib down like this. If you draw sideways like this, the nib Cambodia bit scratchy. So for example, when I'm drawing this cat, I'm drawing it sideways. It feels a bit scratchy on paper that went, I'm drawing the sites here. I'm actually pulling the nip tau. Notice how I changed the position of the nib so that I can prove it and nip. So that's easier. It collects easier and glass more smoothly on the paper. With flex name, you do have to draw a bit slower because flex snips are more scratchy. And if you draw slower, you can adjust your pressure in greater detail. But if you draw faster, usually we are just drawing way of thing aligns. For example here, draw fast. We draw a thinner lines. If you draw a fasts and you want to apply pressure, this is what will happen. What may happen, that's railroading. So I'm going to draw a bit slower so that the ink flow can catch up. It is important not to flexed and nip beyond what it can flax. Because if you do so, the nip me, Ben, and you would have destroyed an IP. So you want to, want that to happen. So here I want does pot here to be thin. But for the bottom here I want it to be thick. And as I draw this part I went into within the experience. It's, it's a very different experience compared to drawing with other fountain pen nibs. Such pen nibs are usually used by comic artists. Among God is. Traditionally they would use a pen with a flex snip. But nowadays you can actually get flex nips with fountain pen, so that's more convenient. Because that would mean you don't have to keep reloading your dip pen. All right, for this watercolor tube, which is in the background, again, I'm going to draw with the inner lines just to separate this tube from the tubes in front, the tubes in the foreground. Notice when I drove penalizing media, the eye can see the separation. And is tube in the background is also going to be drawn with thinner lines. Now I'm not going to draw the grooves here because I can't see the groove that clearly and because the groups are far away, because these Timmy is actually in the background, so I don't actually need to draw those groups. If you can see the details, then you can draw the details. But if you cannot see the details, maybe there's no need to draw the details. I can add details as well. Now flex nips like this, especially flex nims debt have taken produce very thin lines. You can actually use them for hatching to create old values. So by using hatching lies, you can create an additional value. You can also have crosshatching, which is basically overlapping of hatching lines. And you can keep overlaying host lines with more lines just to create darker tonal values. And you can use the lines to draw the contours of the watercolor tube just to give you a bit more form. That's comparative sketch drawn with the foodie UNEP and flex snip. So again, when you see them side-by-side, this visual difference is very obvious. The lines with the foodie name, thicker, but with the flex name, you can actually produce very thin lines. With the food a name you can use the broad side off the NAEP to create shapes like these to pluck up black areas. But with the flex name, you actually have to do crosshatching. Or you can use another media and adulthood who create ships like this, you can maybe use a brush with black ink. So with thin and thick lines, you can create visual interest very easily as well. However, you do have to pay attention to where you add the thin and thick lines. For example, take a look at these two tubes here. With this watercolor tube, you can see the thicker outlines for the foreground. And as it goes towards the back of the tube, we get thin line. So there is this nice transition from thick to thin. Whereas for this watercolor to you, you can see it's thick outline, almost a whole tube. So. We don't really get that sense of depth. That element of foreground and background versus this tube here. So that's nips are great for drawing comics, for drawing monger, because the line quality is more predictable compared to using, let's say a Freudian IEP for drawing comics. So for example, I can create lies with consistent, with consistent thickness if I want to. And I can press now harder to get the thicker lines. So for the hare here, I'm actually drawing a self-portrait here. I can have tape strokes. And it's going to be very difficult or almost impossible to draw tapered strokes like this with a foodie. So different tools for different purposes, for different types of work that you may want to create. And you can draw really fine details with this. And this is how the same self portrait will look like with a fully nip. This is good if you want an predictability. The lions heroes or very expressive, just they can be a bit more unpredictable. So you can see when I draw tablets stroke state aren't I mean days due to paper but he didn't taper as nicely compared to the flat snip. I do enjoy drawing with food in law. Not least inflow again, not that great. The thickness of the lines from a foodie Nim are more random here compared to the mall control. Look here with a flex name. Be sure to let the ink dry completely before you store your art away. If you are drawing in a Sketchbook, it's important to let the ink dries so that ink we're no go onto the opposite page. And also while you are drawing, try not to accidentally have your palm oil finger run over wet ink. Drying time of the ink is affected by the type of ink you use, paper you use, and also the humidity in your atria. After awhile you will get a sense of how quick your ink can dry and hence, how fast you control.
8. Pen maintenance: To clean a fallen pen is pretty straight forward. So right now I'm AD sync to show you how GES dismantle depth ten, removed the Inca converter. I would like to clean this part first, Byron Ronnie, a small stream of water. You don't actually have to use a lot of water. So this is actually too much water. Just control how much water you have. Have it run through for fun and pens where you can dismantle pen nib and feet completely. Obviously, you are going to be able to clean them penn more thoroughly for this particular pen I am actually not able to do spent over this part, so I can only run water through it. All you have to do is to run whether through it until you don't see anymore in. So this is considered clean. For the ink converter. I'm going to feel this upward, some water. So I'm going to get clean water in and push it out here and keep doing this until the ink converter is clean. Now, this ink converter is push pull type, so it's actually easier for you to clean. If you used a twist type is going to be a bit more tedious. Once you have most of the ink out from the Inca inverter, you can then pleased the income litter in the water and move the piston up and down. So this will get the water in and out of the income inverter very quickly. Of course, have you used a tree's time income foot who's going to be more tedious. And now you can see this in convertor, it's pretty quickly. Another way you can clean the pennies to have this section connected to the income Furda and put the whole thing in the water. And again, move the piston up and down to push out the ink and get the water in. When the water is black, you can change the water and do it again until you see clean water here, if your pen has very stalin ink stains or ink inside that spurred difficult to clean, I recommend you get some fountain pen cleaning liquid. This particular one is made by Dr. ph. Martin. This is a pen cleaner, wrote ring, which is another brand. They also make ten cleaner. So all you have to do is to again disassemble your pan, removed in comfort her and squeeze some pen cleaning liquid into a small tree. This tree is actually too big because if I were to put this here, I have to squeeze a lot of liquid in order to cover this whole part here. So I recommend you find a tree that is just big enough for you to put sectioned Penny Bender feet so that you don't have to waste too much liquid. So for example, if this smaller tree, I just have to squeeze less than half the liquid and pet who, what? I have to squeeze here. And you have to leave the fountain pen section here overnight. Just one night. The next morning when you take this out, wipe away, ink. This whole thing will look as good as brand new. How often should you clean your pen? If you use pigmented inks in the pans and you use the pans regularly, I said jazz cleaning the pen once a month. If you are not going to be using. And for a week or two, you can just clean the ink out of the pen and Statoil way because I'm some pens, the cat may not be completely airtight so you don't want the ink to dry on the name. It's gonna make cleaning quite challenging if the ink is solid, what I've just said applies to using payment at Inc's if you use Diabetes is basically things that do not have physical particles that do not have pigments. When diabetes inks dry, they actually dry and leaving nothing behind, like water evaporates into nothing. So if you use databasing, you can actually keep the inks in depend for months. You don't actually need to cleaned pens and even if the diabase ink dries out, it leaves nothing behind. So you can't just very simply do quick cleaning and few Abu, some other color inks, regular maintainers are found in passing is important if you want to use your pans for a long time, if you want to keep them in good conditions. I have fun bands that are more than ten years old and the steel work perfectly today as Eve, I just bought them.
9. Goodbye: Thank you for joining me in this began his claws on drawing with fountain pens. Now for the three pen news that I have shown you, you can actually find them at pretty affordable prices. If you need recommendations, you can check out the list that I have provided in the download section on the list are some pens which are really moved and money and pens that I personally recommend. Alright, by the way, if you guys want to learn more about drawing with pen and ink, you can check on my other, the costs of this arrow is a causal Android with pen Inc and watercolour. And there is another cause on drawing with Sumi ink, which is basically a type of ink that has a lot of textures. Alright, once again, thank you so much for joining me. See you guys in the next cause I
 Teoh Yi Chie, Sketcher, watercolour lover