Transcripts
1. Introduction: Hi. My name is And Williamson. I'm an artist, producer
and professional guitarist. Welcome to my studio. As well as producing
records and Turing, I've been teaching
guitar for over a decade now from here in my
production studio. For those of you interested in learning how to
play the guitar, have made this really simple
course to get you started. Learning the guitar
really isn't complicated. So let's keep it as simple and straightforward as possible. We will go through all the
basic anatomy of the guitar. You will also learn how
to play your first notes, your first chords, and your
first drumming parents. All you need to take part
in this course is a guitar. Even if you don't have
your own instrument yet, you can still take
this course just to see what's involved in
learning the guitar. There's also going to
be a class project where you can demonstrate
your new found skills. So come join me as
I introduce you to the guitar here on Skillshare. No.
2. Class Project: Yeah. Yeah. Yeah. O. As part of this course, there
will be a class project. I want you to submit a video of you playing
your first chord, your first strumming pattern or your first couple of
notes on the guitar. It doesn't need to
be complicated. I just want to see you
confidently play in your guitar. I always believe that
having a goal is such a great motive air to aid in your practice
and learning. Practicing, being conscious of the fact that you're working
towards being able to play something well enough
for your class project will fuel your learning
and your progress. Keep it simple and achievable. I'm not expecting videos
of guitar soles here. That's not what this is about.
Just a well strung chord or maybe a series of well
played individual notes. It's up to you. Simply
film yourself on your phone or camera
and upload it to the Skillshare class
project section. I can't wait to
hear you play. O. O.
3. Anatomy of the Guitar: We're going to start from
the absolute beginning. What is a guitar? That may seem like
a silly question, but it's important to understand all its parts and what they do. Now, there are two
main types of guitar. Acoustic and electric. Many new students contact me confused about the difference
and even say things like, Do you teach electric guitar or do you only teach acoustic? Let's settle any misconceptions. They're the same instrument. They can make different
types of sound, but they're both
simply a guitar. On stage or in the studio, I regularly switch between
playing electric or acoustic, depending on what type of sound I need for a particular song. With that mind, let's get into the anatomy
of our instrument, and all the parts
that are universal to both acoustics and electrics. A quick note for those of you
who might be left handed. Left handed guitars are
no different to learn. Everything is just the opposite way around, like
a mirrored image. Although a left handed learner will need a left handed guitar, the learning process
is just the same. Much like you and I,
the guitar has a head, a neck, which is this
section here and a body. On the head, we have
these things called machine heads that we can
adjust to chin the guitar. On the neck, we have
a fret board which allows us to play
individual notes, and of course, the
strings themselves. The strings are attached to
the guitar at both ends. At the top of the machine heads
that we saw a moment ago, and at the bottom,
on what we call the bridge where the strings
are anchored to the guitar. Here we have the
nut, which keeps the strings in line and
even space between them. Let's have a closer look
at the frets themselves. The frets are these
metal strips that are embedded into the
wood of the fretboard. When a string is pushed
down to touch the metal, you can pluck that string
and ele musical note. On the body of the guitar,
we have a scratch plate. Scratch plate is just simply a piece of plastic or
similar material that stops the body of
the guitar getting scratched whilst you're
strumming or playing. Talking of strumming,
an essential accessory to your guitar is the plectrum. This piece of plastic just goes between our first
finger and he thumb, and we use it strum, like so. Plectrums come in
different thicknesses, over time, you'll find out
which works best for you. In the beginning is safest not to go too thin or too thick, as it might affect your plane. Somewhere in the middle. I use
a 0.6 millimeter plectrum, which is probably a
good starting point. Those are the main
parts of all guitars. Now let's look at some parts individual to acoustics
or electrics. On acoustic guitars,
we have a sound hole, which helps project the guitar
sounds so we can hear it. We also have bridge bins to
hold the strings in place. On a standard acoustic, that
would really be everything. But there is another
type of acoustic to consider an electro acoustic, which is what this
guitar here is. An electrocostic is
simply an acoustic guitar with a built in mic phone that can be plugged into ampifer. This allows the acoustic
to be played louder, ideal for performing
on stage, for example. In that case, the guitar
would normally have a hole in the bottom of the side to
plug it into ampifier. You can see a my guitar here, I have my hole just at
the bottom to plug it in. You'd also tend to
have some controls in the body for things like
volume and base or treble. You can see my controls here,
that can be adjusted as so. These depend on the
make or a model. Here we have an electric guitar. On the electric, it's the
same as the electro acoustic and that we have an input in the bottom to plug
a amp in here. We also have what we call
pick ups here and here. These simply capture the vibrating strings
and turn that into electrical energy that can be reproduced in an
amplifier and a speaker. A similar process to that of
a singer and a microphone. Unlike an acoustic, an
electric guitar is not designed to be played without being plugged into an amplifier. Electric guitars often
have a selector switch, which can select which pickup you're hearing at
any given time. Each pickup will create
a different sound depending on its position
in relation to the strings. On many guitars,
you can choose to hear the neck pick
up or the bridge pick up or both at the same time to give you as much sonic
versatility as possible. You also tend to
have controls in the body for volume and tone.
4. Guitar & Music: Yeah. Yeah. Before we start playing,
we need to have a little understanding of what we're doing with
this instrument. What are we trying to achieve? Let's think about music as a
whole in its symbols form. There are only 12
standard notes in music. Almost every song you've
likely ever heard is just a different combination of these 12 notes in a
different order. That's it. It doesn't matter if
you're playing the piano, the guitar, bass, singing
or blowing a trumpet. These notes are all
exactly the same. You're just using a different
instrument to create them. If I sing the note of
A, it's no different to play the note of A
on a guitar or a piano. It's the same note.
It's universal. You may look at a piano or
a guitar and think, well, that piano has far
more than 12 keys, or that guitar has six strings
and way more than 12 fits. What happens after
those 12 notes? They simply repeat higher or lower in what
we call an octave. Instead of A, I can play an A higher up or
the A lower down. This isn't something to overthink or get
bogged down with. It just helps to have
an understanding in the back of your mind about what we're doing on the guitar. You're not making random noises. You're playing musical
notes that are consistent with any
other instrument.
5. Tuning The Guitar: O. Before playing, we must, of course, make sure
our guitar is in chin. This simply involves tightening
or loosening each of the machine heads to make sure each individual string is in ch. The easiest way to
tune a guitar is by using a clip on guitar
tuner like this. These are generally
inexpensive and very handy. They just clip onto the
headstock, and you turn it on. Now, if I pluck a string, notice how it's green
and in the middle, and it says the note V, which is exactly what it's
supposed to be. If I overtight this, you'll notice that the tuner starts to turn yellow because it's too
high or if I undertight it, notice how it's red
because it's too low. I want to get that
right in the middle. We just repeat the process
for every stringing. There we go. Our
guitars and chain. Whilst chain on the guitar, we'll also need to know
the names of the strings, which are E, A, D, G, B, and E.
6. Notes & Chords: When it comes to the guitar, we really only have
two main options on the type of sound
we can create. We can play individual
notes or we can play cords. Notes are just individual sounds we can make by
pressing a string on a fret of the
guitar and plucking that same string with he
finger or a pltrum, like so. Or we can play multiple
notes in a row. Cords are where we
play multiple notes at the same time and
strum guitar, like so. Right, Let's get the first
sounds out of our instrument. Before we start, please remember that if
you're left handed, everything will be the
opposite way round from me. So if I say, take your left hand, that
will be your right hand, and so forth. Let's play a note. To play a note in the guitar, we simply take a finger on
our left hand and place it in the middle of any
of the threats on our fret board on
any of the strings. What do I mean by the
middle of the fret? Well, for starters, we
don't want our fingers on top of the metal frets
or too close to them. We want to be in between them. Then we simply push
down the string and pluck to make
our first note. When referring to our fingers, I refer to them as finger one, finger two, finger
three, and finger four. When talking to the frets, the space between the first
fret and the is fret one, The space is fret
two, Fret three, fret four, and the same
the whole way up the neck. If I were to say second
finger, fourth fret, thick at string, I would take
my one, two, second finger. Count on my frets,
one, two, three, four, push down the
middle and pluck. Try it yourself. Take
your second finger, place it on your
fourth fret and pluck. If your note doesn't sound very clear or doesn't
sound like mine, you may need to adjust
your finger position or push down a little harder. If you're not pushing
down hard enough, it can send mute,
or if you're too close to the fret,
it can send buzzy. To make sure we're in
the middle of the fret, push down as hard
you like pluck. As we've established, cords are just multiple
notes played together. If I put multiple fingers
on the fret board, push down the strum,
I have a chord. Now, the position
your fingers are in changes depending on the
chord you want to play. With that mind, step one is just learning the shapes and finger
positions of each cord. Before we start then
in all our chords, it's important to
mention that there's two main types of chords that we'll look at
in the beginning. Major chords and minor chords. In the most basic form, major chords sound happy, minor chords sound sad. All of records have a
major and minor version. Let's look at A, for example. We have a major, which
sounds and we have a minor. Which sounds sad. Okay
Let's play our first chord. We'll start with E as
it's nice and simple. What we're going to do is
take our first finger and place it on the fourth
string down, first fret. Then we'll take our
second finger and place it on the second string
down, second fret. Then I'll take our third
finger and place it on the third string down,
second fret, like so. Once you're confident in
your finger positions, then we're going to
just strum the guitar. That is the chord of E major. Now, if we keep
that position and simply remove our
first finger like so, we have the chord of e minor. Salts version. Notice
a huge difference in sound just that one note made by removing
that one finger. So we have e major E minor. Give that I go yourself
and see you go.
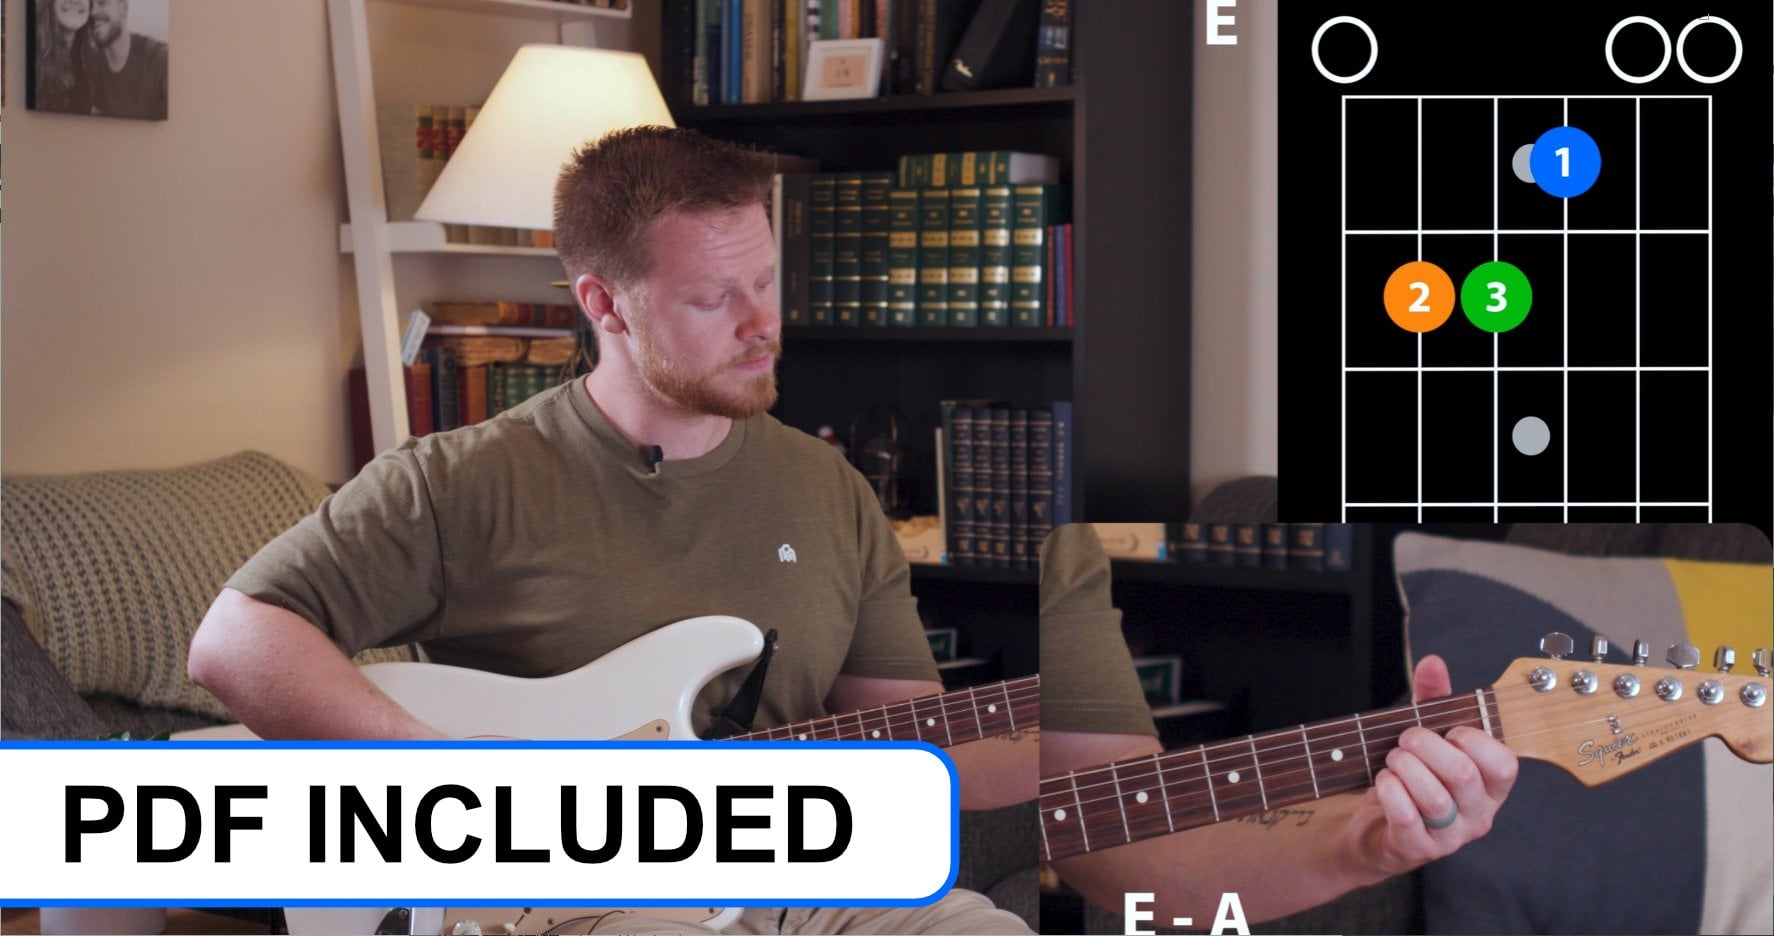
7. Reading Chord Charts: Now that we have the
basic principles, we now need to be able to read chords or melodies or rifts. For this, we'll use cord
sheets and guitar tap. Cord sheets are a great
way to learn your chords. They're essentially little
diagrams of your guitar that tell you where to position your fingers and the
name of each chord. Let's have a look. The
sex vertical lines are the strings of our guitar. The sex horizontal line,
is the nut of our guitar. Above that, we can imagine what the head of our
guitar would be. The name of the chord
is noted above. If it's a major chord, it will just say the latter, such as A. If it's a minor chord,
it'll have the latter with a small beside it,
so you know it's minor. The number dots indicate finger positions and the number relates to which finger you use. Above the lines, you may
see an x or an shape. The x means you
missed the string out and don't pluck
it when strumming. The means you play the string, but it has no fingers pressing on it. It's just
the open string. For the D chord, I have an x above the first two
strings, so I miss them out. I have an above
the third string, which means I play it even though there aren't
any fingers on it. For this, I simply
take my plectrum, place it above the third string, and strum from there, missing
at the top two strings. See how strum the cord, but miss the top two
strings altogether. Let's try that again. Simple. When strumming the cord, if
it doesn't sound quite right, try strumming it one
string at a time, so you can find out which
finger is the problem. For example, if I
take this cord of D, fer to strum it, it doesn't sound quite right.
I can take one at a time. The string is fine. Next string isn't quite right, so I can reposition my finger or push it in slightly harder. Try again. This applies
for all your coords. So if I was playing G, for example, send right, I go. That's fine. That's not. I can readjust. Reposition
those fingers it sounds nice. Another important factor is position of your thumb
on the back of the neck. Your thumb should never be horizontal in line
with the neck, I should always be moving
up and down like so. If we think about it logically, we want our thumbs to be behind our finger that's pushing down the f. If I want to
play the fifth fret, for example, and my thumbs
all the way over here, that's not give me much strength to push
down that string. I want my thumb to be behind
the strings pushing down. If I push down the fist ft, my thumbs behind the fifth fret, it makes it a lot easier. Essentially, we
want our thumb to be behind the fingers that
are on the fret board. If we're playing
in the third fret, we want our thumb to be
somewhere behind the third fret. How far up or down the
back of the neck will also change my hand position,
especially with cords. The lower my thumb is, the further my hand will be
pushed away from the guitar. The higher it is, the more
my hand will come back in. Your thumb position
will alter up and down, depending what cord you're playing and how you need
your fingers to sit. For now, just find what's
comfortable and practical, roughly about halfway
down the neck. Work your way to
your record sheets and gradually memorize
their positions. Once you've memorized a few, try playing multiple in a
row, changing between them. One.
8. Reading Guitar Tab: Guitar tab or tabletur is easy
to learn. But what is it? It's simply a form of
music notation that instead of telling
you more complex things like musical notes, easier still, it literally tells you where to place your
fingers on the fret board. We see six lines on a tase. Each line represents a
string of the guitar. E, A, D, G, B and E. This line represents the thickest string
normally closest to us, and this line, the thinnest
string, fest away. Just as if your guitar was
lying flat in front of you. Then we see numbers. The numbers are just which fret of
the guitar you play. If we see a number one
written on the e string, we simply go to the e string, place a finger on the
first fret and play. If we see a number four
written on the be string, we simply take a finger, place it on the fourth fret
of the B string, and play. Sing a lot of numbers in
a row can look daunting, but don't panic. It's
the same process. Just take them one at a time. I've added some tab for you to download and try in
the class description. Tab and Cord sheets are
readily available online. Simply search for your
favorite song with the words tab or cords
and you should find it. Cords will be for more
strumming based songs and tabs used for more
melodic or rif based songs. The hardest part at this stage when looking for
songs to try and play is that you won't know which songs are hard and
which songs are easy. The best place to start is by
asking your search engine, top ten easy songs to play on guitar or top ten easy
rifts to play guitar, or even search easiest songs to play by and insert
your favorite artist. Then give them a go. Take a slow and you should have no problems.
9. Strumming: Yeah. Yeah. Yeah.
Yeah. Yeah. Yeah. What is strumming?
Well, of course, strumming is literally taking our plectrum and strumming it down all the strings
to make up a chord. But I also tend to talk about
our right hand as being the rhythm of the guitar.
What do I mean by that? Well, our left hand makes
the melodies or the notes, but our right hand is in
charge of the timing. Let's see some examples. When listening to
most modern music, we tend to tap our feet or our hands along to
the beat of the song like so one, two, three, four. That is the timing of the song. I can do the same thing
with my strumming and strum the guitar
in the same way. That would be the timing
of the song we're stowing. If I want to play a slow song, we can slow that beat down. Boy. It to play a faster
song, we can speed up. That is the basics of strumming. Ortho nice and easy, that is however a little bit boring and not very exciting. That's when we move on
to strumming patterns. When strumming the guitar
to begin with at least, you only have three options.
You can strum down. You can strum up or
you can strum at all, which we'll get to in a minute. A strumming pattern, which
is a combination of s, strumming up or not strumming. Another basic strumming
pattern could be up, down, up, like so. Now, you can make your
stowing parent as easy or as complex as you wish. Another classic
example might be down, down, down, up,
down, up, play this. Down, down, down, up, down, up, down, down, down, then. If I play that a little faster, you can have listened
to that sounds. Instantly, that's a lot more
interesting and exciting. All we've done is added two ups. But, it sounds like something you might be
quite familiar with, something that's in many songs. It might have seemed odd when I said that our options
were to strum down, strum up or nothing at all. But nothing is an option.
What does that mean? Well, I could strum down,
I could strum down again, then I could leave a space
or what we call a rest, and then strum down up quickly. I'd have, do, space, down. Let's listen. Now a little bit faster. See that space or
rest becomes part of the pattern and part
of our timing and rhythm. When you're searching
for chords on line, it often tells you the
strumming pattern as well. It'll be listed as D,
for down, and u for up, so it might say D, D, D U, D U, which you now know
is down, do, do, do. Simple. There's a lot more we could go into here
with ting or bars and beats, but we're just getting started. Let's not overcomplicate things. Just try some patterns and
see what works for you. Yeah. Yeah. Yeah.
10. Progressing on the Guitar: O. As I've mentioned
already, I've been teaching guitar for
over ten years now. And two of the most
important things I've learned in that
time are that one, there is nothing more
important than practice. And two, the skills or knowledge I need to teach
you are incredibly simple. And what do I mean by that?
Well, the learning part of the guitar really is simple. The concepts around the guitar are very easy to understand, and the rest is just practice. Let's imagine you had
five guitar lessons and a year of
continuous practice. You could progress
a lot in that time. Let's also imagine
you had a year of guitar lessons and 5
hours of practice. You likely wouldn't be able
to play very much at all. It's that simple.
It's all on you. I'm not telling you you need to play guitar 8 hours a day. But little and often is key. Building it into your routine and your daily
habits of your life. 5 minutes a day
could be great, 15, even there, whatever you can manage, but
keep it consistent. I tend to find that 10 minutes a day is worth more than
an hour once a week. You also want to reach
a stage where you have your daily practice as
part of your routine, but you're also picking up your guitar for an hour
here or there, just because you
enjoy it so much. If you can practice
a little every day, then license could
work wonderfully. It'll speed up your process
and it's great fun. O.
11. Final Thoughts: O. There's a lot more to
learn about the guitar, and a lot of fun and
interesting things. That's not for now. This simple course is
just to get you started. If this course gets
you playing and enjoying the guitar and
you'd like to learn more, then feel free to contact
me to book some lessons. Or if there's enough interest, I may make another course with slightly more complex themes. For now, just grab your
guitar and give it a go. It's really not complicated. Don't forget to submit
your class project. I can't wait to hear
your first chord or your first rift and the beginning
of your guitar journey. The most important
thing is to take your time and schedule regular practice into your
daily routine. This could be 10 minutes
after your breakfast or 30 minutes in evening,
whatever works for you. Just enjoy it and don't
be too hard in yourself. Learning a musical
instrument takes time, and it's absolutely normal for your chords to sound less than
perfect in the beginning. Your fingers might get a little
sore for the first while, but that stops the
more you practice. If they do get
sore, take a break. There's no need
to hurt yourself. For now, enjoy playing and a
hopeless course has helped. Please feel free to
join me on Instagram as Andy Music UK, to
keep up to date. You can also find me at andy music.com to book a lesson
with me, or to get in touch. For now, see soon.
 Andy Williamson, Artist & Producer