Transcripts
1. Introduction: Welcome to this digital
painting coats. My name is James
settlement to and I am a freelance artist towards
business industry since 2018. I'm also a writer
and civil engineer. But today I'll be an
artist guiding you through the process of creating realistic and
expressive portraits. During this course,
you will learn about the fundamentals building
organic farm and details. We shall also talk
about the degrees of realism and how you can control that in your walk
so as to create realistic portraits or any portrayed in a style
that you want. Sheldon use that knowledge
to build on and draw our very own portrait while exploiting the design
principles of foam, value, light, color,
spective, and so on. And we shall combine
them and come up with a realistic
looking portrait. But it's also very close in. We shall then top it off with
a project from each one, you draw and paint your very own realistic and
experts portrait. And then you'll submit it for feedback from me and other
students in the class. So for this course, I'll be painting
using Photoshop CS6. So this means that if
you have Photoshop, CS6, CS5, and beyond, which
means a Creative Cloud, you'll be able to follow along. You can also use any other
software that you feel like. For example, procreate, or any other software that
you feel comfortable. Don't worry. There is not
much of any technique called technologies that
are specific to Photoshop. So feel free to use the software that
you're comfortable with. I'm also going to be using the
default Photoshop brushes. Mainly the default chalk
brushes in Photoshop. But in case I use
any other brush, I'll leave it for you in
the description down below, so that you can also
use a tissue one. By the end of the course. You'll be able to draw your own realistic and
expressive portraits. And you can do this for
friends, family, and friends. I look forward to seeing
you in the course.
2. Basics of Building Form: We'll begin by building form
out of a simple circle. To do that, create a
circle selection on a new layer and fill it with the best collateral
represent a late skin tone. We then mark the general light
direction using the arrow. With a default chalk
brush in Photoshop, begin making marks
that rho naught the forms of the sarco
into a spherical volume. You'll notice that I'm shifting the color downwards
to form darker tones. A trip present the
shadow regions and they shifted upwards to
form the light areas. This is called a tonal shift. These however, is not to
complete color selection as there is a crucial part of color selection
that is required. When shifting the tonal
values into the darker areas. You may notice that
the darker tones are now greenish. And Maddie. This is non trade. Unless you're painting
creatures with green blood, human beings have great blood. Therefore, they
require a hue shift after the tonal shift. To do that. One more step is required, which involves shifting
the color wheel. Whenever you shift
the tonal values. You can see it here. When a shift a tonal values, then I shift the color controls
down into a more red hue. This is a complete process
of shifting the hues, which will help you create a more realistic
looking skin tone. We then use that to add a
core shadow and cast shadow. Cast shadows and black. But they generally darker
tones of the clustering body. And have therefore
exaggerated that effect. To make it more apparent. We can then begin smoothing out the surface using
a soft airbrush. With the opacity controls on. Make this smoothing selective so that you don't smooth over all. The texture is to introduce randomness and interests
in your painting, which will be, which
is very important. It's a very important part of painting realistic portraits. With these, we are ready to
paint a realistic portrait.
3. Degrees of realism: I'm going to be working with
a concept of light and mass. And I'm going to be explaining
how different artists use this technique to just not totally focused on
creating their own style, but also in creating visual compositions
in their artwork. So the idea here we have our two surfaces, two
spherical surfaces. You can see that one is heavily defined by patches
of light and shadow, and whereas the other is defined
by just blocks of color. So here we just have just simple plain of simple
mass of color, right? So these could be any color
for simplification sake, I'm living it that
white and black. So here this is fun
and this is mass. When you're working
with, with art, you're going to have late
falling on surfaces. So once you know the, the degree to which
a render those, that light is going
to determine form. Most art is going to fall
under two categories. One way of defining
form and another. Well, where it's heavily
well-formed is heavily defined and another worm
mass is heavily defined. If you render a
surface and you render the proportion of
light versus shadows, you're going to come
up with what we call a form dominant artwork. If you're growing
and you're just using Khan lanes to define, or you're using colors to
define planes and ships. You're not, you're
not rendering late, but she just rendering ships
of all blocks of color. So there you're using mass. So here we are using
late versus shadow. So when you use
light versus shadow, you're going to come
up with this thing. Form. All right, so you're going to
create form to your iso it, Let's go in, you're going
to round out surfaces. Because actually when you're
looking in real life, the idea of form is when light
is interacting surfaces. So what you see as form, I'll just discuss the
value changes as it is, but that doesn't relate to it. So it just has blocks of
Kyla, nothing like plate. Where is used to define this artwork is just
blocks of color. So these are just masses. Masses of, we have names for those things and
can also be called chiaroscuro if you're
referring to form dominant or no ton. If you're referring to
amass dominant surface, you are, it's going to fall somewhere in-between
these two areas. When you hear as you
move towards here, is going to create some realism. So your, your
images are going to look a little bit
more realistic. But once you bring for sterilized or like
cartoony surfaces, or you're going to base your, your art or your compositions that they're
going to be must dominate. So once I combine this, all right, I get that. So it's form is
being defined more. You want your work to be biased, or in other words, you don't want to equally make these two surfaces compete. This one is more on
the nighttime side, whereas this is more on the
chiaroscuro or form side. So, which means here
you can easily make out the form of, of this surface. And here you can, you can't see that even though they're both combinations
for both of them. But this one is heavily
inclined or bias towards this, and this is heavily
biased towards z. So these, this creates two
different styles of art. There are very many variations. Very subtle variations can cause your walk to appear very differently and it's
all subjective. If you don't make them biased, it's going to create mud
or it's going to create discord or something
unpleasant, for example. So on this surface here, if I'm to increase the opacity of both of
them to give maybe a 100, maybe limb is say, 100% of of form of
late versus shadow. And also I have a 100 percent. You can see that
even though this is a good step or it could
be as tail as well. But it's creating
this too much noise. Okay, so what most
people do is you can. Downplayed in your composition. So for example, I
can reduce the mass. And you can see now that this is a little bit different
and it's much more pleasant, you can see that
this is just our, He's painting his work. He is briskly, heavily
Naughton or must dominate. You can see that he
blocks out the colors are just fully yellows and greens
and Bloods and oh, okay. So you consider is defining form in the
sense of so which, which means maybe this
is like cubism of sorts. But living that said, it's just there is nothing
like late over versus shadow or nothing Lakers mostly
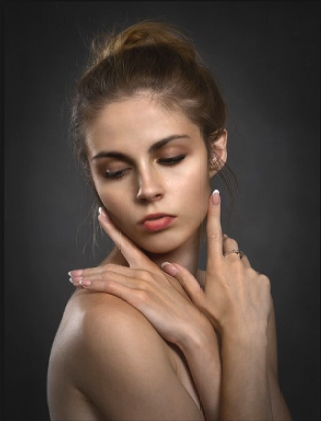
briskly blocks of color. So compare that to this one, whereby you're seeing that the shadow areas and
the light areas, when you look at the
dress of this lady here, you can see that it's not
heavily are formed dominant, it's heavily must dominate
whereby it's showing you are. He has, he has downplayed the late interactions
on this dress here, whereas here you can't see that he has defined the creases. Saw this one is, it's
heavily formed dominant. Alright. So, and then in the
background there you can see that his downplayed
also the late interactions. So this creates a
composition whereby these creases are leading you in your eye around
the composition. And also, for example, here, this shadow here or
at the slate, it all, it's, now he's using
the late and shadows to move your eye around
this composition. This is another area where he, the artist has used both form dominance and mass dominance in
different places. For example, if we zoom in here, you'd see that here on this, on this person's clause here, there's basically
no form, right? So it's just mass or
a block of mass here. Whereas when you look at
the king's clothes and see that there he has defined shadow areas
and light areas. And these, these, these
shadows are all oil leading, leading into this sort. They are coming like
this lake that today are leading your eye right
around this place. So here there are no, there are no, there is no
visual interest at all. So your eyes good
to come back here. And then here, the
visual interests also, he has added a lot of form here. So undo consider creases here is they're all bending
into the composition. And so, which means that
you're going to find that your eye is going
to come on, keep, keep on moving into
the areas here or it, then here we have
another artist's. Again, it's fiscally
must dominant. It, it says Norton, it's best. Just simple shades of
light and dark or eight. Picasso's are used to use
this and defined his title. And also these artists used to use these different his time. All right, so you can't see that how using these
can define style. And again, so he didn't
eat within a composition. You can have areas where
you heavily Muslim in on, areas where you're
heavily formed dominant, or the entire composition is heavily dominant or one of them. So for example, this one
is heavily mass dominant. And whereas this one has both. So for example, here on
the red place, the red, it has these areas where
it's heavily must dominate. Whereas here, on the
green side here, you can see that these areas here have shadow and they
have formed to them. So he has taken the fixed
interest to do that. So this is, again, Picasso's work, I guess. So when he was 15, you can see that his work was heavily formed, dominant
or chiaroscuro. So he's defining light
areas and shadow areas. And as you can see, these are more realistic
than these ones were. For example, this one is just defining dark areas
and light areas. Okay? Same for this one.
4. Rough First Sketch: Choose any sketch
brush of your choice. And we shall begin
with creating a cell, because all heads have a secular structure that outlines the top
half of the head. Here I am filling for the
orientation of the plane, which is this straight
line through this. We cut this circle to add is
spherical dimension TOEIC. By the help of a resume name, you should didn't begin adding more rhythm lanes to mark
the general landmarks, the fish of features. We looked worry about getting
it right the first time. Just make it close
enough and make sure the orientation of the fissure features is parallel to the INA. The orientation of the Allain also helps you determine
the orientations of the nose and mouth in such a way that if you are to draw
lines at each section, those orientations
must be part of. You can see, for example, that might detainee of the nose shows that one nostril is
higher than the other. Just like the Iranians. If you're walking up close, it's best to open another
window that is zoomed out. This will help you keep
proportions in rhythm. Do this by going to Window
and click on Arrange, and then click on New Window. The point of sketching this, which would be to help you
define the form using lanes. The mouth should also follow
a similar orientation unless you are drawing subjects with add-in
animated fishery expression. But for pneumo fifths is
kickball through parallel. This fixed the first pass of
terrorism lanes complete. It should then Tony
beaten down by using the raise or using the transparency I
just met controls in Photoshop or the
software you're using.
5. Finishing Up the sketch: Use the landmarks took place more Fisher features while maintaining the form directions. When you draw the head mass, let it follow the
form of the head. This will be important
in making it feel believable later on during
the painting process. Familiar with don't
want to create a face as you walk around
completing the head, outlining the generous ship of the figure with the closest
approximation new card. And while doing this, make sure that you have at
least what do we do that is fully opened the orange, but fully shows your cameras to help you get those
proportions rate, as well as have a typical
position in your walk. Avoid street lanes, shop, or hardships when
drawing the figure. As these tend to make figure drawings,
Steve, an unrealistic. You lanes must be soft
and you couldn't do this by making them
flowy, make them curvy. For instance, you can see the neck is not
as a street lane, but I have slightly
exaggerated the keV. This makes it look sort of
an organic and interesting. Repeating this technique
across your portraits prevents them from Brookings
TEA Fund meconium. Flipping your converse is also an amazing advantage
for us digital artists. And this is the right team
should start doing it. It will hope you see your image in a different perspective, which you can help, which can help you
identify errors in your form that your
previously blamed. Flip your Canvas. You can go to Edit, then under Edit,
go to transform, and then go to flip
horizontal too. But I do not recommend doing it twice, says, in Photoshop, you can just use
shortcuts to add a shortcut or go to
the Edit button and scroll down to the keyboard
shortcuts under that, go to Image and
expand the options. Then scroll to where
you flip your face and flip canvas horizontal
and click on it. It will prompt you
with a textbox. I personally use
control plus F to flip my Canvas so you can input that or you can make
it whatever you want. Just make sure that it doesn't interfere with the
important shortcuts that you may frequently
use. When you are ready. Click into, and then click Okay. You should be able
to flip your canvas horizontally with a
simple shortcut key, clean up your image. And at this point, it should start looking very similar to the reference image. But do not worry about it. Don't worry if it doesn't
look exactly our lake yet. What is important here
is to make sure that your sketch proportions irate regardless of what position
your Canvas has flipped to. When you propulsion sphere rate, begin sketching the
rhythms of the eyes. Keep in mind that sometimes
the eyes may not be open. That is why your already
trained to sketch the readings rather than that. Or what you think
they should be, or what you think the
eyes should look like? Correct? The eyes to follow the general
directions of Eileen. The trick dr. Bought
in a previous lesson. And with this, you should
be ready for the painting. But, but before you do, feel free to just
stick your team and correct your image proportions. Zoom out a bit and get it done.
6. Blocking in of Base Colors: Begin by setting up MLK
grown and volume using the adjustment that delivers
an adjustment layer. On a new layer, begin walking towards the
closest color tone you want. This might mean copying the except highlight
tone in there. If it's, in my case, I wanted to subject
colors to be a little warmer than refers. So that's what they did
in the beginning though. Try to approximate the true
colors of a reference image, but do not color pick from it. Known Trey, don't worry
about painting art, say the sketch lanes from now. We should clean that up later. Decides that the clean up mix up paintings
look more organic. I'll show you what they
mean, not relate to. Use different values of the
same color to define form. The areas that face the late should have later and less
saturated color values. And then those that don't. And even though we are painting
with different values, make sure that the
values hominids, in a way, let the create
an illusion of volume. Now, we can take another brush that is not
very hard versus soft and begin cleaning up the
image to get rid of the paint that flows
out of the sketch. Lanes. Ask Kish, lanes are not
Logisim color as a skin tones, but we can do that by creating a new layer above
the sketch layer by layer. Then fill that layer with a
generous skin color tone. And then clip layer to the
layer of the sketch layer. You can also change the
color of the clipping later by clicking
on the color icon, of course, and changing
it accordingly. Do this to make the sketch lines look like they are part
of the skin tones, but there are different enough so that they can be identified. You don't want to lose what
you've already sketched. So that is why we make the skin tones or the sketch lanes locally
a part of the skin tones. So once you've done that, you can select both layers
and then match them. So this will mark the
end of a block in fish.
7. First Detailing to loose the line work: Starting with a mouth, I'm going to use this
default chalk brush in Photoshop to add
volume to the forums. And in the process, we have to lose the lane walk for a more realistic result. At this stage, you can quickly
sample the layers from the already existing
base colors to create a semi blended look
in your portraits. To do this, just click the
Alt or Option button on your keyboard to quickly switch between your Eyedropper
Tool and your paintbrush. Constantly flip
the campus to make sure that your forms
rate correctly. And make sure you
smooth out the lane walk in areas like
the nostril ends, but leave a little indication of the lane walk to define
the deepest shadows. You don't forget to turn on pen pressure disappoint
to facilitate. Isn't mixing of the tube paints. Focus on using the extinct best, best colors to define the forms of the face and don't introduce the lighter or
darker values just yet. Even with these
best paints be used later values to define
it forms the tiering the light and use
the darker colors or the data color values
to define areas that are away from the light or
areas uttering a shadow. Beyond the first. Treat complex figures
like basic shapes. For example, treats the
neck as a cylinder fast, as well as the fingers. Because these basic
shapes will help you to define form more easily. And they will help you build
up to a more realistic look. New paint.
8. Initial highlights and volume definitions: At this point, the form
definitions are clear, but they haven't
yet fully defined. So you need to introduce
a few later tons. These will help you pull
out the areas of B, which will increase the form, definitions or the figure. Keep the highlights, lose and Trey to add them
towards many areas. In the latest pause symbol. That is same for the hair and make it appear to have volume. Make it appear to
roll into their head at all points where
it touches the head. This would make it feel
like it's part of the head. Don't worry about painting
individual hair strands. Just define its volume first
with the normal brushes. And we shall get into
making this translate. Once later twins are added, uses some brush with pen pressure tandem to blend that the lighter
tones into the best Don's preserve the latest points with the latest points that
had directly in the late, but make the ages fall into
a relatively smooth blend. Do not use a soft brush or a soft airbrush has to do this. Just use the normal
brush we're using.
9. General Form definitions: Fingers can be tricky to paint, but you must reduce
them to Bessie, cylindrical ships or trust. Do this by outlining each individual finger and then pink later tons into them. This will help you
define the R form. Once those highlights
how blended. And one says, hey, let's have blended or with
a base and shadow colors. So you want to paint in there later tons in the areas
that TO it didn't in late. You use later tons
and then the areas within these shadows
you want to paint with the darker tones and then just add a
soft blend to them. And this will define them
into a cylindrical shapes. In cases like these
where fingers are also making in gesture that is
important in a composition. You can focus on painting
what feels right to you. But in general,
paint what you see. Oil treating them as cylinders, and you'll get
different results. Constantly go over
your finger paint to make sure that you
do not over paint. And from one area wild
and neglecting others. The painting has to move and
progress no tenuously on. That is why you see me
jumping all over the place. Here. I'll just define the ship
so he took bit more. I'll also add volume to the eyes using the same technique
of building form. And add a small room late
on the Sayed that has eat.
10. Creating Contrast With Further adjustments: Now I'm going to paint the
eyes with a much darker tone. And it is coding trusted
by very late audience, which will help define what they see from the reference image and not be afraid of moving ships around
using the Lasso tool. If you feel like
they're non trait, the ships should feel
right to you and you should feel free
to use the lasso tool.
11. Form Shadows, Highlights and Creating Hair Strands: Start by making sure we
have defined the forms using the hide ish
brushes that we chose. This is important to have different non blended
color tones before we switch to the soft brushes to
begin the blending process, remember, flipped the Compass and also check your results. In the other window
that is zoomed out. Detailing the hair requires a fascial singing
in a normal brush. Set to averse more sales. And being odd if few
hair strands that are color extensions
of the hair Clara or the base hair colors. I do this by sampling
a given hair color and then using my brush to
pull out a few strand. In the practice of whacking on the portrait to
Mauritania sleep. I quickly jump around at this point to correct
the shapes and forms that could use a
little bit more work. Use this opportunity
to make sure that all relating and form
definitions are in place. Make sure that the shadows
are correctly cast. Apply reflected lates
where they are needed. And just generally odd
or postulating rules to your portraits, from shadows to highlights. Doing this helps you make the
portrayed more realistic. This is another part that
you don't want to rush. So take your time.
12. Initial Blend and Final Adjustments: This part is still
an extension of the previous lists order in which I am defining the
forums a little bit more. At this point, it should feel
like the forms blend into each other without the
help of a soft airbrush. This will be very
helpful in adding interests and dynamism
to your portrait. If there is a point
you want to change, like shifting and knows
upwards at this point. Plus make a copy of
the paint layer. And then on the top layer, make the adjustment
that you need. After which you can blend
and match both layers. I find these to be
helpful in keeping your image clean and
free from visible cuts. Look, worry about
your color tones that don't match the refund. You should have
artistic decisions that feel good to
you for your mouth. For instance, I did not want it to be the main focus
of this portrait. And that's why I did it, give it contrast
from the skin tones. These are artistic decisions that you need to
make as an artist. Make sure you gradually
build up the colors. For instance, when
increasing shadow colors, I gradually use darker
tones and blend them with the surrounding
values to keep the value of harmony harmonious. And they do the same
for the highlights. Do the same, and make sure
that you keep the value. Family manias.
13. Final Blends and Finishes: It's now time to
smooth out of values. Select the soft brush and
make sure that the smoothing doesn't just flatten out the values that you have
worked so hard to build. This is done by
keeping the brush size small and mostly smoothing
out Wilson Dean. Denote choose very
big smoke brushes. Let's smooth as over one
fissure plane at a time. Smooth areas that are
on the same plane. And you will achieve
display painting with a small brush says that it doesn't go over any planes. When painting or smoothing. Do not do it. For the whole painting. Leaves some parts and smoothed as this will create
contrast in your image, which will be interesting. Use this much brush at a small size can begin
pulling color values into each other to create the hair strand
effect that you see here. This was my edge. Here, Carlos, assuming
that they are late mine, to create these illusions of individual hairs
forming the hem us, tick your TAM and it's mage, follow the four over here flown. This must be done on the pink
there as a smudge function locks destructively.
Final touches. Can I add more
interest to the road? And you can also create
washes off late when your image or your figure
using this soft airbrush. But there is very sparingly as it can
flatten out your image. If you're not very careful. At this point, what
is left is detailing, which will involve using small
traces of extreme globe. You can also use the Dodge
tool to highlight areas late the hair highlights that need a little bit
more isolating. And to add for cause, we can create a brush. And that can also be
useful in making here. By the way, to make this brush create a new
canvas and set it to 50, 50 by 50 pixels. And using a soft or
hard drag the brush, create random sock
was on the Canvas. Icc here. Then go to file, Define Brush Preset and sea of your new brush under
any name you want. You can then adjust the brush
settings as you see here, and then use it in your image. You'll get some Foucault
inspirations and use the brush to just recreate what you see and just make them subtle to either fuel for
cost your face to the first. Then you can adjust
the settings to turn the seven brush
into a hair brush. And generate with these. You will have lobbied how to paint a very expressive
portrait in Photoshop.
14. Conclusion: I've done this
lesson to focus on the basics of painting
realistic forms. Most of it has been sped up
to make sure that I cover all the important topics you need to become good at painting. Your task now should be to paint using the ideas
that we've talked about. And feel free to
revisit the lessons for those areas that you
may not have understood. All the Tammy has moved too fast when you're
comfortable with a walk. I have left a project in description that you
should consider doing. After getting it done, please post your walk here
so that we can take a look. And I can give you some
feedback where I need be. And there are students who
will also be able to help to give you and give you
helpful feedback. And so you should
consider that as well. My socials are at gyms as KJ on Instagram and James
sick Almaty on YouTube. So these are my ADSR shows. And if you need anything or to follow me
or find out more about me, that's why you kind of do that. That is it for this course. Please share your
feedback as well. This will help either
potential students to know whether or not this course
will be useful for them. Your feedback will be also very helpful as a walk on
posting more courses. So please let it be genuine. Thanks for watching.
 James Ssekamatte, Freelance artist, Writer and Engineer