Transcripts
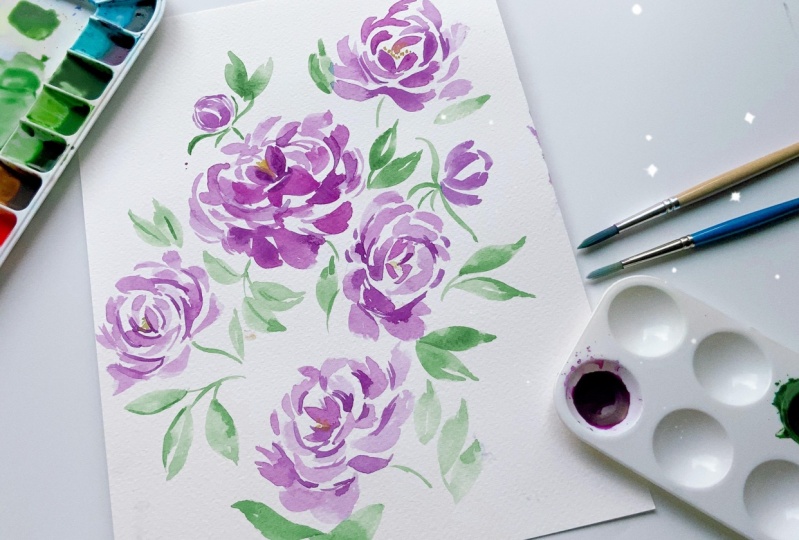
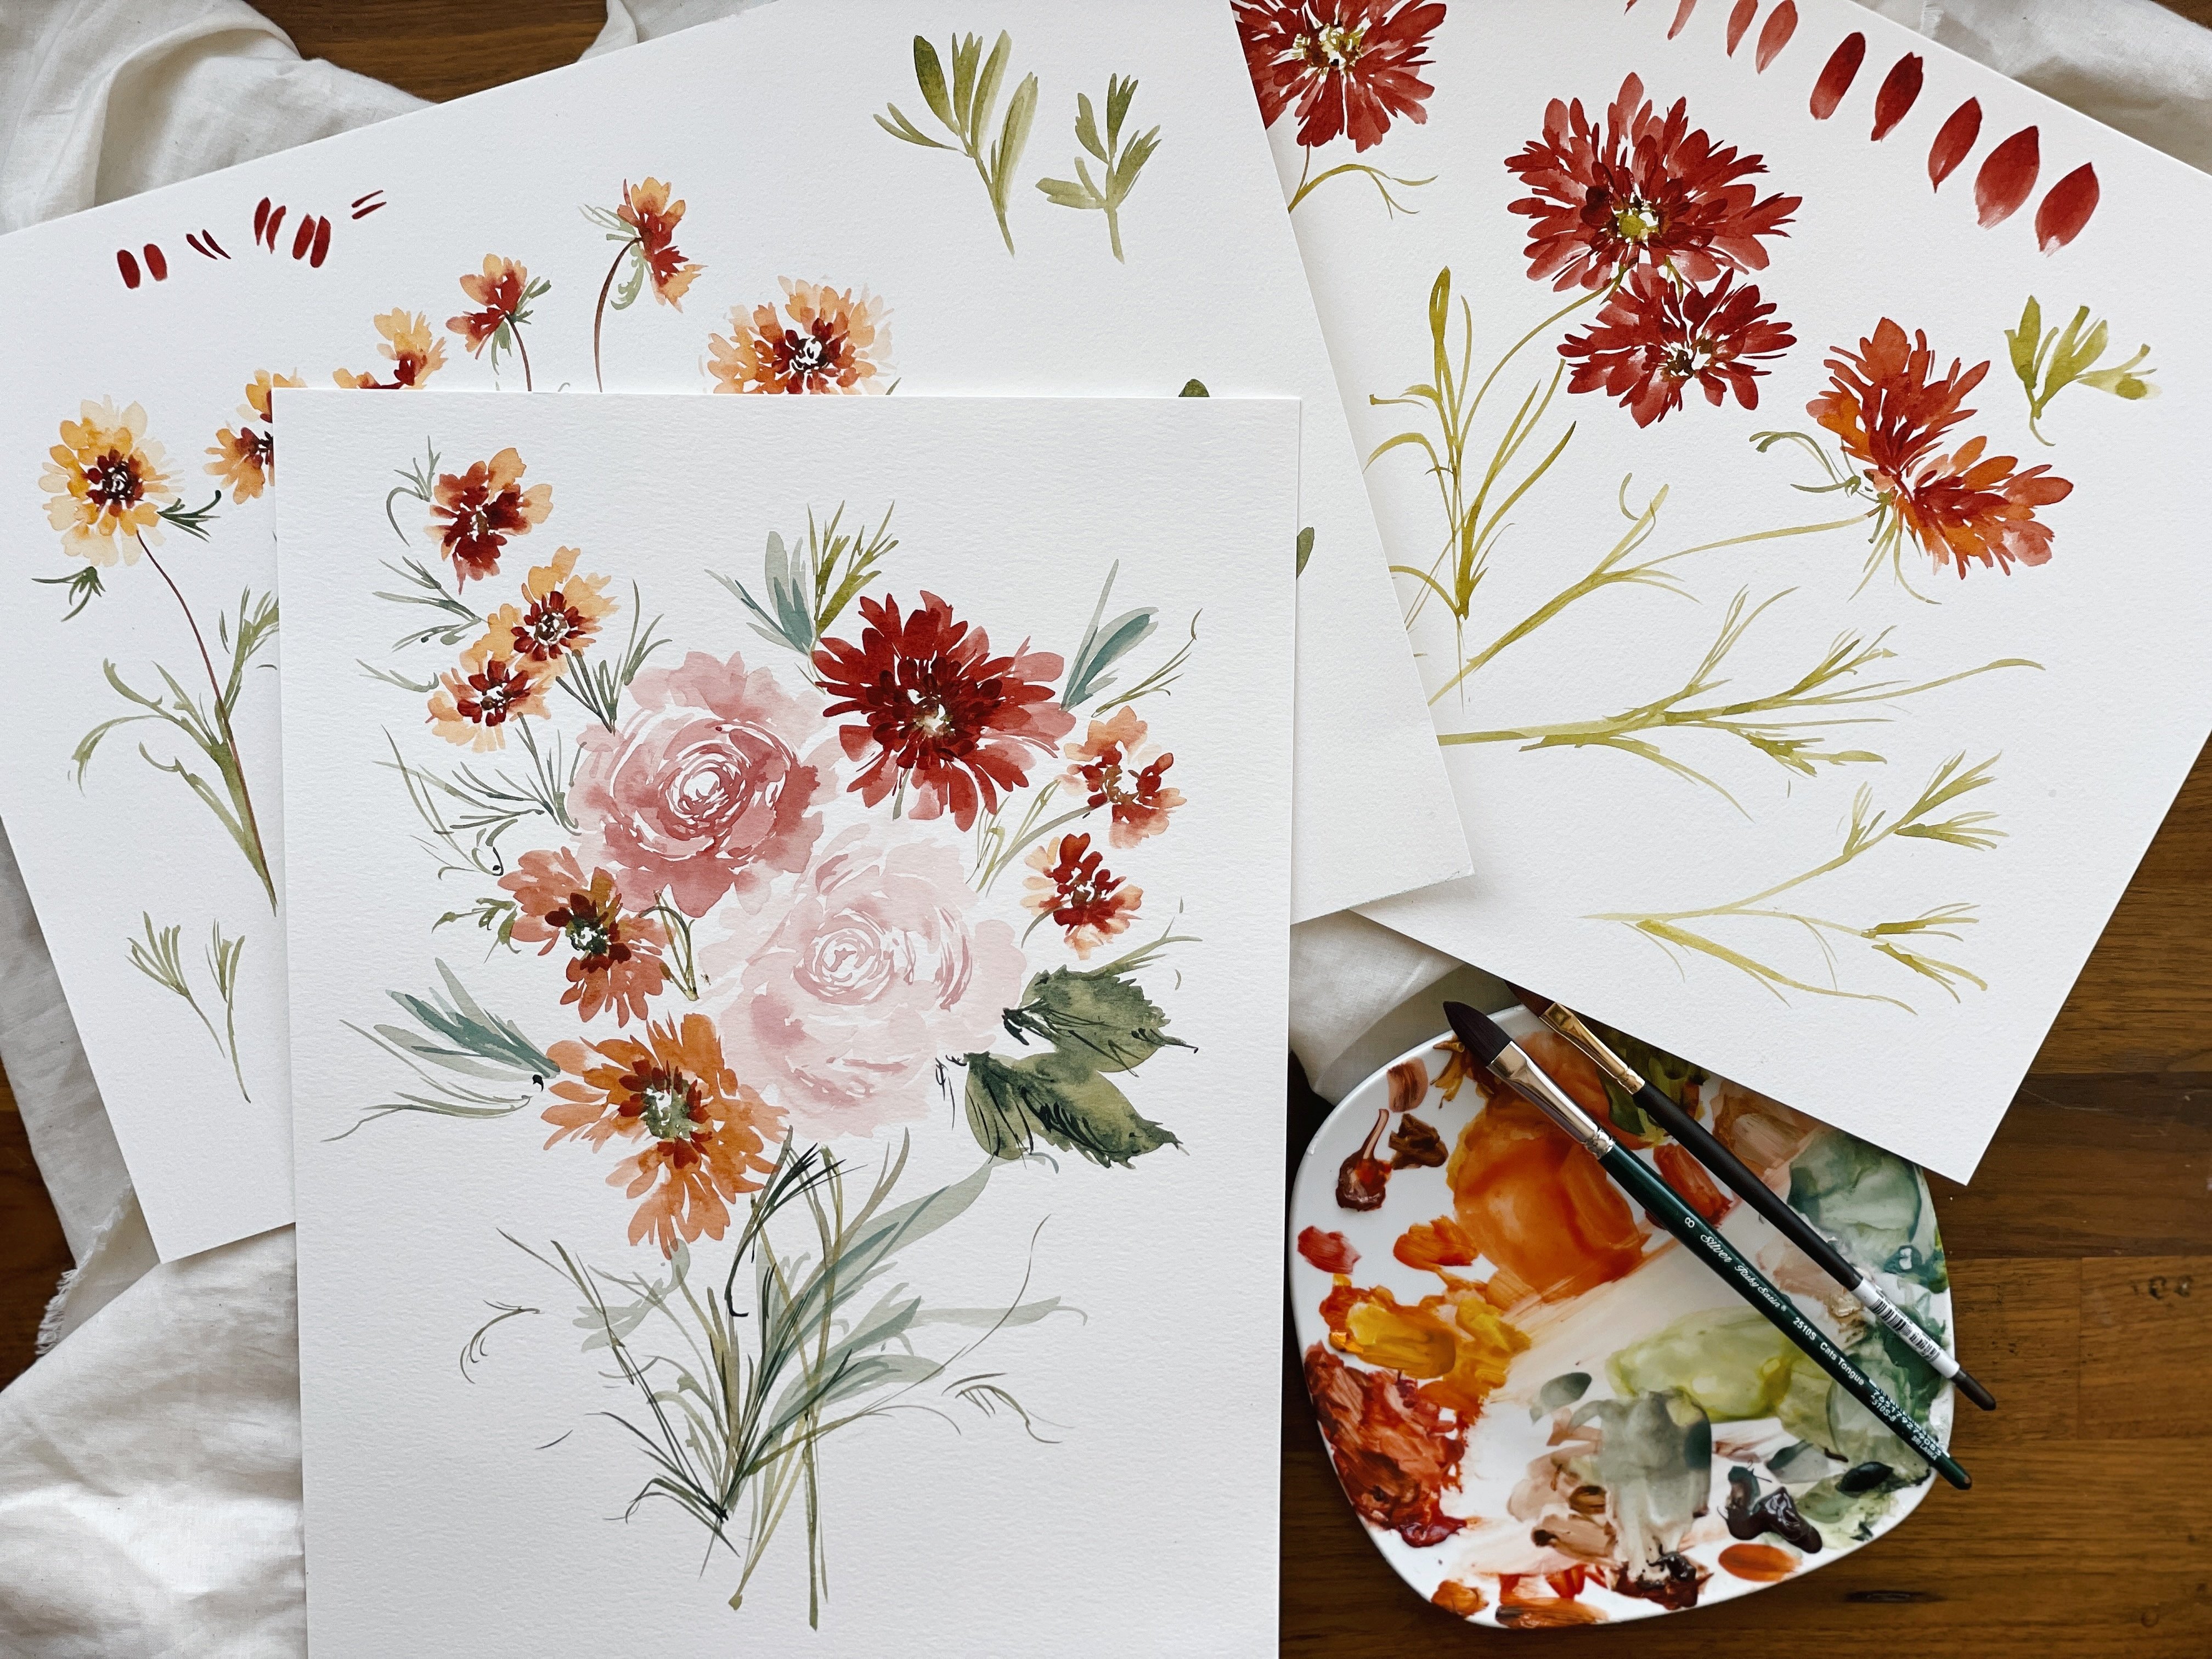
1. Introduction: hi, everyone, and welcome to our fifth skill share class together. I am so excited to have you here. If you are just meeting me for the first time, let me just introduce myself very briefly. I am Kara Rosalie Olson. I am the owner of Rosalie Gwen Paper, which is an online floral boutique, and we specialize in stationary custom wedding bouquets, watercolor shoes and also a wide variety of artistry sources. So if you are still hungry for more knowledge after the class, and you have not already taken advantage of my cover guides, which is in essence, where I explained how to mix certain watercolors together to get new colors, mainly muted vintage colors, then please head over the website. Have a look. I also have more classes over there if you are still in the mood to get your paint on. So today we're gonna be focusing on peonies, which was widely requested from the community on Instagram. So I am extremely excited to be able to offer this to you. It also changed things up a bit, and we're going to talk about a brand new brush today, featuring the Princeton 3/4 oval Wash we're gonna be able to do so many fun things with this brush. I have a feeling you're gonna be addicted just like I was when I first bought it. And, um, we're gonna have a lot of fun, A few things. We are going to talk a little bit about how to find your own style. And what do you do with the knowledge once you've retained it? Once you've learned it from not just my classes but other people's classes. How do you then go on and make your own art? That can be very tricky to navigate, because once you've learned a specific way to paint things, it's hard to then unlearned those specific techniques and avoid making your art look exactly like someone else's art. So we're gonna talk a little bit about that about how to look deeper, to expand on the artistry that is unique to you and already within you and how Teoh avoid that pitfall of just copying Once we've learned a certain technique. Another thing I like to bring you guys and very closely for certain things that are happening on the page and the palate. And for one of those times I forgot to push the zoom or not the zoom the focus button when we went back to the normal angle, and so things were a little blurry from there. It's only about 10 minutes, and you can still see what I'm doing. However, it's distracting. It is resolved within the next video. They didn't want to just give you a heads up that there is a portion of the video 10 minutes or so that is a bit blurry. So, uh, yeah, technical issues always right? There's always something. Cameos from my Chihuahua. Bella. She will be heard snoring in the background occasionally. So, um, join me for that. And other than that, I make super excited to get started. If you have any questions after the class, you are welcome. Teoh, email me police Please, please post and tag me on Instagram. And if you have a moment, I would be so appreciative if you left a review. All right, guys, happy creating and let's get started
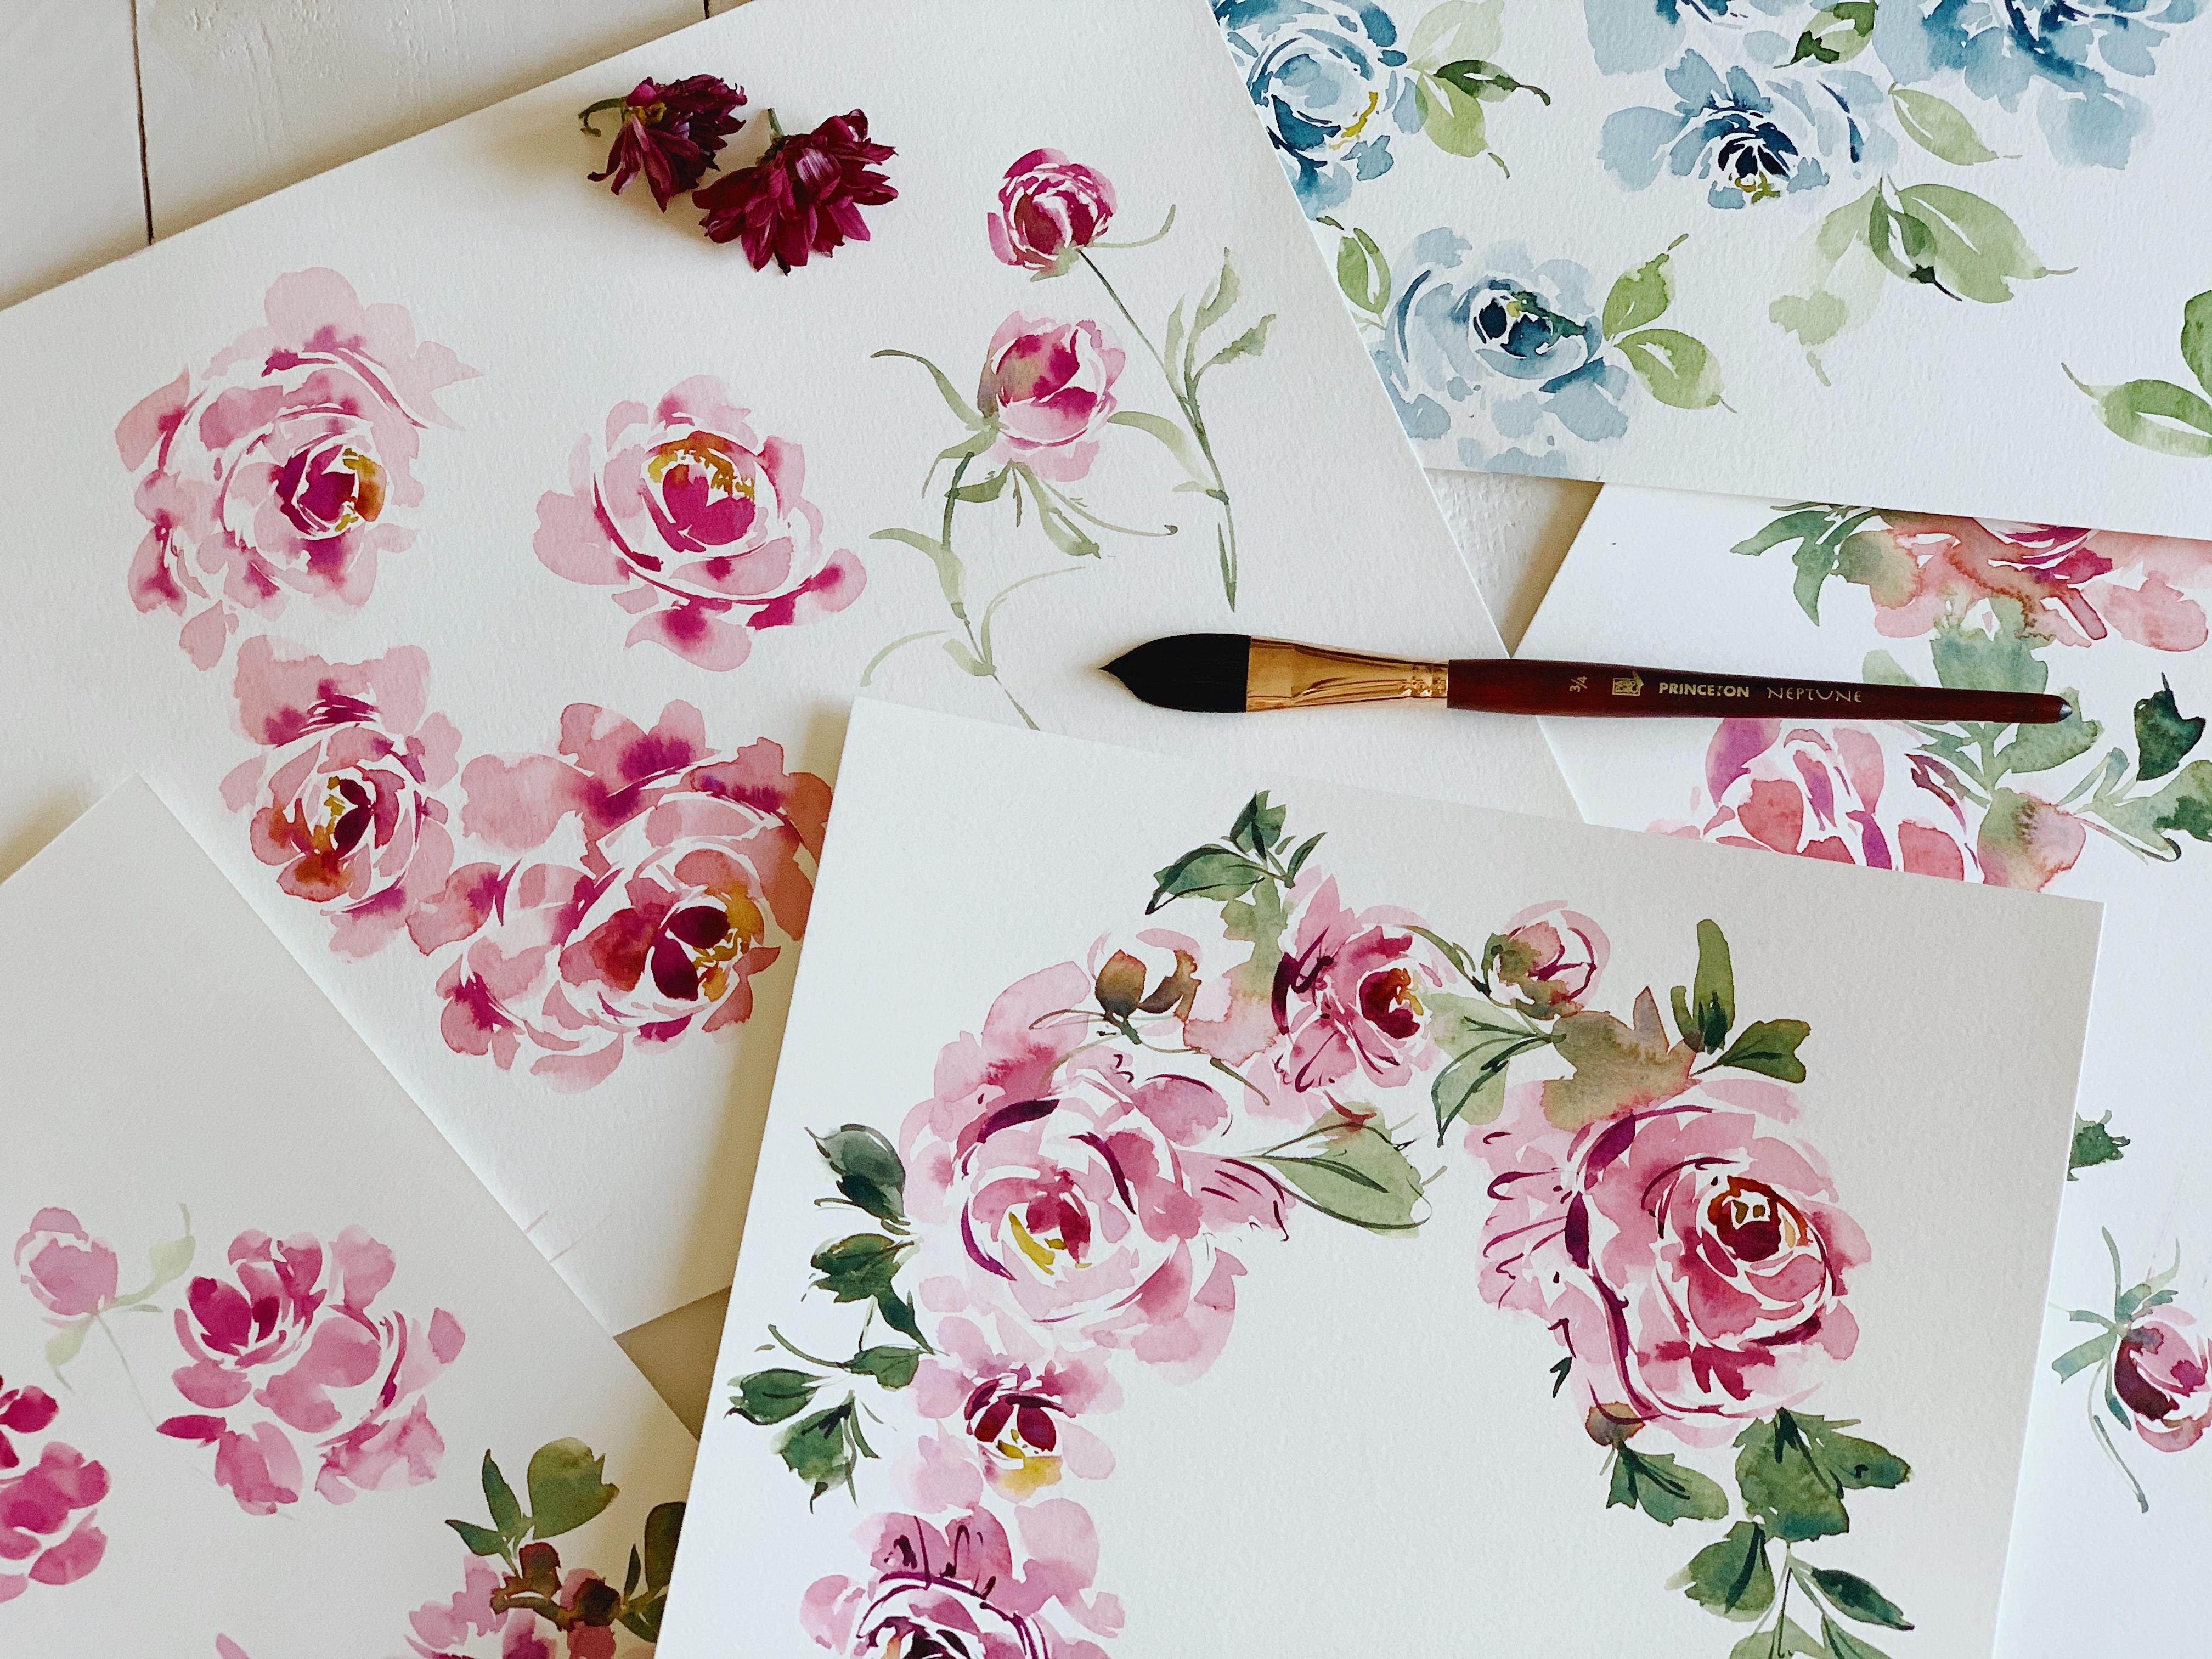
2. Supplies: Let's briefly go over our supply list. Nothing new here. If you have been taking my previous classes, then you'll recognize all of the supplies we're gonna be using much of the same. We start with our paints, which I have a collection right here featuring Daniel Smith. Extra find watercolors, which are my favorite. They're very high end, but very, very close thereafter is the Windsor and Newton brand. Um, I get a lot of questions about the professional grade versus the, um the student and which is the common, and I honestly, I do not see a huge, huge difference. I snow. Some people swear by the professional line and will not use anything else. In my experience, they are fairly similar. You might get some pure. It's a hard word to say pure pigments when, um, working with the professional line. But the common will work great if that's what you have, and that is what I use in my work. So, um, again, if you do not have these exact brands, as long as you have something artists grade, I've gone over my preferred list of paints in my watercolor supply guide. It basically runs through Daniel Smith, Windsor and Newton, Van Gogh, Groom, Bachir and Turner. Those air really the only brands that I use but moment mainly just Daniel Smith and Windsor Newton. Um, we're gonna be using undersea green, which is one of the most beautiful colors in the world. It is so beautiful. I can't wait for you to discover this. If you do end up buying this one, I will. Um, I will have posted about the colors that I'm gonna be using and also the brush that we're gonna be using more about that in a minute. Um, before this class is published. So hopefully you will have gathered the supplies that you want tohave for this class. And if not, no big deal. Um, what we can work with what you have. Eso Daniel Smith, Undersea green, Daniel Smith, rows of ultra Marine Daniel Smith, Rich Kringle, which I use for everything If you're going to buy one color um, from Daniel Smith, I would suggest this. I mix it with my warms. I mix it with my cools, and I use it all by its lonesome concede here and the peonies that I've done over here in the Navy. This is pretty much I don't believe I makes. The seas were painted a while ago. Um, I think this is just Daniel Smith on its own. So it's It's a beautiful color and very versatile. We'll be using sepia wrong number and permanent rose. So those are paints. We'll need a pallet. I use my porcelain plate here, but whatever you have at home work paper, we're using the same brand that we always use, which is the cancer £140 cold press. I am a huge proponent of this brand just because of its, um, its ease of accessibility. It is one of those papers that it performs really well under pressure. You can put lots of water down on it, and it's not gonna buckle and warp, and it's grain is in the middle. It's it's arches, has that very toothy grain to it. And then hot pressed paper obviously is quite smooth. And so I just feel that cancer is that great little marriage between the two and has just the right amount of texture and again performs really well. You can see these bleeds happening. It's just a great paper and very inexpensive. So bonus points for that. Um, moving on, we will be needing a cup of water and a paper towel to blot on and brushes. Of course, I'm going to be using to Princeton brushes size 10 round. Make sure that you are using round brushes. Um, we really want this. The tip is gonna be very important. We're gonna be making some very fine lines. And although, you know, I've seen people do peonies and chisel brushes for this class in particular, I'm really gonna focus on the's rounds, so I will suggest that, but again, if you don't have these at home, work with what you have the other brush that we're gonna be using so excited to share with you today is this 3/4 overwash from Princeton, Neptune. I'm hoping by now you will about this brush. I will have been pushing it hard as I promote this class. Um, although the although we're gonna to focus on peonies with these round brushes of you know , these were all made with round. I really want to be able to offer you something new and unique, and on this pne right here was used with this brush and the leaves that we're going to be doing are gonna be made with this brush. And I know it's expensive. It's an $18 brush, but it is again so versatile, and you will be you're gonna fall in love with it. I remember when I got this brush thinking that what the heck do I do with this thing? It's huge. It has this really, really fine tip. And I remember just sitting down and being like, Well, you know, I have an ambassador. So they gave this brush to me for free, and I was thinking, OK, we'll just see what I can dio. I played with this brush. No joke for a week. So I'm hoping that you will have bought it and will be able Teoh play along with me. If not, a round brush will suffice. So there's that that, um, that concludes air supply list. So let's move on to the next segment
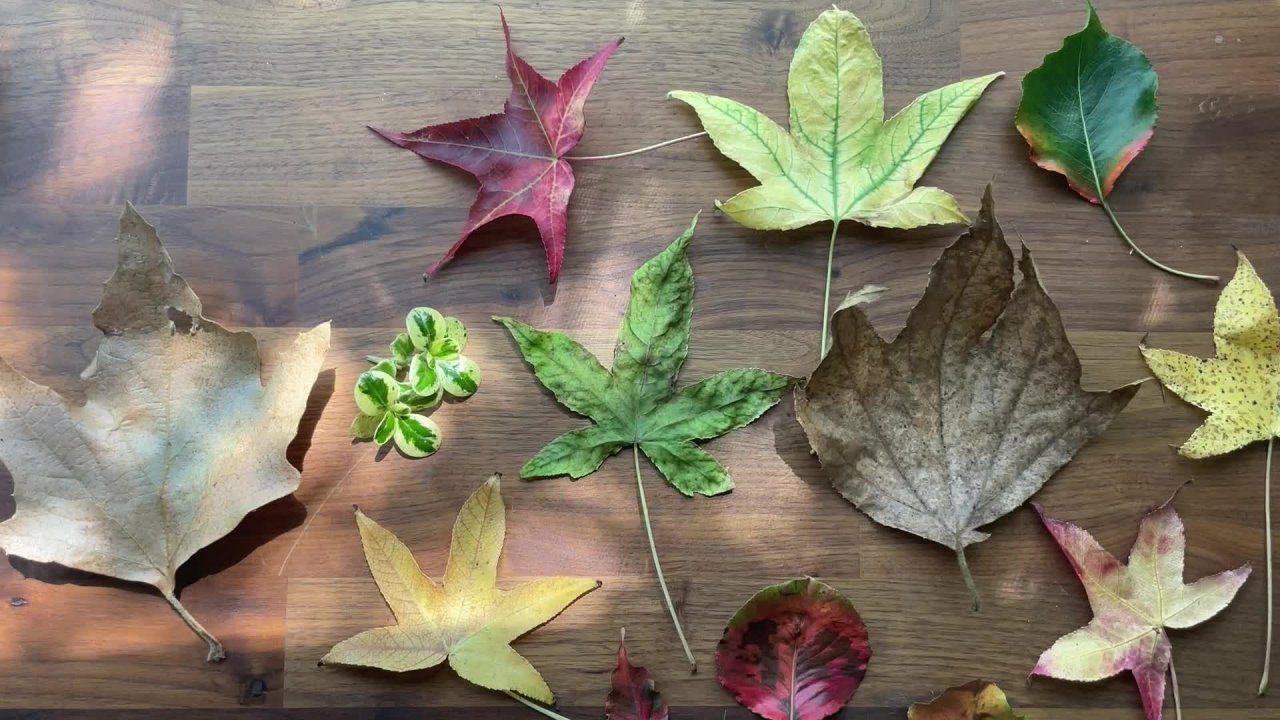
3. Gathering Inspiration: So for those who follow my process on Instagram, you'll know that while my art is inspired by nature, it is not taken directly from nature, meaning that when I paint, I do not keep reference images, um, up, you know, walling painting. And I do not do pedal for pedal. My aim and goal really is to capture the essence of the flour, a bit of its personality and just mainly, just this shape. And maybe, perhaps where the sun is is aiming, you know, in order to get the shading correct. But other than that, I do not prefer to follow strict guidelines when it comes to painting. Obviously, this is called loose watercolors for a reason. It's loosely based off of, um, nature. So whatever you feel comfortable with, if you would like to keep some reference images up as you're painting along with me, please, by all means go for it. Um, I usually will take about 45 minutes, look at a bunch of different pictures of peonies or whatever subject matter it is that I'm studying or planning to be painting and just get a really good feel for it. Then I will save those pictures to my photos so that I can later reference them or along the way, reference them, you know, whatever, whatever it is that I need from them. But I try not to have a model, and I'll tell you why that is. I tend to have the type of creative personality that is hard on myself and nature's It's is perfect. It's imperfectly perfect. But there there are moments when I am painting where I feel like it needs to be perfect, perfect, and there's no room for imperfection. And sometimes when I have pictures of that in front of me, um, I'll tend to not enjoy. The process is much so that that's the reason why I try not to spend too much time focusing pedal for pedal because eventually what happens is you get into a rhythm and you start to trust that intuition that all of us artists have and and need to trust. Once we start with the process. I think in the beginning when we have that blank canvas and we're staring at it, we're feeling all that anxiety and trepidation. It's nice to have a safety net there, but once we have gotten in the groove. I think it's so nice to be able to just put that aside and just let your lecture or your heart and your art come forth and not use anything to impede that. So that's some That's my explanation for that. Feel free to disregard any of that. It's just what I like to dio. But if you don't mind, just take a few moments to capture a few images of peonies and different positions and shapes and sizes like such as this one, which is great because it has three peonies in different positions and you can see like where the statement is covered a little bit where it's mostly open and then where you can't see it. It also something like That's fantastic. And take a minute to look at the leaves. Aziz, you saw. I'm going to go. We're gonna be using that brush and, um, creating leaves that loosely look like what we have here but again, not strictly based off of that, and also take a moment to study some buds as well, because we will be doing some peonies. But so again, four or five minutes don't take a long time to do it. Just enough to just get a feel for the flower
4. Color Mixing And Water Ratios: So if you've taken any of my previous classes, then you'll already know that mixing watercolors is pretty much my most favorite thing to Dio. I have a whole line of color guides, which feature vintage colors in the entire spectrum. So from the warmest of warm to the coolest of cool, we have all of the colors in vintage muted tones. You could definitely have a look at those if you're interested in more about color mixing. I won't repeat content here just because of everyone who's been following so far has already very well versed in all of that. Since I tend to talk about it a lot, Um, what we will go over are the water ratios that we will be using for this class on water ratios simply means how much water to paint we will be using. So we're going to swatch out two separate um, swatches, and one of them will be lighter tones, meaning we will add more water and the other one will be a more a thicker, syrupy consistency, which will be featuring more of the paint itself. So the two colors that will be mixing together are the Windsor and Newton permanent rose and the Daniel Smith rows of Ultra Marine. So, you see, I kind of already done that over here on my practice page, take one of my number tens and just kind of rejuvenate this pile here. So great thing about watercolors is all you have to do is really just gently stroke the blob, and it comes back to life. So I like to mix up a nice, nice, nice thick consistency, like I said, sort of like maple syrup and then get it to the consistency I like, and then bring in the Windsor and Newton er permanent Rose will at that on there to create this really beautiful shade of magenta again. You are always welcome to go lighter or darker, just depending on what you like. And I like to show this process because in a lot of instructional videos, teachers will tend to just bypass this stuff and just think well, people use water colors, they know how to mix paint, not always the case. And then you end up marginalizing people in making people feel frustrated and discouraged that they aren't able. Teoh, you know, even get the right consistency which just stagnates the entire process. Oh, excuse me. Just knocking things over in my studio. Um, So I ask your forgiveness if some of this is repeat material, I do try to bounce off of our previous classes. Um, but I also like to be very thorough and everything that I teach just so that people feel, um, as though either being walked through the entire process. So you're welcome to turn sculptures. Great. They have these little settings down at the bottom, left hand side of the screen. You can turn it on to 1.5 speed or to speed or even three speed, which will make me go like this. Little sound. Really? Like I'm talking so fast, but it'll speed through the content. And, um, if all of this is repeat, then you can just keep going. Um que So we have our little pile here. I'm gonna keep mixing until I have this purple and pink kind of where it want it. So that's pretty good. Pretty much using up all of my pink. Here, you can see the Daniel Smith. It goes a long way. That's the thing about Daniel Smith is like These were the same blobs when I began. And you can already see that this Windsor and Newton blob is completely gone. And this one still has, like, 3/4 of its life left. So that's the thing. When you do buy expensive paints, it is an investment. However, ultimately, in the long run, you are saving yourself some money. So please consider that this is shaping up to be beautiful. So it's definitely more on the rows of ultra Marine side. If you want more of a permanent rose pinky pinky, just add more of that unless that easy peasy. Okay, so this is mixed up to where I like it gonna show you what this looks like on paper so that you can actually see. And we're actually gonna go darker than that because we want to have some really, really pretty bleeds. So I'm gonna makes up a little bit more off to the side here and the reason we swatches so that we can tell. Okay, that was too light because what we want is that really pretty contrast between the lighter tones and the darker tones. So that's about as dark as I want it um, possibly even a little darker. So that tells me I need Teoh. Make that pile a little bit darker so you can see this one's darker right off the bat. And that's but we're gonna be shooting for So switch that off. Um, off to the side. So you know what it's actually gonna look like on paper cause it's gonna appear darker on your palate than it will on paper. And then, um, very quickly, I've talked a lot about loading brushes and what does that mean? That means that I like to have my brushes preloaded meaning mixed up with the colors I intend to use on the page. So this brush I am using for my darker tones this one's gonna be saved for my lighter tones . That way I'm not having to rinse off this brush and, you know, blot it, get it back into the pile and then onto the page, because when we work with wet into wet, we need to act quickly, depending on how hot it is in the room that you're working Or just, you know, the amount of water you have in your pile, the paper will or the paint will dry up on the paper, and if you don't act quickly, you lose that. That fleeting moment where the bleed happens and it's it's crucial to time it right. So I load up my brushes so this one will be used for my darker tones. This one for my lighter tones. It's the same brush. It's just its its same brush size 10 just having different different variations of the colors. Now, if this gets confusing for you, what you can dio is get another 10 brush in a different color, or what you can do is put a little piece of tape around one of them and market so that, you know, okay that once in my life, you know, put a piece of tape that says L and then you do a piece of tape that says D for dark. So however you know it's gonna work for you. Just figure that out because I think you will find that technique very helpful for you when you're working with watercolor. Okay, so here's my additional brush. What I'm gonna do here is I'm going to draw out this color into 1/3 pile. So this was my pink. This was my purple and pink mixed. And this is my third pile. So this will be the color of the pedals. May end up being to light, and I may need to darken it a little bit. We shall see. Okay, so and then what I usually do there is get back into my darker tone and just see how that's going to react with that. So just a little brush off there. I want to see that, you see, that's already dried up because the paint was wearing off my brush. So I kind of just figuring out what's gonna happen when I put these two colors together. This is the part of the process that a lot of artists will skip because it takes time. And if you're anything like me and you're chasing around after two babies, you just want to paint and get something accomplished for the day, which I completely understand. But your art will be better served if you take the time to swatch your colors out, see what they look like on paper. And then, um, you know, practice with what it's gonna look like when these two colors merged together. So, um, obviously, at your discretion, you can practice as much as you like, but, um, whenever I'm really working on something that I want to, you know, if the logo or custom wedding bouquet, I definitely take the time to do this so you can see that's beautiful. The bleeds happening here. And, um, yeah, we're gonna have a lot of fun with these colors. So those are our pinks. Let's launch into the greens, Precious, Rolling away from me. Um, as I mentioned, we're going to be using Daniel Smith Undersea green. Um, probably all by his lonesome. However, we may mix a little bit of sepia into it just to create some additional tones. I still have a little bit of pink on this brush. I'm not all that concerned because pink actually does go quite nice with green. You wouldn't think, but, um, it does. I tend to mix these colors a lot, as you can see. Um, right here the pinks and the greens. They create this beautiful sort of warm yellowy greeny pink. Yeah, it's a professional color of that right there. You can quote me on that. So again, I am just kind of waking up this pile here, gently dabbing at it. Do not stop at it. Um, you don't want to damage your bristles on your brush. And then I am going to put this on the page so I can see what it looks like. Do this a little bit quicker just because we're pretty thorough the last time. And let's see how that looks. That's just about right. Might go a little bit darker. And then, obviously, for our lighter tones, you have something that looks about like that with leaves. It's a little bit different. Um, I tend Teoh. I just use one solid color, and then I will later on go back in and add some darker elements so we'll see what we do. I'm gonna kind of leave that part loose as we're creating. But ultimately you wanna have two colors, one darker, one lighter. If you'd like to mix a little bit of sepia with it, you can That's gonna create more of this brown, green, deepen, earthy, which is really beautiful. I may do that when I'm actually, you know, going into doing our leaves. But for now, I'm just gonna leave it like that just so you can see what it looks like. So those are our water ratios. I hope that little segment has been helpful to you. If you are unfamiliar or just really need a thorough look at how we mix up the paints so we will move forward from here and begin putting our pedals on the page.
5. Small Talk About Finding Your Style : skipping back to inspiration briefly. So if you did end up saving a few reference images if you have something like this, this is what I used to hold up. My I've had it works really great just to kind of keep things off to the side. Um, and you could be referencing those as you work. What I tend to do is I use this same thing, um, to hold up my own artwork. I like to be inspired by the things that I have painted that I'm most proud of. That feels incredibly intimate to me when I'm painting toe, have my own work. Serve as the inspiration, which may be sounds, perhaps a little narcissistic. But, um, ultimately, I want to be the one inspiring myself. This is what leads Teoh, I think true creativity. I think when you rely too much on someone else's even nature's style or appearance, you end up just creating more of the same and someone else's art. We've talked a little bit about that briefly over on instagram about finding your own voice in your own style, and I did want to take just a moment here to address some questions If this segment is not pertinent to you and you really just want to get to the painting part of this class, please go ahead and just fast forward. But I am going to take a moment here because it has been widely requested that I talk about where is the line? How do we not cross it? Essentially, if I am learning how to create flowers or whatever subject matter from someone, isn't that information or material now? Mine, if especially if you've paid for it. If you've paid for a class such as I offer a loose roses class, does that mean that that person can now, um, pain arose that looks exactly like my rose and claim it as their own? Well, yes, I know you can. You can take that rose and you can and you learned how to do it and claim it as your own. How every ultimately that rose was born from someone else's style. My hope whenever I teach a class, is that I lend you are equip you with this the mechanics to create, but that you would then take that knowledge that education and use it to create something that is you. For example, when I was when I was learning how to paint roses, I used other artists as my inspiration. Obviously, I found other artists whose roses I admired. And every time I tried to paint their roses, I came up feeling short that it was just not what I was looking for. It wasn't as good as their roses, and I ultimately just felt very discouraged and frustrated. It wasn't until I learned the mechanics of their roses, but turned them into something different that I truly felt like I had unlocked something very intimate in my own artistry and now my roses again trying to speak humbly. Here are one of the things people request most from me, and it is my most purchased class. Um, so while I invite you to use my art as a stepping stone, I absolutely encourage you to please take that knowledge and then extend it. Look deep inside your own heart and figure out what makes you feel like an artist. That's what this process is all about. It's not about painting pretty things. It's so much bigger than that. And I want that for you. I want that for every artist to be able. Teoh, um, not create more of the same, but to create something that is your something that feels, um, intimate to you. Um, so I have this sense posting skill share classes run into people who are now, um, pretty much taking the content that I have taught you and our teaching it as their own. And, you know, I suppose that ultimately ends up happening. Anyway, you know, someone teaches something, and then it sort of loses its strength, and then it there's a resurgence of it. And I really don't mind as long as people are, um, owning up to the original creator and also making it different enough that it's not just, you know, posting the same class that I've created already. Um, that is irks. Um that is insulting. So, um, I hope that is direct enough, but also gentle enough. I'm trying to find that that medium place where I really am absolutely open and encouraging you to paint just like this. But then the work needs to happen off of the page. You need to take the blank canvas, and then it reach further and deeper beyond this to create something that feels like you. So I know that's a long journey. I don't expect it to happen overnight. I always invite people to continue to use my work to service inspiration and reference for as long as you need, so long as you are tagging me or whatever artists, whoever it is that you're learning from in your work and lead them back to the original Creator. So I didn't want to take a moment just because this class was almost cancelled due to the fact that somebody released a, um, peonies class before I had a chance to get to it. And I was concerned about teaching more of the same. I have changed things up enough here, though, that we're gonna be offering. I'm going to be offering a fresh look on peonies and leaves and using a completely different brush it at some point. So I'm super excited about that. I think everyone who reached out to me in the community and asked me to move forward with this class. I was uncertain about it, but feel extremely confident now going forward that there's gonna be a whole lot of New Insight year all right. That was a bit long winded, Really. It was only six minutes. It probably felt like six hours. So I apologize. But, um, I get messages everyday on Instagram from people asking me, you know, where is the line and how do I make sure not to cross it? And, um, does this content now belong to me and all of that? So I did want to just address those questions briefly, and hopefully I did. Hopefully I was clear enough. If not, I'm always available. You can email me and message me, and I will get back to you time permitting as I chase after two babies, okay?
6. Learning strokes: Okay, so I just had to take a moment and direct you Teoh. What always feels like, as Bob Ross would say, Ah, happy accident. You know, while I think it's important to keep certain colors separate from one another when you're mixing them, sometimes something incredibly beautiful like this happens. And I'm gonna try and focus the camera here so you can actually see it. Um, this green undersea green is mixing in with his permanent rose, and it's creating this gorgeous, gorgeous bleed. Did not intend to do this. The colors this were a little too close to each other and began to mix. And it's stunning. And this is ultimately what we're gonna end up doing when we mix in the Daniel Smith Green Gold to the center of our peonies. So I almost feel like it's like a precursor to what's gonna happen. And it just feels like it's like arts way. That sounds so new agey. But it sounds like it feels like it's arts way of just like saying, I see you, let's do this together, and I always feel like when that happens, like I'm I'm I'm like in the zone. So anyway, If something like this happens on your palate and its complementary eri I invite you to just, like, keep it and not really worry about too much about oil that if I have to keep that color separate because it's really fun to allow these colors to mix and you know, to do their own thing. Okay, so I'm gonna put that off to the side. We're not gonna do the Daniel Smith Green Gold right away. I think doing too many steps at once can be overwhelming and peonies themselves have what, um, can feel like a complicated structure. So we're gonna just kind of slow things down a bit. And mostly since we have the time, um, let's see, we are going Teoh, start with positioning. That tends to be the area that I think a lot of artist struggles with is I'm getting the positioning of pne just right. You can obviously paint one like, in a circle and and have, like the middle and then the pedals folding out. But what you get is this very one dimensional looking puny, and you add some leaves to that and you can actually, you know, jazz it up a bit and we'll end up looking like it has more movement. And you'll see that even when we create peonies that have a bit of a structure that still that the leaves will do that for you. But we're gonna aim to give our Penis, um, movement just on their own. So what you might find helpful to dio if you have a pencil is to, like, look at the shape of you can either look at your picture or if you have a reference image of a painting and just kind of take thanks, for example, this one, this one is on its side. It's a little more complicated. We're going to start with this. This one right here is kind of facing up, and so you can kind of just gonna take your pencil and just shape around it is kind of like an A is on its side. So I'm gonna do that here on the page right here. And that's just kind of a loose, loose sketch of the shape of that. I'm not gonna be married to that. Probably gonna end up coming down more like that. But this frame of reference gives me um, it gives me a chance. Teoh. Just kind of look at the direction that I want things. That's where it is on my page. You see here it's kind of pointing at an angle years. We have these leaves spread out or the leaves, Parton pedals pointing out, and we have the center kind of going off like this. So it makes this little mark here, and, um, it serves as a guide. And then when you're painting and you're in the moment, you don't feel like Oh, you know, how do I How do I fix That's going in the wrong direction so you can leave that, and then you just take your handy dandy erasure. This is a need herbal eraser, and it works fantastic and you can leave it or you can erase it after either way, so I'll keep my guide there. But I will erase that middle One thing. This does not take off the paint. I highly recommend Inedible Racer if you do not already own one. Okay, so let's start there, pick up my number 10 brush and dip it into my darkest wash and just start loading my brush . You could see it's pretty dark, and then I have the other wash over here off to the side. Kind of created this more this yellowing pink, which is actually it's even better than I. It is. It's a happy accident because these tones were kind of similar, and now I have a tone that's a little bit different. So this is more of like a coral, which I love, and this one's more of a magenta, and that's gonna add even more like strength to the flower. Because depending on how you know, um, you're looking at a apandi in real life, you know where the sun's hitting it. It will be light in certain areas and darker and others. And yeah, it's just I love that I love when that happened. That's why I attend to mix colors on a plate like this. Because, um, I love when things happen without my even asking them to. It's almost nature's and arts way of saying like here, allow me to help you with that, madam. Okay, so here we go. We have our egg on its side. I have my painting propped up here to my left, and I will be um, referencing that as we paint this together, we're going to start with kind of like a V. That's the best way I know how to describe it. So we have one there, and then we have another one here, and it's not a perfect fee. Obviously, you don't want it to be perfect. And then what we're gonna do is we're gonna put one line down here, and that is typically all I will do with that darkest pigment. And then from there, I pick up my other brush, dip it into my Corley pink, had a little bit too much paint on it. So I'm gonna blood off a little bit off to the side, and now I'm going to begin the structure of the pedals. So, um, you're gonna want to come up on your brush and also come to you an angle I need. This is something I cannot help you with. So I need you to kind of just experiment with different positionings of brush. Um, if you want those really fine fine lines, you're going to have to come up super straight like this to get those, um, really, really fine lines. If you want something that's a little bit more thick than obviously you come down just a bit. Obviously, if you came way down, you get something super thick. Okay, so here we have our little B, but just actually a little bit bigger than I probably would I've ultimately wanted. But that's okay. We will work with it. And now I'm going to begin the structure of the PNE. This kind of dried up on me, but that's okay. I'll go back in in a moment and at another bleed, and we're going to just kind of start building around this centre here. That's the easiest way I find to do this. I tend to do a stroke and then I go back over the stroke and kind of shape it in the direction that I want. I soften off certain areas. I leave other areas sharp and rigid. E. I really don't have a A plus B equals C method here, so I hope that doesn't feel, um, confusing to you. It's a lot of different concepts and mechanics put together. Garden roses tend to have the same sort of locus peonies as well, so you can also be studying those. Okay, so we have this first flowers. So now we know that this is the center, and then the PNE is now folding outwards. Then we will do some additional strokes here. It's just a quick swoop, and then we connect that one. Then we're gonna come down over here, and we're gonna start aiming our pedals in this direction. You see this egg shaped right here? If I do, I'm down here. We're gonna lose the shape. So we come back up this way and we want to start positioning thes pedals in the right way. I'm dipping in the water and then dipping back into my coral. Now, while this is wet, I get back into my darkest with my other 10 brush preloaded and I created Bleed. Okay, Same here. Gonna create a very fine line here and create that bleak. I'm gonna leave those unb leading. I think too much bleeding and you over complicate things. I think you need to be intentional with that sort of thing. Um, that's just my preference. I think it makes, um, moments happen on the page, which is what I live for. You know, you try and shove too many things into a flower, and it's just your overwhelming your I you're I needs a place to rest. So give Give yourself that as you're creating, all right, so we have a really, really great shape going here. We're still pointing in this direction. We have leaves, leaves. I keep saying leaves petals coming out in this direction and again, we're just going to keep supporting that structure. So we're gonna come down here kind of a, um boom, Oring esque type, shape and again, just kind of dragging the brush and creating some larger pedals. Obviously, as you work your way out, you get larger unless it's coming up on its side over here, and then we get thinner, which I will show you. So it's a little bit too much room in here. Um, I love when that happens, when you know it's just not perfect that I can show you what I would do. So it's a little bit too much room, so I'm just going to add another little pedal happening here. Just gonna kind of squeeze it in, and then I'm going to take my other brush, dip it back into my darkest pile and land it right in here. Okay, so you see, there's a little bit of space here, so we know that that is its own pedal. But it's touching there, so that's kind of fun can. Then we'll continue to move outwards. And I said, over here, we're coming up a little bit thinner because we want this pne on its side. This is its longest side. This is going to be its shortest side here. We will not have any puddles at all other than right here to give that structure of it pointing up. Okay, we're kind of doing these same link with our roses Were doing these half sort of see marks and then I'm going to a little bit more emphasis on some darker areas here, coming back in while things are still wit. Another bleed happening here. Super fun. One more happening here. If you hear snoring in the background and you're no stranger to my classes, you'll know that that is my £7 Shuala. She snores like a trucker, and she's also 13 years old, so sometimes it takes me a moment to wake her up. Um, I apologize. She has massive separation anxiety. So while I could probably put her in a different room, it would not be good for her. And, um, I just hope you understand that I love my dog. So if you hear her occasionally snoring, just give me a break or give me a moment, Teoh to rouse her. All you animal lovers out there know exactly what I'm talking about. Those of you who don't love animals or like give me a break, lady. All right, so we have a really beautiful looking pne happening here. We have some moments of bleeds, kind of. I'm gonna go through this process faster so that you can see what it looks like, but I really wanted to just break it down. Explained every individual stroke. Why I do every individual stroke again. The thoroughness of my classes is sometimes a little overwhelming, but I like to give people a really, really, really good comprehensive look at what it is I'm doing. OK, so great structure here. We're going to add one more here, and then we're gonna come up here. These are actually still wet because I put on so much so I may even have time to dip into some green gold and let that magic happen. All right, if you ever forget which brushes which I tend to keep my darker one in my left and my lighter one in my right. But, um, you can obviously just do a little swish off to the side on your paper toe. That helps. Okay, go. But more like a wave. Waves and see marks are the shape of typically of my peonies. And then we're gonna close it up here. Okay, one more right here, I think is necessary just to kind of give it that imperfecta. It was kind of looking to too perfect to, um um Cyclical. So there we go. And then we're gonna leave space here because that's important for the bleeds toe happen. So one more right here and then that's plenty of room. I'm actually looking at this. Think that one more pedal over here would actually probably do nicely. So get back into my lighter color. Just a very thin. I'm gonna come up on my tip, and here we go. Okay. Come back in here, which is my darkest and at another bleed. This is pretty wet. You're going to see that it's immediately going to pool. I would probably typically wait a little bit longer to time. This bleed correctly, but let's just see what happens. It's a little bit more watery than I would like, but that's okay. It still works. What happened when you time it correctly? Is this beautiful? Fading? What happens when you do not time? It correctly is it just sort of sits here a the bottom in a puddle of water. So I like being able to show you both. Okay, Um, for the green gold, I recommend using a size six brush. I didn't go over that when we're doing our supplies, because I forgot. So hopefully you have a six or a four lying around, and I'm going to put a little bit of green gold on my brush. Mix it up right to about here. Here is what the green gold will look like. This is our statement. It's a very loose tayman. I do not attempt to make anything too realistic crime and sort of invited over here. And I may even put a little bit down here and again to sort of invite it if you like to not touch your bleeds after you've created them. I completely understand. I tend to be the same way. Um, but you can always just take your brush and just sort of, like I said, encourage the pain to continue down. So there we go. Um, it's not perfect, but it's it's got all of the things that I would be looking for. It's pointing in the right direction. The leaves are at the longest. I should I should have to, like, snap a river band on my wrist. Every time I say leaves, the pedals are coming in the right direction and everything is facing the right way. We don't have a darker or a lighter side here. Really, Just because I imagine like the sun is kind of up here and it's shining down. If you want to make one side of your pne a little bit darker than the other, that would add even more just life likeness to it. But again, not really necessary, because you have all of these gorgeous bleeds happening. Okay, so we're gonna do that again. I'm gonna do it a little bit quicker now, Um, so you can just kind of See how it looks like when I'm not explaining every single step in this time. Um, we will obviously be adding the rich green gold if you saw it here, Off to the side. Uh, this is my rich green gold right here. Such a pretty color. I'll put a little bit more. You can see what it looks like again. Extremely versatile. Here you go. That's at its darkest If you want to see what that looks like, Obviously what you could do is just take your brush and give a little swatch here off to the side. Not as important. Sorry you didn't even see that. I like to stay close up so you guys can see everything that I'm doing. But then I realized that I need to move my papers. You could see everything. So let's try that one more time. There we go. We have rich green gold, such an elegant color. So I'm just gonna leave that on my numbers expression have that sitting off to the side for when I need it and picking up my two number tens again and waking up my piles when you're working with mixed colors. Be sure to give your piles a little stir every once in a while because the pigments will start to separate. You can see that Here you can see the pinks and purples. There's just sort of separating. That's just what they dio just give it a little Wake me up. Okay, so we have our upward facing pne. Let's go for a different direction this time. Let's go for a side pne. Okay, so we have a couple different options here we have this one, which I really like because it's sort of like 1/2 pne. It's gonna nestle up against a bigger one, so I'll do that right here. Um, so you can see what it would look like against this one. Because ultimately what we're gonna be doing is putting everything together. So let's do this side pne here. And then we will Teoh will mix well, mess around with some other different positionings too
7. Wet Into Wet: we're gonna start with the same sort of structure with that little V in the middle. But this time I'm going to leave some space here. And, um, if you need to do another pencil mark, go for it. We have it shorter over here and longer pedals over here, and then we have it sort of softening off right about here so you can see that. And obviously, I'm not. I don't stay married to those lines. I will be end up going over, but it just services that loose guide. Okay, so we have this pedal sort of facing, um, this or these flowers facing this direction. So let's go. There we go. Are middle this time. I'm actually gonna use my lightest color for that third a little closer right here. And just sort of let those to touch for a moment. It's very wet, so I'm not gonna do anything else to it at that point. And then I'm gonna start closing in the shape. So our pedals are all facing this direction except for the ones that are coming back to here. So let's start with that. Our goal is to always work towards closing the flower off towards the middle. And then if we want, we can have pedals facing outwards in these directions. But if you do not stick to the structure of closing it, what ends up happening is you have this flower that has all of these one dimensional pedals that are the same size and the same direction trying to go a little bit faster here. So you see what it looks like? Everything's still wet, so I don't need to, um, get too caught up with bleeds yet. And then what we have here is one more small one, and then we start to expand a little bit, so kind of run up against here, get a little bit bigger there. We're gonna come out here and finally our longest pedal over here. Now we will start adding the bleeds in where appropriate. So this one sort of drying up on me here and by these little rings here, you really give that I, ah, place to focus on. That's extremely important when working with flowers is being able to just give the viewer ah, place, uh, to focus on this'll. So I'm doing here is taking the tip of my brush and just sort of dragging it back and forth . They called us adding interest. Okay. And then think one final on right there. Okay. Gonna try and not get bleed happy here. So I'm gonna leave that at that. And then what we do from that point is pick up our number six bush, get back in and again, come upon the point and add some pretty little middle's go. Okay, so there we have a side. Any? There are lots of different ways to go about doing that. This is just one. But when you have them nestled up against each other, like in a wreath, it's so lovely to have one facing one direction and the other facing a different one. Okay, let's do that again in a different direction. There we go. We have a V this time I'm connecting that Be down here. Let me bring you in a little bit closer to so that you can see just exactly everything that's happening. Okay, again, I'm coming up on the tip here of my brush, and I'm gonna start, um, focusing on the direction. So here we have. The middle is right here. so we want to be pointing in this direction. Will have pedals this way, this way and some shorter ones over here again. I am referencing my own peonies and, um, basing the shape off of that leave little gaps here. If you are wanting to dio bleeds, a lot of artists get too close. And what ends up happening is you don't have enough room, come up on the tip of your brush here and gently lay in back into my light color, leaving lots of room for bleeds. And I'm gonna start working on closing it off. This one is gonna be a smaller PNE. It'll be. It'll be really nice when we're doing the Reto have different sizes as well. I didn't leave much room here, but that's OK, because I imagine this one is sort of folding over this Damon. Okay, back into my green gold into go just a little bit, um, a hint of the green gold because, like I said, I imagine this to be kind of closing over it. If you wanted to take the pne a little bit further and make it bigger, you could you could add one more right here. And then you point these pedals in this direction into your darker and again. So now we have a little bit of a bigger pne back into your darker. My art drastically improves when I go faster. When I have to slow down and break down every step, things just slow down. And what happens is when you get into that groove, you'll find that your art improves because you're not thinking about it. You're not overthinking it. So I look at this one, and I think that's what it's a really nice pne, but I think this one's much nicer. I think it has more of a flow to it. So again, you can, um, do darker colors in order to create less of a contrast. It really depends on you. You might like this lighter, one better, or you might like this one that's a little bit darker and darker, so it's completely up to you and your discretion. Okay, so I think that's a pretty good starting place for peonies in different directions. One facing up, this one's kind of facing off to the side. This one you have aside. I don't tend to do flowers upside down. I usually just turned my paper upside down, so if I were going to do it upside down p any show you I'm always working at my own best. So I would just turn not here. If I were working on, like, a fluid piece, like with this one. I didn't paint peonies upside down. I just turned the page as I worked. I find that a lot easier than just trying toe. Um, not move as I'm working. All right, so let's do one more, and then we'll move on to pee. Any buds? Okay, let's do this one a little bit bigger. So you can kind of see what that looks like all on its own. Start to get bigger here, doing some more gestural strokes and back into my darker tones and start putting in the bleeds. Really? Practice. Coming up on the tip of your brush. You can see how fast that one waas then adding in are getting cold. Okay. All right. So there you have it, a bunch of different directions. And now we're gonna play around with the pne. But
8. Peony Buds: At this point, you may need to refresh your piles of watercolor. So I'm gonna do that here. Just show you again what that looks like. We have the rows of ultra Marine. I still have plenty of permanent rose, so don't need anymore. They're just gonna gently encourage it. And over here makes it up to the consistency that I like and then come in with the permanent rose. Okay? We also are going to be dipping into our undersea green now going to be doing peonies buds with little green stems. And then we will also do another Pini, and add believes next. Okay, so my piles air where I like them. And now for the buds. So nothing overly complicated about these. I think you can definitely overthink. It s so it's good to just again have a structure. So think about the direction you want your pne to face. Nice. Curvy, um, stem here. And then maybe your bud sort of looks something like that. Okay. I'm going to dip into my light color and begin to create the pedals. So you have this one facing a little bit higher, this one coming at an angle and then we have it here closing up. Now we do. While things were still wet, conceal on buds How they are Dockers around the edges. So take your brush. Really? Come upon the tip here, launch into that little white space and create that bleed along the edge. You can also do it back here if you want to. Although sometimes it can create some confusion. You might just wanna have it right around here. Now, I'm just sort of playing with it. This one. Maybe you're having it opening up just a little bit. I'm gonna show you what the leaves would look like using the round brush. And then we are going. Teoh, launch into our introduction torn in our next brush. Okay, so I changed the position here a little bit. So the stem no longer works. We need to look at the middle of the bud and the stem would now start here and come down. I'm just gonna leave this as is, um, just dio the base of it since we're gonna be using this for a wreath. So I start out here and I come in in touch. Sometimes I like to fix things up a little bit again. I start out here with the tip and increase the pressure. Didn't quite time this one the right way. But that's OK. Some quick, gestural marks suffice. Okay, so there we have the pne, but we wanted to do one completely closed up. We would go small and then a little bit of green along the base kind of looks more like a Rosa PNE does have more layers. However, you would have to wait until this is dry and then go back over. So, uh, the only way to really do that is to kind of create these really, really fine gestural marks. And then you have something that looks like it has more layers. It's a little complicated for me. I like the simplicity of this. But if you want something that's a little bit more pne ask, you absolutely can do that. You just sort of keep playing with it. And you have all of these sort of messy layers going on so you can kind of decide which look you like best. And if you did want to add a system to it, you easily could starting here because it's facing up this way. There you go. Not focusing too much on this because we're gonna be putting them in a wreath. But just to give you an idea of what it would look like. Okay, so there you have that. Oh, right, my friends, the next portion is going to focus on our new brush, so excited to go over it with you.
9. Working With The 3:4 Oval Wash Brush: All right. So I want you to take your brush and begin mixing it into the undersea green. This brush has a lot more bristles than the round brush. It's bigger. So you'll need to take some time to properly load it and just kind of get a feel for it. But I'm just gonna show you some basic strokes so that you kind of get an idea of what it's capable of. And then we will start playing with it and making our leaves and hi. Morning, you. Now you're gonna love this brush. OK, so this brush has so many capabilities, you can use the tip of the brush for extremely fine lines which are so fun, like when you're doing a stat like, let me show you. Well, that's not that fine. That's because I have too much water on my brush. As the thing is, you're gonna need to experiment. There we go. So you can see, depending on how much pain you have on your brush and how upright you are, you can get these really, really great than Struck's. Then if you push down a little bit further, um, in depending on which direction you're going. If you're going in a up to down movement, then you have something that looks like this. You can finish that off with a tip. So if you started here, tip pressing down flat, you can see how why'd you get and then gradually lifting up on the brush and bringing it back to a tip. So that's what it looks like. Same thing when you're moving side to side tip flat tip tip, flat tip. So to be able to go from this thin to this thick and one brush is kind of incredible, and it's pretty awesome. You'll see how this aids us when we're working with the leaves, some dipping back into my Pete. And usually the way that I will create a leaf with this brush is I'll create a line first and then I'll begin adding pedals. I don't know what you call that, but just starting to create the leaf. This is so great because you don't get those Really, um, stiff. You know where when I'm creating, like, around like, you know, if I'm doing a round brush me show you, I tend to just kind of make it very neat and tidy, which I like. But with this brush you're forced to be a lot looser, which, if you're anything like me, type a tightly wound toe have to get a little bit looser with a brush is just really good for me. So again and then what you could dio I want to show you a couple of different things as you compress this brush flat and just create one leaf like that flat or what you can dio. If you do need to have some control, is make your line do your stroke. But then you can take the tip of your brush and start to shape it so you don't have toe have thes jagged lines. If you don't want them, you can start to shape it toe look more soft. So there you go. I'm using the very, very tip of the brush in order to create that really round natural or, I guess, unnatural. The more natural would be something like that, to be honest, especially where peonies concerned. Okay, so I'm using it to gradually make it the shape, but then taking the tip and self ning things off and then you can go back in and kind of add some more gestural marks If you want. Teoh, I'll show you a big one here. My pink and my green is mixing over here on the page, which I love sort of creating a brown. We'll work with that. So here will be a big leaf. So this is very coming up on the tip, and then I can go in and soften up those sides. So there you have something that's more like that. There are so many different things that you can dio with this brush. Do you want more of just strokes? Go something that looks more like that. All right, let's zoom out a little bit here because I can see that I'm running off of the edge of the video and I want you to see everything that's happening on the page. Okay, I'll do that one again, since I think that was cut off. I put my paper around so I don't smudge my home. So this is more of like a I am Twig then relieves like a palm branch can go back in. Add some more. You will need to run and you can see how often my hands flying off of the page. Here you will have to dip back in because you're using more of the paint because this brush is bigger, pushing flat and to tip me on the side, flat to tip. Then you could coming over here, do something a little smaller, do something a little bit more gestural, wiggle that brush back and Ford. That's kind of a fun leave as well. Let's do another wiggle leaf tip and wiggle. You see what I'm saying? With a round brush, you can do all of that, but you have to work a lot harder. This is all just different pressure on different sides of the brush. So those are some Superfund leaves? Um, may mainly for the peonies like you saw in that initial picture. We're focusing on something that looks a little bit more like this, but I really just wanted to take the opportunity to show you how many different ways you can use this brush. I am one of those people that love my round brushes. I really don't ever feel the need to venture very far from it because I feel like they're very versatile. I don't use Shader, zor chisels or wedges or anything. Really? In my work. Um, I've just learned how to be really proficient with rounds. This is one of the brushes that his sort of broken that barrier and I just can't talk more most. I just can't talk about it anymore. Clearly, I can't talk about it more because I have been talking about it more. But you get the point, right? Okay, so go. Okay. All right. I feel like I've given you lots of different ways to use this brush. I encourage you to play with it, Um, off, you know, on your own. But before we launched back into creating the leaves on top of the peonies, I just wanted to show you some stem capabilities to So go back over here a little bit more green on my palette. It's soaked it up really fast. Like I said, it's a big brush, so you will have to use a little bit more paint and stems are incredibly fun with this brush as well and very gestural here. If you wanted something that was more simple, could just easily do that. These were still a little bit wet but I think we can go in there and do something go. All right. Hopefully you have fallen in love with this brush as much as I have and have found something new to play with. I I assure you, it is absolutely worth $18. Okay, There you have it. Okay. Next portion will be making the peonies and adding the leaves wet into wet.
10. Adding Leaves Wet Into Wet With Oval Wash: all right. Now it's time for a little wet into wet fund. So I have both my 10 brushes. I'm going to be doing a, um, wide peonies like the beginning, one that we started. Let's go back into that. It's a little weird adjusting to a round brush after working with that oval wash and will warn you, my hands were like, Whoa, there's so much less here. But, um, hopefully you can have a chance to work with it. All right? Can see here two colors. That was the This is the result of the green mixing a little bit with that softer wash so you can see that's kind of fun. What's happening there and mixture of thinner and thicker strokes can we're facing in this direction. So we're working on closing it off, leaving room for that yellow gold. And let's do one more really big one. Really get that essence of those wide pne pedals really coming out here flat, flat, flat on the brush. Okay, launching back in while everything still wet, looking at the driest aspects first so that I can time those bleeds correctly Stings air still very wet down here. I have lots of time that I'm going to leave without any bleeds in there so that the yellow can do its thing. We go having some thinner variations here, Della. No, sir. Baylor? No. Sorry. Here she goes. Okay. Letting some areas touch and others Not so much. Then third, brush my size six going into my yellow gold and creating that middle. Okay, now, while things are still wet, I know I'm moving very fast here dipping into my undersea green with my 3/4 overwash. Let's make some leaves. How fun is this? Okay, just sort of playing around with everything. Not really feeling like I have to do one thing in particular, but letting these colors just do their thing bleeding. Oh, so beautifully. I already need a little bit more undersea green. So I'm gonna do that really quickly. I have everything out in front of me, so I can just sort of do it all quickly. But I definitely recommend having your paints already plenty of paint to go so that you're not, um, having to waste time to do that. Because I want those really pretty dark bleeds. Come around here at a weird angle. I just love how gestural everything looks. It's so, so loose. And I just truly appreciate that when I used to do botanical artwork, I could appreciate Um, you know the intricacy of that. But there's something so life giving about the looseness of this style. So I hope that you are enjoying that, too. I've really gotten into more gestural work as my journey has evolved. Okay, so we're gonna do another one over here, off to the side. I'm actually gonna blend it into this one over here. So start with R V. Give yourself plenty of space here, or you can work from the outside in either way, a little bit more complicated and tricky to stay on top of, but it can't be done, so I'll show you that, actually, since it is a little bit more complicated. So now I'm keeping in mind that this is the direction that I want my pne to face. And I'm working from the outside in. Okay, now I will do going back in. Let's add some bleeds. Make this pop Picking up my number six green gold and go Let's had somewhere leaves back into my undersea green trying to do some smaller leaves this time go again Dipping back into my undersea green again. What you can dio I'm gonna put a lot of green on my brush, and I'm going to go back in now on top of and add. Sometimes I think that's too much. But I also like it is. Well, it just kind of depends on what else is happening in the flower. It can be pretty, um, to have some very light areas and then to go back in and add some darker areas. So there's what that looks like. Belen. No snoring honey during our time. All right, well, then we're here. And do you have it? I just can't say enough good things. Now, the goal will be to not smudge it with my Paul. Okay, so you can see everything still nice and wet. That's the thing about having your brushes loaded and ready to go. You can get back in and you're not gonna end up doing this. And then well, actually, it was still pretty went to. That's what I love about this paper. It does stay quite wet for a while, but, um, you know if you were hoping to make a bleed, happen here. Can see what happens is absolutely nothing. It just sort of stays there, So not terrible, but And if you want this this magic toe happen, you have to time it just right. All right, Let's do a pne, bud. So I'm gonna be holding all my brushes in my hand. You know, that could be a little bit overwhelming. Feel free to put them down sky. This one's more brownie color. This is my green in my pink mixing. Which kind of like can anybody here and gonna go any over here? Add it into the base and if you wanted to do a stem, could come down right here. Has your stem work hand a bit more leaves here. And if you want to put a little bit more color back into the base or along the edges, you can do that as well. In the earlier one, we did it along the edges. So there you have your pne bud. Let's do that one more time A little bit differently. Case will start with or later color. I'm gonna flip it around here so I don't smudge closing things off and then going into my darkest and adding some details along the edge, then picking up my opal wash back into my undersea green for a pretty little base. Go. There's another little bud for Yeah, okay. So that pretty much covers wet into wet, um, peonies, butts and using our oval wash. The next thing that we're gonna do is we're gonna put it together for our class project and do, uh, a wreath style. And I definitely have lots of tips about how to, um, not create a wonky wreath, So let's head into that.
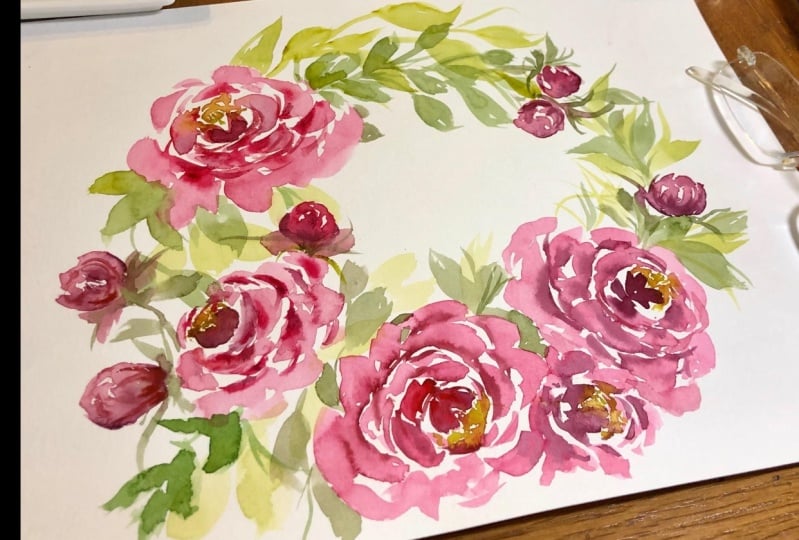
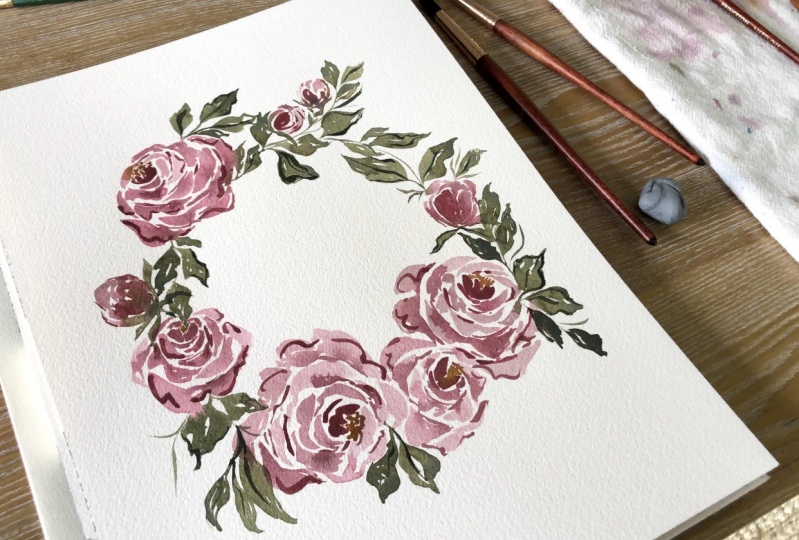
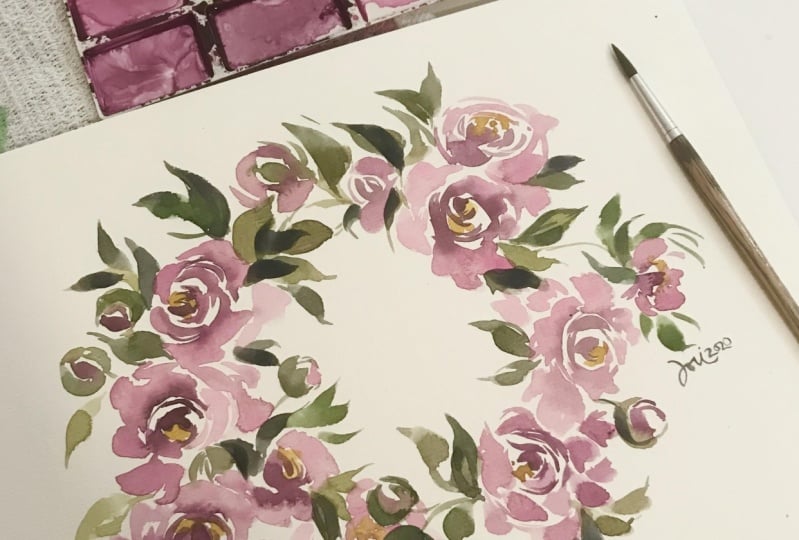
11. Class Project Peony Wreath - Part 1: Okay. My hot tip for wreaths. If you've ever seen a wreath and it looks even slightly off balance, it just makes the whole thing look like a mess. Um, you have to be very intentional when you're making a wreath. If you just start going at it and a little bit here and a little bit there it ends up being all lopsided. I feel like I've tried read so many times just to do them, and I never end up liking one that I don't plan out. So this is my tip. It's super simple. This is the top of candle. It's just the right size, um, something that's like You can kind of see it in comparison to my hand. It's probably 54 to 5 inches in diameter, and I will put it in the middle of the page, and then I take pencil something really light, and I just trace it all the way around, and this is going to act as my area of do not trust Pass, So meaning this circle needs to stay pretty much open. I'll have some branches kind of flowing into the middle, but what happens is if you don't leave this area. You have this wreath that's all crunched in. And there's no pretty hold in the middle to give that that, um beautiful circle shape. So be mindful of this as we're working to create this second ring around the outside, so I'll probably use something else to kind of go out to this. But obviously, you don't want to run up against the page two. If you have square paper with you, a square sheet is awesome toe work on. I don't have a square, so I'm just kind of kind of pretend I'm gonna make some guidelines, like, Okay, this is my square. And then I know that I don't want to run up against, you know, my square page. Um, then you could, you know, if you're gonna sell the original, you could cut off the side. Has obviously read doesn't really work on rectangular paper. So anyway, that's my tip. I hope it's helpful. And, um, like I said, I will guide you as we move along to be mindful of this from this center spot. Okay, my friends, we are ready to create our breathe. I'm so excited, so off to the side. I have made sure that everything is ready. You see that I have my guide circle. I've also lightly, lightly penciled another guide side circle so that this kind of looks like attire. That way I avoid from crunching up against the top and crunching up against the bottom again. If you're selling something as an original, you want to be mindful of all of the space is just as important as the space that you're working with. Your cool canvas is the canvas, especially where wreath is concerned when you want something to maintain its shape. Um, if you're just using this to turn into a prince, it really doesn't matter because you could be putting it on a different background and you can move it around. But if you intend to sell originals, you have to be very mindful of all of the space around what it is that you're working with . That's why composition is so incredibly important. So, for wreath, specifically, we want to be mindful to not come up to close and crunch into the sites. It does happen and you can sort of balance things out. As you move along. I may get carried away and it might happen, but I would be doing my best to avoid that. So also mixed up piles. Everything is exactly how I like it. I have my lighter color wash in that softer pink. I have the darker wash with more of the rows of ultra Marine. I have my Daniel Smith green gold and I have my understand green, which I will makes up in just a bit as well. We will be using the oval watch for our leaves and the round brushes for our peonies. We didn't end up using any of the numbers you know by typically always add a sepia or an numbered to my pinks just to kind of make him a little bit more earthy and vintage. But I loved what we were doing so much that I opted to just kind of keep them as is. However, if you have purchased one of my color guides and I prefer a different pink or a red or whatever, please feel free to refer to that. Like I said, all of the tips and techniques will apply. Okay, I also put on a little did you say cleared a loon for us in the background. I won't be talking through this whole process just because everything that we've done, um I've already are everything we will be doing. I've already showed you all of the steps, so I'll speak up when you know pertinent information is being shared. But other than that, I felt like this would just be a good time for us to just paint alongside each other. All right? One of the other things that I did want to mention that is key. When creating a wreath is balance, We want to make sure that our that our circle is not too heavy on the bottom or to have you on the top or that things are to equal. We wanna have this sort of cock eyed feel to a wreath again. If you can take a moment, search Pinterest and just search floral wreaths, you can search floral, wreath, watercolor or just a floral wreath. In general, you will see that nothing is too heavy, right on top of each other, side to side, bottom or top. Everything has a sort of balance to it or is equal in proportion. So someone might having grief. That's totally full of florals, and that works. But if you have like too much up here and you don't have much over here, it can look. We're the only time it does. Work is when you are doing like 1/2 wreath style, so you could put peonies along this whole side and then just do leaves on the other side, and that would look very pretty. There are so many different ways to approach balance. It's not. It's not one of those things that if only you do it this way. It's correct. But I did want to make mention that it's something you do have to keep in mind. When you're creating for us. We're gonna be putting some peonies down here. Some peonies over here and probably some buds up here just in order to get the right balance and you'll see, is how you know, as I'm creating how that works and you may have plenty of experience with threes, I always try and talk on these videos as though I'm talking to somebody who is starting from the beginning. Beginning there's nothing more frustrating for a newbie than bypassing all of the little things and steps that lead up to the arts. So please bear with me as I am extra thorough with that, Aretha's also why we, um, practice all of those positionings Because if you have a wreath with flowers all facing the same direction in the same size again, it's gonna look very one dimensional. So you're gonna want to perhaps take your pencil and just give yourself some guide marks. I tend to not really need those when I'm working with a wreath, but I think we'll do it just just for the heck of it. So do my sideways A here and then I'm gonna dio a little bit right here again. I'm crossing into that territory. It's okay to do in certain spots. But if you do it all the way around your ended up with this, um, you're gonna end up losing your circles, so kind of keep this is your guide. So again, there's that there's this one, and then I'm gonna have one coming up right here, and we'll have one down here, then perhaps one right there. And this is just kind of serving as a reference point. I may break it as I'm painting In fact, if, like it's not turning out the way I want to, that I'm gonna have to totally adjust what I'm doing. That's just the nature of loose artwork. So keep that in mind as we're going along here. Okay, so you have some very loose pencil marks. Another thing that I forgot neglected to mention, is that you can make your guide marks, and then what you can do is take your need herbal eraser and go over them, which is what I did here. I don't think I mentioned that already. So I had my circle, and then I just took it and just kind of gently blotted it along the paper. That's going to make it easier after we're all finished. To erase those pencil lines afterwards, make sure there's no little fibers or anything. Watercolors will pick up anything, and then it just sits in there and can really drag it out until it's dry. So make sure your canvas is nice and clean. Trying not to have any oils on your hands cause what ends up happening when you have oils on your hands is the paint absorbs into the oil and you get this sort of smeary look, So I try to be mindful of that, too, but sometimes that happens. Okay, so I'm gonna pick up me number 10. We will start with our first Pete. Me? I'm erasing those lines that were going through the flower just cause I know I don't need those Alexa Volume up. Let's rock out. Right, Alexa Volume. I love Alexa. Sometimes I boss her around and I try and say please. But I don't know if any of you guys with kids have noticed that if you have smart homes or use Alexa, you know, you hardly ever say like, Alexa. Please turn the volume up. But I try and do that. So Hazel knows that we don't just demand people to do. Thanks. Uh, it's interesting living in the 21st century. All right, Okay. - So you can already see that I've run into my space over here where I was planning on putting that little pne, so that's not gonna work anymore. So I'm going to be moving it down into this direction and just sort of modifying as I move along, picking up my number six brush with the Daniel Smith Green gold picking up my mobile wash dipping into my undersea green, Going to get some of those pedals while the paint is still wet. Going to be mindful, however, that this is our circle. - No , - Bella , uh, that no story, no story do my second p Any sort of hiding behind these leaves here, - picking up my overwash come in while these leaves were still wet, just like before. Have to be careful about these leaves, though, because you can already see this Read this sort of coming like day, so it's gonna be very important to make it come back around. - So here I'm gonna work from the outside in. So this is usually where I take a moment to just sort of pause and reflect and look at what it is that I've done. It's really good to be able to just kind of stand back and have a look at the whole thing. When you get carried away, that's when you start to lose structure in shape. So this is shaping up to be, um, pretty much, you know, as I anticipated. Obviously, I've gone off of my original designed, but that's fine. I just sort of adjusted as I've gone along, gonna end up doing one more down here, kind of facing this direction, and then I'll do a couple buds up here and that will finish off the reef and then I'll go back in and add some leaves while things were dry as well. So don't feel like you have to do wet into wet with every single pedal. It definitely gets overwhelming to time at all, so you can just pick your moments and where you want that to happen.
12. Class Project Peony Wreath - Part 2: good. Flip the paper around to get the best angle, and I wanted to do it while trying not to smudge my And in my painting, which I am known for doing. Start of losing my dark pigment pigment over here something quickly. Add a little bit more Rosabal True marine to the mix. Very pretty. You can see that's much darker, which it kind of like definitely add some fun. Contrast. No. - Came back into my brush. Create the leaves. Sorry, I am having trouble playing music. We'll turn it. Alexa, please play cleared. A loon. Here's Claire de Lune by Claude WC on Amazon music So being careful not to run up too close to the edge of the page, getting a little bit more green on my palace. Well, starting to dry up e u a few penny butts a little too soon to be adding the wet into wet there, but I'm just kind of trying to keep things moving along well at the leaves. For those in just a moment. Once things have dried up a bit, - you might like the instrumental version of this song to hear it just say, play the instrumental version of clear to bloom. Play the instrumental version of Cleared alone. Thank you, Alexis. Okay, some adding some sort of with speed leaves to the birds. Doesn't sound like Alexis gonna play it for us. Alexa, play the instrumental version of Cleared balloon Claire de Lune by classical vault of eyes on Amazon music. Okay, you're looking good. Go in and add some more leaves over here. Also going, Teoh Durkin up a few spots over here, - picking up more green on my brush to darken up some of the lighter parts of the leaves and just kind of give some wispy motion strokes starting to run up against my pages. You can see it's not terrible, but in order to get that trajectory of that round motion, I need to be careful about putting too much down here or you end up getting a square wreath , so I probably shouldn't have added that lead. Just, you know, hindsight, but it's not terrible. We fix it by some thinner strokes along the edges. See, this is the part where you have to sort of be mindful of everything that's happening darker along the base around and actually over here to kind of, um, fix the bottom heaviness that's happening. And it's okay if you run over your flowers. I don't think that look bad at all. Especially if things were still wet. Kind of works perfectly. - Go . I like to stand up and look at things from an aerial view a lot of the time rather than just stay in my seat. Um, it helps me to just kind of see the scope of the peace and make changes as necessary. - Case we have a read that's looking pretty good. Has a nice round shape to it. Um, it's a little bit bottom heavy over here, but I think that that's a nice balance against the emptiness over here. So I would say that this is a pretty good It's not perfect, but I feel like if we touch it anymore at this point, we're going to start to lose the shape that that circle is so important to maintain and this space in here or else. Like I said, you run the risk of just losing that that open space. So at this point, I would probably like, maybe poke at it a little bit more, take a few minutes to look at it, Poke it a little bit more. It really comes down to preference now. So again, I'll leave you to it to decide what you might add at this point or nothing. And, um, yeah, I think this looks pretty good. Um, other than that, I may when things were dry going and add some veins. But a wreath like this doesn't really need them because there's so much wonderful texture and bleeding happening. And I feel like the more details you add, sometimes you can just over at interest. So keep that in mind to, and then when you're all done, you can go in with the the need herbal eraser and follow that will come out and it won't lift up your water color paint, right? That was super fun. I hope you enjoyed this peonies class. I hope the wreath was explanatory. And, um, like I said, if you have any questions about anything that we've covered, you're more than welcome to email me. I look forward to seeing your beautiful creations. Please, Please, please post a picture here so I could take a look. And if you post them on instagram, please tag me. I always appreciate your reviews and your feedback. So thank you for the time you take to do that. It means a lot as there are hours and weeks that go into making these classes happen. Alright, guys, Until next time.
 Cara Rosalie Olsen, Floral Designer + Watercolor Instructor