Transcripts
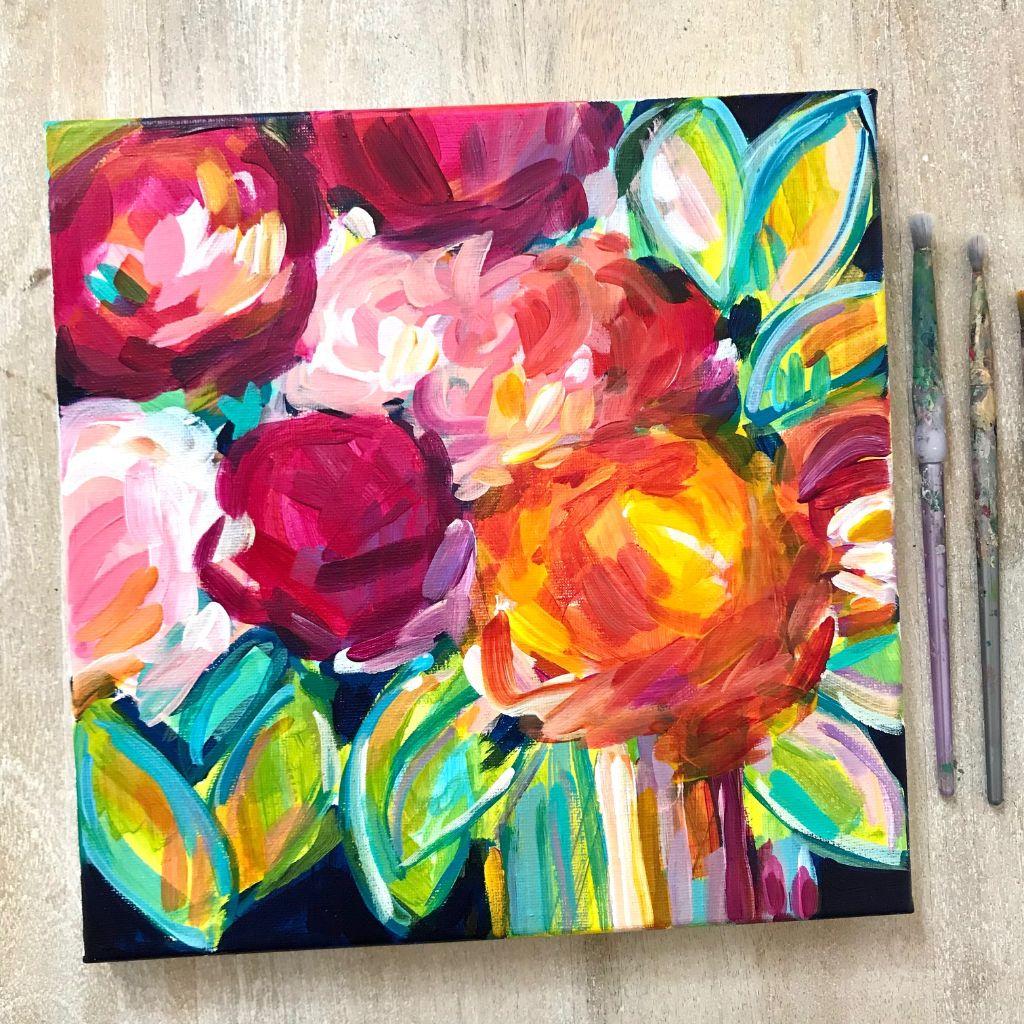
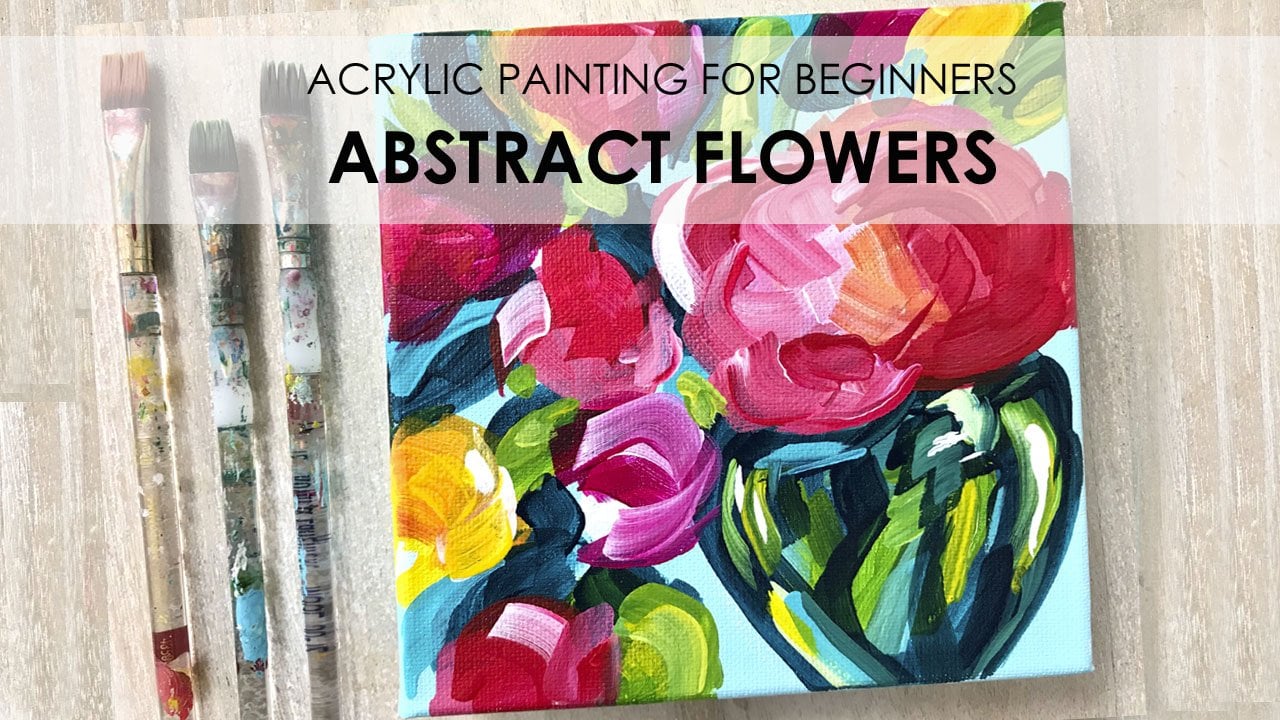
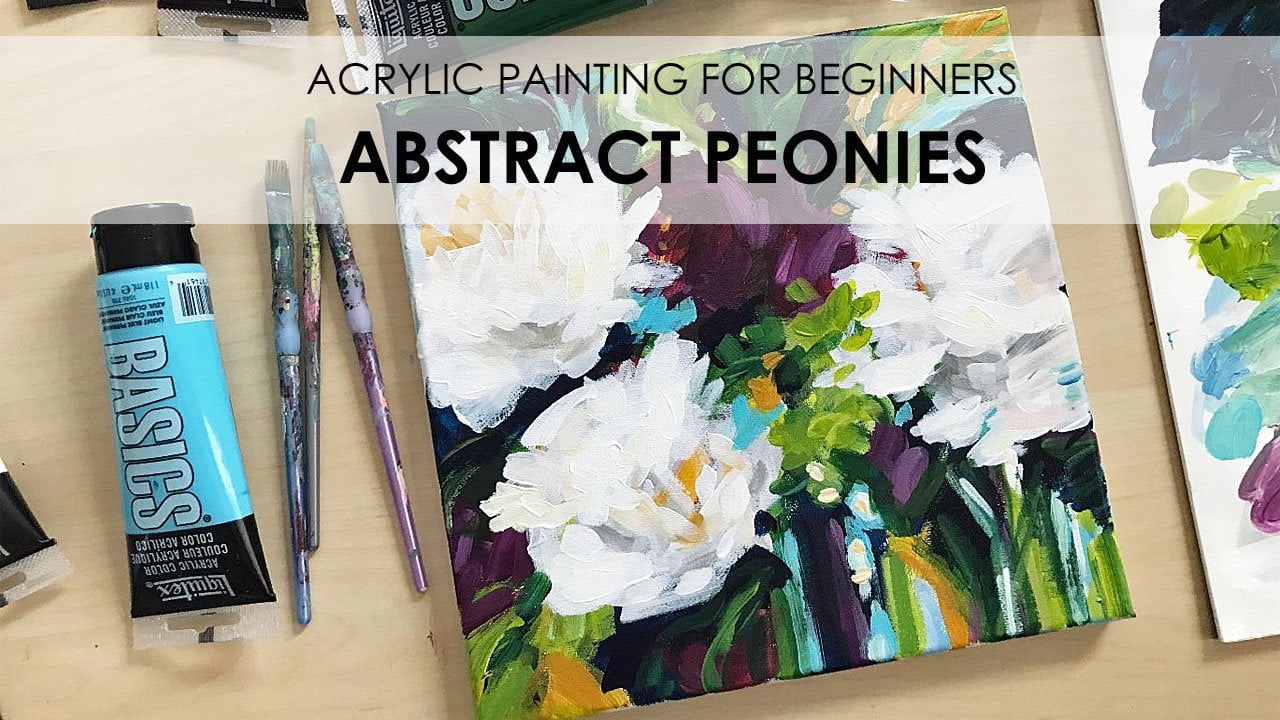
1. 1 Introduction: Hey, artist friends, it's L. Today I'm gonna show you how I painted this bright, bold and loose abstract flower painting Before today's class, we're going to use a 10 by 10 inch canvas and acrylic paint. You're also going to need some paintbrushes, water, paper towels and a paint palette or a paper plate. You'll also need some pastels are a pencil to mark up your composition on your campus? I've listed all the supplies and paying colors I used for this class below the video, but feel free to change up the colors and composition of your painting. I'd love to see what new ideas you come up with.
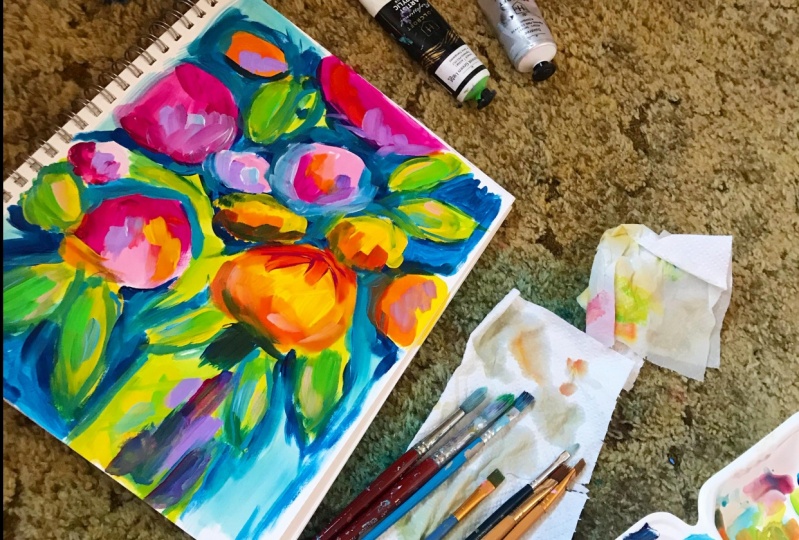
2. 2 Sketching Composition: I like to sketch a few possible compositions before I start painting. I get most of my ideas for composition by looking at pictures of flowers online. I keep my sketches very basic. I break down the image into simple shapes, and then as I paint, I use my imagination toe add details. I like my paintings to be semi abstract and whimsical. So once I nailed down a composition, I no longer used the original image for reference because I'm not looking for realism, just composition for today's painting. I'm going to use this composition, so I'm going to grab my canvas and my pastels and we're going to get started.
3. 3 Outline: Now that I have sketched out my composition, I'm going to market on my campus using some pastels. I'm gonna first draw roughly where I want my leaves to be. Don't worry about being to exact. I know that I want my vase in this area slightly off center. I like to have a couple of leaves coming off the side of the base and I have one overlapping here and then for my flowers. I like to have a big focal point flower sitting on top of the vase. I'm gonna have one coming off the side here when coming off the top here, a few smaller ones that will probably end up blending together good sized flower there and just like that, and then the rest will be will fill this in with some foliage color or will make our flowers a little bit bigger as we go.
4. 4 Color Blocking: because I want this painting to be bright. I'm going to start with the brightest colors that I have for my leaves. When you use a lot of this light, all of green and a lot of cade medium, medium yellow and I'm gonna add some water because I want this to be a little more translucent. This painting is going to be very layered because the paints air so translucent it's gonna go on very thin, and we're going to need a lot of layers. I'm just gonna add a little bit of yellow to some of my leaves and maybe around the leaves . Them also gonna add some to my base. Don't worry about going over the lines. We're going to clean up the edges later and with the same brush, I'm picking up some of this all of green. I added some water. I'm gonna fill in my leaves nice and thin, kind of messy. You can put some of your green around your flowers too, if you want. Doesn't have to go directly in the leaves. And don't worry about staying within the lines. You can also add a little blue at this point if you want. I'm only gonna add touches of blue. I would rather have more green and yellow in this painting. It'll look nice later with our orange and pink flowers just adding touches around the flowers. Some of it will get covered up. Some of it won't. It'll make for a nice background. Okay, Now I'm going to add my base layer for my flowers because I want this painting to be bright . I'm going to start with the brightest colors that I have for my leaves. When you use a lot of this light, all of green and a lot of cade medium, medium yellow and I'm gonna add some water because I want this to be a little more translucent. This painting is going to be very layered because the paints air so translucent it's gonna go on very thin, and we're going to need a lot of layers. I'm just gonna add a little bit of yellow to some of my leaves and maybe around the leaves . I'm also gonna add some to my base. Don't worry about going over the lines. We're gonna clean up the edges later, and with same brush, I'm picking up some of this all of green. I added some water under a minute. Fill in my leaves. Nice and thin. Kind of messy. You can put some of your green around your flowers too, if you want. Doesn't have to go directly in the leaves. And don't worry about staying within the lines. You can also add a little blue at this point if you want. I'm only gonna add touches of blue. I would rather have more green and yellow in this painting. It'll look nice later with our orange and pink flowers just adding touches around the flowers. Some of it will get covered up. Some of it won't. It'll make for a nice background. Okay, Now I'm going to add my base layer for my flowers.
5. 5 Color Blocking Part 2: for my flowers. I'm gonna go mostly with yellow, orange, and magenta and pink already have some yellow there. This big flower is going to be my yellow and orange flower. You just wanna block in the space right now. I'm going. Teoh have three or so magenta flowers on a couple of pink and white ones blended in. Go with magenta at the top. Be a mixed flour Here. I'm keeping my paint pretty thin at this point. So it dries quickly so that I can add a lot more layers at this stage of the painting. You really just blocking everything in. You don't need to be to exact We'll do some pink and white here in the same over here. If you mix this yellow and this magenta gives you a nice orange color, we're going to be adding some of that orange to our focal point flower. And while this is drying now, I'm going to add some of my shadows
6. 6 Negative Space Shadows: for my shadows and my negative space. I'm using this Prussian blue, which is a very dark blue. I'm gonna put some of this around the flowers and in my negative space here, putting some around the flowers will give it a nice shadow and add some depth. And when we're finished, you'll see that these bright colors really pop more because of the dark blue background. I want this painting to look a little loose, so I'm not worried about clean edges or sharp edges. We can clean this up later if you want. Just really fill in the space. Simple brush strokes. Keep it loose. - Now , I'm gonna let this dry for a few minutes before I start my second layer.
7. 7 Layers and Details: now that these layers are mostly dry. I'm just going to go over the leaves to make some details. And I'm gonna do this a few times. I mean, you add details into my face. I'm gonna mix some of my green on blue, and I want to also leave some of the yellow from putting the layers on. Been still so that I have that translucent look. I kind of like the way this one is looking Might leave that for now. You can vary the direction of your brush strokes to make some subtle looking marks. And it's okay to overlap that dark blue that you just put on or whatever other color you used. The green on top of the green will just darken it a little bit. But I'm not covering the entire leaf with one color. I want to keep all that variation in my face. I'm making some diagonal marks and I'm gonna add in a little bit of turquoise as well. I have not used to yet have this turquoise blue color. I'm going to take a smaller brush and outlined some of my leaves Add a little water Gonna hold my brush toward the end so that I don't have super control over it. Because I don't want my lines to be exact. I want them to be a little loose. - And I'm also gonna bring a little bit of this turquoise down into my face. Then I'm gonna add some to the background between the flowers. Little bits of this might stand out as we get closer to finishing our painting. And just to add more detail, I'm going. Teoh, use some of my light blue, make some additional marks, these air a little bit more subtle. But they had some nice detail and I'm going to go back to my flowers.
8. 8 Layers and Details: now for the flowers, which you know are my favorite part. I'm going back to Magenta Cade me, um, yellow pain. Quiet. Maybe a touch of purple. And that's basically what I'm going to use for my flowers to make my orange. I'm gonna mix my cave me, um, yellow and my magenta. And I'm also gonna add a lot of these colors into my face because I want this painting to be more whimsical. I don't want This is not a realistic painting. This is a loose painting. It's a bold painting. So we're gonna add color where we normally wouldn't see color in a painting or in a real bow. Okay, I should say I'm going to start with a little bit of magenta. Little bit watered down. You'll notice that I'm not making circles and mostly making lines, maybe some semi circles, maybe some sort of triangle shapes To get this nice orange color, I'm going to take some of my yellow, a little less magenta and mix those together. You can add more yellow or more magenta, depending on the shade of orange that you're looking for. I'm adding a little bit of water to my brush because they want this to go on. Then again, I'm not making circles just some lines because this is so translucent in our blue is so dark, it's gonna take a lot of layers to cover that up. That's OK. It'll make our painting a little bit more interesting. You could use white to cover it up a little, let it dry and then paint over it if you want. I'm gonna put a little bit of orange and some of my other flowers, but this is going to be my big orange flower right here. I like to add different tones even though this flower is gonna mostly beam agenda. It's nice to have a little bit of orange in the background. I'm gonna pick up a little purple and layered onto my magenta. Here, you can see that my brush strokes, they're going in different directions because I don't want my flowers to be perfect circles . No, just wipe off my brush and I'm gonna add some fun colors down here into my vase. So I'm gonna put a little bit of orange Just a little, some magenta, a little bit of paying, put a little pink in my leaves also. And I'm just making some marks that, I guess make things a little bit more fun and whimsical. Layer my pink. - Just keep mixing colors with those same few colors that you already have on your palate. For some variation, add a little to your leaves, go outside the lines and we're already looking like we're getting a little bit more fun. I'm going to take a little bit of blue and put it near the pink. I like the way those colors look together. And I don't have enough blue for my taste in my face. Okay, I'm gonna let this dry and decide what my next move is going to be.
9. 9 Layers and Details: okay, Clean my brushes while that was drying. And I've been looking at my painting, and I think I need to start to add some fun details. So I'm gonna add maybe a little bit of white, too. Some of my flowers and I was gonna add some dots and some lines. I think the key is try not to be too exact. You might want to try to loosen up by may. Be holding your paintbrush in your non dominant hand or holding your paint brush at the edge so that you have less control. Any area that looks a little too dark to you, you can cover that up with some white. I do always like to have a little bit of white and my face as well. Gonna mix a little purple and white. Lighten up that purple a little is going to use the purple sparingly, but I do like it for some details. Work on these magenta flowers a little bit. My brush is dirty, so it's not really the color I wanted, but that's OK. Just kind of turn your brush to to use the different sides of the brush. You don't have to use just the tip or the flat side. You can turn it sideways. I've been a mix a little bit more orange. - I think this is gonna be just kind of a big blob here, So just making some little swirly lines with some of my pinks. Keep that pretty abstract. Too much paint on my brush. I got a little yellow lightened that up a light yellow mixed with white. They're like that a little better now. I think the best flowers are the ones that are unplanned. Just adding some details and jamai leaves with all different colors. Do you really like how whimsical this oneness coming out? Sort of bold, little bit loose. I need a little more variation in my magenta The mixed the teeniest bit of blue And to darken it up a little made it more of ah, purple e magenta Because we don't want it all the same exact color that I was going to make a few different lines. Hey, I like this one. I like this one. I think I like that one. I'm gonna add a couple more details over here with my pink. A little bit of yellow just a little bit change things up. I think I want a little bit more yellow in this one. Less orange, this cave. Me, um, yellow is very translucent, so you do need a lot of layers. If you want it to stand out, you can also paint it right over white, which helps it stand out a lot. I'm just adding a little bit more of it to my leaves to kind of balance things I would a little I like that turquoise there, so I'm gonna leave that. - I'm just thinking about details now. Where could I use a highlight? Is there anything that needs to be covered up? Are we balanced here?
10. 10 Final Details: to finish this up. I'm just going to go over my dark blue and I think I'm gonna outline my leaves again. I'm pretty happy with all of my flowers. I like that. Some of thm are more detailed than others. Even though there isn't much to this one. Sometimes less is more. You don't need all of your flowers to be a focal point. It is hard to stop. Sometimes, though, I find myself over doing my flowers a lot, it helps to step back and just let your layers dry And look at what you've done so far. I'm gonna go back to my thin brush and I'm gonna mix some of this blue, I think with a little bit of white and also a little bit of water so I can make some really loose lines. Hold the very end of my brush. You can even go over them with a couple of different colors. Maybe you want to add some turquoise are some aqua, Some white are almost white, is nice too. And your leaves for details. You can even use some of your colors if you want to use some purple. I think that looks good that purple and green look great together. This awful color that I haven't used yet. Just get one area that's bothering me a little bit right here. Just put a little more paint on that to cover up that blue there. Okay? And I am calling this painting done.
11. 11 Varnish and Sign: Once you're painting is completely dry. Don't forget to sign the back and toe varnish your painting to preserve the colors. I like this heiress Ole Matt Varnish, but there are a lot of other ones on the market that you can use if you want to be notified . Every time I create a new skill share class, you can click the follow button above the video and you'll be notified every time I upload a new class. And if you do create a painting after watching any of my classes, I would love to see it. Please click on the projects tab below the video and upload a photo of what you created. Thanks for following along with me on skill share.
 Elle Byers, Artist and Teacher