Transcripts
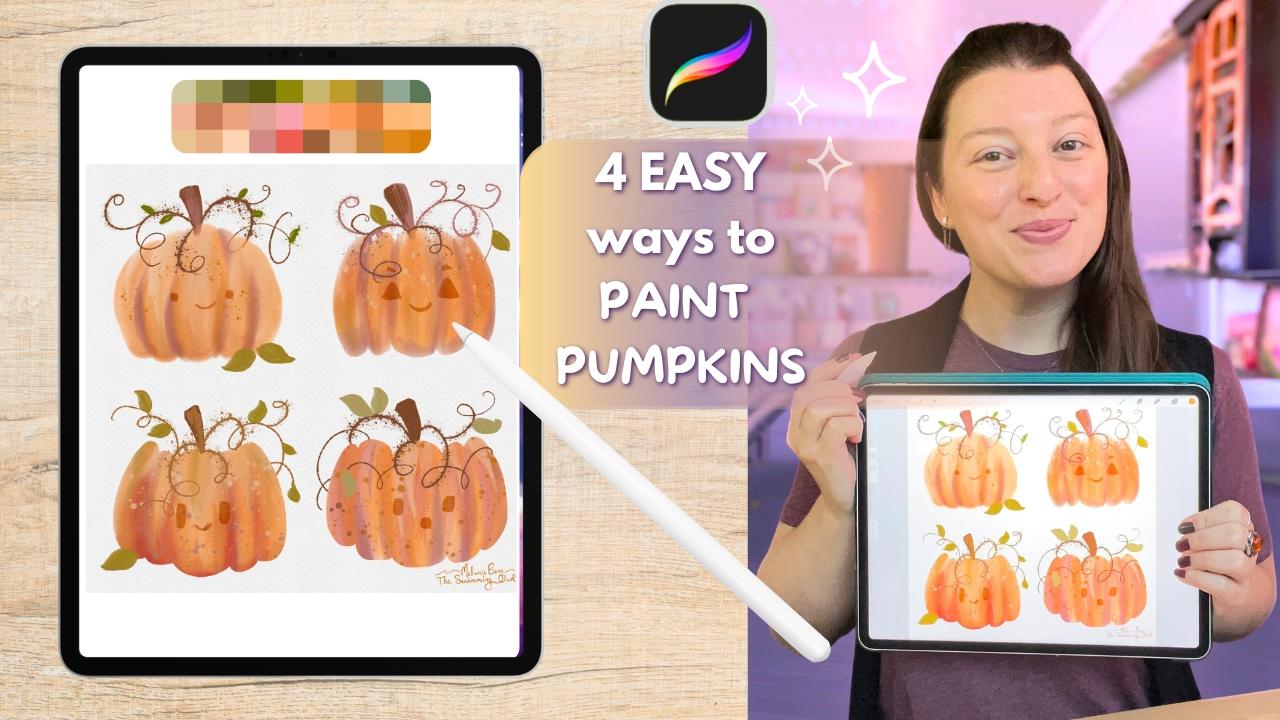
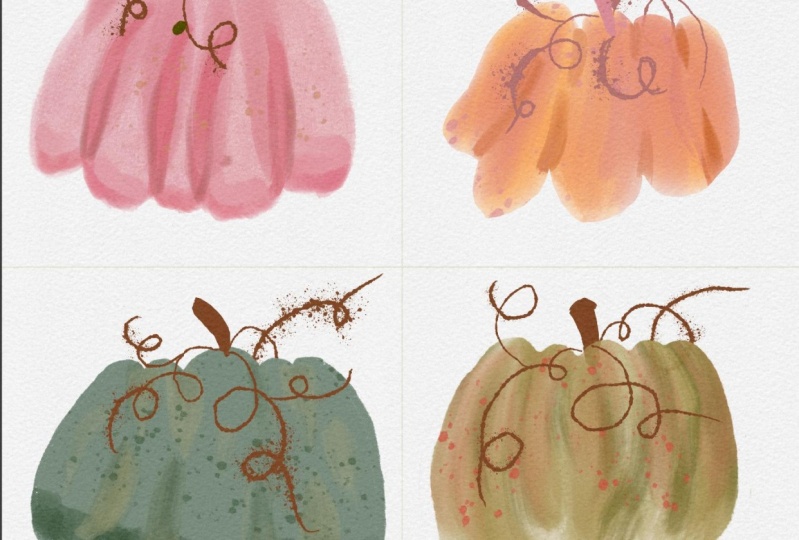
1. 1 Let's Paint Pumpkins Together: Hey, creative friend. If you are in the
mood for a quick, creative wind that
feels cozy, playful, and a little bit whimsical, this class is for you. We are going to be
painting pumpkins in Procreate using four different
super easy techniques. Each one will have a soft
watercolor inspired vibe, but we'll be using different
approaches each time so you can discover the technique that feels the most fun for you. There is no pressure and no
perfection in this class. We are just making a messy, cute pumpkin patch
that will make your iPad feel like
a sketchbook page. Hey there. I'm Melanie. I'm your creative
cheerleader today. I'm a full time
artist and teacher, and I love creating
colorful whimsical artwork. It's usually for cozy products and coloring books these days. My classes are all about joy, play, and approachable
creativity. And if you'd like more
happy art in your life, you can find me making art
over on YouTube, as well. And please consider hitting that green follow button
here on Skillshare, so you never miss a
new class from me. Alright, let's grab our iPads and paint some
pumpkins together.
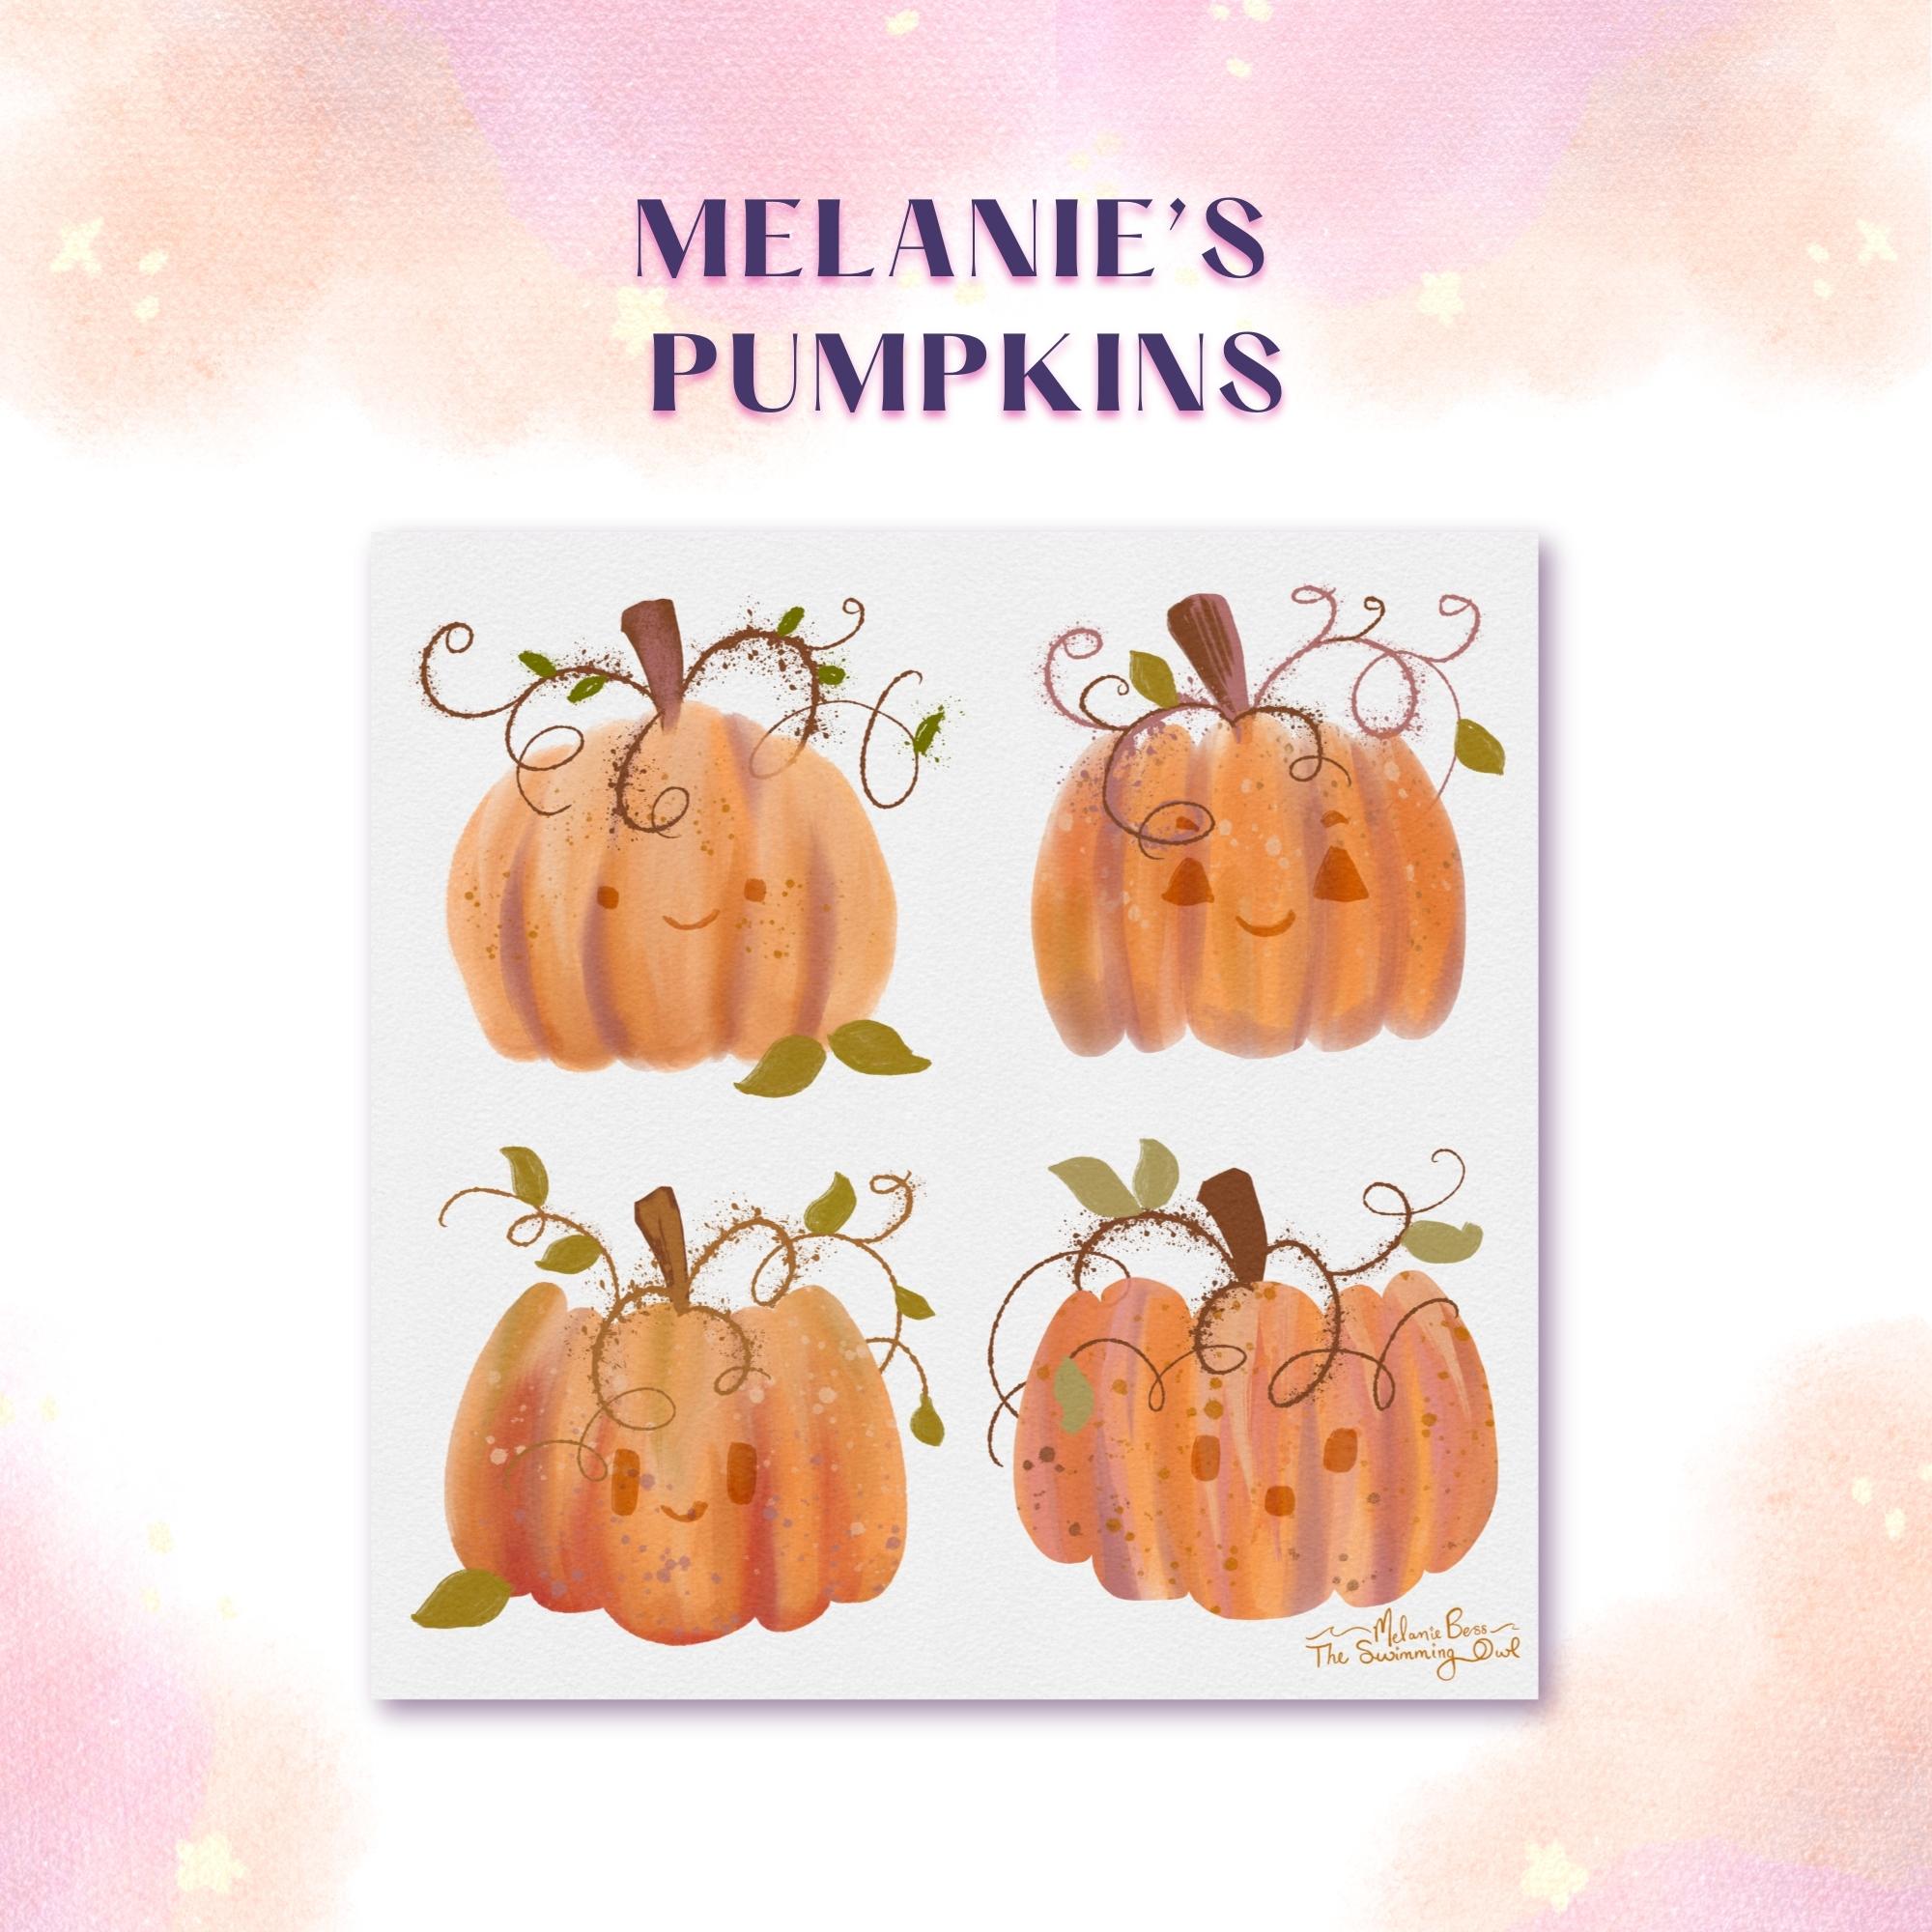
2. 2 Your Project: By the end of this class,
you will have four pumpkins, each with a slightly
different personality, kind of like a messy
little pumpkin patch. And, of course, as always, feel free to make these
pumpkins your own. Use your own color palette, add some cute faces or vines, fall leaves or fill out the page with more
artwork and doodles. Once you're done, I'd
love to see your pumpkin, so please upload your projects into the projects
and resources tab. It always is inspiring to see the creative twists
everyone comes up with. You can even create
a whole page of pumpkins using your
favorite technique, and then share that
in the Projects tab.
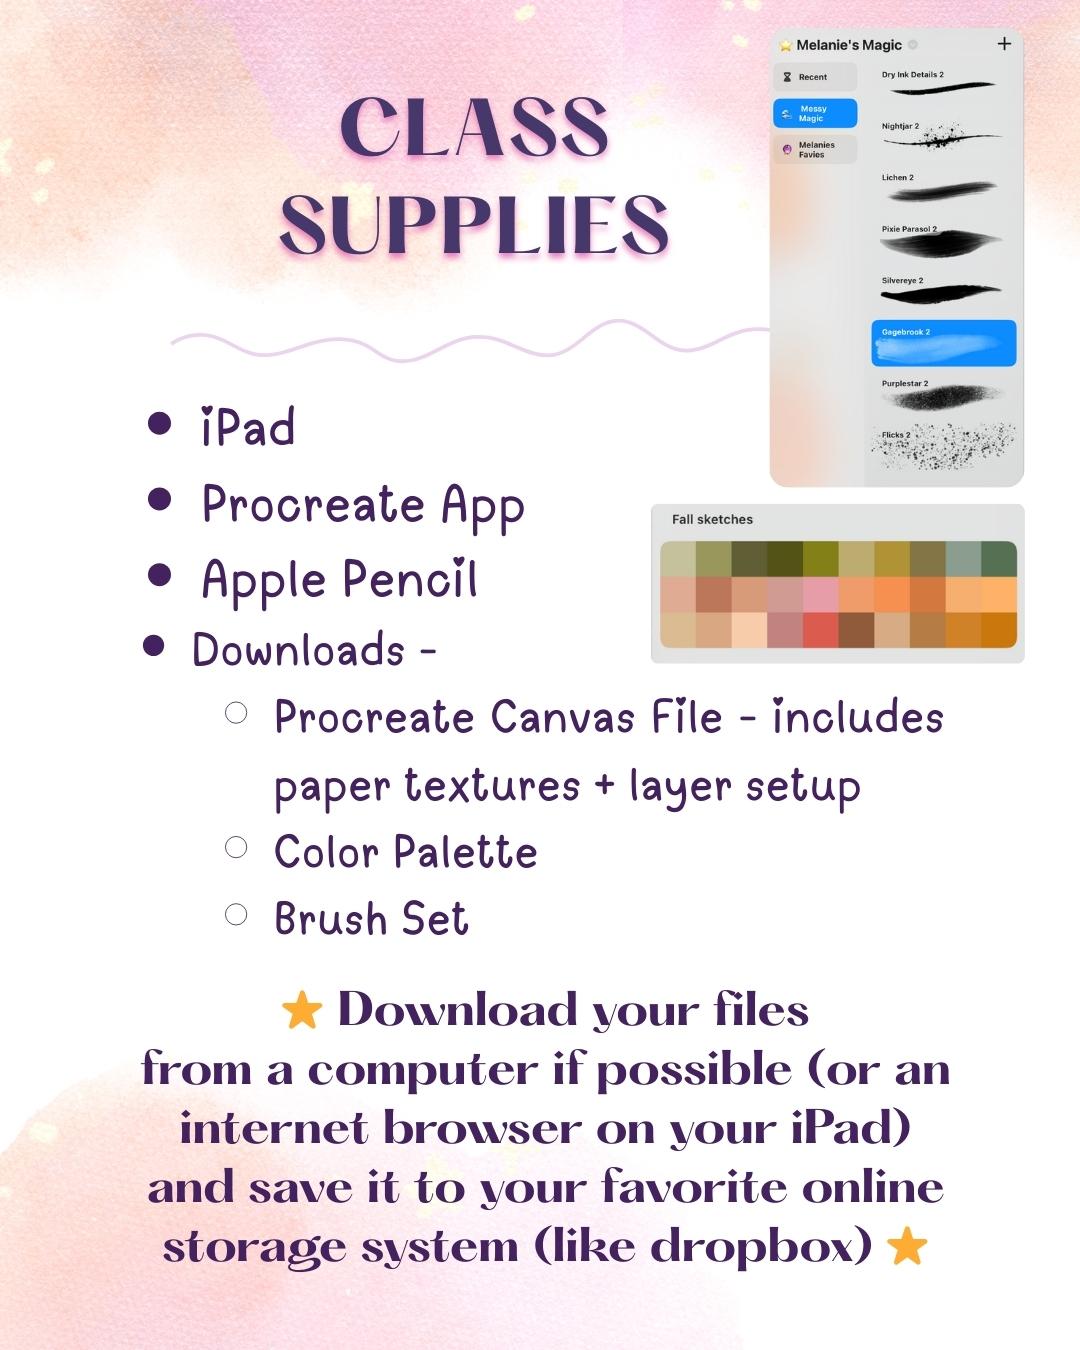
3. 3 Supplies and Downloads: For this quick class, you're
going to need your iPad, the updated version
of Procreate, which actually had a
very large update as of September 2025 with
lots of new brushes, and you're also going to
need your Apple pencil. I've also included a brush
set, a color palette, and a textured canvas
in the resources tab, so your pumpkins will
have that watercolor feel right from the start. So go ahead and download those files and import
them into Procreate. I always save my
files to Dropbox, and then it's as
simple as tapping that file to import
it into Procreate. I usually will import
the canvas first, then the color palette,
and then the brush set. So once you're inside
Procreate to import that file, you're going to hit
the button that says Import at the
top of your screen. After you have hit Import, you're going to locate wherever
you saved those files. So for me, it's
always in Dropbox, tap on it and pull
it into Procreate. On this file, you're going
to notice several things. At the top, I have this layer
that's called dividers, and that is simply the lines here that's going to help guide us in where our four
pumpkins are going to go. At the end, you can turn
that off if you want to. But keep it at the top for now. Next, you're going to
see paper textures, which is a grouped layer of
different paper textures I have added into this file for us so that we get that
watercolor texture. These layers are
locked so that you can't accidentally
paint on them. The next thing I have here
are some pumpkin shapes. This is actually one
of my coloring pages, but I put it into this file
for us in case you needed to reference a pumpkin shape
really quickly at any point. You can turn that on
and off as you need it. Next, you will see
four pumpkin layers. Each pumpkin today is going
to go on its very own layer. So I've gone ahead and
set that up for you. The next thing you're
going to want to do is pull in your color palette. So come up here to the circle
and make sure you're under the palettes section and hit the plus to import from a file. And find wherever, again, you have saved that, tap on it, and it will pull
in to procreate. The next thing is the brush set. It's called Messy Magic to pull that in, go
to your brushes. If your brushes look like this, it's because you've gotten the updated version of
Procreate right now. Procreate just added a ton of new brushes for
us to play with. So I went in, I grabbed a bunch of my favorites out
of those new brushes, and I made a set just
for us for today. So you're going to get to familiarize yourself
with some of these new brushes
that are what I consider to be kind
of a watercolory, traditional feel to them. They're really fun to use. So that's called messy magic. You're going to
hit the plus here, and again, import from files, tap on it wherever
you've saved it, and it's going to pull
up that brush file. So for me, I've created my own little library here outside of the Procreate
library in the classic library. So mine is right over here. It's called, again, messy Magic. So once you have your canvas, your color palette, and
your brushes pulled in, we are ready to paint.
4. 4 Pumpkin One - Freehand Style: Alright, let's paint
our first pumpkin. So, in case you skipped
the supplies lesson, each pumpkin today needs
to go on its own layer. And you'll also see these
divider bars on our canvas. That's just to give us quadrants
to put each pumpkin in. Doesn't matter
where you put them, but I'm gonna go one,
two, three, four today. So I'm going to put
pumpkin one right up here. I'm going to come
over to my layers and find the layer
that says pumpkin one. We're going to start
with what I would consider the simplest
technique today, which is just painting or
drawing a pumpkin free hand. So we're going to grab
a brush, pick a color, and just start painting
organic oval shapes that overlap a little bit. So come to your brushes, and the one that
I really like to start painting with is
called gauge Brook. This has a really nice
watercolor texture to it. It's really fun. It gets us out of
making perfect shapes because it's got a lot of
texture and rough edges. And this brush is just
really fun to use. So I'm going to start
with gauge Brook. Then I'm going to start
with this kind of bright orange over
here on this side, but you can literally use
any color you would like. And to start, I'm
going to start with one kind of big oval
here in the center. Don't worry about
perfect placement. We can change that later. Right now, just get a nice
pumpkin shape going in here. I like the bottom to be
a little bit bigger, so I'm gonna kind of taper
the top in a little bit. And that's going to be
the start of my pumpkin. Super messy and
fun, but I love it. Then I'm going to come in to
a slightly darker color in here and make my brush
a little smaller. Remember, you can
always play with the size and opacity
of your brush, and I'm just going to drag in some kind of shadowy
colors here. And then I'm going to
lower the opacity, make my brush a little bigger, just kind of brush a little
bit of this in at the bottom. It's like a shadow down here. And then I'm just going
to bounce around, do a bunch of different
oranges and layer these in. Kind of swiping them in, maybe make my brush
a little bigger. I'm really liking this so far. I'm going to go a
little brighter. Remember, we can always
two tap to undo, three fingers to redo, or you can use little arrows over here as well,
undo and redo. The other thing that's kind
of fun is we could blend. So to use the same brush
as our blending tool, hold down on the little
smudge tool right here, and it will select Gage Brook
as your blending brush. And then you can sort
of blend any areas that you want the texture
to be a little softer. I actually really want
a lot of messy texture. I think it's just
super fun and playful. I'm gonna choose this
kind of mauve color down here to put in for
some of my shadows. I'm really liking this so far. You can keep playing with this as much or as
little as you want. You can make this as fast or take as long
as you want here. The last thing I'm going
to do is I'm going to grab the flick brush and just put in a little bit of dotted
texture on here with this. I'm going to go
down to this more pumpkin pie color down here. I'm gonna make
this really small. And I'm just going to sprinkle
a few of these in here. I think that looks
really good for now, but our pumpkin is missing some stem and vine action here. So let's add that in now. The first thing
I'm going to do is I'm going to move my pumpkin a little bit because I went way towards the top and I
don't have enough room. So I'm going to
take my arrow tool. And because this is on its
own layer, I can move this. It's isolated. It's
very easy to do. I'm going to move it
down. The other thing I can do is transform this. So to transform it, I have some different
options down here, uniform, distort and warp. Uniform will make the whole
thing change all at once. It keeps the same ratio, distort, lets us make it
maybe taller or just wider. The whole thing doesn't
move all at the same time. Remember two fingers to undo if you made something
you don't like. I think I'm going
to make it a little wider, and I'm going
to move it again. We can also warp, which
allows us to change just certain sections
and not the whole thing. Sometimes I like to squeeze
the top in a little bit, maybe make the center a
little bit more rounded. And I'm happy with
that. So I'm going to tap on the arrow tool
again to kind of release this tool.
Now I need a stem. So there's a couple of
different ways you can do this. You could just put
everything all on one layer just to keep this a simple
sketchbook page for fun, or you can make a new layer, drag it beneath pumpkin
one to start your stem. For the stem, let's come to our brushes and tap on lichen. And then I'm going to use
this deep brown first. And now since I drag
that layer beneath, this stem will be
behind this pumpkin. Because this is a
watercolor brush and it's not super solid, I can see the stem just a little bit through,
and I don't mind that. If you do, you could
blend it or erase that, but I'm going to
leave it because this is a fun sketchbook page. Then to make the fun vines and you could also layer
in more color here, but I'm going to
leave this for now. I'm going to go to this
brush called night jar. I'm gonna use the
same color to start, and I'm gonna put this
first vine kind of behind my pumpkin a
little bit, like that. Now I'm going to
combine my layers. So I'm just going to
take two fingers and pinch pumpkin one and
this layer here together. So now my next vines will
be on top of my pumpkin. And I'm just making
some really fun, squiggly lines, swirly lines. This brush is so cool. The more pressure you put, the more it makes these kind of messy dotted ink
spill splatter marks. And I think that's just super
fun for a sketchbook page. Let's see. So make
these however you want. I think I'm going to
call that good for now. You can change up your colors. You do not have to do
everything that I just did. You can add more
texture to this, take your time on
it if you want to. You could also even add, like, some little leaves on
here if you'd like to. You can play with any of
these other textured brushes I've included that I
think are a lot of fun. But I'm going to call
number one done for now. So that was just a free
hand painting and drawing really quick to make a
really soft edge pumpkin.
5. 5 Pumpkin Two Selection Tool: All right let's move on
to pumpkin number two. Important part, come down
to pumpkin number two here. Let's work on a new layer. I'm going to come over here
to this quadrant here. Feel free to move to
whichever one you want. For this one, we are
actually going to make a selection and paint
inside of the selection. We need this ribbon
tool over here. This is the selection tool. You have different
options down here, but we want the free hand tool. What I'm going to do
is I'm going to draw a pumpkin shape with
the selection tool. I generally start at the top and make my little bumps
and then come down, make bumps at the bottom, and then end back up at the top. If you need to just
watch me first and then try it
when you're ready. So I'm going to give it
three bumps to start, come down and match those bumps. Then I'm going to do two
more on this side and come up and then do
two more on the top, and to close my shape, I'm going to tap this
little gray circle here. Now my shape is complete. You'll see these running
ant lines all around it. That means we have
a solid shape here that we can now paint inside of. Don't worry if this
shape isn't perfect. Remember, we can always
distort it and warp it later. We can even erase parts
away if we need to. But I'm going to paint
inside this shape now, so I'm going to select my brush. I'm going to come
back to Gage Brook and one of these
orange colors again. I'm going to make my
brush nice and big, almost full opacity
and I'm just going to paint inside of this selection. You can layer up this brush. And now just start bouncing
around your colors. You can also go back
to the flick brush and add flicks
inside this shape. As long as we do not select the arrow tool
or a different layer, we can continue working
inside this shape. I'm going to do
the same things I did for that first one
where I'm going to put in some shadows and
some light areas and just make it messy and fun. This brush does kind of
grab colors around it, so it's pulling in some of the white of the page right now. Remember, we can also blend. I'm going to add in
some flicks really quick. I'm going to
make them larger. Since I can contain these
within my selection, I can make these larger
and they are not actually going to spill
outside of my pumpkin. Whereas with the free
hand shape they did. But with this one,
I can make these really big and not worry
about where they go. I'm going to choose
something dark to do down here at the
bottom with a big brush. Remember you can always select a color here and
then change it a bit by moving around in the
disc or the classic area. You do not have to just
use the colors I gave you. I think this is a
fun messy pumpkin. I'm ready to distort the
shape a little bit now. I'm going to select
my arrow tool now. Now the selection released. I'm going to distort it. First, I'm going
to move it down. Then I'm going to distort
it by making it a little taller and then I'll warp it just a little bit
to make the top a little bit more narrow. We need a stem and vine again, I'm going to use
the same brushes, same tools, and the
same technique. I'm going to come to
pumpkin three but add a layer that way it goes
beneath pumpkin two. If yours went above, you're just going to hold
on it and drag it down. I'm going to come back
to my lichen brush. This time, I think
I'm going to choose this move color for my stem. Then maybe I'll layer just a
little bit of this dark in here and come to my night jar brush back
to my mauve color. I'll put one vine behind, combine them, and now the
rest will show up on top. The ones on top of the pumpkin are blending in a little bit, so I'm going to switch
to a darker color and come back over
the top of that. There we go. Cute. All right. If you need to, you can
reposition the whole thing again. Make sure you're on uniform
if you just want to move it around to make things a little easier on yourself. I think that one is good. Let's go on to pumpkin three.
6. 6 Pumpkin Three Alpha Lock: All right, pumpkin three, I'm going to come down
here to this section. I'm going to come
up to my layers and move down to pumpkin three. For this pumpkin, we are going to be working with alpha lock. It's a very handy tool
to know how to use. For this one, we
are going to draw a solid pumpkin shape
first with a brush. I'm going to be using the
dry ink details brush and a light color. I'm going to use this light color down here at the bottom. You are just going to draw
a pumpkin shape right now. This is a little bit different than
all of my other pumpkin shapes and that's great. I love that they're
all going to have a little bit different
personalities. Make sure your shape is completely solid
so that there are no gaps because now we are going to drop fill
color into this shape. You can refine it a little
bit if you need to or you can wait until it's filled and then refine it a
little bit more. But to drop fill,
let's grab this dot of color and pull
it in and drop, but don't lift your pencil yet. If you notice a gap between
your line and the filling, you need to increase
your threshold. If you notice it spill out, you need to decrease
your threshold, and you do that by keeping
your pencil on the screen the whole time and you don't
release until you're ready, and you're happy with the fill. I'm going to come
all the way up to 908-90-7908 and release. Now if I want to, I
can refine this shape or I can get to painting in
some texture on this pumpkin. I think it's pretty cute,
so I'm going to leave it. Come to your layer. There are a couple different ways
to turn Alpha lock on. The easiest way that
I find is to tap the thumbnail version
and click Alpha lock. You'll know it's on
because you'll see little checkbox marks behind the thumbnail image
of that layer. The other thing you can
do is you can also take two fingers and you can swipe like this to the right and it turns
Alpha lock on or off. I just sometimes
have a little bit of a hard time getting
that to work. I typically tap and
hit Alpha lock. Now that Alpha locks on, anything we paint
inside this shape stays within the boundaries of the shape, it
will not spill out. I'm going to come to Gage
Brook again and I'm just going to start painting in lots of fun color and texture again. You cannot choose
any wrong colors. You cannot do this wrong. We are just having fun playing
with color and texture, turning our brains
off for a little bit, and making something cute
and whimsical and playful. I'm going to get a
little bit brave and put some of
this red in here. I think it would also be
fun for you to put some of these more green colors in here if you wanted,
play with that. I'm going to blend a little bit. Again, I'm going to hold down, make sure I'm blending
with my gauge book brush. You can lower the opacity of that blending tool so
that it doesn't do a perfect blend because I
still want this texture. I almost overdid it
a little bit here. I'm going to come back and
put in a little bit more. I love that this brush
interacts with the color that's already on the page
and it pulls it around. Let's add some flicks. This brush here is a lot
of fun for texture too, so feel free to bounce
between any of them. I also have my brush preview on, so that way I see where the
flicks are going to go. You can turn that on
in your preferences. I think that one's super fun. Feel free to take
your time on it, though, but I'm going to go
ahead and move this down, maybe warp it a little bit,
to make it a little bigger. I'm going to turn it a little so you can rotate
your drawing as well. There's a little
green circle here that we can tap and pull on. I'm happy with that. I'm going
to center it again though. Good. I'm going to
make a new layer beneath pumpkin three
to start my stem. You could use any of
these to make your stem. I just really like
this brush because it has this really
cool angle on it, which automatically gives you a great stem shape at the top. Okay. Let's see. What if I lower the opacity and brush a little
bit of this in? Good enough. Let's come
to our night jar again. I'll put one vine behind and combine pumpkin three and my stem layer and
now put the next ones on top. All right. I'm very
happy with that one. Feel free to fix or change
it as much as you need to. And when you're
ready, meet me in the next lesson for
pumpkin number four.
7. 7 Pumpkin Four Cut Collage Style: Are you ready for
pumpkin number four? It's the most unhinged and
fun process of them all. I'm down here in my
bottom quadrant. I'm going to come
to my layers and make sure I select
pumpkin number four. You definitely want to be on
your own layer for this one. I'm going to start with my
gauge Book brush again. And a pumpkin color. I'm going to have a
nice big brush and a nice pretty much
full opacity here. I'm going to just make a mess
right here in this area. I'm going to make lots
of texture and color, not trying to make any shape. I'm just making a big blob here and we are going to cut
out our pumpkin shape, almost like collage cut out. I'm just going to start
painting in Again, I'm not worried about staying
in a pumpkin shape here. Make my brush a little smaller
and change up my colors. What if I go with this
more pinky color? Why not? I am going to give myself
this up and down texture that I've been doing on the other
pumpkins a little bit. Now I'm going to move
to my flick brush and I'm going to flick some
texture on here as well. Let's go with this
pumpkin pie color again. It's okay that this is over
here. It's not a problem. It's on its own layer and
we're cutting that out. I've got a little wild. Take your time on this or
be done if you're ready. The next step is we're going to cut our pumpkin shape out. There are two ways
we can do this. We can use the selection
tool or the eraser. If you're going to
use the eraser, I would suggest erasing with
the dry ink details brush. Tap on the eraser and
select that as your eraser. I'm going to use the
selection tool though. I'm going to come back over
here to the ribbon tool. I'm going to zoom
in and angle this a little bit because it's easier for my hand to draw like that. I'm going to draw in the
same way we did up here. I'm going to start
at the top to make my bump shapes come down, the bumps at the bottom, and
then end back at the top and tap that gray button
to close the shape. Remembering I can
always warp and distort this later if it
doesn't come out perfect. I made my shape. I'm going to close it by tapping
this gray circle. I'm going to three fingers
swipe down, cut and paste. I'm going to come down here to my layers because now I have the pumpkin shape I made and then the original pumpkin layer. The original pumpkin layer is the one that I'm
going to delete. It leaves me with my
cute pumpkin shape that looks like I just painted on a piece of paper and
then cut out a shape and we're collaging,
which is super fun. I definitely need to move this
and warp it a little bit. If it bothers you that this is no longer called pumpkin number four or that none of our
layers have our names anymore, you can always rename them. Back to this. I'm
on my last pumpkin. I'm going to move it and
change the shape a little bit. I actually like how wide it is. All I'm going to do is warp
the top just a little bit. That's much better. There we go. Now, if for any reason you used the selection tool and part of your shape isn't perfectly
smooth and you want it to be, again, grab that dry
ink details brush. Oops, grab that brush. You can come in and
erase any areas that are bothering you or
refine any edges. I'm going to leave it. I
like how playful it is. I'm going to make a new
layer and I'm going to drag it beneath to start my stem. I'm predictable.
I'm coming back to the lichen brush and I'm
going to use the brown. Make my stem, come
back to night jar, and let's go this way this time. Why not? Now that I
have one beneath, you could add as many
beneath as you want. I'm going to pinch
these together and now make vines on top. Just like that, we just created four totally different pumpkins using different techniques, but they were all
fun and whimsical. I'm curious which one
was your favorite? In the next lesson,
we'll do a little bit of embellishing and talking about what you could do next. But
8. 8 Add Fun Details: Oh my goodness, wasn't that
so fun making those pumpkins? Now that we have learned four different ways to paint
a simple motif like this, you can go on to add
embellishments on your pumpkins or make a
whole brand new page, go back out to your
gallery, hit the plus, make a new sketchbook page
at any size that you want, and create a whole pumpkin patch using whichever was
your favorite technique. But first, I want to
show you how to add some cute little faces to these pumpkins
if you'd like to. You can use the same
technique that I'm showing you right now to add
anything to these pumpkins, but let's add some cute
festive little faces. All right, come to our layers. Above all of our pumpkins, I want a brand new layer. I came up to this top pumpkin
and I'm going to hit the plus and here's a layer right here where I'm going
to put all of the faces. To do this, I want to use a color blend mode so that it's going to interact with
the color beneath it, and I'm going to
do multiply mode. Tap the N, come up
here to multiply. For my brush, I'm going
to use this pixie parasol and the pumpkin pie color or any orange color
that you want. I'm going to zoom in on my
first pumpkin and just draw in a really cute little
face, just like that. Because this is
in multiply mode, I can see the
textures and colors interacting through
what I just painted on. You could do anything
you want here. A little faces, cute, creepy, scary,
whatever you want. Remember two fingers tap to undo things if you
don't like what you did and because this is on its own layer, we're extra safe. We're not going to
hurt our pumpkins. We can always turn this off. But you could make cute
little cards like this, cute little doodles
for yourself. We have some cute little faces. We can also lower the opacity if you don't want them
to look that stark, tap on the M and take this sliding bar here and just lower that
down a little bit. I think that's a little cuter. You could also make
a brand new layer. You can leave it on a
normal blending mode. Choose any of these
brushes here. You could add in some
fun and festive leaves. Once you're done embellishing, the last thing you
want to make sure you do is sign your sketchbook page. I'm going to come up
to my brushes and I'm going to choose this
stamp that I have made. I choose pumpkiny
color and come down to the corner and stamp
my name in here. Oops, I need to put
it on its own layer. I'm going to stamp my name, resize it and put it down
there just like that. If you would like to
learn how to make your own signature
stamp like that, I have another class on my Skillshare
profile that teaches you how to do this in
less than 20 minutes. It's super easy and
instantly levels up your digital artwork and makes it your own
and protects it. If you don't have one yet, highly suggest you go
take that class really quick and sign all of
your artwork from now on. Okay, so when you're done, please share your
pumpkin patch in the project gallery because
I cannot wait to see it and I always comment on your projects because I
love seeing what you created. I do come and talk to you and interact with you when
you upload your projects. Can't wait to see what you did.
9. 9 Thank You: Thank you so much for
painting with me today. I hope this class
gave you a quick, creative win and a cozy little pumpkin
patch on your iPad. If you enjoyed this class, don't forget to
follow me here on Skillshare for more
whimsical procreate fun. And if you have a moment, leaving a quick review
below really helps me out. Okay, friend, go make
your pumpkin patch, and I'll see you
in the next class.
 Melanie Bess, Painting By The Light Of The Moon