Transcripts
1. INTRO: Hi everyone. My name is Colleen and
welcome to my class. In my previous lessons, I have shown you how
to make a dress, then how to draw a
fashion illustration. Now, I will show you
how to make jewelry. There will be several
projects in this class, and I will start with this crochet necklaces and bracelets that are
so easy to make. These crochet is very relaxing. So if you are stressed, try this activity and
you will see it will keep your mind away from
your everyday problems. Besides the beauty of this colorful beads is fascinating and it's
going to cheer you up. You can wear this jewelry
in so many ways as a necklace that you can adjust the length with the
neck list extender. You can wear it as a head
band for a special occasion. And you can play with
positioning it as you like on your forehead or partially
cover your head. And play with
different hairstyles. You can use it to
cover and embellish objects or as a back strip. There are so many
possibilities to create jewelry only by choosing
your beads and furrows. We will continue this class by creating these beautiful
feather earrings, necklace combined with pearls. And then I will take you through the making of some colorful, gorgeous cubed
jewelries that are, again, very easy to make. By the end of this class, you will be able to make these jewelries.
Let's get started.
2. CROCHET Tools & Beads Threading: For this crochet project, you will need obese
meal with needle, a nylon wire of 0.4
millimeter diameter. Some crochet hooks, approximately
50 grams of seed beads, and some other paths
of various dimensions. Accessories such as chain
extender and teardrops, lobster claps, open jump rings, cone ends, two pins and pliers around nose pliers and a needle nose
with wire cutter. Start by filling the
beats in the meal. Thread the wire in the needle, please, the needle in the mail with one hand and spill the meal with the other hand are
collected on the needle. Holder bees through the wire and continue to collect
the bids until you have approximately ten
centimeter obese on the wire. And you can alternate
the sizes of the bees according
to your preferences. Try to find the right
angle of the knee, the wild collecting the beats. The more you do it, the easier it gets to
pick up the beads. You can try a different
technique to rotate the mill. But this method is
less efficient. If you have left with
some beads in the meal and it becomes difficult to
collect them on the needle. Just place them on the piece of paper that you fold in order to create a funnel and put
them into a small sexual
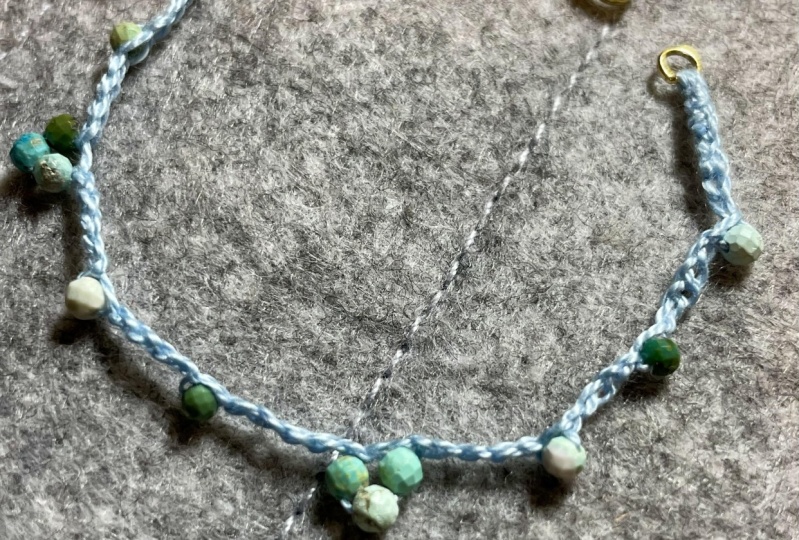
3. CROCHET The Technic: Once you have finished
reading the bits, do not cut the thread as you will use it
for your crochet. You have now reached a point where you will have
to put the bit further on the thread in order to be able to
start crocheting the end of the thread into
and create a naught with a loop approximately 15
centimeters from the end. Please the crochet hook in the loop and start
crochet thing. You obtain the best results
of this necklace by crochet eating one or two beats and crochet thing only
the thread in-between. Don't crochet it more than
three beats in a single loop. It's not going to look nice. Change the crochet
hook if needed, depending on what size you
are comfortable to work with. During the growth
shading process. Bend your hand up and down to slip the beads on the thread. As I mentioned in the intro, this activity, it is so
relaxing and distressing. It's not only enjoyable, but keeps your mind focused
on what you are doing. Another method to slip the
beads on the thread is to put it on the floor and the
bits on the wire on that way. Keith crochet thing on your left with the
threats hanging down. Look at this area thread
we have obtained. Isn't it beautiful? The bids really look
like they are floating.
4. CROCHET Measuring & Assembling the Strands: When you have finished
crochet thing, the remaining tread through the last loop in order to make a knot and cut the thread at approximately 15 centimeters. Wind the Crochet to
tread on a bobby pin or a piece of paper to
prevent it from tangling. You can measure the length of the neck list that
you would like to have by putting the strands around your neck
and adjusting them. Also, you can determine this way the number of strands you need. Deep one end of
the neck place and measure the length without
stretching this trend. Two pieces of thread, approximately 15
centimeter each. You will use them to tie
the stress together. Pull the thread through
one of the loops at the end of the strand
and make several knots. Measure the length of the first trend that
you would like to have, and pull the second thread that you have cut preview asleep through a loop of the strand
and make several knots. The first trend as a reference for the next trends that you will create and repeat the
steps of tying them together. You can use various methods
to create your strands. As, for example, choosing two points by pinning
the strength down. If you have a length
of strand left, just cut it down at five centimeters and
undo the Crochet loops. Die this threat to the others.
5. CROCHET Assembling the Necklace: One of the pins make a loop
and y the end around the pin. One of the threats of
the neck list through the pins loop and
make a few notes. Gotten two threads down
at 0.5 centimeters. All the account through the pin, and then the pin perpendicularly cut it down and one
centimeter and make a loop. Repeat these steps with the
other end of the neck lease. I think the extended chain and open the last
loop at the split. Never opened the loop
by pulling it apart, which will make you
lose the shape of it, but rather pushing
the end towards and away from you to close it, do the same thing backwards
until the C matches up. Now the teardrop
and close the loop. They could jump, ring, open it, as mentioned before, attach it to the other end of the extended chain and
the neck list is loop. Close the jump ring. They can either
jump ring, open it. But there's the other end of the neck lease and
the lobster clips close the ring and ball at
the necklace is finished.
6. CROCHET Product Variations: You can use this crochet tread, decorate items such
as Kendall glass, but you will have
to blow it down. Since you have created
the neck lays, a bracelet would be a beautiful
option to complement it. To make the bracelet, you have to use the same method as for the necklace assembling. Okay.
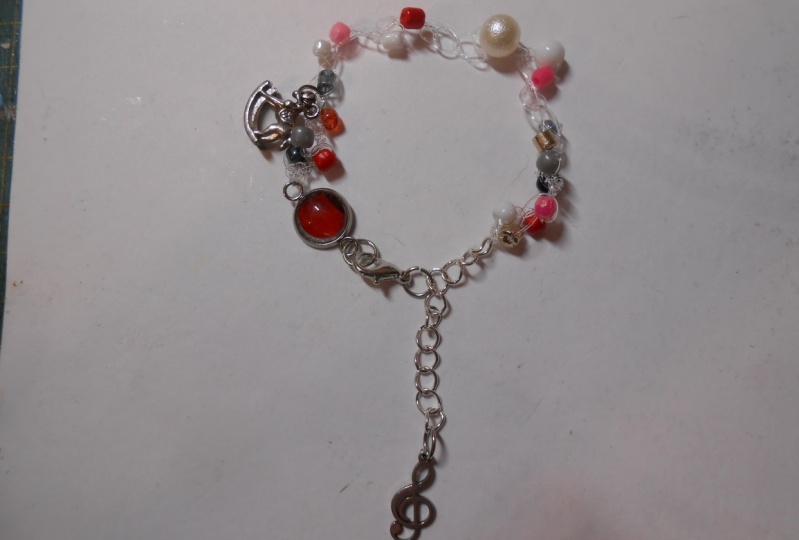
7. CROCHET Pearl Necklace & Bracelet: To make these beautiful
crochet necklace, bracelet, you will need the following tools
and accessories. A chain, a chain
extending and teardrops, lobster clefs, open jump rings, some both champs to
embellish the jewelry. A nylon wire of 0.5
millimeter diameter. Some crochet hooks and pliers
around nose pliers and the needle nose with wire cutter and pose
of various diameters. Try to alternate the signs of the bars in order to
have a nice outcome. Start by pulling the
past through the tread, fall the end of the trading, and create a notch width a loop approximately at 15
centimeter from the end. Please the crochet hook in the
loop and start crocheting. Crocheting the bus one-by-one. When you finished crochet thing, pull the remaining tread through the last loop in order to make a naught and cut the thread at approximately 15 centimeters. All the end of the
thread through the loop of the bot
and make a few notes. Oh, all the thread through the first two paths
to hide it and cut it down. The extended chain,
open the last loop at the split and attach the
teardrop and close the loop. They could jump, ring, open it and attach the bow
and the extended chain. Close the jump ring. Take another jump ring, open it up the chain, and the lobster collapse. Measured the length
of the chain you need on your wrist and
cut the excess down. All the thread at the other end of the
phrase length through the last loop of the chain
and make a few notes. Pull the thread through
the first two births to hide it and cut it down.
8. FEATHER JEWELLERY: For this project, you will need burst of various dimensions. Some seed beads,
earrings, hooks, some caps, some toothpicks
to handle the glue. Pliers around, nose pliers and a needle
nose with wire cutter, nylon wire, 0.04
millimeters superglue. A chain for the neck lays some pins with flat
head and feathers that the 15 centimeter leg
of nylon thread and take a few strips of very fine ostrich feathers
and tie them together. They both ends of the thread and pull a
small pore through it, the pin through the pearl, and pull the thread through
it in order to hide or not. Take a small silver beet
and pull it on the pin. Put some super glue between
the two beads and pull the silver seed bead on
the glue to fix it down. Take the threads and
make a few notes between the two beads
and cut the end down. Good. The fourth seed beads on the pill together
with the pleura. Ben the pin perpendicularly at one centimeter from the
end and make a loop. For the neck lays at the cap on the top of the
part to embellish it. The earrings hooks to the pin. O, put the pins loop at 30, earrings hook and
close the loop. Now you will have to glue the four bits on the
pin with superglue.
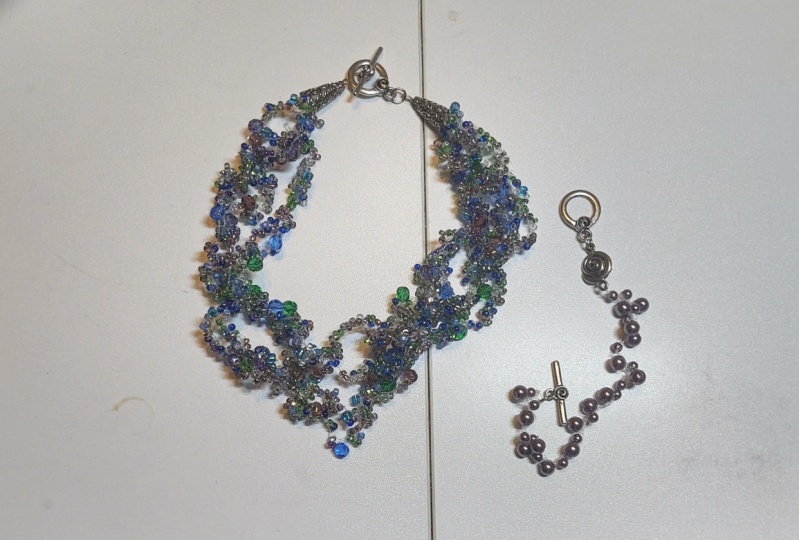
9. CUBE JEWELLERY: This project, you will need some soft flux
beading, metal wire, flyers around no supplier and the needle nose with a
wire cutter, cube beads. They can be Swarovski,
bees or gems. Squad throwing
stones, bumblebees, squad spaces, a chain extender, jump rings, gloves, connectors, lobster claps, green beads, and earring hooks
for the earrings. Start by creating a harmonious B's color
and shape arrangement. The Wire and thread,
older boots up. The clasp connector on the end of the wire together
with the crimp bead. Both the end of the wire
back through the cream bead, all the other end
of the wire to make a very small loop and squad
the beat with the supplier. All the clasp connector to
hide the bid and close it. Got the other end of the wire at approximately
ten centimeters. And repeat these steps. Open a jump ring, attached it to the
class connector and the lobster claps
and close the ring. Open another jump
ring and attach it to the other clubs connector and extend the chain,
close the ring. Now you have this
beautiful necklace, easy.
10. FINAL THOUGHTS: To recap the points
of this lesson word, the Crochet technique
for creating jewelries in seed
beads and boroughs. Creating feather jewelries
and cube jewelries. Just as a reminder, feel free to post your project
in the project gallery. And you can also follow me on Skillshare or on social media. If you like, leave me a review and give me
a like and share. Many thanks and see you
in my next class. Bye.
 Carleen, Sewing, drawing, making patterns