Transcripts
1. Intro: Hi, I'm Maya Faber. And in this class, I will
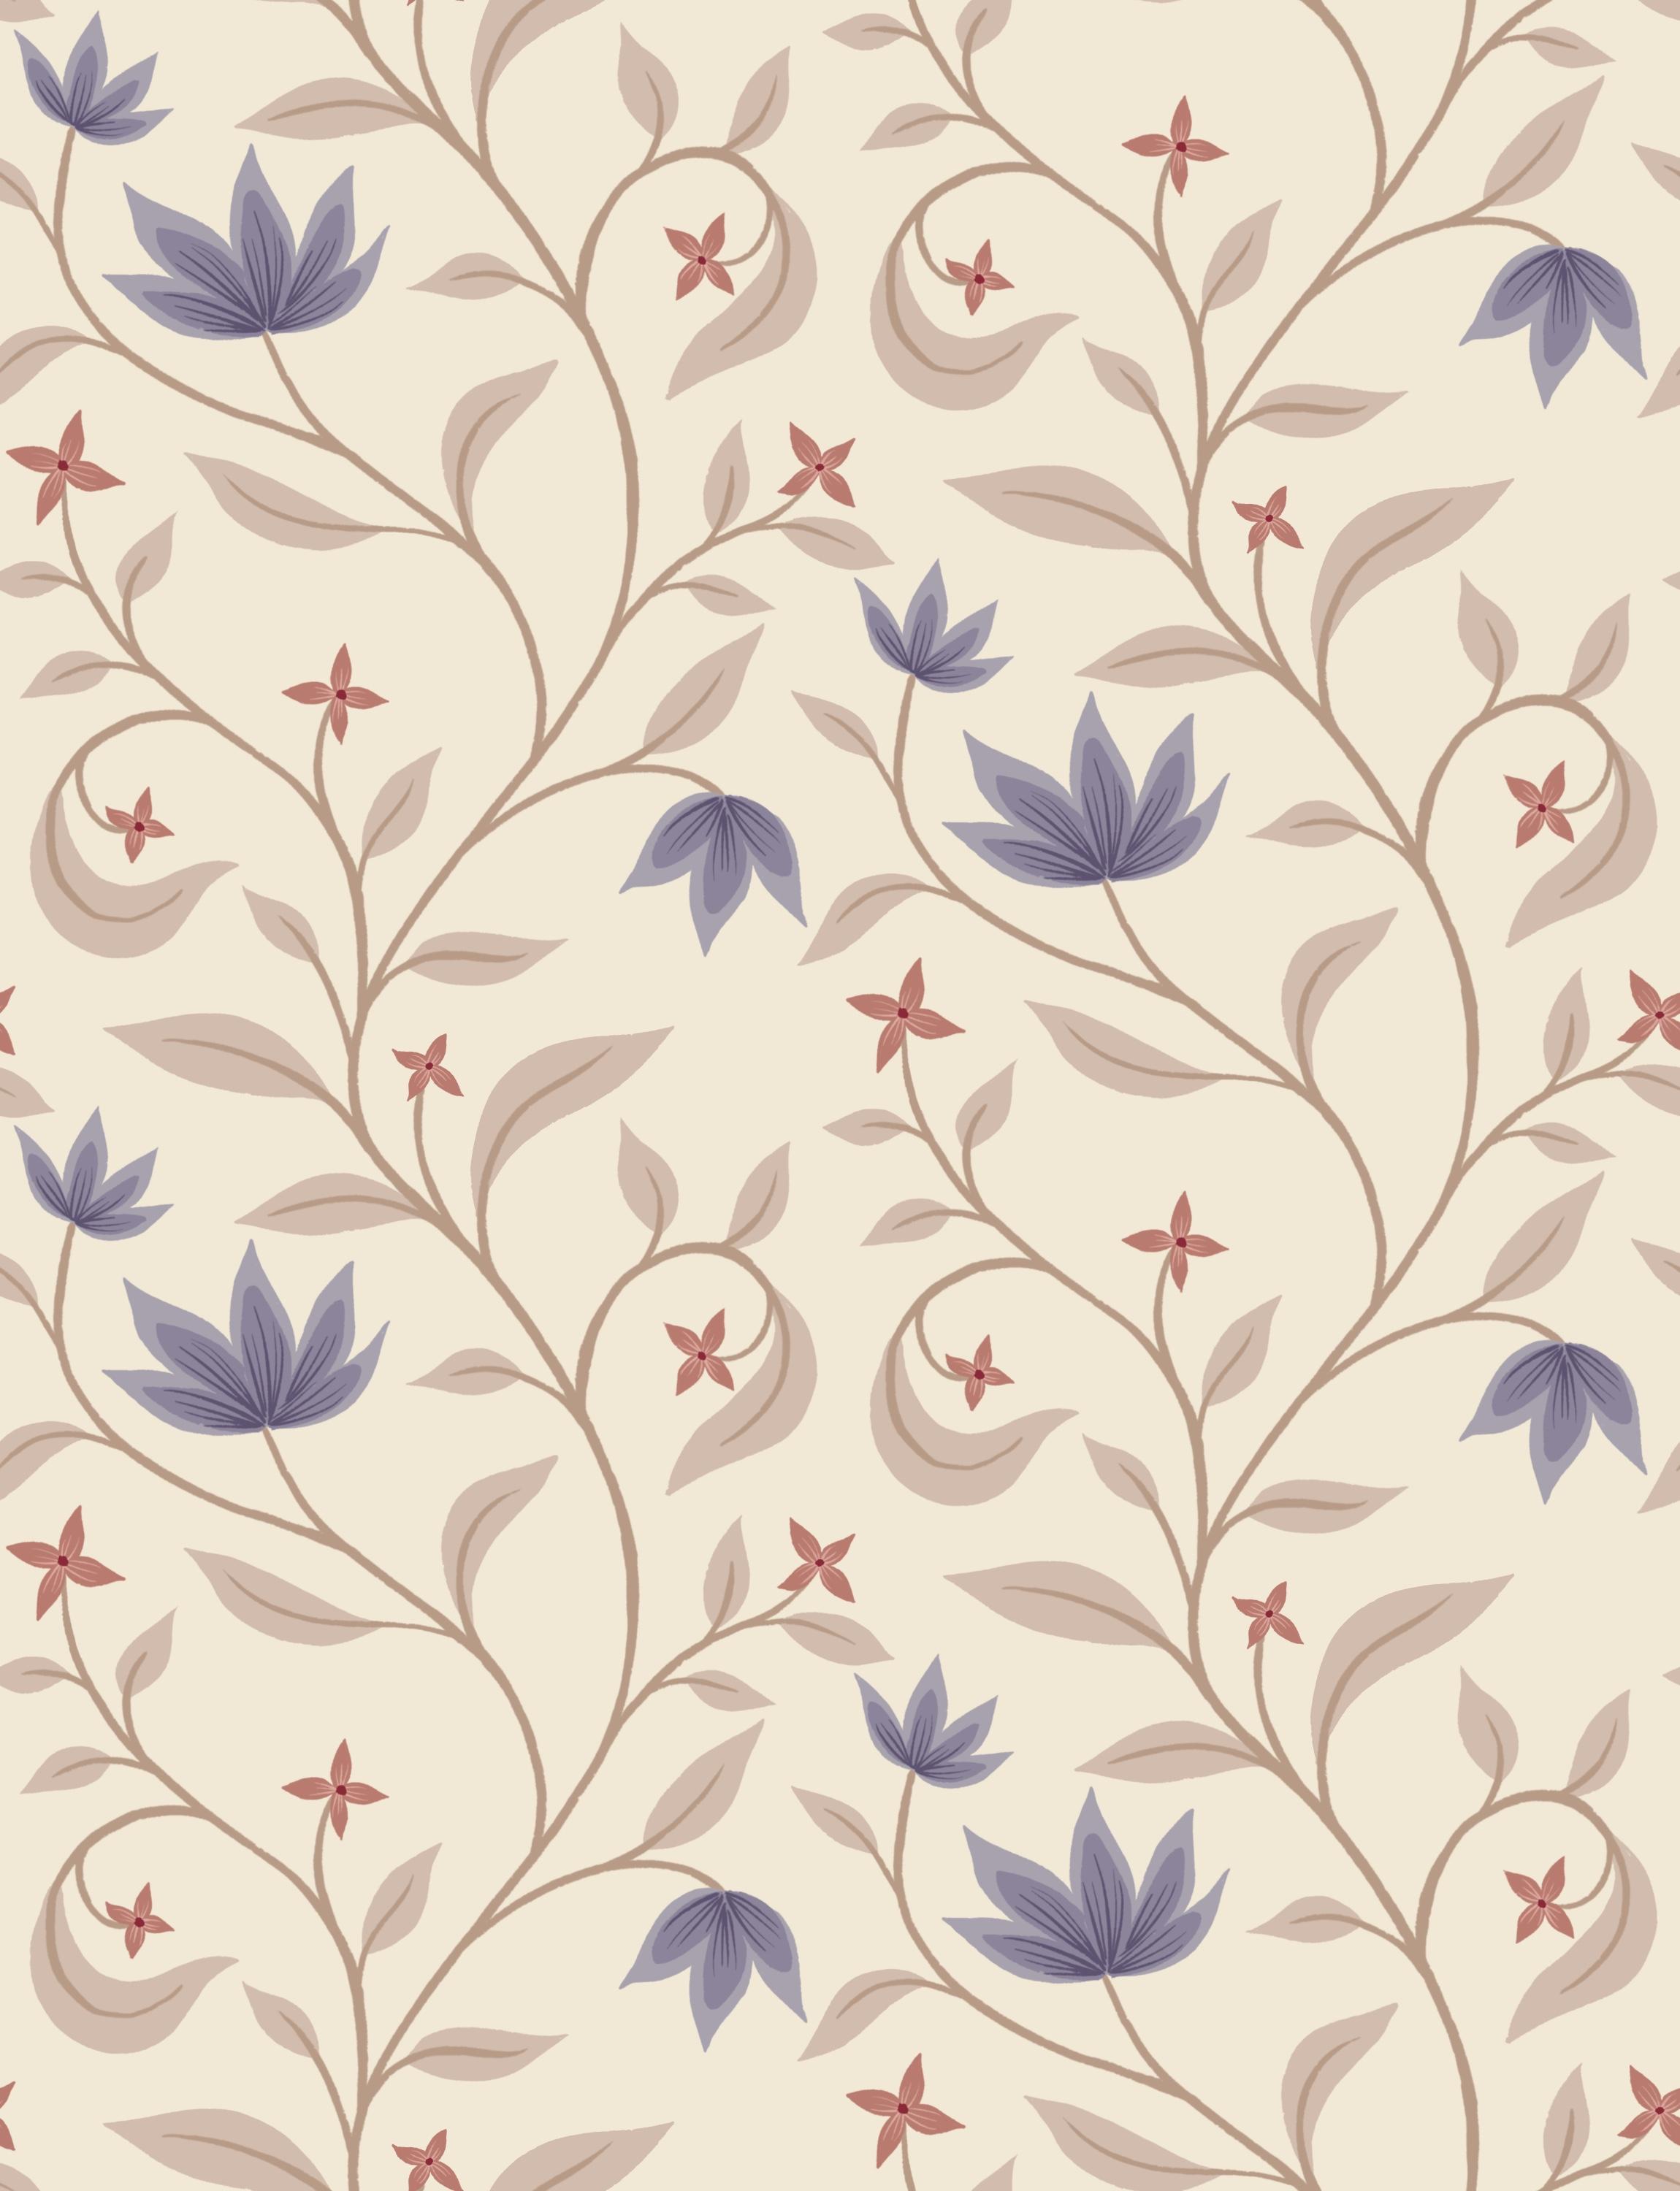
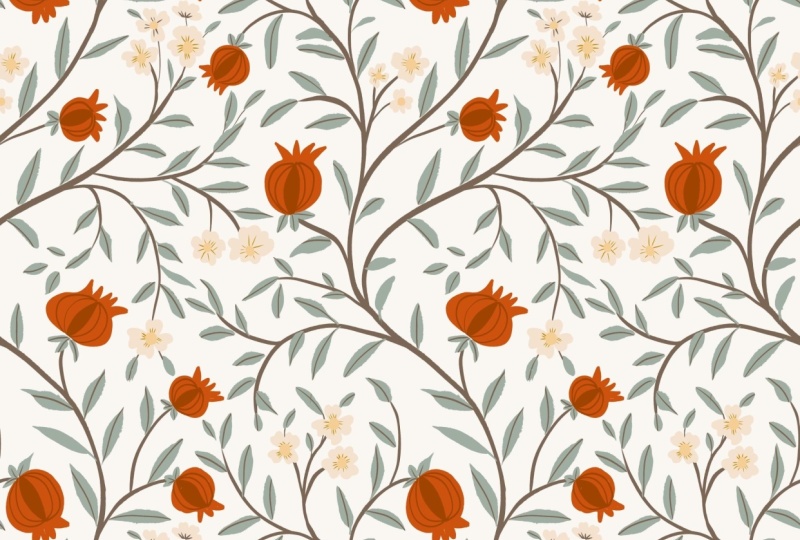
teach you how to create a beautiful Indian floral
style pattern Improcreate. You will learn how to design a complex floral pattern using a rectangular tile to add extra
interest to your designs. I will also guide you through working with an
color palette that is soft to give your pattern an elegant
and timeless feel. In this class, you'll
get free resources, including one rectangular
pattern template, two procreate brushes, and
one procreate color palette. Join me for a fun class where you will
learn how to create a beautiful Indian floral
pattern in Procreate.
2. Your Project: For this class project, you will create your own Indian floral pattern in Procreate. I recommend using the free
downloads here in the class, which is a pattern
Perfect Template, the free Procreate brushes, and the pre made color
palette to be able to get the best possible
learning experience in class. Please share your
project in class. I can wait to see
what you create.
3. Sketch the Pattern: Okay, so let's start
this class with using the pattern template that
is included in this class. It's a rectangular template, so it's a little
bit different than the square template
that we usually use. So download this, and let's
start with the pattern. So the first thing
that we will do is to tap the layers panel, turn off the visibility of the guide layer and tap
to add a new layer, and I will rename
this to sketch. This sketch will take a little
bit more time than usual to get it right because we are drawing a little bit more
complex floral pattern. So we'll go back
and forth a bit. So just follow along because
if we get the sketch right, we will get the pattern right. I am using the perfect pencil, which is included in the
Indian floral brush set. And now let's start our sketch. So what we want to create is a kind of growing
floral pattern, the Indian floral style. So I will start with
drawing a line, some kind of stem that maybe goes up and something like that. Maybe it's a little
bit too far out, so maybe something
like that is good. This here is supposed to
meet up with this here. And then from there, we could go for something
that goes up here maybe. So something that goes a
little bit twirling like this. And then something that goes a little bit
twirling like that. So now I'm just kind of trying to balance out the pattern here. This might be leaves or flowers
or something like that. And then I might
want something that goes up here as well. Maybe a little softer like that. And then let's see. We probably want
something coming up here, a branch as well. So this branch isn't alone. So maybe we can have
something going up here, and then I can actually start
over here and maybe go out. That was too wide, probably. So I was trying to follow the
lines here and make it like soft curves that kind of feel like they are
flowing into each other. So here, this line is supposed
to be some around here, but we need to flip the pattern around to do
something about that. I think that I also want something that goes
up from this one. Maybe that's just a softer, like a branch with
leaves or something. And Yeah, let's just start
with that and then we will flip the pattern around and see what we can do with
these lines over here. So the first thing that I
would do then is to tap the guide layer and tap the
plus to add a new layer. And I would use just plain white as the background to start with and tap fill layer
and rename the background. So now when I'm sketching, I'm just using black and white. And I will swipe right
on both of these layers, tap the group, tap the
selection tool, save and load, and now I want to flip
only the selection eight, tap the transform tool, flip vertical, tap the
selection tool to deselect, and tap Save and load
selection seven, tap the transform tool
and flip vertical. And then I will tap the
transform tool and rotate it 45 degrees four times so that I get it in the same
position as I draw it in. Then I will head back
into the sketch layer. And here I can see instantly, I'm erasing a little bit
with a monoline brush from the pattern elements Bushet that part there that
didn't meet up, and then I will continue
that smooth curve there. So that is there. And let's see what I
wanted to do here. Maybe some kind of something
was supposed to go there. That's some kind of like branch, and then we have
something going here. That should probably go maybe a flower like that and then
maybe going up there as well. That might look good. Now I'm
trying to get the curves in the pattern so that the flow of the branches
and everything looks good. Now we can start to plan
a little bit where to place flowers and
where to place leaves. Let's start with, I think that
this should be some leaf. I will just draw a
flowing leaf like that. I also think that this the
really curvy ones would be nice if they would be
really flowing leaves. So I'm sketching
really rough now. And here we could definitely
have some kind of flower. So I'm just drawing
a ring for a flower. I will draw something
else later on, but this is just a rough sketch. And up here, we also might
want to flower a smaller one. And let's see. Maybe
we want some kind of flower like here as well,
like a smaller one. So now we have flower, flower, flower, leaf, leaf, leaf. And here we could have
maybe leaf like that or we want to do
something else there. So we might want to do like some leaves that
go out like this, just to get flow in the pattern so that we have a little
bit of variety there, like a branch that
goes out there. So we have those to leaves. We have these like branches, and then we have flowers. And we could also
do some kind of, like, softer floral shapes, maybe smaller around
those leaves. Oops. Maybe like that. Let's see how that looks. And then we definitely want
to add some flowers and leaves amongst these stems. So let's just try it out and see what we can do if
we have, like, something. There maybe we want maybe like that sort of leaf
over there. I'm not sure. And then let's see
what we want there. Probably some sort
of leaf there, maybe some sort of leaf there. And for that flower, we could have more flowing thing over there and also over here. So I'm just trying things out
now to see how we can get a good flow with the different types of flowers and leaves
and things like that. Okay, so that might look good. We probably want some kind
of leave sticking up. Over here and maybe
over there as well. So as you see, I'm
just trying to add some more motifs and make this more of a
connected pattern. So we could definitely
do some kind of leaf that goes up there. And let's see up here, we could do maybe
something going up there. And up there, I didn't
like that part. Okay, so let's just flip
it around again and see how it looks when
we flipped it around. So tap the group, tap the
selection tool, save and load. And I will tap selection
six this time. Tap the transform
tool, flip horizontal. Then I will tap the
selection tool to deselect, same load selection five, tap the transform
tool, flip horizontal. And here we have the
edges of the pattern. So this would probably work. And all I want is for them to kind of meet
up here at the center. So I don't want this
line, actually. We need to kind of fill
this out with something, so I will erase this, and then might want to add More like a branch leaf there so that it doesn't
make a straight line there, maybe a little flower there. So that might look good, and we definitely
want something here, something there and
filling out this space. This one could go a
little bit higher maybe. So we could move that
one up like that. And maybe even a little
bit more angled inwards. So something like that. And now I feel that I need to flip the
pattern around again. So let's try it again,
tap the new group, tap the selection
tool, save a load, and let's just flip
around the four parts. So tap selection four. Tap the transform tool, flip vertical, flip horizontal, tap the selection tool
again to deselect, tap the selection
tool to select, selection three, tap
the transform tool, flip vertical, and
flip horizontal. Tap the selection tool again to deselect and tap selection two, tap the transform tool, flip vertical and
flip horizontal, and tap the selection
tool again to deselect and the selection tool to select Save my
load selection one, tap the transform tool, flip
vertical, flip horizontal. Now it's upside
down, so I will tap the transform tool and
rotate four to five degrees. Okay, so now we can see that a pattern is starting
to build up here. So I will go to the
sketch layer again. So we want to fill
out this space. I could definitely use some kind of small flower
over there, maybe. And we want something over here. Maybe we could do just,
like, branch there, like a leaf there and something that
goes up from that one, something that goes maybe
down from that one as well. Let's see. Maybe
a little flower, I don't know, or maybe
just a little leaf. This one isn't looking so good. So we're going up
there like that. And now we can see that we're starting to fill the pattern with leaves and
branches and yeah. So nice floral motifs here. I'm not sure what this
is supposed to be. Maybe just empty or
maybe something. I'm not sure. Maybe
like that sort of leaf. No, maybe that's
supposed to be empty and just bring up this
flower a little bit. So this is just a matter of trying things out,
seeing what works. Okay, so that probably
will look good. And some kind of
leaf there maybe. Okay, so that looks good. So let's just try
out the sketch now. It looks like it's a
little bit empty here, but we will just try
it out really quickly. So how I will do that is to swipe down
with three fingers, tap, copy all, swipe
down with three fingers, tap paste, and then I
will tap split view, Safari, and the pattern tester, which is linked to in
the downloads lesson. And then I will zoom in
and out of my pattern, and I can see that
this empty space is the only problem as
I can see it right now. So let's head back to Procreate. And what I want to do then
is to delete that one and I will actually
duplicate this my group, and I can you can decide here. It depends on how
many layers you have, but I will duplicate the group. You can also merge your sketch in the
background together. But I will do duplicate Sada. I have my original here. I'll just rename this original. Then I will turn off the
visibility of that one, and then I will tap the
first group up here. I will tap the transform tool, tap in the three little no, tap in the left corner node, and I will type in half
of the size of this. So half of this is 1,150, if I'm not wrong. Yeah. So that makes it
1,500 pixels there. And then the next group, tap the transform tool, tap in the right corner node, 1,150, and then tap
in the next group. Tap the bottom left
cordon node, 1,150, and then tap the next group, the bottom right
cordon node, 1,150. Okay, so now I have this layer is what
I want to draw on now. So I will actually just tap
that background and just go a little bit gray on that background
and tap the group, tap Alphalo and tap the layer so that I only
fill that little square. So now I can see exactly
where my pentle is. And then I will start to
sketch on that layer up here so we can just bring down the other ones and I will sketch on this one. So as you can see,
what I want to do is that I want to
fill out this space, and now it's more clear
to me that I need something that goes up
from here, probably. Or how will I fill that space there? Is
something coming there. And maybe I need something
that goes out here, like a branch with
maybe a flower. Like that, I can't see
what I'm doing over here, but I can see on this one, and I can see that I might want that flower
to almost fall off the edge and then
have some leaves. Just go down and
brush size a little bit and see how I can feel out the
space better. Oops. Uh Okay, so that
might look good. And then maybe I want something to go out from that one as well, or if I'm happy with
how that looks. Because this one is
meeting up with that one. I could do something over here, so I could actually
erase that one and go This one could go a little bit more to
the right, probably. So that I kind of go almost outside of there and
a smaller flower. And then I can bring
in some leaves there. And here we can have
a smaller flower. Okay, so what I've
done now is to kind of cover up the edge here, and I might want to do
something with that as well because we have a little
bit of blank space there. I will go for this one. But I can visualize
how that will look, and I probably want to maybe
I go upwards like that and then something that
goes downwards to better fill out this
space, that area there. So now I'm just imagining what I draw
here will show up there. But we will see it
in a little while. Oops. Maybe we can
have a flower there. Okay, so, something like that
will probably look good, and we might need to
adjust that later on. So the next thing
that we would do is to use this sketch instead
of the one that we had. So I'll delete the other ones. And I will tap that group. Oops, I deleted the original.
I didn't mean to do that. Original is supposed
to be there, and then I will tap that group, tap the transform tool. Now as I've drawn
outside of the group, I can actually draw
up this so that the gray area meets the outer part of the camas
as it's just a sketch, it's not super important
that it's looking good. And then what I do is that
I will try to repeat this, but I probably want this
one to go over there, but I will first,
just flip it around. I will tap the group,
tap the selections tool, save and Load Selection six, tap the transform tool
and flip horizontal, tap the selections tool to deselect and tap it again
to select Save and load, selection five, tap the transform tool
and flip horizontal. And here you can
see on my sketch that these are a
little bit cut off. So I definitely want to fix that and draw them
as I want them. These are just, like,
guides for a flower, but at least that is how I imagine that I want this sketch. I could even go further
up here, I think, with my little leaf. Like that. And now I think we have
our finished sketch. So we can always
change things with this later on when
we draw our motifs. But for now, I think this
sketch is finished and we will check it out by swiping
down with three fingers, tap copy all, swipe down
with three fingers. Oops, tap paste, and then
tap the three little dots, split view, tap Safari, and drag it into the pn tester. And here we can see
how it repeats. So I think that this looks
really good as a sketch, and then we can see how our pattern will look when
we draw the actual motif.
4. Draw the Stems: So let's start to
draw the pattern. I will just delete this
flattened image and first just turn this around
because I feel that this is the wrong way and the other
way is the right way. I will tap the group,
tap the selection two, save and load, selection six, tap the transform tool, flip horizontal, tap the
selections to again this, select Save and load, selection five, tap the transform
to the flip horizontal. And this feels more right
for me to draw this way. So the next thing
that I would do is to actually use the background
color that I want to use. So I will use this like
vanilla, cream beige color. And the background
has phalloc on it, and then I will tap fill layer. So I want to make sure
that the layer is filled completely as we move
so much back and forth now. So I will actually tap
the layer, tap the layer, and then tap the transform
tool and fit to canvas. That way, I know that
it's filling out the whole canvas,
our background. The next thing that I will
do is just to drag down the opacity on my sketch
layer to around 15%, and then I will tap the
plaster to add a new layer, and let's just start
with the stems. So the stems, I want
to be drawn in, let's do this darker beige
color. Try that out. And I will just
rename this to stems. And I will use the
crusty edge inker for all of the motifs
in this pattern. And then I will continue
with drawing the stems. Let's see which size that
was a little bit too big. 14%, maybe around
I have 12% now. Let's try that out. And I
will start to draw the stems. I want to keep them pretty thin. So let's start with that. I will draw the stems that goes upwards here and crosses the edge because we
will fix it later on, but it's easier if I
just draw them now. So first, let's do this one. Oh, I'm trying to
get a good like, flow when I'm drawing it so
that it's not too shaky. Something like that, maybe
a little bit thicker. Maybe just have 12%, I will keep maybe 14% and light on my
hand with the pressure. So like that. Okay, that's good. And then I will
draw all the stems. Maybe need to zoom in a
bit for some of them. Feels that you need
to kind of get into the groove of the flow of the pattern to draw all
of these curvy lines. So you have that
one to the flower, that one to the small flower. I'm drawing the
larger ones first. And this one to that leaf and
this one is going up there. This one is going up there. Like that maybe. And then this one is going
out to that flower. And this one it's
going out there. And then we have this and
this that I'm not sure. We need to match
that up over here. And then we can continue
with the smaller ones. So I would do that one for leaf. Oops. One leaf going that way, one going that way, and one kind of flower
going down there. One leaf. I won't live there, one live there, one there. One there. So we can always
adjust this later on, but we want to get a good start with the pattern
now, something like that. And then that flower over there. Oops, and that leaf. Maybe like that. And one thing
over there, one over here. And one over there. One kind of flower going there. One going up here. So this is a type
of pattern where you need to just kind of draw, and then you might
need to change. Lot of things later on. Okay, so I think that this
looks good in this position. So let's just flip
the pattern around. I will tap the group
and we can just flip. First, flip the top
and the bottom, selection eight, tap
the transform tool, flip vertical, tap the
selection tool again, tap the saving load, selection seven, tap the
transform tool, flip vertical. Then I will tap the transform
tool and rotate 45 degrees. So now we can fix
these edges over here. This one is Make sure
you're on the right layer. The stems layer, I will erase
with a monoline brush from the pattern elements
brush set and erase a little bit where the
pattern isn't meeting up, so I want this one to meet
up with that one probably. And here we have something
strange going on. Let's start with fixing that. And I might need to
erase a little bit here to get the good kind of flow from this
one to this one, and then I might need to fill
out the edges a little bit. And without a showing. Too much. Probably like that. I could actually erase
this whole thing and try to move up from this. Something like that,
and then this one. Going down like that. And then I need to fix the details here so
that it's seamless. Moving from one
parentile to the other. This one may be supposed
to be a little bit thicker than the whole kind
of branch thing. Okay, so that looks good, and then I need to oops, head back to the right
percentage, 14%. And this is supposed to go
up in a leaf over there. Fix this little edge over there. And then out to a
leaf out to a leaf. And here we have
this type of leaf. We have one over there.
There's the flower. Do we have something
else yet over here? Where is this one coming from? Hmm. I think I need to flip the
pan around to be able to draw the s. I will
tap the group, tap the selection tool, save a load, selection six, tap the transform tool, flip horizontal, tap
the selection tool to deselect and tap
the selection tool. Again, save a load, selection five, tap the transform tool
and flip horizontal. And now I want to go
into the stems layer, and I have a little stem
going out like that. I just want to get a
good flow in that. I don't need to follow
the sketch exactly. It's better to
follow my stems now. I can't seem to get
that right Oops. Maybe like that.
And then one leaf, one little flower, and one leaf. Okay, so I think I've
drawn all of the stems, but that will also
show up if I haven't. Okay, so now it's time to draw the flowers
and the leaves.
5. Draw the Flowers: So let's start with the flowers and then continue
with the leaves. So I want to bring
down the opacidoi sketch a little bit more
to maybe around 10%. And I hope that you can see this on screen, but
I think you can. And then I will tap the plus, and I will rename
this to flowers. I don't know if I will
have different flowers, but at least I will start
with the larger ones. So with the same brush, across the edge ink, I will go for the
lightest blue color. There on the flower layer, and we don't have
that many here, but we have one over here. So on top of the stem layer, I think I want this one
to be want this type of, like, delicate flowers
and falling down. I think this looks good.
Let's start with this. So the flowers are
basically like three leaves put together. I want it to be a little bit
more delicate, actually. I think I would do that again. So let's just tap the
transform to bring it out. And I think I will try to do I will twist
my canvas around. I want to do, like,
a little bit more flowy in the edges like that. And then flowy and flowy. So not as oops. I didn't like that one. Yeah, a little bit more
pointy in the edges. You can draw any type
of flowers, of course. This is the one
that I'm drawing. Okay, so that looks pretty good, maybe a little bit thicker. A little bit wider. Okay, I'm going to be
satisfied with that one. Maybe just tap the transformed and pull it to
the right position so that it's looking good on that stem there,
somewhere around there. Okay. And then I want to add
some details on the flour. So I will tap to add
a new layer on top, and then I will tap
clipping mask on that one. And I don't know
what to name it yet, but with the same brush and with a kind of
medium blue color, I want to add almost like Some details like this. But maybe not so pointy. Maybe a little bit
more round, like that. I'm trying to be a little
bit more loose when I'm drawing this so that it
looks a little bit more, you know, hand drawn.
Okay, let's try that. Let's do one more
layer with details. Tap tipping mask on
that one as well, and a darker blue color. And here I might just want to add a smaller size of
the brush, maybe 4%, maybe add some lines there. Okay, so I think
that looks okay. I will see if I want to keep that style when I continue with drawing the
rest of the flowers. So let's see. I definitely want
this one and this one to be the blue flowers,
maybe even this one. We can try that one as well. So just swipe right
on the group them, so that is one flower. And then I will tap to add a new layer and tap the
lightest blue color. And then draw the
same type of flower. Maybe it will go better
this time around. Feels like it. I like
this one better. I like these flowers to be
a little bit, like, flowy. So maybe I will
redo the other one. Maybe not. We will see. But sometimes you get into drawing a certain style with certain flowers,
certain motif. More and more, the more you the further into
the pattern you are. So then you can
always go back and change the ones that you draw previously if
you want to do that. Okay, so then I would
just tap and place it on the stem in
a good position, and then I will tap to
add a new layer on top, tap clipping mask and tap the medium blue color and
kind of just not sure, but I want it to be like
flowing more like this. I'm trying to, like,
keeping loose and How does that look? It looks okay, but it's not exactly the look
that I'm after. I'm not completely sure why. Maybe larger brush. Okay, let's try
that out and tap to add a new layer on top
and clipping mask. And we'll use the darker color, save the brush
size, and just add And just draw some
flowy lines here. Maybe just trying to be
even looser with my brush. Okay, so that looks better. And now I want to flip
the pattern around so I can draw this larger
flour and this one. So first, let's just
group these together. This is blue flower one
and blue flower two. If you run out of layers, you can definitely group
the layers that are in the same color and flatten
those layers into one layer. I will show you that later on. But for me, while I draw, it's nice to have them on
separate layers so that I'm able to change easier, add details and make changes
to the different flowers. So now I will tap the group and I want to flip
the pan around, so I will tap the
selections tool, save and load selection six, tap the transform tool, flip horizontal, tap the
selections tool to deselect, save and load, and tap it again to select and then save
and load selection five, tap the transform tool
and flip horizontal. And now we have our
other flower over here, so I will tap above
the blue flower too and add a new flower there. So let's draw something. This one is supposed to be
the largest one, I think. So maybe something like that, and filling it in. That looks pretty good. Adjusting some details here. And then I will
tap that and drag it and kind of rotate it so that it's good position there,
maybe even larger. A little bit larger,
especially the center one and this one as well. Okay. Now I think it's
almost too big. Okay. That would probably be good. And then I will tap that
a new layer on top, tap, clipping mask, use the
medium blue color, and I will fill in the details there and fill
it in with the color. And then tapped at a new layer, taped clipping mask
on that layer, taped the darker blue color
and just draw a few lines. Here. Okay. So for me,
that looks good. And now we have one more
flour. It's over there. So what I need to do is to swipe it right on this,
tap group, group, rename them to blue flower
three, not E. Three. Then I will tap my group, tap the selections two, save and load, selection eight, tap the transform
to flip vertical, then I will tap the
selections tool again, selection seven, tap the
transform to and flip vertical. Now I don't have it on
the right position. Anyways, I will tap the
selection tool again, selection six, tap
the transform to, flip horizontal, tap the
selections tool again, same load, selection five, tap the transform to
and flip horizontal. Then I will tap the
transform to and rotate 45 degrees four times so that I get it
in the right position. Okay. So now we have
another flower here. So let's try to create that
one as a blue flower as well. And I will tap that new layer, use that light blue color. And I want it to be, like, flowing in that direction. That will probably look good. Okay. And then I can tap that and drag it in
the right position. Something like that, and then I will tap that a new layer, tap clipping mask on that layer, tap the medium blue color, and just fill in
the details there. Okay. And then I will
taft that a new layer, tap clip mask on that layer, use the darker blue color,
smaller brush size. I have around 4%. And drawing like that. Okay, so now we have
the blue flowers, and it's time to move on
with the other flowers. So these flowers
are more simple. First, I will just group
that one and rename that to flower four. Blue flower four. But actually, what I will do now to save
layers because I know that not all iPads have the same amount of layers
available that I have. So what I will do is
just to first open up these because I know I want
them in the same colors. I will swipe to the
right on the blue. Flower layers tap group, swipe to the right on
the details layers, tap group, and on the
line layers tap group. Then I will tap that
group, tap flatten, tap that group, tap flatten, and tap that group
and tap flatten, and then I can go in
and tap clipping mask on that group and clipping
mask on that one. These are blue lines. And these are blue detail. And then we can rename
this to blue flowers. Blue flowers. I can delete the other
blue flower groups. So now we have saved layers, and it's time to draw
the other flowers. So what I will do then is just to add a new layer on
top of the blue flowers, and I want these
flowers to be drawn in this kind of medium
brownish color. And with the crust in
ink as well, the brush, the crust the edge ink, I will start to
draw those flowers. So these ones, I think that I
want to draw really simple. So maybe just thinking of a round shape and
then maybe like four small petals like that. So that would
probably look good. And I will just redo that so that I get them in
the right position. It's easier to draw this way. So one, one, two, three, four. I'm
going fill it in. Y That we look good. I think I want to make
it a little bit smaller. So these flowers are, like, small detailed flowers. Like that. Okay, now I will
continue on the same layer. I will just rename this too. Let's rename them
to brown flowers. And I will draw
one here as well. Like that. I'm trying to keep a
loose hand here as well. And let's do one over here. Like that filling it in. And maybe we want to move that one a little bit up on the stem. And then on the right layer,
we have one over here. Let's do that one a little
bit further down like that. Okay, and do we
have another one? Not right here. We have one over here and one, Oh,
yeah, over here. Let's do that one. Okay. And then we have one over
here. Can we do that one? Maybe we can. So we don't need to flip
the pattern around. I don't know if we
can or if we're just making it ugly now, but let's just try it
out to save some time. Maybe we need to fix
this one later on. Let's see. But here
we have the flowers. And then I want to add a dot. I will tap the layer
to add a new layer, tap the plus, write the dot, and I will use this
dark red color to add some dots here at the
center of these flowers. Kind of quickly some dots. And then I will tap the
brown flowers layer, tap the layer, tap the
plasty in your layer, tap clipping mask, and here I will just rename it to lines. I will use the lighter color and just add a few quick lines to the petals to bring in the texture to
these flowers as well. And this one over here. And this one over here, Okay. So now we have drawn
all of the flowers, and it's time to move on to the
6. Draw the Leaves: Let's move on to the leaves. I will swipe these
three layers to the right and tap group and
rename them to brown flowers. And then I want to
add the leaves. I want them to be
below the stem. I will tap the sketch layer, tap the plaster a new layer, and I will rename
that to leaves. Then I will use the
lighter beige color and the same crusty edge ink and
start to draw the leaves. So let's just start somewhere. We can start with this
one, the flowy leave. Maybe oops, a little bit
larger in brush size. I have around 14%, and then I'm not sure how
I want that one to look. We can just try it out a little bit smaller in
brush size, maybe around 8%. Yeah, that is probably
good. Around 8%. Okay, so let's continue
with the other ones. So I'm just following my sketch, but also trying to see the stems and flowers and everything that we've drawn so that
it all fits together. I'm trying to have this flowy feel when I'm
drawing so that I get nice curves in the leaves and the flowers and
stems and everything. Okay, so that one
looks good now, and then I will
continue with this one. It might be easier to
change the details when we don't have the
sketch shining through. But first, I want the sketch
so that I follow the sketch, and then we can adjust the details and
everything later on. There's nothing wrong with that. Okay, here's another leaf. And here's one. Like that. Oops. And over there over here, just continue to
draw the leaves. All of them that I
can see that aren't cut off in the edges
of the canvas. Where do we have
another one over here. Here's that kind of
flow leafy thing. There's another one.
Here's another one. Trying to draw the leaves in the same direction as the stems. Have I missed anything here? No, it's time to flip
the pattern around. So let's just flip
the top edges first. So tap the group, tap
the selection tool, save and load, selection eight, tap the transform
tool, flip vertical, tap the selection tool
to deselect and tap it again to select Save
and load, selection seven, tap the transform tool
and flip vertical, and then I will tap
the transform tool and rotate 45
degrees four times. And then on the leaves layer, I will continue with the leaves. This one is supposed
to be that flowing kind of leaf. Like that. I have two different
kinds of leaves here just to make it a little
bit more fun the pattern. Like that. And Okay. And do we have
another leaf here? No, we have that one. So let's flip it around again,
tap the group, tap the selections
tool, save and load, selection six, tap
the transform tool, flip horizontal, tap the
selections tool to deselect, tap it again to
select Save and load, selection five, tap the transform tool,
and flip horizontal. And here we have
two more leaves. So is this one that flowing leaf kind of thing
eh? How did that go? Maybe like that.
And is this one. Oops. Like that. And here I saw one more. I actually have one more over there that I've forgotten about. So tap the layers panel again, tap new group, selection, selection number eight,
tap the transform tool, flip vertical, tap
the selection tool to deselect and tap it again. Save load Section seven, tap the transform tool
and flip vertical, and tap the transform tool and rotate 45 degrees four times. On the leaves layer,
I will add this last at least I think is the last one little
leaf over there. Okay, so let's just turn
off the sketch layer, and see how it looks. So for me, this looks good, and it's time to try out the
7. Test the Pattern and Adjust Details: So it's time to try
the pattern out. I will tap at the top of my layers panel and then swipe
down with three fingers, tap, copy all, swipe down with
three fingers, tap, paste, and now I will tap the
three little dots that are disappearing sometimes here at the top corner, split view, tap Safari, and
then I will tap and drag my pattern to the
pattern tester on my website, and I can zoom in and out, and I am super happy with
the result of this pattern. I think the only
place I can see that I might want to add something
is here on that flower. So let's do that. And I can instantly see that it's the largest flower and I have a little
bit of a hole there. So I will actually just go ahead and draw a
little leaf there. If you need to, you can
flip the pattern around, but I don't think
that I need to, so I will go to the stems layer, choose that brownish color
and just draw out Oops. They're not on the right layer. So let me just remove
the visibility of that. And just delete that because
I didn't do that correctly. And then I will go
on the stems layer, and I'll just move out. I think, just a little
leaf over there. So something like that. And then on the leaf layer, with a softer beige color, I'll bring out a leaf over here. And with that little adjustment, I think I'm happy
with the pattern now. So let's just try it out again, swipe down three
fingers tap copy all, swipe down with three
fingers, tap paste. Go to split view, Safari, the pattern tester,
bring in the pattern. And now I really
like the results. I'm super happy with this
Indian floral pattern. I really like the flow of it, and I'm very happy with it. Let's just repeat it
and procreate as well. I can shut down
the color palette, and I will delete the
first platen image, and then I will duplicate the second one so that I have five copies, zoom out a bit. I will tap the top layer, tap in the transform tool and
the top lift corner node, and type in half of
the size of this. Make sure you have the
change symbol tapped in. That is 1,150. And then tap the next layer, tap the transform tool, tap the top right
cordonod 1,150. The next layer, tap the
bottom left cornonod 1,150 and tap the next layer, the bottom right
coronoid, 1,150. And now I can merge
these layers together, and here I have my
repeated pattern, and here I have my patent.
8. Recoloring: If you would like to recolor this pattern, what
you would do is, let's say that you want
to recolor the stems, and then I would tap that layer or let's just
recolor the leaves. Tap that layer, tap Alpha lock, and let's say that I want to do like a
green color instead. So tap the layer, tap the layer. And then I want to recolor
the stems as well, so I tap Alpha lock
on that layer. Maybe a darker green color. So that is how you would
recolor all of the motifs here, even the flowers,
afloc on that layer. I want them to be
pink, for example, fill the layer,
flock on that layer, and then you would just
move ahead like this. Fill layer, alfalc
and fill layer. So that is how you would
recolor this pattern. I would just undo this because I liked my original Colors. But that is how simple you
can recolor the pattern. You can, of course, also recolor the background or just
duplicate the background, and let's just
recolor it to pink, for example, and that is how
you recolor the background. Okay, so deleting that, and now we're finished
with the pattern.
9. Export the Pattern: So it's time to
export the pattern. I will turn on these two. So I can export my
repeat pattern. I will tap the actions panel, share JPEG, and save the
image to my camera roll, and I can also
export the Patntile. Actions panel, share JPEG, and save it to my cable. So you can share your
patterns here in the
10. Next Step: Grab Your Free Starter Pack: Before we end this class, I want to give you
something extra. If you enjoy this
class and want to keep building your
pattern design skills, I put together a free Pattern Rebels starter
pack just for you. Inside, you will find two mini classes,
procreate brushes, a playful color palette, time saving templates, and
even a procreate mockup. All designed to help you create beautiful patterns with more confidence and
less overwhelm. It's a real taste of the classes tools and
resources that you find inside the Pattern
Rebels membership without the commitment. No credit card, no
deadline, no catch. Everything is yours
to keep forever. You can grab it
right now through the link I've shared
here in class. Just click Sign up and you will get instant
access to everything. It's completely free. I can't wait to see what
you create with it. The link is in the
description about this class. And if you're excited
to dive even deeper, check out Pattern Rebels
my membership program. Inside, you will get
monthly classes, resources like brushes,
palettes, mockups, and pattern layout templates, plus design challenges, feedback sessions,
and Q&As with me. You can learn more at
patternrebels.com. Finally, thank you so
much for watching. If you like this class, you
can hit the follow button by my name so you don't
miss my future classes. You can also tap my name to see all of my classes
here on Skillshare. If you have any questions, drop them in the Discussions tab and feel free to leave a view
if you enjoy this class. I would love to
hear your thoughts. Don't forget to upload your
project here in the gallery, and if you share
it on Instagram, tag me with Maya Faber. I would love to see
what you create. Thanks again for joining me, and I hope that you
enjoy this class.
 Maja Faber, Surface Pattern Designer