Transcripts
1. Welcome To The Course: What is that? 40 people. My name is Darrell. And today I'm gonna be showing you all how to make a website step by step with no experience required, you could be 15 years old. You give me 55 years old and you can watch It's a total today and walk away knowing finally how to make a WordPress website and you need to have any sort of experience or knowledge of coding. Everything is done with a dragon drop builders. You can visually make your website the way you want it to look. In fact, we're gonna access over 700 different templates and layouts to help you create the most modern, professional and beautiful website the way you want it to look. Tell you what, Let's take a quick look at the website that will be making today in this tutorial. So this is the website will be making and you can see right here that is a modern, a professional looking website. You can simply just drive the images, place them wherever you want them to be, or even just make changes to the text right away and all the changes you make our lives on the website. It's that easy now. This page Miller allows you to do some incredible things like make different animations, different border styles, and you're going to see that making a website is super easy. And we're using the number one most popular WordPress theme in the world. This Steve has more active in salt and downloads than any other theme in the world. It comes with the best driving drop builder, simple ways to change colors and text and also allows you to add really modern cell designs for your websites. Now, in case you're wondering who I am, my name is Darrell Wilson, and I help teach 100 of thousands of people, create their own websites for themselves or for their business is I'm also ready within the top 10 best website instructors in the world from you to me dot com. Now here's some viewers who have already watched my videos and created their own website or Web design business just by simply watching my videos. So here we have Sean. She's saying, Thank you. This was amazing. The eases a tall for first time like me to follow. I learned a lot. I'm excited to get started on my new websites. We also have Andrew Rodriguez saying Yo, thanks a 1,000,000 brother. I needed it to tour on this stuff like this video popped up on my list. I'm building an art website for my friend. And this help tons keep up loading and keep doing your thing homey. Here we have comfortable hotel seeing one of the most amazing, great to told I've ever seen. And also one of the Lupus saying, Thank you, dear. Offer a truly helpful tutorial straight to the points and clear. Now, today, everyone needs a website because everything is online. So you're finally ready to learn how to create professional and beautiful website the right way. In this video, I'm gonna show you how you can do that step by step. So if you're ready, let's go and get started with this tutorial.
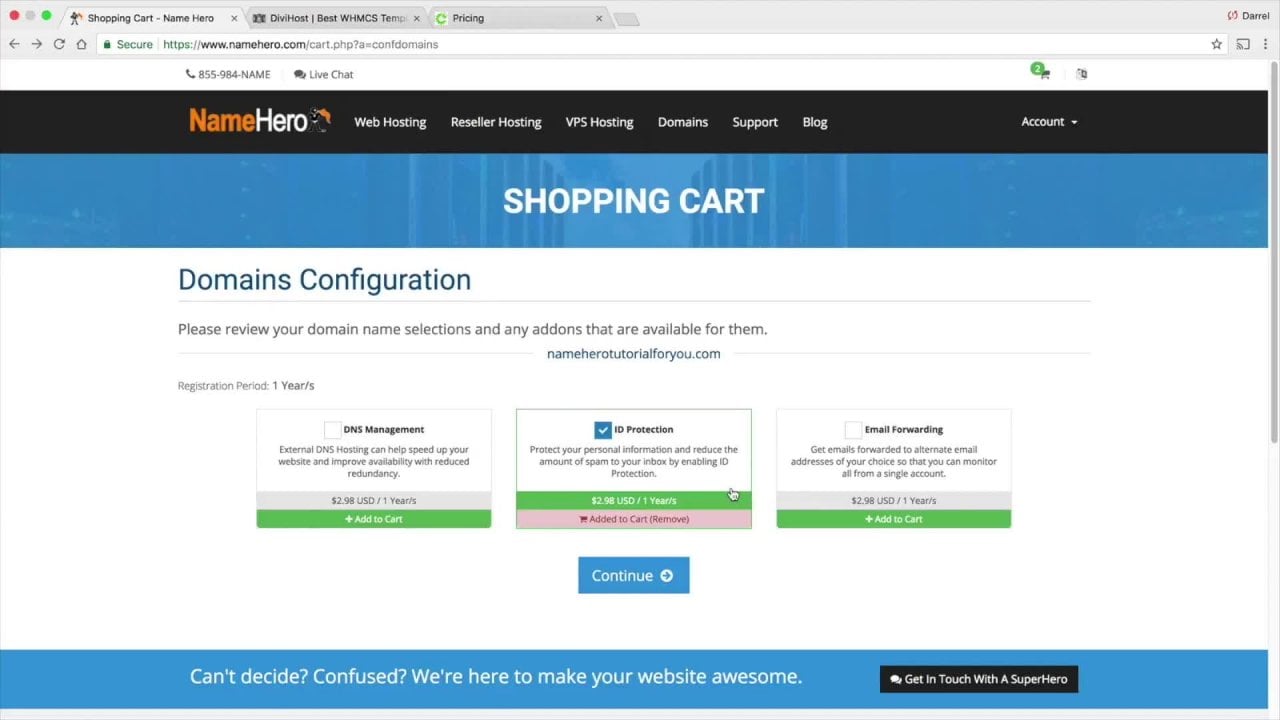
2. Getting Hosting And Installing Wordpress: All right, let's get this tutorial started. So the first they're going to do is purchase our domain and hosting. So, for example, your website dot com. After that, we're going to install their Number one content management system, called WordPress. After that, we're going to download and install the Davy theme, and then we're going to create our amazing website, and it is going to be beautiful. Now there is a link and description of this video. It will take you to a page that looks just like this right here. And this is cyclone dot com. Now cycle dot com is the fastest and the most reliable hosting now. How do I know that? How do I know that they're the best actually compared and tested them against 14 different Web hosting companies, and they came out first as the fastest, most reliable and with the best support as well. You can see I compared them against various other companies and they came out as number one , you know, on my channel, I always have the best. You know, I only want the best of the best because I want to give that value back to my audience. So this is the page we brought to. And right here you can click on shoes plan and that's me right there saying, Hey, you know, I recommend the company. I've obviously obviously recommended them for a long time there. Great. So here click on shoes plan and there's three plans, but I'm going to recommend one now There's the startup, the row big and the go geek. Now I recommend the grow big because with grow big option, you get unlimited websites hosted rather than just a single website hosted. So that is a pretty big difference. And for a few dollars a month, it's really not going to make a big difference. So right here you click on order all rights and right here gonna go ahead and register your new domain so obviously don't have one. So I'll, I'll go through the process with you and install domain. So here ago, Dio Patty Patty wack worlds See if that one's available. Patty wack world. That sounds interesting. Paddy whacker. That's actually my dog. So Patty wack world and it is available our rights. So once you are here, you'll go ahead and you know, entering your email your password, your client information. I'm sure you've seen a lot of screens like this where you have to enter in your information . Now, I do want to talk about something down here. So for the period, I recommend doing the 12 months because that would give you kind of enough time and also give you a bigger discount than doing the month to month. So please do the 12 months because you're gonna save a lot more in the long run and also right here for the extra services. Now, one thing I really recommend you to do and trust me, just do this one. Is that a main privacy protection? Because if you don't have this, you're gonna get all these people that are gonna call you and email you because they have access to your information on your domain. Now, if you if you check that box, they will no longer be allowed to see your information. So it prevents a lot of spam. Trust me to get it. And also right here the psych around side scanner. It's got a tongue twister. But I actually do recommend that as well. I mean, for $20 a year for people to monitor your website every single day to make sure is protected. I think it's worth it, you know? So I actually have that on my website as well. So after you're done filling out all this information, you can put in your social security number and all that stuff. I'm just kidding. No one asked your social. It's a joke. It's I'm just kidding. So what you're done with that you'll click on. Ah, Well, first, I'm sure you're gonna all read this right here. Right? And you're all going to read this right here. The privacy policy, right? So, yeah. After you do that, you would click on check and check are This is actually for their news. So you don't have to do that. But, you know, if you want to get information from the hosting company, you know, you can check that box, but those the services I recommend you don't have to have a second sight scanner, but I recommend it. But I really, really recommend the domain privacy protection. So what? You fill this out? I will go ahead and fill this How? Right here as well. And I will meet you on the very next page. Okay, so I went ahead and put him on information. I was brought to a screen that says, Hey, your order was processed. Click here and then I was brought to this page right here. Now, Cycles made it very easy for you all to set up your websites. And I'm gonna show you the easy way and then also show you another way on how you can do. It's just in case you want to do it from scratch or however you, however, you want to do it. But right here to click on start a new website and they already know where it presses the most powerful software out there. So click on WordPress here, going entering your admin, email, your user name and your password as well. Don't worry about this information. We can always change this later, but for right now we'll go ahead and put in something so I'll go ahead and put in my email address right here. Darrell Wilson, 99 8 at gmail dot com. And you want to make sure that's a correct email because whenever you go to you forgot password, that is where your password is going to go to and then right here I'll put in, Ah, Paddy, whack 99 then I'll put in my password right here and right here. Click on, Confirm. All right, that's a little browser thing. And then right here, I'll say, Okay, everything looks good. I'll go ahead and click on confirm right here, and they're going to say, Okay, you want to go and could be the set up. I'll say, Yes, I'll go and complete the set up. And there you go. They are getting WordPress all in salt for us right away so we can get started on our website. Now, in case you're running about WordPress, WordPress powers more than 1/3 of the Internet. So it is the most popular platform for making websites because it's a dragon drop builder. It's very easy to do, and ultimately I find that it's much easier to do this then to learn custom code because that's a very old fashioned of making websites. So here is processing are set up, and there we go. So it says you're hosting accounts writing to use proceeds to customer area. All right, so this is our dashboard. This is our back and right here. Now, if you ever have a question about something, you can always go ahead and click on support. You can open up a ticket, you can go ahead and give them a call. Everything could be done right here. And also right here for building if you ever want to, you know, change your billing or upgrade or whatever. They also referral deals. They have additional services. You can add perks. You guys can kind of go through this and check it out. But for right now, we'll just go to click on accounts right here and right here is our websites. Now. All right, here. We can cook on this website right here. And this is our new websites. Congratulations. Now, in order to access, this is a few different ways. So right here and click on dash TVP dash admin. And this will bring us to our log in right here. So remember earlier how we made those log in credentials. I'll put it those in and click on Log in. I'll do that one more time. All right, So this is the WordPress starter. This is just you know, all this stuff is just kind of knew. But right here, I'm just click on exit because we don't really need to use the service because we're going to do our own. So here, click on exits and right here. Oh, click on don't show this again. And congratulations. So this is our new website. So this is how everything looks right here. Now, if you want to see your website again and over here, click on a visit Websites and this is our website. I know. Looks very ugly right now. It doesn't look anything like you see solid early years, though not to worry. We're gonna make it look amazing. Now there's other things that we can do right here. So again, if you visit side, you can check it out there or change the theme. You can go ahead and change the team. But don't do that because we're actually going to install Ah, much, much better theme than what they have right there. Now, also, let's get you a little bit more familiar with this right here. So right here is our domain. And if I click on go to admin panel, it will bring you out over right here, to your websites. Now, if you ever want to go ahead and change your information, you over here to users and go to your profile. Now, this is kind of where you can decorate everything. So right here we can kind of, you know, decorated. I always like midnight here. You can go ahead and change your your nickname. You can change your email address, and also, you can change your password as well. So right here. Click generate password generator password for you. But if you like the pastor that you have, you can just click on Cancel. And there you go. That's all. That's all set. Now, one thing I also want to do before we begin is change our Perma links. And that's a very important part. So right here under settings, go to Perma links. Now, I know this might be a little confusing ball. Just explain it to you. So you kind of understand it. So right here you can see that our Perma links, which is this stuff right here you wanted to display on a post name. Now the reason why we do this is because you go to a website, you know? So, for example, your about us page. You want your website dash about us, right? Not to 081 duty. You know, all this other stuff you want, make sure it's under post name. All right. And then right here, we'll click on save changes. All right, so
3. How To Install Wordpress Manually: All right. So let's go and take a look at our progress. So we got our domain and hosting congratulations. We've done now to be actually installed WordPress as well. Congratulations. Next, we're going to purchase and install the Davy theme, and then we're going to make our amazing websites. Okay, so let me just kind of familiarize with the back end and just kind of explain to everything what they are. So again, this is the dashboard. This is basically we're going to be working now, right here. Click on dashboard really quick. And what I want to do right here is actually changed this dashboard because this dashboard is actually from site ground. And I want the default wordpress one. So in order to do that, just scroll down right here. Scroll down. Just keeps growing. And right here. Click on switch to default, dashboard. And this is basically your new WordPress dashboard. So this is what it's gonna look like. This is how you're going to make pages, how you're gonna make post how we're gonna do all the cool stuff. Okay, so now I'm gonna show you all how you can install wordpress manually just in case. Maybe you close your screen or something happened or you were fresh and you kind of lost the page. I'll show you how you can install Ah wordpress on your domain manually. It's really quick. Really simple. So right here, click on my accounts. And as you can see, I have many, many accounts. So you're just gonna go and click on it? You're hosting package, So right here. Oh, I'll just like this one right here. Click on manage account. Of course, you should only have one. You just click on manage accounts, all right? And right here at the top, you click on go to see panel. All right, so right here is your c panel and you'll just click on this right here called Soft. Accurate. You can also use WordPress, but this right here I think a little bit easier. So if you click on soft Oculus and right here under WordPress, you click on install. Now, all we need to do here is go ahead and find your domain. Of course, I have many, many domain. So you're just gonna go and select the domain that you purchased, and then your domain will pop up right here. So I go into, like, account route dot com right here. Make sure nothing is there. Okay. Please make sure nothing is there, cause then it's going to install your WordPress dash, whatever you put there and you're permitted to be all weird, so just make sure nothing is there. Your site name and a description. You can go and put your website. So cat website, we make cat stuff. Now, don't worry about this right here, because we can always change this later in the theme customizer. In fact, there's a much faster way to do this. So you don't have anything there right here. Go and put in your user account your user admin and user password so he could put Patty wack eight. And also, if you're Adam email, please make sure you put in your email you have access to because if you lose your password , I'm sorry if you if you lose your password and then you go to forgot password, it's gonna go to this email. So please make sure that you have the correct email right here, out of an email, choose language. And on every to tora, we always have a debate here, you know, now they have Chinese simplified Chinese traditional, and now they have Chinese Hong Kong. I thought it was Mandarin. You know, some of the comments. One lets me know about that. I would love it, but I'm pretty sure issued a Mandarin or Cantonese or Yeah, right. Yeah, I think so. It's also like the English now, right here. It says WordPress starter. I don't really need this. That site grounds personal thing, and I just don't want That's so all in. Check that and click on install. So now it's gonna go ahead, install WordPress onto our domain. All right. It says, like, four minutes, because it's literally, like, 15 seconds. It's really fast. And there you go. Now, right here. You click on TV Dash admin, and it'll take you directly to your back and right here. So this is it. This is your back end. So just like you were checking up with four, you can click on visit sites, and there you go. And then, yeah, this is just another way and how you can install wordpress. So I just want to show you all this alternative way of how you can install WordPress. So let's go ahead now and go back to the tutorial stuff. So here are your options. Like, for example, you have, ah pages. You can go ahead, make pages such as your home, the about the services. Here you have appearances such as we just we'll talk all about these features a little bit later. But I'm just kind of, you know, you can just kind of, like, you know, soup around and kind of look, look at stuff. But this is the back end, and right here, if you click on website, this is the front, and okay, so just give you a little familiar of the back and and everything.
4. Created Pages and Menus: Now what we need to do first is we need to make some pages, right. So we have no pages, so let's go out to make some pages. Now, this is very simple. Just like you make a home page, right? So go to add new. I'm going to close this and we're here to steal your page name. So has a home page right home page. And then I'll go over here to page, and then we'll do our about us page about us. All right? Just keep going and you can also view the page. But remember, there's nothing on it. So we haven't done anything. It's just this right here this super ugly, you know? So don't worry. We're gonna make it look really cool. Now you can make a page a certain way. You could go up here and go to plus New and go to page or go to pages and go to add new. It doesn't really matter. It's the same thing. So right here, you see all pages and these are the pages that we currently have. And, you know, we made the home the about us. Now we're gonna make the services and the blogging, the contact. So services published and the right here we go to page blawg, and then we'll do the contact page contact. That's where they can kind of send you emails if they have questions. I'm sure you love answering people's requests. Report request saying, Hey, this isn't working out. You know, I I love support requests that they're fun. They're great. So once you're done with that, um, you over here to visit site now you can see right here. Our pages are now displayed right there. Now the reason why it's not really looking good is because we need to actually create a menu. So it's going to do that now. There's two ways you can do it. You go over here to menus and click on menus, or you can just go ahead and go to your dashboard right here. So appearance and menus as well. So I hear it will do, uh, Patties menu Patty made. It doesn't really matter what you call it's because people will not see this, so don't worry about it. It's OK now over here in our pages will click on view all and click on the home the about the log involve a ball. Now, the reason why there's two home pages because WordPress actually makes a default. Ah, home page. Now the one you want is the actual page. So this custom link, we don't want this. It's in order to delete a page. You just click on this right here and remove it. Now, how do you want to position these? Well, I want the home page first, right. You have a home page, and then we want the about us, the services. The block in the contact will make this our primary menu, and then we'll click on save menu. All right, I'm gonna close this whole thing. Now, let's go ahead and see how our website looks now. So visit sites and voila. We got the home. The about the services, the block and the contact. Pretty easy, right? It's pretty simple. Now, one thing that we need to do is we need to set our home page. Now if I type in my domain right here, you know, Patty, wack world, you can see this shows up, and that's because we need to tell people what our home page is. So when someone visits your website. What paid you want him to go to first? So let's go ahead and go do that. Over here, we'll go to our theme customizer. Now the theme customizer basically kind of customizes the actual theme. It's basically how you can decorate stuff, how you can add certain features in how you can change the menu. The color of the menu also do really cool stuff, but we'll come back to this a little later once we actually make our first page. But right here under home page settings, click on that and say, I want a static page now, right here they're saying, Okay, What home page do you want it to select? Well, I'm gonna say all my home page to be the home page, right? That makes most sense. So here, overcome, publish and click on X ray here. All right, perfect. Congratulations. Now we can go ahead and activate the builder. We need to start building our website right now. There's two ways you can do this. So over here we can click on Edit Page and we can click on edit with the Devi builder right there, or a much faster way is right here on the top right here. Which is enable visual builder. You can just click on that right there. And this will actually enable the visual builder. All right, now this is like their little ah, you know, they have a tour on everything they're saying. Yeah, we can help you with this. Help you with that story here. I'll just click on start building and they have three options so we can build a website from scratch. You can use one of their P made layouts or we can clone an existing page. Now, right here. I want to click on build from scratch. I actually have pre meal out that I personally designed for you for free in this video. So you're gonna get active to some really beautiful layout, so I'll talk more about that a little bit later. Once we kind of, you know, you get comfortable with the theme and you understand how to use the Paige Miller. We'll talk about layout to talk about features that Debbie has but for right now is to stick to the basics and just make a basic page. Sorry. Here, click on start building. So right here. You can kind of see columns. Now, these would be the columns that you used to make your website with. Now, this video room making this same exact website. It's a professional, modern, beautiful website that you're making for your very first time. And we're gonna make the same exact website with this current theme and we're gonna go ahead and use this as a guy to kind of help us understand how the thing works, how to build the websites and everything else. Now, one thing I do want you to know is now please wants this tutorial all the way to the end because what I found is that people learn a little bit and then they kind of get comfortable, kind of skip around and they don't know how to do something. And then they come back in the question and I love comments, but, you know, people should watch the entire tutorial all the way. Now, also, there is a link and description of this video for demo images that will actually you know, you guys follow along with these images. Also, I'm gonna give you a link to this website right here, which will help you pick different greeting colors, depending on what kind of color scheme you like. You know, it's it's a great website to kind of help you get inspiration and ideas from and later on. Once your WordPress master, you can join my website WP friends dot com where we talk about all things WordPress you know, you can see here It's a big active community is a beautiful websites spaces like the Facebook for wordpress users. So you know you can check out their website little bit later and you can also get a free lay out there a little bit later, later as well. So this is the website we're gonna be making. So let's go ahead and get to it. So the first you want to do right here is
5. Installing The Divi Theme: Now, the next day we're going to do is install the Davy theme. Now there is a link in the description of this video. It'll take you to a page. It looks just like this right here. Now, also, you can get to this page by going to darrell wilson dot com Dash Devi and putting it enter . This isn't a feeling. So if you guys do decide to purchase this, I do get a small commission. Now, I bet you're wondering, you know, Darryl, why are we going to use this theme? What's what's so good about this team? Well, this is a number one dragon dropped builder, and it is the most popular, uh, theme out there on the Internet. In fact, I'll go ahead and show you all. So our here, although built with and this basically less, you know, about, like, themes and everything it talks about, like, what's the best? And this is David. So this is what we're gonna be using and you can see on this list right here. That's Davey is way ahead of its competitors because it is so easy to make websites with this theme. In fact, it even it even just blows all these of these on the water. So, for example, right here, if I scroll down, you can see that this theme is assault on around 1.9. I'm sorry, uh, over one million websites, and the closest theme to that only has 157,000. This is a default theme, so it doesn't really matter, because that's like the default insulation. But the closest theme is around 157,000. I'm sorry, Nevada, which is 500,000 and Devi just clearly just beat that. And that's because it's so easy to use. It's the number one theme. So in my tutorials, I always recommend the best. So over here we'll go to you can click on joint to download. Now you have to plan. So you have the yearly planning. You have access point now, before you want to know about this or you're not sure everything I recommend. This tutorial has a 30 day money back guarantee. So the hosting has a 30 day money back guarantee, and this theme has a 30 day money back guarantee because I know people might be skeptical, so don't worry about it. You can always get your money back if it doesn't work out. But trust me, this is the number one theme in the world for a reason. I use it. I have it. I love it. And it's the best. So you get the yearly axis, which you know you'll pay $89 a year or going to go ahead and do the lifetime access, which is a one time fee of around $2049. And you also get access to all their illegal plug ins. You get access to tons of layouts, tons of tutorials is so much stuff going and pick which one you want. You can do the yearly or the lifetime. I have a lifetime access and I'll go ahead and show you that I do because, um, you know, of course, I'm you know, I'm not just those guys were saying Oh, yeah, get this, You know. But right here it says I already have a lifetime membership, and it is the best theme. So right here, you'll click on downloads. Oh, I'm sorry. So, once you go over there, what? You go over there, you'll, uh you know, you'll sign up today. So you click on sign up today and then he would go ahead and entering your information. And this is the price right here and again. You get a 30 day money back because they are so confident that you will love the theme because it's the best, So I don't say what they're So once you go ahead and fill this all information out, you were about to this next section right here. I'll go ahead and log in. You know, that's really annoying when people you see all those websites recommending services and they don't even use the service there, just like, you know, go by. It's cool. It's a great theme and they don't use it. It's like no man. I really used this theme. It's the best. I've used it for a long time. I love it. So what's your bought? Teoh this page right here You click on download and this right here is the theme right here . So right here you click on download. Now these other things you get, you get the extra theme. It's like a it's like a blogging platform. But I think there is a little bit better you also get the Devi builder, the bloom plug in, which will talk more about the bloom plugging. And then you also get the monarch plug in which you know, don't worry. We'll talk about plug ins and what they are a little bit later if they're just basically APS for your website. So it's it's really convenient really easy. So I'm gonna go back over here to my website. I'm going to close these right here. You know, I hope you guys don't mind. I'm going to go and close all these right here because I don't like a lot of things open up . And this is the actual three emails that you guys get. So you go. You know, these are all the stuff. So what, you actually purchased the hosting? You'll want to go ahead and verify your information by clicking on that link, so make sure you do. That's because it's part of the ICANN rules. It's part of like the domain registrars of the people who issue out remains as part of their. You know, it's part of their their terms of conditions, so you just need to click on that and click on verified and you're all set. All right, so let's go back over here now. I'm gonna go over here to appearance and go to themes. Now, how WordPress works is basically you and Saul a certain type of theme for your Web site. So over here, like under latest, you can see there's various different themes. Now, these are basic free themes, and they don't really have any builders. They don't really have a lot of features, and quite honestly, you know, a lot of them just aren't nearly as good as Davey. That's why most people use Devi because it's the best. Now use Didi. You click on upload theme right here and click on Choose file and then go ahead and select the actual file that you downloaded. So it should be a zip folder like this, right? So did he dot zip and I'll click on open and I'll click on install now. All right, so it is installing the Davy theme on our websites. Congratulations. So right here to click on activate. All right, look at that. Beautiful. You get to see if it's already. It's already ready. It's already getting ready. You have this beautiful little notice and we have the theme right there. Now we can kind of take a look at our website really quickly and just kind of this ghost. Let's visit websites, see what's happened. So you can see the website is a little different now. So you know the websites a little different. You can see that has, like, a white background. We have a logo. We have some social icons, but this is just the beginning, man. This is just the beginning, baby, We're gonna have a lot of fun here.
6. Creating The Home Page: you can see right here We have different rows. So this right here is one row to rose. Three rows, etcetera. Story here on three and then you notice right here. You have three different columns right now. I want actually use of one. So I'm gonna go and delete that. And then right here, I'll click on one row. Now, in this one row, we have different elements. So these are all different elements that you can use to help, you know, build your website so they have, like, you know. Ah, text. They have video sliders. They have images. They have dividers, contact, formed comments, all sorts of really cool model that you can use. But the one that we want to use is just a basic text. You know, I think the most common that one that you're gonna use is probably text and images. Because a lot of the other ones, you know, they're great and all, but I think that Texan images is probably That's all you need for a website. Really? So here, click on text. And here you can kind of see that we have our text right here. Now, this is the techs in the box, and there's raceways. You can actually style this so you can put it over here. You have like that, however you want to do it. I kind of like it, you know? Ah, like dragging and dropping it kind of. So it just helps me get a better idea of it. So right here, you can either click on this content right here and change it. So But, um, he will put you put something and, you know, I don't wanna put right here. We put no your digital media company. No, your digital media company. Now there's various ways you can do this. You can either use this builder or you can actually use this right here. So right here. Click on center. We'll go ahead right here and click on this right here and center it. Okay. Now, over here, you can kind of see that we have the font right there, and you can actually link this to a specific area. So right here is a link, but most people don't use that. Ah, background. You don't want to really add a background to that because it's it's a really small area. What I want you to do overhears go to design. No. If you want to design your text, this is where you're gonna do it. So right here you can see text and you can kind of see how it hovers over it. So we know what it's doing right there. So we'll click on text right here. And this is you can change the font. You can change all sorts of stuff right here now. Ah, big tip of advice is just used 1 to 2 fonts maximum on your website. So in this video, we're gonna be talking more about design because you can see from this website it's a beautiful website and the reason why it is because we use specific texts and we use specific colors to make sure the website is optimized. You don't want a bunch of colors on the website. It looks tacky. You don't want a bunch of different funds because it looks weird. So over here the font I chose is months. I think it's monster at I don't know how to pronounce that month months, ARATS right monster at So that is. You can see how it's changed right there. You can change the actual size of this. Now, these options are on every single module. So once you learn how to do this with one, you know how to do it for all of them. So right here you can Honestly, you know, I want to send my bold I want you know, however you want to change it here, you can kind of change the text of the color or the color of the text. Here you can have different styles such as all caps. You can have just the beginning caps, which is very common in Web design. I know in English that's an F puts on Web design. That's what everybody does. You can kind of change the text size of it. And then also you can also change the letter spacing. So I mean, like, really cool. And then you could change the line height. You can add a tech shadow around it, which basically gives it this a shadow around it, which looks really nice, right? You can have a tech shadow to its right here. The text orientation had changed out as well, but we really change that. The default here, text color. You don't even mess with. That's because we've already We've already basically mess without setting. So we've we've already or for a header text. I'm sorry. That's for H. One. Tags will do that in the next section, but right now we're just editing basic basic. You'll you'll learn more about this in the next section over here, sizing we don't need to mess with. That's because it's, you know, we don't we don't mess with that. It's just basically making it smaller. Bigger? Well, we want to make sure it leave it like that spacing. We'll talk more about Pat. Ah, margin and patting a little bit later. It basically just gives space. So, like, for example, right here, you want more space on the bottom right here, I'll type in something like 500. It just makes 500 pixels of space. So that's what that basically is. And in border, you can also add a border on it. We'll do that in the next section because we don't want out of order on there. We can also add a box shadow by adding a box shadow. But that doesn't doesn't look good at all, and there's a lot of different ways. We can use these and in this tutorial, teach you all. Now, this is a really cool one. Filters. But, you know, this is probably the wrong model to teach you this. Once we use images, will use more of these, and you'll kind of get a better understanding of that. And also animations. You can kind of have these animates to however you want, and they have up to seven different kinds. So we'll just leave. We leave it at that one, and then they have different animations setting. So animation duration the delay. So if you want to delay on it, you can add seconds. So, for example, 1000 which would be one seconds. That's the students too long. And then, you know, you can kind of just, you know, these were just basically self explanatory, you know? So ah, starting capacity, which is basically saying, Do you want this to be fading in? Because if you change that, it'll fade in as well. And then we have the advanced tab, which is probably you'll never use because most people don't know CSS are watching this. It's just basically added features. But most people don't really know about CSS. So in this video, we're not going to covering CSS. We can cover that. And another video. You won't need it. You won't need it. I promise. Ah, visibility will talk more about that. And why you need it a little bit later and then transitions. We'll talk more about that a little bit later. But for right now, we'll just keep it basic. So right here. I'm so you know what I want to go and change. This text is something like, um well, believe it as that color for now. And right here we have this right here. So we have Welcome to the complete WordPress tutorial for beginners. Course. So let's do that. Let's make another module, and then we'll go ahead and put that in, so I'll go ahead. And sometimes that happens where the plus gets buried under there. So I'll tell you what would you if that ever happens to you guys? We'll just do it like this. All right? We'll just We'll do some like this right here. All right, So let me show you how we can drag and drop stuff. So right here. Click on. Add a new module. Lettering Text. All right, Now, this section right here, I want to go out and drag this. I want to go and drag this right there. Okay, so that's what I was trying to achieve Sometimes that the builder does that where it gets really too close. And if that happens, just make a new section. Sometimes that happens, you know? So here I'll type in something like, Welcome to the best WordPress tutorial on the Internet. And right here we'll go ahead and center aligned this. Remember, you can always do that through the actual options as well of the module. So this setting right here will actually take you the settings. Now, we have other settings right here. So this is duplicates. If you want to duplicate something you can just click on that will duplicate it. But I want I don't want to do that. So right here. I'm quick on this trash icon and just delete that also right here. We can actually save this to our library so we can use it later. Now, we will be using this a little bit late in the video, so we're gonna go ahead and skip this for now, but right here we have Welcome to the best were present on the Internets. And I'm gonna go ahead and edit this This text now. So now what I want you to do is actually highlight all of this. Click on this section right here and click on heading one. Now, the reason why we do that is because over here on the design tab you see how we have text. Now we have heading text. Now this section is decorating the heading text. So that's basically why you wanna have a text and heading Texas will So you can kind of distinct different Texas from each other. So right here, we'll keep it simple, you know, monster at and we'll go ahead and leave it as ah, leave it as a bold right now and then we'll change this something Teoh leave. It is dark because we're gonna change these all to whites. But that's once we add in the background image. So right here again you have the same. You know, obviously we have the same letters, you know? So it's it's pretty self explanatory. All changes to something like 48 and then You know, you have the same exact settings, guys. So everything is the same. So it's It's not like, you know, you have clarity from scratch. What? You learned one module there? The same for all of the modules. So I was going to close that, and then click on check. Now, this looks kind of boring. Looks really white, right? Let's go ahead and upload some images. So right here, this is We're gonna control the section of this right here. And you can actually just drag this stuff like this and just kind of, you know, visually, you know, make it how you want to look. Now here, click on this icon. Remember, this section right here controls the background. So right here we have background. And then we also have link, Remember? You know, you don't want we want to make it. So someone clicks on the background and bring them to a link, because that's just really, you know, not necessary. So right here in the background, we have different options. We have, ah, straight background color. Were you just add Ah, one background color or you have Grady. It's all right Here. We close this click on the radiant. And now we have Grady in. And you can select different kind of greeting colors to kind of you no matter what you're going to do. So you know, you mess around with that, but, you know, I'm gonna go ahead and go out and close. That's all right Here. We cook on clothes now, right here is image. And you can also have a video background as well. So right here and click on image. Click on Add a background image now and those follows. Essentially. Well, you can go ahead and upload them right here. So right here. Click on select files. And I believe I have my Yeah, they're all right here. So right here. I'm gonna go ahead and take all these right here, and I'm going to go ahead and upload all of these files I have to my server. So right here. Click on open. All right. So now it is taking all the images in that folder, and it is putting them on this website right here, so we can kind of use these as we go on. Remember these air free images? These are all copyright images. So You don't have to worry about, like, you know, downloading from from Ah, copywriter website. You know, all these right here are, um are they're free, so you can do whatever you want with. Um, So right here is the image I want and click on upload an image. Now you can kind of see our websites are looking a little better, right? It's looking, little girl, it's looking good. Now there is one thing I do want to add, though, you know, over here we have this beautiful great in over here so you can see the image in the background. But I want to add a greeting over it. So let's do that over here into the year icon. Click on background local ingredients and click on this right here. Now, I actually have certain color code that I've used now, this website right here watch to give you the color code so we need to do is just copy this right here. Whatever color code you decide to use if you want to ingredients, go back over here and say we just paste that in right there. Now you can see right there the great it is right there. Now the reason why it's not displaying is because we need to place ingredient above the background image. So I click on that. Now it's going to show, and once we reduce the opacity of it, you can actually see it. So, for example, I'll click on this color right here, and this section right here controls the actual power of the color. And this right here controls the actual grating color. There was weird. So here you can see. Now you got to see how the color now fades, fades out. So now you can kind of see the colors. So that's basically how that's achieved. Now, over here, we're going by no pad right here, and I'm gonna go ahead and grab my color codes I used And, um, you can kind of see the numbers, so rgb a and I'll put these in the description just so you can use the same exact ones as well go back over here for color one. I want to go ahead and paste my code, and then over here for number two I mean, let me scroll down. Come on, my Mac. Come on, You can do it That's a year it's there goes it Decided to work. Now. I just got this new I Mac. So it's It's a learning curve, you know, has a personality to you know, sometimes it works. Sometimes it doesn't. It just depends on how it feel, how it feels. So here we go ahead and pace that there. And there you go. So now we have the you can kind of see, I have 82 opacity and then we have the color code right there again. You can always go ahead and check the color code. Doubts. But I found that this right here is what I want. Now, remember, guys, when you're used ingredient, you want to be consistent, you conceal a website right here that we kept ingredient consistent, you know, with greedy int grating could be very tricky. You know, it can really be tricky. So you want to make sure that if you do decide to use a grading color, you need to use that throughout the websites. It's over here. I'm gonna go first off. Let's changes toe white right here. I'm sure you know how to do that, right. Design text. Scroll down. Text color. All right. Right here. Designed heading text. And then we'll change this to white right here. Now, one thing I do want to add, you can see right here is I have these really cool borders right here. And this is just, you know, it had style in the core to it. Remember how we talked about Borders last time? And I said, I'm gonna show you how to do it now, At the time, now is the time. So right here we have border and border will actually allow you to add specific borders over your text. Now, what I did to achieve that look is I just added a border right here. You can see this one. I added two pixels, and I made it white so they can see that we have the border there. And I also want to add a border to the left right there. Sorry. Here and click on white and add a border like that. You kind of see now how it's really adding, designed into court to our website. Just a little too things. You know what kind of emphasises the text? So next we have to do is create a button and called action buttons are pretty standard, you know, for most websites, I think most websites have a button because you always want to direct the audience. You always want to tell them where to go Sign up by this. That's exactly what you want to do with with buttons. So right here, just typing button. All right, Now we have click here, but we can change that. I put Let's write something you know you want to be Ah, you want to be created with that. You know what's right? Something you know? Let's let's Ah, let's do something. You know, BB Modern, You know that No one says click here anymore. You like those. Remember those pay, pal scan buttons. You know, you want it to be modern and night. So right here under link. Now, this is where you're actually going to use the links. So, for example, you know www dot darrell wilson dot com and then right here, you can say if they click on this button, do you want to open it in a new tab or the same window up a new tab? Now we have design. Now, this is basically where you're going to need to kind of add some designed to this button because it's pretty ugly by default, right? So we're hearing to design, we have alignments and then we have center. All right now for the text again right here changes to something like lights. Now that text color is just It's a short cut, basically, because you can always, you know, you can always changes to any car you want. So it's just a short cut now under button right here. You want to set custom sells for button, all right, And we can have ah, different colors. Styles all right. Here you can see we have color. We can add ingredients, or you can add an image to your button, but I kind of want to add ingredient to it. In fact, I want to use the same greeting colors I've been using. Now that's a very tricky thing to do, to add grating over ingredient. But I'll teach you. I'll teach you the skills here, you know? Sorry. Here, I'm take my color code and I'll go ahead and pace. That's to this one right here. Now you don't have to do this all the time, I'm going to show you a short cut and a little bit later on something, a feature they have called extend styles, which will basically take this same feature and apply it to different modules. You don't have to do this all from scratch again. That's the great part about Davies. They have so many tools that you can use to make the process faster. So over here, we'll change this right here. All right, Now we knew. Do you change the direction? You know, I don't like the direction of that's I want to change it to something where it's, like, 62 and you can actually create really amazing stuff like this so you can actually make split screens. So right here you can see we have a split screen so you can have that on different parts of your website. But, um, you know, for most people, I think that we'll just, you know, we'll just leave it basic for now, you know? All right, here you can add grading above the background image, but we don't do that. Here. We have the button border color, but I don't really want out of border here. so I'm gonna go ahead and change at 20 Now we have no border. The border radius. This will actually make it circular. So if you want a circular button, you just put it to 65. And now you have a circular button over here. I have a square button, but if you want to have a circular button, you can go ahead and do that as well. Here we can have letter spacing, just like the other models. Guys. So this is very repetitive, I guess you can say, because all the models were the same thing. So here on changes to monster app. Okay, that is way too much letter spacing, you know, as I'm not in the script. So I just know how to use divvy in and out. So, uh, you know, if if if I'm not the best commentator, you know, don't don't give me any crap, because I'm you know, I'm not on the script. You know, I'm really not also for icon, so if they hover over it, you want to show a Nikon, You gonna show like a little check box? That looks cool right now. One thing I do want to add is I want to add a box shadow to this. Now, this right here is a tech shadow, so it's gonna add a little bit of text shadow over. That's But what I want to do is I want to add a box shadow over this and this is kind of right Emphasize the butts and you see how kind of pops out. Now, Now it looks great. Right now there's one little thing you can do here is you can actually add a color to that box shadow. And I want to add a white one now you can kind of see now it looks sharp. Now it looks great right now it looks now it looks like I really want to click it. Just it's coming out of me, you know, I want to click on it. So now we have our basic lining page. Now all you need to do right here, it's simply just go ahead and, um, you know, scrolling down however you want to look. And while we have a beautiful landing page, you can see right here, landing page and lining page. The only difference right here is that this is a transparent menu which will talk more about once we're done with the page. But ultimately it's the same exact page. Just ah, you know, a little bit of fonts, a little bit of color, but it's ultimately the same exact being just different font size is everything else. So congratulations. We met her. We made our page Wolf, Get yourself a beer, you know, Get yourself up. Um, Adelo Mandela's That's the beer to go to. So here we click on X individual builder. And if I click on this, it's gonna open up a new tab and go to my website darrell wilson dot com. You can see here that zai website, you know. Go ahead, go check it out. Go click all the links, go click on the links and come back. Go click all the length. So let's go to keep going so right here and click on enable of
7. Creating The Home Page PT 2: enable visual builder. And now I want you to kind of visualize. So right here. This is a text module, a text module, a divider and a text module. So I kind of want to show you, You know, I want you to look at something and know how I did it. So this part actually, is a little complicated, but, you know, that's why I'm here. We're gonna make We're gonna make sure that you can, you know, make beautiful websites. What is this? Here. Get this out of here. Including delete, delete, delete. Now it to make a new section right here. Click on Plus new and click on Regular. And I just want one section right here and a lot in a text. And right here, I'll go ahead and put in services. So here we have services. Now I'm gonna show you how I did that. I bet you're thinking yourself. That looks beautiful. How did you do that? How did you make it look like that? Cause you know, by default, it's really hard to achieve. These looks so right here on the go to text. And now we're using the play fair play fair display, and that gives it that elegant look, you know, and for the color right here, I want to kind of, ah, kind of wants to choose a specific color right here. It is the black, but we're gonna fade it out a little bit, you know? Just make it a little faded, you know? So now has that faded. Look, I'm gonna make this a little bigger, and then we'll go ahead, give it some letter spacing, you know, a little bit letter spacing too much. There we go. All right. And, ah, once we're done with, that's we can click on check. Now, we're gonna go ahead and make the next section right here, which is our services. So right here. You know, I always does that. There we go. There we go. Text. And this right here is our services. And I will center this right here design, and then we're gonna go ahead and do the will make this Ah, header, text design, header, text. And then we'll do monster app. Okay? And I want this little bold. You know, the thing is, with these titles right here is I feel that bold makes you seeing just really, You know, it just really, um it's really friendly, you know? I guess you can say so. We have our services, and we will make this a little bit bigger. Hey, this is something like, uh, well, changes to, like, something like a 50. Okay, now we have our services. So right here. I'll go ahead, make this a little bigger because we want to kind of make this, have that that look of being much bigger. So right here, you can see it caps out 150 pixels. I'm sorry. 100 pixels. Now, a good trick to do is if you want to make it bigger to simply type it in. So now you see how the service is, how it got a little bigger there, but I think a better one with probably 200 pixels probably be much better. And right here we can kind of reduced capacity as well to just make it very faded. You know, something like that right there that would give it a very, very elegant look right there. So that's how I achieved that specific section. Next, we'll go ahead and do this little divider right here. and then we'll also do. This section right here is Well, so right here. I'll click on this plus icon, and we're gonna add in a divider. Now, Now the divider. Really. The main purpose of a divider is to basically give the page space. But we can use this to kind of add design in the core to our specific section. So right here, I wanna go ahead and take this. I'm starting to go put their right there, and I want to go ahead and take this divider right here, and I want to drag it down right there. And right here we have different settings, so I'm going to model setting Oh, throng one where we go. Sometimes the models get mixed up like that and just, you know, there's just you just gotta find it, you know? So here I want the divided to show and for the design of it, I want to change the color to black. Now for the styles right here we can have dashed. We have dotted all these different ones. Now I do use the dash and the dotted on actually different pages on the contact page. I use dotted and I know daughter doesn't look the best. But there's, you know, there's always a reason to use certain features depending on the need of the website. So right here we have size. So I'm gonna change it to something like two. But you can see that the more you have, the more it shows. But I wanted something like maybe two right there and then the haIf I want to reduce the height. So the main purpose of the divider is toe ad space below it. Like that's not adding space. But, you know, I don't really want to add too much space, so Oh, my water bottle just cracked. It was weird. And I here I want to reduce the with and then right here we can center it like that. So you kind of see now how it's getting a little smaller like that as well. And then here over spacing. Now you can even tried to push the push the button a little closer to it. Now, this is where we use margin and padding, so you can see how Remember, we talked about margin padding earlier, so margin creates space. So the more space you have. It's gonna create space right there. But the less you have, it's going to actually, you can actually do a negative effect where it's actually going to reduce it. And patting is again space as well. So if he had 500 pixels, it's gonna make 500 pixels of space in between this right here and this. So patting is just space Margin is where you wanted to start from, so I know they're kind of confusing, but ultimately, that's how you would use margin and patting. So we have that there and over here, cook on plus and we'll go another text, and I'll just go ahead and click on this and we'll go ahead and dragon this down right here so we'll just drag it to the bottom. We'll drag it to the bottom. See? Here, take this. Put it up. There we go. And then for this right here, I kind of want to reduce some some of the font and then also, we can actually just center this week in center line. This is well, now, I'm not gonna go ahead and go through the options because you guys know how to do this now one thing I want to talk about. That's how you actually save right there you click on the X and click on Safe is if you ever have trouble looking for models like that. There's actually a feature right here on the top on the bottom. Left, right. Here is a wire frame view. Now here. You can kind of see that we have the text. We have the divider. So we're here. We have text, text, divider, text. So you have problems trying to figure out which, you know, if you're working with really close models, you can kind of just move them around, and you can all you know, everything from here duplicated from here. You can work on your whole website from here. You know that you can do everything right from here also right here. You can see we have the button. You can move the butts in around to wherever you want. So this is the wire frame of, and this is a great future. They added, in case you're trying to find a different, you know, trying to find the modules story here. Well, look on desktop you later on, we'll go ahead and optimize our website for a mobile. So these options right here is how it looks like on a tablet. And then this is what looks like on a phone. Now, of course, this doesn't look good right here. And remember earlier how we talked about visibility, how you can disable something for mobile. We're going to go and do that little later when we talk about mobile optimization. So I kinda want you guys to stay till the end to make sure you all know how to do that. So next, gonna go ahead and do this section right here. So this section right here is three images and this is called a call to action module, which we're going to use right now. Also, you noticed that I added this little design right here on the right, and that's a background image, and we're gonna go ahead and do that right now. Sorry here on the plus and click on three. So right here, we'll type an image right here. Click on the It's a default one, you know. So just click on this one, click on the image and simply just go ahead and select one of those dummy images I have Now , this part of the Torah is gonna be a little more a little more complicated. We're gonna go kind of in the advanced features and kind of show you what this team can do , you know, because there's no limit on what you can do with this right here. Click on plus two module image, but on this one, and we'll go ahead and select. I think it was this one right here. Yeah. Okay. Now, one thing I do want to talk about really quickly is the image filters. Now, the image filters are an amazing thing that has a lot of power. Basically, it's like a photo shop. So right here on our filters, you can kind of change the hue of its You can see how changing color you can change the saturation. You can change the brightness of this image, the contrast. You can actually invert everything like that's which looks really cool. Or you can you know, you can blurt out and Davey has actually had really good examples on how you can use each and every one of these. So I'll be talking more about the these in detail when we talk a little bit later about the advanced features, and then right here again, you can have an image to it as well. But, um, you know, I don't want to do that. So and you never want to change anything to default. You can just go ahead and go back toe, you know, changing a default once. You kind of mess around with this stuff. So right here we have the images. Now below this, I want to add a call to action. So call to action is basically taxed with the button. So right here and click on plus and right here, click on call to action, or it's right here. And this is actually a very common popular one that most people use. So what has the title text has a button text, and then it has the content. Now it doesn't have a button right here, because under the links section, you just need to add in, You know, anything right there. And then whatever they click on that, it'll go to the specific link right here. So right here. You know, I put clear design and then I put you know, some content right there. So it's going to do that. So right here, I'll click on See, we go. Let's see how this works. There's another way how you can access the's right here by clicking on these right here. And this will take you directly to the title text right there. You see, you had some trouble there, but that's another shortcut. How you can just click on these and it'll just take you to the specific module in this section to make it really fast. Sorry. Here, we're gonna go and do monster app. Now, the great part about this is that we'll get through this once and then we're going to duplicate these modules and we're going to actually put them on the other on the other one , so you don't have to do one, and then we can just copy that one and have it for these other ones as well. So I know it's a little work, but, you know, it's just how it goes. So title text on leave all this toe white. Um, for this content, I have a little bit too much content here, so I don't want to really add that much in for the click here. But we're gonna go ahead and go to button right here, enable the style, and then we're gonna go ahead and change this a little differently so you can kind of get the idea. Now I'm going to check one thing really quickly here. So I think right here we can actually copy the section styles. And I believe we can No, we can not. For this module. We'll talk more about the about the extend styles a bit later. So here design, we have the, uh I'm sorry. The buttons were decorate the butts in there. What you doing? Where you are you going? And ah, right here. We have a grating colors, and, um, I selected the I selected this one. See if I can actually copy this one right here. It'll be kind of cool. No, you can't do that yet. Oh, that's too bad. All right. So I'll go ahead and go back to the my no pad really quick and get those coats. You just want to consistent with your design. You don't want to, you know, have different cause. That looks really ugly. Grading with another greedy. It just looks does not look good. So I'm gonna go ahead and change this right here. You don't have to do this. I'm just doing this just to kind of show you. Exactly. You know how I did this and how you know everything. So, you know, you just just just have a drink, have a drink, have a beer, really quick Modelo right, Modelo. And then we hear all right, And then the same thing here, I would change this direction. Something like 66. I also wants to take out the border cause I don't want a border here. In fact, I can even add the same thing right there. We added the Thea shadow over here will take just a monster at rates. And then I'll go ahead and change the box shadow right here and then I want it white. Okay, Now, in this image right here, you can see I just used the border radius to kind of you know, how we use border radius earlier to kind of Ah, make it circular. So we're going to do that as well because square buttons are really ugly. So we hear of a square radius right there Now, one thing that we need to do right here is we need to change the background color. The background color is really, really ugly. So to do that, we're gonna go ahead and go to our go to our background right here and change this simply to or ah changes the block right here. And there you go. All right. So you can see now we have the call to action right there. And it looks good. Now, remember, you can always duplicate this so you can duplicate this and put it right here and also do that again and duplicated. Put it right there. Now, what I was gonna do, actually in this video was I was actually gonna make really creative into some like this right here, because that looks really cool as well. But, you know, it's just how on how you want to style stuff. But I think that was that look really nice right there. So I did like that Look as well. So over here under this image will cook on this and we go to design, and I believe it is under spacing. So right here, under spacing, I don't want to show any space below that image. You see that? So now the images going or the space is gone because the space looks really ugly, right? So again, right here, Design spacing. Take that out. And right here we'll go ahead and take out the design and spacing. And there you go. Now we have a beautiful call to action section. It looks great. Of course, the text looked a little difference. And right here you can see that actually made this white right here. So I just kind of in verse the design because this looks a little too repetitive. You can kind of say it looks it's too repetitive, right? So what I did to Dio to achieve that was I actually used a white background here and under the design section, I changed the text of dark right here. It looks like that right there and then actually added, am a box shadow around it right there. You can see that all these have box shadows as well. So over here under the design section, we have the box shadow. And I just added a box shot up to these right here to kind of, you know, just just take away from it being so flat because it looks a little ugly, right? So they can kind of see, that's we have the box shadow, the box shadow. I love it. It looks great. I'm a big box shadow fan. A lot of people, you know, they're kind of against its, but, you know, it just looks so nice. Now the bus and right here needs to be changed. The white so but in text color whites. And that's how I achieved that section. Now, one thing I do want to add it right here is a background. But just to this little section right here. So in those images I gave you, I'm gonna go ahead and click on this gear icon and do background, and I'm gonna upload a background image. Now, the one I use right here is this one right here. Now you can kind of see that looks really ugly. Looks pixelated. Looks ugly, right? We're gonna go ahead and make this the actual size. Now you see that it's in the middle, but we can't see it. So over here, under the background image position, I want to change. This is something like the bottom center or I'm sorry. The top. We're going to Top Rights Top right? What's the worst? The right one Rights Rights centre. Right there. There you go. The Okay, So there you go. So now we have this section full of complete. It's very similar. This section right here. Of course, this was changed, the black different, you know, different text. But ultimately it's the same exact style and structure about it. One thing I did also add is you can also increase the size of this section to make it a little bigger if you choose to do that. So right here in a row. Settings under design of the alignments. We can actually change this to make it a little bigger. So right here, sizing full with or you can use a custom with, and it's going to actually make it. However you want it to look. But right there, you can see it caps out. Now, let's say, for instance, you want to actually delete all of this space right here. In between these, you can actually change the gutter with toe one, and it looks like that. So there's various designs. How you can add to this theme. And you know, I gave you guys the demo, but, you know, some of you might want to do something else. So I'm just kind of giving you all different ideas and examples of what you can do with your websites.
8. Creating The Home Page PT 3: all rights. Next section. We're going to do this section right here. Now. This section. It's elegant. It's beautiful. It looks kind of like classy, sloppy. But it looks really nice at the same time. So let's go and do that. So just by looking at this, I hope you can know what this is. This right here is a call to action. This right here is an image, and it's a two column row. So you see that? So right here. If I click on this call to action, this is an image. We change the filter a little bit. That's why it looks like that. And it's a two column row. We expanded all the way to the page. We made everything bigger. All right, so over here, plus new gonna keep working here image. And I'll close this right here. Oops, that I close that. There we go. All right, sometimes, yes. Sometimes weird stuff happens in the wooden wordpress. I'm telling you, I'm telling you So now we have the image, and then But we can also do here is just duplicate this right here and simply just drag this right here. That's another way. On how we can do this. Well, we need to modify a little bits because we don't want the background color. We'll all that you decide. We'll let you be the person. Make that decision. So right here under this, this gear icon, I want to change this to spacing. I'm sorry, sizing wanna make this a full with and I want to reduce the gutter. Remember how we had no space in between this? I want to do that here now. So right here. Use custom gutter with and changes to one. Now you can kind of see how there's no space in between it. The image have gotten bigger. It's filled up all the space as well. And then right here, you can kind of put in some text. So here we have signature process made simple. I'll put that in signature process made simple. Now I want you to look at this and understand what I did. So what I did doesn't make the text bigger. I had a little bit of space in between. It's and that's about it. I change the text of Black and I reduced. I took out the background, so it's just inverting everything I've done, basically. All right, so over here we can go ahead, make the design of the politics a little bigger Here, we're going change this to something like title text will change it to something like 62 the alignments will put it to the right. So just like that, And then also for this text right here, I'll just go and copy this. And also one thing to notice is that you see how I add it in a black overly or I'm sorry, a block shadow instead of a white one to kind of emphasize because we're not using black color, so or we won't be using a black color. So here, let's go ahead and paste this and I'll make this to the left right here as well. And also right here for the for the button as well. It will change the button alignments to the left as well. Like that. All right. No. One thing I want to do here is I want to actually, um I don't want to add in this black background, you see, right here how we don't have this background. So we're gonna do something a little different here. So I'm gonna go ahead and get rid of this background here. Actually, leave it for now. Now, Trick to do right here is I want to add color right here. Right? But I can't, because that's how much the model covers. Now, over here under this section, we can click on Roe settings. We can actually add a color for that specific section. So right here in the background, you can see how we have background color one, and then we have background color to So here I want to add a background color of something like gray or something, something a little bit better than what we have there. So I might add in, like maybe ah, gray here. Background color too. Uhm, I'm going to reduce this a little bit more to make this just to cut off these images. All right, so we have background color back on color to over here. I'm gonna go ahead and delete this background. Make sure that's all deleted. We're not gonna use a background color there. And now you can see that we have the background color there as well now, But I also want to do here is I want to equalize the column. Rose. I want to make sure that both of these columns are equal. So under the design, I believe it is under sizing. I want to equalize the column, Rose. So what that does now is that it's basically making the space right here. Now I do have a box shadow there, and I dont know why. Thats Oh, I did. I did. I did that, Adam. Sorry. So a box shadow, we have to take that out. That's really ugly. Now this is we're gonna use the margin and patting. This is where we're gonna kind of decorate and design where we want this position out. So right here under the design, we have spacing. Now we're here looking out in 50 margin, maybe a little bit more. Give you 60 margin. Now, this is a complicated feature. You know, split screens are always a little complicated, so if you don't understand this, you don't feel like it's ah, you know, don't feel like this is like, super complicated, But you can kind of understand now why we use margin padding. And I specifically did this in this tutorial to help you will understand. You know why we would why and when we would need margin padding. So making kind of see that, um, we have this, uh, this background right here, and it looks great, you know. Now, one thing I did here is I actually added this into a slant. Now we're gonna introduce you to something called shape dividers, and you are going to love shape the fighters. So go ahead and reduce this all the way, and I'm going to reduce this all the way to kind of close it. And, uh, you know, I did add a dark a tech shadow. So for the button, I added in a black shadow. So right here added in a black one right there. So let's go in and add in a divider. So right here in the sections, we're gonna do dividers, and you are going to love the fighters. So right here we have dividers. See, arts is top right there. Section divider. Pick a section. I wanna make this clear. Right. I want to make this transparent. So the top. All right. So now we have the divider heights. Where to go? Oh, you know what I believe we're supposed to take that out. So let me let me do something really quick here. We're gonna go ahead and change. We're gonna change them, saying sorry. I messed up a little bit background setting. We're gonna go ahead and and, uh, we're gonna go ahead and delete this one, and we're gonna add in the color right here as well. Sorry. So the background color is gonna go in this section right here. All right. You see that? Sorry about that guy. I messed up, so I'm not in the script, Guys. Give me. Give me a break. Come on, give me a break, you know. All right, so we're gonna add in it like that now, right here under this section right here. We're gonna go to design dividers, and we're going to just kind of, you know, you can pick a divider right here. Whatever one you want right there. So you can kind of see how it's now. You can kind of see the how. It's kind of like a a different slant and everything, and I'm gonna change it to this one right here. Now, I'm actually gonna invert this like that and you can actually change the divider heights. You can make it however you want. So that's another amazing feature. And you could do this on all the pages, so I did it like that. Now I want to go ahead and do that for the bottom as well. Sorry. Here, under the bottom. I'm going to the same exact thing, you know. See how beautiful that is. Look at that. It's absolutely gorgeous. Now, you can do this different ways. You can see right here how You know, there's very different ways on how you can do this, but I just decided to do it like this. I just you know, you get the point. You know, uh, I'm not gonna follow the exact same step, but why did here was I just added a call to action. I used the same thing. And that's basically how achieve that section right there. So that's right there on how you can use shape dividers and you can you shape dividers on any specific part. So, for example, right here under the design tab under dividers on the bottom, you can have a divider right here on the bottom as well and you can actually change the height of its to. However you want it to look on, they're gonna You're gonna blasted the fighters people, especially beginners, love shape dividers. So that's basically how I achieved that certain section. You can kind of mess around with that and kind of, you know, have fun with that's and that's wrong with that. But let's go on and go on to the next section. We're going to testimonials. And then we're gonna do this section right here and actually have a free loud for you on my website that you're gonna go ahead and upload. You don't have to make your own footer. This is a custom footer and I've actually made it for you. You can just go ahead and you know, mess around with that as well. So right here. Now you can see this section right here is virtually the same thing right here, right. So instead of doing all the hard work all over again, why don't we just save this section and upload it to another part of the websites? So right here and click on this little gray or sorry teal section, click on Save Roto library, and this is gonna be our header section, and we're going to save this to the library. All right, now, right here. Don't click on this. Plus add from library. And now we have this section for the library, and then you could see it's right there. Now, what I want to do here is I want to actually, actually, what we'll do, we'll go ahead and delete. This section will make a brand new part, and then you can see right here. How kind of you know it's a whole new section. It doesn't extend to the part of the page. And then now, right here, we'll go ahead and add in this section right there. And of course, you just have to change the font or the color or the words you know, testimonials. Now you notice how it's too big, right there will probably need to reduce the font size. So it is a little too big for us. So right now we have 200 pixels, and I believe we can kind of change it. But you know, it will probably do that through the through the module setting cause sometimes sometimes the builder can get glitchy when it does that, so I just choose not to do that. So right here. Now you notice how I can't really highlight this section. How? It's kind of like it's kind of hard to get it. This is We're gonna use this part right here. So right here I go to the text. We're gonna change this to something like, we'll change this to 150 pixels. Okay, cause it's too big for that section because testimony is a longer word. So I changed it, and I will go bad and scroll down. And now you can see how it fits there. And now, right here. See here we got it. The our services, and they will do testimonials, and then we'll just leave. This is demo content right here. So now we're gonna do is we're going to add in these sections right here and again. We'll need to make one section because with one section, we can add it, we can duplicate it and make various sections. Right. So right here, we'll do three icons, and then we're going to now use the testimonial one, and there's tons of models you can use, but you know, it's just a learning curve at this point. You know, all the settings are the same for each module. You kind of have fun messing around with them. Now here will put Darrell Wilson, Darrell Wilson and then for a job title do CEO and then one of my website there wasn't dot com and then here we have some text etcetera. Now, here on her image. This is we're gonna want to add in the portrait. So right here, you can see that have different portrait's and a lot of this guy. This guy right here, he's having a good day. You re having a really good day. And of course, you can change all the settings as well. So for the design, you know, you can change the portrait with everything else. You can have the text color, uh, quote icon. You can change it to something like black. That's not black eso most of these settings air Very. I guess you can say, um I guess you you understand it. So here on out of box shadow and I won't change the box out the black all right. And I'll just reduce. They're all just copy this. Put it right here and I'll go ahead and copy this and do it right here. Now I want to show you a new feature called Extend Styles. This is basically where you're going to copy everything throughout the entire page. So right here, I'll go ahead and do something a little different. You don't follow me here. You can just kind of watch and have a drink. Were drinking Nadella, right, Mondelo. So here, I'll just change this to something like tens of black. Now, what I can do here is I can right click on this and go to extend testimonial styles. Now, what this means is it's going to extend this style onto every single module on the page. So right here, I want to say I want to send a style to the entire page, this section, this row or this column. Now, since when we have testimonials on this three on this page, I can just put this page, you know, But let's say, for instance, I had a call to action right here, and I wanted to do this. Page is gonna change all the call to actions throughout the entire page. so that way you can visually create something really fast. But for this one, I'll just do this section and then we'll go to extend. Now you can see that it's all changed because it's just copied the style throughout the entire website or for this section. So that's basically what I did right there. So that's that's, Ah, feature. They have called extend styles. And it's a great way how you can speed up the process of making your website now changes to something like Blair. There we go and then I'll do this again. We'll do extend styles and their ego, and you could see nothing else on the page has changed because it's on Lee affecting the testimonial modules. And I want to add in my little cool little little design right there, my background. So we're here background image, and then wait is in the left side now, Yeah, left side right now, Yeah, left side, and then I'll go ahead and make this the actual size and then I'll put this to the bottom left. There we go Now. There's also something that we can add in here called the Parallax Effect as well. So is it? No center left center left the parallax effect. What we will do is it will actually make the illusion, the images following with it. Now, this is about image to use, So we'll do that little bit later. But I'm just kind of showing you that if you do like to have the parallax effect, you can have it. In fact, let me see if I can add it to this image right here. I believe we can, I don't know for I think it's only for backgrounds. Yeah, we'll have toe. Yeah, we can't do it. We can add it to this one right here. I'll give you an example. Oh, but the problem with the parallax a disabled ingredient. So right here. You can see that if I scroll down the page, you can see the image follows with it. But it does disabled, radiant, Because the green it will not work with it. So that's just too bad. We'll have toe want to say that for another day, Another rainy day. All right, so we have this section right here. Now, just by looking at this, I want to understand what this is. So this is simply just a background. We have the great and we added the image. And this is a simple call to action. You'll notice that Texan images are pretty much almost the same thing. And what I've done here is you can actually say these layouts and use them on different parts of your website instead of doing them all over again from scratch, because that could be, ah, total pain in the butt. Right. So let's do that right here and click on this regular, and we have ah, tell you what. We're gonna go ahead and use another called action that already have. You know why? Why should we do everything all over again? We already have something that we've already made. Sorry. Here is gonna copy this and take this called action and drag it all the way down here. All right. And right here, we're gonna go ahead and enter in the background image. I have the picture of this girl right here, and then we can go ahead and, uh, we'll add in another one. Ah, greeting overlay. Remember to make sure that this will place above its and then you would simply just go ahead and ah, pace that it Not really quickly. What I want to do here is I wanted, but I believe we can go ahead and copy this section Copy section styles. And I believe you can apply it over here. There we go. Yeah, except it just took the image. That's OK. We'll just change the image. So that is another feature that that's another feature you can add, you know? So, um, you know the copy. The copy style will basically just copy all the formats. And then, you know, you can just kind of Ah, you know, it'll just copy it, and you can have fun with that. All right, so all right. That's being a little weird. Drag it down a little. Now, one thing right here is that we have a white background, so we don't want a white background, but I'll just change the text right here to white before we do that. Three here. Light. And we do have a background right here. So you want to go ahead and disable that background color? I want to disable the background color. Don't give me attitude. Here we go. Now. One thing you notice that it has a box shuttle around it as well. Because up there, we had a box shadow. So Bach shadow Just take it off. And then from here, you know, we can kind of just, um you know, we could just make the text a little bigger title text. We can make it. Ah, you know, a little bigger to kind of give it some design into core and everything else. So at this point, we actually made the button. It doesn't look somewhere this and the only difference is that this is bold ID, and this right here is a square button right here. So we can just actually bold this right here. And I feel that bold makes the makes the page. I'm sorry. Makes the makes it more friendlier. You know, it just it just, you know, it's more friendlier, is it's just it's more inviting. That's why I really like bold on call to action buttons as well
9. Footer + Divi Library: So right here. I'm going to go ahead and save this now. And that file that you downloaded, there's actually a layout for you. So I'm gonna go ahead and go ahead and show you guys might my back in right here. Okay, now, really quickly. That, Ah, that fall that you have it has a freely out for you. So it is the divvy footer dot Jason file. Now, there's two ways you can do this, and I don't know why, but sometimes it doesn't work 100%. Well, with Devi, I wish it did. So here. Must save this. Make sure it's all correct. And I want to take this and drag it onto the page and make sure this is not checked because this will delete everything. So you don't want that checked and right here, click on Davey Builder layout. Now, this works for some websites. I don't know why it might not work for me. Didn't work earlier. And if you get this error, that's quite okay. Uh, it happens sometimes we'll go ahead and do it another way. So right here, I'm gonna go to dashboard now. Right here. We have Debbie and we have the Divvy library now, Right here. I'm click on important exports import. Choose the file and simply go ahead and select that file. So right here we have the it is the Davy footer dot Jason and then import this TV builder layout. All right? It is importing. All right, so now we have the footer. So know what you do is just simply go ahead and make this bigger and we'll go ahead and enable the visual builder, and we'll simply just upload that layouts on our foot. Or just just because I'm a nice guy and I want to give you, you know, easy work. So here, footer. And there you go. Now we have the footer. Now, I want you want you to look at this. You know how I did this. You know, I don't want just to use the layout. Do not understand how I did it. So I'm going to reduce the padding there. You Actually, maybe I should change that up for the things, you know. Um, so right here we added a text module, a text text, text, you know, just text here we have a text, and below that we have the social media following. So right here we have different toe ones. And, of course, you can just go kind of duplicate one. Go to the settings, and you can kind of mess around the design. Now, all these are the same thing. So I don't want you to work too hard, you know? I want you to know it's a beautiful, you know, it's Ah, it's Ah, it's a beautiful footer. Looks great. And then here we have the subscription where people can actually signed up to your email address and, you know, mess around with that and have all sorts of fun. But, um, I'm going to cover the Bloom plug into this a little bit later. Okay? So we're not gonna do this just yet because we don't have mail chimp installed, but we will do this a little bit later. They have other various email things have used, like active campaign or constant contact. Whatever. Whenever they sign up will go directly to your list on your email provider. All right, so congratulations, guys. You guys successfully did the first page. I want to go out and give a big round of applause. Everybody for doing that. That's great. No, I actually have free layouts for the services and the contact, but we're gonna do the block from scratch. All right, But before we go on the next page, we need to talk about the theme customizer settings, such as like the menu such as The Footer Options down Here and ultimately, what the theme can offer.
10. Intro To Theme Customizer: Okay, So in this section, we're gonna go and talk about the theme customizer of DB. So over here you can go to dashboard. Now, when you download David, when Saul David, you get this little Davey icon. Now, these are all of the features that come with TV. So earlier we talked about the Davy Library. We're gonna talk about role editor, and this is important. If you are running websites and you have clients and they want to mess something up, you can limit what they can do on the Web site so they don't destroy the website. You know, a lot of people actually do that. But right here, we're gon theme options. So right here you have general theme options such as you want at a logo. So right here, click on upload. And over here we have this little local right here and click on cities logo. We have a fixed navigation bar. We'll talk more about that. What it is, we have a duty gallery. We have different color palettes. You have got first post all these basic options right here. Now, a lot of these I'll be very honest. You're not really gonna mess with these right here. You might if you have a custom footer. So these right here are the icons on the bottom of the page. So right here, you can see that we have these icons. This is what these are referring to right here. Here we have, ah, number of post displayed on a category page. We'll talk more about this when we talk about the blawg. Um, we have, ah, back to top button. So if you want, like, a back to top button like this right here, that would enable that feature. Ah, smooth scrolling, which is I really recommend to do. You can go ahead, enable smooth scrolling. It'll basically allow the website to smooth scroll E on the website instead of like, choppy. So here you can see that we have a smooth scroll effects to it. Here, I'll go ahead and exit the visual builder. Does that kind of give you? Ah, you know a better example of that. So here you can see how it smooth scroll e and it's not chopped up over here. We have other files, but you know your options, but you're not gonna really messed any of these. I believe all these a standard over here under the year. I'm sorry. Click on save changes because I added the logo Over here, we have navigation. And this is more for, um you know, ah, pages and other options, but quite honestly, you're probably never gonna mess with these, So I would go ahead and leave everything here. Blink category. This is for the blawg general settings. You know, disabled top to your drop down menu links. All these settings are here. We're pretty much not gonna accident. We don't even have scrolled anchor text. Ah, builder. Right here. You can enable the Davy Builder on pages post and also projects. I think you'd always want this enabled. I don't know why there's an option to disable its advanced again. You probably would never do that except right here. You might want to edit the classic editor if you are familiar with TV already. This is where you would Ah, you know, add in the, um, Kosik editor and name with the latest Davey builder experience. You know, I gotta be honest. I have no idea what that is. I'm really not sure to be honest layouts, right? here. You can decide if you want to display the author of the date, the categories, the comments on your blog's posts. And when we do the block, you understand more about that single page layouts, General settings adds. I don't think you ever wanted. I don't really run ads on this section. I use it as a widgets. We'll talk more about widgets and a little bit. We talked about the blawg S e o. There's a plug in for this. I really wouldn't mess with its integration. I would leave all this. Debtor, this is more for developers and updates. This is we're gonna entering your user name and your a p I key. So when you get DV you actually have the option Teoh here, go ahead and show you all. I'll go ahead and log in under the accounts you have your, um your a p I he So this is basically where you're going, Teoh, you know, enter and all that information. So your user name in your a p I key right here You can go ahead and put that in right there . All right, now let's go out and talk about the theme customizer. So I'm going to visit websites and up here were able to theme customizer. All right, now the theme customizer controls basically your header and your footer section as well as different other options. So right here in the general settings, we have site identity Now, right here. It's like, What do you want your your think to say up here. Now we have ah, logo right there. So I don't really want to add anything. So this ready doesn't really matter what I puts because I already had a logo. Now, if you need a logo, there is a link in the description of this video to a web site called Fiverr and fiber is a great websites on where you can get lows for very, very cheap. So here I'll type in logo design. Let's see if I can skip that right, and you know, you get logos, keep us $5. You know, there's these guys who charge way too much money, but we can get something that's like 0 10 bucks. You know, like something really cheap, you know, because 50 bucks all that stuff? Yes, right here. You guys could get a beautiful logo for as little as $10. I will have a coupon code in the description of this video. I think they offer me a coupon code so you will get a big discounts on your on your first logo. All right. So be sure to check out that coupon code as well. Over here, we have the site icon. So you see how over here we have the site icons, so if you want to change those, this is we're going to do it and click on Select Image. And I'll just collect vp friends dot com and then see how over here you can see the icon has changed. So now when they visit my website, they're gonna have that logo right there. Layout settings. Now, I don't personally like these options because we have already designed all of the settings right here in the page builder. So I really think that these right here are not necessary. But you want a mailbox layout? You could enable box layout to your page. You can also change the content with of it as well the gutter with of it as well. You can miss with all these settings, but I personally don't like to use the settings, because again, um, we've already kind of done that in the page Builder. So I don't really think the theme customized would be any good topography. Same thing. Thes are global layout. So our global, I guess you can say where it's gonna go ahead and change the text size all of this stuff right here. And it's gonna apply to everything on your websites. So you want to go and have that approach? You can do that. So, for example, right here the header text size, it's gonna go and change all of the header text sizes on the entire page. But I don't really want to do that because I've already made it toe how I wanted to look, So I'm just kind of giving you options on how you can design this, but I'm kind of against the theme customizer because we don't really need. That's because we've already designed all of these right here on the page builder. So, you know, why would we want to do it like this? You know, because maybe you want a different header tax for certain parts right over here. Background. You can add a background color. But again, that's the default. We've already have our own background color, so those options are a little not necessary. But the ones that are necessary is the head of navigation and the footer. So hair navigation. So right here we have our menu. Right? But maybe you want to go in and change some stuff. So header format, We have different style. So we have centered. We have senator line with logo. So our logo is right there. We have a slide in which would basically slide in the menu. Or we have a full screen right here where we can go ahead and click on this and I'll be like that right there. Or we also have a vertical navigation, which is trending. And here you can have the menu on the side right there. If you choose to have it like that so you can go ahead now a vertical, um, navigation. I'll just do centered for now. So I'll do you center in line with logo and uncle Gun publish. So now I have it like that over here, the prime, A menu bar. So here we have the options to change the different stalls of the menu. So here we can make it full with, and we can even hide the logo. Now, when you make it full with right there, that only works for certain options, like the default. I'm sorry. The Yeah, the default. So here, menu bar make full with. And then right here we can kind of change the I believe it is. Yeah, I guess it change the spacing just a little bit. Just a little bit there. So it should change a little bit more, but yeah. So yeah, we'll go and change it back there. Well, it seems back to center. All right. The menu height. You can go in and change the menu high right there. You can change them the logo size. You can make the logo bigger, or you can make the local smaller. You can change the text size of the menu. So you see how the Texas getting a little bigger letter spacing. So here we can have the letter spacing will different. And also the fonts which, you know, you might want to choose the same one. I think we're using Monster at right. Is that correct? Monster at? I just thought monster at their it is. What's that? One Monster Alternatives, huh? That's interesting. And then here we have the text color. We can change this. Something like black changes the white. Um, we can even bold it now. Right here we have active link color. So that means whenever they click on a link, what color do you want that link to be? Well, changes to something black or we contain just a white. If you don't want it, you can just change it to transparency. And then it's not going to show that you are. You know, you're gonna change the same color of the letters, so we can't see anything right now if you want to change the background color so we hear in the background color changes to read, you know, black or you can have a transparent menu like this right here. You can kind of reduce the transparency. And now we have a full with transparent menu. Um, the drop down menu background color. No, I didn't show you how to do that. So I'm gonna show you how to do that really quickly. So you want to drop down menu we're gonna go ahead, go to our menus right here, and I'll explain what I dropped. The menu is so over the menus right here. You're gonna go and take this and drop it like that and save it. Now, when I hover over, it's it's gonna have this drop down like this, and you can kind of change the background color of the drop down as well. So that's basically what the what that setting is. So had our navigation where we were at Primary Navy Bar. And then we have the drop down menu text color and the drop down menu background color. So maybe changes to some of the white, and now you can see it like that. But you might want to change the text for That's because you can't really see it. So maybe black, right? That makes more sense. And then we can change this. Also, the black right here, have a black line a little bit cleaner, right, Okay. And then we hear secondary menu more. So this is basically when you scroll down, you know how you want it to look. So right now you can see how the menu kind of adjusted right there. You see that? Also the fix navigation settings. So this right here is the fixed menu height and again, you know, you might want to change this. So what they do, scroll down like this right here. You can see how now a Just like that. So I added black, you know, just because I think blacks good, but that's basically what the fixed navigation settings is. And I'm sorry, the second menu bar is when you have a secondary menu. So the second menu can actually appear above this one right here. All right, so that's basically the second arm Nur settings. And then we have header elements. So if you want to add in various other various other ones, we can go ahead and do, like, you know, we can add in. Um, it's not supposed to be looking like that. It's a little strange Sometimes. Guys, the builder acts a little strange, so I believe it's posted. Go above it. Let me go to the second Menu bar and yeah, you know, sometimes it does tend to get a little glitchy. This is supposed to be actually on the top, so that does happen you. You know, my apologies, but ah, that's what basically the hell header elements is supposed to display on the top of their list. It is something wrong unless I change the setting right there. But generally I believe it supposed to display above that page. So if that ever happens to you, just contact Davie and saying, Hey, you know, this is acting kind of weird or this is this is not correct, but I believe that is this year Had our moments. Yeah. Supposed to display the top right there. I'm not really sure. Maybe it's gonna have to publish the page and then actually visualize it on the web sites. I think that might work. Just go and try that. Yeah. See, there it goes. You know, I don't know why I did that. Sorry. It's just sometimes in the world of wordpress guys just just really weird stuff happens, you know? So that's basically ah, the additional born you can have up there, and then you can always change the settings for that as well. Under the header elements. Um, with some CSS, you can change the position of its but you can kind of venture off and kind of joined like Debbie P friends and ask people for help saying, Hey, you know, how do I do this with TV? And you can join our Facebook group All sorts of really cool stuff footer. So we have ah, foot or right here. Now we have a specific footer, so we have different foot or options. So we have, like, a three column, a to column and a four column row and right here in the widgets, widgets are basically the actual foot. Or so Let me go ahead and enable some footer widgets. So right here footer elements. So you can see here like this for here will change for further elements Footer menu. This will change actual footer, text color all these other settings right here Once we add some text to it and then the widgets right here. We want to go ahead out in some widgets. Let me go ahead and see. We get out in some widgets here and this right here will take you know, it takes the credit right here. So all this stuff, all these options right here are for the bottom section. Now let's go ahead and add in some widgets on the footer right here. So we have widgets and we talked about foot area. So foot area one, we can add a widget. And maybe you want to add something like a text on here. You can add in about us and then you can type in something like this groups you can type in something like this is all about me or about us, you know? And it's a dummy text. Maybe so since you're here, Secret website got a secret. But don't don't tell anybody secret website, right? And I'll just copy some of this right here, and then we'll just pace it. Now I rather do the, um however, they have this kind of footer right here because this footage right here, it's very limited in it. There's not much you can customize. So, you know, I just choose not to. You really use the default for Devi because the footer I mean, let's be honest, this right here, it looks much cleaner than this right here. But if you choose to use this footer, you know you can add another widgets. You can type in something like, um, calendar. You could have a calendar to these date. Morgan, enter and photo every three. And you can have pages, maybe through the pages. So this would be an additional footer, so we made this footer. Now, if you don't want this footer, you can delete this footer and use this one as your default. And, of course, you can always change the color. You can change the font of this, but I just prefer to use this one because it's more customizable. And, you know, you can kind of messing with that and have fun. So that's basically the footer section. So again, um, you know, it just it just takes time to mess around with, you know, for elements, show social icons. You kind of go with this. You know, I think by now you kind of know what this is. So here we can changes the three and then, you know, 11 even, you know, some like that. But I don't really like the footer on this day because I don't like their page builder better. So it's just preference at that point. What you want to use now? Buttons. You know, I don't even know why they have these options here. I'll explain to you what they are, but I don't think you're gonna want to use them. Buttons will just basically change the colors of your buttons on your site. But we've already done with the page bowler, so I don't really want to do that. Blawg section. You can change the Blawg once we talk about block, you can change the header, size everything else for your blawg and that you might want to do mobile styles. So this is what looks like on a tablet and you can always change, you know, the section headings. Now this would be necessary. You know, you can change the header text right here on your mobile to make sure that it's kind of ah , mobile optimized. This section right here would probably delete because oh are probably hide it for mobile because it's just too big. But generally the site, it looks beautiful on mobile. You know, we need to make some small adjustments here, like getting rid of this right here. But ultimately, the site is pretty much optimized for tablet and on the mobile view. We can see that again. We'd probably needs to reduce the size of this text, right, cause that's too big, disabled this section and we'll talk more about that when we talk about mobile optimization . Maybe we could even disable this image right here because it's just not needed. And we also want to reduce this size of this text because that's too big and disable this section, maybe reduce the size of this and, uh, yeah, you know, disable or make that text a little smaller and again, you know, we'll cover all of this when we talk about mobile optimization. We're almost there, you know. I think by now you guys are getting very familiar menus. That's the menu home paid settings. We did that and then additional CSS as well. Okay, so that's basically a quick run down of the theme customizer. It doesn't give a little bit more options as far as your footer in your header. So now let's go ahead and go on to the next section. We're gonna go ahead and create the about us page
11. Creating The About Us Page: hottest page. Translate this page? No. So go ahead and make this same. We're gonna go ahead and make this one right here. And this is the last basically the last section of the page Miller. Because then we're gonna go on. I'm going to give you a layout for the services, the contact, and then we're gonna talk about the we're gonna talk about the blawg. Now, one thing that I do want to note is that by looking at this, I hope you will know how to do some of this. Remember, we already have all this stuff done. So we already have all this stuff done. We have, um we're gonna make this section right here. We'll show you how to do so let's go out and get started. So over here gone Enable visual builder and let's go ahead and make the about us page right here, both from scratch. Now I want to make that one section we have up there. Sorry. Here, I'm going to you about us, and we're going to go ahead and center this a line center and I want to change this to something like, uh, we'll change. This is something like a monster right mantra. It's a good one. And we'll make this, uh, ultra bold and we'll make it bigger like this about us. Now, right here. We just need to go ahead and add in the background. So we have a background back on image, and we'll select these guys right here. They're all having a good time, you know? They're having a good time. They look busy, and they look motivated, you know? So we have This is actually the guy who made the Devi thing. This guy right here saves Nick, nice guy. And then this guy right here is a designer. This is their operation manager, and this is their designer team. All right, so we made that section. Now I want to go and adding that Grady in color that we have right there, So going back over here, or actually, no. We can do here to kind of simplify stuff. To make it faster. We can add a new section at from Library, and we'll add in our footer. Now, we also have another section that we made that, um, the secondary section. So we're going at this from library? No, not that one. We have another section here. We have another section regular and this section right here. What is this section right here? No, we don't. We forgot to save it. So let's go ahead and say this section really quick. And I want to go ahead and save and save the other part so we can use that on our other side of the website. So click on the home and I want to save this section right here because I want to use that on my other part of the websites. So what I'm trying to say here is that you can kind of take sections and kind of mix and match. Now that that menu it's way too big. We probably need to adjust that. So right here I'm a cook on this and go to call to action section, Say this to the library, click on this and I'll cook unsafe. Now, these other options were here really quickly. Like this right here is history. So if you ever want to go back to something, you can go over here to your history. This right here is ah, the setting. So, like you're paid settings designed But you can always change this. When you make the page, it's just another way to do it. And then this right here is adding in pre made layouts, which will talk about and just a little bit in the next section. We're almost there. So I made this section, but really quickly. I want to go ahead and make that menu the second menu a little bit smaller. So have a navigation fixed navigation settings and want to change the menu. Height? Yeah, something a little bit smaller. You know something? There you go. There we go. A little bit smaller, cause I was way too big. All right? And let's keep going about a speech. So here I am, unable to visual builder, and I want to add in the other section, so this will have to cut down our work, you know, so enough to do so much. Over here we go to add from library this section right here. Add from library, the blue section, the blue section called to action. And there you go. So now I already have this section done. We have this section done. We have our title right here, which we're gonna use on. We can use out on, you know, the other part of our on this website. But right here we'll click on this gear icon, go to design and same thing, background. See, we can do here. I want to go ahead and copy this section styles. And I wanna go ahead and paste secret here. We can go ahead and do this right here. Copy section styles and then pay section styles. There we go. And then here, we're gonna change the image. So that really makes it a lot faster. You can see that we can, you know, do everything a little bit quicker than we normally Good, right. So here, only about us. I just want to change this to something like whites because, you know, it's it's it's better. Looks better like that. And I even added a drop shadow to it, and that kind of gives it that look right there. So that's how he achieved this look right here and then right here and now. Hope you know what? This is right here. So this right here is simply a call to action and an image. Right, So right here. New section begin. Delete this section right here. I'll close. This will delete this. Actually need this section. So here we have an image, and then we'll just add in the w p. Friends one right here and right here we can. Adam called Action. Now, I made the mistake. We actually made a call to action already, so we can just go ahead, and I that from the library. Right. Let's see. We can save this right here. Now, I should have said that other modules because we already made the other module. I don't want to work again. You know, lazy, I'm really lazy. We can We can just take this right here and slap it on on the other part of the website. So I'm a lazy guy. We're going to say this model right here. This is the new call to action. See how amazing that is, how we can just kind of safe stuff. We'll save it. And then we just put on different parts of the website because, you know, we're already using it, you know? Why would we want to do everything all over again? Sorry. Here. I'll go ahead and have this in call to action. And I think we could change this to something like I think we're using what is the black. And then right here will also change this section right here to the title or the text to black or dark. Now, the reason why it looks like this is because remember, we added margin and patting to this earlier. So under this facing section, you just take this off right here. And for some weird reason you can see that turns blue. I don't know why it's it's just a mystery. It's unsolved mysteries, Davey thing, you know? So we change the butts into here toe white, right? And there you go. We have a beautiful section right here that we can use. And remember you can mess with the settings. Guys are over here. Under the design, you can change the spacing of Sorry, the alignments, the spacing, sizing the sizing to bigger and, you know, maybe just mess around. We could make it a full, you know, whatever. Whatever you want to do. You know your the boss Now, Now you're the boss. Now you know what to do. Right? So now you can kind of teach me on what to do, You know, your styles and this section right here. We're gonna go ahead and add in three blurbs. Now, we haven't used blurb icons yet, so right here is a blurb. And this is basically something where we can add in an image and in some other, another text to it. So here, but better designs. And then, you know, we'll minimize that for image and icon will delete that will use an icon instead. And we'll just use, like a check mark, you know, And here you can add a link. So, um, if you want to link that to somewhere, you can do that for the design image icon contain just too dark. And I want to circle icon. So you actually, I don't know about that. It looks I don't know about Circle Icon, and we'll move this to the left. Right here. So there you go. Now we have that specific section, and here you can see I just change the icon to white so I can color black, certain color black icon white. And we can also change the size of this as well. So make this a little bigger all right. And of course, guys, you know, I'm lazy. So we're gonna go ahead and duplicate this, and we're going to put it right there. And now we have a beautiful section that we made for the about a section. Of course, you need some tweaks and design. You know, this this text right here doesn't look that great. We can even, you know, You know what? This is missing. It's missing a simple background. So right here, under section settings, background will choose the background image, and we'll choose that. Same when that we use before, you know, you want to kind of be consistent with your design, and then we'll go ahead and use this as the actual size and put this one. Put this one to the bottom center. No, no Senator. Right. Senator. Senator. Right area center. Right. You see how just that little piece right there? It takes away from the white because when you have too much white, it's distracting. It's it's it's annoying, it's ugly. So just by adding a little bit of design, you can really just, you know, you can do a lot like, for example, right here. I was at a box shadow to this. I'm sorry I bought Chad out to the actual text, You know, just by adding just that little stuff right there. We've already kind of taken away from the white, you know, And we kind of, you know, kind of taken it away and, you know, it looks it looks better. So you can see just by just by messing around these settings, you can kind of really just, you know, there you go. Like, now it looks way better than before just because we added this little image and we added this little drop shot I love dropped out. I think they look great now. Right here. We have bar counters. So right here, we'll click on plus regular. Now, I want you to tell me what we did here. I mean, I want you to tell me what we did. So look at this and say What is this? Well, obviously, this is a two column row one. Calm to Collins. This right here is a header text and a regular text. But I did a trick right here. I added a call to action. So over here, I'm gonna do two sections call to action. So I didn't call to action and I added some bar counters. Now, here we could duplicate the bar counters and, um, you know, you can go design. You design the bar counter color and make it black. You can change the title right here. You can add a drop shot to it. Very same options, everyone. It's It's the very same options. It's it's not too difficult. Um, they're all the same options, so I'm not gonna go too much into its and then right here. What I did was I just put in something like a social media website agency and then right here, I just put some text. Now, the only thing I didn't do here was I didn't add the link, so we don't have to use the link Now. What I'm trying to get out here is you don't have to use the purpose of what Therefore as long as you you know, as long as it achieves your purpose, that's all that really matters. So right here, you can see that I just didn't add a background to it. But I did add in some, you know, we added some different structure for the text. And then here will just make it a line to the left and also went to the left. And then, you know, we can change the title right here, that politics to also aligned to the left as well. And we can make it bigger as well. And then we would just delete the background because you need the background stoop now. We can't see it, of course. So let's go ahead and add in a background image, just like we did before. In fact, you No, no, no. I want to take this right here and I want to wait. There we go. I want to copy this section styles and I want to go ahead and pace the section cells There . There you go. Very amazing. Look at that. I love did you know It's great. Now, right here. Obviously you want changes textile whites. So over here you go to gear icon. I'm sorry design and go to the title text and changes toe white right? And then we can go and delete these ones and duplicate those right And what I did right here also is what I I added the added the shape divider. So what we can do here is also add in the shape divider. So for the background design dividers for the top, we can go ahead and do this right here for the bottom as well. That's here. So the top and for the bottom and see here, There we go seem like that. You can see how now we're adding, designed into court to its and, you know, we needed to make some space. So it's like just simply dragging some space. And there you go. Now you have a stylist section right there, you know, so very stylish. Very beautiful. Amazing, you know, And it is very simple to do this stuff. And this stuff looks very advanced, you know? I mean, this section right here looked like it was pretty hard to achieve, but it really wasn't, you know, it's just the shape dividers. And, you know, this right here is bold. Remember, that's a very big thing to do. I think you should always make these titles bold because they just come off very friendly, you know, like like that. Like now it looks complete. Just because you changed that. You know, In fact, people really buy stuff on your website or visit a website just based off text fonts, image and color. You know, the brain is a delicate thing and you have to kind of manipulated to get what you want. And right here you can see that just by changing this looks more comfortable right now. Over here, we have meet the team and we have our people right here. Now, right here. Let's go ahead and add this in. So right here, out from library. We have the call to action sexually that it called action setting. No, we'll do the, uh let's see here. Which would section do we do here? That's the same section. I believe it is. This section right here. Header section. There we go. But this section right here, we don't want to kind of combine it. So we want to take this. We want to take this one out of this one. So what we can do here is probably dragged this down. Um, actually, I think we'd probably have to We'd probably need Teoh. Uh, the reason why it's combining is because they're both in the blue. So what? We can do here is probably just duplicate this right here. And then maybe we would want Teoh. Let's see what can do here. I got idea. We'll make a new section. There we go, and then we'll add it in there. And then we'll go ahead and add in this section header section. There we go. Just like that. See, there's always a way to do something, you know, You just have to kind of mess around with it and kind of think about what to do. Now, right here, we have three different profile modules. So right here, click on this. Want three columns, right, and we'll go out and find the profile models. Now, guys, in this video, I can't go through every single module because there's so many. But, you know, you'll get the idea in points. So right here we have you change your name to Darrell Wilson or whatever you want to change . And then we hear CEO, and then we'll out in just a little, you know, just a little icons right here. And then that's the description. Now we're here for the design. Of course we can change the icons, the black and what I did Right here was I just decided to put in an image right here. We'll put in this guy right here and for the Texan everything. You hear this text? We want to go ahead and center. Line it. That's really all I did. I center line it. I made it dark. This one right here, click on this center line and then all things to do now is just out of drop shadow to it to kind of take away from the whiteness. So we'll go ahead and go to box shadow. And there you go. We have something very similar to what we did right here. We just change the font, of course. You know, the we change it to monster at two made a bold and then we can just kind of duplicate this twice and then just simply drag and drop it, drag and drop it like this. And there you go. And we can also add in the little, like maybe we can add in this little thing over here to kind of take away from the whiteness. But, you know, I think that's fine, you know? Right here, you just change the image of the person. Of course, it looks kind of weird, but you actually give you a low. Ah, I gave you guys the, um the people Right there. So now you got to see it looks a little bit better. And why didn't this one right here like that? All right. Perfect. So you can see that we have the models there, Every looks, greats. Um, it's the same way to stall it. So go ahead and click on this right here and click on safe. All right, so we made the about us page. Now I'm actually gonna give you the
12. Services And Contact Us Page: services page. So on the services page right here, I'm gonna go see if we can actually draw, drag and drop this thing again. Let's see if this works. So we're gonna go ahead and build it from scratch, and we're gonna go to your father. You actually got and you can actually drop the file. And it should load on the page. Services import she Is it gonna work now? Now it works. See that? Now It works well. What just happened there? What has happened? See, now the services works, and I made the services pages for you guys. Now, you guys can kind of go through this and kind of look at what I did. And what I really did here was I took part of the templates from Devi and I added him in here. So in this next section, we're talk about to talk to you about templates and also different other sections. But we just got the services page. You have a services page fully complete. Now go to your contact us page. I don't know why it does. This one is saying translate. It's something here. Oh, maybe this I don't know. I really don't know why itself me to drop its in English, you know? Sorry. Here, both from scratch. And I have the contact page for you. Just drag and drop it and export the layout. See if this works. I'm sorry. Import the layout. Alright, Awesome. There we go. We have the contacts section now. Now you have a full contact section right here, Ready to go now I will be having a full tutorial on this contact form because the contact form is very, very dynamic. There's a lot you can do with it. So I felt that putting it all in this the tora would have been too much. Because, let's be honest, you're probably you're probably binge watching this and you're probably you know, you're looking at other things. You're getting distracted. So I realized that, you know, we'd probably wants to save this for another part of the video because they have conditional logic and we can go ahead and talk about, like, relation equals two and all this stuff. So I will be making a separate the tour for it. But for generally for most people, for the email, you just want to go to put in your email right there. So my email right here and also for redirect. So if they felt this contact form, do you want to take them to another girl? That's what that means right there. And I think that's basically everything else is just going to style it, you know? Same thing, same exact features. So check and click on save. All right, so now you have a full contact form already to go. Perfect. Now let's talk about the blogged, so
13. Creating The Blog: lock section. Listen, cooking, translate. Let's let's see what? See what it did, all right? I don't know what it did. It's a mystery. All right, so for the block section, it's really simple, actually, Over here, we're just going to actually use, um we're gonna go ahead and use the we're gonna go and use our title. But you know, I didn't say that so really quickly. Let's go ahead and go to another page here. Let's get out of here. Let's go back to our website and what I want to do here is I want to take this section right here and apply to our blawg because we've already made the header for the website. So I want to keep it consistent. So right here, I'm gonna put header for website and I'm gonna use this for the block section. Okay? And say that Go back to our blawg enable the visual builder. So ultimately guys were all we're pretty much done with the actual website. So here are under the ad from library put header for section. I'm sorry. No, Over here. The blue one head of her website. There we go Now. Over here. We're gonna cook on Plus and we're gonna add in the block module now. So here is the block module, and the block module will basically display all of your post that you have here. So we don't have any post yet, so it's going to add in a post really quickly. I'll just show you how toe you know, make a post. And this footer is really bothering me. You guys mind if I delete it? You know, I just I think it's really, really ugly. Also for your block. Paige, don't forget to add in your footer so that would be your footer. Not this right here. Okay, So make sure to add in your footer as well. So over here, go to Plus doing. Go to post. Now, this is if you want a blawg. And blogging is a great way on how you can add design into court to your website. Now there's two ways you can blawg. You can actually use the default editor, or you can even use the Davy Builder. So over here we can put in like what makes woman crazy. And I want to use the default editor and then said we just go ahead and put some dummy text in there. Sorry. Here, I'll just put them some dummy text. Now, over here, under the documents section, we have featured image, and this is pretty much one of the only sections we're gonna use. So set of featured image. And, um what women? What drives a woman crazy? What would be a good image for that? We don't have one. We'll just put that will put these guys working. Maybe maybe guys working too much makes women crazy. You know, that's a good one, you know? And right here, click on view the Post, and this is your new post right here. So we have what makes women crazy, and then you have the post, and then you can leave a comment. This is great. I am against about the comments. And there you go. We have a comment now on the block section right here. You can see that we have the post there. So now the post automatically appear here. However, I do recommend it using a different style called them. I think it's the masonry grid. So over here to the year icon will change this to for the design, the layout. We wants to do a grid. I prefer grid better. I just think it's cleaner and again here. You can change the text of its You can do all that settings right here. I'm not gonna really go too much into this because it's the same settings. Guys, this is the same exact stuff. You know, Show author showed h of categories. You don't want the date to show to take off the dates and it will disappear. All right, so we made a block post, and that's it. I mean, that's how easy just to make a block. But right here. And probably put our block right are blogged. Save this. Now, we can also use the Davy Builder to make a post. Now did he does actually have DV blawg layoffs and a really nice. So I'll probably include those in description as well. So we'll put Did he blow ugly out? And instead of using the default editor, you can actually use the Davy Builder to design our you know, our block post as well. So Ray hero do build from scratch? Actually, no. Well, um, we probably can probably had a lay out there instead. But here, you can kind of ad in, you know, whatever content you want to add with the Davy Builder. So, for example, right here we have. You know, we've we've say various sections here, so we can just add in, you know, whatever sexually wants. And then, you know we can we can publish it. And instead of using the default editor, we can now use Didi on our block page. Now, one thing that you might want to do here, you might want to make this fool with. So I believe it is over here on the right side, where we have the page layouts will just do a full of section and then update it. So now we go back to our post, the sidebar is now gone. And then we can actually make the make whatever post you want right here as well. So that's basically a good way on how you can, you know, use the Davy Builder and, you know, did he actually has a really, really good one. So here will dio did he blood layouts and then uh, uh, layouts. Let me just give you Ah, good example. CE 11 websites flog layout, layout pack. There we go. Here we go. So they've actually made really nice ones. Let's see right here. You can kind of Ah, let's see here. Like this right here. They only have one. You can see. I'm sure there's more. Here we go. So this one right here, you can see the how they've designed the block post with the Davy Builder. Looks beautiful, you know, And you can go ahead and go to this page right here. You can download these layouts and just upload them to your website. All right, so that's
14. Additional Divi Modules: section. Now on this deck, Chester, we're gonna talk about We're gonna talk about the different models that we didn't use, and then we'll talk about the advanced features Hamilton ization. And then you get to the beer because, well, we all be done. So let's go ahead and go on to the next section. Alright, guys, in this section, we're going talk about the different styles of modules that you can use with the Davy Builder. After that, we'll be talking about global optimization and then the advanced features of Didi, along with the templates that you get with TV as well. So right here and click on page and make a new page. You want to follow me here? You just kind of kick back what we're drinking. Mondello, just get out. Get your favorite beer page demo and kind of kick back and watch me watch what I do. I'm just gonna kind of show you different features about what you can do with the Devi builder. So right here we have used a divvy builder and I'll go to build from scratch. No, Right here we click on close and click on the Blue icon. Now in the blue icon right here. You notice that we have regular, We have specialty and we have full with now. First, the full with modules are basically models that you can use for the entire page. So they cover the full of section. So right here you can see that it's a full with section. So the reason why I kind of don't like these models sometimes because it's very hard to kind of position to text however you want it to be. It's also hard to kind of position things to where you want him to go. So I don't use the full models too much. But they're also, you know, it's a great way on how you can, you know, style it. So in order to get this to go to full with or the full page Actually, I don't think they have that one. So over here we go to you full with, and I believe it is the fourth images. Well, right here will cover the entire fourth of the page, and then you can just kind of, ah, you know, change the image, whatever you wants, and then it will just cover the entire page of the I was messing around with this earlier. So that's why you see different images. But for example, adding this one right here and you got to see it's just in image that's full with. So that's basically what the fourth models do. And you kind of go through these like they also have a slider and, you know, the slider. You can kind of see how it you know, you can slide it like this. But again, I don't really like the full of spiders too much because I feel that well, first off, I think started kind of becoming outdated. I don't think any website you cited anymore, but to change the position of everything. It's a little hard because, like even for the alignment right here, um, it's just hard to kind of Ah, I guess you can say position. That's where you want it to go so you can go and messing with full of setting, see if those work for you. You know, I'm sure it worked out for some people. I know a lot of websites out there use it, um, so that that's basically an overview of the full with modules again right here we have, ah, fourth menu. Now that one I would probably use more because that right here, you can kind of position to different parts of the website and, you know, the sky's the limit. Whatever you can think of to do, you can do it with TV. You know, it's just there's just no limitations on what you can do with TV over here again. I'll do full with. And you know, we have a full with header, and here you can have a full of header. I believe I hear you contain the position of it as well. I believe you can change the position of it. It's the image, the bottom. You can add an image to it right here. We can add a quick little image right here. I'll go and had in something like, uh, I didn't love this right here. So it displays above its and then for the image. We can kind of put it to the other side on the bottom. I believe that's how it works. But again, you know it's up to you. If you want to use the fourth modules, I just chose not to cover it because a lot of times they're just I just feel that they're not really needed too much. Oh, header image is that as I would his header image. So there they are interesting modules that you got to go with. You know, they work for some people. So that's one thing to look out. That's what basically full of models are. Now it's going talk about the specialty modules. So I'm gonna close this really quickly. And over here we have specialty models and these models are really useful. So you can see right here how they have different styles. So unlike the basic ones that we're using here, these have different toll of style. Like, for example, right here you can add in the side bar to the left side of the page. So, for example, right here I want to add in a sidebar. So here we can type in sidebar, and then your sidebar will appear right there. And then here you can kind of say, I want three columns right here, and then you can add in something like a circle counter you can add in, I don't know, a blurb, and then also right here can add something else. So they're just different ways and styles on how you can actually, um, you know how you can actually position your page differently and you can see it's orange, so it is a little different and, um, yeah, so I hear again Specialty modules. I'm sure by now you guys understand what these are. They're just different ways on how you can style the page. And there's ah uses before. There's very specific ways on how you can use these. It's just for the average user. You might not want to use them too much, you know. But I have built websites before. We're actually did use these right there. So they do have some use form and a lot of people actually like especially models, because of the function out of that you get with TV, so you're not limited to just a column row. You can have one that's really big when small one really big one, really small, etcetera. So that's a quick little rundown of the models that we didn't use, and you can kind of go through the actual modules like the ones like Thea, like these ones right here you know, you can kind of go through the easy to check the mouth. You know, they're all pretty self explanatory. I think there is a total of 30 something modules, so there's also a slider in there as well. There's pricing tables also the really cool stuff. So that is basically a quick run down of the models that we didn't use and how you can utilize them. Now let's talk about mobile optimization. Let's go ahead and optimize our website for mobile now this is
15. New Divi Theme Features: I've already introduced you all to a few. I've introduced you all to the extent styles that you wreck. Click on it. You can copy the section. You can paste this section, you can reset it. You can view modified cells and then also the extend styles as well. Now the extent styles, you can actually, you know, apply these to various parts of the website. So you just gonna be a little bit careful, you know? So you know, you can extend this call to action to all the call to actions on the page, but remember that it'll apply to whatever you want to do. So, for example, right here extend called action styles. So remember this page, so it'll apply to the It'll take this section and apply it to our this style and apply to all the call to actions or this section or just this row or justice column. So this is a great way and have to speed up the process of your website in case you are, you know, you have a lot of buttons on the web site or you have a lot of call to action is you can just simply do this and that will speed up the process dramatically. All right, so that is extend styles. Also the copy section in the pay section. We already did. That's where you can go ahead and copy a background right here, and you go ahead and pace it on a different background. And it will basically display those settings on that specific style right there. All right, let me think. Here will be Got else. We have, um they have all the features that I mean devious, out of a lot of features. And also, guys, they're constantly adding in new features all the time. So in fact, they just added this new and right here, and I'm not even sure on how to use it. They added it as of today, and I'm just kind of, you know, go to a certain section, go to a row, go to this road. It's like kind of like a speeded up process. And they also have keystrokes, and I don't even know the keystrokes. I know this is a David tutorial, but they added so much stuff. It's really hard to keep up with, and it's really hard to master each one But I'm sure you know, with, um, go to a module which Marge, I want to go to you. We want to go to the title. Okay? Wait. Yeah. Okay. So, yeah, You got a kind of mess around with that, and you'll kind of get the hang of it, And, um all right, so yeah, that's basically that that little section right there. Now, there is one advanced feature that they added, and this is called dynamic content. Now, this is probably one of the biggest features they've added in a while. And I'm just going to show you what? This is so right here. We have module setting now. I'm sure you've noticed throughout this tutorial. You see this little icon right here and it's icon right here. Shows pay title excerpt published, etcetera. All this information? No. The main purpose of this is to basically update your dinette update your content dynamically. So, for example, this is great for car websites. It's great for websites like it. Say, for instance, you have a page, and that page is gonna look the same a lot. It'll basically change everything to like an automated system. Sort of. So for example right here. I'll just put the, um I'll just do our services right here, and I'll change this to the page title. So now you can see that it's called the page title. Now, of course, this is a terrible example. But let's say, for instance, that you're doing a car websites and you want to do that. You want to have, like, a page templates and you wanna have a specific template for every single page. That's when you would use dynamic content. Now, let me just give you a better example of the name a content with a plug in that we're going to use called dance custom fields. So here we go to plug ins and go to add new, and we're gonna type in something called advanced custom fields. Now, many of you might not need this feature, but this is a Davy tutorial, so I have to cover everything, right? I can't leave anything out now. Right here. This is advanced custom fields, and the main purpose of this is to have custom fields. So for clients who are entering an information, So, for example, you make a website for someone, right? And your client wants toe update the prices. Well, they can go ahead and do that themselves without you having to intervene. So over here on a custom fields, we're gonna go to field groups now. Those are already made one. I was messing with one earlier, but I'm going to trash this one, and we're gonna make a new one from scratch. So I'm going to add new and go to courses now. Really quickly. You want to change This post type is equal to page. Make sure that's correct. All right, now, right here. We have courses. Well, what kind? Of course is, Well, I want a course that talks about, um, C course right here. We could talk about courses. Um, you do? Course number will do. Course difficulty. And then right here, I'm gonna do text area. Now. You can just watch me here. I know this is very new. This is a plug in. You have no idea what this is, but I'm just gonna give you an example of this because I want you to understand. And then right here put place description here. This is for your client, all right. And nobody one more and I'm due course number the and then right here will do you a number . Okay, so we have our two fields. Now I'm gonna click on Publish. So now I have course difficulty and course number. So let's go ahead and and use these right now. So I'm going over here to pages and already made a demo page right here. So this is my demo page. I'll just go and show you really quickly. You actually get this layout for free with the Davy Builder. I'm sorry. With the TV theme right here we go to enable the visual builder and right here we have. Ah, you know, it's a course website, so we're here offering basic courses on our website. Now, let's say, for instance, that you want your client to be able to just, you know, enter something in without having TV. It used a Davy builder. We're gonna go ahead and do that. So maybe right here we can add something in right here. So I'm going over here to edit page and right here we have course difficulty, Right. So, um, this is for advanced users, and then we have a course number, so let's say this is course number. I don't know. 2017 16. All right, 16. I'm gonna go and update that now. No, I'm gonna click on edit with the Davy Builder and right here we have web development right now. Also right here we can we can say something like, you know, what's I want A I want this to be something like the course type instead, and it's just going to basically take the course type right there and yeah, the course type. So I don't know what's this school, though? Let me let me double check their But I'm going to do one more right here. I'm at a woman text, so maybe I should go ahead and, uh, let's go ahead and duplicate this. Oh, it's a call to action. It's a blurb. I thought they were both there to, uh, to text right there. So that's probably why and also right here, I'll just do something like, um, we'll add in the other one. Right there. Course difficulty. This is for advanced users. That's that's the correct one. You know, I don't know why that other one worked. So basically the main purpose of this here is that you can actually set this right here to basically be or dynamic content. So the course difficulty will display right here. Whatever your client types in, it'll just display right here for them instead of them having to even use the Devi builder . And this is great. You can create page templates for them. Maybe there's, ah menu and they have different items and their prices changed a lot. You could just say Yeah, just go. Just go in the back in and then just put the price because when they put the price is gonna change dynamically. So let's say, for instance, right here, your client says, Oh, the price change. You know, this is for beginners now, but this is for beginners, and they would just click on update. Now that right there is going to display instead of the other part that we put. I don't know why it does. That's kind of weird, you know? Well, the WordPress were stuff happens, you know, leave, leave. I want out. I want out. So now when I scroll down right there, it's going to say this is for beginners so dynamic the content is changing dynamically. And of course, you can always style this to whatever you want. So a good example for this would be if your client has prices for something and the prices change all the time, Instead of actually opening the Devi builder and doing everything from scratch again, they can just go on the back end and then change whatever they want. So by doing this way, it's a little bit easier than having them even mess with the Davy Builder. And that leads me to my next feature that I won't talk about is the Devi roles. So over here in your divvy, we have the role editor and this is basically saying for contributors they have this access for authors. They have all this access, you know, they could mess around all these settings, right for editor. They have all these settings right now. How do you make a user? How do you have you basically apply that the Davy Roll Editor? Well, over here, under users, you'll click on add new and this is great for clients. So, for example, put patty wack you put their email in so and then you know that you give a password and then they would be able to log into your website. Now, right here, you can set the role. So let's say this is your client. You're saying, OK, I want to give her contributor access and then I'll just click on add new user. Now you can see that the contributor is now there. Now, if you go back to the the D B roll over here, the rule editor, you can go ahead and limits the contributor right here. So you're saying, Look, I don't want I don't want them to have access any of this stuff. You can. They can move the items. They just can't do this stuff, you know? So by doing this, you're limiting your client because trust me, if you're a new and Web design, your clients are going to try to do things, and they're gonna mess it up, and then they're gonna want you to fix it, and I'm not gonna want to pay you. So that's really what happens in Web design. So welcome to Webb's welcome to about design, you know, congratulations. Welcome to crazy clients. And here you can kind of limit the module use and say I don't want them to you the specific modules, etcetera, or even mess with these settings right there. So you know, I don't want them to use any of this stuff. So that is example of the role editors and also dynamic contents. And remember, Devi is constantly adding in new features all the time, So be sure to check out their websites, go to their website and go to their blawg section and just check it out because they as so many features in even I lose track. And you know, my job is a WordPress promoter. I talk about different themes and stuff, but Debbie updates quite honest, quite a lot. So you keep up with them can be very challenging. So that is an example of some of the features that you can do with Devi. So they're pretty straightforward there. Not too difficult. They're not too complicated. I thought that Ah, a lot of these features are needed. They do have some, like they have. Like, um, they have one with the keyboard strokes. I just I just don't I don't know it because I I just you know, I don't know. But there is one last when you talk about before I forget, there is the split testing. And this is a great feature that Davies added that a lot of other page builders and themes do not even can you cannot even think about. So, for example, right here we have this section right here. Now I want to go ahead and say, You know what? I want to find out What's the best landing page. You know, I want to know which one's the best. But the problem is that I can't Really I don't know, because how can I do that? Well, that's why we have split testing. So over here, we're gonna go to split test, okay? And we'll click on this right here. All right, so now we have a split test. So what did he has done? Basically, is they have actually created two different versions of this website. So they've made one right here, and then they have the other right here. So you can see how this says one over here. And this is too right here. So, for example, if you want to go ahead and edit one, you would click over here. You have to edit it through this back end right here. Now, this is a duplicates of the same one that we made. They're just making two, and users will see different pages. So let's say, for instance, right here you want to go ahead and use a different background. You're saying maybe the background is calling people not to use my service, so I'll go ahead and use this one right here. Maybe the butts in is not doing good. So I want to go ahead and say, Let's bar, let's or contact me. And if a gun safe So now your website is running two different versions of its running, basically two different versions. So it's running the 1st 1 and now it's running the 2nd 1 And if you ever want to see the statistics on them, you just goto visual builder. Click right here on statistics and right here it'll tell you the clicks, the reads, the bounces and ago engagement. So right here you have reads. This is burning a little slow. Come on, come on, Duty. Come on. What's going on? Um, maybe it's just because I just did it, but, um, you know, it does show you bounces, re statistics, all that stuff. So let me just go ahead and close this really quickly and all of this. Let's do this. Now. I will also visit this website on a different browser to show you all what it can do. So let me just go ahead and open a new browser in Rio to Patty. Wack world Patty wack world dot com. All right. And then, you know, just refresh the page a little bit. All right? So, going back over here, you can see that the pages different for various websites. So you see over here how this right here looks like this. And this page right here looks like this right here because it's running split test to find out what users like the most where they want to engage in and also look at the butts and right there. So it says, contact me and you'll notice there's no other landing page. So it's running an eighties protesting for us right now. So that's the great part about disease that we can run, maybe split testing right here from our website, now a score of head and go to the enable visual builder and see now if we can go ahead and access the statistics so we'll go ahead and click on this right here. And there you go. So now it says, like Section one has been impressions. Section two has one impression because we just click. We just checked it out, obviously. And right here we have the reeds, we have the balances. So Bounces is basically saying if people are leaving the website right away and then we have the gold engagements and you know, you can just kind of compare goals now, once you're done with this, once you decide. OK, I've done It's, you know, I know everything you can click on, right. Click right here and end this blood test. Click on proceed. And now you can pick the winner Now, Right now, we don't have enough statistics. So right now it's 0% 0%. But you're you're you're sexually with more clicks and engagement will have a percent sign . So the one with the higher percent you'd probably want to say, OK, you know what's this one's working out for me? We'll use this one and then we'll just save it Now, This one right here is your winner, and now this one is what's going to display on your website. So that's basically a quick run down of split testing. It's a great feature. It's an amazing, powerful feature that you can use with the Devi builder.
16. Mobile Optimization: This is probably one of most important parts of the video. Because did you know that there are more mobile users than there are desktop users? So we want to make sure that our website is fully optimized for mobile. So it's going optimize our first home page right here. So right here. I'm going to see how it looks like on a tablet. Do we need to make any changes to it? What do you think? Well, maybe this right here is a little too big. Maybe we can go ahead and change this section right here for mobile users. So under the heading text right here, I want to say, you know what's, um I think that this is a little too big. So right here on the tablets, we can reduce the size of this. So you see how I clicked on the tablets. Now it looks different now. I'm not changing the actual website. I'm just changing how it looks like on tablet devices. It's going down right here. Now, this section right here, there's a few options of what we can do. We can either reduce the size or we can hide it completely. So over here under the design, we can go to settings and go to Let's see, right here. Where is the text size click on this and the tablet, and we just reduce it, you know, maybe, like 100 50 pixels. There we go and going down here. You guys tell me, how does this look? I think this looks great. I think it looks beautiful. Now, this section right here, we might not need it, right? I mean, it's it's it's nice, but for a mobile user air a tablet user, it doesn't have the split screen effect. So we can do here instead is decide to hide the image. So here, under Mount Module settings, I wanna go to advanced and go to visibility and hide us on the tablet and the desktop. Now I'm sorry. Tablet in the phone. So what that means is basically saying that this module will not appear on mobile users and for tablet users, so they will not see that this section right here. Maybe we need to go ahead and change the divider right there. I'm sorry, the you have the divider because it's just not working properly. You know, the divider is kind of article differently, and I believe it's up here or it could be the blue section. So it is. I think it's the blue section. Yeah, at the blue section, the blue section design and then the dividers. And then for the bottom section, we might need to adjust this. So let's go and take, like on the tablet right here. We can go ahead and kind of reduce it like that. So now it looks correct. Right now it looks a little bit better now over here again. Same thing. But we have an option. You know, we can always just go ahead and disable this right here for go to visibility. We can go ahead and just disable this for tablet and phone. So it really depends on how you want to approach your websites because you can either decide to reduce it or we can go ahead and just disable that. So now, for instance, this will not display on mobile websites or I'm sorry on mobile mobile devices. Sorry. It's like 4 a.m. You know, I I I'm out of coffee. It's gone, you know, It's it's it's all gone. So here we have our our social media follow now right here, if we can and change alignment to center like that. But the problem with that is that this is actually going to affect how it looks like on the actual website. So we might want to just leave it like that because I don't think that it's that big of a deal. But then again, you can go ahead and change it. But if you do change it, it's going to go ahead and disable that for, um, it's gonna apply it to the entire website. So what you can do here is probably just disabled or make this invisible on mobile and tablet users because, I mean, how many people are actually going to? Well, actually, I don't know. That's actually a good idea. Maybe someone who's on Facebook might be on their phone and check your website and might go to your Facebook link. So that's kind of you know, that's where kind of critical thinking comes in. So that's kind of up to you on how you want approach the website and then this. But it looks like right here on a mobile phone right here. Remember the section is disabled. This section right here, we probably need to fix a little bit more so we could go back over here and go to design and go to dividers and for the bottom divider. We want to select the phone right there, and we want to go ahead and see what we're doing. And there you go. So now that that's what looks like on a phone, it's growing up here. I think it looks great. This services section. You'll need to adjust this as well, so we'll go to our click on this right here. And then we can do phone and then reduce the phone size like that. All right? I mean, it's very simple. It's very self explanatory is very easy now. One thing I do want to notes that if you do decide to add video sliders or video backgrounds, video backgrounds do not play on mobile devices. So if you do decide to do that, you must have a background image t replace that or else your users are going to see a gray screen. And that great screen Is this going to look very boring and bland? Remember, you can always add video backgrounds here. I believe they have. You are else now as well. Or you can just go ahead and put in your roles for YouTube or something like that. And you can just, you know, put it in there. Now you will need to go ahead and just upload your file right here. And then it will display on the background. But I'm not a big fan of video backgrounds. I know when I was a beginner, I love video backgrounds, but people were like, Hey, man, this looks weird on my mobile. And hey, this looks weird on my website because, remember, people are using different resolution screen sizes, so I feel that adding just a plain image or ah, color would be better. But if your client out there really wants video backgrounds, which I see a lot than then, you'll have to do it like that and then add it. Add in ah, background image because remember, video video will not play on mobile devices, so that's a little bit about mobile optimization. I'm sure that you guys can kind of go ahead and check that out. Let's click on the services page. Let's just see how it looks. Let's just take a wild guess. You know, Let's just see how this all looks on our services page. So right here on the go to tablet. All right? Everything looks kind of good. All right, Now check the mobile and again. Same thing. I think it looks great. I think this is totally perfect. It looks good. Everything's simple, everything structured. So I think the mobile optimization section is pretty self explanatory. But remember that you must do this for every page, because remember, also, Google will rank you better if your site is mobile friendly. And trust me, man, they know everything. I don't know how, but Google knows everything. So you want to make sure that your site is fully optimized for mobile. Okay, So that we talked about the module. We talked about mobile optimization. Let's go ahead now and talk about the DVD advanced features that they have added in the theme. So
17. Divi Global Features + Blank Page Template: All right, guys, in this section, I'm gonna talk to you a little bit about global features and also the Davy Blank page template and what you can do with it using the Davy Builder. Now, first, let us talk about global features. Almost crawl down right here, Just give you an example of a global features are and what you could do with them. So right here you can see that my icon is green. And the reason why it's screen is because actually made this a global feature. Basically saying when I changed one thing on this footer, it's going to then apply it to all of the footers on my website, so I don't have to goto every single footer section and change it. Let me just go and give you an example right here to go ahead and to stay with the global Now, for instance, for you, let's just say, for instance, this is your first time using the global feature. You would click on this little icon right here and you would go click on make this a global item. Now again, you can uses for different parts like you can make this a global feature you can and despicable feature, but I find that most people use the global features for the custom footers. So right here, I'll go ahead and put in the custom footer a custom footer and click on Save Toe Library. And again, you can always disabled global features just by right clicking on it and clicking on disabled Global. But for right now, and click on Save and just give You an example of the Global Footer, it's right here or click on Plus New look on page, and this will be that we'll just go with the foot or page. Well, we have the foot or page. There we go, the footer page and click on Publish. I'll click on used a TV builder build from scratch, and I'll click this build on the front end. All right, And right here, click on both from scratch. I'll just go ahead and, ah, just squatting. Just use a template. We'll just use a quick template right here. I'll just grab this one. I'll use this, that right here just for an example. You know, you don't have to do this. I'm just kind of giving you an example All right, So here's the page. Now on the way bottom right here. Instead of using their custom further, I'm gonna go ahead and delete this right here and we want you insert my custom foot or so right here. Click on the plus icon. Click on add from library and you can see that we have this these green icons now, earlier I was messing around with it, of course, But right here, we just made the custom footer. So I click on this and now this is the custom footer from the original page. Now, if I were to change a Perma link, if I were to change a text, it's then going to apply it to all of the global features. So again, instead of actually having to go to each and specific every single page, you going to change it on one section and apply for all of these sections where you have the global features enabled. So it does allow a lot of customization. It allows a lot of ah sped up time. So I highly recommend doing the global features if he decides to use a custom footer. So right here. Look at something like speed up. I'll click on safe. Okay, Now it's going to go back to the original page and see if that has actually changed on our home page. So right there, I'll click on home. And now the footer should change to say something like Speed up. And there you go. See? Now has it says speed up because it's applying it to all of the global features on our website. Pretty cool, right? Pretty amazing. Pretty fast, right? So that is basically a quick run down of the global features, not talk to you about the Diddy blank page templates. Now, I do have a freebie for you all. I do have a free downloadable kit that you guys can download on my websites or has tons of really nice custom footers. I'm sorry, Custom headers. Let me just go ahead and over here and go to plus do and go to page. And right here will do the Divvy Blank where the Davy blink and for templates also like a blank page and click on publish. So now we're using a blank page templates Now with the blank blank pigs have. What means is that we're actually not using any of the theme features anymore. So, for instance, right here we're not gonna have the footer. We're not gonna have the header that comes with the theme we're gonna have literally ah, blank page with nothing on. It's so I hear foregone build on the front end. Now you can go to my website right here, darrell wilson dot com and click on D V layouts and I give away tons of free stuff, man. Tons of free layouts, tons of free layout packs and the one I want you to download is right here called The Free Divvy. Download the Devi header. You like it now? It's a free layouts not gonna cost you anything. You'll just click on add to cart and then right here, click on view the cards and you'll get a ZIP file tells you to do is go ahead and down the zip file, and then you will go ahead and extract it and open up the Jason file. So right here you can see on placing the order. It costs us $0. I will place the order and while Aussie and use the bloom plug in right here from elegant themes you guys can see. And I also use the monarch plug in as well from elegant theme. So I I use all of the moment website. So right here, I'll click on download. So download Davy 100 head or you like it? You can see this fall right here has downloaded. So I'm gonna go ahead and take this, and I'm going to drag it right here. Okay? Now inside of that file right there. You're gonna get this Jason file. So when I open it up right here, you're gonna actually get the Jason file. And this is what you're going to use right here in order to, um, upload to your divvy library. So go back over here. I will go back over here and we'll be exit out of this really quickly. We're going next it out because we need to actually upload this to the D V library first. So did he. Devi library and import and export imports choose the file. And also to go ahead and put in the Devi header. Davey Kit. Jason, there we go. A little bit of some twists or there you go. Import Debbie builder layouts Okay, so it is importing my head early. Else that I have created Now over here Oh, click on all pages and I'll just click on Ah, Are we doing what we did? The, um we'll just click on what just did. A new page will go to new Page because I made a bunch of pages earlier. It's kind of messing around with it. So we here will do the blank page template. Oops. Temp off Temple it. There we go. The TV blank page template. And right here I'll click on blank page and click on Publish and then use it. Every builder built from scratch and build on the front end's Okay, so right here you can see that we have this blank page literally. Everything is blank. So there is no theme options right here. So what will do you right here is I'll click on this plus icon, click on add from library. I'm sorry we have our We have their in their library. So over here we'll click on this plus icon right here, go to your saved layouts, and now we can see the Devi header. The header Devi kit will click on that right there. So that is the father you downloaded from my website tonight. We have all these cool headers. All these right Here are headers that you can use for your website. So let's say for it to someone out of button. You know what? Let's say, for instance, I really like this one right here, this blue one. So I'll just go ahead and delete all these. You just kind of grab the when you want, you know, just just ah, discord. And, uh, you can pick one. You know, just go and grab one. I'll grab this one right here. This blue one, it's going to lead all these right here. And then you would just make your website, like normally. So now you have a custom footer. I'm sorry. Custom header using the blank page templates. And I'll just go ahead and just give you an example of why you'd want to use it. So right here Or just, um, just Well, that's a really bad example we used. We used this one right here. No, we'll use this layout. So I'm just kind of giving you different options. Just in case you wants to be very customizable and not use the default themes settings that you get with Didi. So now you can see that we have a custom header right here. And then we have our website right here and then the say, for instance, you want to add the global foot on the bottom. You can go ahead and do that by clicking on the plus add from library and out of the custom footer. So by saving this page now, we have the global footer right there. We have our website and then up top right here. We have a custom header that we made with the Davy Builder. So I'm just kind of giving you all different options on what you can do with it. And it is responsive. So you click on little icon right there. You'll see that right here. They actually did blur it out because on a screen it would be too hard to click the butts in. But you can see right there that it is totally responsive and it looks good now just by looking at this hope, you know what it is. So this right here is a text, a text, attacks, attacks a text and literally, that's all we did. We just basically made text models right here. We space them out and then over here we said, we just added in a button module. So I hope you kind of understand how we achieve that. So there is just no limits on what you can do with Davey. It's extremely creative. I mean, you can have a custom. Everything you know you can. You could make a custom sidebar. There's just so many different possibilities and features that you can do with the Davy theme. So in this section, I want to cover that really quickly because I didn't leave that out in this tutorial. So that is a great example of what you can do with the custom footer at the blank page and also the global features right here as well
18. Templates With Divi Theme: Now it's going talk about other things right here. So let's talk about the bloom plugging Oops, Go ahead. And, uh, going to put that back over here was this It does that sometimes, you know, we have toe have to align these properly here. All right, so when you get TV, you get the bloom plug in, and the blue plug in is an email opt in. Its great is powerful and it's amazing. So go and click on download and we go back over here to our website and we can actually upload this plug in. So right here, we'll click on plug ins. Now, I'll just give you a quick run down of what plug ins are Plug ins are basically APS for your websites. Just like you have APS on your phone. This is plug ins or APS for your website. So this one right here is a contact form. This one right here helps us CEO. This right here allows you to sell sell products on your website and take money. And if you're injured in that, I had a full editorial on that in the description below. This one here is forward friends, Security for, you know, XML, site maps, Google analytics. I mean, there's over 50,000, 56,000 plug in. So it's hard for me to tell you which ones to use. I just use a bunch of, um and, you know, a duplicate. This will duplicate your entire websites contact form. This is a cashing plug in This right here is Ah, slider. This right here is a cashing. This right here is a really old page filler known uses no more. So you know, they're there. Just a lot of plug ins that you can do that. You give your website a lot of functionality, but over here, we'll click on add new upload, plug in, choose the file, will go ahead and download the bloom plug in. All right, and activate the plug in. So we have bloom right here. So bloom, over here, you have different often forms. Right here. We have opt in forms and you can select the new often and what kind you want. Do you want a pop up flying below the post, etcetera? So maybe you just want to pop up right now and right here is where you're gonna entering your information. So right here, we're gonna go to mail chimp, just for instance, out of accounts. And then this is we're gonna enter in your account name in your A p i for whatever email. Um, you know, whatever provider that you're using, I'm using mail chimp. So that's basically what I use. So I do have a full totoro militant as well, in the description below, if you're interested in. So these are the template that you can use and just go out and grab a template, or you can make your own, and here you can actually preview it. And when your visitors go to your website there going to be wrought with this pop up right here. It's a beautiful pop up. It looks greats, and I'll go ahead and do this place settings. Here you can kind of decide the display setting. So how many seconds? How many delays? Seconds. Do you want this problem to show up? Well, five seconds. Do you want this to show at the bottom of the post? You know, trigger after scrolling? There's various options that you can use with this right here, and I just want to space on the home page, just the home page or post, you know, just the post and then click on next and saving Exit. So they basically told me I haven't at an email list and that's correct. And that's because you'll need to enter in your A P I and your user name. So once you add that end, ital linked to your account and it will pick it up going back over here to visit sites. Let's see now if it displays, usually for the first time, it will display. But since we're in admin, it might not show up. No, Okay, But it does work, you know, it does work. So I'm just, you know, it's it's probably because we're logged in and the cookies are unable, etcetera. So But I also want to show you what you can add. It's to a widgets. So over here we have widgets right here now going over here to widgets. Now the Bloom plug and also acts as a widgets. Remember earlier we had the footer menu, how we have different widgets. We can go ahead and add in the bloom plug in as a widget as well. So right here under bloom well at in this opt in form. Now, of course, the opt inform isn't isn't It's not completed yet because we haven't set up the correct AP I so you'll need to set up your A p I with whatever server you're using our service, and it's both to display right here. But I believe it's because I don't have the A p I. He tell you what, I'll just go ahead and grab. I'll just go out and grabbing the A P I key and then we'll go ahead and we'll go ahead and use it there. So are ready. 15,000 subs not bad. So I'm over here and go to Bloom and just kind of just I'll just go out and show you all email accounts. New accounts. Well, dio mail chimp and then all intern my a p I key. And then I'll authorize it. And you know it works because once it works, it will actually pick up your list. So right here you can see that it's picking up my lists. So now I know it's connected so often forms We'll go ahead and click on this right here, and they will say, You know what? I want to select my user name and Ah, there you go. So now it's actually working, and it's actually integrated correctly. So now the opt inform actually works. And I also we talked about the subscribe on the bottom of the page as well. So you'll also need to do the same thing right here for your subscription. So you need to go ahead and entering your your, uh, your A P I for your mail chip accounts. So, for example, right here it'll want your AP information. And whenever someone enters something in oh, myself already connected because it worked with Bloom. Um, right here, just like this? No, at it. It's asking me for my a p I he again, and I'll just go ahead and submit that it's right there, all right. And now whenever someone signs up for my email meal account, it's gonna automatically go to my mail chip account, and it's going to add all my subscribers right there. So that's what you also get with David. You get the Bloom plug in. It's a great email. Opt in. It's beautiful. Let's go and see if it works on the block page. Now we'll go ahead and check it out. We'll go ahead and ah, see here. We'll go ahead and go to widgets. Now, before we actually configure Bloom to have ah, opt in, we need to actually create one for the widget. So right here under Bloom will go to opt in forms and we'll click on new Opt in and right here we want a widget. So you want to select a widgets and this will actually make it so our widgets can actually use abuse for opt ins. So right here, I'll go ahead, slick mail. Chimp and I will go ahead and select my accounts and I'll go and select the list. I'll just put Darryl's discounts and then click on Save and Exit. And there you go Now, I could have chose a design for it, obviously, but I just kind of covered that last time, so I don't want to go through it again and everything. So let's go back over here and go to appearance and click on widgets and simply click on the bloom and we'll go ahead and select our new option that we made. So I should have titled it differently, Obviously, because you don't want to confuse yourself. So I should probably titled. It's, um you know, here. I'll just I just want to show you Oh, whoa, we'll go back here. You know, were you name it so instead of this right here will put, um, widgets and then a preview of it. And then I will go ahead and click on Saving Exit. And now we'll go back over there, you know the proper way, and then I'll go ahead and select which it's click on safe, and then we'll go back over here and click on Blawg and I'll check out my blawg post and ball off. There you go. And, of course, if someone types something in right here, for example, they want to go ahead and describe your newsletter. Click unsubscribe and ball off. It will go directly to my mail chip list. Now there's also various other male chip designs. I think there's one we're locking content to. Your seen it where you go to a website and they kind of lock it and you have to subscribe to see the rest of the content. They have flying. They have all sorts of really cool stuff to be sure to check out their other modes. Okay. All right. So the next, actually, we're talking about template. It's yes, we love temples. Everybody loves templates. So here are goats two plus new and click on a page, and we'll talk about the templates that you get with the debate team as well. So here, click on page.
19. Web Design Courses + WpFriends: we'll go to templates. Click on, publish and use the Navy builder. Now, when you get DV, you actually get access to tons of different templates as well. So right here you can choose a pre made templates and they have various templates that you can use. So it's a, for instance, right here. You want to use this layout, you can just click on. Now, this is a nice layout. Beautiful. And the great part about Didi is that they add to layouts a week. So if you're watching this video in three months from our or six months from now, there's gonna be a lot, a lot of layouts that you're gonna get with the Devi theme. So right now it's importing the layouts. Remember, you must entering your user name in a P I in these settings to get this So right here, you can kind of see that we have a layout. Everything is beautiful, everything is done, it looks great. And remember, you can also take specific sections from Davy as well and say, You know what? I like this, you know. I want to take this and put on my website. You can do that just put in a footer, you know, footer from layout and then say that Davis of library. And now you can go ahead and use this on various parts of your websites. So you know the possibilities with Davies. Just It's incredible. There's so much stuff you can do with its. The lots are great. Now, again, remember to get those layouts, you must go to the theme options right here and go to updates. And you must entering your user name in a P I key right here. And you can get that by going into your divvy settings or your you know, your elegant themes account. So that's basically a quick rundown of templates. The templates are great. I love them. I think they're I mean, they're amazing, you know? So, uh, yeah, that's basically it with templates. Me Go ahead. And, um, I love you just one more time and we're going enable visual builder. I was working on something earlier and then, you know, choose to remain layouts is checking. Let's check out another one. You know, this is look at one more really quickly. Look at ah, they have a new one for gamers. like that one. DV defenders. Let's let's use this late almost. Yeah, this one looks so here we go. You have a full functional websites. It's beautiful and it looks great. Awesome. Awesome, Awesome. Awesome. All right, so that's basically a quick run out of templates. And again you can use you just goto plus new a new page and then add the every specific page. So whatever you want now also, I'm introducing you to be friends dot com. Now, this is a social networking website for WordPress users, and you can actually get my layout for free if use the code Davy 100. All right, did he? 100. You'll get access to this layout for free now. Usually you have to get points for this play out. But you guys are watching this video, and I want to go ahead and reward you. Oh, and if you're watching this, you know, use the code or use the coupon code D V 100 you'll get this layout for free. And it's a beautiful layout that we made, and we have more coming. We have at least three or four more coming so you can see That's just a beautiful layouts. Professional looks great, It's amazing. And it comes with five pages. So it comes with the home, the about the services, the latest news and contact us page. So it's a great layouts. If you need, like, something to turbo boost your website or you need help or inspiration, you go ahead and use that coupon code. Um, you know, I'm just really thankful that you guys made it this far and you watch this tutorial. This is also another layout that we're making. It's another great one, and I don't know if I get us to you for free. You know, I don't know. We might. I'll think about it, used the code Darrell one or did you? 100 you can actually probably get the sale for free as well. Once we added in it thought up yet, But it'll be on FB friends very soon and, um, go back here. They quick WP friends, We go WP friends. So this website again, it's just a social networking website for WordPress users that I specifically made. It has a little over 1000 members and you can see a lot of people engaging in it, talking about it. But also it's a really cool stuff. You can also go ahead and join our form. We have people asking questions on our form as well. We also have groups. So if you want to go ahead and join one of our groups, you could go ahead and do that here. You can talk about you know s e o or freelancing or rate my websites. All these other groups that we have we have a David Themes group as well. Slider revolution. All these other groups and also we have questions as well. So if you want to ask questions, you go ahead now, two questions and then we'll respond to its and then you could get help right here on the web sites. Now, there is one last thing that I want to talk about. Now, most of you have watched this video and you're kind of struggling on Okay, dear. Oh, I made the websites. What do I do now? You know, how can I start my business? How can I get people to you know, how can I get clients? How can I? How can I get a system where people can actually purchase stuff and, you know, start my full business because sure, you got the school to make a website. But now what do you do? You know that a lot of different ways you can go with this. And these guys are Tim Stifler and David Blackman and they, actually, they actually made a biz. They first start off his Web designers, and later on they actually opened up their own plug in and theme development company. They saw making websites, and now they're teaching people on how to do it full time. So this is a great course. In fact, it's an eight week course. It's a very long course because the amount of information that you get in it is crazy. And here they talk about how Davies, most popular team in the world, why you should use its you know how more than 30% of the Internet uses WordPress and these guys really know their stuff. And I've actually taken the course and, you know, they talk about marketing. They talk about, you know, you know what you could do with its where you can do with TV, how you can pick up clients, and it's just the amount of knowledge that you get is just incredible. There's so much noise that they teach you. They're both there. You get a private call once you get the course. Now the course is, Where is that? Let's go ahead and go to join. Now now, of course, is 97 now I do have a coupon code, so the coupon code is bleeding is narrow. Darryl 10 and not want to save you guys are $100 off course. Now I know that's a lot of money, but remember, you also have a 14 day money back guarantee. And quite honestly, you might want to take this course because when you're doing Web design, you're gonna be like, I'll take $3 jobs for larger final jobs and that's the bad approach. You want to sell websites for 5 to $6000. You know you have to respect your time, and a lot of people don't know that, and they just you know, they'll take anybody they can get. And I'm saying, Man, you're attracting the wrong audience. You don't want to track people who want website for $500. You want to check people with big budgets, corporations, business owners saying, You know what? I'll give you something incredible and you also provide value. You know, you can provide a lot of value to your clients by saying, Hey, you know, I know how to make websites. I know how to do all this stuff. You charge them five grand mean the course has already paid for itself. So I highly recommend taking its They don't have it. Obviously, they don't. You know, I have it on YouTube because it's Ah, it's an eight week course. It's a very, very long course and it would not fit on YouTube. But these guys, they do have experience in the industry, and they first started out. I mean, they had a website here called aspirin for your studios. That's been true studios, and this is one of the websites right here and again. They start off just like Web designers, and now they're doing, you know, full full divvy stuff. They're doing like memberships are making child teams making plug ins. They're doing courses like with CSS and everything, so I have a recommend it, so be sure to check out the VP gears dot com The course really does pay for itself. I know it's a little expensive, but as long as you make one sale from that course for our clients, the course is already paid for itself. So that's why I really recommend it, because those guys really know what they're doing. And I only recommend the best because, you know, that's that's what I do. Recommend the best, you know in all my videos. So look, there's the blue plugging, So go ahead, entering your your PC order on for and that, you know, and then click on Subscribe. So it's working now, guys, it's working and not go straight to my mail chip account. So yeah, I don't know. It was just being really weird. I wasn't really sure why why? It was not working, but I know that's that's a whole other story. So again, guys, I hope everything was helpful. Make sure to check out every P. Friends don't calm. You have access to the free layouts. Be sure to ask a question. If you have any questions for me, please feel free to put them in the comments below. I really hope this is Tora help you all out. You know, I know it's very exciting when you're making websites and you want to get clients, but make sure not to attract the wrong clients. And also, you know, I hope this tutorial actually helped you out with design, because design of the core is everything in a website, you know? I mean, people are truly buying positions on your content and how it looks. I mean, look at apple apple dot com and you go to apple dot com. You feel elegant. You feel like you're high class just by being on the website, and you want to go ahead and get people that same exact feeling when they visit your website. So I really hope this was helpful. Guys, make sure you like this video subscribe. Um, I have a link to the comment or this links for other tutorials. In the description below. I really, truly wish you all the best, you know. I know it was so exciting for me when I got started, and I really hope that you guys succeed and make a lot of money. I really, truly hope you do so again. My name is Darrell Wilson, and I will see you all in my next video. Take care. Everybody
 Darrel Wilson, Wordpress & Ai Enthusiast