Transcripts
1. Introduction: Hi. I am Mona. I am a clay artist from Idia. I have been passionate
about creating with my hands since
I was a child, and I have been sharing that joy through online teaching
for past nine years. I believe that everyone has a
creative spark within them, and I am here to help you ignite your through my online courses, I strive to create a supportive and inspiring
learning environment where you can explore your creativity and discover the joy
of working with clay. In this course, we will dive into a unique and
rewarding project, transforming
discarded bottle into a stunning tribal
figurine vase using clay. We will hone our clay sculpting skills by creating
expressive tribal figure. You will learn
techniques for creating facial feature and
body adornments, developing your ability to bring unique character
to life in clay. This course is designed
for beginners, and I will provide step by step instructions that
are easy to follow, even if you have
never worked with clay before. So join me. Let's give a new
life to this bottle.
2. Materials : Let's start with the materials. I am using a used
plastic bottle. You can use any plastic
or glass bottle, any size or shape. I find a bottle with
a long neck works best so that the figurine can sit securely
on it like this. Next, you will need two to three kitchen tissue
papers, acrylic paints, clay. I am using resin air dry clay. This clay usually
comes in two parts, a harden and a resin. You can take any a dry clay you will also need
or purpose glue, although I find wood glue
works best with the clay. You will also use metallic golden powder and
a medium to mix it with. You can also use
copper or bronze. A varnish will help
seal your project. As for tools, you
will need scissors, a knife, a paintbrush, a roller, a scale, a piece of sponge, and an OHP sheet. Great. Now, let's get started.
3. Preparing the Surface : Now we are going to cover the
bottle with tissue paper. To do this, let's open the tissue paper and tear it
into roughly four pieces. You might need around two
to three tissue papers, depending on the
size of your bottle. I have taken a bowl and
added some glue in it. You can use all purpose glue, wood glue or any glue you have. I am adding a little
bit water off to it. The ratio is one part
water to three parts glue. Let's mix it well. I'm using an old paintbrush
to mix the glue. Now let's apply the
glue to the bottle. You can see how easily
it's spreading. If it was thick, it would have been more
difficult to apply. After applying the
glue on one side, we will take a piece of tissue paper and place
it on the glue part. Once placed, press it down with sponge to ensure the
tissue paper stick to the surface of the bottle. Apply glue to the
remaining parts and stick the tissue
paper in the same way. By covering the bottle
with tissue paper, the color will
adhere much better. Otherwise, acrylic paints on glass or plastic bottle tend
to peel off over the time. Plus the tissue paper will give a unique texture that
look really cool. Uh so we will cover the entire bottle
with tissue paper. You can even add an
extra layer if you want. I'm going to add two layers. If the tissue paper
doesn't stick well, you can apply more blue on top. Once we have covered
the entire bottle, we will let it dry completely. This is a fun and
easy way to transfer a plain bottle into one kind
piece of art, isn't it?
4. Colour on the Bottle : Once it's completely dry, check if any tissue
paper is coming loose. If you find any loose area, simply apply a layer
of glue over it. In the next step, we will
take black acrylic paint, mix it with a medium
to thin it out. You can also use water, but a medium works better. Mix it well. Now we will apply this black paint over the tissue
paper on the bottle. Applying tissue paper to the
bottle is a great way to create a textured surface that helps the
paint adare better. Unlike painting directly
onto the glass or plastic, where the paint can
easily chip or peel off, the tissue paper provides
a more durable base, plus the texture created by the tissue paper adds a unique
dimension to our project. Once we apply another
color on top, this texture will become
even more pronounced. Let's set it aside to dry
and let the paint set.
5. How to prepare Resin Clay: Now that the base color of
the bottle is completely dry, we can start decorating it. We are going to use
air dry resin clay, which is a fantastic
material for crafting. This clay comes in two parts that we need to mix together. Let's combine equal
amount of resin and hardener and knead them until they form a
smooth pilable dough. To prevent sticking,
I recommend applying a small amount of baby powder to your hands and work surface. Now, let's roll and fold the clay until it's
a uniform color. This might take a
couple of minutes, but it's worth it for
that perfect consistency. Our clay is now well mixed, uniform in color,
and soft to touch. It takes about 15
to 20 minutes to work with this clay
before it starts to harden and it can take up to 90 minutes to
dry completely. And
6. Sculpting the Legs: Let's start working
on the project. We will begin by
making the legs. I have mixed some clay and
made two equal size balls. I'm rolling these balls This roll will be
slightly thinner on one side and a bit
thicker on the other. Let's place this role on the
bottle to see how it fits, place it from the middle
of the bottle downwards, about 2 centimeters
above the bottom. Check the size to
ensure it's perfect. Now let's create another
role for the second leg. So now we have two
equally sized rolls. Let's thin out the bottom part, starting from the
thinner side by rolling it slightly with
a 1 centimeter gap. Then we will press
the portion used for the foot and give
it a pointed shape. See, I have rolled it here, flatten it, and then
pointed the front end. Now let's apply some
glue to the bottle. First, apply glue to the spot on the bottle where you want
to place the first leg. Then we will attach
the leg to it. I am positioning the leg with a bent forward pose,
adjust the position. Attach the second leg in the same way as
shown in this pose. So now I'm applying
glu to the leg itself, and then I will attach. After placing the second leg, I am creating a
ball by crumbling a piece of tissue paper to provide support
underneath the foot. This will help it stay
in place here too. When the clay dries
and hardened, we will remove
this tissue paper. So the legs are ready now.
7. Sculpting the Body: Now let's create the
chest and abdomen part. I have mixed some clay and I am shipping it into a drop form. Flatten it slightly. It's about six
centimeter in size, but you can adjust the size
according to your bottle. This will be the chest. Pinch the top to create
a neck like shape. Press the sides to
form the shoulders. Gently shape it with your hands. You don't need any
special tools for this. Make it slightly
thinner at the waist. To make it a bit longer, you can stretch it out
to smooth the surface, rub it gently using
the talcum powder. Check the size by placing
it on the bottle. It looks like the right size. Now apply glue on one
side and the bottom. Then stick it to the
legs and the bottle. Press gently, so it all
to the bottle surface. Slightly around the hiparia So this is what we
have created so far. Since most of the weight is
on one side of the bottle, it might become
unstable and fall over. To make it more stable, you can fill the bottle with pebbles to make the
bottom heavier. If you are using a glass bottle, you won't need to do this. See, now it's stable
and won't fall over. In the next step, we will
create cloths for our figurine. So let's make some more clay.
8. Making of Clothing: Now let's create the clothing. Roll out the clay
to make it flat. I'm using an acrylic
roller and placing the clay on an OHB sheet or
butter paper before rolling. Since there is a
reflection here, I'm using butterpaper instead
of an OHB or plastic sheet, you can use any one of these. After flattening it, we will create a texture using scale. Let's make horizontal
lines on it. Be careful not to
press too hard, as it might cut the clay. After making the vertical
lines, create diagonal lines. Leaving small gaps
between the lines. Now, let's move on to
covering this part. From the piece of clay we
rolled out and texted, we will cut a rectangular shape. It should be around three
to four centimeter long. Save the extra pieces for
liter. We might need it. Carefully lift this piece and place it onto the hip
area first check the size, then apply glue and
stick it in place. Gently place the piece
on the figurine, ensuring the good
side is visible. Attach it loosely. And trim any excess
from the backside. Now, let's make the hands. You can use the leftover
clay from the cloth cutting.
9. Sculpting Hands: Let's make the hands. But before that,
take a toothpick, break it into two pieces, insert a piece into the body while the
clay is still soft. This will be where we will
attach the head leader, gently push it inwards. Adjust the shape. Ensure there is enough space between the neck and the bottle. For the hands, we will take clay and divide it
into two equal parts. Make ball with these. Roll these balls just
like we did for the legs. The process of making hands is similar to
that of the legs. Et's place one end on the shoulder and the other end
on the neck of the bottle. Roll it slightly to lengthen it. Let's check if it fits, bend the arm and
place it like this. Now, the size seems perfect. Hedges the shape. Thin one end of the
roll using your finger, flatten it and pinch it, just like we made the wheat. Now roll the other ball and make the other
hand in the same way. Platin pinch. Our rolls are ready. Now let's apply glue to the shoulder where we
will attach the arm. Apply it to the
entire roll as well, so it stick well to the bottle. Place slightly bend the elbow and attach it securely. Use a ruler to ensure the
hand is positioned correctly. Fix the hand to the
neck of the bottle. We will attach the other hand in the same way from backside. Apply blue to the roll. Stick it at the backside, bring the hand part
forward like this. Adjust the position. Press it gently on the shoulder. See, both hands are attached.
10. Making of Shawl and Bangles (1): To create the shawl, I have taken a small amount
of clay and rolled it out. I'm using an acrylic roller to flatten it into a
long thin strip. Let's cut the sides. Then we will create the same
pattern on this piece as we did for the Duthi vertical
or horizontal lines first, followed by tagnon lines. Now, let's place it on one
shoulder to check the size. I am trimming the excess
length and the weight. Create small slits along
one edge of the shawl. Apply glue to the shoulder and then place the shawl on it. Place it loosely. Edges the back side as well. You can see how
loosely I have placed it so that it resemble a cloth. To avoid wasting the extra clay from the previous cutting, let's use it to make mangles. Make thin rolls. Measure the wrist and cut
the clay accordingly. Now apply glue to these pieces and stick them
onto the hands like bangles. You can add two to three
bangles on each hand. Do the same for the feet. I am using a toothpick
to press the sides. Stick the remaining rolls
onto the hand as bangles. You can add two, two, three bangles on each end. I have trimmed the aces and using a toothpick
to press the ASIS. But you can use any
other tool you prefer. So we have made good use of the leftover clay.
What do you think?
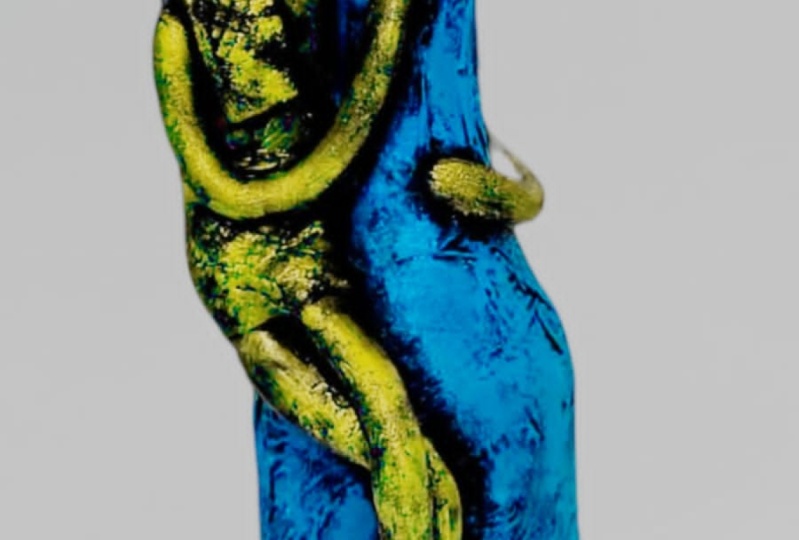
11. Sculpting the Head: This is what we have so far. Now let's make the head. I have mixed a little
more clay for this. We will form a small ball. I'm taking a piece
of tissue paper, crumble it into a small ball. We could make the
entire head from clay, but that would make it heavy
and use up a lot of clay. So this technique will prevent the head from
becoming too heavy. Enclose the tissue
paper ball within the clay and mold it
into a smooth sphere. Make sure the tissue
paper ball is firmly packed to provide a good
paste for the clay. Test the size of the head
by placing it on the body. Since the clay is still soft, the shape might get
distorted a bit, but we will fix it later, just checking the size
now and it looks perfect. We find the shape of
the head as needed. We will sculpt the
facial features next. We will begin by the
sculpting of ice. I am rolling two small
balls of clay for ice. Apply a small amount of blue to the designated
area for the eyes shape the cla balls, make them pointed on both
sides and broad in the middle. Then using a knife, create a straight
line impression down the center of the eye. Pick it up and stick it on being careful not to
distort the ship. We will repeat the process
for the second eye. Shape the clay into an almond
shape with pointed ends. Score a line down the
middle of the eye. Carefully position
the eye on the face. Adjust the shape. Now nose. To make the nose, take a small amount of clay and first
create a drop sheep. Then pinch the top
to form a pyramid like shape, flat the bottom. See this. Now we
will stick it on. Apply glue to the area where
the nose will be placed. Gently press the nose onto
the face, adjust the shape. Take a toothpick and make two holes at the
bottom for nostils. This is an optional step. You can skip it if you like. Applying glue for the lips. We will follow a similar process for the lids as we
did for the eyes, shape the clay into a small aluminated
shape for the lips. Use an p cutting tube to create a subtle
line for the mouth. Carefully ada the
lips to the face. Now that the pace is done, we will add the turban.
12. Making Turban : For the turban, we need to
roll long strips of clay. Cut the sides using
a knife or a ruler. If the cuttings are a bit rough, smooth them out by pressing
them with your hands. Same way, prepare another strip. We will keep the leftover
clay pieces for later use. I have cut two strips from it. So I have a total of
three strips now. First strip will be placed
diagonally across the head. Start from here, take it upwards to the
center of the head, and from there, bring
it down and around to the back and stick the
strip to the back of the head. Cut off any excess clay, gently press the strip onto the head to ensure
they adhere properly. Now, let's attach the second
strip to the other side. Apply glue to the second strip and carefully place
it on the head. Make sure the second strip is positioned symmetrical
to the first. Trim off any excess clay and press the strip
firmly onto the head. We will attach the third strip slightly behind the
parallel to the first. Ensure there is a small
gap between the strips. We will use the remaining
clay to make another strip. The final strip will be placed
parallel to the second, leaving a small gap. The head is now ready. This leftover clay
will also be useful. We need to use it
before it hardens. In the next step, we will fit
the head onto the body. But
13. Fixing Head and Making neck ring: Now to attach the head, apply a small amount of glue
to the end of the toothpick, gently lift the head. It is still very soft. If we wait for it to harden, it will be difficult
to insert later. So carefully lift it and
stick it onto the body. Press it gently. With a remaining clay, just like we made
the bengals earlier, we will create a
ring for the neck. You can add a pattern
to it if you like. I am making a zigzag
pattern with knife. Trim off the axis, leaving just enough
to encircle the neck. Now apply glue to the back of this ring and loosely
attach it to the neck. Don't make it too tight
against the neck. Keep it loose as shown. Press it firmly from
the back to secure it. I'm also adjusting the
pattern a bit more. We have a little clay left, so we can use it
to make earrings, roll it out and cut
it into two pieces, then shape those pieces
into two circles. We will stick the circles under the turban where
the ears would be. This way, none of our
leftover clay goes to waste. Use a toothpick to
press the top part. Here is not much space, so use a toothpick to adjust
and press the earring. Our figurine is now complete, and we will now let it dry.
14. Coloring -1 : The clay is completely dry, so it's time to paint. We will apply a coat of black acrylic paint to both
the figure and the bottle. Now, let's try.
15. Coloring - 2 : The paint is dry now. To give figurine
a metallic look, we will apply gold
and metallic powder. You can also use copper, bronze, or silver,
if you prefer. I have taken a small amount
of the powder from the back, and I'm mixing it with
a medium or binder. Add a little and mix well, and your golden
paint will be ready. You can also use pre mixed metallic
paint for convenience. Take little paint in brush, wipe off s, and apply very
light strokes on figrine. By this, the deep areas
will remain dark, preserving the black base color, while the embosed area will
be highlighted with the gold. This technique will
enhance the texture of the clothing and making
it more visible. Using a light touch
with the paint, we can create depth
and dimension. For even more shine, you can apply a second coat after the first one
dries completely, but let it dry through fast.
16. Coloring - 3: For coloring, I am
using sap green, white, lemon yellow,
and Persian blue. Mix them well. You can use any other shade
of your choice. Now, let's apply the
color to the vase. Keep a tissue paper
or a cloth handy. Take a dry brush, take
a little paint on it, wipe off the excess
on the tissue, and start applying the color
to the bottle from backside. We have to apply this color with a dry brush technique
with very light hands. This technique will bring out
the texture on the bottle. Slowly cover all the
parts of the bottle. Look how beautifully the
texture is now visible. Let it dry. After that, we have to do one
more coating on it with a slightly
lighter shale. It will take 15 to 20 minutes
for it to dry completely. So let's wait until then
17. Coloring - 4: The first coat is dry. Now, we will add a slightly
lighter sheet on it. So I am adding more
yellow color to the previous mixed
color. Makes it well. And then just like before, wipe off the excess
on the tissue paper, apply color on the vase with the dry brush technique
just as you did before. With very light gentle strokes, this second coat with a lighter sheet will add more
highlights and dimension. This technique is
perfect for highlighting the texture and adding
depth to the surface. We are being careful
not to apply too much paint as we want to maintain the delicate
balance of colours. Now we will take a little black
color and wipe off the s, apply it lightly to the
area around the figure. This bit of black paint will add contrast and make the lighter
color stand out even more. We are doing this also with
a dry brush technique. Patience is key in this process. Letting each layer dry completely ensure
the best results. So now let it try.
18. Varnish : For the final step, we will apply a coat of varnish. Varnishing will provide
a glossy finish and a protective layer. Apply the varnish with a
brush to the entire piece, including the vase
and the figure. Apply a thin and even coating. The varnish not only enhances
the beauty of the piece, but also add a crucial layer
of protection against dust, scratches, and even UAs. It also makes the
piece easier to clean, simply wipe it down
with a damp cloth. Oh. The varnish appears milky white at the moment, but it will become transparent
once it's completely dry. If you want an even
glossier finish, you can apply another coat. But for now, let's allow
it to dry completely. While we wait for
the varnish to dry, it's important to keep the piece in a dust
free environment. This will ensure a clean
and flawless finish.
19. Final Thoughts: Thank you again for being
a part of this course. I hope you found it useful
and easy to follow and that you are inspired to create your own unique shape
tribal figure was. I can't wait to see
what you come up with. I also value your feedback, please leave a review for me. It really helps me to improve. For more of my artwork, please check my
social media handles, Instagram, YouTube
and Facebook page. I hope to see you in my
next class till then five
 Mona Arty, Clay Artist & Educator