Transcripts
1. Trailer: Hi, welcome to my introduction to green-screen course. My name is Chris and I'm a filmmaker, photographer from England. In this course, I'm going to show you how to set up the puppet green-screen, how to light that green screen, what you through some of the common errors and how to avoid those errors. And then we're going to edit out footage inside of Adobe Premiere and Adobe After Effects. So let's begin.
2. Setup: Setting up your green-screen is one of the most important parts of the green-screen process. Because if you get this wrong, then unfortunately it can produce some serious problems later on down the line, which can't really be fixed in the edit. So it's really important that you set up your green screen correctly. Now the first thing that you want to do is make sure that your green-screen is perfectly smooth. So if there's any marks on the green screen, if there's any creases, you want to get rid of those marks IN OUT those creases and make this as smooth as possible. So this means if you'll basically using a giant green cloth, then you go into 12, hang this or IMS for the creases to fall out. Or if you're using a puppet green-screen, then again, you want to make sure that there are no marks on the screen. And you also want to make sure there are no fine creases on the green screen. If you're using a piece of cloth, then you're probably going to have more creases. Then if you're using a pop-up green screen. So if you haven't got a green screen yet, then I would recommend getting one of these puppet versions because I am much easiest to store without causing heavy creases in the green screen. However, if you do own a cloth green screen, then that's fine. Just make sure you haven't got any creases in the green screen. Now my second set when it comes to setting up your green-screen is to place this in a room where there isn't much natural light. The problem is if you're doing green screened for extended takes, if you have loads of light spilling in from a window, then unfortunately the sun passing behind the clouds are coming out from the clouds. Or changes in weather can mean that your lighting is consonant going to change. And this means the color of the green screen is going to slightly vary throughout. You'll take this means when you get this into the edit, unfortunately, it might be keyed perfectly at one specific time, but maybe a minute late to the sun could pop out from a Cloud. Green-screen is completely overexposed, and that key won't be the same as it was before. This just won't walk unfortunately. So when you're filming with your greens green, I would recommend putting this green-screen in a room where you can close the blinds. You can close the cutscenes to block out that natural lights. Or you can just add something up over the windows to block out that natural light spilling into the room. It's really important that you use correct a lysing in your green screen. But we'll talk about lysing in the next episode. So now that your green-screen a is not damaged, there's no creases, that's no marks. And you've got it sets up in a room where there's no natural light spilling in. Now you want to go ahead and create a little bit of separation from your subject and the green-screen, you say when it comes to lighting. Once a light you'll subject and your green-screen independently to one another. And if you've got your subjects really close to the green screens, some maybe just a few inches away from the green screen, then the shadow is going to spill onto the green screen. And this is going to make things very difficult for you. So if I was you try and get at least one meter between your subjects or yourself and the green screen. And that's really going to help to avoid any issues with green spilling onto your subjects or your shadow spilling onto the background.
3. Lighting: Next up we're going to talk about lighting, because lighting is one of the most important parts of creating great green screen footage. The problem is if you're using incorrect lysing your lights is too harsh. You have this placed incorrectly or you don't have enough light on your subject and your background, then unfortunately, any one of these is enough to derail your footage. And it can just creates a really difficult and really horrible key in the edit. So this means when you're trying to get rid of the green, not all parts of the green are going to disappear. There'll be some patches which are still stubborn and still staying there. So that is white lighting is so crucial when it comes to setting up your green-screen. So the first tip is to let your subjects, the person in front of the camera and the green-screen independently from one another. And they should be easy to do if you've got a distance between your subject and the green screen. So if there's a meter, two meters, three meters between the person and the green screen, then it's going to be quite easy to control this. So first of all, what you want to focus on your subject first. So make the person look great with your lighting. It's always really beneficial to know what you're going to put behind them before you do the lighting. If you're just doing a talking head video, then it doesn't really matter too much. But if you plan on putting your character in a desert or in the middle of a rainforest, then you want to try and look at lighting in that environment and try to match that with the person in shots. So this at the moment here, the lighting I'm using on myself is just one lights up here and then I've got a backlight up here. So I've only got two lights lighting me in this example. So if I was to put this fatigue may ensue footage of a nightclub, for example. The lighting is very different in that environments to this static whites light. So placing this footage of me, white lights in environments where the lights are constantly changing, you very easily be able to tell that that was green screen footage. So if you could try and match the lighting of your person in the green screen footage to the environment, then that's really going to help to create a really seamless effects in the edit. Saying that though, if you're just doing a very simple talking head video like this where I'm just talking to camera and the background doesn't need to be anything too specific, then just focus on using a standard two or 3 lighting setup. So a three-point lighting setup is probably one of the most idealistic options for your green screen footage. And this is basically three lights. So you've got your key lights, which is up here. You have a fill light switches, a second lights. So you've got two in front of the subjects and that you have a light just behind the subjects, which is your backlight. And this is just adding this nice soft glow around my hair. The reason why a backlight is important is because it's really helping me to stand out from the background. That's also really beneficial as well when it comes to pulling your key from this green screen footage. If you're standing out from the background and it's really going to make things much easier in the edit. So as you can see, this is the highlights on and this is the highlights off. As you can tell, the footage looks completely different and I'm blending in with that background a lot more. And if I tried to keep this footage right now, unfortunately, I would have a hard time. I know it probably start to see some artifacts appearing from the footage. So I'm going to put my hair light back on. So now that you've let the person in front of the green screen, now we need to move on to lighting the green screen. So let me turn off my two lights that I have lights in the green screen and we'll build this up piece by piece. So at the moment I only have one light on. So this is just the light which is lysing myself. There's not really much spill going onto the green screen. There's a little bit of spill, but there's not too much because there's a little bit of distance between myself and the green screen. I'm going to turn on the highlights and instantly I'm standing out from the background a little bit. And that highlights a spilling onto the green screen just a little bit, which is giving that just a little bit of light. Now, the problem is if you look at the green screen at the moment, unfortunately, is very uneven. So there's dark patches over here and then there's a really bright patch just above my head up. Haha. So if I tried to pull a key from this green screen footage, unfortunately, it wouldn't work because the light isn't even. So this is where we need to bring in two different video lights to light and this background. So I'm just going to turn the first one on over here. They got, I've got that first light now lysing this side. And as you can see, having one lights on the background isn't enough because this side of the green screen is now perfectly lit, but this side of the green screen is just falling off into darkness. So again, this would result in an uneven key and that wouldn't look great. Certain I'm just going to turn the other lights on. And there you go. Instantly. We have a much softer results on our background. Now it's really important that when you're lighting your green screen, it's important that you use soft lights rather than hot lights. And the difference between headlights and soft lights are exactly that. Hotlines give a much harsher look. So if you're shining a hard light directly at somebody's face, then you would see harsh shadows across their face. But the light that I'm using in this example, the light that is lysing my face is a soft lights. And in order to get this soft light, I'm using a soft box. And as you can see, there's no real harsh shadows across my face. It's just a soft fall off. And that's the same thing for lighting the green screen. So as you can say, I'm going to pull one of these lights in and I'm going to show you the difference between hard and soft. So at the moment, this light has got some diffusion around the front of the lights and then a softening the lights off. So this is what the light looks like with a soft lights. And then when I take that off, as you can see, the lights is a lot harsher and because the light is a lot harsher, it's spilling on some me a little bit. And if there were any marks, creases or anything on the green screen, then we would say a harsh shadow across the green screen. As you can see, you've got that harsh shadow appearing on the green screen. And just for reference, by the way, this is what I'm using to soften up the light. So it literally is just this white sheet that I've read over the front of this thing that goes on top of the lights. And that is just going to soften off that light. As you can see, I've got that diffusion now onto the lights. And if I put my hand over the background, you can see there is a much softer shadow. And that means if any shadows do fall onto the green screen, then there's not going to be so much of an issue with keying. Now that brings me on to my next point. Shadows. You want to at all cost, avoid shadows on the background. And this is all to do with your lighting. So make sure your lights are angled in a way where you're not casting any shadows onto the background. Because if your shadows appear on the green, unfortunately, it's going to be very difficult to get rid of that when you're trying to get rid of the green from the footage, a great way of avoiding shadows is to simply just have that separation between your subject and your background. So if you have a mesa or teammates is between your subject and the green-screen than the shouldn't be too much of an issue over shadows. But if you do need to be a little bit closer than just pay very close attention to your lighting and make sure there's no shadows falling back onto that green screen size. You can say there's no shadows at the moment, but the shadows now. And if I try to keep this footage, it gets very difficult to do. And then as a general rule with your lighting, you want to try and get a very even look across the green screen. You don't want to have light plots and dot plots of the green-screen, you want everything to be fairly consistent. So if that means you have to use three lights, use three lights. If you have to use folates, that's fine. The aim here is to have a really soft and even look on your lighting across your green screen. As you can see again, if I turn off one of these lights, you can see I've got these bright support. I've got the darker parts. And this just is not creating the effects that we need in order to get the clean green-screen effects. So lysing really is one of the most important parts when it comes to green screening. And it's really important that you take the time to get your lighting perfect.
4. Camera Settings: Next up we're going to talk about camera settings. And before we even jump into the camera and look at the settings in the camera, you first just wanted to make sure that you put your camera on a tripod or a stable surface. It's really important that the camera doesn't move walls with filming our green screen footage. Because the problem is if the camera is moving, then when we pull the green out to the footage, it means the person is moving. And when we put this person onto a static background, unfortunately, we'll have the person bobbing around on a static background and it will look really awkward and really amateur. You can move the camera if you want, but then you have to put tracking markers onto your green screen and then you have to get the footage and then remove the green and then at the onto footage and track that footage and it just gets really complicated. So the best thing to do is just to put your camera on a tripod and film all your green screen footage completely static. Now with your camera mounted onto your tripod, we can jump into the camera. And there's two important settings that you need to pay close attention to when you're shooting green-screen. The first one is to do with your motion blur and manage your shutter speed. Normally when you're filming video, if you're filming in 25 frames per second, for example, you would double your frame rate, so you get 50. And then that would be the number of your shutter speed. So your shutter speed would be one over 50. But the problem is that one of the 50 produces too much motion blur. If I was to move my hand around like this. Unfortunately, if that was 1 over 50, that would be too much motion blur in that movement. And that means when we're trying to remove the green from this blurry, unfortunately, it becomes very difficult. And this is why you typically see that green fussiness when you see somebody moving in front of a green screen. It's because there was too much motion blur and that's because they're shutter speed was too low. So when I'm doing green screen, if I'm filming in 25 frames per second, I double my shutter speed and then a double that's again. So this means we end it with a shutter speed of one over 100. Now if you take this to high, then unfortunately your footage is going to start looking a little bit weird. But if you keep that at around one over 100, then you go into reduce the motion blur enough so that it doesn't become an issue and you're pulling the green, but it also won't start to look weird and a bit choppy. One over 100 is the perfect number when you're doing green screen footage. So just remember, when you're filming your green screen footage, set your shutter speed to 1 over 100. If you're shooting in 25 frames per second. If you're shooting in 30 than doublets and double it again. So we're going to go 306120, so your shutter speed should be 1 over 120. And that's example. This isn't a strict rule by the way, you don't have to follow this advice, but I generally find increase in the shutter speed like that, like I mentioned, it really does help to pull a much softer and a much nicer K. And then of course we also have to pay very close attention to our aperture. The problem is if we have a really small aperture and only a small part of our face is in-focus. So let's say we're focused on the eyes and we're shooting and an f-stop of F1 0.8. By the time we get back to our ears, our ears are going to be soft. There'll be out of focus. So this means trying to pull the key from this blurry edge is going to be very challenging. Unfortunately, when we try to get rid of that green will end up with a green halo around the person on the green screen, and that just won't look any good. Plus the problem is then you have to match the background and try and get that same amount of blur in the background. And this does limit what you can put in the background and the amount of sharpness that you can have. Because if you're blurry at the back here, but your background is shop unfortunately looks completely fake. I'm not saying though that you have to have a really high aperture. You don't have to shoot in F 22. I'm just saying don't go too low on your aperture. So F4, F5, F6, somewhere around there, I would say is the perfect sweet spot. You're letting in enough lights, but you're focused field isn't too shorts. And this means an entire head will perfectly be in focus. So the nose, the eyes, the ears, they're all going to be perfectly in focus. And this means when we pull the green, we're not going to get that fuzzy, blurry green halo around our subject. And then of course, it's really important to say that we should be in manual mode. If we're in an automatic mode, your camera will try to adjust the exposure halfway through the shots. It might change the white balance, it might change the shutter speed. It must try and change our settings for us halfway through the shots. And this means there will be inconsistencies throughout the footage. And when we key the footage at one moment in time, unfortunately, it just won't look the same a minute or two minutes late. And that will make for a really, really painful editing process. So set your camera to manual mode, and then you want to set your shutter speed to 1 over 100, 0, 1 over 120, and then set your aperture to a sensible number around FO or F5.
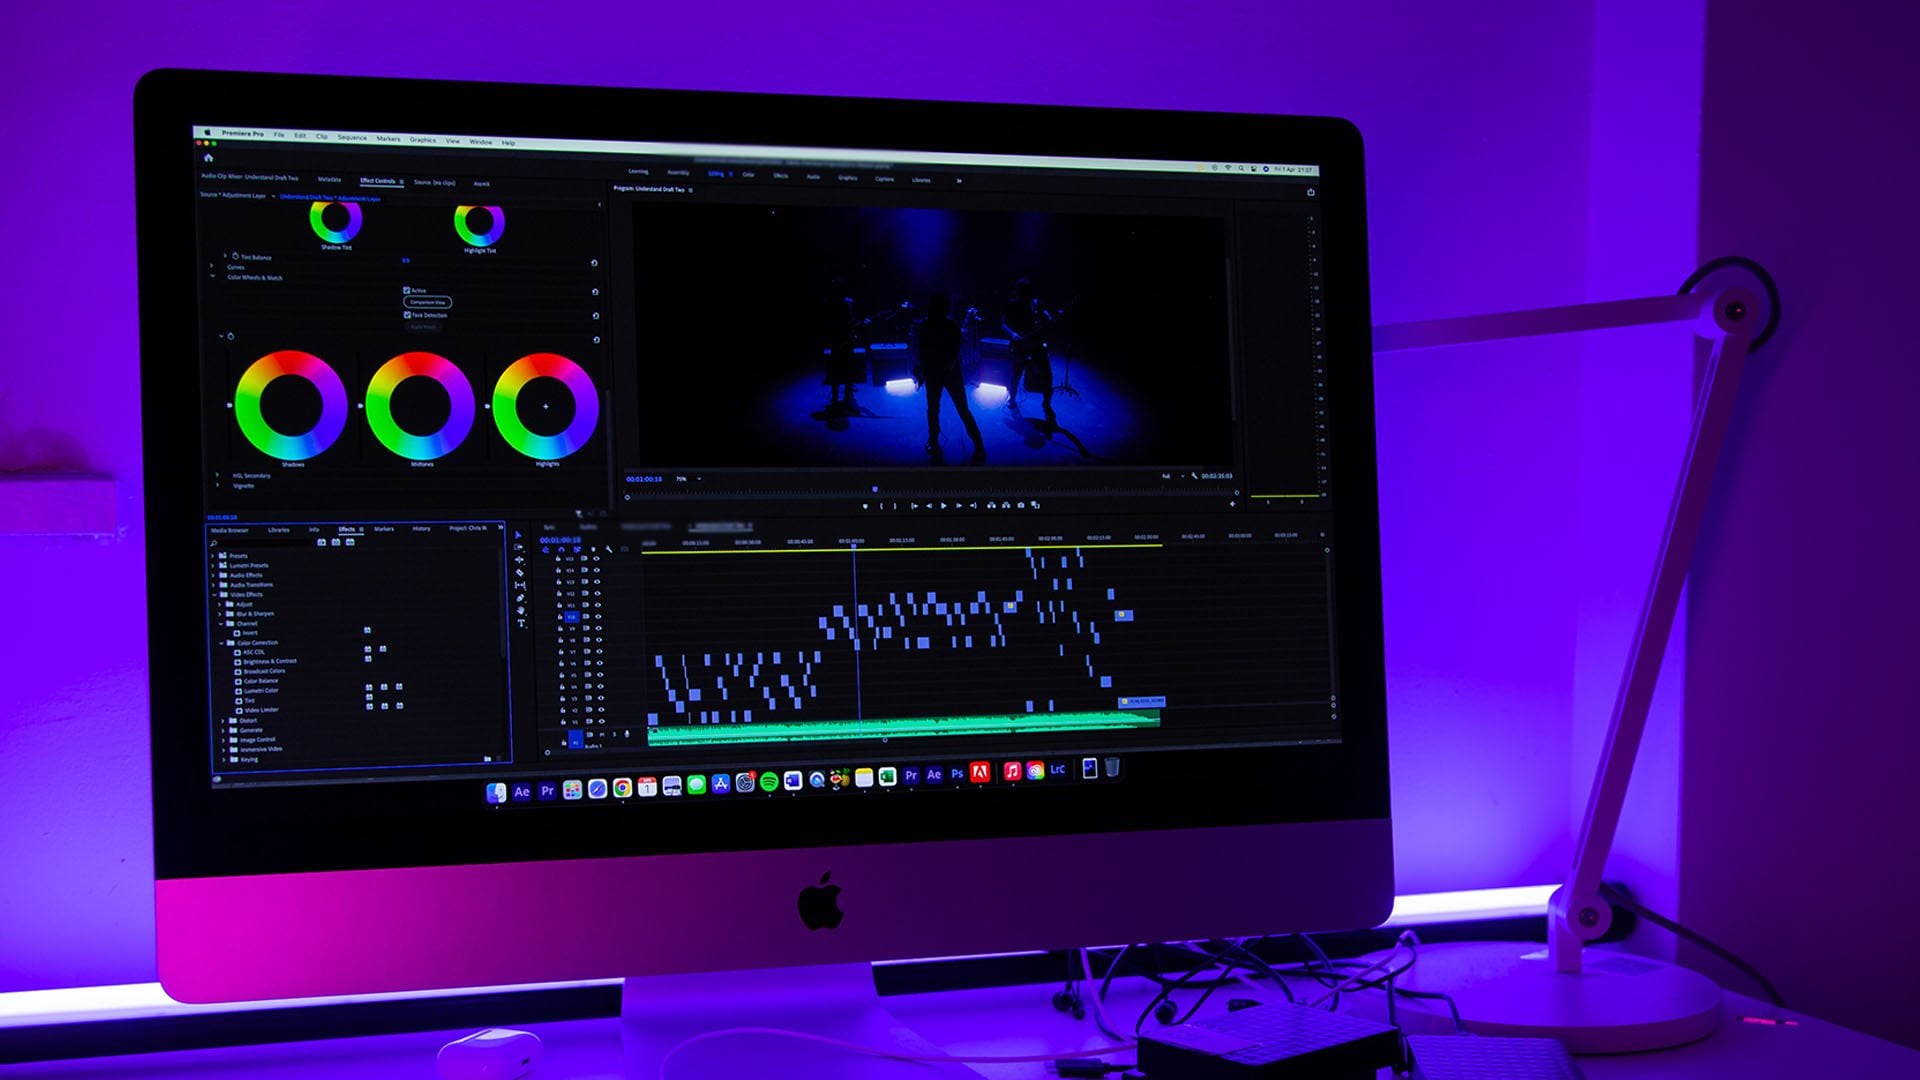
5. Editing in Premiere: So we're inside of Adobe Premiere Pro and as you can see, we have a brand new sequence crates it. So first of all, we just want to drag off footage onto our timeline. And as you can see, this is the green screen footage that we are going to be using. Now unfortunately, this isn't the perfect green screen footage, as you can see that awesome darker areas and the awesome slightly brighter areas throughout this footage. So this will require a little bit of work to get perfect. But saying that, let's just jump straight into the editing of this footage and I'll show you what you need to do and how I would go about fixing this to get a clean key from this green screen footage. So the first step is to go into effects and search for color key. If you search for a key, should come up with color key there. So you just want to drop the color key onto your footage. And then we're going to go over to the Effect Controls. Go down to Color kx and ky color. We're going to use this eyedropper tool to select a green close to the person. And as you can see, that's instantly added this black effect to our footage. And that's because the green is already started to get pulled away. And then from that you just want to increase the color tolerance in till it starts to eat into the person. Says you can see if I pull this all the way up to around 100, you can see that the green screen effect, the color key is eating into me. So I need to pull that down until that starts to happen. So I think 60 is roughly well, that starts to happen. So I'm going to leave this one at 56. Now as you can see, if I zoom into this green-screen effect. So I zoom into this footage, you can see the edge is a little bit harsh and you can see it's actually starting to eat into me here. So I'm gonna pull this down a bit more. There you go. That's about right there. So 52. And then we can thin the edge, but that is basically just going to eat into the edge of the footage. So if I pull this up to five and a zoom back out, you can see it's actually made me smaller, which is not what we want. So that's not going to give us the cleanest result. So generally I leave edge then a completely alone. I generally just leave that at 0. Of course, if you needed to, then it is always there to just clip into the edge of that effect. And then we've got edge, feather and edge for that, it's just going to soften off that key. As you can see, it's just softening off that edge and combining a little bit of edge feather with maybe one instance of edge thing can really help to tidy up that key. They go to the edge of the green screen is now starting to look really good. But unfortunately, as you can see, we still got these bright patch up here and this dark patch down here. So we need to add color key again. We'll select that bottom left corner will increase the color tolerance and that should get rid of that. But the problem is you're starting to notice it clipping into my beard down here. So in order to avoid that, I'm just going to use the free Joel Bezier tool and draw a mask around that bottom left-hand side of the footage. So it means only this part of the footage will be affected. As you can say. Now we need to add another round of color key. So we're going to color key again. We'll select that top color. So this green up here, this brighter green, increase the color tolerance. And that has got rid of this color on the right and the color at the top. And then as you can see this summit, the top-left and the top right. But rather than trying to keep those outs, we'll just zoom out, go out to a passage a, and we'll just draw a mask around myself. And this basically means that this up here, and they said, Hey, it doesn't need to be keyed out because we've marked that out instead. So if I now go into the Settings window, turn on the transparency grid. You can see that the subjects I'm now on a transparent layer. You can see unfortunately the black cable down here is being eaten into a little bit. So I could go back in to these color keys and I could just clean this up. As you can see, the problem is coming from this one. So I'm just going to pull this down to 12 and add another round of color key just to get that lost phase of green. They got, and again, we're gonna have to draw a mask around this bottom side. So just draw this mask just so that it doesn't affect me up here. I might have to zoom out so that I can expand the mass just down to get this last bits as well. So that will be the last option and the last layer. There we go. We'll pull this down. And now we've got myself on a transparent background. So from here, we can just pull that footage up onto video layer 2. We can go into the project window and we can create a new solid. So we can either right-click and go new item or we can go new item down here. So I've got the project Ben, and we'll go new item and we'll go color matte. Press okay on this, select the color of your choice. I'm going to go for a slightly gray white somewhere around there. Press OK. And we'll drag this onto a layer one and extend the duration out to the right. And as you can see, the footage is now on this gray slash, white solid. And the key looks fairly okay. I am getting some issues up here, unfortunately with my hair. And that a slightly annoying that is causing us a little bit of inertia. But that's where you can just go back into your edge feather and your edge then on a specific area. So let's zoom in to full 100 percent. We'll look at the hair, will add another round of color case Olga effects. Color key on the green screen layer will select just that green. So we'll select this green here. And then we'll just draw a mask around the top half of my head. So just this area here. And then we'll just increase the color tolerance on that specific round of color keying. They go and this is going to be quite a fine one I feel, because this color is very close to my hair, this is going to be quite difficult one to get. So I might just have to try and get this slightly darker, green maybe and pull that up. But they go, we can add around of edge thin as well just to thin off that edge. And then we can add some edge feather as well. And that should help to smooth that out a little bit. And there you go, That is looking a little bit better. It's not quite perfect, but all I would have to do here is just keep going back in to those rounds of color keys and just adjusting the masking. And then we can adjust the color tolerance, the edge thin and the edge feather as well. But there you go. Once you've done that, you can just experiment with your backgrounds. You can place new backgrounds behind you in the edit. It doesn't have to be a color solid. So you can add some video footage in there if you like. As you can see, I'm just going to direct this footage onto video layer one. And I'm just going to scale this down because this is a five K video clip. As you can see at the moment, I look a bit too contrast in the saturated versus this background. So I'm going to go into effects and search for lumetri color should be at the bottom. We'll drop that onto our footage and we'll go into basic correction or select a Input LUT from here. So I'm going to go for this one as a starting point. Then we can just increase the contrast. We can increase the exposure to try and match the brightness. There you go. We can increase the saturation as well. They go, That's looking good. We can also go into these other settings as well and adjust the highlights and the shadows, and the whites and the blacks as well. Try and get that to a point where they match. And then from that I just go into effects, search for below. And we can use a round of Gaussian blur on that background to create a soft focus effect. So if we go up to 20 percent and select repeat edge pixels, you can see we've got this really nice background behind our green screen footage. Now the reason why this is working so well is because one, these are both static video clips and 2. In this example, you can see the light is coming in from this side, the footage of myself. And if you look at the shadows in the background as well, you can see it's brighter on the rights and darker on the left. So the lighting kinda matches as well. If we flipped there, as you can see, it doesn't work quite as well because the light is a bit darker over here and lighter over here. But when you look at myself, it's a lighter over here and darker over here. So when we flip that background to the normal way they go, you can see this works a lot better. It's dark on the left and it's darker on the left on the footage of myself. So because the lighting has matched, that really helps to blend these two video clips together. Of course, it doesn't have to be a close up of a flower in the back of your shots. It can be literally anything you want. It can be a city, it can be some random B-roll. It could be some stats and infographic or random backdrop that you want to add in. You can literally add anything behind you. But my biggest tip when it comes to green-screen is to try and match the lighting of the scene. And then just add a little bit of soft focus using Gaussian blur effect just to make it look like you've just got a nice low aperture on your camera is very tempting on this Gaussian blurred, by the way, to just go completely over the top with it. So around 100%, as you can see, that's really blood out the background, but that doesn't look realistic. At the moment. It looks like somebody is on a green screen layer, but when you pull that down to around 30 or 20, looks like it could be realistic. The amounts of blood in the back of that shot is realistic. And if you were to film that through the camera, That's typically what the blur would be in the background. So hammering the blood up to around one hundred, two hundred percent would just make it look really obvious that you're on a green screen. But there you go. Those are my top tips for editing your green screen footage inside of Adobe Premiere Pro. In the next episode, I'm going to walk you through the same process, but inside Adobe After Effects. I believe After Effects is a little bit more powerful and can handle green screen footage a lot nicer than Premier Pro can. So if you do have Adobe After Effects installed, then I would recommend watching the next episode because you will get a much cleaner key from your green screen.
6. Editing in After Effects: So as you can see, we're inside of Adobe After Effects and we've got our footage imported in our composition. So the first thing that we need to do is just focus their screen. So we're going to focus on getting rid of the green background. And in order to do that, we want to go into Effects and Presets, and we're going to search for key lights. So as you can see that his key light or 1.2, we're going to drop that onto your footage. And then from here we want to select the screen color. So we'll use this eyedropper tool to select a green close to the person. And as you can see, that will instantly get rid of that green background. If we go to final results and go status, you can see everything white is the subject and then everything black is a clean key, service gray. This unfortunately is just a little bit in the middle, so we need to try and ion that's out. So there's a bit more of a black to white ratio. So we'll go down to screen gain and we'll pull this down, we'll pull this up. We'll try and get this to a point where we're happy, where it is not eating into the person. So you can say if I pull the screen gain up to around 170, That's looking great. Pull this up much higher. You can see it starts to eat in, around the edges of the subjects. So we're just going to keep this nice and low at around 170. Then we could go to Screen balance and we can pull this up or we can pull this down to try and get more of a white subject. So you can see this black here and then there's white in the subject. And if we go back to final result is, you'd see that starting to look a lot nicer. If we toggle that transparency grid here, you can see what we've got floating around. So you can see down in the bottom left corner, there's a little bit of noise. And then you can see there's a little bit of noise up here, but don't worry about that too much for now. So in order to get rid of that, rather than trying to key that out, because that's quite a difficult color to get rid of down there. We're just going to mark that out. So we'll go up to the pencil and we're just going to draw a mask around our subject like this, making sure that bottom left corner is not included. So as you can see, now, we only have to focus on this small section here. Just make sure that if your arm or your hand goes out of that mask like this. As you can see, unfortunately, my arm has gone out which means I'm going to get cut off there. So I'm just going to expand that over to the right and make sure that I always stay contained within this mask. As you can say, I move my hand up again there. So I need to make a new point. And then just move this new point over like this. So as you can see, this green screen effect is already looking really clean. Of course, we can go into screen mats. If we go to status again, if we go into screen that we can clip the black, we can clip the whites just to take that to the next level. We can do some rollback. We can have some screen softness, but I generally like to keep screen softness at 0. You've got one of these other colors as well. You've got the inside mosque and there's a bunch of settings here, outside mosque. But generally, all the heavy lifting should be done with screen gain, screen balance, Clint Black, and clip whites. And then from that, once you're happy with the look of that, we can go about two final results. And then we just want to duplicate this footage. So we'll go Command C, Command V, or if you're on Windows, that's Control-C, Control-V. So I've made a copy of that. Then we're just going to go onto the bottom layer and we'll delete key light from the bottom layer. Then you want to select a toggle switches slash modes that you see Track Matte here. So if this is what you're seeing is you're seeing the motion blur and the 3D box then select toggle switches slash modes to ravel track mattes. And then once you've found Track Matte, you just want to select Alpha Matte and then your green screen layer. And this will do a lot of the Cleaning up. So if we go up towards my hair up here, so got full 100 percent and we'll zoom in on my hair. If I turn that layer off salts on the Bossman, I often focus on the top layer. You can see there's quite a lot of noise up here. You can see just around the edges this some pixelation. But if I do that Track Matte effect, you can see that is a lot cleaner. There's still a little bit there, but it is a lot cleaner now than what it was before. And then once you've done that, you can just select both of those layers. Right-click, select, pre-compose. And you can rename this green-screen or key layout, whatever you want to cool this. And this now is I'll footage isolated without the background. So if we go into Layer New Solid, we can create a brand new backgrounds. Let's go for this nice, subtle tan peach color. We'll add this behind the subject. And they got, you can now see I've got myself on this nice solid background. Now if I wanted to make this look a little bit more realistic and add a shadow, then I could just copy that green pre-comp. So Command C, Command V or Control C, Control V. We're then just going to solo that middle layer. Go to effects and presets and such for levels will drop the levels onto that layer. And then we'll increase the input black all the way up they go. So we get to around. 239, you don't want to let it go. What you want to keep this black, then we can uncheck solo layer. We can move this over to the right a little bit. And then from here we can search for Barilla. I'm going to use any one of these blobs, but I like the look of camera lens blur. We can drop that on, increase the blurriness of this layer. So somewhere around here, then we can go into transform and we can pull the opacity down to a very, very subtle number. If you keep it at around 60 or 70, it looks way too harsh. But if we keep that at a really subtle number of around 10 percent and we pull this down behind the subject. You can see that looks really nice. And you can also see that the light is hitting me from this side. So if I was to put the shadow on this side, it wouldn't look quite right because you would expect the shallow to fall off over to the left. So use the lighting of the person in the camera to motivate that shutter. Of course, you don't have to have a shadow that's completely up to you. But if you did want to add that extra realm of realism onto your footage, then just adding a shadow is an easy way of doing that. Of course there it, Let's get rid of that solid background and that shadow. And let's work with some footage. So it will go back into our project bin and we'll just import some footage now. So I'm just gonna drag some random footage underneath the subject. As you can see, this is just some random B-roll of a random town in England. And at the moment it doesn't look exactly convincing. The reason why is because the color doesn't match. Plus this nobler in the back of the shop. They just looked to clear, sorry, let's address that 1 first semen is we've got camera lens blur loaded up. We're just going to drop that camera lens blur effects onto that lower level. And we're just increase that or decrease that, adjust a little bit. You don't want this to be too blurry again, like I explained in the last example, if this is too blurry than it won't look believable, it will look obvious that you're on a green screen. So keep there somewhere at around maybe 45. Yeah, 5% works in this example. I think that looks really realistic. And then as you can see, we're starting to get the edge fading. And if I've really increase the blur radius, you can see the edge just disappearing. So in order to prevent that, you just want to select Repeat Edge Pixels. And that will completely get rid of that for you. But again, we want to get back down to five. Now we need to address the issue of the color temperature. So at the moment the footage in the foreground looks to warm. It looks a bit too red and orange, and the background looks a bit too cold. Submit to blur. So let's address that by fixing the background. So there's multiple ways of doing this. We can go into a Mettrie direct Lumetri color onto the background layer. And then if we go into basic correction, we can pull the temperature towards the warmer colors. And then we can also push the tints so that we can balance the tint as well to really much that footage guy that looks a bit more believable. Or alternatively, we can just go into the color correction folder and we can use one of these effects. So let's go for curves, will drop curves onto that background layer. And then we'll go into the red layer, will increase the red highlights, will increase the red shadows a little bit. What add a little bit of grain, because as you can see, there's just a green hue on our footage layout. Will pull down the blue highlights a little. Pull down the blue shadows a little as well. So the way the curves, what is the shadows are in the bottom of corn at the highlights are in the top right corner and then the midtones are in the middle. So if you pull these in specific directions, it will affect different areas of the footage. But there you go. Just by adjusting a few of those curves, you can see the footage is now matching and that looks like it could have been filmed on location. Or you need to do then to make this even more believable is just add some subtle wind noises into the audio file so that it sounds like you're outside. Maybe you can have an ambient outside traffic sound or people talking in the background sound just have that soft in the background. And having that combination of the audio and the green screen footage will really make this look and sound convincing.
7. Outro: And there you go. That brings us to the end of the green-screen course. So thank you ever so much for choosing to watch this course are really do appreciate your support. And I hope this course has been beneficial TO. Of course, if you film some green screen footage and you edit that in Premier or After Effects, I would love to see your work. So please feel free to upload this in the class project section, and I'll reply to anyone and everyone post their work in the project section if you have any questions or queries regarding green screening and this entire process. By the way, then please feel free to leave a question in the discussions panel and I'll get back to you and try and answer your question as best as I can. But there you go. Thank you ever so much for watching this course. And of course, please do feel free to check out any of my other courses. I have a premier course, I have an introduction to filmmaking cause I have a creative video transitions course. And hopefully either one of those courses could be of interest to you. So, thank you once again for watching this course and I will see you on a future Skillshare course. See you there.
 Chris Brooker, Filmmaker & YouTuber