Transcripts
1. Introduction: Hi. Welcome to my How to Film a Great Interview course. My name is Chris, and I'm a filmmaker and photographer from England. Now, interviews are a really crucial and fundamental parts of filmmaking. If you get it right, then a great interview could really help to take your film to the next level. A great interview will allow your viewer to connect with the person on screen and it will really help to tell that person's story. However, if you get it wrong, unfortunately, it can do more harm than good. So it's really important that you actually take the correct steps in order to capture a great interview. Throughout this course, I'm going to be covering the planning or the pre-production phase, everything you need to do before the interview. Then I'm going to talk about some production tip. What you should be doing with the cameras, things that you should be doing when you're asking the questions. Then once we've finished with that, we're going to go into post-production and I'll give you a few editing tips. I'll give you a real case study where I edit an interview and you can watch along how I edit an interview. Then we'll talk about some multi-camera interview editing, and then we'll finish off with a lovely [inaudible] Before you get on the set, make sure you watch this course and figure out what you need to do in order to capture a great interview.
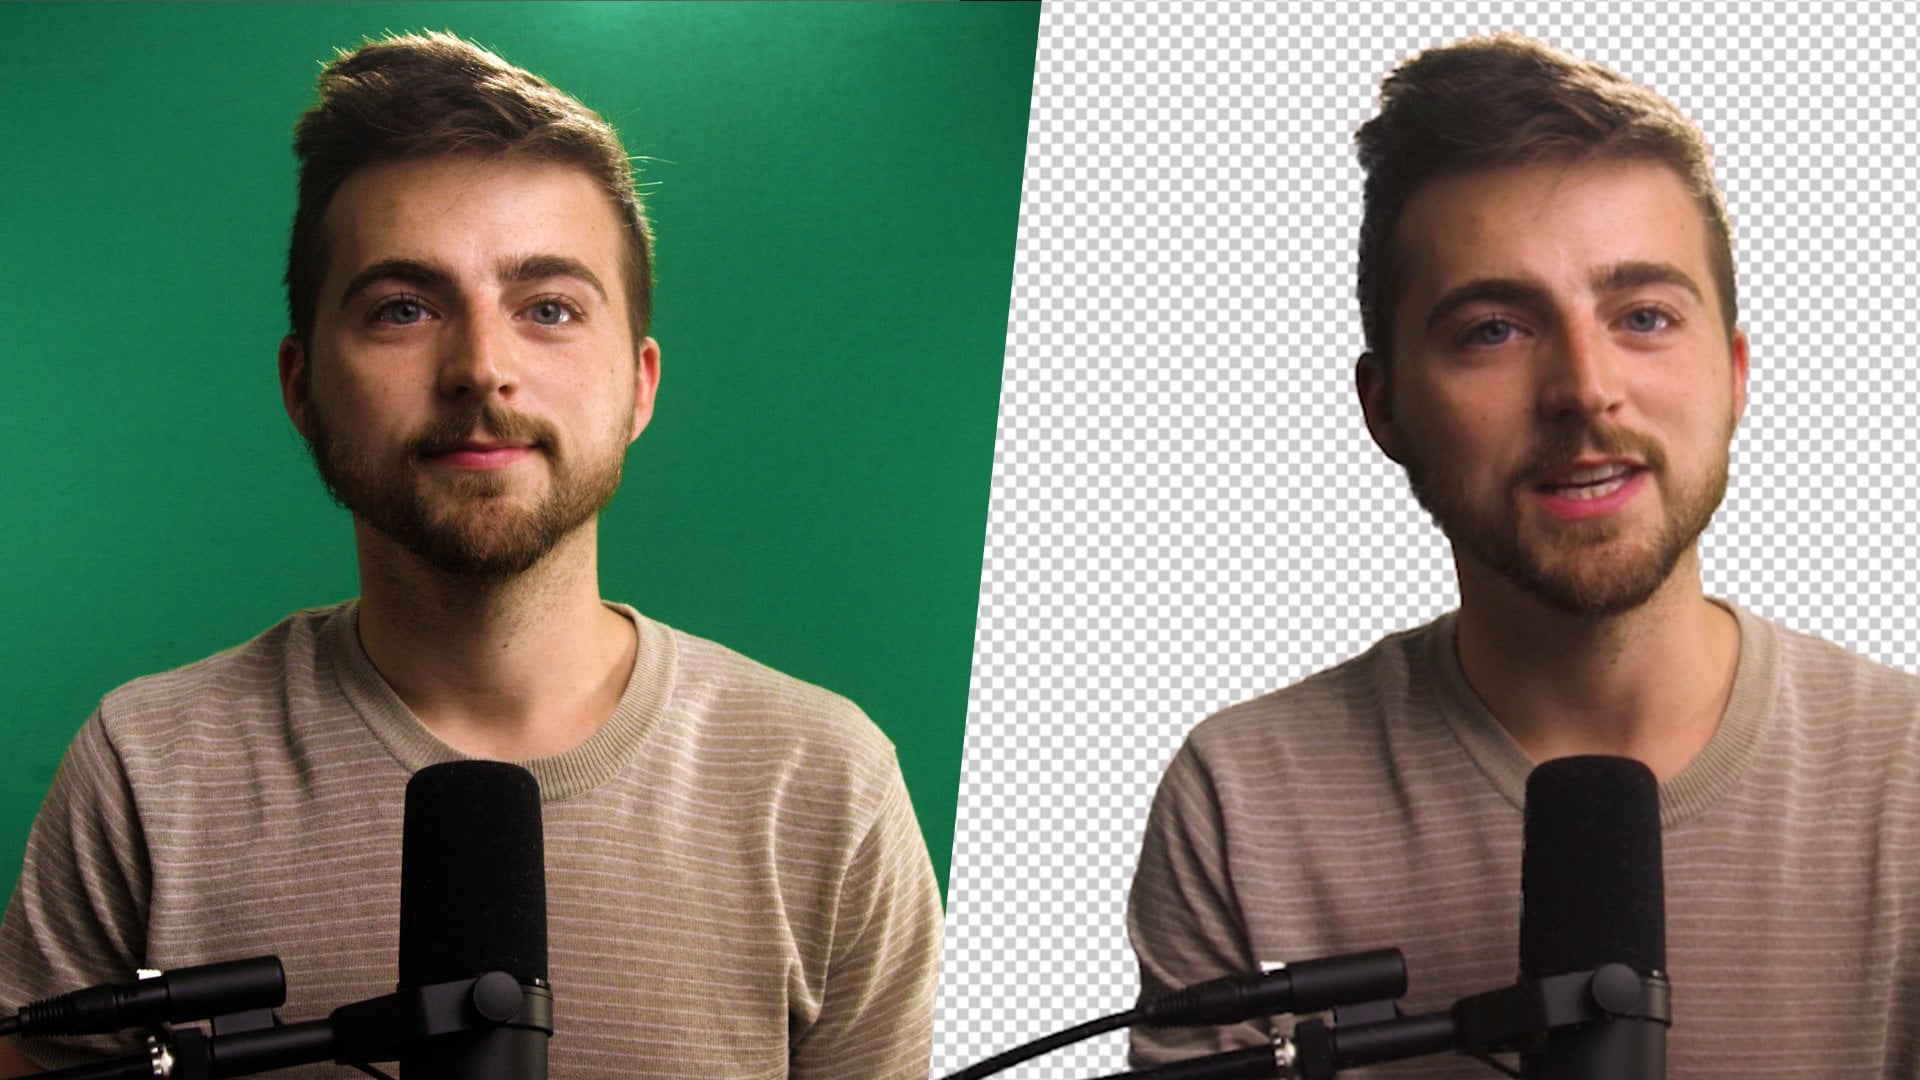
2. Pre-Production (Planning): Now, before you actually start filming your interview, it's really important that you've done all the correct planning. This is your pre-production phase, because if you don't put enough time and effort into your pre-production, then your interview isn't going to be as good as it can be. The first tip to you is to understand what you want to capture before you get onto set. If you want to create an emotional phase, or a heartwarming phase, or a funny phase or something with lights and breezy, then it's really important that you understand that before you get onto set. Before you start filming, it's really important that you understand the tone of your interviewer because this means you can actually plan your questions accordingly and try and word your questions in a way that it will lean into that emotional response. Now this leads me on to Tip Number 2 and that is to try and do a pre-interview, or at least just talk to the person you're going to film before you actually film them. Because if you can understand their character, understand a little bit more about who they are and then ask them specific questions that will help you to formulate questions for the interview, then it's really going to go a long way in conveying the specific tone that you're looking for. Maybe you're interviewing a comedian, for example, just jumping on a Zoom call beforehand is really going to help you to target your specific questions towards that comedian. Maybe they had a story about why they got into comedy. Well, if you ask them a little bit about it beforehand, then you know that you can get a few more questions from that backstory that's really going to help to tell your story. Of course, this is only in a perfect example. Sometimes unfortunately, you won't have the opportunity to do a pre-interviewer. If you're on a corporate shoot, for example, and you're just filming 506 talking head style videos and somebody is talking about the company that they're working for, then jumping on a Zoom call beforehand might not be an option, and to be honest, you might not even have to if they're just giving testimonial was about the company, for example. But if you can, then I would always recommend trying to meet them or speak to them on the phone beforehand because you'll understand more about them, the story and what they're talking about in the interviewer. Then Tip Number 3, is to write out a list of questions that will allow for long answers. The aim here is to not have yes or no answers. Let's say we're interviewing a comedian and the points of the film is to talk about their backstory and how they got into comedy. Well, if the answer is because that dad was a comedian and they were inspired by seeing their dad, them rather your question being, while you inspired to get into comedy because of your parents, that would lead to a yes or no answer, so instead of that, you would say, why did you get into comedy? That would provoke a slightly longer answer. Then if it's still short, you can ask them to elaborate when you're filming. The problem is once you've cut your question from the interview and it's just the answer. If they say yes, it means nothing to anybody unfortunately. If you can get them to give detailed, lengthy answers and that's really going to help you any edits because it would give you all the building blocks that you need to structure your edit. When you're planning your questions, it's really important that you plan questions that will have a longer answer. My last tip when it comes to pre-production and planning is to think about the location of the interviewer. Yes, of course, the story is the most important and what the interviewee is going to say is the most important. But if you can put them in a location which looks good and relates to their story, and it's really going to help out and massively with that interviewer. Of course, that's not always possible duty budget or location restrictions, of course I understand that. But if you're interviewing a comedian, maybe get them at a comedy store, maybe interview them in the childhood home where they were inspired to start comedy. Or maybe interview them with the backdrop of the city behind them where they first performed their comedy sets. Your location can really help to elevate your story and your interview, so rather than just putting your subjects in a boring room against a white background, think about the location and think about how the location can actually enhance the story. Of course as well as the location has to actually be ideal for filming, so as well as relating back to the story, it's also has to be an ideal location for filming. The three things that I always look for when I'm filming an interview is your background, the sound levels, and the distance between your subject and the background. First of all, let's talk about sound. You don't want to be interviewing in the middle of Times Square because unfortunately there's going to be too much noise and is going to be too distracting when you're capturing your audio. Number 2, your background. You want your background to be lit correctly, and you also want to make sure that there's nothing distracting in the background. If you're in Times Square, for example, if you've got loads of people walking directly behind the person that you're interviewing, it's going to be very distracting. This is where Tip Number 3 comes into play with distance between your subject and your background. It's always really important that you add a little bit of separation between your subject and the background because it's going to create a more dynamic shot. If your subjects was directly standing in front of a white wall, then there's going to be no blurry background is not good look interesting, it's good look boring. But even if you take that same white wall and you place them two or three meters in front of it, that it means you can light the person separate to the background. It also means you can play with some really cool camera settings to get a nice blurry background. Of course, though, that is getting a little bit technical, the main things that you want to look for is the background extracting and is the sound distracting. You don't want anything to distract from the interviewee because this is the story that you're trying to tell. Once you've done all of that plenty, you've got all of your questions sorted, you've got a great location and you know exactly what type of film you're making and the tone that you want to convey. Now it's time to meet with the subject and get this interview filmed.
3. Production: How to Interview: Now that you've got your interview planned, we can now move on to the production phase. This is where we're going to film my interview. Now, there's multiple different things that you need to think about when you're filming your interview, but first I'm going to talk about everything that you need to know as the interviewer, then we'll get on to the more technical stuff so multi-camera and lighting and all of that stuff later on. First of all, we're just going to focus on what you should be doing as an interviewer. Now, the most important thing that you want to do when you're filming an interview is to get the interviewer to put the question in the answer. Let's say we're interviewing a coffee shop owner, for example. Let's say we're asking the question, "Do you like making coffee?" Now generally, when you're filming interviews, you'd like to cut the question and only have the answer. This means if we were to cut that question out of the edit and we only had the answer, which is yes, unfortunately, we have no idea what's happening. This is where it's really important to rephrase the question and try and get them to put the question in the answer. If the question is, "Do you like coffee?" If you put the question in the answer, their response would be, "Yes, I love making coffee." That answer is a lot more usable in the edits now. This means if we were to ask another question that followed on from this question, we could stitch those two bits together and we know exactly what's being talked about. That is the first and most important tip when it comes to filming your interview, make sure the question is in the answer. Now we all want the person on camera to be as relaxed as possible. The way that we do this is to, first of all, make them look at yourself rather than the camera. If this was an interview setup, for example, rather than looking directly into the camera and answering, I'd be looking at the interviewee just off-camera over here because it's a lot less intimidating. The problem is when looking into the camera is you become very aware that you're being filmed and most people don't like talking on camera. If you break this off and have a conversation, then this means they're going to feel much more comfortable when answering your questions. Tip Number 2 is to try and get the person on camera to look at you off the camera rather than looking directly into the camera lens. Of course, now this brings me on to Tip Number 3, and that is to try not to turn this into a conversation. When you're filming like this and the interviewee, the person on camera is looking at you rather than the camera, it's very easy to forget that this is an interview. It does naturally end up becoming a conversation between two people. However, the problem is if you actively engage in the conversation and you're going yes, okay, that's good, when they're talking, unfortunately, that audio is going to be picked up in their sound and this means you can't use any of their interview content because you're talking over their voice. It feels very unnatural at first, but when you're interviewing them, you want to be signaling back to them with facial gestures rather than physically saying anything. Whilst they're answering the question, lots of head nods, not okay, that's awesome, wow. You don't want to be doing any of that because it's going to ruin your audio and therefore ruin your interview. This is one that I always have to tell people, whenever I'm on a client shoot and the client wants to be the person asking the questions, I always have to remind them not to say anything during the interview. Now my next tip is to focus on achieving contexts and clarity. You've done all of this research into who they are and what their story is about, and chances are you've probably even had a pre-interview over Zoom or a phone call. You understand who they are and the contexts of their story, but that doesn't mean the person watching your video knows who they are or what their story is about so you have to make sure that the context of the interview is really clear. This is a mistake that I do see quite often, and this is people jumped straight into the emotion rather than the context. This is unfortunately very backwards because you want to first understand who they are, what their story is, and then we can connect with the person on camera on an emotional level afterwards. Let's say we're interviewing this guy called James. He runs a coffee shop and unfortunately, had to close business during the pandemic. If we go straight into, I've been struggling paying the bills, I've had to close business, we don't understand what's happening. We have to give ourselves contexts and clarity first, this is what's happened, this is how it's affected me, and this is how I feel about it afterwards. Never forget the audience doesn't know who this person is, they don't know their story, they don't know the circumstances that they're in. Make sure you give all of that information upfront and then hit them with the emotional response afterwards. This is who I am, this is what's happening, this is how I feel about it. That's the way you want to try and structure your interview. Of course as well, if you're asking the questions, if something hasn't been answered, or if something isn't clear enough, don't feel like you can't ask the same question again. Just jump in and say, "Can I have this question again please, or can I hear a little bit more about this, or what were your thoughts and feelings about this? Yes you have got your list of questions that you planned out in your pre-production and you're planning phase, but that doesn't mean you can't jump in and ask them to elaborate on specific details or add new questions in to help tell the story. As well as conducting the interview, it's also important that you're actively listening and trying to pick up on bits of information that are going to help to tell the story. Then my last tip when it comes to this section is to shoot B-roll or inserts. At the moment we just have a person sitting on a chair, this is this one shot and we're just asking these questions. Now from an edit point of view, this is going to get very boring if we're just watching a three-minute film of somebody talking about their life. We're seeing nothing else, it's just the same shots for about three minutes, this is going to get very boring. Of course, as well, if your interview lasts 20, 30, 40 minutes, for example, and you've got to cut this down to three minutes, then if we don't have anything to cut to, then we're going to see all of those cuts in the edit. Which means every time we make a cut, you're going to see that jump cut in the edit and that's going to be really distracting. There's two ways to combat this. You can shoot B-roll, and B-roll are basically cutaways or general views of what they're talking about. If they're talking about their coffee shop which has closed due to the pandemic, then you can get shots of coffee, you can get shots of a coffee shop, you can see the outside of the coffee shop derelict. There's loads of different things that you can add into this to give more context through the visuals. Or alternatively, if you can't shoot B-roll, then inserts are a really great way of achieving the same effect. An insert is basically just a close-up of the person talking, but you can't see their mouth moving. This means maybe you see a close-up of their hands just there moving their hands together, maybe you just see their eyes, maybe you see their feet shuffling on the ground, maybe it's a shot all the way at the back of the room and you're focused on something else and they're in the background. There's loads of different inserts that you can add into your interview that are going to help to give you more visual flavor in the edit. It's important that you capture inserts and B-roll because if you get into the edit and you do need them, then it's best that you've got them and not need them, rather than need them and not have them.
4. Production: Cinematography & Sound: Now we know how to conduct an interview and get the correct answers from the subject. It's now really important that we actually focus on the production, because there's no point having a really awesome insightful interview if the institute doesn't look any good. That's where we're going to break this down into three sections. We've got camera, lights and sound. These are the three most important elements when it comes to making your shot to look good. Let's first of all just focus on camera. Now, as a general rule of thumb, you want to put your camera on a tripod. Of course, this isn't a hard and fast rule. You don't have to put this on a tripod. But if you've got a half an hour long interview setup and you're holding the camera on your shoulder or your going handheld, then your hands are going to start hurting, and this is just going to get really shaky and wobbly footage off after about 15 minutes. Plus, if it's only yourself doing the interview, you're asking the questions and filming then trying to do the both of these is going to be really difficult. Generally, I like to put the camera on the tripod. Now we briefly covered this in a previous episode, but you want to get your subject to look at yourself on the side of the camera rather than looking directly into the camera. Of course, again, this isn't a hard and fast rule. You don't have to follow this if you wanted to, you could get the person to look into the camera. But this does get quite intimidating staring into a lens. To make your subject feel at ease, ask them to look at you and you can be sat just at the other side of the camera. Now when you do this, you want to try and frame the shot so that there is more room on the side of the frame where they're looking. If they're looking into the right of the frame, then give them more room on the right of the frame. You don't want them to be looking into the edge of the frame. Now as you can see, this is a real interview setup, and naturally, if I'm the person on camera, I would be talking to the person over there. As you can see, there is a large amount of space on this side of me, but there is only a small amount of space on this side. So I'm looking into the area of the frame where there is the most amount of space. When I look over here though, all of a sudden there is loads of space behind me and it just doesn't look as natural. So this is why when you're filming an interview, you really want to make sure that you have loads of space on the one side of the subjects and they're looking into that space. So in this example, I'm looking over here. So the interviewer would be just over there on the side of the camera. Of course, you can break this rule if you're telling the story about somebody who's claustrophobic and filled traps than having them look into the negative space in the frame can actually help to enhance the emotion of the film. But generally, you want them looking into the larger amount of space. Then of course, she wants to set your camera into manual mode and make sure all of your settings are manual. You don't want automatic settings here because if your camera is set to an auto mode, then it means the lighting and the camera settings might be adjusting midway through the shots and that's not what you want. You want this to look consistent throughout the shots. Set your shutter speed to 1 over 50, adjust your aperture. If you're trying to get a blurry background, then you want to make sure that you've got a low aperture. So somewhere around f2, 0.8 will do. Then you want to make sure your frame rate is 25 frames per seconds at your white balance is matched to the color of the scene, and then make sure all of the other settings are nicely controlled and they're not going to change halfway through the shot. Then of course, coming back on itself a little bit, talking back down to the positioning of yourself and your interviewee, it's really important as well that you're both at the same eye level, and it's really important that a camera is at the same eye level as well. So if I, the interviewer was to be standing up, the interviewee is sitting down, then unfortunately, the interviewee is going to be doing this for the whole interview. Which can weird. Alternatively, if they're standing and I'm sitting and I'm asking questions, then they're going to be doing this for the whole interview, and it's going to look really awkward. So make sure you're both at the same level. If you're standing, make sure they're standing. If you're sitting, make sure they're setting. You want to mirror this and then you want to get your camera roughly at the same height, so somewhere in line with the eye line. Of course, you can bring this down a little. You can bring this up a little, but don't go for anything too drastic. Super low angles or super high angles are not good looks when you're filming an interview. Then of course, going back to that positioning again, when you're sitting at the side of the camera, it's really important that you are not too far away from the camera. Because if you're a meter or two away from the camera and the person is looking at us, they're being interviewed, they're going to look like this for the whole interview. You just gotta get a side profile. It's going to look really awkward. Instead, rather than looking over there, you want them to look just here, just past the camera, because that's going to fill in nice and natural. Now that we've talked a little bit about the camera, it's really important that we move on to lighting because you could shoot your video on an iPhone, a digital SLR camera, or you could even use a cinema camera. But if you're lighting isn't good, then unfortunately your shot won't look good either. It's really important that rather than depending on the natural light, It's really important that we use our own lighting. It's also really important as well that you use soft lighting. The difference between soft and hard lighting is exactly what it sounds like. Hard lighting is really harsh, direct and costs really harsh shadows. Where as soft lighting costs more even shadows, and it's generally seen to be more beautiful and more flattering, and that's the look that you generally want to go for when you're capturing interviews. In order to do this, just get yourself a soft box kits. You can get these from Amazon and they range anywhere between 50 to a few $100 or pounds wherever you are in the world, then not too expensive. Just get yourself a set of softbox lights and that's really going to help. Now that you own some softbox lysing, it's really important that we talk about the positioning of the lights. Generally, the general rule of thumb is to use a three-point lighting setup. A the three-point lighting setup is exactly what it sounds like. It's just three lights in the scene. This is your key light, which is one big light just on the side of the camera. Then you've got your fill lights, which is another light just on the opposite side of the camera, and that's just going to fill in some shadows that the key light is creating. Then you've got a backlight, which is a light behind, and you can see it in this example. This highlights just wrapping around my hair repair is the result of a backlight. She can kinda see there's just a little bit of glow just appear just just above me, and that's what the backlight is doing. The reason why we use a three-point lighting setup is because it gives you a really smooth, complimentary lighting on the face, and then this backlight helps the interviewee. Then this nice backlight helps the interviewee to stand out from the background. Of course there you don't have to use a three-point lighting setup. It's actually seen to be more cinematic sometimes to use a two-point lighting setup. So rather than having to lights at the front, you cut that down to one. So you've got one lights at the front, one lights at the back. The backlight does exactly the same. It's costing this nice hair light, but the light is in front is going to be used in a more cinematic way. If I was the one being interviewed and I was looking at the interviewer, then if I was looking in this direction, rather than putting the lights here, I would actually put the lights over here, so that it casts lights on this side of my face. This means that the dark side of the face is pointing towards the camera. Now, this doesn't sound like it would work. The shadow side, the dark side of the face is pointing towards the camera. Surely you would think you want nice bright, even lighting all over the face for this to look good. But by placing lights over here off-screen and lighting this side of the face, the one that's on the opposite sides of the camera. You go into get this really nice cinematic look. If you look at high-end interviews, you'll see this look absolutely everywhere. You will also see the style of lighting in dramas and really nice cinematic TV programs. What you need to do to achieve this is to just pop your backlight is in place to give this nice headlights. Make sure that backlight is not in the shots. Figure out which way the person is going to look and then just put the lights on the opposite side of the face. Again, if I was looking here, the light wouldn't be here. The light would be here. Select this side of the face. Of course though, if you do happen to find yourself outside, then it's really important as well that you try and control the daylight that you're using. So rather than having harsh sunlight glaring down on to the person's face, you can soften that with some diffusion. Or alternatively, you can just turn them around so that you use the sun as a big backlight. However, though, I would always try my very best to avoid filming outside because daylights can be very difficult to control. If you're trying to create a more movie look or a more cinematic look, then using your own lighting is going to be the best approach. Then next up we've got sound. Sound is arguably the most important parts of any interview because if you can't hear the person talking, then everything is pointless because that story is being told through that words. It's really important that we have really clean audio. There's multiple different ways of capturing audio. You can use a shotgun microphone, you can use a lavalier microphone. You can use a vocal microphone like this, which sounds really nice, but essentially the one secret to capture and great audio when it comes to shooting an interview is to get the microphone as close as possible to the person talking. Now whenever I'm talking about sound, I always give this example. Take this microphone, for example. This microphone costs somewhere around 400 pounds. I guess that's maybe $500 and it sounds really clean when I'm this close to it. But the second I take the microphone over there, it's literally just a few feet away from me. It doesn't sound anywhere near as good. The reason why is because this distance between myself and the microphone, and I'm also talking into the side of the microphone. Now, as soon as this comes back into the center of the frame on directly in front of it, this microphone sounds beautiful again. Whether you're using a vocal microphone like this, you're using a shotgun microphone or a boom microphone. Or you're even just using your phone to record audio, just try and get that microphone as close to the person talking as possible. There you go. That's it for all of the tips to capture a really beautiful looking interview. Of course, if I was to add one more step on, that would be to add a second camera and have a multi-camera interview. I'm going to talk more about that in the next video.
5. Production: Multi-Camera Interviews: In this lesson, we're talking about multi-camera filming or multi cam interviews. But what is a multi-cam interview? Well, quite simply, a multi-camera interview is exactly what it sounds like. It's an interview filmed with multiple cameras. Now typically I like to use two cameras when I'm filming my interview. But why? Well, the great thing with multi-camera interviews is you can only really stay on the same shot for about five or six seconds before the audience starts to click away. If you've got two cameras, that means you can alternate between the two cameras. This means you have to rely less heavily on Insert and B-roll in the interview. The main benefit to multi-camera interviews is it gives you more flexibility in the edit, but it also gives your edits variation. Once you've stuck on this wide shot for a while, you can cut to a close up of the interview. That's just going to add more variants to the interview, it's just going to make it look a little bit more awesome. However though there are a few traps that you can fall into when you're filming multi-camera interviews. I'm going to run you through those now and make sure you don't make any of these common mistakes. Now, the first mistake is to shoot at the same focal lengths. You want to avoid this at all costs. The reason why you've got two cameras or even three cameras, is because you're trying to add a new shot, a variant of the same shot. If your first shot is a mid or a wide then you want your second shot to be a close up. Of course it doesn't have to be in that order. The first shot could be a close up, the second one could be a wide, but you want these to be different focal lengths. You want these to be different shot types. One shot wide, one shot close up. If you have two wides and the cameras are next to each other, then you just going to get a really jarring edit. The next mistake that you want to avoid is different camera settings. If this camera is shooting in 25 frames per second and has a shot of 1 over 50. The second camera has a shutter speed of 1 over 100 and a frame rate of 50. When you cut between these two, they're going to look really different. The same thing applies for your white balance. If one is daylight and the other one is set for a warmer color tone. These are going to look very awkward edited together in the edit. It's really important that your camera settings are matching on both cameras. The next mistake that I often see as well is not following the 180 degree rule. The way that the 180 degree rule works is if I was to draw a line down the middle of my face, I'd have to pick a side. I could pick this side or I could pick this side. But once I've picked a side, I have to stay on that side. Essentially, if I want my cameras to be this side, then it's really important that both cameras stay on this side throughout the interview. Because if one camera is here and one camera is over here, for example, if I was looking there in the middle, unfortunately when we cut between these two shots, the first shot will look like I'm looking one direction and the second shot will look like I'm facing the other one. This becomes very jarring in the edit. It's really important that if I was looking over here, it's important that both cameras live on this side of them. This is probably one of the biggest mistakes that I see when people do multi-camera interviews. Follow the 180 degree rule. If all of that sounds complicated, the easy way to prevent this from happening is do not place the interviewer, the person asking the questions in between the cameras. Because if there's one camera here, and one camera here, and the person asking the question is in the middle, we're going to have that problem. But if the interviewer picks a side, then the cameras are going to be on the correct side, regardless of which way you're looking. Essentially camera, camera, person or person camera, camera. Even if you have followed that 180 degree rule, the next mistake that I often see in multi-camera interviews is having too much distance between your first and your second camera. In my example, I've only got the cameras may be half a meter away from each other and it's giving us enough distance for the shot to look different. But it's not enough of a distance for this to look really drastic and dramatic. You want the second shot to be an aid for the first shot. You want this to supplement that first shot. You don't want this to be a whole brand new shot. You want this to be almost part of the first shot. If you go quite front in your first shot, and your second shot is very side profile. Then there's too much of a distance and is going to become too jarring. You want to try and keep your cameras roughly within 45 degrees of each other. Of course, there are exceptions and you can break this rule if you're trying to create a jarring effect. But generally if you're shooting a multi-camera interview, you want to try and keep within this specific guideline. Then lastly, you want to make sure that your cameras are set to similar heights. If you have one which is eye level and another one which is on the ground or is really high up when you cut between these two, there's going to be that really drastic change in the shot again. It's really important that these are roughly at the same height. The best way to ensure this is to just get two tripods, set the tripods to the same height, then place the cameras onto the tripods and frame up your shots, then you should be good to go. Now of course, there are more things that you have to look out for when you're filming a multi-camera interview. But all of the mistakes that I've listed in this episode are the main culprits for why multi-camera edits don't work. As long as you follow all of the tips listed in this episode, then you should be fine to capture a great multi-camera interview.
6. Editing Your Interview: In this episode, I'm talking all about editing our interview footage. Now in this video I'm going to talk about the single cam interviews and then we'll do a separate video afterwards about multi-cam editing. With your footage now in your editor of choice, the first thing that you want to do is just go through the edit and then just cut down all of the sections that you want to include in your final film. This is essentially just a shortlist of all the possible options and it's really important as well that you listen through to the entire take and make sure you know exactly what sections you have on camera. Let's say you wanted introduction. You would just scroll through until you find the introduction. My name is Chris, and I'm a full-time filmmaker and photographer from England. You just take that section and then you can go through and find the next section. I would honestly like to say a massive thank you to everybody that is watching and supporting me on YouTube. There you go, that's the next section, and then you can just take that. Then once you've done that, you can just go through and delete all of the unused clips. At this stage, once you've gotten to this point, you've got a few sections of interviews, you want to now cut this into a sequence. It's really important as well that you leave gaps between each section. If in one section you're talking about something and then in the next section you're talking about something slightly different, it's important that you leave just a few seconds in-between that section. The reason why, is because if you put all of these clips together like this, then you'll overwhelm the edit. This basically means you're going to overwhelm the viewer because there's no pause. We have to pause to take in the information that we're witnessing. It's really important that you just add a little pause between each section and that's going to help to punctuate your edit. There's a term in editing and it couldn't be any more accurate here, and that is, let the edit breathe. It's really important that you give the edit those moments way it can rest, hold, give the viewer a moment to think about what was just said, and then we can move on to the next section. Now, don't worry about the fact that we have this gap in the edits because that's where we can use a B-roll to cover that gap. We can also use a music soundtrack just under here so that there's no awkward silence for like two or three seconds. Now next up you want to go into those sections and you want to cut out all of the stuttering. Any uhs, ums, or stuttering, you want to try and get rid of those because one, they're clumsy and they can make the edit feel awkward. But then two, they also actually add up over time and take up quite an amount of time. If you can cut down on those, you'll probably end up saving yourself a good amount of time, which you can spend talking about something else in the film. Now I specifically filmed a small section of this interview footage where there's more uhs, ums and stutters, and pauses. I'm going to show you how I edit those out now. Let's just watch this clip story first. The reason why I wanted to start is because I really enjoyed doing this. You can see this feels really slow hesitating too much. Let's go in and let's cut out all of that fluff. I'm just going to go to the beginning. You're going to press "C" on the keyboard in Premier and that's going to load it the razor tool. That was doing nothing for edit, so we can just get rid of that instantly. Let's get rid of that section there and we'll just delete. This, I guess you could probably say is a bit of an awkward interview. See instantly there you've got a few pauses. Let's just get rid of those pauses. Let's get rid of these and then we'll just cut those and let's see how this sounds now. Once we've closed these together, so close those gaps so they've all come together. This, I guess you could probably say, is a bit of an awkward interview. There's lots of uhs and pauses. There's also then a really awkward long pause and then an elongated and, so we'll just get rid of that. We'll get rid of that, close that gap. Let's play that back. Ums and pauses. If we just play this back and naturally on its own. There's a big, um, so we'll get rid of that, so make this cut and make this cut. Let's see how this sounds. On its own. There we go. Let's play this back from the very beginning and see what we've got now. This I guess you could probably say is a bit of an awkward interview. There's lots ums, there's lots of uhs and pauses. If we just play this back and naturally on its own, I guess you could. There we go, that instantly sounds so much better. All we've done that is target some of the ums, the uhs, the pauses, and the hesitation. Of course though, it's really important that when you're doing this that you understand where the line is. Because it's very tempting to get rid of every pause and every, um, but if you get rid of all of them, then it starts to sound robotic and it doesn't sound great. Let me show you what I mean. This I guess you could probably say. Instantly at the start there's a lot of fluff. "This I guess you could probably say", we only actually need, this. Let's take the rest of that off. Let's get rid of this gap here. There's another gap here, let's get rid of that one. Let's play about what we've got so far. This is a bit of an awkward interview. There's lots of ums. There you go. You can see I've only done a shorter amount, but already that feels like it's way too fast. There's absolutely no pauses and it doesn't feel natural. That's the thing when you're editing interviews. It's really important to make the interview feel natural. It doesn't want to feel like you've pieced together random sections of the interview. It wants to feel like the person on camera said this perfect sentence and it flows really nicely. That's your objective here. Cut down a good chunk of the ums, the uhs, and the stutters, but don't cut down too many to the point where it becomes unnatural. Note at the moment, you can see there's loads of cuts in this footage, and if we play this back. This is a bit of an awkward interview. You can see I'm jumping around all over the place, and those jump cuts down to look professional. This is why you could do one of two things. You could either use your second camera angle and every time you cut, it cuts into the second camera angle. But if you don't have a second camera angle or there's too many cuts, you can actually use B-roll on top of this. I'm just going to drop some footage onto video Layer 2. We'll cut this down. I'm just going to scale this down because it's larger footage is 4k video footage. They you go. We'll let this first clip play and then we'll cut into the B-roll. Then we'll come into that just often this cut here. Let's see how this looks. This is a bit of an awkward interview. There's lots of ums, there's lots of uhs. That was nice, although, I would probably say don't put B-roll on its own like that. You would want a sequence of clips. Generally, I say two or three clips minimum. Then if you've got more footage as well, you can add this in over the top, but you generally want two or three clips every time you cut away to B-roll. Now B-roll is really great because it gives you more information about what the person is talking about and it gives the edit, some spice of life, is giving you something different to look at. If you've got lots of different bureau films, you've got your establishing shots, you're wide, your close-ups, you're following the person through different locations, then it's going to make for a really interesting edit. Let me show you what I mean. I'm going to add this clip here, then I'm going to drop another video clip on top. All of this footage is completely random by the way, so this won't feel connected. I'm just going to drop this random footage on there and then I'll drop one more clip on because three is probably where you want to be. Let's zoom too, on top of this. There we go. Now let's play this back. This is a bit of an awkward interview. There's lots of ums, there's lots of uhs and pauses, if we just play this back and naturally on its own. There we go. That already feels so much better. We've hidden the cuts that we've made in the interview. The audio sounds somewhat natural and the B-roll over the top of this is just getting rid of everything and it looks really nice. When you're editing your interview, there's a few things that you want to pay close attention to. One, get rid of everything that you don't need, and then try and organize everything that you've got in a good structure. Try to structure your video as, who are we talking about? What is their story,? And how does this make them feel? Then you can go on to cutting down all of the ums, uhs, and the hesitations, and then cover all of those cuts with B-roll and other footage. Now that is a real art to editing interviews. When you're editing your first interview, it probably might feel a little bit awkward on the first go, but stick with it. Keep practicing, keep dragging new interview footage into your edit. Keep playing around with that, and honestly it will get much easier with time. I can't stress the importance of letting your edit breathe. It's one of the mistakes that I see beginners make all the time. You want to make sure that your edit and each section of the edit has enough time to breathe. That's it for single cam editing. In the next episode we're going to talk about multi-camera editing in Premiere Pro.
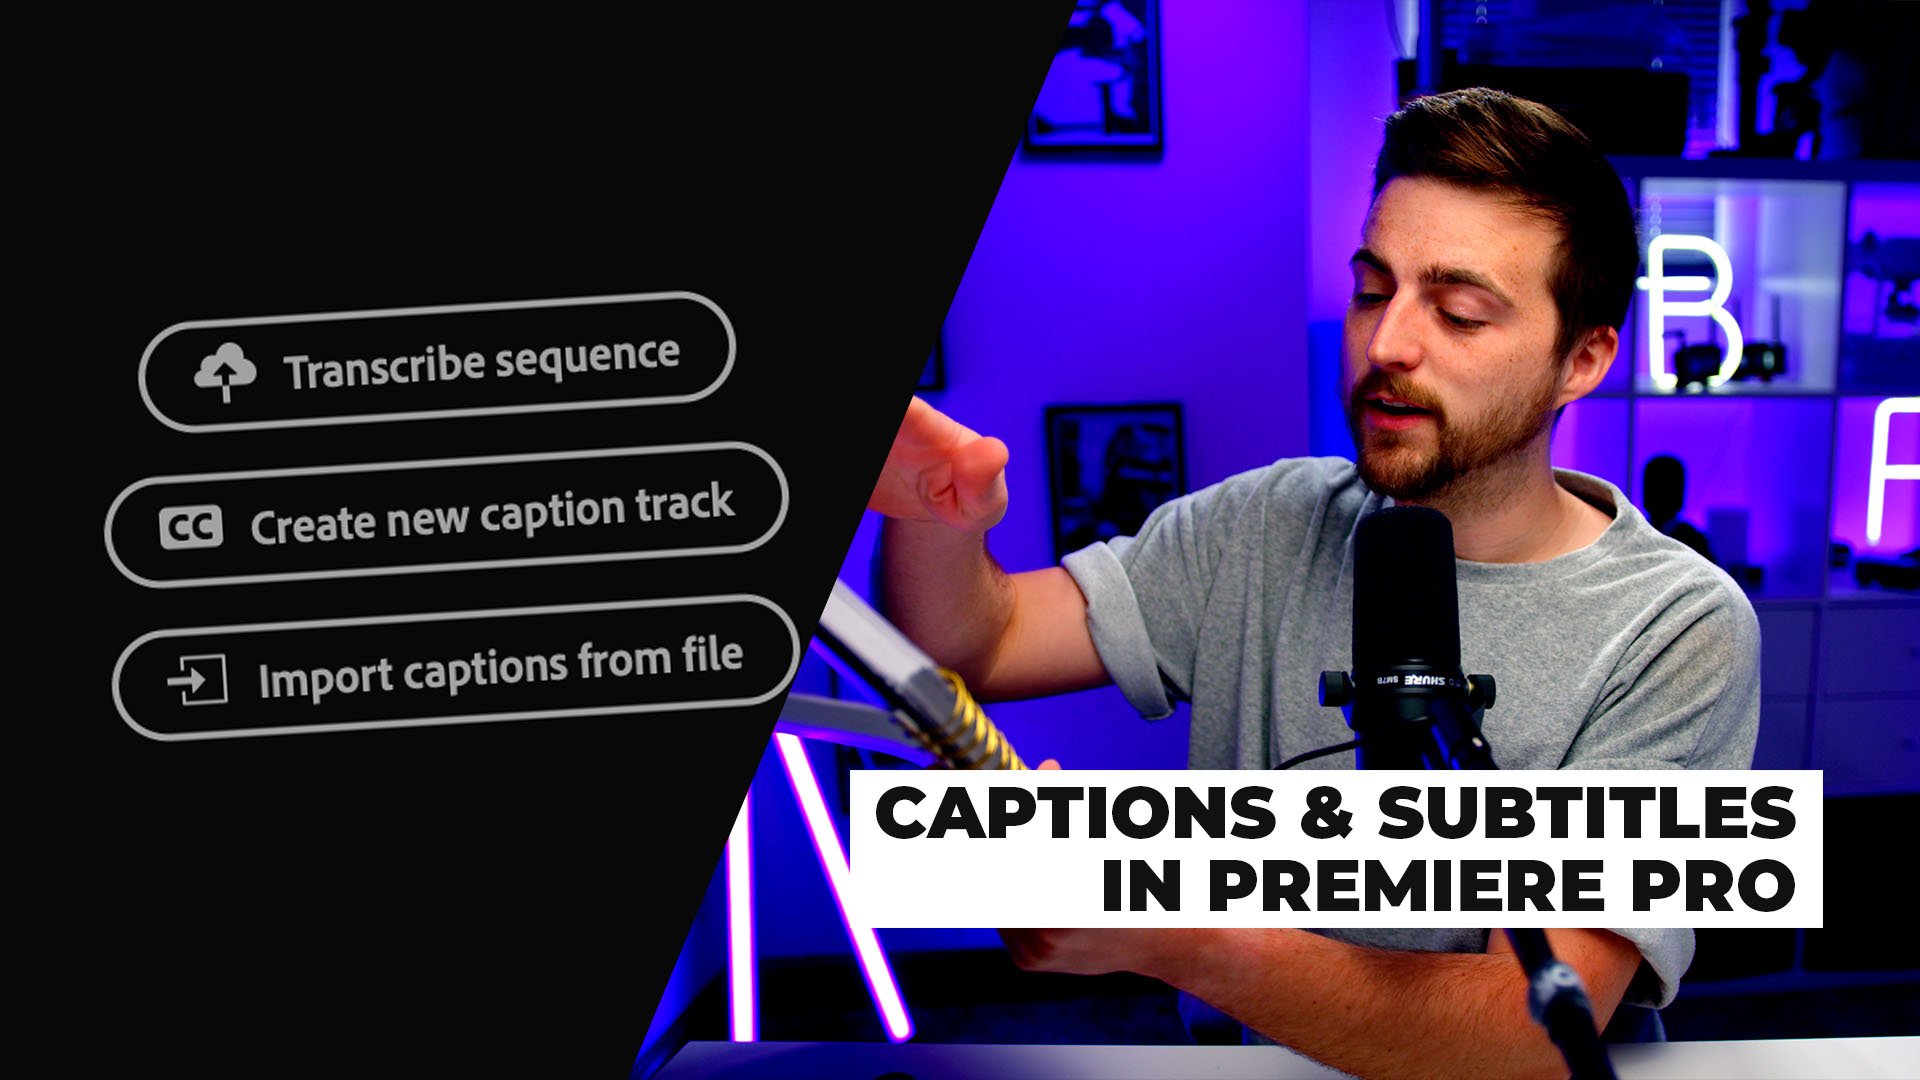
7. Multi-Camera Edit Workflow: In this episode, I'm talking all about multi-camera editing your interview in Adobe Premiere Pro. I'm going to show you how to sync up your video footage, sync up your audio to your video footage, nest that in its own nested sequence, and then edit that in real-time using the multi-camera editing feature inside of Premiere Pro. As you can see, we're inside of Premiere and we've got our audio file here. We've got our first camera angle here, and then we've got our second camera angle here. First of all, I'm just going to scroll through to the start, of the audio. As you can see, we've got the sharp spike. This sharp spike is done on purpose. This is because this is a sync clap. A sync clap is exactly what it sounds like. It's just a clap in front of the face. There you go. You can see that was the sync clap in the edit, and with both cameras rolling and the audio rolling, you'll see there's a clap in each video clip and there's a sharp audio spike in the audio. The reason why I've done that is because that is the point where I can sync the audio to the video. I'm just going to go to the beginning of the audio, scroll through to that point, so that's about here. Press C, make a cut and then get rid of the start to the audio. Now I'm going to scroll through to the video and then go that goes through to where I did that clap. There we go. That was there. I'll make a cut there. Then I'll go to the second camera angle and I will do the same thing again, I'm going to look for that cut. I think it was this one. There we go. I'm just going to get rid of the start to that video. Then I'm just going to get rid of the audio from these cameras, and then we can just sync this all up with that audio file. We should now have our synced cameras to our audio, so just going to check Camera 1. My name is Chris and I'm a filmmaker. That's right and Camera 2. Photographer from England, and that's in sync. As you can see, now we've got two cameras and the audio now in sync with one another. At this point, I'm just going to go through to the end, make sure they finish at the same time. Then, from there we're just going to highlight everything, right-click and we're going to select nest. We can call this interview nest, press "OK" on that, then we'll right-click. We'll go up into multi-camera and select "Enable." We've just enabled a multi-cam editing feature on this nested sequence. A nested sequence, by the way, is just a sequence that contains all of our footage. If we go into this nested sequence, it will give you those two video clips, as you can see there. But we need to change the view of this window here to a multi-cam edit window. In order to do that, we'll go into the Settings icon. Then we'll go up onto composite video, go down, add to that multi-camera. Now you can see we've got a multi-camera edit live. I'm just going to scroll through to where I want to start this edit. I would honestly like to say a massive thank you to everybody. We're going to start here. As you can see at the moment, the yellow box is around this first clip, a wide clip, and as you can see, this is the footage that we have on screen. If we just press Space, I would honestly like to say a massive thank you to every, if we wanted to make a cut and change to the close-up, then you just press the Number 2. This wide-angle is one, and the second angle is two. I would honestly like to say a massive thank you to, could press 2, everybody that is watching and supporting me on. As you can see, I've pressed 2, and the box is now around this camera angle and now has updated over here. Let's play it and carry on. Let's keep pressing one and two, on YouTube and Skillshare because the support is really appreciated. I know I wouldn't be here creating the content for you if it wasn't for you watching. There we go. I've made a few cuts and as you can see, those cuts have been applied in that nested sequence. Let's go back and watch that now as an edited piece. I would honestly like to say a massive thank you to everybody that is watching and supporting me on YouTube and Skillshare because the support is really appreciated. I know I want to be here creating the content for you. As you can see, I've done this multi-camera edit on these two video clips. If I had three video clips or four video clips, the process is exactly the same. You just get three camera angles here or four camera angles, and you just press 1, 2, 3, or 4 to cut to your camera angle of choice. Now, this style of multi-camera editing is really awesome if you've got long form content. Maybe your interview is half an hour and you need that to be the full half an hour. Well, this is the process that you would follow in that scenario. Alternatively though, if you've done a half an hour interview and you need to cut this down to three minutes, then you would follow the same process from the single cam edits. As you can see in this one, you've got a single cam edit. This is our breakdown, but rather than having one angle, you'd have two angles, and then all you need to do in this example, so let's just start running clip on top, pretend this is a second camera angle, all you would need to do is just make a cut and delete the parts of the footage that you don't want, and then it would just cut to that angle whenever you need that angle there. Multi-camera editing is extremely useful because it gives you the flexibility of having an extra shot. If you need to make a cut in the edit to edit two clips together, just cut to the second camera angle and it will hide that cut. Maybe the person hesitated, they paused, they said something wrong, just cut that section out, go to the second camera angle, and then come back to the main after a few seconds. It's really handy as well if you don't have much B-roll or inserts because you can just keep flicking between the two camera angles rather than having one static boring camera angle.
8. Outro: There you go. That is the end of the How to Shoot A Great interview course. My challenge to you now is to go out and plan shoots and edit your own interview-based film. I want you to go ahead and plan a bunch of questions that you can ask your talent. Then I want you to shoot a great looking interview and then edit that into 30-seconds or 1-minute film and upload that to the student's project section on Skillshare. If you do upload a project, then I will be commenting and I will be giving you my feedback, giving you tips and tricks on how you can improve. Please do feel free to upload your projects because I would love to see your work. There you go. I hope you enjoyed this course and I hope it was beneficial to you. If you did enjoy it, then please do consider checking out one of the other courses. I've got an introduction to film-making course, I've got editing courses, I've got some other creative courses, and of course, I've got loads more planned and they'll be coming in the near future. Feel free to check out one of those courses. But all I want to say is thank you once again for watching. I really appreciate your support and hopefully, I will see you on the next course. See you there.
 Chris Brooker, Filmmaker & YouTuber