Transcripts
1. Introduction: Hello everyone and welcome
to a drone masterclass. This class will take you from
not knowing anything about flying a drawing to be able
to film something like this. I'm going to take you
through each step in detail and show you
tons of examples. So by end of this class, all your drone fundamentals
are clear and you should be very comfortable
with flying your first grown. And once you are comfortable with all the basic movements, we'll move on to the
best part of the class. I'll teach you at least 20
creative cinematic shots. I'll show you exactly how
to achieve those shots with the controller steak
and also taking some help from the
intelligent flight features. It's kinda refund. Trust me, my name is, are they saying I'm a filmmaker and a professional drone pilot, and I'm also getting
into FEV game as well. I've been flying drones since the last six years and
when I started playing, I had no idea what am I doing? Can I also crashed a few times. In this class. I'm going to teach you
what I have learned from flying a drone for
the last six years, which took me from a
beginner to a professional. So enough of intro, let's get into the class.
2. Drone Settings: Drone settings and getting
to know your drone. This is one of the most
important sections. I know that feeling
that you just got your first run and all
you want to do is fly. I have done that
before and later on I realized that I wish I knew those settings
from day one and it would have saved
me so much time. So let's get into
the drone settings. So this is how the
main screen looks. So I'll just go from
the left-hand side. So if this is the GPS, which is going to show which direction my drone is pointing. And if I tap on that, it's going to show me a map. And if you tap again, it's going to show you
the map in fullscreen and my image sort of
becomes a bit smaller. So yeah, this map would be
really helpful when you're flying because this is going
to show you very drawn is. But we're gonna get
into that later. And here we have spew
cinematic settings, few intelligent flight modes, which we're going
to talk about later throughout the whole video. And this is a takeoff bottom. So don't do it when
you are inside, but you can do it
when you're outside. So what is this gonna do? Is gonna help you
take off the drone. So you don't just use this slide and the drone sort of
takes off and it's going to hover at 1.2
meter as how it says here. And here. This is the GPS signal. If you tap here, it's
just going to show you all the errors and stuff. Now, if you see it ready to
go vision, so it's yellow, which means that my drone is not getting the optimum GPS signal. Or you see now, now
you just got it. So I have turned on my
drawing inside my home. So that's why my drone was
looking for GPS signals. And once it gets the GPS signal, then it's going to solve
record the home point. But if it's yellow, then that means that it's
still looking for GPS signal and it's not recommended to fly
during that time. And here it's going to
take you to the settings, but we're gonna go through
the settings later. Here it's showing me the
satellite, the GPS signal. It is ten, which is pretty good. But if it's like five or six, which means that you need
to wait for your drone to be connected to
the satellites. And the next one,
if you see here. So here it shows that the sensors in
the front is working. The sensors in the
back is working, but the sensor on the
side is not working. So that's also the thing
with the drones these days. Some of the drone model, they would have sensor
just in the front. Some of the role models
they would have center in the front and back and some, some drones would have Center also on left
hand, right hand side. So yeah, my drone has sensor on left hand,
right hand side. But always make sure
that you know where the sensors are because these sensors are going
to save your life later. Here it's really showing me that only the front and the
back sensors is activated. So if I'm flying now, I would exactly know what
direction I can just go without thinking and
trusting the sensor. And here it shows
the battery status. So you can see the
battery percentage, you can see the
battery temperature, you can see how your
battery is doing. But if you're going to get
back to these things later, and here it's says
your video settings, so I have my video. I'll just put the
video in auto for now. And then we have shutter
speed and everything. So this is all the
video settings. We're going to talk
about that later. Now let's go into
the main setting because that's really important. Also with this menu system
or some controllers, the money system would
be completely different. But these settings are the same. You really have to keep
the same settings. The first thing what
I'm gonna do in the main controller
setting is here. If you just go here, it's going to show you
home point settings. If you click this arrow, which means that
it's going to save the whole point of the aircraft. The aircraft is now. Yeah. And it's not recording because
it's not connected to GPS. Of course. This point means
that it's going to select the whole point of
the drone where you are. So this gets, so now
it's connected to GPS and now our home
point is recorded. So this would be really
helpful if you're flying on a boat
and you took off at one place and you are, you went somewhere else. And now, if sometimes
the GPS signal is lost, the drone would go back to
the home point very to cough. So that's why you should
immediately go here and change the home setting to where the controller
is, where you are. So that's when you have
to press this button. Yeah. That makes sense. And then we're going to move
to the I'm just going to, I'm really going to showing
you the important parts which you really
need to understand. Then here it says
multiple flight modes. There is sports mode,
there is a tripod mode, and there's a normal
positioning mode, which is the mode where
we're going to fly the most and then return
to home altitude. So I've set it to 30 m. It comes with a default 30 m. So what happens here is that. If drawn, has to go back to its home when the
battery is low, e.g. if it's in a forest, it's not going to go straight
from where it is to home. It's gonna go up 30 m above, about the trees are
above the buildings and then it's going to
come back to the home. So you can also set it to 100
m. It's really up to you, but I choose 30 m because
I don't want you to waste so much battery going so high because the
battery is already low. I think 30 is a
really sweet spot. And then I scroll up
maximum flight altitude. In most areas, the flight altitude you should set it up to is one-twenty. In Euro drawn, it could
be 120, but yeah, make sure to set it to 120
and then enable max distance. Here. If you're a beginner,
I would really, really recommend to
go at least 1,500 m because you don't want
to go further than that. And if you are really feeling comfortable going
further than that, then you can change the
drone max distance. Here we're going to go
to advanced settings. So these are all the parameters
of how the sticks would perform when I'm using them at like how sensitive
these sticks are. But I'm going to just leave
it to these parameters. That is that then sensitivity. I've put my sensitivity
here to here. The sensitivity numbers
would allow you to get the cinematic shots and
yet be safe at the same time. Because sometimes you
want to break and you have chosen
the sensitivity is super high that it
takes so long to break. And before you know that
your drone has crashed, set these numbers
into the ground, and then gain an expo. I would just leave
it as it is sensors. Here. It's going to just
show you some information about the sensor is
not really important. Remote controller signal
loss, return to home. So there's three
different options. So really, really important. As soon as you lose a signal, just let the drone
to come back home. So that's returned to home
option I've selected. You don't want to
choose the land in Utah and I choose a hover because you don't know where the drone might lose the signal. It would probably be
super far away from you. And turn the LED lights on. And these stop motor method, sometimes if you're
flying indoors and you'd really want to
turn off the engine, then you can choose
these methods. So here what it says
is that if you sort of move the sticks like
this or move the six legs, this, the motors would stop. So I have actually
crashed a drone, ones like this because
the drone was crushing. It was going to crash in front of me and I couldn't do anything because I didn't know this
emergency stop feature. So these were the few
important settings. What you need to know. Now we're gonna go to
the obstacle sensors, so you really have
to turn it on. Because if I have to turn it, if this is all,
you really have to turn it on and it's going
to really show you. And you can just read it through them and it's going
to just show you how the obstacle sensing
works and this and that. If I go advanced setting, There's also landing protection. So Drone also had a
sensor at the bottom. Sometimes it wouldn't
land on a border, on a C, on a wall or on a water because it's just going
to detect the water. But if you just bring
your hand and catch it, it would still not come. So that's the time where
you have to disable that. But I would just say keep all the sensors on
as much as possible. And returned to
her home obstacle. You also should turn it on because the drone
is coming home. It's not blind. The sensors are still active, so you should turn leave it on. And here we have remote
controller calibration. You can calibrate when you want. Sticks mode is really important because there's three
different stick mode. The first one is where you are going front and back with
the left side of the state. But I have chosen more Two, which is the most common mode. In this mode, the altitude of the drone will change
with the right stake. When I go up or down, the position of the
drone would change with the right stick more to, I think it's like
the most common mode being used throughout
the whole world. So I will just change, I
will just select that. And then there's some custom
buttons in your controller. So it really depends on
what your controller is. You can choose what
settings you want in custom buttons is not
that important here, just the battery warnings
and low battery warnings. If you're a beginner,
I would really recommend to go to at least 25. And the more you fly,
then you would know how much the capacity is
off you're drawn. So then you can change
the low battery warning according to that flight time. It's going to show you when
you're flying, of course. And here is a Gimbal mode. Here's the setting for Gimbal. So we go to advanced
settings because I want you to change
these numbers. So gimbal, max,
gimbal pits speed, you should really
keep it to four. You see, I would really keep it to four because
that's going to really give you the super
smooth motion from the gimbal and gimballed
pitch smoothness. I have put it to 26. So you see, you
can just scroll it here to 26 because I'm going to show you later how smooth my gimbal is and how
important it is to tweak these settings
and then enabled gimbal tilt to 30
degrees. It's really run. It depends on the
model of the drone. So yeah, these are the
few settings you need to tweak before getting
a first flight. And this would also, just by going through these settings, it also sort of gave
you a few inflammation. Are few features about what
all things your drone can do.
3. The First flight: So guys, I'm here outside and we're gonna be
doing our first flight. So a few things to keep
in mind before you fly. So I'll just leave the
drone on the ground. So the first thing
what you need to keep in mind is that wherever
you're going to fly, it should be an open area and you should be aware
of what's around it. You should be really
familiar with it. It shouldn't be some place where we have been
for the first time. Few more things to keep in mind. If you're an early morning
person, wake up early, go on the weekends
early morning to like these open areas because there wouldn't
be any people. There wouldn't be a lot of cars. They wouldn't be people
just walk in with their dogs because
sometimes dogs, they freak out with
the drone a lot. And the second thing,
if we have two, oh, my wings fall off from
the drone, that sphere. And the second thing, I'm
just going to open the drone. That's why you should also
do this trial flights because you never know you over your wings might fall off. So always make sure all the
propellers are probably tightened up wherever
you're going to place the drone to take off, make sure that that
area is concrete. Grass is not very ideal, but that's the only
option we have. So I'm gonna put it here,
but always make sure that the grasses are not too long
because sometimes the grass, the grass can entangled between the propellers and it's
going to break the motors. Yeah, I am just going to put it here and I'm going to
have starting a drawn. So how do you stop the drone? You can also take up the drone while the
drone is in your hand. So I do. So I did one little
tap and then one long term. And now you can also just turn it on your
hands and that's totally fine. I'm going to leave
the drawn here. And then how do you turn
on the controllers? Have already attached my
phone with the controllers. So how do you do same thing, one small tap in, one big tab. So so it says here, it says here it's connected. So there will be some methods, so you really have to read it
out what message they show. Because sometimes it could
also show that you cannot fly in this area are these are the rules if the app is updated. So always make sure to update your firmware in the app
and also of the drug. So yeah, I'm also just going
to make sure that nothing is touching the gimbal
from the bottom because I think these graphs
is a little bit long. It's touching the gimbal, but I think it should be fine. So how do you take it off? So to take off, just
take these two sticks and you have to push
them inside yet. Now to take it off, I'm just going to push this take-up That's going
to lift the drone up. I'm just going to
lift it like this. So I am just going to go
more higher, higher, higher. So I'm just gonna go as
high as possible just to make sure that
I'm in a safe area. And then I'll show you what would I do in
my first flight. But this is how the drone looks. So I would just press this tick because that's what we selected from the thing before. So just press this thick that
pushes my drone forward. So I'm just going to go
forward in the open field. So now I would just
leave the drone there. So the drone would
be at its position. So now let's check the
function of the stick. So this, with this thick, you can just rotate
the drawn on it at its place because that's
the setting, what we chose. So now it's going right. And with the other steak, you can just go left. And with this then
what happens is the drone goes forward and back. So now I'm just pushing
the drone forward. So by doing this practice, you would be also get familiar with the
speed of the drone, how fast it goes and
how slow it goes. And if I have to go
back, what I'm gonna do, this drone might
run as a sensor, as you can see in the app. But if you're doing doesn't
have a sensor in the back, you go check nothing
is in the back. And then you go here and
then you're coming back. And then if I have to go right, I will just make sure there's
nothing on the right side. I'll just go to what's right. And the same thing
with going left. So this practice is really,
if it's your first flight, just really get familiar
with all the movements. Then if I lower the
height of the drum, then it goes like this. But then I can also
check in the map how high the drone is
from the ground. If you see there is
distance, there's high. So you're always
make sure also in your first plot that the
drone doesn't go too far. It's always in your
line of sight. Or you can call a friend
because then they can see the drone and you can
focus on flying the drone. I'm just gonna go more forward
and then I'll come back. So this is like really, and then I can also play with this wheel to sort of
change my gimbal angle. So what I'm gonna
do, so the bit, the setting, what
we chose before. So now I'm getting a strong inference for remote controller, signal into an interruption may most likely to fly with caution. So I think there might be an
aircraft which is flying or there might be some sort of antenna which is sort of rigid, sort of messing
with the, my GPS. So, but if it's not like
really strict signal, you shouldn't be
worried about it. So I'm just going to change the angle of the gimbal
and see how it looks. Yeah, You see how smooth it is. That is just because of the
setting, what we chose. So I'm just gonna
go more forward, maybe push the gimbal down. So this is just playing
around with the drawn. Our main goal with
this session is to really just get comfortable
with the drone. I'm going for load, so my distance is almost 500 m. I can still see the drone. So that's that's why I asked you to fly in an open area so that you can get
used to the drone, tilting the gimbal up. Then with this button, I'll go above the road. Some sort of almost 700 m. I'll go a little bit higher. And then with this bottom, as we chose before, I'm going to sort
of look down and see what's behind
me, what's under me. I'm gonna go a bit more
higher, higher, higher. So really just enjoy
the flight and you see, you see how cool
this road looks. I'm just going to rotate, maybe sort of keep it straight, maybe go straight with the road. Here. I'm really 100% sure that there's nothing
in front of me. I'm also sort of
trusting my sensor. So this flight session is really just to boost your confidence. So I am just going
to come back home. You can also sort of turn
the sticks like this, this to change the angle. But if you see, if you
turn really faster, it's gonna go really fast. But if you go really gradually, you see
how cool it looks. A knife outside of
turn the gimbal down. We have to have really
smooth hands with this one. So I'm not really pushing
the sticks too much. Just a little bit. You can also see
in the map here. So if we tap the map comes, this is my home because I
really just went straight up. And I'll just tap here. And we can still see that
we have 69% battery left. And I'm just filling
in Auto at the moment. So it's like really not too. And I'm gonna show you later how you can get the
best video output. As you can see in the map. I am sort of coming
closer to home. What I'm gonna do, I'm
just going to press this button and sort of change the landing area just
with this, these sticks. Or you can also use
return to home, which I'm going to
show you later. The drone is right on top of me, so I'm just going to land it. And before landing
I'm going to make sure that there's
nothing around, you know, kids, no
person, no dogs, nothing. And I'm just going to land
on a flat and safe area. So I'll just push the
altitude sticks down. And then there will
be a point where it's sort of pause
this for a little bit. And then it lands itself. That's the pause. And then it lands itself. Because the sensor under the drone that sort
of discovers that, yeah, it's going to land and there's something beneath that. It lands at its own pace. So you really don't have to be super precise with lending. And there was a
practice session. I know it's a little bit boring, but this is the mistake. A lot of people do. They get, they're drawn,
they are super excited to go to this pretty
place and they fly it. And then they're
frustrated at why they are not getting any good shots. And then the reason is because you have not
practiced enough. So that's why if you
get your first round, go to this empty area. It doesn't have to be pretty, it just has to be empty, safe student be a lot
of people around. Just fly. Just get used to the stakes, get used to using both the
stakes at the same time. Get used to the gimbal angle. Just sort of play with the
drone as much as possible. Because just when you are
flying these drones, now, we had a really
good flight because sometimes there's a
lot of errors which comes when flying the
drone and you don't want to have those
errors when you are traveling or when you are in a foreign country
and you really have limited time to fly the drone and then you have
the error and the New York, you have no idea what to do. So that's why it's really
important to just do these trials sessions and then you're going to run
into those errors. And then I'm going to tell
you how to deal with them. So here are some of
the errors which can come when you're
flying the drone. So the first one is
GPS signal lost. And why this happens is
sometimes the drones GPS can interfere with some
of the GPS around you. Or sometimes there's a
really strong antenna which is sort of getting
in range with the drone. So that time the
drone sort of gets confused and the signal between your remote and the
drone kind of gets weak, or there is some
sort of interference that time the drone might
say GPS signal lost, or sometimes you just
went too far and your controller cannot detect where the drone at that time, it's going to say
GPS signal lost. When it happened with
me for the first time, I really thought my
drone is crushed. But then because the settings, what we chose before
that as soon as GPS, as soon as GPS signal is lost, the drone is going
to keep looking for GPS signal and it's going
to return back to home. And as it returning
back to home, it's going to kind of catch the signal from your controller. So if the GPS signal
fails, don't do anything. The only problem is if you do not have enough battery left, that's when you shouldn't
be flying super far because if you
lose GPS signal, sometimes the drone state do not have enough battery
to return back home. So they're going
to land wherever they think the
battery is super low. And sometimes even
before taking off, it's going to give you an error that the drone cannot fly. During that time. What I would suggest you is to calibrate the campus
of the drone. And even if it doesn't work, just go somewhere else and then take off the drone sometime there can be a really strong
magnetic interference, whether it could be
from underground, if there is some wires or
some sort of antennas, or it could be some
things around you. Really don't freak out. There's nothing wrong
with the drone. Just go somewhere
else and then fly. The more you're going to
practice with you drawn, the more you're going to know how much Wendy or
drone can handle. Because it really depends
on what model you're using. If the model is super
light is not going to do as good as the heavier ones. So yeah, my drone
as DJI magic to it does great job while
handling the wind. And that's why I am sort
of resisting myself. Do not do by the small ones
because with the small ones, especially in the mountains, so windy, it's so windy
when you go up there. So it can be really tricky because I've also heard
this story from my friend. He was flying in the mountains. The renewal is just so bad. The drone really couldn't
come home and it just landed wherever it could
when the battery was dead. In your practice test. Just really keep an
eye on the drone, how good it is with the van. And same with battery low. You have to really check, like sometimes I used to set my low battery
warning at 30%. And then later on I sort of got more confidence that okay, 30%, I still have a
lot of flight time. So I can maybe tweak
it down to 25. Okay, I still am
more flight time. So I can maybe tweak
it down to 20. So yeah, the more you're
going to do practice flight. If you have a battery, if you have a low
battery warning, you would know what what
percentage you should set the low battery
warning and check sensors. If you know that the front
sensor is working really sometimes just go close to a
tree or close to any object. Obviously you don't
want to hurt anybody. So I think the
trees or the best. So go close to a tree and then
see how far your drone is. Until the sensors, the
signal you that there's something in front because my drone also has
a back sensors. I also check with
the back sensor and the drone is in front of me, like really close to
me so I can just go outside and really
build confidence, build that trust between
you and your drone. And really build that trust
on that sensor that okay. No matter where I am, this sensor is going
to save my life. So yeah, just really play
around with the sensor. So when I started flying
ahead or not so good for. And then every time if
I'm just in the app, sometimes the app would hand. Sometimes the cable is not
working with the drone. Sometimes if I switch between
the photo and video mode, the app is just so slow. So these kind of things
you should really check before going for
the actual flight. So that's why the practice
flights are so important. Because you just get
to know more about how this whole
system is working. And if these errors, they come when you're flying in a foreign country you are in, you are flying in
front of the client. And if some of these
things happen, you're not going to freak
out because you would know how to deal with
these situations. That's why practice flights are really, really,
really important. Then there would be
a point where it's sort of pause this
for a little bit, and then it lands itself. That's the pause. And then it lands itself. Because the sensor under the drone that sort of
discovers that yeah, it's kinda land and there's
something beneath that. It lands at its own pace. So you really don't have to be super precise with lending. And there was a
practice session. I know it's a little bit boring, but this is the mistake. A lot of people do. They get their drone,
they're super excited. They go to this pretty
place and they fly it. And then they're
frustrated at why they are not getting any good shots. And then the reason is because you have not
practiced enough. So that's why if you
get your first drone, go to this empty area. It doesn't have to be pretty, it just has to be empty, safe, shouldn't be a lot
of people around this fly. Just get used to the stakes, get used to using both that
sticks at the same time. Get used to the gimbal angle. Just sort of play with the
drone as much as possible. Because just when you are
flying these drones, now, we had a really
good flight because sometimes there's a
lot of errors which comes when flying the
drone and you don't want to have those
errors when you are traveling or when you are in a foreign country and
you really have limited time to fly the drone
and then you have the error and then you
have no idea what to do. So that's why it's really
important to just do these trials sessions
and then you're going to run into those errors. And then I'm going to tell you. How to deal with them. So here are some of
the errors which can come when you're
flying the drone. So the first one is
GPS signal lost. And why this happens is
sometimes the drones GPS can interfere with some
of the GPS around you. Or sometimes there's a
really strong antenna which is sort of getting
in range with the drone. So that time the
drone sort of gets confused and the signal between your remote and the
drone kind of gets weak, or there is some sort of
interference at that time, the drone might say
GPS signal lost, or sometimes you just
went too far and your controller cannot detect where the drone at that time, it's going to say
GPS signal lost. When it happened with
me for the first time, I really thought my
drone is crushed. But then because the settings, what we chose before
that as soon as GPS, as soon as GPS signal is lost, the drone is going to keep
looking for GPS signal. And it's going to return back to home and add it
returning back to home, it's going to catch the
signal from your controller. So if the GPS signal
fails, don't do anything. The only problem is if you do not have enough battery left, that's when you shouldn't
be flying super far because if you
lose GPS signal, sometimes the drone state do not have enough battery
to return back home. So they're going
to land wherever they think the
battery is super low. And sometimes even
before taking off, it's going to give you an error that the drone cannot fly. During that time. What I, what I would
suggest you is to calibrate the compass
of the drone. And even if it doesn't work, just go somewhere else and then take off the drone sometime there can be a really strong
magnetic interference, whether it could be
from underground, if there is some wires or
some sort of antennas, or it could be some
things around you. Really don't freak out. There's nothing wrong
with the drone. Just go somewhere
else and then fly. The more you're going to
practice with you drawn, the more you're going to know how much wind your
drone can handle. Because it really depends
on what model you're using. If the model is super
light is not going to do as good as the heavier ones. So yeah, my drone
as DJI magic to it does great job while
handling the wind. And that's why I am, I'm resisting myself
to not to buy the small ones because
with the small ones, especially in the mountains, so windy, it's so windy
when you go up there. So it can be really tricky because I've also heard
this story from my friend. He was flying in the mountains. The renewal is just so bad. The drone really couldn't
come home and it just landed wherever it could
when the battery was dead. In your practice test. Just really keep an
eye on the drone, how good it is with the wind. And same with battery low. You have to really check, like sometimes I used to set my low battery
warning at 30%. And then later on I sort of got more confidence that okay, 30%, I still have a
lot of flight time. So I can maybe tweak
it down to 25. Okay, I still am
more flight time. So I can maybe tweak
it down to 20. So yeah, the more you're
going to do practice flight. If you have a battery, if you have a low
battery warning, you would know what what
percentage you should set the low battery
warning and check sensors. If you know that the front
sensor is working really sometimes just go close to a
tree or close to any object. Obviously you don't
want to hurt anybody. So I think the
trees or the best. So go close to a tree and then
see how far your drone is. Until the sensors, they
signal you that there's something in front because my drone also has
a back sensors. I also check with
the bank sensor and the drone is in front of me, like really close to
me so I can just go outside and really
build confidence, build that trust between
you and your drone. And really build that trust
on the sensor that okay, no matter where I am, this sensor is going
to save my life. So yeah, just really play
around with the sensor. So when I started flying
ahead or not so good for. And then every time if
I'm just in the app, sometimes the app would hand. Sometimes the cable is not
working with the drone. Sometimes if I switch between
the photo and video mode, the app is just so slow. So these kind of things
you should really check before going for
the actual flight. So that's why the practice
flights are so important. Because you just get
to know more about how this whole
system is working. And if these errors, they come when you're flying in a foreign country or in your flying in front of the client. And if some, some of
these things happen, you're not going to freak
out because you would know how to deal with
these situations. That's why practice flights are really, really,
really important.
4. Best Video & Photo Settings: In this section, I'm
going to teach you the best settings to get
the cinematic videos. So let's get started. So my drawing is ready. And now what I'm gonna do, it's just giving me
some safety error so you can switch between
photos and videos mode. So I would go here. So I was flying during
the practice rounds, I was flying just in
auto mode because I was not really worried
about getting the best shot, the best this and that. I just wanted to get to know my drawn better
and just practice. Now is the time to get some really beautiful shots and get the most
out of your drone. So what I'm gonna
do first thing, I would switch to manual mode. And I don't know what model
of drone you're using, but in some of the drones
you can change the aperture, but it's some NADH
is just gonna be the fixed aperture in
most of the drones, yes. Then here what I'm
gonna do is I'm going to keep it shutter
speed to one or 50. And here at the bottom you can also see the exposure level. So it's minus three,
it's super dark. So you have to
always make sure is that you can change your ISO
according to the exposure. So if I bring my eyes
are super high exposure becomes if I go to 1,600, It's exposure is
still zero point. Exposure goes off
course a bit higher. But really do not push
your ISO too much, like ISO maximum 400 is good enough if you go
a little bit about that. The drones these days, they're not super
good in low light, so you are really not
pushed the ISO too much. But if you're flying
in a broad daylight, even with these settings, you have to put a filter on the drone just to get
those cinematic shots. And if I go here in the, in the video format section, video size, I'm gonna do for k, for k if we left the FOB. And because I'm in Europe, I'm filming in 25
frames per second. Or if you have for k 60 frames per second
option film in that. When you are filming
in forecast 60, then you should be bringing
the shutter speed to 120. So this is the golden
rule of videography. Whatever your frame rate is like for k 60
frames per second, then your shutter speed
should be double of that. And if you want to
learn more about that, you can check one of my previous classes where I talked about video
camera basics. I've taught about
all these settings in super detail and also show you what to do and what not to do is show
you the difference, different formats and stuff. So if you know, learn
more about that, you can check that
class after this one. With video settings filming
the best resolution possible. Some drones, they
can fill them in five K, So film in five K, but also makes sure you
have a good memory card. Fast enough memory card
to handle that five K. I would never fill maintain
ADP because it is no point. And then video format, mp4, MOV, it's totally optional. And then white balance, I wouldn't set it to auto when I was filming in an auto mode, then the white balance was Otto. But it really depends
on some presets. You can choose these presets or you can choose
the custom settings. If it's 38,000 Kelvin, then it's gonna be
a lot of blues. And if it's 10,000 Kelvins, it's gonna be a lot of yellow, so you have to sort of
keep my white balance to 5,000 when I'm flying
in broad daylight. And in the evening,
I sort of keep my white balance to
about 6,000 or so. But you can really tweak. You can also keeping
these presets. But never put it
in auto because if the white balance is
changing in one shot, the whole single shot
would move from yellow to blue or blue to
yellow in one shot. And that's going to look
really not professional. So I will just keep it to 5,000. And then the style, I leave it to normal because
DJI maverick to they do a really good job of keeping the standard profile
looking very natural. Because in some drones, their sharpness is a
little bit too much. So you can reduce the sharpness. You go to custom. This
is the sharpness thing. And I would go to minus one or minus two and
really just fly and see if your image has that fake sharpness or no,
because most of the drone, that's why I don't like it, is that if the camera
quality is not good, they sort of or sharpen
the image and it just looks so unprofessional and
it also looks super cheap. So yeah, keep the
sharpness a little bit low because you can always increase the sharpness
in post and color. Now they also have
SLD or normal. When it was in auto mode, I would just fly
normal because I don't really care so much
about color grading. But when you want to do a
creative color grading, you should be filling in
the dialogue from DJI. It's a lot from DJI. The footage which comes
out of the drone. It's a little bit flat. But then you can go into them, into resolve or any other
video editing software. And you can just put
some cinematic colors, image format, and video codec.
That is really important. X2, x4, H.264, you see it's
only supposed to normal mode. You can choose as 264 in the normal and the file sizes
would be a little bit bigger. But if you choose H.265, the file sizes are a little bit compressed as compared to H.264. So I would just
keep it to H.265. Image format is wrong. If you would do jpeg plus rho, then what is the
benefit of that? Is that all the
JPEG file you can literally transfer from
your drone to your phone, editing the Lightroom
or phone and just upload it on
Instagram straightaway. So you really don't
need a laptop. But if you are film, but if you are taking
the photos just in rock, you have to keep in
mind that you cannot transfer those raw photos, your phone, and save original
turn-on wrap panorama. I also put it to row. If you're taking a
panoramic image, I never do it. Save or original
hyper laps to draw. Later on I'm going to
teach you how to take hyper lapses and then all the images what
was in hyper lapses, they would be in raw format. So if it's rod, then I can put so
many creative lots, so many creative colors on that image without that
image blowing out. So that's why I do this to row headlight turn on,
overexposed, turned off. If you want to do grid, I have put the grids here. You can do none. What? I would do grid here
because later on I'm going to teach you something
called as rule of thirds. Later on in a minute. I'm going to also teach you some beautiful compositions
to get cinematic shot. And in those times that grid lines would be
really important. Center point, I don't put it is just like you can choose
the center points. Like I don't see any point
of the storage location as the garlic engender
the drawn depending on how much space you
have in the drone. And you can also format
SD cards from here. So these were the few
photo and video settings. So yeah, if you
have any questions, you can just leave
them in the comment. And later on, I'm going
to show you how to edit those cinematic
videos in DaVinci Resolve.
5. Essential Cinematic Shots: In this section, I'll show you at least 20 cinematic shots, what you can take while
you're flying a drone. I'll show you exactly how
to achieve those shots with controller stick with also taking help of the
intelligent flight feature. Achieving each are perfectly would need some
sort of practice. So once we have learned
what I've taught, just go outside and
practice as much as he can. And soon you're
going to be super professional in those shots. If you see exposure level
here at the bottom, it's a little bit higher, so I'm just going to
change the aperture. Or you can change the filter, or you can also change
the shutter speed. So it really depends on you, but to have a 180 rule, you have to keep the
shutter speed how it is, and change the
filter because I am assuming that you're
drawn might not have this aperture
changing options. It's only in DJI to
DJ maybe Q2 and Q3. But yeah, coming back
to the cinematic shots and now our exposure is perfect. Let's press record. And first shot,
what I'm gonna do, there's two different
movements in this short. I would be going
forward like this. Then as I'm going forward, you don't see a lot of
foreground what's in the front. So to reveal that I am going to change the
altitude of the drawing. You can use these
shots anywhere. This is such a cool shot just
to just reveal everything, what's happening
in the foreground or what's happening
in the image. That now we're gonna do three different movements
from the camera. So my height is, let's go up to say 15 m. I'm just going to set the focus here and
now press record. I am going to go forward. And then at the same time I'm
going to change the height. And then from this hand, I am going to bring the gimbal down slowly,
like really slowly. So you see, now there's three different
movements going on. You see how cool it looks. So we're really focusing
on what's going on underneath us and
we're also going forward. It's a really cool intro short. So let's do the auto focus. And then when I go back, what I'm gonna do
with my fingers here, I'm going to bring
the gimbal up. Really easy shot guys, but it just makes so
tells the story so much. And then once I
have enough reveal, then I'm going to leave the
gimbal and it would just look like so cinematic because, because, because in
the beginning we change the sensitivity
of the gimbal. I'm just going to push
the drawn back here. What you can also do is that three movements like how
we did for the first shot. My gimbal is a little bit lower. I'm going back. And then I kind of go up. And then I'm also
bringing the Gimbal a little bit really smoothly. I'm sort of revealing
everything in the picture. And it will just give
me that feeling that the drone goes up so quick. And then I'm going
to leave everything until we have enough height. And then I'm just going
to press the back button. The drone is going back, back, back, back, back. Here we're going to show
you some more examples of what you can do with what
I've taught you so far. So just by going front and back, you can already tell
so much stories. So here as we see in this shot, our waterfall is
being revealed by just going a simple
forward motion. And I'm also sort of bringing
the Gimbal a little bit down here and they showed it looks like we're
distracting in a mountain. But as I'm going back, I'm revealing the
whole big cliff. And we achieve that just by
going back here in this shot, I'm bringing the
focus of audience. Do this castle which is
attached to the buildings. Here. I'm just going
forward and sort of tilting that gimbal
down very slowly. Here I'm shifting the
focus of the audience from the water to the buildings, to the highway, and to
the client just going forward and bringing the
gimbal up really slow. And here I'm going to
teach you a new effect which is called dolly zoom. So here what's happening
is that I don't know if he can see I'm going back. The drone is going back, but the background
is coming closer. Here's the original clip, the original plate, you
wouldn't see anything. But if I play back the edited clip where
I'm sort of going back, but I'm also zooming
in in the image. So you see it sort of gives a little bit of trippy effect. And in distributed shot, all I'm doing is just changing
the altitude of the drum. I'm really doing nothing just changing the
altitude of the drone. And you can already
tell so much stories. But if there is something in the foreground that's
kinda look even better. Something like this.
In this image, I am going up, but I'm also sort of tilting the Gimbal a little bit down. So all the buildings,
what you see, it's kind of in the
focus the whole time. All I'm doing is changing the viewing angle
of the audience. And here I'm sort of going up, but at the same time on
maltose that of rotating the drone a little bit just to change the
angle a little bit, just to show more of the
mountain, more of the water.
6. Intelligent Flight Features: Next one I want to
teach you is how to use the point
of interest shots. I say e.g. I need to sort
of go around this form. So what I'm gonna do, I would
choose point of interest, and then this is my
point of interest. I'm just going to make
a box around this. And the height is
what we have here. The drone has to
calculate the radius. So I'm just going
to let it press go. So now it says Do
not operate aircraft during the subject
position calculation. So now it's sort of just
choosing the radius. So now it has chosen the radius, and now I can change the speed. So if I go to 2093 cards, if I go 29, go super quick, it can go quite far. But here, wanting
really importantly that added sort of revolving around the shoulder
is really cool. What do you have to
really make sure that your sensors are activated? Because in some drone, you don't have side sensor. So what can have,
what's going to happen there is that you have to really check if there is nothing
on the side because I have crashed my first
drawn like this, there was something on the side. I didn't have sight
sensor that drawn Christ. And then if I have to
rotate the other way, I just go press this. Tonight, it's going
more clockwise. So now with my hands,
I'm doing nothing. The drone is just taking a really beautiful shot with
the point of interests. You can do a lot. And I will also teach you
some cinematic shots, what you can do with
the point of interest. So with those shots, I am
just going forward like this. To the subject. I'm just
pressing the Forward button. And then going backward button. And bell I'm going back. I'm also increasing the
height of the drum. So these things you can do
with point of interests. And while doing that, I'm
also sort of changing the gimbal language and then
changing the gimbal angle. And if you're on to cancel
the point of interest, you just go here and
we just canceled. And now I'm going
to show you some of the possibilities of what you can achieve just by using
the point of interest mode. So here, if you see
really closely, I'm sort of making the drone
go a little bit higher. And the drawing is
at the same time going a little bit back. And this point, I'm also tilting the Gimbal
a little bit down. So the drone was
already rotating because the point of interest
around these buildings. And then we're going back, we are going up in the altitude and the
gimbal also goes down. And here, just by rotating
the drone around this church, I am revealing the background. There, as you can see,
I'm sort of revealing the whole image by just
rotating around the building. And in this example, the point of interest
is the bell tower. And my drone is just rotating
around the bell tower. So instead of giving her an effect called
parallax effect, where the foreground is
moving a little bit slower, but things behind
the foreground, the background, it's moving a little bit faster
than the foreground. This you can achieve by just letting the drone do
the point of interests. So now what are we going to do? You might have heard about this intelligent flight feature called the follow mode, that the drone just follows
you wherever you're gonna go. And the sensors around
the drone digests, sort of do the job
instead of trying not to collide somewhere else. But here I'm gonna teach you when should
you use follow mode? Because there's also some
really cool smart features in the drone that you can use. Bit is better than follow mode. I'm going to show you the
drone is connected to the GPS. Let's take it off. And
first I'll show you how to follow mode works and what all things you can do
with the follower mode. And then I'll show you a
really cool alternative. So let's take off
the drone first. If you're doing follow
mode, make sure to wear bright clothes
because sometimes, sometimes the situation around
you is too complicated. The drone can only track you
for certain distance because then it might confuse
you with something else, some other object around you. If you're very bright clothes, it's going to be easier for
the drone to follow you because then you're sort of popping out of the background. So let's try. So how do you do follow mode? You go here, then you
go to active track, and then you just do
the trace option. And I'm just going to make
a circle around me. Yeah. So I would just also
bring the drone a little bit closer and see how we go. I'm just going to
make a circle around me that now the drone sees me. So I would go, I would press Go, and now I am. So I am just going to go back. And the drone is coming
towards me, I suppose. Yeah, the drone is
coming towards me. I hope you guys
can hear me still. So that is how the
follow mode works. And one more really
cool thing also, what you can do with
the fall of mode is you can see these
arrows on the sides. So if I do this way, they draw inward, sort of follow me and also goes
counterclockwise. So you see now what's happening is drawn his following me,
It's going counterclockwise. I am just going to
increase the speed. And I can also see
in the corner that the author is all activated. The drawing is following
me and it is sort of revolving around me
so he can do this, but he could draw
on doesn't have a proper sensors on the site, then it might be a bit tricky. It's a really cool feature. So you see now the
drone lost me. So yeah, now because he was
too bright in the background, so that's why the drone lost me. So you have to be
really careful about the light that how the
light is falling on you. Because if it's too,
it was too bright, the drone couldn't detect me. So these are things
that you need to be taken care of with
the fall of mode. So now what I want to
do with polar mode is that this time
what I want to do? I want the drone to keep me on this line and then follow
me in the same way. So if I go this side, I want the drone to
keep me on this angle. So let's try the active track and then I go active track here. I'll tap myself here. I do go. So as soon as I do go, you see kind of drone
is letting me go. And now it is sort
of coming behind me. So now the drone is
actually following me. It's not sort of going in the same direction
and that's the thing which I don't really like
about the fall of mode. I'll give you one more example. And if I want myself
to be at the bottom, at the bottom line here. And if I go follow mode, you see the gimbal changes
itself the direction. So now, of course the
drone is falling me, but it's not giving
me the flexibility to keep myself wherever
I want in the screen. It's always going to
bring me in the center. And sometimes I don't want that. So what is the
solution for that? I'll show you here what kind
of shot I want is that I am here at the screen and the
drone is coming towards me. And it sort of keeping
the same angle. So it's the road, it kind of gives you
the diagonal line. It's kind of satisfying the videography rule,
the diagonal lines. So let's try a new method. So tap in flight. Then I knew about this feature,
it was a game changer. So what do we do in tap
and fly is that you can tap anywhere
on the screen and the drone would just
go in that direction. And it can also change
the speed of the drone. So I'm going to show you
with a super low speed. So that's the, that's
the home point. So if I just tap here
and then if I press go. So now the drone is slowly
moving towards me at the 3.6 km/h speed. I'm still following
the rule of third. It has still in
the diagonal line at drone is going really slow, so it really doesn't matter
about how your speed is. The drone is just taking a really cool cinematic
shot in that direction. And we can also do it backwards. So what I can do so I would
just set the angle here. Yep. And then I want the
drone to go back and I want the drone to
keep me at this angle. So what I'm gonna
do, I press reverse and now the drone is going to
go back at this speed, 3.6. I press go and draw this kind of going back really slow and it's still keeping
me at that angle. And violet is going back. You can also sort of
bring the gimbal up. Bring the gimbal down. So what this moment
has done is that it has given me a
lot of flexibility. So every time when I'm hiking, I just pressed this mode. If I go forward or backwards
and then I don't have to touch anything that
drone is going backwards in a
really smooth way. And then I can
focus on the hike. And same with going forward. So I like sometimes I just
want the drone to follow me at a certain angle to
maintain the rule of thought, to maintain the diagonal lines. So then I can use this
feature because with follow mode is just
going to bring me the center and then it's
going to follow me. Sometimes if it loses, u is just going to
stay at its place. So there is a risk
with using color mode. But if you know that the place
around you is super clear, you can imagine there's
also a free one. With the free what do you do? You just press Go and it just goes wherever you want it to go. So now I can also increase the speed and it's just going
to go in that direction. So it's going to go close to the road because I
have put it here. But if I press go go there, then it's gonna go
on that direction. If I press here, is gonna go in that direction. So you see, it's really cool. And the only time tap and fly, it wouldn't be applicable is
then you are sort of riding a bike or reading or
sort of going through so many bushes
because that term, the drone couldn't detect your movement because a lot
of times they find one, if I'm writing on the bicycle, then I use the Photoshop. If there is so much twists and turns and stuff on the road. Because then I just
want the drone to just follow me wherever I go. I would highly recommend
you guys to try it. It's such a cool feature. And also one more really
cool slide feature. If you don't want to use any
sort of follow movement or anything you can do is also
something really cool. So what do you, I would just go up here and then
I'll show you. So here what I'm
going to do, guys, I am just cannot change
the drone to tripod mode. And if I go the other side, if I'm just going
to press Record, you see how cool it looks. So this is also a shot
what you can do here. So I'm just gonna go this side. The drone would go really slow. So you can just press
the right joystick, just push it towards right
and just walk slowly. It's going to keep you
in the same angle. If I want to be on this line, I can just be on this
line and just go. If I don't have sensors on the side, then you
have to be careful. But if you have sensors, so you can see that it's
all activated here. Because if I get out of the
tripod mode and then I fill, now you see how fast it goes. You see it goes super-fast. And sometimes if you don't
want to use the follow motor, if you don't want
to use anymore, you can just use
the tripod mode. If I go here and if I just
press the back button, it's going to go
back really slowly. So I think the tripod
speed is about, I think 2 km/s or
something like that. So yeah, we are in tripod mode and if I just
want to be in this angle, I just pressed the front
button and the drone would be following me
super slow and super nice. You see, if I go back. Now you see it's like a
really smooth motion. And you also get a really
cool cinematic shot. Because if I go
in a normal pace, then I have to really sort
of press the joystick super slope to get
a smooth motion, but a tripod mode, you can just press
it all the way and it's going to
have a smooth speed. Because if I go
into normal mode, if I go like that, you go, It's going really fast. Then I have to really
maintain the speed by going soft on the joystick. And that is really hard when
you are walking, trust me. So yeah, tripod mode. I have started using tripod
mode a lot recently.
7. Hyperlapse: Hyper laps, hyper lapse in simple term is a
moving time-lapse. In this mode, the drone takes
several photos via flying, and then it combines
them together in the end to make a really cool
effect called hyper laps. Okay guys, so we are going
to do a hyper lapse. So how do you do it? So you first go to the
intelligent flight setting, go to hyper laps, and this time the drone would automatically change
it to a photo mode. So now you see there's
four options here. So one is free when a circle, of course log n v points. So what I'm gonna
do, first thing I'm gonna do is,
uh, course lock. So when, once I explain that, then you have more idea
of how hyper laps works. See if I do course lock. It's going to show
me a little demo that digital course lock works, which means that aircraft would
just go in one direction. So I'm just going to set
up the gimbal movement. So here this is
really important. So what I see here
is interval 2 s. So how often I want the
camera to take photos, because hyper lapse is a
combination of photos. So I would just do 2 s and how long do I want my
final video to me? So I would maybe to say 8 s. Which means if you
see here is that the aircraft would
take 200 photos. So I'm just going to
press Tick here and what should be the
speed of my aircraft. So I'll probably do 2.2, 0.5 or so maybe in yet. And our course, like I said, the course has been locked. So I'm gonna go in
this direction. The aircraft would go
in this direction. So let's press go and
see what happens. Now, the aircraft
would be just taking photos for 6 min and 39 s, as you can see in the screen. So which means that
you should have plenty of battery for the
hyper laps to be working. And in the next
segment I'll show you also some creative hyper
leftward you can take. So we will just wait until 6 min and 39 s and then
I'll get back to you. Now the hybrid lab
has done the drone is sort of making a
video out of it. So because the setting, what we chose before, we already have all
the raw file selected. So we're just gonna go here and see how our
hyper laps looks. Tonight it's kinda die and
downloading with the Internet. So we have this little sample
video and then we also have all the raw photos
which we can edit in Lightroom and then export and Da Vinci. And let's
see how it looks. Hyper lapse in this
scenario didn't come good because it was
a little bit windy. But later that evening
I went outside again and tried it out and
it looked pretty decent. Then I'll do waypoints. Waypoints. What happens is you can choose
the position of the drone. So if I choose, say this position
to the position a, and I have put the Gimbal
a little bit lower. And then I come
back, back, back. And then I do gimbal. This side. It does. This is just for
demonstration purpose, and then I select the position and angle of the
gimbal at this point. So you can also have 23 points. So I'm just doing with two. So what I'm gonna do is reversed is because if I do in order, the drone is going to go at first position and then
it's going to start again. But I would just do reverse because I don't
have the battery. So drone is going to start from position B and then go to it. So I'll just go a confirm. And then I would just do
video length a little bit, say 5 s because I don't
think I have enough battery. The 0.19, no new task
created or there's no task would be
overwritten, That's fine. And then I do go. So now the camera is going
to do the same thing. It's going to move
in same direction. So hyper laps in a circle. Notice when I select it, it's going to show me a demo. Then I will select
this subject in which I'm going to be circling. I am going to change how long I want the
hyper laps to be. So let's say 8 s, I would
leave the speed the same and it's counterclockwise, so I would just press play. But then I realized that it is going in a counterclockwise
direction. I want it to be clockwise. I would cancel again. And then I just chose the option to clockwise
rather than counterclockwise. I'm going to select
the main subject and then let the
drone do its magic. So now it's calculating the radius around which
it's going to circulate. And once it's done calculating, then it's going to
start taking images. It has to take 200 images because we chose the
video length to be 8 s. And we'll do, and we're
just going to wait. So here you really don't
have to do anything. The only thing you
what you need to do is to keep an eye
on the battery, keep an eye on the sensor. If you don't have a site sensor, makes sure that drone
is in line of sight. Because if there is something
on the side of the drone, it's going to hit the wall or
it's going to hit a branch, it's not going to stop. It looks like we're almost
done with the hyper laps. And this is the result. Should be taking hyper
lapses of any moving object, whether it's moving clouds, moving people, moving traffic. And yes, they were they
in those hyper lapses, make sure you have
enough drawn battery to take the hyper laps.
8. Composition: So composition. In this section I'm going to
show you a few techniques which is gonna make your footage stand out from
other drone pilots. The first one is rule of thirds. Rule of third is something
which looks like this. So if your subject
is somewhere on this point, on this point, or in these areas, it looks a little
bit more pleasing to the audience rather than keeping your subject in the center. And rule of thirds
works when the things in the frame are
not symmetrical. So you see in this
image and keeping the land on one
side of the frame. Because if I put
it in the center, it's not going to
look as pretty as how my subject is
on, is on one side. Always make sure to
remember this technique, the rule of thirds, the rule of third
world work every time. Sometimes keeping the subject in the dead center also
works very well. If there is a symmetrical
landscape around the subject, and if you're flying the drone, always look for
patterns in the image. Parents would make
people go Wow, because it might
be the first time they would be seeing
something like this from that high diagonal lines also make your
footage look amazing. Here's a few example of what I mean when I'm saying
diagonal lines.
9. Essentail Tips: Here are a few other tips, but you should be knowing
when flying the drone. So in whatever
direction you fly, makes sure that you fly in that direction for
at least 15 to 20 s. So you know you have enough clip length from
that particular angle. And when you're flying
in particular direction, avoid sudden movements
because that's just going to make your shot
looks super immature. Whenever you're flying a drone, always make sure to look for
things in the foreground. Because that's going to make
your footage look, wow. That foreground can either
appear in the image, that foreground can either
disappear in the image. So you're always makes sure always look for
foreground in the image. And it's also going to create so much depth in your image. And these are the few things
which is going to separate your footage from the people who are not watching
this class probably. And also few more things while
you're flying the drone. Just to get the most
beautiful output, you should be flying
drone off course in golden times during sunrise
or sunset during that time. Because if you're taking
videos during the daytime, when the sun is literally
right on top of you. The footage is not
that good and you cannot get the best
colors out of your image. If you're also planning
to fly at certain places, really make sure
what side is east, what side is West? So when would the sun hit your subject or when is the sun in the back
of your subject? I do a lot of research
before going to a place and then I can plan when do I
want to film the drone shots? Because the drone shots
are the best when that orange sunlight is
hitting on my subject, whatever I want to fill. These are little things which are going to make
so much difference between an amateur flying
and professional flying. These things, of
course, it's going to stress you out
in the beginning. But then the more
you're gonna do, the more easier it would be. So now when I just go to
a certain place to fly, I exactly Nahuatl shorts I
want and we then like 10 min. I took off, I flew
I got some shots, I got some photos. I took the drone down and then I can have so much battery left and I can go with one battery and flier to three other places.
10. Take Off and Landing In Hands: Taking off and landing in hand because there
might be some places, especially if you're
on the mountains are especially if it's
an uneven surface, you can take off and
land on your hand. And here's how you do it. It's a little bit tricky, but it's not scary if you
do it the right place. I'm going to show
you the risk-free rate to take off the drone. So take the throne in your hand. And I would really recommend when you're
doing this to sit. Because then when you're standing and if you
lose your balance, you might fall off or
wherever you're standing. So if you can just
sit like this, then what I would do also leave the controller
on the floor. And then I would just
keep my palm like this. Put the drawn here. And then if I see the screen, there is a takeoff option
in the corner here. So what I would do as
soon as I press that the drone goes up 1.2 m and
it's going to hover there. So what I want to do, I want the drone to just
go up and away from me. Not horror there. Because sometimes if it's windy, it can also come back to me. So what I would be doing as soon as I slide up,
the drone takes off. And then I would just press the Up button so that the
drone goes up away from me. So I'm just gonna do a take off. It takes off. And it
just goes off. Yeah. And the main reason
why am I doing it is because why am I keeping my hand here is because
if I keep my hand here, as soon as the drone takes
off and it gets super windy, the drone might come back to me. And now I'm going to teach
you how to catch the drawn. So you're just going to
bring the drone down. Now. You can also do this
standing catching, but I would always
recommend to sit. So I'm just going to catch if
I'm a right-handed person, so I would use my right
hand to catch the drug. Allies see a lot of people
just catching here, but I would try to catch here. So I'm going like this. So now the drone sensor, it's kind of activated, so it might also be
resisting to come down. So what happens is that
there is a point where the drone sensor is not
letting it go down, but then you still keep
pressing the downward button. And then it's gonna go down
really slow because then it will detect that
there's something ready for it to catch. And as soon as it's coming
closer to me, what I do, I am using these two
fingers to catch the drawn, and I just hold it
here really tight. And sometimes people also
do this really fast. But for beginners, I
wouldn't recommend that. I would just say
just clamp it like this and keep pressing
the downward button, the drone would stop
itself. Let's try again. I'll show you. And if you
are on an uneven surface, I would really recommend to
sit down because sometimes you might get dizzy or sometimes I don't know,
anything could happen. So like really sit down
on the ground and like just stabilize your position and then sort of
catch the drone. So I would go here and I'm
raising my hand above. I'm not going to catch here
just for safety reasons. Go down. Still pressing the bottom
button, and then I catch it. If you're not pressing
the bottom button, even if you catch it, it's going to fly, fly, fly. So as soon as you catch
it, keep pressing the bottom button
until it stops. So yeah, really
practice this as well. And yeah, so let's
get back to that. Let's go back to the studio.
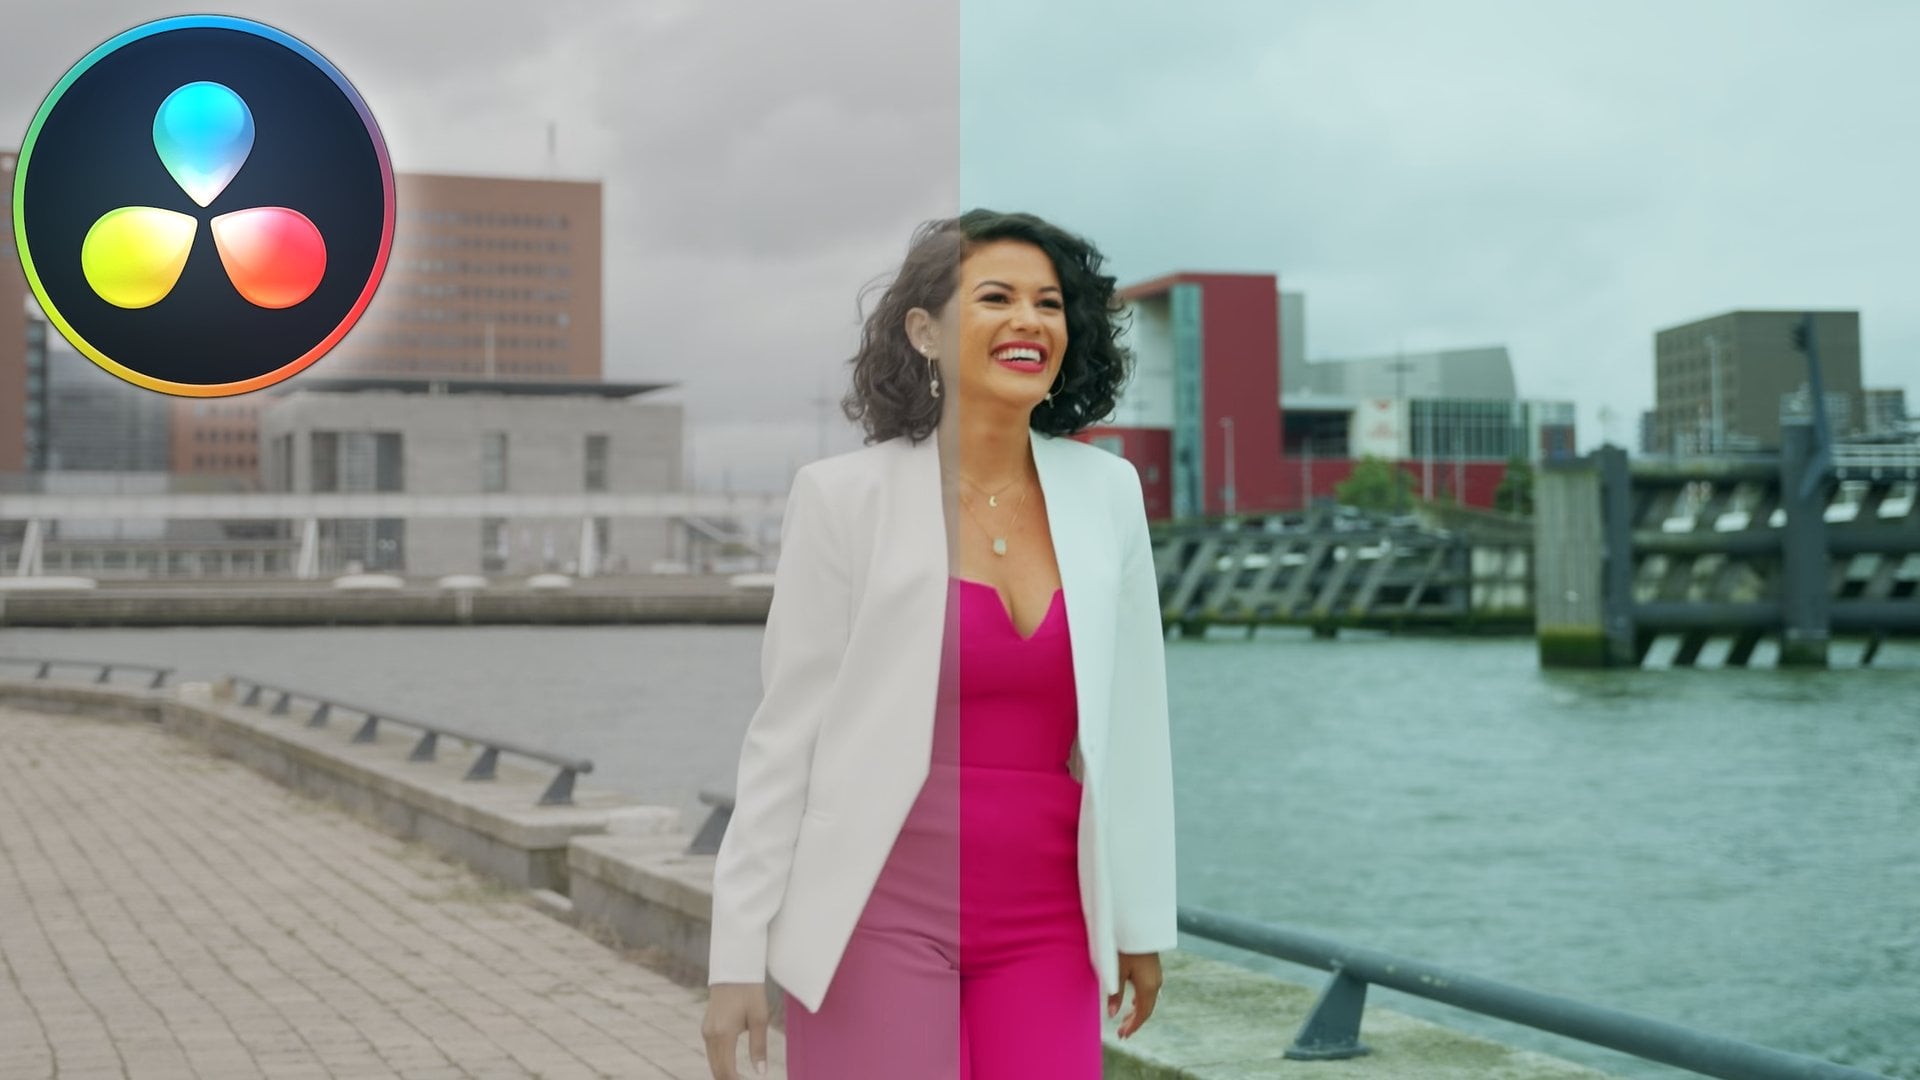
11. Color Grading: In this section, I'm going
to teach you how to take your drone footage
from here to here. So guys here we are in DaVinci
Resolve and we're going to go to the Color tab
and start editing. So I would expect you to do at least the basics
of DaVinci Resolve. And if you want to
learn more about it, the tons of classes
of their software. So you can always just go to
my profile and see some of the classes where
I've taught about specifically color grading in the interiors or from scratch. But getting back
to this footage, so yeah, it's a drone clip. And first thing what
I would want to do is to land my image
on a master frame. Like the favorite
frame of this image. I will just put it here. And these are the
primary wheels. This is just a scope
which we will, which would be really helpful
for our color grading. And I have made for notes. Hang on. I'm going to tell
you how to make notes. I'm just going to press Option
S to get four more nodes. So I would have four nodes here. And what I would be
doing is on this node, on the third one, I would be doing a color
space information. So your say you
just need to go to effects and then maybe type
color, space transformation. And here what are
we going to do? So as I was telling you before, that we should be filming in decent and log straight
out of the drawn. Then in the post, we can give it any cinematic look as possible. So that's what we're doing. So right now, the footage
looks a little bit flat because it is shot
in decent log. And the first thing,
what are we going to do is to convert it, to convert this
into rec seven or 97 or nine is the normal
color profile picture. And these are just
a neutral color, what it looks to our eyes. So what are we gonna do? Put it to naltrexone
or nine vegan and good input color
space was DJI D garment. And output, input from
our input Gamma is 0.9. Output color space would be
the same as the timeline. So to show you what color
profile I'm filming this. I'm editing this footage
is I would just go here. And then I'm going to show
you a color management. So you just need to
literally you just need to copy these settings
in your software. And then you gotta
get the same output as how I'm getting if you're using a Mac or also
Windows, it should be fine. So this is coming
back to the tutorial, coming back to the color
page we are selecting DID gamma truck 7.9 and then
turn off the effects tab. So now we have a
neutral looking image. And now what are we going to do? Vc from these scopes
is that we have a lot of room in our
highlights and a lot of room in our darker
areas to play it. I'm just going to
get the most out of the image because it still
looks a little bit flat. So I would put some
brightness in the image. I would make sure it's
not passing this line. Now we just maybe just be here. And then what I'm gonna do, go to gamma and then
just bring the mic, the darker areas, a
little bit more darker. So there's a little bit of, so now I can see in
the image is that there is a little
bit of contrast between the brights
and the dark. This is what makes the
image look more pop. And I'm also gonna go to
the left and make this, bring this a little bit down. But I would just make sure
that the darker areas here, it's not going too dark here. And I'm also seeing in this
graph in the scopes is that nothing is
clipping below zero. So I would just go
until, say, minus two. And I would maybe also increase the shadows a little bit here. So if I go before an actor, how do you go before and
after you go Command D or D? You have to select
the node command D. And all. This already looks pretty good. And if you go Alt D or option D, dD, going to see the
transformation of the whole image. So if I just press that, this was the before, I press Alt D again, I see the accuracy is do you see how far we
have come already? So now what are we going to do? We're going to put some
colors and make it, make it a little
bit more cinematic. So the first thing
what I'm thinking of doing to just get a
pop in these red. So what I'm gonna do, I'm gonna select this node. I would go to the graph here, to the curves here. And then maybe not Hue vs Hue, I would go hue and saturation. For some of you, this tutorial
might be overwhelming, but I would really encourage
you to follow my course. Color grading in that
material is all there. I have taught you
everything in detail. But basically what I'm
doing right now here is to change the colors
are manipulated. The colors are the reds, the greens, and blues. The blues are not
here, so we're not going to do blue go blue. But in our previous example, in our next example,
we have glues. So that's literally what
a color grading is. And you would just have
to manipulate the ribs, the blues and greens, and then you get a
nice cinematic look. So I'm collaborating is also
a little bit subjective. So for some people
it might be good. For some people it might
be not your style, so just do it your way. Here. What I'm gonna do, you see that the other part
of the read is here. I'm going to explain you again. Here what I would do. As soon as I go to this curves, I have this selectors. I will just select
the roof here. And then you see there
is some points here. So what I'm gonna do, there's one point here, the center point
and the endpoint. And I can make more points
here that I just need three, I'm just going to bring this
up a little quieter up yet. So now what I would do if
I go before and after, so pressing Command D or D, you can see the
color difference. So there's no difference
in the greens. Just their rights are changing. It's just getting a
bit more pop. Yeah. Now what I would be doing, add node, I will go
parallel and parallel node. If you want to learn more
about non-structured, go to my previous class. Here, what I would do, I think the greens are
a little bit too much. Who does expanded? Maybe sort of put the
greens a little bit low. We will take care of the greens a little bit later as well. So I just wanted to Green's
not to pop up too much. And then what I'm gonna do the next step in
this color grading, I would get one more node, which is Alt plus S.
I'll bring it here. And then I also want to change
the color of the green. So what I would be doing, I go to Colors, presets and then
select the green here. So if I see this node, I see something here. So what I would do, I
would go highlight, and that's going to show me what all things are selected
now in the screen. So you see all these
greens are selected here. So because of this method, going back to
colors and Presets, I can just select the greens
and change their colors. So I would go to
Color Wheels here. And then with the help
of not Saturation Hue, we can change the
tones of the green. So if I go this side, it's going to be more
sort of darker green. If I go the opposite side, it's going to be
giving me more warmer. Cc. It really depends on how
what type of look you want. If I go before and after, I think maybe I did it too much, maybe I would go to say a 57. That looks kind of okay. Yeah. So these three nodes, who are my color grading now
it's like if I just select these and go Command
D are all D. Let's see how much difference
we have in the colors. And if you want more
pop in the image, what I would do, I would go here and then I would maybe do a little
bit of color boost. Maybe ten, maybe
it's a bit too much, maybe eight, and then the
score before and after. So we are here. Now what I would do, I would just add
some vignetting. So just get one more node. I go here, which is the window panel kinda
zooming out the image. And I will select
this circle here. So you see there
is a soccer here. This is also a kind
of a selector. I'm just gonna, we're
just adding vignetting. Maybe because I want
the audience to focus just over these
areas and I see, I feel that the
sites are exposed. So what I would do now
if you see in this now it looks like just the
middle part is selected. What I want to do the opposite. So I would go here. Now just the outer
parts are selected. Go to the curve, go back to the
clustering curves here. I'll just zoom in here. And then I'm going
to put a point in the middle and just
bring it down slowly. Then I'm going to
show you what magic vf created when Vigo,
before and after. So let's go before and
after, before and after. Safely go from, say
here, That's it. Before you see. Now my
focus is just a waterfall. Go up. How cool everything looks. Everything looks kind
of neutral color, but there's also a little
bit of cinematic look. That looks really good to me. So if we go all the way, is if we just
de-select everything, which is all d. First
thing what we did was color space transformation
to brought it back to wreck seven
or nine here. Looks pretty okay. And then second thing
what we did was took care of the exposure. So broad the highlights up with the gain and sort of
bring broad the shadows, shadows a little bit down
just to create more contrast. And in this node, what I also did was
color boost and shadows. I'm just going to
activate the node, is the color boost
and shadows I did. Just by this node you see how
much difference it makes. And I'm sort of getting the
most out of my parade here. In the beginning, my
parade was just like this. And they sometimes the period
is like really narrow. The flatter the image is the parent of
latter period goes. The more colorful, the more bright and contrasty
that image is, the more the period
expense here. Or you can also see
this little wave form. So you see in the beginning how narrow it was and then we
expanded it that much. But I prefer parades though. It would also help you to see if something is clipping or not. After parade, what we did, we didn't do anything with here, but usually I use this node
to change the white balance. White balance looked pretty
spot on and here what I did, I sort of enhanced the reds. So just put more
colors in red so easy. It's a little bit of pop. And here I kind of
desaturated the greens. It's a very little difference,
but it just makes, so my students, so here are the greens are a little
bit desaturated. And here I sort of change the color of the greens
because there were other, a little bit too green for me. I wanted to make this image
like a bit more summer vibe, bit more warm, so I added
more warmth to their grain. And then finally we
added the vignetting. This is what the image looks. So before and after. So if we want to do the similar setting
on the other image, you can just go grab still, go back to the previous
image and go to gallery. This was, I suppose the image, so I would just do apply grade. You see, one type of lead is not applicable to everything. So what I'm gonna do,
I'm going to de-select the or if you want. We can also start
all over again. So here we have a
nice evening view. I'm just checking
the master shot, so I would maybe put it here. So this is a really
complete them. And so we have the reds here, we have the greens all around, and we have the blues. So here I can show
you a bit more. So this node, what I would do Effects Color Space transform. I would do DJI D gamut. Here, we're exhaling R9, get rid of the effects. And then the first thing,
what are we going to do is to the primary curves. So here if you see there's
quite some dark areas in red. The blues and the greens
are a little bit lifted, but there's a lot of
room here in highlight. So you can already see that
the image is not that bright. I'm just going to push it. Maybe say until here. Because I'm also
want to make sure my blues are not sort
of blowing out here. You see cheers until here. And then what I'm gonna do, I'm gonna bring my
gamma and down. Just, I'm doing this just to get more contrast in the image. I know the rates are going down, but I have a little
bit of planning now. Just put the gamma until here
and then what I'm gonna do, these areas became a
little bit darker. So I will just
increase the shadow very gradually, very gradually. You see, now, if I
increase the shadow, only place majority
of the effect change. What you see is in this area. So we just leave it
here and now just, let's just go before and
after pressing Command D or D. So you see how much life we have
brought into this image. That looks really cool. It's already looks really nice. Maybe. Let's just choose this
as the master frame. And now what are we going to do? We're going to be playing
with some colors. So here what I can do, I would, let's try with
the presets right here. So let's say red. If I see my block here, node here, I see these
things are selected. But if I want to select
some more things, more reds than what I would do, I would go here to
the qualifier that I see that these are the
stuff, what is it? Select it in the image. I will just increase
the bandwidth. There is not just read
a little bit of yellow, a little bit of orange, which is also selected so that we can do some
changes in the color. So here what I'm gonna do, go to the primary wheels. It's going to change
the hue because I don't want to make it sort
of greenish type. I wanted to make it more pink. Ish maybe just until here. Just 53. It looks right now the red is kind of popping
out a little bit. Then what I'm gonna do
at node a parallel here, I would take care of the green, so I would go color greens. So now if I go here, there's barely any green
selected and go to qualifier because they might be the greens in the image
might not be on this color. Just increase the bandwidth. So we want here all
types of green. We want to change colors
of all types of green. You can also just
move saturation to see if you can select the areas. I think this is the only
proper greens in the image. Here with hue, we're going to
make it a little bit warm. So if I go here, it becomes
kind of like say dark green. Feature school 53 or so. Is he already so
mySchoolFriends? Then if I'm going
to just go here and I'm going to increase
the color boost. Just to get more
pop in the image. Maybe I'll just select
that and maybe de-select that because that pink
looks a little bit weird. What I will do something
with the curves. So I just want the red to me maybe pop out a
little bit more. Just meant to here. Going more towards
the green side. So we don't want if you go here, most of the greens
would be also selected, but I just want the red to be higher so that these
buildings to pop out, you see there's a very
little gradual change. So I'm just going to
bring this bar here, the greens out because
I don't want any greens to be super popular. You see all this whole area. There's a difference. Then as they go
before and after. Now what I would do, I would also change the
color of the blues. I go, let's just do the graph, the curves, so I
would go parallel. So we should be in Hue
vs Hue Saturation. And I just select here. Now I'll show you
a little magic. So if I go down, is either
color of the water changing. But I want the other way. I want a little bit
of teal in the water. Not too much green. Cheers. Cheers to very little. So if I go before and after, you see before and
after, before and after, maybe a little bit low, not trying to make
it to fake laughter. So if we go here and just select all the colors
and then de-select that. If the, how much difference
we made in the image just by changing these
colors, very little. Then here what I'm gonna do, I'm just going to do a
little bit of vignetting. But here what I will do, I will just select these houses. So these are kind of
like my center of focus. Maybe this area. So now it's selecting this
area if you see the nod, but I want to invert it. So anyway, it go in Word. I go here and then I'll
just go down slowly and see if I did anything good. Go before and after, after. Let's play the footage
from the beginning. So here what you would see is that these areas are also dark. So what I would do kind
of make this broad enough go at the beginning
and then I would track it. So how do you do tracking? You go here all the way to
the beginning and then play. So the software is going
to attract and keep the circle just over here. Yeah. So now I think
everything is tracked. Let's go before and after. So now let's display the image. See how much life
there is in the image. This was the before. There's the after. See how cool it looks. So yeah, that was it
from the color grading.
12. Conclusion: So guys, that's
it for the class. And I hope that
you got some value from this drawn masterclass. And if you have any questions, let me know down in
the comments below. And if you enjoyed
the class, give a, give a review that really helps me to make more
of these classes. And yeah, thank you so much for watching and I'll see
you in the next class.
 Adi Singh, Videographer and Youtuber