Transcripts
1. Welcome & Class Introduction: If you are a beginner to video editing in
Adobe Premiere Pro, then you are in the right place because today I'm
going to be teaching you everything you
need to know on how to edit amazing videos. You see once upon a time, I was also a beginner
when it came to video editing and learning
Adobe Premiere Pro. And it can seem quite
a daunting prospect. However, I know this and this is why this course is
taught in an easy to follow along manner
where I'm going to take you through
things step-by-step and show you exactly how I do everything so that you can follow along and learn at home. My name is Dylan, I'm a
full-time content creator. I've got over 60,000
subscribers on YouTube. Five years of video editing
experience in Premiere Pro. And this course is going to
cover literally everything in Adobe Premiere Pro from starting out with
the basic layout, how to cut a video
to color grading, motion graphics, everything. And who knows if you're
looking to get into YouTube, I'm going to offer a few gems as well as that is my background. So I hope you
choose to enroll in this course and
there'll be a class project linked down below. So please, once you've
finished this course, have a go the class projects, create your own videos and
I'll give you some feedback. And if you go onto
enjoy it lever of view down below as it
really helps me out. But without further ado, let's jump into the first
section of this course.
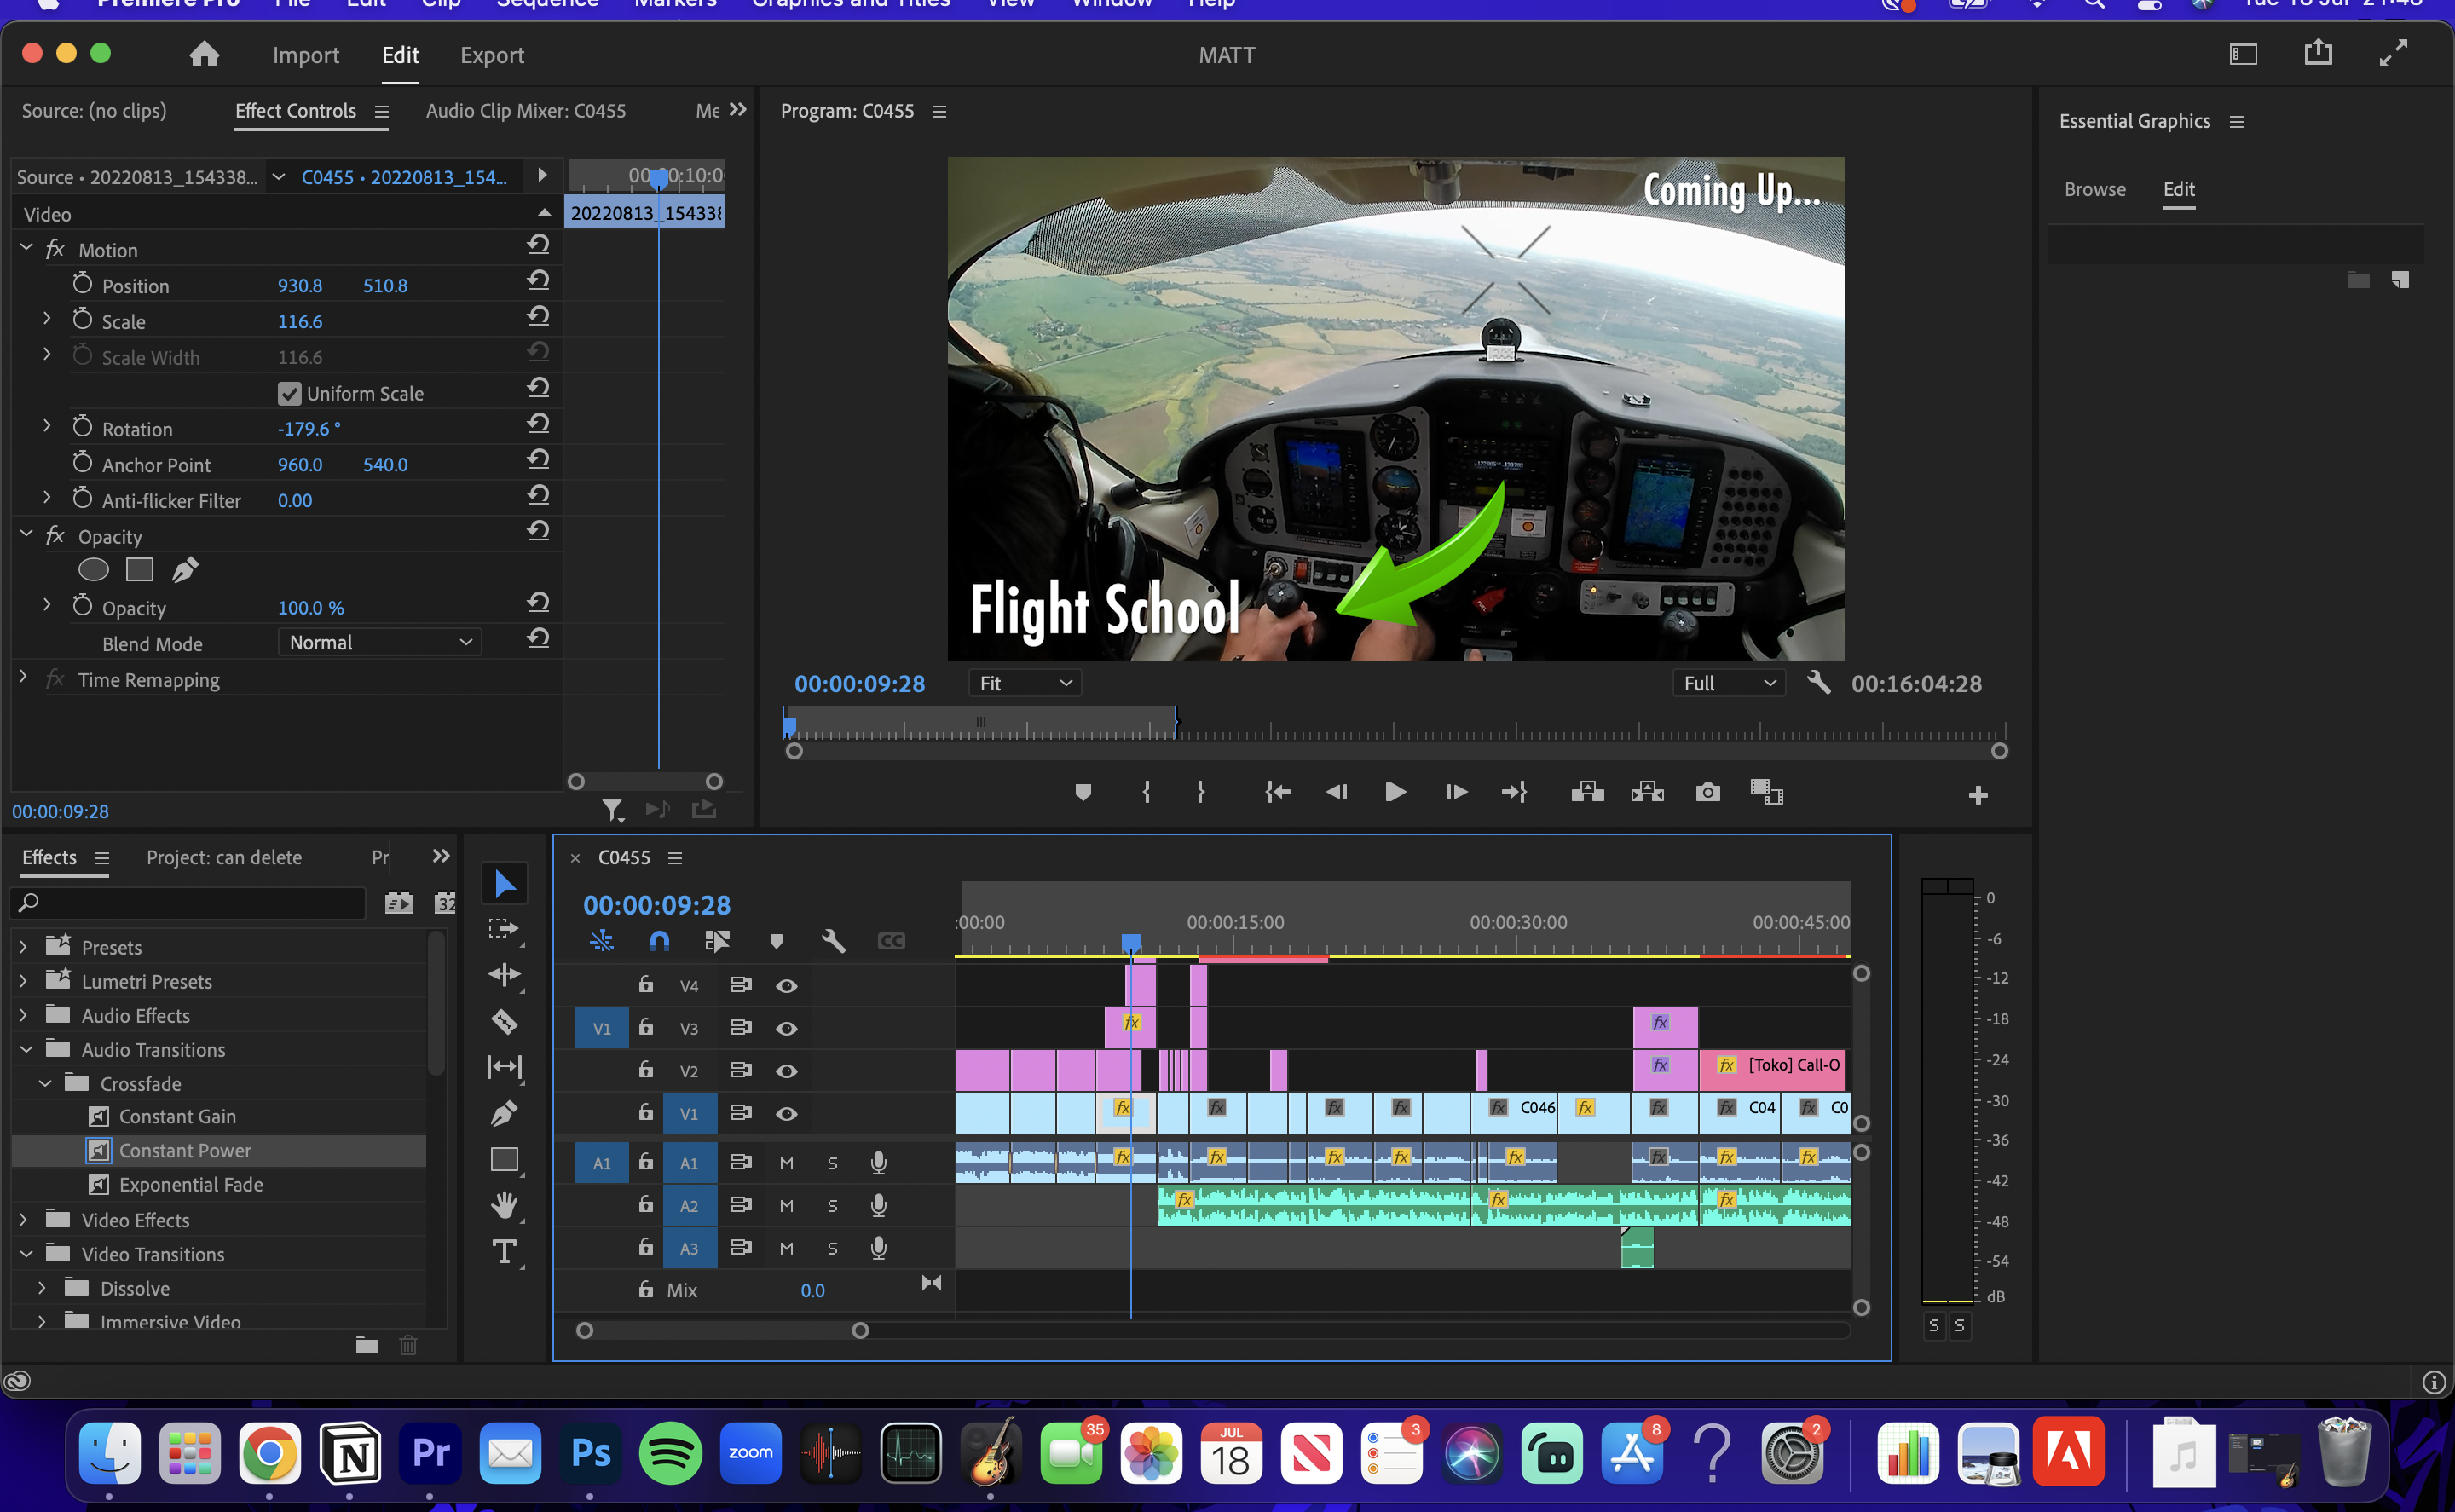
2. Premiere Pro Workspace: Welcome to class one. In this class I'm going
to be taking you through how you can open up
Adobe Premiere Pro and make it to the timeline so
that we can import and add our own clips to edit for future classes and
future videos. At the bottom, you'll notice
Adobe Premiere Pro 2023. Click on that and then
it will bring you up to the Adobe
Premiere Pro screen. It's gonna look something like this if you're new
to Premiere Pro. And it'll give you a
few little tips and tricks if you really want
to read through them, we're just going to close
this down as today. I'm gonna be taking you through everything that
you need to know. The first thing you
want to do is select New Project in the top
left-hand corner right there. And then it's going
to bring up some sample content that you can find an edit if you don't have anything yourself that
you want to add it with. But all we're gonna do at
the top left-hand corner, again, it's going to
say project name. I'm going to change
this to Dylan's course. And then in the bottom
right-hand corner down here, you'll notice it
says Create and the project location at the top
there, where my mouse is, that is where the
file that we're creating is going to be saved as so if I select
M1 Dylan fab 2023, this is the folder where all of the materials saved from this project is
going to be located. So that's great, that's
where I want it to be. And then I'm going to
select the Create button in the bottom right-hand corner. Once I select that, it's going to bring me up to the homepage for
Adobe Premiere Pro. This is exactly what
you're going to see every single time you open up a
video and begin to edit. Now, the very first
thing that we're going to want to take a look at is what is happening on the screen. The top left hand corner
is going to say source. Now this is all of
the clips that we're going to drag and drop
into this project. This is where all the clips are going to be located in
the source section. Now you've got Effect Controls here is where we're going
to add effects later on, like fade-in, fade-out,
adjusting the volume, adding call motion graphics,
that sort of stuff. We're going to be
controlled around here. Audio clip mixer, this
is what we're going to alter the audio below this, I'm going to actually go back
over to the source so we can see what clips
we add below this, just above my little face cam. Again, we can drag
and drop media here is going to have
all the effects again, like we said, a similar
panel to drag and drop onto our project file. And this is where we
choose the effects and above is where
we control them. And again, just
basic stuff here. We've got a few
little adjustment tools that we use throughout. So e.g. drag-and-drop,
Track Select. I'm going to cover all
of these due very soon, but just be aware that all of these tools have a
different function, whether it to be to add text, to move stuff along, to cut and split clips, or to do a few other functions. Now the timeline is where
we drag and drop all of our logos or sound effects
or music or videos, and they all come up on this lovely section at the bottom. And then that is where
we edit our stuff. The top right-hand corner as central graphics
is up right now, depending on what panel you select from this drop-down menu. This is what will come up here. So for color grading,
we'd have color up. If we were looking at what clips were in
the assembly panel, we'll select assembly
and it comes over here. So really, again, it sounds
very complicated right now, but you just have to trust that. I'm just making you aware of what everything does
and what everything is. Don't worry about understanding
it completely right now because this was
a whistle-stop tour. We're gonna go through
every individual section very soon in a lot of detail and it's going
to become super clear. I promised, but I
just wanted to get a real quick overview done over some of the things that
are in Adobe Premiere Pro. So what I would suggest doing is making sure that
before you again, you select the
editing workspace. This is just a nice
default workspace. While we're going to
see everything that we need to start with
on the screen. Right now. I'm going to take
you through how to add clips to your timeline. So firstly, you want
to go to your desktop, go to the folder where
your clips are located. And then we're going to
simply drag and drop those clips directly
onto the timeline. And so right here is all
of the footage that we're gonna be working with
in today's course, we've got some footage walking
around as if it's a blog, some footage of me sitting down and we're going to
create a really cool video. And then I've also got
some computer overlays where when I'm talking
about stuff on screen, I'm going to have a face cam and then actually have myself. So we're covering a wide range of stuff in today's course. But to start with,
I'm going to add the default that bulk
footage to my timeline. Now that bulk footage is
mostly media is sitting down on in front of the cameras, so I've highlighted it. Then I'm going to
drag and drop it onto the timeline sequence. It then begins to import all of the thumbnails and the videos. And you'll see that
this section up here has now got my video right here. And there's me talking through all of this
stuff we're about, as you can see here, 31 min. So there is exactly 31 min of content I've added
to this timeline. Now another thing
that I am going to do is I've got some other
stuff that I'd like to add. This is overlays
from my computer. I'm going to drag
and drop those. And then I'm going
to highlight them, drag and drop them onto
my timeline as well. Now I'm going to make sure that these are a bit further back. We're going to push these
away to the back because for now we're not going to
be working with them. But as of now, all of my clips that I'm going
to need in today's course, in today's video editing, projects are all
on the timeline. I think that that is a great way to kind of go about starting off your first edit is to
make sure that all of the clips you want to use in the video or on the timeline. So we have everything
organized in one place and all you have
to do is drag and drop. Now again behind me,
behind this face cam, you'll notice that
all of the clips that I've dragged and dropped or exactly on the Dylan's
course section. If I was to change my layout
to assembly really quick. You'll notice again, here
are all of the clips in today's project located
in the assembly panel. But I'm going to
head back over to the top right-hand corner. I'm going to select the
editing layout again because I think this is
the easiest as a beginner. It is now time to start editing. Now the way I'm going
to take you through this editing process
is that I'm going to basically go along and edit the video as I would
normally edit it. Now there's a few things to note about why I'm doing this, but I'm going to save
that for the next class. So thank you for
watching class one. Let's jump into the class too.
3. Important Editing Tips!: So welcome to class. In this class I'm
going to be taking you through a few video
editing principles that are going to save you
a lot of time and going to help make your process
so much more efficient. Now as a video editor, I've learned over
the years what is the best way to go
about doing stuff. So e.g. if I was to
add music right now, all of the music that I want
to add to this timeline, what will happen is that once I had the music at
the bottom here, if I then wanted to cut the clips of me
talking in the video, I would end up cutting
and splitting up the music, making
everything disjointed. If I added the music
without cutting the video, then I would have to readjust the music every time
I cut the video. This would mean that the process of editing becomes a lot slower, a lot more time-consuming. Now, over my seven
years of video editing, I've learned a lot
of tips and tricks. And in today's course, the way I go about editing this video is going to include all of those
tips and tricks. So it's easiest if
you're a beginner or somebody who's looking to
improve their video editing. If you follow everything that I do in the order that I do it. So I just wanted
to make that very clear because it is
a key principle of video editing that the
order you can do stuff in can help make your
videos so much better. And also when you find that when you become a longer-term editor, you really want to be
as quick as possible and get projects done
as quick as possible. This is exactly why I want you to follow the exact
order I do stuff in. So again, it sounds like a
rather silly thing to say, but it took me years
to learn this. So first off, right now, the only things I'm adding to my timeline of the video clips, that base of our projects. All the other extras, the logos, the music, they're all
going to be added later on. But right now we're focusing on the base and as well
in today's course, the way I'm going to
teach you is that I'm going to show
you and talk you through the exact
way that I edited video so that you can
copy along at home. And I think by me doing this, it really helps you get a
greater understanding of how to truly edit a
video to a high standard
4. Cutting Together Your Video: So welcome back to class three. And this one we're going to
be taking a look at making the first cut of our video
in Adobe Premiere Pro. So whenever we create a video, regardless of what
the video is, you, there's always gonna be
bits of dead space, e.g. like here, or here, where in the video the
person is thinking or the person's not quite doing what they was meant
to be doing. So e.g. we can often spot dead space as we like to call it by
looking at the audio. The audio is this bottom line here on the timeline, right? The top half is split
into visual elements like logos or graphics or
anything like that, along with video, the bottom
half is split into video, audio, sound effects,
music, and so on. So that is quite a key and
useful concept to understand. But to start with, one
of the first things you want to do as
a video editor in a Premier Pro is to
simply cut out all of the dead space that's not
being used within your video. So to do this, what you do
is if you're using a Mac, you can press C for shortcut. And what this does, it brings up a razor tool. So this razor tool right here is what we're going to
use to split the clip. If C doesn't work,
then simply head over to this menu.
Click on this. Once this blue is highlighted. And what happens is, you'll notice is that if we then go on to our
timeline video clip, we'll notice that
we can split with this razor tool different
elements of the video. So by splitting it up, what happens is we're essentially turning into
separate pieces of video. Now this is very
valuable because e.g. now, if I was to then
head back over to my selection tool by clicking
or pressing the shortcut. If I zoom in on my trackpad, I get closer into the video
timeline and I can really get close to those edges of
the audio clips. So e.g. I'm then going to go in-between
the two video clips, where I just literally
split the clips and I'm gonna drag by
clicking and holding and moving left and
get rid of all of that dead space in
the video clips. So by dragging and
dropping this, I'm able to get rid of
the clips now as well. One thing you can do is you
can split the razor tool, the elements of dead space off. So what I did was I split
here and I also split here. I can then click on that individual clip now
because we separate it by using the razor
tool and press backspace, backspace or delete, and
then that clip disappears. Another thing that
when you get advanced the video editing is this
process can be done a lot quicker by using
shortcuts Q and V, e.g. so you can literally zoom in, find the start of the audio
which is going to be useful. And then press Q or w, sorry, by pressing Q at trims
that the start of the clip and by pressing, pressing W at trim to
the end of the clip. But let's say e.g. right here, if I wanted to trim the start of this clip and I use
the shortcut queue, I'd recommend trying
the shortcut. I just accidentally delete
all of that initial content. So what I want to do is Edit
Undo at the top right there. So if you want to make changes
by going forward or back, head up to the top, select Edit, and then undo or redo based
on what you want to do. So what you do in this situation
where I'm talking e.g. it's all useful content. There's a break of dead space
that I want to get rid of. But then I'm talking again. So this is when the razor
tool comes in handy. You'd select the razor tool. You go to that middle
of the dead space. It's split right in the
middle of that dead space. Go back to the selection
tool, zoom in, then simply drag one side to make sure that
there's no dead space. And then drag to the other side to make sure
there's no dead space. Now, alternatively,
what you can do, e.g. if I wanted to read,
drag out those clips because let's say I
trimmed them wrong. All you have to do is, let's say if I trim
too much audio, you just read, drag it out
like that, exactly like that. Nice and simple. And we're looking for here is fused to get zoomed
in and to really trim close to the edge of this audio so that everything is nice and smooth and so that
the audio is clear, concise, and doesn't waste a lot of time, not all
of the dead space. Nobody likes dead space
and video editing, whether it'd be for
client projects, YouTube videos, social
media projects. We all like fast-paced stuff nowadays to keep you engaged. So by deleting that dead space, that is exactly
what we're doing. We're making sure
the videos engaging, which is key for whatever
project it is, let's say e.g. in this situation right now, we've got a gap, right? We've got this gap right here. If I want to subsequently move this video
clip to the left. Oh great. They're
gonna be joined. Once I quickly zoom in, go over here and drag and drop this on a
drag-and-drop this back. It's nice that they're
nicely joined, right? However, what is
actually happened is dragging drop that clip. I then created a gap here. So I move this one across Baba and then
created a gap here. So you can see that if you have multiple different video clips and you're trying to
edit them together, this is gonna be a real
time-consuming problems. So what we wanna do
is in this situation, we want to double-click and
it will say ripple delete. And then what ripple
delete does is it makes everything to
the right of this clip move close and to the left and join this other clips that
everything is now joined. Everything's moved in
the same proportion. Now e.g. another
thing you can do, a very cool tool is the
track select forward tool. By selecting this,
what we can do is we move to whatever point in the
timeline we want to move to Then by clicking e.g. here, it highlights
every single clip to the right of it. So e.g. then I can move every clip to the right of the cursor
where I selected later on in the video or I can
move it closer to is a very useful tool when you've got multiple
different elements, not only videos but
music and logos, you can use this tool to
move everything all at once. Basically, you can
change it from the right to the left if
you click down and hold it. But what I'm gonna
do right now is Vi, the exact same processes
that I've just showed you. And for the reasons
that I explained, I'm going to trim all of my video clips and get rid
of all of the dead space. So that might videoclip
has a base layer of engaging content
and I'd like you to the same home if you're
working on a project. And I thought to say
that a big advantage of using Q and W, the shortcuts, is
the one we actually use Q and W to trim the
start of the clip, e.g. it automatically
moves everything to the right-hand side inwards. So it's like a ripple
delete plus a trim in one. So it's very useful
to learn to use q and w when you look at
the actual worldwide. But when you look at e.g. the
worldwide rankings, so e.g. right here, I made a
little mistake, right? This section right here is
where I made the mistake and this is where I repeat
the same phrase again. So what I wanna
do is I wanna get rid of this little
section right here, because that's the
mistake phrase and then add in the good phrase. So I'm going to
trim in the middle, started this mistake and then
at the end of the mistake. And then in this case what I'm gonna do is I'm going to just going to delete it,
ripple, delete e.g. and then I'm going to tidy
it up to make it flow. The previous clip,
what UCL ranks e.g. ten finishes right there. I'm going to press W to
trim the end of the clip, and then I'm going to press Q to trim to the start of the clip. But when you look at e.g.
the worldwide rankings, and it flows very nicely now, perfect just what I was after. Now another thing that
I'm just going to quickly point out is
their right here. I've got two goals at
doing my video intro. So whatever this is,
let's say you've done two takes for a client video
or personal YouTube video, or to takes of certain B-roll. The best thing to do is to line both takes up side-by-side. So right here I've got an intro, a brand new video on
the channel guys. And then on the other side, exactly the same thing. A brand new video
channel guys today we're throwing it back to some old
school student blogs calling the things that I
would personally look for when it comes
to deciding what clipped to use and
what one to delete when I'm going through this
trimming phase in the video. The very first phase of creating a video is I look at what
the lighting is like, what's best in terms of energy, and what kind of flows nicely. Sometimes it's nice to choose a clip that
flows really well. Now what makes a clip
flow is to do with how many mistakes you make and how much you'd have
to trim the clip. Maybe it's just what looks
prettiest or maybe you just, you just like the way you're
looking at sound clips. So that's really what
I'm doing now as well, is not only in my
trimming clips, but I'm also deciding
what ones to use. So e.g. there is this one right here, the second one, you guys today, I do love my energy, but I'd say something
about the lighting is almost nicer
in the first one, I've got a more relaxed tone. So welcome back to a brand new video on
the channel guys today. So I'm going to have a
little chop and change. I'm going to decide
what one I want to use. But also remember that when it comes to the magic
of video editing, if you did two takes, e.g. I. Could say the first
half of the first take and then I could use the second half of
the second take. All I'd have to do
to do something like this is, let's say e.g. I want the intro
of the first clip. Guys today, we're
throwing it back. Welcome back to
the channel guys. I want that from the
first clip and I want to replace that,
that clip there. Welcome back to the channel. I want to replace
it and move it onto my second overall intro. Hey Brandon video on
the channel guys. So I say exactly the same thing. I'm going to split
both clip elements up. Then I'm going to drag both
clips next to each other. So these two right
here that I've highlighted is saying
exactly the same thing. I'm then going to drag and drop the first clip over
the second right now. So welcome back to a brand new
video on the channel guys. Today we're throwing it back to some old school
student blogs content. I've got the lovely
relaxed intro of good lighting on the
first from the first clip. And I've attached that first take to the second take
where I've got more energy, so I've got the best
of both worlds there, or from a little bit of magic when it comes to video editing. So that's another
thing to be aware of when you're creating the
first cut of your videos. So just I'm throwing in
a few little nuggets here that listen, this is going to take you
a while to learn fully and understand fully what
I'm, what I'm doing. So don't worry about all
this stuff just yet, but this is stuff to
think about as you become a better video editor
and just learn about. So again, stick to the
task right now of trimming that very first piece of
video that you've added to your timeline and
making it nice and simple, getting rid of the dead space. And then we'll go on from there. So there we have it right now, I have just finished up trimming my introduction
to my video. I've trimmed my video
clip that was all one to start with,
unless there's two. And now you can see that this clip has been split
up multiple times. And it now looks like 20
different video clips. That's absolutely normal. And that is what
we need to do in order to make sure that
our video is engaging, has no their space, and so on. Now a key thing to do in
Adobe Premiere Pro is to be consistently file and
saving at the top right there, or pressing Command and
S as a shortcut to save, saving your videos is a must because if it crashes and
you lose the progress, that is not good at all. Now as well, you notice
towards the end of this video, I've got more clips
that we're going to come onto later
on in the course. But right now,
we're just going to focus on building up and making sure that this
intro is engaging as good. And also it has a lot
of elements to it, that it doesn't matter how
long or short the club is. The stuff I'll teach you can be applied to every single
thing that you add it. So we're going to deep
dive into getting this intro up to a
fantastic level. I don't know why I
keep pausing the video on some rather unflattering
poses, but yeah, right. Let's, let's get on
with the next class. Thank you for watching this one. Your clip should roughly look and your videos
roughly look like this. If you're editing
along nice and trimmed
5. Key Engagement Tools Part 1: Hello and welcome back to class. For in this class
we're going to be taking a look at
engagement tools now, engagement tools are what
we use to make our videos super entertaining to
increase the watch time. And thus whatever project
you're working on, whether it be Youtube videos, the algorithm is
going to pick it up and you're gonna
get more views. Or if it's for a
client base project, you're gonna be able to make
sure that the client is happy because they're going
to watch the whole thing, be entertained and so on. So what we're gonna
do is add graphics to our screen from our computer and add sound effects and audio. Now we're gonna be adding steel graphics to start with here. Later down the line,
we're gonna be adding motion graphics there,
the cool ones that move, but we're going to
start off basic now whenever I'm editing a video, once as we did in last class, you make the first cut of the video by trimming out all of that dead space and emerging two separate clips
together because they had, you'd like the first
part of the first clip and the second part
of the second clip. Once that's done and
you've trimmed up all of the clips nicely as
I've done right here. This is the next step
that I undertake. I made sure that I add all of the small little sound effects and graphics to my video just to make it that'd
be more engaging, right? So to do this, identify a spot where
you would like to add an arrow or a
circle or a logo or anything that it
might be for me in this video that I'm making
right now in the intro. The intro is when you really
hook people into your video, no matter what the project is, the intro is a key component of this video editing rights. So always I'm looking to make the video as engaging as
possible at the start. So as you just saw, I say, what today we're
gonna be reacting to the best universities
in the world. Now what I'd like to do here
is really emphasize this. Now there's many
ways I can do this, but one way I'm going
to choose today via engagement tools is I'm going to add text to highlight
those words. Okay, So as I was saying before, we can add arrows, we can
add circle sound effects. To start with, I'm going
to add a nice bit of text to the front of my video. Now this can be done
via emotion graphic, but right now I'm using text. So what we're gonna do
is simply t for shortcut or come over here and
select the type tool. Then we're going to
find the ruff element and the rough place we want to add the text for me is
that little intro section. I'm going to tap here. And there we go. I can now type on the
screen and notice on the timeline the pink
graphic has appeared. Now this is basically
our texts graphic. So if I type in the best e.g. you knees in the world, right? So now we're at the situation where we've
got our texts on our screen. We now notice that it's
slightly off the screen, so we want to move
it to the center. I'm going to come over,
select the selection tool, drag and drop this text
right here to the center, so it's in line with the Play
button, that little circle. And now when I was
this, if I hit play as the video
clip is playing, as soon as that little purple
box starts with a text in, that's when it pops up, right? So just here. And then when does it end? It ends when it disappears. So now we're going to look at customizing this reacting to. So firstly, you want
to make sure that your text is in line with
when you say the word. So you can choose to have one world come on the
screen at a time. Or you could choose to have the whole sentence common in
a band motion all at once. So this will be the band motion. The best universities in
the entire world for 2023. Exactly like that. Okay, So for me, what I wanna do is I
actually want to shorten this clip so that when
the last word I say, in 2023, the clip
is going to end. Let's say you want
to edit the text, you can simply press T,
select the type tool, come over to where the
text is highlighted box and you can delete
it and type again. When it comes to customization, we'll come on to
that in a second. But something I like to do and a key video editing tip here from somebody who's
been in the game a long time is rather than have all of the texts
cap at the same time, having one-word
come up at a time. As I say, it is really
a great thing to do. So what I mean by this is it's going to say instead
of all of it at once, it can be like the
best universities in the entire world, etc. So that is what I'm
gonna do today, one word at a time coming
up in line with when I say the words because
it's super engaging. Now a key pro tip That's
going to save you a lot of time is that before we
actually split up this clip, the texts clip,
and add the words one-by-one to our, to our video. We actually want to
customize the text first, get it in the right
font, the right shadow, and everything like that
before we go into edit it. So if we simply select the text by clicking
on it on the timeline, zoom in there so you
can see it better. It highlights it in
the right-hand corner. We'll see it automatically opens the essentials graphics panel. I'm still in the editing layout. What we can then do is on the edit section,
select the text. And it brings up
this massive menu of all this stuff
that you can do. What we're gonna do is
select text fonts here. And we're going to
choose a font that we might want to work with. So for me I'm looking
for something maybe bold because I think that
always helps to stand out. Not quite that. I do. Yeah, I'm gonna go with one
of the first ones I selected, the Ariel black e.g. then I'm going to add a shadow. Shadow is what you'll see. Your background is
this right here, so you can add a background. You can take the
background box if you want to make it
more see-through, bring opacity down to zero. If you'll make it fill up, bring it all the way to the top I'm going to leave
background of stroke is something that you can add an extra highlights
on the outside. I don't really use
this too much. Phil is the color of the text. You can change it around. White is often a great
color to use and have. But one thing I'm
gonna play around with now is the shadow. Shadow just emphasizes your
clip ever so slightly. I'm going to take the shadow to black and then I'm
going to scroll down. The opacity can
stay close to 100%. I want the distance
of the shadow from the words to
be just above zero. And then I want the thickness
to be just ever so slight. And I want to turn down
the size spread to zero. I'm going to make
this 100 per cent. Then I'm going to change
the angle actually of the distance that it's
away from the texts, the shadow that is
so you see that now the ankle moves
into different way when I increase the distance, make it a bit smaller, make it a bit closer. I just wanted to
ever-so-slightly emphasize what I'm
saying with the text. So there's the
shadow customized. You can't see it too much
because I got a little black on black going on here. But if we make it bigger,
you'll understand that it does actually
make a nice difference. If you want to make
the text to italic, you can change it here. Make it bold, change it here. Make all caps. Do it right here. I'm going to leave
this as all caps. And then I'm also going to
increase the font size a bit because I'm going to
have one more cup at a time. I'm going to make
this a 191 font size. I'm going to actually
go back to my text tool pressing T. I'm going to delete the rest of
the text, right? Because I just want one
were to come up at a time. This is exactly what I
want to have my screen. Another very cool piece of knowledge that
I've gained over many years is if you want the text to come up
directly in the middle, we're customizing the first
and only texts layer we have right now so that when
we add extra texts layers, all of these default
settings are applied. I'm going to select
the center line tool. Then I'm going to move by
having my arrow tool back out, drag and drop this clip
back to the center Screen, going to resize it
again slightly. You don't always have to
change the text size here, you can just drag
and drop the box. Now this means that with this central line
setting on the when we add new text is automatically going to
come to the center. So now what I'm gonna do is
now I've customized the text. I wanted to say. When I say v, I want that
to come up when I say best, I want best account and so on. So firstly, I'm going
to drag and drop this text layer to the
length of the clip. So this is exactly where I want my text to end because I finished saying the sentence I
want to highlight. Now a little cool trick we
can do is get our ripple delete out right here, raises all sorry, razor
tool and split the clip. Well, we want the text to end. Now, if we have this magnet
on here, snap in timeline, it basically means that
whenever we make adjustments, if they're roughly close
to each other, e.g. like, it's easier for me to now stop the length of that clip at the split because the
split just acts as like a little magnet and it
pulls stuff together. So that's why I've
split that clip here. I'd also always
recommend splitting the audio and the image
together at the same time. Now we have split
that clip here. The text is easy to drag
and drop right here. It just gives you an
idea of what's going on. I'm now going to split up
after every word I say, the texts layer, right? The best universities in the entire world for 2023. Cope. So now I've split up the text. At the moment. It all says the same
thing we're now going to do is change the words
of that text, right? So they said we're going
to leave that as there. The second one is going
to change the best. So I'm going to press
my T for text tool. Highlight that. Type invest. Perfect is in the center. Same again, select the T for text tool universities was
a nice long word there. So now we're looking
something like this. And again, finishing
off this whole process. And I want you to do exactly
what I'm doing here today. Because choose a phrase from your intro within the first 20 s and highlight it
with some sort of texts to really
make it stand out. So I've just
finished doing mine. And this is now what
it looks like, right? I'm going to turn up the volume
so you get an idea of it. The best universities in
the entire world for 2023. Now, fantastic that it just adds a bit of
energy to the video and it's really what
we're looking to do. Now, if you've messed
up the timing slightly, you can adjust it without having to edit the clips. So e.g. maybe I want to universities
to come slightly later. I select the university's
texts bark has now be split up the text bar into seven
or eight different clips. And I drag and drop it roughly in line with
what the audio starts. That's a nice low life hack
right there for analysis. The audio can also
guide your visual. So like wherever you see the audio star that might
represent a new video, a new cue for us for a visual. Now going to drag and
drop the best to fill up the space home and do the same again in
the stars to be later, entire stars a bit earlier. So I'm going to shorten
in their increase in tire and the rest of
it works quite well. So it's all about just ever so slightly when you're editing. Once you've created
the base layer of emphasis, the
engagement tool, which is slightly
fine tuning it, okay, engagement tool one done, and that's all to do
with adding texts. Now while we're on adding texts that let's say if you
wanted to just add a little sentence or
paragraph text tool back out, type in whatever you want in the entire world and Tableau. And you can customize it
exactly like we did before. So when it comes to tax, Let's say if you wanted
to add a load of small text to the bottom
of your screen as well. Because text is a key
engagement tool that everybody uses and it is often one
of the most powerful ones. Again, you simply
select your T and let's say this time you didn't
want to do something bold. You just wanted to type in some small neutral text, right? So again, we just undo
some of these settings which changed the form back to Arial, the default setting, which is somewhere
around here, right here, with unhighlight that the bowls, and we'd get rid of the shadow. And then we get rid of this. And you can see what
we're coming back down to just normal text. So e.g. here we're trying to get
normal texts, normal text. Text. Delete it all, type in. If you are enjoying this course, don't forget to
leave a review e.g. right, then if it's
in the wrong place, simply tap on the box,
tap the arrow tool, tap the text, move the box
around however you'd like it, position it wherever
you would like it. Drag and drop the box to adjust the size, put it in the corner, and then alter the
timing of the texts by dragging and dropping this box like we did with the video. If you want to add two layers
of texts at the same time, simply drag and drop your
second layer of text up a video layer up to the
same spot as your other texts. And you'll now see that we have two layers of texts on
the screen at once. You can assembly,
keep on doing that. And that is roughly if you want to customize it
the same process as before, but that is a text overview
as an engagement tool, a very key engagement tool. That is how you're
going to work with it. You know how to
change color, change the font, change the size, direction, length, how to
split up all that stuff. You've now gotten the locker.
We're now going to delete this because we don't want
this this additional text
6. Key Engagement Tools Part 2: Another cool thing that we
can do to really emphasize the text is to add a little sound effect for
when the first word pops up. So how do we go about
adding logos and sound effects and
other engagement tools to our video timeline. This is how we do it. So e.g. we find the folder with all
of the stuff we want to use. E.g. you have to
download PNG images from the Internet or sound effects from the internet to
be able to use them. But in this case
right here, swish, swish and cutscene
sound effects, right? So I'm going to add
these to my timeline. Simply drag and
drop to the bottom half now because it's
an audio effect, then you'll notice that all of these other sound
effects that I have now downloaded and got into
my Premier Pro project. You can find Freesound
packs online, just go on YouTube and find
some free sound effects. And you'll find some libraries
where you can download sound effects via YouTube
videos, download them, drag and drop them
straight onto your page, and then listen and
choose what sound effects you think would
work best for me. I think this bubble
pop sound effect to the bottom here is
going to work best. I am now going to drag
and drop and trim that bottom audio clip as we've done before
many times now. And then I'm going to
drag and drop it in line with the first
bit of texts that I, that I have on my video. So as soon as we hear this sound effects
at the same time, the bubble hop Santa Fe
is going to come in, there, is going to then
come up on the screen. Okay, so let's play through
to the best universe. And it is, it works quite well. It's a tiny bit loud right now. So a little trick, we're
going to look at audio bit more in the next class, but we'd want to lower
that audio down. Okay, so we're gonna
save that for later on. But that is a rough essence
of what we're working with. So as well as adding call
audio clips like that to really emphasize the texts that is emphasizing the video intro, making it really engaging. We can also add some
additional emojis, e.g. in my video right now
I'm talking about the best universities
in the entire world. Maybe I'd like to add
a few little what our graduate caps to
my timeline, e.g. so if I find the emotive, I like this one right here. Drag and drop it straight
onto the top layer of my, of my timeline. Now we always want
to make sure that we don't drag and drop stuff over the video because then we end up deleting the video as so. If that ever happens,
press Command Z or edit, undo, and you'll get a
second chance at doing it. E.g. never drag it over
your other clips like this because then you basically make the other texts we
created disappear. So again, Edit, Undo or Command said there's a
shortcut to go backwards. I'm, what I'm gonna do is find a place to add this cool emoji. Maybe I'd like to add it just over the longest
word in my intro. Universities double-click
on the object on the screen and then highlights
up the layer that I've added to my
video at the top. And then I can use
my trackpad or use the arrows to make it
bigger or smaller. Exactly the same
process as the text. So maybe I'm going
to add this right here in-between the u and the n. But I wanted to start at
the same time as the word. So if I zoom in, I'm then going to drag and
drop my object, my graduate hat, to start at exactly the same time as
the university's texts. Now the magnet tool, which is should be on your
screen automatically. It's great to have on
because as we said before, it helps snap it into
exactly the right place. Now if we play this little intro once I've trimmed
it down to the end, that the university is what? We're going to have,
something like this. The best universities in the entire world that
looks at very nice indeed. So let's play the
whole short intro that we have going
on at the moment. So welcome back to
a brand new video on the channel guys today
withdrawing you back. And you know, I'm watching
my video right now and part of me thinks that
in their mission to always strive to make
the most engaging video possible. Maybe I
don't need this. Welcome back to
the channel guys. Maybe I can just go
straight into today. We're throwing it back to
some student loans content. So in this engagement
tools less than so far, we've looked at adding texts, customizing the text,
adding logos and adding sound effects and splitting up the clips to
make it engaging. Now another cool thing we can do is add stuff
like arrows if we wanted to highlight something within the video. So e.g. I. Might want to add an
arrow right here to highlight screenshot that's
coming later on in the video. So again, drag and drop it onto your timeline may show
us in the PNG format. Otherwise you're going to
have a horrible background. And then let's say if there was a little
screenshot from the video, the later on that I wanted to teach people at the start with. Then I would go to
the end clip of my video where I'm going
to find the screenshot. And I would add that
screenshot, started my video. Now this is the screenshot
that I want to add. So if you've got a
screenshot from later on in your video that you want to add to the start of your video. Simply hover. You'll click your
mouse cursor and your line here over the clip
that has the screenshot. Then we're going to
select this button right here, export frame. We're going to
choose the location greatest going to
my main folder. We're going to write test. I'm going to scroll back to the start where I just
laid down the arrow. I'm going to find
that screenshot. Drag and drop it onto the
same place as the arrow. And now you can see that
we're making progress. We're adding another
cool little effect to the intro of our video. We're now highlighting some
texts that is coming later on in the video to
really make people hooked and engage
with the video. The same principle can be applied for any
photo and the image. Anything you wanna
add at the start, you can do it exactly like this. Now, I want to make this
screenshot bit bigger. So what I'm gonna do is
I'm going to double-tap. He then brings me
up the corners of this piece of the imagery. I'm then going to
drag and drop it. I really want people to see the University of York is
what I'm looking at. And then I want to change
the position of the arrow. So I'm gonna
double-click the arrow. I'm then going to maybe
even rotate it around. So when I hover near
the corner, right? Yes. And I'll put it right here. Then. We're going to have
something like this season, the entire world for 2023. Now, this is a series that
I used to do all the time. Since I've moved on
to live with Dylan. I haven't been as
active on the scene, but trust me, today I'm
back with a nice worldwide. And then I'm going
to drag and drop these two clips to the
point in the video where I feel I'm talking about
these university rankings. So whenever you've got Eclipse
and you're highlighting something with an arrow with
the screenshot on the video, you want to make sure
that those two things appear directly in correlation to one
you're talking about those things says no
point me being like, Welcome back to the
channel and then having random clip of
a university rankings, I have to put these clips on when I'm talking about
university rankings. I've added a screenshot from later on down the
video that shows a university ranking for UCL. And I've got a
comparison between one ranking and another
ranking, right? And that's what
I'm highlighting. This is something that I talk about later on in the video, but by kind of teasing it
at the start and the intro, the video, it keeps
people hooked. That is why we do it. That is why it's always good to have a slight teaser element at the start of the
video. Now, if e.g. I. Hid all of my extra layers, if I didn't have anything. I'm just talking about it. It's not as engaging. As soon as I add a
little screenshot, it becomes a little bit
more engaging, right? As soon as I added arrow, even more engaging
and as soon as I add text is the icing on the cake, it just makes everything
that tiny bit more engaging and that's what
keeps people hooked. Now another very
cool thing we can do is firstly, add a slow Zoom. I've shown you how to add all
of these elements, right? You know how to move
arrows, add text. One thing I would say is
if you've added text e.g. to your screen and you now want to move the image
or the arrow right? You'd normally
double-click on the image. Happy days. Wait, why is, why is it moving the
text and not the image? Now, in this situation, right? If you're trying
to move something else after you've
already added the text. What you have to do is simply
select the potluck tool, toggled track lock on
the layer with the text. What this means is now that
we can select the text layer. And so whenever we double-click
on this image right here, the actual image is
going to be selected if the same thing is
happening and for whatever reason you're trying to select the background image. But one of your other layers, like the arrow or the
text is being selected, you just need to padlock
up the layers on the timeline that have the
arrows or the other logos. And then you'll be able to
get to the bottom layer. They are trying to move around. So it's all to do of
layering here on the reason why you're automatically
selects the text layer. So we're going to unpack
these and start cracking on. And remember, that's why I say
if you look at what I did, I added the background image, then added the blue arrow, and then I added the text because that's the
easiest way to do it. It's taken me a while to learn a whereas if I added
the text first, and then you've got to
move around the text and the arrows and
everything else, which takes a lot more time. So doing it in chronological
order and really build up the picture from
nothing to what it is, is the best way to
go about things. As I was saying, one thing
I would now want to do this is moving on to
advanced video editing. But like I said, this is a
full beginner to pro course. I'm going to make a
slow zoom happen here, just to increase
engagement even more. So firstly, I'm going to lock up the paddle
up by the pad, lock the layer with the text on. Same for the arrows. And then I'm going to double-tap and select the background image. I'm then going to go into Effect Controls and the
top left, right here. And I'm going to look at video. Then it's going to say motion. It's going to say
position and scale. Now by moving these
things around, we can change the
position of clips and the zoom levels as
the video goes along. So as the video moves, we can slice Zoom. So this is what I'm
gonna do, right? It's about a slow zoom. Select the start of the imagery, zoom into the timeline. Put your cursor over the
start of the UCL image, make sure it's highlighted. Double-tap both
position and scale. Right? Then we're going to drag the cursor all the way along
to the end of the clip. Right here. Make sure
it's highlighted again. Double-click. And then we're going
to zoom in slash, make it bigger right here. So I'm making it bigger. I don't want the number
nine to go off the page. So I'm going to drag
and drop and move the position of the image
to the right a bit more. And we're gonna get something
like this now if we play it back and make sure
you have two dots At the start and the
end come up for this. And there'll be wrapped
around the ten to 15 mod. Well, when you look at that, it just makes it that
tiny bit more engaging. That is what we call a bit
of magic in the making. And let me do the
same again here. Lovely GI bleed, zoom
in a bit faster. Move that here. Happy Days. If we
look at the engaging, the intro we're building, we've got something like this, yellow Manchester,
and there'll be wrapped around the
ten to 15 model. But when you transfer goods,
the worldwide rankings, ranked like night, the
speed of the zooms there. That also creates an emphasis on the effect that
I'm trying to create. I'm trying to be like, Well,
take a look at this e.g. that's not right,
because when we take a look at this
other ranking, it is like this. And this, That's what speed
of the Zoom also emphasizes. So again, that's a bit more. You'll pick these
things up over time. But just to recap, we've covered zooming in on certain
photos and images, adding arrows,
texts for emphasis, thinking about the position
in which we can add these adding sound effects, adding that single text, we're covering a lot
into them this lesson. So keep going. I'm sure you're gonna get there. And it also, one thing I say is whenever you're
creating your own video, come back to this lesson. Just refer to whatever it is that you want to
add your own video. Refer to a part of this
lesson that covers that. So if you want to add
text, refer to the star. If you want to zoom in
on a clip or a picture, refer to this a little bit. Now. White right here. I want to add a little photo snapshot effect
because I feel like Darby, a very cool engaging photo
sound effects to add. So once you've downloaded
your sound effects from YouTube or wherever
else, same as before. Drag and drop it
onto your homepage, make it in line, trim it down. And then a little
cool trick we can do if we want to, let's say e.g. add the sound effects and
the style of this bit here. And on the started this bit is we can select the Santa
Fe we just added. We can press Copy, go over to the style
of the other clip, and then press
paste Command C or Control C on this highlighted
come over here, command V. Exactly like this. Again, you can see we're slowly padding out and
building this intro. We will thirty-seconds down, we got a very cool effect. Let's save it so we
don't lose any data. Now another thing that I noticed is I'm rewatching this video. We looked at how
we can zoom into a separate image on the screen. You can also zoom in to your videos to make
them engaging. So if we wanted to do this, we want to highlight the SAT and video clip that we
want to zoom into. And then what we can
do is zoom into that. Now if we only wanted to e.g. Zoom into half of this clip, whatever whatever section of the clip you want the zoom to happen on is where you're
going to split it. So for me, I want it to
happen on this whole thing. So I want to start
with a slow zoom from here all the way to here. If I only wanted to zoom to happen up to the
middle of this clip, then our gamma
rays, it's all out. I'd split it in the
Zoom would happen from here, here, right, under that course, I'm going to same processes
before engagement tool. I'm going to effect controls
double-click position. Yes, yes. Scroll to
the end. Yes, yes. Zoom in. Boom. Let's see how this
looks. Now. This is a series that I used
to do all the time. Since I've moved on too long. I'm liking it. I'm just gonna move
it down slightly as active on the
scene, but trust me, today I'm back with the
bank and these worldwide, so yeah, I'm pretty, I'm pretty pleased with
how this is going. Another thing we might want
to do is just as we're starting to build up the intro
now is add a bit of music. Now you can get music
from places all over the Internet for you can pay for it
and get some free, royalty-free stuff.
You can go on. Find that yourself. But once you've
downloaded some songs and they're in your folder, then you simply drag and drop
them onto your timeline. Now it's worth noting
that depending on what projects are on or
using or what is four, you'll probably need
a different license by, let's say e.g. I'll include one of my
own songs that you can practice with non commercially, non online in this video
and course content. But you simply drag and
drop it onto your timeline, making sure it's below all
of your other effects. And then less if we hit
play, what does this happen? What does it sound like? What happens to
any Brandon video is far too loud and we might want to trim the the
elements of the video or the audio clip in line with exactly what we're trying
to create within our video. It's the same process as before. We trim line exactly like this. If we want to split it, we can split it and move
it up exactly like this. If you want, have a
little break in the text, a break in the music to
emphasize the text, and so on. So yeah, this is another tool that we can add to help
create engaging content. So for me right now,
Let's just recap before we're wrapping
up this class, this masterclass right here,
this one has been heavy, but remember refer back to each individual section
as you're needing it. We've added logos,
we've added text, we've added screenshots,
we've added arrows, we added sound effects,
we've added music. We've looked at
why it's important and how we can zoom into text, how we're creating engagement. I mean, goodness me, we've learned a lot
in today's class. I would definitely encourage
you to take some time, process it, go back over
whatever you need to. And right now, I'm going to take exactly the same principles as we've just learned
in this class. And I'm going to fine tune everything at a few more
bits here and there. So we're ready for
the next class. But thank you very
much for watching. Take care, and I'll see
you in the next lesson.
7. Audio, Mastering & Music (KEY!): Welcome to class five. Now in classifier,
we're going to be look at altering the
audio on our video, on our music and
our sound effects. Now, as we discussed
in last class, adding graphics and audio
is a great way to make the video engaging and to
make it flow really nicely. Now we ended off after we added
a few elements like logos transition zooms with an intro that looks something like this. Now I'm going to play it. And what you'll notice
if I turn up the volume, the best you can really
hear what is being said. Because the audio at the
bottom right here, the music, the background music is far
too loud at the moment. So how do we change
the volume of this and how do we increase
the volume e.g. of our audio track where our video in which
we're speaking as well. So for every clip that you want to increase
the volume with, hover over it, it Double-click and scroll down
until you see Audio Gain. Here you can type in ten. And what this does
if we zoom in, it adds an increase as
the audio by ten dB. Now, you might want
to increase it a lot depending on how
quiet it initially is. So maybe you wanna go plus
another another seven. As you can see for me that, Oh, if I zoom in, the audio
is almost peaking. Now, on the
right-hand side here, the audio bar is
absolutely booming, so this is a bit too high. So I'd say that roughly with a clip like
I've got right now, I can roughly judge how loud
my clip is to start with. You're probably
only going to need about an extra three or
four dB on this audio clip. So when you're
playing around with the audio is roughly about listening and seeing what feels right and making
sure nothing peaks. And checking this bar over here. If you make the audio too loud, just adjust the gain again, but this time, put a
minus in front -12. Now for me, is still a tiny bit on the
higher side round here, but it's not permanently
blasting their higher red zone. I'm the audio gain at one
more time by double-clicking, going and minus one. For me, that's about right. It occasionally hits the top. But most of the time we're
in the nice greenish zone. And then if we take
a look at the actual audio clip at the bottom, there's not really
too many peaks. Maybe you could
go down one more. But in essence, that is what you want to do
for every clip now, depending on if you're filming a vlog or a sit down
and talk video, the audio might be constant, or it might not be if
the audio is constant, like in this video right here, because I'm sitting down and I'm exactly the same length
away from the microphone. This short as throughout
the rest of the video. So a cool little
trick you can do is highlight all of that clip, all of the video clips, not the sound
effects and not the music because we're going
to deal with them later on. But just the video
clips exactly like so. It can be the audio
and the video doesn't make any difference, or it can just be the audio. And then I'm going to do
the same process if I wanted to adjust everything. Double-click audio
adjust plus four. Now, every single clip has increased by four, is
saved a lot of time. Now I did already adjust
this one at the very end, so I'm just going to
readjust this one and go down by four. Now, the same process can be done for our audio clips
and our sound effects. Sometimes sound effects
can be a bit too loud. Let's double-check Manchester. And there'll be rankings, ranked ever so slightly
a bit too harsh, often sound effects, we
want them to be subtle. So as we can see, it's quite a sharp sound by the sudden spike in audio there. So I'm going to hover over
these two sound effects since they're the
same audio gain, minus about a five
on these Manchester, maybe even a minus one more. I talking to the minus two, you see yellow Manchester
and there'll be ranked around the rank ligand. And that is exactly perfect. This is exactly
what we're after. Again, we're just adjusting the audio so it's
perfect formula. We're watching it at the clips because there's nothing
worse than having overpowering audio from a
sound effect relative to your voice. The best. The bubble pops, alright, maybe go down by one or two. And then we're going to
deal with the music. So right now we'll come
back to any random video and the music is far too loud now one or
two different things we can do with
this is overall we want to decrease
the whole thing by about ten dB because this is just meant to be
background music right? Now there's a few things we
have to cover with audio. Often, you might want to have
a montage piece of music, whereas loud at the star, then if somebody
starts to speak, you want it to become
a bit quieter. Now, you can do this via fades, but often fading in and out with effects in the effects panel. If we select here,
it doesn't really give us enough control,
in my opinion. Now as a beginner,
I think there's a really easy and
cool way to do this, change this effect and, and have more customization. And I use this now as
opposed to those effects. And it is simply by finding the point where we'd
like to music The suddenly get a bit
quieter and splitting it using our razor tool
like we saw before, and then adjusting the music. So e.g. previously using
the razor tool right here We split the clip about here. Now, this is about 7 s in. So ideally, so we get
a feel of the video. I'd like the intro music to be a bit louder
in the first 7 s, then I'd like it to quiet and
down after those first 7 s. So what I do once I split
that clip right here, the audio clip is I'd
maybe leave this first set of audio now because it's split into two different parts
at a higher dB and volume. Then the other part,
the second part, I want it to be a bit quieter. So I'm gonna go
like a minus five. And then I might even
create a third parts. We get really in-depth, some subtle background
music minus five again. Now, to do this, what did I do? I hit the razor tool, shortcut
C, split a clip here, selected this individual clip, audio gain minus five. Boom, job done. Again, we'll notice
a few things. Guys today. The audio doesn't really start until
this point right here. So I may want to trim it by dragging and dropping when
I'm on the arrow tool, which is V, I'm just
going to drag and drop it just said the audio starts directly as I start speaking, I'm going to highlight
all the audio. They're the only things
I want to move using my Selection tool again,
the arrow right here. Then I'm going to drag and drop this towards the
front of the track. Now we've got
something like this. A brand new video on the channel guys with throwing your bag with some old-school guys today with throwing your bank or
some old-school student blogs, content, and reacting to the best universities
in the entire world. Now, for me, I think I can reduce all of these clips
by another minus three dB, so I highlight them all
and move on from there. Now we're going to come on
mostly two effects later on. But there is
something cool I want to show you when we're
adjusting audio. So firstly, it's going to
be adding a cross-fade. So I made myself down to
that corner right here because I want to
now talk to you about a crossfade is
a very cool effect if you're on the editing panel like we are at the top here. Once you're on the
editing section, you'll notice we're on beyond
Effect Controls by default. And at the bottom where
it says Projects, they'll also say effects. Now select the effects panel. And then what we want to do is it will give you
something like this. We want to look for
audio transitions, crossfade, and then
constant power. So what this does, it basically means
instead of going from allowed section of
music at the star here, too, a lot quieter. Instead of just
dropping like this, it's going to drop
nice and slowly. And it just creates
a subtle transition. So simply all we do is once you've got this effect
on the left-hand corner, highlighted drag and drop it
to the middle of this clip. Same again to the second clip. And then we can zoom
in on the timeline and adjust the length
of the cross fade. Now this is a great
little trick. And it's now going to
sound something like this with an even smoother
transition in between. Today we're throwing
it back with some old-school
student blogs content, and reacting to the
best universities in the entire world for 2023. Now, this is a series that
I used to do all the time. Since I've moved on
to life with Dylan. I haven't been as
active on the scene, but trust me, once
you've done that, you might want to do
the same thing again while you extend the audio
clip all the way out. And then little key tip
is you, by the end, you wanted to draw
people in and then fade out massively
into the background. And you can tell when
it's roughly faded out. It shouldn't be too far
below your previous clip, which has some lines on the
audio section by there. Now virtually on kinks, it's ranked like night. They move on to add the
constant power shifts. And to me, maybe I could go
up one more dB on this track. But this actually
is very subtle. And why I like to
use in my videos because the discrepancy
is still there, but it's not overpowering. The main focus of the
video is what I'm saying is exactly right. So there's a cool little cross constant power cross fade effect that I'm always
using for my audio. I could also use it whenever I'm splitting
up some clips on my actual speaking as well as the actual background tracks. So if you've got two
overlapping clips today when you could use it, e.g. on there. But one little thing I will warn you about using an
audio when you're speaking. Sometimes it can
force your clips to merge two different
audio sounds together. So really if you are
going to use this, make sure it's really small, like so today withdrawing. And for me I didn't
need it on this clip. But you can do this if your audio is really
harsh and it's like, hey guys, welcome back to
the channel and then bam, you're getting some
sort of peaking there. Adding a crossfade onto
the track is magic. Cool. So you're making great
progress by the way, I hope you're
enjoying the course. If you are a lever of you,
it really does help me out. And hopefully you're
finding, yeah, all of my knowledge very useful. So when we're also
looking at audio, one very advanced
thing that you can do is master your audio. So whenever you're kind
of Within a project, you can master your audio clips so that everything is
a consistent level. So I'd like to do
this when I finished editing all of my content for the video that I'd highlight
all of my speaking clips. And maybe I decide
to master the audio, just adds that extra
bit of clarity. So I'd highlight all of the e.g. the clips of the audio. I'm going to highlight
the visuals as well, because to master an audio clip once we split it
up several times, I e this video, you want
to nest that the track. Now the next thing, it basically rejoins everything that we split up back together. So it is a very Very useful tool when it comes to mastering
and audio track. Because if we didn't,
didn't draw it up together, we'd have to add the mastering effect to every single
different audio clip, as you can see right here, which would take ages. So it's unethical it together, highlight everything
I'd recommend doing the audio as well. Double-clicking, selecting nest, call it whatever you
wanna call it on a call, an intro, select. Ok, boom, is now
merged together. Now, ideally we also want
to link these together. Apparently they're
already linked, so we'll get, don't
worry about it. But now to really
master this track, we're going to head over to this effects panel right here. As always, a quick way to find stuff is to
just search for it. Somebody said from master. It becomes on the Audio
Effects special mastering, drag and drop it onto
this full audio clip. Now in the top left-hand corner, it's going to bring up once
it's highlighted here. The Effect Controls menu. Simply select on the
custom setup edit. Now to really, you can play
around with the settings, but essentially it's gonna
be bright right now. But Tammy, listen
to some old-school. Yeah, it's not what we want, so let's highlight it again. It's going to bring back up
the audio menu right now. And we're going to select from bright hype
to subtle clarity. This just adds a slight
bit of a difference. Now when it comes to
revolve on the right, This is like an echo. We don't really want this enabling a low shelf and
high shelf is good just to stop any peaking
and to create some consistency to tick
these boxes right here. Now when it comes to loudness, loudness maximizer is making
SAT and ACT sections louder. Maybe you have a tiny bit
on same for the exciter. Then if you want to
adjust the overall volume just like we did
audio again before, you can do it ever so
slightly here as well. Now this makes a very
minimal difference, but it also just kind of evens out all that eclipse
within the video. So if I were speaking and I went really far back like this, it's gonna be a bit quieter. Mastering. It helps bring that
quiet level like from back here a bit closer to the
more normal level, right? So that is why so good. So let's play it back to a brand new video on
the channel guys today, withdrawing it back to some old school student blogs content, and reacting to the
best universities in the entire world for 2023. Now, this is a series that, and boom, it is
looking very nice. The audio has been mastered. We've adjusted it. We've added transitions for the audio music that we've
got in the background. We've got sound effects
at the right volume. And everything is coming
together quite nicely. Anomaly audio front. I think that is most of the things that you're
ever going to really need to do when it comes
to editing audio. Of course, you can trim up and join different music
tracks together whenever you're looking on doing a transition between two songs, adding a crossfade is a
great thing to do because it can once again just make that transition very
smooth and very nice. And overall, I think that you can keep
adding sound effects. And it's always about finding
what sound effects suit, what it is you're talking about. And that's a skill
that comes with video editing practice and listening to all the sound
effects out of there. So I hope you found
this class for our useful audio editing is very cool that mastering trip I told you about nesting
the clips together. Again, super useful. Unless move on to the
next class in the course.
8. Color Grading In Premiere Pro: Alrighty Everybody,
you're smashing it. Welcome to class six. Now in this one we're
gonna be taking a look at the color grading
over video clip. And what you'll notice
is what I'm doing. I'm giving you a
rough overview of everything that we can
do in Premiere Pro. And After watching
this first section, you'll be able to
edit a video to a very high standard without this course eating
up too much of your time. And then after this,
we're going to delve really into the
more in-depth stuff. We're gonna be looking
at a color grade. Now, a color grade is when you basically
take a clear by this, you can change the background
from warm to cold, light, orange to blue. E.g. add a bit more color to your face or had a bit
of a fade, et cetera. So It's really a
really useful tool and it can really take a video from being very good to looking
absolutely outstanding. So whenever you're doing
a color grade, right, you'll notice that
in last class we joined up all of the
separate clips we had here into this one long
green clip by nesting it. Now, if we don't
join up those clips, we have the same problem as we always have, even
when the audio, when we're trying to
master it, we'd have to color grade every single
clip individually, which we would not want to do. Now, if you've got multiple different clips that you
don't always want to nest up because you might be wanting to change them again, changing the timings
of them later on. Then the best way to color grade is by adding
an adjustment layer. So I'd say that Realistically, no matter what the project is, always color grade by
using an adjustment layer. And by using an
adjustment layer, you don't even have
to nest the clips. To do this. We're going to hover over this
track right here, right in line with our
video clip number one. But below all of our effects because we don't need
to calibrate those. We're going to select Add Track. Now what this does, it moves everything up without
changing the position. And then if we head
over to our assembly, so we click up in the
top right-hand corner, select the assembly panel. All of our tools and video clips and logos we've
imported and sound effects a role in this
assembly panels so we can see exactly what we have in our video editing
project right now. So what we're gonna
do is we're going to select new item down here, adjustment layer right here. Select Okay, it's already got
the right default settings. It's going to call up
here as plain black. And we're going to drag and drop it directly onto our timeline. Now, we're going to
head back over to the editing panel because
it makes it a bit nicer. We can see more stuff
about what's going on. And we're going to drag and
drop this adjustment layer. To the end of our clip. Select the adjustment layer. And what this is, it's like a little mask over the
top of our videos. So e.g. now, whenever
I go to color grade, I'm not actually changing the original video
clip right here. I'm changing like a mask
on top of that clip. So it's like a really cool
little tip and trick. So if I now go to the tunnel at the top here, I select color. I'll see I got Basic
Correction right here. Can change the warmth, change them all to
zero, the tint, which is obviously
a bit extreme. But sometimes if you're
doing some crazy amount, one that the saturation which makes you go red
and orange as well. Or I can just change
the general brightness. The general increase
the black ****** make it more faded
and washed out, highlights increasing
the whites. Shadows increasing
the whites again realistically and
increasing the Fade. And then real whites make it nice and bright, and
then the blacks. So that is play around with those you'll find exactly
what you're looking for. I can reset it like this.
To go back to the default, I can press OK.
And Photoshop has a go automatically
color correcting what they think works best. There's a few default lots
that you can install. I'm going to show
you how to install certain Lutz properly later on. Let me reset this, had
the line store well, and yet you can see
there's quite a, it's alright, It's alright. But the way I like to get and do stuff is I like to get a bit
creative sono reset this. I'm gonna go to none. And I'm going to leave
basic correction for now. I'm going to head
over to the creative panel and I'm going to look at all these default settings that we can play around with and select and see what kind of color grading essence
we'd like to fulfill. So there's warm blue, blue ice somewhere around here. Right here is a bit
of a color fill. I can go to something
quite neutral, selling black and white
like this, and so on. Now a cool thing to
note is when you're checking what progress you've
made in the color grade. And other great
thing about doing the adjustment layer is we can then hide the
adjustment layer by clicking this side and we
get the original back. We can undertake this I and this layer comes
back right here. We can do the same
with the effects. We can press the I, they disappear past the
Eigen, they come back. So it's a great way to check whenever you're using
an adjustment layer, what difference is
actually making. So for me right now, obviously I don't want to
have a black and white. I'm going to find one
that looks quite nice. Maybe I'm thinking it's
a bit strong right now. This looks quite nice
bit orangey though Maybe, maybe big HDR. Let's see how we
get on with that. So once I've got the right one, I want to use a
mid tone it down. You rarely want to
be over 35, 40. In a situation like this, I think the optimum is 20-30. Apparently a video editor
professional told me that when I starting out from
this baseline, we can see I've just got a
bit more color in the video. I've just got a bit
more saturated clips and it's looking
actually quite nice. So from here is when I
start to play around with maybe adding a
tiny bit of a fade, just a tiny bit. The clips already quite sharp
so I wouldn't change that. Maybe do I need any
more color in there? A bit more vibrant so
I don't wanna look to read maybe a tiny
bit of vibrance. If I change the saturation, it becomes a bit too much. So I'm gonna type in 100, get the default number
back right there. Now, this is what I like to go back over to the
basic correction and play around with
it just to make it maybe a little bit sharper, maybe a little bit nice and
bright increase the shadows, maybe a tiny bit more because
right now the clip is, is quite dark, especially
on my t-shirt. If had a little girl and
changing the blacks, I don't want it to
become too faded, but maybe a nice
little one here. How the y's doing the
wiser, quite fine. Anyway, and you'll see that I'm bringing this clip to
life just very subtly. And that for me is what it's all about when it comes
to color grading. Now again, there are some
curves that you can change. But for me when you're starting
out S curves and so on, they're not really
as vital to use as just getting in perfect and the creative and Basic
Correction tabs can, we can increase the
shadows here using much more of a manual way. And again, you can undo small touches you make
whenever you're using these, these filters by
pressing undo at the top or Command
Z or Control Z, if you like using shortcuts. Always select the highlight, the adjustment layer if it's not coming up and you can't do stuff because your adjustment
layer isn't selected. Then you can also play
around with the blur if you wanted to bless
stuff out and so on. Again, color correction, just play around with it,
you'll figure it out. It's all about
that when it comes to when it comes to this. I think this looks quite nice, but I've got
it on right now. I'm not going for
something spectacular. There's not a lot
to color grade. I don't, I don't want it
to be super cinematic. If you want it to be
super cinematic as well, you can add black bars, we'll come on to that later on. You can also add some really
intense color grading. You can download lots online, which I'm gonna show
you when you can download how to download
external fonts, lots, color gray packages
and so on, later on as well. So this is really your
basic color grade. If you want a Vision app, white VNet right here, black one right here, creates
a very dramatic feel. And then you can roughly
change the position of that. So I'm gonna go back to zero. I'm gonna go back to
50 right here as well. So for me as far as
color grading goes, I'm like, Yeah, that
looks really clean. I'm really happy with that. So I would personally
leave that there. Now another thing
that a lot of people might want to do
is add black bars. Now, the easiest way to add
black bars show videos. I know many of you might
want to do this as well, is to add an adjustment
layer again. So same process at track. We're gonna go over to
the assembly tunnel panel in the top right-hand corner. And we're going to find
the adjustment layer right here. We're
going to add it. Okay, I start a new one, drag and drop it
onto your timeline, increase it all the way to
the very end of the track is always head back over
to the editing panel. And then what we're going
to actually look for in the effects section right here
is something called crop. Find it such it drag and drop this crop onto
the adjustment layer. Nothing's going to happen. Don't worry about that at all. But in the effect controls
scroll down to the left. And we want to
change this top crop to ten per cent, right? It adds a black bar, change the bottom crop, ten per cent adds a black bar. If you really want to adjust how deepen and thick
these crops are, just change the percentage. Maybe you want a small minimalistic crop
of three per cent. That looks quite nice. And this is really great for
whenever you're creating B-roll or really that movie like content or cinematography, and so on for me in this
video right now that I'm creating black bars
on quite necessary. So in actual fact, I'm
just going to delete this adjustment layer if you want to view it
before and after, as we said before, you
really use the AI tool. So black bars are a very easy thing to create
an add onto your content. And whenever we're doing
stuff with adjustment layers, whether it be color
gradings I just showed you or
creating black bars, I'd often say leave
them to the very last until you've done all of your other stuff like
your sound effects, you're trimming your
logos and so on. Because basically now e.g. as I was saying at the
start of this course, the reason why you follow
the order I do stuff in is because if I
wanted to say e.g. chop out something in the middle of this this
audio clip, right? I'd have to split it right here, split right here, and zoom in, trim, e.g. this bit. Now it's like, well, I've
got to trim the audio. I've got to trim the
adjustment layers of the color grade and the crop. It just becomes an
absolute kerfuffle because the audio would then not
be synced up in line. The adjustment layers
will be really yeah, you can see exactly why I
told you to follow the order. I do stuff and when it comes to adjustment layers
of music and so on. So I'm gonna delete this. I'm going to delete this track again. This is how
you delete it. Double-click once
you've highlighted that track, and so on. We're back to where we were
a few seconds ago without the black bars because that my content doesn't need
it right now today. But I thought I'd check that in right now because I know it's a very popular thing that people like to
add to their videos, especially when it
comes to color grading. So now in this course lesson, you've learned how to calibrate, how to add vignettes, how to add black bars. I think that while she perfect and get a real
sense of a feel for what it is that you're trying to do to do a new color grade. These are three
really key components that you can play around with non-stop and get it, get a feel for exactly what your style is and how to,
how to do it properly. Now, as you get a pro or back
onto the color grade layer, really, you play around
with the S curves, e.g. so the S curves often
you'll find that e.g. some of the pros might create a few different points within
their, within their curves. And they'll create something, the shape of an S. So I hope you found this
class very useful, Well done with smashing
through this course. Thank you for being on board and I'll see you
in the next class.
9. Overlays, Facecam & Reaction: Hello and welcome
back to class seven. Now in this class
we're going to be taking a look at overlays. And this relates to doing
reaction videos, face cams, or just interchanging between
different video clips within the same synchronized
piece of footage. E.g. so far in this course, we've looked at how to
build up this intro. Now this can be replicated throughout our
whole, entire video. All of the tools and skills I've shown you from engagement tools, color grading, audio,
background music. There is enough right here
to make a solid video. Now another thing
that when you're editing videos that
you might like to do. And in the case of my YouTube video that I'm
creating on this journey of this course is that
I've also got myself reacting to a few
elements on screen. So e.g. I've separately
filmed myself with a camera, talking while reacting to something on my computer screen. Now I've also recorded
my computer screen. So e.g. on the right here, I've got all of my
computer screen footage and on the left, I've got me talking about those things that
I'm seeing on the screen. Now, as we said before, audio layers at
the bottom right, here on the left,
and then at the top, visual layers. So e.g. if I was to drag and
drop layover here, it removes the
video of me talking about what I was reacting to, but it's kept the audio
which doesn't work. Command Z or edit undo
to go back there. Now, when we work in layers, what we want to
do if you're e.g. wanting to create
a reaction video, you want to overlay some B-roll on top of you
talking about something, we're simply just going to
drag and drop both elements of the second video away from that same timeline that the
original footage is on. And then we're going
to highlight it and drag and drop it over
the top right here. So the key to this, and the key to editing
videos like this is that you want to sync up the two
videos to start with. Now, as soon as you've seen those videos up to start with, it makes the whole entire
process so much easier. And that is a key tip. Now
how can you sync them up? Now this is really
important that when you're recording two separate
things. So e.g. my computer screen and then
me talking in general, I've made sure that if we zoom in at the bottom right here, I've got both
pieces of audio on. Although I don't need both
audios to be recording, I did that purely so that when it comes to the
editing process, I can simply and easily ensure that I can now match up the audio peaks
between both clips. So if we zoom in on here, you'll notice there's a slight
pattern right here, right? It's exactly the same. This makes editings
ten times easier. So I'm really just going to
zoom in as close as I can. I made sure that for
this first clip, we're all nicely lined up. And pretty much as
far as things go, we are quite nicely lined up. I'm going to turn up
the audio right here. Let's jump into
the 2023 rankings and it's perfectly sink. Now this means that whatever
I'm talking about on the screen is going
to match with me speaking in real life
key tip right there. So if you've got
B-roll with no audio, then that isn't as important. You can drag and drop
it however you like. But if you're talking
about something specifically on the
screen in your project, your credit crowd-funding video. And you're talking about e.g. this section of
the movie trailer. At that point, then
you wanna make sure that everything's in sync. Element number one
in sync will then notice around here that the
second clip right here, I've got one big long
clip for the screen. But then in actual fact, for my speaking, I've
got two separate clips. So I'm going to cut this here, split this here, and then we're going to try
and match this up again. So taking it in and look at it, thanks the recording
both sides of the audio, I can now matched up in
accordance with the audio peaks. Now putting the
padlock on right here, just to ensure that I don't mess around with the middle
two layers right here. Going to trim this by drag and
drop, highlight the clips. And then in this occasion, because we're working with
another audio clip here, we don't want to use Q and V, the shortcuts
because it can trim that as well unless you put the padlock on, which
is what I've done. So e.g. precisely
drag and drop this. Let's try and line this up. That's a bit too much. So I'm just check
that right now with the audio on is
perfectly synced up. Now I'm just gonna go
through the rest of this video clip and the rest
of my content are here. They've remaining
part of the content, which is all talking about
what's on the screen. And I'm going to sync it up
exactly like you just saw. Alright, So we're back
in the game now as well. What I'm looking to
do in this situation is create a face cam. So whenever we're creating a face cam, that
is the first step. The second step is
to ensure that e.g. now you cannot see my face. This is because it's
actually behind the screen. The screen overlays.
So what we wanna do is actually
rearrange these clips. So I want to highlight
the middle to right now, drag and drop them down
below my other audio clip. And drag and drop it above
my other visual clip. And then the two in the middle
that I want to have are the audio and the picture for my screen recording.
So I'm going to do that. Drag and drop these back
is quite tedious process. So now we cannot see the
screen recording clip. However, there is something
that I want to do right now to make my life
easier going forward, we've got two different
sets of clips The in-between those clips, there's four different splits. So clip one is obviously
the screen recordings clip, clip to is gonna be me
talking right here. Now just to make my life
easier because there's four trims in those clips from when we
synchronize the audio, I now want to re, set those clips into one
big one to make my life easier when it comes to placing the face cam and zooming in
and getting rid of this, this black bar right here. So e.g. again, you'll learn
this as time goes on. If I was to zoom in and crop out that black bar on
this clip right here. I then have to do
it for this one and this one and this one. However, if I actually
nest the clips together, then I would only
have to do it once. So I'm gonna do that process
right now as we did before. I'm going to scroll down here. I'm going to select nest, which is right here. Same again, I'm going to lock
those middle two layers, and I'm going to nest
the second set of clips. This is exactly what
I want to be doing. And then it's going to be nested sequence three and perfect, they're all nicely together. Now the first thing I wanna do in this situation right here is I actually want
to crop this, this, this video clip, but because
of this little poll, which is that it
doesn't look the best. So I'm tempted to crop it just so it looks
a bit like this. Now when it comes to cropping, that is not a crop
dashes the Zoom In, which means if I was
to make the clips smaller for a face cam, I would still have
that black rod there. So what I'm gonna do is
go back to the original, head over to the Effects
panel and search for crop. I'm going to drag
and drop that onto the whole nested sequence. Now by dragging and dropping it onto the whole nested sequence, it means that the whole clip is going to be cropped
instead of just one of the four that
we previously had. And then I'm gonna
look right here. Now I'm looking to
crop pretty much the same ratio for all of them, let's say 20 per cent, it's too much, 10%. That should do the trick,
or the top, the bottom, the right, and the left, right, and that's a
tiny bit too much. So let me try five. Let me try five again. Let me try five here. And let me try it five here. That is about right. So now that poll has gone, I can even maybe get
it down to a six. Now I do want it to be
roughly symmetrical, which is why I'm not
doing anything probably higher than a six
because I don't want to cut my head off too much. But that my friends looks very nice and tidy
compared to what we had before. And that last for the
whole entire clip. Now e.g. when I move
this clip over to the face cam section
is going to look very nice to start with. I'm going to look
at my video clip. And when it comes
to the editing, I want to have the
first little bit of me talking nice and big, just introducing
that background. So I'm going to leave
it this size with this little hint about what's coming up
in the background. And then about 05:10
seconds into this, I'm going to move myself
slowly via the zooming we looked at before into
that top right-hand corner. While you're likely
to see at most face cams be in general
video editing. So now I've sync up the
audio of these clips. I've also nested
them so that we have one smooth consistent clip
which has allowed me to crop that clip very
nice and easily. Now my final step
in preparation for using and working with
overlays is going to be, as we said before, to create the first cut of this new video. So essentially, now we've
got two new videos, ones and overlay ones. The actual me talking, I now need to edit out
all the dead space, get rid of all the bad bits. And then I'm gonna see
you in the next class. Thank you for watching
10. Editing Styles (KEY!): Welcome back to class eight. In this class I'm
going to be taking you through the different
editing styles. Now in this course, I've chosen to edit
a YouTube video and you're following
along learning all of the different tips and tricks
and things you can do in Premier Pro to make a
great YouTube style video. Now, the reason for this is that when you're editing
a YouTube video, you tend to use all of
the different things you can in Premier Pro to
make that video engaging. Then when you go
into Edit montages, Jim videos, corporate
or client videos, you might not necessarily
need all of the tricks and tips that I'm showing
you for this YouTube video. But you can pick
and pull everything that you need that
you now know thanks to this course and use
it within that project. So essentially, by editing a YouTube video
is the time when you're going to use most
of the features in Premier Pro, in my opinion, especially for short video, because the likes of client
videos or corporate videos, they tend to be a
lot more smooth with less stuff popping
up on the screen, but they still need e.g. a great color grade. The idea as well is that when
you're editing a video, once you know how
to do everything, It's just about
finding your style and finding what works for the type of project
you're working on. So bearing that in mind, Let's crack on with class eight. At the end of last
class, I basically said, we've now sync up the audio for the screen and my
actual camera recording. But before we want to go around
adjusting anything else, I do want to trim the clips. And by trimming the clips, it allows me to have a following video
that's super engaging. So I followed exactly the
same process for trimming these clips as we did at the
very start of this course. Now the one thing I said to make sure of was that you want to trim both clips at
exactly the same time. So there's no point in
just trimming, just e.g. the screen audio and the
screen picture and not trimming my face
cam because then that makes it go
out of sync again. Every time we was
trimming something, the idea was that not only
do I trim the top one, but I trim both
clips as I just did. I split all of the clips, which that means that
when I use my shortcut to go to Split and
trim everything, everything trims in
line and stays in sync. So make sure when
you are trimming used to in both elements, a few little updates
that I've done so far of things that
you know how to do is that I've turned
down the audio for the small secondary clip
from my computer screen. Now I turned on this audio instead of the one
from my camera because my computer audio
isn't as good a quality. We know how to turn
down the audio. We saw that before as well. You notice along here,
I've added some texts. Let me just turn
down the volume. E.g. I've added some texts
and I made it rotate. And what you'll also notice at the bottom is I've added
some sound effects, some bubble pops, and
then a little camera. And I've also added a image. Now the way that
we add an image is simply like we added the
video to start with, where we just drag and drop
that image from our file onto our timeline and drag
and drop it like that. It's really simple, so I'm sure that you remember how to do that from
earlier on and you can. Now the reason why I've done this is all about engagement. So we're looking at style one. Youtube is all about fast
pace and making stuff pop-up to keep everybody engaged when we're
talking about engagement. And take a look at this and
let me know what you think. Students satisfaction
school, how hard they are to get into the prospects
of the graduates. And then we often make
decisions based on this table is going to be over two years, one
year incentives. And I remember looking at right, York's, York's the highest one. Realistically with a
link I'm going to get into on this table.
Let me go here. There's quite a lot
of fast-paced cuts, high-energy editing, and a lot of stuff
popping up on the screen. Now this is great for YouTube
style video because we're always looking
within that 10 min on average to retain retention. So focusing on the YouTube
side of things for now, we've got a very fast, high paced intro with
Zooms, with texts. But there's a lot of
stuff that I did in the trim that was
specifically for YouTube. The style of the tremor was
doing was for YouTube videos. So if we take a look up here, I've got a few clips that I've
actually trimmed out, e.g. of my actual main videos
that we've just done. But I copied and pasted them
over here so I can show you why and what I did. Let's
take a little look. Let's take a look at the
top three universities in the world for 2023
at number one. So right there, you'll
notice that I said, let's take a look at the
top three units for 2023. And then I go at number one. Now, my idea here is that
I remove that first bit of the clip because I don't want
to for a YouTube video e.g. to introduce the concept and
then show them it again. I want them to just
be suddenly hit with the revelation of the number
one university in the world. And I don't want to
build it up too much and drag it out too
much because I've already said that before. And I don't want to waste any of their time
because on YouTube, as soon as they click away from a video, you're kind of lost. So e.g. in that case, I just want to hit
them straight away. This is number one
and they're like, Whoa, that's number one. Okay. And then just as
they process that, I want to move straight
on to the next clip. Stack consistently engaged. Now, if it was a corporate
style video or more video that was allowed to be
at a slower pace where you're not
competing for attention. So maybe a client video,
then you know what? It is quite nice for an
explainer video as well to have that introduction of
what's coming up next. So e.g. I. Would keep that in a client
video or corporate video, but I wouldn't keep this
pre-introduction for a YouTube video because on
YouTube, retention is key. And you know what I mean?
There's so much competition that people just
click off stuff. So yeah, that's what
I ended up with. That's why number two, I was just trimming this clip. So at the start of it I kind of give a bit of
small talk about a waffle. Let's stop there because
that's what we need to do. But just remember
those rankings. So we're gonna come back
to them in a second. And for the use for
a YouTube video, for a client with air
for a corporate video, you wouldn't really
want any waffling. There are any small
thought because everything should have a purpose
in the video editing. So e.g. in this case, I remove it, that little intro. So if I zoom in, if
I just trim that, but just remember those. And then I move on to my
next point where I give a bit of an opinion
on stuff that is what the viewers want to see and
that is why I cut that out there and I would do the same for any other style of video. Finally, finally, when I take a look at
this little last clip, but just remember
those rankings, we're going to come back
to them in a second. For the UK tables and
the guardian, etc. These are all roughly
stay the same places. There's a few changes here and there, but roughly the same. So again, I'm talking here, I'm saying that all these
rankings are roughly the stay the same for the
difference sort of websites. And whilst it's true, what I actually want to do for a YouTube style video where I'm looking to keep everybody super engaged because I'm
going to trim that. And then basically get straight on to the actual rankings. Because as soon as they're
going into the rankings, that's what the view
is therefore on YouTube in this case from
my video and it's engaging. They're getting more
information and more value. So really, when it comes to
editing styles on YouTube, you're looking at in essence, what does it add
value to my viewer? And what can I take out of this video where I still
flows and makes sense, but then the video
shorter and quicker. So e.g. let's take a look at this ray paths and to
learn from on creating YouTube style videos were all done in the
editing as well as Mr. Beast, e.g. have a
six-minute video, right? He cured and help to
1,000 deaf people. He would have filmed hours and hours and hours of content, but it's all condensed down
into a six-minute video. Now the reason for this
is the watch time is key. So we're looking to the
same sort of principles. Again, he spent loads of money days traveling around
the different yachts, is a 45-minute video. Same for the plane tickets
is a 12 minute video. So really, when it
comes down to YouTube, you're looking at quick,
short, fast content, high-energy, good delivery,
just to keep people engaged in terms of
general editing style. Now, again, corporate
projects at different client projects that different short
films are different. Let's take a look at this. So e.g. this is my show real. And when the clips
in this were edited, it's done in a very
smooth, real, natural way. And you can tell it's
a very different style to what was before. However, notice that the
tools I've been showing you to utilize and use when
creating YouTube video. I black bars, color grade
texts they used in the show, real and other projects as well. So let's have a
little watch news, see the pace difference. I need to tell you something. Very chill. Whereas if we go
back to the start of my YouTube videos
satisfaction score, how hard that is to get into the prospects of the graduates. And it's all going on. There's even a zoom right there. So notice The, whilst, this course is
teaching you to do everything and how to do
everything in Premiere Pro. When it comes to what
you're going to be using for your own journey. It really depends on the style of projects you're working on. But hopefully, this shows you again firstly, how
to add a YouTube videos. And a great way as I've eyes I'm doing
and as I've shown you. But again, firstly,
I hope this helps. But again, firstly, I hope this. But first, but I hope this lesson within this
course has shown you firstly how to edit a YouTube video and the style
you should be aiming for. Again, look at all
of these trims. I've made high-energy,
fast-paced, note that space and just cutting out anything
that doesn't add value. Look how many cuts
are made, hundreds, just to make that YouTube
video as engaging as possible when it comes
over to climb projects, it, depending on
what the project is, you're going to be using a
very different style of cut. Maybe it will be one cut every now and then,
e.g. like here. But it's not going to be
nowhere near as many as this, which is really micro cuts. Generally a corporate video, short films, client videos. They're gonna have a
lot less cutscene than the likes of a YouTube video, but I hope that helps see
you in the next class.
11. Motion Graphics: Welcome back to class nine. In this class we're going to be taking a look at
motion Graphics. What are they? How do we use them and where do
we get them from? Firstly, a motion graphic or
loads of different things. They could be, for example, a background that you see on
someone's video like this. They could be a little icon that pops up on the screen
above a video. And it has a sort
of animation or motion is a graphic
that has emotion. It's in the name, but
they're literally a whole load of
different things. You can adjust the size,
you can change them. And these motion
Graphics could also be titles or transitions as well. They can contain data
and information, which is notably
amazing for if you're doing a pitch video
or a corporate video, motion Graphics like these are fantastic. As well as this. You can also have
sound effects with the motion Graphics
because you can see right here this transition, it comes with a
little swoosh sound. And then we've got a nice
little call out here, highlighting anything
within the video that we might want to highlight. This really does take any video you have
to the next level. And it is great for increasing
the quality of the videos. Now when it comes
to YouTube videos, you do use motion Graphics, but I'd say that motion
Graphics are great for corporate or client videos
when you're just adding that extra layer of
professionality, right? So firstly, I've moved up here because I want to take
you through how we can find the default motion Graphics that come with
Adobe Premiere Pro. So what we're gonna do is
we're going to head up to this top right-hand
Workspace panel, and we're going to select
captions and Graphics. And right now, I'm gonna
show you how to add your first motion graphic
to your timeline. Once we're on this
panel right here, we're going to select Browse. And then we'll see two sections, my templates and browse
templates from Adobe stock. Now Adobe Stock is going
to have a select amount of templates that we can buy
or ones that are free. Now the ones that are free, we can tick this box
and it comes up with six pages of transitions
and other stuff. So for example, right now, if we wanted to add a
circular reveal title, I can drag and drop it. It downloads it, slash loads it, and then you'll notice
that it's on my screen. So if I actually move this
panel slow trick right here, move these panels across just so my screen becomes bigger. If I now play my, my Video. Always the same metrics. I've got this very cool
transition with title. Now, obviously I wouldn't put
a title over me speaking. I put it, for example, in-between to clips of change. So for example right here, less, less, find a good ones, put it in just so I can show you when as a good place to use it. For example, here
I go from being on screen to moving on to a bit of video where I'm not looking at
a computer screen, I'm looking at what's
inside my house. I would put the transition over the change of these two clips because that is a
transition in itself. So if we look at
it, we can see it's fully read right here. So at this point here I'm
going to press C or get my cut tool out at the top here, raised at all and split it here. So now what I want to
do is when the screens fully red dots when you want the change of Clips to happen. And this is a pro tip. And the reason when you want the change of Clips to happen, when did screens fully red is because then it
seems professional. You don't get any lag between
the two transition changes. So I'm gonna move
my transition right between the green
and blue clips, right between the screen and
the impulse and video clips. And I'm going ahead
over here and see is that line up
properly? No, it's not. It needs a bit more
bit more still, a bit more, still, a
tiny bit more still. Perfect. That is fully a nicely lined up, which should make
this transition look absolutely seamless. So let's give it a little play. And you see that, right? Amazing. The transition
happens super smooth. However, if I wasn't
to line up properly, you'll notice that
the transparent bid will be during the
change of the clip, which means that viewers can
see the change in Clips, meaning the transition
isn't smooth. Let's play it again. It's just not quite as smooth. So we're gonna move
this back here. And once we have the
transition in place, we can pretty much click on it right here on our timeline. Select the T for text button, highlight where the
text is double-click. And we can now type in
whatever we like to this. And then we can also customize the text and the
right-hand side here, just as we normally would
as I showed you earlier on. So we can type in
interview and then time, we can just customize this
transition anyway, we like. So again, that's a motion
graphic that's added, that's a default
one that comes from the Adobe Premiere Pro marketplace
and it was a free one. If you want to add
another transition or mode, the callout, go back over to browse, make sure you're on
the Adobe templates, and then select one
to drag and drop. So for example, maybe I want
a social media lower third. Now a lower third
is, for example, as you'll see in a second, something that comes just in
the bottom of the screen. And it often is to add
extra information. So for example here,
dynamic lower third. And maybe I want
to add this in to highlight something that's
being shown in the video. It looks quite nice. It's a very smooth transition. Now sometimes the change
in motion Graphics text, you want to head over
here to the central graphics panel which was on, instead of browse beyond edit
while it is highlighted. And then I will say
texts controls 0102. And here we can also
change the text. So I'm gonna say Pro
text number two. Perfect, just if
I wanted to add, make a bit of FUN or have a little bit of a joke in
the video, I could add this. But this is also great for
highlighting if you're doing, for example, a client room
tour or client House tour Just to highlight
what room urine, or to highlight walk
place your next or sometimes call-outs as we'll see in the browser
if we go back up here, that allow you to add loads more texts at the
bottom so you might be able to give information. So really what I'm
saying is that this is how you use motion Graphics. This is how you
get them to start with when you're just loading
up Adobe Premiere Pro, the nice, easy way. And then you choose
and customize them based on what type of
video you're creating. So most of the time
YouTube videos, you can use motion Graphics. They look great, but
really inclined videos. This is what really
stands you out. So for example, we, we've, we got an end card here
that we could use at the end of a, have
a youtube video. So if I load this up, again, this is dedicated for YouTube. You've got something
saying subscribe previous video, next video. And some of the templates
you'll find are built for YouTube and some of you for more corporate stuff. So really it's about playing around with what you can find inside that panel for free and then customizing it, right? There's some great stuff in there, elusive wedding slides. So for example, let me play
it over this clip right here. And obviously I would
add the photos into this wedding themed
motion graphic. And here we can see we
can control the text, we control the style. We have lots of variables on
what we're able to control. So really what it is, is importing that motion
graphic by dragging and dropping it from the panel
and then customizing it. For example, I can add
three images right here. And these small touches really make a great
big difference when it comes to creating a
high-quality video. So I'll leave this one in here. Now, I'm going to go
through my entire video. I'm going to look at
what motion Graphics I have and what I can add in order to add a bit of
value throughout the videos. So maybe if there's not much
happening on the screen, I might add a motion graphic. So for example, along here
it's a lot of me talking, but not much other than
scrolling down on the screen. So I might add a
little fact about Use it or I might add
a little call-out to show some extra information on the screen just to
keep people engaged. But just before I go on to buy my motion Graphics
to this video, we can indeed add an import, our own motion graphics
to Premiere Pro. So if we go online, we
don't always have to use the Adobe Stock
ones if we head over to my templates now I've got
loads because I actually purchased a motion
Graphics pack online. But what we can do is in the bottom right-hand
corner right here, it will say install
motion Graphics. Now, if you've downloaded a motion Graphics pack
from online years, plenty of tutorials out there on how to do that on YouTube. I'd recommend having
a little look. Or if you've Googled more
free motion Graphics, Adobe Premiere Pro, and you've downloaded it and it's in
your downloads folder. Simply, what you
wanna do then is install motion
graphic templates. So you click on this when
you're in Adobe Premiere Pro, you find the right file that
you're looking to install, you click it and that
Motion Graphics Template than installs into
your template section. Now for me, again, I've
got the free ones. I've got a pack
installed already. I won't do this, but I strongly
encouraged if you like motion graphics and you end up using the free ones
a lot from Adobe. Look into expanding
your package. You can even get some premium
ones from Adobe themselves. So really I think
about doing that if you're enjoying
using motion Graphics. For now, for me, what it is, I'm going to go across my
video and I'm going to add motion Graphics
in to my video. Now as well. When
you do get advanced, you can actually install
an extension now and extension if we go
up here to Window. Notice if we go to Extensions, I've got a motion Pro
Workspace extension, which means that when
I click up here on the top right-hand
corner on my Workspace, I've got one called
Motion Pro Workspace. And all of my motion Graphics pop up in this little
panel right here. And I can then seamlessly select all of my different
motion Graphics that are available and Add and
drag and drop them to my timeline nice and easily. Now, for me, as I was
saying earlier on, when you're changing
between clips or topics, adding transitions, which
are like this right here. Further transitions,
flat transitions, and they add a
little sound effect. That's a great thing to do.
12. Edited Video Review: Hello and welcome back to
class ten in this course. Right now we're going to
be taking a look at and reviewing the video that we've created so far in the course, because I've uploaded
it to YouTube. It is performed very well and it currently sits
around 3,000 views. It was very well received. And so we can determine that the video we created so
far and all the skills that I have taught you how
to utilize in Premier Pro are great for creating
engaging YouTube videos. And so I wanted to break down the final product is such and show you exactly how everything has come together
and how we've used all the different tools to
make a successful video. Now this kind of caps off the
first part of this course. The second part,
we're going to be taking a look at
finer detail things. I'm looking at editing
different styles of videos. I'm going to show you
a lot of the tips and tricks that I've learned
over the years for this taking quality
to the next level and to basically help
you save a lot of time, there is so much that
you can learn in Premiere Pro that will save you so much time going forward. So that is what we're
gonna be looking at in the second
half of this course. But for now, let us break
down the reacting to the best universities
in the world. For 2023. Today we're throwing it back to some old school
student blogs content, and reacting to the
best universities in the entire world for 2023. Now, this is a series that
I used to do all the time. Since I've moved on
to life with Dylan, I haven't been as
active on the kinesin, but trust me, today I'm
back with the bank. So I think straight away, well, we can see is that I'm
really making the US the most use out of the text popping up on the screen to
keep people engaged. The little inside
information jokes that are kinda pop up
and then asterixis, and then the changes
in zoom levels. I think I talked about
that a bit in the course. But literally, zooms can make a video so much more
engaging and fast pace. And then I've got Q
and most of music, because I changed the music to reflect the type of
story I'm now telling, but having that Q emotive
music come up on screen is like showing a
little inside joke with the audience,
which is quite nice. Again, notice that I, every time I kinda changed the subject of what I'm
talking about in the video. I try and change the
background music as well, because that helps separate
each part of the video. And it also helps to bring
a new lease of energy to the video topic which
keeps people engaged. I've got a nice little motion graphic there to
help people liked the video, and so on. Again. Another cool motion
graphic right here, containing a lot of cool information and
then a transition. It's like small stuff like that. That transition was very smooth. I had a sound effect. The motion graphic also came up on screen to share a
lot of information. And that can make a
really big difference to the quality of the video. I said before about
motion graphics should mostly be used
in corporate videos. Yes, That is very true. But sometimes if I'm
making a YouTube video or an informational video, then you do have, you can add motion graphics. But it's just more
common to see them in the sort of more
professional corporate videos. So again, what I'm
looking at right here, I've got the two different
layers on the screen. I've got my face cam and I got
my actual computer screen. And notice how sometimes I'll
dissolve one or the other or zoom into my face like just then I'll zoom
into the screen. Whereas got the specific universities that
I'm talking about. And again, those Zooms just help to make and shift
the viewers focus. Now when I can shift
the viewers focus, they almost means that
they're looking at something new and they
stay, become more engaged. So really what
this YouTube video is all about engagement, because if we think about it, zoom right there, highlighting exactly what I'm talking about. It keeps people engaged
because there's not too much happening in terms
of on the screen or me and the background
doesn't change. So to keep that as
sort of engagement, I am zooming in and
highlighting bits and bobs, Cambridge, Oxford, and so on. At number one, Massachusetts
Institute of Technology, with a score of 100 out of 100. It's in Cambridge, in the US. Number two, the University
of Cambridge, 98.81, 0.2% behind Massachusetts, which you haven't really
noticed a difference though. And here's the thing, Robbins or Cambridge quite
a few times now, once for business and wants to interview the students there. Again, another transition to kinda show the viewers
what I'm talking about. I've always talking about the
bins Cambridge a few times. So it's alright, Let me just add a five to ten clip proving that I've been
to Cambridge before because that proving it kind of adds credibility and also to smooth transitions where there's a small wash, a
small transition. And that really helps keep
the video nice and smooth as opposed having a hard
cut into that video, hard cut back out, a transition. Just kind of, I don't know, it's a very relaxing, smooth, it feels
professional and you go, Oh, nice sharing,
talking about it. It comes up very nice and chill. Whereas if it was harsh, there's something about it
wouldn't be as flowing. It helps keep the
flow of the video, which is so important. No matter what the project is. Here, I've got another
video layer on the screen. I've lined it up exactly with my face cam to keep it
nice and symmetrical. I think as well. The way to white video layers,
as I mentioned before, is exactly like you're
adding a logo on the screen. Exactly like you're
adding a motion graphic. You just drag and drop
the video clip with the audio to a layer above
the original two videos, making sure you
don't overlap it. And that's how you get this sort of effects I talked about. We're going to cover more
of this a bit later on. But again, that's small
little adjustment of adding an extra
video on the screen. It just helps bring something new and something
fresh which can make a big difference to the quality of the production,
too much sense. Now the reason why this sort
of thing happens as well, having a reliable face
cam in the sense that right then I just blew up my face cam to the size
of the whole screen. But it's still maintained its exact high-quality
definition, which is very key because
let's say if I was filming on a device and I did it low-res because I thought it's only going to be small in the corner. If I then wanted to have
the freedom to blow that picture up in
the edit and make it full screen. It'll
be too blurry. So one thing I
think I've learned as well as my YouTube
and editing and all that sort of
journey is always filming the highest
quality possible and always give yourself
as many options as you possibly can when
it comes to the edit, because the more
options you have, fine, you might not
need to use them. It might, you might
spend an extra ten, 15 min cutting the video. But if you've got those options, it goes an extremely long way to helping you create the
best quality content because half the time, right? Film two or three intros. And I'll be like, Oh, I didn't
need to fill my third one. Well, that first one
was probably fine. But the fact that I've
then filmed three intros, I can then choose all
the different parts of those intros and cut them
together seamlessly. So sometimes having more content is definitely merrier
in that sense. But yeah, so motion graphics
color grade as well. You probably have noticed
it, but eye color grade is very smooth and soft. You wouldn't even know that
it's been fully color graded, but it looks very nice. And it's all about text, music, changes in scene and
subjects relate to changes in music and
speed and so on. So I hope this gives you a rough idea of what
we've built so far. If you'd like to
see the full video, I'll leave a link down below, but for now, let's move on to the second half
of this course.
13. The Class Project: So welcome to the
class projects. But before I tell
you what it is, congratulations
on completing all of this course
because I know that it's a really long grind to get through all of this
content to learn it, you've now got a very
valuable new skill, and I think that
it will serve you well in this digital age. So congratulations once again, but let's move on to
the class projects now, for those of you that are
going to do the class project, what I want you to do is to choose a video you have,
whether it be a vlog, sit down and talk video and
edit it using Premier Pro, covering all of the things
we talked about today. Or there'll be cutting
the video color grading, sound effects, motion graphics sent over to me and
the box down below. And then I'll be able to give
you some feedback on what I think you could do to
improve it, what I liked. And hopefully after you
get the feedback as well, you'll be an even
better video editors. So congratulations again on completing all of this course. I really do look forward to
seeing your class projects, and I'll see you
on the outro for one final bit of advice.
14. Well Done & Thank You!!: Congratulations on completing
this entire course. It really is a great skill
to have video editing. And in today's age,
like I said before, everybody wants somebody who can edit videos or edit photos. And it's kind of
like now you can add videos using other Adobe
products or Photoshop. It becomes ten times easier. If you enjoyed this course, I would encourage you
to keep learning and let me know what your plan
is with this knowledge. Now if Premier Pro, what you're gonna
do, you're going to create a YouTube channel. Is it for work? I
really would be interested in seeing
what you guys are gonna do with these skills. Thank you for watching and
I'll see you again soon.
 Dylan Reeves-Fellows ⭐️, YouTuber, AI & Professional Editor