Transcripts
1. Introduction : Hi, my name is Braden messenger. I'm an artist, YouTuber, and I make content for
the Internet of things. I'm going to be your
instructor for this one. And I'm going to be
taking you through and showing you how you
can easily draw noses. Now, there are multiple ways
that one can draw a nose. But I'm going to teach you
the most simplest of ways. The SRO method as
derived by John Asara, is a method that was
originally used by painters, but it can be adopted and
used by any visual artist. So what's in store? In this one? I'm going to be
taking you through and we're going to study the SRO methods specifically
with five different angles. We're going to start off
with just the profile ankle. Then we're going to be moving on to a three-quarter turn angle, a straight angle, then
the opposite profile. That's the first part. Once you are confident
with the SRO method, then I'm going to show you
how you can very easily use real life reference photos and the SRO method as a general
approach to drawing them. So once the basic structure and the planes have
been identified, then we're going to have
some fun and I'm going to show you how you
can very easily, with the colored pencil,
go in and start to carve out that realistic shape. Once the planes are established and the shape
has been laid down, then we can start to
punch in our nostrils, building up our lower
values and really ringing out that
underlying form. All in all, you are going to be drawing ten different noses. The first five are going
to be basic SR or noses. The second five are going
to be real life noses using the SRO method
as a general approach. And that's pretty much it. I hope to see projects from you. I would love to see ten
different noses sketched out and the projects
that you upload. And then of course, at the end, if you could upload a
review of the class, I would greatly appreciate it. So that's it. That's all. And see you in class
2. Profile Left Angle - Asaro Nose: Okay, so first up, we're going to be sketching in the SRO knows from a
side profile angle. Now looking at the
reference photo, I first want to establish what's known as the
bridge of the nose, right? So that's where the nose
connects to the brow line. And when you're
drawing your nose, try to use the overhand method, which is how I'm
holding my pencil here. As opposed to what
most young artists do, is they will try to draw
with the three-point method, which is how they
teach us to write. In school. However, you can switch back and forth just like I did here. From the overhand
to the 3-point. The big difference
that you'll find with the overhead
method like this, see I'm old enough is that it forces you to actually start to use your elbow and not so much your wrist
when you're drawing. And effectively, it makes you use a light
pressure control. And light pressure control, as you already know if you
followed any of my tutorials, is extremely important, right? We can always use more pressure. Can always build
up a lower value. It's very hard to
erase, especially with colored sketch
pencils such as this. Yes. So looking at the
reference photo, you can see that there are
multiple planes involved. Now, bear in mind. These planes are not
absolute, not by any means. They're not meant to be. The SRO method is meant to showcase the underlying planes which of course dictate form. But it's meant more
as a general guide. Now, I've mentioned this
in other tutorials, but the SRO method was originally
developed for painters. Not so much pupil that sketch and use graphite,
charcoal, colored pencil. But because we are
all visual artists, much like painters,
it works, right? So what I'm doing here is I'm just going through
and the reason why I'm sketching out the
planes of the SRO nose first is because I want you to get familiar
with them, right? Because if you can
draw out the planes based off of the SRO head model, then when you go to
draw realistic noses, like what I'm going
to be showing you further down the line
in these lessons. You will already have this so conscious understanding of those planes involved, right? John Asara himself
famously said that his method was meant
as a simple guide, but one must find
their own path. So now that we've effectively drawing
out the front plane, now what I'm going to
do is I'm going to focus on building up
these lower values here. Now notice when you look
at the reference photo, the light source is
being cast from above. And so where is the
low-light, right? Where are those low values? Well, they tend to be on the bottom of the nose
or the nostrils reside. And then they tend to be at the top and the sides of
the ridge of the nose. Now the ridge of the nose is different from the
bridge of the nose. The bridge of the nose
is effectively where the nose connects to the brow. But the ridge of the nose
is that long plane that extends from the bridge down
to the tip of the nose. And that's called the
ridge or the ridge plane. The bridge, or the
bridge plane is the V-shaped notch at the top of the ridge,
ridge Enbridge. I know there's similar, but makes sure that you understand the difference between each
the difference between them. Okay? Now, for the most part, we have identified
each individual plane. And this is where I want you to have fun with your sketch. I want you to start using different pressure
controls, right? And I want you to start with a nice light pressure control. Then if you need to continue
to lower that value, like say for example, on the bottom of the nose
or the nostrils should be go ahead and go over
them again and again. And effectively lower
that value more and more. Okay? Think of these first
five lessons as practice, especially if you've never
heard of the SRO method. Okay? A lot of times if you
just kinda let yourself go and you flow with it, right? And you just have fun. Subconsciously, you
will actually absorb new information better
than if you're kinda stiff and rigid and worried that you're going to mess up
and you're unsure, right? Never mind that the sheer fact that you are trying
something new is in it of itself a good thing. And you are already expanding your knowledge and
building up muscle memory. Okay? But notice this writer. So you start from the line and then start to work your
way away from the line. See that that's a
trick that you can use throughout this class,
through multiple lessons. When you start to
build up a line, you can actually
start to blend with your colored pencil immediately up against that line and
then move away from it. And what you'll discover
is that you'll have a nice smooth gradation from that abrupt contrast
between a high or a mid tone to a low value, right? Or a shadow. One of the most effective
things that you can do with contrast is blending those
differences in value. Okay, let's move
on to lesson two.
3. 3/4 Left Turn Angle - Asaro Nose: Okay, so now with this one, we're going to be doing
the exact same thing. Only we are going to
be sketching out. Our SRO knows from a
three quarter turn angle. So as with the first
one, we want to start with the bridge of the nose. So I'm just going to pull down
nice and light like this. And do what you feel as
comfortable like right now, I'm using the
three-point method, but now I'm going
to switch it and I'm going to use the
overhand method. Now one thing I will say, when you first start using
the overhand method, it's going to feel weird. It's definitely
going to be foreign to you and it's
going to be alien. And the reason why is
you've gone pretty much your whole life using the
three-point method, right? But the thing of it is, is the more you use
the overhand method, the more comfortable
they will become, then you will start using
the overhand methods subconsciously and you
won't even think about it. And then the cool thing
is going to be for you when you realized that as you
go through your drawings, you'll be switching
back and forth between overhead
3.3 point overhand, depending on what it
is that you're trying to accomplish on paper. Okay? But what we're doing
is I'm identifying that top plane of the
ridge of the nose. So here I've identified the end of that top plane. Now I'm going to use the corner here and I'm
gonna kinda come down. This is what they call
using a reference point. So I'm using the reference point to the corner of the eye socket, pulling down the marking, the paper roughly
right about there. Then I would say do this. Use that top plane
as a guide for identifying the front plane of the tip of the nose, right? That is in-between the
nostrils of the nose. I'm just go nice and light. There's no need to use a
hard pressure control. You want to start applying
pressure slowly but surely, after all of the
individual planes of whatever angle
are identified. And then of course, like I was saying in
lesson number one, just go over the
same spot again and again to continue to
lower your value. Now that we have this plane kind of identify there's a hook here, so we're just going
to pull that over. Then notice how this
different angle, you can start to see
those planes a lot more. And that's one of the
fascinating things about the sorrow method
is that depending on what angle it is that
you're working with, the same knows the
same planes on the same side of the phase can
look completely different. The light source has not changed from lesson number one,
lesson number two. But what has changed
is that angle. But this is one of the reasons
why I'm taking you through the five different
angles effectively, you're going to learn
a profile angle. A three-quarter turn, a straight on the opposite
three-quarter turn, and then the opposite
profile ankle, right? Those are the five
angles that I want to take you through
so that you have a thorough understanding of all of the different planes
involve that you can use to your benefit
when it comes to sketching out
human portraits. And the other nice thing about
the SRO method is that you can use this method for
realistic portraits. You can use it for painting.
You can use it for charcoal, graphite,
colored pencil. You can even use this principle for certain
animate characters, if you will, or
cartoon characters, whatever suits your fancy. You can do that. Because just like all the
methods that I teach from Andrew Loomis to Frank
Riley to John Asara. They're all principle in nature Okay, so now that
we've pretty much have these planes identified what we're doing as I'm going through and
I'm just hatching. Hatching is where you
pull just one way. Alright, crosshatching is where you pull one way
and then you pull in the opposite direction over the top of your initial polls. Whichever one you like. And here I'm going to lower
this value right here. Because just like in
that first angle, notice those planes from
the tip of the nose down towards the nose
plugs back into the face underneath are all going
to be lower values. And you'll see in the
lessons to come how we use this principle for
shading our noses. Because noses from
different subjects, they all abide by the
same late principles. There's really no escaping. A light will cast over a shadow. Even though that shadow
might be slightly different, it's still genuinely the same. That light will
genuinely cast the same. Okay? So just be aware of that. But this is where you
can really start to play with your
pressure control guys. Okay? And like if you want to
go super, super dark, go ahead and really press into the paper, not
too hard, right? You don't want to
scratch the paper. But generally, especially
if you're following along and you were using
colored pencil just like I am, then what you'll notice is that you don't have
to press hard at all. Colored pencil wants to
fill in those gaps, right? It wants to build on itself
and lower that value. So all you have to
do is just go over the same spot over and
over and over again. But depending on how detailed you want to get
and I would actually say that you should draw out these SRO noses as detailed
as possible because the more time you spend studying these different planes
on the SRO nose, the more it will sink in. So when you go to
draw a nose based off of a client or just for fun, you will have this
subconscious understanding of exactly what the requirements are for identifying
specific planes so that you can have a very
accurate knows and you can mess around
with your line quality is like this here I'm
going to thicken this up a little bit now. Line quality for those
of you that don't know, I know a lot of you
already know this, but I'm going to say it for
those that don't line quality like what I'm doing
right here is the thickness or
thinness of a line. So I'm going through
and I am very enough these different line
qualities because I can bring out the illusion of form. Rain drawings principally are only ever going to be in
two-dimensional space. So artists such as us are actually more
like magicians, right? We have this sense of
magic about us because of what we're able
to do on paper, were able to fool
the eye through optical illusion that
something looks dimensional. It has that third dimension, even though technically
it never will. So line quality is crucial
now there tends to be a correlation between
line quality in line weight. Line weight is almost
the same thing as quality, but not quite. Line weight is the strength
of a line or you can think of it like how dark it
appears on the paper. So remember it like this. The darker the line,
the heavier the weight, the lighter the line,
the lighter the way. Most of the time,
not all the time. A thicker line will tend
to have a darker wait. A thinner line will tend to
have a lighter line way. Okay. Just play with them. Alright? Alright, let's move on
to lesson number three.
4. Straight On Angle- Asaro Nose: Okay, now the straight on angle. Now this one might seem a little bit challenging
for some of you. I know it can be
because all of a sudden you have to worry
about quote unquote symmetry, where with profile angles, three-quarter turn angles, you don't really need to
worry about that. But when you have
someone looking directly at you, symmetry is involved. Now, just like the
first two angles, we're going to start with
the bridge of the nose. Okay? Always start with the bridge. And then you can build
from there when you're drawing the nose based
off of the SRO model. Okay. And then we're going to
work our way down from the bridge and we're going to
bring out the ridge plain. Nice and light. We're using a very light
pressure control here. And we're going
to go all the way down to the tip of
the nose. Okay. Now one of the things that
I wanted to point out, you may notice that one side of the SRO model is different
from the other side. Now, according to John Asara, the left side has more planes
to it and sharper features. Apparently. The reason why is because older
references, alright, older individuals tend to have sharper features where younger individuals
not all the time, but most of the time, tend to have softer features. Okay. Not to mention that aside, the only thing that
will ever deviate cross different references and clients that you'll draw
on your art career. Or the proportions. Principally, as you're going to discover at the end
of this course. Every knows, regardless
of type or size, starts out the same. The only thing that is variable or the
proportions, right? A great artist as a good
eye for proportions. And that's one of the reasons why when they render someone, people say, Wow, that
looks just like them. Or you have captured
their likeness, right? It's the same thing. But now, as you can see, starting from the bottom
and we're slowly bringing out those different planes that we see underneath the nose. Now, like I said in
the earlier lessons, these planes are meant to be
principle guides for you. And you don't have
to draw them out perfectly so much as you
understand where they are. There are lots of
noses, as you will see, that are extremely soft
from the bridge down the ridge all the way to
the tip of the nose and beyond where they plug
in to the rest of the face, but they still have
planes, right? One of the reasons why
the SRO method is so rigid is because planes in
general are very rigid. Not to mention, when you
have a very stiff plane, you bring out contrasts
with how that light casts at an optimal
level, right? When edges are smooth, all of a sudden you
have what's known as a phenomenon called
late gradation. Where even though technically
there's a plane there because it's a
smooth transition. It doesn't drop off a cliff. There's no real
defined edge of where that plane stops, right? But with more realistic noses, you have a sense
of like radiation. Okay? So that's one of the reasons
why I'm starting you off with the SRO model, specifically without
any references because in my opinion, this does the best job of
getting you to thoroughly understand where those
plane boundaries are in relation to one another. Okay? So just keep that in mind. Okay, someone is
switched up and go to the overhand method
and write about, right about here is
the edge of the nose. And I'm going to pull this over, something kind of like
that. Then I'm going to Switch from the overhand,
the three-point. Just gonna kinda connect
this. Pull this up. Again. I'm using a very, very light pressure
control here. And then this is me messing with my different line qualities. Remember that
definition from lesson two was pulling up, just hatching this. Notice how that
value slowly lowers. This is also a very
good exercise for you guys to practice
that pressure control. The heavier pressure you use. The lower the value will be. The lighter pressure you use, the higher the value will be. Okay? And like I said, you can
go over certain areas again and again in that value
will continually lower, especially with these
colored pencils. They're really nice
to sketch with ice, sketch with them all the
time simply because I like the versatility that I'm
able to get out of them. And every once in a while it's nice to take a break from the monochromatic scale
of black and white. There's only so many
tones right there. It's kinda wanna bring
this out a little more. You can mess with
your line weights and you can mess with
your shading as well. When you look at the
reference photo, not only is there a
significant contrast between or the nose ends, but then there's a slight drop shadow is what it's called. And so we can place
that drop shadow here. And also bear in
mind that there are different shapes of the
top of the nose as well, and different variations
like I mentioned earlier, there are different proportions, but the planes themselves
are universal. It's just the overall
shape of the plane that is variable across
different subjects that you'll draw in your career. But the big thing when
you upload your projects, because I would very much like
to see your SRO noses and then your realistic
noses, right? I would love to see both. I would love to see you just
play with your line weights. I want to see maximum variation between your thinnest
line qualities and your lightest line weights. And then some of your
thickest line qualities and your darkest line weights. Don't be afraid to throw in a defined line every
now and again. And then use your shading in your pressure control to bring
out those implied lines. Just like this. Mess around with different
hatching techniques so that you can bring out
that sense of gradation across the different
planes that you have and that you want to
bring out in your SRO noses. This is supposed to be fun. So just make sure you
have fun with it. Pull this, blend this up
like that. Wonderful. I'm not going to get to too
carried away with this one. Alright, let's move
on to lesson four
5. 3/4 Right Turn Angle - Asaro Nose: Okay, So just like
lesson number two, we're going to be doing
the exact same thing. Only this time we're going to be drawing the left side
of the SRO model. But we're going to
start off the same. So we're going to draw in the bridge of the nose
here. Just like that. Then once we have
the bridge drawn in, then we're going to pull
down just like this. Whether you want to
use the overhand or the three-point
grip, it's up to you. For this one, I'm going
to use the three-point. I'm going to switch it up. No, actually, it actually I'm going to pull
this down like this. If you want. You can mess with
the different shapes of that ridge
plane, if you will. It doesn't have to look exactly like the
reference photo, right? Because as I was
mentioning earlier, these planes are the same, but their dimensions are subject to
interpretation based off of the reference photo, right? So something just like this. Then I'm actually
going to connect the plane here on
the tip of the nose. Notice how the planes here
are slightly different. Now, on the right side of the SRO knows it's
just one basic plain. Okay. And that's to get you to
start to understand that yes, there is a basic plane there. And then if you want
or depending on how the subjects nose actually is in your reference photo
that you are drawing. You may very well have
to go in and place additional planes within
generic plane space, right? And this right here is
one of the reasons why the SRO method has
been adopted by so many visual portrait artists, from painters on
through to graphite. Colored pencil artists, is
because of its innate ability to be so versatile across different
subject matter, right? Even though as individuals, we all look very different, we are built very much the same. It's just those proportions that are always off a
little bit depending on who it is exactly
that we're drawing. But just like before going
in and I'm just getting a nice sense of where those
general planes are, okay? And you don't even necessarily
have to quote unquote define the lines between
the different planes. This is actually probably
a good place for me to talk to you about the definition of an implied line versus
a defined line. Fine line is kinda
like what we did with the bridge of the nose and then coming down the rich plane, then that is when you continue
a line without any break. Now implied lines are pretty
much the exact opposite. Notice how on the side of the nose I was
going in and I was very lightly lowering
my values. Right. And then you look at the reference photo
on the side there. There's a slightly lower value than a higher value
than another low value. But there's no real abrupt line. Implied lines are
pretty much brought out in a drawing by the
contrast and value. Okay? So like a mid tone immediately next to a super
low value, or vice versa. A low value immediately next to it, an
extremely high-value. That break in-between
those values is an implied line, essentially. And then of course,
depending on exactly where in the drawing
we're looking that can extend out
from just a very, very subtle short line to
something much longer. It just really depends on the subject matter that
you're drawing at the time. Just be aware. It's
always good to understand the definitions of
things, especially lines. Because as visual artists we are very much
governed by them. Alright? There's something that we
have to abide by and use and use effectively and understand
what they can do for us. How they can complement
our drawings. Now they can take away
from our drawings. We just need to understand thoroughly how to use
them to our benefit. But then notice, notice how
we can go in and we can just, again and again use
our sketch pencil. And we can pull and push lines in different
directions, right? Pulling and pushing. When you pull a line, you're basically
dragging your pencil towards your hand, right? That's what they call polling
a line onto the paper. Pushing along it's
the exact opposite. That's where your hand
follows the pencil and you're pushing
away from your hand. So that's the difference
between pulling a line and push it alone. Alright, let's move on
to lesson number five
6. Profile Right Angle - Asaro Nose: Okay, so now we're back to
the opposite profile angle. So we're going to start
off at the very tippy top. This is the bridge. Then we're going to pull
down just like this. We're going to push that
line all the way down. What I wanna do is I
want to define it. I'm just going to bring it out to find that line all
the way to the tip. And then I'm going to pull
it down. Nice and light. And it's too short, little, short little poles and then pull it from there.
Something like that. Then of course
where it attaches. Okay? And then we have
these planes, effectively. We have three individual
planes at this angle. So this is the first plane. Here's the second plane, right? Very lightly fill this in. Then of course I'm
going to split this into two planes,
something like this. Boom, there's our third plane. And then notice how there's
different values across all three given the angle,
the light sources, again, it's been in
the same spot on all five of these
reference photos. It's only the angle
of the actual model that has changed because
we've turned it around. We started off looking
at it's right-side. Now we've come all the
way around and we're looking at it from
its left side. If you want to, you can keep the contrast
between your planes as implied. Or if you want to go through
and you want to define them with your line work,
go ahead and do that. I'm a big proponent for
trying things in drawing, especially if it's new to you and you've never
done before, right? Because one of two
things is gonna happen. You're either going
to look at and big, wow, I absolutely love that. That works for me. Or you're going to
look at it and go, Oh my God, I do not
like that at all. And you're never going
to do it again, right? So that is part of developing
your own style, right? Just trying things and drawing. There's no such
thing as accidents. There's just adjustments. And I've mentioned that
and other classes as well. So just like life. Okay. Notice how I
brought that out and that's that's effectively where the cheek the meat of the cheek kinda ties into
the side of the nose. Then I'm just going to
pull this up and over. Then there's a slight, slight rise right here, which I mean a notice that two notice how if you
pull from left to right, it looks a certain way and
then you can pull up and down immediately above
that on a different plane. And it'll actually give
you a different type of implied line and a
different contrast between those different planes. And depending on
the viewer's eye, whoever it is that's
looking at it. That will jump out at some
people more than others. So that's what I meant by
like trying different things. Alright, so like for me, when I'm doing here, I'm just going in and I'm pulling this and kind of lowering this value
from the edge. But I like to go in, I
like to define lines. I just don't like to
define every single line. But the right amount
of define lines with the right line quality
in the right place. We'll actually give your drawing
kind of elevated, right? And give it that certain, certain sense of dimension. That if you were
to just leave it alone and just leave
everything implied. A lot of lot of
drawings tend to lack. But again, that's also
a personal preference. One of the beautiful
things about drawing and sketching and
about art in general, regardless of medium, is that it is very much
subjective, right? It's all about the viewer.
That's the name of the game. Okay. So those are the
five basic Asaro noses. Now let me take you through some actual real life
reference photos
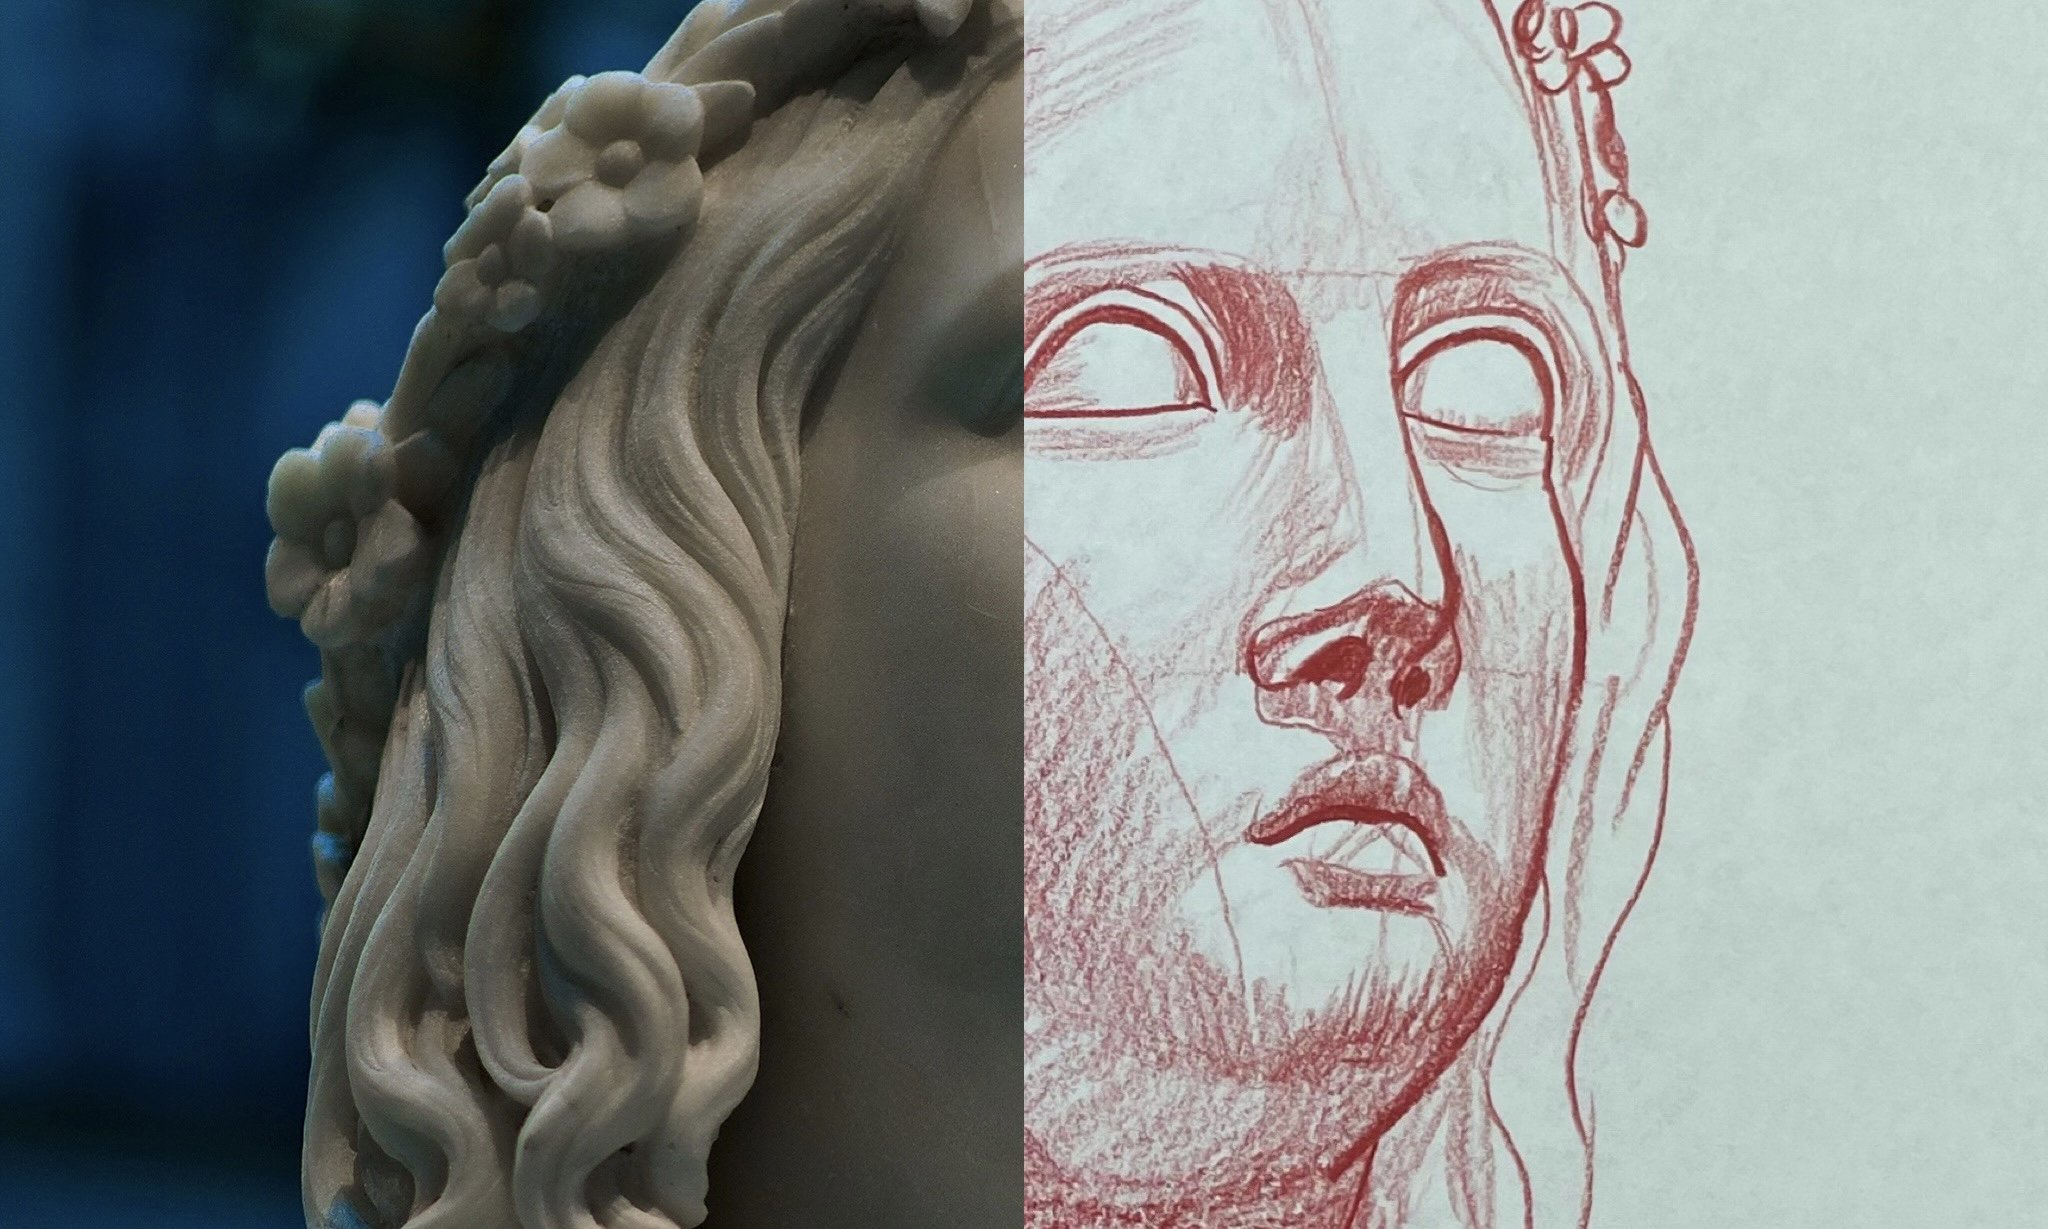
7. Profile Left Angle - Real Nose: Alright, let's do number six. So as you can see, we're going to be
drawing the real-life reference photo on top. But I also provided the
reference of the SRO nose. The reason why I
did it like this, because as we go
through and draw this, I want to show you
how you can use the SRO method when
you're drawing something that's supposed
to look realistic. Okay? So this is actively showing you how to take the principles, the planes of the nose
and apply them to actual rendering of a real nose. Okay, so what I like to do, I'd like to start off
with the overhand method. And I like to start out with
the basic shape of the nose, right, the outside shape. Because when you start off
with the shape of the nose, then what you do is you
kinda open yourself up so that you can work
from the outside. In. So once we have this
basic shape established, then I can very easily go
in and I can start to draw in the plains of the nose as far as where my light would
be and more importantly, where it would not be. But just like when we
were sketching out the SRO noses by
themselves, right? Nice light pressure control. Because we want to
be able to go back in and erase if need be,
with colored pencils. It's hard to erase. But
if you're drawing like a graphite or charcoal
pencil so that you can. Now here, since I like this
one I'm gonna do is I'm going to define
this line, right? Remember what a defined line is. It's when you continue a
line without any breaks. So I'm extending this line from the bridge of the nose down
the ridge of the nose. And now I am solidifying
that outside edge, right? Bringing out the
shape of the nose. Just do short, short little
pools. Short little pools. Okay. Then right here, I'm going
to pull over like this. Then even though
you can't see it, remember what I was
talking about with light gradation
across a smooth edge. That's what this is, right? So even though obviously the real-life nose is
not geometrical, right? It's not, It's not
shaped like this. Principally, as far as the
light is concerned, it is. So I'm using a very light
hand and I want to identify exactly where these
light casts would be. But then you'll see
as we go in and I use my pressure control
and continue to build up my lower values. You'll see the nodes
start to take shape. And the nose always takes the
most shape when you put in the nostril for whatever reason that nostril either
makes or breaks a nose. So this is coming together
pretty nicely, right? We have this basic
understanding. So right about here, I'm going to switch from the
overhead to the three-point. Then I'm just gonna start
pulling this defined line over. And you'll start to see here
in a second what this is. This is the nostril, something like this. Okay. Do short little poles that way. I find with shorter poles you actually have a little
bit more control and you can actually
make adjustments as you're pulling that line. And it reveals itself, right? You just want to make
sure that that line is in proportion with
your reference photo. Now, we're going to start doing, is we're going to be keeping in mind that underlying form. What exactly does that
underlying form look like? Okay, so now let's switch
back to the overhead method. Here. I want to to identify the
edge of the nose, right? Because this is really going to kinda bring the
whole nos together. I can define this line as well. Then we'll fill in this nostril, effectively lowering the value. There we go. I like that. Then I'm going to pull up, notice how I'm pulling guys. See this. Notice how I'm pulling. A lot of times if you
just pay attention to that underlying
form and you pull your pencil across the
paper accordingly, what will happen is you'll
actually be able to convey form without
much shading at all. Especially if you're
using colored pencils. Like I am for this one. You can also go through them. I would say you'd want to use the overhand method and you
can give the whole knows just like your base
line layer of value. If you want, some artists
don't like to do that. They'd like to keep
their high values as light as possible, but it's really up to you. Now check this out. We can go right about here. And just very, very
lightly, very lightly. It's called a nice
little circle. What this does is this starts to bring out that
underlying form as well. If you actually look at
the reference photo, you can kinda see that circle. It's very, very, very light. But almost every single nose has a circle in that specific
area, right, right here. See this, see that shadow. That lower value in
the reference photo. Almost every single
dose has that. And it's not until you
actually start to look at different reference photos
over and over and over again. If people's noses
where you actually see a mature enough, it's there. And then here, right? Just like the SRO knows,
principally shows us, right along the edge of the snow's going to be lower
value or the late. Just simply isn't casting nearly as much as the rest of the nose. Especially because
like our sorrow knows, this light is coming from
pretty much the same direction. Only because of the smooth ER, form that the light
is cast upon. It's much harder to
make out those planes. But we know they're there. We know they're there. Let's pull this up. I'm choosing to fine lines and I'm kinda beefing up the
edge of the snows. Let's see. I wouldn't
want to take those defined lines all
throughout the nose, Not at all. Then notice this,
notice how you can take your pencil and just
pull it, pull it over. That gives our sketches
sense of roundness. And you can get his
carried away as you want to with these noses guys. But for me, I'm just doing
a nice generic sketch, taking my time and I'm showing you how I would
approach it, right? So check this out. You see this slight
low value kind of a it's like a different plane of the cheek plane where it
actually ties into the nose. We can bring that out. And that just gives the nose
something to sit on, right? So it's not like
this floating nose on the middle of space. Then notice the hatching. With sketching like this. It's all about the
direction that you pull. That direction will
be everything. Then we're going to
go right up against this line, right up against it. Just go back and forth. It's nice tight little circles right up against that line. And just notice how as I lower that value immediately
next to that line, that sense of gradation
starts to come out, right? That, that smoothness. It's not so abrupt. It's not so it wouldn't look as Leonardo da Vinci would say, lower and lower and lower. And notice how the
majority of what we're doing here now is
just value building. We're building values
were messing around with some of our line quality
is in our line weights. But the SRO method really truly came in about the first 2
min of sketching, right? If you actually continue to
draw portraits for yourself, one of the things
that you'll find, you're really going to lean into those principal planes
right off the bat, right? When you're establishing
your features, when you are messing around with your proportions and trying
to get all that right. All of this, the value
building the line work right, detail work that
all comes later. That all comes after. You've used the SRO
method to identify the plains and identify your basic shape
of your features, whether that's the
eyes, or the mouth, or the ears, the
face in general, the SRO method
applies to all of it. This class specifically
just focuses on noses. But just keep that in mind. Okay. I'm just going
to pull this up. I'm not going to run
that defined line all the way up, Right? I want there to be that variation in line
quality because remember I was talking about
how you don't want every single line
in your drawing had the exact same link quality, the exact same thickness
because that would look, that would look
cartoony, varied up. It'll bring out just
a different dimension to your drawings. Okay? That is looking pretty good. I think what I'm going to do
actually is for the nostril, I think I want to
lower this value just a little bit more. Let me show you
this. Check us out. Push a little harder. I'm really going to bring up
that defined line. And that's something
that you can do. You can mess with, you can
mess with that line quality. Alright. Let's move on to
lesson number seven.
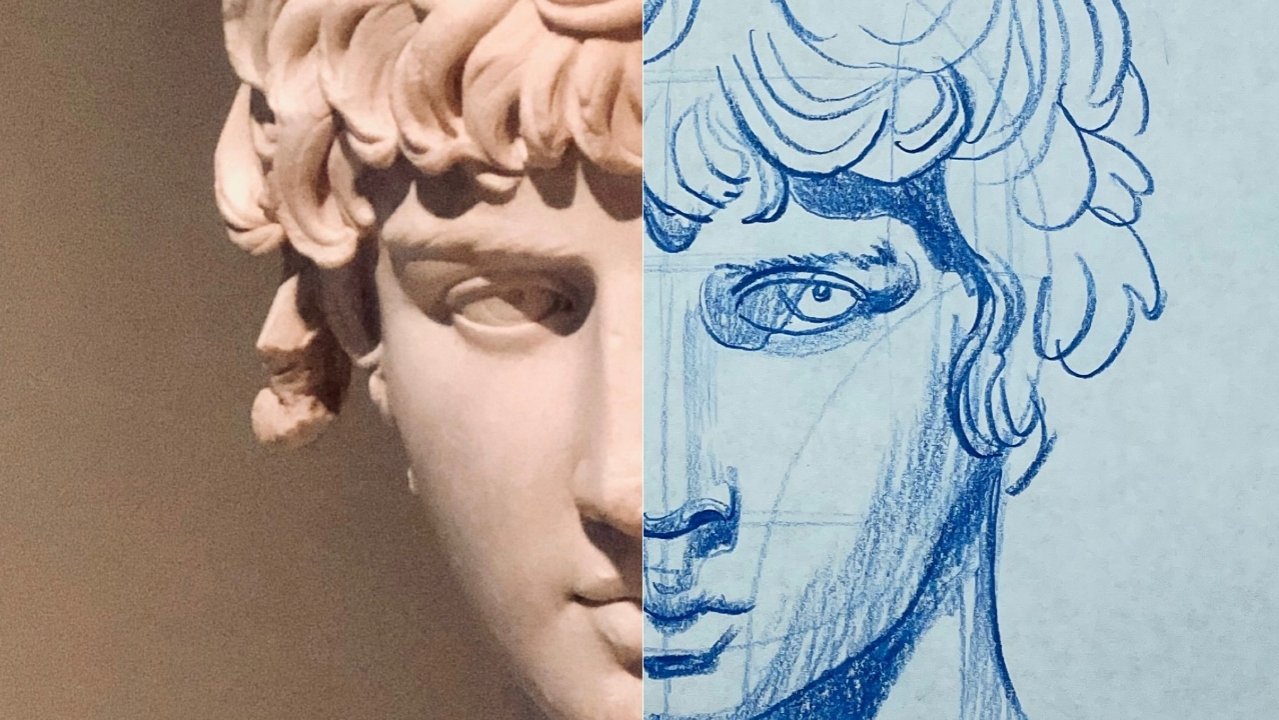
8. 3/4 Left Turn Angle - Real Nose: Alright, so for this one we're dealing with a
three-quarter turn. I'm going to sketch
this one out and blue. And here we go. So this one, this one, what I wanna do is I
want to start with the tip of the nose playing now, typically, I either start with the bridge of the nose or I start with the tip of the nose. At the end of the day, it
is personal preference. But as you build up your
confidence more and more, you'll be able to bounce back
and forth between the two. But what this one, I've drawn
out that tip of the nose. I've pulled my plane
of the tip down. And now I'm just establishing
those side planes, right? And I'm going very,
very late on purpose. This is the foundation
of this nose. And as you can see the
real life reference photo, that nose is extremely smooth, so I want to make sure that
I'm able to bring that out. Something like this. I will say when it comes to
drawing noses such as this, your bottom planes, right from
the tip of the nose down. Those ones are probably
your most important. The actual ridge of the nose from the tip all the
way up to the bridge. That's fairly easy
because there's just not a lot to it outside of maybe the proportions
of its width. And then of course
it where it actually plugs into the face that is just simple shading and making sure that your
gradation is on point. But now that we have
this established, I'm going to pull
this up, right? I'm just going to keep
working all the way up, straight, straight
up, straight up. Pretty much to
where it would plug in to the actual bridge. Just going to run that
rich straight up, something like this using
the overhand methods. So I have more of
an implied line then I do a defined line. I can always switch from
overhead to three point. Then I can define that line
and really bring it out, solidify exactly
where the edge is. And this is just kinda
more or less like you can see that there's
a plane of the nose. We understand where that plane is based off of the
SRO model here. Then what I'm gonna do is now that we have a pretty good understanding of
where the planes are. Now the fun part begins. So now we can start to bring out the character of this
specific knows. Okay? Because let's face
it in your planes at the end of the day
are very generic. You know, it's like,
oh, there's numbers of this plane right here, then there's that
plane right there. But every real nose is
subjective and it's unique. So now we're going to bring
out that uniqueness, right? Like this, pull this out. This is more or less were a contrast implied line lives
with this side of the nose. Because when you look
at it, you really can't see the nostril. It's, it's it's tucked back behind the actual
tip of the nose. But you do have the
very outside of the nostril and that we
have to kinda bring out. So now I'm actually going
to define this, right? This is where you can get
real specific about where you want the edge of
that nose to live. This right here is one
of the reasons why it's important when you're just
doing basic sketching, trying to get a feel for those
proportions that you use the overhand method
because it forces you to use a lighter
pressure control. And you're able to
get a good sense of where things are
supposed to live. And then of course, once
you're satisfied that Yep, that's exactly where I
want that line to be switched from overhand a
three-point and define it. Right? Then right here. Trying to get a
good idea of where the edge of that nose would be. Then you can also kind
of go like this, right? I'm just lowering
the value here. Because when we look at
the reference photo, we can see with the
way the light casts as with the sorrow model, that all those low values
are going to live from the tip of the nose down,
covering the nostrils. And then because
of like radiation, because of that smoothness. I mean this effectively is what the actual plane looks like. Obviously, it's not
stiff and rigid and square like the SRO
plane for the bridge plane. And then we can just kinda
pull down from there. I suddenly basin lakes. We can always build
that up if we want to. Then I want to start thickening up these line qualities and darkening some
of these weights. Because that's
going to bring out contrast within the values, right, between high and
low and our mid tones. There's a slight drop shadow
here within the nostrils. So from the line, right from the line, work our way away from the line. But we always want to
start right up against it. What that'll do is that'll
actually believe it or not, play a trick on
the eye and it'll crisp up that line so that we don't necessarily have to define it so much or any further. You know, all with the use
of messing with our values. Here. There's little lip right here. Then we have our low value here. Just nice and light. Remember you can always go
back over it again and again. And that value
will get lower and lower like this to
find this line. And then by defining that
line that effectively brought the tip of
the nose closer to us and it pushed that far side of the nose back a little bit. There's lots of things that
you can do with line work. Once you understand
how it works, There's lots of things that
you can get away with. Lots of illusions that you
can play on a viewer's eye. Based off of placement
and thickness and wait. Cameras can darken this
up a little bit more. Why not? Let's see now. Now pretty much all of the
planes have been identified. So in my opinion, this is actually the
easier part of it. When you're laying
down your basic shape. To me, that is one of
the hardest things to do because there's so
much room for error. Where once you're just
simply building up values, your framework has pretty
much been established. But then remember the last one, kinda like I was saying,
you have these two circles. You have a circle for
the tip of the nose. Then you have circles
for the nostrils. What that does is that
pretty much gives you a general sense of structure for the bottom
part of the nose. Now just make sure you go
light with that, right? Because like say for example, in this reference photo, you can see the circle for the nostril on the
nostrils closest to us. But you can't really see it for the actual
tip of the nose. But right here, this is
where the direction that you pull across the paper becomes
very important, right? Think about the underlying form when you look at the
reference photo, exactly how is that
form being conveyed? You don't want to just
pull your pencil left, right, up, down, all around. There's a sense, there's a sense of structure
in that reference photo. You just have to analyze it. Figure out where it's
right about here. Use a reference point from the right nostril
and pulled it over. This is where I'm going to place the edge of my other knows trump nice and light school over the line over and
over and over again. Colored pencils tend to
be somewhat forgiving as long as you use a nice
light pressure control. Okay. So now that we have that, I'm just going to pull this up. And really this is where
we start to kind of blend all of these
planes together. Right? Then we can just start
to get a sense of The overall structure
for the nose. But just bear in mind that your lowest values
are still going to be within those planes that we identified from the tip down. Okay. From the tip
down and then on the side of the nostrils down, that's going to be where
our lowest values live. And then of course, your highest values
are gonna be right along the ridge plane. And then the tip of the nose, especially in this one. But
let's do this, do this. You can do this just like we did in the first real knows sketch, like where you just kinda
pull over up and over, right? Because it's not so
much that we're worried about the value because
we're sketching. We want to bring out the
form before the value. Now if this was like a
charcoal or graphite sketch, we would definitely
want to be more conscious of high values and we probably
wouldn't do that. But because it's a
sketch and we're just bringing out the underlying
form of these noses. Why not? I actually find
that sketching like this is a lot funner than doing an actual Commission pieces
because you just get to, you don't have to stress out
so much about proportions, so much as you just
really have fun with it. And you just kinda kinda
let yourself go with, go with the flow
and select this. And then even within
these low values, you can go back in and you can target the slight variations, those tonal differences
between a super, super low value and then maybe
like a mid tone, you know, something that is low value
but it's not nearly as low as say like the
inside of the nostrils. Of course, on this plane here, it's going to be
of a higher value. Right here where it
plugs into the eye, plugs into the eye socket. Something like that. Of course. Here they can
thicken this lineup, pick it up, it's quality,
darken its weight. And then I'm actually
really going to hammer in this
low value here. Because you can go
back in and you can define these lines
lowered these values. The more you work on it, obviously, the more of the
detail will come out in it. But you can spend as
little or as much time on these as you want to. I would say that if you're following along and
you're using graphite, grab as much or do
nice light smudges, bring out that
gradation and see how close you can get your project to the
actual reference photo. Why not? Give it a go? You don't have to do this entire class and
colored pencil like me, if you don't want to do what
you're comfortable with, no matter what medium it is. Just to have fun. Do you I'm just pulling this up. I want that underlying form to come out and
notice how it is. Just by doing those very, very quick basic hatches, I'm just pulling one way. It's amazing how much form
just came off that paper. Just by doing that. We could sit here for hours
and just do this detail and that detail and it would just get better
and better and better. But we got three more
noses to draw here. But I hope you're starting
to have fun with it. And hope you're starting
to see that if you just follow a basic principle
approach through the SRO method, that you can easily
start to draw noses, which I think eyes are the hardest to each row
in the face to draw, but noses are, you know, they're nothing to joke about. Let's move on to
lesson number eight.
9. Straight On Angle - Real Nose: Alright, the dreaded
straight on ankle. Now, I chose this
real-life reference photo for the nose because
of how rounded it is, we have to kind of
opposing things here. We have a rounded
real life knows. But I wanted to
show you that even though that nose is
rounded in nature, that you can still
use the SRO method to break it down and to draw a
very convincing render. Okay? So first things first, we draw the tip of the nose, we identify that front plane, okay, and then we
go off the side. Now this is a really good
view because it shows you how even though on the left
side of the SRO model, it's just kinda one plane. And then it shows
you the breakdown of the three individual
planes on the other side. Now, depending on you, you can either use
one big plane for your nostril or you can use up to three planes
for your nostril. It's really a
subjective take, okay? Then once we identify
these planes, I'm going to go in
and I'm going to show you how if you go into heavy handed and
your values are off, how you can slowly
go back through and build those lower values and effectively blend
that mistake away. Alright, but first things first, we're gonna identify these
planes just like this. We're just going
to pull up here. Notice how we're using the overhand methods so that we have a nice light
pressure control. Because in this step
of the process, we are very much identified
our proportions. Okay, The hardest
part, the first part. Then what I like
to do because of the nature of this
reference photo, I'm just gonna kinda go
around and kind of a, an upside down horseshoe if you want to think
of it that way. Okay. So now what I'm going to
do is nostrils somewhere. Somewhere right about here. Okay. Because notice just like with the other
ones, you know, we, we kinda started with
those bottom planes. Now that we have
the foundation of the bottom of the nose
pretty much established. We can start to
establish the nostrils. Now that the nostrils
are drawn in, I'm gonna go I'm going to put just a nice base
layer down, okay? And this is lowering that value. Given the light
just simply isn't reaching this part of the nose, which is why we have the SRO
planes the way that we do. Okay. Now we're going to
start building the nose up from that bottom plane. And we're also going
to be building the rigid the nose to where it plugs in to
the bridge, right. And this one's kinda
round all the way around. So I'm just going to round
it out just like this. Alright, from bottom to top. Then I'm going to pull
this up and over two. Yeah, something like that. Okay. So now that we have I'm just gonna kinda go
in a nice light circle here. You don't have to do this
if you don't want to, but I enjoy doing it. So I'm going to,
not to mention it's the perfect excuse for you to practice your circles, right? Those of you that have followed
my tutorials on YouTube. I mean, I used to always use
a compass for my circles and then I started
doing it manually. I actually prefer to
draw circles manually. It's a lot of fun. They actually have competitions all over the world where
artists can come together, you know, draftsman,
and they can practice their circles manually. Legend has it that the only artists during
the Renaissance that could draw a perfect
manual circle was Rafael. Alright, so now what we're going to do
is we're just gonna go ahead and we're
going to we've established these nostrils. And so we're gonna go
and we're going to lower that value because as we
look at the reference photo, we can clearly see that there is no light entering those
nostrils whatsoever. Now, this is kinda
what I was mentioning, right where we've
reached the point The creative process where we have the basic shape
clearly identified. Now, in order to bring up
the character of the nose, we are going through and we are building up
our low values and effectively drawing
out those high values and those mid values as well. Let's see now like let's say
you go in here and yada, yada, and you're just kinda
not really paying attention. Something like this. I don't
know, something like that. You know, and you're right. I mean, look at the
reference photo, right? It doesn't look like that.
The values are clearly off. So I'm going to show you why. You don't panic in a
situation like this. Okay. First off, I would
say if you mess up like that, take a breather. You know, maybe maybe go
for a quick little walk. You know. Maybe if you have a garden,
go out in the garden, or it's going to drink water. Then come back to it.
When you come back to it, don't go straight
to the problem. Work on your values
somewhere else. And the drawing, like what
I'm doing here, right? Because this is fairly easy. We kinda wanna get back
into the swing of things. We want to build up some of that confidence lost when
we accidentally messed up, building up some of
our lower values. But it's just that, right? We're building lower values. So what we can do is like, let's say for example,
if you messed up with the overhand method, you can go in with a
three-point method. I can guarantee you, you're probably gonna be
a little bit more confident with the
three-point method then you are the
overhead method. Especially if you're a
newer artists, right? Then you can start going
in just like this. Pay attention to the direction
that you're pulling. And you can use a nice
light pressure control continued to go over that spot because effectively
what we want to do, this is because you went in
with too heavy of a hand. That value was a little too low. We need to build up
the value around it so that it is effectively
pretty much the same value. Once the value around
it is the same value, then all of a sudden
we can go in with even lower values
and we can pretty much recover the fact that you were too low value in
the first place, okay? Now, if you're having a hard time wrapping your
head around that, don't worry, just watch. Just watch what I do here. Because effectively it's a
blending game, a value game. If you want to think
of it that way, we need to lower all of these values in unison around the spot
where we messed up. So that we can lower the low values that need
to be lowered, even lower. And then that will
effectively help us kinda mask the area where we
went in with too low value. I'd like to show how to fix
little things like that, because if there's one
thing that we all know, it's the life is all about
messing things up and it's all about how you
recover from messing up. That makes all the difference. So pretty much I
just showed you. If you fall off the
horse that way, this is how you can
get back on it. Alright. Something just like this.
Just notice how I'm pulling. Pulling one way over and
over and over again. Nice and light. See that? Notice how it just gets
lower, lower, lower. Then all of a sudden that
form starts to really come through that right
there is what we want So here for example, we can switch to the
overhead method. I'm just going to go around and, you know, little circles, right? Lower this value in general. Especially immediately
under the nose. The nostrils and stuff are
lower and lower and lower. And then of course
we can go in here right up to that line, right? And we can lower the
value just like this, you this right up
next to the line. Then we can still kinda see we messed up here. It's
nice and light. You don't want to push
too hard because if you, if you use too heavy of a pressure control,
what's going to happen, especially with colored pencils, is colored pencils
or soft enough, kinda like a CRAN, where they don't necessarily
scratch the paper. But what happens is they smear a bunch of their head onto
the paper and then you almost have like this gunk or this buildup onto the paper, which effectively is
the same thing as scratching the paper, right? They're both equally annoying. But if you just use a nice light pressure
control and you just continue go over the same
spot over and over again. You'll pretty much have a nice even waxing if
you wanna think of it that way of the colored pencil tip
on top of the paper, on top of itself, on top of the residue that
was left by the initial past. So you just do that over
and over and over again. That value gets
lower and lower and lower. You don't
want to rush it. That's the big thing. A lot
of people think that if they just go kinda, kinda bulldoze their
way through it, they'll get done
faster or whatever, but that's not what
you want to do. You want to relax, man. Take your time. Enjoy it. Otherwise, if I do a manner where it's pulling this
up, just like this. Now you can kind of
start to see how that spot we were working with. It's almost completely
gone right. Now. Obviously, if
I wasn't showing you how to mask a mistake, I wouldn't have done
them, but I wanted to show you how to fix it. And then just like the
other ones, just like this, left to right, left, right, left, right, and
a nice slight arch. Okay. Then what that does, that
pretty much is hatching, but it shows that roundness, especially for this snows. This nose is a challenge because not only
do have to worry about symmetry,
but it's rounded. And because it's rounded, it is different from
the very square, sharp, rigid SRO knows. They just kinda go in
circles like this. See, this kinda continued to blend the nose over and over. And then if you want to
switch to the three-point, really get in here and
lower some of these values. You can do that as well. And that's just it,
especially when you're bouncing back and
forth between lake. Red, blue, green. Depending on the viewer. Each color kind of showcases that contrast
and value differently. I personally think that green is of the three colors,
not the best. It's showcasing the transition between high, mid
and low values. I think red is the best,
at least for my eye. And then followed by blue. I think blue and red are
both really, really good. But who knows? Maybe maybe for you? Green is money. Yeah. But yes. But that is how you fix a low value mistake if you
go into hot and heavy. Now, the next one, we're going to sketch
this one out and read. And we're going to do
a three-quarter turn, look in the opposite way. So let's get ready
for lesson nine.
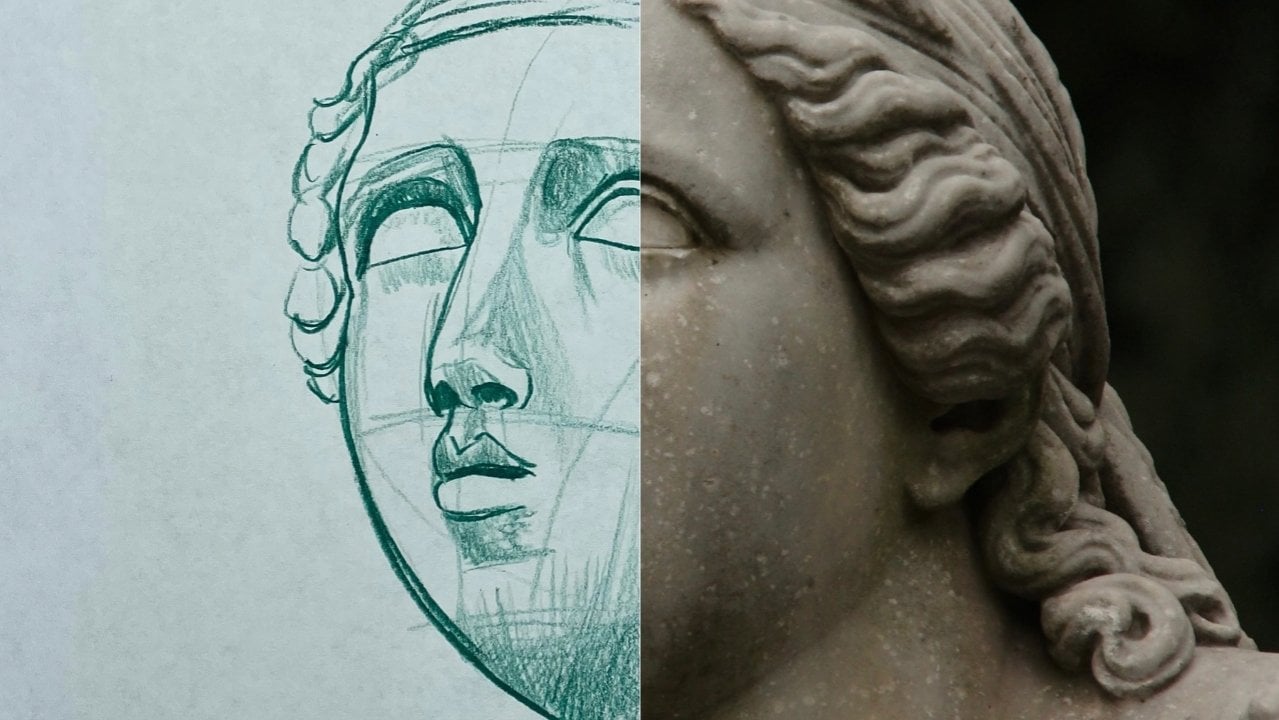
10. 3/4 Right Turn Angle - Real Nose: Okay. So three-quarter turn. This nose is very much
like the last one, right? It's much softer,
it's much smoother. It's not nearly as sharp
featured as the SRO knows, but we'll show you how these
principles still apply. Okay? So we're established
the tip of the nose. Then. Notice how these planes, even though they follow the same basic
guidelines of the SRO, knows what I'm
doing is because of the nature of the reference
photo is I'm taking them, I'm taking those planes
and I'm condensing them random kind
of squishing them. Because the reference photo nose is not nearly as big as
the SRO knows, right? So this is a way
that you can take the SRO method and you can
use it to your advantage. Remember, it's not
that the planes are different from subject
to subject that you'll draw. It's that the proportion of those planes will be different. So this is a prime example of that. So just keep that in mind. Okay. Now that we have those basic planes
kind of established, we've, we've more
or less sandwiched them given the nature
of our reference photo. Now we're just gonna
kinda pull this up and we're going to establish the edge of
the ridge of the nose. Okay. Then from the corner here, nice and lightly, you
can just pull this up. And this is pretty much the
other edge of that top plane. That ridge plane. Then of course that's where
the nose kinda goes off and ties into the eye.
Something like that. Okay. Alright. So those are pretty much the basic planes that we're going to be using in this one. Now, I'm going through and I want to start to bring
it up that basic shape. Okay? Once you have the
planes drawn in, then generic shape comes in. You can establish the shape with the outside edge of the
bottom tip of the nose. And then you can
also bring it out like this by drawing in the shape of the nostril.
Top of the nostril. Then of course, you can do the edge of
the nostril, right? Kind of where that
ends. Bring that back. Then. Yeah. It's practice or
circles like that. This is almost more of a, more of an oval on this one. That gives us a
subconscious idea. The structure of the
bottom of this nose here. And just for kicks,
I'm going to, I'm going to actually
draw in very lightly some of these other planes
just so we can practice them race so we can get a general understanding of
what these planes look like. The hope is at the end of
this class with all of these different projects
that you will know exactly how to approach the nose of any subject to that it is that
you're drawing. Okay. That's the hope. Then just
like our other ones here, we're just going to go in. Just kinda run this line. Something like this. I want to bring this in a little closer. Then we have the
bottom of the nose are going to thicken up the
quality on these lines. Let's pull this up. And
then on this I'll also show you how you can
go in and you can use shading techniques on
the opposite side, right? And by shading like
this, what it will do, especially with
that define line on the edge of the ridge of the
nose is it'll kinda push that side of the face back
and it'll bring the nose forward ever so slightly so that it will look a lot
like the reference photo. I mean, when you look at
the reference photo, right? On the subject's right side, where the light is not casting, that side of her face
does look a little bit further away because of the
contrast in different values. From her nose to the right side. A low value from the ridge of the nose over a lighter value. Then right along the line, I'm just going to put a low. It's going to put a
little value there. This is where it kinda starts to go into the eye socket here. Nice and light. You look
at the reference photo. I mean, that is really
the trick with this one. You're just going
to pull this over, up and over, up and over,
something like that. There we go. Then I'm still very much building
the lower values on the bottom plane
of the snows. If you want to like if you're
using graphite or charcoal, following along, you
can use smugglers. I would also say try
brushes as well. There's only one thing
that's more fascinating than blending charcoal or graphite was imagers and that's brushes. And I'm just because
the gradation is a whole nother level. So
maybe give that a go. If you're following along and you're not using
a colored pencil. But if you are using
a colored pencil, It's all about pressure control. It's all about pressure
controlled and the amount of times that you're going over the paper in a specific
area to lower that value. Okay? I just kinda wanna
keep this going, keep this nice and light, and just kinda blend it. There we go, something
like that and see that I'm just really going to lower this value right up next to this nose. And you can go in circles
or you can hatch. It's really up to you as far as as far as what
you want to do, what you want to
kind of finalists that if you want to convey. Then here I'm just,
I'm just going to a nice tight little
circles right up against that line because I want to lower the value a little bit more
on this nostril. And most of the time, when you draw on doses regardless of the
medium that you use, the nostrils are going
to be the lowest value. I mean, just because the nature of how it knows is
constructed right? I mean, like just doesn't go
into nostrils so that for you is going to be something to keep in mind because that is very much an anchor point
for your lowest value, which in turn will affect the overall contrast of your
drawing at large, right? Let's practice our circles here. Got the tip, got the nostril, and see how that just kinda, really kinda brought
that nose out. Tokens so simple. And
then of course we have our lower plane. We want to make sure that we
shade that appropriately. Really bring that out. Shade, shade and more shade. Something just like that. Let's continue to blend it. Because value contrast is really the biggest
thing that you have in your arsenal as far as sketching and conveying
underlying form, right? The more contrast you have, the more variation you have
between low value, mid tones, high values, the more
your drawing will pop, regardless of what it is, whether it's just a nose, just a set of eyes, or a whole portrait. It's just understanding
those different values and how to bring them out
with your pressure control. And then of course, the amount
of times that you shade a specific area is
Very important. Okay. So then here we go. I'm just going to keep
pulling this down. Watch that value lower
and lower and lower. There we go.
Something like that. Notice that define line, that's what I just put there, that is a defined line. Then I'm just going
continue to blend this. And this is what I was
talking about with maximizing that contrast
and your different values. Now, you don't want to
go overboard with it. Some artists just have a
light hand in general, they don't really like to double down on accentuating
the value scale. I will say that is something that comes with
practice and time. And you know, the more
you do it, the more confidence you'll build up in yourself where you beck,
Yep, You know what? I'm actually going to go
super, super dark right here. Because I know that
that'll make all of my higher values pop
and vice-versa, right? Which is something that comes
with time and practice. But this one's coming
along quite well. The big thing with this one was just the shading on the left
side of the face there. That's why I wanted
to do this one. Next to the nose
being super round, like the last one. I wanted to show
you that you can shade and you use that
shading on the other side of the face to make your nose fill out and
actually have a sense of form. You don't necessarily
always have to rely on that bottom plane from
the nose tip down to the nostrils for for
value contrast, right? All right, that's
pretty much that. We got one more lesson, ten
11. Profile Right Angle - Real Nose: Last one. All right, so we've come to the other
side of the face now. Alright? So what
we're going to do, that is we're going to start off with the plane at
the tip of the nose, right, the end of the
ridge of the nose. Then from there we're
going to pull up. We're going to bring
this slide up. Nice short little poles
from left to right as to keep our line
straight as we can. Okay. And then of
course we get to the bridge of the nose or a
line effectively goes up. Then we're gonna pull over. We're also going to keep in
mind our reference photo. So the nose comes here. Then. From there, it
plugs into the face. So from here though, I want to stay true to the
three different planes. The SRO knows at this
angle. Plane number one. Then I'm going to draw
out the second plane, which is something
like that, right? But I'm going to sandwich
it an elongated a little bit because of the nature
of our reference photo. Then of course we have
these planes here. Pull this over ever so
slightly, ever so slightly. We want these planes
here to be very subtle. Subtle as we can get them. We still want to keep in the back of our mind
almost subconsciously. We know they're there. I'm feeling pretty
good with that. So now let's start bringing out the actual shape of
our reference photo. Because remember what
I was saying earlier, the SRO planes only
gets you so far. At the end of the
day, it's a formula. You might hear the
term formulaic. Lots of critics will say, Oh, that drawing, it
looks very formulaic. It's just whatever like drawings are all based off of some
type of formula, right? Whether it's luminous or
Riley or sorrow or what have you or Bridgeman, whoever. Okay. Now I'm just going to
shade this nice and light. The reason why I'm
shading this is because as the SRO model dictates, we know that the nature of the light source does not
cast past this point. So why not lower it? Something like this. Okay. Now, from right about here, notice how I'm using
the three-point grip. Pull this over. Something like this. Slit that kinda fade off. Nothing. Then of course
there's a slight indent. And buy writes a drop shadow
because of the indent, the very bottom of the nostrils. We kinda wanna pull that over, but I want to push too hard. That way we have a
little bit of variance between the quality of the top line and the bottom
line on this nostril. But then we're gonna go in right up against the
defined line on the top. Certainly lowering that value, right? Nice tight circles. See something like that. Then I'm going to pull
this over. Effectively. What I just did there is I just thickened up
the lines quality. And remember how
he's talking about correlations between
quality and wait. When I opened up that quality, the weight of that line
got heavier, right? Got darker. So now we have a little bit of a drop shadow underneath his nostrils. So we just kinda want to
bring that out using a mid, mid to late pressure
control here. Like I said, with
colored pencils, there's really no need to press super hard
unless of course you're trying to do line work simply because it's kinda
like a crayon, right? So it's just lumps like a wax. It'll just more and
more and more it'll slowly build up on
their right here. Just want to stiffen
up that it's the beginning of that
upper lip there. And then notice
this notice there's no sound pulling
up from the line. Pull up, pull up. You lift up as you conclude, that gives you a really cool hatching effect onto the paper. And that actually works well for blending in different values and allowing your shade work
to really kinda be elevated. But the biggest
thing for this step as you're drawing
this nose guys is just look the values and just play around with
different pressure controls. Jump back and forth between the overhand grip and
the three-point grip. See what works best for you. Everyone's hand is different. We all hold our pencils
slightly differently as well. Okay, so just by sketching and trying
out different grips, especially if you just
kinda do it subconsciously. One of the things that I
actually would recommend is record yourself sketching
these noses okay, set up like little tripod
or whatever. And just draw. We use your smartphone,
record it and draw it. And then go back through. After you're done
drawing and just watch your hand and watch
what you're doing when you actually transition from three-point to overhand, then that way it's kinda like you're studying
yourself, right? Like how do you draw, right? What works for you? What does not work for you? It's an analysis of yourself. You know, by doing that, you can start to really understand what works
and more importantly, what doesn't work
or maybe what you need to improve on, right? So just be aware of that,
maybe try that out. Then here I'm just gonna kinda
go kind of a rough circle, almost more like an
oval and a circle. Then here I'm just gonna
kinda same thing here. I want to kind of
bring out that, that form of that knows
something like that. Snow is just starting
to take shape. Then let's, let's do
something crazy. Why not? We haven't done this in
any of the other ones. Let's notice has some hair. Let's give her some
hair. So notice the different lines that I'm able to get when I have
my three-point grip versus my overhand.
A three-point. Here's over hand
and pull it down. Notice how my lines
are thicker, right? For hair. It's like the hair is bunched up a little bit more. Have more coverage
with each stroke. And that's something
that's important to understand and to note. No, just like that, I'm going to switch it
over to three point grip. Notice how many lines are
thinner, sharper, right? Yeah. Something like that. Why not? Yeah. It's gonna continue to kind
of build this up. But after going through
all ten of these lessons, I hope that now you have a thorough understanding
of the SRO method. I hope that you learned
how to start to look at real life
reference photos and understand exactly where those basic SRO
planes live and how you can use those planes to start to establish the basic proportions
that you'll need. Draw most any knows
that's out there, makes sure that you
upload all of your noses. I'd love to see all of them. I'd love to give you guys
my feedback on them. And then if you please, I would love for you to leave
a review of this class. Tell me what you think. Stay happy, stay healthy. And remember, never
stopped drawing
 Messer Creations, Artist | Author | YouTuber