Transcripts
1. Intro: Hello, my name is Jesse
and I wanted to artists. And in this class I
will be teaching you how to draw one of the
most recognizable, an iconic traditional
tattoo designs. So grab your paper and
pens or your iPad. And the goal is that by
the end of this class, you'll know how to draw these designs without
any reference. So when I was making
my portfolio, when I was choosing for
apprenticeship from the 2s to the OS and
I was learning to draw traditional
tattoo or flats. I couldn't really find
in the bike how to videos or anyone who teach
how to draw these designs. So I thought maybe I could help either people who
just loved the industry, I want to draw these
designs or people who are searching for 2006. So this is for you. Hopefully this will help you achieve your dreams
in becoming that. Sure, Let's get into it.
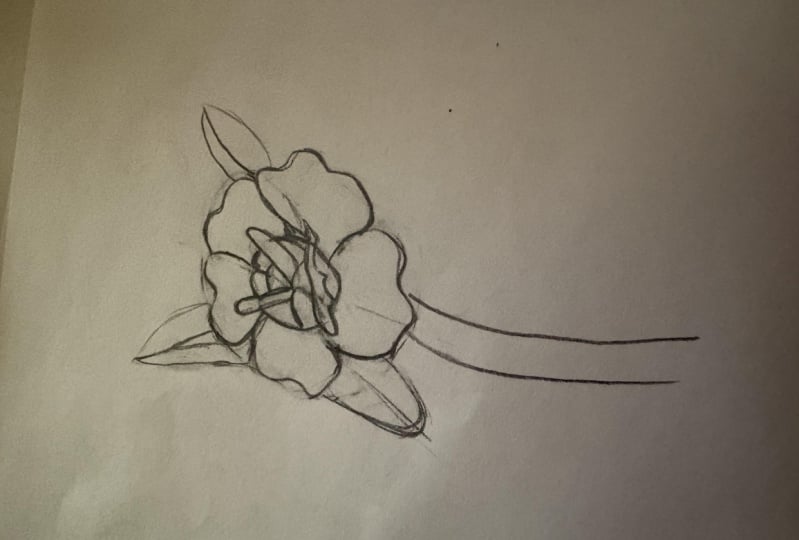
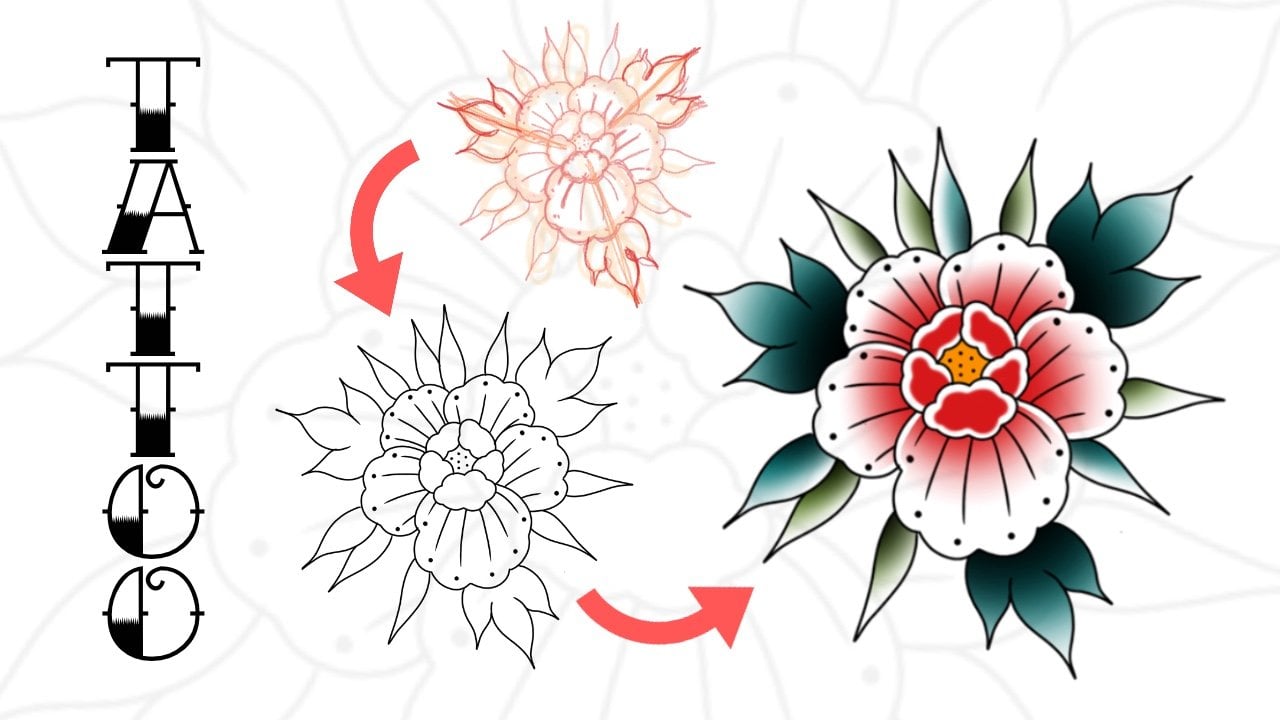
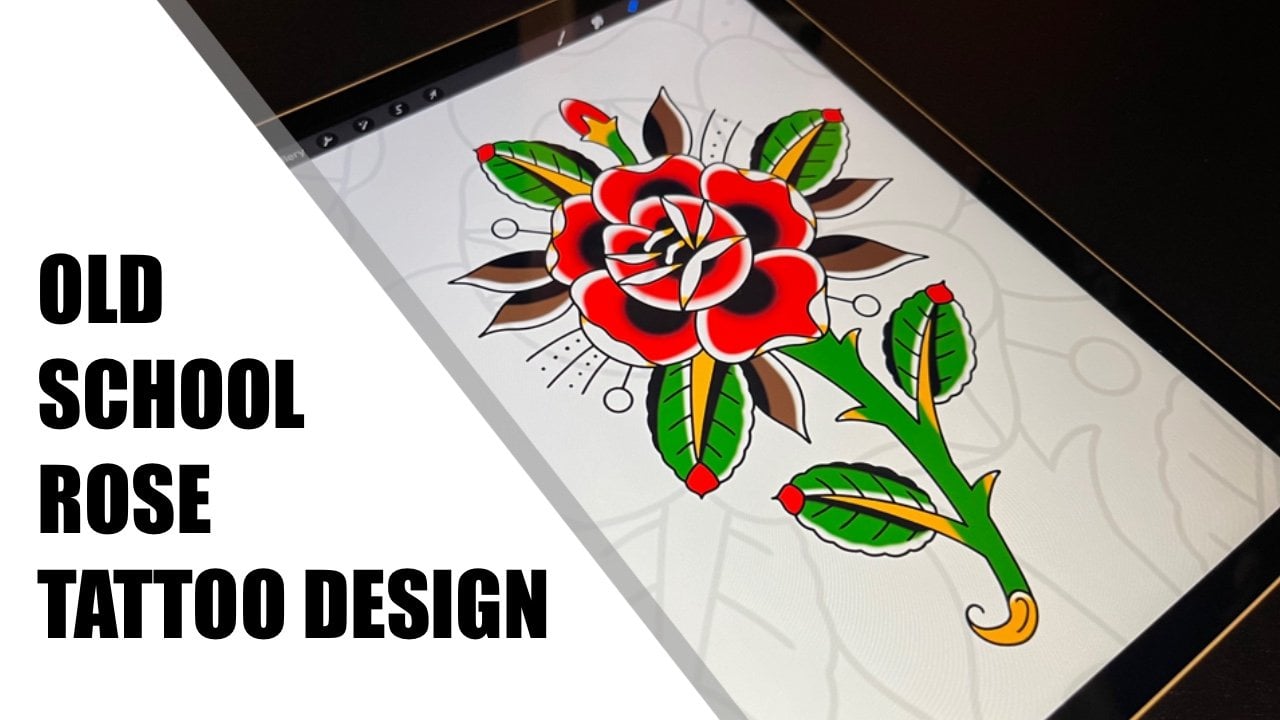
2. A Rose: All right, so I
thought I'd start with maybe the most classic
design of the mall, which is a rose. And those 1000 ways to do this, and this is only true
way I like to do it. So I started with a circle and then I do a smallest
circle note in the center, but like slightly
over the center line. And then I start building the the middle part of
the rows, the lines. And I never like to do the rows. Like it's perfectly
in the vertical line. It's, I like to do them
always a little crooked. And I start building
the center line, not to send the line, but
the sender of the rows. So still very, very rough lines. And then when I have
something there, I start sketching where
I put the leaves, not the least, but the petals. And I feel like the five is
the most for this at all. And because the smaller circle is slightly over
the center line, the petals at the bottom will be larger than right at the top. Well, so these first and then
I'll do the, the leaves. And always I start from the, again, from the center. And I throw my needle. And then the to show code. And then I start sketching the fill us to like give
them a little life. So they are ancestors,
perfect circles, but they have some character
to them, you know. And you can always write
renews the amount of leaves. There's a lot of like four petal roses I'm and
you can just add them. You're going to add them
as much as you want. And I liked roses
because you can, you can do so much with them. You've got always like
add all this things. Always. And you can play with the shape
as much as you want. You can like, you know, I've seen rotors with like
a Pele's and then you can bring them like lower if
you want to, if you want to. And rows is such a great
filler in statues because you can play with the leaves and the shape and what do
you call it the stem. And UGA likes to read, sit in any cap. You're
getting massive. And then when I had the the
basic sale of the rows, then I start adding leaves. And I feel like you should always use like two
different types of leaf, like bigger ones and
small ones because it gives it almost more
character again. So first, I'll start
sketching the bigger lives. And, and the center line
of the leaves should always imagine like
the dead center of the center of the rose. And the center line of the
leaves would always like lead. That was that. And then
you go like one over here. And then if you want to, you can like add like
three bigger ones. And there's a few ways to
draw the speaker leaves. I'll show you there's the very classic way
with his life using the save like this. And usually when you
do the leaves as such, you would color these parts red. And then this would be like. Hello or fade from
brown to yellow. And then there's the
ICC establish shape. And then I've seen people use like they draw the
center line out. And then they assess
throughout like this. And then they use lines on
the other side that cross d. The outline. I personally prefer this one, but I also use this one. Sometimes. If I really
like or need color, I will use this one
because this is usually, like I said, colored red. So it gave us a
little mice thoughts. But I think in
this demonstration I will be using
this farm because I'd like this is the
most classic design. So the way I do it, I start with the, the middle line for
this triangle CEP, following the middle line. And then I'll draw the end. And then I'll just bring
out the shape of it. Like so. And then I'll just repeat it with with
every single one. And the third one.
And I always throw the biggest lever is first. Because I feel like they are
the most important ones. And then I'll go with
the smaller leaves. And I like to pair them
with some of the biggest, bigger leaves, like so. And then of course
used as indivisible. Or you can spare them to, and again, follow the, that the center line
of this layer would be directly from the center. And then you might
throw one, maybe there. No, actually I would not
do that because it's directly opposite of this one. And if it doesn't look good, so maybe put it like here. And then just start drawing
in like other things. Because again, the great thing about the roses is you can add anything I like to
really classic. Things are like this. Lies that come from underneath. Maybe throw some
dots in the middle. And then one really, really common being UCs is this. Or maybe you do some like
these type of leaves, but you do them almost
as like these spikes. And you can see drawing as
much of these as you want. And you can make this
fit in the kneecap. And then you can if you want to, you can draw the
I don't even know if it's called a stamp
on Insert again, follow this line from the
Everything's shoot like spawn from the center
point, like this one. And I like to do
the basic shape. And then the end. And then I always like to
draw in some, some leaves. And It's really easy. It's just like again, you see the triangle
shape come from this. So you just throw it
out there and then use just throwing these leaves. Same on the other side. And then you can throw
a song like taunts. And right, this would work perfectly without
the bottom part, Just as it is. But like I said, you can
always throw in something or you could add like
like another rose. But it's not like bloomed yet. That is just like
opening right there. Trolling some baby
leaves maybe like there. And you can add
like two of these. It can, again, it can
fill up any space. But you can imagine
life. Without this. You know, you would reduce
the amount of leaves. You will take this one out, this one out, whatever you want. But I feel like the rows. If you want to start practice in our draw,
traditional tattoos. I feel like the rows is
the foundation for all. I'd like to Rose is the most important thing
you should be able to draw whenever, wherever. However, Thank you for watching. I'll see you in the next class. Right.
3. A Dagger: So the second part
is about daggers, which is almost as
important as roses. And there's a really cool
design where you draw the rows and then you throw the
dagger to pierce through 0. So these two combined
really well. And the classic dagger design, it consists of three parts. It has the handlebars, and then the cart, and then the blade. So I'll be showing
US, First of all, I will be drawing like the
very, very basic design. And then I will
be showing you in different handles,
different costs, and different types
of blades that you can just combine
them however you want. So first, I always starts
with a straight line. And in the most classic designs, the handle is always way. We're away, shorter
than the blade. So basically you
just draw across. And then you start building
to shape the handle. And then the guard. I will try to draw this to be as classic as I possibly can. Usually the director has
the quad of like this. Maybe the hardest thing about this one is it's symmetrical. So if you draw it like this, it can be difficult to get it very much trouble
with the handle. And then the blade. You start bringing out. And then the very
classic design, it narrows the M. So here's the card. I don't even know it. Card is the right word. And then the handle. Again, this is like the very, very basic version
off the dagger. You can't get basically a
more basic than this one, but I will show you more fancy version of
the that I could do. I like this is the
most classic one, but you don't like really start playing with
them with the handle. Right? If you draw
out the basic shape, you can like, again, like with the rows
and with light, with most of really
traditional designs, you can get very
creative with it. Start playing with shapes. And with the designs. You're going to add
it we want into it. You can make it way more longer. Maybe you can use
the same batter, you know, and then take it even, even further for ever you want. And you're going to, you know,
like add this one there. And there's like this is
testing metrical one. But there is always light. You can make it more like curvy. I showed you that one also. Because geometrical
can be boring. With this one, you can really play with the
shape of the blade. And this one, again, very traditional, very
simple, very clean. But this is the design where
you can really get creative. But I feel like you
should really get good with the basics
before you start playing. You know. And then maybe you can bring
out the blade even further. And the blade where like where it connects to
the card should always be like the the
width of the handle. You know, you're going
to bring this out. And then maybe you can throw in some like decoration
wherever you want. And then start decorating to handle maybe jewelry there,
wherever you want. And then there's always
other normal place called. But when you draw, are the non symmetrical one. Mass interest the
handle, I am God. And you can use
just like really, really massive plate also. And this is usually paired
with our, with a snake. Like imagine if the SD
card is just the handle. And usually there
is some snake or something like crawling
with his head. Or maybe the dagger is piercing the snake
head doesn't vary, are very, very classic. Touch your design. And again, it's really
fun design to learn, because once you understand these three paths with the
guard played and the handle, you can start doing whatever
you want with them. You can combine these to
create amazing saves. And then you can always pair
these with other designs, like I said, further, rho psi. So early on, like imagine
it without the bottom part, you would draw the, the
blade by the guard was here, now the handle and then the car. And then the blade would come. And PST roles
basically like there. If this was the
blade and it could come out from the bottom. And it creates a really,
really nice design. And I guess I'd better than
managing snakes, wildlife. But this is the very, very basic shape and
design of the, the dagger. And I see, I think
this should be the first one to master. And then start exploring
with different, a more complex shape
to create the webinar. So thank you for watching.
4. A Panther: All right, So let's stay in the lane or
the classic designs. And one of the most common, commonly seen traditional
tattoo design is a banter. So once again, we start
with which are called. And then Let's
divide the sheriff will have vertical line
with a vertical line. And then let's find
the middle line. But let's draw it
very, very lightly. And now let's draw two lines on either side
of the center line. These are the important lines. This middle line
can be like erase. It doesn't matter what you end
up with the CEP like this. And this is your guideline
with that Benzer head. The now the Panther. I'll draw it facing
this direction. So that means the one I will be like P at the crossroads
of these two lines. And the other line will be, I'd say, in the meal of this line to give
it a slight tilt. And then the nose will be on this line
somewhere around there. And this gives us like the very, very basic guidelines because
now we know where the ISR, we know where the nose will be. And then we draw the, I don't know this is in English. But you are troll there. Like so. And then the other T, it will follow the circle line. And now you can take the bottom show like
wherever you want. But I say it should be
like in a line with the lines between the eye
and the nose somewhere, that new inflow,
the bottom teeth. And then you will be showing
you fall this, of course. But it doesn't have
to be precise. Is really your preference. The way you like it. Like I've like this
is way too long. And this follows the line of the circle and it comes
up somewhere around the eye. And the ear will
come right there. And then you can just start flowing in the rest of the head. No. The head or gum. The other year. There is a really simple design. Once you understand the, the proportions of the
cat drawing the eyes, draw in the Tang. And then you throw in the, what do you call
this in English, which goes, I don't know. Then maybe give some life to
shapes, drawing some dots. And then you bring out the neck. Throw in the very classic, very, very classic,
simple design. You know, it can have some
spit coming from the mouth, really wherever you want. And again, these could
have the backer, you know, coming from like
top of the head, maybe come out from the mouth. You know, play there. The guard to handle. But this is like the very, very basic design folder for the bands are like
this three-quarter view. Like angry panzer,
but its mouth open. And I feel like you should just understand
the proportions. And then you can start drawing Japan's her into
shape. You want you. Because again, there's a
million different ways to draw our Banza. So once you understand
the basic components, no, the eyes, the nose and the mouth than the
total line and the year. The neck and adopted the head. You understand the components and then you start
playing with it. It sounds like, like I
said in a previous video, satellite with every other, like classic that you design. Once you master the basics, then you start playing with it. It's really, really
fun. But yeah. Here's your classic tanzer head. Do you see in every other traditional tapped your
slave satellite US said, this is a great
design. Thank you.
5. A Skull: All right, so in this
video for drawing a skull, and once again, it's very easy. So I start with a shareable
and then, you know, line. And this is the art, the middle of the face. And the eyes will
be on this line. And then use shaping the
eyes just like to start with this very, very simple shape. Nose, mouth. And then I start like
this looks weird, but this is the way
I like to do it. I started then shaping
the cheekbones and then the eyes, and the nose. And the mouth will be here. The jaw, and then the top of the head. And this is like do
very, very basic. I will go over that again. So I will first draw our circle. And this is the spark up to
the cheekbones and not. So. Then I will decide the angle. I1 scholar in. I draw this line that will come from
the Dumpty head from between the eyes
and be a snowshoe. So let's say I want the skull
to be in this direction. These fields determine
the placement of the eyes and the nose. And now again, with this line Eigen decide the
angle of the eyes. So now that these line phases, because here it's like this. So it's looking
downwards, are here. And I draw the line
like this one, it will be looking
slightly upwards. So then again, I draw
a line like this, and then I bring it out
to fall over this shape. And again, this is the
way I like to do it. So there's the eyes, there's the nose,
there's the mouse. Then the G phone, the nose, triangle, eyes. And this is basically like as simple as you get
to make the skull, other cheek bone,
Some of the head. And this is like as basic
as you're going to draw it. And with the shading,
really simple. And you know that you have it. Very, very basic SQL. So once more on the shared
goal and your lines. One, a curved line here, follow the shape and then
you bring it up there. You can bring this line
out if you want to. I I know my cheekbone
cheekbone file again. So just play with the shape and do whatever
you want with it. I think it's a very
important thing to learn in that terrain is very pretty common, so
that you have it. Thank you.
6. A Snake: And now let's get
into the Snake. Our spoken about earlier. But instead of drawing
the snake head, Let's draw entire snake. And what I like
about this is again, you can bend it in
any shape you want. So it can be used in
a very good filler. You can put it around and
drew a rose, a dagger oil. So you can do anything
you want with it. So first, let's sketch
the basic shape. You want a snake, the pain. It's very awkward to draw
without anything to put it around or inside
or something to have. I feel like the snake
snake heads funding to do by themselves, but I feel like this whole
longest name should never be done all by themselves
because they are really, really awkward when they are
not attached to anything. And then the head
will be like there. And then let's draw
the headfirst. So you start with the this is the upper jaw and then
it has its mouth open. And I like the way on the very classic
snakes aren't wrong, that the tongue basically comes straight from the right. So and then use a stroller. And then it comes like
from between bats. Can you draw the eye? And then the, and then bringing this shape figure like so satellite through very, very, very basic shape. So there's no snake. And again, you can
draw this in any save. I tried to draw
this as simple as possible so as to get the
basic components right. So you're going to
start playing with it. Now. It's thought to shaping, shaping the snake. Because I might be. Then stop adding some detail. Bottom t. And then with the body. The way they have in the most
classic designs is you have the labelling and then you have, and this will be like
something alarm like this. In very, very plastic design. And then back bonding in this type of shape. And you're going to use
all it's like two colors in the maybe huge, like yellow here and
then chlorine there, and then yellow on these
smaller dots again. And then you can
continue the belly. The mighty indeed there and
then continue there again. Like the answer is D bone with the 3D shape. And then you bring it
out again over here. And then use this
like back shape the hair cells again. What ever you want to do is you understand the basic
components and then you can bend in
any way you want. But this is your very,
very basic snake. You have the head with
its tongue and teeth. Then you have this, your bottom, like
the snake's belly. And then you have the backside with usually this type of like spots with dots in between. And you know, you can
play with the colors. You can play with the shape. You can do anything
with the snake because you know,
the way they are. You can bend them in
in any way you want. And again, like Let's
go back to the rows. You could have baby
snake head and then it could come from behind
and appear from there, and then gum in
front of the rows. And then this tail would
come out from there. You know, like I said, highlight as being
the snake more of a, as a filler for a components should take
at least I never liked to draw them like in their own
entity if you say that, but you can, if you
want to just again, learn the basic
components and then just start experimenting and draw. Then the way you, Mike. Thank you.
7. A Ship: And in this video, we'll draw our ship. But again, see it has
become my boundaries. Most classic designs with
the rows and the plants. And the way I like to
start a ship is to draw one vertical line
through it like this. And then bringing
out the baseline. This is like an
upside down often, you know, this is
the first sale. And then I divide it from here. And then there. And then then in four parts, you can do this in three
parts if you wish. And and then draw
another behind it. But like slightly
under the first-line. Only spotlight without the
lowest one, only three. And then finally,
I'll turn more. And this one ends
with the same line. And again into three parts. The CCO, like you can imagine, like to masts. There. There's your sales. And then I start sketching
the ship itself. A lot of people
start with the ship. I like to start with the sales. It's your personal preference. That's the middle. I don't know any SHE parts. So forgive me about this. The the spike
thing. I apologize. I don't know any C parts. And then the bottom
of the cell there. And then I like to draw these little roundness
in them like so. And say with there
and there and there. And now you can
really see like if the wind is blowing
from the behind. And then you do this. Don't draw like she
metrical line like this, but starts like this,
is not symmetrical. Like so. And then in a very
classic designs, you have these like the bottom sales from each
mass is like wrapped up. The Select very common in
very, very classic designs. And then you have your, the ropes there and then
you're going to draw in the other mass two like so. And then within these
like bottom two cells in the phone last, there's always like this. Additional small sales. You can add there for you
to read the rope there. Like so. And then you have another
maybe behind it, like so. And then you have these details. You start pulling off the ship and you're
going to draw in the board, wherever you want. Maybe draw in the rope some light curves to
them so you can get the integrational wind and before the master. And then maybe you can
extend the middle one. I like to do it. And then so straw flag. Again, it's whatever you want. I like to draw in black, baby. Draw in some birds. Or you can have the
very classic on some basically like
within the clouds. So you can have it like there. And then you're
going to add the, the waves however you want them. But like the very,
very classic is, you draw it. Hi, this. And then you drawing
the middle parts. And you would call this one blue in the middle. And these would remain white. Like those. Again, I don't want
the terms in English, I apologize, but
the entity waves. And that is like the most. As simple as you can draw on
traditional type to ship. Once again, you learn the basic components
and then you can draw these in any
shape you want you. So again, my advice like
with every single one of these is to practice the very, very basic of these
and everyone. So you can start to get
very creative with them. Thank you.
8. An Eagle: And now, with our
next designs equal, There's so many different
ways to draw them, but I will be drawing
it the way you'd have, like the Nazis P statue. That it's spread out. So the range will be
somewhat symmetrical. Somewhat to never get this like completely symmetrical,
draw your head. Head will be there. And then here, like basically where this line
a bit, it is at hand. At the end of the
head ends you will have your I phoned wing. And then the backlinks. And I always start with a basic, basic shape of the wings. And then the tail will
be here to give alike, to contour, wait for the head. And then you're going to
have the feet gone there. You will never get this
completely symmetrical. But if you have
some weight there, you just have to wait the air. And with the eagle, you can do it with the tail. So we have the head. You have the beach, like so. And then you
have the the head, you have the eye, and then you have the tongue. Miles. And I know that looks ridiculous right now. But the user to always
just draw something. And you can always
like to draw it. So your stop fixing
the particular shape. And then the, and then the, it will like
the feathers on the head. Just draw basic save the head. So you're going to start with
sketching the, the wing. There'll be one
layer of feathers. And then there's going to be
another layer of feathers. C will be like the long
feathers of the wing. And then Hero fee
to short feathers. Again, there's so
many different ways you can draw on the eagle. But in this one, I'll
try to teach you the most classic designs. Here. We'll be long feathers. And usually the longer feathers. Or it's wrong with a different style of
ends. I'll show you. So here we'll view the dot points will come along and then it'll
highlight these type of shape. And then usually
these in parts will be read into very,
very classic design. And the cool thing about
eagles, again, a stub. Their wings allow them to be put in like any
saved, imaginable. I like the smaller feathers are usually shaded differently. And the longer feathers, and sometimes you even have these like small dots at the end. And then you'll have
your back wing. And again, if you imagine
the center there, the wings should be
somewhat symmetrical. And then you got the wing. I usually like to draw it by delta wing in a slightly
different manner. In a very, very classic designs. You have this sort
of baton there. And then you have
your longer wings. Or sorry, the longer
feathers and sort of arrows. And again, try to follow the same, same shapes. And a few smaller ones. And maybe the dots there. And now you have some symmetry. And then I like to
draw in the legs. You can have the upper parts with this different
type of feathers. And then you have
the light there. The call. Maybe it's called. And you can add life stuff
into the law of the equal. Maybe you're going to have
a snake there, whether. And then you add the lag behind. And now you'll have legs. And then like this
is very off-balance. Again, if you think
the ascender line runs somewhere there, all the weight, even though this
wing is slightly, it seems longer, even though
they end at the same marks. But the weight is right there
with the legs and the head. So I like to add the detail somewhere
that so it gives, like I said, the
the counterweight. And this I like to always do
with this same type of like, longer feathered style, like so. And then have the same
ints and the same dots. And oftentimes, for this
angle equals 0 drawn with the leg red circle
right in the middle. And I often like to add this one and then it
would come there. And then this would be red, like air, these small dots. And then there and then behind the law and it and
it really gives it. Of course, I didn't do it properly because
it's so yes, kids. But like if you draw
calls these being precisely and because
the ICO is very, very dark, it really gives it a nice pop from the
chest, from the paper. And this is like a chest piece because
the wings are wider, but you could have
the front wing facing life there and the
back when facing like there. And you can squeeze
it in small place and you can put it on a
calf or arm, whoever. That is. Like. The
very basic components and shape of the
traditional sailor. Serie equals f x2. Thank you.
9. A Woman: All right, so in this
one we'll draw maybe the most recognizable woman
in traditional tattooing. We'd like to tipsy
head side profile. Again, we start with
very, very basic shape. So I'm the head. And then I in the middle. You have the nose and then mouth thing out. So line that's way too big until the lips. Nostril. And then usually it's
gypsy woman into chewing. They have like Roche. Now you know how you throw it. And then they have like this. So scarf on the head. So I'm hair light coming
from underneath there. So then you this rose,
like the petals. Then maybe you have one of
the leaves right there. It's a hair coming. So and then you can
bring out the scarf. Maybe there have a mother leave. Basically, if there
have the hair, come out from there again, maybe have the hair there. Usually they have like this
for clarity, very dark. The care have the
shoulder with the sleeve here coming out again. And then you, they're very
Buffy to leaves dividing it. So you're going to draw it. So it's the way you want. And there's likely
very, very weak skids. So now you're going to start
putting in the details. I always like to start
with them. With the eye. Now it may be a little narrower. Top plate. The eye lashes. There's no 400 and I'd like to. Freeing out this
one a little latch. So into Libs could be even bigger if y12 is really
a personal preference, like like in every single design is all up to you how
you want to make. It's like, I don't
like jaw right now. You know, you would make the nose slightly
smaller if he wants to, you know, play with the
shape of an ellipse, maybe you could make
these gap smaller. So now there's enough
room to maybe putting the eyebrow or something to give it even more character. And then so interrelates us to
know how you prefer. So as we get. So in the rows. Like very, very row should
be like very simple. Study is not the point. The lady should be the slicing
main, main thing here. So keep the rows
minimal, simple. And just throwing leaves. Then be It's a scarf. It's very, very classic. Sign. The hair. Then have the hair
maybe there and there. Then the scarf can come. Maybe something like this. And then we'd beat these batteries as the hair, every Buffy there. And then the neck and
then have the shoulder. And then once again, I'm going to repeat
the same pattern I already used in the scar
from a youth, judge. The tariff, the bottom. Then have this shame. Safe. There also are old and I feel like
this comes down to low. So it's good like
somewhere like there. I feel like the better have the patterns like there. And then I'll add some hair. And these could
come out like that. If you wish, however you like. And there's your life
very, very traditional. Cpc head women. That's you. Thank you.
10. A Sparrow: Then let's get too attached to, we've all seen a true
state of that too, which is a spiral. I do them like this. Through all this
sort of curve shape. There is the head and
there is the body. This is the shape I
like to start with. First peak. There's the first wing, they will be there,
another one there. And then the tail will follow
the shapes of the body. So I will draw the wing like so. Another, then Just wings. And then I flow in this line. This will be the belly. Grow in the wings. This group go a little further
and then have the tail. This Mofolo like
you see this curve. And then this, another, this, otherwise I will follow
this curve, the belly. And there it is, as simple
as you possibly can have it. You can take this even
further if you wish. And then this would be dark. So and then you pull fate somewhere there
on top of the head. And then of course, the wings. And there it is. As simple
and basic as it can be.
11. Misc.: In the last video, I will
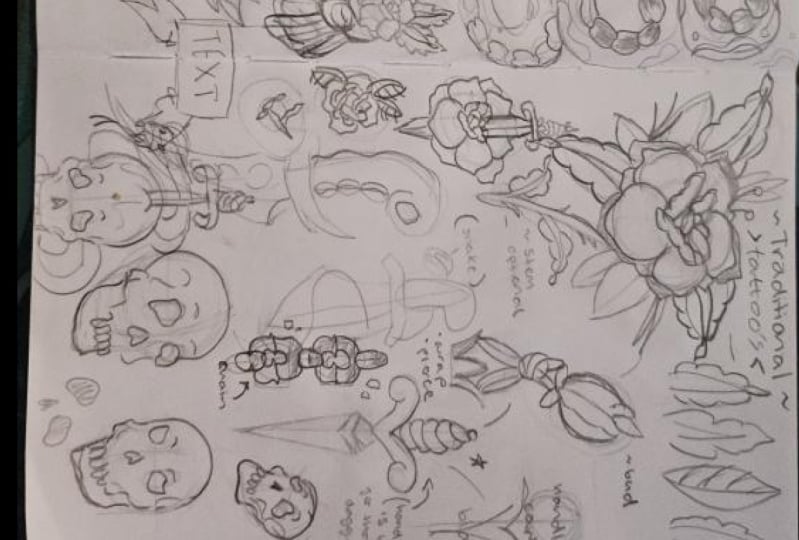
show you some of them. 78 common components you see
in traditional tattooing. For example, a rope used
in a lot of SATA tattoos. So first, I'd like to
just like winter snake, drawing the very basic. And then I'll start
adding the baton. Like very, very rough pattern. And then I like to draw
the ends, like so. And then follow this pattern is very easy and once again, you can bend it in any way you want to put it. But this is like the very
basic shape of the rope. And then if it's a larger one, do you like add
this smaller lines in between to really
give it texture? Or maybe some like dots, the wherever you want. And then one really
important one is a chain, which consists from
these chain links. First you draw the very
basic shape, like so. And then everyone is divided. This is very, very phasic. Like saying, yeah, I meant, you will see
insect's chewing for the slight morning star
flavors for example. It can be used very
fun by filler. You're going to use. And these are like the this one. And this one, I like
the whole ones. And then this one and
this one I like halves. And you know, you're gonna
like to order them so they are pro can maybe however you want. And the way you
would shave these is like every flight, for example, from the top of the
sand, every like half. It gives it a really
nice texture. And the rope, everyone
would come from the like Keats and every loop would come
from the same corner. And then finally, on banners for your text is very important. Like if you had like a heart. So you would draw in a banner, this one like so. And try to keep the width of banner consistence so it
looks solid. Like so. And then, you know, you're going to have
the ends right there. Now you can have
your own mom them. And same with the
banners in, you know, you can you can do whatever
you want with them. You can add them,
do anything really. Just understand way. And I'm like This is also very
important along to learn. Because lot of people like to have text inside of tattoos. So practice drawing them in different shapes
and different ways. You know, very important part of touch hearing is
these banners and you can wrap them
around anything. You know, that the
rows split or a snake. Cool thing to add. I mean, basically. Thank you.
12. Outro: All right, I tried to gather like the 10 most iconic designs, but the truth is, there is so many classic designs that I could take
this up to a 100. And so if you want
to see a prompt to, I'm more than happy to make one. And if you have any questions, send them to me and
I'll ask to you, especially if you have any
questions about getting an apprenticeship Inuktitut
studio, send me a message. And of course, I'd love
to see to throwing so seldom show them and will help you become
a better artist. Thank you for watching. My name is Tessie yet when? And I hopefully see
you in another class. Bye.
 Jesse Edvin, Artist