Transcripts
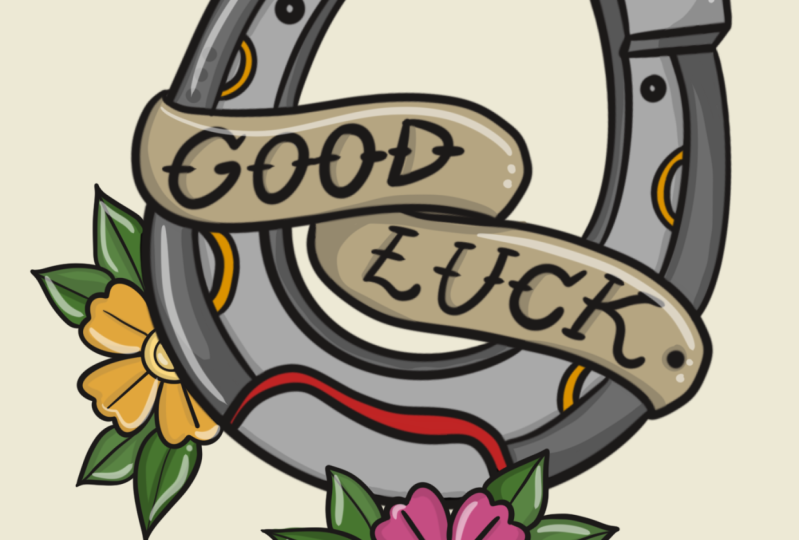
1. Intro: Hello, everybody.
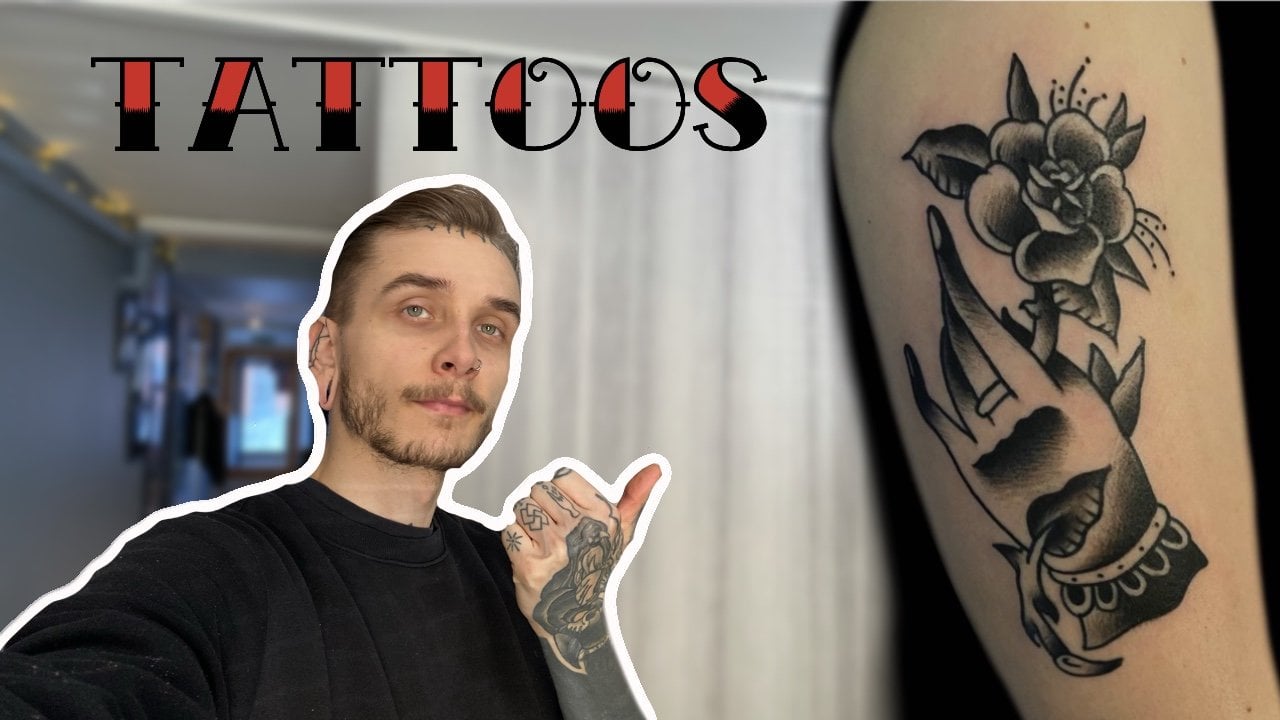
My name is Jessie. I'm a tattoo artist
here in Finland where I have my own tattoo
studio, and today, I'll be teaching you how to draw a very traditional old
school horseshoe design. And I will also be including all the coloring
there as well and my sort of thought
process behind why I do things a certain way and why I don't do the things
a certain way. So grab your iPad or
your tablet or just your pens and paper and
let's get to it.
2. Tips on Symmetry: All right, so before I start actually teaching you how
to draw the horseshoe, I want to give you
a quick tip if you don't own an iPad or a tablet, which makes drawing
symmetrical designs very simple because most of these apps have the sort of symmetric tool that
really helps you. But if you only have
paper and pens, I recommend using it sort of see through
paper for the sketch. And what you want to
do is you want to fold the paper in half. So you get the sort of middle line here when you
open up the paper, like so. And I'm just going to draw
something very quick. Like when you draw,
like, your design, you keep the middle line there, and you draw your, like, very basic like horseshoe shape. You just sketch it in, you know. So then you can fold it again. And then you need some
sort of a light source. I'm just going to
use my iPad here, but, you know, you can
use really anything. So now you can sort of
trace it with this paper. So when you open it up, you will have a
symmetrical design. Let me take that. Oh. You will
have a symmetrical design. And then when you, um, A, I don't know if you can really
see it through the camera, but now you can see the
design under there. And when you trace it
on this regular paper, you will have a completely
symmetrical design because without this, if you just wanted to draw here, drawing symmetrical designs
will be very, very difficult. So this is so method. I suggest you use if you don't
have an iPad or a tablet. And yeah, let's get to it.
3. Sketch: Alright, so let's begin by
drawing on the drawing guide, and then we got the symmetry, and that should do it. Yeah. And with the sketching, I just want to start
with the basic shape. It doesn't have to be accurate, but just like to have something
to, you know, work on. I'm going to make it
a little quicker, and I make sure I
have the snapping on so I can keep it right
there on the middle. And then I just turn
the opacity down. And I can start sketching
in the more refined shape. And with these symmetrical
designs, they are very, very easy to draw because you basically only have to
draw like half of the image. But I have found in my years
of tattooing that tattooing, these symmetrical designs
can be a little frustrating. First of all, you know,
getting the stencil on perfectly and just making completely sure that not also is drawing symmetrical, but, you know, the
tattoos as well, and you have to shade it
same way on each sides, and, you know, it
can be a hassle. And I have also found that these most basic simple
symmetrical designs, they are very difficult to draw. Like not draw, but, you know, to get the shape, right? Like you can see here,
I'm making a lot of different sketches until I get the shape the way I want it, like horseshoes and hearts, for example, it's so difficult. And here I try to when
I sketch this in, I try to keep like this part, I'm going to change color. Like, these parts here,
like, that doesn't matter. I try to get like
the other line, the way I want the finish
finished line to look like. Like here, it's
starting to get better. So I'm just pull the outline
outwards a little bit. And now we are getting there. I think I'll make these
parts a tiny bit ticker. I love tattooing horseshoes. I love drawing them.
They are so fun. And I think this is starting
to look pretty good. And, you know, like,
when we take spa out, Yeah, that shape is starting
to look pretty good. And now I just want to like with horseshoes,
it's really simple, like the classical
traditional tattoo elements in a horseshoe tattoo. It's so basic and it's so
simple yet it's so much fun. And I always throws
the ends the same way. And then like these lower parts, there should be some
sort of shape there, and then I want to
bring a line like here. Something like that. And then
here comes the basically, very simple fight
version of the holee in the horse shoe will
attach to the like, what do you call it
on a horse hoof. Is that it? I apologize. I don't know. The pattern part of the horse's foot, you know? And just like this part here, you know, just to have
some, like, details. But I think I want to make
that a little a little wider. And I also like
tattooing horseshoes in color because the color
palette is so simple, and I love, like, colour tattoos where the color palette
is very limited. Again, oftentimes, like,
the most simple designs, they are the most difficult, and it makes it
really fun, you know? Just have little shape there. And with horseshoes,
I have found, like when people get tattoos, eventually, say you want to tattoo this horseshoe
on a person's arm, and they want to make
it sleeve at one point. And like these center part here, it's going to be a problem. So, oftentimes, I want to
fill this with something that is included in this whole design because if you only
do the horseshoe, and you leave this space empty. And the person wants
to get a hose sleeve, you can't really fit anything in this pot unless the
whole horseshoe is really, really big. So what I like to
do is add a flower, for example, small,
simple flour, like there. And then when I do some
leaves and details here, it's going to fill up the space. And what I usually do
also with horseshoe, I don't like to I always say
to my clients I want to, like, just rotate it a
little bit, you know? Just tiny bit to make it like I can break the
symmetry in it, you know? I think it looks better, and it also like, again, tattooing, you know, it's a
human made handmade product, so it's not going to be perfect. So when I rotate
it a little bit, it sort of breaks the illusion of symmetry in it, you know? So I'm gonna add flower there. And I think that's a really
good place for a sketch. So I'm gonna make another layer. I'm gonna take a
red one. I'm gonna make it a little bit smaller. So now Again, this sketch
doesn't have to be perfect. I just want a sketch team. Basic shape. Yeah, that's pretty good. Yeah, something like that. And then the top parts, I'm gonna leave space there. You know, you can add dots
there if you want to. And then the lower parts. I think that's too wide. Bring it just a
little closer there. Yeah. And then I'm
going to take one more and go like this. And then here, it's really important that the
space between these lines, it's like, same length
in every spot, right? And then I usually
do like three of these because I like to have these lower
parts a little wider. Like so and then I'm
going to do the flower. I like to do roses are
different thing, but, like, with these very simple flowers, I want to keep it exactly that, you know, very simple. And this middle part, you don't want it to
be, like, really big. I think it looks
like almost comical. So you want to keep
it, like, quite slim. And then we're going to add
the leaves right there, which is also nice because
we can add green like this. And then I think that space
is too narrow for a leaf. So I'm going to add
these very basic details that is very common in, like, rose tattoos,
some Dutch tattoo. And then I'm going to add some dots ertu it will hurt you. And again, with the dots, you want to make sure
that the distance between the dots is same length, you know, except
for the end parts. And I think that's a really really nice
design because now, like you can see, this
middle part it's filled. And also, one thing you can
do if you don't want to do the flour is you can
take the horseshoe, turn it a little bit, and
then you can make it sort of like three D by adding, you know, some stuff like here, and then you just color
this, you know, black. So it gives it like
little tree effect, and you can still the
flower really easy way to, you know, change things
around a little bit. But this is what I'm
going to go with. So And then here in the
middle of the flower, I will always add these smaller lines to add
a little detail, and I will, I have
the symmetry on. I will add these small lines with like a line that is not as thick
as the basic outline. It gives it a nice detail. And here is the
very basic sketch. And let's get to the outlines.
4. Outlines: So once again, I will
combine those layers. I will bring the opacity
down a little bit. I will take out my studio pen, Yeah, this is the smaller lines that I will be using like here. And what's the size of, I'm going to make it just a
little bit bigger, I think. Yeah, that's good. So
the drawing assist on. And now the most difficult part of this sketch this drawing is to get the outlines right to
make it look like smooth. Again, with the
horseshoe and the heart, I find it really,
really difficult to, like, make sure that the shape, is very smooth, like
you can see here, it's not like this part here. It's not smooth at all.
So you just have to keep trying I think here, I feel like the lower part, it comes down too much. Comparing these lines
here and this here, I feel like this
one is too wide, so I need to bring it up just a little bit,
see how it looks. Small change, but I
think it looks better. No, I'm gonna I'm gonna
try if I can make it just a little bit thinner. Let's see. Yeah, I think that's right, except for that part there. There we go. And then at this. Again, making sure that the length between these
two lines is equal. And then I like to use another brush for
the dots. Like so. Then I will put these circles, and I keep holding it, so I can make it a perfect
circle around there. Yeah. Then let's continue
with the bottom part. Yeah. That's nice. And then this right here. Like you can see here.
I made a mistake. Like the distance from here, like, right here, it's
longer than it is here. And when you tune out,
you can really see it. This should go a
little more like this. Yeah. Now do these Yeah. Excuse me. Yeah, I
think that's good. So now I will add
these touts there, and then I'm going to
make another layer and do the flour. Yeah, that's good. And then at the center. Make sure it's, like,
somewhat in the middle. Yeah. Then I'm going
to add the leaves. With the smaller flowers, I want to keep the leaves,
like, somewhat thin. I want to make the
flowers, like, you know, be like really thick. I just think it doesn't fit
the aesthetic, you know. Like so. And then sports. And like here, I don't
want to keep the distance between this line like
equal in this time. I want to make sure it starts
like a little thinner, and then it widens
towards the end. Like so. And then I'm going
to add the dots here too. Very, like, traditional
thing to do School tattoos. And then finally, I'm
going to save that. I think that's a
little too small. I'll bring it up a little bit. Yeah, yeah, this is good. So now I'm going to add
these smaller lines here. Three with this one. And here, and then I'm
going to do these two. There's one, there's
one, there's one. Now, I'll make one more, and then let's
present there's one, two L so And here our outlines.
5. Colors: And now let's get to shading. I'm gonna combine those. I
can delete the sketch layer. I'm gonna put lf lack
on and paint it black, and I think I will
actually I think I'll remove the line from the
A witchy color palette. Like I said, I want
to keep it simple. I'm going to use black. And then I want to use red and some golden
mustard yellow. And then I'm just going to
add a little bit of this, like, rust color.
You don't have to. I don't think it's, like,
really, like, traditional, but I think it really makes the yellow pop
in certain places. And then I think I
will make the flower the orange because
it really fits the yellow and red to
keep the palette warm. And then I'm gonna make screen. Let's see. Um, green for the leaves. And that will be our palette. So, um, take the alpha
lock on the assist is on. And like with every design, I will start with black. And here I will color like this. I'm going to add
some black there. Like, so. And then
also these parts here. I will make completely
black also. And I make another
layer for the colors. Then I will add just
a little bit black here to sort of keep the flow from
these parts over there. And then I want to add some
black here on the leaves, just a little bit, not too much like just like
the teetop parts. Oh, I have the system. And then with these type
of flowers I like to do. I like to use black here
on the inner parts. And what I like to do
with my tattoos, also, I'll bring black, but
I don't want to make it so that it's complete black. So I will, like, delete
the outer parts. From it. And this is
always what I do, like I said, with
my tattoos too. This is how I will color these smaller flowers because oftentimes I make tea
flowers very bright, yellow, red or orange. So I want to have it
just a little bit of darkness as a depth. I just think it works
so much better. And actually, I want to
add some great air too, and I will explain it
to you at the end why. So now, here is our
black and gray version. If this wasn't going
to be a color tattoo, there are a couple of things
I would do differently, and I will show
you now, but I'll make it just a
quick quick sketch. So if this was a black
and gray tattoo, so I would bring this color, this black from these
leaves further. And then I would also bring
this like further down here. But because if this
is a color tattoo, it will be a which color. And then also the
center of the flower, I would like use
just a little bit, like W tattooing, just the tiniest bit of whip
shading that comes there. It looks like almost
gray, tiny bits. And I would just leave
it as it is, you know. But with the colour one, um this will be green. So same with the other leave. And I talked about last
time how when you add a when you add a color, it should be present in
three different places. And with this one, I
will break that rule. And like the cliche saying goes that if you
want to break rules, you should first know them so you can break the
rules properly, you know. With this design, I could add a third piece that would
include the color green. Like, I could have other
like green leaf there. But I think the middle part gets too crowded,
so I won't do that. Or I could also add like leaves like that they come
from the outside. But I think that messes
up too much with this nice curve that we
have with the horseshoe. So here, there's going
to be only green in one and two places
and not a third. And then we're going
to take some red. I'm going to color this one red. Then I will also color this red, too, like so, and
then also these ones. So a lot of red, but I
think it works really nice. And then I will take the.This will be yellow. So at drawing a cyst
and make them yellow. And you could leave these
yellow spots as is. But like I said, I like to use sometimes just a
little bit of like this rust color
and just bring it like just a tiny bit,
like, from the end. And I think it works really, really nicely with the yellow. It's not like completely
traditional thing to do in old school tattoos, but I just personally
like the way it looks. It doesn't look so
good here on the iPad, but on the skin, you know, because skin isn't completely
white. It looks so good. And then we take the flour. And that will be orange. Take the assist of and like I
talked about previous time, always leave some skin there, or in this case, some white there just for the
room to breathe, but make sure you
cover the space, like, where the lines end like here, too, so bring the orange,
like, right there. And the reason why I brought up the gray, like
you can see here, uh like these spots
like these areas, they are completely white. And with the black
and gray tattoo, this doesn't like this
is not a problem. But with the color tattoo, it looks like
something is missing. And I think the same
with the parts that goes around there because
we have the dark, we have the yellow, we
have the dark and red. So these completely empty spaces here and here, it
looks unfinished. So what I do is the drawing asiste and I
will take the gray and gray, for example, on the skin, when it heals, it heals
very, very light. You barely notice it, but it's going to transform
this whole thing completely. What I do is I select
these and I just take tiny bits of gray and
I bring it from there. It's not a huge
change, but trust me, on a skin, it completely changes the
design for the better too. And then I'm going
to do the same. But this time, I'm
gonna bring it there. And then we have it very, very basic, very
simple horseshoe. With the collars, you
can always play around. Like for example, these parts these red ones here,
they don't have to be red. They could be yellow, they could be orange,
they could be whatever, or you could even try to be, you know, bold and, you know, make them green. I think that would work too. And now that would be
more green with this one. I wonder if you could add green. Now, I wouldn't add
green here because now all the green
is very top heavy. Maybe this could work.
Yeah, maybe it could. No, I wouldn't do it.
Maybe here. Just maybe. But yeah, there we have it. Very, very simple basic
horseshoe tattoo. And like I said, if I
were to tattoo this, I wouldn't place it on a skin like completely
like symmetrical. I would take it and just, oh, excuse me, and just put it
like little, like tilted. And I would put it so that the flour is here at the bottom, meaning that I
wouldn't put it like this because I feel like
it looks kind of silly. When the weight of
this flower starts to, like, sift up, I don't
think it looks good. So I would put it like this, or then, you know,
flip it like so. And there we have it. I'll catch you on the next one. Thank you.
6. Outro: There you have it very traditional old school
horseshoe tattoo design. I love drawing and
tattooing horseshoes. They're such a
fantastic designs. Hopefully, I will catch
you at the project tab. I'll see your horseshoe
tattoo designs as well. I'm really looking
forward to it, yeah, I'll catch you
on the next one. Thank you so much for
watching. See you.
 Jesse Edvin, Artist