Transcripts
1. Mushrooms and Crystals Intro: In this course, I will show
you how to draw a mushroom with crystals from scratch
without needing references. I will show you each
step to take to create your own mushroom
and crystal design.
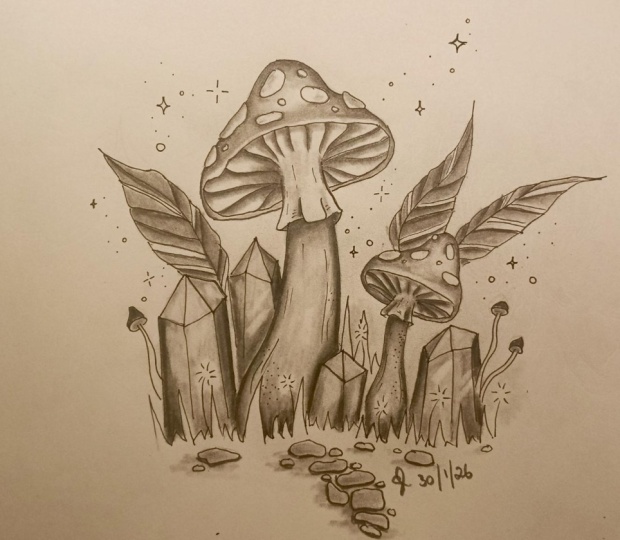
2. Drawing the Mushroom: Before we get started, I would like to explain
that you can draw your mushrooms in
any shape or size. For the base, I
draw an oval shape. It can be round,
wobbly, or narrow. I draw another oval
for where the stem will go and draw
the mushroom head coming out from around the oval. Starting with the design, I'm drawing the main oval for the underside of
the mushroom head. And the inner oval for where
the mushroom's stem attaches. I then draw a basic curve
for the mushroom head on top and draw the stem coming out from the
sides of the inner oval. The stem should be
slightly thinner where it connects to the mushroom
and thicker at the base. You can curve it like I did, or keep it straight depending on the style you
want to achieve. For this design, I'm adding a smaller mushroom coming
out from behind the big one. Once you are done
adding the main shapes, you can alter them to
make them more unique. I'm adding wobbles to the main oval so it
looks more organic and also adding some
dents to the side of the mushroom heads to give
them a different shape. Here you can also
decide if you want to straighten the stem
or curve it more. It's all up to
personal preference. Once you are happy, you can add the
skirt to the stem. The skirt will taper
out a bit from the stem and is a part that curves around
the mushroom stem. I'm drawing a curve at
the bottom and drawing lines to show that it's going around the
back of the stem. Now you can also adjust
the shape to make it more organic by adding some waves
or tears in the skirt. I also draw some
directional lines up to show the
texture of the skirt. To draw the gills
of the mushroom, draw curved lines coming from
the stem going to the edge. You can keep the lines smooth or add some texture to these lines. I will be adding some bumps
to each to stylize it. Now we can draw a rim
around the mushroom edge, which will also help as a
guide for the edge highlight. When we get to shading. I prefer drawing
small flat ovals for the spots on
the mushroom cap. This is optional because a lot of mushrooms don't have spots. I also tried to draw these spots organic and not perfectly round, with some being bigger
and some smaller. I'm adding some lines following the
direction of the stem to add texture and help
as guides for shading.
3. Drawing the Crystals: The best way to draw crystals is to
understand the shapes. For the top point
of the crystal, I try to use
these three shapes. A triangle which
has three edges, a kite which has four edges, and a pentagon which
has five edges. When trying to figure
out where to place the edges for the
body of the crystals; any of the top shapes
that have corners pointing down will have
a line going down making an edge, as well as
the sides of the crystal. When planning the crystals, sketch them in where you want them and approximate thickness. I'm using the crystals
to frame the mushrooms, drawing one on each side
with one in the middle. Now, you can add the shapes
for the top of the crystal. For the first one, I'm starting with
a kite shape and connecting two triangle
shapes to it on each side. Try add variance to the
shapes when drawing, making some thicker,
thinner or wider, so they aren't too symmetrical. When you are done drawing
the top of the crystals, you can add the
edges for the body. Once the main crystals
are in place, you can add more to the foreground and
background of the design. For this design, I added
one shorter one in the front and another filling
more space in the back. I also added a small one to the side of the one
crystal for variance. Once you are done placing
all the crystals, you can draw the bottom
connecting some of the corners to each other
with straight lines. You will have to
mess around a bit here to see what will work best. Once you are done
with the crystals, you can add leaves, grass, or more mushrooms to fill up some spaces in the
background as needed. When you are happy
with this design, you can draw the final lines in with a marker or darker pencil. In this design, I'm
going over most of the lines except for the texture and
highlight guidelines.
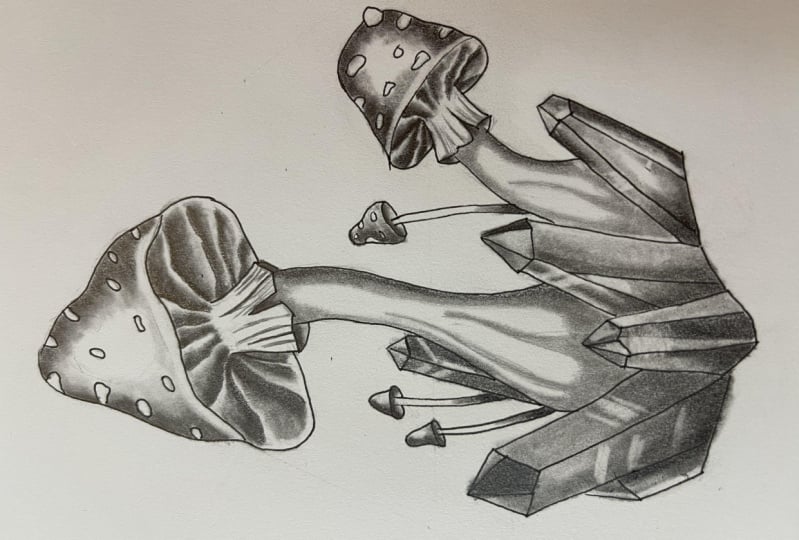
4. Shading: We can now start shading. I start by choosing where the light spot is going to be on the mushroom cap so I can start shading the darker
areas around it. I'm using the paper stump
to smudge the pencil for smoother shading. I'm then adding a darker
layer closer to the edges. Moving on to the mushroom gills, I'm shading darker beneath
each line, fading it downward. To add details to the skirt, you can extend some of the lines upward or add some
finer lines in-between. There will also be
a shadow beneath it to show it's hanging
above the stem. I add a small shadow along
the sides of the stem. One side will be
darker than the other depending on where you want
the light source to be. There will also be
more shadows at the base of the stem
behind the crystals. When shading the stem, I'm following the
directional lines I've made earlier
to make ridges, to give it some texture. But this is optional. When shading the crystals, I like making the outer
edges a bit darker. I add a gradient shadow to each facet. To shade
the facets; I choose an edge or
corner that will be the dark area and fade it
to the light area. Some facets can be
darker than others and the gradient can start
on varying edges. To let the design breathe, I leave a highlight
on some of the edges.
5. Highlights and Contrast: The final step that makes
a big difference is adding some highlights and
contrast to the design. I erase some lines on the crystals to indicate
light reflections. This will help the
image look less flat. After that, I go in and darken some shadows
with a darker pencil. Here you will darken
parts that are too similar to give the image
some contrast and depth. And that's how I draw mushrooms and crystals
from scratch. I hope this video
helped you. Please share your drawings with us
so we can see how you did.
 Jessica Coetzee