Transcripts
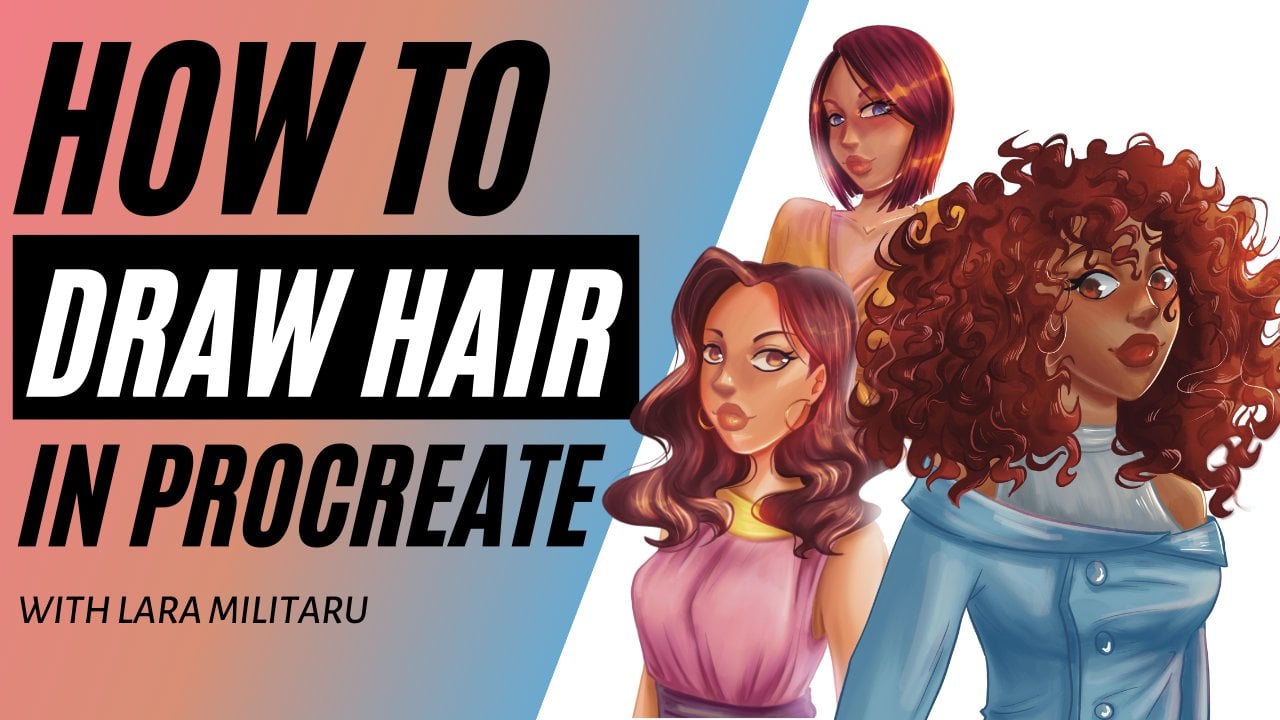
1. Intro: Hello guys and welcome to the second part of the how to draw hair in procreate. In the first part, we went through three different types of short and medium length hairstyles. And now we will go through free long hair styles that you can easily draw. If you did not see my other tutorial on hair, I highly recommend you do because you will learn even more tips and tricks and gain a lot of value about how to render decent types of hair from straight to crow. Compared to my last tutorial, I tried to not to speed up so much in the process in order to let you see everything that I'm doing. Also, I structured each hairstyle into different modules. One that contains the description of each warrior prince and what to look at when using a photo reference. And then how to sketch and create the line art. If you feel like you already know these things, you can feel free to skip to the second module of each hair style, which is about the coloring process, starting from the base color all the way to the final details. As a bonus, I chose to show you in one of the modules For REG, some color mistakes. If you realize some choices were bad, likely in the process, just like before in the resources section of this class, you will find details, Oakland brushes, where you can find them or how you can edit the original procreate wants to make them even better. You will also find free bolds models that you can use to draw their hair. They are only for studying purposes. So if you don't want to draw a character and you just want to practice hair, they will be useful for you. You can watch this tutorial and draw along with me, or you can watch it first, understand what I'm doing, and then apply for yourself. Whichever way I definitely recommend you try to do with yourself so that you will actually experienced what I'm showing you. The more you try doing it on your own, the better you will get every single day. Now for your assignment, I would like you to choose which ever one of these hairstyles or even maybe find a different one if you'd like, and start studying the reference price kitchen and maybe even coloring gets submitted to the project section of this class. I will allow us to help you out and point out what you did great and what you can work on some more. I would also really appreciate the coup followed me on Skillshare is I'm posting the extensive tutorials on digital art and procreate. So we feel don't want to miss anything. Click the follow button. I would also like to be more active with my followers and show you some progress shots of the next tutorials. Discuss with you what the next one will be about, and so on. Right now, I'm only doing that on my Instagram page. So if you'd like to follow me, this is my handle. Now guys, without further ado, let's get started with the first module.
2. Twin tails - reference & sketch: Welcome to the first hairstyle OPE is months tutorial. We will start with the references I choose. Crippling fails hairstyle. I think this is the first hairstyle I chose because they look so good, so childish and so Frisch. So let's get started on studying go references. So I chose two references from different angles and with different hair volumes. It's important to notice the shape of the hair before you start pulling anything. So starting from the top of the hair and going down to worse, the hair tight. You can see this curves formed by the hair when it's getting closer to the hair type. Def is a nice sense of volume, so we will replicate that. Then we will complete the form. The upper side of the hair. The bands, the way the bands are framing the face in this reference makes the place look almost like a reversed heart, which adds to its cuteness. Then we have the volume of the thales and the septal curls of the hair. Moving on to the next reference, the faces longer here and more mature. The banks are also slightly different, more wavy and there's no more heart shape. There is also less volume. So this reference has an overall belong their shape, which adds suites maturity. You can choose whichever you want for your drawing or find more references and tried to understand what makes them different and what are you trying to reproduce exactly. Now this is our first walled modal, which you can also find in the resources section of this class. You can draw and paint using this model for studying or posterior triangle to claim it as your own. So I will use the gestures kids brush for my sketch. I love this brush and I always use it. Or sketches. Find as an localist bubbles back edge Armagan road for only $5 or maybe even less. So let's start by drawing the banks ends the middle of the hair, then going down towards the MSc, joining the hair ties and giving some volume to the fails. I chose to combine the two references I have. I want the volume that comes before the Herod dies to be a bit elongated compared to the first two references, but still have some volume in the tails. The slope of the hair is longer than there were Francis, and it creates a nice overall shape. I will use the framing of the face from the first set of friends, but stylized the backs of bit. Now I will just add details to the hair and keep sketching until I liked the overall hairstyle. Okay. Okay. Okay. Okay. I have all my details in place within the sketch. I will lower the opacity of the sketch, create a new layer and choose the modified shale brush. I have attached a file with all the brushes that I use, including colleague and modify the shale brush. And the thing, the one that I'm using right now, you can find this file in the resources section of the class. So why use the modified shale brush? Because it has the perfect pressure sensitivity for my kind of line art, which means just brushing order to finalize the line art of this hairstyle. And I will see you in the coloring module. The British. Okay. Hello.
3. Twin tails - coloring: So now that we have our line art finalized, we will drop in the base color of the hair, which I wanted to be belonged. For that, we will use the layer we made in the last video, which will be placed below the line art layer, but above the Mongols layer. If we build a fluke it above the models layer between sales and the banks will fall behind the Mogul. Now in order to quickly drop of base color, I will use the selection tool from the upper left side of the menu bar. With the selection tool, I will take my time to go over the hairs, alter line, and recreate its shape. When I'm done, I will simply connect the starting point of the selection with the end point. And if the color fill Balkan is activated, the color you previously selected will automatically be filled in the shape. If you want to go crazy with the colors and not have only one color, is your base. Then do not select the Auto Filter button and simply fake a large airbrush and choose your colors reference to fill in the hair shape. Maybe you want the soft gradient from light to dark, or maybe you want some colored edges of the hair. If you want that, make sure to smell to them out using the blend tool. Remember that this is merely the base color and the details will come as we advance in our rendering. Now we will make a new layer above the base color and tap on the thumbnail of the layer and choose clipping mask. Clipping this layer to the base color means that everything that we draw on this layer will only be visible above the base color. Let me demonstrate my randomly scribbling on this layer and you will see what I mean. Using clipping masks save a lot of fun when you're drawing digitally because you don't need to concern yourself with drawing within the lines or erasing anything you could go outside the lines. So that note, all the shading layers will be clipped to the base color. I also choose to make this layer a multiply layer. So if I keep the base color of the hair selected and we'll get on the multiply layer. The lighter yellow I have selected will appear darker. Feel free to choose even different shades of your base color, or even a different color entirely like blue. And see what happens when you shade with those. In essence, the color you choose will appear darker on the base color and you can create warm shadows or cold shadows. In the future, I will create the color theory tutorial on Skillshare in order to better explain these concepts. On this multiply layer, I start filling in the parts of the hair that I know will be the darkest. According to my light source. I also drew the light source, so we will get an idea of what I'm aiming for. If you are at the beginning of your art journey, it will help you to draw your light source on a separate layer. So you won't forget to be consistent with your shading. After I finish filling in the dark parts of the hair, I will move to using the blend tool and forth that I will select the damp brush from the painting folder of Procreate brushes. This is a standard Procreate brush, so we don't need to download anything else. I simply blend the lethal color I then so as to defuse it, this won't be the final shading. That details will come later, so don't make it too dark. As you blend, tried to follow the shape of the hair so that the shading will make sense. You need to give it more volume. So it's important to respect the shape. Now that we have some basic shading done, we will start a going for more definite shapes in our shadow. Create a new layer set to multiply and pick up the end of the shale brush. You can find the edits I made to Procreate's shale brush to make it smoother in the resources section of this video. So with the shale brush, I start making confidence tropes of hair in the direction that the hair is flowing in. This layer of shading will be more intense than the first one. So put an accent on the roads, the bars that are hidden from the light. The part where the Harris died and so on. I will let you watch for with my shading and you can follow along. Now that I finished booking in the shaming, I will grab the fame currently brush from Ross trends for our set and use it to blend the shading and give moral glow effect. I always use this brush specifically for hair because the result looks really genuine. There are other great textures in this essential brush set, which is only three or $5. So it's definitely worth the investment. As I blend the shaping, I might find different spots where I want to add more detail. So I will do that with the shale brush and then Blend. And I will keep doing that until I feel like there is enough detail in the hair. When I feel like there was enough shading for the beginning, I will make a new layer, set it to color dodge mode, grapple warm color, and start creating more texture. I will first add that the entire flight on the top of the hair with an airbrush. Then on a separate layer, I will choose a round brush and start creating some stronger lights. Think about where your hairstyle is most likely reflect the light and the police it's there. Then grab an eraser also with the round brush. Start erasing parts of the light like I'm showing you right now. After you are done erasing and go to your layer settings and the lower the opacity. And this will not be your strongest light, but it will give a really nice effect. Now for a really nice highlighting effect, create a new layer set to add. Grab your shale brush and start creating some really light strands of hair. They don't need to belong sense You'll blend them in later on. If you have issues with figuring out where to put the highlights, they are in the place is closest to the light source, basically in the highest places. Now just like before, I will blend the highlights with a thinker really brush and that will make it local. Iq can see the hair strands, life enough. Why the sunlight? So take your time to blend the end of the brush strokes that you make. Now on a new layer, I will keep selecting colors that I already used on the care and keep adding new strands of hair in order to create more volume. I'm using the shale brush for this. I will also want to add some strands of hair that are going outside of the shape of the hair that we already established. So I will change the color of the line art. In order to do that, you will select the layer with the line art, set it to alpha lock, choose the closest hair color near the line art and simply go over it with an air brush. I use lighter next to the lip areas and darker near the shadows. Four, we'd go to the next step. Let's clean up vote. It will select all your hair layers by dragging them to your right, and then ungroup them. That would keep their group. So you would have a safe version and flap and the group that you've just stuffed KP is now only our hair is on one layer. I will shortly milk for the steps that we have made so far. We have the base color, the base shading, the dark strands of hair. The crease blinding, the highlights, and the strands of hair. Let's call her her eyebrows. Before we go any further. Generally, the eyebrows are slightly darker than the pair. So choose one of the darker colors that you have previously used. Now that we have much all of our hair in place, it's time to make an upgrade to the shadows on the face and body. The model doesn't have the shadows caused by the cares, so we will need to add those accordingly. If you use the free models that I provide within this class, use a layer set to multiply. So this skin color and start darkening the face where the hair would be covering it from your light source. I also take the time to darken some of the shadows I already have on the model. Now that we have added some highlights and shadows to the body, Let's do some finishing touches. We will merge our hair and models so that we have everything going along the layer. We will not locate the entire layer and add a gradient to it. And you run the color palette that I currently have. I want the worm great. The end. After that, I will lower the opacity of this gradient so that it will only act as a thin color to the layer beneath it. I have also set the gradient layer on multiply, but sometimes I live it's normal. Finally, when it comes to care of my favorites finishing thoughts is to add some incense trends of highlight. Make a new layer, set it to add mode. Grab the shale brush, and let your hand flow as natural as possible. Non-preferred thing here, align the fluid than precise. If the strand doesn't look good enough, undo and start again. So this was it for that entails, take a short break and then we'll see you in the next module where we start the bony tail from a side view.
4. Ponytail - reference & sketch: Hey guys and welcome back to one new hairstyle. In the next two modules, we will look into how we can draw and color a high ponytail. So let's take a look at our free references over here. One thing that you'll notice right away is that all three sides views suddenly will first begin by drawing the shape of the head because the hair is type, so type, so there's no extra volume before the actual only fill in this reference. Upon the reference to the right. However, the hair is tied more loosely and it creates this nice. And before the tight. The last one also has a nice volume, but it's more tidy, more neat compared to the previous reference. Of course, it's up to you which one inspires you the most. Now for the actual hair ties in our references from right to left, the heresies go from small to medium and then too large. You can have either unnoticeable haired bite or a really small one depending on your preference. Now let's take a look at the shape created by the actual ponytail part, the middle reference, we can notice a client level of shapes starting directly from the hematite. For the restaurants in the right, we also have a triangle shape, but we also have to note this, the small negative shape created by the hair dye. For the last where France weekends. Yeah, rectangular shape, new to the huge volume that the hair has. Again, it's up to you whichever shape you'll want to use in your artwork. Now let's try to understand what's going on with the details of the hair. As usual, in order to simplify what you see, tried to concentrate the outline of what you are drawing. And that's what I'm going to mark out. Finally, the bands. We will also outline the shape of the bands in a true referenced, the one on the right has a nice swirl to the end. We do can really stylize by adding random strands of hair around them. The middle one is rather symbol, slight curl and going around to the mouse line with most of the volume in the upper side of the banks. The last one is rather interesting. Due to the hair strand that goes into back to create the hair type, you can try drawing this one if you will, also use different hair colors for the hair strand compared to the hair behind this trend. Otherwise, it's one's really stand out. Now let's meet our second wild model, which you can also download from the resources section of this class. Just like before, this model is to be used for studying purposes only. I also pulled my three references on the side and now I will grab my gesture brush and start aligning the hair. I like to start with the banks so that I will see how the face will be framed. Then I will try to go with a lot of volume for my own art break. So I will try to shape the only fail as a rectangle. As discussed before. I also add some of the curls on the very beginning because the volume comes from this curls. After I'm done with the sketch, I will lower the opacity of the sketch layer, wrap the modified shale brush, and start making the line art on a separate layer. In case you skipped the first part of this class, you can find all the information on the brushes I use in the resources section of this class. I would love it for you to watch the way I sketch and then draw the line art before jumping to the coloring video, try to create your own drawing. The only grow your skills by doing and not learning by watching tutorials. Also, I would love for you to also submit for drawing, whether it's only the sketch or the final, right for the project section of this class. A. Now before jumping to the next module, I will select that Harris alter aligned with the Lasso till and fill it in with a nice red color. I will see you guys are the actual coloring art in the next module. Let's see.
5. Ponytail - coloring: Welcome back to the coloring part of the pony tail. Well, there's no reason to waste anytime. So let's jump right in. We already have the base color. Now start the actual coloring. We will make a new layer and set it to multiply, grab an air brush, and start filling in the darker areas. Hold the hair. Just like I showed you in that entailed coloring module. As I mentioned before, make sure you know where your light source is before darkening areas of the hair because you need the consistent light and shadow. After I finished filling in the darkest areas, I use the damp brush on the Blend tool and start blending and giving. Sure. It's worth noting that at this stage we are only laying the foundation of the hairs shadows. We will lay there, come in with darker shades and create shadows that will flow in the direction of the hair. Now I will grab the painterly brush. We type up the boat in the previous coloring module, set a new layer to clipping mask and I will start creating work detail. This layer is also set to multiply. I will start adding the shadows that will flow in. That was Paris flowing in. I always start from the darkest parts of the hair where delights or school reached the least. My light source is the same as before in the upper left side of the drawing. So my darkest parts will be behind some banks around the hair dye, in the bony tail under meet the hair dye. And on the right side of the ponytail. I also create texture on the bands and tried to start from the right side, the one that is not facing the light source. I will always try to leave as unthought this possible the areas that will be elite later in the process. Now that we have the color and it's time to blend it using the same thing thoroughly brush. As I mentioned before, I love this brush and I'm calling the hair because it allows me to create something really close to what hair texture. Congrats the baggage on painting this brush for only $3 on rough transfer website browse bras.com. It's the first package I bought that I actually used a lot in my drawings. All right, so we added a lot of shading until now. Let's see some before and after shots shortly. Let me just group these layers and create a duplicate with us before. And this is after. Life, interesting how much volume some shadows can give right? Now that we have most impoverished shadows done and thoughts. We have our darkest colors laid down. We can change the color of the line art before moving gone. Change your line art layer to alpha lock so that you can lock the pixels on that layer. Now you can wrap your, because brush, choose the darkest color on the hair and go over the line art with it. You can color with the lighter color next to the lighter areas of the hair. Afterwards creates a duplicate of your line art layer. It's safe. Enlarge the color with the line. Now it's time to add our first flights. I love adding some lights picture before anything else. So I make a new layer and set it to color dodge, clip it to the previous layer and choose a nice orange. Using the hard round brush, I start highlighting some of the area's declared that will be list. And simply start lighting good. At this stage, J Marion, lead, tap the drawing or create circles with this brush instead of living belongs brush strokes. I'm done. I used the same hard round brush and the eraser and start erasing parts of the light. This leaves a nice lights picture that I love using one hair. Now it's time to add on a different layer set to color dodge more lights. But this time they will be following the shape of the curls. I use the painterly brushwork. This, I start by highlighting the bank. It's short strokes and slightly curved as to follow the hair shape. I keep doing this on all the curls death needs to build it. Then I will grab the blending tool with the same painterly brush and start elongating this light strokes that I made before. So you can see that in less than 10 minutes we already have the hair colored shaded and the highlight them all off. You can think we'll stop here because the hair looks great already. However, what will make them different sense? What will catch the eye of the viewers will be contrast. Contrast is key in any art. Ended whom keep that source of confidence in your art. It will be fine your subject more and it will bring the attention exactly where you want it to be. So we will create a new layer set to multiply and dark on our shadows. We will keep using the painterly brushwork is, but we will later come back with the shale brush from our definition. However, right now we will dark in certain areas and then blend these new shadows. Okay. Now it's time to lighten our lights after we have darkened our darks. At this stage, I love using the shale brush and a really saturated color, the arriving from the base color, in this case a really saturated orange, and creates some really intense lights tricks. They will be placed where we put our lives before and they will accentuate those areas. See. Okay. Now that we are done adding the light streaks, we will start blending them with the painterly brush. This word, the real fun begins and where your hair will start shining laser early. I will, if you have a look at how I'm blending this highlights or the next couple of minutes. I'm trying not to cut the parts of the drawing process because some of you mentioned before that if I'm going too fast, I would love to hear from you into reviews if you prefer a longer classes with lists keeping or spinning true? Okay. Now we will add more details. So my mom layer, using the shale brush, I will pick colors from the canvas and start adding hair strands every year. And they're, please note that it's best you don't clip this layer since you will want to create strands that will go outside of the base, pear shaped. One of the biggest mistakes beginner artists make one drawing hair is to start by creating hair strands. One is the time. This is extremely time-consuming and not really useful. Not to mention that in the end, you won't have a hairstyle that actually has a shape. You will only have bonds as lines. That's not the way to go. Your artworks needs to seem confidence, which is why you need recognizable forms. Every other detail comes later in the process. That's why I insist on showing you what to look after in the references that we chose at the beginning. All right. Hello. Now finally, we will add the lightest half trends of the hair by creating a separate layer set to Add. And a really light color yields the shale brush and create really light highlights, but don't go overboard with them. We wanted them to shine. Let's not to be lost from the drawing. After our new blend them. You can add some long strands of white hair and the stills will add some juice to your hairstyle. Okay? And one finishing touch to go, create some more shadows on your model. Your hair will definitely block the light on different areas of the body. So we need to show that I will scale in the next module of our last hairstyle.
6. Long hair - reference & sketching: Welcome back to the last hairstyle of this class. So this whole class is based on longer hairstyles. So I think that in the end we can relax allele the width, a simple long, and weigh the hairstyle. Nothing too complicated. Look, we still want it to look good. So let's take a look at that. We'll reference, we have a long pair with soft waves in the banks and the worst dance. Let's try to outline a bit what stands out in this reference. We have a banks that are framing the base nicely. And we have this soft waves towards the end that are curling inwards. We will of course stylized the hair some war, but the key concepts are easy to remember. Now let's meet our modal or this module, which again find in the resources section of this class. Let me grab the gesture brush, which I always use in my sketches. And let's start sketching the hairstyle. Start by drawing the bands because I really wanted them to frame the face nicely. Then I will sketch the pair or onto the head. And the goal for the wavy hair that's falling on her shoulders. I wanted to create those nice way, the ends that curls inside as well. Okay. Okay. Now we could stop here or we could add some more. Whatever your preference is. Don't forget to draw along or draw after watching me and submitting for joining the project section of this class, you can try annual fee hairstyles I presented so far. Or you can try a completely different one, or you can do all three of them if you are really ambitious, of course, against meet either sketches, a line art, or fully colored hairstyle. It doesn't really matter. I would absolutely love to see your work. Now with the shale brush, we will start creating the line art on a different layer. We'll use the shale brush because I love the line weight it offers. I explained in the attachments from the waist vs. section how you can edit the shale brush in order to get to the one I'm using. Play around with your line weight when you are creating the line art because it can add a lot of life to give growing. Even before you start coloring it. I will let you watch the rest and I will see you on the coloring module. Okay?
7. Long hair - coloring: Welcome to the final module of this class, guys. In this module, I will show you how to color the hairstyle that we sketched in the previous module, and also how to correct some color mistakes fast. So we will start by selecting with the lasso tool, the whole outline of the hair and fill it in with the color that we choose. Now it's important to start with a blend when you create the narc work, otherwise you will end up undecided like me. And you will need to change things along the way. But that's all right, smart, only there your bones to make some mistakes and you will need to do something about them. So it will be a good opportunity to show you a week late mixing color issues. My mistake was that I did not plan what hair color I wanted to make before coloring the modal. And I end up choosing the theme cred, very similar to the one on the shirt. That's a no-no and definitely cannot stay like that. Since I liked the Harris base color. What's left to do now is choose a different color for the shirt, which I will show you how to do later in this module without redrawing the modal. So after I choose my base color is usual, I proceed with the shadows on a multiply layer depth, width of the base layer. This over here is my light source. So I will take it in consideration when I'm doing my base shadows. I'm placing my base shadows around that, the roots, the edges, and the areas around the neck. You can see similar shaping in the references as well. After the base shape is placed with an airbrush, I will then grab my brush and blend it. Then I'll label. This is my way of making those gradient and it will be my base shadow. Now on a separate layer set to multiply, I wanted to accentuate the dark and make the hair streaks recognizable. So I grabbed the modified shale brush and start to add in darkness takes off hair. Starting from top to bottom. I tried to leave the alias that will be touched by the light clear. After I finish adding the streets, I will choose the painterly brush on my blend school and start blending everything in. Remember to respect the flow of the hair when doing so. Now we will jump into adding some light texture. I am creating a layer on color dodge mode. Choose a hard round brush and really, really saturated red. Then I start creating circles on the hair, on the a rheostat will be linked to the most, just like the first layer of shadow that serves as a base or what comes later. The first layer of flow, I think, will serve the same purpose. When you are done filling in the Life rap, they raise her with a round brush and start carving in the light. Finally, lower the opacity of the layer. Similar to our work on the shading, we will now create the new color dodge layer and steadily build our lighter hairs takes the same way we did with our darker ones. Now we learned or to make the hair which are in the build. We will add lost takes up hair using the color that we already happy our hair. We will also change the color of the line art in the same way that I described before by setting the line art layer to alpha lock and then painting galleries with the hair color closest through each portion. High thing, the line art is way gives a more natural feeling to your illustrations that you can leave the lines black or gray as well if that suits your style more. Before I move on with the hair, I need to get back to the idea of fixing mistakes. So as I mentioned before, I want my hair to be distinguished from the shirt. And since I like the hair color, I will simply change the color of the shirt. I think I'll the lasso tool and select the short only. I'm working directly on the layer with the model, no other layers. Or maybe after I select the shirt, I opened the hue and saturation menu and I start playing around with the colors and the brightness. I decided upon and blue shirt. And then I changed the eye's color as well. It was uneasy fakes that look only at. And Gail, I made up my mind and now my character's hair really pops out, is we have a combination of cold and warm colors. Now, in order to add some contrast to the hair, I will create a new layer set to multiply. Start adding darker streaks of care in a few places around with the hair. After we finish adding the contrasting streaks, blend them as before, you will start noticing your character's hair coming to life more by adding this time of contrasts. Now it's time to bring everything on one layer and edit the colors that we have so far. At this point, I like to adjust the curves of the artwork. I could spend two minutes on working on the curves then compared to what I had before. And still like the original mark, but sometimes it fails the way we reach her after working on the purse. Now I would like to add a few details to the face, like some eyelashes and contrast. It's not entirely the subject of this tutorial, but they are part of my finishing touches. So take away as many tips and tricks that you can. Hi. Usually when I get to this point, the artwork is almost done. Misses the point where I added the highlights on our layer set to add mode by using the shale brush. This will be the lightest part of the hair light and the light shines the brightest. Hello. Hi. I also like to refine the drawing by adding some head shakes that are out of place, but don't go overboard. Its them, this details are best gift minimal, or their effect will decrease in the eyes of the viewer. Now as usual, don't forget to add more shadows on the model. After you finish creating the hair. The hair casts a shadow on the skin and load, so make sure that the Cloud, those tails. Okay. Now our third hairstylists done and you reached the end of this module. I will see you in the next Blanca explain your assignment.
8. Project & final words: Congratulations on finalizing the second part of the hair tutorial. Now you should know my whole process of drawing hair. What brushes I use, how to study a reference, how to color, how to use contrast, and how to adjust your colors. Now for your assignment, I would like you to choose whichever one of these hairstyles or maybe even find a different 25th like, and start studying the reference price sketching and maybe even coloring it. Then submitted the project section of this class. I would love to help you out and point out what you did great and what you can work on some more. If you found this class useful in any way, I would also really appreciate it. You follow me on Skillshare as I'm posting monthly extensive tutorials on digital art in Procreate. If you don't want to miss anything, click the follow button. I would also really appreciate if you took one minute of your time and leave a review, tell me what you think about this class. You'll like it when I go slower, would you like me to talk more? Would you like me to answer some questions of yours in the class? And we will definitely be able to do it. Thank you so much for participating. I appreciate you and your time, and I will see you on the next tutorial. Bye guys.
 Lara Militaru, Digital Illustrator & Coach