Transcripts
1. Introduction: Hey, it's Clayton. In this
class you're going to learn how to draw the female torso. We'll talk about the
foundational building blocks that you're going to
use to construct it. We will discuss the anatomy and the primary muscle groups that you'll need to
consider throughout it. I'll show you how to pose it and represent it from a number
of different perspectives. Before finally
demonstrating for you three different examples of a finished female torso drawing. Let's jump straight
into the first lesson.
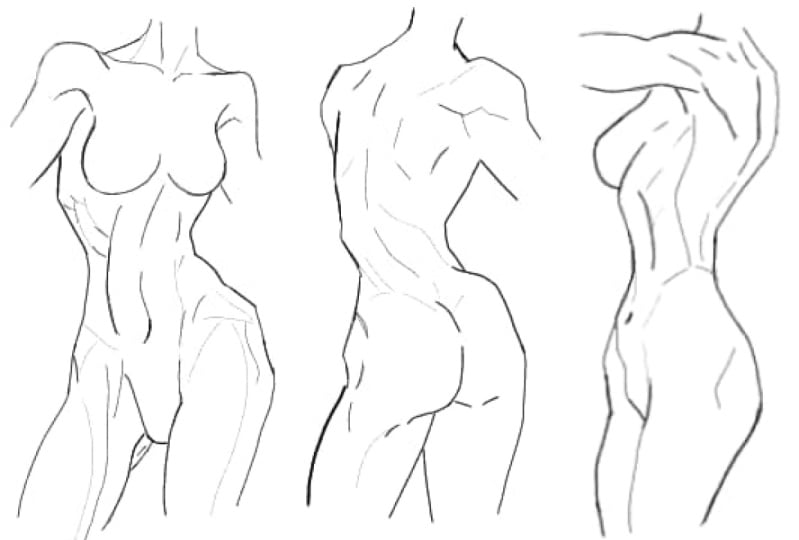
2. Front View Torso Foundations: So I always like to start
out with the chest. And to draw the chest. What I'm really laying
down onto the page is just the most
simplest basic form of what you could
consider a ribcage. I call this the
chest first because that is what it looks
like is a vest. I place in some arm holes which will show me
where the arms are going to pop out on either
side of the upper torso. I lay in a center
line to show me where the front of the
chest is going to be. And then I lay in another
cross contour that wraps around the chest form on
the horizontal plane. I also add in and Nicole. And if you want, you could even pull out the shoulder joints from the arm halls just to show
where the arms would connect. You could do the same
thing for the neck hall. Okay. So that's where our other body parts would
connect to the chest. From there, what we can do is we can continue this center line all the way down to about here, where we'll find the pelvis. Now the first thing to note, and this is important
when it comes to the differences between male
torsos and female torso is, is that the hips
of a woman usually going to be the same
width as their shoulders. And so as we're drawing
the pelvis here, which is not the
same as the hips. We want to consider that we
want to keep it in mind. What I would like to
put forth is that the pelvis is
probably going to be the same width as the chest, really maybe even a
little bit wider. I'm going to draw
that in like so. And the pelvis as far as its
simple form is concerned, I like to refer to it as the pelvis panties because that's essentially
what we're looking at, is a simplified
pair of underwear. And when I call it a label
such as pelvis panties, that just makes it easier
for me to remember. You can come up with
your own nicknames for each of these forms, whatever helps it stick
inside your mind easiest. But essentially, I draw out an underwear type
shape to begin with. You could think of it as also maybe a heart with the top caved in
a little bit further. Whatever you want
to think of it as, whatever helps you remember it. Think of it in that way. But once I've done that, I go ahead and I place
in some leg holes. And then the same
cross contours, the guidelines that wrap
around the form that we laid into the chest. And that just gives
us a sense for the three-dimensional
surface form of the shape that
we're working with. And the cool thing about it
is that when we can break the female torso it down into
these really basic forms. It becomes so much
easier to think about. It becomes easier to draw, it becomes easier to
lay down onto the page. And it really isn't that
much of a hassle to build up from this to actually start to place
in the anatomy on top, which I will be showing you
how to do in just a moment. Once we've got the
pelvis in there, we can draw out some hip joints. Now remember, these hip joints
are really going to want to align with the width
of the shoulders. So we're going to pull
them out to about here. Now the torso, it does have its own proportions that
we want to consider. If we think about
where the head would sit up here somewhere. Then we consider that
the breasts come down about one head or
two heads rather. Then we've got the belly button which comes down another head, then the bottom of the pelvis, which comes down to foreheads. Okay, So if the entire
figure is eight heads high, it's about the midway
point that we're going to find the bottom of the torso, the bottom of the pelvis. We want to consider
that if we take away the head and we're
just left with the torso, while the overall
length of the torso is going to be roughly about, let's say 12. Maybe three heads, maybe 23. So 12, and then maybe
another half a head. So you want to just keep in
mind those measurements. You don't have to be
super specific with it. You don't have to
stress out about it, but as long as you're just
generally keeping in mind the different size
ratios and whatnot. You'll, you'll tend to find
that you're able to draw the female torso up to
size fairly accurately. Now the last element
that we need to lay in here is of course, what I like to refer to as
the trunk or the muscle tube. That's just going
to run down from the chest form into the
edges of the pelvis panties. Now this area here
is really a tube of muscle that is responsible for a majority of
the torsos movement. You see the chest
and the pelvis. These are just
solid bits of bone. These are solid objects. They cannot bend,
they cannot shrink, they cannot move on their own. What they are is masses, primary masses within
the female torso that is responsible for
powering it forward. So we can twist
those at either end. And we can push the body's
movement by doing so. The middle of the torso
works a little bit like a, I guess you could call
it a spring sort of system where you can
twist it and propel the body forward with the aid of those two masses
within the torso. But if you think
of it in that way, then it should make movement of the female
torso a little bit easier for you to get
your head around. So that takes care of the basic foundations of the
female torso from the front. But now what I'd like
to do is actually show you how to place in
some muscles on top of it.
3. Front View Torso Anatomy: Now it's not really
all that hard to begin dropping anatomy onto
the female figure. So we can start out with
the neck at the top, which will lead down
into the shoulders. And then we've got
the collarbone at the base of the neck. I'm just roughly laying this in. But the collarbone on either side of the
female body is going to run up from the middle out to the
edges of the shoulders. Then the shoulders will come down over the top
of the upper arm. The reason that I'm starting
to draw those in there, even though we are focused
on the female torso. Primarily at this point
is because indeed the shoulders and the chest
are somewhat connected. They work in conjunction
with one another. So we can't really draw the chest without
considering the shoulders. Once we've got the shoulders
and the neck drawn in there, we can add in some additional
additional anatomy here on the neck if we want to. Just for the sake of getting
some anatomy drawn in there. Once we got the shoulders and the collarbone and
the next sorted out, what we can then move on to
is the rest of the torso. So we're working our way
down from the top here. Now, as I said before, if we think about where
the breasts would SIT, They would sit about well depicts rather sit
about two heads down. But because we're talking
about the breaths, they hang a little bit lower than those standard
proportional measurements. So let's draw in some PECS as if we were drawing a
male torso to begin with. Because actually the
muscle structure here is very similar. If we were drawing a male torso, this might be how it looks. But because we're
drawing breasts, what we wanna do is add
onto the pictorial muscle because women do
have picked as well. Very similar in terms
of structure to men. So what we'll do here is
actually draw those out. In terms of how big
the brush should be. It really depends
on the character, does not any one standard size. So again, they built off of that underlying
pictorial muscle. The breasts. And really made of muscle. They're more made of fatty tissue that sits over
the top of that pec muscle. And so there are similarities between
male and female torsos. It's just really
a few adjustments within the anatomical
structure and features of the female torso that separates it
from the male torso. And most of those are
concerning proportions. But also a little bit of the anatomy differences
as well, such as, for example, the breasts tried to make it as symmetrical
as you possibly can. It doesn't have to be perfect. This is just a study to
get the anatomy down. But once we've got the
breast drawn in there, I think it's important
to consider how the outer edges of the breast actually
connect to the shoulders. And what you're going
to find is that you get this armpit area
that builds off of the breasts at the top and it almost looks like
it's hard to describe. It looks like maybe a a
teardrop almost. Okay. So you get this sort
of shape happening. Okay, where you've
got the main mass of the breast at the bottom and then this little bit
that pokes out from the top and starts to
venture into the shoulders. Now the shoulder
muscles are going to overlap or at least
I have them overlap. The upper area of the breasts
once we get to the top. But it's important to
remember that in the end, these are all connected. This is all muscle there. If the shoulders rays, then the breasts are
probably going to raise with them while they will, guaranteed, they will
raise with them. Once we've drawn in the breasts, we can continue working our
way down for the most part, we've got the upper region of the torso sorted anatomy wise. We can follow this center line
down to the belly button. Now remember that the
belly button is going to sit about one more
head down from the breasts at three heads in terms of the overall
measurements of the human torso. So I'm going to place the
belly button at about here. And what you'll notice is that the belly button of a woman aligns pretty much with the
waistline of the torso. It's going to sit
right in the middle between the chest
and the pelvis. Once we've got that
drawn in there, we can start to think
about the ribcage area of the torso and how that connects with the
abdominal muscles. Okay, so for the most part, what you'll see is
that the breaths sit over the top of the
ribcage a fair bit. So that upper arch
is going to come up and it's going to sit very close to the
bottom of the breasts. Now of course, it depends on the breast size of the female character
that you're drawing. But if you've got large
breaths that hang lower, you'll find that they cover
the top arch of the ribs. The bottom of the ribs will come down to sit around about here and these outer edges of the
ribs connect with the abs. Okay, so I'm going to draw in some
abdominal muscles here. I'll start a little bit higher. So we're going to find a top
set of abs here at the top, just underneath the breasts. And then we'll find another set below those. Then I'm going to build out the side muscles of the
upper torso from those abs. And then we'll lay
in the bottom set of abdominal dominant muscles, which typically longer
than the top sets. And so you end up with something that looks a
little bit like this with the abs that run down the middle of
the female torso. And then these
outer muscles that enclose the abs
around the sides. And you'll be able to
get a better look at these side muscles and
how they're represented. But for now, what you end up with is this sort of pattern. If we were looking
at the side muscles from the profile view, you would see that
they would create a pattern that looks
somewhat like this. Okay, So that's really
what we're trying to draw the sides here just from a
foreshortened front view. Now as far as the lateral
muscles are concerned, which wrap around to the back, and they typically won't be
super visible from the front. And then you've got the side
muscles that continued down. And again, I don't know what the technical names for them. I didn't pay a lot of
attention to that. Really, what you want to
be paying attention to is just what they look
like and where they sit and how big they are. But you have got these
other muscles here. I'm not sure if they're part
of the lateral muscles. I don't think that they are. But they're going to come
down and they're going to sit on top of the
hips, the hip bone. And then we can
continue the tendon all the way down into the
bottom of the pelvis there. Once we've got that sorted, then we can start to draw
out the legs if we want to. But for the most part, that
completes the front view of the female torso and the anatomical structure
that makes it up. Let's move on to the side
view of the female torso.
4. Side View Torso Foundations: For the side view of
the female torso, we're going to start out with our basic foundations
just as before. That foundational
structure pretty much is what is going to
allow us to be able to draw the torso from any angle in any position
we want with ease. So if we can draw it, then we're already
most of the way there. It's just a matter of dressing
it up with the muscles. I in fact like to call
this the mannequin model of the torso. Because it really is
that it's an armature essentially that we use
to pose the figure. This is what the chest form
looks like from the side. It's very basic. We can place in the
cross contours. One running down
the vertical axes and around the
horizontal axis of the form to describe it. And what I want you
to notice here is how that upper body is actually slanting backwards
in this direction. Okay. So the bottom
of it is pushed forward while the back of it oh, well, the top of
it is pushed back. Then we're going to continue
down into the pelvis, taking that center
line and curving it around until we
reach the pelvis, which is essentially
just a circular form when looking at
it from the side. And the thing that I want
to bring your attention to here is how it is slanted back
in the opposite direction. We've now got the top of
the pelvis pushed forward. Well, the bottom of it is pushed back and this creates
a harmony and balance within the female torso that ultimately enables
us to stay upright. That helped then, as
the body is moving. These two different
masses can compose themselves with one another in order to ensure we
don't fall over, we don't lose balance. Okay, so that's that's
really what they are. Then we can add in the
leg holes just as before. This is what the Legos
look like from the side. Then once we've done that, we just need to add in the
muscle tube, the trunk. It's sort of like a
corset of muscle that is going to join the upper body
and lower body together. And that completes the side
view of the female torso. Now let's add on some
of the anatomy and take a better look at exactly what the
different muscle groups, what muscle groups are
going to be involved in, how they look when we're
looking at the torso, the female torso from
the side profile view.
5. Side View Torso Anatomy: So we'll start out just as
before with the shoulders. Now the shoulders when we're looking at them
from the side view, what you end up getting is not a perfect circle,
but rather this. I would describe it as a shield, a very iconic shield shape. Okay, so it looks a
little bit like this. And you can divide the
shoulder up into three groups. And these make up the primary muscle
groups of the deltoids. The deltoids really are the muscle groups
that we're talking about here with the shoulder, but you can divide
them into three parts. Once we've done that, we're going to draw in
our pecs once again, remember that we
want to still treat the female torso as
though it has picks, but we're just adding on
the breaths afterwards. Okay, now, the reason that we want to consider the anatomy, the muscle groups of
the female torso. Because it helps to give us a reason as to why
the body is shaped. The female body is shaped
in the way that it is. Okay if we know what's going
on underneath the surface, then we've got reason as to why we're drawing
it in the way that we're drawing it and we're able to
better and more accurately capture the shapes that we're after when we're
drawing the female figure, it ensures that we've got some accuracy happening in our
female torso drawings. I'm just going to add in
the neck at the top here. You'll see that I've
got that pushed forward a little more. Just to once again create
some additional balance. What you end up seeing here is that the neck
is pushed forward, the chest is pushed back
at least at the top, while pushed forward
at the bottom. And then you've got the pelvis, which is going to be pushed back at the bottom
but push forward at the top. And so you get the
zigzag type pattern. But once again,
you're really seeing a spring type formation occur, which is quite
interesting to look at. And once again, it makes it
easier to remember as well. Once we've got the
breast drawn in, we can go ahead and
continue working our way down the body. And this is where things get tricky because a lot of the time the arm is actually covering
the side of the torso. But because we're
leaving it out, which I've intentionally done, we should get a good
look at exactly how the muscles are going
to appear in the side view. Now you've got the main, one of the main back muscles
actually that are going to be visible in the side view. It's going to come
down from the back and around to the upper side
edge of the pelvis. This is the lats, okay, the lateral muscles of the back. Very, very powerful. They're going to drop down
the other side of it, the front of this
muscle, if you will, that's closest to the
front of the female torso, is going to drop down all the way down from the
bottom of the arm into that same point at
the top of the hips. Then we're going to
continue this muscle, which is also part of
the back muscles system. Down into the butt area. Next up we have got the abs. Remember, we want to
actually establish where the bottom of the
rib cage is first. I think that's quite
important in order to find where everything
else needs to sit. Released. It helps me do that. And then we're going
to draw in the abs. We're going to start
with the top set. And then the next set below it. Working our way down until
we've reached the bottom set, which is the longest set. And of course you've
got this side muscle that sits around the
abs at the bottom, which we're going
to sketch in there. And then what we're left with is a really clear look at
exactly what's happening at the sides of the body as far as the muscle
structure is concerned. And it's fairly easy
to get your head around once you see it in
practice it a few times. But it can be strange to
look at in the beginning. If you've never really had the chance to
observe it properly. Now what's happening around the leg area? Around the hips? Well, we've got the hip bone here that we want to place in. And just above that hip bone, we've got a large muscle that
is going to join into it. These muscles actually
somewhat transition into the butt. Okay. So the, the gluteus maximus, which sits behind the pelvis. You've got this long muscle that runs down the side
of the leg here. Now, that completes the entirety of the female torso
presented from the side. We've got the anatomy, we've got the back muscles, the side muscles, the
front abdominal muscles, and then we've got the
hip muscles around here. You don't need to get
these 100% right. Once again, as
long as you've got an overall basic understanding as to what's going on with
the anatomical structure. That's going to be
enough to really help you out with this stuff.
6. Back View Torso Foundations: Next we're going to go
ahead and take a look at the back view of the female torso and see
how that's represented. Again, this is
often a tricky view that not a lot of people are familiar with because we just
don't see it a whole lot. And most of the time
when we look at a character is being shown to us from the front view or
maybe the profile view, but even that is less common. So let's take a look at the back view here
and I'm going to do my best to show
you how I like to think about it and
understand it. As far as its anatomical
structure is concerned. It's actually very similar
on a foundational level two, how we constructed the
front of the female torso. We're going to start
out with the ribcage. Remember that women do
have a smaller ribcage. The men, men tend to
have a bigger chest. Just in general, it's part of our biology, part of our makeup. It's part of the reason as
to why also the hips are somewhat the same width as the shoulders, but
at the same time. Another reason for
that is of course, because women need
the ability to give birth and wider hips make
that process easier. So we've got the chest drawn in. Now, what you'll notice is that it looks a
little bit different. Because if we look at the torso from the
side, just as before, we can see that in fact, the the ribcage is pointed
forward at the bottom. Okay, so we're going
to see this curve. We're not going to be
able to be looking up at the front of the chest vest as we were in the front
in the front view. Instead of in the back view, we're looking at it in
the opposite direction. So we'll see this curve
happen and we will, again, the underside of it
will be obscured to us here. And in fact, you'll
notice also as we add in this cross contour around the horizontal axis
of the chest form, that it is also now
bending downward. It's dipping downward as
opposed to up wood in the front view because we've got that tilt that we're dealing
with in both of these views, which is obvious
from the side view, but not necessarily
the front and back. Next we've got, just as before, we've got the shoulders, which a guy to come out
from the arm holes. So we'll get those
drawn in there. Once they're placed in a drawer and will continue
down the spine, the pelvis. Now here, rather than looking down at the
top of the pelvis, we will be looking
at the back of it. And we'll see that the curve at the top is actually inverted. It's important to notice how these forms
appear in each of the different views because as we start to turn
them in space, you'll need that understanding. It will help you to
construct the human body. The human female
body, much easier. And even what you're
learning here can be applied to male torso
is quite easily, again, it's just a few
different cells within the measurements and the
construction of the anatomy. But for the most part, this is really what you're
going to be dealing with regardless of whether
you're drawing men or women. Once again, we can
see that if we add in this cross contour around the horizontal axis of the form that it is now being
pushed upward. It's arching upward. We can add in the hip joints, which remember, are going
to come out about as far as the shoulders. And then we've got the trunk, then joins the pelvis
and the chest together. That is our foundational model for the back of
the female torso. Now let's go ahead just as
with the other examples and start to add in some
of that anatomy.
7. Back View Torso Anatomy: This is where things upgrade
in terms of difficulty, because many of us are
just not that familiar with how the muscle groups
appear from the back. So we'll start out
with the neck. That's definitely going to
be the easiest place to start when you're drawing the
back of the female torso. And you can see me drawing
here these muscles that run a diagonal trajectory down to the shoulders from
the trunk of the neck. That's what's called
the trapezius muscles. Okay, Now these
trapezius muscles there, the star of the show almost in the top region of the
back of the upper torso. So we'll draw in
the shoulders here, the shoulder muscles real
quick that aka that deltoids. They have a very similar shape to the representations of
the deltoids from the front. It's going to lift up these trapezius
muscles a little more, give them some additional mass. Once we've drawn those in there, we can start to take
a closer look at how the trapezius muscles
actually ventured down into the rest of the back, the upper back here. They're going to run down
all the way down into about, I would say the middle point of the upper female torso to the middle point of
the back of the chest. This shape for the muscle can be broken up into
almost four pieces. Okay, so we've got this diamond that starts to appear right in the
middle at the top. What's cool about
the female body is that it's actually
quite symmetrical. It has is the male body. And that division is going to continue
down to the bottom. So this is really what you're going to be
drawing as far as the trapezius muscles
are concerned when you're observing
them from the back, presenting them from the back. And just to give
you an idea as to the forms of this
trapezius muscle, I'm going to lay in some cross
contours on those as well. Alright. So that's one of
the primary back muscles. You can see how much
space it takes up. It's a powerful muscle. In fact, the bank has a lot
of powerful muscles in it. From there we're going to
draw out the deltoids, the shoulders at their base. You can go ahead and add in a division between
those if we want to. Once that's done, we can
continue down the body. And what we're going
to notice here is that we can see this band of muscle. Again, the corset wrap around to the back and sit just underneath the bottom portion
of the trapezius muscle. I'm not even sure if
the trapezius muscle is still called the
trapezius muscle when you get to this point. But again, I like to group them all together in order to
remember them a little easier. And you know what, you could call this the upper back muscle if you didn't want
to get technical about it and that would
work just as well. But once we've got this
shape drawn in there, which sits just
underneath the shoulders. This section here
is what I like to refer to as the back
shoulder muscle cluster. And these you'll find often get tight if you
lift heavy things. A lot of the time. If you were removed
list for example, you'll find that you get a lot of tightness within
these muscles because they are responsible for
pulling the shoulders back and forth, right? What we're going to see is a little muscle
that occurs here. And by the way, just keep
in mind that most of these muscles aren't actually visible on the
surface of the skin. This is just what's
happening underneath. And primarily what you're going to find is
that these muscles provide more information
for the silhouette. They inform the outer shape of the body rather than any
of the interior details. Once we've drawn that in there, we can place in
another big band of muscle that runs from the edge of that triangular
piece at the base toward the top of the shoulders or the underside
of the shoulders. It's going to look a
little bit like that. And so you're left with is essentially something that looks a little bit confusing. But once you've drawn
it a few times, It's actually quite easy
to get your head around. Now, what you may want
to keep in mind here as well is that you've
got the sub forms. I would refer to the back
muscles as sub forms. And then you've got the
primary forms which are created by the
underlying skeleton. Okay, Now the
underlying skeleton is important here at the back because what you do
see on the surface of the skin is a lot of the
time the shoulder blades. Now, the shoulder blades are going to be outlined
and appear like this. I'm going to use a darker
pencil just to show you. They're going to look a
little bit more like this. And you'll find
that this contour, it is definitely present within
finished representations, finished drawings of
the female torso. It's one of the few details, one of the few contours
that you're going to find a find on a finished drawing
of the female torso. So just keep that in mind. So once we've got
that figured out, we're going to continue our way down the female
body from the back. And one of the things that
we're going to focus on next is the bottom of this side
muscles, the lateral muscles. Okay. Now, from the base of
the trapezius muscle, what we're going
to Draw route is this downward curve that wraps around to the
side of the hips. And what we're
actually seeing here, if you remember back to
our side profile view is this curve. Okay, that's what we're
drawing from the back here. So it's important
to make sense of how these muscles
are appearing and why they appear the way they appear in conjunction
with each other views. Because then you get
that, that model, that three-dimensional model
starting to form inside your mind of the anatomical
structure of the female body. Once that's done, what we
can then do is according the rest of the outer shape
of the upper female torso. We're going to see
these side lateral. We're going to see these side, I guess hip muscles or
waste muscles that form. They go into form
around about here. And the thing to keep
in mind, by the way, is that we do get some rather confusing
compositions happen with the muscles here. But it's important to remember that one of
the reasons as to why it gets confusing is because the muscles are layered over
the top of one another. Sometimes they are
thick muscles, sometimes they're thin muscles. When they're thin muscles, you're going to get
those underlying muscles start to define some
of their shape. And so yes, there can make it
really confusing actually. But for the most part, what we're going
to do here is just bring these middle muscles down into the base of the upper gluteus maximus,
the upper bottom. And what you're
going to see here is a little bit of
a better look at those side base waste muscles which sit in which
hug, which cuddle. That bottom set of
abdominal muscles. Okay, so it's gonna look
a little bit like that. Next we've got,
as I said before, the gluteus maximus
muscle That's going to come down and around. I like to think of the bum
muscle as a butterfly almost. Okay, so it might look
a little like this. And the reason I
say butterfly is because it looks
somewhat like this. The gluteus maximus
muscle. Okay? Now, of course, the
gluteus maximus is actually quite
joined to the legs. It's responsible for powering the legs forward and
pulling them back. So we can draw out our leg here. Remember that hips come
all the way out here. Gives us that nice
hourglass type shape. So the gluteus maximus from behind is actually going to run down into the back
of the leg there. Sorry, into the outer edges? The outside of the leg. Okay. And we'll clean this up a little bit. Once again, this is quite
confusing to look at. But it's really just what's going on
underneath the surface. To give you an
explanation as to how this female torso is shaped and why it's shaped
in a way that it's shaped. It's really the underlying
muscles that are to take the credit for it. Okay? And then of course
you've got the divisions within the gluteus maximus
that you can then make. Looks something like that. But for the most part, that's how the
female torso looks. From the back view.
8. Three Quarter View Torso Foundations: Let's do one more
anatomical representation of the female torso, but this time from the
three quarter view. Okay, because that's
what's really going to make it three dimensional. That's what's going to
join all of these views together for the most part except for maybe the back view. Okay. So the top chest piece
that we've been, we've been becoming
familiar with throughout. Each of these views is going
to look a little like this. From the three-quarter view. We are going to see that indeed it does come further
forward at the bottom. While it is pushed
back at the top. I just like to loosely sketch
this out to begin with, until it looks somewhat right. We're going to place in
the middle guide line that runs from the top to the
bottom of this chest form. It's very important in a three-quarter view
because once again, this shows us where the middle of the chest is at the front. We've got our horizontal
guideline that wraps around the equator of the form. Then we've got the arm
holes which will place in. And then we'll then we can add in the
neck whole place in the shoulder joints. The neck joint poking out of the neck hall where the
head would be placed on. Then we'll take this
middle guideline and bring it all the way down to where the bottom of
the pelvis would be. Now what you'll notice is
that there is somewhat of a dip occurring in the
middle of this line, just as there was in the side
view of the female torso. And that's because
of the shape of the abdominal muscles and how they're structured
within that area. Next I'm going to place
in the top of the pelvis. It's going to be tilted backwards. Like so. And I'm just roughly
sketching that out. Again, this is such a
basic model that is very quick to fix if you
don't quite get it right. We'll draw in the leg
holes on either side. Then just as before, we're going to place
in our hip joints. And I'm going to try
to get this shape as accurate as I can
possibly get it here. I'm going through
this very quickly because in the end you just need a general
idea of all this stuff. You can practice it a few
times if you want to. And I'd highly
recommend that you do that you fill up
your sketch book with as many examples of this basic fundamental
mannequin model structure for the female torso. Until you become a
100% familiar with it. But certainly don't get too
caught up in the details. You only have to really do that a few times in order
to get the hang of it. And I'll show you in
after these examples, how to draw that basic
foundational model from a number of different points
of view in different poses. And then had to put
the anatomy on top of it just to bring this home. Okay, so that's the basic
foundational structure of the female torso as represented in the
three-quarter view. Let's now go ahead and begin to place in the muscles on top.
9. Three Quarter View Torso Anatomy: I'll start out with the neck. Because when it comes to
drawing a full female figure, that's where I usually like
to begin, is the head. Then I place in the neck that I work my way down the
rest of the figure. And I'd just like to
approach it in that way. I feel like once
the head is done, then the rest falls into
place because I use the head to measure out the rest of the
body's measurements. So I think that's maybe why
I tend to do it that way. Then we've got the
collarbone which will place in around the top of
the female torso here. It's going to come out to
join onto the shoulders. The shoulder muscles that deltoids which will be
placed around about here. Observe their shape. Try to familiarize yourself
with it as best as you can. I keep it simple, as
simple as I possibly can because it just makes it
easier to think about. Once we've drawn
in the shoulders, then we can build out the
pictorial muscle mass, which will ultimately
join onto the breasts. I like to bring the
breasts down to sit just on top of that
upper arch of the rib cage. Remember, we do want to try to keep proportions in mind here. Breaths can be any size
you want them to be. So you can tend to make your
own proportions with them. If you'd like to
draw small breaths, then they're going to have, there's going to be a
particular point to which you bring them down each
time for your characters. If you tend to draw big breaths, then of course it's going to
be a different measurement. What you do want to keep in
mind with breasts though, is that you want to avoid them appearing as though
they're sitting right on the front of the torso. You do want to have them
come out a little bit. So one way in which
you can ensure that is you can draw
out a right angle from the middle of the
collarbone as a guide to where the main mass of the breast should appear on either side of
the female torso. So that's one way
that you can do it. I tried to have them come down the same distance so that they're aligned
with one another. Unless of course
you want asymmetry, which there may be a reason for that depending on the
character design. But then we've got our little bits at
the top because there is some fatty tissue at the top of the breast as well. Keep that in mind. Once we've got the
breasts drawn in there, we can pull out the eraser to clean it up a bit to tweak
the shape if we need to. I will often do that, especially when it comes to
drawing the female body. It's just comes
with the territory. But once you've got
the breast drawn in, we can then continue to work our way down the
rest of the body. Remember we've got the
belly button here. And that's going
to run down into the bottom of the pelvis there. We've got the ribs, the
bottom of the ribs, which I like to draw in as a
starting point for the abs. Once they're drawn
in, I can start to lay in the contours
for the top set of abs. Placing the ribs and those
side muscles that sit around the abs and continue building my way down until
I get to the bottom set. Now what I want you to
notice is this curve here. How, how the side muscles
at the top of the hips will actually curve inward to narrow the bottom set of abs as they go down
into the pelvis. Okay. So that's a good
observation to make that'll allow you to capture the proper form for
the female torso. Once we've drawn that in, we can indicate this back muscle here that's going
to come out from the underside of the arms and then come all the way around and down into the
top of the hips here. The lateral muscles, you
can refer to these as. And remember you have
got these masses of muscle that sit just on top of the hips there around
the bottom of the waste, which we can place in. Then once we've drawn in a
majority of the upper torso, we can start to work
our way into the base. We've got these two tendons that run down from the bottom of those side hip
muscles into the leg. Then we've got the
hip joint here. So we'll lay that in. Move at some of the front
leg muscles as well. Which will want to
consider if we are indeed drawing legs
onto our female torso. Okay. That just about covers it for the three-quarter
view of the female torso. Now we'll I'll probably bring the shoulders down
a little further. So sometimes we don't tend to bring shoulders down enough. It's important to
remember that they do come a fair way down into the upper arm of the body. And again, I like to make I like to consider the
deltoids as being part of the torso because
they really are very much an important
piece when it comes to the movement of the pecs
than the upper chest. Okay. So that is our anatomical
representations of the female torso in each of the primary standard
points of view.
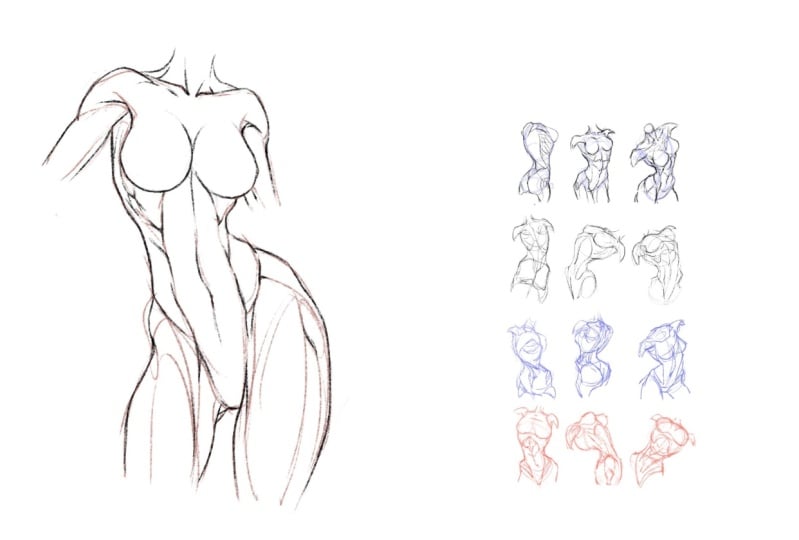
10. Working With The Base Torso Model: The next thing that we're
going to be drawing up is the basic mannequin model
version of the female torso. And we're going to
be presenting it from multiple points of view, in perspective, in
different positions. And because we're taking the
anatomy out of the equation. So the different muscle
groups where you're really going to be observing
is the proportions, the pose and the
placement on the page. So let's just jump
straight into it here. I'm going to just draw
up a few of these. And you can follow along
if you would like, or you can come
up with your own. But this is very much how
I would actually draft up the female torso if I was
drawing it out for real, for an illustration, I
keep it very, very loose. And I try to add as much
energy as I possibly can into it as I'm drawing it. In order to come
up with something which has life to it,
which has movement. I think it's really
important to add that in as much as
you possibly can. You want that energy to be
instilled within the pose? Because ultimately that's going to come through in
the final artwork. Ends. By doing these exercises, what ends up happening is you become extremely familiar with the different
components that we're using to construct
the female torso. Not only that, but you also find that you're able to let
me start that one again, is getting a little
too rough with it. You're also going to
find that you're able to familiarize yourself with
the scale of each of these parts in comparison
to one another. Which is an important thing. In other words,
you'll start to see the relative measurements
between each piece. So you'll get an idea for
how big the pelvis should be at this particular angle
when comparing it to, let's say the chest. Now, again, I've got a bit of a twist happening
within the torso here. And I'm looking
at it from above. Now, on this much
of a basic level, I do tend to do a lot of erasing in order
to get it right. And when I do that, it doesn't
really matter that much. I've haven't gone
ahead and wasted a whole lot of
time. Neaten it up. Alright, that's why
it's so important to get it right at this point. Because if you can get
it right at this point, then when you go to draw
all the muscles and the design of the
character on top later on. It's not that big of a deal. Okay, so let's do one
from the back here. So I like to have
the top of the torso and the bottom of the
torso angling back in opposite directions to
make it feel more dynamic. And once again, it does add that that sense of balance
to the figure I think, which is important to have. We can do one from the
side, but looking up at, at someone and you can see
how rough I'm keeping it. It doesn't have to be exact. And believe it or not, this is more than enough
to actually start building out a
female torso on top. I finished female torso. In other words, the muscle
groups and whatnot. Okay. So this is a twisted
female torso from the top from the bottom
that we're looking at here. So that's where her
behind would be. You can just pull out your
sketch book and start filling the page up with these
really studying at, really getting to
know how to draw the basic forms that the
female torso consists of. And I want you to do
it enough that you become completely and
100% comfortable with it. Not just drawing it well, but also maneuvering at around, turning it in space, looking at it from
different angles, challenging yourself
to come up with difficult poses.
And I want you to. Reach a place where there's no pose that's too
difficult for you to draw. For the female torso. You can have not just
the female torso bending from one side to the
other, but also downwards. So let's say that the
neck hole is here. You've got the back there. We can add a cross contour in to show where the middle of the
top of the chest vest is. And then maybe the pelvis is all the way back here in
the chest is in front of it. Okay, so challenging
yourself with poses like this is
absolutely great. Maybe it the chest
wouldn't actually be that large at
the front and back. It might be a little bit
more squashed on that plane, but this does the job. This gives you an idea, it gives you something
to work with. And this isn't the be-all and end-all of your female torso
is if this doesn't work out, it doesn't matter, it
can easily be tweaked. That's the thing
with this model. It's so tweakable,
it's a test dummy. That's what I like
to think of it as, is simply a test dummy. Keep these poses just basic. If you're having trouble. Just starting out with the
base model, the female torso. Keep it simple, get
familiar with it, and then start to
venture out into these more dynamic
representations, these more dynamic drawings
of the mannequin model torso. Let's totally fine. You don't have to do
it all in one here. You have to manage
your learning. You build your learning up in much the same way as
you build a drawing up. Now one thing I like to do
when it comes to drawing the female torso is I'd like to if the shoulder is it
tilted in one direction, then I'll have the hips
tilted in the opposite. Once again, it just adds that, that extra little bit of
dynamism to the piece. And you can really push
that and trusting tilt. So you could have
the upper torso bent right over, right over. And then you can have the hips tilted in the
opposite direction in a really exaggerated
way if you want. And what you'll notice is
that just like an accordion, the middle muscle chub of the female torso is
going to stretch on one side and
compress on the other. Okay. So by the time you've
done a full page of these, you'll be extremely
familiar with working with the basic
model of the female torso. And that's exactly the place
that I want to get you to. Okay, so we've got
another example here. This time I'm going
to be drawing the female torso from above. We're going to have
a little twist for the body to show the pelvis at the bottom turning
away from us so we can actually see her bottom if we were bringing
this to a finish. And how crazy is that by using this basic model,
all of a sudden, drawing these crazy dynamic
views of the female torso in perspective becomes quite easy. And the reason for that is because we're not thinking about this on a
complicated level. We've actually decided to go ahead and simplify
it for ourselves, which makes it easier to draw. And if it's easier to
draw in the beginning, and you can get this base
model fairly accurate. It's not that hard to just
start building on top of it. Really all you need is
something to work with. It's very much like
sculpting, okay, you can think of
this basic model of the female torso
as the armature. Okay? It's what allows you to
establish the proportions and the pose of the character's
torso in the beginning. But later on, of course, you're going to add more clay
in on top of it to start sculpting out those
secondary details on top. Really tried to get
creative with these poses. I'm drawing a few of them that are actually quite similar, but I'm going to try to really push myself to come up with something
new and interesting. I mean, the human
body can only be maneuvered in so
many different ways. It does have its constraints. But let's say that
we wanted to draw another example of the
female torso from the back here you can see that I'm
changing the scale of them from one example
to the other. Because it is important
to be able to also draw these basic models
at different scales. You're not always going to be drawing characters
at the same size. You are going to want to
mix that up a little bit and it can become apparent that you'll get comfortable
drawing them at one scale or another if you don't
keep it in check, if you don't try to mix
things up from time to time. By mixing things up, you become elastic. Lester. Your abilities become
elastic, right? You're able to stretch
them in different ways. Less to Thai iced. I don't even know
if that's a word, but it sounds, sounds
like it should be. Sense. Cool. Alright, so we've
got another example of a female torso
here, bending back. So try to twist it. Try to twist the or rotate the pelvis in
one direction while rotating the direction of the chest in the
complete opposite. Keep in mind that
you're going to want that center line to run from the top of the chest down into the
bottom of the pelvis. Either way that it will follow the trajectory
of that twist. And I'm going to fill every single inch of
this page up with examples of the basic female
torso mannequin model. You'll notice that
very roughly the width of the torso as far as the chest
and the pelvis is concerned is fairly equal. Let's draw a much bigger example here just to take up some space. Alright, and what direction
will we have it looking in? Well, let's have it looking in. Will look. We'll be looking
up at the female torso. In this example. You can see I'm
almost using a circle there to draw it out.
And that's okay. This is going to be a
very interesting pose that I've just come up with. It's a little bit difficult
to draw actually. But again, when
things are difficult, when they feel difficult,
that means you're learning. So if you're finding this hard, that means not only do
you need to learn it, but you are learning. Okay, So I'm going to have
another crack at that. Yeah, that one's not
working out for me. I think I'll start again. I didn't think that
one through properly. Okay. So we'll add the neck
hole in there and we'll bring down that center line into where we want
the pelvis to be. And what I'm gonna do here
is I'm actually going to twist the pelvis
around at the base. Again, really trying to
challenge myself to come up with poses that are
difficult for me to draw. And what we're going to do in the next lesson is we're going to draw out a
few more of these, except we're
actually going to be placing muscles in on top. But I want you to just focus on the primary forms
that we're using to construct the female torso here. That's what's important. I don't want you getting distracted with the
muscles at this point. You've got to become
familiar with this first. So don't move on to
the next lesson. If you're not familiar with
this basic structure, I mean, you should be once
you've gone through this exercise with me, and then up a few examples of your own mannequin,
mechanized female torsos. Because in the end, with repetition, you're going
to get better at anything. It's funny how simple learning
how to draw actually is. Oftentimes we know
exactly what we need to do in order to get
good at drawing something. It's just for some
reason or another, we don't do it. We do not always do it. It's like going to the gym. It doesn't feel good. Sometimes it's not
the most fun thing in the world to be drawing just a bunch of
mechanized female torsos. But it's going to really help us out later
on down the track. We're going to be come
so good at drawing them. We're going to
become comfortable and confident at drawing them. Even more importantly. So let's keep going here. Let's fill up even
more of the page with additional examples of
female torso is okay. We'll draw a few more over here. And if you did this
on a daily basis, I can tell you you will get
very comfortable drawing, at least on a base
form, the female torso. And you'll become
comfortable drawing it dynamically from a multitude
of different viewpoints. K. So here we're actually
looking up at the female torso. Getting a nice worm's eye view. It's very powerful representation
of the female torso. You can imagine a
female character looking down at you
from this angle. As far as the thickness or the
width of the waste itself, that's completely done to you. Typically built looking
female characters who are somewhat bath
and wrong in appearance. What you will want to
do is thicken that up. Whereas if you're looking at a female character who you would like to
have more sex appeal, who's a little bit more petite, then you'll want to
make it appear thinner. So what I'm trying to represent
here is a female torso where we've got the top of the chest being pushed
forward from the back. But then you've got the butt coming out
and swinging back. Like so. And I don't know if I'm being
entirely effective with it. But again, this is what's
great about these exercises, is if you do a few of these
from different angles, you'll become familiar
with the movement. What you could do is
you could even use some references for this. Construct the basic
female torso model based on that reference. And then draw it. Draw the pose that you're
observing in the reference from an angle that you're not
able to observe a K. So if you've got a
reference where you're looking at the female
torso from the front. Try to draw that same pose for the female torso from
behind or from the side. It's gonna be tough and
you'll find it difficult. But that's because once again, your brain's working, your
brain is being challenged. Now what you'll
notice is that if the upper torso is larger
than the lower torso, you're female, body is going to end up looking
more masculine. Which is fine. If
you want to create or convey a masculine
looking female character. If it's not, then you'll want to just
simply increase the width of the pelvis or decrease the width of the upper
body, the chest region. The chest and mass,
you could call it. Okay, we'll draw in
another example. So the funny thing is, you might feel as though
this is a little bit boring. Just drawing these very basic, very bland looking mannequin
model, female torsos. But here's the thing. It's actually quite relaxing. You can turn on your
favorite soundtrack. And you can sit here for
half an hour and draw out, who knows how many 3040 poses
of this basic female torso. And by the end of it, have a whole bunch of
experience points built up. That'll aid you, that'll pay off later on down the track
in a massive way. Now if you end up finding that you're doing the same pose, at some point, that's fine. Practices, good. Do the same pose, but try to mix it up. Be aware of sticking with poses that you're more
comfortable with over others. Sometimes it's a
creative challenge. It's like, what can I
come up with now after I've drawn 30 poses
for this female. Basic mannequin model. What can I come up with next? That's different. And you might notice that once you get really
comfortable with this, your lines become loose, just like the lines on
laying down onto the page. Now you'll notice that
the more of these I draw, the loose or I get, that's a good sign that you're really starting to let
this stuff sink in. Okay, It's a good sign that you're getting
comfortable with it. Typically that the tighter and neater we try to make something. That means we've still got a
little bit more work to do because we're trying to make it tighter and neat
to overcompensate. When not sure about it. We're finding it difficult to
draw and so we neaten it up in order to try to
make it better. In order to provide hope that it will work out in the way that we
wanted to work out. Now, sometimes it works and
sometimes it doesn't work. Unfortunately. I do
know that as you increase your ability
to be able to draw this stuff and it
becomes second nature to you. It's going to look looser,
it's going to look rough, ER, and that's exactly
how it should be, because this is just
the foundations, just the foundations that
we're dealing with here. So what if we did
a female torso? We're looking up at the chest, but we're looking down on the
pelvis as it's pulled back. I've probably done this
pose already actually. But again, it's It's all practice getting
that mileage behind you. That's going to be the
key to your success, is setting aside a
little bit of time each day to rewrite this
whole process to disk. So you might be doing
a whole bunch of these basic mannequin model
female torso is right now. And he might feel like you've, you've racked up a few of them
by the end of this lesson. But here's the thing. Tomorrow I want you
to do it again. And the day after. I actually want you
to do it again. Because if you don't,
what's going on? Is it you're going to forget, especially in those
beginning stages. So when you learn something new, you want to do it a few
times over in order to make sure properly sinks in
that you probably got it. I'm going to fill these
little gaps up in here with some little mannequin
model torsos. Once again, drawing
the female torso at different scales
is important. It's going to help you out
later on down the line. When, especially
if you're drawing comics for your comic book
artist watching this, you're going to want
to be able to draw characters at different
scales, different distances. And if you've practiced that, of course it's going
to be much easier. Okay? So we'll draw a few more out. We're going to continue this. I know that it's a, it, it gets a little
bit old once you've drawn a whole bunch of these for 30 minutes. But let me tell you
by the end of it, you're going to feel
a whole lot more comfortable drawing
the female torso. And I believe that you can do
it if you've got the focus, you've just got to sit there, sit your butt down with a pencil and actually draw it out,
have that commitment. Not a lot of people are
able to do that these days. And if you are, then you've
got a super ability. You really do. You're going to be ahead of pretty much
everybody else who struggles to sit
down and focus and actually draw out a whole bunch. Like who else do you
know is going to sit there like a madman and draw out all of these mannequin
model female torsos. I don't know anybody
except for maybe me. And maybe you sitting down
right now if you're following along and you've been drawing out your female
dossiers for this long. Congratulations. You're one of the mad at people who are actually going to
get good at this stuff. I remember my
sketchbooks used to be full of examples of
different body parts, just like this.
Legs, full figures. And it really is one of the reasons as to why
I'm so comfortable drawing the human body out
to this day fairly quickly. I don't have any
anxiety about it. I don't stress about it. I don't get caught
up in the details or at least I try not to. Usually if I do get
caught up in the details, It's because I haven't
been doing my practice. Okay, It's because I haven't
been drawing enough. And so what I want you to try to remember is that just
like going to the gym, if you go to the gym regularly, you're going to stay tones, you're going to stay fit. If you take some time off, Then eventually there will be a point where your
muscles start to atrophy and you're no longer
as toned as you used to be. You no longer as well-versed. So let's try to draw an example
of a female torso here, which is a classic pose, where you're looking directly at the side as it's
twisting around from, say, the back or
the front. Okay. So let's say that this is the front of the pelvis here
that we're looking at. But the side of the upper body. This is a classic pose that
you can take to the bank. This is definitely
oppose that is used a lot within comic
books, within pin-ups. We can do another version
of that where the body, the upper body is once
again turn to the side. But now we're actually looking
at the back of the pelvis. So seeing the gluteus maximus there and the side of the body, the upper body. Now we can mix that
up a little bit. We can actually have it so
that we're now looking at the front of the upper body, the front of the chest
as it turns toward us, but then we've got the
side of the pelvis now. Okay, so once again, we've got that twist happening. Remember that we can mess around with the tilt
here that looks a little bit boring
for a torso pose. So in fact, what we can do in
the next example is we can have the chest piece being
pushed back at the top. And then we can bring
this curve round. Looking at the pelvis from
the side or even slightly behind as the upper
body twist toward us, but it's also tilted back in the opposite
direction to the pelvis. And that just makes the whole pose looks that
much more dynamic. There's so much more
movement there. Now. As I said before, there
is limits, of course, to how far the human torso can twist in one
direction or the other. But it is certainly something which is worth keeping in mind. Okay. So we can take
a look at the chest from the top as the rest of the body
swings down and then back. I don't think we've
done that pose yet. You essentially want
to be able to draw any pose with the basic mannequin model
torso that you can, that you can think up with ease. And if you find again that
you don't have enough twists in your torso is that there's not enough tilting happening, then do a few
examples where you're intentionally
putting that force. It's important to go
into the darkness, to go into the areas of your artistic abilities that
aren't quite as honed yet. And so if there is a particular pose that you are uncomfortable
with drawing, when it comes to
the female torso, then I would say practice it. The more you practice it, the less of a problem
it's going to become. So here we've got the butt twisted in one direction
and bent back. While we've got the upper body being twisted and tilted in
the opposite direction to it. Again, it's all about
opposites. Right? If you've got the torso pointed in one
direction at the top, try to pointed in the opposite
direction at the bottom. Keeping in mind the constraints. You can find those constraints quite easily with your own body. If you're afraid that you
twisted the body to fire around and stand up
out of your seat. It's good for you anyway, if you're an artist
that sits down all day and actually
see if you can push your own body to that extent without hurting
yourself, of course. Alright, and if you can't, if you find it difficult, if you find it awkward, then maybe it's not
such a good idea to draw your human
torso in that way because it might
look awkward and it might look uncomfortable
for your characters. And the viewer, whoever is looking at your artwork
will be able to tell that. Okay, so try to make your poses look as natural as
you possibly can. At this point, I think that
we've pretty much drawn enough basic mannequin
model female torsos. Now let's go ahead and actually draw up some more
examples like this, but we'll place anatomy
in on top of them. After that, we will
draw some finished, polished female torso is where I'll show you exactly
what is going to appear on the surface of the skin with all of that underlying
muscle considered. Alright, let's move on
to the next lesson.
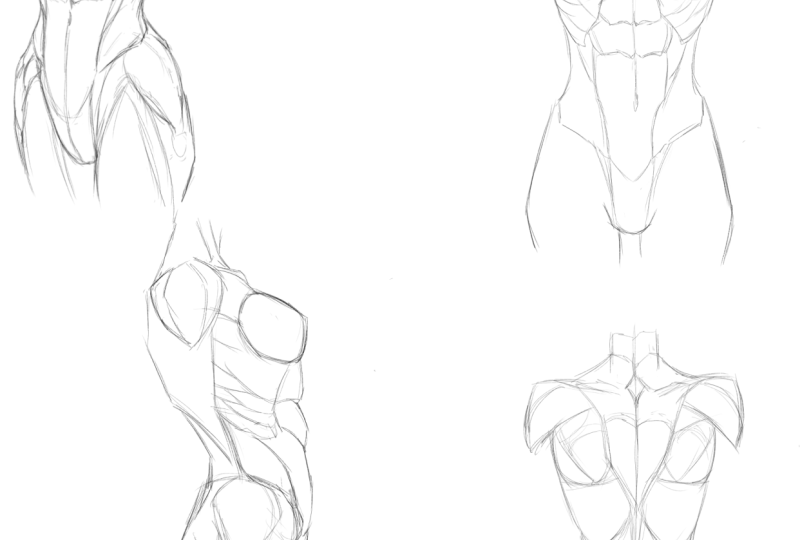
11. Female Torso Anatomy Pose A: Next up, let's do some more mannequin model female torsos, but with some anatomy drawn
over the top of them. And for these examples, I'm going to do them a little bigger than the previous ones, just so that you can see exactly where those muscle groups go and what's happening
with them as we maneuver it as a torso
into different positions. Okay, So let's start out
with the first one here. Let's say in this
example that we wanted to look at the top of the torso, the chest piece
from the side view. While we were looking
at the bottom portion, the pelvis from the back. Okay. So just as before when we were doing the
anatomical studies, I'm going to place
in an arm hall. I'm going to place in the horizontal
contour that wraps around the belly of
the chest first. Then I'm going to take the center line down
into the pelvis, which we will be
looking at from behind. Now, it'll be an
angled perspective. So it's not
completely looking at the pelvis from
the back because I don't I don't believe that the human body could
twist that fire around. Again, we want to keep
those constraints in mind. But just as with the upper body, we want to add in
that sense a line running from the top of
the form to the bottom. When I play C and the
horizontal cross contour. And then we will go ahead and we'll place in the leg Hall. So that's the basic, on a fundamental
foundational level. That's what we're
dealing with as far as the mannequin model
is concerned. So what I'll do at the bottom of the chest before we move
on here is I'm just going to go ahead and mess or link because we might be able to see underneath it just
a little bit here. So I'm going to to tweak that someone we're looking at
the chest from above. So when we're dealing with
really basic forms like this, it does become easier to
figure this stuff out. So I think it would probably be a little bit more like that. Alright, great. And I'll just tweak the
shape a little up here. That's looking good. I'll bring the top
of the pelvis up. So I'm really starting to focus in on the
masses at this point, resizing them, reshaping
them as needed. Again, if we can get
this part right, it makes the whole series of steps that come
afterward much easier. We'll place in the arm joint, we'll place in the hip joint. And then we will place
in the muscle tube. Now, we want to take
this central line at the back of the chest
and we're going to twist it down and I haven't run into the back of the
pelvis because of course, the back of the pelvis
is going to align with the back of the chest regardless of what
direction it's turned in. X. We'll go ahead
and we'll place in the other side of
the muscle tube. Like so. I'm going to have
the upper body, the chest, slant
even further back. We want to push that tilt
a little more, I think. Okay, there we have it. That's looking good to me. Again, on this
foundational level, I find that I sometimes even
spend the most amount of time because I know if
I can get this right, I know if I can get this down, then the rest is going
to be smooth sailing. But once we're at this point, we can start to place
in the anatomy. Okay. I'm going to go ahead and turn this blue so that we can
place the anatomy on top and see a distinction between the underlying
foundational model and those different muscle groups
that we're dealing with. So we have got the PECS which
will join onto the breasts. Okay, so we'll end up with something like this
from the side. Okay. So we're
essentially looking at the side view of the female
torso up the top here. Okay, so that'd be the breast. And of course that's going
to join onto the shoulder, which will sit at the
top here as well. So we'll draw that out. We're going to see the
armpit underneath. And of course, if there was an actual arm there than
we would draw that in. I'm actually trying to represent the arm is being
pulled back a little bit here. So Mike come out this way if we were actually
drawing it in there, but I'm not drawing it in there. So I'm just going to leave it at the shoulders and move on. Once we've got this drawn in, we can think about the
center of the back here because that's
going to help us to it's going to give us a place to start building out the muscles
from the middle of the back. Okay, so we've got
this large muscle. The course at least I like
to think of it almost as a course that's going
to run down from the middle of the back
to the sides of the hip. Okay. So it's going to twist. And remember that that muscle drops down from
underneath the arm. I don't know if this
is 100% accurate, but you can take a pretty
good guess once you are familiar with the
basic structure of the female figure and you know where those
muscle groups go. What you're really doing here is you're just making
an assumption. You're making an assumption as to where everything
is going to sit and where it's going to go. So I'm going to do
some erasing here. After a while. What
you're going to find is that the muscles and the foundation of model tend
to work together to help you figure out whether or not what
you've drawn is accurate. So if the muscles are looking weird as you lay them on to the foundational model, then that means you may have messed up that foundational
model to an extent. Okay, just like here
in this example, I realize I needed to raise
the hips a little bit more. I just had a gut instinct
moment that that was the case. Once that's done, I can
continue the middle of the back down into the base of the
gluteus maximus here. We've also got this side muscle around the torso that's going
to be placed at the bottom, just above the hips, and surround that bottom
set of abdominal muscles. Then we've got the other
side of the back muscles, the lower back muscles here, which will also run down into the middle of the
gluteus maximus. Then we will draw out the
butt down into the legs. Like so. We can continue building
the muscles up for the gluteus maximus
around the leg as we work until we've completed the bottom area of
the female torso. Next, let's work our
way up the figure. As we attend to the the lats. So we can call
these the serratus. I guess these would
be the technical name for these muscles. The serratus. Again, you don't really need to necessarily know or
understand them. But they're also known
as the obliques too. So this would be the serratus, that's this top set here. Then you've got the obliques, which is really what this side muscle is
cold there, right? And getting the names
often escape me. But it's certainly
a prominent muscle that you want to take into
consideration, no doubt. So what we're going
to be looking at here is how they
form around the abs. Okay, so let's say that we
can get a peek at the top AB, they're just before the
body twists around. This is what we're
going to be observing. So that is the
muscles of the back, end of the side of the torso, back of the pelvis that we
want to be considering, that we would place over the top of that
foundational model.
12. Female Torso Anatomy Pose B: Let's do another example here. This time of the female torso facing toward us at the top. And maybe even the
same with the pelvis will have that facing toward us to so that we can get a
good look at the muscles. But we will change
up the position, maybe the tilt of these two major forms that make up the mannequin model
version of the female torso, the foundations of
the female torso. So maybe the chest in this example is going
to be tilted forward. Indicate that it's
tilted forward simply by pulling down that
horizontal guideline that wraps around the equator. Then we've got the center line, of course, the
vertical center line. And that's going to run
down into our pelvis, which in this example, I'm actually going to have
the pelvis facing forward. So pushing outward,
something like this. So now what we're
going to see is the abs actually compressing
against one another. And maybe in the
final example we can have this tilt occur in the, on the other axis. Okay, So this is the
front and back axes. Will maybe we'll
have it tilted too, from one side to the other
in the next one a case. So we want to take this center
line and we want to bring it down to describe the
front of the pelvis there. Now this is not necessarily going in the
direction that I want, so I'm just going to
erase it and start again. And sometimes what I'll do
is I'll start to build out the trunk of the torso as it
leads down into the pelvis. I might even restart this. Let's have another go at it. Again, I'm going to loosen up here because
sometimes if I get a little too tight
in the beginning, I start to overthink things
and it doesn't always work out in the way that I
necessarily want it to. So going to have
another go at it. Again, it's not a big deal. Just it didn't work
out for me the first time around. And
that's the point. That's why we're using this basic foundational model is because we're going
to make mistakes. It's inevitable, no matter how experienced
you think you are, you going to make mistakes. And it's just part of
the drawing process. You want to be making mistakes because you're always
learning something. Your brain's working when it's
trying to solve problems. I've always found drawing
to be the ultimate puzzle. The puzzle that never ends. So I'm just going to tweak
this top mass, the chest vest. I want it to appear as
though it's coming forward now because it is a little larger and appearance
than the pelvis right now, what is happening is
that we're getting a more masculine
appearance for the pelvis. So we want to fix that up. I'm just going to tweak
this until I get it right. Again, you're getting
a live demonstration of me making a mistake with my drawing and
actually fixing it. Which I think can be just
as valuable sometimes as when it goes completely
to plan because that is, so unlike many of
our experiences, it rarely goes to plan for me. Unfortunately, this is a weird, awkward pose to put
the torso into. In any case. It's going to look a
little bit strange. In fact, I don't like the way that the pose
is looking at all. So I'm going to
maybe reposition, reposition the bottom
of the pelvis. I'm going to add a
bit of a twist to it. It was just too much of
an awkward pose, I think. And I'm even going to change
the top chess piece here. Sometimes if a pose
isn't working, it's not working and
you've got to call it quits and go to call
it a day on it. But you can see how quick it is to just knock out a new one. It's very fast. And that's the beauty
of using this model. So I guess now instead of having the pelvis being hunched over, we're actually pushing
it back in this case. And this could give
us a better look at the anatomy in
fact, in either case. So that's okay. That works for now. But that's the basic model that we're going
to be using here. Now let's go ahead and
place in the anatomy so you can see how fast it is once it actually
starts going to plan. Okay, So we'll start out with these two little lines for the pecs of
our female torso. You can see that the arms
I've brought them up, they appear as though
they're being brought up. So we'll lay in the shoulders. At this point. Does look like a, quite a masculine torso, but bear with me. We will be adding in the
breaths in just a moment. In fact, we'll add those in now. Okay. Let me get rid of that. I'm not liking the direction
that's going in either. Lay in the neck. Let's start there and
see how we go with that. It's a little bit better. I think. Sometimes if you're being too tight
with it at the start, as I said before, it can mess you up. It doesn't give you
the room to explore. You'd need to be
loosened the beginning. That's the key. That's
what I've found, works for me best. So we've got the
breast drawn in there. You can see that I went a
little smoother that time. We'll draw in the
shoulders once more. And I'm just going to go ahead and define the
outline of each of these major areas more clearly so they can see
what's happening with them. And I will tweak this anatomy if needed just to make sure
it's all looking right. Okay. So that's the breasts and the shoulders taken care of. Now let's go ahead and draw
in the abdominal muscles. The underside of the ribs will
usually be fairly visible. Depending on how much
weight your character has. But uses there'll be visible
and what you'll notice is that the breasts, the shoulders, and the bottom of the ribs are all going to
align with one another. Regardless of the
tilt or regardless of the positioning of the
female torso in perspective. So just make sure
that in any case, all of those are aligned. And then we've got the abs
which will place in now. I'll drop down from
either side of the ribs. At the top. We want to
take this center line, bring it down to
the belly button. Just so that we can align the middle of the abdominal
muscles properly. Once we've got one
set of abs drawn in, we will place in the other. Now keep in mind that
we've got the female torso being pulled back
here in this example. Which means we are going to see some foreshortening occur. Then we've got our obliques. So I'm using the
proper name now. The obliques which
are going to come down to hug the side of
that bottom set of abs. And I don't want to make
them too big because we are drawing a
female character here. And sometimes it's easy to draw those larger than
they actually should be. So I'm bringing those
down all the way down to the top of the hip bone, which is where they would end. And then finally,
we've got the tendons that dropped down from the bottom of the
obliques and into the middle of the crutches base. And that pretty much makes up, for the most part, the
middle anatomy of the torso. So this is another anatomy
study except for this time. As opposed to the
start of this class, where we were looking at
the diagrammatic views. Well, the anatomical makeup
of the female torso. We're now seeing how these
muscles are going to appear as the female
body is in motion, as it's placed into
different positions. So that's the abs. We've got the breast drawn in, we've got the obliques. Now we want to take care of the serratus and
a lateral muscles. Again, don't worry too much
about having to remember the names of the
muscle groups really, you only have to
remember them if you plan on teaching it
to other people. So it can be a bad teacher
sometimes because I forget. But we're going
to draw those in. And I'll start out with
the lateral muscle, which is going to
come down like so. And it might not even come out that far to be honest with you. So if I need to,
I'll tighten it up. Sometimes you really
wanna do is just look out that the outside shape
of the female torso, see if it works out. And it looks the way
that you want it to, because you don't
necessarily need to follow that underlying
foundational model. If that's not right, then don't follow it. Simply tweak the shape until it is the way
that you want it to be. And that's exactly what
I did just before. Okay. So I think that
that's looking pretty good. We'll add in the ribs on the
other side as well. Okay. And then finally, we've got our legs which are going to
drop down from the obliques, or at least that's where
the top of the hips will begin and lead down
into the legs. So this would be where
the hip joint is. And then we've got
the upper leg muscles which we'll want to
take care of them. And as far as what the upper leg muscles consist
of will leave those for another lesson because that's
a whole other body part that deserves its own class. But that is another example
of the female torso. Except this time we're
looking at it from the front.
13. Female Torso Anatomy Pose C: Let's do another example now. Where we, well, let's
just see where we go. I'm not even sure what
pose I'm going to do for the next
female torso example. But let's see, maybe
we can do, I know. Let's do a top-down
representation of the female torso here. I guess we don't have a
whole lot of examples of the female torso from
the back just yet, at least in the top
of the top region. So we may go ahead and tackle
that for our last example. Again, I was getting a
little bit too tight there. I want to loosen up. If you're having trouble
with this stuff, loosen up a little bit. And what you'll find I think, is that it makes the whole
process much easier. Now I do want to try to make this example the same size
as our previous examples. So we'll draw that
just a little bigger place in the pelvis
at the bottom there. Keeping in mind that perspective
that we're dealing with. Sometimes I like to draw in
a line that would signify the tilt of the shoulders and the hips in comparison to one another like so, that
can really help. Going to sculpt down
this base form a little more in order to get it looking
the way I want it to look before I start laying
the muscles in on top. But remember that any
errors here within the foundational model can
be solved with the aid of the muscles that we're going to lay it on top because they do help you to fit the human
body together in a sense, in the correct way. Now I'm going to draw
in the muscle tube that sits between the upper
body and lower body. I'm going to extend the
chest vest down further. Again, making some tweaks
here as I work on the fly, pulling out the eraser. When I need to, as I need to. I've repositioned the neck
hole so that we're now looking down on the top of
the female torso. Even more so. And I'm just really trying
to get a sense for the tubular form of
that middle piece of muscle that joins the two primary masses
together within the torso. I am looking at the outside
shape of the torso as much as I'm looking at and observing
the interior major forms. And these are the major forms, really the chest vest and the pelvis that we've
got to deal with. But I think that's
pretty good to go as is. It's very sketchy
and it's very rough, but it'll work for what we need. And now it's time to start
placing in the muscles on top. Okay, so again, if
I keep it loose, I'm probably going to
have the best luck. So I'm going to remember
to do that this time. We have got the collarbone that I'd like to add in
here before we get too carried away
with the breasts because the collarbone
is going to help us to establish that angle within the perspective we've drawn
the female torso on here. And it's dynamic
perspectives that can make the whole process
all that much more trickier when it comes to
drawing the anatomy on top of the basic foundation of the
female torso, which is why. It's important to
familiarize yourself with the mannequin
model version as much as possible so that you don't
have to be concerned about that as well on top
of everything else. Because at least if
you've got that down, It's something that
you don't have to worry about as much anymore. And you can focus
on the things that are of a larger concern. Okay, So I'm going to place in the middle
guideline that's going to run down from the chest
fist into the pelvis. I am trying to think about exactly how
that's going to work. Again, It's, at this point, it's like trying to
solve a big puzzle. That's really what
it feels like. So once that's done, I'm going to draw in
the abdominal region. We have got the
shoulders up here. So if we place in the shoulders, that'll help make sense
of things as well. So we'll draw those in. And again, I will be
showing you some examples of how the female torso
looks in a finished state. So these are our anatomy studies that we're doing at this point. This isn't what you're
going to be drawing for a finished torso illustration. Unless it's an anatomy study. It's probably not the most accurate shape for
the shoulders, but it'll do for
these examples here. We've also got the neck, which we'll do some
work with for a minute. Because the neck is important. It's an important component of the body that we want to
consider, especially on women. Because of course, women have typically longer
appearing next than men. And so they do get noticed
on women a little bit more. But I'm going to start with
the trunk of the neck. And then once that's in, we can build the anatomy
around at someone. As we bring the two side
muscles of the neck down to the center
of the collarbone. Then we've got the
lateral muscles that come out from behind. I'm sorry, not the
lateral muscles are trapezius muscles
that come out from behind it down into
the rest of the torso. And given those lateral
muscles, sorry, those trapezius
muscles might actually be a little too bulky, making our female character look more muscly
than she should be. But for now, that's okay. It doesn't matter too much. Okay. We'll draw in some of the
other neck anatomy there. Thicken up the trunk
of the next somewhat, I think that could do with
some extra thickness. Again, on this
foundational stage, you can pull out your eraser
as much as you need to. For finished drawing, you don't necessarily have to
place an older muscles. It's completely
fine if you don't, you don't have to get
this deep detailed, this comprehensive with it. This is just to show
you definitively, at least on a moderately
definitive level, what the muscles are going
to be doing as the torso is placed in perspective and positioned into
different poses. So once we've got the top region of the
female torso sorted, we can then go ahead and we
can place in the rib-cage. We can then place in
the lateral muscles. Coming in from the back. We've got the serratus and the obliques going to wrap around from
the back and then enclose surrounding
the abdominal muscles. We are looking at a
perspective shot, another perspective shot
of the abdominal muscles. Abdominal muscles which are both compressing and stretching since the body is twisting and tilting
in different directions. And I want you to
become comfortable with doing that because
that's the reality. The body is almost
in constant motion, even when it's at a standstill, you're going to notice subtle
tilts and twists because the body needs to
do that in order to balance itself
and unnatural way. Then finally, we've got the hips and the legs, which are going to be pulled
out from those hip sockets. There's leg holes. And we can go over
the top of this. We can define the anatomy just to make it
clearer, easy to see. If you really want
to get detailed with the muscle structure in the
middle of the body here. What you're going
to find is that the muscles are going to
fan out across the body, across the upper chest,
underneath the breasts. But that it was a fairly
difficult representation of the female torso
from this angle. At the same time though, it, it taught us a lot. And we can see that those muscles do maneuver
in certain ways. They stretch and they
can press depending on how we're putting the
female torso and motion.
14. Female Torso Anatomy Pose Practice: Next up we're going
to do a few examples of a combination of the
basic mannequin model, female torso with
the anatomy on top. But we're going to draw
some quicker examples. Okay, so these are going to be really fast studies that you can do in your sketchbook practice
and get familiar with, just as we did with those base model
mannequin female torsos. Okay, so let's just
jump straight into it. We're going to start out
with the basic forms, the chest, the pelvis. Now sometimes I won't even draw the pelvis is
something separate. I'll kind of dropped down the tube of muscle
and then I'll draw route the pelvis shape
at the base of the torso and then construct a
pelvis panties from there. But you can see
how messy this is. Although this is
all I need to begin sculpting out the rest
of the female body. Because what they do then is
I'll draw out the breasts. And this is much more
realistically how I draw. I keep it quick. I keep it fast. I keep it super basic. I usually don't
place in the abs for a female character
simply because really, it's quite rare unless
you're dealing with a ultra muscular female
character to see them. But you can add them
in there if you want. For sure, we know
how to do that now. And we can even go
ahead and start to indicate the
positioning of the legs in some of these
examples if we want. Okay, so we've got one female torso drawn out
here for the most part. And we can draw in some of the neck muscles as
well if we want. This is just extremely rough. Just for the sake of a study. But let's really see
if we can push this. Now we didn't get to do an anatomy study of a post
female torso from behind. So let's go ahead
and do that now. This is the perfect
opportunity to do that. Again, drawing out my pelvis, dropping it straight
down from that tube. That sits between the
pelvis and the chest. Okay. So here what
I'm going to do is start sketching out the outer
shape of the female torso. I'm thinking about
where the neck is, so I'll draw the neck out. Because remember
that that's going to lead us into the
trapezius muscle, which runs down the
middle of the back. And then from there, we can start to build out the other areas of the
female torso from behind. The other muscle groups. We've got this big
lateral muscle that drops down and runs all the way
out to the top of the hips. Then we've got the middle
lower back muscles, which run down into the, into the top of the butt. Got the gluteus maximus, which is going to run
down into the legs. Now, here's the thing
you don't need to get these muscles exact at
this level of detail. For these studies, you just need a general idea of
where they sit. The reason that I say that is because at the end of the day, you are not going to
be representing all of these muscles on the
surface of the skin anyway. So as long as you
know their shape, as long as you know roughly
where they need to go. It's fine. It really is. Okay. So that's the
female torso from behind. Let's go ahead and do another
example up over here. Follow along with your pencil and sketchbook and
let's see how many of these we can push out in
the smallest amount of time. Again, it's important to do these studies in order to
apply what you're learning. In order to get it to sink in. If you're not doing that, then that's when you'll find this information goes in
one ear and out the other, it simply isn't enough to just listen to it
and to watch it, you actually have to do it. So this will be
another female torso drawn up from behind. We will place the
anatomy on top. The more you draw the
female torso from behind, the more comfortable you're
going to get with it. Most of us are uncomfortable by default just because
we don't do it enough. If you want to get as
comfortable as you are at drawing the
front of the torso, withdrawing the back, then I highly recommend that you just get
that mileage up. Any, these are just
really quick studies. Once more don't be too concerned with getting them 100% accurate. The fact is, is that
you're doing it, that you're getting the idea. And I would even say
that if you do find you're making mistakes
on one example, simply correct those
mistakes on the next one. Draw out another example where things are
looking more correct. And what I wanna do is really observe how
these muscles are going to be led by the underlying primary forms of the foundation that
we've established. This back muscles is lateral muscle is
actually going to twist around with the pelvis as
we view it from behind. Okay, so we'll
bring the bottom of the gluteus maximus into the
sides of the legs there. Alright, that's
another example of the female torso from behind. We don't get enough of those. But for now, we'll do an
example from the front. This is just going to be a
very basic example here. Once more you'll notice
it is my habit to just drop the pelvis directly down from that
tube and then to draw in the form of the
pelvis after that. Because I like to focus on
getting the shape right. I think that's probably the reason that I
do it primarily. And we're reverse engineering the whole thinking process by taking a closer
look at the anatomy, you'll notice that I'm really
focused on shape here. So we could take this shape, we could tweak it
and we can leave that most of the
anatomy and have a pretty done good
looking female torso sitting in front of us. After that. It's just that we look at the
anatomy because it helps to explain to you why I shaped things in the way
that I shaped them. Because it is
ultimately indicating that underlying anatomy
in a stylistic manner. But in the end, silhouette is by far the most
important things. So even if you get all the anatomy right or you think you get all
the anatomy riot, but that's silhouettes
still doesn't look as good as it could look. The shape, in other words, of the overall female torso doesn't look as good
as it could look. Then you've gotta go back. You gotta get your eraser
out and you've got to tweak it as best as you can. Okay. So that's the breasts, That's the shoulders drawn in. Let's indicate the abs a little. Again, even if they're not represented on a
finished female torso, I think it's nice to just see where those abs
are going to sit. In an anatomical sense, just knowing where they
sit is going to help you to capture the shape of
the body that much better. It's all about shape. In the end, all about shape. Let's draw the torso
from the side here. But now we're looking up at it and we're pulling it
all the way back as well. Quite a dramatic pose
for the female torso. But one that I think
will challenge us in a positive manner.
You'll notice that I. When ahead and I just drew the pelvis out there without dropping it down from
that muscle tube. So I don't always work
in the exact same way. Each time. I I do
what I need to, to serve that particular piece that I'm working on at any 1. Now, drawing the breath
in here is going to be tough because they actually will sit
off the surface of the top of the chest. And remember that
we're looking for the most part at the
chest from the side here. So I think we'll draw at the
bottom of the breasts first. We'll draw out the top of them. They're going to flatten out. Unless they're
synthetic breasts. They're going to flatten
out because bursa, like anything else, gravity
will apply to them. So the flatten out across
the top of the chest there. Just a quick study so
I'm not going to spend too much time tweaking it
and getting it accurate. We've got the back muscles from behind what you're going to run down into the
top of the hips. Now I can't help myself. I am going to pull out my
eraser and I'm just going to tweak the shape of the breasts somewhat here until I'm semi
happy with them. And I'll jump around to the
back of the female torso and just modify the shape there until I think
it looks right. Sometimes it just
looks off to me. And I think once you become super familiar with the
anatomy of the female torso, you'll find the same
thing that you would just intuitively start to recognize
when something looks off. Even if you've done
it to the book. It's, sometimes you're
just going to end up making little errors
along the way that need to be addressed
later down the track. And that's completely fine. That is the nature of the beast. So it's another example of the female torso drawn up from
a rather difficult angle. Let's do another small one here. Okay. Once more, starting with that mannequin model version
of the female torso, drawing it out and then placing the anatomy
riding on top. You can see that we're looking at the top of the chest bend
all the way back there. Which means just as with
the previous example, we may end up seeing
the breasts flattened out on top rather
than hanging down. Then we've got the ribcage. The abs, which we'll
draw in really quickly. Try to get fast. Try not to spend too
much time on these. And your speed will naturally increase as you practice this. So if it is taking
you some time right now, that's totally fine. Take the time you need, especially if you're not well acquainted with
the female torso. If you're just coming into
this for the first time, really study the muscles, really try to neaten them
up and get them right. Because certainly that's going to help you out in a big way. Alright, next up, we
will draw routes a, another representation
of the female torso, I think from the back again, except this time I'm going to have it from
the direct back. And we're going to rotate the body so that we're
looking up at it. We're looking up at
it and we're looking directly at it from
behind as well. And there's a slight
tilt happening. Okay. Alright, so that's all we need. You can see how quick I
went and sketch that out. Doesn't have to be
anything fancy. Will draw in the shoulders
and we'll draw in the neck. Because from the neck we can begin building down
the trapezius muscle, which is going to drop
to about the midway or the bottom really of the chest. Maybe the mid point
of the chest rather. So about here. Now we've got
those back shoulder muscles. Next up, we'll draw in the muscles that
sit just below it. And they'll come down
all the way down into the top of the
gluteus maximus. The spine will draw in as well. Then we've got the
button muscles that are going to run down into the sides of the leg,
the outer sides. And that completes back view of the female torso with
all the anatomy drawn in. Let's do another example. This example will draw out the female torso laying
back at the top. And then we'll add in a curve here that runs down
into the pelvis. And maybe we can be looking at the pelvis from the side here. Well, the chest at the
top is twisted toward us. Okay. So because the chest is tilted
upward to such an extent, we're going to see the breast
flatten out once again. So what we're getting
a good look at is how the shape of the breast
can be modified. How they deform under gravity. And it can be tough actually, it can be tough to
get these rights. So just kind of pull
out my eraser there and really try to
think about it. Okay, I think that'll do. They are going to appear
a little more circular since they're flattening
out on top of the chest. Whereas if the body
was pushed forward, then they would appear
more like teardrops. Or dare I say it,
water balloons. I mean, breasts behave in very much the same way
as water balloons. In fact, if you sit
a water balloon down then on top of a
surface like the chest, then it's going to be
affected by gravity. It will expand, it
will flatten out. And in fact, that the
breasts are probably the hardest part of this pose that I'm having trouble with. I'm going to
continue to pull out my eraser until I get it right. You'll notice of
erased away half of the foundation there because it's simply wasn't serving me. And so I'm just going to keep tweaking the female torso
here until they get it right. Once again, the base model that we're using for
the female torso, it can be pushed and pulled
and sculpted and whatever way you like until you've got
the ideal representation. Of the female body that
you're looking for. Add in the abdominals
and the obliques, and the lateral muscles
here at the back. And there we have our
next example completed. Let's do a few more. After this demonstration,
you should have a pretty good
introduction into how to draw the female torso
and a multitude of different poses and also lay the anatomy
for it in on top. So hopefully you're
following along and you're drawing up
your own examples. I think that if he can do that, it's going to be what gives
you the most results. It's what's going to
be the big payoff from taking this class. And I think that
anyone can get good at drawing anything they set their mind to anything
they practice. Drawing is just
like handwriting. It's a technical skill. And as long as you can put
that time into practice, as long as you can
dedicate yourself to it, you will see results. I have no doubt about
that whatsoever. Everything you need to know
about drawing female torsos. I am showing you right here. The only reason that it will be ineffective is if
you don't apply it. So certainly apply it. And I think that
you will find that it just has a massive payoff. Is It's funny because no
one can really do the work for you when it
comes to drawing, when it comes to learning
how to draw various things, you've really got
to take the reins and put that time in in order
to see any result from it. Okay, So this is another
slightly strange pose that I've
decided to go with a really like to challenge myself with these demonstrations. I like to come up with
poses that I don't, I don't think I've ever
drawn, to be honest with you. But again, following the theory and the techniques that
we've been covering here, it doesn't matter really if
I've drawn it before or not. I can just go through
the same process and hopefully see see the results coming together in a way that leads to like the
end result looks accurate. It looks right. And that's the main thing that I'm
looking for in the end. You can do this
with each part of the female body in order to
get comfortable with it. I'd honestly spend a week on each spend a week on each part of the human body
doing exercises like this. And you'll find that you get very comfortable
with it quickly. Okay. So we've got another twisting motion
for this female torso. On drawer out some legs for it. Placing the breasts, placing the abdominal muscles, the obliques on either side
of the abdominal muscles. And you just work your way down, work your way down
until you've reached the bottom of the female torso
at the base of the pelvis. Then move on to the next one. Can't forget the lattes at
the sides of the torso there. Let's do another example. By going through example. After example, we could do some more dramatic
representations of the female torso with some. Major foreshortening
because this technique is going to work
for those as well. Don't worry. I've got
the breasts here. We're looking down onto the
female torso from above. In this example. We've got the shoulders
that are going to come out on either side. I'm just using my
basic shield shape for the shoulders there. We've got the collarbone
coming down in a V-type shape. We've got the back, the upper chest area there. Then we've got the
lower body joining into the pelvis or the mid section joining
into the pelvis. Although it is dramatically
foreshortened. We can see the gluteus
maximus there. The bottom. Again, tough angle to
draw the female torso on. But one which I think we've
done a pretty good job with. Let's do the female torso
in a reclining position. You can see how quickly we
can just knock this out. All that matters is we get
something down onto the page. If we can get something down on the page that we
can work with it. Alright. Drawing
the breasts here. They are going to be hanging in the direction that
gravity is pulling them. Let's keep that in mind. They might even be pressed
against the floor here. In this reclining position. If you want, your female
torso is to look natural. These are the things that
you will need to consider. You don't just want breasts
standing up on their own. Even if they are
implanted breasts, for example, they will still
be some gravity applied. And you'll want that, you want that to be present in your artwork in order
to capture a natural, realistic and believable
appearance for them. Okay, So we'll draw
in side of the ribs, draw in the abs
them the obliques, and take that amount of
anatomy down into the pelvis. Okay. Let's draw out just a few more. A non torturing you. But this is what you
came here to do is to learn how to draw female torso. Is this my friend is what
is going to get you there. Because we are drawing a heck of a lot of them
throughout this class. And I hope that by the
end of the class you've got a sketchbook full of
examples just like this, of different female torsos
that you've drawn up. The basic female torso model. And then the anatomy
drawn in on top of it. By the end of the
class, you should have, my goodness, who knows how
many of these torsos drawn up? You'll be definitely
comfortable with drawing the female torso at the
end. You will have to be. Okay. There's another one, again, just a basic, standard
female torso. What else can we fit in here? Let's see if we can draw a representation of
the female torso. Where we're looking at
the back of the chest. The side of the pelvis. I don't think we've
done one of those yet. Again, if we can
draw in the neck, then that's going
to help us out. When we're looking at
the back muscle anatomy because from the neck down we can start to place
in the trapezius muscles. Then we can add in the
back shoulder muscles, the lateral muscles,
then the obliques. And then finally we've got the hip bone and the
gluteus maximus, the behind of the female torso. Let's add in another female
torso up the top here. And we could for short and this female torso have
it jutting forward toward us at the top and
then back toward the pelvis. Okay, so now we're getting really dynamic
without poses here. And we'll add in the breasts, which are going to overlap the trunk of the torso
quite significantly him. Well, let's add
in the collarbone first because that's
going to give us an indication as to the curve of the chest as we
look down upon it, which will help us to
attach the breasts. Okay. And most of the trunk part of the pelvis is going
to be obscured here, so we don't really have to worry about the anatomy of that. Who knew foreshortening
could be so well, I guess non time consuming. Get our eraser out here, just erase that construction
behind the breast there. And really that's what it is, is drawing the things that you can't see when it comes
to foreshortening. That's how you get good at it. Alright. I will draw another
example of the female torso. Up from the side here. We'll have it take up
this entire space just so that we can make
things along a little. This will be another one
where we're looking at aside but slightly back view
representation of the pelvis and a slightly
front view representation of the chest looking up at it. Okay, so we might
be recapping on this example somewhat here, but that is never a
bad thing. Course. Okay, I'm going to draw in
the breasts at the top. There we go. And then
we'll join those onto the shoulders. Like so. And then we've got the lateral muscles actually
going to come down. Then we've got the
obliques wrapping around the side of the body
toward the front, just sitting above the pelvis. Got the abs there that we
can see that general form. With the abs confined. Then we've got the
lower back muscles, which we'll add in
the butt muscles. Then I'm just going to
do some tweaks up here just to neaten up
the whole situation. Because it's certainly messy. A little bit too messy.
What I've added here. Okay. I might get rid of that
Far Side breast there. It's probably not needed. And I'm just going to
bring in the anatomy on the front, the torso. They're not the best
example, but it'll do. And I think we'll
leave it at that. For our female torso examples. We've gone from the foundations, the initial mannequin
model female torso. We've added the anatomy on top, and we've tested out
a whole bunch of different poses at different
scales and perspectives. Now it's time to apply
everything we've learned to some
finished female torsos.
15. Female Torso Study A: Alright, so now
that we've learned about the foundational model of the female torso and how to
add anatomy and on top of it, how to put it into different
poses and perspectives. Starting to take
everything we've learned and actually put it into action with a final
polished female torso. Three, in fact, we're gonna be doing three different
examples up here. So we're going to go through the exact same process except maybe not so much
into the anatomy. We're going to be keeping
that fairly basic, but we are indeed going
to be starting with our foundational torso model. So I'm just going to sketch something fairly lightly
here to start out with. This is the chest vest that we have become well acquainted
with at this point. I'm going to just drop
down that muscle tube, the middle bit that joins the pelvis and the
chest together, start to draw out the shape of the bottom
of the pelvis from there before actually segmenting away the pelvis and separating
it from that area. I just find that that works a little better
for me sometimes. For some reason. Now, I am going to make the front of the pelvis
facing this direction, while the chest faces in
the opposite direction. And I'm going to take
some time to just tweak the shape of the torso here. I'm going to add in the legs. Okay. So we've got the front, we've got the side and we've
got the main leg shape, the main leg form there
on that side of her body. And then I'm going to drop
this side of the pelvis down. Thinking about the tilt of the shoulders and the hips in
comparison to one another. And I'm going to draw out this leg and pull it
out in this direction. Okay. I think that that's
looking fairly good. That's a good place
for us to start. You can get a real sense for the movement or real
sense for the pose. I do think that I need to add some additional
balance here, so I'm going to pull the
chest back a little. Remember that this
foundational stage is everything in order to figure out what will make this in
order to ensure the success, essentially of our
torso drawing. I'm really liking the direction that it's going in so far. I think that this
is a good pose, is aesthetically pleasing. There's a decent amount
of movement in it. There's some dynamism within it. And every part of the body, no matter what the
poet should feel like, it's got movement in it. We'll draw in the arm holes. Now. I almost feel like we could pull the torso over
just a little bit more there, which I think we will do. I'll bring the hips up. Again. I'm looking
at the outside shape of the body at this point. And I think that
just about does it. That's looking good to me. Wonderful. So next up, I'm going to go ahead
and convert this to blue and draw riding on top. And we're going to
draw out the anatomy. Now I'm not going to be drawing every muscle group in here. I don't need to because in a final finished illustration
of the female torso, a lot of the definition of the muscles is going
to be fairly subtle. We're not going to need to add that much into
complete this drawing. In fact, women tend to
have more fat throughout their body due to hormones and biology
and things like that. And so they just appear
softer in general. Now as I work here, as I add in the anatomy, all go through another pass
of reshaping the body. If I think that it
needs to be reshaping. I have got the collarbone here, which I'll add in, leading it up into the shoulder section where we're going to join it
onto the deltoids. And you can see that
I'm getting into some of the muscle groups
of the shoulder there. That's going to help me
to define its shape, to figure out what its
shape really needs to be. That's really what
I use my knowledge in anatomy for is
just defining shape. That's what it's all about, especially when it comes to
drawing female characters. That's what you really
want to be focused on. Because shape is your
biggest ally there. It's really all you've
got to work with. So I'm going to take the time to draw out
some of her arm. So I'll draw that out. Just very roughly sketching
it in there because these are more completed
representations of the female torso. I think that we can take
the time to do that. It will help us to position the shoulders a little
bit easier as well. Each part of the
body sort of informs the others. I've found. So that's going to be
our shoulder there. And we can have her arm come out a little bit further at the top here again, just balancing that pose. At this point where
we're just making it up. This is all coming from our imagination because
we know how to use the fundamental model to define
that pose to begin with. And now what we'll
do is start to draw out some of the anatomy here
that we'll be dealing with. I'm not going to be
defining the abs here. I really don't feel
like I need to. What I will do is lay in the serratus muscle
and the obliques. They going to be
fairly prominent here around this
section of the body, but then will lead the
abdominal area down into the bottom of the pelvis. We've got this tendon
that runs down the thigh, the inner leg. And then we've got the
hip bone on either side. We'll add in the muscle
that goes around the top of that kinda joins onto the
bot as well, Funnily enough. And then we've got the
top quad of the leg, which we'll add in there. And we'll do that on both sides. In fact, we've got the
thigh, the inner thigh. It's going to come
through there. And then that is our basic anatomy sketch
that we're going to use to form the basis of our finished female
anatomy and drawing. Now, I am going to
make some tweaks here. I think that the breasts could probably hang a little lower. I feel like this
sitting too high up. I'm using my eye to judge that. And a lot of the time
you'll find that most of you are like us, me, you, everybody has this
natural intuition, whether they draw or not, of the proportions
of the human body. That's why we can tell if
something doesn't quite look right as far as proportions and measurements are concerned. So just keep that in
mind. Keep it in check. Make it something that
you're observant of when it comes to drawing
the female torso. Okay, so that is how
anatomy layer placed down. Next up, let's draw
in the final outline. Okay. And this is where we're
going to neaten things up. This is how I would finish
one of my torso drawings. And here, as I said before, what we're going to be depending
on primarily is shape. That's what we want for
the most part is shape. Even if we only outlined the outer contours of this female torso that
we've been drawing up. That'd probably be enough. It would probably look great. Okay, now of course we've
got the obliques here. There is going to be some
definition where they reside. We might have a
little indentation here just underneath the ribs, at least the bottom set of ribs. So we can draw that in. And usually they're
going to lead into the abdominal muscles. So we control those out. Once again, there's not
going to be a whole lot of detail here that
we need to define. If we have got a
fairly built woman, then maybe, maybe we'll
show some of the details. In the area where the
serratus meets the obliques. That can work fine. I'm going to do
some erasing here. Just because I feel like I could define this area a
little bit better. But for the most part,
we can leave it at that. It's a fairly good female torso. We don't need to make it
more complicated than that. At least the mid section. We're not done yet.
Make no mistake. Okay? Can see that I'm adding line weights in to
the outer contours. You can see that I'm adding
line weights to the outline of the female torso that
I'm illustrating here. And I'm going to place in an indication of
some of these leg muscles. We do get a fairly
obvious Division running down the inner thigh, separating it from
the front of the leg. Then I'm going to
draw in crutch. As far as the leg
muscles are concerned, I'm not really going
to define them. I might define them more on a, on a man, but not
really a woman. I want the thighs
to appear soft. And if I start adding in
defining muscle groups, It's just going to make them
look hard and rock-like. I don't wanna do
that. Next, we'll tackle the right-hand side
of the female torso here. And for the most
part, same deal. We can simply just
add in an outline for this leg because any
additional definition is just not going
to be necessary. Unless we're drawing a really
fit muscular character, which honestly, this female torso already
has that appearance even without the additional defining
of those muscle groups. So once again, it's, it's really something
that you wanna be extremely wary of adding too much detail to the muscles
of your female characters. Certainly only do that if you want them to
appear superscript. Next up, we've got
the middle division, which we can add in. That's going to run down
the belly from the top. Going to get my eraser out here and just clean
this area up. Someone. There we go. Then we can start to
outline the breasts. Now at this point, I can focus on just
the line quality of the finished outline because I've figured out how big the
breasts are going to be. I know generally what their
shape is going to entail. And so I, I've moved on from
that phase of the drawing. Leaving space in my mind too, focused on, focus on the final aesthetics
and get those right. Okay. I'm making my way around the breast on the
opposite side of the body. I'm taking a little bit of time, but I am working fairly fast. And if I notice any tweaks
do need to be made to the shape of the breasts or any other part of the
body for that matter. I'll get my eraser out. And I'll certainly go ahead and do some additional
sculpting if need be. Everything is changeable, especially if you're
working digitally. So never feel like you
have to stick with anything that isn't
quite working. Because you can always
go back and tweak it. Always. Go ahead here and just
erase that down a little. We've got our shoulder
muscle there. And we don't really
need to articulate the divisions in the deltoids on a regular female character. We can just leave
it to the outline to inform the viewer on
what's going on in that area. And that's all we'll need. Placing the collarbone
on the opposite side. Now, again, that's just
going to be a basic outline. Nothing too fancy. Oftentimes the simpler the better when it comes to
drawing female characters. And once we've got
the shoulder drawn in place in the bottom of the arm. This is where the
bicep would be. Then we've got the tricep. And then finally, to finish
off this female character, what I'm going to do is just add in a quick outline for the neck. And that will be that the nickel be consisting of
something like this. We'll see those trapezius
muscles dropped down from the back sides of the neck. But unlike a man, those trapezius
muscles are going to have quite a deep dip. Okay, and so this will
be what we're left with. We don't have to apply too much detail to the
anatomy of the neck. That's not going to be required. And in fact, we can pretty
much leave it at that. We've, we can add into
the lateral muscles. We did somewhat forget those, so we'll draw those in. But other than that, we've pretty much completed this example of a
finished female torso.
16. Female Torso Study B: Example number two. Let's now draw the
female torso from. Let's draw it from the back. Okay, so we can
get a good look at exactly what we will be
defining and what we won't be defining when it
comes to drawing a finished female
torso from behind. Just draw this out real quick. I will add a slight twist to
the torso for this example. Can thinking about the tilt of the upper body in
comparison to the lower body. In order to create some balance. Can see that I'm doing some pretty big changes already to that
foundational model. Once again, I know that
if I get this right, it's going to solve
me a whole bunch of potential issues
later on down the track. One of those main
issues is just getting the balance of the
female torso, correct? Then I think that is looking much more balanced,
which is great. Okay, Wonderful. We'll draw
in the trunk of the body now. And you can see that the upper body is twisted in
the opposite direction here. Just to make things a little
bit more complicated. I like to do that for
myself sometimes. Okay. I'll erase that down because it's probably got a
little too much height to it at this point. But I think that's
looking good there. So really that's all
we need to move on to the the next stage
where we're going to now go ahead and place
in the anatomy on top. So we'll convert this to blue. We'll start to sketch in
the anatomy just roughly. And we need the neck here to begin adding in
the back muscles. It's just something that I find is necessary
most of the time. Remember that the
trapezius muscle is going to come down to about the midway point of
the upper chest. Then we've got the
shoulders there. And we'll draw on
an arm as well. We've got the shoulder on the
opposite side of the body, which I didn't think
is going to be doing a whole lot
in this example. We've got the back
shoulder muscles. And then we've got the lats, which are going to be somewhat compressing and stretching here. In this example. Remember they come down
in an interesting way. They, they come
back around almost enjoin into the top of
the gluteus maximus. Can see them right there. So that little bit of fat, fatty tissue just above the
tail bone in that area. Then once we've
reached that point, we can start to draw
in the butt muscles. Like so. Cut the hip joint. We can't forget
about the hip joint because that'll tell
us where the leg is. Put the obliques. Then we've got finally the legs. Okay, done. I think that
gives us plenty to work with. So now let's go
ahead and move on to the final line art
for this female torso. Now in order to get this
dark line that you see me placing around the figure, I'm just pressing harder
with my pencil now I'm working digitally and Manga Studio with the
darker pencil tool. But the same thing applies. If you're working traditionally. You're just pressing harder, defining what is
there on the page. And really trying to add some, I would say character
some style to the outline of the female
torso that you're drawing. Now once again, you can see
that even though I'm not defining any of the
interior muscles or at least very few of them. Within my female torso. Indeed, I do still
two seem to be presenting a rather
built female figure. And so it doesn't, it just does not take that
much to actually draw route. A female torso that
looks rather muscular. You don't have to add a lot
of detail in there at all. Now, as I was talking about
at the start of the lesson, one thing that will become a
little bit more apparent in the final representations of the female torso is the
the shoulder bones, the shoulder blades rather. So we're going to keep that in mind as we lay in these muscles. Now, there's not going to be
a whole lot of definition. And the trapezius muscles. It is a fairly, on a regular person, it's a fairly thin muscle that lays over the top
of the skeleton. And more often than not, what you're going to
be noticing instead is the shoulder bones
which are going to come down and then back up. Okay. So we'll do that again. Going to come down
to about here. Then going to come up. And that's really all
that you're going to see as far as the details on
the back is concerned. So in some ways that the
back is fairly easy to draw. Once again, you've slipped
the shoulder blades here, but they are just this subtle details,
subtle definitions. You may have some indication
of the middle of the back, especially toward the bottom, going down into the base, just above the gluteus maximus. But once again, we're keeping all these details fairly subtle. Remember we're drawing
female characters here that don't require a whole lot
of interior definition. It's all to do with
the outer shape. I'll go ahead here and
I'll outline the pelvis. The bud is going to be one line essentially
as we bring it around. So I'm going to try to keep
this line nice and strong. I'm adding line weights as I go. So I'm varying the thickness of the line as I work
in order to get some additional
appeal incorporated into the final lineup. We'll draw in the middle
of the gluteus maximus, leading it down into the leg. Then on the opposite side, we're going to see it
lifting up just a bit. And I think we could even pull that leg out just a
little bit further. In order to tweak the shape. Can add a slight dip
in there if we want, but it's really not
all that necessary. Again, the less
detail you add in, the softer your female
characters are going to appear. And I personally do like the soft look for my
female characters. I find that too just it has a little more femininity
Within the final presentation. Okay, so that's the back view. We can go ahead here and add in a few more little dimples and indentations just to describe the anatomy of the
pelvis in this area? Certainly, but other than
that, we can leave it there. We'll place in the shoulders and drawing the neck. When I try to get these
trapezius muscles right? So I'll draw those out and
give them some extra height. Again, who knows if this is
exact? You'll never know. As long as it looks right. That's really all that matters. In my experience. That is how next finished fine
tuned and polished example of the female torso
presented from behind. Let's do one more example
before we wrap this up.
17. Female Torso Study C: For our final example, we will draw the
female torso up in the side view and maybe add
a little bit of a twist to the pelvis in order to get that extra dynamic
touch added into it. Okay. So we've got
the side view of the chest that we'll
get down onto the page. Just adding and adding that
in there really quickly. And then we've got the pelvis, which I'm going to rotate
toward us ever so slightly, just so that we're not looking
at a direct side view. Try to make things a little
more interesting than that. And that gives us more than enough to work with, I think so. Besides adding in the legs, I think that we're ready
to draw in the anatomy. Okay. So I'm going to
convert this to blue. Jump up to the top here, sketch in the
shoulder real quick. And of course, we'll place in an indication of where
the arm might sit. Probably somewhere there. Piecing together the human body can certainly be a challenge, but it can be a lot
of fun as well. I've found we've
got the neck here, which will bring up someone
that should help us out with the trapezius muscle that will run down the back. We've got our back
shoulder muscles here. We've got the lateral
muscles which are going to run down the back
and into the top of the hip. And then we've got the breasts. So quickly. Sketch the one that we can see
at least in from the side. And then we'll
draw out the ribs. You can place in
an indication of the abs if we want to as well. We've got the obliques, which I'm roughly
sketching in there. Again, that the first row work, sometimes the better off I am. I've found. I don't know if
it's the same case for you, but I certainly find that that that's how it works for me. I just end up overthinking
it otherwise. And I find that working quicker and sketchy or
puts me into more of an unconscious state where I can depend on my artistic
intuition a little more. I'm not quite happy with the shape of this breast
and how it's looking. So I am going to erase it and
completely get rid of it. Probably what is making it
confusing for me is I've got the arm pointed
up like that, so I'm getting a little just a little lost
as to how it should look. It's looking rather pointed. So I'll have another
crack at it. Again. I just I keep on trying until I get something that
looks moderately right. And maybe this one is
right looking enough, so I'll leave it there for now. Maybe just needs to come
down a little lower. Bear with me while I try
and figure this out. Sorry, I'm going to
ignore that arm for a moment as if it wasn't there. And I think that's going
to work a bit better. There we go. That's
what I'm looking for. Okay, great. Looking at the outside
of the body now, sketching around the shape
to refine it somewhat. Then I'll place in the bottom AB the oblique on the
other side of the body. As the pelvis turns toward us, we have got the hip joint. So add in the muscle
on the top of that. The muscle here. And of course we got
the button muscles, which we're going to
draw out as well. Okay, Wonderful. Now I might tweak
the final shape there in the finished artwork,
the finished drawing. But I think for now, that's looking pretty good. I think that'll do. Okay, So that is the next example that
we've got to work with for our female torso. Let's go ahead and finish it up. We'll convert that to blue line. I'm using the same pencil the whole way through
regardless of whether I'm sketching or
laying in the final outline, I just, once again, I simply increase the amount
of pressure I'm applying. I make the lines less sketchy. And I tried to neaten
things up as best I can. And I'm going to go
around the outside of each one of these
muscle groups, defining the
exterior silhouette. And once more, I don't need to detail out the
muscle groups too much. That's not going
to be necessary. Especially on the back. We want to keep it simple. I've got her arm raised there. What I'm going to do next
is outlined the breast. That gave me a little
bit of trouble during the initial
drafting phage of the phase of the anatomy. But I feel like in the end we arrived at a solution
that worked. I'm going to break the line. As I lay in the bottom
of the breasts, they're drawer out the
front of her belly, lead it down into the crutch, bottom of the pelvis. We've got this center line
for the belly button. That'll give us a clear
look at the twist that's happening within the torso. As it twists around. Pull out my eraser again, and I'm just going to
do some slight tweaks. I do feel as though I haven't
quite got the back right. I'm probably looking too much at the side
of the bank there. So I'm going to erase that out. And we are getting
a little sketchy. And now I want to be careful
of that since this is our final rendition
of this example. And I'm just going to draw
that in and hope for the best. Or maybe I just need to
narrow it out somewhat. Maybe that's the key. Okay. I'm going
to drop back down to my muscle layer for a moment and start to figure out some of the issues of the back that I hadn't
yet considered. So let's say that. And get the middle point
of the backup here. Okay, there we go. Maybe this will work, maybe it won't work. We'll see. I'm going to
work with that though. And I'm going to erase the
bottom of the breast here. Change the shape of
its underside curve to indicate the rotation, the correct rotation
of the upper body. I'm going to erase this line. And then what I'll do is draw in the hip
form right there. Sometimes we can see it, just a little indication of it. Okay. Now this is
looking better. This is what we're after. Placing the shoulder blade
going to come up there. Then we've got the middle of the back That's
going to come down. And then I'm just going
to tweak the outline. The shoulder blades here. Like so. It's still
not working the best. So I'm going to erase and
have another crack at it. Don't give up easily. And I suggest that you
take on the same attitude, that you remain persistent, as persistent as you
can be with this stuff, as you try to work out the different issues that a whole that is the holding
your artwork back. I do it all the time and I
find that for me it is one of the greatest learning techniques that you could ever hope for. It'll, it'll teach you
things about yourself as an artist that you
couldn't ever have imagined. I would highly recommend it. I just recommend
staying with it, staying with it until it's done, until you've worked
out what's going wrong and bringing it home. Alright, That's a little
better now I think. I'm glad I'm glad
that I stuck with it. And hopefully it'll all
work out for the better. Now. Next up, what we
wanna do is add in. Our lat muscle, will
draw that back in. There it is. Now I'm probably
starting to get to, to find with the
muscle structure. I don't necessarily
want to do that. Because remember this is the final artwork,
the final drawing. So we want to keep
things subtle. Not to find. Next up we've got the legs, will draw that in with
a nice clean outline. We'll place in her bottom so
we're getting a good look at what the belly looks like from the side front and you
can't see it from the back. We're getting a good idea of
what the the gluteus maximus looks like from the
sides, from the back. So hopefully you've got a well-rounded knowledge
at this point. All the females anatomy and its involvement
in the torso area. What does the torso and tail, you should know now? You should know how to
construct it on a basic level. And you should be well-equipped
to place in the anatomy. Hopefully, it no longer is is too intimidating
to you at this point. So now what I'm going to do is just indicate
where the hip is. We'll add that in. And I really do think that
that's probably it and maybe we can place in a dimple
just at the back there. But otherwise, I think we've
got that pretty much sorted around the back bottom
region of our female torso. Now we can go ahead and add in the outline for
the opposite hip. Draw in the leg on
that side as well. And that completes
all three examples. Female torso. Course later on, you can add clothing to
your female torso as you can really place
the design in on top. But if you can get
to this point, the rest is just
icing on the cake. It's easy-peasy. I hope that you've
enjoyed this class. Thanks so much for watching. And that completes our
female torso demonstrations. So if we take away the underlying
construction that we use to arrive at these
final representations of the female torso. You can see that they
really did help us to arrive at a fairly
gorgeous outcome. These are solid female torsos. Hopefully, on the
page in front of you, you're looking at
something similar. Maybe you've chosen to do up your own female torsos
and not exactly copied. What you see here. That's completely fine. No worries. But if you have been following along, congratulations,
That's fantastic. This does however, complete our demonstrations as
three demonstrations for the final polished representations
of the female torso.
18. Assignment: Thanks for watching. I hope that you enjoyed
this class and that you've got a ton of value out of it. But now it's time
for the rubber meet the road or with
your assignment. Task number one is for
you to draw up a series of foundational female
torso sketches, fit as many of them onto the
page as you possibly can. Task number two is to
draw in the anatomy on top of these foundational
female torso sketches. Then finally, task number
three is for you to give those female torso is
a finished outline. Polish it up into the final representation of
your female torso drawings. Once you've completed
the assignment, submit it into the
project section of this class for feedback. Good luck, and until
next time, keep drawing.
 Clayton Barton, Harness the Power of Dynamic Drawing